


 Loading...
BeoLink Wireless 1
Guide
CAUTION
RISK OF ELECTRIC SHOCK
DO NOT OPEN
WARNING: To reduce the risk of fire or electric shock, do not expose this appliance to rain or moisture. Do not expose this equipment to dripping or splashing and ensure that no objects filled with liquids, such as vases, are placed on the equipment.
To completely disconnect this equipment from the AC Mains, disconnect the mains plug from the wall socket. The disconnect device shall remain readily operable.
The lightning flash with arrowhead symbol within an equilateral triangle, is intended to alert the user to the presence of uninsulated “dangerous voltage” within the product’s enclosure that may be of sufficient magnitude to constitute a risk of electric shock to persons.
The exclamation point within an equilateral triangle is intended to alert the user to the presence of important operating and maintenance (servicing) instructions in the literature accompanying the product.
This class B digital apparatus meets all requirements of the Canadian Interference-Causing Equipment Regulations.
The internal antennas used for this mobile transmitter must provide a separation distance of at least 20 cm (8") from all persons, and must not be co-located or operating in conjunction with any other antenna or transmitter.
Modifications not expressly approved by this company could void the user’s authority to operate the equipment.
NOTE: This device complies with part 15 of the FCC Rules. Operation is subject to the following two conditions: (1) This device may not cause harmful interference, and (2) this device must accept any interference received, including interference that may cause undesired operation.
This equipment generates, uses and can radiate radio frequency energy and, if not installed and used in accordance with the instructions, may cause harmful interference to radio communications. However, there is no guarantee that interference will not occur in a particular installation. If this equipment does cause harmful interference to radio or television reception, which can be determined by turning the equipment off and on, the user is encouraged to try to correct the interference by one or more of the following measures:
–Reorient or relocate the receiving antenna.
–Increase the separation between the equipment and receiver.
–Connect the equipment into an outlet on a circuit different from that to which the receiver is connected.
–Consult the retailer or an experienced radio/TV technician for help.
Contents |
3 |
Introduction, 4
This chapter provides you with an overview of the Wireless 1 system in the main room and the link room and describes the Master Link and Power Link setups.
Close-up operation, 6
Find out how to switch on the Timer Play function and ‘listen in’ on a source playing on the main room system.
Beo4 remote control, 7
Find out how to use the Beo4 remote control to access main room sources in a link room.
Beo4 – Sound adjustments, 8
Find out how to use the Beo4 remote control to adjust sound settings.
Set up BeoLink Wireless 1, 9
Information about placement, installation and connections of the Wireless 1 units and the ‘IR-eye’.
Ready for use …, 16
Information about making your link room products ready for use.
4 |
Introduction |
The main room is the room in which you have placed the audio and/or video system – complete with their various sources (the main system). Connected to the main system, you will need a BeoLink Wireless 1 set up as transmitter.
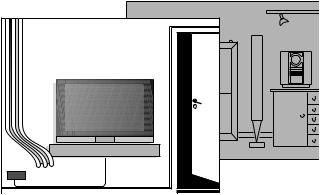
The link room is where you have set up another BeoLink Wireless 1 as receiver. To complete the link room setup, you will need either a Bang & Olufsen audio/video product, or a pair of active speakers.
Link room system with a compatible video product – set up with a Master Link connection.
Depending on the type of your link room product, your link room system requires either a Master Link setup or a Power Link setup.
Master Link setup
If your link room product is either an audio or a video system, it must be connected to BeoLink Wireless 1 with a Master Link cable.
For operation of such a setup, refer to the Guide enclosed with your link room product.
Note that a BeoLab 3500 setup must also be connected to BeoLink Wireless 1 with a Master Link cable.

5
For information about installation of the BeoLink Wireless 1 system, refer to ‘Set up BeoLink Wireless 1’
(pp. 9–15) in this Guide.
For information about how to set up the main room system and the link room products, refer to the Guides enclosed with the products.
Link room system with active speakers and an ’IR-eye’ – set up with a
Power Link connection .
Power Link setup
If your link room product is a pair of active speakers, they must be connected to BeoLink Wireless 1 with Power Link cables.
This setup also requires an ‘IR-eye’, in order to be able to operate the the system – either by close-up operation, or with a Bang & Olufsen remote control.
For operation of such a setup, refer to pp. 6–8 in this Guide.

6 |
Close-up operation |
This page concerns only a Power Link setup with an ‘IR-eye’. For information about close-up operation of link room products set up with Master Link cables, refer to the Guides enclosed with the products.
The small circular ‘IR-eye’ has buttons for close-up operation.
You can use the buttons to listen-in on a source currently playing on the main system.
You can also use the buttons to adjust the sound volume.
The buttons can also be used to include or exclude the link room speakers in a Timer Play programmed on the main audio or video system.
The Timer Play function is not available in all Bang & Olufsen systems. Please refer to the Guide for your main system.
Listen-in on a main room source
>Press PLAY • to listen-in on a source that is currently playing in your main system. If no source is playing when you press PLAY •, the radio in the main system will be switched on. If the main system have no audio sources, it will switch on the TV program that was last playing.
>Press PLAY • again, and the link room speakers switch off (a red standby indicator appears in the PLAY • button).
If you keep the PLAY • button pressed for more than two seconds, both the link room and your main system switch off.
Volume adjustment
>Press  or
or  to raise or lower the volume level in the loudspeakers.
The volume level in the link room speakers is adjusted independently of your main system.
TIMER
PLAY
Timer Play control
If the main system is programmed to start playing automatically (Timer Play), the link room speakers can be included as well.
>Press TIMER. A small red light in the TIMER button indicates that the link room speakers will be included.
>Press TIMER again to cut out the Timer function for the link room (the red light disappears).
Loading...