


Content |
|
English........................................................................... |
. . . 1 |
Français........................................................................ |
10 |
Deutsch........................................................................... |
19 |
Italiano............................................................................ |
28 |
Español.................................................................. ........ |
37 |
Русский........................................................................ .... |
46 |
Português................................................................... .... |
55 |
Български........................................................................ |
64 |
Česky.............................................................................. |
73 |
Nederlands...................................................................... |
82 |
Eesti................................................................................ |
91 |
Suomi............................................................................. |
100 |
Ελληνικά........................................................................ |
109 |
Magyar........................................................................... |
118 |
Bahasa Indonesia.......................................................... |
127 |
Latviski........................................................ ............... |
136 |
Lietuvių....................................................................... |
145 |
Polski.............................................................................. |
154 |
Română........................................................ ................ |
163 |
Slovensky...................................................................... |
172 |
Українська........................................................ .......... |
181 |


 FCC Warning Statement
This device complies with Part 15 of the FCC Rules. Operation is subject to the following two conditions:
1.this device may not cause harmful interference, and
2.this device must accept any interference received, including interference that may cause undesired operation.
This equipment has been tested and found to comply with the limits for a class B digital device, pursuant to part 15 of the FCC Rules. These limits are designed to provide reasonable protection against harmful interference in a residential installation.
This equipment generates, uses and can radiate radio frequency energy and, if not installed and used in accordance with the instructions, may cause harmful interference to radio communications. However, there is no guarantee that interference will not occur in a particular installation. If this equipment does cause harmful interference to radio or television reception, which can be determined by turning the equipment off and on, the user is encouraged to try to correct the interference by one or more of the following measures:
-Reorient or relocate the receiving antenna.
-Increase the separation between the equipment and receiver.
-Connect the equipment into an outlet on a circuit different from that to which the receiver is connected.
-Consult the dealer or an experienced radio/TV technician for help.
CAUTION
Any changes or modifications not expressly approved by the party responsible for compliance could void the user’s authority to operate the equipment.
Prohibition of Co-location
This device and its antenna(s) must not be co-located or operating in conjunction with any other antenna or transmitter.
Safety Information
To maintain compliance with FCC’s RF exposure guidelines, this equipment should beinstalled and operated with minimum distance 20cm between the radiator and your body. Use on the supplied antenna.
Declaration of Conformity for R&TTE directive 1999/5/EC
Essential requirements – Article 3
Protection requirements for health and safety – Article 3.1a
Testing for electric safety according to EN 60950-1 has been conducted. These are considered relevant and sufficient.
Protection requirements for electromagnetic compatibility – Article 3.1b
Testing for electromagnetic compatibility according to EN 301 489-1 and EN 301 489-17 has been conducted. These are considered relevant and sufficient.
Effective use of the radio spectrum – Article 3.2
Testing for radio test suites according to EN 300 328- 2 has been conducted. These are considered relevant and sufficient.
CE Mark Warning
This is a Class B product, in a domestic environment, this product may cause radio interference, in which case the user may be required to take adequate measures.
DGT
English

 ®
®
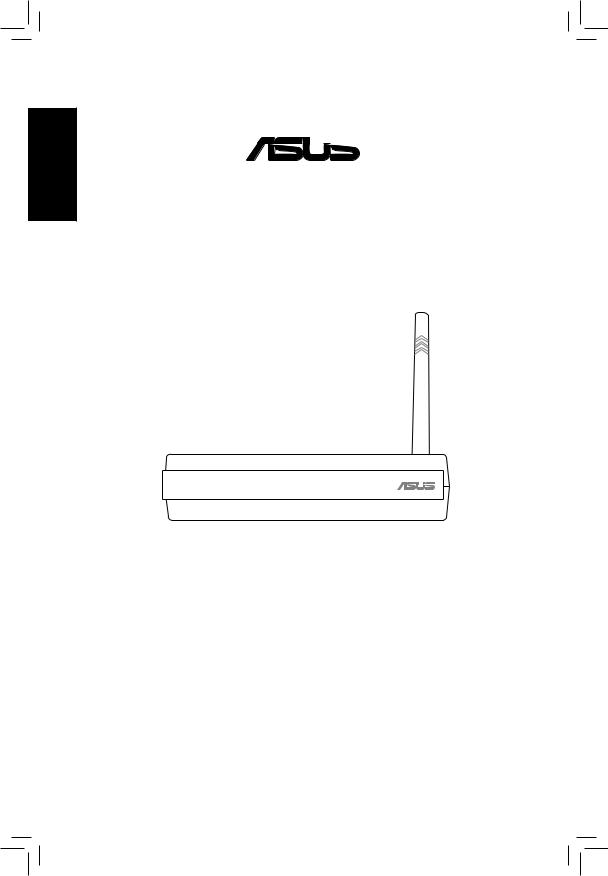
Pocket Wireless Router
(WL-530g V2 for 802.11g/b wireless clients)
Quick Setup Guide
English
Quick Setup
Installation Procedure
Follow these steps to install the ASUS Wireless Router.
1.Determine the best location for the ASUS Wireless Router. Keep in mind the following considerations:
•The length of the Ethernet cable that connects the ASUS Wireless Router to the network must not exceed 100 meters.
•TrytoplacetheASUSWirelessRouteronaflat,sturdysurfaceasfar from the ground as possible, such as on top of a desk or bookcase, keeping clear of obstructions and away from direct sunlight.
•Try to centrally locate the ASUS Wireless Router so that it will provide coverage to all of the wireless mobile devices in the area. Orientating the antenna vertically should provide the best reception.
•Use only the power supply that came with this unit. Other power supplies may fit but the voltage and power may not be compatible.
2.Wall mounting or vertical standing is also possible.
Warning: It is the responsibility of the installer and users of the ASUS Wireless Router to guarantee that the antenna is operated at least 20 centimeters from any person. This is necessary to insure that the product is operated in accordance with the RF Guidelines for Human Exposure which have been adopted by the Federal Communications Commission.
3.LAN Connection: Attach one end of an RJ-45 Ethernet cable to the ASUS Wireless Router’s LAN port (any one of the four) and attach the other end to the RJ-45 Ethernet cable to your desktop computer.
4.Power Connection: The ASUS Wireless Router requires power from an external power supply. The ASUS Wireless Router ships with a UL listed, Class 2 power supply. Attach one end of the DC power adapter to the back of the ASUS Wireless Router and the other end to a power outlet.
The Power LED on the front of the ASUS Wireless Router will light up whentheunitispoweredON.Inaddition,thegreenLANorWANLEDs will turn ON to indicate that the ASUS Wireless Router has a physical Ethernet network connection.
ASUS Pocket Wireless Router
Quick Setup
Software Configuration
Configuring the ASUS Wireless Router
The ASUS Wireless Router can be configured to meet various usage scenarios.Someofthefactorydefaultsettingsmaysuityourusage;however, others may need changing. Prior to using the ASUS Wireless Router, you must check the basic settings to guarantee it will work in your environment.
Configuring the ASUS Wireless Router is done through a web browser. You need a Notebook PC or desktop PC connected to the ASUS Wireless
Router (either directly or through a hub) and running a web browser as a configuration terminal. The connection can be wired or wireless. For the wireless connection, you need an IEEE 802.11g/b compatible device, e.g. ASUSWLANCard,installedinyourNotebookPC.Youshouldalsodisable
WEP and set the SSID to “default” for your wireless LAN device. If you want toconfiguretheASUSWirelessRouterorwanttoaccesstheInternetthrough theASUS Wireless Router, TCP/IP settings must be correct. Normally, the TCP/IP setting should be on the IP subnet of theASUS Wireless Router.
Note: Before rebooting your computer, the ASUS Wireless Router should be switched ON and in ready state.
Connecting to the ASUS Wireless Router
Wired Connection
One RJ-45 cable is supplied with the ASUS Wireless Router. Auto crossover function is designed into the ASUS Wireless Router so you can use either a straight-through or a crossover Ethernet cable. Plug one end of the cable into the WAN port on the rear of the ASUS Wireless Router and the other end into the Ethernet port of yourADSL or Cable modem.
Wireless-Connection
Refer to your wireless adapter user’s manual on associating with the ASUS Wireless Router. The default SSID of the ASUS Wireless Router is “default”
(lower case), encryption is disabled and open system authentication is used.
English
ASUS Pocket Wireless Router
English
Quick Setup
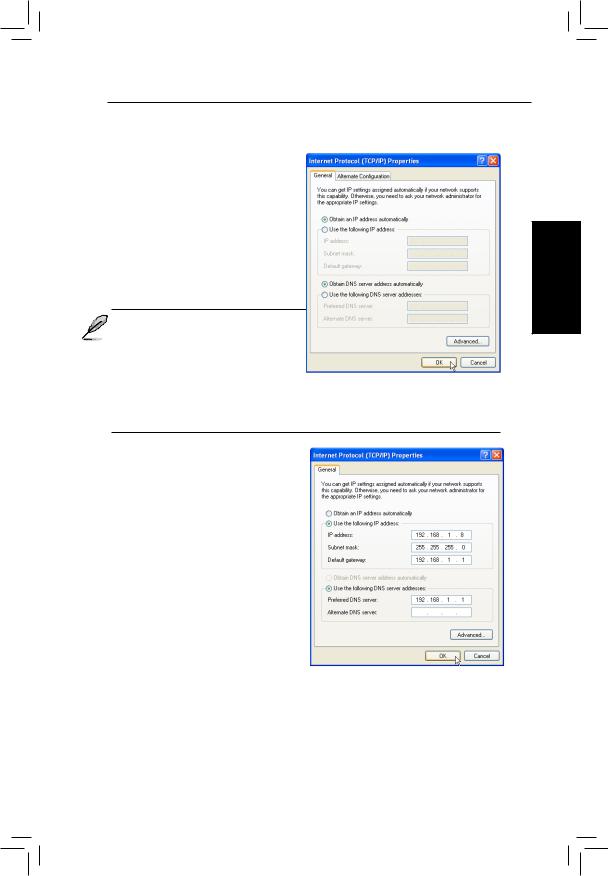
Setting IP address for Wired or Wireless Connection
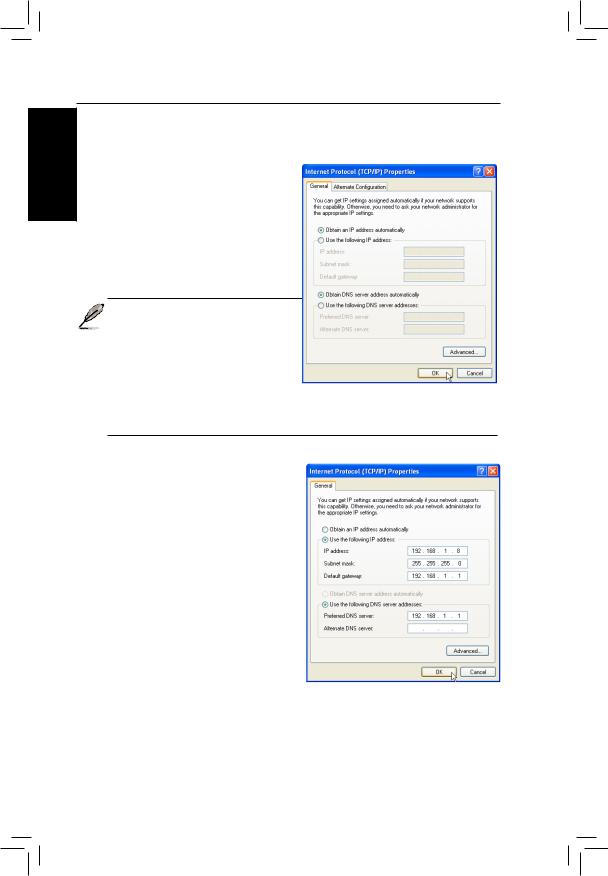
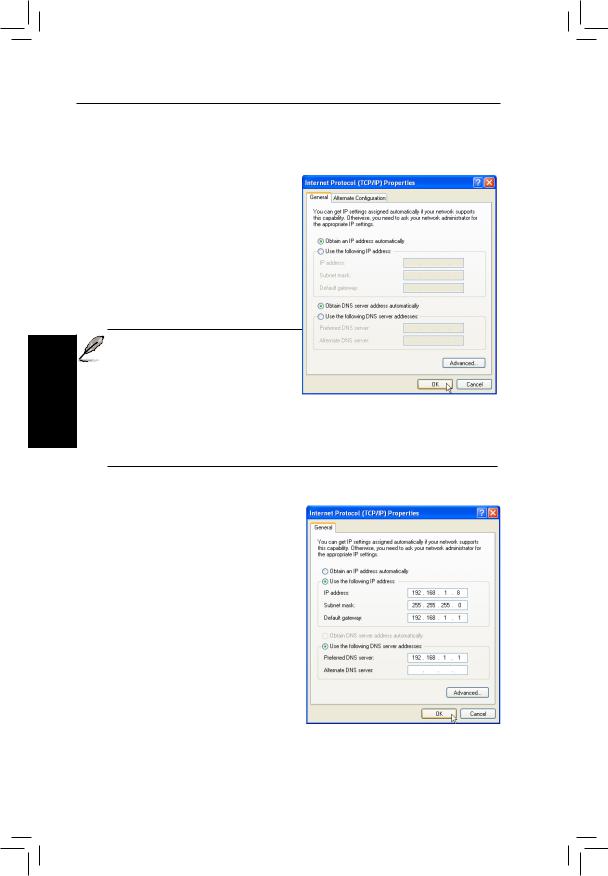
Get IP Automatically
The ASUS Wireless Router incorporates a DHCP server so the easiest method is to set your PC to get its IP address automatically and reboot your computer. So the correct
IP address, gateway, DNS (Domain
Name System Server) can be obtained from the ASUS Wireless Router.
Note: The Wireless Router will act as a router and provide IP address only when the physical connection of WAN port exists. You must connect the WAN port on the ASUS Wireless Router with
the Ethernet port on your ADSL or Cable modem with a network cable. Before rebooting your PC, the ASUS Wireless Router should be switched ON and in the ready state.
Setting IP Manually
If you want to set your IP address manually, the following default settings of the ASUS Wireless Router should be known:
•IP address 192.168.1.1
•Subnet Mask 255.255.255.0.
If you set your computer’s IP manually, it needs to be on the same segment. For example:
•IP address 192.168.1.xxx (xxx canbeanynumberbetween2and 254 that is not used by another device)
•Subnet Mask 255.255.255.0 (same as theASUS Wireless Router)
•Gateway 192.168.1.1 (this is theASUS Wireless Router)
•DNS 192.168.1.1 (ASUS Wireless Router IP address or your own).
|
ASUS Pocket Wireless Router |
Quick Setup
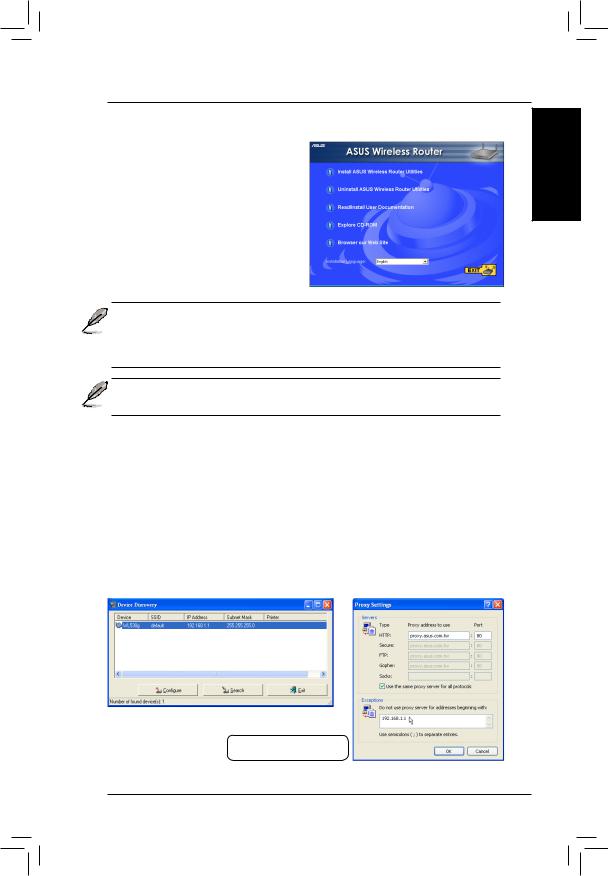
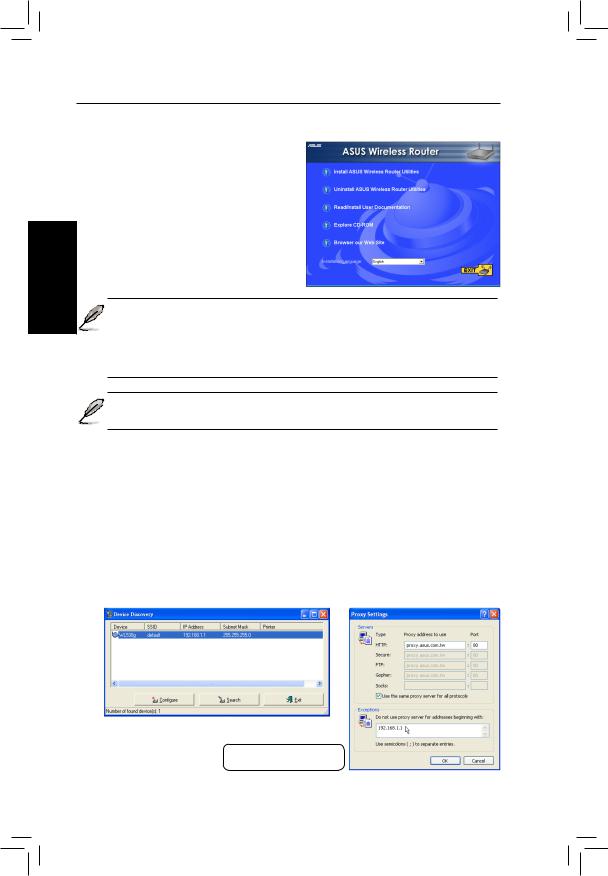
Installing the ASUS Wireless Router Utilities
Follow these steps to install the ASUS Wireless Router Utilities in Microsoft
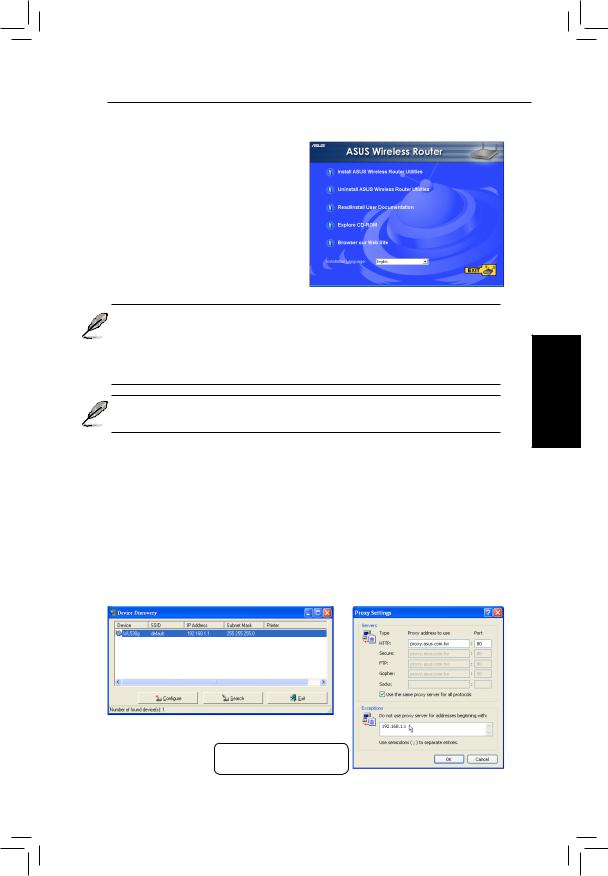
Windows.InsertthesupportCDprovided with the ASUS Wireless Router and the menu will appear. (Double-click setup.exe if your autorun has been disabled.)
Note: By default, the Wireless Router will act as a router and provide an IP address only when a physical connection on the WAN port exists. You must connect the Wireless Router’s WAN port with your ADSL or Cable modem using a network cable.
Note: Before rebooting your PC, the ASUS Wireless Router should be switched ON and in the ready state.
Using the Wireless Router for the First Time
1. ASUS Wireless Router Utilities
Run Device Discovery from “ASUS Utility” in Windows Start Programs.
2. Connect to the ASUS WLAN Web Manager
Run the ASUS WLAN Device Discovery from the Start menu and click Config when the device is found.
English
Add 192.168.1.1 in the Exceptions box if you are using a proxy server.
ASUS Pocket Wireless Router

Quick Setup
 English
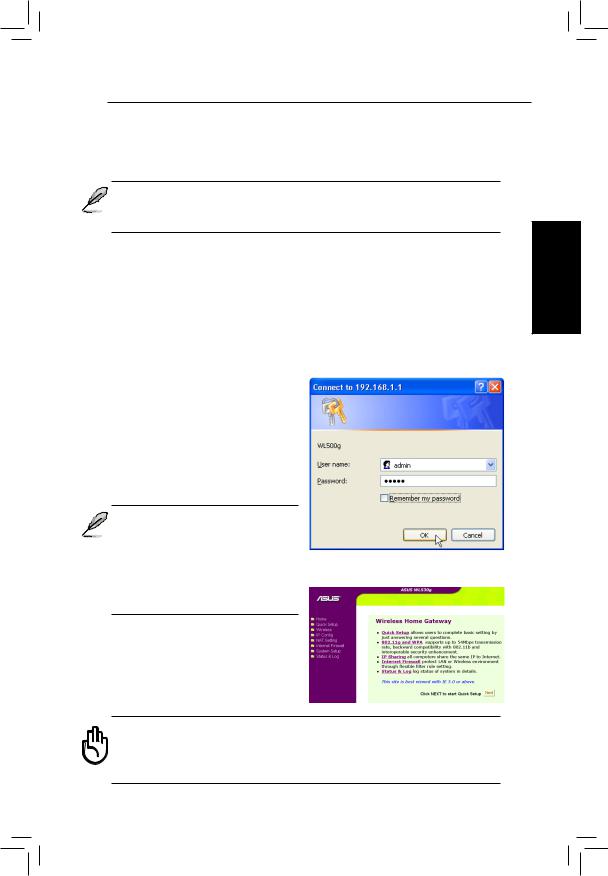
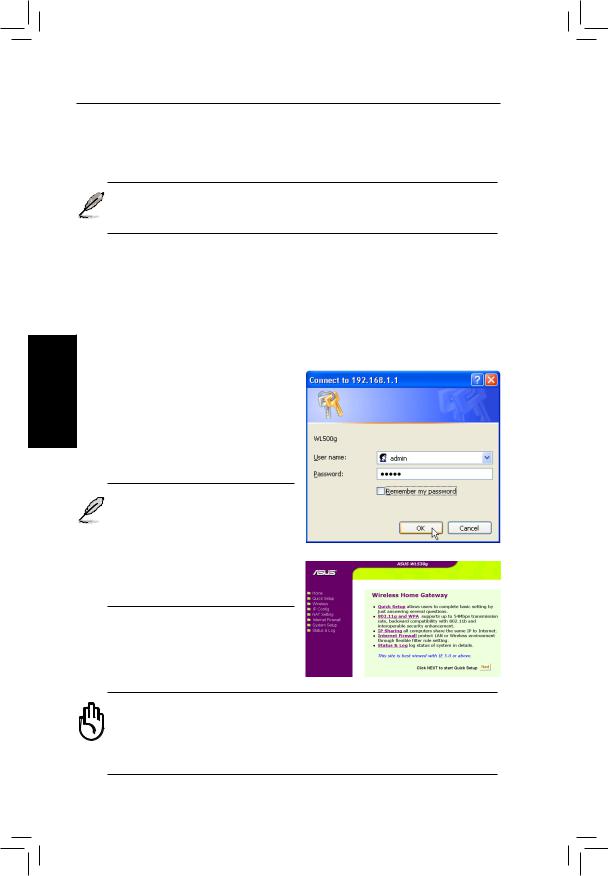
If your computer’s IP is not on the same subnet as the ASUS Wireless Router
(192.168.1.X),youwillbeaskedtochangeit.TheIPaddresscanbeanynumber from 2 to 254 that is not used by another device. Gateway is not required.
Note: Using a proxy server for your LAN requires that you set an exception for the ASUS Wireless Router or else connection will fail.
Enter Address or Name Manually
You can also open your PC’s web browser and enter the name or the default
IP address of the ASUS Wireless Router:
WL530g V2
http://my.router or http://my.WL530g V2 or http://192.168.1.1
User Name & Password
Once connected, a window will ask for the User name and Password in order to log in. The factory default values are “admin” and “admin”.
Note: If you cannot find any the
ASUS Wireless Routers due to a problem in the IP settings, push and hold the “Restore” button over five seconds to restore factory default settings.
Home Page
After logging in, you will see the
ASUS Wireless Router home page.
Important: After entering information on any page, click the
“Apply” button  . If you click any other link, you will be directed to another page and lose your new settings.
ASUS Pocket Wireless Router
|
Quick Setup |
||
|
|
|
|
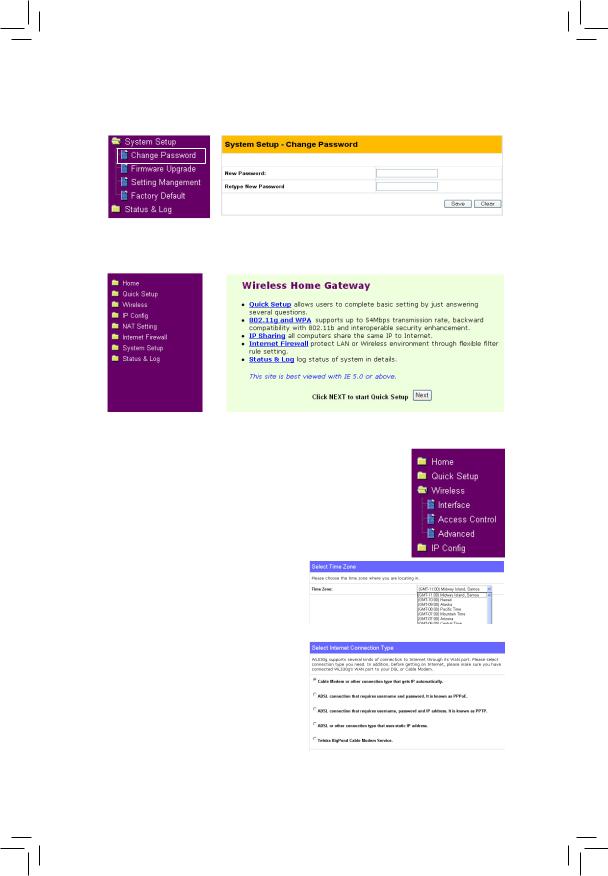
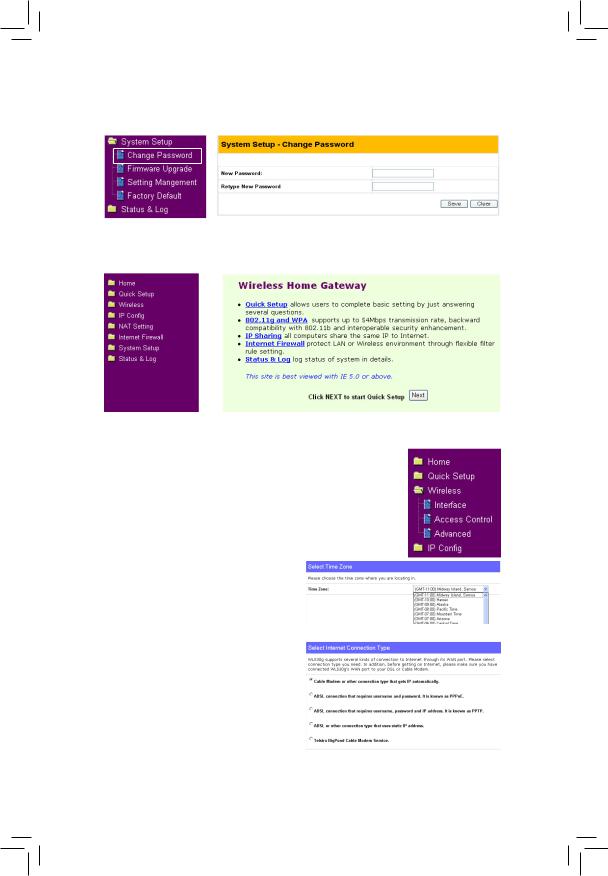
3. |
Set your own password |
|
|
English |
|||
|
|
||
|
|
|
|
4. |
Use Quick Install |
||
Quick Setup
To start quick setup, click Next to enter the “Quick
Setup” page. Follow the instructions to setup the ASUS
Wireless Router.
Select your time zone or the closest region. Click Next to continue.
Select the connection type. Click
Next to continue.
ASUS Pocket Wireless Router |
|
English
Quick Setup
Quick Setup (Cont.)
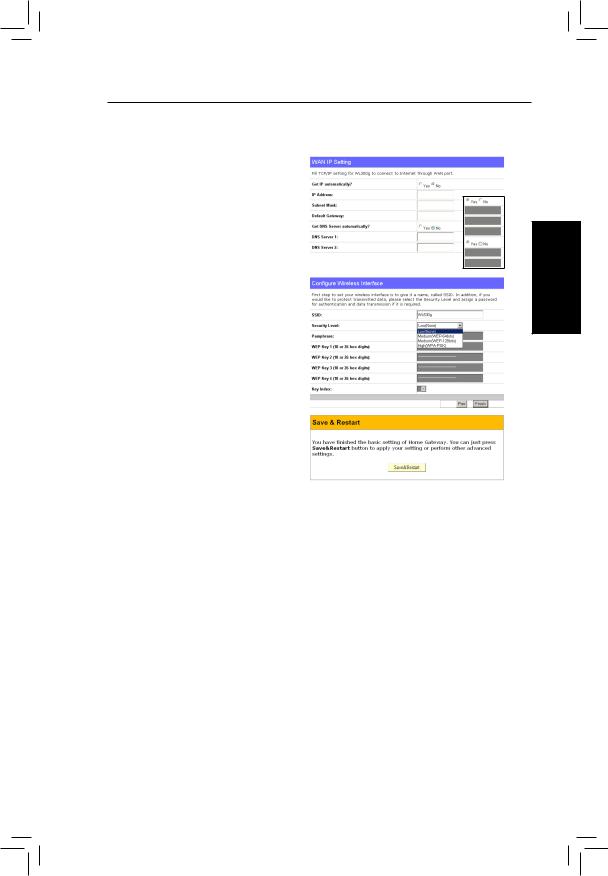
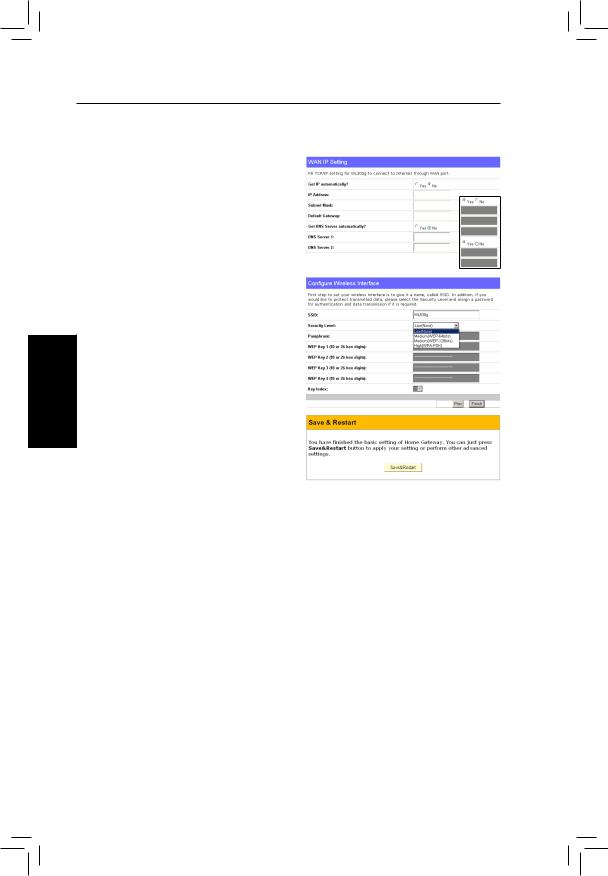
Select “No” to enter the information manually.“Yes”willdisablethefield. Click Next to continue.
To set up your wireless interface, you must first give it an SSID
(Service Set Identifier). The SSID is auniqueidentifierattachedtopackets sent over WLANs. This identifier emulates a password when a wireless device attempts communication on the WLAN. Because an SSID distinguishes WLANs from each other, access points and wireless devices trying to connect to a WLAN must use the same SSID.
Also,ifyouwanttoprotecttransmitted
data, select a middle or high Security Level.
Medium : allows only those users with the same WEP key to connect to this access point and to transmit data using 64bits or 128bits WEP key encryption.
High:allows only those users with the same WPA pre-shared key to connect to this access point and to transmit data using TKIP encryption.
Click Finish to continue. You are prompted to save the settings. Click
Save&Restart to save the settings to the ASUS Wireless Router and enable the new settings.
ASUS Pocket Wireless Router
Quick Setup
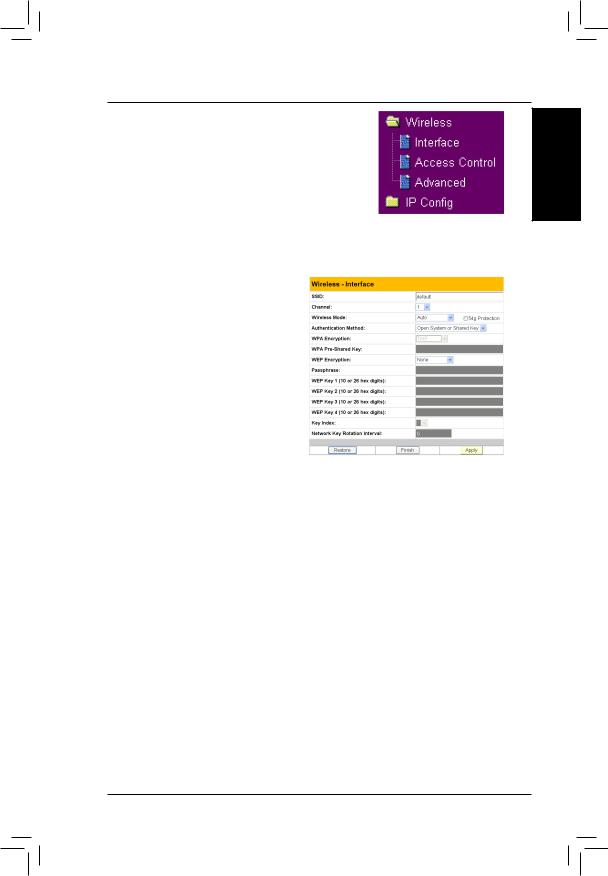
Authentication and Security
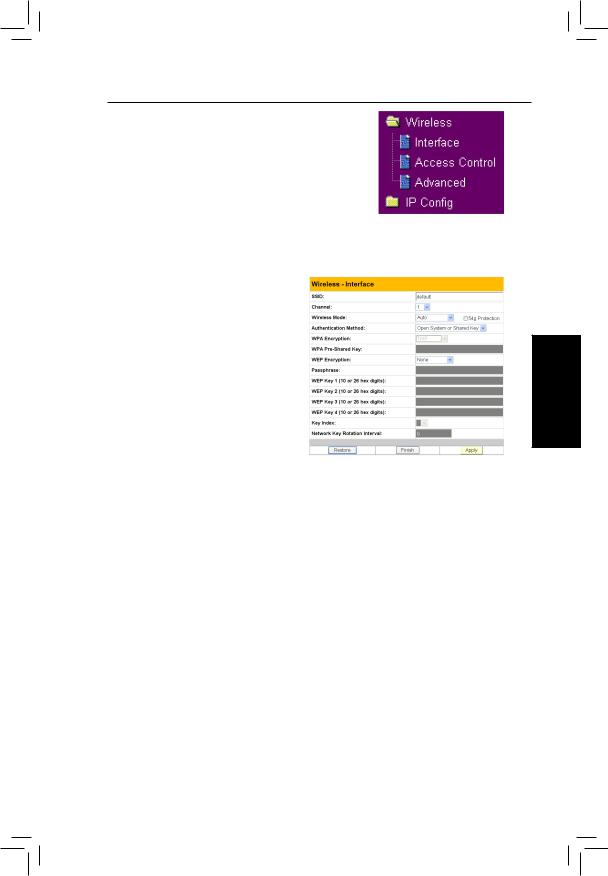
Click Wireless on the menu to reveal a submenu.
Thisfieldenablesyoutosetdifferentauthentication methods which determine different encryption schemes. If all your clients support WPA, using “WPA-PSK” is recommended for better security.
WPA Encryption
When “WPA-PSK” authentication method is used, the newly proposed
TKIP (Temporal Key Integrity Protocol) encryption schemes are applied.
TKIP: TKIP uses an encryption algorithm, which is more stringent than the WEP algorithm and also uses existing WLAN calculation facilities to perform encryption operations.TKIPverifiesthesecurity
configuration after the encryption keys are determined.
WPA Pre-Shared Key
Selecting “TKIP” in theWPAEncryption, this field is used as a password to begin the encryption process. Note: 8 to 63 characters are required.
English
ASUS Pocket Wireless Router

 ®
®
Routeur sans fil de poche
(WL-530g pour clients 802.11g/b)
Français
Guide de démarrage rapide
Démarrage rapide
Procédure d’installation |
|
|
Suivez ces étapes pour installer le routeur sans filASUS. |
|
|
1. Déterminez l’emplacement optimal du routeur sans filASUS. Gardez à |
|
|
l’esprit les considérations suivantes: |
|
|
• La longueur du câble Ethernet qui relie le routeur sans fil au réseau |
|
|
ne doit pas excéder 100 mètres. |
|
|
|
|
|
• Essayez de placer le routeur sans fil ASUS sur une surface plane, |
|
|
aussi loin du sol que possible (comme par exemple sur un bureau ou |
|
Français |
sur une étagère), sans obstruction et non exposé à la lumière directe |
|
|
du soleil. |
|
|
• Essayez de positionner le routeur sans fil de manière centrale, de |
|
|
sorte qu’il offre la meilleure couverture possible de la zone. Orienter |
|
|
l’antenne verticalement devrait offrir la meilleure réception. |
|
|
• N’utilisez que l’alimentation livrée avec ce produit. D’autres alimen- |
|
|
tationspeuventyêtrebranchées,maislatensionoulapuissancepour- |
|
|
raient ne pas être compatibles avec l’appareil et l’endommager. |
|
|
2. Une fixation murale ou un positionnement vertical sont possibles. |
|
|
Attention: il est de la responsabilité de l’installateur et des utilisateurs du routeur sans fil ASUS de garantir que l’antenne opère à au moins vingt centimètres de toute personne. Ceci est nécessaire pour assurer que le produit est utilisé en concordance avec les “RF Guidelines for Human Exposure” adoptées par la Federal Communications Commission.
4.Connexion LAN: reliez un bout d’un câble Ethernet RJ-45 à un port
LAN du routeur (n’importe lequel des quatre) et connectez l’autre bout du câble RJ-45 au connecteur réseau de votre ordinateur.
5.Alimentation: lerouteursansfilASUSrequiertunesourced’alimentation externe. Il est livré avec une alimentation de classe 2. Reliez un bout de l’adaptateur d’alimentation à la prise située au dos du routeur sans fil ASUS, et l’autre bout à une prise de courant.
Letémoind’alimentation(PowerLED)durouteursansfilASUSs’allume lorsque l’appareil est allumé. En plus, les témoins lumineux verts LAN ou WAN s’allument pour indiquer l’existence de connexions réseau physiques du routeur.
Routeur sans fil de poche ASUS |
11 |

Français
Démarrage rapide
Configuration logicielle
Configurer le routeur sans fil ASUS
Le routeur sans filASUS peut être configuré pour répondre à divers usages. Certains des réglages d’unsine par défaut peuvent parfaitement répondre à vos besoins spécifiques. D’autres devront être modifiés. Avant d’utiliser le routeur sans fil ASUS vous devez vérifier les réglages de base pour vous assurer qu’il fonctionnera dans votre environnement. La configuration du routeur sans fil ASUS se fait via une interface web. Il vous faut un PC (de bureauouportable)reliéaurouteur,soitdirectementsoitviaunhub, etfaisnt opérerunnavigateurInternet.Laconnexionpeutêtrefilaireousansfil.Pour une connexion sans fil, il vous faut une carte compatible IEEE 802.11g/b , installée sur votre portable. Il vous faudra également désactiver le WEP et régler le SSID sur “défault”. Si vous voulez configurer le routeur sans fil ASUS ou si vous voulez accéder à Internet via le routeur sans filASUS, les paramètres TCP/IP doivent être corrects. Normalement, le paramétrage IP doit être sur le même sous-réseau que le routeur sans filASUS.
Note: Avant de rebooter votre ordinateur, le routeur sans fil ASUS doit être allumé et prêt.
Se connecter au routeur sans fil ASUS
Connexion filaire
Un câble RJ-45 est fourni avec le routeur sans filASUS. La fonction “Auto crossover” est implémentée dans le routeur sans filASUS de sorte que vous pouvez utiliser un câble droit ou un câble Ethernet croisé. Branchez un bout ducâbleauportWANsituésurl’arrièredurouteursansfilASUS,etbranchez l’autre bout sur le port Ethernet de votre modem Câble ouADSL.
Connexion sans fil
Reportez-vous au manuel de votre adaptateur sans fil pour savoir comment l’associer au routeur sans fil ASUS. Le SSID par défaut du routeur sans fil ASUS est “default” (en minuscules); le cryptage est désactivé et l’authentification “open system” est utilisée.
12 |
Routeur sans fil de poche ASUS |
Démarrage rapide
Réglage de l’adresse IP pour connexions filaires ou sans fil
Obtention automatique de l’IP
LerouteursansfilASUSincorporeun serveurDHCP;leplussimpleestdonc deréglervotrePCpourqu’ilobtienne une adresse IP automatiquement.
Ainsi,labonneadresseIP,passerelle,
DNS seront attribués par le routeur sans filASUS.
 Note: le routeur sans fil fournira une adresse IP uniquement si la connexion physique au port WAN existe. Vous devez relier le port
WAN du routeur sans fil ASUS
au port Ethernet de votre modem câble ou ADSL par l’intermédiaire d’un câble réseau. Avant de rebooter votre PC, le routeur sans fil doit être allumé et prêt.
Réglage manuel de l’IP
Si vous voulez régler l’adresse IP à la main, les paramètres par défaut du routeur doivent être connus:
•Adresse IP: 192.168.1.1
•MAsque de sous-réseau:
255.255.255.0.
SivousréglezvotreIPmanuellement, vous devez mettre l’IP de l’ordinateur sur le le même segment. Par exemple:
•Adresse IP 192.168.1.xxx (xxx étant un nombre compris entre 2
et 254 et qui ne soit pas utilisé par un autre ordinateur)
•Masque de sous-réseau 255.255.255.0 (le même que celui du routeur sans filASUS)
•Passerelle192.168.1.1 (c’est le routeur sans filASUS)
•DNS192.168.1.1(AdresseIPdurouteursansfilouvotrepropreadresse
DNS).
Français
Routeur sans fil de poche ASUS |
13 |
Français
Démarrage rapide
Installer les utilitaires du routeur sans fil ASUS
Suivez ces étapes pour installer les utilitaires du routeur sans fil ASUS sous Microsoft Windows. Insérez le
CD de support fourni avec le routeur sans fil et le menu apparaît. (Double cliquez sur setup.exe si votre autorun est désactivé.)
Note:pardéfaut,lerouteursansfilfonctionneracommeunrouteuret fournira une adresse IP uniquement lorsqu’une connexion physique existe sur le port WAN. Vous devez relier le port WAN du routeur sans fil au port LAN de votre modem ADSL ou câble en utilisant un câble réseau.
 Note: avant de rebooter votre PC, le routeur sans fil ASUS doit être allumé et prêt.
Première utilisation du routeur sans fil
1. Utilitaires ASUS Wireless Router
Lancez le “Device Discovery” depuis “ASUS Utility” dans les programmes du menu démarrer de Windows.
2. Connexion à ”ASUS WLAN Web Manager”
Lancez l’ASUS WLAN Device Discovery depuis le menu Démarrer et cliquez sur Config lorsque le périphérique est trouvé.
Add 192.168.1.1 in the Exceptions box if you are using a proxy server.
14 |
Routeur sans fil de poche ASUS |
Démarrage rapide
Si l’IP de votre ordinateur n’est pas sur le même sous-réseau que le routeur sans filASUS (192.168.1.X),il vous sera demandé de le modifier. L’adresse IPpeut être comprise entre 2 et 254 et non utilisée par un autre appareil. La passerelle n’est pas requise.
 Note: l’utilisation d’un serveur proxy pour votre LAN requiert que vousrégliezuneexceptionpourlerouteursansfilASUS,sinonvotre connexion échouera.
Entrer l’adresse ou le nom à la main
Vous pouvez également ouvrir le navigateur internet de votre PC et entrer le nom ou l’adresse IP du routeur sans filASUS:
WL530g
http://my.router ou http://my.WL530g ou http://192.168.1.1
Nom d’utilisateur & mot de passe
Une fois connecté, une fenêtre demande le nom d’utilisateur et le mot de passe permettant d’entrer dans l’interface. Par défaut, ces valeurs sont: ”admin” et ”admin”.
 Note: si vous ne trouvez pas le routeur sans fil ASUS à cause d’un mauvais paramétrage IP, appuyez et maintenez enfoncé cinq secondes le bouton “Restore” pour revenir au paramétrage d’usine.
Page d’accueil
Après être entré, vous verrez la page d’accueil du routeur sans fil
ASUS.
Important: après avoir entré des informations sur une page, cliquez
sur le bouton “Apply”  . Si vous cliquez sur un autre lien sans le faire, vous irez sur la nouvelle page, mais vous perdriez les paramètres fraichement entrés.
Français
Routeur sans fil de poche ASUS |
15 |
|
|
|
Démarrage rapide |
|
|
|
|
|
|
3. |
Entrez votre propre mot de passe |
|
|
4. |
Utiliser le “Quick Install” |
Français |
|
||
|
|
|
|
|
|
|
|
Quick Setup
Pourlancerlequicksetup(paramétragerapide),cliquez sur Next pour entrer dans la page “Quick Setup”. Suivez les instructions pour bien configurer le routeur sans fil
ASUS.
Choisissez la zone d’heure qui vous convient(oulaplusproche).Cliquez sur Next pour continuer.
Choisissez votre type de connexion.
Cliquez sur Next pour continuer.
16 |
Routeur sans fil de poche ASUS |
Démarrage rapide
Quick Setup (suite)
Choisissez “No” pour entrer les informations à la main. “Yes” désactivecechamp.CliquezsurNext pour continuer.
Pour régler votre interface sans fil, vous devez commencer par lui donner un SSID (Service Set Identifier). Le SSIDestunidentifiantuniqueattaché aux paquets envoyés par WLANs.
Cet identifiant émule un mot de passe lorsqu’un périphérique sans fil essaie de communiquer avec le
WLAN. Puisqu’un SSID distingue les
WLANsentreeux,lespointsd’accès et les périphériques sans fil essayant de se connecter à un WLAN doivent utiliser le même SSID.
De même, si vous voulez protéger les données transmises, choisissez un niveau de sécurité moyen ou élevé.
Medium : n’autorise que les utilisateurs ayant la même clef WEP à se connecter à ce point d’accès et à transmettre des données en utilisant une clef de cryptage WEP 64 ou 128 bits.
High: n’autorise que les utilisateurs ayant la même clef WPA pré-partagée
à se connecter à ce point d’accès et à transmettre des données en utilisant le cryptage TKIP.
Cliquez sur Finish pour continuer. Il vous est demandé de sauvegarder les résultats. Cliquez sur Save&Restart pour enregistrer les paramètres sur le routeur sans filASUS et pour activer ces nouveaux réglages.
Français
Routeur sans fil de poche ASUS |
17 |
Français
Démarrage rapide
Authentification et sécurité
CliquezsurWireless dans le menu pour dévoiler le sous-menu.
Ce champ vous permet de choisir différentes méthodes d’authentification qui déterminent différents schémas de cryptage. Si tous vos clients supportent le WPA, utiliser “WPA-PSK” est recommandé pour une meilleure sécurité.
WPA Encryption (cryptage WPA)
Lorsquelaméthoded’authentification “WPA-PSK”estutilisée,lesschémas de cryptage TKIP (Temporal Key Integrity Protocol) sont appliqués.
TKIP: TKIP utilisa un algorithme de cryptage plus pointu que l’algorithme WEP et utilise les capacités de calcul du WLAN pour effectuer les opérations de cryptage. TKIP vérifie la configuration de sécurité une fois les clefs de cryptage déterminées.
WPA Pre-Shared Key
Choisir “TKIP” dans WPA Encryption; ce champ est utilisé comme mot de passe pour démarrer un processus de cryptage. Note: 8 à 63 caractères sont requis.
18 |
Routeur sans fil de poche ASUS |

 ®
®
Pocket Wireless Router
(WL-530g V2 für 802.11g/b Wireless Clients)
Deutsch
Kurzanleitung
(Ein ausführliches Handbuch im PDF-Format . befindet sich in der Support-CD)
Kurzanleitung
|
|
|
|
|
|
|
Installationsvorgang |
||
|
|
Folgen Sie diesen Schritten, um denASUS Wireless Router zu installieren. |
||
|
|
1. Suchen Sie die beste Installationsposition für den ASUS Wireless Router aus. |
||
|
|
Berücksichtigen Sie bitte dabei die folgenden Konditionen: |
||
|
|
• Die Länge des Ethernetkabels, das den ASUS Wireless Router mit dem |
||
|
|
Netzwerk verbindet, darf nicht länger als 100 m sein. |
||
|
|
• VersuchenSiedenASUSWirelessRouteraneineebene,stabileOberfläche, |
||
|
|
diemöglichstfernvomBodenliegt,wiez.B.aufeinenTischoderBücherregal |
||
|
|
zu stellen. Halten Sie das Gerät frei von Hindernisse und setzen es keiner |
||
|
|
direkten Sonneneinstrahlung aus. |
||
|
|
• VersuchenSiedenASUSWirelessRouterzentralzustellen,sodassalledraht- |
||
|
|
losen Mobilgeräte innerhalb des Abdeckungsbereichs liegen. Eine vertikale |
||
|
|
Ausrichtung der Antenne bietet den besten Empfang an. |
||
|
|
|||
Deutsch |
• Verwenden Sie nur den beigefügten Stromadapter für dieses Gerät. Ein |
|||
anderer Stromadapter hat möglicherweise passende Anschlüsse aber eine |
||||
falsche Eingangsspannung und falschen Eingangsstrom. |
||||
|
|
|||
|
|
2. Eine Wandmontage oder ein vertikales Aufstellen ist auch möglich. |
||
Warnung: Es ist Aufgabe des Installateurs und der Benutzer des ASUS Wireless Routers, einen Abstand von mindestens 20 cm zwischen der Antenne und Personen sicherzustellen. Dies ist erforderlich, um hinsichtlich der Funkstrahlenaussetzung der Menschen sicherzustellen, dass das Produkt gemäß den von Federal Communications Commission festgelegten RF-Richtlinien betrieben wird.
3.LAN-Verbindung: Verbinden Sie ein Ende eines RJ-45 Ethernetkabels mit einem der vier LAN-Ports am ASUS Wireless Router und das andere Ende mit dem RJ-45 Ethernetkabel an Ihrem Desktop-Computer.
4.Stromversorgungsverbindung: Der ASUS Wireless Router benötigt eine externe Stromversorgung. Ein UL-genehmigter, Klasse 2 Stromadapter ist dem ASUS Wireless Router beigelegt. Verbinden Sie ein Ende des Wechsel-
/Gleichstromadapters mit der Rückseite des ASUS Wireless Routers und das andere Ende mit einer Netzsteckdose.
DiePower-LEDanderFrontseitedesASUSWirelessRoutersleuchtetauf,wenn dasGeräteingeschaltetwird.ZudemleuchtendiegrüneLAN-oderWAN-LEDs, wenn der ASUS Wireless Router eine physische Ethernet-Netzwerkverbindung hat.
20 |
ASUS Pocket Wireless Router |
Kurzanleitung
Softwarekonfiguration
Konfigurieren des ASUS Wireless Routers
Sie können den ASUS Wireless Router entsprechend verschiedenen
Verwendungskonditionenkonfigurieren.ManchewerkseitigeStandardeinstellungen passenmöglicherweisezuIhrerVerwendung,undmanchebenötigenmöglicherweise
Änderungen. Sie müssen vor dem Verwenden des ASUS Wireless Routers die
Grundeinstellungen überprüfen, um sicherzustellen, dass er in Ihrer Umgebung funktioniert. Die Konfiguration des ASUS Wireless Routers läuft über einen
Webbrowser. Sie müssen einen Notebookoder Desktop-PC (direkt oder über einen Hub) mit dem ASUS Wireless Router verbinden und einen Webbrowser als
Konfigurationsterminal öffnen. Die Verbindung kann verdrahtet oder drahtlos sein. Für die drahtloseVerbindung muss ein IEEE 802.11g/b kompatibles Gerät wie z.B. ASUS WLAN-Karte in Ihrem Notebookoder Desktop-PC installiert sein. Zudem müssen Sie die WEP-Funktion deaktivieren und die SSID auf “default” für Ihr drahtlosesLAN-Geräteinstellen.DieTCP/IP-Einstellungenmüssenstimmen,wenn Sie denASUS Wireless Router konfigurieren oder über denASUS Wireless Router auf das Internet zugreifen möchten. Normalerweise muss die TCP/IP-Einstellung das selbe IP-Subnetz wie der ASUS Wireless Router haben.
Hinweis: Der ASUS Wireless Router sollte eingeschaltet und betriebsbereit sein, bevor Sie Ihren Computer neu starten.
Verbinden mit dem ASUS Wireless Router
Verdrahtete Verbindung
Ein RJ-45 Kabel ist dem ASUS Wireless Router beigelegt. Die Auto-Crossover- Funktion ist im ASUS Wireless Router integriert, so dass Sie sowohl ein Straight- throughalsaucheinCrossover-Ethernetkabelverwendenkönnen.VerbindenSieein
Ende des Kabels mit dem WAN-Port an der Rückseite des ASUS Wireless Routers und das andere Ende mit dem Ethernet-Port an Ihrem ADSLoder Kabel-Modem.
Drahtlose Verbindung
Anweisungen zur Assoziation mit dem ASUS Wireless Router entnehmen Sie bitte dem Benutzerhandbuch Ihres drahtlosen Adapters. Die Standard-SSID des ASUS
Wireless Routers ist “default” (alles kleingeschrieben), die Verschlüsselung ist deaktiviert und das offene System wird alsAuthentifizierungsmethode verwendet.
Deutsch
ASUS Pocket Wireless Router |
21 |
Deutsch
Kurzanleitung
Einstellen der IP-Adresse für eine verdrahtete oder drahtlose Verbindung
Automatisches Beziehen einer IP-Adresse
Der ASUS Wireless Router verwendet einen DHCP-Server. Die einfachste Methode ist deshalb, die “IP-Adresse automatisch beziehen”-Funktion an Ihrem
Computer zu aktivieren und dann Ihren Computer neu starten. So erhalten Sie die richtige IP-Adresse, den Gateway und
DNS (Domain Name System Server) von dem ASUS Wireless Router.
Hinweis: Der Wireless Router funktioniert als Router und bietet die IP-Adresse nur an, wenn die physische Verbindung mit dem WAN-Port existiert. Sie müssen
den WAN-Port am ASUS Wireless Router über ein Netzwerkkabel mit dem Ethernet-Port an Ihrem ADSLoder Kabel-Modem verbinden. Der ASUS Wireless Router sollte eingeschaltet und betriebsbereit sein, bevor Sie Ihren Computer neu starten.
Manuelles Einstellen der IP-Adresse
Wollen Sie Ihre IP-Adresse manuell einstellen,dannmüssenSiediefolgenden
Standardeinstellungen desASUS Wireless Routers verwenden.
•IP-Adresse 192.168.1.1
•Subnetzmaske 255.255.255.0.
WennSiedieIP-AdresseIhresComputers manuelleinstellen,musssieindemselben
Segment liegen. Zum Beispiel:
•IP-Adresse 192.168.1.xxx (xxx kann eine beliebige Zahl zwischen 2 und 254sein,dienichtvoneinemanderen
Gerät verwendet wird)
•Subnetzmaske255.255.255.0(wiedie des ASUS Wireless Routers)
•Gateway 192.168.1.1 (dies ist derASUS Wireless Router)
•DNS 192.168.1.1 (ASUS Wireless Router IP-Adresse oder Ihre eigene).
22 |
ASUS Pocket Wireless Router |
Kurzanleitung
Installieren der ASUS Wireless Router Utilities
Folgen Sie den nachstehenden Schritten, um die ASUS Wireless Router Utilities unter Microsoft Windows zu installieren. Legen Sie die dem ASUS Wireless
Router beigefügte Support-CD ein. Das
Installationsmenü wird geöffnet. (Klicken
Sie doppelt auf die Datei setup.exe, falls
Ihre Autorun-Funktion deaktiviert ist.)
Hinweis: In der Standardeinstellung funktioniert der Wireless Router als Router und bietet die IP-Adresse nur an, wenn die physische Verbindung mit dem WAN-Port existiert. Sie müssen den WAN-Port am Wireless Router über ein Netzwerkkabel mit dem Ethernet-Port an Ihrem ADSLoder Kabel-Modem verbinden.
Hinweis: Der ASUS Wireless Router sollte eingeschaltet und betriebsbereit sein, bevor Sie Ihren Computer neu starten.
Erstmaliges Verwenden des Wireless Routers
1. ASUS Wireless Router Utilities
Starten Sie Device Discovery von “ASUS Utility” unter Start/ Programmen in
Windows.
2. Verbinden mit dem ASUS WLAN Web Manager
Starten Sie ASUS WLAN Device Discovery vom Start-Menü und klicken anschließend aufConfig (Konfig.) , wenn das Gerät gefunden wurde.
Deutsch
192.168.1.1 in das Feld unter “Exceptions” (Ausnahmen) hinzufügen, wenn Sie einen Proxyserver verwenden.
ASUS Pocket Wireless Router |
23 |
Kurzanleitung
WennsichdieIP-AdresseIhresComputersnichtindemselbenSubnetzwiedasdes ASUSWirelessRouters(192.168.1.X)befindet,werdenSieaufgefordertdieAdresse zu ändern. Die IP-Adresse kann eine beliebige Zahl zwischen 2 und 254 sein, die nicht von einem anderen Gerät verwendet wird. Ein Gateway ist nicht notwendig.
Deutsch
Hinweis: Wenn Sie einen Proxyserver für Ihr LAN verwenden, müssen Sie eine Ausnahme für den ASUS Wireless Router einstellen. Andernfalls kann die Verbindung nicht hergestellt werden.
Manuelles Eingeben der Adresse oder des Namens
SiekönnenauchdenWebbrowserIhresPCsöffnenunddenNamenoderdie
Standard-IP-Adresse des ASUS Wireless Routers eingeben:
WL530g V2
http://my.router oder http://my.WL530g V2 oder http://192.168.1.1
Benutzername & Kennwort
Sobald die Verbindung besteht, erscheint ein Dialogfenster, in das Sie den
Benutzernamen und das Kennwort für die Anmeldung eingeben müssen. Die werkseitigen Standardwerte sind “admin” und “admin”.
Hinweis: Können Sie wegen eines 
 Problems in den IP-Einstellungen keinen ASUS Wireless Router finden,danndrückenSiebittedie
“Restore”-Taste für fünf Sekunden, um die werkseitigen Standardeinstellungen wiederherzustellen.
Startseite
Nach dem Anmelden sehen Sie die
Startseite des ASUS Wireless Routers.
Wichtig: Klicken Sie auf die ”Apply” (Übernehmen)-Schaltfläche
 , nachdem Sie auf einer Seite Informationen eingegeben haben. Wenn Sie stattdessen auf einen Link klicken, werden Sie zu einer anderen Seite gebracht und Ihre Einstellungsänderungen werden nicht gespeichert.
24 |
ASUS Pocket Wireless Router |

Kurzanleitung
3.Einstellen Ihres eigenen Kennwortes
4.Verwenden der Schnellinstallationsfunktion
Deutsch
Schnell-Setup
Klicken Sie auf Weiter, um die “Schnell-Setup”-Seite zu öffnen. Folgen Sie denAnweisungen, um denASUS
Wireless Router einzustellen.
Wählen Sie Ihre Zeitzone oder die nächste Region aus. Klicken Sie zum Fortfahren auf Weiter.
Wählen Sie Ihren Verbindungstyp aus. Klicken Sie zum Fortfahren auf
Weiter.
ASUS Pocket Wireless Router |
25 |
Deutsch
Kurzanleitung
Schnell-Setup (Fortsetzung)
Wählen Sie “Nein”, um die
Informationen manuell einzugeben. Die Option “Ja” deaktiviert das Feld. Klicken Sie zum Fortfahren auf Weiter.
Um Ihre drahtlose Schnittstelle einzustellen, müssen Sie ihr zuerst eine SSID (Service Set Identifier) zuweisen. Die SSID ist eine einmalige
Identifizierungsnummer,dieindieüber
WLANs gesendeten Pakete eingefügt wird. Die Identifizierungsnummer emuliert ein Kennwort, wenn ein drahtloses Gerät versucht eine Kommunikation im WLAN zu haben. Da eine SSID die WLANs voneinander unterscheidet, müssen die Access Points und drahtlosen
Geräte,dieeineVerbindungmiteinemWLANherstellenmöchten,dieselbe
SSID verwenden.
Wollen Sie die übertragenen Daten schützen, dann wählen Sie dazu eine mittlere oder hohe Sicherheitsstufe.
Mittel: NurdieBenutzer,diedenselbenWEP-Schlüsselverwenden,können auf diesen Access Point zugreifen und Daten mit der 64Bits oder 128Bits
WEP-Verschlüsselung senden.
Hoch:
Nur die Benutzer, die den selben gemeinsamenWPA-Schlüssel verwenden, können auf diesen Access Point zugreifen und Daten mit der TKIPVerschlüsselung senden.
Klicken Sie zum Fortfahren auf Fertig stellen. Sie werden aufgefordert die Einstellungen zu speichern. Klicken Sie auf Speichern & Neu starten, um die Einstellungen in dem ASUS Wireless Router zu speichern und die neuen Einstellungen wirksam zu machen.
26 |
ASUS Pocket Wireless Router |
Kurzanleitung
Authentifizierung und
Sicherheit
Klicken Sie auf Wireless imMenü,umeinUntermenü zu öffnen.
D a s F e l d e r l a u b t I h n e n v e r s c h i e d e n e
Authentifizierungsmethoden, die verschiedene
Verschlüsselungsschemen verwenden, einzustellen. Für eine bessere Sicherheit ist es ratsam “WPA-PSK” zu verwenden, wenn alle ihrer Clients WPAunterstützen.
WPA-Verschlüsselung
W e n n d i e “ W P A - P S K ” Authentifizierungsmethode verwendet wird, werden die neulich eingebrachten
TKIP (Temporal Key Integrity Protocol)- Verschlüsselungsschemen angewendet.
TKIP: TKIP verwende t einen
Verschlüsselungsalgorithmus, der strenger als der WEP-Algorithmus ist und auch die existierenden WLAN-Berechnungsfähigkeiten zur
Ausführung von Verschlüsselungsoperationen verwendet. TKIP überprüft die
Sicherheitskonfiguration, nachdem die Verschlüsselungsschlüssel bestimmt wurden.
WPA gemeinsamer Schlüssel
WennSie“TKIP”fürdieWPA-Verschlüsselungsoptionausgewählthaben,gebenSie ein Kennwort in das Feld ein, um denVerschlüsselungsprozess zu starten. Hinweis:
Deutsch
ASUS Pocket Wireless Router |
27 |
 Loading...