


Index |
|
|
1. English............................................................................ |
1 |
|
2. |
Deutsch......................................................................... |
22 |
3. |
Français........................................................................ |
43 |
4. |
Italiano .......................................................................... |
64 |
5. |
Español......................................................................... |
85 |
6. Русский........................................................................................... |
106 |
|
English
Deutsch
Français
Italiano
Español
Русский


 ®
®
Wireless Local Area Network Adapter
WL-160W
(For 802.11n draft, 802.11g & 802.11b Networks)
Quick Start Guide
QE2920/ Nov. 2006
Quick Start Guide

 English
Installation Procedures
Important: Install the WLAN Adapter utilities before inserting the WLAN Adapter into your computer.
Installing the WLAN utilities and driver
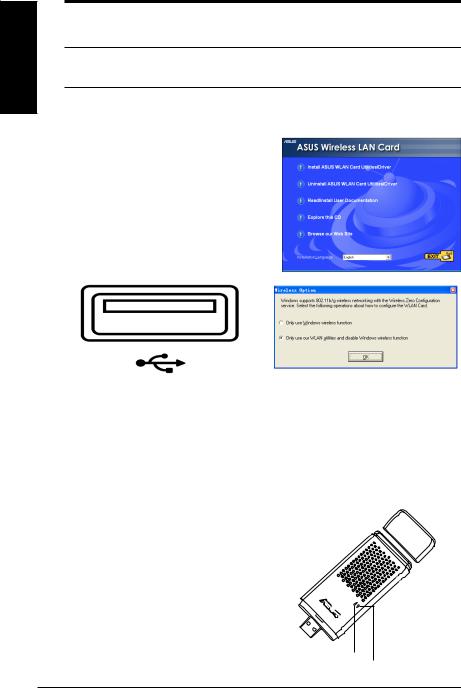
Follow these instructions to install the WLAN Adapter utilities and driver. Insert the support CD into your optical drive. If autorun is enabled in your computer, the CD automatically displays the utility menu. Click Install ASUS WLAN Card Utilities/Driver. If autorun is disabled, double-click SETUP.EXE in the root directory of the CD.
Insert the WLAN Adapter into your computer
’s USB port using the correct orientation.
Windows will automatically detect and configure the WLAN Adapter using the utilities and drivers installed in the previous steps.
Windows XP users: When the program is launched for the first time (during Windows restart), you are asked to choose one utility to configure the WLAN Adapter. Select "Only use our WLAN utilities and disable Windows wireless function".
Reading the WLAN status indicators
The device comes with two LEDs that indicate the status of the WLAN Adapter.
ACT LED
Blinking: Transmitting data; the blinking speed indicates the link speed.
OFF: Radio off or Adapter is disabled.
LINK LED |
|
|
ON: |
Connected to wireless device. |
|
OFF: |
No wireless connection. |
ACT LINK |
|
|
|
ASUS WLAN Adapter
Quick Start Guide
One Touch Wizard
Use One Touch Wizard to setup your wireless connection with an existing wireless LAN.
English
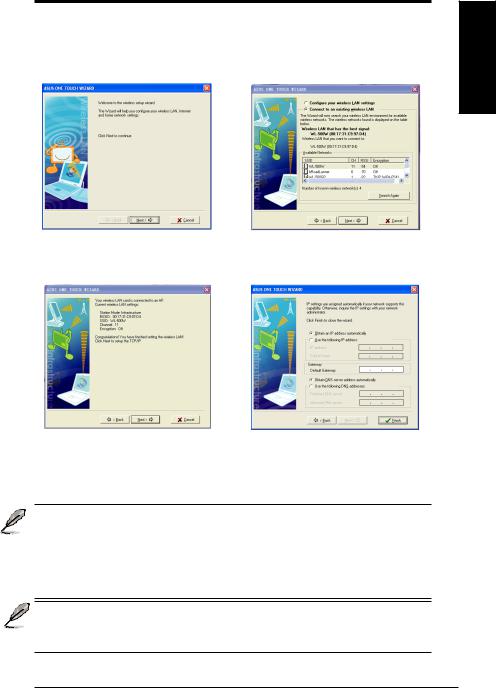
1.Launch One Touch Wizard from Start menu and click Next to set up your wireless network.
2.Select an AP from the Available Networks then click Next.
3.Connection is complete. Click Next to setup the IP address for the WLAN Adapter.
4.Choose to obtain an IP address or to assign static address manually for your WLAN Adapter. When IP setting is complete, click Finish to exit the One Touch Wizard.
Note: If the access point you want to connect has set up encryption policies, you must configure the same encryption on your WLAN Adapter.
Select "Configure your wireless LAN settings" radio button in step 2 and make the settings accordingly. When the encryption settings are complete, you can launch the One Touch Wizard once again from the Start menu to set up the connection with your AP.
We suggest WL-160W work with WL-500W Super Speed N wireless router for maximum performance. Make sure the router firmware is the updated. Check ASUS website for router latest updated firmware.
ASUS WLAN Adapter
English
Quick Start Guide
Configuring with the WLAN utility (Infrastructure)
UseASUS WLAN utility to get connected with an existing wireless network.
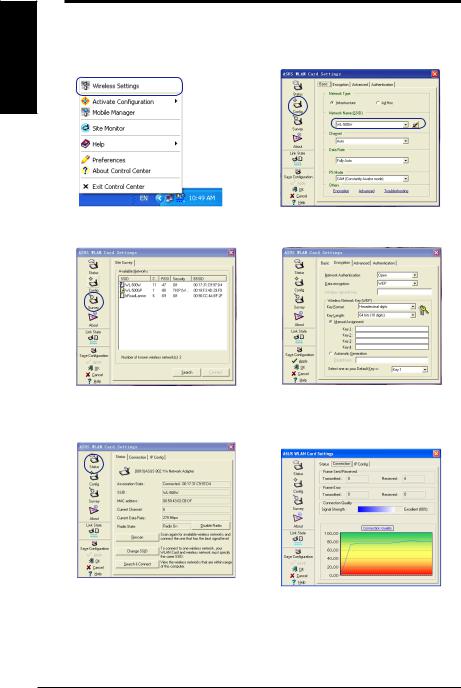
1.Right-click the wireless connection icon and select Wireless Settings.
2.Check the Config page to set the SSID (network name) to that of your wirelessAP.
3.Use Site Survey if you don’t know the SSID of your access point(s).
5.Check the Status page to see the association state. If connection is established, the box shows “Connected - xx:xx:xx:xx:xx:xx”.
4.Encryption settings must match those at the access point. Ask your network administrator about settings if necessary. Click Apply to activate the settings.
6.Check the Connection tab to see the signal strength. Click OK to exit the utility.
ASUS WLAN Adapter
Quick Start Guide
Configuring with the WLAN utility (Ad Hoc)
The WLAN adapter supports Ad Hoc mode which allows communication between wireless stations without an AP.
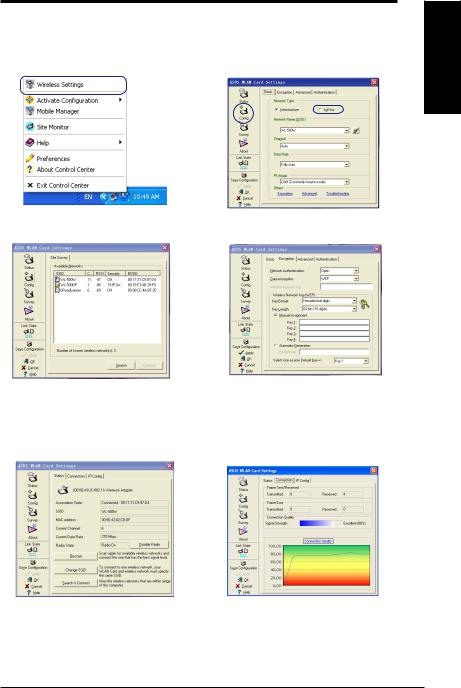
1. Right-click the wireless connection icon |
2. Click the Config button and set the |
and select Wireless Settings. |
WLAN Card to AdHocconnection mode. |
English
3.Click the Survey button to scan for Ad Hoc nodes. Select the node you want to communicate with and press Connect.
5.Check the Status page to see the association state. If connection is established, the box shows “Connected-xx:xx:xx:xx:xx:xx”.
4.If the encryption settings of your WLAN
Adapter are different from those of the other Ad Hoc nodes, you are prompted to make the encryption of the two nodes identical. Click Apply to activate the settings.
6.Check the Connection tab to see the signal strength. Click OK to exit the utility.
ASUS WLAN Adapter

English
Quick Start Guide
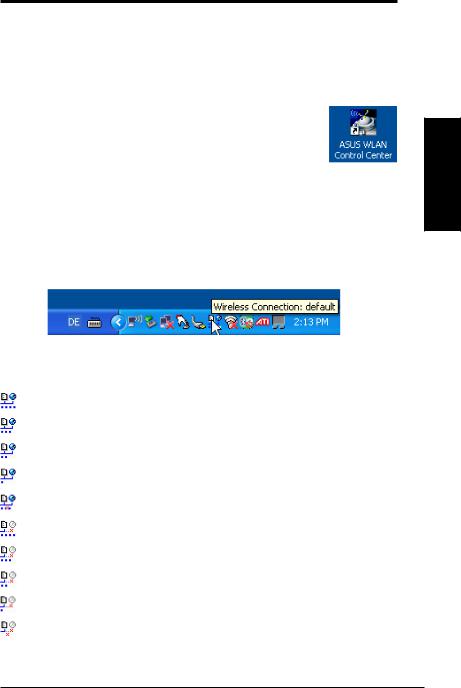
ASUS WLAN Control Center
ASUS WLAN Control Center is an application which makes it easier to launch
WLAN applications and activate network location settings. The WLAN Control
Center starts automatically when system boots. When WLAN Control Center is running, you can see a Control Center icon on the Windows taskbar.
Starting the Control Center
•Select ASUS WLAN Control Center in Windows Start menu, or
•Double-click the ASUS WLAN Control Center icon on the desktop.
Using the Control Center
The Control Center taskbar icon displays the following information:
•Link quality of the WLAN Adapter (Excellent, Good, Fair, Poor, Not
Linked)
•Whether the WLAN Adapter is connected to a network (Blue: Connected, Gray: Not Connected)
Taskbar Icon and Status
Wireless Status Icons (on the taskbar)
Excellent link quality and connected to Internet (Infrastructure)
Good link quality and connected to Internet (Infrastructure)
Fair link quality and connected to Internet (Infrastructure)
Poor link quality and connected to Internet (Infrastructure)
Not linked but connected to Internet (Infrastructure)
Excellent link quality but not connected to Internet (Infrastructure)
Good link quality but not connected to Internet (Infrastructure)
Fair link quality but not connected to Internet (Infrastructure) Poor link quality but not connected to Internet (Infrastructure) Not linked and not connected to Internet (Infrastructure)
ASUS WLAN Adapter
Quick Start Guide
Taskbar icon - Right-click menu
Right-click the taskbar icon to show the following menu items:
•Wireless Settings – Click to launch Wireless Settings application.
•Activate Configuration – Click to choose a preset profile.
•Mobile Manager – Click to launch Mobile Manager application.
•Site Monitor – Click to to launch the Site Monitor application.
•Preferences – Click to customize the Control Center program. You can create a Control Center shortcut on the desktop and decide whether to start Control Center when system boots.
•About Control Center-Shows the version of Control Center.
•Exit – Click to close the Control Center program.
Taskbar icon - Left-click menu
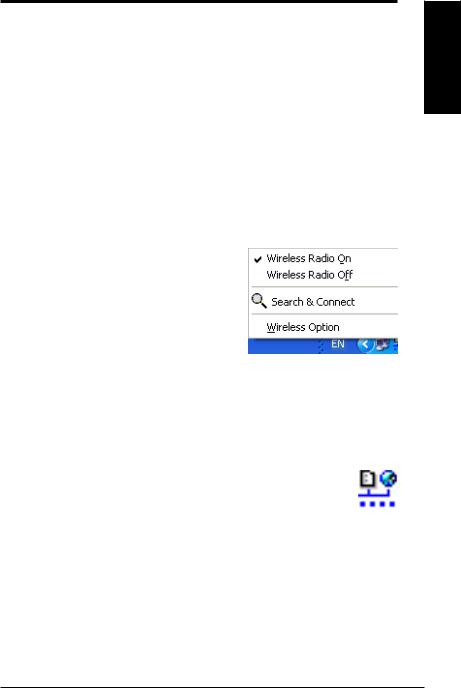
Left-click the taskbar icon to show the following menu items:
•Wireless Radio On – Click to turn the wireless radio ON.
•Wireless Radio Off – Click to turn
the wireless radio OFF. |
Taskbar Left-Click Menu |
•Search & Connect – Click to view
the properties of available access points.
•Wireless Option (Windows® XP only) – Click to choose Windows
® Wireless Zero Configuration (WZC) service or ASUS utilities to configure your WLANAdapter.
Taskbar Icon - Launch Wireless Settings
Double-click the taskbar icon to launch the Wireless Settings utility.
English
ASUS WLAN Adapter |
|
English
Quick Start Guide
ASUS Wireless Settings Utility
WirelessSettingsisanapplicationfor managing the WLANAdapter.UseWireless Settings to view or modify the configuration settings, or to monitor the operational status of your WLAN Adapter. When Wireless Settings is launched, you can see the tabbed property sheets which categorize the configuration options into groups.
Starting Wireless Settings
•Open the Windows Control Panel, then double-click the ASUS WLAN Adapter Settings icon.
or
•Click the Windows Start button, select Programs | ASUS Utility | WLAN Adapter | Wireless Settings.
or
•Right-click the Control Center icon on the Windows taskbar and select Wireless Settings.
NOTE: If you have more than one ASUS WLAN device installed on your computer, you may see a device selection window when you launch the “ Wireless Settings” utility. Select the device you want when such situation occurs.
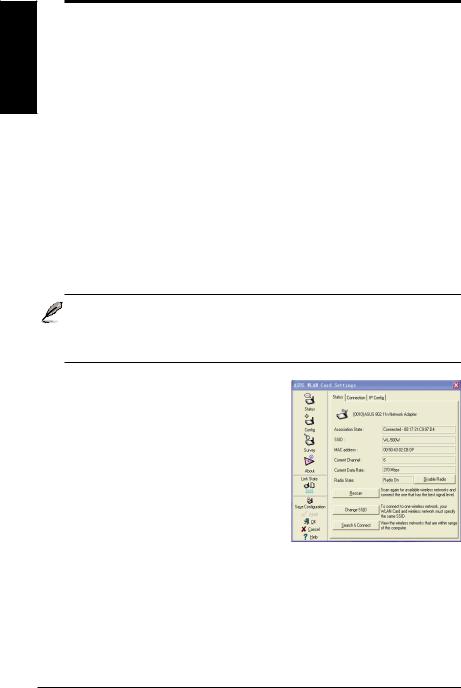
Status - Status
You can view the information about the
WLAN Adapter from the Status menu. The status fields are blank if the WLAN
Adapter is not installed. You can turn off the WLAN Adapter by clicking the “Disable Radio” button.
Association State
Displays the connection status as follows:
Connected - The adapter is now associated with one wireless LAN device.
When operating in Infrastructure mode, this field shows the MAC address of the access point with which the WLAN Adapter is communicating. When operating in Ad Hoc mode, this field shows the virtual MAC address used by computers participating in theAd Hoc network.
ASUS WLAN Adapter

Quick Start Guide
Scanning... : The station is trying to authenticate and associate with an access point or Ad Hoc node.
Disconnected - The WLAN Adapter is installed to the system, but not yet connected to a wireless device.
SSID: Displays the Service Set Identifier (SSID) of the device that the adapter is either associated or intending to join.
MAC address: Shows the hardware address of the WLAN Adapter. MAC
address is a unique identifier for networking devices (typically written as twelve hexadecimal digits from 0 through 9 and A through F separated by colons, i.e. 00:E0:18:F0:05:C0).
Current Channel: Displays the radio channel to which the adapter
is currently tuned. This number changes as the radio scans the available channels.
Current Data Rate: Displays the current data rate i≠n megabits per second (Mbps).
NOTE: For 802.11n performance, select 40MHz bandwidth in wireless router. Channel option will depend on the bandwidth that you select.
Radio State: Shows the wireless radio status: ON or OFF.
Radio On: When the wireless radio is turned ON, the icon on the right appears in the upper left of the Status page.
Radio Off- When the wireless radio is turned OFF, the icon on the right appears in the upper left of the Status page.
Buttons
Rescan – Make the WLAN Adapter rescan all available devices. If the current link quality or signal strength is poor, rescanning can be used to push the radio off a weak access point and search for a better link with another access point. This function usually takes several seconds.
Change SSID – Click this button to set the SSID to that of the AP you want to connect.
Search & Connect – Click this button to connect to an available wireless AP.
English
ASUS WLAN Adapter
English
Quick Start Guide
Save Configuration
When you make settings for a certain working environment, you may need to save your settings to a profile so that you can easily switch to the settings without repeating the configurations. For example, you can set profiles for work, home and
other situations. When you travel from home to work, choose the "office" profile that contains all your settings for office use. When you travel back home, choose the “home” profile.
Activate Configuration
Auto roaming is enabled by default and makes the Adapter automatically switch to
APs of better signal. You can uncheck it if you want to connect to a specifiedAP using aparticularprofile.
Status - Connection
You can view the current link statistics about the WLAN Adapter. These statistics are updated once per second and are valid if the WLANAdapter is correctly installed.
Frame Sent/Received
Transmitted - The number of frames that were transmitted.
Received - The number of frames that were received.
Frame Error
Transmitted - The number of frames that were not successfully transmitted. Received - The number of frames that were not successfully received.
Connection Quality
Signal Strength - Shows the link quality of the access point or Ad Hoc node the WLAN Adapter is currently connected to. Ratings are: Excellent, Good,
Fair, and Poor.
Overall Connection Quality
The overall connection quality is derived from the current signal strength. A graphic chart uses percentage to show signal quality.
10 |
ASUS WLAN Adapter |
Quick Start Guide
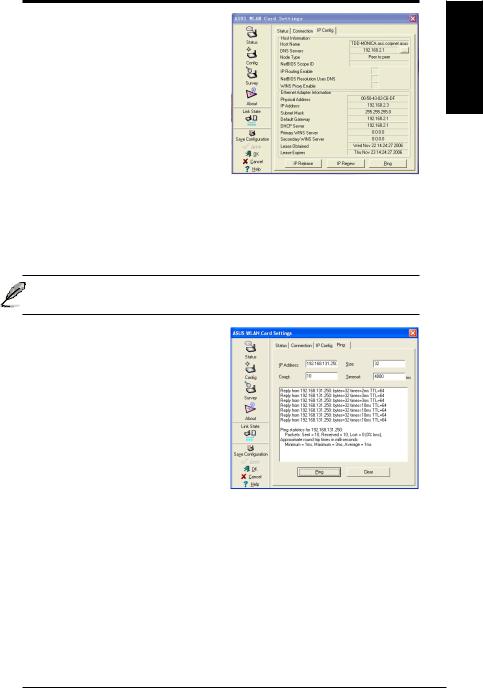
Status - IP Config
IP Config tab shows all the current host and WLAN Adapter information including host name, DNS servers,
IP address, subnet mask and default gateway.
Button
IP Release - If you want to remove the current IP address, click this button to release the IP address from DHCP server.
IP Renew - If you want to obtain a new IP address from DHCP server, click this button to renew the IP address.
Ping - Click this button to open “Ping” tab which is used to ping the devices in your network.
NOTE: The IP Release and IP Renew buttons can only be used on the
WLAN Adapter which gets IP address from DHCP server.
Status - Ping
Click the "Ping" button in Status-IP Config tab to open this page. The Ping tab allows you to verify the accessibility of other computers or network devices.
To ping a connection:
1.Type the IP address of the device you want to verify in the IPAddress field.
2.Configure the ping session by assigning the ping packet size and
number of packet to send, and the timeout value (in milliseconds).
3.Click the “Ping” button.
During the ping session, the Ping button changes into a Stop button. To cancel the ping session, click the “Stop” button.
The session field displays information on the verified connection including the roundtrip time (minimum, maximum, and average) and packets sent, received, and lost after a ping session.
Click the “Clear” button to clear the session field.
English
ASUS WLAN Adapter |
11 |
English
Quick Start Guide
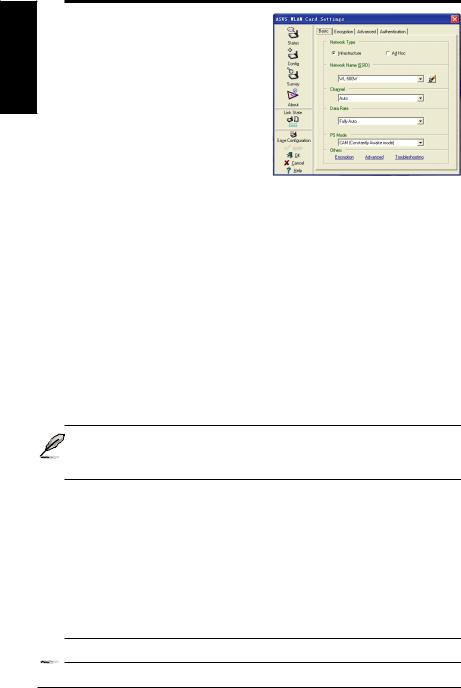
Config - Basic
This page enables you to change the
WLANAdapter configurations.
Network Type
Infrastructure – Infrastructure means to establish a connection with an access point. Once connected, the access point allows you to access wireless LAN and wired LAN
(Ethernet). The Channel field turns to Auto if the connection is based on Infrastructure.
Ad Hoc – Ad Hoc means to communicate directly with other wireless clients without using an access point. An “Ad Hoc” network can be setup quickly and easily without pre-planning, for example, sharing meeting notes between attendants in a meeting room.
Network Name (SSID)
SSID stands for “Service Set Identifier”, which is a string used to identify a wireless LAN. Use the SSID to connect with a known access point. You can enter a new SSID or select one from the drop-down list box. If you get connected by designating the SSID, you are only to connect the AP with the SSID you assigned. If the AP is removed from the network, your WLAN Adapter does not roam automatically to other APs. SSIDs must all be printable characters and having a maximum of 32 case sensitive characters, such as “ Wireless”.
 NOTE: Set the SSID to a null string, if you wish to allow your station to connect to any access point it can find. But you cannot use null string in Ad Hoc mode.
Channel
The Channel field is for setting radio channel. Your WLAN Adapter can automatically select the correct channel to communicate with a wireless device, and the parameter is fixed to "Auto" in both Infrastructure andAd Hoc mode.
The available radio channels depend on the regulations in your country. For the United States (FCC) and Canada (IC), channel 1 to 11 are supported. For Europe (ETSI), channel 1 to 13 are supported. For Japan (MKK), channel 1 to
14 are supported.
 Click Apply to save and activate the new configurations.
12 |
ASUS WLAN Adapter |
Quick Start Guide
Others
Encryption – Click this link to show the "Encryption" tab.
Advanced – Click this link to show the "Advanced" tab. In most cases, the default values do not have to be changed.
Troubleshooting – Click on this to show the Troubleshooting utility.
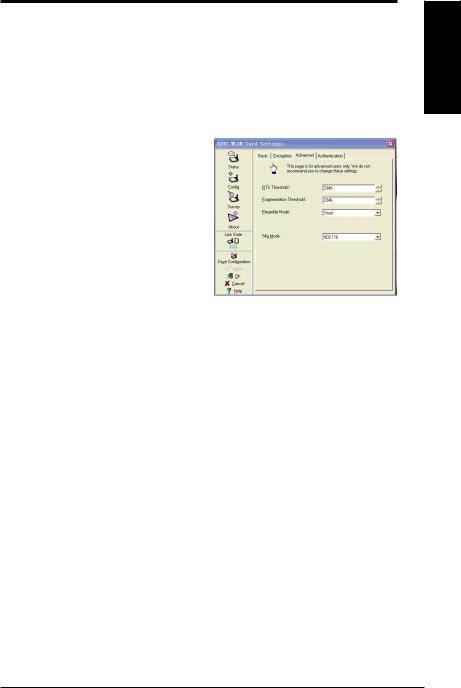
Config - Advanced
Click Advanced link on Config-Basic page to show this tab. This tab allows you to set up additional parameters for the wireless adapter. We recommend using the default values for all items in this window.
RTS Threshold (0-2347)
The RTS/CTS (Request to Send/Clear
to Send) function is used to minimize collisions among wireless stations. When RTS/CTS is enabled, the router refrains from sending a data frame until another RTS/CTS handshake is completed. Enable RTS/CTS by setting a specific packet size threshold. The default value (2347) is recommended.
Fragmentation Threshold (256-2346)
Fragmentation is used to divide 802.11 frames into smaller pieces (fragments) that are sent separately to the destination. Enable fragmentation by setting a specific packet size threshold. If there is an excessive number of collisions on the WLAN, experiment with different fragmentation values to increase the reliability of frame transmissions. The default value (2000) is recommended for normal use.
English
ASUS WLAN Adapter |
13 |
English
Quick Start Guide
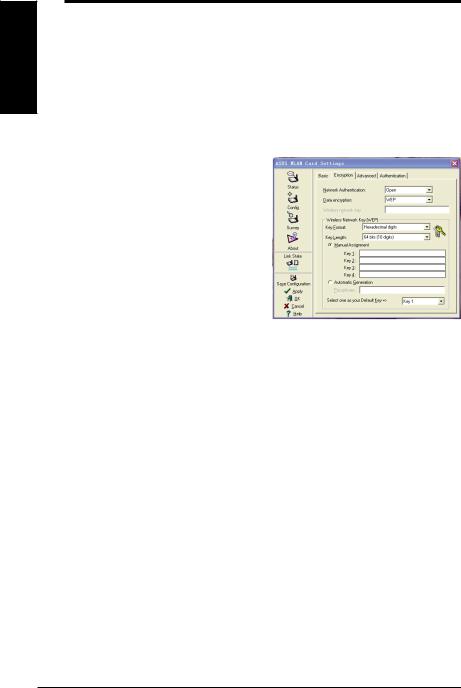
Config - Encryption
This page enables you to configure the Wireless LAN Adapter encryption settings. For data confidentiality in a wireless environment, IEEE 802.11 specifies a Wired Equivalent Privacy (WEP) algorithm to offer transmission privacy. The WEP uses keys to encrypt and decrypt data packets. The encryption process can scramble frame bits to avoid disclosure to others. The
WPA/WPA2 is improved security system for 802.11 which are developed to overcome the weakness of the WEP protocol.
Network Authentication
Since there is no precise bound in wireless LANs, the WLAN users need to implement certain mechanism to provide security solution. The Authentication policies in this tab provide protection of different levels such as Open, WEP, WPA, and WPA2.
Open - Select this option to make the network operate on Open System mode, which use no authentication
algorithm. Open stations and APs can authenticate with each other without checking any WEP Key, even if there is.
Shared - Select this option to make the network operate on Shared key mode.
In a Share KeyAuthentication system, four-step exchange of frames is required to validate that the station is using the same WEP Key as the access point.
WPA-PSK/ WPA2-PSK - Select this option to enable WPA Pre-Shared Key under Infrastructure mode. It enables communication between your client and
APs using WPA-PSK/WPA2-PSK encryption mode.
WPA/ WPA2 - The network is operating in IEEE 802.1x authentication mode. This mode is for environments with RADIUS (Remote Access Dial-in User Service). In a RADIUS environment, three Extensible Authentication Protocol (EAP) are supported, including PEAP, EPA/TLS, and LEAP.
14 |
ASUS WLAN Adapter |

Quick Start Guide
Data encryption
For Open and Shared authentication mode, the configuration options of encryption type are Disabled and WEP. For WPA, WPA-PSK, WPA2 and
WPA2-PSK authentication mode, Temporal Key Integrity Protocol (TKIP) encryption andAdvanced Encryption Standard (AES) encryption are supported.
Disabled - Disable the encryption function.
WEP - WEP Key is used to encrypt your data before it is transmitted over air.
You can only connect and communicate with wireless devices that use the same WEP keys.
TKIP - TKIP uses an encryption algorithm methods which is more stringent than the WEP algorithm. It also uses existing WLAN calculation facilities to perform encryption. TKIP verifies the security configuration after the encryption keys are determined.
AES: AES is a symmetric 128-bit block encryption technique which works simultaneously on multiple network layers.
Wireless Network Key
This option is enabled only if you select WPA-PSK or WPA2-PSK authentication mode. Select “TKIP” or “AES” in the encryption filed as encryption mode to begin the encryption proceed. Note: 8 to 64 characters are required in this field.
Wireless Network Key (WEP)
This option is configurable only if you enable WEP in Network Authentication field. The WEP Key is a 64 bits (5 byte) or 128 bits (13 byte) Hexadecimal digits which is used to encrypt and decrypt data packets.
Key Format
You can select to enter Hexadecimal digits (0~9, a~f, and A~F) or ASCII characters to setup keys by defining the Key Format.
Key Length
For 64 bits encryption, each key contains 10 hex digits or 5 ASCII characters. For 128 bits encryption, each key contains 26 hex digits or 13ASCII characters.
Two ways to assign WEP keys
1.Manual Assignment - When you select this option, the cursor appears in the field for Key 1. For 64-bit encryption, you are required to enter four WEP Keys. Each Key contains exactly 10 hex digits (0~9, a~f, and A~F). For 128-bit encryption, you are required to enter four WEP Keys. Each Key contains exactly 26 hex digits (0~9, a~f, andA~F).
English
ASUS WLAN Adapter |
15 |

English
Quick Start Guide
2.Automatic Generation - Type a combination of up to 64 letters, numbers, or symbols in the Passphrase box, the Wireless Settings Utility automatically uses an algorithm to generate four WEP Keys.
Select one as your Default Key
The Default Key field allows you specify which of the four encryption keys is to use for transmitting data over wireless LAN. You can change the default key by clicking on the downward arrow, selecting the number of the key you want to use, and clicking the “Apply” button. If the access point or station with which you are communicating uses the identical key by the same sequence, you can use any of the keys as the default on your WLAN Adapter.
Click the “Apply” button after you have created the encryption keys, the Wireless Settings Utility uses asterisks to mask your keys.
64/128bits versus 40/104bits
There are two levels of WEP Encryption: 64 bits and 128 bits.
Firstly, 64 bit WEP and 40 bit WEP are the same encryption method and can interoperate in the wireless network. This lower level of WEP encryption uses a 40 bit (10 Hex character) as a “secret key” (set by user), and a 24 bit “ Initialization Vector” (not under user control). This together makes 64 bits (40 + 24). Some vendors refer to this level of WEP as 40 bits and others refer to this as 64 bits. Our Wireless LAN products use the term 64 bits when referring to this lower level of encryption.
Secondly, 104 bit WEP and 128 bit WEP are the same encryption method and can interoperate in the wireless network. This higher level of WEP encryption uses a 104 bit (26 Hex character) as a “secret key” (set by user), and a 24 bit “ Initialization Vector” (not under user control). This together makes 128 bits (104 + 24). Some vendors refer to this level of WEP as 104 bits and others refer to this as 128 bits. Our Wireless LAN products use the term 128 bits when referring to this higher level of encryption.
16 |
ASUS WLAN Adapter |
Quick Start Guide
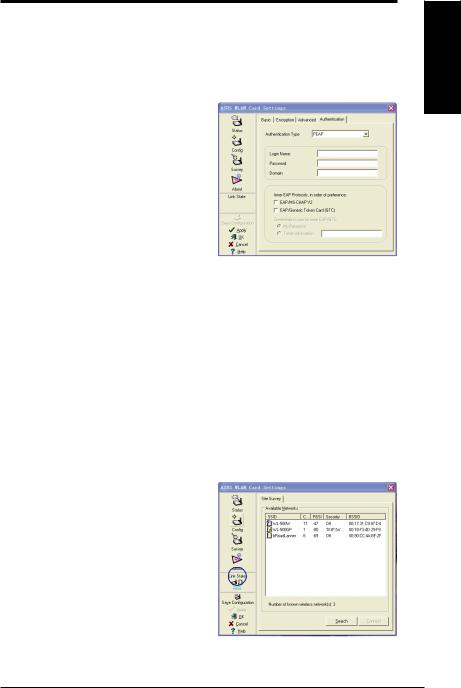
Config - Authentication
This tab allows you to set the security settings to match those of your AP. It is configurable only if you have set Network Authentication to WPA or WPA2 in Config-Encryption tab.
Authentication Type
There are three options for the authentication type:
PEAP: PEAP (Protected Extensible
Authentication Protocol) authentication is a version of Extensible Authentication Protocol (EAP). EAP ensures mutual authentication between a wireless client and a server that resides at the network operations center.
EPA/TLS: EPA/TLS (Extensible Authentication Protocol - Transport Layer Security) is a follow-on to Secure Socket Layer (SSL). It provides strong security, but relies on client certificates for user authentication.
LEAP: LEAP (Light Extensible Authentication Protocol) authentication is a version of Extensible Authentication Protocol (EAP). EAP ensures mutual authentication between a wireless client and a server that resides at the network operations center.
English
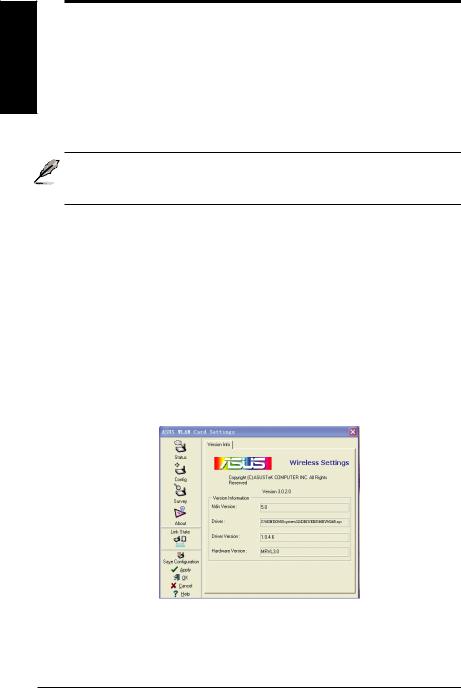
Survey - Site Survey
Use the Site Survey tab to view statistics on the wireless networks available to the WLAN Adapter and their parameters.
•SSID: The SSID of the available networks.
•Channel: The channel used by each network.
ASUS WLAN Adapter |
17 |
English
Quick Start Guide
•RSSI: The Received Signal Strength Indication (RSSI) transmitted by each network. This information is helpful in determining which network to associate to. The value is then normalized to a dBm value.
•Encryption: Wireless network encryption information. All devices in the network should use the same encryption method to ensure the communication.
•BSSID: The media access control (MAC) address of the access point or the Basic Service Set ID of theAd Hoc node.
NOTE: Some access points may disable SSID broadcast and hide themselves from “Site Survey” or “Site Monitor”, however, you can connect such AP if you know their SSID.
Buttons
Search – To scan all available wireless networks and show the scan result in the
“Available Network” list.
Connect – To associate with a network, select the network from the
“Available Network” list and click this button.
About - Version Info
Uses the Version Info tab to view program and WLAN Adapter version information. The program version information field includes the Copyright and utility version. The version information includes the NDIS version, driver name, driver version, and hardware version.
This screen is an example only. Your version numbers will be different from what are shown here.
18 |
ASUS WLAN Adapter |
Quick Start Guide
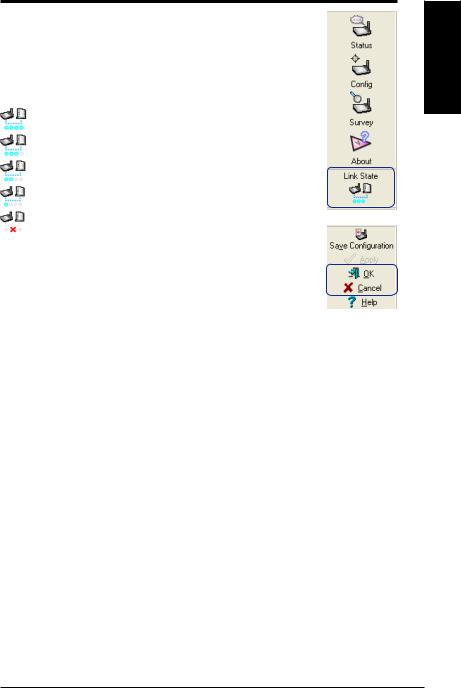
Link State
WLAN Adapter “Link State” icon appears on the left side of the WLAN Adapter Settings. Use the icon to view the current signal status.
Excellent Link Quality (Infrastructure)
Good Link Quality (Infrastructure)
Fair Link Quality (Infrastructure)
Poor Link Quality (Infrastructure)
Not linked (Infrastructure)
Exit Wireless Settings
To exit Wireless Settings, you can click OK or Cancel.
English
ASUS WLAN Adapter |
19 |
English
Quick Start Guide
Windows® XP Wireless Options
The wireless options window shown below is only available for Windows® XP.
It appears when you run the Control Center utility at the first time. Select the utility you want to use for configuring your WLANAdapter.
Only use Windows wireless function
– Only use Windows® XP Wireless Zero Configuration service to configure the WLAN Adapter.
Only use our WLAN utilities and disable XP wireless function
– Only useASUS WLAN utilities to configure the WLANAdapter. (recommended)
You can open the Wireless Option setting window at any time by leftclicking the control center icon and choosing Wireless Option.
Taskbar Left-Click Menu
Configuring with Windows® Wireless Zero Configuration service
If you want to configure your WLAN Adapter via Windows® Wireless Zero Configuration (WZC) service, follow the instruction below to make the settings.
1. Double-click the wireless network icon on the task bar to view available networks.Select the AP and click
Connect.
2. A window prompts out asking you for the key if you have set up encryption on your wireless router, input the keys and click Connect. The connection is complete.
20 |
ASUS WLAN Adapter |
Quick Start Guide
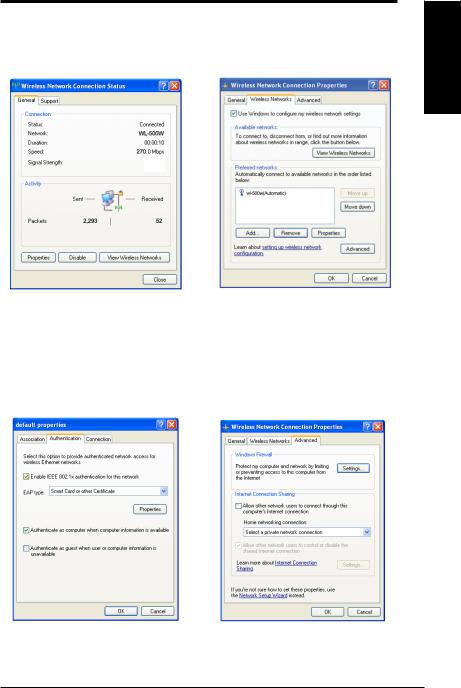
To set up the wireless connection properties, right-click the wireless icon on the taskbar and select Open Network Connection. Then right-click the network connection icon and select Property to open the Wireless Network Connection
Status page.
English
1.The General page shows status, duration, speed, and signal strength. Signal strength is represented by green bars with 5 bars indicating excellent signal and 1 bar meaning poor signal.
2.Select “Wireless Networks” tab to show
Preferred networks. Use the Add button to add the “SSID” of available networks and set the connection preference order with the Move up and Move down buttons. The radio tower with a signal icon identifies the currently connected access point. Click Properties to set the authentication of the wireless connection.
3.The Authentication page allows you to add security settings. Read Windows help for more information.
4.The Advanced page allows you to set firewall and sharing. Read Windows help for more information.
ASUS WLAN Adapter |
21 |


 ®
®
Wireless LAN-Adapter
WL-160W
(Für 802.11n Draft-, 802.11g- & 802.11b-Netzwerke)
Schnellstartanleitung
Deutsch
22 |
QG2920/ November 2006 |
Schnellstartanleitung
Installation
Wichtig: Installieren Sie die WLAN-Adaptersoftware, bevor Sie den WLANAdapter in Ihren Computer einstecken.
Installation der WLAN-Software und des Treibers
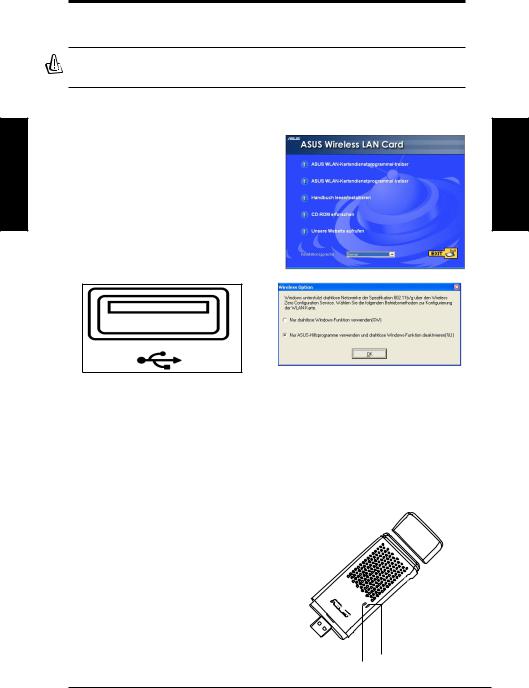
Folgen Sie diesen Anweisungen, um die WLAN-Adaptersoftware und -Treiber zu installieren. Legen Sie die Support-CD in Ihr CD-Rom-Laufwerk. Sofern Autostart auf Ihrem System aktiviert ist, zeigt die CD automatisch das ProgrammeMenü an. Klicken Sie auf ASUS WLAN- Kartendienstprogramme/-treiber. Falls Autorun deaktiviert ist, doppelklicken Sie SETUP.EXE im CD-Hauptverzeichnis.
Deutsch
Stecken Sie den WLAN-Adapter vorsichtig in den USB-Anschluss Ihres Computers. In den folgenden Schritten erkennt Windows automatisch die WLAN-Adapter und konfiguriert sie mit Hilfe der Programme und
Treiber.
Windows XP-Benutzer: Wenn das Programm zum ersten Mal ausgeführt wird (nach dem Neustart von Windows ), werden Sie dazu aufgefordert, ein Programm zur Konfiguarion des WLAN-Adapters zu wählen. Wählen Sie die untere Option, wie im Bild.
WLAN-Statusanzeigen ablesen
Das Gerät verfügt über zwei LEDs, die den Status des WLAN-Adapters anzeigen.
ACT LED
Blinkt: Daten werden empfangen oder übertragen; die Blinkgeschwindigkeit zeigt die Verbindungsgeschwindigkeit an
AUS: Sender ausgeschaltet, oder Adapter deaktiviert.
LINK LED
AN: Verbindung mit einem Wireless-Gerät. AUS: Keine Verbindung.
LINK
ACT
ASUS WLAN-Adapter |
23 |
Schnellstartanleitung
One Touch Wizard
Mit dem One Touch Wizard können Sie eine drahtlose Verbindung zu einem bereits existierenden Wireless-LAN aufbauen.
Deutsch
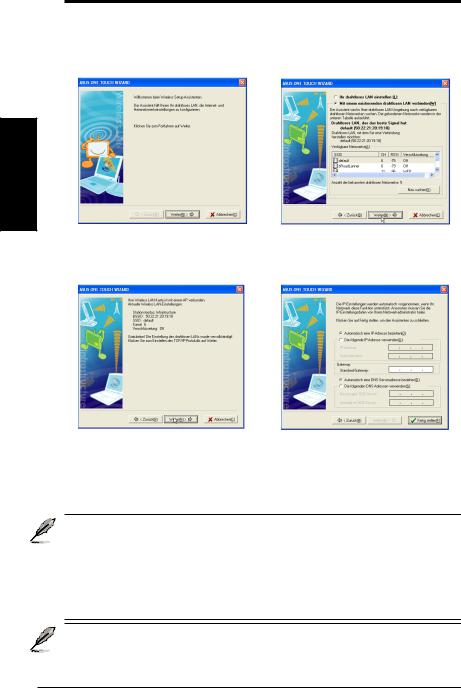
1.Öffnen Sie den One Touch Wizard über das Start-Menü und klicken Sie auf Weiter, um ein Wireless Netzwerk einzurichten.
2.Wählen Sie einen AP aus dem Feld
Verfügbare Netzwerke, und klicken Sie auf Weiter.
3.Die Verbindung ist hergestellt. Klicken Sie auf Weiter, um die IP-Adresse des WLAN-Adapters festzulegen.
4.Wählen Sie aus, ob die IP-Adresse Ihres WLAN-Adapters automatisch bezogen werden soll, oder weisen Sie ihr manuell eine statische Adresse zu. Wenn die Einstellung beendet ist, klicken Sie auf Fertig stellen, um den One Touch Wizard zu beenden.
Hinweis: Wenn der Access Point, mit dem Sie eine Verbindung herstellen wollen, ein Verschlüsselungsverfahren nutzt, müssen Sie Ihren WLANAdapter auf dieselbe Verschlüsselung einstellen. Wählen Sie in Schritt 2 die Option "Ihr drahtloses LAN einstellen" und nehmen Sie die nötigen Einstellungen vor. Wenn die Verschlüsslungseinstellungen beendet sind, können Sie den One Touch Wizard erneut aus dem Start-Menü starten, und die Verbindung mit Ihrem AP einrichten.
Wir empfehlen den WL-160W mit dem WL-500W Super Speed N ireless Router zu betreiben, um die maximale Leistung zu erzielen. Vergewissern Sie sich, dass die Firmware des Routers aktuell ist. Sehen Sie dazu auf der ASUS-Webseite nacht, um die neuste Version der Firmware zu beziehen.
24 |
ASUS WLAN-Adapter |

Schnellstartanleitung
Konfiguration mit der WLAN-Software (Infrastruktur)
Mit der ASUS WLAN-Software können Sie sich mit einem bestehenden Wireless-Netzwerk verbinden.
1.Rechtsklicken Sie auf das WirelessSymbol und wählen Sie Wireless
Settings.
Deutsch
2.Geben Sie unter Konfig bei “SSID” den gleichen Namen ein wie bei der SSID Ihres Access Points.
3.Verwenden Sie die “Site Survey”
(Standorterfassung), falls Sie die SSID Ihres/Ihrer Access Points nicht kennen.
4.Die Verschlüsselungseinstellungen
müssen ebenfalls mit denen Ihres Access Points übereinstimmen. Bitten Sie, wenn nötig, Ihren Netzwerkadministrator um Hilfe. Klicken Sie auf Anwenden, um die Einstellungen zu übernehmen.
5.U n t e r S t a t u s s e h e n S i e d e n Assoziierungs-Status”. Er sollte als “ Connected - xx:xx:xx:xx:xx:xx” dargestellt sein.
6.Sie können die Signalstärke auch unter
Verbindung überprüfen. Klicken Sie OK, um das Programm zu verlassen.
ASUS WLAN-Adapter |
25 |

Schnellstartanleitung
Einstellen des WLAN-Programms (Ad Hoc)
Der WLAN-Adapter unterstützt den Ad Hoc-Modus, mit dem Sie auch ohne Access Point eine Verbindung zwischen Wireless-Geräten herstellen können.
Deutsch
1.Rechtsklicken Sie auf das WirelessSymbol und wählen Sie Wireless
Settings.
2.Klicken Sie die Konfig-Schaltfläche und stellen Sie die WLAN-Karte auf Ad Hoc- Modus ein.
3.Klicken Sie auf Survey, um nach erreichbaren Ad Hoc-Geräten zu suchen. Wählen Sie das Gerät aus, mit dem Sie sich verbinden möchten, und drücken Sie auf Verbinden.
4.Falls sich die Verschlüsselungseinstellungen Ihres WLAN-Adapters von denen anderer Ad Hoc-Geräte unterscheiden, werden Sie aufgefordert, sie miteinander abzugleichen. Klicken Sie auf Anwenden, um die Einstellungen zu aktivieren.
5.U n t e r S t a t u s s e h e n S i e d e n “ Assoziierungs-Status). Er sollte als “ Connected - xx:xx:xx:xx:xx:xx” dargestellt sein.
6.Sie können die Signalstärke auch unter
Verbindung überprüfen. Klicken Sie OK, um das Programm zu verlassen.
26 |
ASUS WLAN-Adapter |
Schnellstartanleitung
ASUS WLAN Control Center
Das ASUS WLAN Control Center ist eine Anwendung, die Ihnen das Starten von WLAN-Programmen und Netzwerkeinstellungen erleichtert. Das WLAN Control Center wird automatisch beim Windows-Start gestartet. Wenn es aktiviert ist, erscheint in der Windows-Taskleiste ein Control Center-Symbol.
Control Center Starten
•Wählen Sie ASUS WLAN Control Center im WindowsStartmenü, oder
•Doppelklicken Sie das ASUS WLAN Control Center- Symbol auf dem Desktop.
Control Center benutzen
Das Control Center-Symbol in der Taskleiste zeigt folgendes an:
•Die Verbindungsstärke (Hervorragend, Gut, Mittel, Schlecht, Nicht Verbunden)
•Ob der WLAN-Adapter mit einem Netzwerk verbunden ist (Blau: Verbunden, Grau: Nicht Verbunden)
Symbol und Statusanzeige in der Taskleiste
WLAN-Statussymbole (in der Taskleiste)
Hervorragende Verbindungsqualität, Internetverbindung (Infrastruktur)
Gute Verbindungsqualität, Internetverbindung (Infrastruktur)
Mittlere Verbindungsqualität, Internetverbindung (Infrastruktur)
Schlechte Verbindungsqualität, Internetverbindung (Infrastruktur)
Nicht verbunden, aber Internetverbindung (Infrastruktur)
Hervorragende Verbindungsqualität, keine Internetverbindung (Infrastruktur)
Gute Verbindungsqualität, keine Internetverbindung (Infrastruktur)
Mittlere Verbindungsqualität, keine Internetverbindung (Infrastruktur)
Schlechte Verbindungsqualität, keine Internetverbindung (Infrastruktur)
Nicht verbunden und keine Internetverbindung (Infrastruktur)
Deutsch
ASUS WLAN-Adapter |
27 |
Schnellstartanleitung
Taskleistensymbol - Rechtsklickmenü
Rechtsklicken Sie auf das Taskleistensymbol, um die folgenden Menüpunkte anzuzeigen:
|
• Wireless-Einstellungen – Startet die Wireless-Einstellung. |
||
|
• Konfiguration aktivieren – Zum Wählen eines Profils. |
||
|
• Mobile Manager – Startet das Mobile Manager-Programm. |
||
|
|||
Deutsch |
• |
Site Monitor – Startet das Site Monitor-Programm. |
|
• |
Einstellungen – Zum Anpassen des Control Centers. Erstellen Sie |
||
|
|||
|
|
eine Control Center-Verknüpfung auf dem Desktop und entscheiden |
|
|
|
Sie, ob das Control Center beim Systemstart gestartet werden soll. |
|
|
• Über Control Center - Zeigt die aktuelle Version des Control Center. |
||
|
• Beenden – Beendet das Control Center-Programm. |
||
|
|||
|
Taskleistensymbol - Linksklickmenü |
||
|
Linksklicken Sie auf das Taskleistensymbol, |
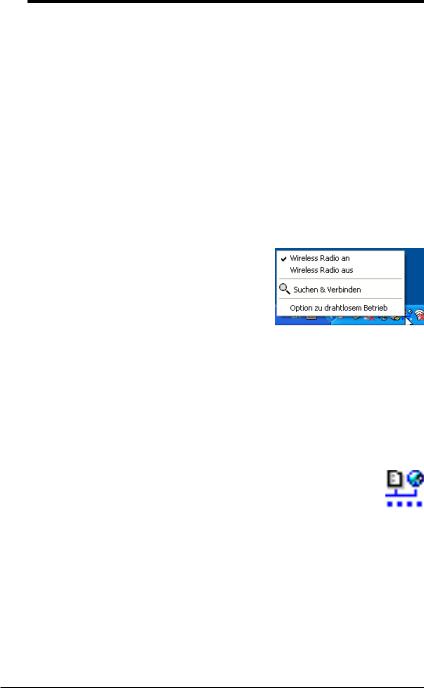
||
|
um die folgenden Menüpunkte anzuzeigen: |
||
•Wireless Radio An – Schaltet
den Sender des WLAN-Adapters
EIN. Taskleisten-Linksklickmenü
•Wireless Radio Aus – Schaltet den Sender des WLANAdapters AUS.
•Suchen & Verbinden – Zeigt die Eigenschaften der verfügbaren Access Points an.
•Option zu drahtlosem Betrieb (nur Windows® XP) – Zur
Auswahl der WLAN-Konfiguration über Windows® Wireless Zero Configuration (WZC) oder über dieASUS-Software.
Taskleistensymbol - WLAN-Einstellungen starten
Zum Starten des WLAN-Einstellungsprogramms doppelklicken Sie auf das Taskleistensymbol.
28 |
ASUS WLAN-Adapter |
Schnellstartanleitung
ASUS-WLAN-Einstellungsprogramm
Mit dem WLAN-Einstellungsprogramm verwalten Sie den WLAN-Adapter. Mit dieser Anwendung können Sie Konfigurationseinstellungen anzeigen lassen oder modifizieren, oder den Betriebsstatus Ihres WLAN-Adapters überwachen.
Beim Start des Programms sehen Sie in Register eingeteilte Seiten mit
Eigenschaften, die einzelne Gruppen von Konfigurationsoptionen enthalten.
WLAN-Einstellungsprogramm starten
•Öffnen Sie die Windows-Systemsteuerung, und doppelklicken Sie auf das Symbol ASUS WLAN-Adaptereinstellungen.
oder
•Klicken Sie auf Start und wählen Sie Programme | ASUS Utility | WLAN Adapter | Wireless-Einstellungen.
oder
•Rechtsklicken Sie auf das Control Center-Symbol in der WindowsTaskleiste und wählen Sie Wireless-Einstellungen.
HINWEIS: Falls mehr als ein ASUS WLAN-Gerät in Ihrem System installiert ist, kann beim Start der “Wireless-Einstellungen” ein Fenster zur Auswahl des jeweiligen Gerätes angezeigt werden. In diesem Fall wählen Sie einfach das gewünschte Gerät aus.
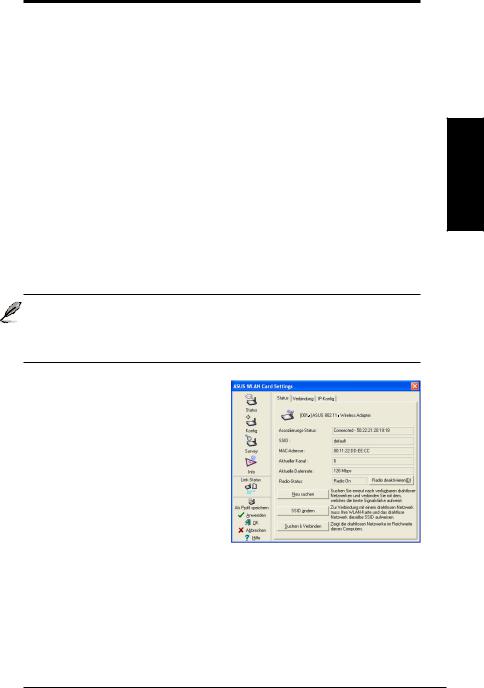
Status - Status
I m S t a t u s - M e n ü k ö n n e n S i e Informationen über den WLAN-Adapter abrufen. Falls kein WLAN-Adapter installiert ist, bleiben die Statusfelder leer. Schalten Sie den WLAN-Adapter aus, indem Sie auf die Schaltfläche “Radio deaktivieren” klicken.
Assoziierungs-Status
Zeigt den Verbindungsstatus auf folgende Weise:
Connected (Verbunden) - Der Adapter ist mit einem WLAN-Gerät verbunden. Im Infrastruktur-Modus zeigt dieses Feld die MAC-Adresse des Access Points, mit dem der WLAN-Adapters kommuniziert. Im Ad Hoc-Modus zeigt dieses Feld die virtuelle MAC-Adresse, die von Computern im Ad Hoc-Netzwerk verwendet wird.
Deutsch
ASUS WLAN-Adapter |
29 |
 Loading...