


Copyright Information
No part of this manual, including the products and software described in it, may be reproduced, transmitted, transcribed, stored in a retrieval system, or translated into any language in any form or by any means, except documentation kept by the purchaser for backup purposes, without the express written permission of ASUSTeK COMPUTER INC. (“ASUS”).
ASUS PROVIDES THIS MANUAL “AS IS” WITHOUT WARRANTY OF ANY KIND, EITHER EXPRESS OR IMPLIED, INCLUDING BUT NOT LIMITED TO THE IMPLIED WARRANTIES OR CONDITIONS OF MERCHANTABILITY OR FITNESS FOR A PARTICULAR PURPOSE. IN NO EVENT SHALL ASUS, ITS DIRECTORS, OFFICERS, EMPLOYEES OR AGENTS BE LIABLE FOR ANY INDIRECT, SPECIAL, INCIDENTAL, OR CONSEQUENTIAL DAMAGES (INCLUDING DAMAGES FOR LOSS OF PROFITS, LOSS OF BUSINESS, LOSS OF USE OR DATA, INTERRUPTION OF BUSINESS AND THE LIKE), EVEN IF ASUS HAS BEEN ADVISED OF THE POSSIBILITY OF SUCH DAMAGES ARISING FROM ANY DEFECT OR ERROR IN THIS MANUAL OR PRODUCT.
Product warranty or service will not be extended if: (1) the product is repaired, modified or altered, unless such repair, modification of alteration is authorized in writing by ASUS; or (2) the serial number of the product is defaced or missing.
Products and corporate names appearing in this manual may or may not be registered trademarks or copyrights of their respective companies, and are used only for identification or explanation and to the owners’ benefit, without intent to infringe.
SPECIFICATIONS AND INFORMATION CONTAINED IN THIS MANUAL ARE FURNISHED FOR INFORMATIONALUSE ONLY,ANDARE SUBJECTTO CHANGEATANYTIME WITHOUT NOTICE,AND SHOULD NOT BE CONSTRUED AS A COMMITMENT BY ASUS. ASUS ASSUMES NO RESPONSIBILITY OR LIABILITY FOR ANY ERRORS OR INACCURACIES THAT MAY APPEAR IN THIS MANUAL, INCLUDING THE PRODUCTS AND SOFTWARE DESCRIBED IN IT.
Copyright © 2003 ASUSTeK COMPUTER INC. All Rights Reserved.
Limitation of Liability
Circumstances may arise where because of a default on ASUS’ part or other liability, you are entitled to recover damages from ASUS. In each such instance, regardless of the basis on which you are entitled to claim damages from ASUS, ASUS is liable for no more than damages for bodily injury (including death) and damage to real property and tangible personal property; or any other actual and direct damages resulted from omission or failure of performing legal duties under this Warranty Statement, up to the listed contract price of each product.
ASUS will only be responsible for or indemnify you for loss, damages or claims based in contract, tort or infringement under this Warranty Statement.
This limit also applies to ASUS’suppliers and its reseller. It is the maximum for which ASUS, its suppliers, and your reseller are collectively responsible.
UNDER NO CIRCUMSTANCES IS ASUS LIABLE FOR ANY OF THE FOLLOWING: (1) THIRD-PARTY CLAIMSAGAINST YOU FOR DAMAGES; (2) LOSS OF, OR DAMAGE TO, YOUR RECORDS OR DATA; OR
(3) SPECIAL, INCIDENTAL, OR INDIRECT DAMAGES OR FOR ANY ECONOMIC CONSEQUENTIAL DAMAGES (INCLUDING LOST PROFITS OR SAVINGS), EVEN IF ASUS, ITS SUPPLIERS OR YOUR RESELLER IS INFORMED OF THEIR POSSIBILITY.

Notebook PC
Drivers and Utilities
User’s Manual
Product Name: |
Notebook PC Support CD |
Manual Revision: |
1 E1542 |
Release Date: |
April 2004 |

|
Table of Contents |
|
|
Support CD for Windows............................................................ |
5 |
SupportCD |
New Windows Installation .................................................................................................. |
5 |
|
Drivers for Windows ........................................................................................................... |
5 |
VGA Driver ........................................................................................................................... |
10 |
VGA Driver Setup ............................................................................................................. |
12 |
Display Settings for Windows XP ..................................................................................... |
13 |
ASUS Wireless LAN ............................................................................................................ |
16 |
Wireless LAN Driver Setup .............................................................................................. |
18 |
ASUS WLAN Utility Setup ................................................................................................ |
18 |
ATKACPI .............................................................................................................................. |
20 |
ATKACPI Setup................................................................................................................ |
22 |
Audio .................................................................................................................................... |
22 |
Audio Setup ..................................................................................................................... |
24 |
CPU Hotfix ........................................................................................................................... |
24 |
CPU Hotfix Setup ............................................................................................................. |
26 |
Intel INF Update ................................................................................................................... |
27 |
Intel INF Update Setup .................................................................................................... |
28 |
LAN ....................................................................................................................................... |
29 |
LAN Driver Setup ............................................................................................................. |
30 |
Configuring your LAN ....................................................................................................... |
31 |
Modem.................................................................................................................................. |
34 |
Modem Setup - Automatic ................................................................................................ |
36 |
Modem Setup - Manual .................................................................................................... |
37 |
ChkMail ................................................................................................................................ |
40 |
ChkMail Setup .................................................................................................................. |
42 |
Hotkey .................................................................................................................................. |
43 |
Hotkey Setup ................................................................................................................... |
44 |
Hotkey Reference ............................................................................................................ |
45 |
2

LiveUpdate ........................................................................................................................... |
50 |
LiveUpdate Setup ............................................................................................................ |
52 |
Using LiveUpdate ............................................................................................................. |
53 |
PC-cillin 2002 ....................................................................................................................... |
55 |
Welcome to PC-cillin 2002 ............................................................................................... |
56 |
Personal Firewall ............................................................................................................. |
57 |
PC-cillin for Wireless ........................................................................................................ |
57 |
Trojan System Cleaner .................................................................................................... |
58 |
ScriptTrap Technology ..................................................................................................... |
58 |
Emergency Lock .............................................................................................................. |
58 |
User Interface .................................................................................................................. |
58 |
About Intelligent Update ................................................................................................... |
59 |
New product registration method ..................................................................................... |
59 |
About viruses ................................................................................................................... |
59 |
How viruses are created .................................................................................................. |
60 |
Accessing the Trend Micro Virus Encyclopedia ............................................................... |
60 |
Viewing the Trend Micro Virus list .................................................................................... |
60 |
Contacting Technical Support .......................................................................................... |
60 |
PC-cillin 2002 Feature Screens ....................................................................................... |
62 |
Power4 Gear+ ...................................................................................................................... |
62 |
Power4 Gear+ Setup ....................................................................................................... |
64 |
Probe2 .................................................................................................................................. |
69 |
Probe2 Setup ................................................................................................................... |
70 |
Probe2 Reference ............................................................................................................ |
71 |
TouchPad ............................................................................................................................. |
75 |
Touchpad Setup ............................................................................................................... |
76 |
Synaptics® TouchPad Features ....................................................................................... |
77 |
Property Pages ................................................................................................................ |
80 |
Frequently Asked Questions ............................................................................................ |
87 |
Support CD
3

Support |
|
|
|
WinFlash .............................................................................................................................. |
88 |
|
WINFLASH Setup ............................................................................................................ |
90 |
CD |
|
|
|
Using WINFLASH ............................................................................................................ |
91 |
Memory Reader ................................................................................................................... |
92 |
Memory Reader Driver Setup .......................................................................................... |
94 |
BIOS Setup ................................................................................ |
95 |
Updating your BIOS ......................................................................................................... |
96 |
BIOS Setup Program ....................................................................................................... |
96 |
Main ............................................................................................................................... |
100 |
Advanced ....................................................................................................................... |
101 |
Advanced (sub-menu) .................................................................................................... |
102 |
Display ........................................................................................................................... |
105 |
Security .......................................................................................................................... |
106 |
Security (sub-menu) ....................................................................................................... |
108 |
Power ............................................................................................................................. |
110 |
Boot ................................................................................................................................. |
111 |
Boot (sub-menu) ............................................................................................................ |
112 |
Boot ................................................................................................................................ |
113 |
Exit ................................................................................................................................. |
114 |
4

Support CD for Windows
The Notebook PC you purchased may or may not be preloaded with an operating system. The support CD included with this Notebook PC provides all the necessary drivers and utilities in order for you to use your Notebook PC with Microsoft® Windows® XP (referred to as “Windows” in this User’s Manual).
The levels of hardware and software support may vary depending on the installed operating system. Operating systems not pre-installed on this Notebook PC may produce different results than the ones described in the provided user’s manuals.
If your Notebook PC is not preloaded with any operating system, or you want to install another operating system other than the preloaded one, the following pages will give step-by-step installation procedures for typical system configurations under the Windows® operating system. For application usage, please see the online help provided with each of the applications after installation. The following are contents of a typical support CD. Variations may be found for each territory or language. If the autorun menu does not appear, double clicking the CD-ROM disc drive icon in “My Computer” (may be the (D:) drive or (E:) drive on hard drives with two partitions) or running SETUP.EXE (through Start menu “Run...”) located in the root of the support CD, will bring up the autorun menu.
New Windows Installation
If you install a new operating system on your Notebook PC, there will be many hardware devices without drivers. Use the provided support CD to correct this problem.
Drivers for Windows
Next page gives descriptions of each support CD item. Due to ongoing improvements in the support CD, there may be some differences between this User’s Manual and your support CD. The names in quotations are the actual driver names displayed in the System Properties of MS Windows. Windows cannot contain all the device drivers from every manufacturer, with every update; therefore the provided support CD will contain the best driver for your built-in devices and should be used in place of any Windows default drivers.
Support CD
5

SupportCD |
Required Drivers |
|
Some drivers may already be provided in Windows. If you have any problems with these drivers, visit the |
||
|
||
|
Microsoft Windows Update site. A link is provided in Microsoft Windows Explorer under “Tools.” |
|
|
VGA (Display) “ATI Mobility Radeon 9600 Series” Driver |
|
|
Installing the VGA driver first will make viewing other setup screens much easier. This installs display |
|
|
drivers for your operating system in order to properly use the Notebook PC’s built-in graphics controller and |
|
|
to provide optimal display features. Once the display driver is installed, you can change your display’s |
|
|
resolution and color through Display Properties. |
|
|
This device is shown under Windows Device Manager “Display adapters.” |
|
|
On selected models ASUS Wireless LAN “Intel(R) PRO/Wireless LAN 2200BG Network Connection” Driver or |
“Intel(R) PRO/Wireless LAN 2100 3B Mini PCI Adapter” Driver (depends on model)
Required on models with internal wireless LAN. Installs the required network driver for the Notebook PC’s optional internal wireless LAN controller. If you purchased the optional internal wireless LAN, you need to install this driver. If you did not purchase the optional internal wireless LAN, you cannot install this driver.
This device is shown under Windows Device Manager “Network Adapters.”
ATKACPI “ATK0100 ACPI UTILITY” Utility
This utility is required for special utilities provided in the support CD. This installs drivers for the Notebook PC’sAdvanced Configuration and Power Interface (ACPI) for features utilizing power management functions.
This device is shown under Windows Device Manager “System devices.”
Audio “C-Media AC97 Audio Device” Driver
This installs audio drivers for your operating system in order to properly use the Notebook PC’s built-in sound controller. All audio functions are configured through Windows and help can be located within Windows documentation or Windows help files.
This device is shown under Windows Device Manager “Sound, video and game controllers.”
CPU HotFix
This installs Windows support files for advanced features in new Intel processors.
Intel 845M INF Update (required) “Intel 828XX” Drivers
This installs drivers for the Notebook PC’s specific chipset.
This device is shown under Windows “System devices.”
6

LAN “Marvell Yukon Gigabit Ethernet 10/100/1000Base-T Adapter, Copper RJ-45” Driver
Installs the required LAN driver for the Notebook PC’s built-in PCI Fast-Ethernet controller. Fast-Ethernet supports both 10 Base-T or 100 Base-TX networks at half or full duplex.
This device is shown under Windows Device Manager “Network Adapters.”
Modem “AC97 SoftV92 Data Fax SmartCP” Driver
Installs the necessary driver in order for your operating system to have the correct files for the Notebook PC with built-in modem and drivers for integration with the internal audio. With third-party software, fax and speaker phone capabilities are possible using this Notebook PC.
Recommended Utilities
Check Mail Utility
Installs Check Mail Utility to monitor and notify you of incoming email messages waiting in your Microsoft® Outlook or Outlook Express Inbox. (This utility may or may not be compatible with other email applications.)
Hotkey Utility
Installs Hotkey utility. Hotkey utility is a program designed to intercept key strokes so that key assignments can be made to run a program or script. This program cannot be used to change default keys or key combinations used by other software, operating systems, or by the Notebook PC’s hardware.
LiveUpdate Utility
This utility helps you easily upgrade your Notebook PC’s BIOS through an Internet connection.
PC-cillin 2002 Utility
Installs Trend’s PC-cillin 2002, a world-class anti-virus protection software for the new Internet era, to keep your PC virus-free. This very powerful anti-virus software is bundled with each Notebook PC to protect your investment. As software become more and more a part of our daily lives, measures have to be taken to protect them. You may skip this software if you have your own anti-virus software.
Power4 Gear+ Utility
Power4 Gear+ is a custom utility designed for this Notebook PC that allows you to use predefined or user defined values for multi-selectable power saving modes or “gears”. You can “shift” between the “gears” using the taskbar icon or the “Power Gear” key above the keyboard.
Probe2 Utility
Installs Probe2 utility to monitor the Notebook PC’s CPU temperature and other resources. This is an optional software to help you better manage your Notebook PC’s resources.
Support CD
7

|
TouchPad “Synaptics PS/2 TouchPad” Driver |
Support |
Shown under Windows “Mice and other pointing devices.” Installs “Synaptics® TouchPad” utility. The |
Notebook PC already supports built-in or externally connected keyboard and PS/2 mouse devices. However, |
|
the provided device driver will provide enhancements and features to theTouchPad to increase the functionality |
|
CD |
of the TouchPad. For detailed information, see the Software Reference in the next section. To access help, |
|
|
|
right-click the TouchPad icon on the taskbar and select Help. |
WinFlash Utility
Installs a BIOS update utility for Windows so that you can conveniently update your Notebook PC’s BIOS without having to restart your Notebook PC in DOS mode.
8

Drivers Provided in Windows XP
If you have any problems with these drivers, visit the Microsoft Windows Update site. A link is provided in Microsoft Windows Explorer under “Tools.”
1394 “R5C593” (Already supported in Windows XP)
This driver is provided by Microsoft in its Windows XP operating system.
This device is shown under Windows Device Manager “IEEE 1394 Bus host controllers”.
Fast IR Driver “IrDA Fast Infrared Port” (Already supported in Windows XP)
This driver is provided by Microsoft in its Windows XP operating system.
This device is shown under Windows Device Manager “Infrared devices”.
PCMCIA “R5C593” (Already supported in Windows XP)
This driver is provided by Microsoft in its Windows XP operating system.
This device is shown under Windows Device Manager “PCMCIA adapters”.
RICOH Media Card “R5C593” (Already supported in Windows XP)
This driver is provided by Microsoft in its Windows XP operating system.
USB 2.0 (Already supported in Windows XP SP1 & Windows 2000 SP4)
This driver is provided by Microsoft in its Windows operating system. The support CD also includes a version of this driver for Windows 98 SE or Windows ME. This driver is not required for Windows 2000 or Windows XP and installation will not be possible.
This device is shown under Windows Device Manager “Universal Serial Bus controllers”.
SteepStep (Already supported in Windows XP)
This function is already supported in Windows XP. The support CD also includes a version of this utility for other Windows versions. Installation will not be possible under Windows XP.
Intel® SpeedStep™ is a technology that provides adjustable processor speeds for maximum performance when connected to an external power and battery optimized performance when going mobile. The processors can dynamically switch clock frequency and voltage, depending on whether the computer is running on batteries or is plugged intoAC power. These changes in frequency happen in only 1/2000th of a second — so fast, they are invisible to users, even if they occur in the middle of performance-intensive applications.
Support CD
9
Support |
Other Support CD items |
|
[Read Me] Text File |
||
|
||
CD |
Gives you notes concerning this support CD or the Notebook PC. |
|
[Browse this CD] Link |
||
|
Shows you the contents of this support CD using Windows Explorer.
[Technical Support Form] Text File
Opens up a Technical Support Request Form so that you will understand what kind of information is needed if you run into problems and require technical assistance.
[AFLASH2] Folder
This utility allows you to upgrade your Notebook PC’s BIOS in DOS mode. You enter DOS mode by booting to a DOS system on a floppy disk, CD, or USB drive instead of entering the Windows operating system. AFLASH2.EXE can be found in the Aflash folder of the support CD.
[Exit] Link
Closes the support CD autorun screen.
10

VGA Driver
(It is necessary to install the VGA driver first in order to see other setup screens in their proper sizes.)
Topics Covered:
VGA Driver Setup
Display Settings for Windows XP
ATI Taskbar Icon
Screens will vary depending on your operating system but the contents should be the same.
11
Software Drivers
VGA Driver Setup
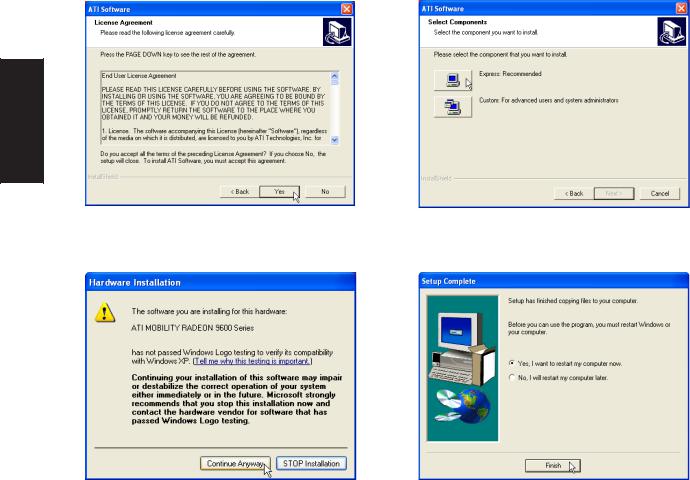
Running setup will give you the following wizard. See next page for VGA settings.
SoftwareDrivers |
On the “License Agreement” screen, click Yes after reading the message.
On the “Select Components” screen, click Express... to begin installation.
Click Continue Anyway because this driver has been tested to work with Windows XP.
On the “Setup Complete” screen, click Finish. Restarting now will help enlarge the screen area to view other setup items more comfortably.
12
Display Settings for Windows XP
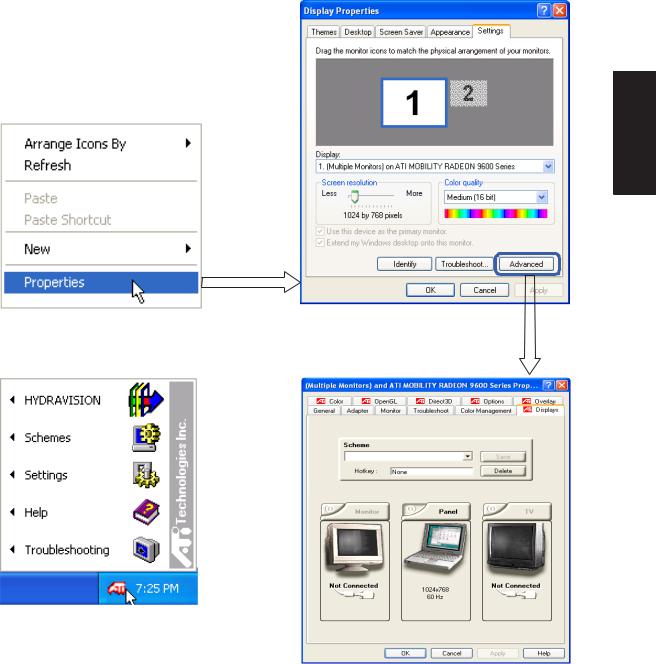
Display Properties
Set screen resolution and color quality to the maximum for best results. If your Notebook PC does not support the maximum resolution, panning will occur to cover the extra area. In this case, you can lower the resolution. .
For advanced graphics controller By right clicking your desktop and settings, click the Advanced button selecting Properties, you can view
your display properties.
Software Drivers
ATi Display Properties
ATi display properties can be accessed through |
Displays |
|
|
the advanced button or through the ATi icon on |
This page allows you to enable or disable display |
the taskbar. |
output devices and save schemes with hotkeys. |
13
Display Settings for Windows XP (Cont’)
SoftwareDrivers |
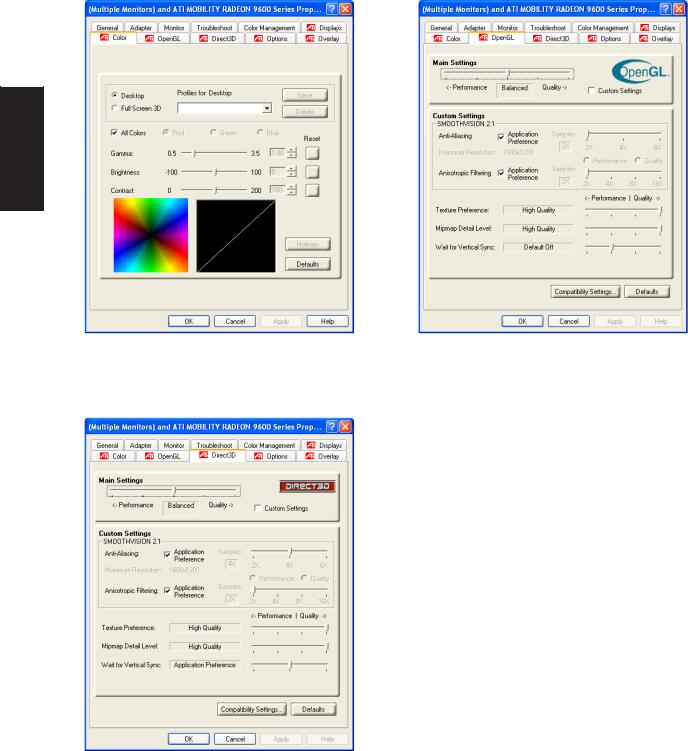
Color
This page allows you to adjust and save profiles for colors, gamma, brightness, and contrast.
OpenGL
This page allows you to adjust quality and performance for applications using OpenGL.
Direct3D
This page allows you to adjust quality and performance for applications using Direct3D.
14
Display Settings for Windows XP (Cont’)
Software Drivers
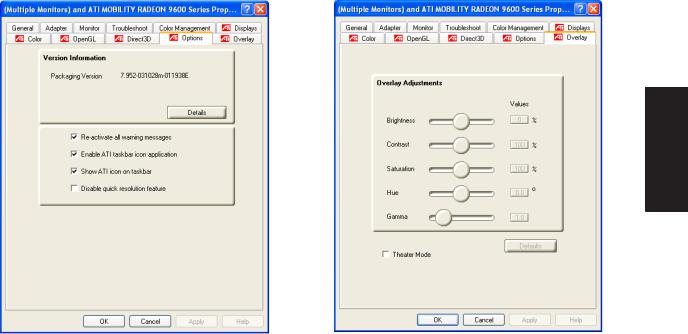
Options |
Overlay |
This page allows you to enable or disable ATi |
This page allows you to adjust brightness, con- |
quick access desktop and taskbar menus. |
trast, saturation, hue, and gamma for videos. |
15
Display Settings for Windows XP (Cont’)
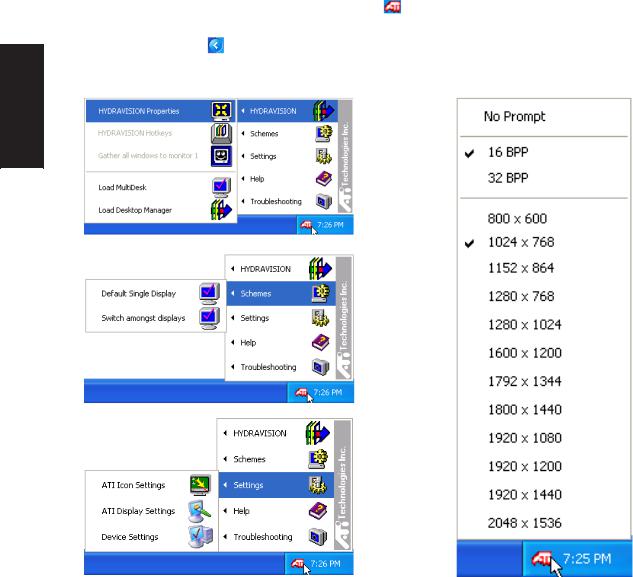
ATi Taskbar Icon |
|
Bring up ATi quick-access menus by right clicking |
on the task bar. You can quickly launch display- |
related property windows using the ATi taskbar. If you cannot see this icon, you may have to “Show hidden |
|
icons” by clicking on . |
|
SoftwareDrivers |
|
Right-click the ATi icon for many quick access menus.
Left-click the ATi icon for quick display resolution changing.
16

ASUS Wireless LAN
(Required Driver)
Topics Covered:
Wireless LAN Driver Setup
ASUS WLAN Utility Setup
ASUS WLAN Utility Quick Start
Screens will vary depending on your operating system but the contents should be the same.
17
Software Drivers

Wireless LAN Driver Setup
Running setup will give you the following wizard:
SoftwareDrivers |
Click OK to install the modem driver. |
On the “Finish” screen, click OK. |
|
||
|
ASUS WLAN Utility Setup |
|
After installing driver, you need to install the wireless utility.
Click Next after reading the “Welcome” screen. |
Click Next after reading the “Information” screen. |
On the “Choose Destination Location” screen, click Next to continue or you may first change the destination folder.
On the “Select Program Folder” screen, click Next to continue or enter a different folder name.
18
ASUS WLAN Utility Setup (Cont’)
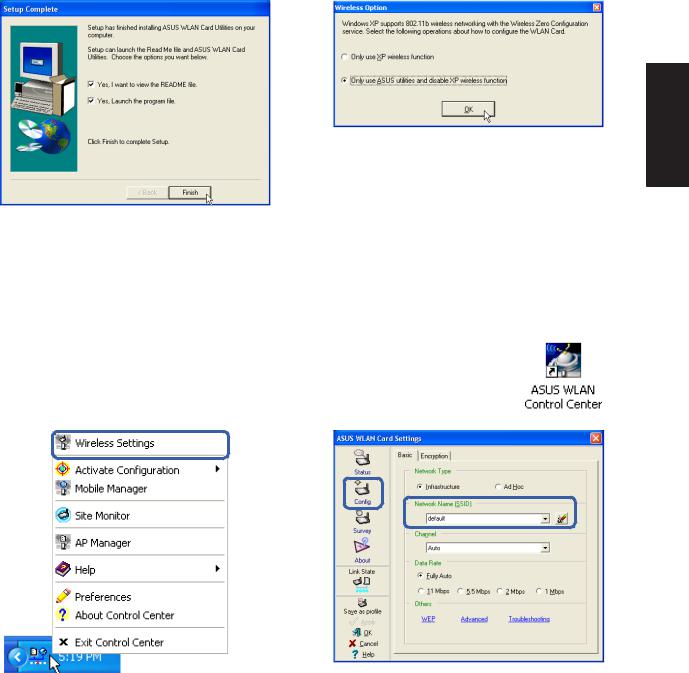
Click Finish on the “Setup Complete” screen.
Software Drivers
Select to use “...ASUS Utilities...” for added features while using the wireless LAN device.
ASUS WLAN Utility Quick Start
After installing the ASUS WLAN driver and utility, the utility will automatically start with Windows. If you need to start it manually, you can launch the utility using the desktop icon or through Windows start. You will need to make some wireless LAN settings before being able to use your wireless connection.
(Right-Click Menu)
Right-click the ASUS WLAN icon and select “Wireless Settings”
Set the Network Name (SSID) to the same name as the SSID set in your wireless access point.
19
ASUS WLAN Utility Quick Start (Cont.)
SoftwareDrivers |
Use “Site Survey” if you don’t know the name of your access point(s).
Encryption settings must also match those set in the access point. Talk with your network administrator if necessary. Click Apply to save your settings
Check the “Status” page to see the “Association State”. It should show “Connected - xx:xx:xx:xx:xx:xx”.
You can also see the connection quality on the “Connection” page. Click OK to exit the utility.
20

ATKACPI
(Required Utility)
Topics Covered:
ATKACPI Setup
Software Drivers
Screens will vary depending on your operating system but the contents should be the same.
21
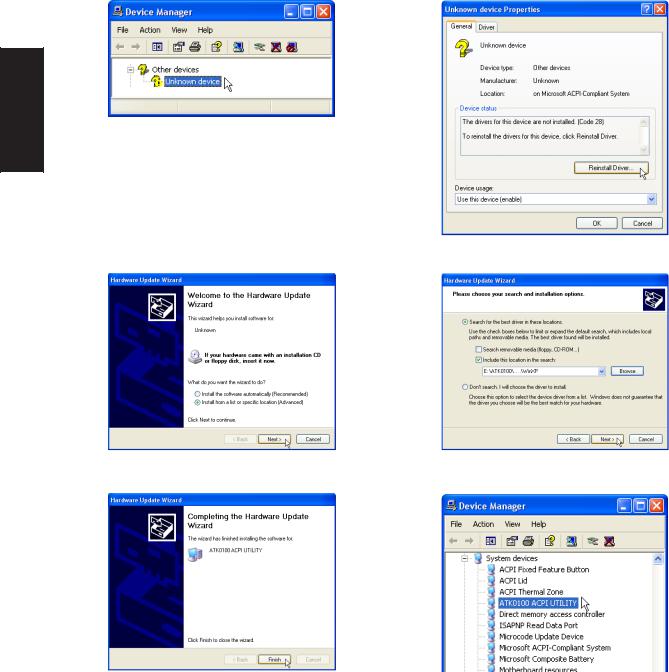
ATKACPI Setup
This utility requires that you manually install it from Device Manager. No software operation is required.
Software |
|
Drivers |
Double click Unknown device. |
|
Click Reinstall Driver.
Select “Install from...” and click Next.
Browse to your operating system folder in the “ATK0100” folder and click Next.
Click Finish when setup is complete.
“ATK0100 ACPI UTILITY” should show under System devices.
22

Topics Covered:
Audio Setup
Audio
(Required Driver)
Software Drivers
Screens will vary depending on your operating system but the contents should be the same.
23
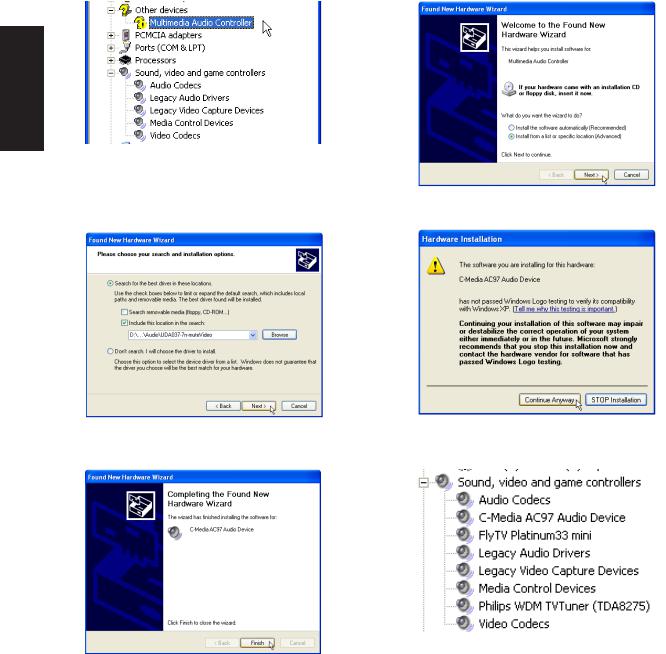
Audio Setup
You will see a “Found New Hardware Wizard” if you device requires setup. If not your driver may already be installed by Windows. If your device is not working, you can manually install the driver as follows:
SoftwareDrivers |
Normally, you will get a “Found New Hardware Wizard” as shown on the next step. If not, double click theAudio controller with a question mark.
Select “Install from...” and click Next.
Browse to the folder shown here and click |
Click ContinueAnyway because this driver |
Next. |
has been tested to work with Windows XP. |
Click Finish. Restarting Windows will start the USB Controller.
The installed audio driver will appear under “Sound, video and game controllers”.
24

CPU Hotfix
(Required Driver)
Topics Covered:
CPU Hotfix Setup 1
CPU Hotfix Setup 2
Screens will vary depending on your operating system but the contents should be the same.
25
Software Drivers
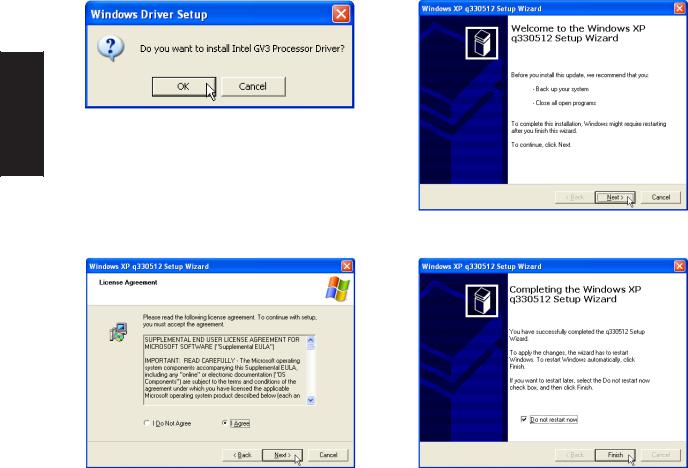
CPU Hotfix Setup
Running setup will give you the following wizard:
SoftwareDrivers |
Click OK to begin the installation wizard.
Click Next on the Welcome screen to continue.
Select “I Agree” and click Next on the License Agreement.
Select “Do not restart now” and click Finish when setup is complete. (This allows you to install other drivers and utilities before restarting.)
26

Intel INF Update
(Required Driver)
Topics Covered:
Intel INF Update Setup
Screens will vary depending on your operating system but the contents should be the same.
Software Drivers
27
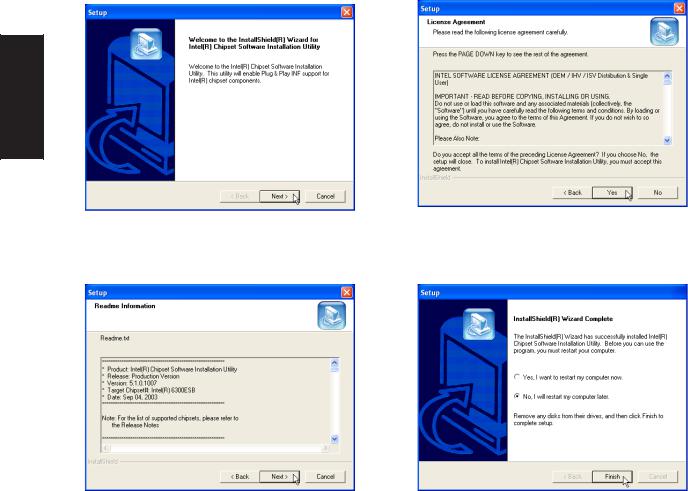
Intel INF Update Setup
Running setup will give you the following wizard. No other configurations are necessary.
SoftwareDrivers |
On the “Welcome” screen, click Next after reading the message.
On the “License Agreement” screen, click Yes after reading the message.
On the “Readme” screen, click Next after reading the message.
Setup is now complete, select “No...” and click Finish in order to install other items.
28

LAN
(Required Driver)
Topics Covered:
LAN Driver Setup
Configuring your LAN
Software Drivers
Screens will vary depending on your operating system but the contents should be the same.
29
 Loading...