


Content |
|
English................................................................................................................. |
1 |
Česky.................................................................................................................. |
6 |
Deutsch.............................................................................................................. |
11 |
Français............................................................................................................. |
16 |
Italiano............................................................................................................... |
21 |
Español............................................................................................................. |
26 |
Hollands............................................................................................................ |
31 |
Polski................................................................................................................. |
36 |
Português.......................................................................................................... |
41 |
Pусский .............................................................................................................. |
46 |
Magyar.............................................................................................................. |
51 |
Türkçe............................................................................................................... |
56 |
Bahasa Indonesian............................................................................................ |
61 |
Български............................................................................................................ |
66 |
Eesti.................................................................................................................. |
71 |
Suomi................................................................................................................ |
76 |
........................................................................................................... |
81 |
Română............................................................................................................. |
86 |
Slovensky ......................................................................................................... |
91 |
.................................................................................................................... |
96 |
Українська......................................................................................................... |
101 |
Latviešu........................................................................................................... |
106 |
Lietuviškai......................................................................................................... |
111 |


 FCC Warning Statement
This device complies with Part 15 of the FCC Rules. Operation is subject to the following two conditions:
1.this device may not cause harmful interference, and
2.this device must accept any interference received, including interference that may cause undesired operation.
This equipment has been tested and found to comply with the limits for a class B digital device, pursuant to part 15 of the FCC Rules. These limits are designed to provide reasonable protection against harmful interference in a residential installation.
This equipment generates, uses and can radiate radio frequency energy and, if not installed and used in accordance with the instructions, may cause harmful interference to radio communications. However, there is no guarantee that interference will not occur in a particular installation. If this equipment does cause harmful interference to radio or television reception, which can be determined by turning the equipment off and on, the user is encouraged to try to correct the interference by one or more of the following measures:
-Reorient or relocate the receiving antenna.
-Increase the separation between the equipment and receiver.
-Connect the equipment into an outlet on a circuit different from that to which the receiver is connected.
-Consult the dealer or an experienced radio/TV technician for help.
CAUTION
Any changes or modifications not expressly approved by the party responsible for compliance could void the user’s authority to operate the equipment.
Prohibition of Co-location
Thisdeviceanditsantenna(s)mustnotbeco-locatedoroperatinginconjunctionwithanyother antennaortransmitter.
Safety Information
To maintain compliance with FCC’s RF exposure guidelines, this equipment should beinstalled and operated with minimum distance 20cm between the radiator and your body. Use on the supplied antenna.
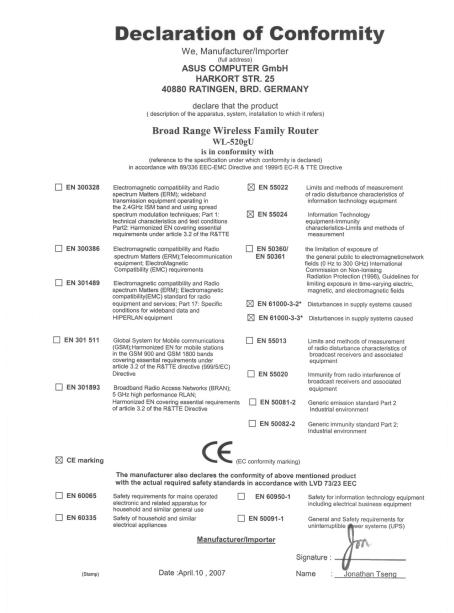
Declaration of Conformity for R&TTE directive 1999/5/EC
Essential requirements –Article 3
Protection requirements for health and safety –Article 3.1a
Testing for electric safety according to EN 60950-1 has been conducted. These are considered relevant and sufficient.
Protection requirements for electromagnetic compatibility –Article 3.1b
Testing for electromagnetic compatibility according to EN 301 489-1 and EN 301 489-17 has been conducted. These are considered relevant and sufficient.
Effective use of the radio spectrum –Article 3.2
Testing for radio test suites according to EN 300 328- 2 has been conducted. These are considered relevant and sufficient.
CE Mark Warning
This is a Class B product, in a domestic environment, this product may cause radio  interference, in which case the user may be required to take adequate measures.
DGT
加大功率或變更原設計之特性及功能。

WL-520GU/GC Broad Range Wireless Family Router Quick Start Guide
1.Package Contents
•WL-520GU/GC wireless router x 1
•Power adapter x 1
•Utility CD x 1
•RJ45 cable x 1
•Quick Start Guide x 1
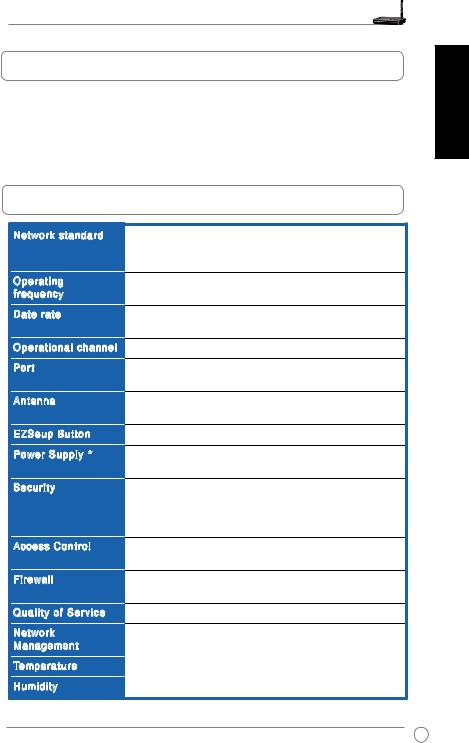
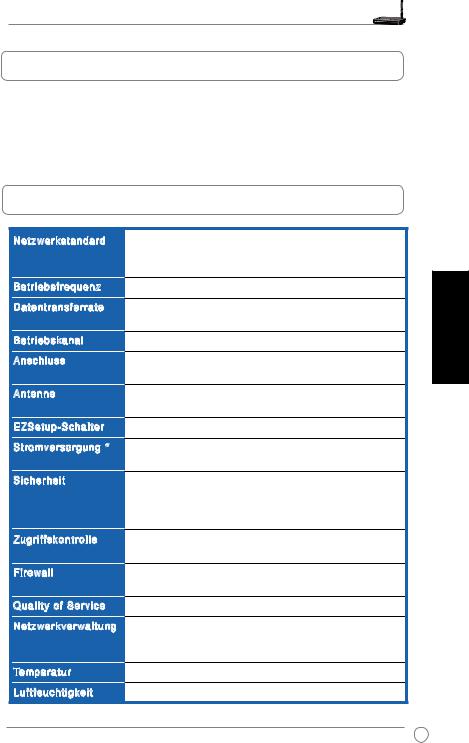
2.Specification summary
Network standard |
|
Operating |
|
frequency |
|
Date rate |
. |
Operational channel |
|
Port. |
|
Antenna. |
|
EZSeup Button |
|
Power Supply *. |
|
Security |
|
. |
|
Access Control. |
|
Firewall. |
|
Quality of Service |
|
Network |
|
Management |
|
Temperature |
|
Humidity |
|
IEEE 802.11b, IEEE 802.11g, IEEE 802.3, IEEE802.3x, IEEE 802.3u, IEEE 802.1x, IEEE 802.11i, IPv4, IPv6, CSMA/CA, CSMA/CD, ICMP
2.4G ~ 2.5GHz.
802.11g: 6, 9, 12, 18, 24, 36, 48, 54Mbps. 802.11b: 1, 2, 5.5, 11Mbps
11 for N.America, 14 Japan, 13 Europe (ETSI)
WAN x 1, LAN x 4 RJ45 for 10/100 BaseT, 1 x USB2.0 for printer sharing(WL-520GU only)
SupportAntenna Diversity, 1 x Reverse-SMAantenna connector
Automatically SSID and WEP or WPAconfiguration
WL-520GU: DC: +5V with max. 2Acurrent. WL-520GC: DC EU/UK: +9V/1A; TW/US: +9V/800mA
WEP-64bits, WEP-128bits, WPA-Personal, WPA2-Personal, WPA-Auto-Personal (TKIP.AES. TKIP+AES), WPA-Enterprise, WPA2-Enterprise, WPA-Auto-Enterprise (TKIP.AES. TKIP+AES), Radius with 802.1x
MAC-levelAccess Control, Inbound/Outbound IP Filter,
DomainAccess Control
NAT Firewall, SPI (Stateful Package Inspection) Firewall, WAN ping control
BOD (WL-520GU only), WMM
Support UPnP, DHCP Server, DNS Proxy, NTP Client, DDNS, Port Trigger, Virtual Server, Virtual DMZ, VPN Pass-Through
Operating: 0~40oC |
Storage: -30~50oC |
Operating: 50~90% |
Storage: 20~90% |
* Use only the adapter included in the package.
English

English
WL-520GU/GC Broad Range Wireless Family Router Quick Start Guide
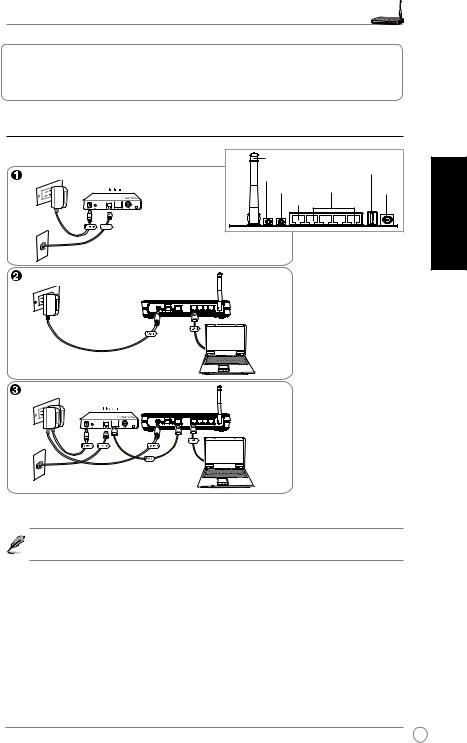
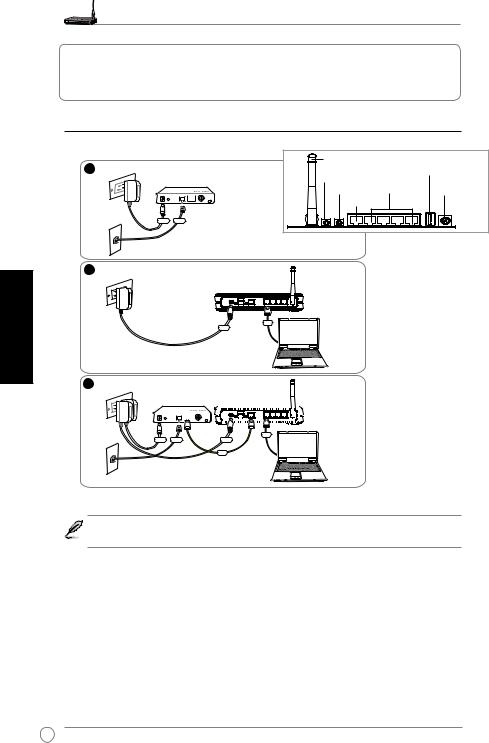
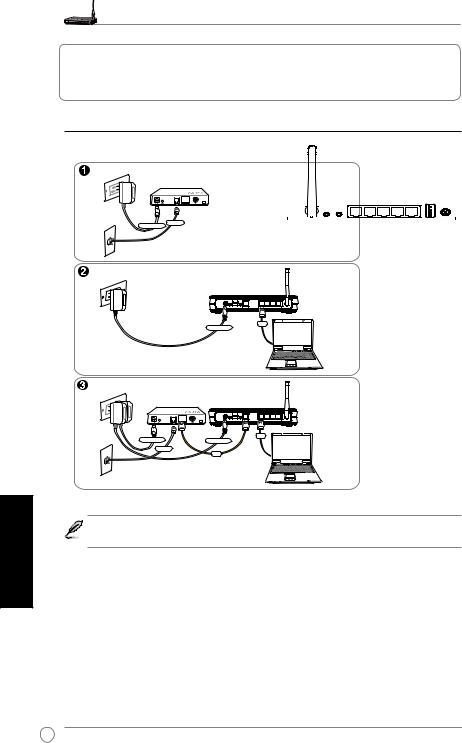
3. Connecting Wireless Router to Cable/DSL/ Satellite Modem
1) Cable connection
1 |
Wall Power Outlet |
Antenna |
|
USB |
EZ Setup |
|
|||
|
Modem |
LAN |
|
|
|
Reset |
Power |
||
|
|
|||
|
|
WAN |
|
|
|
Power Phone |
|
|
|
|
Wall.Telephone Outlet |
Rear Panel |
|
|
|
|
|
|
|
2 |
Wall Power Outlet |
|
|
|
|
|
ASUS Wireless Router |
|
|
|
|
LAN |
|
|
|
|
Power |
|
|
3 |
Wall Power Outlet |
|
|
|
|
Modem |
ASUS Wireless Router |
|
|
LAN
Power Phone
WAN
Wall.Telephone Outlet
 Note: Use only the adapter included in the package. Using other adapters may damage the device.
WL-520GU/GC Broad Range Wireless Family Router Quick Start Guide
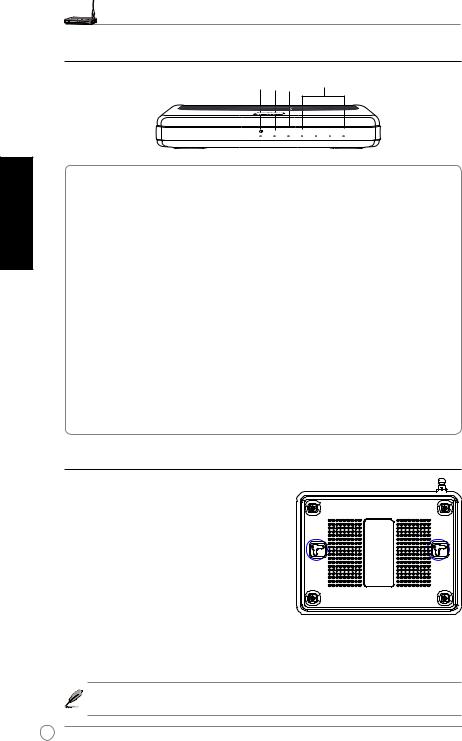
2) Status indicators
|
PWR AIR WAN |
LAN |
|
|
WL-520GU |
AIR WAN LAN1 |
LAN2 LAN3 LAN4 |
|
125M High Speed |
|
|
PWR (Power) |
|
|
|
Off |
No power |
|
|
On |
System ready |
|
|
Flashing-slow |
Firmware upgrade failed |
|
|
Flashing-quick |
EZsetup processing |
|
|
AIR (Wireless Network) |
|
|
|
Off |
No power |
|
|
On |
Wireless system ready |
|
|
Flashing |
Transmitting or receiving data (wireless) |
||
WAN (Wide Area Network) |
|
|
|
Off |
No power or no physical connection |
||
On |
Has physical connection to an Ethernet network |
||
Flashing |
Transmitting or receiving data (through Ethernet cable) |
||
LAN 1-4 (Local Area Network) |
|
|
|
Off |
No power or no physical connection |
||
On |
Has physical connection to an Ethernet network |
||
Flashing |
Transmitting or receiving data (through Ethernet cable) |
||
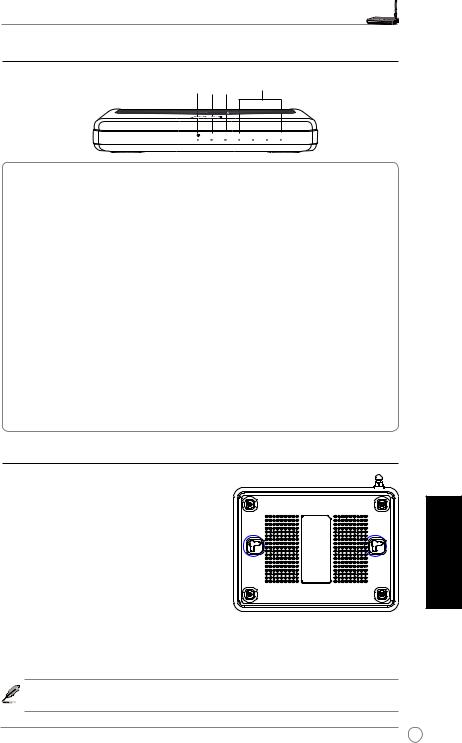
3) Mounting options
Out of the box, the ASUS WL-520GU/GC Broad Range Wireless Router is designed to sit on a raised flat surface like a file cabinet or a book shelf. The unit may also be converted for mounting to a wall or ceiling.
To mount the ASUS WL-520GU/GC
1 Look on the underside for the two mounting hooks.
2. Mark two upper holes on a wall or on a raised flat surface.
3.Tighten two screws until only 1/4'' is showing.
4.Latch the hooks of theASUS WL520GU/GC onto the screws.

 Note: Re-adjust the screws if you cannot latch the ASUS Wireless Router onto the screws or if it is too loose.
English
English
WL-520GU/GC Broad Range Wireless Family Router Quick Start Guide
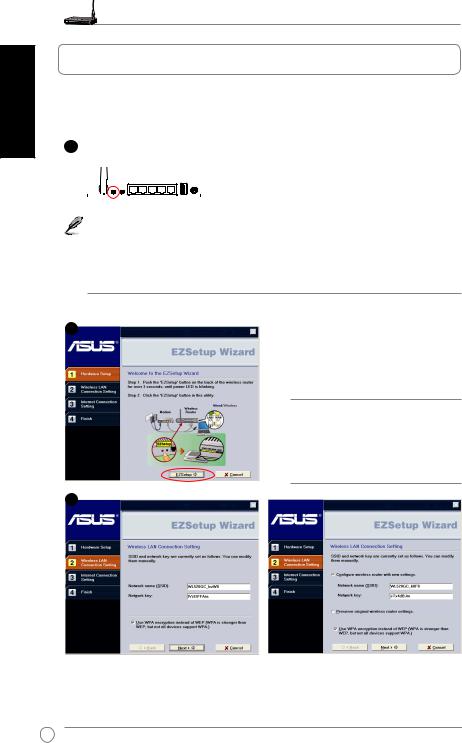
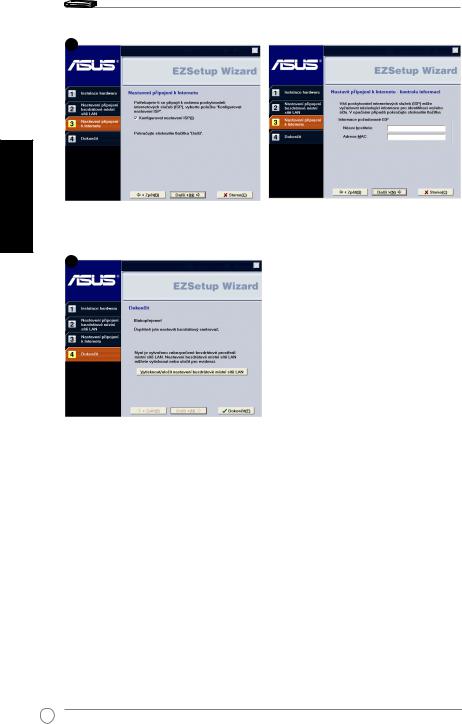
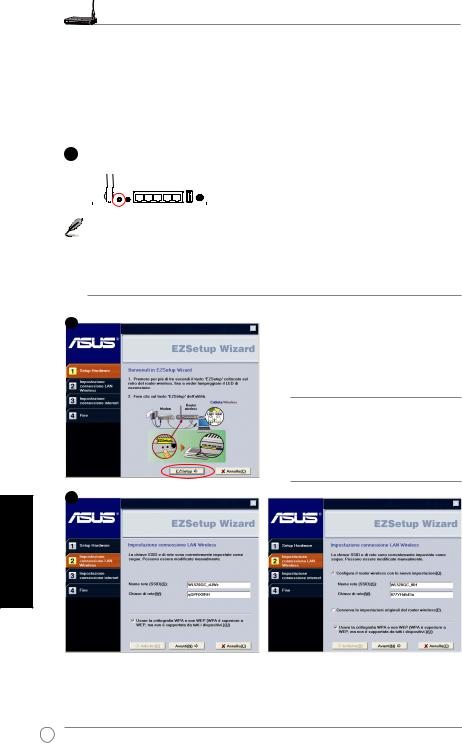
4. EZ Setup
The EZSetup utility enables you to easily complete the wireless LAN setup in just two steps. First, launch the EZSetup from the Start menu, then push the EZSetup button, located at the rear panel, for three seconds.
1 |
Push EZSetup over |
|
||||||||||
3 sec. and release. |
|
|||||||||||
|
|
|
|
|
|
|
|
|
|
|
|
|
|
|
|
|
|
|
|
|
|
|
|
|
|
|
|
|
|
|
|
|
|
|
|
|
|
|
|
|
|
|
|
|
|
|
|
|
|
|
|
|
|
|
|
|
|
|
|
|
|
|
|
|
1)If the setup button is pushed without running the EZsetup wizard utility, the PWR. indicator will flash and Internet connections will pause for a short period but will then return to normal operation without change..
.
2)TouseEZSetup,werecommendusinganASUSwirelessadaptersuchasWL-106gM, WL-100gE,andWL-169gE.
Insert the Utility CD into your PC’s CD drive,
2 and run Install ASUS Wireless Router Utilities.
After installing the ASUS Wireless Router Utilities, run the EZSetup Wizard from
[Startup] -> All Utilities [ASUS Utility] -> [WL-520GU/GC Wireless Router].
Note: Use EZSetup Wizard with one wireless client at a time. If the wireless client computer cannot discover the wireless router while in EZSetup mode, shorten the distance between the client and the router.
3
Wireless settings, including network name and network keys, are generated automatically. You can modify these settings manually. Note if your wireless router is configured before, select Preserve original wireless router settings to use the current value. Click Next to continue.
WL-520GU/GC Broad Range Wireless Family Router Quick Start Guide
4
English
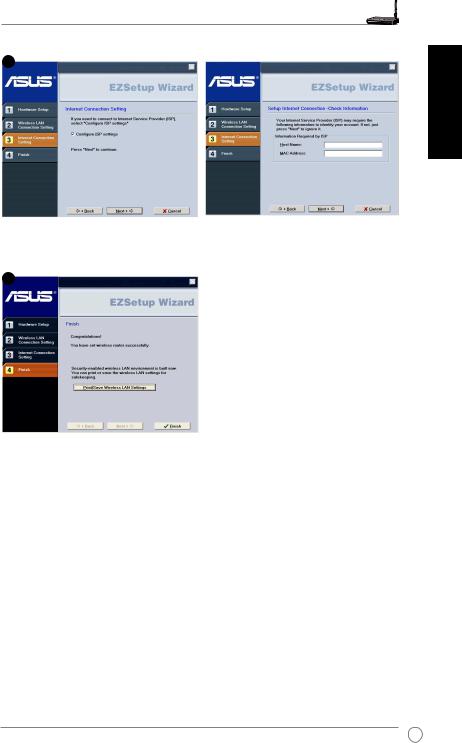
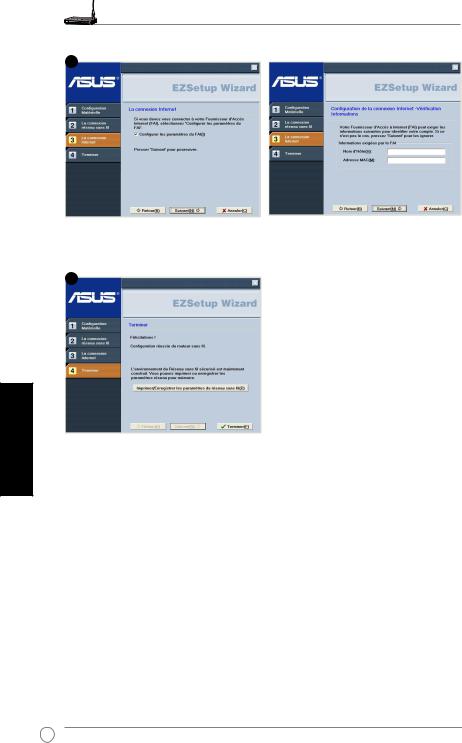
If you need to configure the ISP settings for your wireless router, select Configure ISP settings, click Next and follow the instructions to complete the settings.
5
Setup is completed. Press Print/Save Wireless LAN Settings button for future reference. Click Finish to exit the EZSetup utility.
Česky
Širokopásmový bezdrátový směrovač WL-520GU/GC – stručná příručka |
1.Obsah balení
•Bezdrátový směrovač WL-520GU/GC x 1
•Napájecí adaptér x 1
•Disk CD s nástroji x 1
•Kabel RJ45 x 1
•Stručná příručka x 1
2.Přehled specifikací
Síťové standardy
Provozní
 frekvence
Rychlost přenosu dat
Provozní kanál
kanál
 Port
Port .
.
Anténa
Tlačítko EZSetup

Napájení*.
Zabezpečení .
.
Řízení přístupu.
Brána  firewall

Služba Quality of
Service (QoS)
Správa sítě
Teplota
Nem
IEEE 802.11b, IEEE 802.11g, IEEE 802.3, IEEE802.3x, IEEE 802.3u, IEEE 802.1x, IEEE 802.11i, IPv4, IPv6, CSMA/CA, CSMA/CD, ICMP
2.4G ~ 2.5GHz.
802.11g: 6, 9, 12, 18, 24, 36, 48, 54Mbps. 802.11b: 1, 2, 5.5, 11Mbps
11 pro severníAmeriku, 14 pro Japonsko, 13 pro Evropu (ETSI)
WAN x 1, LAN x 4 RJ45 pro 10/100 BaseT, 1 x USB2.0 pro sdílení tiskárny (pouze WL-520GU)
Podpora diverzity antény, 1 x reverzní SMAantenní konektor Automatická konfigurace SSID a WEP nebo WPA
WL-520GU: stejnosměrné: +5 V s max. proudem 2A. WL-520GC: DC EU/UK: +9V/1A; TW/US: +9V/800mA
WEP-64bits, WEP-128bits, WPA-Personal, WPA2-Personal, WPA-Auto-Personal (TKIP.AES. TKIP+AES), WPA-Enterprise, WPA2-Enterprise, WPA-Auto-Enterprise (TKIP.AES. TKIP+AES), Radius with 802.1x
Řízení přístupu na úrovni MAC, filtr příchozích/odchozích adres IP, doménové řízení přístupu
Brána firewall s překládáním adres (NAT), brána firewal s kontrolou paketů SPI (Stateful Package Inspection), kontrola WAN pomocí příkazu ping
BOD (pouze WL-520GU), WMM
Podporuje UPnP, server DHCP, server proxy DNS, klient |
|
NTP, DDNS, spouštěč portů, virtuální server, virtuální DMZ, |
|
předávání VPN |
|
Provozní: 0~40oC |
Skladovací: -30~50oC |
Provozní: 50~90% |
Skladovací: 20~90% |
* Používejte pouze adaptér dodaný v krabici.
Širokopásmový bezdrátový směrovač WL-520GU/GC – stručná příručka
3.Připojení bezdrátového směrovače ke kabelovému/DSL/satelitnímu modemu
1)Zapojení kabelů
|
Anténa |
|
USB |
Elektrická zásuvka |
Nastavení EZ |
|
|
LAN |
|
||
|
Resetování |
Napájení |
|
|
WAN |
|
|
|
Zadní strana |
|
|
Telefonní zásuvka |
|
|
|
Elektrická zásuvka |
|
|
|
|
Bezdrátový směrovačASUS |
|
|
Elektrická zásuvka
Bezdrátový směrovačASUS
Telefonní zásuvka
Česky
Poznámka: Používejte pouze adaptér dodaný v krabici. Používání jiných adaptérů může poškodit zařízení.
Česky
Širokopásmový bezdrátový směrovač WL-520GU/GC – stručná příručka |
2) Stavové indikátory |
|
|
PWR AIR WAN |
LAN |
|
WL-520GU |
AIR WAN LAN1 |
LAN2 LAN3 LAN4 |
|
125M High Speed |
|
|
PWR (napájení) |
|
|
|
Nesvítí |
Není napájení |
|
|
Svítí |
Systém připraven |
|
|
Bliká pomalu |
Chyba upgradu firmwaru |
|
|
Bliká rychle |
Zpracovávání EZsetup |
|
|
AIR (bezdrátová síť) |
|
|
|
Nesvítí |
Není napájení |
|
|
Svítí |
Bezdrátový systém připraven |
|
|
Bliká |
Vysílání nebo přijímání dat (prostřednictvím bezdrátového připojení) |
||
WAN (síť širokého dosahu) |
|
|
|
Nesvítí |
Vypnuto nebo žádné fyzické připojení |
||
Svítí |
Fyzické připojení k síti Ethernet |
|
|
Bliká |
Vysílání nebo přijímání dat (prostřednictvím kabelu Ethernet) |
||
LAN 1-4 (místní síť) |
|
|
|
Nesvítí |
Vypnuto nebo žádné fyzické připojení |
||
Svítí |
Fyzické připojení k síti Ethernet |
|
|
Bliká |
Vysílání nebo přijímání dat (prostřednictvím kabelu Ethernet) |
||
3) Možnosti montáže
Širokopásmový bezdrátový směrovač ASUS WL520GU/GC, který je po vybalení připraven ihned k používání, je určen pro umístění na zvýšené rovné ploše, například na kartotéce nebo na poličce. Zařízení lze rovněž upravit pro montáž na stěnu nebo na strop.
Montáž zařízení ASUS WL-520GU/GC
1. Vyhledejte dva montážní otvory na spodní straně.
2.Přeneste dva horní otvory na stěnu nebo na zvýšenou rovnou plochu.
3.Zašroubujte dva šrouby tak, aby vyčnívaly pouze 0,5 cm nad povrch.
4.Nasaďte otvory zařízeníASUS WL520GU/GC na šrouby.
Poznámka: Pokud nelze bezdrátový směrovač ASUS zajistit na šrouby nebo pokud jsou šrouby příliš utažené, upravte je.

Širokopásmový bezdrátový směrovač WL-520GU/GC – stručná příručka
4. EZSetup
Nástroj EZSetup umožňuje snadno vytvořit bezdrátovou místní síť v pouhých dvou krocích. Nejdříve spusťte nástroj EZSetup z nabídky Start, a potom stiskněte a podržte tlačítko EZSetup, které se nachází na zadním panelu, po dobu tří sekund.
1 |
Stiskněte a podržte tlačítko EZSetup po dobu 3 s. a potom uvolněte. |
||||||||||||
|
|
|
|
|
|
|
|
|
|
|
|
|
|
|
|
|
|
|
|
|
|
|
|
|
|
|
|
|
|
|
|
|
|
|
|
|
|
|
|
|
|
|
|
|
|
|
|
|
|
|
|
|
|
|
|
|
|
|
|
|
|
|
|
|
|
|
|
|
|
1) Stiskněte-li instalační tlačítko, aniž by byl spuštěn průvodce nástroje EZsetup, indikátor PWR začne blikat a připojení k Internetu budou krátce pozastavena, ale poté budou beze změny obnovena..
2) .Chcete-lipoužívatnástrojEZSetup,doporučujemepoužítněkterýbezdrátovýadaptér ASUS,napříkladWL-106gM,WL-100gEaWL-169gE.
2 |
Vložte disk CD s nástroji do jednotky CD v |
|
počítači a spusťte volbu Instalovat nástroje |
|
bezdrátového směrovače ASUS (Install |
|
ASUS Wireless Router Utilities). |
|
Po nainstalování nástrojů bezdrátového |
směrovače ASUS spusťte průvodce nástroje EZSetupzumístění[Startup] -> ASUS Utility
[All Utilities] -> [WL-520GU/GC Wireless
Router].
Poznámka: Používejte průvodce nástroje EZSetup s jedním bezdrátovým klientem najednou. Pokud počítač s bezdrátovým klientem nemůže v režimu EZSetup vyhledat bezdrátový směrovač, zkraťte vzdálenost mezi klientem a směrovačem.
3
Česky
Nastavení bezdrátové spojení, včetně síťového názvu a klíče sítě, jsou vygenerována automaticky. Tato nastavení lze upravit ručně. Pokud byl bezdrátový směrovač již dříve nakonfigurován,zaškrtnutímmožnostiZachovatpůvodnínastaveníbezdrátovéhosměrovače bude použita aktuální hodnota. Pokračujte klepnutím na tlačítko Další.
Česky
 Širokopásmový bezdrátový směrovač WL-520GU/GC – stručná příručka
4
Je-li třeba nakonfigurovat nastavení ISP bezdrátového směrovače, zaškrtněte možnost Konfigurovat nastavení ISP, klepněte na tlačítko Další a proveďte nastavení podle pokynů.
5
Instalace je dokončena. Stisknutím tlačítka
Vytisknout/uložit nastavení bezdrátové místní sítě LAN vytisknete/uložíte nastavení pro budoucí použití. Klepnutím na tlačítko Dokončit ukončete nástroj EZSetup.
10
WL-520GU/GC Broad Range Wireless Family Router Schnellstartanleitung
1.Paketinhalt
•WL-520GU/GC Wireless Router x 1
•Netzteil x1
•Anwendungs-CD x1
•RJ45-Kabel x1
•Schnellstartanleitung x1
2.Spezifikationsübersicht
Netzwerkstandard |
IEEE 802.11b, IEEE 802.11g, IEEE 802.3, IEEE802.3x, IEEE |
|
|
802.3u, IEEE 802.1x, IEEE 802.11i, IPv4, IPv6, CSMA/CA, |
|
|
CSMA/CD, ICMP |
|
Betriebsfrequenz |
2,4G - 2,5GHz |
|
Datentransferrate. |
802.11g: 6, 9, 12, 18, 24, 36, 48, 54Mbps. |
|
|
802.11b: 1, 2, 5.5, 11Mbps |
|
Betriebskanal |
11 für USA, 14 für Japan, 13 für Europa (ETSI) |
|
Anschluss. |
WAN x 1, LAN x 4 RJ45 für 10/100 BaseT, 1 x USB2.0 für |
|
|
gemeinsame Druckernutzung (nur WL-520GU) |
|
Antenne. |
Unterstützt verschiedeneAntennen, 1 x Reverse-SMA |
|
|
Antennenanschluss |
|
EZSetup-Schalter |
Automatische SSIDund WEPoder WPA-Konfiguration |
|
Stromversorgung *. |
WL-520GU: Gleichspannung: +5V mit max. 2A-Stromstärke. |
|
|
WL-520GC: DC EU/UK: +9V/1A; TW/US: +9V/800mA |
|
Sicherheit |
WEP-64bits, WEP-128bits, WPA-Personal, WPA2-Personal, |
|
. |
WPA-Auto-Personal (TKIP.AES. TKIP+AES), WPA-Enterprise, |
|
WPA2-Enterprise, WPA-Auto-Enterprise (TKIP.AES. |
||
|
TKIP+AES), Radius with 802.1x |
|
Zugriffskontrolle. |
MAC-Level Zugriffskontrolle, Eingangs-/Ausgangs-IP-Filter, |
|
|
Domain-Zugriffskontrolle |
|
Firewall. |
NAT Firewall, SPI (Stateful Package Inspection) Firewall, |
|
|
WAN Ping-Kontrolle |
|
Quality of Service |
BOD (nur WL-520GU), WMM |
|
Netzwerkverwaltung. |
Unterstützt UPnP, DHCP Server, DNS Proxy, NTP Client, |
|
. |
DDNS, Port Trigger, Virtual Server, Virtual DMZ, VPN Pass- |
|
|
Through |
|
Temperatur |
Betrieb: 0 - 40oC |
Lagerung: -30 - 50oC |
Luftfeuchtigkeit |
Betrieb: 50 - 90% |
Lagerung: 20 - 90% |
* Bitte verwenden Sie ausschließlich das mitgelieferte Netzteil |
||
Deutsch
11
Deutsch
WL-520GU/GC Broad Range Wireless Family Router Schnellstartanleitung
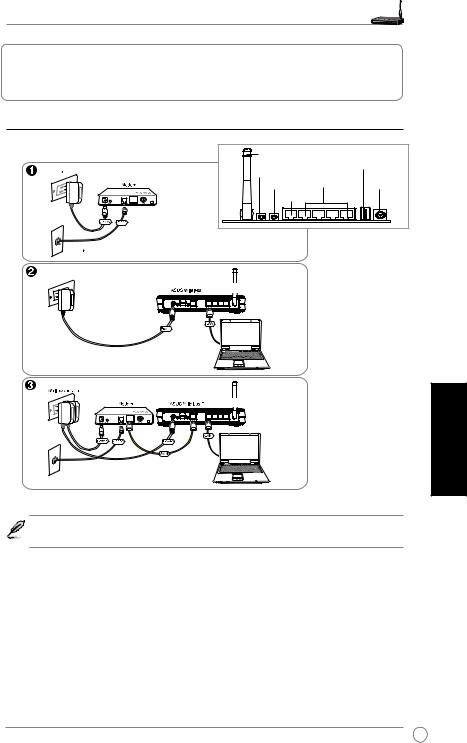
3.Anschluss des Wireless Routers an ein Kabel-/DSL-/Satellitenmodem
1)Kabelanschluss
1 |
Wall Power Outlet |
|
Antenne |
|
USB |
|
EZ-Setup |
|
|||
|
|
Modem |
LAN |
|
|
|
|
Reset |
Stromversorgung |
||
|
|
|
|||
|
|
|
WAN |
|
|
|
Power |
Phone |
|
|
|
|
Wall.Telephone Outlet |
|
|
Rückseite |
|
|
|
|
|
|
2 |
Wall Power Outlet |
3 |
Wall Power Outlet |
ASUS Wireless Router
LAN
Power
Modem |
|
|
|
|
|
ASUS Wireless Router |
|
|
|||||||||||||
|
|
|
|
|
|
|
|
|
|
|
|
|
|
|
|
|
|
|
|
|
|
|
|
|
|
|
|
|
|
|
|
|
|
|
|
|
|
|
|
|
|
|
|
|
|
|
|
|
|
|
|
|
|
|
|
|
|
|
|
|
|
|
|
|
|
LAN
Power Phone
WAN
Wall.Telephone Outlet
 Hinweis: Verwenden Sie ausschließlich den mitgelieferten Adapter. Die Benutzung andererAdapter kann das Gerät beschädigen.
12
WL-520GU/GC Broad Range Wireless Family Router Schnellstartanleitung
2) Statusanzeigen
|
|
PWR AIR WAN |
LAN |
|
WL-520GU |
AIR WAN LAN1 |
LAN2 LAN3 LAN4 |
|
125M High Speed |
|
|
PWR (Strom) |
|
|
|
Aus |
Kein Strom |
|
|
An |
System bereit |
|
|
Langsames Blinken |
Firmware-Aktualisierung fehlgeschlagen |
||
Schnelles Blinken |
EZSetup in Betrieb |
|
|
AIR (Wireless-Netzwerk) |
|
|
|
Aus |
Kein Strom |
|
|
An |
Wireless-System bereit |
|
|
Blinken |
Übertragen oder Empfang von Daten (Wireless) |
||
WAN (Wide Area Network) |
|
|
|
Aus |
Kein Strom oder kein Netzwerkanschluss |
||
An |
Anschluss an ein Ethernet-Netzwerk |
||
Blinken |
Übertragen oder Empfang von Daten (über das Ethernetkabel) |
||
LAN 1-4 (Local Area Network) |
|
|
|
Aus |
Kein Strom oder kein Netzwerkanschluss |
||
An |
Anschluss an ein Ethernet-Netzwerk |
||
Blinken |
Übertragen oder Empfang von Daten (über das Ethernetkabel) |
||
Deutsch
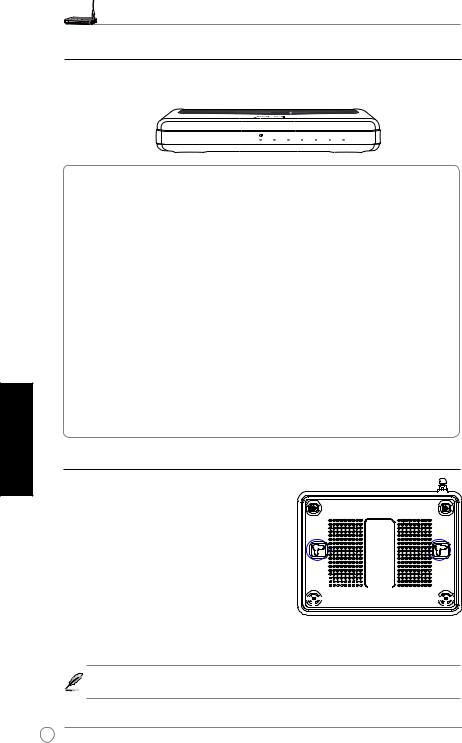
3) Befestigungsmöglichkeiten
Der ASUS WL-520GU/GC Broad Range Wireless Router wurde dazu entworfen, auf einer ebenen Oberfläche, z.B. einem Regal oder einem Schrank aufgestellt zu werden. Der Router kann allerdings auch an der Wand oder der Decke angebracht werden.
So wird der ASUS WL-520GU/GC aufgehängt:
1.Suchen Sie auf der Unterseite die zwei 


 Anbringungshaken.


2.Markieren Sie zwei Löcher an der Wand oder einer erhöhten ebenen Oberfläche.
3.Drehen Sie zwei Schrauben ein, bis diese nur noch ca. 1/2 cm hervorstehen.
4.Haken Sie die Haken desASUS WL520GU/GC an die Schrauben.
Hinweis: Drehen Sie die Schrauben weiter in die Oberfläche oder lösen Sie sie leicht, falls sich derASUS Wireless Router nicht richtig anbringen lässt.
13
Deutsch
WL-520GU/GC Broad Range Wireless Family Router Schnellstartanleitung
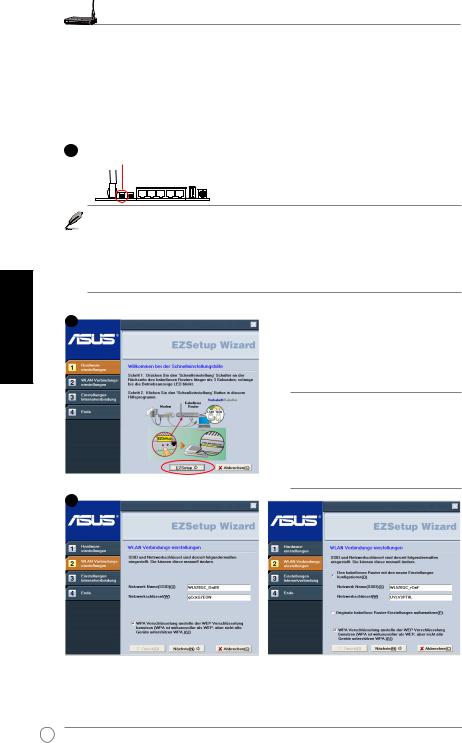
4. EZSetup
Mit dem EZSetup-Programm können Sie die Wireless-Lan-Einstellung in nur wenigen Schritten fertigstellen. Öffnen Sie EZSetup zuerst aus dem Start-Menü und drücken Sie dann den EZSetup-Schalter auf der Rückseite des Routers für mind. drei Sekunden.
1 |
Drücken Sie die EZSetup-Schaltfläche 3 |
Sekunden und lassen Sie sie wieder los. |
1) Falls die Schaltfläche gedrückt wird und das EZSetup-Programm währenddessen noch nicht ausgeführt wird, leuchtet die PWR-Anzeige auf und die Internetverbindung wird für kurze Zeit unterbrochen und kehrt dann wieder in den Normalzustand zurück.
2)ZurBenutzungmitEZSetupempfehlenwireinenASUSWirelessAdapterwie. WL-106gM,WL-100gEundWL-169gE.
Legen Sie die Anwendungs-CD ins CD- 2 Laufwerk und wählen Sie Install ASUS
Wireless Router Utilities.
Starten Sie nach der Installation der ASUS Wireless Router-Programme den EZSetup Wizard über [Startup] -> All Utilities [ASUS Utility] -> [WL-520GU/GC Wireless Router].
Hinweis: Benutzen Sie den EZSetup Wizard mit einem Wireless Client zur Zeit. Wenn der Wireless Client Computer den Wireless Router im EZSetup-Modus nicht erkennt, verringern Sie den Abstand zwischen Client und Router.
3
Die Wireless-Einstellungen, einschließlich Netzwerkname und Netzwerkschlüssel, werden automatisch erstellt. Sie können diese Einstellungen manuell verändern. Falls Ihr Wireless Router bereits konfiguriert wurde, wählen Sie Original kabellose Routereinstellungen aufbewahren, um die aktuellen Werte zu benutzen. Klicken Sie dann auf Nächste.
14

WL-520GU/GC Broad Range Wireless Family Router Schnellstartanleitung
4
Falls Sie die ISP-Einstellungen für Ihren Wireless-Router verändern müssen, wählen Sie Einstellungen Internetverbindung, klicken Sie auf Nächste und folgen Sie den Anweisungen, um die Einstellungen nach Ihren Wünschen zu ändern.
5
Deutsch
Die Einrichtung ist fertiggestellt. Klicken Sie auf Kabellose LAN-Einstellungen drucken/ speichern, um die Einstellungen für spätere Verwendung auszudrucken. Klicken Sie
auf Ende, um das EZSetup-Programm zu verlassen.
15
Guide d’installation rapide du WL-520GU/GC
1.Contenu de la boîte
•Routeur sans fil WL-520GU/GC x 1
•Adaptateur secteur x 1
•CD d’utilitaires x 1
•Câble RJ45 x 1
•Guide d’installation rapide x 1
2.Caractéristiques
Français
16
Standard réseau
Fréquence
 d’opération
Débit .
.
Canal
 d’opération.
Port .
.
Antenne
Bouton EZSetup

Alimentation *.
Sécurité.
Contrôle d’accès.
IEEE 802.11b, IEEE 802.11g, IEEE 802.3, IEEE802.3x, IEEE 802.3u, IEEE 802.1x, IEEE 802.11i, IPv4, IPv6, CSMA/CA, CSMA/CD, ICMP
2.4G ~ 2.5GHz.
802.11g: 6, 9, 12, 18, 24, 36, 48, 54Mbps. 802.11b: 1, 2, 5.5, 11Mbps
11 pour l’Amérique du Nord, 14 pour le Japon, 13 pour l’Europe (ETSI)
1 x WAN, 4 x LAN RJ45 pour BaseT 10/100, 1 x USB2.0 pour partage d’imprimante (uniquement WL-520GU)
SupporteAntenna Diversity, 1 x connecteur Reverse-SMA
Configuration WEP, SSID ou WPAautomatique
WL-520GU: CC: +5V ; courant max. 2A. WL-520GC: DC EU/UK: +9V/1A; TW/US: +9V/800mA
WEP-64bits, WEP-128bits, WPA-Personal, WPA2-Personal, WPA-Auto-Personal (TKIP.AES. TKIP+AES), WPA-Enterprise, WPA2-Enterprise, WPA-Auto-Enterprise (TKIP.AES. TKIP+AES), Radius with 802.1x
Contrôle d’accès MAC, Filtre IP entrante/sortante, contrôle d’accès de domaine
Pare-feu. |
Pare-feu NAT, Pare-feu SPI (Stateful Package Inspection), |
|
|
Contrôle Ping WAN |
|
Quality of Service |
BOD (WL-520GU uniquement), WMM |
|
Gestion de réseau. |
Supporte UPnP, DHCP Server, DNS Proxy, NTP Client, DDNS, |
|
|
Port Trigger, Virtual Server, Virtual DMZ, VPN Pass-Through |
|
Température |
Opération : 0~40oC |
Rangement: -30~50oC |
Humidité |
Operation: 50~90% |
Rangement : 20~90% |
* Utilisez uniquement l'adaptateur inclus dans la boîte.
Guide d’installation rapide du WL-520GU/GC
3. Connecter le routeur sans fil à un modem câble/DSL/satellite
1) Connexion des câbles


 Prise secteur murale


 Prise téléphonique murale


 Prise secteur murale
Antenne |
|
USB |
Configuration EZ |
|
|
LAN |
|
|
Réinitialisation |
Alimentation |
|
WAN |
|
|
panneau arrière |
|
|
Routeur sans filASUS

 Prise secteur murale
Routeur sans filASUS


 Prise téléphonique murale
Français
 Note : Utilisez uniquement l'adaptateur secteur inclus dans la boîte. Utiliser d'autres adaptateurs pourrait endommager l'appareil.
17
Français
Guide d’installation rapide du WL-520GU/GC
2) Témoins d'activité
|
|
|
PWR AIR WAN |
LAN |
||||||||||
|
|
WL-520GU |
|
|
|
|
|
|
|
|
|
|
|
|
|
|
|
|
|
|
|
|
|
|
|
|
|
||
|
|
|
|
|
|
|
|
|
|
|
|
|
||
|
|
|
AIR WAN LAN1 |
LAN2 LAN3 LAN4 |
||||||||||
|
|
125M High Speed |
|
|
|
|
|
|
|
|
|
|
||
|
|
|
|
|
|
|
|
|
|
|
|
|
|
|
PWR (Alim) |
Pas d’alimentation |
|
|
|
|
|
|
|
|
|
|
|||
Eteint |
|
|
|
|
|
|
|
|
|
|
||||
Allumé |
Système prêt |
|
|
|
|
|
|
|
|
|
|
|||
Clignotement lent |
Echec de la mise à jour du firmware |
|||||||||||||
Clignotement rapide |
EZSetup en cours |
|
|
|
|
|
|
|
|
|
|
|||
AIR (Réseau sans fil) |
Pas d’alimentation |
|
|
|
|
|
|
|
|
|
|
|||
Eteint |
|
|
|
|
|
|
|
|
|
|
||||
Allumé |
Système sans fil prêt |
|
|
|
|
|
||||||||
Clignotement |
Transmission ou réception de données en cours |
|||||||||||||
|
|
(via le réseau sans fil) |
|
|
|
|
|
|||||||
WAN (Réseau étendu) |
Pas d’alimentation ou de connexion physique |
|||||||||||||
Eteint |
||||||||||||||
Allumé |
Connexion physique à un réseau Ethernet |
|||||||||||||
Clignotement |
Transmission ou réception de données en cours |
|||||||||||||
|
|
(via le câble Ethernet) |
|
|
|
|
|
|||||||
LAN 1-4 (Réseau local sans fil) |
|
|
|
|
|
|
|
|
|
|
||||
Eteint |
Pas d'alimentation ou de connexion physique |
|||||||||||||
Allumé |
Connexion physique avec un réseau Ethernet |
|||||||||||||
Clignotement |
Transmission ou réception de données en cours |
|||||||||||||
|
|
(via le câble Ethernet) |
|
|
|
|
|
|||||||
3) Fixation murale
Al'extérieur de la boîte, le routeur sans filASUS WL-520GU/GC est conçu pour reposer à la verticale sur une surface plane comme un classeur ou une étagère à livres. Il peut également être converti afin d'être fixé à un mur ou au plafond.
Pour fixer le routeur ASUS WL-520GU/GC :
1.Repérez les quatre crochets de fixation placés
en dessous du routeur. 


2.Percez deux trous sur une surface plane en 


 suivant le modèle ci-contre.
3.Placez-y deux vis et serrez-les jusqu'à ce que seul un quart soit visible.
4.Emboîtez les deux crochets supérieurs du routeurASUS WL520GU/GC dans les vis.
 Note : Réajustez les vis si vous ne parvenez pas à emboîter le routeur sans fil d'ASUS dans ces dernières ou si la fixation est trop lâche.
18
Guide d’installation rapide du WL-520GU/GC
4. EZSetup
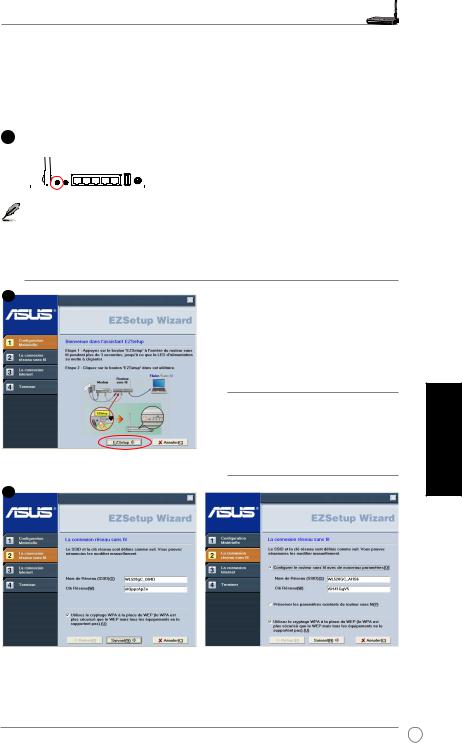
L'utilitaire EZSetup vous permet de configurer un réseau sans fil en deux simples étapes. Lancez d'abord EZSetup via le menu Démarrer, puis pressez au moins trois secondes le bouton EZSetup, situé à l'arrière du routeur.
1 |
Pressez le EZSetup au moins 3 sec. puis |
||||||||||||
relâchez-le. |
|||||||||||||
|
|
|
|
|
|
|
|
|
|
|
|
|
|
|
|
|
|
|
|
|
|
|
|
|
|
|
|
|
|
|
|
|
|
|
|
|
|
|
|
|
|
|
|
|
|
|
|
|
|
|
|
|
|
|
|
|
|
|
|
|
|
|
|
|
|
|
|
|
|
|
1) Si le bouton Setup est pressé alors que l’assistant EZsetup n’est pas en cours . |
|
d’exécution, alors la LED PWR clignotera et les connexions Internet seront |
|
interrompues pendant un cours instant, mais reprendront ensuite normalement, |
|
sans aucun changement.. |
|
2) Pour utiliser EZSetup, il est recommandé d'utiliser un adaptateur réseau sans fil |
|
tels que les modèles WL-106gM, WL-100gE, et WL-169gE. |
2 |
Insérez le CD d’utilitaires dans le lecteur CD |
|
de votre PC, et sélectionnez Install ASUS |
|
Wireless Router Utilities (Installer tous les |
|
utilitaires du routeur sans filASUS). |
Après avoir installé les utilitaires du routeur, lancez l’assistant EZSetup via [Démarrer] ->
All Utilities [ASUS Utility] -> [WL-520GU/GC Wireless Router].
Note: Utilisez l'assistant EZSetup avec un client sans fil à la fois. Si le client sans fil ne parvient pas à détecter le routeur en mode EZSetup, diminuez la distance entre le client et le routeur.
3
Français
Les paramètres sans fil, dont le nom réseau et les clés réseau, sont générés automatiquement. Vous pouvez également modifier ces paramètres manuellement. . Note : si votre routeur sans fil a été configuré auparavant, sélectionnez Préserver les paramètres existants du routeur sans fil pour utiliser les valeurs existantes. Cliquez sur Suivant pour continuer.
19
Guide d’installation rapide du WL-520GU/GC
4
Français
Si vous devez configurer les paramètres FAI pour votre routeur, sélectionnez Configurer les paramètres FAI, cliquez sur Suivant et suivez les instructions afin d'achever la procédure.
5
La configuration est terminée. Pressez le bouton Imprimer/Enregistrer les paramètres du réseau sans fil pour une future utilisation. Cliquez sur Terminer pour quitter l'utilitaire EZSetup.
20

WL-520GU/GC Broad Range Wireless Router - Guida Rapida
1.Contenuto della Confezione
•Router Wireless WL-520GU/GC x 1
•Alimentatore x 1
•Utility CD x 1
•Cavo RJ45 x 1
•Guida Rapida x 1
2.Specifiche Tecniche
Standard di
 Rete
Rete
Frequenza

Operativa
Velocità Dati
 .
.
Canale Operativo
Porta.
Antenna.
Pulsante EZSeup

Alimentazione *.
Sicurezza.
Controllo di
 Accesso.
Firewall

 .
.
Quality of Service
Gestione di
 Rete.
Rete.
Temperatura
Umidità
IEEE 802.11b, IEEE 802.11g, IEEE 802.3, IEEE802.3x, IEEE 802.3u, IEEE 802.1x, IEEE 802.11i, IPv4, IPv6, CSMA/CA, CSMA/CD, ICMP
2.4G ~ 2.5GHz.
802.11g: 6, 9, 12, 18, 24, 36, 48, 54Mbps. 802.11b: 1, 2, 5.5, 11Mbps
11 per N.America, 14 Giappone, 13 Europa (ETSI)
WAN x 1, LAN x 4 RJ45 per 10/100 BaseT, 1 x USB2.0 per condivisione stampante (solo WL-520GU)
SupportoAntenna Diversity, 1 x connettore per antenna Reverse-SMA
Configurazione automatica SSID e WEP o WPA
WL-520GU: DC: +5V con max. 2Adi corrente. WL-520GC: DC: EU/UK: +9V/1A; TW/US:+9V/800mA
WEP-64bits, WEP-128bits, WPA-Personal, WPA2-Personal, WPA-Auto-Personal (TKIP.AES. TKIP+AES), WPA-Enterprise, WPA2-Enterprise, WPA-Auto-Enterprise (TKIP.AES. TKIP+AES), Radius with 802.1x
Controllo diAccesso a livello MAC, Filtro IP in ingresso / in uscita, Controllo diAccesso al Dominio (DAC)
Firewall NAT, Firewall SPI (Stateful Package Inspection), Controllo ping WAN
BOD (solo WL-520GU), WMM
Supporto Server UPnP, DHCP, Proxy DNS, Client NTP, DDNS,
Trigger Porta, Server Virtuale, DMZ Virtuale, VPN Pass-Through
Operativa: 0~40oC |
Stoccaggio: -30~50oC |
Operativa: 50~90% |
Stoccaggio: 20~90% |
* Utilizzare soltanto l' alimentatore compreso nella confezione.
Italiano
21
WL-520GU/GC Broad Range Wireless Router - Guida Rapida
3. Connessione del Router Wireless a Modem via Cavo/DSL/Satellitare
1) Connessioni dei Cavi
Presa di Corrente a Parete
Modem
Telefono
Alimentazione
Presa Telefonica a Parete
Presa di Corrente a Parete
Router Wireless ASUS
LAN
Alimentazione
Presa di Corrente a Parete
Modem |
Router Wireless ASUS |
Alimentazione |
LAN |
Alimentazione |
Telefono
WAN
|
|
|
|
|
|
|
|
|
Antenna |
|
|
|
|
USB |
|||||||||||||||||
|
|
|
|
|
|
|
|
|
|
|
|
||||||||||||||||||||
|
|
|
|
|
|
|
|
|
|
|
|
|
|||||||||||||||||||
|
|
|
|
|
EZ Setup |
|
|
|
|
||||||||||||||||||||||
|
|
|
|
|
LAN |
|
|
|
|
|
|
|
|
|
|||||||||||||||||
|
|
|
|
|
|
|
|
|
Reset |
|
|
Power |
|||||||||||||||||||
|
|
|
|
|
|
|
|
||||||||||||||||||||||||
|
|
|
|
|
|
|
|
|
|
|
|
|
|
|
|
WAN |
|
|
|
|
|
|
|
|
|
|
|
|
|||
|
|
|
|
|
|
|
|
|
|
|
|
|
|
|
|
|
|
|
|
|
|
|
|
|
|
|
|
|
|
|
|
|
|
|
|
|
|
|
|
|
|
|
|
|
|
|
|
|
|
|
|
|
|
|
|
|
|
|
|
|
|
|
|
|
|
|
|
|
|
|
|
|
|
|
|
|
|
|
|
|
|
|
|
|
|
|
|
|
|
|
|
|
|
|
|
PANNELLO POSTERIORE
Presa Telefonica a Parete
Italiano
 Nota: Utilizzare soltanto l' alimentatore compreso nella confezione. L' impiego di altri alimentatori potrebbe danneggiare il dispositivo.
22
WL-520GU/GC Broad Range Wireless Router - Guida Rapida
2) Indicatori di Stato
PWR AIR WAN LAN
WL-520GU |
AIR WAN LAN1 LAN2 LAN3 LAN4 |
125M High Speed |
|
PWR (Alimentazione)
Spento |
Assenza diAlimentazione |
Acceso |
Sistema pronto |
Lampeggio Lento |
MancatoAggiornamento del Firmware |
Lampegghio VeloceEsecuzione di EZsetup |
|
AIR (Rete Wireless) |
|
Spento |
Assenza diAlimentazione |
Acceso |
Sistema Wireless pronto |
Lampeggiante |
Trasmissione o Ricezione Dati (wireless) |
WAN (Wide Area Network) |
|
Spento |
Assenza diAlimentazione o di Connessione Fisica |
Acceso |
Presenza di una Connessione Fisica a una Rete Ethernet |
Lampeggiante |
Trasmissione o Ricezione Dati (via cavo Ethernet) |
LAN 1-4 (Local Area Network) |
|
Spento |
Assenza diAlimentazione o di Connessione Fisica |
Acceso |
Presenza di una Connessione Fisica a una Rete Ethernet |
Lampeggiante |
Trasmissione o Ricezione Dati (via cavo Ethernet) |
3) Opzioni di Montaggio
Dopo essere stato prelevato dalla confezione, il Router Wireless ASUS WL-520GU/GC è stato progettato per essere posto su di una superficie piana rialzata, come un armadietto per documenti o una mensola. Il dispositivo dovrebbe anche essere adattato al montaggio su parete o soffitto.
Per montare ASUS WL-520GU/GC:
1. Localizzare i due ganci per il montaggio, sul lato inferiore dell' apparecchio.
2.Individuare i due fori superiori su una parete o una superficie piana rialzata.
3.Stringere le due viti, sino a quando restano esposte solo per 1/4'' .
4.Fissare i ganci diASUS WL520GU/GC alle viti.
Nota: Se il Router Wireless ASUS non è ben fissato o troppo allentato, regolare nuovamente le viti .
Italiano
23
WL-520GU/GC Broad Range Wireless Router - Guida Rapida
4. EZSetup
L' utilità EZSetup consente di completare facilmente la configurazione LAN wireless in due semplici passaggi. Innanzitutto, avviare EZSetup dal menu Start, quindi, premere il pulsante EZSetup, situato sul pannello posteriore, per circa tre secondi.
1 |
Premere EZSetup per circa 3 |
|
|||||||||||
sec. e poi rilasciare. |
|
||||||||||||
|
|
|
|
|
|
|
|
|
|
|
|
|
|
|
|
|
|
|
|
|
|
|
|
|
|
|
|
|
|
|
|
|
|
|
|
|
|
|
|
|
|
|
|
|
|
|
|
|
|
|
|
|
|
|
|
|
|
|
|
|
|
|
|
|
|
|
|
|
|
2
3
Italiano
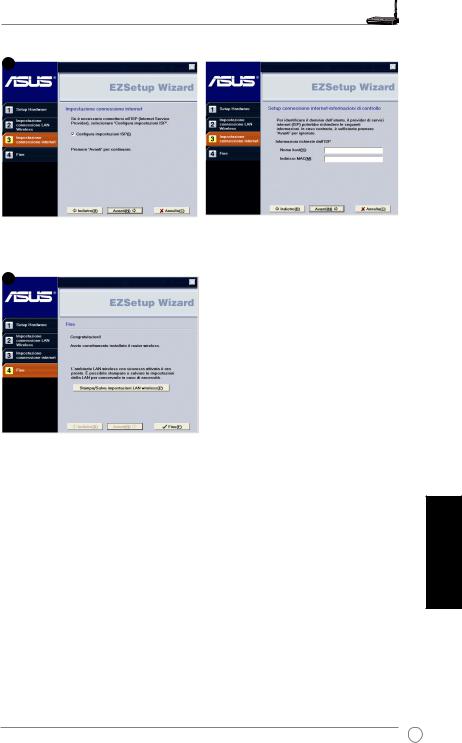
1) Se si preme il pulsante di configurazione, senza eseguire l' utilità EZsetup Wizard, l' indicatore PWR lampeggia e si interrompono temporaneamente le connessioni Internet, per poi tornare alla normalità, senza subire variazioni.
2). Con EZSetup, si consiglia di utilizzare un adattatore wirelessASUS, come WL-106gM, WL-100gEeWL-169gE.
Inserire il CD con le utilità nel drive per CD del
PC ed eseguire Installa le Utilità del Router
Wireless ASUS.
Alterminedell’installazione,eseguireEZSetup
Wizard da [Startup] -> Tutte le Utilità [ASUS
Utilità] -> [WL-520GU/GC Wireless Router].
Nota: Utilizzare EZSetup Wizard con un client wireless per volta. Se il computer client wireless non riesce a rilevare il router wireless, in modalità EZSetup, ridurre la distanza fra il client e il router.
Le impostazioni Wireless, compreso il nome di rete e le chiavi di rete, si generano automaticamente. Tali impostazioni possono essere modificate manualmente. Se il router wireless era stato configurato in precedenza, selezionare Conserva le impostazioni originarie del router wireless per utilizzare il valore in uso. Cliccare Avanti per continuare.
24
WL-520GU/GC Broad Range Wireless Router - Guida Rapida
4
Se si presenta la necessità di configurare le impostazioni ISP del router wireless, selezionare Configura impostazioni ISP, cliccare Avanti e seguire le istruzioni per completare l' operazione.
5
L' installazione è stata completata. Premere il pulsante Stampa/Salva impostazioni LAN Wireless per una futura consultazione. Cliccare Fine per uscire dall' utilità EZSetup.
Italiano
25
 Loading...