


 Loading...
ASUS MAXIMUS VI EXTREME, MAXIMUS VI FORMULA, MAXIMUS VI GENE, MAXIMUS VI HERO, MAXIMUS VI IMPACT User Manual
...
DE138
ROG AI Suite 3 User Manual Quick Menu
AI Suite 3
Installing AI Suite 3
Launching AI Suite 3
AI Suite 3 Main menu
Dual Intelligent Processors 4
AI Suite 3 Utilities
Dual Intelligent Processors 4 with 4-Way Optimization
Wi-Fi Engine
Wi-Fi GO!
Ai Charger+
EZ Update
USB 3.0 Boost
USB BIOS Flashback
USB Charger+
System Information
AI Suite 3
AI Suite 3 is an all-in-one interface that integrates several ASUS utilities and allows you to launch and operate these utilities simultaneously.
Installing AI Suite 3
• Ensure that you have an Administrator account before installing AI Suite 3 in Windows® 7 or Windows® 8 / Windows® 8.1 OS.
•To install the Wi-Fi-enabled features of AI Suite 3, ensure that you install the Wi-Fi module driver from the bundled support DVD. To do this, go to Drivers tab > ASUS Bluetooth 4.0 Wi-Fi Driver and follow the succeeding onscreen instructions.
To install AI Suite 3 on your computer:
Windows® 7 OS
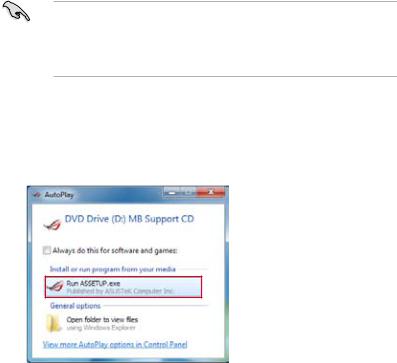
1.Place the Support DVD into the optical drive.
2.In the AutoPlay dialog box, click Run ASSETUP.exe then select the Utilities tab.
3.From the Utilities tab, click AI Suite 3 then follow the succeeding onscreen instructions.
|
ASUS ROG Series AI Suite 3 |

Windows® 8 / Windows® 8.1 OS
1.Place the Support DVD into the optical drive then follow the onscreen instructions.
2.From the ASUS motherboard support DVD main menu, select the Utilities tab and click or tap AI Suite 3.
3.Follow the succeeding onscreen instructions.
If the ASUS motherboard support DVD main menu does not appear, try the following steps:
a. Go to the Start screen then click or tap the Desktop app.
b. From the taskbar, click or tap File Explorer |
then select your DVD drive and |
double-click or tap the Setup application. |
|
Launching AI Suite 3
Windows® 7 OS
From the Desktop, click Start > All Programs > ASUS > AI Suite 3 > AI Suite 3.
You can also launch AI Suite 3 in Windows® 7 by clicking on the Notification area.
Windows® 8 / Windows® 8.1 OS
To launch AI Suite 3 in Windows® 8 / Windows® 8.1, tap the AI Suite 3 app on the Start screen (or if you’re using a mouse, click the AI Suite 3 app on the Start screen).
ASUS ROG Series AI Suite 3

AI Suite 3 Main menu
The AI Suite 3 main menu gives you easy-access controls and insight to what’s going on with your computer - allowing you to optimize performance settings while at the same time ensuring system stability.
Included in the AI Suite 3 main menu is a quick-access menu bar that allows you to swiftly launch any of the integrated ASUS utilities. Click or tap the  on the top-edge of menu to launch the menu bar.
Click to launch AI Suite 3 menu bar
The Ai Suite 3 screenshots in this section are for reference only and can vary depending on motherboard model.
AI Suite 3 main menu bar
4-Way |
USB BIOS |
Wi-Fi GO! |
Optimization |
Ai Charger+ EZ Update Flashback Wizard |
USB |
|
3.0 |
|
|
USB C |
|
harger+ |
|
i Engine |
|
System |
|
Wi-F |
||||||
Boost |
Information |
|
|
|
|
|
|||
• Some functions in the AI Suite 3 main menu in this user manual may vary depending on the motherboard model.
•Refer to the software manual in the support DVD or visit the ASUS website at www.asus.com for detailed software configuration.
|
ASUS ROG Series AI Suite 3 |

AI Suite 3 Utilities
Dual Intelligent Processors 4 with 4-Way Optimization
Dual Intelligent Processors 4 with 4-Way Optimization comes with these five utilities in one interface: 4-Way Optimization, TurboV Processing Unit (TPU), Energy Processing Unit (EPU), DIGI+ Power Control, and Fan Xpert 2.
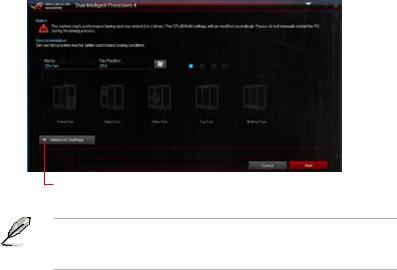
4-Way Optimization
The 4-Way Optimization utility allows you to automatically tweak the TPU, EPU, DIGI + Power Control and Fan Xpert 2 to their optimal settings.
4-Way Optimization screen
Click or tap to enable or disable the SATA ports’ power
Click or tap to enable or disable the Configured Max CPU Power
Select an advanced power saving mode
Click or tap this 4-Way Optimization button to auto-detect and tune the best settings for your system
Click or tap to view the 4-Way Optimization report
DO NOT remove your fan during the tuning process.
ASUS ROG Series AI Suite 3 |
|
Using 4-Way Optimization
Click or tap the 4-Way Optimization button then click or tap Start to auto-detect the best settings based on actual usage.
Click or tap to view |
Click or tap to go back to |
|
|
|
Click or tap to start |
|
|
|
|||||
more settings |
the 4-Way Optimization |
|
|
|
|
auto-tuning |
|
|
|
|
|||
|
main screen |
|
|
|||
• The system may reboot two or three times during the auto-tuning process.
• For Windows® 8 / Windows® 8.1 OS, click or tap Desktop app to monitor the autotuning process after every system reboot.
|
ASUS ROG Series AI Suite 3 |

TurboV Processing Unit (TPU)
TPU allows you to manually adjust the CPU frequency, CPU cache, core frequencies, DRAM frequency, and related voltages for an enhanced system stability and a performance boost.
Refer to the CPU documentation before adjusting CPU voltage settings. Setting a high voltage may damage the CPU permanently and setting a low voltage may lead to an unstable system.
For system stability, the TPU settings are not saved in the BIOS and are not loaded during system bootup. Save your overclocking settings as a TPU profile and manually load this profile after system bootup.
Using TPU
CPU Frequency
Tick to enable
Group Tuning
Click or tap to load the saved profile
Click or tap to save the adjustment into a profile
Click or tap to undo the adjustments
Click or tap or to adjust the Base Clock Frequency, CPU Ratio, and CPU Cache Ratio
Click or tap or to select the number of
cores to adjust
Scroll down then adjust the CPU voltages and DRAM voltages
Click or tap to apply the adjustments
•Set the CPU Core Ratio item in BIOS to [Auto] before using the CPU Frequency in TPU. Refer to section Extreme Tweaker menu in the BIOS chapter of your motherboard user manual for details.
•The CPU Frequency bars show the status of the CPU cores, which vary with your CPU model.
ASUS ROG Series AI Suite 3
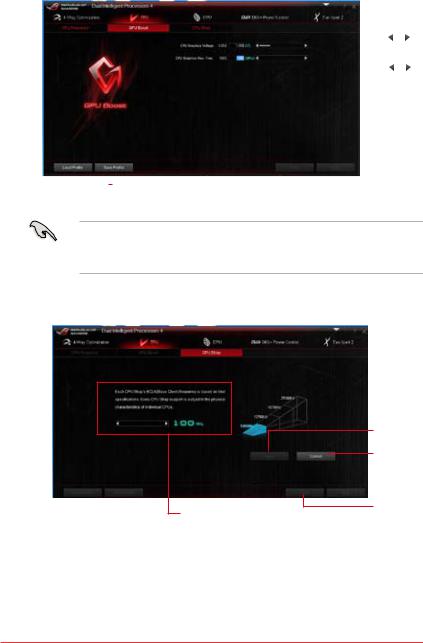
GPU Boost
|
|
|
|
|
|
|
|
|
Click |
or |
|
|
|
|
|
|
|
|
|
adjust the GPU |
|
|
|
|
|
|
|
|
|
|
||
|
|
|
|
|
|
|
|
|
Graphics voltage |
|
|
|
|
|
|
|
|
|
|
Click |
or |
|
|
|
|
|
|
|
|
|
to adjust the |
|
|
|
|
|
|
|
|
|
|
CPU graphics |
|
|
|
|
|
|
|
|
|
|
frequency |
|
|
|
|
|
|
|
|
|
|
Click to |
|
|
|
|
|
|
|
|
|
|
apply the |
|
|
|
|
|
|
|
|
|
|
adjustments |
|
|
|
|
|
|
|
|
||||
|
|
|
|
|
|
|
|
|
Click to |
|
|
|
|
|
|
|
|
|
|
||
Click to load the |
|
Click to save the |
|
|
|
|
|
undo the |
||
saved profile |
|
|
adjustment into a profile |
|
|
adjustments |
||||
• The overclocking result varies with the CPU model and the system configuration.
•We recommend that you set up a better thermal environment to prevent overheating from damaging the motherboard.
CPU Strap
Click to load |
|
|
|
the saved |
|
Click to save the |
|
|
|||
profile |
adjustment into a |
||
|
|
profile |
|
Drag the slider to adjust the CPU Strap’s BCLK (base clock) frequency
Click to apply CPU Strap settings
Click to cancel the CPU Strap settings
Click to apply the  adjustments
Click to undo the adjustments
ASUS ROG Series AI Suite 3

Energy Processing Unit (EPU)
EPU is an energy-processing utility that allows you to adjust the CPU, GPU, and Fan Control settings to their power-saving conditions.
Using EPU Auto
Tick to select Voltage
Decrement setting
|
|
|
|
|
|
|
|
|
|
|
Tick to enable |
|
|
|
|
|
|
|
|
|
|
|
Away Mode |
|
|
|
|
|
|
|
|
|
|
|
and move |
|
|
|
|
|
|
|
|
|
|
|
the sliders to |
|
|
|
|
|
|
|
|
|
|
||
|
|
|
|
|
|
|
|
|
|
|
adjust monitor |
|
|
|
|
|
|
|
|
|
|
|
and system |
|
|
|
|
|
|
||||||
|
|
|
|
|
|
|
|
|
|
|
sleep time |
|
|
|
|
|
|
|
|
|
|
|
Click or tap to |
|
|
|
|
|
|
|
|
|
|
|
select a fan |
|
|
|
|
|
|
|
|
|
|
|
|
|
|
|
|
|
|
|
|
|
|
|
profile |
|
|
|
|
|
|
|
|
|
|
|
Click or tap |
|
|
|
|
|
|
|
|
|
|
|
to apply the |
|
|
|
|
|
|
|
|
|
|
|
|
|
|
|
|
|
|
|
|
|
|
|
adjustments |
|
Click or tap to apply the |
|
|
|
Click or tap to undo the |
||||||
|
|
|
default settings |
|
|
|
|
adjustments |
|||
High Performance
Tick to enable Away Mode and move the sliders to
adjust monitor and system sleep time
|
|
|
|
|
|
Click or tap |
|
|
|
|
|
|
to apply the |
|
|
|
|
|
|
|
|
|
|
|
|
|
adjustments |
Click or tap to apply the |
|
|
Click or tap to undo the |
|||
default settings |
|
|
|
adjustments |
||
ASUS ROG Series AI Suite 3 |
|
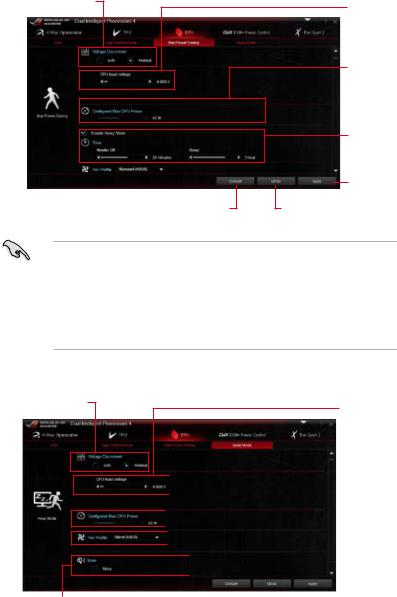
Max Power Saving
Tick to select Voltage
Decrement setting
|
|
|
|
|
Click or tap to select a |
|
Click or tap to apply the |
||
fan profile |
|
|
default settings |
|
Move the slider to adjust the CPU Input Voltage
Move the slider to adjust the maximum CPU power
Tick to enable Away Mode then move the sliders to adjust monitor and system sleep time
Click or tap to apply the adjustments
Click or tap to undo the adjustments
•When you enable the Configured Max CPU Power to boost the energy saving condition, the CPU frequency is displayed at 800 MHz in the Windows® OS information of your computer. However, the actual CPU frequency varies depending on the wattage that you manually set. You can adjust the CPU wattage from the lowest point to your preferred value.
•Configured Max CPU Power may decrease the total power delivery to the CPU and affects the CPU performance under a heavy system. To restore your system to its default settings, reboot your computer.
Away Mode
Tick to select Voltage Decrement setting
Tick to mute the system’s sound
Move the slider to adjust the CPU Input Voltage
|
|
|
|
|
|
|
|
|
|
Move the |
|
|
|
|
|
|
|
|
|
|
slider to adjust |
|
|
|
|
|
|
|
|
|
|
the maximum |
|
|
|
|
|
|
|
|
|
|
CPU power |
|
|
|
|
|
|
|
|
|
|
|
|
|
|
|
|
|
|
|
|
|
Click or tap to |
|
|
|
|
|
|
|
|
|||
|
|
|
|
|
|
|
|
|||
|
|
|
|
|
|
|
|
|
|
select a fan |
|
|
|
|
|
|
|
|
|
|
|
|
|
|
|
|
|
|
|
|
|
profile |
|
|
|
|
|
|
|
|
|
|
Click or tap |
|
|
|
|
|
|
|
|
|
|
to apply the |
|
|
|
|
|
|
|
|
|
|
adjustments |
|
|
|
|
|
|
|
|
|||
Click or tap to apply the |
|
|
Click or tap to undo the |
|||||||
|
default settings |
|
|
|
adjustments |
|||||
10 |
ASUS ROG Series AI Suite 3 |
DIGI+ Power Control
DIGI+ Power Control utility allows you to adjust the CPU and DRAM power settings for optimal system efficiency, and overall system stability and performance.
Adjusting the CPU Power
Click or tap to switch between screens
Click or tap to undo |
|
|
|
Click or tap to |
the changes |
|
apply the changes |
||
CPU Load-line Calibration
It allows you to adjust the voltage range to control the CPU Load-line. Adjust to a high value for system performance or to a low value for power efficiency.
CPU Current Capability
CPU Current Capability provides a wider total power range for overclocking. A higher value brings a wider total power range and extends the overclocking frequence range simultaneously.
CPU Power Phase Control
Increase the phase number under a heavy system load to get more transient and better thermal performance. Reduce the phase number under a light system load to increase the VRM efficiency.
* The system automatically sets the default to [Extreme] when using the Intel® iGPU.
CPU Power Thermal Control
A higher temperature brings a wider CPU power thermal range and extends the overclocking tolerance to enlarge the overclocking potential.
ASUS ROG Series AI Suite 3 |
11 |

CPU Voltage Frequency
CPU Voltage Frequency affects the VRM transient response and thermal conditions. Higher VRM frequency gets a quicker transient response.
Active Frequency Mode
Active Frequency Mode allows you to enhance the power saving condition of the CPU. Tick ON to get a quicker transient response while saving the CPU power.
CPU Power Duty Control
CPU Power Duty Control adjusts the current of every VRM phase and the thermal conditions of every phase component.
Adjusting the DRAM Power
Click or tap to undo |
|
|
|
Click or tap to |
the changes |
|
apply the changes |
||
DRAM Current Capability
A higher value brings a wider total power range and extends the overclocking frequency range simultaneously.
DRAM Voltage Frequency
Allows you to adjust the DRAM switching frequency to stabilize the system or to increase the overclocking range.
DRAM Power Phase Control
Select Extreme for full phase mode to increase system performance or select
Optimized forASUS optimized phase tuning profile to increase the DRAM power efficiency.
• The actual performance boost may vary depending on your CPU specification.
• Ensure that the cooling modules are properly installed in your motherboard to monitor the thermal conditions.
12 |
ASUS ROG Series AI Suite 3 |
Loading...