


USER GUIDE
THE LEADER IN PERSONAL STORAGE
Copyright © Apricorn, Inc. 2008. All rights reserved.
Windows is a registered trademark of Microsoft Corporation.
All other trademarks and copyrights referred to are the property of their respective owners.
Anytime (GB) is used in this document: One gigabyte (GB) = one billion bytes; accessible capacity will be less and actual capacity depends on the operating environment and formatting.
Distribution of substantively modified versions of this document is prohibited without the explicit permission of the copyright holder.
Distribution of the work or derivative work in any standard (paper) book form for commercial purposes is prohibited unless prior permission is obtained from the copyright holder.
DOCUMENTATION IS PROVIDED AS IS AND ALL EXPRESS OR IMPLIED CONDITIONS, REPRESENTATIONS AND WARRANTIES, INCLUDING ANY IMPLIED WARRANTY OF MERCHANTABILITY, FITNESS FOR A PARTICULAR PURPOSE OR NON-INFRINGEMENT, ARE DISCLAIMED, EXCEPT TO THE EXTENT THAT SUCH DISCLAIMERS ARE HELD TO BE LEGALLY INVALID.
2 The Leader in Personal Storage
|
|
TABLE OF CONTENTS |
|
1. |
Introduction ................................................................................ |
4 |
|
|
System Requirements ...................................................................... |
4 |
|
|
Getting to know your Apricorn product............................................... |
5 |
|
|
Package Contents .......................................................................... |
5 |
|
|
Front Panel .................................................................................. |
6 |
|
|
Rear Panel |
.................................................................................... |
6 |
2. |
Hard Drive Installation .................................................................. |
7 |
|
3. |
Connecting your EZ Bus DTS ........................................................... |
9 |
|
|
Installing the Single Port eSATA PCI Bracket .................................... |
10 |
|
4. |
Software ..................................................................................... |
|
11 |
|
Before your Backup! ....................................................................... |
11 |
|
|
EZ Gig II |
install instructions for Vista ........................................... |
12 |
|
EZ Gig II |
for Windows ................................................................ |
13 |
|
Cloning your Hard Drive with Disk Clone .......................................... |
14 |
|
|
Imaging your Hard Drive with Create Image Wizard ............................. |
19 |
|
|
Smart-ER Hard Drive Monitor for Windows ...................................... |
24 |
|
|
Microsoft SyncToy™1.4 for Windows ............................................ |
24 |
|
|
SuperDuper! Backup Software for Mac ............................................ |
25 |
|
|
Synchronize! X for Mac .................................................................. |
26 |
|
|
Initializing your Hard Drive ............................................................. |
27 |
|
|
Reformatting you Hard Drive ........................................................... |
30 |
|
5. |
Disconnecting your EZ Bus DTS ....................................................... |
33 |
|
6. |
Contacting Technical Support ........................................................... |
34 |
|
|
RMA Policy ................................................................................... |
34 |
|
|
Warranty Conditions ...................................................................... |
35 |
|
7. |
FAQs ........................................................................................... |
|
36 |
www.apricorn.com 3

1. INTRODUCTION
Thank you for purchasing your EZ Bus DTS system.
Engineered for desktop and notebook applications, the EZ Bus Desktop family of storage & backup products has two models to choose from: USB 2.0 (EZ Bus DT) and Serial ATA/USB 2.0 (EZ Bus DTS).
The EZ Bus DTS is for use with SATA (Serial Advanced Technology Attachment) hard drives and connected to any system that offers a eSATA or USB Type B port for USB 2.0/1.1 compatibility.
Backing up your invaluable data has never been easier. The ultra-cool fan keeps the enclosure at optimal temperatures which will extend the life of your hard drive and data.
System Requirements
Hardware: Pentium II CPU or Apple G3 or later 128MB RAM
CD ROM or CD-RW drive
For use with SATA:
SATA compatible mother board with an open SATA port and an open case expansion slot bracket cover or eSATA PCI card installed with an open eSATA port
For use with USB: USB 2.0/1.1 Port
Operating systems:
Microsoft: Windows Vista Home Basic/Premium, Ultimate & Business
Windows XP Home and Professional Windows 2000 Professional
Mac: OS 9.2 or higher OS X 10.2 and later
4 The Leader in Personal Storage

GETTING TO KNOW YOUR APRICORN PRODUCT
Package Contents
PC
EZ Gig II Backup & Disaster Recovery Software
SMART-ER - Hard Drive Monitor
Microsoft SyncToy® 1.4 download
Mac
ShirtPocket SuperDuper! - Backup Software
Synchronize! X - Synchronization software
Apricorn Data Protection Suite
EZ Bus DTS Stand
EZ Bus DTS Enclosure
eSATA to eSATA Cable
Single Port eSATA PCI Bracket
USB Cable
AC Adapter |
AC Cable |
|
|
www.apricorn.com |
5 |
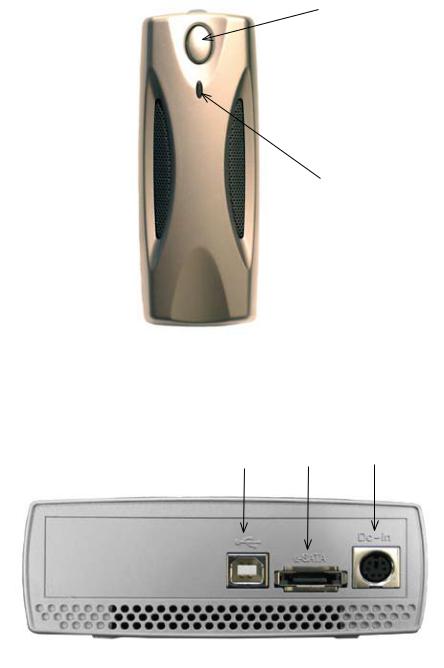
Front Panel
On/Off Switch
LED activity/
Power Indicator
Light
Rear Panel
USB Cable |
SATA Cable |
AC Adapter |
Connection |
Connection |
Connection |
6 The Leader in Personal Storage
2. HARD DRIVE INSTALLATION
EZ Bus DTS Kit hard disk drive installation instructions (the kit is shipped without a Serial ATA hard disk drive). If you purchased an EZ Bus DTS with a hard drive already installed, please proceed to page 8.
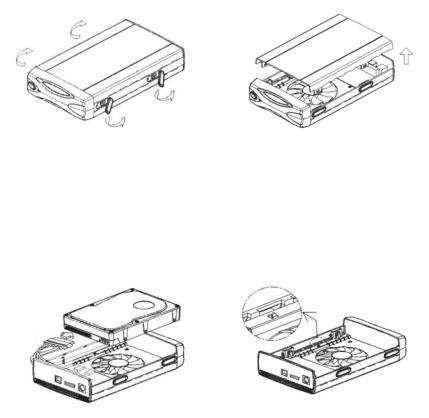
Please follow the steps as below for installing your HDD into the EZ-BUS-DTS enclosure.
1. Pull and rotate the rubber |
2. Gently lift the top cover. |
plugs. |
|
3. Attach the cable to the hard disk drive.
www.apricorn.com 7

4.Replace the top cover by inserting the tabs into the slots on the bottom of the case.
6.Rotate the rubber plugs to the original positions.
5.Screw the top cover and the hard disk drive.
7.You are now ready to use your EZ-Bus-DTS.
8.Proceed to the section on initializing, partitioning and formatting your new hard drive.
8 The Leader in Personal Storage
3. CONNECTING YOUR EZ BUS DTS
You have two choices for setting up your EZ Bus DTS. You may use either the eSATA to eSATA cable or the USB cable provided:
For use with the eSATA cable on a system with a pre-installed eSATA card:
1. Start by turning off your computer.
3.Connect the eSATA cable to the eSATA port at the rear of the EZ Bus DTS and the other end to an available port on your pre-installed eSATA card
4.Connect the AC adapter at the rear of the EZ Bus DTS and then plug into an available wall outlet or power strip.
5.Push the on switch located on the front of the EZ Bus DTS. The indicator light will come on to let you know that the EZ Bus DTS is powered.
6.Now, power up your computer.
For use with the USB cable:
1.Connect the USB cable to the USB port at the rear of the EZ Bus DTS and to an available USB Port on your computer.
2.Connect the AC adapter at the rear of the EZ Bus DTS and then plug into an available wall outlet or power strip.
3.Push the on switch located on the front of the EZ Bus DTS. The indicator light will come on to let you know that the EZ Bus DTS is powered.
www.apricorn.com 9
Installing the Single Port eSATA PCI Bracket
Installing the Single Port eSATA PCI Bracket applies only for Desktop computers. The desktop computer must be equipped with a SATA compatible motherboard, an open SATA port and open PCI bracket insert on the case.
Please consult the manufacturers documentation for compatibility and instructions on how to open the case and find the appropriate port. Anytime you make a connection to a port directly on the motherboard extreme caution should be observed including but not limited to turning the power off to the computer, dissipating power and electrostatic charges. See the FAQ’s for basic Electrostatic Discharge instructions.
1.Turn off the power to your desktop computer.
2.Disconnect the power cable and then hit the power button on your desktop computer to discharge any power stored on the motherboard.
3.Discharge any electrostatic charge that is built up by touching a bare metal portion of the computer case.
Refer to the FAQs for basic ESD information or the manufacturer’s documentation for more in-depth information about proper Electrostatic Discharge precautions when working with your motherboard.
4.Open the case and locate the open SATA port on the motherboard.
5.Connect the SATA end of the of the Single Port eSATA PCI Bracket to the open SATA port on the motherboard.
6.Remove one of the case expansion slot brackets / inserts (cover or back plates) from the back of computer case and insert the Single Port eSATA PCI Bracket into that slot and secure with the same screw that was holding the PCI bracket insert.
7.Close the computer case and go back to the beginning of Section 3 CONNECTING YOUR EZ BUS DTS (for a system with a pre-installed eSATA
card) and follow the instructions.
10 The Leader in Personal Storage
4. SOFTWARE
Before You Backup!
With more of your work and personal life becoming digitized, backups are essential.
Backups protect and preserve precious data, music files, digital photos, digital videos and other important computer documents from being lost forever.
The following next few steps are recommendations to consider before backing up, to help the process run smoothly:
1.Ensure there are no file system errors by running Windows Check Disk
(or a similar check disk utility) on your computer’s internal hard disk drive.
2.Defragment your computer’s internal hard disk drive by using Windows Disk Defragmenter (or a similar disk defragmenter utility).
3.Make copies of any important files or data to another drive.
4.Hard drive backups work best when done on a regular basis. Take a moment to establish a backup plan that works for you.
Disk Clone and Disk Image will both create a full backup of your system.
Use Disk Image and create a full backup each day, week or month depending on how critical your data is and how far back you would like to recover a version of the files you are working with.
Use Disk Clone and create a full backup if you are upgrading to a larger hard drive or anytime you want or need to have an exact bootable clone of your hard drive.
5.Once you have decided upon your plan, proceed to the appropriate sections in this manual to either use Disk Clone or Disk Image.
www.apricorn.com 11

EZ Gig II installation instructions for Windows Vista:
Windows Vista’s User Account Control helps stop unauthorized changes to your computer. The User Account Control window pops up in Administrator Approval Mode whenever a program tries to install on your Windows Vista system. If the User Account Control window does not pop up, please skip to the EZ Gig II installation.
When the User Account Control window pops up there will be a warning symbol and message that reads, “A program needs your permission to continue.” The instructions will read “If you started this program, Continue.”
Please click the Continue button and proceed to the EZ Gig II main installation screen.
Change the default “Power Options” for Windows Vista operating systems:
Be default Windows Vista operating system will “Turn display off” after 20 minutes and “Put the computer to sleep” after 1 hour of keyboard or mouse inactivity. It will take more than 20 minutes to backup most of today’s larger hard drives. If the system goes into display is turned off or the computer goes to sleep during the backup, your backup may fail. This will not damage your original hard drive in any way but you will have to restart the backup. To avoid this issue change the default “Power Options” before starting the backup on Windows Vista Systems.
From your Window Vista Start menu type “Power Options” in the “Start Search bar” and the “Power Options” program will be listed in the results window. Alternately you can go to Start Menu – Control Panel – Power Options. Click on “Power Options” to launch the program. On the left window click on “Choose when to turn off display” and make the changes as listed below.
Turn Display Off |
Never |
Put computer to sleep |
Never |
Once you have completed the backup go to “Power Options” and restore the default settings.
12 The Leader in Personal Storage
EZ Gig II for Windows
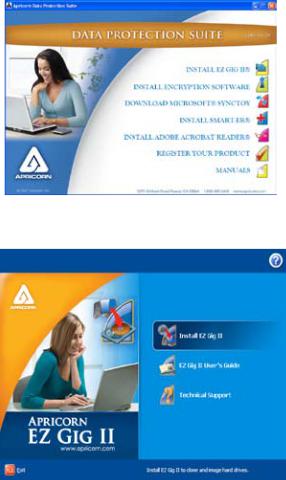
1.Insert Apricorn CD into your CD-ROM drive.
2.Setup screen will pop up. Click Install EZ GIG II button.
3. EZ Gig II installation screen will pop up.
4. Follow instructions for installation.
www.apricorn.com 13

Read all instructions carefully before cloning. This is only a quick overview of how to use Disk Clone in Typical Mode. For detailed instructions including the custom options read Chapter 10 “Transferring the system to a new disk” located in the EZ Gig II User Guide located on the Apricorn software CD that came with your Apricorn product. Alternately if you have installed EZ GIG II on Windows, go to: start/All Programs/Apricorn/ Apricorn EZ Gig II/Apricorn EZ Gig II User Guide
Cloning your hard drive with Disk Clone
EZ Gig II allows you to clone your hard drive from inside the Windows operating system or by booting directly to the Apricorn Software CD provided with the product you purchased. If your system is running normally we recommend that you clone your hard drive by starting up the program inside the Windows operating system.
1. Ensure your Apricorn product is connected to your computer.
2.To start EZ Gig II, click Start > Programs > Apricorn > EZ Gig II and click on Apricorn EZ Gig II. This will open the main screen of EZ Gig II. You can also click on the Apricorn EZ Gig II icon on the Desktop.
3.On the main screen double click on the Clone Disk icon to open Disk Clone Wizard.
14 The Leader in Personal Storage
 Loading...