


User Guide
THE LEADER IN PERSONAL STORAGE
Copyright © Apricorn, Inc. 2004. All rights reserved.
Windows and MS-DOS are registered trademarks of Microsoft Corporation.
All other trademarks and copyrights referred to are the property of their respective owners.
Distribution of substantively modified versions of this document is prohibited without the explicit permission of the copyright holder.
Distribution of the work or derivative work in any standard (paper) book form for commercial purposes is prohibited unless prior permission is obtained from the copyright holder.
DOCUMENTATION IS PROVIDED AS IS AND ALL EXPRESS OR IMPLIED CONDITIONS, REPRESENTATIONS AND WARRANTIES, INCLUDING ANY IMPLIED WARRANTY OF MERCHANTABILITY, FITNESS FOR A PARTICULAR PURPOSE OR NON-INFRINGEMENT, ARE DISCLAIMED, EXCEPT TO THE EXTENT THAT SUCH DISCLAIMERS ARE HELD TO BE LEGALLY INVALID.
TABLE OF CONTENTS
1. |
INTRODUCTION .............................................................. |
1 |
2. |
GETTING TO KNOW YOUR EZ BUS ........................................ |
2 |
|
A. PACKAGE CONTENTS ................................................... |
2 |
|
B. SYSTEM REQUIREMENTS ............................................... |
3 |
|
C. REAR PANEL OF EZ BUS .............................................. |
3 |
|
D. SET-UP OF THE EZ BUS .............................................. |
4 |
3. |
SOFTWARE ................................................................... |
5 |
|
A. BEFORE YOUR BACKUP! ................................................ |
5 |
|
B. INSTALLATION OF EZ GIG II ......................................... |
6 |
|
C. CONNECTING TO WINDOWS 98SE OR ME .......................... |
7 |
|
D. CLONING YOUR HARD DRIVE WITH CLONE EZ ..................... |
9 |
|
E. IMAGING YOUR HARD DRIVE WITH IMAGE EZ ...................... |
14 |
|
F. REFORMATTING YOUR HARD DRIVE .................................. |
16 |
|
G. CRYPTAINER ............................................................. |
19 |
|
H. SECOND COPY .......................................................... |
20 |
4. |
DISCONNECTING ............................................................. |
21 |
5. |
CONTACTING TECHNICAL SUPPORT ........................................ |
22 |
6. |
RMA POLICY ............................................................... |
22 |
7. |
WARRANTY CONDITIONS ................................................... |
23 |
8. |
FAQS ........................................................................ |
24 |
1. INTRODUCTION
Thank you for purchasing your EZ Bus system.
EZ Bus is the ultimate portable hard drive and backup system. Its sleek, slim, self-powered design makes it the perfect traveling companion so you can backup or reinstall your data wherever you are.
Engineered for people on the go, EZ Bus comes with everything that you need, including USB Cable, backup software and a heavy weight nylon travel pouch to protect the drive and keep you organized while traveling.
With storage capacities up to 100GB you will have plenty of space to not only back up your system, but for additional storage of all of your digital photographs, emails, music and video files.
Regardless of whether you use a notebook or a desktop PC, EZ Bus is the ideal hard drive to add additional capacity to your system. Simply plug EZ Bus into a USB port and you’ve instantly increased the storage capabilities of the computer.
The included award winning EZ Gig II Back & Disaster Recovery Software is comprised of two separate programs complete protection for your entire computer system.
Clone EZ creates an exact bootable clone of your hard drive creating a disaster recovery backup of your system. In the even of a hard drive failure, you can be back up and running in minutes.
Image EZ takes a snapshot of your entire system and compresses it into a file half its original size, thus enabling multiple backups to a single drive. This method saves hours of system rebuilding and is simple and easy to use.
1The Leader in Personal Storage

2. GETTING TO KNOW YOUR EZ BUS
A. Package Contents
EZ Bus Enclosure |
EZ Bus Carrying Case |
USB Mini B to |
AC Adapter to |
AC Adapter to |
USB Cable |
PS/2 Cable |
USB Cable |
EZ Gig II Software and
Encryption and Synchronization Software
www.apricorn.com 2
B. System Requirements
To use the EZ Bus effectively, you will need the following minimum system setup:
Hardware:
Pentium II 350MHz compatible process or higher 64MBs RAM
USB 2.0/1.1 or FireWire port CD ROM drive
Operating Systems:
Microsoft:
Windows 98SE, Me
Windows 2000 Professional
Windows XP Home and Professsional
Apple:
Mac OS 9.X and later (in USB 1.1 mode only)
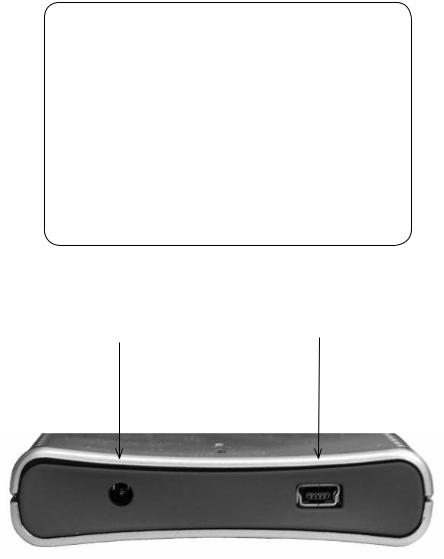
C. Rear Panel of EZ BUS |
|
AC Adapter |
USB Mini B |
Connection |
Connection |
3The Leader in Personal Storage
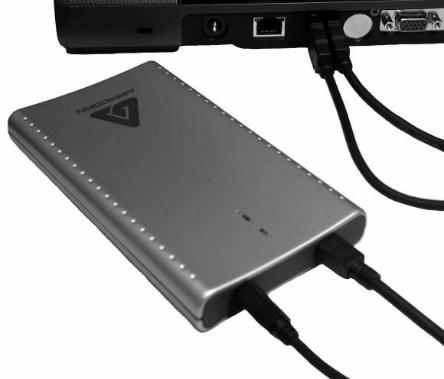
D. Set-Up of the EZ Bus
You will need to connect two cables to the EZ Bus in order to power the product correctly.
1.For the USB Mini B to USB connector, connect the USB Mini B side to the open USB Mini B port on the EZ Bus and then connect the USB connector to an open USB port on your computer.
2.For the AC Adapter, you have two choices: the AC Adapter to PS/2 cable or the AC Adapter to USB cable. Plug the AC Adapter end into the EZ Bus and then connect the other side of the cable into the appropriate open port on your computer.
The set up example below uses the USB Mini B to USB Cable and the AC Adapter to USB Cable.
www.apricorn.com 4

3. SOFTWARE
A. Before You Backup!
With more of your work and personal life becoming digitized, backups are essential. Backups protect and preserve precious data, music files, digital photos, digital videos and other important computer documents from being lost forever.
Follow the next few steps before backing up to help the process run smoothly:
1.Ensure there are no file system errors by running Windows Disk Cleanup (or a similar disk cleanup utility) on your computer’s internal hard disk drive.
2.Defragment your computer’s internal hard disk drive by using Windows Disk Defragmenter (or a similar disk defragment utility).
3.Make copies of any important files or data to another drive.
4.Hard drive backups work best when done on a regular basis. Take a moment to establish a backup plan that works for you.
For example:
a.Perform full backups (using Clone EZ, exact bootable clone of your hard drive) at the end of each month.
and/or
b.Perform weekly backups (using Image EZ, compressed image of your entire hard drive or partition).
5.Once you have decided upon your plan, install EZ Gig II (p. 7) and then go to the appropriate sections in this manual to either use Clone EZ or Image EZ.
5The Leader in Personal Storage
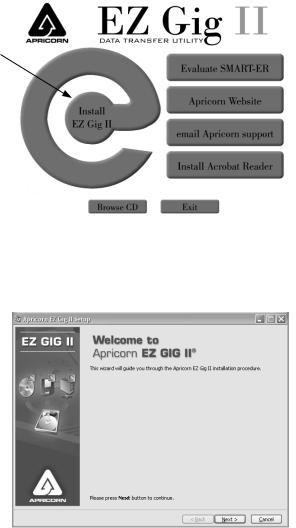
B.Installation of EZ Gig II:
1.Insert EZ Gig II CD into your CD-ROM drive.
2.EZ Gig II screen (shown) will pop up.
3.Click on Install EZ Gig II.
4. Follow instructions for installation.
www.apricorn.com 6

C.Connecting to Windows 98SE or Me
1.Close all open applications
2.Place the EZ Gig II CD into the CD-ROM drive.
3.When the EZ Gig II screen appears, click the Browse CD button.
4.Open the Drivers Folder and then open the EZ Bus Folder
7The Leader in Personal Storage
 Loading...