


 Loading...
EZ Upgrade
NOTEBOOK HARD DRIVE UPGRADE KIT
User’s Guide
Attention:
If your EZ Upgrade shipped with a previous version of EZ Gig II, you can download the new EZ Gig III from Apricorn’s website at:
http://www.apricorn.com/ezgig
Review the most current EZ Upgrade FAQ’s at: http://www.apricorn.com/support.php

TABLE OF CONTENTS
Getting to know your EZ Upgrade |
4 |
Introduction |
4 |
The Package Contains |
4 |
System Requirements |
5 |
Connecting your EZ Upgrade |
6 |
Hard Drive Installation |
6 |
For SATA hard drives: |
6 |
For PATA/IDE hard drives: |
7 |
Before Running the Software |
8 |
Before running EZ Gig III we recommend |
8 |
EZ Gig III instructions for Windows 7 & Vista |
9 |
Changing the default “Power Options” |
9 |
Connecting Your Hard Drive |
10 |
EZ Gig III Start Up Options |
10 |
Creating a Bootable EZ Gig III CD |
11 |
Cloning your hard drive with EZ Gig III |
12 |
Selecting the Source Drive |
13 |
Selecting the Destination Drive |
14 |
Speed Test |
14 |
Drive Verification |
15 |
Advanced Options |
16 |
Verify Copy |
16 |
Copy Free Areas |
16 |
SmartCopy |
16 |
Media Direct (Dell) |
16 |
More Advanced Options |
17 |
FastCopy |
17 |
SafeRescue |
17 |
CachedMemory |
17 |
SharedMemory |
17 |
Animation |
17 |
HotCopy / LiveImage |
18 |
Avoid exclusive read access |
18 |
Partitions |
19 |
Start Clone |
21 |
Interupting the Cloning Process |
22 |
Aborting the Cloning Process |
22 |
Interupting the Verification process |
22 |
Congratulations your Clone is Complete |
23 |
SuperDuper! Backup Software for Mac |
24 |
After the Clone |
25 |
Using the EZ Upgrade as a external backup drive |
25 |
Device Removal (Windows) |
26 |
EZ Upgrade FAQs |
27 |
EZ Gig III FAQs |
30 |
Load errors |
30 |
Error #5002 and ‘Disk error’ |
30 |
Keyboard and mouse |
30 |
General problems |
31 |
Slowed down system |
31 |
Read, write and verification errors |
31 |
IDE/ATA/SATA |
31 |
Hard disk not recognized |
31 |
IDE controller not found |
31 |
Source & Destination Size Differences |
32 |
Equal Size |
32 |
Small to large |
32 |
Large to small |
33 |
Automatic troubleshooting |
33 |
Intensive reading/writing |
33 |
Read errors |
33 |
Write errors |
33 |
Verification errors |
34 |
Contacting Technical Support |
35 |
RMA Policy |
35 |
Warranty Conditions |
36 |
Resizing your partitions manually |
20 |
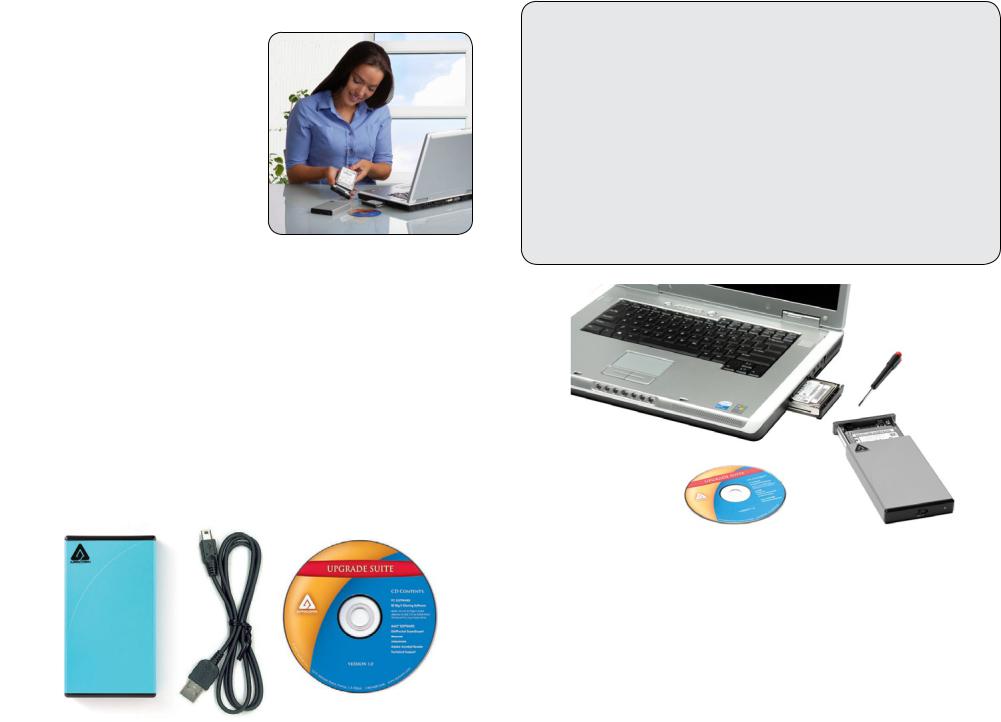
Getting to know your EZ Upgrade
Introduction
EZ Upgrade kit is a complete hardware and software solution that makes upgrading notebook hard drives fast and easy. This kit includes everything you will need to quickly transfer all files, e-mail, settings, applications and the operating system from the hard drive in your notebook to a new SATA or PATA/IDE hard drive whether you have a Windows or Mac operating system.
Once the new drive is installed in the notebook, the old drive can be installed in EZ Upgrade’s Hi-Speed USB 2.0 enclosure for an external storage and backup solution.
The Package Contains
EZ Upgrade Enclosure for SATA & PATA/IDE Hard Drives
USB Cable for Data and Power
Upgrade Suite CD
•Apricorn EZ Gig III
•ShirtPocket SuperDuper! Lite
Quick Start Guide
If external power is needed, an External AC power adapter may be purchased separately from Apricorn. 1-800-458-5448
System Requirements
Hardware: Pentium CPU II or Apple G3 or later 128MBs RAM
Available USB Port
CD ROM or CD-RW drive
Supported Operating systems:
Microsoft: Windows 7, Vista, XP and 2000
Mac: |
OS 9.2 or later |
|
|
|
OS X 10.2 or later |
|
|
|
|
|
|
4 |
www.apricorn.com |
www.apricorn.com |
5 |
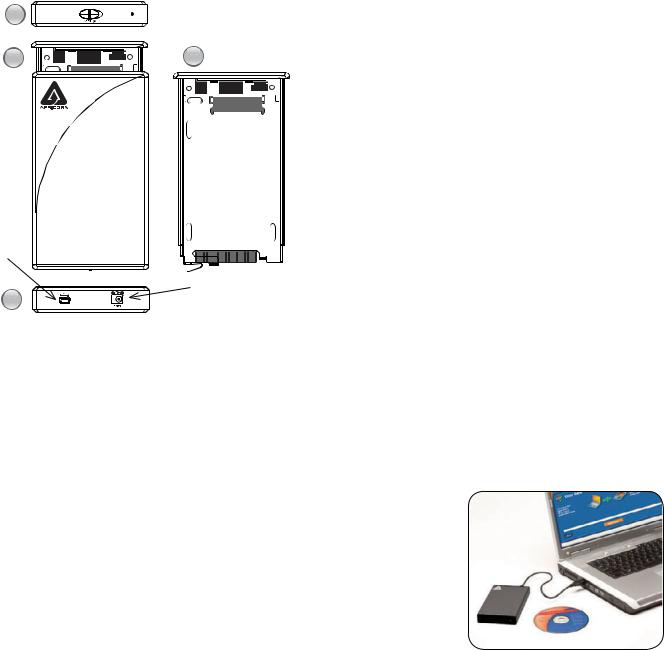
Connecting your EZ Upgrade
1 |
|
2 |
3 |
USB
Mini
Port
|
Power |
4 |
Port |
Hard Drive Installation
Follow these steps to install the Hard Disk into the EZ Upgrade Enclosure:
Step 1 Hold the EZ UP enclosure with both hands. Locate the OPEN switch (diagram 1) and with one hand over the opposite end of the drive slide the OPEN switch in the direction of the arrow to release the hard drive tray. The hard drive tray will slide out of the enclosure into your other hand. (diagram 2)
Step 2 Instructions for inserting the hard drive. (diagram 3)
For SATA hard drives:
Hold the hard drive tray in one hand with the SATA connector (the connector that is closest to the plastic end cap where you connect the cables) away from your body. Now, with the label side up grab the sides of the hard drive with the other hand and set the hard drive into the tray with the SATA blade connector away from your body. Carefully slide the hard drive by placing your thumb on the back edge and pushing it
towards the black socket facing away from your body until it is completely seated. The sidewalls of the hard drive tray will act as a guide, properly aligning the SATA blade connector.
6 |
www.apricorn.com |
For PATA/IDE hard drives:
Hold the hard drive tray in one hand with the PATA/IDE connector (the connector that is furthest from the plastic end cap where you connect the cables) away from your body. Now, with the label side up grab the sides of the hard drive with the other hand set drive into the tray with the PATA/ IDE gold pins away from your body. Carefully slide the hard drive by placing your thumb on the back edge and pushing it towards the aligning the gold pins with the black connector facing away from your body until it is completely seated. The sidewalls of the hard drive tray will act as a guide, properly aligning the gold pins (PATA/IDE) with the black socket and ensuring a proper connection. On PATA/IDE hard drives, if parts of the pins are still visible, the drive is not completely seated.
For Upgrades Proceed to Step 4. To permanently mount your old hard drive proceed to Step 3.
Step 3 Turn over the hard drive tray and secure the hard drive with the four screws.
Step 4 Once the drive is secured, slide it back into the tray. Make sure the Apricorn logo is facing up and the hard drive tray slides into the enclosure with the label side of the hard drive facing up. When the tray completely slides in you will hear the latch snap shut as the hard drive tray locks into place.
Step 5 Connect the USB Mini end into the open port on the EZ Upgrade and then connect the other side of the cable into an open USB port on your computer. (diagram 4)
If additional power is needed use the optional AC power adapter.
Once your hard drive is connected
Now you can upgrade your notebook drive using the Upgrade Suite CD. Instructions for upgrading your Microsoft computer are provided on the following pages. If you are upgrading your Mac, please refer to page 25.
www.apricorn.com |
7 |
Before Running the Software
After many years of use, hard drives can become cluttered with unusable file fragments and other file-system errors. Most file system errors are not immediately obvious to the user, but can be identified and repaired with a few simple steps. Although the steps below are not absolutely necessary to run EZ Gig, it’s best to try and clean-up disk errors BEFORE they are copied
over to the new drive.
Before running EZ Gig III we recommend
1)Clean up any file-system errors by running Windows
ScanDisk (or a similar disk cleanup utility) on your internal hard drive.
2)Defragment your hard drive using the Windows DiskDefragment Utility (or a similar disk defragment utility) on your internal hard drive.
3)Backup any critical files or data.
4)Attach the AC adapter to your laptop, and make sure it is not running on battery power.
5)Attach the USB cable from your computer to the DriveWire.
8 |
www.apricorn.com |
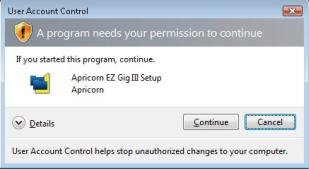
EZ Gig III instructions for Windows 7 & Vista
Windows 7 and Vista User Account Control helps stop unauthorized changes to your computer. The User Account Control window pops up in Administrator Approval Mode whenever a program tries to run on your Windows system.
When the User Account Control window pops up there will be a warning symbol and message that reads, “A program needs your permission to continue.” The instructions will read “If you started this program, Continue.”
Please click the Continue button and proceed to the EZ Gig III Start-Up screen.
Changing the default “Power Options”
Be default the Windows 7 operating system will “Turn display off” after 20 minutes and “Put the computer to sleep” after 1 hour of keyboard or mouse inactivity. It will take more than 20 minutes to clone most of today’s larger hard drives. If the system goes into display is turned off or the computer goes to sleep during the clone, your clone may fail. This will not damage your original hard drive in any way but you will have to restart the cloning process. To avoid this issue change the default “Power Options” before starting the backup on Windows 7 Systems.
From your Window Start menu type “Power Options” in the “Start Search bar” and the “Power Options” program will be listed in the results window. Alternately you can go to Start Menu – Control Panel – Power Options.
Click on “Power Options” to launch the program. On the left window click on “Choose when to turn off display” and make the changes as listed below.
Turn Display Off |
Never |
Put computer to sleep |
Never |
Once you have completed the clone go to “Power Options” and restore the default settings.
www.apricorn.com |
9 |

Connecting Your Hard Drive
Before starting the EZ Gig III software, please ensure that your new hard drive is connected to your notebook’s USB port via the EZ Upgrade. EZ Gig III automatically verifies which Apricorn upgrade product is being used. If used without one of Apricorn’s upgrade products, EZ Gig III will not work.
EZ Gig III
Start Up Options
Depending on how you received EZ Gig III, you have two options.
1.If you have EZ Gig III on a CD, please choose the Start option (proceed to page 13 of this manual to continue).
2.If you downloaded EZ Gig III from Apricorn’s website, you can either choose the Start option (go to page 13) or create a bootable EZ Gig III CD to use in the future (go to page 12 for instructions).
Creating a Bootable EZ Gig III CD
If you downloaded EZ Gig III from Apricorn’s website, you have the option of creating a bootable EZ Gig III CD or thumb drive to use in the future.
To create a bootable media disk follow the appropriate directions below:
•To create a bootable CD/DVD, choose the desired drive at ‘CD/ DVD writer’ and click “Create CD/DVD”.
•To create a bootable USB key, choose the desired drive at ‘USB medium’ and click “Make bootable”.
Follow the instructions and wait until the installation program reports successful creation of the bootable medium.
Once you have created you bootable media device, click “Exit” and then choose “Start EZ Gig III”.
10 |
www.apricorn.com |
www.apricorn.com |
11 |
Loading...