


Aegis Padlock DT
User’s Manual
Table of Contents
About the Aegis Padlock Desktop Drive |
4 |
Package contents |
4 |
Aegis Padlock DT Button Panel |
5 |
LED states and their meaning |
6 |
Aegis Padlock DT - Getting Started |
7 |
Before you begin |
7 |
Connecting the Aegis Padlock DT |
7 |
How do I use the Aegis Padlock DT the first time? |
8 |
What if I forget the User PIN? |
8 |
Using the Aegis Padlock DT |
9 |
Entering the Standby Mode |
9 |
Entering the User Mode |
9 |
Exiting the User Mode |
9 |
Entering the Admin Mode |
10 |
Exiting the Admin Mode |
10 |
PIN Management |
11 |
Changing the Admin PIN |
11 |
Adding a new User PIN |
12 |
Deleting the User PINs |
12 |
Changing the User PIN |
12 |
Setting the Unattended Auto Lock Feature |
13 |
Aegis Padlock DT Brute Force Protection |
14 |
What is Brute Force Attack? |
14 |
How does the Aegis Padlock DT protect against brute force attack? |
14 |
Setting a Self Destruct PIN |
15 |
Completely resetting the Aegis Padlock DT |
16 |
Initializing and formatting the Aegis Padlock DT after a complete reset |
16 |
Hibernating or Logging off from the OS |
18 |
Aegis Padlock DT Setup for Mac OS |
18 |
Diagnostic Mode |
19 |
Troubleshooting |
20 |
Technical Support |
22 |
Warranty and RMA information |
22 |
Copyright © Apricorn, Inc 2014. All rights reserved.
Windows is a registered trademark of Microsoft Corporation.
All other trademarks and copyrights referred to are the property of their respective owners.
Distribution of modified versions of this document is prohibited without the explicit permission of the copyright holder.
Distribution of the work or derivative work in any standard (paper) book form for commercial purposes is prohibited unless prior permission is obtained from the copyright holder.
DOCUMENTATION IS PROVIDED AS IS AND ALL EXPRESS OR IMPLIED CONDITIONS, REPRESENTATIONS AND WARRANTIES, INCLUDING ANY IMPLIED WARRANTY OF MERCHANTABILITY, FITNESS FOR A PARTICULAR PURPOSE OR NON-INFRINGEMENT, ARE DISCLAIMED, EXCEPT TO THE EXTENT THAT SUCH DISCLAIMERS ARE HELD TO BE LEGALLY INVALID
(Rev 1.2) 4/7/2014

About the Aegis
Padlock Desktop Drive
Looking for an effortless way to secure your data? Look no further than the Aegis Padlock DT.
With an easy-to-use keypad design and software free setup, the Aegis Padlock DT enables you to access the drive with your own unique pin.
Featuring 256 bit hardware encryption and a super-fast USB 3.0 connection, the Aegis Padlock DT provides seamless real-time encryption, keeping your data safe 24/7.
Package contents
•Aegis Padlock DT
•AC Adapter
•USB 3.0 data cable (backwards compatible with USB 2.0)
•Quick Start Guide
Aegis Padlock DT
Quick Start Guide
Your Aegis Padlock DT is preformatted in NTFS for Windows and is ready for use. For the Mac OS please refer to the directions on the reverse to reformat your drive to a compatible format.To access the Aegis Padlock DT connect the drive to a power outlet via the AC Adapter and a USB port using the USB 3.0 cable (this cable is also compatible with USB 2.0).
Once connected turn the power switch on the back of the drive to the ON position, the LOCK indicator light on the top of the unit should show RED. Enter the default PIN number of 123456 and press . The UNLOCK indicator light will turn GREEN indicating the drive is unlocked and can be accessed.
Changing the ADMIN PIN number to your own unique PIN number
You are the “administrator” of this drive. The first thing you will want to do is change the Administrator
PIN number from the default 123456 to a unique, secure PIN number that you will remember. To change the Admin PIN number follow the instructions below:
1. To enter Admin Mode, connect the drive to a USB port. The UNLOCK indicator light will be RED.
2. |
Next, press and hold 0 + |
for 5 seconds until the UNLOCK indicator light flashes RED. |
|||
3. |
Enter the Admin PIN number (default is 123456) and press |
. The ADMIN (A) |
|||
|
indicator light will turn BLUE indicating you are in Admin Mode. |
||||
4. |
While in Admin Mode, press and hold 9 + |
until the ADMIN (A) light flashes BLUE. |
|||
5. |
Enter the new PIN number (minimum 6 digits) and press |
. The UNLOCK indicator |
|||
|
light will flash GREEN 3 times if successful. |
|
|
||
6. |
Re-enter the new PIN number and press |
. The UNLOCK indicator light will stay |
|||
|
solid GREEN for 2 seconds then the ADMIN (A) indicator light will become solid BLUE |
||||
|
indicating you have successfully changed the Admin PIN. |
|
|||
7. |
To exit Admin Mode and begin using your Aegis Padlock drive, press the CANCEL button |
||||
|
until the LOCK indicator light turns RED. Now enter your new PIN number and press . |
||||
|
|
|
|
Remember to save your password in a |
|
|
|
|
|
safe place. If lost or forgotten, there is |
|
|
|
|
|
no way to access the drive. |
|
|
|
|
|
If you are having difficulty please refer |
|
|
|
|
|
to the complete user’s manual which is |
|
|
|
|
|
loaded on your Aegis Padlock drive and |
|
|
|
|
|
is also available at Apricorn’s website at: |
|
|
|
|
|
www.apricorn.com/support |
|
|
|
|
|
|
|
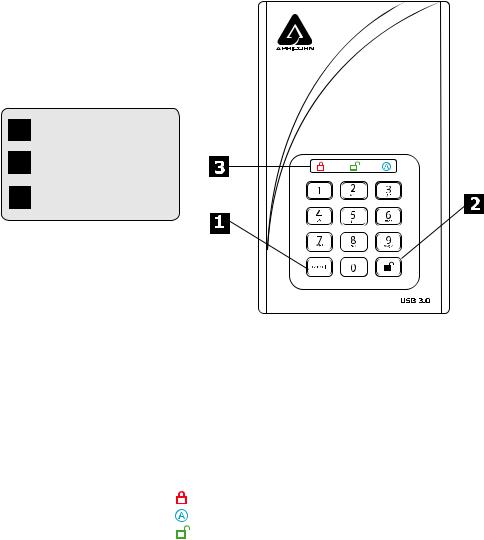
1 Cancel button
2 button
3 LED Indicator light
www.apricorn.com |
4 |
Aegis Padlock DT
Button Panel
1
2
3
Cancel button
UNLOCK button
LED Indicator lights
The “Cancel” button can be used to:
•Cancel current operation
•Return to the previous step when you knowingly entered a wrong PIN
•Exit the Admin Mode
The UNLOCK button can be used to access the Aegis Padlock DT and it can also be used as an OK acknowledgement in the following operations:
•Entering a PIN
•Confirming a new PIN
The indicator light displays the following colors to indicate the various modes of operation:
•RED: Standby Mode
• BLUE: Admin Mode
•GREEN: User Mode
The LED indicator light has other display methods to indicate different status of the Aegis Padlock DT. Details are provided later in this chapter.
www.apricorn.com |
5 |
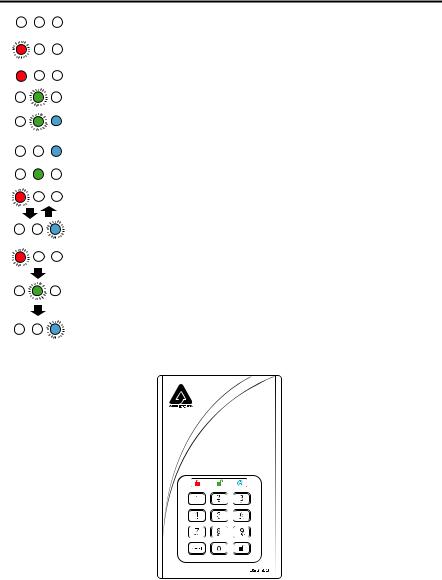
LED states and their meaning
|
No LEDs |
Drive locked and asleep |
|
|
|
|
Blinking RED |
Error / incorrect key entry. Also used for Mode |
|
|
Not Available / User PIN Change |
|
Solid RED |
Stand-by state, waiting for key entry |
|
|
|
|
Blinking GREEN |
Key entry accepted |
|
|
|
|
Solid BLUE / |
Waiting to enter new User / Admin PIN |
|
Blinking GREEN |
|
|
Solid BLUE |
In Admin Mode |
|
|
|
|
Solid GREEN |
Drive unlocked |
|
|
|
|
Alternating RED / |
Indicates a mode has been entered that can |
|
BLUE |
result in the deletion of a User or the Data on |
|
|
the drive (depending on the mode chosen). Also |
|
|
used when setting Auto-lock feature |
|
One second RED |
Self-test mode to ensure all components are |
|
followed by one |
ready and working properly |
|
second GREEN |
|
|
followed by one |
|
|
second BLUE |
|
|
|
|
www.apricorn.com |
6 |
Aegis Padlock DT - Getting Started
Before you begin
Attention: Use only the included cables with your Aegis Padlock DT. You might damage the drive if you use a cable not included with the Aegis Padlock DT.
Connecting the Aegis Padlock DT
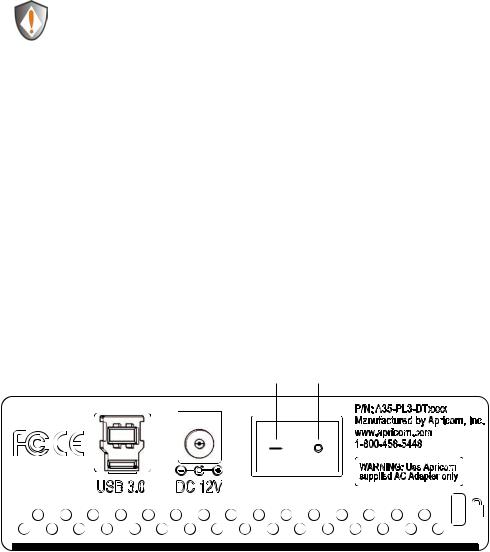
1.Ensure that the power switch on the back of the Aegis Padlock DT is in the OFF position.
2.Connect the Aegis Padlock DT to a power outlet using the included AC Adapter.
3.Attach the USB cable to the Aegis Padlock DT drive and to an available USB port on your computer.
4.Turn the power switch on the back of the Aegis Padlock DT to the ON position.
5.The unit will do a self-test to verify all security components are working properly. The LEDs will go through 3 test stages RED, GREEN, and BLUE. This will be followed by three GREEN flashes on a successful test. Any test failure will leave the unit in an interoperable state with the RED LED flashing.
6.Once the self test is successfully completed, if the drive has never been used the LED will display Solid BLUE and Solid GREEN to indicate the Padlock is waiting for an Admin PIN to be set. If the drive has been used before and has
an Admin PIN, the drive will be in Standby mode and the LED will be on solid RED.
On Off
| |
O |
www.apricorn.com |
7 |
 Loading...