

Page 1

K
Service Source
T wentieth Anni versary
Macintosh
Page 2

K
Service Source
Basics
T wentieth Anni versary Macintosh
Page 3
Basics Overview - 1
Overview
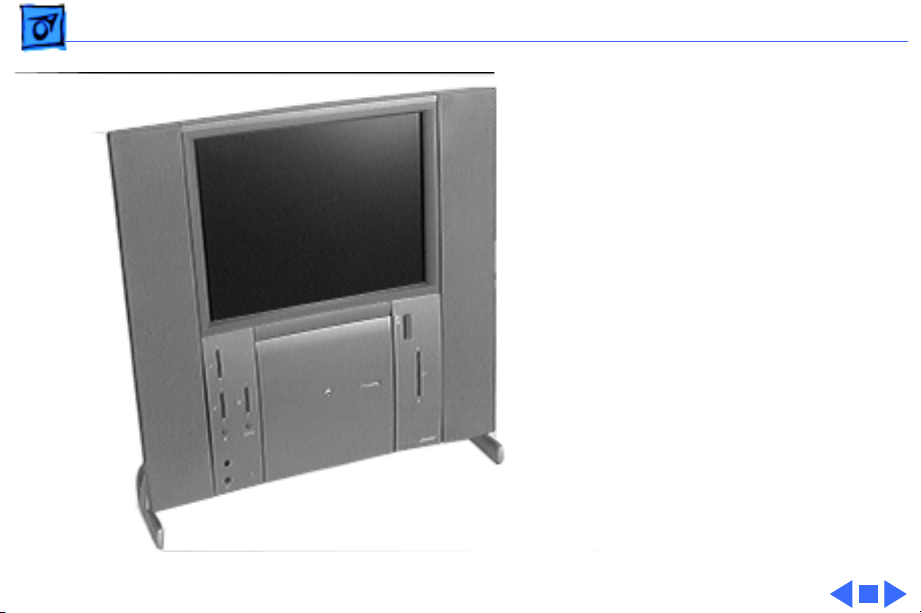
Because the Twentieth
Anniversary Macintosh is a
limited production product,
not everyone will have an
opportunity to personally
view this computer. Some
basic overview information
and the Twentieth Anniversary Macintosh User
Manual have been included
here to familiarize all
Service Source customers
with the basic features and
operation of this product.
Due to the unique nature of
Page 4

Basics Overview - 2
this computer, any service requiring removal of enclosure
screws must be handled by a centralized repair center;
therefore, detailed repair instructions will not be
distributed via Service Source CD.
Details on the Twentieth Anniversary Macintosh service
strategy will be documented on the next Service Source CD
and through a Service Program notice.
Page 5
Basics Rear Panel Connectors - 3
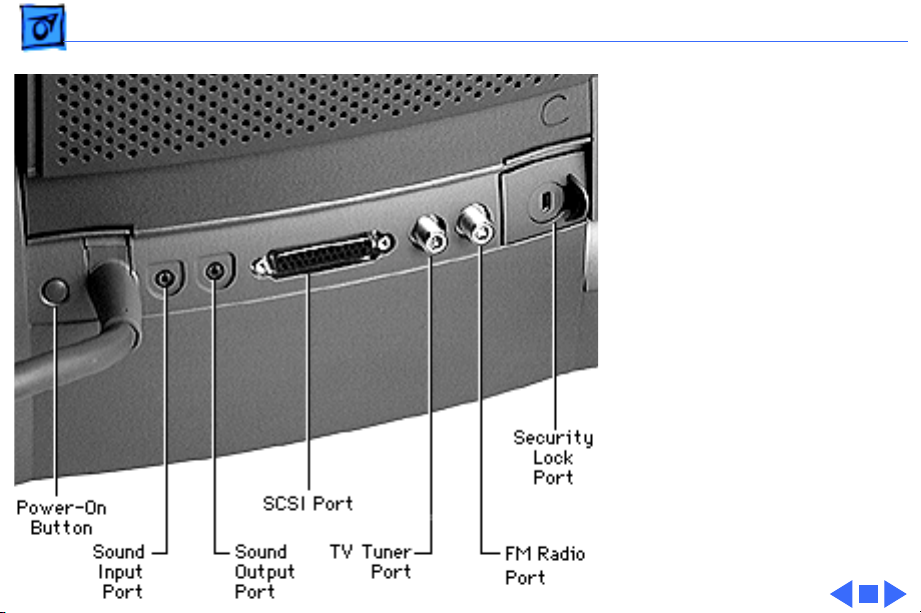
Rear Panel Connectors
The graphic at left shows the
connectors on the rear
panel of the Twentieth
Anniversary Macintosh
computer.
Page 6
Basics Back Panel View - 4
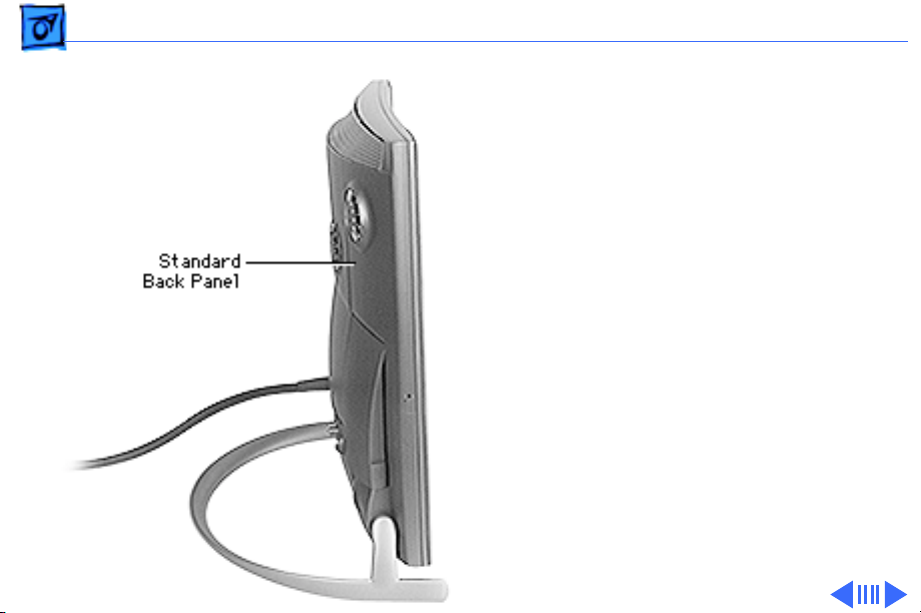
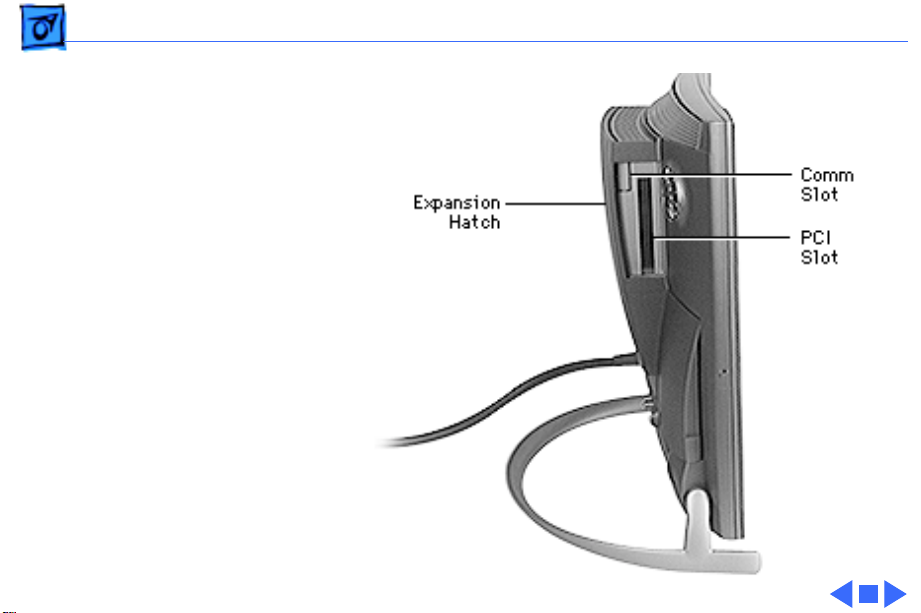
Back Panel View
There are two back panels
that can be installed on the
Twentieth Anniversary
Macintosh main unit: the
standard back panel, and the
expansion hatch that is used
when optional cards are
installed in the unit.
The graphic at left shows the
standard back panel. The
graphic on the following
page shows the expansion
hatch installed on the main
unit.
Page 7
Basics - 5
Page 8
Basics Connecting the Base Unit to the Main Unit - 6
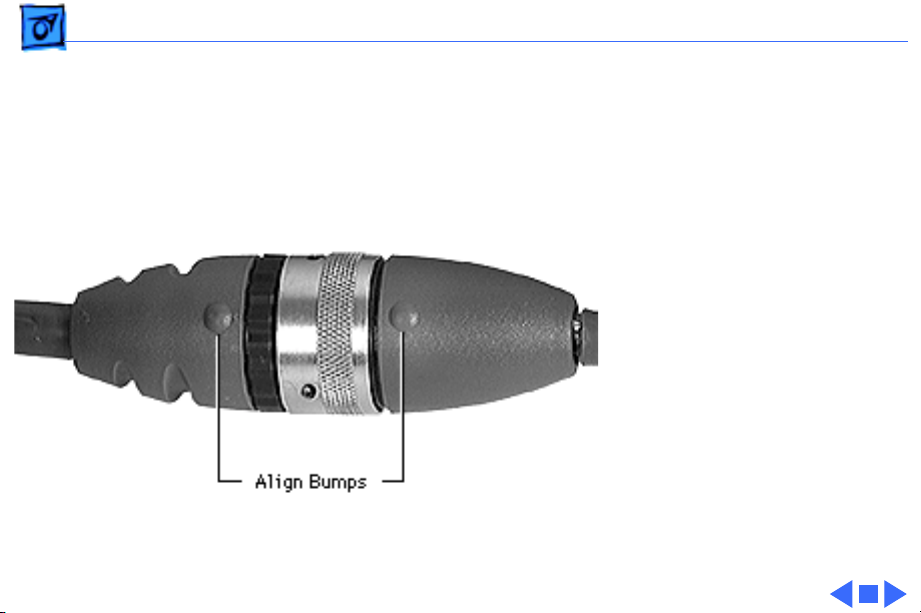
Connecting the Base Unit to the Main Unit
When connecting the base
unit to the main unit, be
sure to align the bumps on
the cable connectors as
shown and then twist the
metal ring to secure the
connection.
Page 9
Basics Sound System - 7
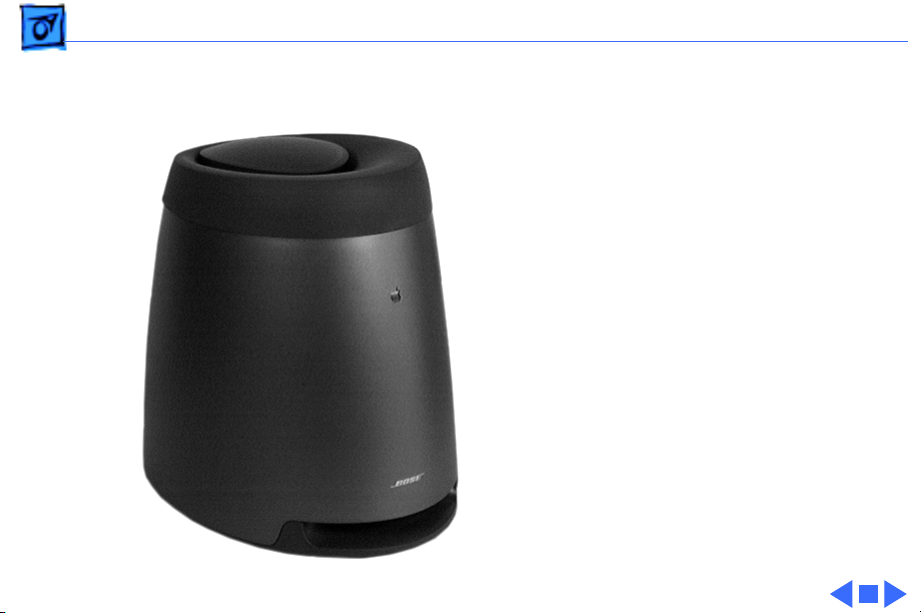
Sound System
The Twentieth Anniversary
Macintosh features a custom
Acoustimass sound system
by Bose with integrated
stereo speakers (built into
the main unit) and
subwoofer (built into the
Base unit pictured on the
left).
Page 10

K
Service Source
Specifications
T wentieth Anni versary Macintosh
Page 11

Specifications Processor - 1
Processor
CPU
250 MHz PowerPC 603e processor
Built-in floating point unit (FPU)
32K of on-chip cache memory
Page 12

Specifications Memory - 2
Memory
DRAM
ROM
32 MB DRAM, installed as either a single 32 MB DIMM or two 16
MB DIMMs.
Each DIMM socket can accommodate a DIMM up to 64 MB, for a
maximum of 128 MB. Requires 64-bit wide, 5 V, 168-pin
EDO or FPM, 60 ns or faster DIMMs with 2K refresh rate.
Note:
SIMMs from older Macintosh systems
this machine. DIMMs that require a 4K refresh rate and 3.3 V
DIMMs
4 MB
cannot
be used in this machine.
cannot
be used in
Page 13

Specifications Memory - 3
VRAM
Cache
Clock/calendar
2 MB of built-in video memory using synchronous graphic RAM
(SGRAM)
256K level 2 cache
CMOS custom chip with long-life lithium battery
Page 14

Specifications Disk Storage - 4
Disk Storage
Hard Drive
CD-ROM
Floppy Drive
2 GB IDE hard drive
Custom front-loading CD-ROM drive
1.4 MB Apple SuperDrive Manual Insert
Page 15

Specifications I/O Interfaces - 5
I/O Interfaces
SCSI
Serial
Apple Desktop Bus
TV/Radio
One external SCSI port; supports up to six external devices
Two RS-232/RS-422 GeoPort-compatible serial ports; mini
DIN-9 connectors
One Apple Desktop Bus (ADB) port; mini-Din-4 connector
Maximum power draw 500 mA; maximum of three devices
total; additional ADB port on back of keyboard
One TV tuner card that provides connection to an external TV
antenna or cable TV (F-type connector) and FM radio antenna.
(The Apple TV/FM Radio System card is already installed.)
Page 16

Specifications I/O Interfaces - 6
Video Input
Sound
Sound Input Port (on back panel)
Built-in video card provides S-video input port for VCR,
camcorder, or other video input device; adapter for composite
video input devices; supports NTSC, PAL, and SECAM video
standards. (Note: this card is different than the video cards used
in earlier entry-level Macintosh systems.)
16-bit stereo input and output ports (3.5 mm) on back panel
Sample rates of 11.025, 22.05, and 44.1 kHz
Built-in Bose sound system, including Bose bass unit
Front-panel push-button control for volume level and muting
Front headphone jack (3.5 mm)
Built-in omnidirectional electret type microphone
Sound input port (3.5 mm) for stereo sound related to video
recording
Input impedance: >3.5 kilohms nominal, each channel
Page 17

Specifications I/O Interfaces - 7
Video A udio Input Port (next to S-video port)
Expansion Slots
COMM II slot
PCI slot
Signal-to-noise ratio (SNR): 75 dB minimum, 80 dB typical (A-
weighted, 2 Vpp output, 1 kHz, digital record and playback,
sound input port to sound output port)
Frequency response: 20 Hz-18 kHz (-3 dB relative to 1 kHz
under the same conditions as the SNR measurement)
One internal (comm slot II) expansion slot, supporting
communication cards, such as an internal modem or Ethernet
card
One internal PCI expansion slot, supporting 6.88-inch, 15 W PCI
cards.
Note:
Install only PCI expansion cards that come with
Macintosh drivers and are compliant with the PCI 2.0 standard.
Page 18

Specifications I/O Interfaces - 8
Video slot
One internal video expansion slot, supporting a video input card
using the NTSC, PAL, and SECAM formats. (The video input card
is already installed in this slot.)
Page 19

Specifications I/O Devices - 9
I/O Devices
Keyboard
Trackpad
Microphone
Twentieth Anniversary Macintosh custom keyboard; draws
25-80 mA (varies with keyboard model used)
Solid-state keyboard-mounted trackpad (ADB device); can be
removed and repositioned; draws up to 10 mA
Apple PlainTalk microphone (optional)
Page 20

Specifications Video Support - 10
Video Support
Display
Graphics Modes Supported
12.1-in. diagonal, active matrix flat-panel display with
backlighting; 800x600 pixels; color liquid crystal; 256 or
thousands of colors; color depth: 6 bits each R, G, B
Resolution Color Bit Depth* Vertical Scan Rate
640x480 8 60
640x480 16 60
800x600 8 60
800x600 16 60
Video input and 2D acceleration supported in all modes. 1st and
3rd mode do not support 3D acceleration; 2nd mode supports 3D
acceleration, as does 4th mode, depending on the window size.
*16 bit color depth displays 32,768 colors, 8 bit displays
256 colors.
Page 21

Specifications Electrical - 11
Electrical
A/C Line Input Voltage
Input Line Frequency
Input Power
Power Supply DC Output
Sleep Mode
90-130 V or 180-264 VAC; RMS single phase, manually
configured
47-63 Hz
140 W maximum continuous
70 W maximum continuous output
AC power usage in sleep mode (without PCI cards) less than 30 W
Page 22

Specifications Physical - 12
Physical
Main Unit
Bass Unit
Keyboard
Height: 17.25 in. (43.8 cm)
Width: 16.5 in. (41.9 cm)
Depth: 10.0 in. (25.4 cm)
Weight: 14.9 lbs. (6.8 Kg)
Height: 10.63 in. (27 cm)
Width: 8.31 in. (21.1 cm)
Depth: 11.75 in. (29.8 cm)
Weight: 10.5 lbs. (4.8 Kg)
Height: 1.0 in. (2.5 cm)
Width: 11.5 in. (29.2 cm)
Depth: 8.13 in. (20.7 cm)
Weight: 1.86 lbs. (.84 Kg)
Page 23

Specifications Environmental - 13
Environmental
Operating Temperature
Storage Temperature
Relative Humidity
Altitude
10–35° C (50–95° F)
–40 to 47° C (–40 F to 116.6° F)
5–95% (noncondensing)
0–3,048 m (0–10,000 ft.)
Page 24

Chapter One
Setting Up 2
Chapter Two
Learning to Use Your Computer 30
Chapter Three
Using Software 40
Part One
Getting Started
Page 25

Mono audio adapter cable
Batteries PCI card adapter
Communication card adapter Expansion panel
Expansion back cover
The illustration below and on the next page shows all the equipment you received with your
computer, including everything you’ll need to set up your computer and begin using it.
Before following the setup instructions in this chapter, you may want to read “Arranging Your Office” in
Appendix A (in the section on health-related information) for tips on adjusting your work furniture so
that you’re comfortable when using the computer.
You will follow these general steps in setting up your equipment:
m Unpacking the equipment
m Connecting the bass unit to the computer
m Plugging in the power cord
m Connecting the keyboard
m Connecting the GeoPort Telecom Adapter (for the modem)
m Turning on the computer
Chapter
One
2
Chapter One
Setting Up
Page 26

Setting Up
3
Bass unit
Power cord
Keyboard and trackpad
Telephone cord
Composite video to S-video adapter cable
Stereo audio adapter cable
GeoPort Telecom Adapter
(In some locations the GeoPort Telecom
Adapter has only one port.)
Remote control
FM antenna
Computer
Page 27

Unpacking the equipment
Take all the parts of your computer out of the boxes. Then follow these instructions:
1 Place the computer face-up on your work surface.
Choose a sturdy, flat surface near a telephone jack.
Place the
computer on a
flat, clean, stable surface.
Chapter
One
4
Page 28

2 While holding the computer’s base firmly, raise the computer to a comfortable viewing position.
Setting Up
5
Page 29

The screen should be vertical, tilted back by no more than a 15-degree angle, or tilted forward by no
more than a 5-degree angle (to ensure that the CD-ROM drive operates correctly).
5° 15°
Chapter
One
6
Page 30

Positioning the bass unit
Place the bass unit near a grounded outlet, within six feet of the computer. The bass unit is designed to
be placed under your work surface and will perform best acoustically when placed on the floor. It can
also be placed on any stable, flat surface. For proper cooling, be sure that the air flow around the bass
unit is not restricted.
Important The bass unit contains a very strong magnet. To prevent the magnet from interfering with
the computer’s operation, do not place the bass unit next to the computer. Do not place floppy disks
on top of the bass unit (data may be lost).
Plugging in your equipment
Before you plug your equipment into a wall socket, carefully read all the setup instructions in this
chapter. Then, before you connect anything to your computer, follow the instructions in this section
to plug it in. The plug grounds the computer and protects it from electrical damage while you are
setting up.
Setting Up
7
Page 31

Attaching the bass unit to the computer
Follow these steps to attach the bass unit to the computer:
1 Locate the large cable attached to the computer.
This cable plugs into the bass unit.
Bass unit Computer cable Computer
Chapter
One
8
Page 32

Setting Up
9
2 Turn the bass unit upside down.
Locate the recessed well on the underside of the bass unit, and the groove containing a short cable
already attached to the bass unit.
Note: The recessed well also contains the bass unit’s level control. The control is preset at the level
that is appropriate for most conditions, so don’t change the setting now. Note the location of the
control in case you want to adjust it after you start up the computer. (Chapter 7 explains how to adjust
the speakers and bass unit.)
3 Pull up on the cable that is connected to the bass unit to release it from the groove where it has been
stored.
Page 33

4 Plug the connector at the end of the computer’s cable into the bass unit’s connector.
Align the two connectors until the small internal ribs and grooves line up, and press the connectors
together. Do not force the connectors.
Chapter
One
10
Page 34

Setting Up
11
5 Secure the connection by very firmly rotating the metal band until you hear a click.
Metal band
Page 35

6 Press the cable back into the groove and route the computer cable through the cutouts in the base of
the bass unit.
Chapter
One
12
Page 36

Plugging in the power cord
Follow these steps to plug your equipment into a wall outlet:
1 Make sure the voltage switch inside the well on the bottom of the bass unit is set for the voltage you
connect to.
The voltage switch is preset at the factory to the correct voltage for the area where you bought the
computer.
If there is any chance that the setting has been changed, or if you take the computer to a country with
a different voltage system, it’s important to check the voltage and change the setting if necessary. The
voltage switch must be set correctly to avoid damaging your computer.
Country Voltage switch setting
France, Germany, and United Kingdom 230
Japan and United States 115
Set the switch to show “115” for
voltages in the 100–130 V range.
Set the switch to show “230” for
voltages in the 200–270 V range.
Before you plug your computer in,
check to see that the voltage
switch in the bass unit is
properly set. If you need
to change the setting,
insert a small screwdriver
in the slot and slide the switch.
Setting Up
13
Page 37

2 Plug the socket end of the power cord firmly into the recessed power plug (marked with the
symbol ≤) inside the well on the bottom of the bass unit.
Route the cable through the cutouts in the base of the bass unit. You can store any extra length of the
power cord in the well.
Chapter
One
14
Page 38

Setting Up
15
3 Plug the other end of the power cord into a three-hole grounded outlet or power strip.
s
Warning This equipment is intended to be electrically grounded. Your computer is equipped with a
three-wire grounding plug—a plug that has a third (grounding) pin. This plug will fit only a grounded
AC outlet. This is a safety feature. If you are unable to insert the plug into the outlet, contact a licensed
electrician to replace the outlet with a properly grounded outlet. Do not defeat the purpose of the
grounding plug! s
4 Turn the bass unit right-side up and position it where you want it.
Important The only way to disconnect power completely is to unplug the power cord. Make sure the
power cord is within easy reach so that you can unplug the computer when you need to.
Page 39

Removing the port cover plate
Before you can connect the keyboard and modem, you must remove the port cover plate. Follow
these steps:
1 Squeeze the cover plate between your fingers and swing it away from the computer.
2 Set the cover plate aside. (The cover plate is made up of two sections that can be easily separated and
reassembled if needed.)
The port cover plate covers the ports for the modem, keyboard, printer, and video equipment (such as
a video cassette recorder or camcorder). For now you’ll just connect the keyboard and modem.
Port cover plate
Chapter
One
16
Page 40

Connecting the keyboard
To connect the keyboard to the back of your computer, follow these steps:
1 Pass the keyboard cable under the computer.
2 Plug the keyboard cable into the port marked with the V icon on the back of the computer, and press
the cable into the cable guides.
Be sure to use the correct port, which is marked with the V icon. Don’t use any other port, even if the
cable seems to fit.
By the way: A port marked with the V icon is called an Apple Desktop Bus (ADB) port.
Port marked with a V icon
Cable guides
Setting Up
17
Page 41

Chapter
One
18
Connecting your modem to a telephone jack
The GeoPort Telecom Adapter that came with your computer lets you connect your computer’s highspeed Express modem to a telephone jack so you can send electronic mail (e-mail) and fax messages,
and connect to the Internet.
Important If you’re planning to install telephone wiring or telephone jacks, follow these
precautions:
m Never install telephone wiring during a lightning storm.
m Never install telephone jacks in wet locations unless the jacks are specifically designed for wet
locations.
m Never touch uninsulated telephone wires or terminals unless the telephone line has been
disconnected at the network interface.
m Use caution when installing or modifying telephone lines.
m Avoid using a telephone, other than a cordless type, during an electrical storm. There may be a
remote risk of shock from lightning.
m Never use a telephone to report a gas leak while in the vicinity of the leak.
GeoPort Telecom Adapter
(In some locations the GeoPort Telecom
Adapter has only one port.)
Telephone cord
Page 42

To connect your modem to a telephone jack, follow these instructions:
1 Plug the GeoPort Telecom Adapter’s cable into the computer’s modem port (W), and press the cable
into the cable guides.
Modem port
Cable guides
GeoPort Telecom Adapter
(In some locations the GeoPort
Telecom Adapter has only one port.)
Setting Up
19
Page 43

2 Plug one end of the adapter’s telephone cord into a telephone jack. Plug the other end into the line
port on the adapter.
If a telephone is plugged into the jack you want to use, unplug the telephone’s cord from the jack.
Important When connecting a modem, make sure you connect the modem to an analog phone
line—the kind used typically in homes. Connecting to a PBX or ISDN line could damage the modem.
If you want to connect the computer to an ISDN line, follow the instructions that came with your ISDN
equipment. See Chapter 4, “Connecting Your Computer to a Telephone Line,” for more information.
Note: If your GeoPort Telecom Adapter has only one port, skip step 3.
Telephone jack
The line port is marked with this icon.
Telephone cord
Chapter
One
20
Page 44

3 If you want to have your telephone use the same jack as the adapter, plug your telephone’s cord into
the telephone port on the back of the adapter (marked with the Q icon).
If you don’t want your computer and telephone to share a jack, skip this step.
Important During lightning storms, disconnect your modem from the telephone jack to prevent
possible damage to the modem.
If your adapter has a
telephone port, it is
marked with this icon.
Setting Up
21
Page 45

Replacing the port cover plate
Put the port cover plate back on.
Chapter
One
22
Page 46

Adjusting the keyboard (optional)
If you wish to adjust the angle of the keyboard, rotate the keyboard feet down.
Repositioning the trackpad (optional)
If you like, you can remove the trackpad from the keyboard and place it directly on your work surface.
Follow these instructions:
1 Loosen the trackpad cable from the grooves on the back of the keyboard.
Do not unplug the cable from the keyboard while the computer is turned on. Attaching or removing an
ADB device while the computer is turned on could damage the ADB device or your computer.
If you put the trackpad back in its original position later, be sure to snap the cable back into either the
left or right groove on the back of the keyboard.
2 Lift up on the edge of the trackpad.
Keyboard feet
Setting Up
23
Page 47

3 Lift the trackpad out and put it to the left or right of the keyboard.
4 Using your finger, remove the leather palmrest section from underneath the keyboard.
The palmrest section is for covering the space created when you remove the trackpad.
Palmrest section
Cable grooves
Chapter
One
24
Page 48

5 Snap the palmrest section into place, positioning the finger keyhole toward the rear.
Setting Up
25
Page 49

Turning the computer on
To turn on the computer for the first time, follow these instructions:
1 Turn on your computer by pressing the Power key on the keyboard.
The Power key is marked with a triangle (π).
You hear a tone from the computer as it starts up. (Information on adjusting the speakers and bass unit
is in Chapter 7, “Sound.”)
Power key
Chapter
One
26
Page 50

2 Check to see what’s on your screen.
The first time you turn on your computer you should see a multimedia Welcome Tour or the Macintosh
desktop (pictured below). Skip now to “
What’s Next?” later in this chapter.
m If you see a blinking question mark, see Chapter 12, “Solutions to Common Problems.”
m If you see anything else on your screen, or if you see nothing at all, see “Problems Turning Your
Computer On?” next in this chapter.
Important If you want to turn off your computer, press the Power key on your keyboard and follow
the proper shutdown procedure explained at the end of Chapter 2 in “Turning the Computer Off.”
Setting Up
27
Page 51

Problems turning your computer on?
If you don’t see anything on the screen, check these items to see if you can identify the problem:
m Is the computer connected to the bass unit, and the bass unit plugged into a power source? If it is
plugged into a power strip, is the power strip turned on?
m Is the status light underneath the bass unit on? If it isn’t, try plugging the equipment into a different
outlet.
m Is the status light on the front of the computer on? If it isn’t, check to be sure the computer’s power
cable is plugged into the bass unit’s cable.
m Is the keyboard cable connected correctly? It should be plugged into the ADB port, marked with
the V icon. (Don’t connect or disconnect this cable while the computer is on. You could damage
your equipment.)
m Is the brightness control adjusted correctly? (The brightness control is marked with the symbol ¤
and is on the left under the screen on the computer.)
What’s next?
Congratulations—you’ve finished setting up your computer. What you do next depends upon your
experience with a trackpad and with Macintosh.
Have you used a trackpad?
If you’ve never used a trackpad, you can see a quick introduction to the trackpad and practice using it.
Turn to Chapter 2, “Learning to Use Your Computer,” for instructions on starting a tutorial that teaches
basic skills, including trackpad skills.
Are you new to Macintosh?
If you’ve never used a Macintosh computer, turn to Chapter 2, “Learning to Use Your Computer,” for
instructions on starting a tutorial.
Chapter
One
28
Page 52

Are you already familiar with Macintosh?
If you are already familiar with the Macintosh, you probably don’t need any printed instructions to
explore your computer, so you can set this book aside for now. Later, return to this book if you want to
do any of the following:
m Learn more about your computer
m Read basic information on connecting to other computers and to the Internet
m Watch TV and video or listen to audio CDs or FM radio
m Attach a printer or other additional equipment
m Add memory or an expansion card
m Find solutions to problems
m Maintain your equipment and accessories (such as the leather palmrest)
If you need to adjust the volume of your speakers and bass unit, see Chapter 7, “Sound.”
Setting Up
29
Page 53

If you have never used a Macintosh computer, you’ll find that taking the Macintosh Tutorial is the
fastest way to become comfortable with your new computer.
Learning the basics
Follow the instructions in this section to start the Macintosh Tutorial.
1 If the computer is not already on, turn it on by pressing the Power key on the keyboard.
The Power key is marked with a triangle (π).
Chapter
Two
30
Chapter Two
Learning to Use Your Computer
Page 54

2 Check to see what’s on your screen.
The first time you turn on your computer you should see a multimedia Welcome Tour or the Macintosh
desktop (pictured below).
If you see a multimedia Welcome Tour, press and hold the x key on your keyboard while pressing Q
(for “quit”). A dialog box appears asking what you want to do next. Press x-Q again.
Note: You can wait for the Welcome Tour’s startup message to finish playing, and quit whenever you
are ready to start the Macintosh Tutorial.
Learning
to Use Your
Computer
31
Macintosh desktop
Page 55

3 Move your finger on the trackpad to move the arrow pointer (8) on the screen.
Place your index finger on the trackpad and your thumb on the trackpad button. Don’t press the
trackpad button yet. Move your finger across the trackpad, watching the arrow on the screen. Notice
that the arrow on the screen moves in the same direction that you move your finger on the trackpad.
The trackpad is sensitive not only to the direction you move your finger, but also to how fast you
move your finger. If you want the pointer to move a short distance across the screen, you move your
finger slowly across the trackpad. The faster you move your finger, the farther the pointer moves
on the screen.
Trackpad Trackpad button
Chapter
Two
32
Page 56

4 Move the tip of the arrow (8) to the question mark (h) in the upper-right portion of the screen.
5 With the tip of the arrow on the question mark, press and hold down the trackpad button.
A list of choices (called a menu) appears. This is the Guide (h) menu, which is the place to go when
you have a question about how to use your computer.
6 While holding down the trackpad button, move the arrow until the words “Macintosh Tutorial” are
highlighted, then release the button.
A window appears welcoming you to the tutorial. You can set this book aside for now and follow the
instructions on the screen. When you have completed the tutorial, return to this book and read the
next section, “After You Take the Tutorial.”
Important You can stop the tutorial at any point and go back to it later. If you want to turn off your
computer, however, be sure to follow the proper shutdown procedure explained at the end of this
chapter.
After you take the tutorial
If you are comfortable with the basic skills taught in the tutorial, you are ready to use your computer.
You may, however, have additional questions while using the computer. This book can answer some of
your questions, but there are many other convenient sources of information. The next section shows
you where to find answers to your questions.
Learning
to Use Your
Computer
33
Page 57

Apple Guide
If you need help or experience a
problem while using the computer,
open the Guide (h) menu and
choose Mac OS Guide. The Guide
menu is the main source for
information while you are using
the computer.
Macintosh
user’s manual
Use this book to help you
set up your computer and
learn about it, or to find
solutions to problems.
Other manuals
For answers to questions about
other equipment or about
application programs you have
purchased, see the manuals
that came with the equipment
or programs.
Apple’s customer
support hotline
If you can’t find an answer in
any of the materials provided,
call the customer support
hotline. (The phone number
for the hotline is in the service
and support information that
came with your computer.)
Where to find answers
When you have questions about using
your Macintosh, there are several
places you can look for answers.
Chapter
Two
34
Page 58

Four simple tips for using Guide effectively
1 When you don’t see Mac OS Guide in the Guide menu
Mac OS Guide is only available while you’re in the Finder. (The Finder is the application that displays
the desktop, or background of your screen, where you find and open other applications and
documents.)
To go to the Finder, do one of the following:
m Click the desktop (the colored or patterned background area of your screen).
m Open the Application menu (to the right of the Guide menu) and choose Finder.
2 When you can’t find the information you need
m In searching for help topics, use all three buttons at the top of Guide’s initial window: Topics, Index,
and Look For.
m If you’re in a series of steps and want to return to a list of help topics, click the Topics button.
3 When you can’t see what’s behind the Guide window
Guide windows stay in front of other windows on the screen so that your instructions are never
covered.
m Drag a Guide window by its title bar to move it out of the way.
m Click the zoom box once to shrink a Guide window. (To expand the window, click the zoom box a
second time.)
4 When you need more information about an instruction or term
m Click the “Huh” button if it is available.
Learning
to Use Your
Computer
35
Title bar
Zoom box
“Huh?” button
Navigation buttons
Page 59

Chapter
Two
36
Getting Help Through the Internet
If you have an Internet connection, you can get information
from the Apple World Wide Web site at http://www.apple.com.
(For more information about the Internet, see Chapter 5.)
Identifying Objects
If you see something unfamiliar on the screen, open the
Guide menu and choose Show Balloons. Then point to the
object you want to identify. When you’re done, choose
Hide Balloons from the Guide menu.
Learning the Basics
To learn basic skills, open the Guide menu and choose
Macintosh Tutorial. Then follow the instructions on the screen.
Page 60

Learning
to Use Your
Computer
37
The Guide Menu
To find an answer to a question, look in the Guide (h) menu—
your main source of information about your computer.
Getting Answers to Your Questions
To get answers to questions you have while working with
your computer, open the Guide menu and choose Mac OS Guide
or a Guide for the program you are using. Then click one of the
three buttons at the top of the window: Topics, Index, or Look For,
and follow the instructions to choose a topic.
Getting the Latest News
Double-click the hard disk icon to see “Read Me” files, which
contain last-minute tips and news. Many other Read Me documents
are in the Apple Extras folder.
Read Me documents that have “PDF” in the icon or in the filename
open in the Adobe™Acrobat™Reader application, which is already
installed on your hard disk.
Page 61

Turning the computer off
To turn your computer off, follow these instructions:
1 Press the Power key (π) on your keyboard.
The following dialog box appears on the screen:
2 Press the Return key on the keyboard.
You will be prompted to save any unsaved work before the computer shuts down.
To turn the computer on again, just press the Power key on the keyboard.
Note: There are two other methods of shutting down:
m In the Finder, choose Shut Down from the Special menu.
m Shut down more quickly by pressing the Power key and holding it down for a few seconds. The
dialog box appears briefly and then dismisses itself, and the computer shuts down.
Important Do not use the power button on the back of the computer to turn the computer off
unless there is a problem that prevents it from being turned off with the Power key. ( You could lose
unsaved work.) To make sure your work is saved, use the Power key.
Chapter
Two
38
Page 62

Page 63

You’ll probably want to purchase and install application software to use with your computer.
Application programs let you, among other things, do word processing; create spreadsheets, databases,
and graphics; play games, alone or with others; and explore the Internet.
Your computer includes some basic application programs as well as other software. Some are
preinstalled and ready for use. Others are optional; if you want to use them, you must install them first.
This chapter explains how to install and work with application programs and describes the software
that came with your computer.
Installing application programs
Most application programs come on a floppy disk or a CD-ROM disc with an Installer program that
makes it easy to install applications onto the computer’s hard disk. Follow the instructions in the
manuals that came with the specific applications to install them. Refer to the general instructions below
for additional help on how to use the applications with the Mac OS.
If you have virus protection installed, you should turn it off before you install an application program.
Also, use the Extensions Manager to turn off system extensions. For more information about
Extensions Manager, see “Checking Your System Extensions” in Chapter 13, “Techniques for Diagnosing
and Solving Problems.”
Chapter
Three
40
Chapter Three
Using Software
Page 64

Using a floppy disk
Some application programs come on floppy disks. The illustration below shows how to insert a floppy
disk into the computer’s floppy disk drive.
After you insert a floppy disk containing an application, you follow the instructions that came with the
application to install it on the computer’s hard drive.
To eject the disk after installation is complete, click the disk icon to select it and choose Put Away from
the File menu.
Metal end first
Label facing forward
Using
Software
41
Page 65

Using a CD-ROM disc
In most cases, you’ll install an application program on your internal hard disk from a CD-ROM disc
that contains the application. To insert a CD-ROM disc, follow these instructions:
1 Open the CD-ROM drive door by pressing the Stop/Eject button.
The door opens automatically when you press the button. Never pry or pull the door open. If the
door doesn’t open when you press the button, see “Problems With CD-ROM Discs and Drives” in
Chapter 12.
CD-ROM Stop/Eject button
Chapter
Three
42
Page 66

2 Press the center of the disc onto the CD-ROM drive’s spindle, label side out.
Center the disc in the drive, handling the disc by its edges, then press on the center of the disc (near
the hole) to be sure that the disc is firmly in place.
Spindle
Using
Software
43
Page 67

3 Close the CD-ROM drive door.
After you insert the disc containing your application program, follow the instructions that came with
the application to install it.
To eject the disc after installation is complete, click the disc icon to select it and choose Put Away from
the File menu.
Chapter
Three
44
Page 68

The illustration below shows how to remove a CD-ROM disc.
Important Do not copy the entire contents of a CD-ROM disc onto your hard disk. (Don’t drag the
disc’s icon to your hard disk.) If you copy the entire contents of a CD-ROM disc, it will take up a lot of
space on your hard disk. When you open applications on some CD-ROM discs, you may get a message
telling you to copy or install the application onto your hard disk. If you get this message, refer to the
installation instructions that came with the CD-ROM disc, or double-click the CD-ROM disc’s icon to
open it, and then copy the CD-ROM disc’s application onto your hard disk.
Remember that you only need to copy an application once. From then on, open the copy that’s on the
hard disk.
Handle the disc by its edges.
Press on the spindle with your
thumb as you remove the disc.
Using
Software
45
Page 69

Installing applications over a network
If your computer is connected to a network, you may find applications on it that you can install on your
computer. Though you can run Installer applications over a network to install applications, it is usually
faster to first copy the application and its Installer onto your computer, and then run the Installer to
complete the installation. Double-click any Read Me file you see, and carefully read it and other
instructions you find with the application you want to install.
Opening an application program and its documents
You open an application the same way you open other items—by double-clicking its icon.
When you double-click a document’s icon, both the document and the application that created
it open.
Once you are working in an application, you can open other documents in that application by opening
the File menu and choosing Open.
Working with several applications at a time
You can open as many applications and desk accessories as your computer’s random-access memory
(RAM) allows. (If you see a message that you have insufficient memory to open an application or
document, you may have too many applications open.)
The Application menu in the top-right corner of the screen lists the applications you have open. The
name of the active application (the one you’re using right now) has a checkmark next to it, and its icon
appears in the menu bar.
Chapter
Three
46
Commands to hide or display open windows
Open applications
Application menu (The icon changes to show
the active application.)
A checkmark indicates the active application.
Page 70

Finding out which applications are open
If you have several applications and windows open, you can find out which application is active and
which other applications are open by opening the Application menu.
Switching applications
You can switch to another open application by choosing its name from the Application menu.
If an application’s icon is dimmed in the menu, that means its windows are hidden. If you choose the
application from the Application menu, its windows become visible.
You can also switch to another application by clicking in one of its windows or by double-clicking its
icon or the icon of a document that was created with the application.
Hiding and showing windows on the desktop
You can hide all windows except those of the active application by choosing Hide Others from the
Application menu. The other applications remain open even though their windows are hidden. When
you switch to another application, its windows become visible again.
When an application is active, its name is displayed in the Application menu next to the word “Hide.”
Choose the Hide command to temporarily hide the application’s open windows. (This helps to quickly
clear up a cluttered screen.) For example, if the Finder is active, you can hide it by choosing Hide
Finder from the Application menu.
If you want to see all the open windows, choose Show All from the Application menu.
Using
Software
47
Page 71

Five tips for using application programs effectively
1 Use Power Macintosh applications.
Your computer is compatible with most application programs intended for use with Macintosh
computers, but it’s best to use applications designed especially for Power Macintosh computers.
(Sometimes these applications are marked “Accelerated for Power Macintosh.”)
2 Put only one copy of each application on your hard disk.
Having more than one copy can cause errors.
3 If you experience problems with an application, try reinstalling.
If an application malfunctions consistently, try installing a fresh copy. If that doesn’t help, find out from
the software manufacturer whether your version of the application is compatible with the hardware
and system software you’re using.
4 Don’t install additional System Folders.
Whenever you copy an application disk to your hard disk, be careful not to copy another System
Folder. Your startup disk should only contain one System Folder. Drag any extra System Folders on
your hard disk to the Trash.
5 Use virtual memory if necessary.
If you run out of memory while using Power Macintosh applications, you can use space on your
computer’s hard disk as additional memory (called “virtual memory”). For instructions, choose Mac OS
Guide from the Guide (
h) menu and read the information under “memory” in the Guide’s index.
You can also add more memory to your computer, as described in Chapter 10, “Installing Expansion
Cards and Memory.”
Chapter
Three
48
Page 72

About the software included with your computer
Your computer includes several kinds of software. Some is preinstalled and ready for use; other
software you need to install before you can use it. The types of software that come with your computer
include these:
m the Macintosh Operating System (Mac OS) software and preselected system software additions,
already installed on your computer
m extra system software additions that you can install yourself
m application programs
The following sections provide details about the included software.
Mac OS software and preselected system software additions
The Macintosh Operating System (Mac OS) is the basic software that runs the computer itself. It tells
the computer what to do when it starts up, keeps track of your documents, files, and other software,
and helps your computer find out what devices—such as printers and network cables—are attached
to it.
The Mac OS was installed on the internal hard disk at the factory, and starts automatically when you
turn on your computer. Here is some of the software that makes up the Mac OS basic system:
m The Finder, the program that displays the desktop and allows you to organize documents, files, and
application programs into folders
m QuickTime, which lets you play digital video on your computer
m OpenDoc, which lets you build a document that can include text, graphics, movies, links to the
Internet, tables, and many other types of information
An OpenDoc document isn’t created within a specific application program. Instead, you create a
document first, and then embed in it the “parts” you want to use. Each part is like an application
program, offering a rich set of features; a single document can draw on the resources of many parts.
A variety of parts will be available from both Apple and third-party sources.
m PC Exchange, which lets you work with DOS and Windows disks as if they were Mac OS disks
Using
Software
49
Page 73

m AppleScript, which allows you to automate tasks in the Finder and other scriptable applications
(applications that support AppleScript). Instructions for using AppleScript are in the Apple Extras
folder on your hard disk.
The following are preselected system software additions, already installed on your computer along with
the Mac OS basic system:
m QuickDraw 3D, to view and manipulate 3D images on your computer
m MacLinkPlus translators, to easily open documents (including DOS and Windows documents)
created in applications you don’t have. These translators work with the Mac OS Easy Open control
panel.
Important System software is preinstalled on your computer. Do not reinstall system software unless
you are experiencing problems or you want to upgrade to a more recent version. Consult Chapter 13,
“Techniques for Diagnosing and Solving Problems,” before attempting to reinstall system software.
Extra system software additions you can install yourself
Your computer comes with additional software that adds additional capabilities to the Mac OS. This
software was not installed at the factory, so you have to install it if you want to use it.
Tip: Some of this software can decrease the amount of random-access memory (RAM) available for
use by application programs, even when it is not in use. To conserve RAM, only install the software you
think you’ll use.
These are some of the extra system software additions that you can install yourself:
m QuickDraw GX, for enhanced printing and typographical capabilities
m English Text-To-Speech, to have your computer read text aloud
m Cyberdog, an application to access the Internet.
m Apple Remote Access Client, to connect to a remote computer (such as your computer at work)
using a modem
m Open Transport PPP, to connect to the Internet using a modem
Chapter
Three
50
Page 74

You can install one or more of the extra system software additions from the system software CD that
came with your computer. See the section “Performing a Custom Installation” in Chapter 13 for
instructions.
Application programs
Your computer comes with application programs to play QuickTime movies, to play audio CDs in your
CD-ROM drive, and to open HyperCard stacks. It also includes Internet access applications such as the
Apple Internet Connection Kit. (For more information about the Apple Internet Connection Kit, see
Chapter 5, “Connecting to the Internet or an Online Service.”)
To see which applications are already installed on your hard disk, double-click the hard disk icon to
open it, then double-click the Apple Extras folder to open it. Many applications are in the Apple Extras
folder.
You also received a CD-ROM disc that contains backup copies of the system software and the
applications preinstalled on your computer’s hard disk. It also contains additional applications that you
can install yourself.
To see what’s on the CD-ROM disc, insert the disc into your computer’s CD-ROM drive. Double-click
the CD-ROM disc’s icon to open it (if it is not already open). Then double-click the folders in the disc’s
window to find out what’s included on the CD-ROM disc.
Using
Software
51
Apple Extras folder,
containing extra applications
Page 75

To install an application, look for an Installer icon (similar to the one below) for the application.
Double-click the Installer and follow the instructions on the screen.
If the application doesn’t have an Installer, you can simply drag the application from the CD-ROM disc
to your computer’s hard disk.
If you have questions about using an application program, open the Read Me file for the application,
which is usually found inside the application’s folder. Some applications also have onscreen help that
you can access after you have installed the application. Look for onscreen help in the Guide (h) menu
after you start the application.
Backing up your files
Making backup copies of important files is good protection against possible damage to the originals.
m You can back up files stored on your hard disk by putting copies of them on floppy disks. (To copy a
file onto a floppy disk, insert the floppy disk into the floppy disk drive, then drag the file’s icon to
the floppy disk’s icon.)
m You can back up an entire floppy disk by copying it to another floppy disk of the same capacity or
larger, or by copying it to a hard disk.
m You can use a commercial backup application to copy new and changed files from a hard disk to
another hard disk, a tape drive, a series of floppy disks, or to another form of removable media.
m If your computer is on a network, you may be able to back up files by copying them to a shared disk
on the network.
Chapter
Three
52
Page 76

Page 77

Page 78

Chapter Four
Connecting Your Computer
to a Telephone Line 56
Chapter Five
Connecting to the Internet
or an Online Service 78
Chapter Six
Connecting Your Computer
to a Network 84
Part Two
Communicating With Other Computers
Page 79

A world of information is now available online. By connecting your computer to a telephone line,
you can access the Internet, send and receive electronic mail (e-mail) and faxes, and connect to online
services like America Online and CompuServe. You can also use a telephone line to connect to other
computers. For example, you can telecommute by connecting to your company’s computers from
home.
When you connect over the telephone line to a spread-out network like the Internet or an online
service, you are participating in a wide area network. This is different from connecting to a local area
network where the computers are linked together by cable connections. You may have a local area
network at your work place.
This chapter provides a brief introduction to the equipment you need to connect to a telephone line.
This chapter also explains how to use the modem that came with your computer to place and receive
telephone calls and voice mail, and to send and receive faxes.
For information on connecting to an online service or the Internet, see Chapter 5. If you want to set up
or connect to a local area network, see Chapter 6.
Chapter
Four
56
Chapter Four
Connecting Your Computer to a Telephone Line
Page 80

Types of equipment
There are three types of equipment you can use to connect to a telephone line: a modem, an ISDN
line, and telecommunications equipment you share with others on a local area network.
Modem
A modem is the most common means of connecting a computer to a phone line, particularly if you are
using your computer at home. A modem works with standard analog telephone lines. Your computer
comes with a GeoPort adapter that gives you access to the computer’s modem. For instructions on
using your computer’s modem, see “About Your Computer’s Modem,” later in this chapter.
ISDN line
An Integrated Services Digital Network (ISDN) line is a special digital phone line that is about four
times faster than the fastest modem used over a standard analog telephone line. However, an ISDN line
typically costs more than regular phone service and may not be available in your community.
Connecting to an ISDN line
If you routinely need to send and receive large files, and find that a 33.6 kbps modem is not fast
enough for your needs, you may want to consider connecting your computer to an Integrated Services
Digital Network (ISDN) digital telephone line, which can transfer data at up to 128 kbps, nearly four
times as fast as a 33.6 kbps modem.
ISDN lines are available to many but not all residential and business telephone customers. Check with
your local phone company to see if ISDN service is available at your location.
There are fixed monthly charges and per-minute usage fees for ISDN, just as for regular phone service.
Typically, ISDN costs a bit more than regular phone service. However, one ISDN line can support
several devices simultaneously—such as a computer, voice phone, and fax machine—so you may be
able to replace existing extra phone lines with one ISDN line.
Note: Because an ISDN line requires a power source at your location, a phone attached to an ISDN
line will not work during a power outage. For emergency use, you should consider keeping your
regular phone line (which receives power from the phone company) as a backup.
Connecting
Your Computer to
a Telephone Line
57
Page 81

Setting up an ISDN line
If you’re interested in setting up an ISDN line, first contact your local phone company to see if ISDN
service is available at your location. Your phone company can also provide specific information about
monthly charges and usage fees. (Your phone company may also charge an installation fee, which is
sometimes waived or refunded if you agree to keep the ISDN line for a specified amount of time.)
In addition, you need to purchase either an ISDN terminal adapter or an ISDN PCI expansion card.
The ISDN terminal adapter, also called an ISDN modem, is an external device that plugs into the
modem port on the back of the computer. The ISDN PCI expansion card is an internal device that you
install into the computer’s PCI expansion slot. Either the terminal adapter or the PCI expansion card
can supply the ISDN port where you connect your ISDN line.
Some ISDN equipment may be difficult to configure with the network configuration of your employer
or Internet service provider (ISP). Work closely with your Internet service provider or computer
network administrator to make sure you purchase compatible ISDN equipment.
Shared telecommunications equipment on your network
One of the advantages of a local area network is that you can share equipment, such as printers and file
servers. If your computer is linked by a cable connection to a local area network, there may also be
shared telecommunications equipment connected to the network that allows you (or anyone else on
your network) to connect to the Internet or an online service. Contact your network administrator for
more information. You can also find general information about networks in Chapter 6, “Connecting
Your Computer to a Network.”
Chapter
Four
58
Page 82

About your computer’s modem
Your computer comes with a 33,600 bps (33.6 kbps) modem, one of the fastest modems currently
available. To use the modem you must attach the GeoPort Telecom Adapter, following the instructions
in Chapter 1, “Setting Up.”
What is a modem?
A modem is a piece of equipment that takes data from your computer, converts it into a series of tones,
and transmits the tones over telephone lines. A modem on the other end of the line converts the tones
back into the original data, so the receiving computer can use the data. The modem that came with
your computer can send and receive data in this way.
The modem enables your computer to send and receive electronic mail (e-mail) and files, connect to
the Internet, and access online services. Your modem also lets you transmit documents on your
computer to fax machines and receive faxes as documents that you can view on screen or print.
In some locations, the modem and telephone can share a single phone line. Keep in mind that if your
phone and a modem share a line, you will not be able to use both at the same time, even if they are
attached to separate phone jacks. While you use a modem, outside callers get a busy signal and you
cannot call out. Conversely, when you use your phone, you cannot use the modem. If your telephone
service has a call-waiting feature, turn it off while you’re using the modem.
If you miss phone calls because you often use your modem, you may want to get a second phone line
installed or get a phone company message service which, unlike an answering machine, will record
messages even when your phone is off the hook or you are online.
Also keep in mind that long-distance charges accrue when your modem dials long-distance numbers.
In most cases, an online service or an Internet service provider will have a local access phone number
so that long-distance charges do not apply.
Connecting
Your Computer to
a Telephone Line
59
Page 83

Using your modem
Your computer comes with several communications applications that use the modem. There are two
applications you can use to connect to the Internet or an online service:
m The Apple Internet Connection Kit, a set of application programs that help you get onto the Internet
quickly and easily
m America Online (AOL), an online information service that provides Internet access (not available in
all regions)
More information about these applications and the Internet in general is in Chapter 5, “Connecting to
the Internet or an Online Service.”
Your computer also comes with the Apple Telecom software, including the following programs:
m Apple Address Book, which lets you create your own address books
m Apple Fax, which lets you send, monitor, and manage faxes
m Apple Phone, an automatic dialing and voice mail system for managing messages
m The Express Modem control panel for adjusting your modem’s settings
All four Apple Telecom programs are already installed on your computer. This section explains how to
start using them. You can also find detailed information about using these programs in Apple Telecom
Guide, available in the Guide (h) menu when one or more of these programs is open.
Chapter
Four
60
Page 84

Apple Address Book
Apple Address Book lets you create detailed address books to store individuals’ and companies’ fax
numbers, addresses, and other information. You can import information from other programs, search
an address book for specific entries, and send faxes directly from an address book.
To start Apple Address Book, follow these instructions:
1 Open the Apple (K) menu and choose Apple Telecom Status.
2 Click the Apple Address Book icon.
Connecting
Your Computer to
a Telephone Line
61
Apple Address Book icon
Page 85

3 Enter the information you want in the Personal Info dialog box.
The information you enter in this dialog box is used by both the Apple Address Book and Apple Fax
applications. Updating this information in one application also updates it in the other. If you have
already opened and entered personal information in Apple Fax, this information appears in the
Personal Info dialog box when you open Apple Address Book.
If your country does not appear in the Country pop-up menu, you can add it to the Apple Address
Book Country preferences, then update the Apple Address Book Personal Info preferences. For
instructions, open the Guide (h) menu and choose Apple Telecom Guide.
4 Click OK.
Chapter
Four
62
Country pop-up menu
provides name and
country code.
Page 86

5 In the dialog box, enter a name and choose a location for the address book, then click Save.
A new, empty address book window is opened for you. You can create as many address books as you
want to organize your information. Each address book that you create is an independent file with no
relationship to other address books.
For more information on using Apple Address Book, open the Guide (h) menu and choose Apple
Telecom Guide.
Connecting
Your Computer to
a Telephone Line
63
Page 87

Apple Fax
Apple Fax lets you convert any Macintosh document to fax format and send it to a fax machine or to
another computer capable of receiving faxes. You can send a fax to several individuals at once,
automatically resend it if the transmission fails, convert fax documents to text (using OCR, or “optical
character recognition,” technology), and view, print, and edit faxes.
Apple Fax supports the following speeds: V.17, V.29, and V.27 high-speed fax, sending and receiving at
14400, 12000, 9600, 7200, 4800, and 2400 bits per second (bps).
To start Apple Fax, follow these instructions:
1 Open the Apple (K) menu and choose Apple Telecom Status.
2 Click the Apple Fax icon.
3 Read the introductory text, then click Next.
Chapter
Four
64
Apple Fax icon
Page 88

4 Choose your modem type from the modem pop-up menu, then click Next.
5 If you want to adjust any of your fax settings, follow the instructions in the “Changing your settings”
panel that appears.
6 Click Done to confirm your settings and close the “Getting Started with Apple Fax” window.
Connecting
Your Computer to
a Telephone Line
65
Modem pop-up menu
Page 89

After you start and specify your Apple Fax settings for the first time, the Apple Fax main window
appears in Outgoing view.
Outgoing view displays your sent faxes. Incoming view displays your received faxes. To choose the view
you want, click the Outgoing or Incoming button.
Preparing to receive faxes
To set Apple Fax to receive faxes automatically, follow these instructions:
1 Open the Apple Fax main window.
2 Drag the Fax Answering button to “on.”
Chapter
Four
66
You access other program
features with these buttons.
Page 90

3 Choose Control Panels from the Apple (K) menu and open the Express Modem control panel.
4 Choose General Settings from the pop-up menu.
5 Click to put an X next to “Auto-answer incoming calls.”
If the Express Modem control panel is not set to auto-answer, you will not receive incoming faxes, even
with Fax Answering on. Apple Fax now receives incoming faxes automatically. The Apple Fax window
does not have to be in front, or even open, in order to receive a fax.
For more information on using Apple Fax, open the Guide (h) menu and choose Apple Telecom
Guide.
Apple Phone
Apple Phone lets you place and receive telephone calls using your computer. You can also set up the
computer to act as an answering machine.
To start Apple Phone, follow these steps:
1 Open the Apple (K) menu and choose Apple Telecom Status.
Connecting
Your Computer to
a Telephone Line
67
Pop-up menu
Page 91

2 Click the Apple Phone icon.
3 Read the introductory text, then click Next.
4 In the Telephone Tool pop-up menu, choose the telephone tool that corresponds to your modem.
Chapter
Four
68
Apple Phone icon
Telephone Tool
pop-up menu
Page 92

5 Click Next.
6 In the “Answering the phone” panel, click Edit; then enter the keyboard shortcut you will use to answer
calls with your computer (letting you hear and speak through the computer’s speaker and
microphone).
The default keyboard shortcut is Command (x)–Space bar, but you can use any key combination you
like. If you select the checkbox, you can then use the keyboard shortcut to answer calls even when
Apple Phone is not open and you are working in another program.
Note: Choose a key combination that is not used frequently within other programs. For example, do
not use x-P, x-Q, or x-A.
Connecting
Your Computer to
a Telephone Line
69
Page 93

7 If you want to adjust any of your Apple Phone settings, follow the instructions in the “Changing your
settings” panel that appears.
Chapter
Four
70
Page 94

8 Click Done to confirm your settings and close the “Getting Started with Apple Phone” window.
After you start and specify your Apple Phone settings for the first time, the Apple Phone main window
appears in Phone view.
Phone view lets you place and answer phone calls. Voice Mail lets you manage message box greetings
and voice messages. To choose the view you want, click the Phone button or Voice Mail button in the
main Apple Phone window.
Note: If you did not create an address book and add entries to it, “No Address Book” appears in the
“Phone numbers from” pop-up menu.
Connecting
Your Computer to
a Telephone Line
71
You access other program
features with these buttons.
Page 95

Turning voice mail on
To turn voice mail on, follow these steps:
1 In the Apple Phone main window, click the Voice Mail button to display Voice Mail view.
2 Drag the Voice Mail button to On.
Note: Make sure that the Express Modem control panel is set to auto-answer. If it is not, you will not
receive incoming calls, even with Voice Mail on. See “Adjusting the Modem,” later in this chapter.
3 Set up the Main message box and prepare a greeting for incoming calls.
For more information on using Apple Phone, open the Guide (h) menu and choose Apple
Telecom Guide.
Chapter
Four
72
Page 96

Adjusting the modem
You use the Express Modem control panel to turn the modem on and off, and specify certain settings.
Note: Normally you use a modem in conjunction with communications software, which automatically
controls your modem’s settings. However, any settings you specify in the Express Modem control panel
take precedence over settings made by your communications software. You may want to check the
settings in the control panel if your communications software does not behave as intended.
Turning the modem on and off
If the Express Modem software is off, it is turned on automatically when an application needs it for an
outgoing communication. But whenever it is on, the modem uses about 600K of system memory, so
you may want to turn it off when you do not need it. Follow the instructions below.
Important If you turn the modem off, no communications program that uses the Express Modem
software will be able to receive incoming calls.
1 Choose Control Panels from the Apple (K) menu.
2 Open the Express Modem control panel.
3 Click the On or Off button to select it.
4 If an alert message appears, click OK to acknowledge the message and complete what you are doing.
Connecting
Your Computer to
a Telephone Line
73
Page 97

Specifying the settings
You specify Express Modem settings in the General Settings and Advanced Options panels, shown
below. Press the pop-up menu to choose either panel. The settings are described next.
Country Telecom Settings
The Country Telecom Settings display the current country and the number of rings possible for
auto-answer. You cannot edit these fields.
Auto-answer incoming calls
When “Auto-answer incoming calls” is selected, and at least one communications program is set to
auto-answer, the modem software automatically answers incoming calls after the number of rings
specified in the ring number field. Calls are answered according to priorities described in “Call
Management,” later in this section.
The checkbox and ring number field override the auto-answer setting of any communications program
that uses the modem software. If you want to receive calls in any of your communications programs,
make sure that this checkbox is selected and the number of rings specified.
If you want to prevent your modem from answering incoming calls, click to remove the X from the
checkbox. If you do this, the modem will not answer calls even if a communications program is set to
auto-answer.
Chapter
Four
74
Pop-up menu Pop-up menu
Page 98

Note: If your modem shares a line with your telephone, and you want to make sure that the modem
does not answer your incoming calls before you do, you can either deselect the “Auto-answer incoming
calls” checkbox or set the number of rings to a high value.
Call Saver mode
Call Saver mode lets you save money on connection charges when you retrieve voice messages from a
remote location. If there are new messages and Call Saver mode is selected, the modem answers your
call at the number of rings set in the Call Saver ring number field. If there aren’t any new messages, the
modem does not answer after the Call Saver ring number setting. You still have time to hang up before
the modem answers your call.
To operate correctly, Call Saver mode requires that the value in the Call Saver ring number field be at
least two rings less than the value in the auto-answer ring number field. For example, you can set autoanswer to five rings and Call Saver to two rings. If your voice mail does not respond by the third ring,
then you know that there are no new messages.
Ring Sound
From the Ring Sound pop-up menu, you can choose the sound that your computer plays when you
receive an incoming call. You can also install and use your own sounds.
For more information on installing additional sounds, open the Guide (h) menu and choose Mac OS
Guide when the Finder is active.
Progress sounds
You can monitor the sounds of a fax in progress by choosing one of the settings in the Progress sounds
pop-up menu:
m Use application settings: Lets you control the speaker volume from your communications software
(and from the Sound control panel)
m Turn off: Turns the speaker off for applications that use the modem
m Keep on until carrier: Leaves the speaker on until a connection is established
Connecting
Your Computer to
a Telephone Line
75
Page 99

Call management
When a call comes in, your modem tries to identify the type of call it is by detecting calling tones. The
modem then checks to see which programs are set to auto-answer and connects the incoming call to
the appropriate program. This is known as incoming call management.
While the modem is on, it answers calls automatically according to the following rules:
m The modem only answers if “Auto-answer incoming calls” is selected in the control panel.
m The modem only answers if at least one program is set to auto-answer.
m If several different programs are set to auto-answer, the modem uses calling tone detection to
identify the type of call, then sends it to the corresponding program.
Since not all calling devices use calling tones, some calls cannot be identified. To enable the modem to
answer unidentified calls—when calling tone detection is unsuccessful—use the “Transfer incoming
calls” buttons to choose the type of application program—Fax, Voice, or Data—you want to answer
unidentified calls. If you expect to receive both voice and data calls, ask your callers to send a data
calling tone when calling your machine.
Make sure the fax, voice, or data program you designate to handle unidentified calls is set to autoanswer.
Ignore dial tone when dialing
When the “Ignore dial tone when dialing” checkbox is selected, the modem dials even though a dial
tone cannot be detected. (This feature is sometimes called “blind dialing.”) It is a useful feature for
locations with a PBX system, such as hotels, where the modem may have difficulty recognizing the
PBX dial tone.
Chapter
Four
76
Page 100

Checking the modem’s status
To check the modem’s status, choose Modem Status from the pop-up menu. The modem’s Status
panel shows the modem’s current state, type of connection, and call progress as well as information
about outgoing data calls, including connection speed, error control, and data compression.
Connecting
Your Computer to
a Telephone Line
77
Pop-up menu
Messages concerning type of call and modem status
Graphical display of call progress and modem status
Information about the call
 Loading...