

Page 1

Apple
TV/FM Radio
System
User’s Manual
Page 2

K Apple Computer, Inc.
© 1996 Apple Computer, Inc. All rights reserved.
Under the copyright laws, this manual may not be copied, in whole or in part, without
the written consent of Apple. Your rights to the software are governed by the
accompanying software license agreement.
The Apple logo is a trademark of Apple Computer, Inc., registered in the U.S. and
other countries. Use of the “keyboard” Apple logo (Option-Shift-K) for commercial
purposes without the prior written consent of Apple may constitute trademark
infringement and unfair competition in violation of federal and state laws.
Every effort has been made to ensure that the information in this manual is accurate.
Apple is not responsible for printing or clerical errors.
Apple Computer, Inc.
1 Infinite Loop
Cupertino, CA 95014-2084
(408) 996-1010
Apple, the Apple logo, LaserWriter, Macintosh, and QuickTime are trademarks of Apple
Computer, Inc., registered in the U.S. and other countries.
Adobe and PostScript are trademarks of Adobe Systems Incorporated or its subsidiaries
and may be registered in certain jurisdictions.
Helvetica is a registered trademark of Linotype-Hell AG and its subsidiaries.
Simultaneously published in the United States and Canada.
Mention of third-party products is for informational purposes only and constitutes
neither an endorsement nor a recommendation. Apple assumes no responsibility with
regard to the performance or use of these products.
ii
Page 3

CONTENTS
Communications regulation information v
Preface vii
1 Installing the Card and Software 1
What you should have 2
Installing the TV/FM tuner card in a
compact computer 4
Installing the TV/FM tuner card in a
modular computer 26
Connecting other video equipment 34
Installing the software 42
Where to go from here 44
2 Listening to the FM Radio 45
Turning on the FM Radio 46
Turning off the FM Radio 47
Getting help on screen 47
Tuning in to stations 48
Adjusting the sound 49
3 Customizing the FM Radio Settings 51
Presetting stations 52
Setting signal range and strength 60
Setting other preferences 62
4 Recording from the Radio 65
Compressing recordings 66
Saving recordings 67
5 Watching TV or Video 71
Opening Apple Video Player 72
Getting help on screen 73
iii
Page 4

Choosing a video source 75
Changing TV channels 76
Adjusting the sound 77
Adjusting the picture 80
6 Customizing the TV Tuner Settings 81
Programming channels 82
Giving names to channels 86
Locking and unlocking channels 88
Creating and changing a password 90
Setting and editing TV reminders 93
Setting a hot key 96
7 Capturing TV and Video Images 97
Capturing individual images 98
Capturing movies 100
8 Other Features 105
Setting the closed caption and video text options 106
Changing the video window size 107
Changing the window color 109
Setting the video input standard 110
9 Using the Remote Control 111
Controlling your FM radio 112
Controlling TV or video 114
Controlling your CD-ROM player 115
Setting preferences 116
10 Troubleshooting 117
Problems listening to the radio 118
Problems watching TV or video 122
Appendix: Viewing Closed Captions on
Videotape 131
Index 133
iv
Page 5

Communications regulation information
FCC statement
This equipment has been tested and found to comply with the limits for a Class B
digital device in accordance with the specifications in Part 15 of FCC rules. See
instructions if interference to radio or television reception is suspected.
Radio and television interference
The equipment described in this manual generates, uses, and can radiate radiofrequency energy. If it is not installed and used properly—that is, in strict accordance
with Apple’s instructions—it may cause interference with radio and television
reception.
This equipment has been tested and found to comply with the limits for a Class B
digital device in accordance with the specifications in Part 15 of FCC rules. These
specifications are designed to provide reasonable protection against such interference
in a residential installation. However, there is no guarantee that interference will not
occur in a particular installation.
You can determine whether your computer system is causing interference by turning it
off. If the interference stops, it was probably caused by the computer or one of the
peripheral devices.
If your computer system does cause interference to radio or television reception, try to
correct the interference by using one or more of the following measures:
m Turn the television or radio antenna until the interference stops.
m Move the computer to one side or the other of the television or radio.
m Move the computer farther away from the television or radio.
m Plug the computer into an outlet that is on a different circuit from the television or
radio. (That is, make certain the computer and the television or radio are on circuits
controlled by different circuit breakers or fuses.)
If necessary, consult an Apple-authorized service provider or Apple. See the service
and support information that came with your Apple product. Or, consult an
experienced radio/television technician for additional suggestions.
Important Changes or modifications to this product not authorized by Apple
Computer, Inc., could void the FCC Certification and negate your authority to operate
the product.
v
Page 6
This product was tested for FCC compliance under conditions that included the use of
Apple peripheral devices and Apple shielded cables and connectors between system
components. It is important that you use Apple peripheral devices and shielded cables
and connectors between system components to reduce the possibility of causing
interference to radios, television sets, and other electronic devices. You can obtain
Apple peripheral devices and the proper shielded cables and connectors through an
Apple-authorized dealer. For non-Apple peripheral devices, contact the manufacturer
or dealer for assistance.
DOC statement
DOC Class B Compliance This digital apparatus does not exceed the Class B limits for
radio noise emissions from digital apparatus as set out in the interference-causing
equipment standard entitled “Digital Apparatus,” ICES-003 of the Department of
Communications.
Observation des normes—Classe B Cet appareil numérique respecte les limites de
bruits radioélectriques applicables aux appareils numériques de Classe B prescrites
dans la norme sur le matériel brouilleur : “Appareils Numériques”, NMB-003 édictée
par le ministre des Communications.
VCCI statement
vi
Page 7

PREFACE
This manual tells you how to install and use the hardware
and software that are part of the Apple TV/FM Radio System
so that you can
m watch TV or video and listen to the radio on your computer
m capture video or TV images on disk
m save radio recordings on disk
m determine which channels or radio stations you receive
m set up a password to restrict access to one or more TV
channels
m take advantage of available closed captions, video text, and
Second Audio Program (SAP) when you’re watching TV on
your computer
m manipulate basic TV and radio features with the included
remote control
m quickly switch among watching TV, listening to the radio,
and using your other computer application programs
Note: You use two separate applications to watch TV and
listen to radio, but you can do both on your computer at the
same time. However, you will not hear the TV while the
radio is playing.
vii
Page 8

CHAPTER
1
Installing the Card and Software
This chapter explains how to install the TV/FM tuner card
and software you need to watch TV and listen to the radio on
your computer. You’ll find information on how to
m install the TV/FM tuner card
m attach an FM radio antenna and a TV antenna (or cable
service connection) to the card
m attach a VCR (or other video device) to your computer’s
video input ports
m install the Apple FM Radio application program, which you
use to listen to the radio, and the Apple Video Player
application program, which you use to watch TV and video
(an installer installs both of these applications at once
for you)
If you purchased your computer with the video input card,
TV/FM tuner card, and software already installed, skip the
instructions in this chapter for installing the TV/FM tuner
card. (Be sure to read the instructions and look at the
illustrations for attaching a TV antenna and FM antenna.)
1
Page 9

What you should have
Check your package to make sure you have everything you
see here. Your package also contains floppy disks from
which you will install the software later.
TV/FM tuner card
Remote control
FM antenna
Note: Your remote control or FM antenna may look
different from the one shown here.
To install the TV/FM tuner card, you first attach it to the
computer, and then connect an FM antenna and a TV
antenna (or a cable service connection) to it.
2
Chapter 1
Page 10
Important The TV portion of your TV/FM tuner card will
not work if you do not have a video input card already
installed. To see if your computer has a video input card
installed, check the back of your computer for these three
protruding ports.
If these ports are present, then a video input card is installed.
You need a video input card even if you do not intend to
connect any video equipment (such as a VCR or video
camera) to it. If you do not have a video input card, purchase
it separately from an Apple-authorized dealer and install it
according to the instructions that come with it. If you have a
video input card installed, go on to the next section.
The steps for attaching the TV/FM tuner card to your
computer vary slightly depending on whether or not your
computer has a built-in monitor.
Installing the Card and Software
3
Page 11
Installing the TV/FM tuner card in
a compact computer
If your system has a built-in monitor, like this one, continue
with the steps below. Otherwise, go to the section that
follows, “Installing the TV/FM Tuner Card in
a Modular Computer.”
4
Chapter 1
Page 12
Important Before you install the card, check the back of
your computer and make sure the access cover for the
TV/FM tuner card looks like the one on the computer on
the left.
The back panel on your
computer should have a
rectangular access cover.
If the back panel on your computer
has a small circular access cover,
you’ll need to purchase a
replacement panel from
an Apple-authorized dealer.
If the access cover on your computer matches the
illustration on the left, continue with the instructions in this
chapter. (The rectangular opening in the computer on the
left accommodates both ports of the TV/FM tuner card.)
If the access cover on your computer looks like the
computer on the right, you need to purchase a replacement
for the back panel from an Apple-authorized dealer. After
you’ve purchased the new back panel, continue with the
instructions in this chapter.
Installing the Card and Software
5
Page 13

To install the TV/FM tuner card in a computer with a built-in
monitor, follow these steps:
Removing the logic board
1 Make sure you save any open documents and quit any open
applications. Then turn off the computer like this:
m First, choose Shut Down from the Special menu.
m Then press the power switch at the back of the computer.
Press the side of the switch marked with the j symbol.
2 Unplug all the cables except the power cord from your
computer.
Leaving the power cord plugged in helps protect
the computer from damage by electrostatic discharge.
Important To avoid generating static electricity that may
damage the card or computer, do not walk around the room
until you have completed the installation of the card and
closed the computer. Additionally, move the logic board as
little as possible while it is outside the computer.
6
Chapter 1
Page 14
3 Use a screwdriver to remove the screws from the back panel.
Note: If you had to buy a new back panel and are removing
your old one, there are only two screws to remove, one on
each side.
Remove these three screws.
Installing the Card and Software
7
Page 15
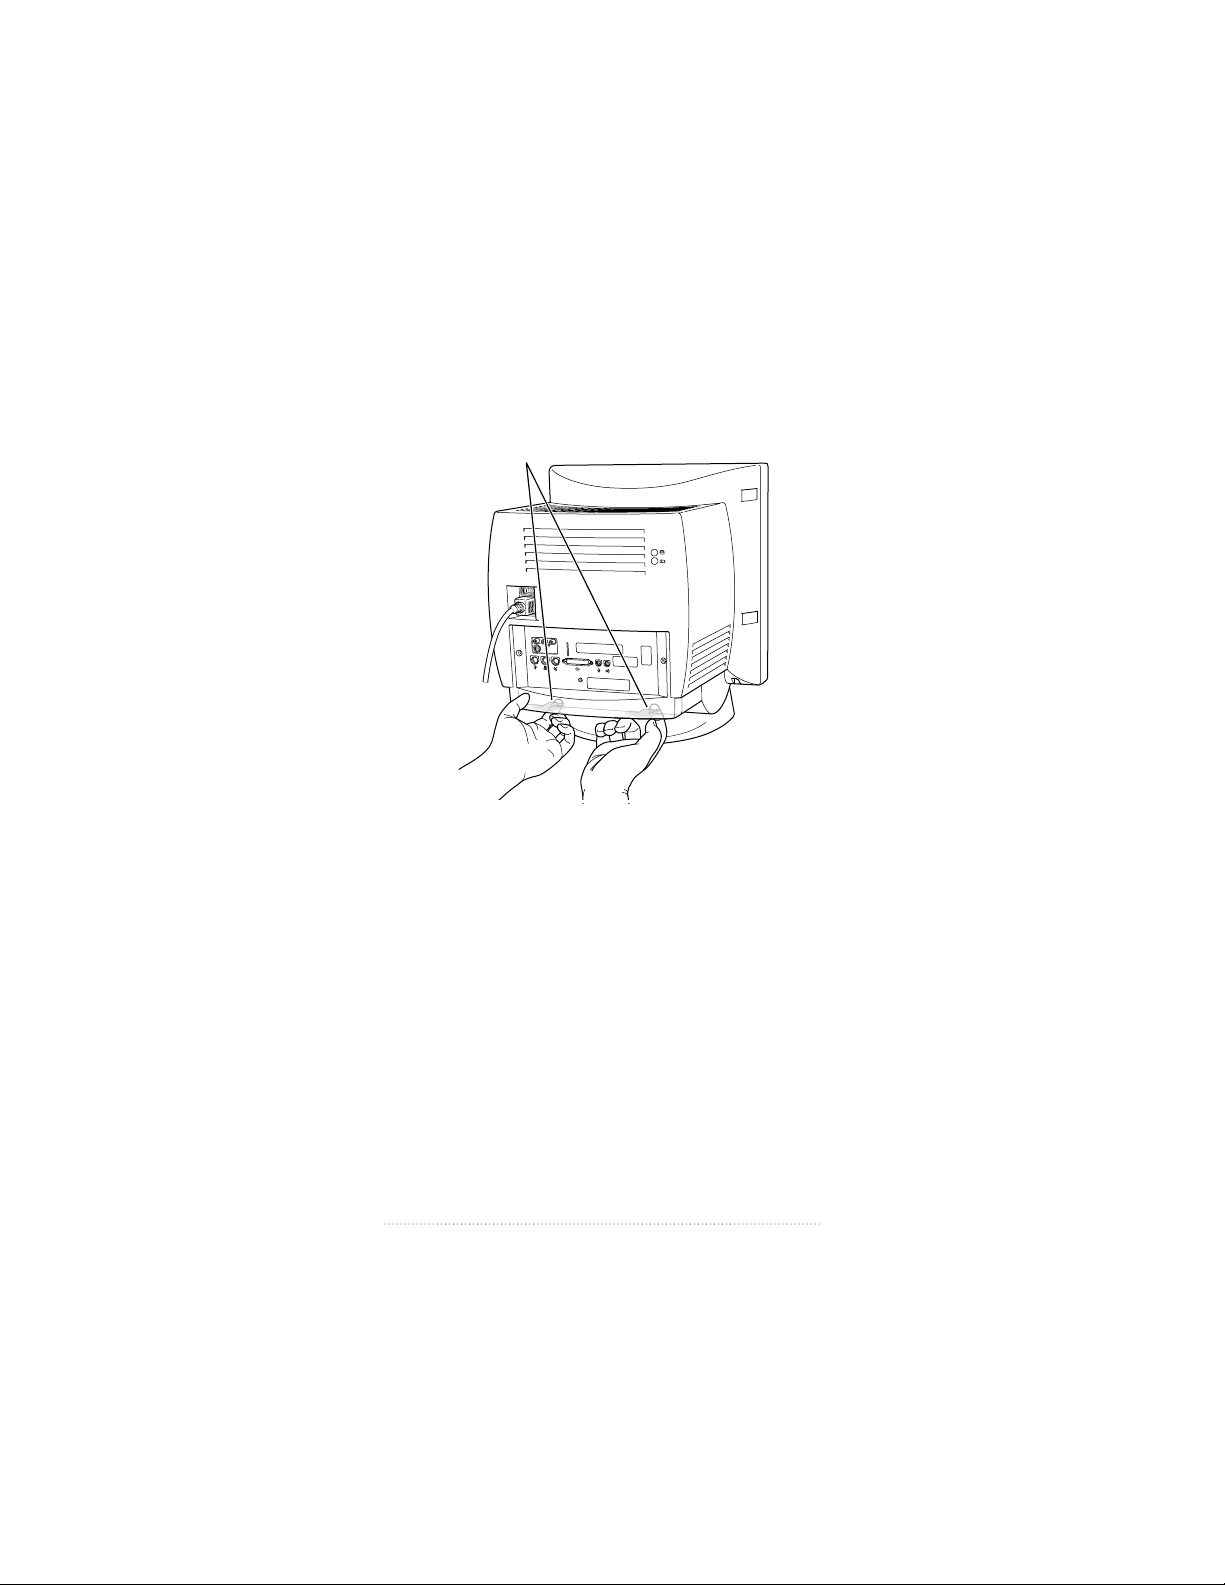
4 With your fingertips, locate the two latches on the underside
of the computer’s case.
Locate the two latches on the underside of the computer’s
case with your fingertips.
8
Chapter 1
Page 16
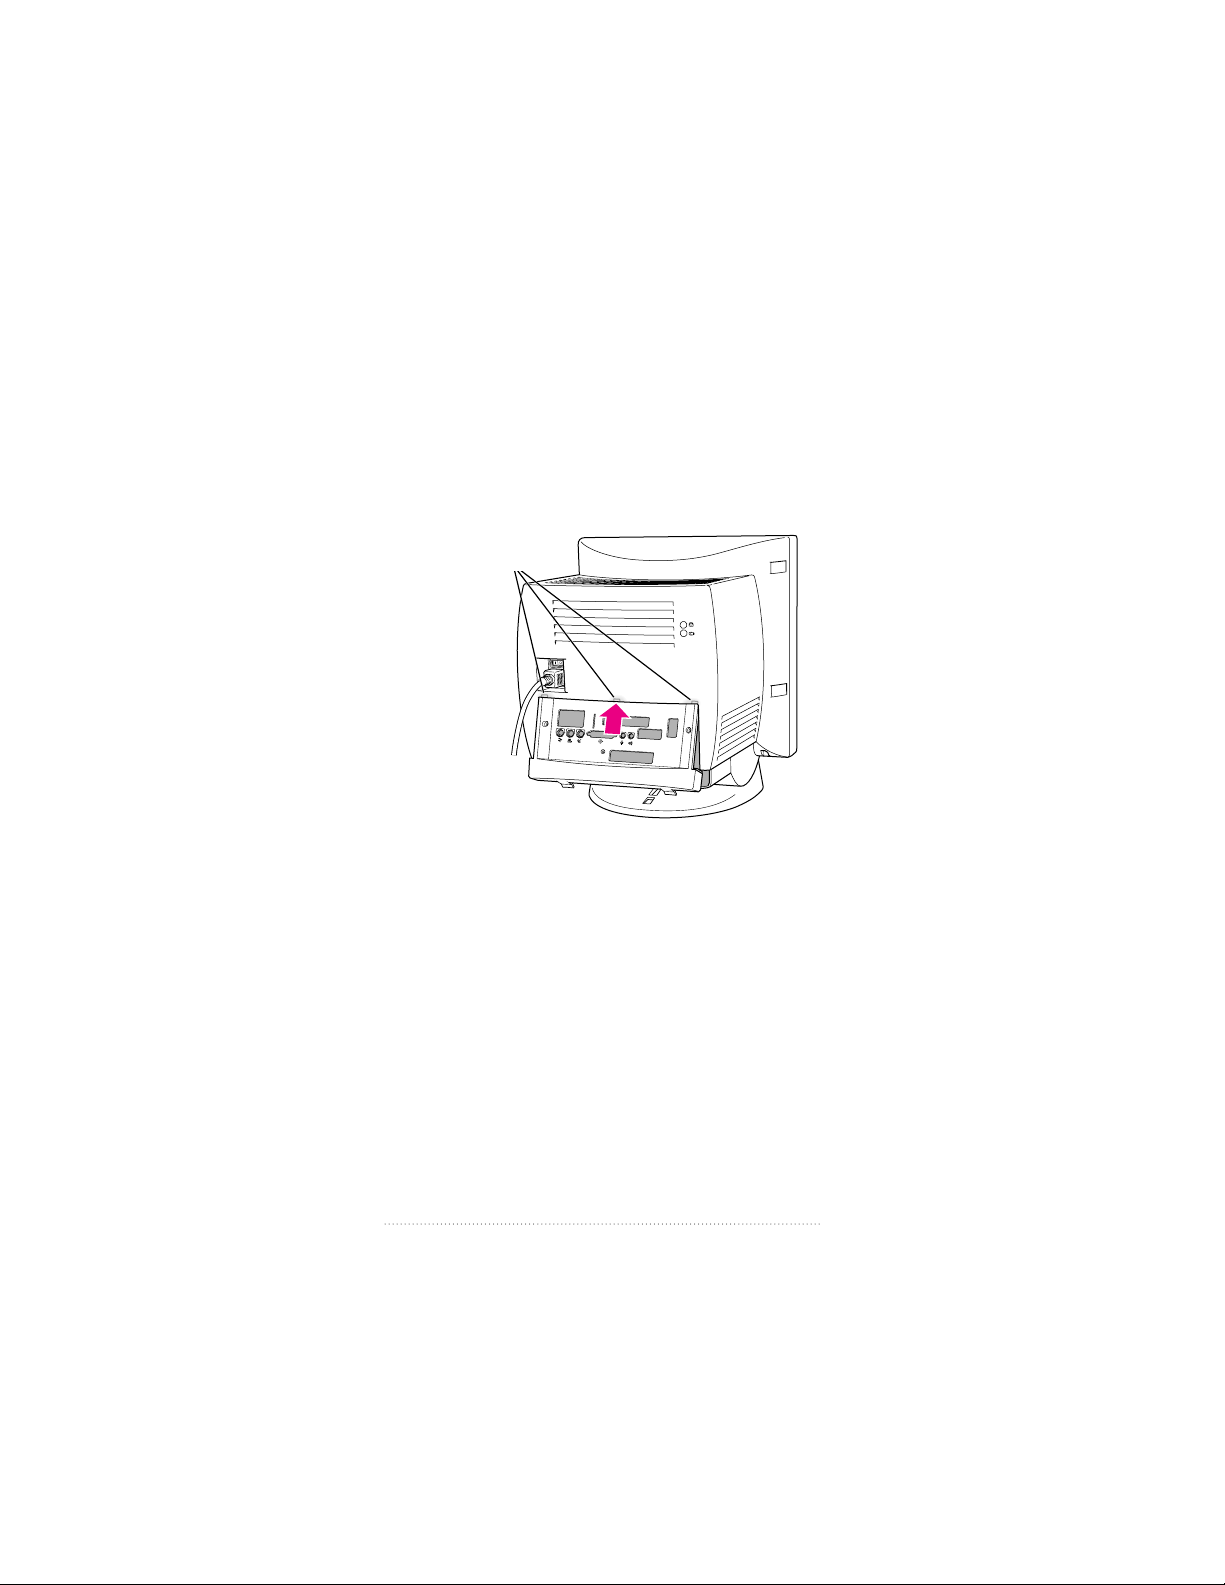
5 Pulling gently, swing the panel up and slip it out.
Pulling gently, swing the
panel up and slip it out.
Remember: Don’t walk around the room until you have
finished installing the card and closed the computer. Move
the logic board as little as possible while it’s outside the
computer.
Installing the Card and Software
9
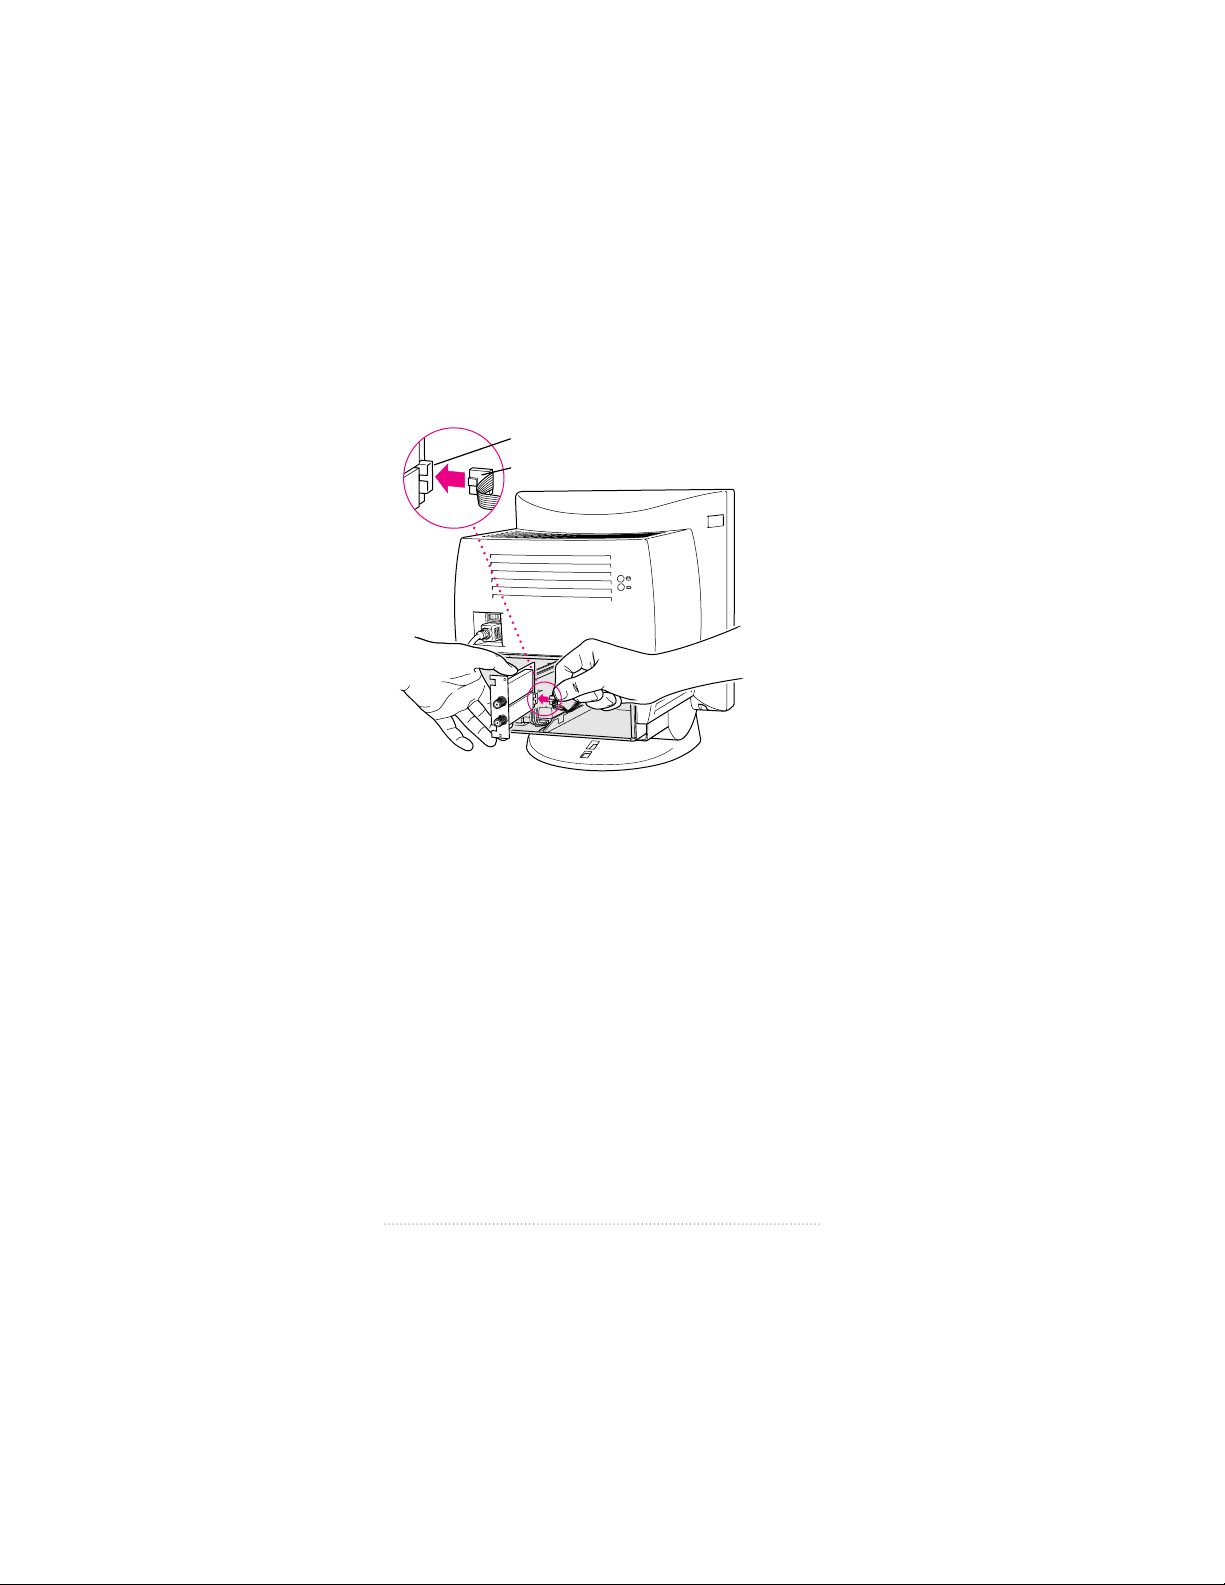
Page 17

6 There is a wire handle on the back of the logic board. Swing
it down and use it to pull the logic board toward you.
Wire handle
The logic board is plugged into a slot inside the computer,
so you may have to brace the computer with your other
hand and pull firmly at first. Slide the entire logic board all
the way out of the computer.
10
Chapter 1
Page 18
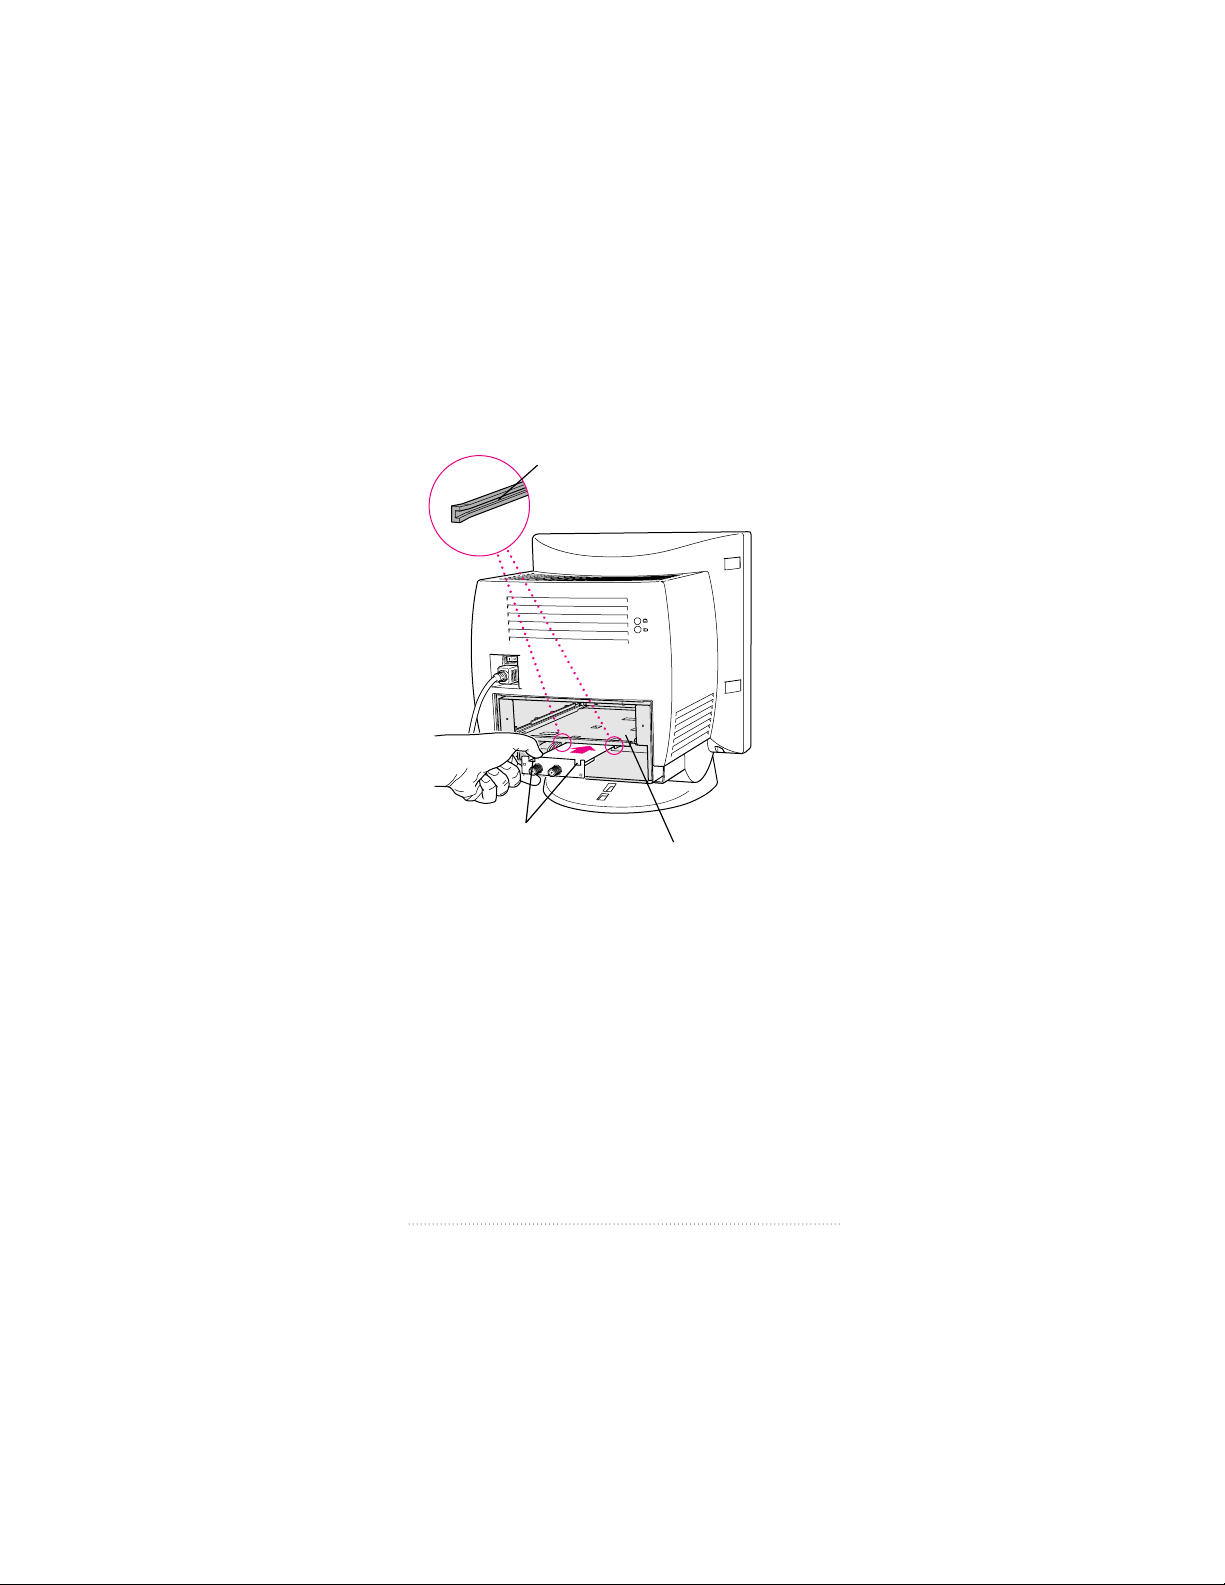
Installing the TV/FM tuner card
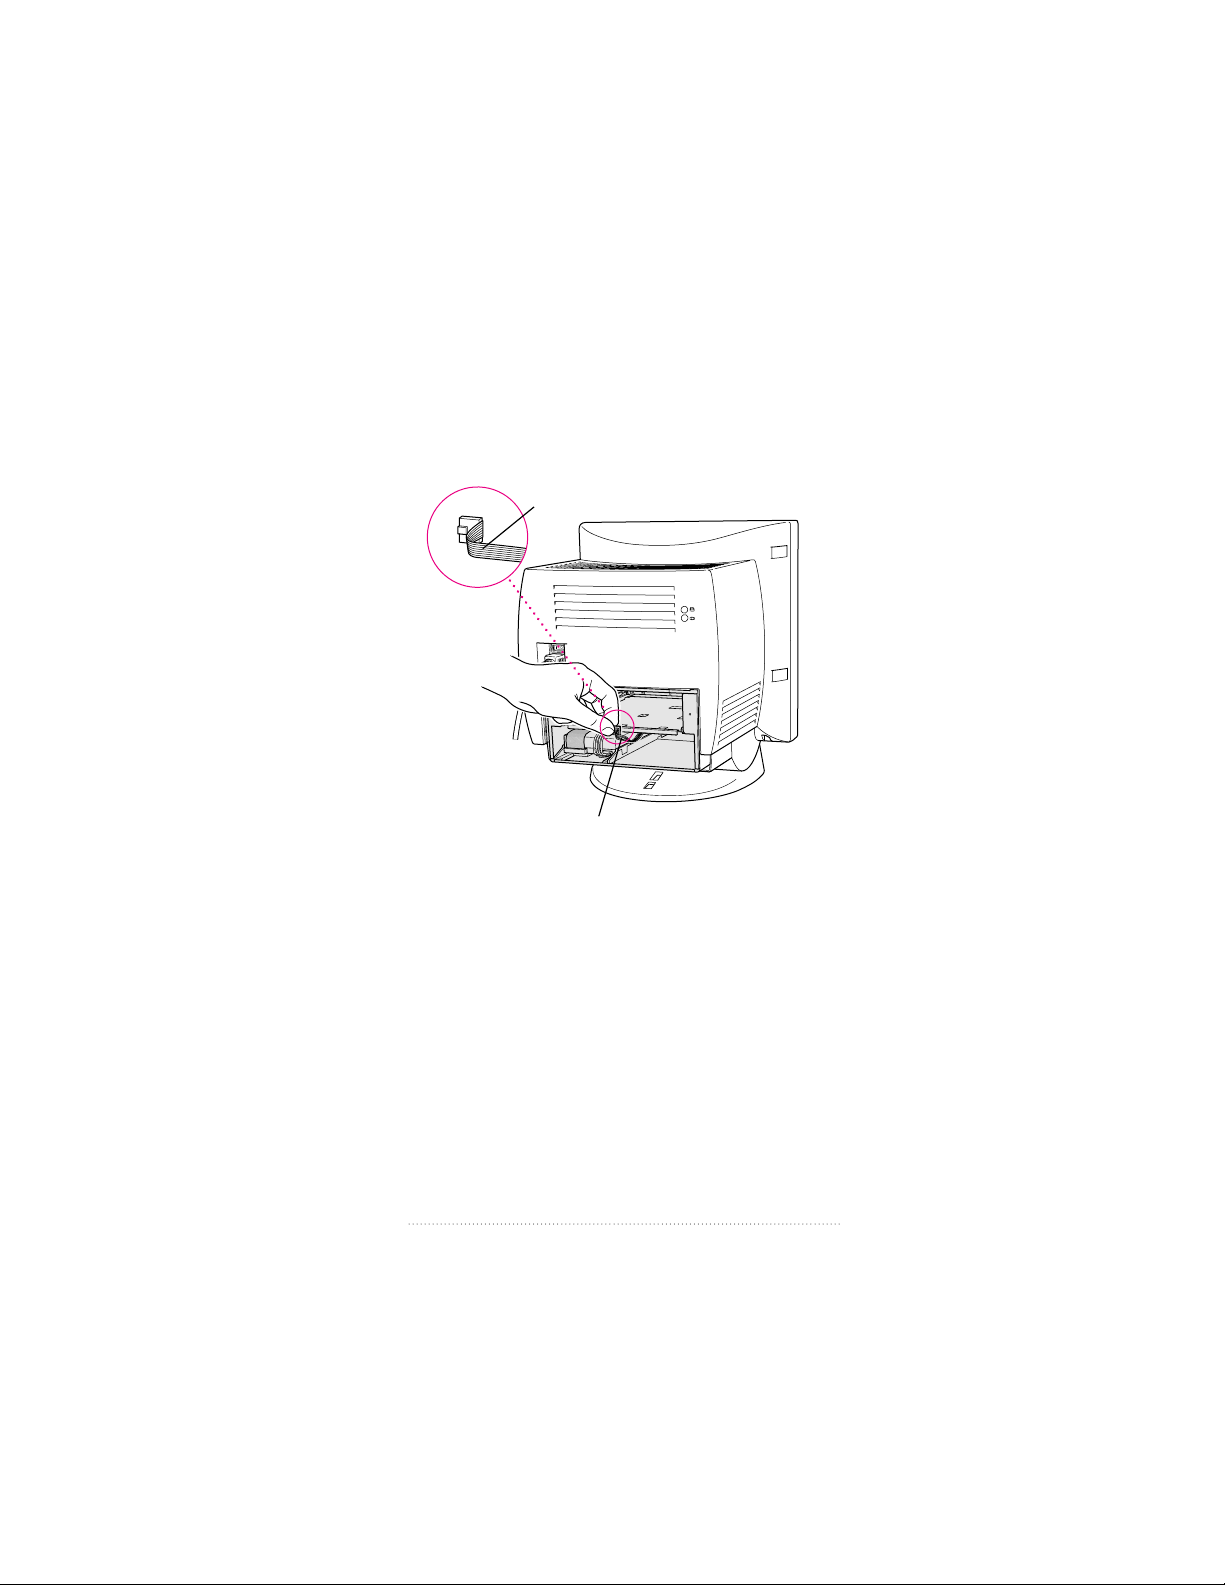
1 There is a ribbon cable inside the computer, held in place
under the logic board tray, at the bottom of the chassis. Pull
the cable gently a short way out of the opening.
Ribbon cable
If the ribbon cable is taped down on the inside of the computer,
remove the tape and gently pull the ribbon cable a short way
out of the opening so that you can attach it to the card.
2 Remove the TV/FM tuner card from its static-proof bag. Hold
the card by its edges to avoid touching the connectors.
Installing the Card and Software
11
Page 19
3 Attach the plug on the ribbon cable to the connector on the
TV/FM tuner card.
Connector
Ribbon cable plug
12
Chapter 1
Page 20
4 Slide the TV/FM tuner card into place under the logic board
tray. Fit the edges of the card into both of the guides there,
making sure the notches on the card point upward.
Make sure the TV/FM tuner card slides
into the guides along the underside
of the sheet metal logic board tray.
Install the TV/FM tuner card with
these notches pointing upward.
Installing the Card and Software
Sheet metal logic board tray
13
Page 21

5 Locate the TV/FM tuner card access cover on the inside of
the plastic back panel.
Note: If you purchased a new back panel, locate the access
cover on the back of that panel.
Plastic back panel
TV/FM tuner card access cover
14
Chapter 1
Page 22

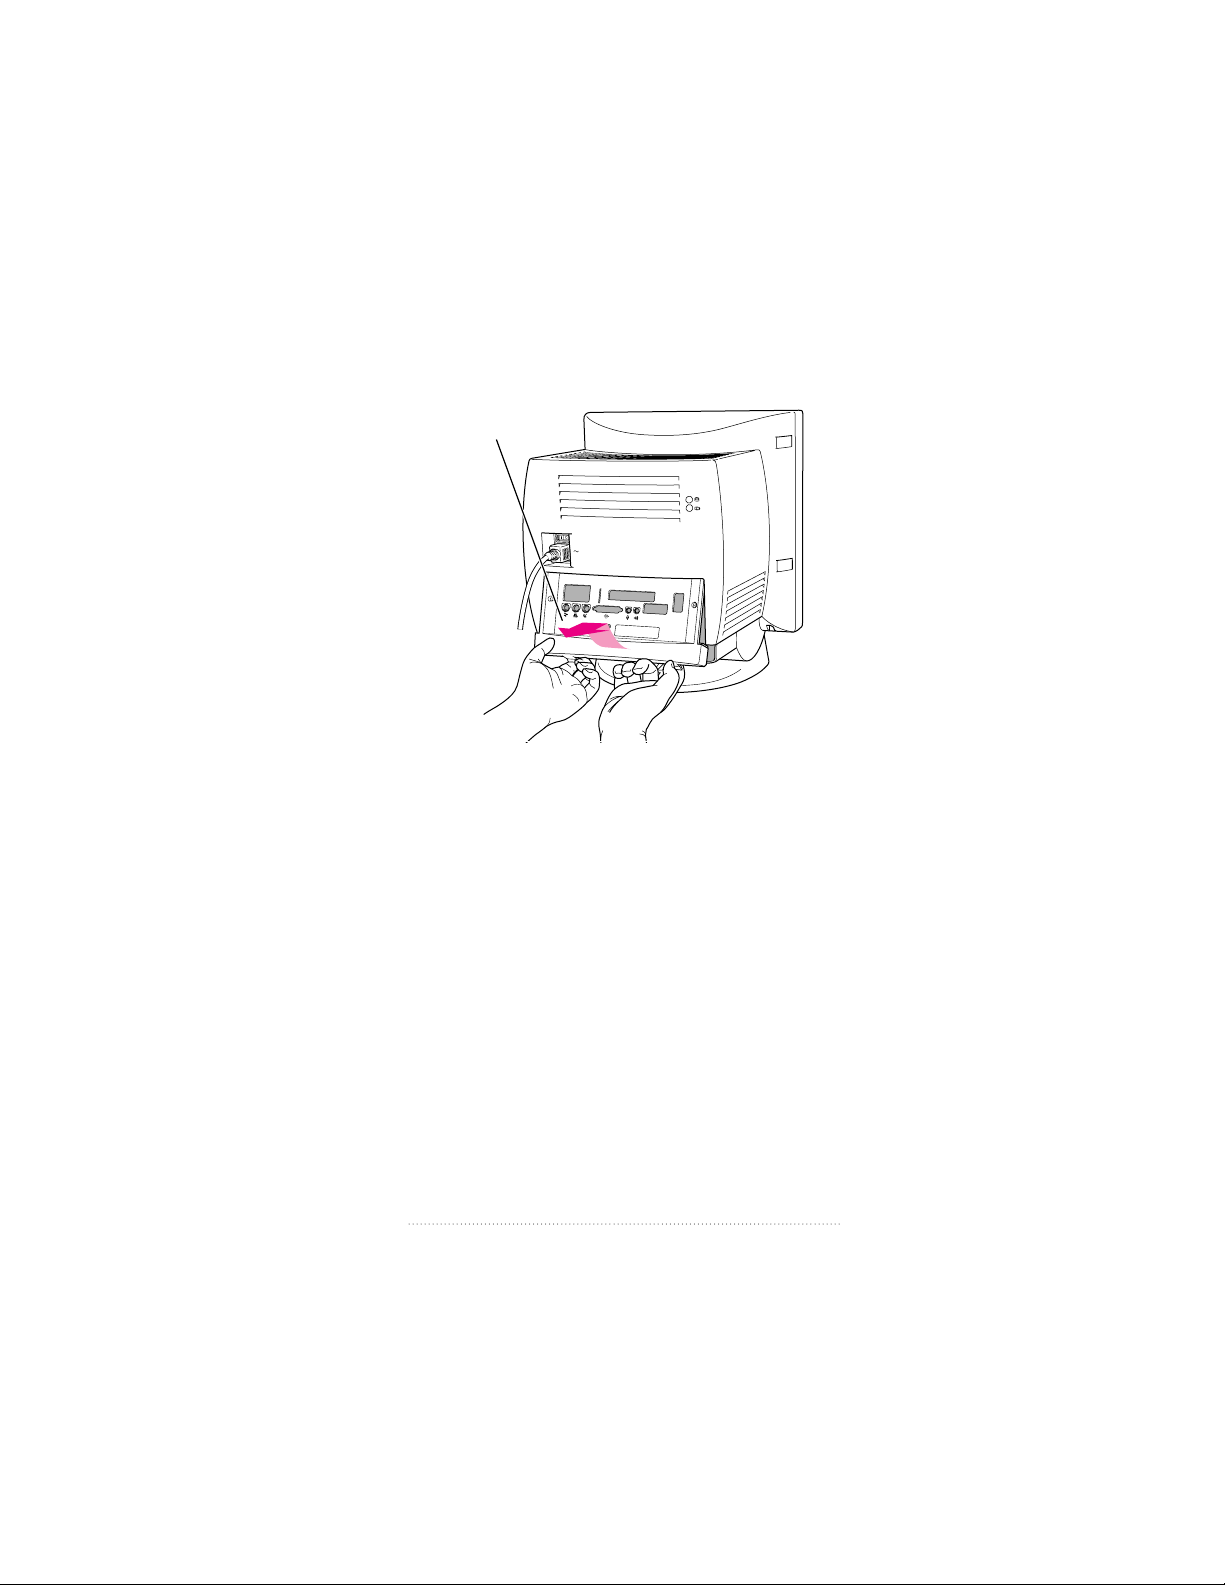
6 Remove the cover from its opening by squeezing together
the plastic tabs that hold it in place.
Squeeze the two plastic tabs
together and pull off the metal
retainer so the access cover
can come off.
Metal retainer
Plastic back panel
Store the access cover; you may want to put it back in place
it if you ever remove the TV/FM tuner card.
Installing the Card and Software
15
Page 23
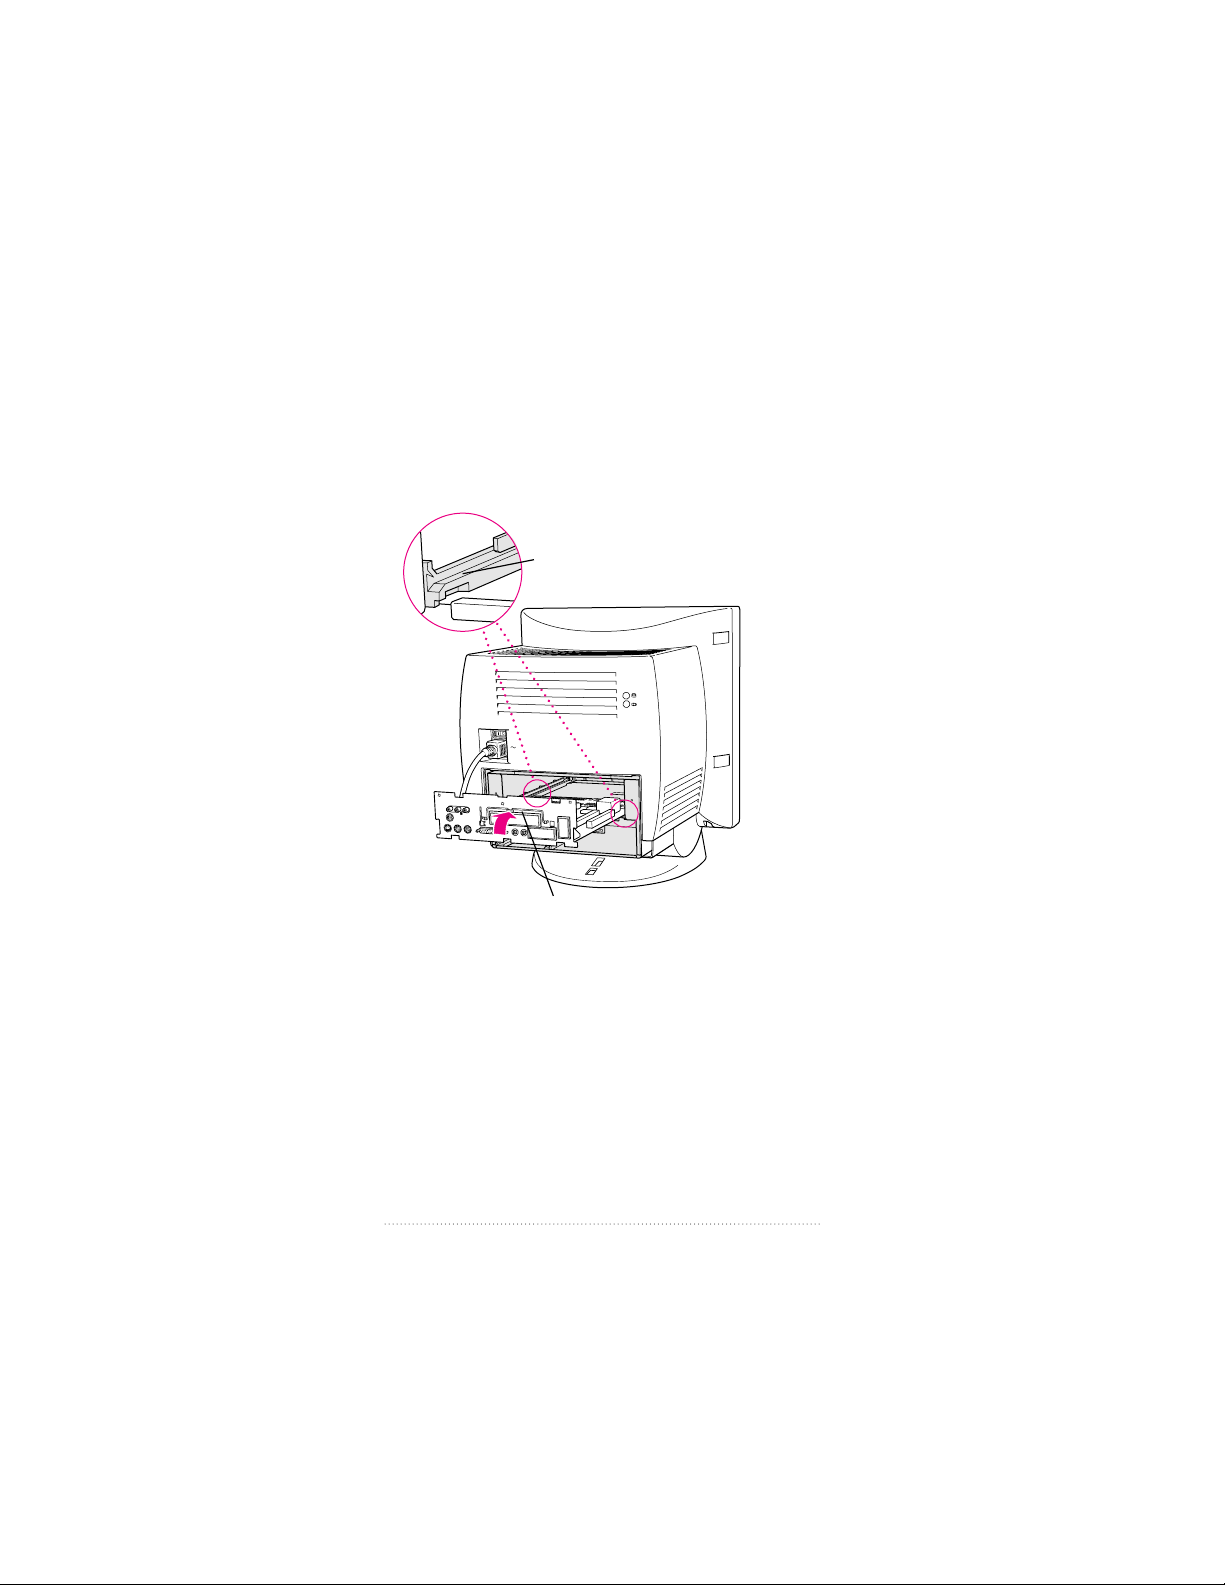
Replacing the logic board
1 Swing the wire handle on the logic board back up into its
storage position, securing it under its catch. Then fit the
logic board into the guide rails on both sides of the
computer’s interior.
Make sure the logic board slides
into the guides that are on both
sides of the computer’s interior.
Swing the handle up, into its storage position.
16
Chapter 1
Page 24
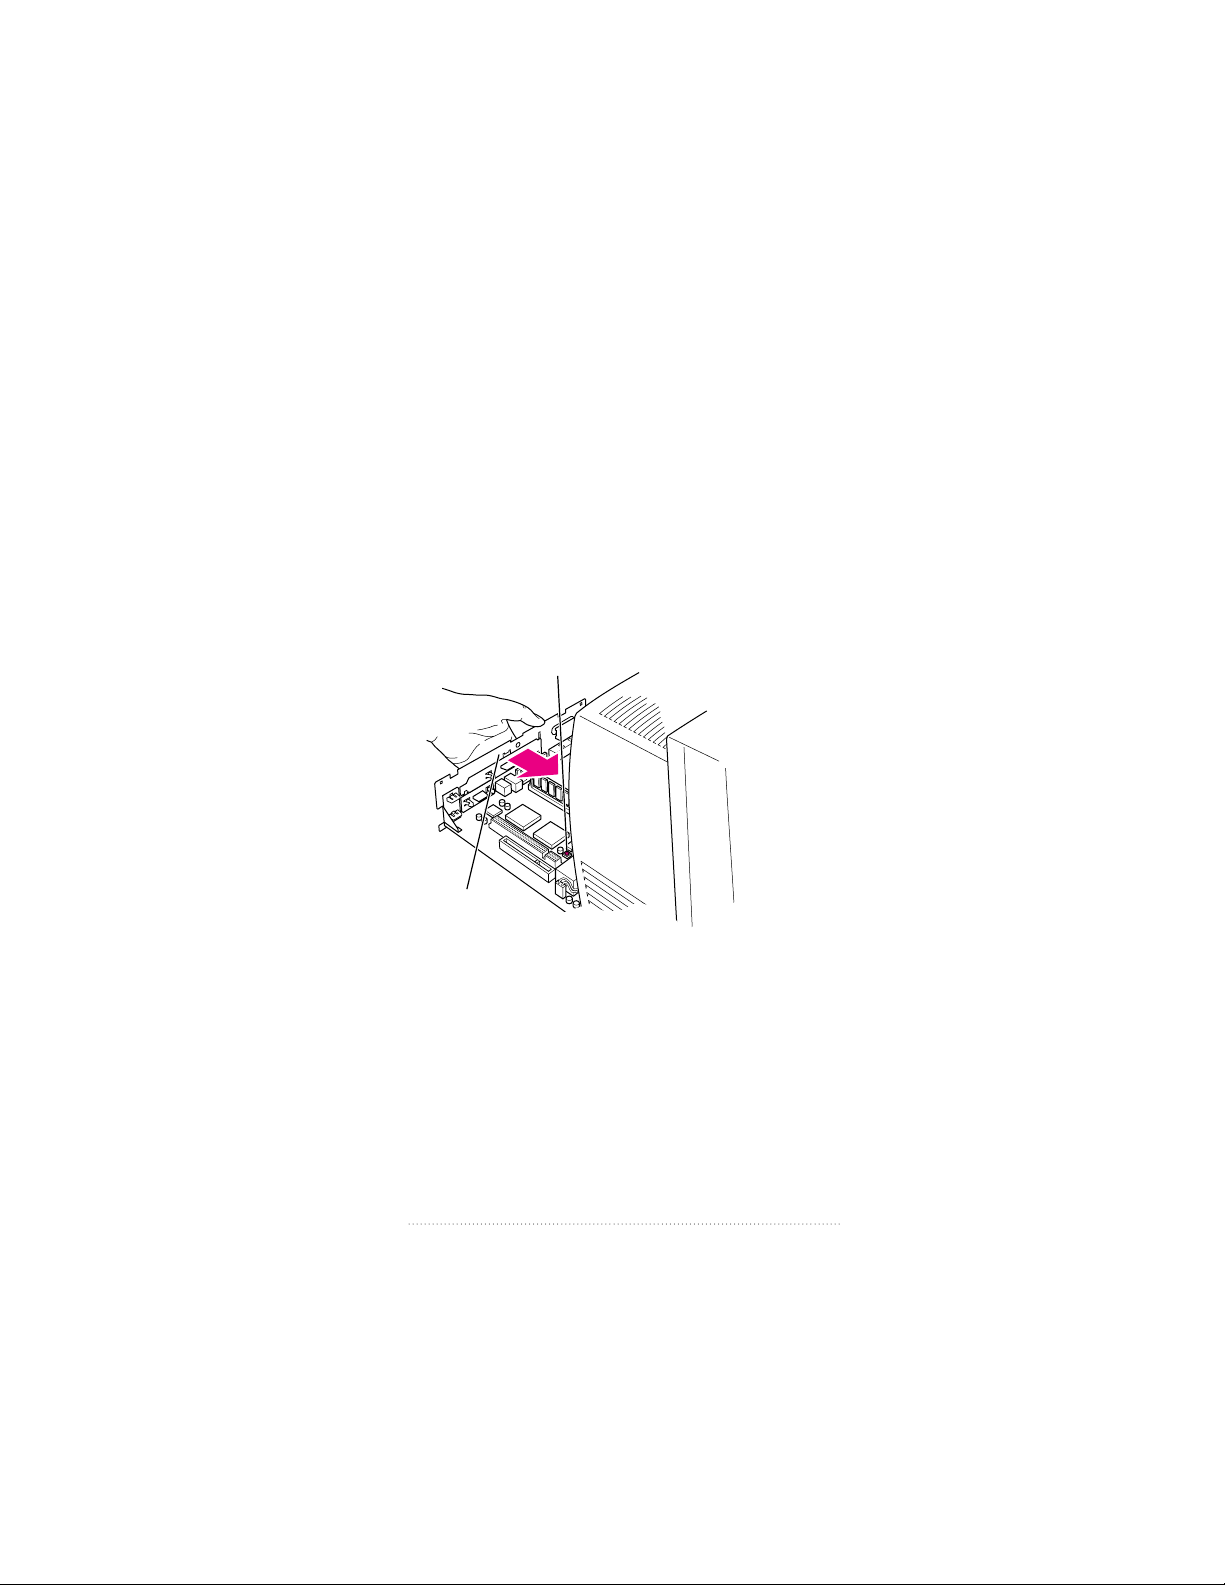
2 Press the reset button on the logic board. Then gently but
firmly push on the vertical plate until the logic board is back
into place within the computer. You’ll need to push a little
harder at the end to make sure the connectors at the back of
the board are seated in their slot.
Note: If you can’t find the reset button, it may be in a
different location on your logic board. Check the manual
that came with your computer, in the section in the
appendix about installing expansion cards. There you will
find an illustration that shows where the reset button is for
your computer.
1 Press the reset button.
2 Gently but
firmly push on the
vertical plate until the logic
board is solidly back in place.
Installing the Card and Software
17
Page 25
3 Slip the three tabs at the top of the back panel into the
matching grooves in the computer case.
Note: If you purchased a different back panel from the one
that was originally on your computer, attach the new back
panel. You no longer need the old one.
Slip the three tabs on the
back panel into the grooves
in the computer case.
18
Chapter 1
Page 26
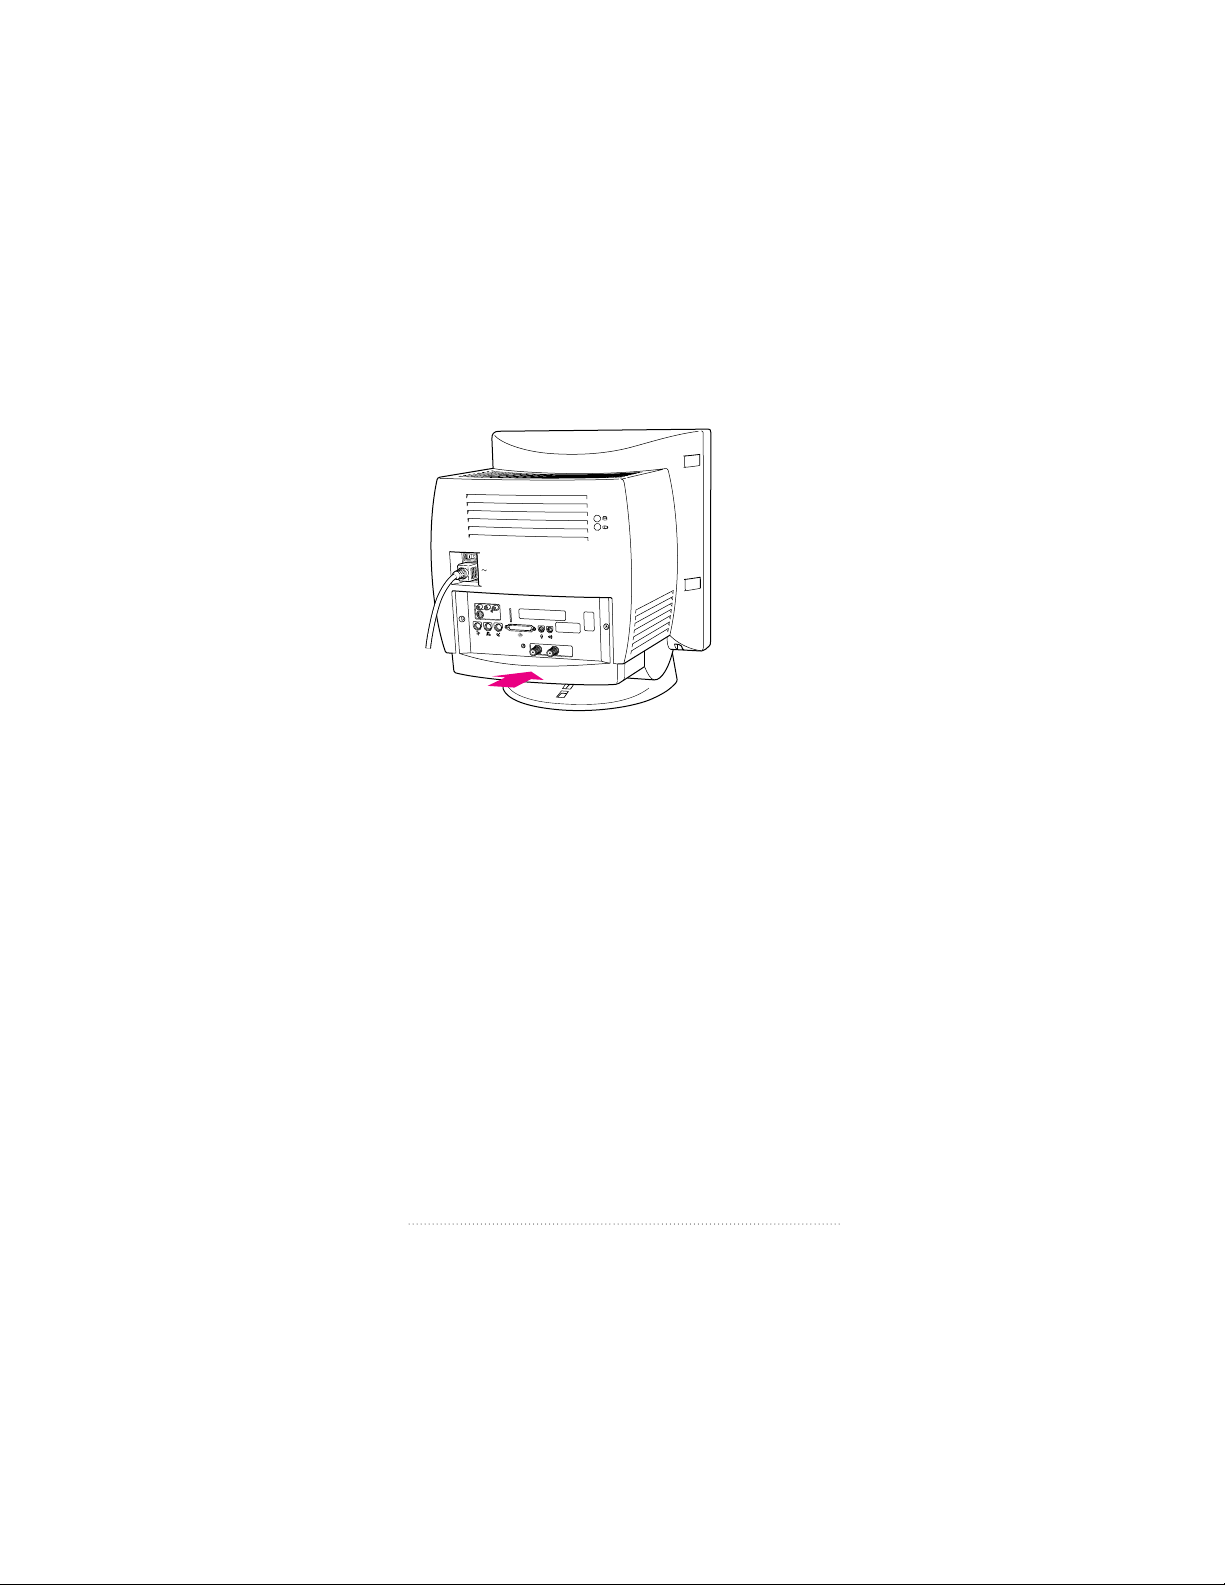
4 Then snap the bottom of the panel into place, making sure it
is flush with the back of the computer.
Snap the plastic back panel into place.
Installing the Card and Software
19
Page 27
5 With a screwdriver, insert and gently tighten one of the
provided attachment screws in the hole just to the left of the
TV/FM tuner card.
Reinsert this screw to secure the
TV/FM tuner card in the computer.
20
Chapter 1
Page 28
6 Reinsert the security screws on both sides of the back panel.
Reinsert both security screws.
Installing the Card and Software
21
Page 29
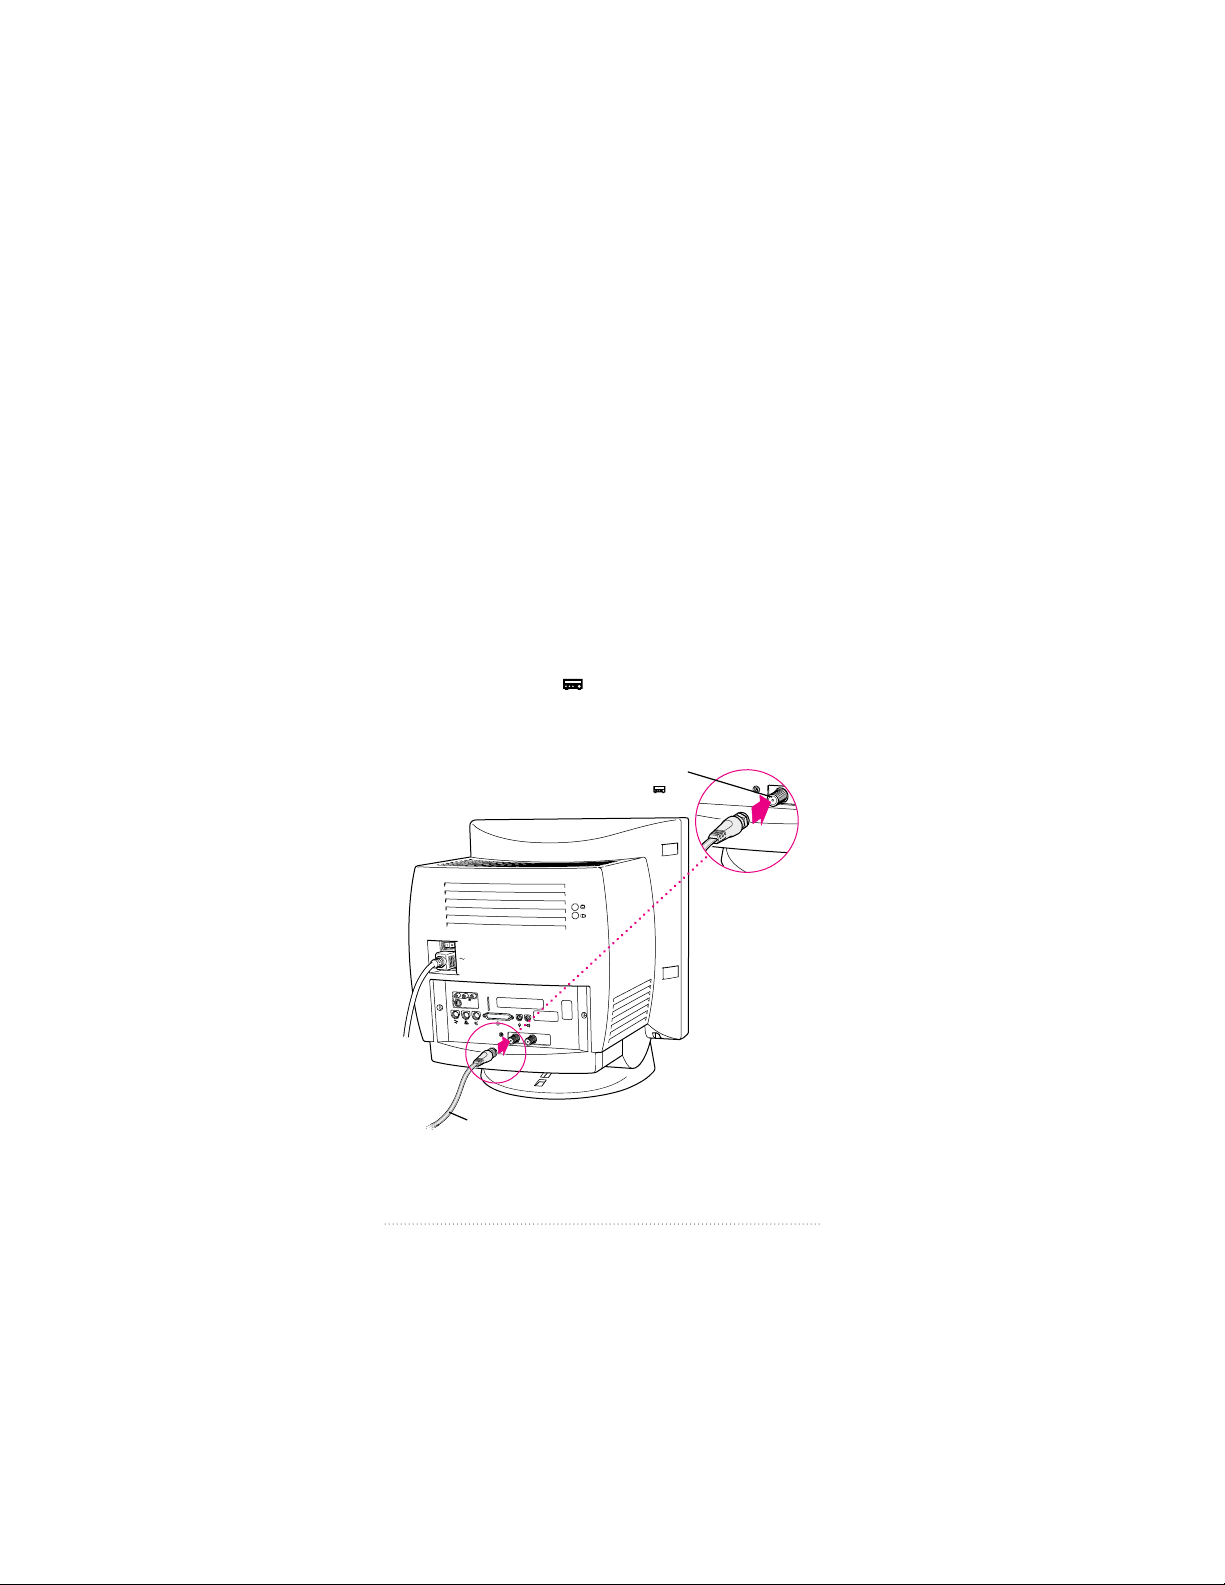
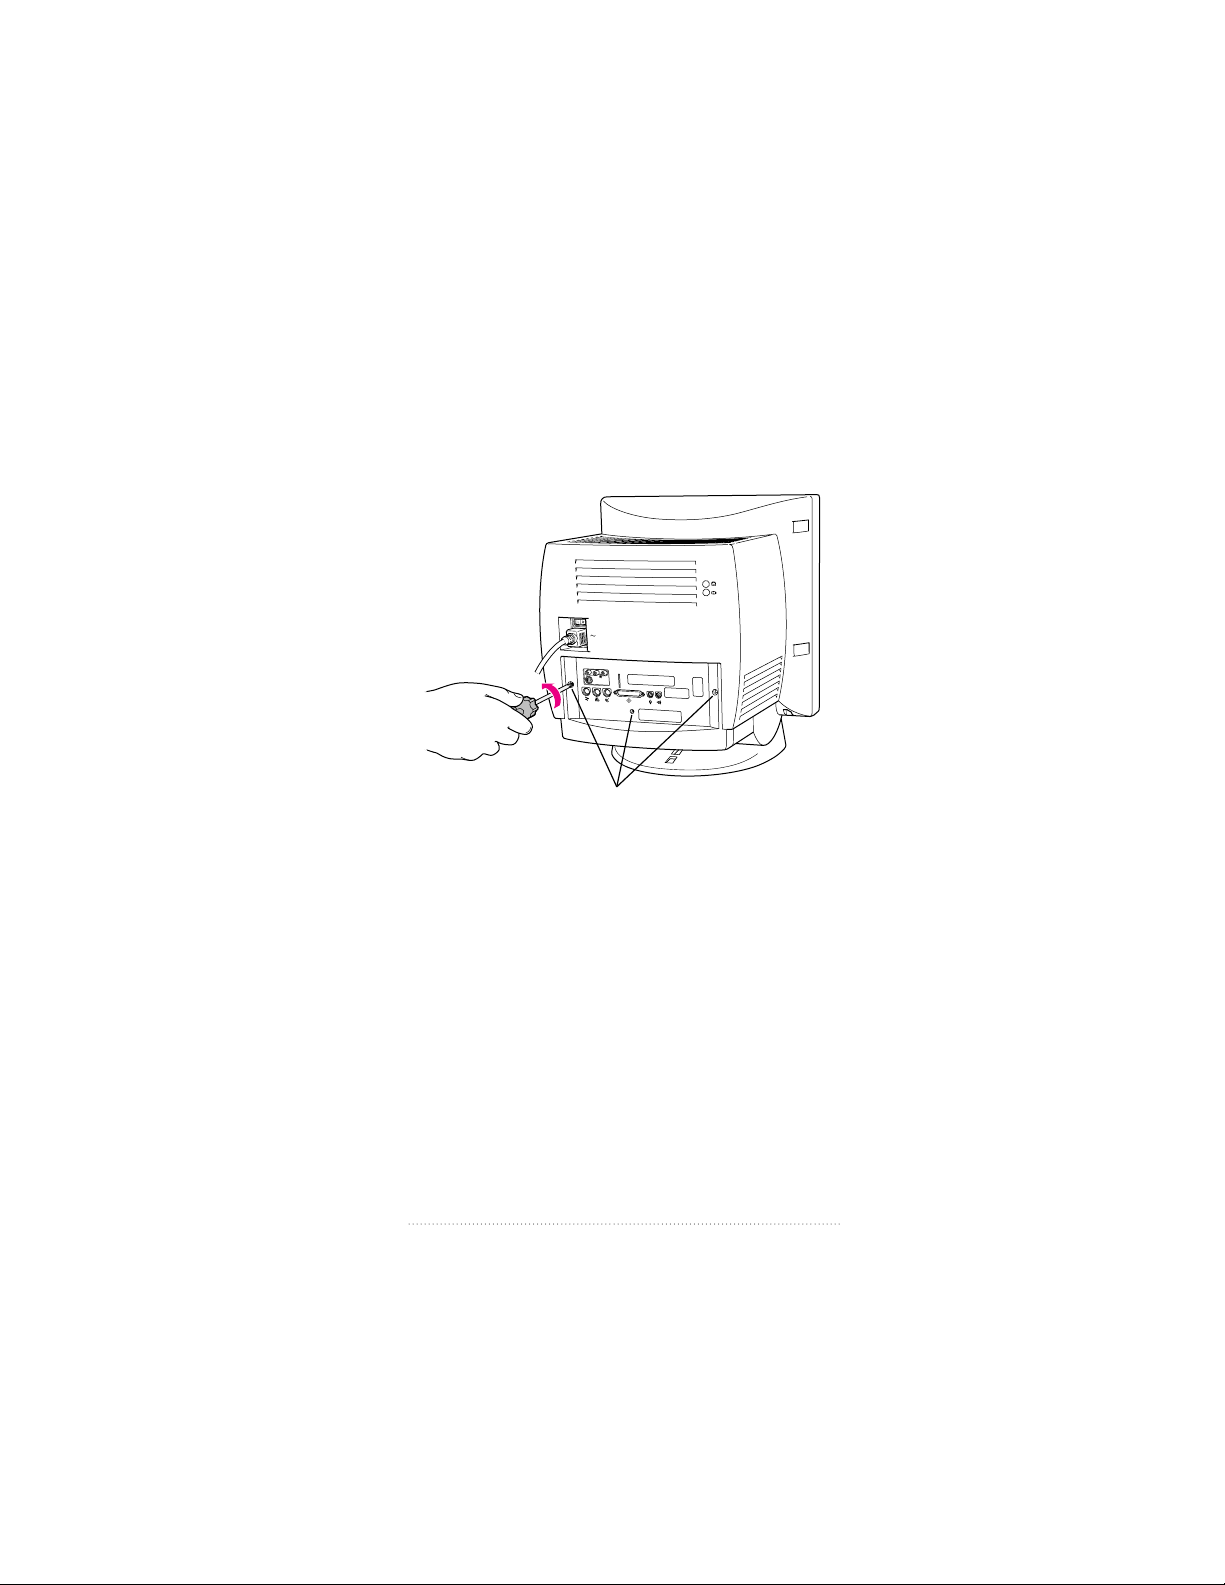
Making connections to the TV/FM tuner card
After installing the TV/FM tuner card by attaching the card to
the computer, you then attach an FM antenna and a TV
antenna (or cable service connection) to the card.
To attach FM and TV connections to the card, follow these
steps.
1 Turn off the computer if it isn’t already off.
m Choose Shut Down from the Special menu.
m Then press the power switch (marked with the j
symbol) at the back of your computer.
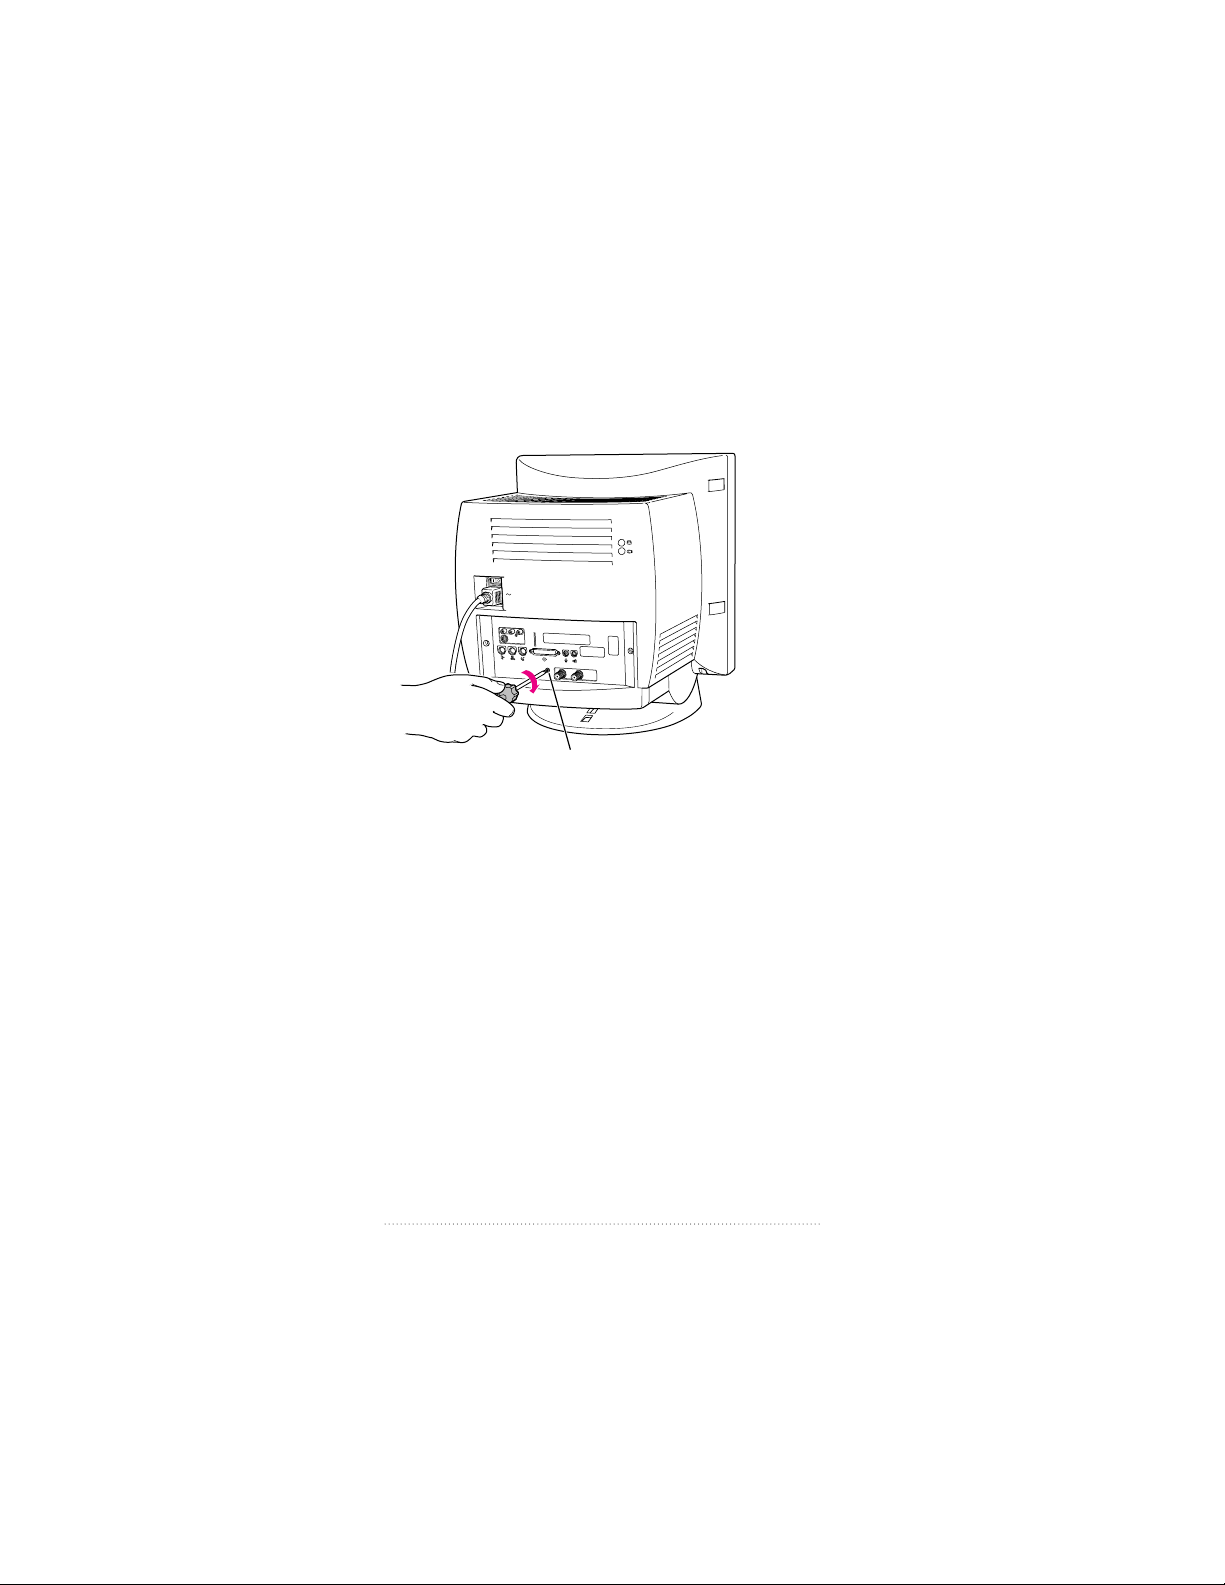
2 Attach the provided FM antenna to the FM port—the port on
the left, marked by the icon. Depending on the type of
antenna that came in your package, you may have to either
push or screw the connector onto the FM port.
Attach the FM antenna to the FM tuner port.
The FM tuner port is marked with the icon.
22
FM antenna
Chapter 1
Page 30

3 Before you attach the TV cable, make sure it has an F-type
coaxial cable connector.
Important Do not attach or detach the coaxial cable while
the computer is turned on.
F-type coaxial cable connectors
Note: If you want to view closed captions on a videotape
that has them, you must connect your VCR to the TV/FM
tuner card, not the video input card. For instructions on how
to do this, see the Appendix, “Viewing Closed Captions on
Videotape.”
Installing the Card and Software
23
Page 31

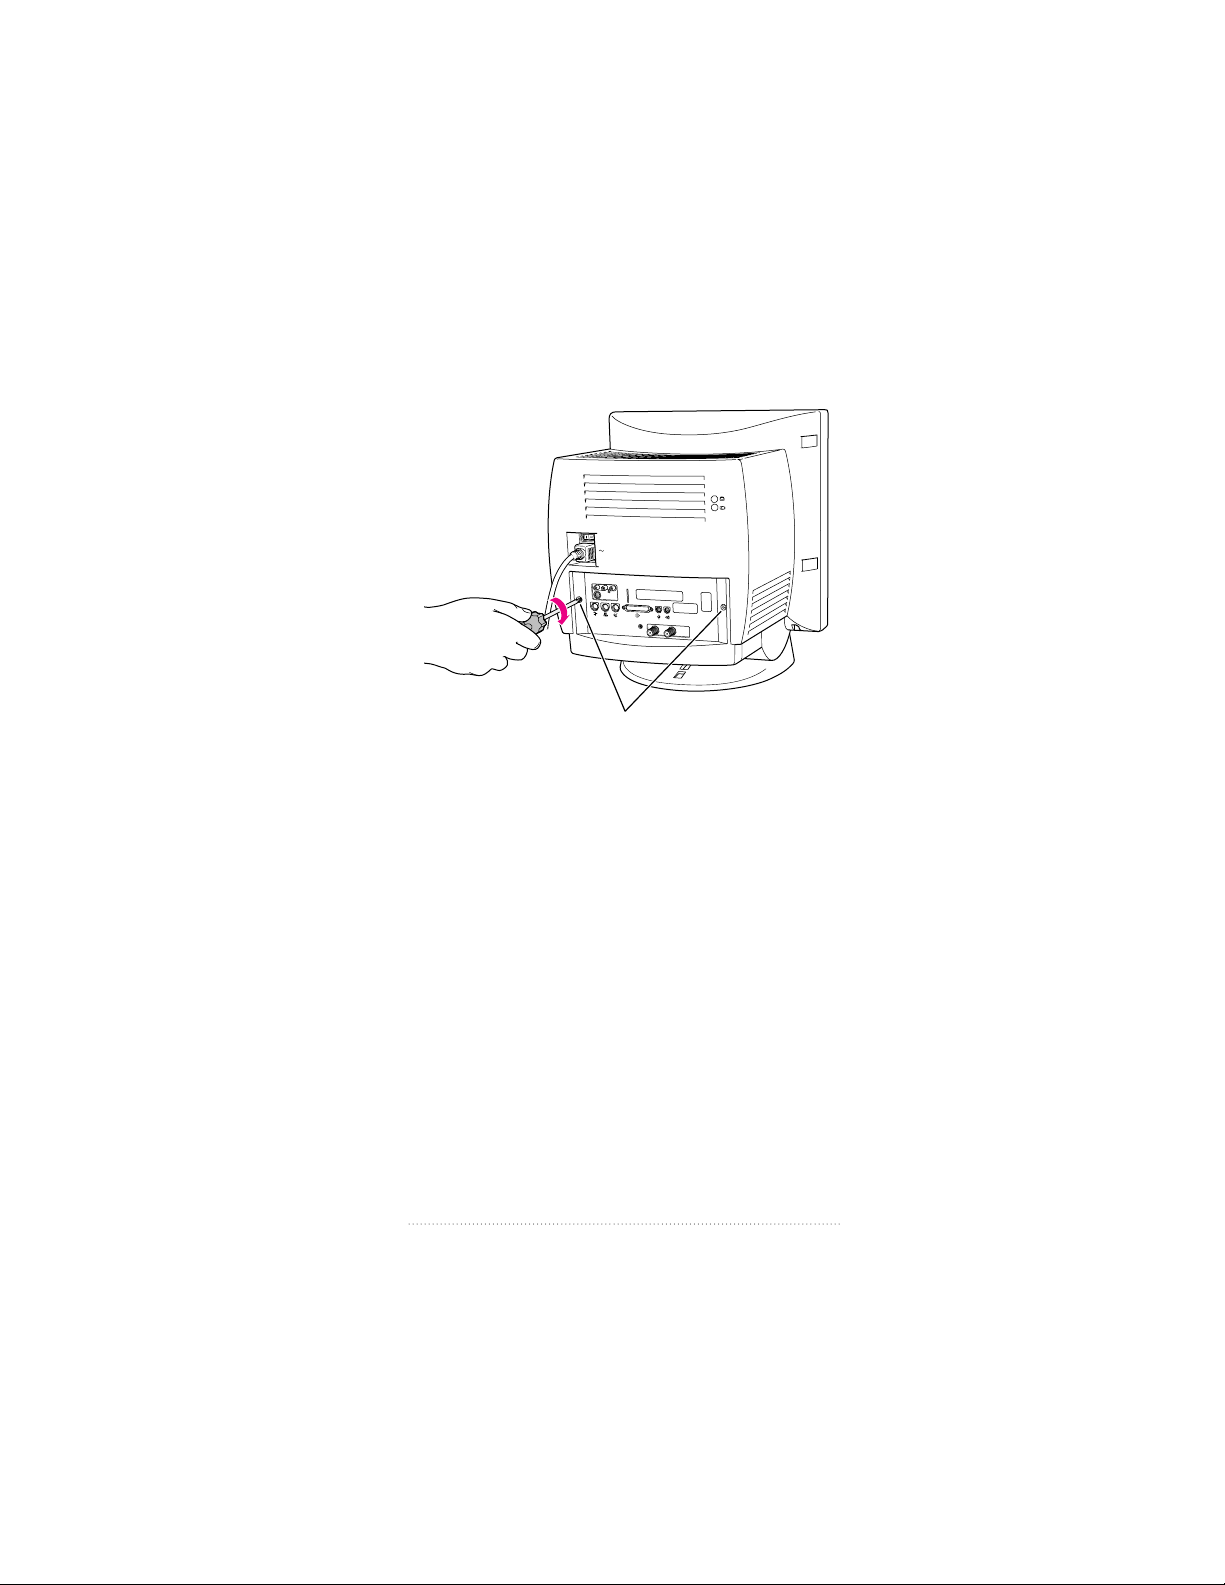
4 Using an F-type coaxial cable connector, connect the TV port
on the right, marked by the icon, to a cable service or to
a TV antenna.
Attach the coaxial cable to the TV tuner port.
The TV tuner port is marked with the icon.
Coaxial cable from an external TV antenna or cable TV service
5 Reconnect any cables you disconnected at the start of
this process.
Because you pressed the reset button on the logic board
earlier, some of your computer’s software settings will have
changed (for example, the date and time on your computer
will need to be reset). You may want to open the control
panels for the date and time, keyboard, and mouse to make
sure that they are set the way you want them. For more
information about resetting these options, refer to
Macintosh Guide, available in the Guide (h) menu. (If you
do not have Macintosh Guide on your computer, see the
manual that came with your computer.)
24
Chapter 1
Page 32

6 Unfold the FM antenna and position it high for the best
reception.
Attach the antenna to a wall in the position that gives the
clearest reception. Use tape, thumbtacks (through the
middle of the plastic strips), or pushpins (through the white
plastic ends).
FM antenna
(Attach the “T” in the position
that gives clearest reception.)
7 Skip the next section, “Installing the TV/FM Tuner Card in a
Modular Computer,” and go on to the section that follows,
“Connecting Other Video Equipment.”
Installing the Card and Software
25
Page 33

Installing the TV/FM tuner card in
a modular computer
If your system has a separate monitor, like this one, continue
with the steps below. If the monitor is built into your system,
go back to the section that precedes this one, “Installing the
TV/FM Tuner Card in a Compact Computer.”
To install the TV/FM tuner card in a modular computer,
follow these steps:
1 Make sure you save any open documents and quit any open
applications. Then turn off the computer.
Choose Shut Down from the Special menu.
2 Unplug all the cables except the power cord from your
computer.
Leaving the power cord plugged in helps protect
the computer from electrostatic discharge damage.
Important To avoid generating static electricity that may
damage the card or computer, do not walk around the room
until you have completed the installation of the card and
closed the computer. Additionally, move the logic board as
little as possible while it is outside the computer.
26
Chapter 1
Page 34

3 Use a screwdriver to unscrew the access cover for the TV/FM
tuner card port.
Remove both screws and the access cover.
4 Remove the access cover by pulling it toward you.
You won’t have to replace the access cover after you’ve
installed the TV/FM tuner card, but you will need the screws.
Store the access cover; you may want to put it back on if you
ever remove the TV/FM tuner card.
5 Remove the TV/FM tuner card from its static-proof bag.
Installing the Card and Software
27
Page 35

6 Reach into the access hole you just uncovered and gently
pull out the ribbon cable.
Ribbon cable
Gently pull the ribbon cable a short
way out of the opening so that you
can attach it to the card.
7 Insert the ribbon cable plug into the connector on the back
of the card.
Connector
Ribbon cable plug
28
Chapter 1
Page 36

8 Gently slide the card into the access hole, with the ribbon
cable on the side of the card that’s facing down.
Be sure that all the ribbon cable goes into the access hole.
Make sure the TV/FM tuner
card slides into the guides
that are on both sides of
the opening.
9 Screw the TV/FM tuner card to the computer.
To do this, use the screws you removed in step 3.
Reinsert both screws.
Installing the Card and Software
29
Page 37

Making connections to the TV/FM tuner card
After installing the TV/FM tuner card by attaching the card to
the computer, you then attach an FM antenna and a TV
antenna (or cable service connection) to the card.
To attach FM and TV connections to the card, follow these
steps.
1 Turn off the computer if it isn’t already off.
Choose Shut Down from the Special menu.
2 Attach the provided FM antenna to the FM port—the port on
the left, marked by the icon. Depending on the type of
antenna that came in your package, you may have to either
push or screw the connector onto the FM port.
Attach the FM antenna
to the FM tuner port. The
FM tuner port is marked
with the icon.
30
FM antenna
Chapter 1
Page 38

3 Before you attach the TV cable, make sure it has an F-type
coaxial cable connector.
Important Do not attach or detach the coaxial cable while
the computer is turned on.
F-type coaxial cable connectors
Note: If you want to view closed captions on a videotape
that has them, you must connect the VCR to the TV/FM
tuner card, not the video input card. For instructions on how
to do this, see the Appendix, “Viewing Closed Captions on
Videotape.”
Installing the Card and Software
31
Page 39

4 Using an F-type coaxial cable connector, connect the TV port
on the right, marked by the icon, to a cable service or to
an antenna.
Attach the coaxial cable
to the TV tuner port. The
TV tuner port is marked
with the icon.
Coaxial cable from an external TV antenna or cable TV service
32
Chapter 1
Page 40

5 Reconnect the power cord and any cables you disconnected
at the start of this process.
6 Unfold the FM antenna and position it high for the best
reception.
Attach the antenna to a wall in the position that gives the
clearest reception. Use tape, thumbtacks (through the
middle of the plastic strips), or pushpins (through the white
plastic ends).
FM antenna
(Attach the “T” in the position
that gives clearest reception.)
Installing the Card and Software
33
Page 41

Connecting other video equipment
If you want to see video on your computer from a VCR, laser
disc player, video camera, or other video equipment, you
need to connect the equipment to the ports on the video
input card in your computer.
You can connect one piece of equipment to the S-video
port or one piece to the composite video port on the video
input card.
Note: You can also connect two pieces of video equipment
to the video input card simultaneously—one to the S-video
input port on the card and another to the composite video
input port on the card. For example, you can view a
recording from a video camera connected to the S-video port,
then switch—using the Apple Video Player application,
without having to disconnect cables—to viewing video from a
VCR connected to the composite port on the card. However,
you will hear sound only from that piece of equipment that is
connected to the audio input ports on the card.
Preparing to connect video equipment
Before you start, make sure that
m both the Macintosh and the video equipment are turned off
m you place the video equipment near enough to your
Macintosh for easy connection
m you determine which type of video connector you need for
your video equipment (see the next section)
34
Chapter 1
Page 42

Determining which video connector
you need
Check the video out port or ports on your video equipment.
A video out port should look like one of the ports pictured
below. (You may have both ports.)
S-video port Composite video port (RCA-type)
To connect to a composite video out port, use a composite
(RCA plug) connector. See “Connecting Video Equipment If
You Use a Composite (RCA Plug) Video Connector.”
Composite connector (RCA plug)
To connect to an S-video video out port, use an S-video
connector. See “Connecting Video Equipment If You Use an
S-video Connector.”
S-video connector
Installing the Card and Software
35
Page 43

Connecting video equipment if you use
a composite (RCA plug) video connector
To connect your video equipment you need one video cable
and two audio cables, all with RCA plugs at both ends. The
cables can be separate or joined. You can purchase cables at
electronics supply stores.
RCA RCA
RCA RCA
RCA RCA
video
audio
audio
or
RCA RCA
RCA RCA
video
2 audio
or
video
RCA
Note: If you have only one audio out port on your video
2 audio
RCA
equipment, you can use a Y-adapter audio cable. This cable
has a single plug on one end to plug into your equipment
and a double plug (where it forms a Y) on the other end to
plug into the two audio ports on the video input card.
36
Chapter 1
Page 44

1 Make sure that both the Macintosh and the video equipment
are turned off.
2 Attach one end of the video cable to the video out port on
the video equipment.
3 Plug the other end of the video cable into the yellow
composite video input port on the video input card.
4 Insert the RCA plugs on one end of the audio cables into the
left and right audio out ports on the video equipment.
If you’re using a Y-adapter audio cable: Plug the single
end of the cable into the audio out port on your video
equipment.
5 Insert the RCA plugs on the other end of the audio cables
into the left (white) and right (red) sound input ports on the
video input card.
Be sure to plug the cable from the left audio out port on the
video equipment to the left sound input port on the
computer. Connect the right ports in the same way.
If you’re using a Y-adapter audio cable: Plug the double
end of the cable (where it forms a Y) into the right and left
sound input ports on the video input card.
Installing the Card and Software
37
Page 45

The video input card ports are exactly the same on a
computer with a built-in monitor, and the card itself is in
about the same position on the back of the unit as in the
illustration below of a computer without a built-in monitor.
Video input port (yellow)
Left sound input port (white)
Right sound input port (red)
Cables with
RCA plugs
Video out port
Left audio out port
Right audio out port
The ports on your video equipment may be arranged
and labeled differently from those shown here.
Your video equipment is now connected to the video
input card.
38
Chapter 1
Page 46

Connecting video equipment if you use an
S-video connector
To connect your video equipment you need one video cable
with S-video connectors on both ends and two audio cables
with RCA plugs at both ends. The RCA cables can be separate
or joined. You can purchase cables at electronics supply
stores.
S-video
RCA RCA
RCA RCA
audio
audio
S-video
or
S-video
RCA
Note: If you have only one audio out port on your video
2 audio
S-video
RCA
equipment, you can use a Y-adapter audio cable. This cable
has a single plug on one end to plug into your equipment
and a double plug (where it forms a Y) on the other end to
plug into the two audio ports on the video input card.
Installing the Card and Software
39
Page 47

1 Make sure that both the Macintosh and the video equipment
are turned off.
2 Attach one end of the video cable to the video out port on
the video equipment.
3 Plug the other end of the video cable into the S-video input
port on the video input card.
About the S-video port: The S-video port accepts 4-pin and
7-pin connectors.
If the connector doesn’t slide easily into the port, realign it
and try again. Avoid using force, which could damage the
card or the connector.
4 Insert the RCA plugs on one end of the audio cables into the
left and right audio out ports on the video equipment.
If you’re using a Y-adapter audio cable: Plug the single
end of the cable into the audio out port on your video
equipment.
5 Insert the RCA plugs on the other end of the audio cables
into the left (white) and right (red) sound input ports on the
video input card.
Be sure to plug the cable from the left audio out port on
the video equipment to the left sound input port on the
computer. Connect the right ports in the same way.
If you’re using a Y-adapter cable: Plug the double end of
it (where it forms a Y) into the right and left sound input
ports on the video input card.
40
Chapter 1
Page 48

The video input card ports are exactly the same on a
computer with a built-in monitor, and the card itself is in
about the same position on the back of the unit as in the
illustration below of a computer without a built-in monitor.
Right sound input port (red)
Left sound input port (white)
S-video port (7-pin)
S-video port (4-pin)
S-video cable
Cables with
RCA plugs
Right audio out port
Left audio out port
The ports on
your video
equipment may
be arranged
and labeled
differently from
those shown here.
Your video equipment is now connected to the video
input card.
Installing the Card and Software
41
Page 49

Installing the software
To play TV and FM radio you use two separate applications.
The Apple Video Player application lets you watch TV and
video on your computer; the Apple FM Radio application lets
you listen to FM radio on your computer.
Note: If you already have a version of Apple Video Player
on your computer, the installer disks in this package
automatically replace that version with the latest version of
Apple Video Player at the same time that they install the
Apple FM Radio application.
To install the Apple FM Radio and Apple Video Player
application programs, follow these steps.
1 Start the computer.
2 Insert the floppy disk, TV/FM Software Install Disk 1, into
the floppy disk drive.
3 Double-click the disk icon to open it.
4 Double-click the Installer icon.
42
Chapter 1
Page 50

5 Click Install.
6 Follow the instructions on the screen.
The instructions on the screen tell you when you need to
insert the next software installer disk.
7 When the installation is complete, click Restart.
You can now find two separate folders in your Apple Extras
folder on your hard disk—one for the Apple FM Radio
application and one for the Apple Video Player application,
with the icons for the applications inside the appropriate
folders.
These are the icons for the applications:
Installing the Card and Software
43
Page 51

Where to go from here
The TV/FM tuner card is preset to display TV shows from
broadcast TV and to receive FM radio broadcasts.
If you want to listen to the radio
m To begin listening to the radio immediately, turn to
Chapter 2, “Listening to the FM Radio.”
m To preset your favorite stations or to set the radio to
receive only the strongest station signals, see Chapter 3,
“Customizing the FM Radio Settings.”
m To learn how to save radio recordings on your computer,
see Chapter 4, “Recording from the Radio.”
If you want to watch TV or video
m To begin watching TV or video immediately, turn to
Chapter 5, “Watching TV or Video.”
m To switch the source of the TV signal from antenna to cable
service, see “Choosing a Connection (Antenna or Cable
Service)” in the section “Programming Channels” in
Chapter 6.
m To customize TV tuner features in the way that best fits your
viewing habits, see Chapter 6, “Customizing the TV Tuner
Settings.”
m To learn how to capture individual images or whole movie
sequences, see Chapter 7, “Capturing TV and Video Images.”
44
Chapter 1
Page 52

CHAPTER
2
Listening to the FM Radio
This chapter contains most of the information you need to
use the Apple FM Radio application program to listen to FM
radio on your computer.
You may find listening to the radio more convenient if you
first set up some of the options discussed in Chapter 3,
“Customizing the FM Radio Settings.”
See also: Chapter 9, “Using the Remote Control.”
45
Page 53

Turning on the FM Radio
To turn on the radio, open the Apple FM Radio application
program by double-clicking its icon. (The application is in
the Apple FM Radio folder, in the Apple Extras folder on
your hard disk.)
When the Apple FM Radio application opens, a window
appears and the radio comes on. (You may hear only static
until you tune in a clear station.)
If you do not hear the radio right away, see the section
“Problems Listening to the Radio,” in Chapter 10.
Note: If you get a message telling you to select TV as the
video source in Apple Video Player, do that. If you need
help, see the section “Choosing a Video Source” in
Chapter 5.
46
Chapter 2
Page 54

Turning off the FM radio
To turn off the FM radio, open the File menu and choose
Quit.
Getting help on screen
If while using the Apple FM Radio application you become
stuck or forget how to do a task, on-screen help may be
available. Make sure that the FM Radio window is active,
then go to the menu at the upper-right corner of the screen,
marked with the h icon, and choose Apple FM Radio Guide.
Note: Apple FM Radio Guide is not available if you have a
computer with system software earlier than 7.5.
To see explanations of all the items on the screen when you
use Apple FM Radio, make sure that the FM Radio window is
active, then choose Show Balloons from the h menu.
Listening to the FM Radio
47
Page 55

Tuning in to stations
You can tune in to stations with the Apple FM Radio
application much as you would with any radio—by pressing
one of the tuning arrows or one of the six Preset Station
buttons on the left (after you have assigned stations to
them). The frequency number of the station you are playing
is displayed.
To learn how to assign preset stations, see “Presetting
Stations” in Chapter 3.
Seeking stations
To tune in to only the clearest stations, click the Up or Down
arrows under Seek. The radio stops at each of the clearest
stations it receives.
Note: The FM tuner is preset to search all stations for the
clearest signals. However, you can set the tuner so that it
searches for clear stations within a certain signal range or
strength. For example, you can preset the tuner to scan only
local signals or to scan all but the weakest signals. See
“Setting Signal Range and Strength” in Chapter 3.
To automatically assign the clearest stations to the Preset
Station buttons, see “Presetting Stations Automatically” in
the section “Presetting Stations,” in Chapter 3.
48
Chapter 2
Page 56

Stepping through all stations
To tune in to all available stations (whether or not they come
in clearly), click the Up or Down arrows under Step. To cycle
through the stations more rapidly, place the pointer on one
of the arrows and hold down the mouse button.
Adjusting the sound
You can adjust the FM radio’s volume and set the radio to
receive stereophonic (stereo) or monophonic (mono)
sound. The sound adjustments you make take effect
immediately, so you can monitor your changes.
Changing the sound’s volume
There are four ways to change the volume.
m Use the volume buttons on the front of the computer.
m Drag the slider next to the speaker icon on the FM Radio
window. (You can also click anywhere in the slider’s track to
move the slider to that position.)
m Press the Up Arrow key or Down Arrow key on the keyboard.
m Use the volume controls on the remote control. See
Chapter 9, “Using the Remote Control.”
Listening to the FM Radio
49
Page 57

Selecting stereo or mono sound
The Apple FM Radio is preset to play sound in stereophonic
(stereo) sound if the station broadcasts in stereo. Some
stations come in more clearly if you select monophonic
(mono) sound. To select stereo or mono sound, follow
these steps.
1 Open the Options menu and drag to the Sound choice.
A pop-up menu appears beside the Sound choice.
2 Select Stereo to receive stereo sound or Mono to receive
mono sound.
The selected sound mode has a checkmark beside it.
50
Chapter 2
Page 58

CHAPTER
3
Customizing the
FM Radio Settings
This chapter explains how to use the Apple FM Radio
application program to give names to stations, to preset
stations you want to listen to most frequently, and to set the
signal range and strength of the stations you want to receive.
You’ll need to turn on the FM Radio before following the
instructions in this chapter. To turn on the FM Radio, open
the Apple FM Radio application by double-clicking its icon.
(The application is in the Apple FM Radio folder, in the
Apple Extras folder on your hard disk.)
Customizing is optional: The information and instructions
provided in this chapter are meant to make using your Apple
FM Radio more convenient. You don’t have to customize the
Apple FM Radio to listen to the radio on your computer. For
the basic information you need about listening to the radio,
read Chapter 2.
51
Page 59

Presetting stations
This section describes how to preset stations so you can
tune them in quickly.
Tuning in to preset stations
After you assign preset stations, there are three ways you can
tune them in:
m Press a Preset Station button in the FM Radio window.
m Choose a preset station from the pop-up menu next to the
frequency of the current station in the FM Radio window.
The pop-up menu lists preset stations in numerical order for
easier reference.
m Press one of the buttons in the Preset Stations window
(chosen through the Options menu).
52
Chapter 3
Page 60

Assigning stations to the Preset Station
buttons
To specify your favorite station as a preset station, follow
these steps:
1 Tune in to the station you want to preset. (See “Tuning In to
Stations” in Chapter 2.)
The station is displayed in the lower-left corner of the FM
Radio window.
2 Use one of the following methods to assign the station to
a button:
m Place the pointer on a Preset Station button, then hold
down the mouse button until you hear a beeping sound.
The current station’s frequency appears on the button.
m Place the pointer on the station’s frequency, drag it from
the box onto one of the six Preset Station buttons, then
release the mouse button. (Note: This method works only
if you have system software version 7.5 or later.)
Customizing the FM Radio Settings
53
Page 61

m Open the Options menu and choose Add Preset Stations.
When the Preset Stations window appears, move it away
from the FM Radio window so that you can see both
windows clearly. Place the pointer on the station’s frequency
and drag it from the box onto one of the rows in the Preset
Stations window. When the row highlights, release the
mouse button.
This method lets you preset more than six stations.
Note: The first six rows in the Preset Stations window
represent the six buttons in the FM Radio window.
54
Chapter 3
Page 62

m In the Preset Stations window, type in the frequency of the
station you want assigned to that row.
Note: If you just type the station’s call letters (usually four
capital letters) and not the frequency, the station won’t be
assigned as a preset station. You must type in the frequency
because the frequency is what the FM tuner uses to find the
station.
You can also type in the station’s call letters and your own
description, although they’re not required. To display this
information on the Preset Station buttons, see “Labeling
Preset Station Buttons” later in this section.
3 Click on the pop-up menu (the arrow next to the current
station’s frequency in the FM Radio window) to see the list
of all stations you have preset. You can use this menu to
choose a preset station to listen to.
If you want to make changes to the Preset Station buttons,
see “Changing Preset Stations” later in this section.
Customizing the FM Radio Settings
55
Page 63

Presetting stations automatically
When you preset stations automatically, the Apple FM Radio
application automatically assigns the clearest stations to the
first available rows in the Preset Stations window, after
stations that have already been assigned. (The added
stations also appear in the pop-up menu list in the FM Radio
window.)
Note: The Apple FM Radio application is set to search all
stations for the clearest signals when automatically adding
stations. You may want to search for stations within a certain
signal range or strength. If you want to do this, see the
section “Setting Signal Range and Strength” later in this
chapter before you continue with these instructions.
56
Chapter 3
Page 64

To preset the clearest stations by adding them automatically,
follow these steps.
1 Open the Options menu and choose Add Preset Stations.
The Preset Stations window appears.
If you’ve preset stations already, they appear in the rows.
2 Click Auto Add.
The FM tuner adds the clearest stations to the rows in the
Preset Stations window and to the pop-up menu in the FM
Radio window. If you’ve preset some stations already, Auto
Add adds to the list in the Preset Stations window; it does
not override stations you have already preset. The stations
added appear in numerical order after the stations that were
already preset.
If you want to make changes to any of your preset stations,
see “Changing Preset Stations” later in this section.
Customizing the FM Radio Settings
57
Page 65

Labeling Preset Station buttons
The Apple FM Radio application automatically displays
stations’ frequencies on the six main Preset Station buttons
when you assign stations to them. But you can also display
stations’ call letters or descriptions on the buttons (or
display simply the numbers 1 through 6 on the buttons).
To display call letters, descriptions, or numbers on the
Preset Station buttons, follow these steps:
1 Make sure that you have typed in call letters or descriptions
for the stations in the Preset Stations window.
2 Open the Options menu and choose Preferences.
3 In “Type of Info shown,” click in the circle next to one of the
following:
m Numbers—if you want the Preset Station buttons to be
numbered in order, 1 through 6
m Frequencies—if you want station frequencies (for example,
102.1) to appear on the Preset Station buttons
58
Chapter 3
Page 66

m Call Letters—if you want the stations’ call letters to appear
on the Preset Station buttons (usually the call letters are four
capital letters, such as WABC)
m Descriptions—if you want your own description of the
station to appear on the Preset Station buttons. (Only the
first four to six characters of the description appear on
the button.)
Changing preset stations
There are several ways to change the stations you’ve preset.
m To change a station in the preset stations list, click in the
frequency column of the row you want to change, and type a
new frequency label.
Remember: You must type in the frequency because the
frequency is what the FM tuner uses to find the station. You
can also change the call letters and description.
m To add the current station to the list, drag its frequency onto
any button in the FM Radio window or to a row in the Preset
Stations window.
m To move a preset station to a different button or place in the
list, drag an entire row on top of another row in the Preset
Stations window.
m To clear a row (delete its contents), click anywhere in the
row and then click Clear Row.
m To undo all changes you just made to the Preset Stations
window (since you last opened it), click Revert.
Customizing the FM Radio Settings
59
Page 67

Setting signal range and strength
You can set your FM radio so that it searches within a certain
signal range or strength for the clearest signals whenever
you use the Seek or Auto Add features.
Choosing signal range
You can select the area—wide or local—from which Apple
FM Radio receives stations. The Apple FM Radio is preset to
receive whatever stations it can pick up, but you may
sometimes want to choose a local range to reduce
interference from strong neighboring stations (stations that
are not local).
To choose the range of the signals in which the FM tuner
searches, follow these steps:
1 Open the Options menu and choose Signal Range.
2 Choose DX to receive any station the radio can pick up.
Choose Local to receive only local stations.
A checkmark appears beside the range that is selected.
60
Chapter 3
Page 68

Choosing signal strength
By choosing a signal strength, you can set the Apple FM
Radio to seek or to automatically add stations that send
signals of a certain strength. For example, if you set the
signal strength to Strongest Only, the Apple FM Radio will
seek or automatically add fewer stations than if you had set
the signal strength to All Stations.
To choose the signal strength that the Apple FM Radio
application looks for when it seeks or adds stations, follow
these steps:
1 Open the Options menu and choose Signal Strength.
2 Choose the signal strength you want.
The signal strength you choose affects how many stations
come up when you use the Seek or Auto Add features.
Customizing the FM Radio Settings
61
Page 69

Setting other preferences
Besides selecting the type of station information you want to
have appear on the Preset Station buttons, you can also
choose the color in which the currently playing station’s
frequency is displayed, and whether or not you hear an alert
sound as a confirmation when you preset a new station.
To learn how to change the compression/sample rate of any
recordings you make, see the section “Compressing
Recordings” in Chapter 4, “Recording from the Radio.”
m To change the color of the text displaying the frequency of
the current station, open the Options menu and choose
Preferences. Click on the pop-up menu next to Color of
Current Station Text and select the color you want.
Note: Whatever station is currently playing is always
displayed in red in the Preset Stations window. The color
you choose only changes the frequency of the current
station displayed at the lower left in the FM Radio window.
62
Chapter 3
Page 70

m To turn off the beep you hear when a new station is
successfully preset, click in the Audio Confirmation of
Presets box to remove the X.
After you’ve finished selecting your preferences, click OK to
implement the changes. (The window then closes.)
m To undo any changes you made since you last opened the
Preferences window, click Reset.
Customizing the FM Radio Settings
63
Page 71

Page 72

CHAPTER
4
Recording from the Radio
This chapter gives instructions for using the Apple FM Radio
application to record radio sound onto your computer’s
hard disk. It also gives instructions for compressing
recordings so that they take up less disk space. You can play
back recordings with the SimpleText application, which uses
QuickTime technology to play back sound.
You’ll need to turn on the radio before following the
instructions in this chapter. To turn on the radio, open the
Apple FM Radio application program by double-clicking its
icon. (The application is in the Apple FM Radio folder, in
the Apple Extras folder on your hard disk.)
65
Page 73

Compressing recordings
Before you record, you may want to choose a compression
rate for your recording. Recordings that are not compressed
have high-quality sound, but they take up a lot of disk space.
If you compress a recording, it takes up less disk space but
the recording sounds less clear than the original when you
play it back.
To compress recordings, follow these steps before you
record:
1 Open the Options menu and choose Preferences.
The FM Radio Preferences window appears.
2 In the Compression/Sample Rate box, choose the
compression rate you want by dragging the slider towards
“Least disk space” or “Highest Quality.”
A compression rate of 1:1 means that no compression takes
place. A compression rate of 3:1 uses a third of the disk
space that 1:1 uses. A compression rate of 6:1 saves the most
disk space.
66
Chapter 4
Page 74

Remember: Compression affects the sound quality of your
recording: the more compression you use, the less clear
your recording sounds.
You can also click anywhere in the track to move the slider.
Note: The compression ratios possible for your computer
may be different from those possible for other computers.
(As a result, you might not be able to move the slider to
certain positions on the slider bar.)
3 Click OK.
The compression rate you just chose remains in effect for all
recordings until you change the compression rate in the FM
Radio Preferences window again.
Saving recordings
You can record from the radio any time by pressing the
Record button in the FM Radio window.
To record from the radio and save it on a disk, follow
these steps.
1 Choose a compression rate for your recording, if you want to
and haven’t done so already. See the previous section,
“Compressing Recordings.”
Recording from the Radio
67
Page 75

2 Click the Record button in the FM Radio window.
Immediately, the Record button turns into a Stop button and
red light, and a “Recording time” counter appears that tells
you the length of time that has passed since you clicked
Record.
3 Click Stop when you want to stop recording.
Important If you don’t click the Stop button, recording
continues until the hard disk is full.
68
Chapter 4
Page 76

The Save Audio Recording dialog box appears.
4 Specify a name for your recording and the location where
you want to save it.
You can also play back a recording and adjust the recording’s
volume before you save it, using the Playback bar. Click the
play (.) button to play it back and the sound (-) button to
adjust the volume.
5 Click Save.
When you open the recording later (by double-clicking its
icon), it opens as a SimpleText document, which uses
QuickTime technology to play back the sound at the volume
level at which you saved it.
Recording from the Radio
69
Page 77

Page 78

CHAPTER
5
Watching TV or Video
This chapter contains most of the information you need to
use the Apple Video Player application program to watch TV
or video on your computer. You also use Apple Video Player
to watch video (from a VCR or video camera, for example)
on your computer.
You may find watching TV more convenient if you first set
up some of the options discussed in Chapter 6,
“Customizing the TV Tuner Settings.”
See also: “Setting the Closed Caption and Video Text
Options” section in Chapter 8 and Chapter 9, “Using the
Remote Control.”
71
Page 79

Opening Apple Video Player
To use the Apple Video Player application program, open
it by double-clicking its icon. (The application is in the
Apple Video Player folder, in the Apple Extras folder on your
hard disk.) You can also press the TV/MAC button on the
remote control.
When the Apple Video Player application opens, a video
window appears. You can watch video or TV in the
video window.
If you don’t get an image in the window right away, see
Chapter 10, “Troubleshooting.”
72
Chapter 5
Page 80

Getting help on screen
On-screen help for the Apple Video Player application is
available through the menu at the upper-right corner of
the screen, marked with the h icon. When Apple Video
Player is the active application, choose Apple Video Player
Guide from the h menu. Apple Video Player Guide gives
you step-by-step instructions for tasks you need help doing.
Note: Apple Video Player Guide is not available if you have
a computer with system software earlier than 7.5.
To see explanations of all the items on the screen when you
use Apple Video Player, make sure that the video window is
active, then choose Show Balloons.
Watching TV or Video
73
Page 81

To be reminded of keyboard shortcuts you can use with
Apple Video Player, choose Apple Video Player Shortcuts
from the h menu.
Using a hot key
You can also open the Apple Video Player application by
pressing a “hot key” (a preset key or combination of keys).
When you press this hot key, you switch to the Apple Video
Player program no matter what computer program you
are currently in. To learn how to set a hot key, see “Setting a
Hot Key” in Chapter 6.
74
Chapter 5
Page 82

Choosing a video source
Using the Apple Video Player application, you can either
view TV signals that come through a cable or an antenna, or
watch a video recording from a VCR or other video device.
To choose a video source setting, follow these instructions:
1 Open the Windows menu and choose Show Controls
Window.
The Controls window appears.
2 Click the video screen icon.
The screen controls appear.
Watching TV or Video
75
Page 83

3 Click the video source you want to use:
m If you want to watch TV, click TV.
m If you want to view video from a VCR or other device
that’s attached to the composite video input port, click
Video.
m If you want to view video from a VCR or other device
that’s attached to the S-video input port, click S-Video.
Note: If you’re not sure which port a video device is
attached to, see “Determining Which Video Connector You
Need” in the section “Connecting Other Video Equipment”
in Chapter 1.
The source change takes effect as soon as you make your
choice.
Changing TV channels
When the video source is set to TV and the video window is
active, you can use any of the following methods to change
channels:
m Click the Up or Down arrow on the video window.
m Select a name from the Names pop-up menu on the video
window (if you’ve given names to channels, as described in
Chapter 6).
m Press the Left Arrow key or Right Arrow key on the keyboard.
(Make sure Apple Video Player is the active application, or
these keys won’t have any effect.)
76
Chapter 5
Page 84

m Type the channel number.
When you use an arrow, you go to the next available
unlocked channel (a channel with unrestricted access). To
go to a locked (restricted access) channel, you must enter a
channel number.
Note: See “Locking and Unlocking Channels” in Chapter 6
to learn how to restrict or grant access to channels.
To go back and forth between the current channel and the
last one to which you were tuned, press the Tab key.
Each time the channel changes, the channel name (if one
exists) appears briefly on top of the TV picture.
m Use the channel controls on the remote control. For more
information, see Chapter 9, “Using the Remote Control.”
Too many channels? When you browse through channels
using the remote control or the arrows on your keyboard or
video window, you may see channels that have no picture or
that show only static. To skip such channels entirely, see
“Programming Channels” in Chapter 6.
Adjusting the sound
You can adjust the sound’s volume, balance, and tone. You
can also choose monophonic (mono) or stereophonic
(stereo) sound.
Changing the sound volume
There are four ways to change sound volume:
m Use the volume buttons on the front of the computer.
m Drag the slider next to the speaker icon on the video
window.
Watching TV or Video
77
Page 85

m Press the Up Arrow key or Down Arrow key on the keyboard.
(Make sure Apple Video Player is the active application, or
these keys won’t have any effect.)
m Use the volume controls on the remote control. For more
information, see Chapter 9, “Using the Remote Control.”
To mute the sound, click the speaker on the video window,
press x-M on the keyboard, or press the muting button on
the remote control. To turn the sound back on, click the
speaker, press x-M, or press the remote control’s muting
button. The sound will also go back on if you adjust the
volume using any method.
You can also click anywhere in a slider’s track to move the
slider to that position. The sound adjustments take effect
immediately, so you can monitor your changes.
Choosing a sound mode
When the video source is set to TV, you can control whether
the sound is mono or stereo. You can also choose the
Second Audio Program (SAP), which (when available)
broadcasts in a second language.
To set the sound mode, follow these steps:
1 Choose Show Controls Window from the Windows menu.
The Controls window appears.
2 Click the sound icon.
78
Chapter 5
Page 86

The sound controls appear.
3 Click the sound mode you want to use (Mono, SAP,
or Stereo).
The new mode takes effect immediately.
Adjusting speaker balance and tone
To adjust the speaker balance, bass, or treble:
1 Choose Show Controls Window from the Windows menu.
2 Click the sound icon.
3 Drag the appropriate slider to adjust the sound to your
liking.
You can also click anywhere in a slider’s track to move the
slider to that position. The sound adjustments take effect as
you make them, so you can monitor your changes.
Note: You’ll only be able to hear changes in balance if
you’re using external speakers or headphones.
Watching TV or Video
79
Page 87

Adjusting the picture
To adjust the brightness, sharpness, contrast, and color of
the picture:
1 Choose Show Controls Window from the Windows menu.
The Controls window appears.
2 Click the video screen icon.
The screen controls appear.
3 Drag the appropriate slider to adjust the picture to your
liking.
You can also click anywhere in a slider’s track to move the
slider to that position. The picture adjustments take effect as
you make them, so you can monitor your changes.
80
Chapter 5
Page 88

CHAPTER
6
Customizing the
TV Tuner Settings
This chapter explains how to use the Apple Video Player
application program to give names to channels, protect
channels with a password, and set reminders that notify you
when important shows are about to begin.
Before following the instructions in this chapter, you need to
open the Apple Video Player application by double-clicking
its icon. (The application is in the Apple Video Player folder,
in the Apple Extras folder on your hard disk.) You can also
press the TV/MAC button on the remote control.
The information and instructions provided in this chapter
are meant to make using your TV tuner more convenient.
You don’t have to customize the TV tuner to watch
television on your computer, but if you don’t you’ll only be
able to see a few channels. For the basic information you
need about watching TV or video, read Chapter 5.
See also: “Setting the Closed Caption and Video Text
Options” in Chapter 8.
81
Page 89

Programming channels
Your TV tuner card can receive channels picked up by your
antenna connection (channels 2 through 69) or cable service
connection (channels 1 through 125).
You can make changes to the list of channels that are
available with a particular connection. First, you choose a
connection; then you can edit the channel list for that
connection.
Choosing a connection (antenna or
cable service)
To choose a connection so that you can edit its channel list,
follow these steps:
1 Choose Channel Setup from the Setup menu.
The Channel Setup window appears, with the channel list in
a scrollable box.
82
Chapter 6
Page 90

2 Open the Connection pop-up menu (under the channel list).
3 Choose the connection you want.
The channel list changes to a list of channels available with
that connection.
About HRC Cable: Some cable services use HRC cable
frequencies instead of standard cable frequencies. If you
can’t receive channels above channel 13, try selecting HRC
Cable in the Connection pop-up menu.
Removing channels automatically
Some channels in a channel list don’t have valid signals.
You can remove such channels from the list so that they’re
skipped when you scan through the channels.
To remove channels automatically, click the Auto Tune
button. Auto Tune finds valid channels and “disables” the
rest, removing them from the channel list.
Note: Auto Tune removes invalid channels only from the
channel list for the connection selected in the Connection
pop-up menu. You may want to choose each of the other
connections and click Auto Tune to remove channels in
each channel list.
Once a channel is removed, you can still get to it by typing
its number on the keyboard. You can also make a channel
available again by adding it to the channel list manually. See
“Restoring and Adding Channels” later in this section.
Customizing the TV Tuner Settings
83
Page 91

Removing channels manually
Although Auto Tune filters out channels that don’t send valid
signals, it doesn’t remove channels that send valid but
scrambled signals (for example, pay-per-view or premium
cable channels). Additionally, there may be channels in your
viewing area that you would simply prefer not to see when
you browse through channels.
Follow these steps to remove channels manually from
channel lists:
1 Choose Channel Setup from the Setup menu.
2 Choose from the Connection pop-up menu the connection
for the channel list you want to edit.
Note: You can remove channels only from the channel list
for the connection that’s currently chosen. For example, if
you remove channel 13 from the antenna channel list, it may
still be available in the Cable channel list or the HRC Cable
channel list.
3 Select the channels you want to remove.
To select several channels in a row, hold down the Shift key
and drag. To select channels scattered throughout the list,
hold down the Shift key and click each channel you want
removed.
You may have to scroll to see all possible choices.
4 Click Remove.
The channels you selected are removed from the channel
list.
84
Chapter 6
Page 92

Locking channels: You may want to keep a channel in the
channel list, but restrict access to it. See “Locking and
Unlocking Channels” and “Creating and Changing a
Password” later in this chapter.
Important If you want to use Auto Tune, do so before you
manually add or remove channels. You can use Auto Tune
after you’ve added and removed channels, but doing so
undoes all your previous changes.
Restoring and adding channels
You may want to put a channel back on a channel list—for
example, when a station that was temporarily off the air
resumes broadcasting. Or you may want to add a channel—
for example, when your local cable company adds a new
station to its lineup.
Follow these steps to restore or add a channel to a channel
list:
1 Choose Channel Setup from the Setup menu.
2 Choose from the Connection pop-up menu the connection
for the channel list you want to edit.
Note: You can restore or add channels only in the channel
list for the connection that’s currently chosen. For example,
if you add channel 36 to the antenna channel list, it may still
not be available in the Cable channel list or the HRC Cable
channel list.
3 Click Add.
The Add Channels dialog box appears. If the Add button is
dimmed, all possible channels for the currently selected
signal source are already available.
Customizing the TV Tuner Settings
85
Page 93

4 Select the channels you want to restore or add.
To select several channels in a row, hold down the Shift key
and drag. To select channels scattered throughout the list,
hold down the Shift key and click.
You may have to scroll to see all possible choices.
5 Click Add.
The channels you selected are added to the channel list.
Giving names to channels
You can assign a name of up to 15 characters to a channel.
The name can be the station’s call letters, network affiliation,
network name, or anything else you want.
Channel names appear in the Names pop-up menu of the
video window. See “Changing TV Channels” in Chapter 5 for
information on using a name to select a channel.
Follow these steps to name or rename channels.
1 Choose Channel Setup from the Setup menu.
2 Choose from the Connection pop-up menu the connection
for the channel list you want to edit.
Note: You can name or rename channels only in the
channel list for the connection that’s currently chosen.
For example, if you give channel 13 a name in the antenna
channel list, the name will not appear in the cable channel
list or the HRC cable channel list unless you name it in
those lists.
86
Chapter 6
Page 94

3 Select a channel from the channel list, then click Edit Name.
Or, you can double-click the channel number or name.
The Edit Name dialog box appears, with any name already
assigned to the channel selected. (Initially, channels have no
names assigned to them.)
4 Type a name for the channel.
To remove a name from the channel, press the Delete key
while the entire name is highlighted.
5 Click OK.
The name you typed appears to the right of the channel
number in the channel list.
Customizing the TV Tuner Settings
87
Page 95

Locking and unlocking channels
Locked channels appear in the channel list but don’t appear
in the video window when you scan through the channels.
1 Choose Channel Setup from the Setup menu.
2 Choose from the Connection pop-up menu the connection
for the channel list you want.
Note: You can lock or unlock channels only in the channel
list for the connection that’s currently chosen. For example,
if you lock channel 15 in the antenna channel list, the
channel will not be locked in the cable channel list or the
HRC cable channel list unless you name it in those lists.
3 Select the channels you want to lock by highlighting them.
To select several channels in a row, hold down the Shift key
and drag. To select channels scattered throughout the list,
hold down the Shift key and click all the channels you want
to lock.
You may have to scroll to see all possible choices.
88
Chapter 6
Page 96

4 Click Lock.
The channels you selected are locked. Small locks appear at
the left of the locked channels’ numbers in the channel list.
You can watch a locked channel by typing its number on the
keyboard. A dialog box appears:
If you click Yes and no password is in effect, you tune in to
that channel. However, the channel remains locked and out
of the normal scanning sequence. If a password has been set,
you must type the password before the channel can become
available.
To unlock a channel, choose Channel Setup from the Setup
menu, select the channel, and click Unlock.
Customizing the TV Tuner Settings
89
Page 97

Creating and changing a password
You can create a password to limit access to the Channel
Setup dialog box and locked channels. When you set a
password, anyone choosing Channel Setup from the Setup
menu or switching to a locked channel must type the
password.
The same password applies to all locked channels.
Creating a password
Follow these steps to create a password:
1 Choose Set Channel Password from the Setup menu.
A dialog box appears.
90
Chapter 6
Page 98

2 Type a word or phrase of up to 15 characters.
You can also type a clue to help you remember the
password. The clue appears every time anyone seeking
access is asked for the password.
If you don’t want to have a clue, don’t type one.
3 Click OK.
Your password is now in effect.
Important Make sure you keep a record of your password.
If you forget your password, you will have to reset all your
customized settings (including channel names and
programmed channels) when you invalidate it, as described
in “Forgetting a Password,” later in this section.
Changing a password
Follow these steps to change a password:
1 Choose Set Channel Password from the Setup menu.
A dialog box appears.
Customizing the TV Tuner Settings
91
Page 99

2 Type the current password.
If you’ve forgotten your password, see the next section,
“Forgetting a Password.”
As you type, the characters are replaced by bullets to ensure
privacy.
3 To change to a new password, click OK. Then follow steps
2 and 3 in “Creating a Password,” earlier in this section.
To remove the password (so a password is not required),
make sure that the password in the Password text box is
selected (highlighted). Then press the Delete key before you
click OK.
Forgetting a password
If you enter an incorrect password, you see this dialog box:
If you can’t remember your password, you must reset the
password and then create a new one.
To reset the password, quit the Apple Video Player
application. Then move the Apple Video Player Prefs file to
the Trash. The Apple Video Player Prefs file is in the
Preferences folder, which is in the System Folder.
Important When you move the Apple Video Player Prefs
file to the Trash, any preferences you have set (for example,
picture contrast or channel names) are changed back to the
standard settings provided by the Apple Video Player
application.
92
Chapter 6
Page 100

Setting and editing TV reminders
You can arrange to have notices appear on your screen to
remind you that specific shows are about to begin.
When the time you’ve set for a reminder arrives, a notice
appears on the screen.
The notice appears no matter which application program
you are using on your computer at the notification time.
If you click OK in this notice, the Apple Video Player
application opens, switches to the proper channel, and
displays the show in the video window.
Setting a reminder
To set a reminder, follow these steps:
1 Choose TV Reminders from the Setup menu.
The TV Reminders dialog box appears.
Customizing the TV Tuner Settings
93
 Loading...