Alcatel Go Flip User Guide
USER GUIDE
A downloadable, printable guide to your Alcatel GO FLIP and its features.
Availableapplicationsandservicesaresubjecttochangeatanytime.

TABLE OF CONTENTS
GETTING STARTED |
1 |
Introduction |
2 |
About the User Guide |
2 |
Set Up Your Phone |
3 |
Parts and Functions |
3 |
Battery Use |
4 |
Insert the Battery |
4 |
Remove the Battery |
5 |
Charge the Battery |
6 |
SIM Card |
8 |
SD Card |
9 |
Insert an SD Card |
10 |
Remove an SD Card |
10 |
Turn Your Phone On and Off |
12 |
Activation and Service |
13 |
Complete the Setup Screens |
13 |
Basic Operations |
15 |
Basics |
15 |
Home Screen and Applications (Apps) List |
15 |
Phone Settings Menu |
15 |
Capture Screenshots |
16 |
Applications |
16 |
Launch Applications |
16 |
Apps List |
17 |
Phone Number |
18 |
Airplane Mode |
18 |
Enter Text |
19 |
Lock and Unlock Your Screen |
20 |
Update Your Phone |
20 |
Update Your Phone Software |
20 |
Update Your Profile |
21 |
Update Your PRL |
22 |
Your Phone's Home Screen |
23 |
i

Home Screen Basics |
23 |
Status Bar |
23 |
Change the Home Screen Wallpaper |
24 |
MAKING CONNECTIONS |
26 |
Phone Calls and Voicemail |
27 |
Place and Answer Calls |
27 |
Call Using the Phone Dialer |
27 |
Call Emergency Numbers |
29 |
Answer Phone Calls |
29 |
In-Call Screen Layout and Operations |
30 |
Place a Call from Contacts |
31 |
Call from Call Log |
32 |
Voicemail |
33 |
Voicemail Setup |
33 |
Optional Calling Services |
34 |
Call Waiting |
34 |
Conference Calling |
34 |
Call Forwarding |
35 |
Call Settings |
36 |
Contacts |
38 |
Add a Contact |
38 |
View Contacts |
40 |
Contacts Screen Layout |
41 |
Edit a Contact |
42 |
Delete a Contact |
42 |
Share a Contact |
43 |
Import Contacts |
44 |
Back Up Contacts |
45 |
Messaging |
46 |
Text and Multimedia Messaging |
46 |
Send a Text Message |
46 |
Send a Multimedia Message (MMS) |
47 |
Save and Resume a Draft Message |
48 |
New Messages Notification |
48 |
Manage Message Conversations |
48 |
Text and MMS Options |
49 |
ii

50 |
|
Set Up an E-mail Account |
50 |
Add Another E-mail Account |
50 |
Create and Send E-mail |
51 |
Open E-mail Messages |
52 |
Delete an E-mail Account |
54 |
Manage Your Email Inbox |
54 |
Internet |
56 |
Data Connection Status and Indicators |
56 |
Browser |
56 |
Use the Browser |
56 |
Browser Options |
57 |
Connectivity |
59 |
Wi-Fi |
59 |
Turn Wi-Fi On and Connect to a Wireless Network |
59 |
Wi-Fi Settings |
60 |
Disconnect Wi-Fi |
61 |
Bluetooth |
61 |
Bluetooth Information |
62 |
Enable the Bluetooth Feature |
62 |
Pair Bluetooth Devices |
63 |
Connect to a Paired Bluetooth Device |
64 |
Send Information Using Bluetooth |
65 |
Receive Information via Bluetooth |
66 |
APPS AND ENTERTAINMENT |
67 |
Camera and Video |
68 |
Camera Overview |
68 |
Take Pictures and Record Videos |
69 |
Take a Picture |
69 |
Record Videos |
70 |
View Pictures and Videos Using Gallery |
71 |
Edit Pictures |
72 |
Share Pictures and Videos |
74 |
Send Pictures or Videos by Email, Messages or Bluetooth |
74 |
Camera Settings |
76 |
Switch Between Camera and Video Mode |
76 |
iii

Set Camera Functions |
76 |
Productivity |
78 |
Calendar |
78 |
Add an Event to the Calendar |
78 |
View Calendar Events |
79 |
Sync Calendars |
80 |
Calculator |
81 |
Clock |
81 |
Set Alarms |
82 |
Additional Clock Features |
83 |
Entertainment and Activities |
85 |
Play Music |
85 |
Music Screen Layout |
86 |
SETTINGS |
87 |
Connections Settings |
88 |
Basic Settings |
88 |
Wi-Fi Settings Menu |
89 |
Bluetooth Settings |
91 |
Cellular and Data |
92 |
Personalization Settings |
94 |
Sound Settings |
94 |
Display Settings |
95 |
Search Settings |
95 |
Notices Settings |
96 |
Date and Time Settings |
97 |
Language Settings |
98 |
Input Methods Settings |
99 |
Privacy and Security Settings |
101 |
Screen Lock Settings |
101 |
App Permission Settings |
101 |
Do Not Track Settings |
102 |
Browsing Privacy Settings |
103 |
Storage Settings |
104 |
USB Storage Settings |
104 |
Media Storage Settings |
104 |
Device Settings |
106 |
iv

Device Information Settings |
106 |
Downloads Settings |
107 |
Battery Settings |
108 |
Accessibility Settings |
108 |
System Updates Settings |
109 |
GETTING HELP |
111 |
For Assistance |
112 |
Troubleshooting |
112 |
Specifications |
112 |
Virgin Account Information and Help |
113 |
Manage Your Account |
113 |
Re-Virgin |
114 |
Copyright Information |
114 |
INDEX |
115 |
v

GETTING STARTED
The topics in this section will introduce you to your phone, help you get set up with service, provide an overview of the phone screen, and get you started with basic phone operations.
GettingStarted |
1 |

INTRODUCTION
The following topics describe the basics of using this guide and your new phone.
ABOUT THE USER GUIDE
Thank you for purchasing your new Alcatel GO FLIP. The following topics explain how best to use this guide to get the most out of your phone.
Before Using Your Phone
Read the Get Started guide and Important Information booklet that were packaged with your phone thoroughly for proper usage.
Accessible services may be limited by subscription contract conditions.
Descriptions in the User Guide
Note that most descriptions in this guide are based on your phone's setup at the time of purchase. Unless otherwise noted, instructions begin from the phone's home screen, which is displayed by pressing the End/power key  . Some operation descriptions may be simplified.
Screenshots and Key Labels
Screenshots and other illustrations in this user guide may appear differently on your phone. Key labels in the user guide are simplified for description purposes and differ from your phone's display.
Other Notations
In the user guide, the phone may be referred to either as "phone," "device," or "handset." A microSD™ or microSDHC™ card is referred to as an "SD card" or a "memory card."
GettingStarted Introduction |
2 |
SET UP YOUR PHONE
Thefollowingtopicsgiveyoualltheinformationyouneedtosetupyourphoneandwirelessservicethe firsttime.
PARTS AND FUNCTIONS
These topics illustrate your phone’s primary parts and key functions.
Note:Yourphone'sscreensandappslayoutsaresubjecttochange.Thisuserguideusessample imagesonly.
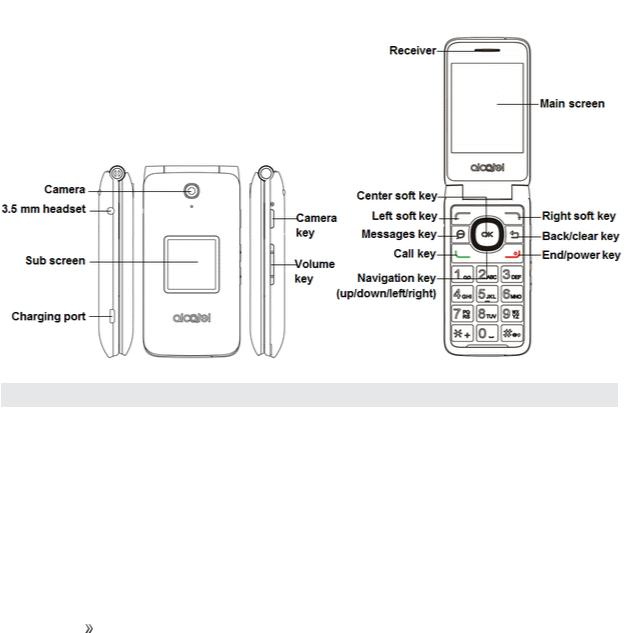
Phone Layout
The following illustration outlines your phone’s primary external features and keys.
Part |
Description |
Camera |
Takes pictures and records videos. |
Receiver |
Lets you hear the caller and automated prompts. |
Main screen |
Displays all the information needed to operate your phone, such |
|
as the call status, the Contacts list, and the date and time. |
Sub screen |
Display the date, time and the notification of incoming calls or |
|
messages. |
|
|
GettingStarted Set UpYourPhone |
3 |

Part |
Description |
Center soft key |
Selects or confirms an option (press the middle of the key). |
|
|
|
|
Navigation key |
Navigate Up, Down, Left, or Right through menus. |
|
|
|
|
Messages key |
Launches the messages screen from any screen. |
|
|
|
|
Call key |
Launches call log from idle screen. |
Back/clear key |
Returns you to the previous screen, or close a dialog box, options |
|
menu. |
End/power key |
Returns you to the app list or turn the phone on or off. |
Charging port |
Allows you to connect the phone charger. |
Volume keys |
Allows you to adjust the ringtone or media volume or adjust the |
|
voice volume during a call. |
3.5 mm headset jack |
Allows you to plug in either a stereo headset or an optional |
|
headset for convenient, hands-free conversations. |
CAUTION! Inserting an accessory into the incorrect jack may damage the phone.
BATTERY USE
The following topics explain how to insert and remove your phone’s battery.
 Battery Cautions
Storage: Avoid storing or leaving battery with no charge remaining. Saved information and settings may become lost or changed, or battery may become unusable. Charge once every six months before storing or leaving unused for a long period.
Bulges:Dependingonuse,bulgesmayappearnearendofbatterylife.Thisdoesnotaffect safety.
Replacing Battery: The battery is a consumable item. It needs to be replaced if operating time shortens noticeably. Purchase a new battery.
Cleaning: Clean soiled terminals between battery and phone with a clean, dry cotton swab. Soiled terminals can result in a poor connection and prevent charging, etc.
Insert the Battery
Follow these instructions to insert your phone’s battery safely and properly.
GettingStarted Set UpYourPhone |
4 |
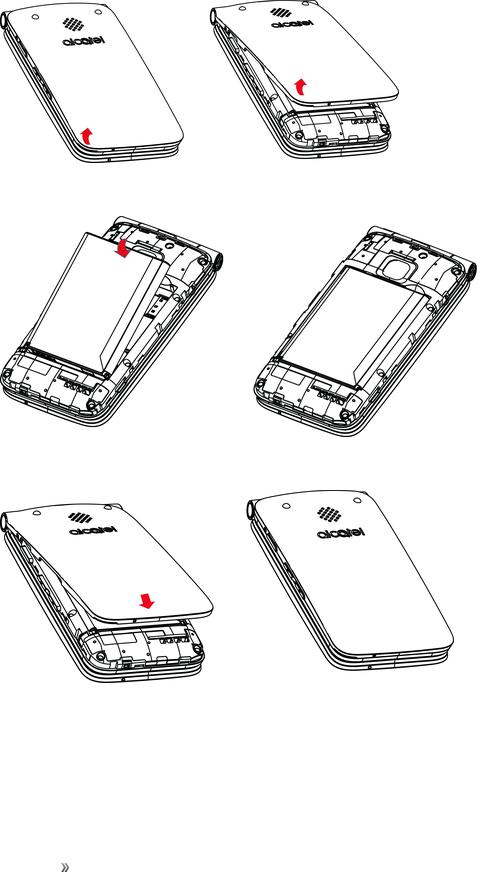
1. Remove the battery cover by gently lifting in the direction shown below.
2. Insert the battery by gently lifting upward as shown below.
3. Attach the battery cover.
• Make sure all the tabs are secure and there are no gaps around the cover.
Remove the Battery
Follow these instructions to remove your phone’s battery. Always power the phone off before removing the battery.
GettingStarted Set UpYourPhone |
5 |
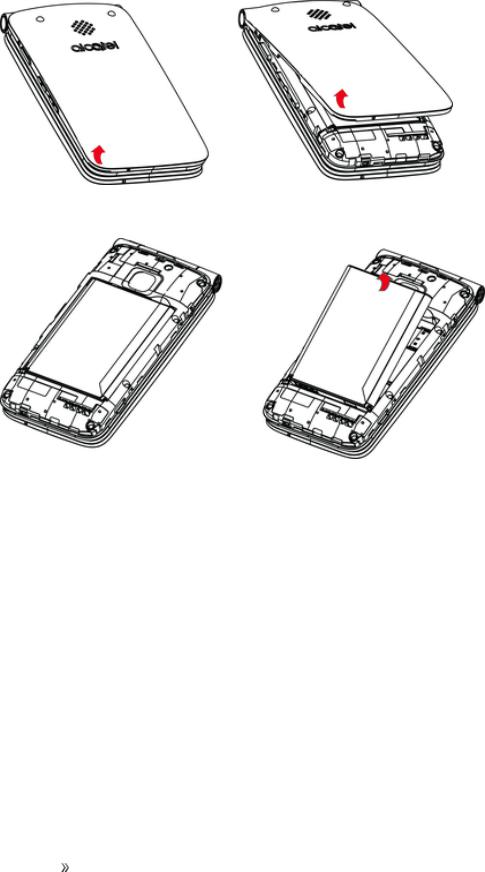
1. Remove the battery cover by gently lifting in the direction shown below.
2. Remove the battery by gently lifting upward as shown.
Charge the Battery
Follow these instructions to charge your phone’s battery using either the included AC adapter or via a USB connection on your computer.
GettingStarted Set UpYourPhone |
6 |

Charge Using the AC Adapter
1. Plug the charger into the charging port of your phone.
2.Plug the AC adapter into an electrical outlet.
3.After charging, unplug the AC adapter from the outlet and remove the charger from the phone.
Charge Using a PC Connection
Before using a PC connection to charge your phone, ensure that the computer is turned on. Depending on the type of connection, your phone’s battery may not charge.
GettingStarted Set UpYourPhone |
7 |

1.Insert the small end of the USB cord into the charging port of your phone.
2.Insert the large end of the USB cord into an external USB port on your computer.
3. After charging, remove the USB cable from both the phone and the computer.
SIM CARD
TheSIMcardisanIC cardcontainingphonenumberandothercustomerinformation.Yourphone’s
SIMcardispreinstalledandshouldonlybeaccessedifdirectedbyacustomerservicerepresentative.
Handling a SIM Card
Keep the following in mind when handling a SIM card.
nYou are responsible for any damage caused by inserting the SIM card in another-brand IC card reader, etc. Virgin is not responsible in such a case.
nAlways keep the IC chip clean.
nWipe clean with a dry, soft cloth.
nAvoid applying labels. May damage SIM card.
nSee instructions included with SIM card for handling.
nThe SIM card is the property of Virgin.
nThe SIM card is replaceable (at cost) in case of loss/damage.
nReturn the SIM card to Virgin when canceling subscription.
nReturned SIM cards are recycled for environmental purposes.
nNote that SIM card specifications and performance may change without notice.
nIt is recommended that you keep a separate copy of information that is stored on SIM card. Virgin is not responsible for damages from stored information that is lost.
GettingStarted Set UpYourPhone |
8 |
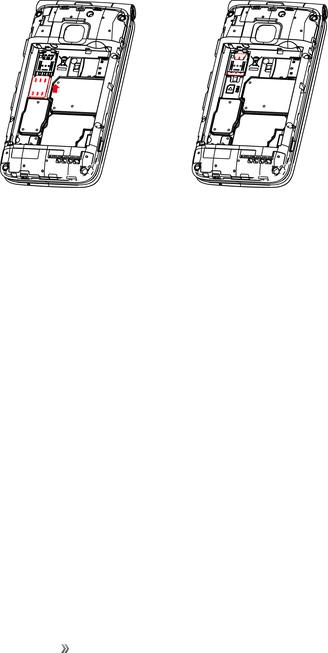
nAlways follow emergency procedures to suspend service if your SIM card or phone (SIM card inserted) is lost or stolen. For details, contact Customer Service.
nAlways power off the phone before inserting/removing the SIM card.
Insert SIM Card
FollowtheseinstructionstoinsertaSIMcard.Remembertopoweroffyourphonebeforeinsertinga
SIMcard.
Note: Your phone’s SIM card is preinstalled. These instructions are for reference only.
1.Remove the battery cover and battery. (See Remove the Battery.)
2.Gently insert the SIM card with the gold IC chip facing downward.
3. Insert the battery and replace the battery cover. (See Insert the Battery.)
•Align the contacts of the battery with the contacts in the phone.
•Make sure all the tabs are secure and there are no gaps around the cover.
SD CARD
Your phone supports the use of an optional SD card (not included) to expand its storage capacity. It supports cards up to 32 GB. Some cards may not operate properly with your phone.
 SD Card Cautions
Data: Information stored on an SD card can become lost or changed accidently or as a result of damage. It is recommended that you keep a separate copy of important data. Virgin is not responsible for damages from data that is lost or changed.
Reading/Writing Data: Never power off or remove the battery while reading or writing data.
Battery Level: A low battery charge may prevent reading/writing to an SD card.
Handling SD Card: Use/store SD cards away from the reach of infants, otherwise it may cause choking if swallowed.
GettingStarted Set UpYourPhone |
9 |
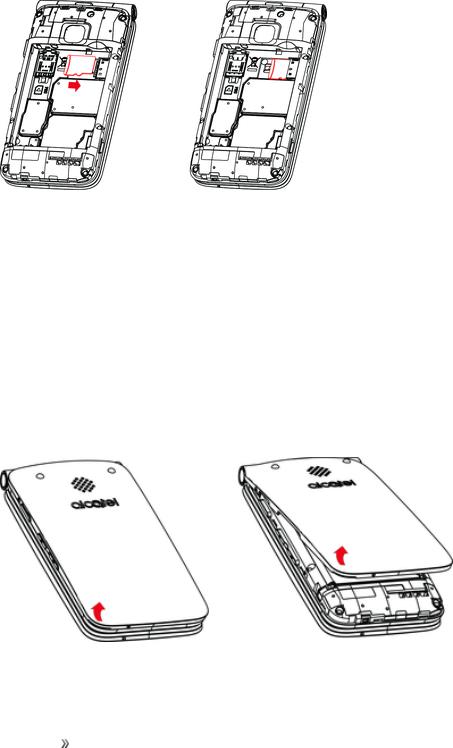
Insert an SD Card
Follow these steps to insert an optional SD card (not included).
Important: Make sure to power your phone off before inserting or removing an SD card.
1.Remove the battery cover and battery. (See Remove the Battery.)
2.Gently insert the SD card with terminals facing down all the way without bending the card.
Important: Insert only SD cards.
3. Insert the battery and replace the battery cover. (See Insert the Battery.)
•Align the contacts of the battery with the contacts in the phone.
•Make sure all the tabs are secure and there are no gaps around the cover.
Remove an SD Card
Follow these instructions to remove an SD card.
Important: Always power off before inserting or removing an SD card.
1. Remove the battery cover by gently lifting in the direction shown below.
GettingStarted Set UpYourPhone |
10 |
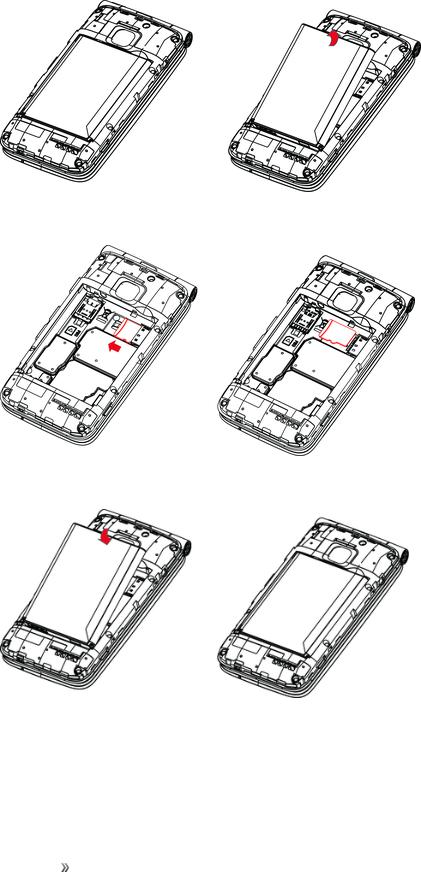
2. Remove the battery.
3. Push down on the plastic spring and remove SD card.
4. Insert the battery. Align the contacts of the battery with the contacts in the phone.
GettingStarted Set UpYourPhone |
11 |
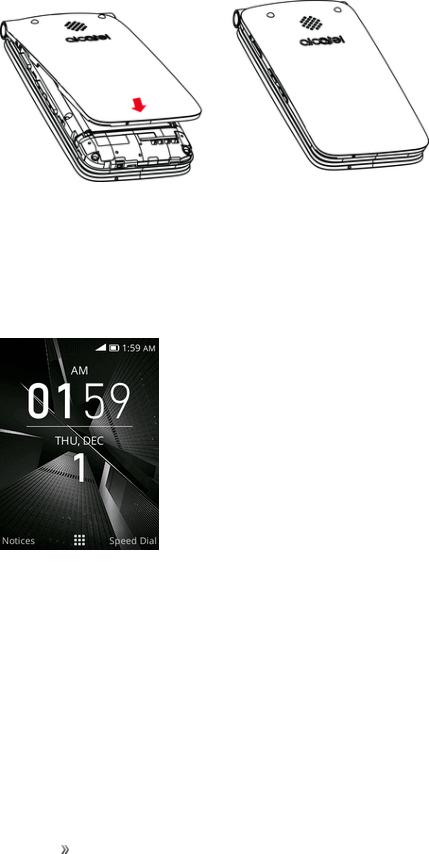
5.Attach the battery cover. Make sure all the table are secure and there are no gaps around the cover.
TURN YOUR PHONE ON AND OFF
The instructions below explain how to turn your phone on and off.
Turn Your Phone On
n Press and hold the End/power key  .
.
 Your phone will power on. Depending on the settings, you may see the lock screen.
•SeeLockandUnlockYourScreenandScreenLockSettingsforinformationaboutusingthe screenlock.
•The first time you turn the phone on, you will see the startup screens. See Complete the Setup Screens for details.
•If your phone is not yet activated, see Activation and Service for more information.
Turn Your Phone Off
n Press and hold the End/power key  .
.
 Your phone will power off.
GettingStarted Set UpYourPhone |
12 |

Note: Your screen remains blank while your phone is off (unless the battery is charging).
ACTIVATION AND SERVICE
Before using your phone, you must set up your service with Virgin. You will need your phone’s serial numbers (MEID and ICC ID). These numbers can be found on the phone's packaging.
For more information about your Virgin account, see Virgin Account Information and Help.
Create Your Account and Pick Your Plan
Set up your Virgin account.
1.From your computer, visit Virginmobileusa.com and click Activate.
2.Choose an activation option and click Next.
3.Whenprompted,entertheserialnumber(MEID)printedonthestickerlocatedonthebackofyour phoneinthebatterycompartment.Thisnumbercanalsobefoundonthebottompanelofthe phone’spackage.
4.Follow the remaining instructions to choose your plan and select a payment method.
5.Follow the activation instructions below and you’ll be able to start using your phone.
Activate Your Phone
AftersettingupyouraccountonVirginmobileusa.com,simplyturnyourdeviceon.Yourdeviceis designedtoactivateautomatically.IfyouareswappingfromanotherVirgindevicetoanewone,be suretoturnofftheolddevicebeforeswappingtheserialnumber(MEID).OncetheMEIDswapis complete,turnonthenewdeviceandtheprogramminginformationwillbepushedtoyourdevice automatically.
COMPLETE THE SETUP SCREENS
Thesetupscreenshelpyousetupcertainfeaturesandpreferencesonyourphone.Onceyourphone hasbeenturnedon,youwillseeaWelcomemessage.Youcanthencompletethesetupprocess.
Note:Youmaybeabletocompletethesetupscreensbeforeyourphonehasbeenactivatedonyour account.
GettingStarted Set UpYourPhone |
13 |

1. From the Welcome screen, select a language and press the Right soft key  to get started.
•To skip any section, press the Right soft key  to skip.
2.Follow the onscreen instructions to complete each section. For each topic, you will have the option to skip it and continue to the next screen.
•Select a network – If prompted, follow the prompts to sign in to an available Wi-Fi network. For secured Wi-Fi networks, you will need to enter a password. See Wi-Fi for more details.
•Setup KaiOS Account – Use the Navigation key to select Create Account to set up a new KaiOS Account or Login Account and complete the steps to sign in to your current KaiOS Account. Press the Right soft key  to skip. The following options may apply depending on your selection:
o Create Account – Follow the instructions to sign up for a new KaiOS Account.
oLogin Account – Enter your KaiOS Account address and password and sign in to your current KaiOS Account.
•About KaiOS – Read any applicable Terms and Conditions of KaiOS system for using your phone, press the Right soft key  to agree to the terms of service and privacy policy.
3.Your setup is now complete.
 Your phone is now set up for use. If you skipped any part of the setup, you can access additional options through the Apps screen or through Settings.
GettingStarted Set UpYourPhone |
14 |

BASIC OPERATIONS
The following topics outline basic features and operations of your phone.
BASICS
The following topics offer an overview of your phone’s basic operations.
Home Screen and Applications (Apps) List
Most of your phone’s operations originate from the home screen or the apps list.
1.Press the End/power key  until display the home screen.
2.From any app screen press the End/power key  to display the app list.
For information about using the home screen, see Home Screen Basics.
Phone Settings Menu
You can customize your phone’s settings and options through the Settings menu.
GettingStarted Basic Operations |
15 |

n From the apps list screen, select Settings  .
.
For more information, see Basic Settings.
Capture Screenshots
You can use your phone’s End/power and home keys to capture screenshots.
nPress and hold the Camera key and Volume down key at the same time to capture a screenshot of the current screen.
 The current screenshot will be captured and stored in the Screenshots album in the phone’s Gallery application. From the apps list screen, select Gallery
  .
.
APPLICATIONS
Thefollowingtopicsdescribehowtoaccesstheapplications(apps)listandlaunchappsonyour phone.
Launch Applications
All installed apps can be accessed and launched from the apps list.
GettingStarted Basic Operations |
16 |
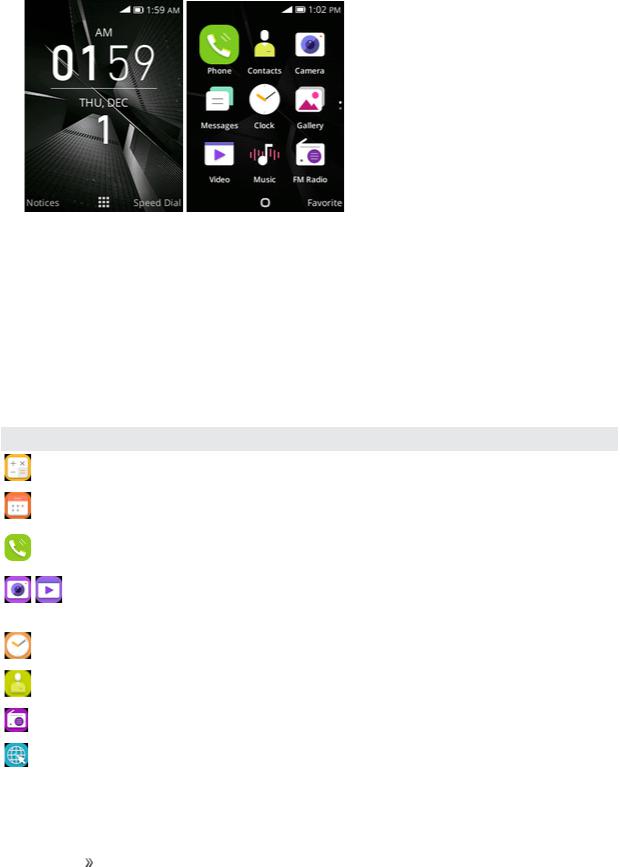
1. From home, press the Center soft key  .
.
 The apps list opens.
2.UsetheNavigationkeytoselectanapplicationandthenpress tolaunchthecorresponding application.
 The application opens.
Apps List
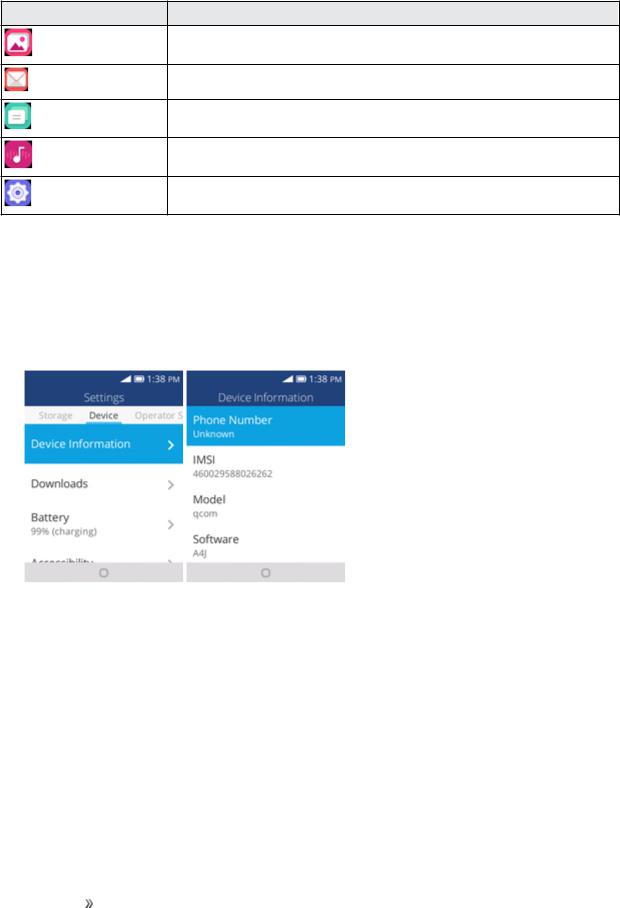
The apps list expands to include all apps installed on your phone. The following table outlines the primary apps that have been preinstalled on your phone.
|
App |
Function/Service |
Calculator |
Perform basic mathematical calculations. |
|
|
||
|
|
|
Calendar |
Create and manage events, meetings, and appointments, organize |
|
your time and reminds you of important events. |
||
Phone |
Place and receive calls, use voicemail, set up and manage contacts, |
|
and more. |
||
/ |
Camera/Video |
Take and share pictures and videos. |
|
||
|
|
|
Clock |
Set alarms, use a stopwatch, set a timer. |
|
|
||
|
|
|
Contacts |
Manage your contacts from a variety of sources. |
|
|
||
|
|
|
FM Radio |
Lets you listen to the radios. |
|
|
||
|
|
|
Browser |
A browser you can use to surf on the Internet. |
|
|
||
|
|
|
GettingStarted Basic Operations |
17 |
App |
Function/Service |
Manage your photos and videos.
Gallery
Send, receive, and manage your Email messages.
Send and receive instant text messages.
Messages
Lets you browse and play music.
Music
Provide an overview of items you can change through Settings.
Settings
PHONE NUMBER
Follow the instructions below to display your phone’s wireless phone number.
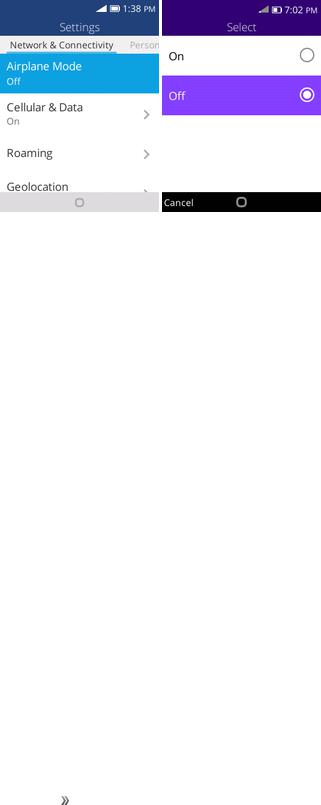
1.From the apps list, select Settings  > Device > Device Information.
2.Select Phone Number.
 You will see the number listed under Phone number.
AIRPLANE MODE
Airplane mode turns off all functions that emit or receive signals, while leaving your phone on so you can use apps that don’t require a signal or data.
To turn on airplane mode:
GettingStarted Basic Operations |
18 |
1.From the apps list, select Settings  > Network & Connectivity.
2.Select Airplane Mode.
3.Select On to enable airplane mode.
 Your phone is now in airplane mode. You will see the airplane mode icon
  in the status bar. To turn off airplane mode:
1.From the apps list, select Settings  > Network & Connectivity.
2.Select Airplane mode.
3.Select Off to disable airplane mode.
 Your phone’s wireless connection features are now restored.
ENTER TEXT
You can enter text using your phone's Nuance T9 keyboard.
Text Input
Your phone offers you a choice of using normal or predictive text input. To select your desired input:
1.From the apps list, select Settings  > Personalization > Input methods.
2.Press  to switch among "Abc/abc/ABC" mode.
3.To insert a punctuation mark or special character, please press  .
.
4.IfyouwanttodeletetypedlettersorsymbolspresstheBack/clearkey todeletethemoneby one.
GettingStarted Basic Operations |
19 |

LOCK AND UNLOCK YOUR SCREEN
Your phone allows you to quickly turn the screen on/off when you unfold/fold the phone, or you can set up screen lock to prevent others from using your phone without your permission.
Turn the Screen Off When Not in Use
n To quickly turn the screen off, simply fold (close) the phone..
Tosavebatterypower,thephoneautomaticallyturnsoffthescreenafteracertainperiodoftimewhen youleaveitidle.Youwillstillbeabletoreceivemessagesandcallswhilethephone’sscreenisoff.
Note: For information on how to adjust the time before the screen turns off, see Display Settings.
Turn the Screen Lock On or Off
1.From the apps list, select Settings  > Privacy & Security > Screen Lock.
2.Select On to enable screen lock
3.You will be prompted to enter the passcode. See Screen Lock Settings.
UPDATE YOUR PHONE
From time to time, updates may become available for your phone. You can apply updates through the Settings  > Device > System Updates menu.
 Software Update Cautions
During update: The phone cannot be used until the software update is complete. It may take time to update your phone’s software.
Signal during update: Update your phone where signal reception is good, and do not change location during the update process. Make sure the battery is adequately charged before beginning an update. A weak signal or low battery during an update may cause the update to fail. An update failure may disable the phone.
Other functions during update:Otherphonefunctionscannotbeusedduringasoftware update.
Update Your Phone Software
You can update your phone's software using the System Updates option.
GettingStarted Basic Operations |
20 |

1. From the apps list, select Settings  > Device > System Updates.
2. Select System Updates.
 You may be required to power your phone off and back on to complete the software upgrade.
Confirm Your Current Phone Software
1.From the apps list, select Settings  > Device > Device Information.
2.Locate the Software version read-only field.
Update Your Profile
Thisoptionallowsyoutoautomaticallyupdateyouronlineuserprofileinformation.Ifyouchooseto changeyourusernameandselectanewoneonline,youmustthenupdatetheusernameonyour phone.
GettingStarted Basic Operations |
21 |

1. From the apps list, select Settings  > Device > System Updates > Update Profile.
2. Follow the onscreen instructions.
 Thephonewilldownloadandinstalltheprofileupdateandyouwillseeaconfirmationwhen
complete.
Note: If your data services or account syncing ever seems to go out unexpectedly, use this feature to reconnect with the network.
Update Your PRL
This option allows you to download and update the PRL (preferred roaming list) automatically.
1. From the apps list, select Settings  > Device > System Updates > Update PRL.
2. Follow the onscreen instructions.
 ThephonewilldownloadandinstallthePRLupdateandyouwillseeaconfirmationwhen
complete.
GettingStarted Basic Operations |
22 |
YOUR PHONE'S HOME SCREEN
The following topics describe how to use your phone’s home screen and understand the status bar.
HOME SCREEN BASICS
The home screen is the starting point for your phone’s applications, functions, and menus.
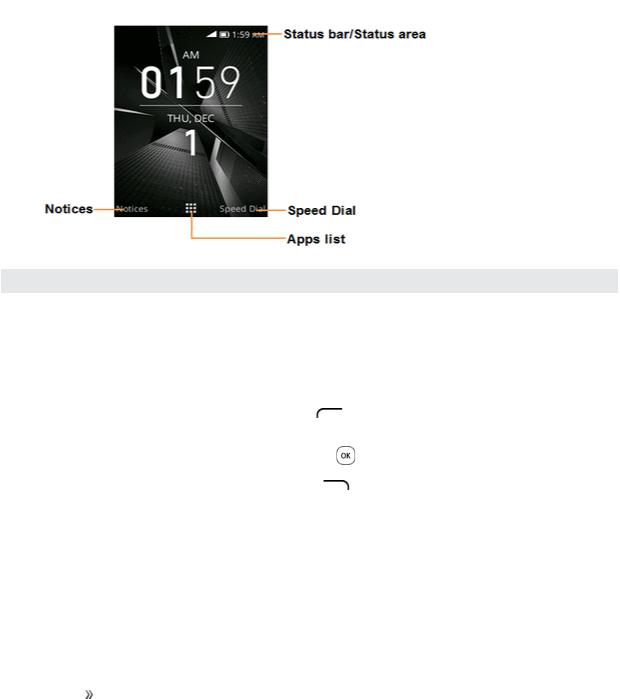
Home Screen Layout
Below is your home screen’s layout.
Item |
|
Description |
Status bar/Status |
The status bar displays icons to notify you of your phone’s status (on the |
|
area |
right side) and notifications (on the left side). |
|
|
The status area of the status bar (on the right) displays phone and |
|
|
service status information such as signal strength, battery status, Wi-Fi |
|
|
and data connectivity, ringer status, and time. |
|
Notices |
Press the Left soft key to view numerical notifications (missed call, |
|
|
new mail, new message,etc. |
|
Apps list |
Press the Center soft key |
to enter the apps list. |
|
||
|
|
|
Speed Dial |
Press the Right soft key |
to enter speed dial. |
Tip: Press the End/power key  to return to the main home screen.
STATUS BAR
The status bar at the top of the home screen provides phone and service status information on the right side and notification alerts on the left.
GettingStarted YourPhone's HomeScreen |
23 |
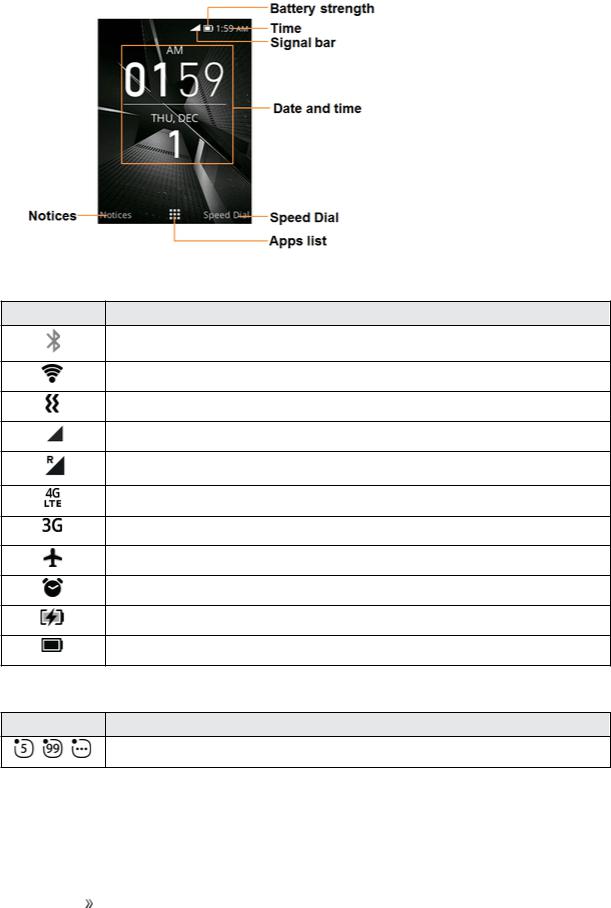
Main Status Icons
Icon |
Status |
Bluetooth® active
Wi-Fi® active
Vibrate
Network (full signal)
Network (roaming)
4G LTE data service
3G data service
Airplane mode
Alarm set
Battery (charging)
Battery (full charge)
Notification Icons
Icon |
Notification |
General numerical notifications (missed call, new mail, new message, etc.)
CHANGE THE HOME SCREEN WALLPAPER
Select and assign your phone’s background wallpaper.
GettingStarted YourPhone's HomeScreen |
24 |
 Loading...