


INSTRUCTION BOOK
SB58XX
Blender
GB |
INSTRUCTION BOOK |
FR |
MODE D’EMPLOI |
NL |
GEBRUIKSAANWIJZING |
DE |
GEBRAUCHSANWEISUNG |
GR |
ΕΓΧΕΙΡΊΔΙΟ ΟΔΗΓΙΏΝ |
PT |
MANUAL DE INSTRUÇÕES |
ES |
LIBRO DE INSTRUCCIONES |
|
|
|
|
|
|
|
|
|
|
D
B |
|
|
|
|
C |
|
|
|
|
||
|
|
|
|
|
A
E
F
G
H
I
www.aeg.com |
2 |

1 |
|
A |
B |
|
|
4 |
|
2 |
A |
B |
5 |
|
7 |
|
|
|
|
8 |
|
|
|
|
|
|
|
|
|
|
|
|
|
|
|
|
|
3 |
B |
A |
6 |
9 |
www.aeg.com |
3 |

CONTENTS
ENGLISH |
6 |
FRANÇAIS |
18 |
NEDERLANDS |
26 |
DEUTSCH |
10 |
ΕΛΛΗΝΙΚΆ |
21 |
PORTUGUÊS |
30 |
ESPAÑOL |
14 |
|
|
|
|
FOR PERFECT RESULTS
Thank you for choosing this AEG product. We have created it to give you impeccable performance for many years, with innovative technologies that help make life simpler features you might not find on ordinary appliances. Please spend a few minutes reading to get the very best from it.
Visit our website to:
Get usage advice, brochures, trouble shooter, service information:
www.aeg.com/webselfservice
Register your product for better service:
www.registeraeg.com
Buy accessories and consumables for your appliance:
www.aeg.com/shop
CUSTOMER CARE AND SERVICE
When contacting Service, ensure that you have the following data available:
-Model Number
-PNC number
-Serial number
The information can be found on the rating plate.
www.aeg.com |
4 |
www.aeg.com |
5 |

ENGLISH
Thank you for choosing an AEG product. In order to ensure the best results, always use original AEG accessories and spare parts. They have been designed especially for your product. This product is designed with the environment in mind. All plastic parts are marked for recycling purposes.
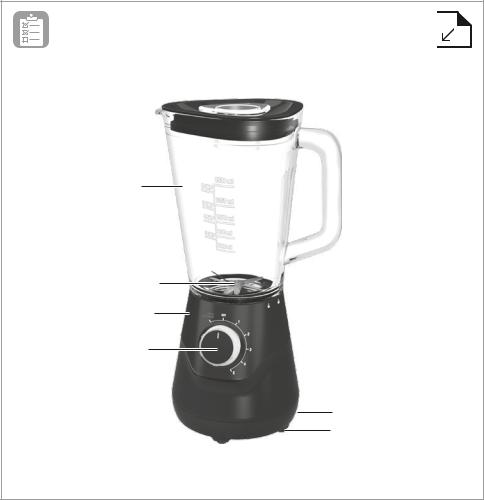
COMPONENTS
A. |
Jug |
F. |
Motor housing |
B. |
Spout |
G. |
Speed selector (with PULSE, ICE CRUSH function) |
C. |
Lid with filler hole |
H. |
Cord storage device (underside of appliance) |
D. |
Measuring cup |
I. |
Non-slip feet |
E. |
Blade assembly, detachable |
|
|
Picture page 2-3
GETTING STARTED
1Before using the blender for the first time, wash all parts except for the motor housing. Assembling: Place the rubber seal on the blade assembly (A) and insert it under the jug. Turn the blade assembly counter-clockwise (B) to fasten.
Caution! The blades are very sharp!
2Place the blender on a flat surface and lock the jug into position on the motor housing. When the arrow is aligned with the “Locked” indicator, the jug is locked in position. Put the ingredients in the jug. (Do not exceed the maximum level as indicated on the jug.)
3Close the lid (A) and insert the measuring cup in the filler hole and (B) lock into position. (You can use the measuring cup to add ingredients while the blender is running. Close the filler hole immediately after, to avoid splashing.)
Caution! When processing hot liquids, see step 4.
4Processing hot liquids: allow hot liquids to cool down until lukewarm before filling the jug. Fill the jug only half full and start processing on low speed. The blender jug can become very warm – take care to protect your hands and to ventilate steam out through the filler hole. Always replace the lid before use.
5Start the blender: Make sure the speed selector is set to the “OFF”-position. Plug into mains. Turn the speed selector to your desired setting.
Note: Turn the speed selector to “PULSE, ICE CRUSH” without releasing it, to accelerate the process of blending. Release to stop.
6Ice crushing: Turn the speed selector to “PULSE, ICE CRUSH” for 3-5 seconds several times until you obtain a satisfactory result.
Note: You can add more ice through the filler hole while the blender is running.
CLEANING AND CARE
7Quick cleaning: Pour warm water into the jug, add a few drops of detergent. Mix water and detergent by turning the speed selector to “PULSE, ICE CRUSH” briefly. Finally, rinse the jug under running water.
8cleaning: Turn the blender off and unplug the power cord. Wipe the motor housing with a damp cloth.
 Warning! Never immerse the housing, plug, and cord in water or any other fluid.
9Remove the lid and jug. Turn the blade assembly clockwise and remove it. Rinse the blade assembly in water and detergent. Caution! Handle carefully, the blades are very sharp! The lid, jug and measuring cup can be washed in the dishwasher.
Enjoy your new AEG product!
www.aeg.com |
6 |

SAFETY ADVICE
Readthefollowinginstructioncarefullybeforeusingtheapplianceforthefirsttime.
• This appliance shall not be used by children. Keep the appliance and its cord out of reach of children. Appliances can be used by persons with reduced physical, sensory or mental capabilities or lack of experience and knowledge if they have been given supervision or instruction concerning use of the appliance in a safe way and if they understand the hazards involved. Children shall not play with the appliance.
• The appliance may only be connected to a power supply whose voltage and frequencycomplywiththespecificationsontheratingplate!
• Never use or pick up the appliance if
–the supply cord is damaged,
–the housing is damaged.
•If the appliance or the supply cord is damaged, it must be replaced by the manufacturer,itsserviceagentorsimilarlyqualifiedperson,inordertoavoidhazard.
•Alwaysplacetheapplianceonaflat,levelsurface.
•Always disconnect the appliance from the supply if it is left unattended and before assembling, disassembling or cleaning.
•Never touch the blades or inserts with your hand or any tools while the appliance is plugged in.
•Thebladesandinsertsareverysharp!Dangerofinjury!Cautionwhenassembling, disassemblingafteruseorwhencleaning!Ensurethattheapplianceisdisconnected from the mains supply.
• Do not immerse the appliance in water or any other liquid.
•Donotlettheblenderrunformorethan2minutesatatimeusingheavyloads.After runningfor2minuteswithheavyloads,theblendershouldbelefttocoolforatleast
10 minutes.
•Donotexceedthemaximumfillingvolumeasindicatedontheappliances.
•Never process boiling liquids (max 90 °C).
•Donotusethisappliancetostirpaint.Danger,couldresultinanexplosion!
•Never operate appliance without lid.
•Donotletthepowercordtouchhotsurfacesorhangoveredgeoftableorcounter.
•Never use accessories or parts made by other manufactures not recommended or sold; may cause a risk of injury to persons.
•The appliance can not be used for blending or grinding hard and dry substance, except for ice cubes.
•Keep hands and utensils out of the blender during operation to reduce the risk of severe injury to persons or damage to the blender.
•Ensurethattheblenderisswitchedoffbeforeremovingitfromthestand.
•This appliance is intended for domestic use only. The manufacturer cannot accept any liability for possible damage caused by improper or incorrect use.
GB
DE
ES
FR
GR
NL
PT
www.aeg.com |
7 |

•This appliances is intended to be used in household and similar applications such as:-staffkitchenareasinshops,officesandothersworkingenvironments;-farm houses; - by clients in hotels, motels and other residential type environments; - bed and breakfast type environments.
TROUBLESHOOTING
SYMPTOM |
CAUSE |
SOLUTION |
|
|
|
The blender does not |
Components are not fixed properly. |
Check if all the components are properly locked |
switch on. |
|
into position. |
|
|
|
|
The speed selector is not on the right position. |
Choose the appropriate speed. To use PULSE |
|
|
function, make sure the speed selector is on |
|
|
PULSE position. |
|
|
|
|
The jug is overfilled. |
Empty the jug so you do not exceed the |
|
|
maximum level. |
|
|
|
|
The plug is not properly connected to the power |
Check the connection of the plug to the outlet |
|
outlet. |
or try another outlet. |
|
|
|
|
Power outage. |
Wait until power outage is over. |
|
|
|
|
Functional problem. |
Contact authorized service. |
|
|
|
RECIPES
MAXIMUM PROCESSING TIME WITH HEAVY LOAD
2 min
WHISKING/WHIPPING QUANTITIES AND PROCESSING TIMES
Ingredients |
Quantity |
|
Time |
|
Speed |
|
|
|
|
|
|
Cream |
200-400 |
g |
50~60 sec |
|
1 |
|
|
|
|
|
|
Note: The temperature of the cream should be between 4 and 8 Degree Celsius. |
|
||||
RECOMMENDED BLENDING SPEED
Recipe |
Ingredients |
Quantity |
Time |
Speed |
||
|
|
|
|
|
|
|
|
Carrots |
20~80 |
g |
|
|
|
Pureeing raw vegetables |
Potatos |
20~80 |
g |
20~30 s |
8 |
|
|
|
|
||||
Onions |
20~80 |
g |
||||
|
|
|
||||
|
|
|
|
|
|
|
|
Water |
60~160 |
g |
|
|
|
|
Tequila |
240 |
ml |
|
|
|
|
Triple sec |
60 |
ml |
|
|
|
|
|
|
|
|
|
|
Strawberries margaritas (Cocktail) |
Frozen strawberries |
225 |
g |
≤ 90 s |
8 |
|
|
|
|
|
|
|
|
|
Frozen Lemonade concentrate |
145 |
g |
|
|
|
|
Ice cubes |
150 |
g |
|
|
|
|
|
|
|
|
|
|
|
Pineapple in slices |
250 |
g |
|
|
|
|
|
|
|
|
|
|
Pineapple-apricots Smoothie |
Dried Apricots |
40 |
g |
≤ 90 s |
8 |
|
|
Yoghurt |
300 |
g |
|
|
|
|
|
|
|
|
|
|
www.aeg.com |
8 |

RECOMMENDED BLENDING SPEED
Recipe |
|
|
|
Ingredients |
|
|
Quantity |
|
Time |
Speed |
|||
|
|
|
|
Milk |
|
|
150-300 |
|
ml |
|
|
|
|
|
|
|
|
|
|
|
|
|
|
|
|
|
|
Milkshake |
|
|
|
Vanilla Ice cream |
|
200-400 |
|
g |
|
20~30 s |
4 |
||
|
|
|
|
|
|
|
|
|
|
||||
|
|
|
Banana |
|
|
¼ - ½ |
|
pcs |
|||||
|
|
|
|
|
|
|
|
|
|
|
|||
|
|
|
|
Chocolate syrup |
|
30-60 |
|
g |
|
|
|
|
|
|
|
|
|
|
|
|
|
|
|
|
|
|
|
|
|
|
|
Potatoes |
|
|
400 |
|
g |
|
|
|
|
|
|
|
|
|
|
|
|
|
|
|
|
|
|
Potato leek soup |
|
|
|
Leek |
|
|
400 |
|
g |
|
30~40 s |
4 |
|
|
|
|
|
Water |
|
|
800 |
|
g |
|
|
|
|
|
|
|
|
Wheat flour |
|
|
150 |
|
g |
|
|
|
|
|
|
|
|
|
|
|
|
|
|
|
|
|
|
|
|
|
|
Salt |
|
|
1 |
|
Pinch |
|
|
|
|
|
|
|
|
|
|
|
|
|
|
|
|
|
|
Pancake (Batters) |
|
|
|
Eggs |
|
|
3 |
|
pcs |
|
30~40 s |
4 |
|
|
|
|
Milk |
|
|
250 |
|
ml |
|
||||
|
|
|
|
|
|
|
|
|
|
|
|||
|
|
|
|
|
|
|
|
|
|
|
|
|
|
|
|
|
|
Water |
|
|
140 |
|
ml |
|
|
|
|
|
|
|
|
|
|
|
|
|
|
|
|
|
|
|
|
|
|
Butter |
|
|
50 |
|
g |
|
|
|
|
|
|
|
|
|
|
|
|
|
|
|
|
|
|
CHOPPING QUANTITIES AND PROCESSING TIMES |
|
|
|
|
|
|
|
|
|||||
Ingredients |
Quantity |
|
|
Quality |
Time |
Quality |
Time |
|
Quality |
|
Time |
|
Speed |
|
|
|
|
|
|
|
|
|
|
|
|
|
|
Bread crumbs |
100-200 |
g |
|
|
3 sec |
|
3~5 sec |
|
|
|
5~10 sec |
|
Pulse |
Almonds |
100-200 |
g |
|
Coarse |
3 sec |
Medium |
3~5 sec |
|
Fine |
|
5~10 sec |
|
Pulse |
|
|
|
|
|
|
|
|
|
|
|
|
|
|
Peppar |
20-100 |
g |
|
|
3 sec |
|
5 sec |
|
|
|
5~10 sec |
|
Pulse |
|
|
|
|
|
|
|
|
|
|
|
|
|
|
DISPOSAL
This symbol on the product indicates that this product contains a battery which shall not be disposed with normal household waste.
This symbol on the product or on its packaging indicates that the product may not be treated as household waste. To recycle your product, please take it to an official collection point or to an AEG service center that can remove and recycle the battery and electric parts in a safe and professional way. Follow your country’s rules for the separate collection of electrical products and rechargeable batteries.
AEG reserves the right to change products, information and specifications without notice.
GB
DE
ES
FR
GR
NL
PT
www.aeg.com |
9 |

DEUTSCH
Vielen Dank, dass Sie sich für dieses AEG-Produkt entschieden haben. Um bestmögliche Ergebnisse zu erzielen, sollten Sie ausschließlich Originalzubehör und Originalersatzteile von AEG verwenden. Diese wurden speziell für Ihr Produkt entwickelt wurden. Dieses Produkt wurde mit Rücksicht auf die Umwelt hergestellt. Alle Kunststoffteile sind für Recyclingzwecke markiert.
TEILE
A. |
Behälter |
F. |
Motorgehäuse |
B. |
Ausgusstülle |
G. |
Geschwindigkeitsregler (mit Einstellung „PULSE, ICE CRUSH“ für |
C. |
Abdeckung mit Einfüllöffnung |
|
Impulsfunktion und zum Zerkleinern von Eis) |
D. |
Messbecher |
H. |
Kabelaufwicklung (auf der Unterseite des Geräts) |
E. |
Klingenaggregat, abnehmbar |
I. |
Rutschfeste Füße |
Abbildung Seite 2-3
ERSTE SCHRITTE
1Vor der ersten Verwendung des Mixers alle Teile außer dem Motorgehäuse reinigen. Aufbau: Den Gummidichtungsring an der Messereinheit (A) anbringen. Schneidvorrichtung von unten in den Mixbehälter einführen und entgegen dem Uhrzeigersinn drehen (B), bis sie einrastet.
Vorsicht! Die Klingen sind sehr scharf!
2Den Mixer auf eine ebene Fläche stellen und den Behälter auf dem Motorgehäuse einrasten lassen. Wenn der Pfeil auf der Verriegelungsanzeige steht, ist der Behälter fest arretiert. Die Zutaten in den Behälter füllen. (Die maximale Füllmenge darf nicht überschritten werden.)
3Die Abdeckung schließen (A) und den Messbecher in die Einfüllöffnung einsetzen und (B) einrasten lassen. (Mit dem Messbecher können Zutaten hinzugefügt werden, während der Mixer läuft. Um Spritzer zu vermeiden, die Einfüllöffnung danach sofort wieder verschließen.) Vorsicht! Zur Verarbeitung heißer Flüssigkeiten siehe Absatz 4.
4Verarbeitung heißer Flüssigkeiten: Heiße Flüssigkeiten abkühlen lassen und lauwarm in den Behälter füllen. Den Behälter nur zur Hälfte füllen und die Verarbeitung mit geringer Geschwindigkeit beginnen. Der Mixerbehälter kann sehr warm werden. Hände schützen und Dampf durch die Einfüllöffnung entweichen lassen. Vor der Verwendung immer die Abdeckung aufsetzen.
5Bedienung des Mixers: Vergewissern Sie sich, dass Geschwindigkeitsregler in der Position „OFF“ steht. Netzstecker in Steckdose stecken. Geschwindigkeitsregler auf gewünschte Einstellung drehen.
Hinweis: Um die Mixgeschwindigkeit zu erhöhen, Geschwindigkeitsregler ohne loszulassen auf die Einstellung
„PULSE, ICE CRUSH“ drehen. Zum Anhalten loslassen.
6Zerkleinern von Eis: Den Geschwindigkeitsregler mehrere Male für 3-5 Sekunden auf die Stufe „PULSE, ICE CRUSH“ (für Impulsfunktion und zum Zerkleinern von Eis) drehen, bis ein zufriedenstellendes Ergebnis erreicht ist. Hinweis: Während des Betriebs können durch die Einfüllöffnung weitere Eisstücke eingefüllt werden.
REINIGUNG UND PFLEGE
7Schnelle Reinigung: Warmes Wasser in den Behälter füllen und ein paar Tropfen Spülmittel hinzufügen. Für einige Sekunden den Geschwindigkeitsregler auf die Einstellung „PULSE, ICE CRUSH“ (für Impulsfunktion und zum Zerkleinern von Eis) drehen, um Wasser und Spülmittel zu vermischen. Danach den Behälter unter fließendem Wasser ausspülen.
8Reinigung: Den Mixer ausschalten und den Netzstecker ziehen. Das Motorgehäuse mit einem feuchten abwischen.
 Warnhinweis! Gehäuse, Netzstecker und Kabel niemals in Wasser oder eine andere Flüssigkeit eintauchen.
9Abdeckung und Behälter abnehmen. Messereinheit im Uhrzeigersinn drehen und entfernen. Das Klingenaggregat mit Wasser und Spülmittel reinigen. Vorsicht! Vorsichtig anfassen, die Klingen sind sehr scharf! Abdeckung, Behälter und Messbecher können im Geschirrspüler gereinigt werden.
Wir wünschen Ihnen viel Spaß mit Ihrem neuen Produkt von AEG!
www.aeg.com |
10 |
SICHERHEITSHINWEISE
Lesen Sie sich die folgenden Anweisungen sorgfältig durch, bevor Sie das Gerät zum ersten Mal verwenden.
• DiesesGerätdarfnichtvonKindernbedientwerden.BewahrenSiedasGerätinklusiveKabel außerhalbderReichweitevonKindernauf.Personenmiteingeschränktenkörperlichen, sensorischenodergeistigenFähigkeitenbzw.PersonenohneausreichendeErfahrung undKenntnisdürfendasGerätnurunterAufsichtbenutzenoderwennsieimVorfeldeine
Einweisung in den sicheren Gebrauch des Geräts erhalten haben und wenn sie die mit derVerwendungverbundenenGefahrenkennen. DasGerätistkeinSpielzeug.LassenSie
Kinder nicht damit spielen.
• DasGerätdarfnuraneineStromversorgungangeschlossenwerden,derenSpannungund
FrequenzmitdenAngabenaufdemTypenschildübereinstimmt!
• DasGerätniemalsverwenden,wenn–dasNetzkabeloder–dasGehäusebeschädigtist.
• Wenn das Gerät oder das Netzkabel beschädigt ist, muss es zur Vermeidung von Gefahren vomHersteller,vomKundendienstodervoneinerentsprechendqualifiziertenPerson ausgetauscht werden.
• DasGerätimmeraufeineebeneFlächestellen.
• DasGerätvordemZusammensetzen,Auseinandernehmen,Reinigenoderwennes
unbeaufsichtigt ist, immer von der Stromversorgung trennen.
• DieKlingenoderEinsätzeniemitderHandoderWerkzeugenberühren,wenndasGerät
noch eingesteckt ist.
• DieKlingenundEinsätzesindsehrscharf!Verletzungsgefahr!Vorsichtbeim
Zusammensetzen,AuseinandernehmennachVerwendungundbeiderReinigung!Das
Gerät muss vom Stromnetz getrennt sein.
•  DasGerätnichtinWasseroderandereFlüssigkeiteneintauchen.
• DenMixermitschwerenZutatennichtlängerals2MinutenamStücklaufenlassen.Nach 2-minütigemBetriebmitschwerenZutatenmusssichderMixermindestens10Minuten langabkühlen.
• DieaufdenGerätenangegebenemaximaleFüllhöhenichtüberschreiten.
• ArbeitenSieniemitkochendenFlüssigkeiten(maximal90°C).
• DasGerätdarfnichtzumUmrührenvonFarbeverwendetwerden.Vorsicht,
Explosionsgefahr!
• DasGerätnieohneAbdeckungbetreiben.
• KabelnichtmitheißenOberflächeninBerührungkommenoderüberdenTisch-oder
Arbeitsplattenrand hängen lassen.
• NiemalsZubehöroderTeilevonanderen,nichtempfohlenenHerstellernverwenden,dadies
einVerletzungsrisikozurFolgehabenkann.
• MitAusnahmevonEiswürfelnistdasGerätnichtfürdasMixenoderMahlenharter,
trockener Substanzen geeignet.
• Während des Mixens Hände und Utensilien nicht in den Behälter stecken, um ernsthafte Verletzungen von Personen oder Beschädigungen des Mixers zu vermeiden.
• Vor Entfernung des Mixbehälters immer erst das Gerät ausschalten.
GB
DE
ES
FR
GR
NL
PT
www.aeg.com |
11 |
 Loading...