


 Loading...
CP9670 AutoScanner®
en Quick Start Guide
fr Guide de démarrage rapide es Guía de inicio rápido
The Quick Start Guide was developed to help you get started using the Scan Tool. If there are any problems following these steps or extra information is required refer to the User’s Guide located at www.actron.com.
All Safety Information is contained in the User’s Guide. Read User’s Guide completely before operating Scan Tool.
Le guide de démarrage rapide a été conçu pour faciliter l’utilisation de votre analyseur-contrôleur. Si des problèmes survenaient au cours de ces étapes ou que des renseignements supplémentaires étaient requis, veuillez vous référer au guide de l’utilisateur se trouvant sur www.actron.com.
Le guide de l’utilisateur contient tous les renseignements de sécurité. Veuillez lire le guide de l’utilisateur avant de vous servir de l’analyseurcontrôleur.
La guía de inicio rápido se desarrolló para ayudarlo a comenzar a utilizar la herramienta de escaneo. Si tiene alguna duda con respecto a estos pasos o si necesita más información consulte la guía del usuario que se encuentra en
www.actron.com.
Toda la información de seguridad está incluida en la guía del usuario. Lea
la guía del usuario con detenimiento antes de comenzar a operar la herramienta de escaneo.

en |
| CP9670 | Quick Start Guide | 3 |
|
Contents |
|
|
1 |
General Scan Tool Information............................................. |
4 |
|
1. 1 User Interface ............................................................ |
4 |
|
1.1.2 Display Icons..................................................... |
4 |
2 |
Download Scanning Suite..................................................... |
5 |
3 |
Using Your Scan Tool............................................................ |
5 |
|
3. 1 Locating Data Link Connector.................................... |
5 |
|
3.2 Connect the Tool......................................................... |
6 |
4 |
Tool Menus............................................................................ |
7 |
|
4. 1 Diagnostic Functions ................................................. |
8 |
5 |
Limited Warranty................................................................ |
11 |
Français.................................................................................. |
13 |
|
Español................................................................................... |
23 |
|
Bosch Automotive Service Solutions Inc. |
573905 REV C | 03.2016 |

4 | Quick Start Guide | CP9670 | |
en |
|
|
1 General Scan Tool Information
1. 1 User Interface
The scan tool is designed for easy use. All menus and lists operate the same way.
• UP/READ key performs the
Read Codes function and scrolls back through the screens. Press this key when an up arrow ( ) appears on the display to scroll backwards, or press and hold for 2 seconds when the
  appears on the display to Read Codes.
• DOWN/ERASE key performs the Erase Codes function and
scrolls forward through the screens. Press this key when a down arrow ( ) appears on the display to scroll forward, or press and hold for 2 seconds when the
  appears on the display to Erase Codes.
• ENTER key selects item.
• BACK key returns to previous screen.
1.1.2 Display Icons
• Indicates additional information is available by scrolling down.
• Indicates additional information is available by scrolling up.
• Indicates the UP/READ and DOWN/ERASE hot keys are active.
•√ Indicates data is available for items on the Review Data Menu.
• Indicates graphical viewing of data items is available in View Data.
573905 REV C | 03.2016 |
Bosch Automotive Service Solutions Inc. |
en |
| CP9670 | Quick Start Guide | 5 |
|
|
2 Download Scanning Suite
√√Go to www.actron.com/updates-downloads and download the Scanning Suite PC application.
√√Scanning Suite is NOT required to operate the Scan Tool.
√√Install the downloaded Scanning Suite application prior to connecting the Scan Tool to the PC.
√√Some of the items included in Scanning Suite are: ––Tool update software
√√To be able to use Scanning Suite the PC must meet the following minimum requirements:
––Microsoft Windows 7, 8, and 10.
––Adobe Acrobat Reader
––Screen Resolution of 800 x 600
>>If screen resolution is 800 x 600, in Display Properties, Settings
Tab, set Font Size to Small Fonts.
√√Use Scanning Suite to determine if any updates are available for your tool by clicking Check for Update button.
√√You can also configure the Scanning Suite Frequency (SS Frequency) to automatically check every xx minutes. The default frequency is 30 minutes.
√√Refer to instructions provided on www.actron.com/updates-down- loads for how to install Scanning Suite and Tool updates.
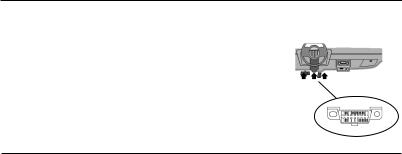
3 Using Your Scan Tool
3. 1 Locating Data Link Connector
•The OBD II Data Link Connector (DLC) is usually located under the driver’s side dash.
•Refer to user’s manual for DLC location.
•For more information, go to http://www.
obdclearinghouse.com/oemdb.
Bosch Automotive Service Solutions Inc. |
573905 REV C | 03.2016 |

|
6 | Quick Start Guide | CP9670 | |
en |
|
|
|
|
|
3.2 Connect the Tool
1.Locate the OBD II Data Link Connector under the steering column. If the connector is not there, a label should be there indicating the whereabouts of the connector.
2.If necessary, remove the cover from the vehicle connector.
3.Turn the ignition switch to the ON position. Do not start the engine.
4.Plug the OBD II connector attached to the Tool into the Data Link Connector.
5.The tool will attempt to identify the vehicle. If successful, the vehicle identified will be displayed. If vehicle couldn‘t be identified, menus will be shown for you to select the vehicle manually. The tool can support one previous vehicle in the garage. If you already have a previous vehicle in your garage, the tool will automatically overwrite the previous vehicle with the currently selected one. All previous scanned data in Review Data will be a combination of all previous vehicles. Run all functions again to ensure that all data was scanned from the current vehicle.
6.Review Quick Test Results.
7.Go to Diagnostic Menu by pressing  ENTER.
573905 REV C | 03.2016 |
Bosch Automotive Service Solutions Inc. |

en |
| CP9670 | Quick Start Guide | 7 |
|
|
4 Tool Menus
The Main Menu and Diagnostic Menu are broken down into the following menus:
ΔVehicle Diagnostics |
-I/M Monitors |
+I/M Monitors |
-DTCs (Codes) |
+Read Codes |
-State OBD Check |
+Erase Codes |
-Recording |
+MIL Status |
-View Freeze Data |
+State OBD Check |
-O2 Monitor Tests |
+View Data |
-Diagnostic Monitor Tests |
+Record Data |
-Vehicle Information |
+View Freeze Data |
*Code Lookup |
+Drive Cycle Monitor |
*System Setup |
+O2 Monitor Tests |
-English/Metric |
+Diagnostic Monitor Tests |
-Language Setup |
+On-Board Systems |
-Long PID names |
+Charging System Monitor |
-Tool Information |
+Vehicle Information |
-Display Test |
+Component Locator |
-Keypad Test |
+Acronyms |
-Memory Test |
*Review Data |
-Program Mode |
Function is only on Main Menu.
+ Function is only on Diagnostic Menu.
* Function is on both the Main Menu and Diagnostic Menu.
Bosch Automotive Service Solutions Inc. |
573905 REV C | 03.2016 |

|
8 | Quick Start Guide | CP9670 | |
en |
|
|
|
|
|
4. 1 Diagnostic Functions
Vehicle Diagnostics
Use this function to select a vehicle and then proceed to the Diagnostic Menu.
I/M Monitors
Displays a snapshot of the state of the vehicle’s OBD II Monitors.
Read Codes
Reads DTCs from vehicle’s computer with KOEO or KOER.
Erase Codes
Deletes DTCs from vehicle’s memory.
MIL Status
Displays whether the Malfunction Indicator Lamp is on or off.
State OBD Check
Displays a basic status of the vehicle’s OBD system.
View Data
Views vehicle Parameter Identification Data (PIDs) in real time. PIDs are displayed in either a text format or graph format when available.
Record Data
Records vehicle PIDs while vehicle is parked or being driven. This function is for diagnosing intermittent driveability problems.
View Freeze Data
Displays a snapshot of operating conditions at the time of a fault.
Drive Cycle Monitor
Displays the current state of the vehicle’s OBD II Monitors in Real-
Time.
O2 Monitor Tests
The O2 Monitor Tests is NOT an ON-DEMAND TEST. This Function displays oxygen sensor monitoring test results from the vehicle’s memory.
Diagnostic Monitor Tests
Reads test results for emission related powertrain components and systems that are and are not continuously monitored.
573905 REV C | 03.2016 |
Bosch Automotive Service Solutions Inc. |

en |
| CP9670 | Quick Start Guide | 9 |
|
|
On-Board Systems
Scan tool controls the operation of vehicle components, tests or systems.
Vehicle Information
Scan tool displays the vehicle’s VIN number, Calibration ID(s) and CVN that identify the software version in the vehicles control module(s.) The tool also displays In-Use Performance Tracking of important readiness monitors.
Review Data
Allows review of data stored in Scan Tool.
DTCs (Codes)
Five-digit alphanumeric codes that help determine the cause of problems with a vehicle.
Recording
Plays back a recording that allows viewing of previously-recorded PIDs.
Code Lookup
Looks up definitions of DTCs stored in Scan Tool.
System Setup
Changes tool settings, displays tool information, and performs tool self-tests.
English/Metric
Changes measurement units
Language Setup
Allows the user to change the language used by the tool. English is the default.
Long PID Names
Allows the user to enable/disable the tool scrolling the complete PID name on the bottom line of the display while viewing live data or viewing freeze data.
Tool Information
Allows the user to view specific tool information that may be needed when contacting customer service.
Bosch Automotive Service Solutions Inc. |
573905 REV C | 03.2016 |

1 0 | Quick Start Guide | CP9670 | |
en |
|
|
Display Test
Used to check the display.
Keypad Test
Verifies that the keys are working correctly.
Memory Test
Checks RAM and Flash ROM.
Program Mode
Used for updating the Scan Tool.
Charging System Monitor
This function is used to monitor the voltage present on pin 16 of the
OBD II Data Link connector.
Acronyms
Allows the user to view acronyms and abbreviations used by the Scan Tool.
Component Locator
Tool will display a list of components and their locations on the vehicle. This function will always appear on the Main Menu. This selection will appear on the Diagnostic Menu only when the tool has a list of component locations for the currently selected vehicle.
573905 REV C | 03.2016 |
Bosch Automotive Service Solutions Inc. |
Loading...