


FULL ONE (1) YEAR WARRANTY
Actron Manufacturing Company, 15825 Industrial Parkway, Cleveland, Ohio 44135, warrants to the user that this unit will be free from defects in materials and workmanship for a period of two (2) years from the date of original purchase.
Any unit that fails within this period will be repaired or replaced at Actron’s option and without charge when returned to the Factory. Actron requests that a copy of the original, dated sales receipt be returned with the unit to determine if the warranty period is still in effect.
This warranty does not apply to damages caused by accident, alterations, or improper or unreasonable use.
ACTRON MANUFACTURING COMPANY DISCLAIMS ANY LIABILITY FOR INCIDENTAL OR CONSEQUENTIAL DAMAGES FOR BREACH OF ANY WRITTEN WARRANTY ON THE UNIT.
15825 Industrial Parkway
Cleveland, Ohio 44135
U.S.A.
Toll free U.S.: (800) 228-7667
©2004 Actron Manufacturing Co.
All Rights Reserved.
0002-002-2186
TM
®
®
by
UP 
DOWN 
RIGHT 
LEFT 
Table of Contents
TM |
CP9110
Vehicle Service Information ............. |
2 |
Safety Precautions ............................ |
3 |
Section 1: |
|
Welcome to The Scan Tool .. |
4 |
1-1 Features ........................................ |
4 |
1-2 The scan tool ................................. |
5 |
1-3 What You Get ................................ |
6 |
1-4 Cartridge and Installation .............. |
6 |
1-5 Cables and Adapters ..................... |
7 |
1-6 Operating the scan tool ................. |
9 |
• Powering-up the scan tool ....... |
9 |
• Keyboard .................................. |
9 |
• Display .................................... |
10 |
• Lists, Menus, & Questions ..... |
10 |
• Other Functions & Keys ......... |
11 |
1-7 Scan Tool Setup .......................... |
12 |
Section 2: |
|
Computer Vehicle Basics .. |
13 |
2-1 Basics of Computer- |
|
Controlled Cars ........................ |
13 |
2-2 About Codes ................................ |
16 |
2-3 When to Read Codes .................. |
17 |
Section 3:
Help and Troubleshooting
Tips .................................... |
19 |
|
3-1 Tool Problems ............................. |
19 |
|
3-2 Car Problems .............................. |
20 |
|
3-3 |
Scan Tool Self-Tests ................... |
20 |
|
• Display Test ........................... |
21 |
|
• Keyboard Test ........................ |
21 |
|
• Memory Test .......................... |
21 |
Section 4: |
|
|
How to Order |
|
|
Accessories ...................... |
22 |
|
4-1 |
Where to Buy? ............................. |
22 |
4-2 |
Call Actron Direct ........................ |
23 |
4-3 |
E-Mail & Internet address ........... |
23 |
Section 5: |
|
|
Appendix ........................... |
24 |
|
Glossary of Terms ............................. |
24 |
|
30 |
1 |

Vehicle Service Information
The following is a list of publishers who have manuals containing electronic engine control diagnostic information. Some manuals may be available at auto parts stores or your local public library. For others, you need to write for availability and pricing, specifying the make, model and year of your vehicle.
Vehicle Service Manuals:
Chilton Book Company
Chilton Way
Radnor, PA 19089
Haynes Publications
861 Lawrence Drive
Newbury Park, CA 91320
Cordura Publications
Mitchell Manuals, Inc.
Post Office Box 26260
San Diego, CA 92126
Motor’s Auto Repair Manual
Hearst Company
250 W. 55th Street
New York, NY 10019
Suitable manuals have titles such as:
“Electronic Engine Controls”
“Fuel Injection and Feedback Carburetors”
“Fuel Injection and Electronic Engine
Controls”
“Emissions Control Manual”
. . . or similar titles
Vehicle Service Manuals from General Motors Corporation:
Buick, Cadillac, Chevrolet, GEO, GMC,
Oldsmobile, & Pontiac
Helm Incorporated
Post Office Box 07130
Detroit, MI 48207
Saturn
Adistra Corporation c/o Saturn Publications 101 Union St.
Post Office Box 1000 Plymouth, MI 48170
Vehicle Service Manuals from Ford Motor Company:
Ford, Lincoln, & Mercury
Ford Publication Department
Helm Incorporated
Post Office Box 07150
Detroit, MI 48207
Vehicle Service Manuals from Chrysler Corporation:
Chrysler, Plymouth, & Dodge
Chrysler Motors Service Training
26001 Lawrence Avenue
Center Line, MI 48015
All information, illustrations and specifications contained in this manual are based on the latest information available from industry sources at the time of publication. No warranty (expressed or implied) can be made for its accuracy or completeness, nor is any responsibility assumed by Actron Manufacturing Co. or anyone connected with it for loss or damages suffered through reliance on any information contained in this manual or misuse of accompanying product. Actron Manufacturing Co. reserves the right to make changes at any time to this manual or accompanying product without obligation to notify any person or organization of such changes.
General Safety Guidelines to Follow When Working on Vehicles
To prevent accidents that could result in serious injury and/or damage to your vehicle or test equipment, carefully follow these safety rules and test procedures at all times when working on vehicles:
•Always wear approved eye protection.
•Always operate the vehicle in a well-ventilated area. Do not inhale exhaust gases — they are very poisonous!
•Always keep yourself, tools and test equipment away from all moving or hot engine parts.
•Always make sure the vehicle is in Park (Automatic transmission) or neutral (manual transmission) and that the parking brake is firmly set. Block the drive wheels.
•Never lay tools on vehicle battery. You may short the terminals together causing harm to yourself, the tools or the battery.
•Never use scan tool if its internal circuitry has been exposed to any liquids. This includes the scan tool and Application Cartridges.
•Never smoke or have open flames near vehicle. Vapors from gasoline and charging battery are highly flammable and explosive.
•Never leave vehicle unattended while running tests.
•Always keep a fire extinguisher suitable for gasoline/electrical/chemical fires handy.
•Always use extreme caution when working around the ignition coil, distributor cap, ignition wires, and spark plugs. These components contain high voltage when the engine is running.
•When performing a road test, never operate the scan tool alone while driving the vehicle. Always have one person drive the vehicle while an assistant operates the scan tool.
•Always turn ignition key OFF when connecting or disconnecting electrical components, unless otherwise instructed.
•Always follow vehicle manufacturer’s warnings, cautions and service procedures.
CAUTION:
Some vehicles are equipped with safety air bags. You must follow vehicle service manual cautions when working around the air bag components or wiring. If the cautions are not followed, the air bag may open up unexpectedly, resulting in personal injury. Note that the air bag can still open up several minutes after the ignition key is off (or even if the vehicle battery is disconnected) because of a special energy reserve module.
2 |
3 |
Section 1: Welcome to the Scan Tool – Basics
1-1 Actron Scan Tool Features
TM
®
by 
 UP
UP


 DOWN
DOWN


 RIGHT
RIGHT


 LEFT
LEFT


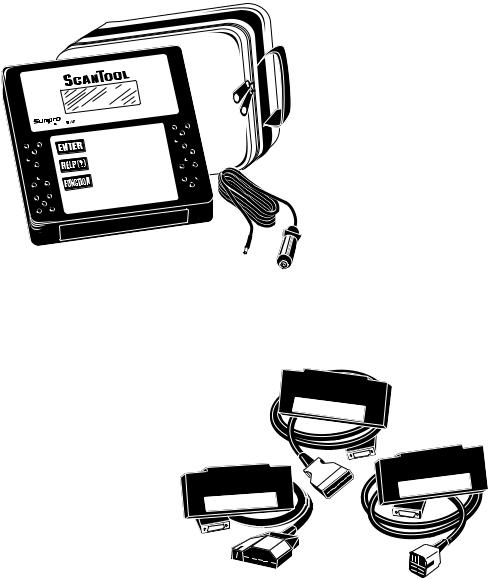
The Actron scan tool has many features that you would expect in scan tools used by the professionals:
•Large 4 line x 20 character LCD display
•High-impact plastic case
•Durable, easy to use keyboard
•Removable vehicle cable adapter
•Removable power cable
Scan Tool & Application Cartridge
Vehicle Manufacturer Application Cartridges
The manufacturer-specific Application Cartridges offer a universal approach in changing software as vehicle technology changes. Actron’s separate cartridge and cable system lets you add vehicle applications to meet your needs.
Cartridge Systems: |
|
|
GM Cartridge |
1984-1995 |
|
Ford Cartridge |
1984-1995 |
1984-1995 |
|
|
|
Chrysler Cartridge |
1989-1995 |
GM |
|
||
OBD II |
1996-up |
|
1989-1995 CHRYSLER
1984-1995 FORD
1-2 The Scan Tool
Actron’s scan tool was developed by experts in the automotive service industry to help you diagnose today’s vehicles and assist you in trouble-shooting procedures. Computer-controlled vehicles have a network of sensors that creates a series of inputs to the engine computer. The computer interprets these inputs and sends outputs (commands) back to the network to control air, fuel, vacuum, spark and other critical functions. When a problem occurs, the computer will store a record of the event, and take corrective action to adjust the circuit at fault. If the circuit does not respond, or the problem cannot be corrected, a trouble code is stored in the computer’s memory. In some cases, the Check Engine light may also be activated. The scan tool will allow you to monitor these vehicle events for trouble-shooting and diagnosis, and to read codes from the computer’s memory to pinpoint problem areas.
The scan tool uses state-of-the-art 16 “bit” microprocessor technology and has twice the computing power of some scan tools costing thousands of dollars! The scan tool is programmed to interpret the computer signals and provide you with a “real time” readout of vehicle data. More importantly, the software programs are written to provide you with detailed, full-screen readouts of all data. In addition, the Code
Lookup feature allows you to reference code descriptions without having to page through an instruction manual.
When the scan tool is connected to the data connector, a communication link is established, allowing the scan tool and the vehicle’s on-board computer to exchange information. The way in which this information is exchanged is referred to as a data stream.
As you use the scan tool, you will become more proficient in trouble-shooting vehicles using the detailed help messages and code description information. Actron will also help you become skilled in using the scan tool for more than just “scanning” the vehicle data list. We will show you many other uses that will expand your diagnostic limits by using the information contained in the application manuals that come with your Application Cartridge. Nostart, driveability, and emission problems will be easier to diagnose than ever before.
Professional-Style Adapter Cables: |
Optional Cable Adapters: |
|
GM ALDL — 12 Pin |
Chrysler CCD / LH – 6 Pin |
|
Ford EEC-IV/MCU — 7 Pin |
Ford/Mazda MECS – 6 Pin |
|
Chrysler SCI — 6 Pin |
GM J1962-OBD-II – 16 Pin |
|
|
Ford J1962-OBD-II – 16 Pin |
|
|
Chrysler J1962-OBD-II – 16 Pin |
|
|
4 |
5 |

1-3 Actron CP9110 – What You Get
When you receive your scan tool, take time to review all package contents.
The Application Cartridge serial tag is located on the top center of the cartridge. This serial tag will always be visible when the cartridge is inserted in the main tool.
Please take time to review all important documents enclosed. Be sure to review both boxes for contents.
Review Box Contents
Main Tool Box
In addition to the scan tool you should have received the following items in the main tool box:
•The Scan Tool
•Carrying Pouch
•Power Cable
•Main Tool Operator's manual
Application Cartridge Box
The Application Cartridge box that you purchased should contain the following items:
•The Application Cartridge
•Vehicle Cable Adapter
•Application Manual for that vehicle
MODEL NO. |
ACTRON MFG. |
SERIAL NO. |
|
CP9110 |
123456789 |
||
PATENT PENDING |
|||
|
© COPYRIGHT 1995 |
|
Actron Manufacturing warrants the software programs to be accurate to the level of information released by the Vehicle manufacturer at the time of release.
(800) 228-7667
1-2325
Main Tool Model and Serial Tag
MODEL NO. ACTRONMFG. SERIAL NO. |
COPYRIGHT1995 |
CP9111 ©PATENTPENDING 123456789 |
1984-1995 GM |
Cartridge Model and Serial Tag
Before You Start
Take time to review the proper procedure for powering-up your scan tool. The following section, Cartridge and Installation, should be read before proceeding! This will help you become familiar with all operating procedures.
1-4 Cartridge and Installation |
|
Review the Application Cartridge instal- |
|
lation procedure before you power-up |
|
your scan tool. Hold the cartridge, serial |
|
number tag up, and slowly insert the car- |
TM |
TM |
® |
|
|
|
by |
|
|
® |
|
|
|
by |
|
|
|
UP |
|
|
|
DOWN |
|
|
UP |
RIGHT |
|
|
|
LEFT |
|
|
DOWN |
|
|
|
|
MODELNO. ACTRONMFG. SERIALNO. |
|
|
|
©COPYRIGHT1995 |
|
|
|
PATENTPENDING |
|
|
RIGHT |
1984-1995 |
|
|
|
|
|
|
|
GM |
|
|
|
|
|
|
LEFT |
|
MODEL NO. |
ACTRON MFG. |
SERIAL NO. |
|
CP9110 |
12345678 |
|
|
PATENT PENDING |
||
|
|
© COPYRIGHT 1995 |
|
Application Cartridge Installed |
1984-1995 |
||
|
GM |
|
|
tridge into the cartridge opening. Align the cartridge slots with the “keyway” on the main tool bottom opening. Continue to gently push the cartridge into the opening until you feel the main “edge connector” resistance, then push to engage the cartridge to the cartridge stop. The cartridge is engaged when the alignment of the serial number tag is even with the top edge of the Main Tool opening edge and flush against the cartridge stop. Refer to the example.
To remove the Application Cartridge simply grasp the cartridge end and pull away from the main tool. This action will disengage the cartridge from the edge connector. Continue to pull the cartridge out of the opening the rest of the way.
NOTE: You should always have the Application Cartridge installed before you connect your unit to the power supply.
NEVER UNPLUG THE CARTRIDGE WHEN POWER IS APPLIED!
1-5 Power Cables and Vehicle Adapters
The scan tool comes with a main power cable designed to plug into the vehicle cigarette lighter.Theotherendofthecableplugsintothe scan tool as shown below.
Connecting to Vehicle |
|
Cigarette Lighter |
|
TFEL |
|
THGIR |
|
NWOD |
|
|
yb |
PU |
|
® |
® |
MT |
|
Connecting to Scan Tool |
|
Occasionally, you may find it necessary to connect directly to the vehicle’s battery. In these cases you may obtain an optional battery clip adapter from Actron. Actron also offers an AC power adapter to power the scan tool with standard 110V wall power. Both of these accessories may be purchased directly from Actron.
Your scan tool has been designed to operate at the same voltage levels as your vehicle’s computer. It requires a minimum of 8 volts to power-up. The scan tool is circuit protected from voltage variations and power surges. Should you have a problem with power-up, review Section 3-1: Tool Problems to verify the nature of your problem. NOTE: Some vehicles shut off power to the cigarette lighter receptacle when the ignition key is in the OFF or START positions.Checkyourvehicletodeterminewhether this is the case.
Optional |
|
Battery |
|
Clip |
|
by |
|
UP |
|
DOWN |
|
RIGHT |
|
LEFT |
AC 110V to 12V |
|
|
1984 -1995 GM |
Power Adapter |
|
6 |
7 |
Vehicle Cable Adapters |
|
|
|
|
|
|
||||
Your scan tool Vehicle Ap- |
|
|
|
|
|
|
|
|
|
|
|
|
|
|
|
|
|
|
|
||
plication Cartridge pack |
|
|
|
|
|
|
|
|
|
|
will contain the Applica- |
|
|
|
|
|
|
|
|
|
|
tion Cartridge, application |
|
|
|
|
|
|
|
|
|
|
manual and vehicle cable |
|
|
|
|
|
|
|
|
|
|
adapter for one manufac- |
|
|
|
|
|
|
|
|
|
|
|
|
|
|
|
|
|
|
|
||
turer (GM, Ford, or |
|
|
|
|
|
|
|
|
|
|
|
|
|
|
|
|
|
|
|
||
Chrysler). The vehicle |
|
|
|
|
|
|
|
|
|
|
cable adapter will be in- |
|
|
|
|
|
|
|
|
|
|
stalled on the scan tool by |
|
|
|
|
|
Connecting the |
|
|||
locating the large connec- |
|
|
|
|
|
|
||||
|
|
|
|
|
Vehicle Adapter Cable |
|
||||
tor receptacle on the top |
|
|
|
|
|
|
|
|
|
|
right side of the main tool. |
|
|
|
|
|
|
|
|
|
|
|
|
|
|
|
|
|
|
|
||
Insert the vehicle cable into |
When attaching the data cable to the ve- |
|||||||||
the scan tool receptacle and use the two |
||||||||||
hicle, take time to review the specific ap- |
||||||||||
“thumb screws” to secure it to the connec- |
||||||||||
plication manual for the cartridge you are |
||||||||||
tor as shown in the illustration below. Note |
||||||||||
using. This will instruct you on correctly |
||||||||||
that you will feel a firm seating of the cable |
||||||||||
connecting the cable to the vehicle. Many |
||||||||||
as you secure it to the scan tool connector. |
||||||||||
of the vehicle adapters are “keyed” so that |
||||||||||
The vehicle cable adapter should always |
||||||||||
the adapter will fit only one way. If you find |
||||||||||
be connected to the vehicle before power |
||||||||||
that you have a special vehicle situation or |
||||||||||
is applied to the scan tool. This will enable |
||||||||||
the adapter does not fit, call 1-800- |
||||||||||
the scan tool to maintain a proper ground |
||||||||||
ACTRON-7 for assistance. Always double |
||||||||||
between itself and the vehicle. If you have |
||||||||||
check the application section to be sure |
||||||||||
connected to the vehicle, powered-up the |
||||||||||
that you are following the proper hook-up |
||||||||||
tool, and have difficulty establishing a link |
||||||||||
directions. For further help that is not avail- |
||||||||||
between the scan tool and the vehicle, |
||||||||||
able in the scan tool help screens, see |
||||||||||
check the following: |
||||||||||
Section 3: Actron Help for solutions to |
||||||||||
|
|
|
|
|||||||
1. Is the ignition on? |
your scan tool problems. |
|||||||||
|
|
|
|
|
|
|||||
2. Verify you have connected the vehicle |
As you review the CP9110 Features sec- |
|||||||||
tion on page 1-1 and 1-2, you will note |
||||||||||
data cable to the vehicle’s Data Link |
||||||||||
there is a complete view of accessory |
||||||||||
Connector (DLC). |
||||||||||
vehicle adapter cables. They are for spe- |
||||||||||
|
|
|
|
|||||||
3. Confirm that proper vehicle information |
cial applications that only apply to certain |
|||||||||
vehicles. If your vehicle is one of these, |
||||||||||
was entered into scan tool. |
||||||||||
you can order cables direct from Actron |
||||||||||
|
|
|
|
|||||||
|
|
|
|
by calling (800) 228-7667. |
||||||
8
1-6 Operating the Scan Tool
Powering-up the scan tool
The scan tool can be powered-up in three ways. The most widely used way is with the supplied cigarette lighter adapter. The scan tool can also be powered up by using the optional Battery Clip Adapter or 110/12V AC Power Adapter. If you are poweringup the scan tool for vehicle testing, then make sure you connect the appropriate cable to the data connector before you supply power to the scan tool. If you do not connect the vehicle data cable now, the scan tool will let you know that you have not connected the data cable. If you just want to power-up the scan tool to do self-tests, then you do not need to attach the cable to the data connector.
Keyboard
The scan tool software was designed for a “user friendly” approach in navigating through operational menus. This makes the scan tool easy to operate. Simply follow the instructions that match the keyboard symbols and you will beusingyourscantoollikeanexpertinnotime. Sincethekeyboardissealed,adampclothcan be used to gently clean the surface. (Caution: DO NOT USE SOLVENTS LIKE ALCOHOL! This could remove the keyboard paint!)
Scan Tool Keyboard and Display
UP
When the scan tool powers-up, a series of screens is displayed. The screens start with a “Welcome” screen and end with a “Key Button Help” screen.
WelcomeTo
TheScanTool
ByActron
PressHELPForKey 
ButtonInformation.
PressENTERToCont 
Welcome & Key Button Help Screens
The screens in between the “Welcome” and the “Key Button Help” screen are for a tool self-test and the cartridge software version. Refer to this software version if you need to contact Actron’s technical support line with a problem. If you wish to review the key button definitions, then push the HELP key; otherwise, press ENTER to continue forward.
9
DOWN
RIGHT
LEFT
Keyboard Functions
The scan tool uses 8 keys to navigate through the software-user interface:
ENTER Used to enter or answer a software request.
HELP Used to request help when the  symbol is in the upper right hand corner of the display.
FUNCTION Used to return user to manufacturer’s function list.
BACKUP Used to move one screen back in scan tool flow.
ARROWS UP or DOWN are always used to move the solid cursor  in the direction of the arrow or scroll the data list in the direction you want to move the list
LEFT or RIGHT arrows move the cursor in the direction of the arrow and allow you to customize a vehicle data parameter list.
 Loading...