


 Loading...
Versa XSTM
Quick Start Guide
Versatile Access Control Programming Software
for EL25

TABLE OF CONTENTS
VERSA XS SET UP AND OVERVIEW . . . . . . . . . . . .2-5
About Versa XS . . . . . . . . . . . . . . . . . . . . . . . . . . . . .2 System Requirements . . . . . . . . . . . . . . . . . . . . . . .2 Direct Connect to the EL25 . . . . . . . . . . . . . . . . . . . .3 Installation . . . . . . . . . . . . . . . . . . . . . . . . . . . . . . . . .4 Starting Versa XS . . . . . . . . . . . . . . . . . . . . . . . . . . .4 Main Screen . . . . . . . . . . . . . . . . . . . . . . . . . . . . . . .5 Icons . . . . . . . . . . . . . . . . . . . . . . . . . . . . . . . . . . . . .6
UNIT MANAGEMENT . . . . . . . . . . . . . . . . . . . . . . . .7-15
Create a Unit . . . . . . . . . . . . . . . . . . . . . . . . . . . . . . .7
Unit Configuration . . . . . . . . . . . . . . . . . . . . . . . .8-14
Unit Status . . . . . . . . . . . . . . . . . . . . . . . . . . . . . . . .15
TENANT MANAGEMENT . . . . . . . . . . . . . . . . . . . .16-21
Adding a Tenant Record . . . . . . . . . . . . . . . . . . . . .16
Viewing Tenant Information . . . . . . . . . . . . . . . . . . .16
Tenant Information Window . . . . . . . . . . . . . . . .17-18
Tenant Groups . . . . . . . . . . . . . . . . . . . . . . . . . . . . .19
Directory Codes . . . . . . . . . . . . . . . . . . . . . . . . .10-21
Credential Bulk Loading . . . . . . . . . . . . . . . . . . . . .21
REPORTS . . . . . . . . . . . . . . . . . . . . . . . . . . . . . . .12-24
Transaction Reports . . . . . . . . . . . . . . . . . . . . . . . .22
Unit Reports . . . . . . . . . . . . . . . . . . . . . . . . . . . . . .22
Credential Reports . . . . . . . . . . . . . . . . . . . . . . . . .23
Tenant Reports . . . . . . . . . . . . . . . . . . . . . . . . . . . .23
Exporting Reports . . . . . . . . . . . . . . . . . . . . . . . . . .24
Printing Reports . . . . . . . . . . . . . . . . . . . . . . . . . . .24
SENDING/RECEIVING DATA COMMUNICATIONS .25-29
Transfer Data . . . . . . . . . . . . . . . . . . . . . . . . . . . . . .25 Using Direct control . . . . . . . . . . . . . . . . . . . . . . . . .26 Real-Time Monitoring and Transactions . . . . . .27-28 Communications-Auto-Configure . . . . . . . . . . . . . .29 Communications-Custom Configure . . . . . . . . . . . .29
VERSA XS SETTINGS . . . . . . . . . . . . . . . . . . . . . .30-32
Preferences . . . . . . . . . . . . . . . . . . . . . . . . . . . .30-31
Passwords . . . . . . . . . . . . . . . . . . . . . . . . . . . . . . . .32
Exit Versa XS . . . . . . . . . . . . . . . . . . . . . . . . . . . . . .32
APPENDIX . . . . . . . . . . . . . . . . . . . . . . . . . . . . . . . . . .33 NOTES . . . . . . . . . . . . . . . . . . . . . . . . . . . . . . . . . .34-36
CONTACT & COPYRIGHT
INFORMATION . . . . . . . . . . . . . . . . . . . .BACK COVER
NOTE: This manual has basic information about the functions of Versa XS. If additional information is needed please review the Versa XS Advanced Programming Manual located on the Versa XS CD
CONTENTS OF TABLE
PAGE 1

VERSA XS SET UP AND OVERVIEW
VERSA XS SET UP AND OVERVIEW
ABOUT VERSA XS
Versa XS is a Windows®-based software application that allows you to use your personal computer to conveniently manage tenant and unit data for one or more EL25 units. Versa XS uses a Microsoft Access® database (.MDB file) to store information associated with the unit(s). With Versa XS’s Send Data features, this information can then be easily transmitted(i.e., uploaded) to the unit(s) via modem or direct connection.
Versa XS also allows you to receive (i.e., download) data from EL25 units. This is a necessary feature because each EL25 unit has its own database, and data added to the unit via the unit’s keypad or your touch-tone phone will not be added to Versa XS’s database until it is received from the unit. It is important to keep both databases updated so there is no mismatched data.
SYSTEM REQUIREMENTS
Your system must have Windows 98 or higher and the following:
NOTE: For databases having a large number of access codes (e.g., a combination of 1000 or more directory codes, entry codes, cards, etc.), Chamberlain strongly suggests using the recommended hardware.
Microsoft Windows® 98 or ME users
Pentium 233-megahertz (MHZ) (Pentium II 400-megahertz (MHz) Recommended)
64 MB of available RAM (128 MB Recommended)
240 MB of hard disk space (300 MB Recommended)
Internet Explorer 5.0 and/or Shockwave Flash Player (version 5.0 or later)
Hayes-compatible modem connected to a COM port
CD ROM
800 X 600 Display Setting
Microsoft Windows® NT, 2000 or XP
Pentium 333-megahertz (MHz) (Pentium II 400-megahertz (MHz) Recommended)
128 MB of available RAM (256 MB Recommended)
240 MB of hard disk space (300 MB Recommended)
Internet Explorer 5.0 and/or Shockwave Flash Player (version 5.0 or later)
Hayes-compatible modem connected to a COM port
CD ROM
800 X 600 Display Setting
PAGE 2

DIRECT CONNECT TO THE EL25
TO CONNECT DIRECTLY TO THE EL25 USING A PC
1.Locate pin connector J301 on the main board of the EL25.
2.Plug 3 pin connector of the Direct Connect cable (part number 002B0731) into J301.
3.Plug 9 pin connector into 9 pin port located on your PC.
Direct Connect
Cable
J301
Direct Connect
Connector
OVERVIEW AND UP SET XS VERSA
PAGE 3

VERSA XS SET UP AND OVERVIEW
INSTALLATION
Important: Users cannot run Versa XS on a central server from remote workstations. All users must have Versa XS installed on their local computer.
To Install Versa XS:
1.Start Windows®.
2.Place the Versa XS CD in the CD ROM drive. Versa XS will automatically start the installation process; follow the on-screen prompts. If the installation process does not automatically start, continue with the instructions below.
3.From the taskbar, click Start >> Settings >> Control Panel.
4.From the Control Panel window, double-click on Add/Remove Programs.
5.From the Add/Remove Programs screen, click the Install/Uninstall tab or Add New Programs button (depending on you operating system). Click Install or the CD or Floppy button.
6.Follow the on-screen prompts.
NOTE: Versa XS may prompt you to reboot your computer one or more times during the installation process. This is required by Microsoft®. If after each reboot Versa XS does not automatically continue with the installation, double-click on the setup.exe file in the Versa XS subdirectory.
You have completed the installation.
Starting Versa XS
From the Desktop (if a shortcut exists):
Double-click the Versa XS icon,
OR
From the Start Menu:
1. Click the Start button.
2. From the Start menu, select Programs >> Versa XS >> Versa XS.
If the Versa XS Password screen appears, enter password.
For information on enabling/disabling passwords, review the Versa XS software manual contained on the Versa XS CD.
NOTES:
•Versa XS is the default name of the program group and will appear unless you change the program group name at installation.
•To create a shortcut to Versa XS, drag the Versa XS.exe file icon onto the desktop (see your Windows User Guide for details).
•At startup, Versa XS will display the Main Screen. See Main Screen, page 5 for more information.
PAGE 4
MAIN SCREEN
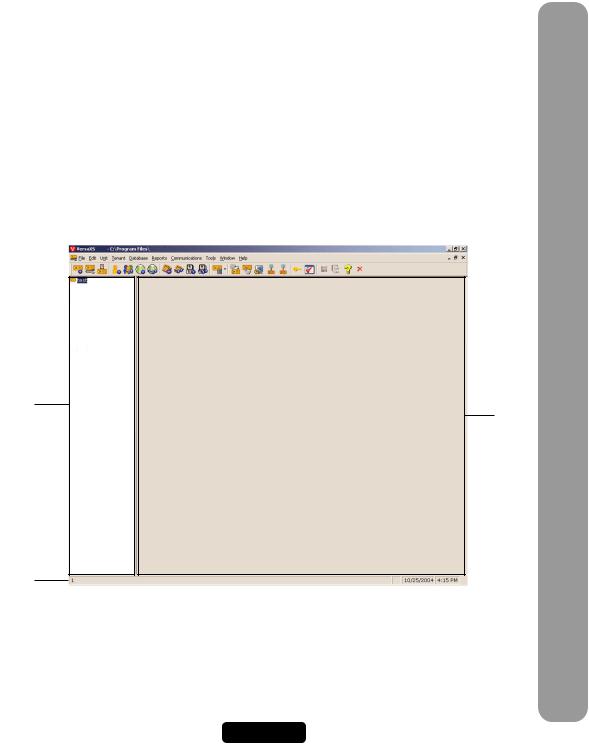
Each time you activate the Versa XS program, the Main Screen will be displayed.
The Main Screen is divided into different areas: Title Bar, Main Menu, Tool Bar, Unit List, Parent Window and Status Bar.
•Title Bar: Displays the name of the application Versa XS, followed by the currently used database path.
•Main Menu: Displays the names of the menus. Clicking a menu name displays a list of commands for accessing Versa XS functions.
•Tool Bar: Displays icons that allow you to perform various Versa XS functions.
•Unit List: Displays the units stored in the current database.
• Parent Window: Displays windows currently in use (i.e. Tenant Information windows, New Unit windows, etc..)
• Status Bar: Displays helpful information for the window currently selected.
Main |
|
|
|
|
Title Bar |
Menu |
|
|
|
|
|
|
|
|
|
|
|
|
|
|
|
|
|
|
|
|
|
|
|
Tool Bar |
|
|
|
|
|
|
|
|
|
Unit List
Area Parent
Window
Status
Bar
OVERVIEW AND UP SET XS VERSA
PAGE 5
VERSA XS SET UP AND OVERVIEW
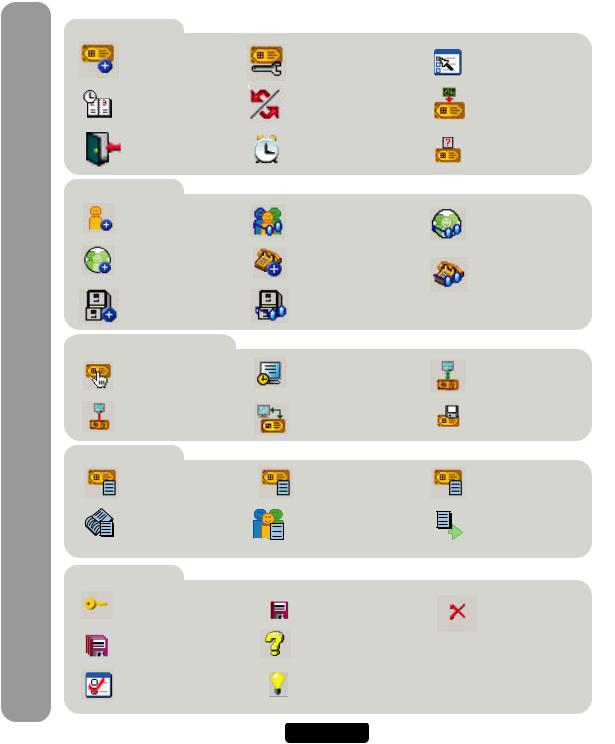
ICONS
Unit Management
New Unit: Used to create a new unit.
Time Zones: Used to set up time zones (schedules).
Doors: Used to define and enable/disable devices connected to the EL25.
Tenant Management
New Tenant: Used to create a new tenant.
New Tenant Group: Used to create a new tenant group.
Bulk Load Credentials: Used to enter credentials (tags) into a selected unit.
Sending/Receiving Data Communications
Direct Control: Used to give commands to
the EL25 unit via your PC.
Custom Configurations: Used to define connection details.
Reports
Reports: Used to access various report windows
Transaction Report: Used to create spread sheets that display credential activity.
Versa XS Commands
Password: Used to enable/disable password settings.
Save All: Saves information in all open windows.
Preferences: Used to define
Versa XS settings.
Unit Configuration: Used to access various unit setting windows.
Relays: Used to open the time zones window.
Alarms: Used to enable/disable alarm situations.
View Tenants: Used to display tenant information.
New Directory Code: Used to create a new directory code.
View Credentials: Used to display credential (tag) information.
Real Time Monitoring: Used to monitor the EL25 unit.
Transfer Data: Used to exchange information between your PC and the EL25.
Unit Report: Used to create spread sheets on unit activity.
Tenant Report: Used to
create spread sheets that display tenant activity.
Save: Saves information in currently selected window.
Help Contents: Opens On-Line
Help.
Screen Tip: Opens an information box that displays the purpose of the currently selected screen.
Settings: Used to configure the unit settings.
Devices: Used to define and enable/disable devices connected to the EL25.
Unit Status: Used to display selected unit's status.
View Tenant Groups: Used to display tenant group information.
View Directory Codes: Used to display all directory codes for a selected unit.
Auto-Configuration: Used to define connection details automatically.
Firmware Update: Used to update firmware between your PC and the EL25.
Credential Report: Used to create spread sheets that display credential activity.
Export: Used to convert spread sheets created in Versa XS to .exl or .txt formats.
Exit: Closes Versa XS.
PAGE 6
UNIT MANAGEMENT
Creating a Unit
You may create a new unit at any time with Versa XS. Versa XS does not require that an actual EL25 unit be installed before allowing you to add a new unit to the Versa XS database. This enables you to configure the unit’s settings and add tenant data before the unit is installed.
If the EL25 unit is already installed, it may already have pre-loaded tenant and unit data. In that case, Chamberlain recommends that you create a new unit and perform a “Receive All” command before you begin to enter or edit unit and tenant data (see Mismatch on pages 57-58 of the Advanced Programming manual for more information).
NOTE: Versa XS contains default unit settings that allow you to quickly create a unit without entering data for each unit property. You must, however, enter a Unit Name. When creating a new unit, review the default settings on the “Unit Settings” windows to review them to see if they need to be
modified.
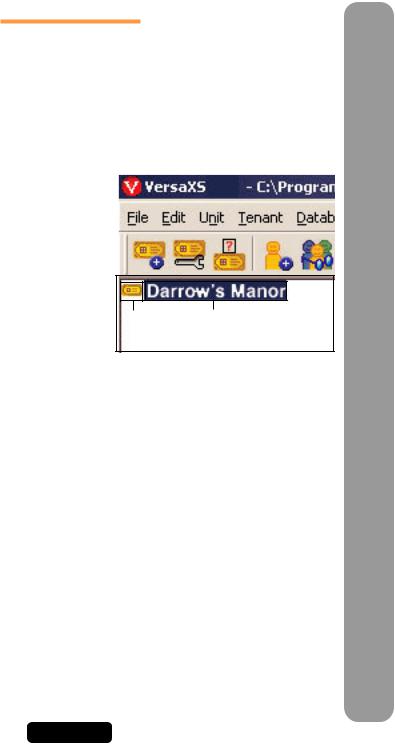
To Create a New Unit:
1.From the main menu select Unit >> New Unit or from the tool bar, click the New Unit icon. This will open the “New Unit” window.
2.Enter the Unit Name. This is a required field.
3.If necessary, modify any default settings data for the unit on both “Unit Settings” windows. For more
information, see Unit Settings Reference, page 11. |
Unit List |
|
|
|
|
|
|
|
Unit |
|
Unit |
||
|
|
|
|
|||
4. Click OK to save changes to save the entry. |
|
|
|
Icon |
|
Name |
|
|
|
|
|
|
|
The unit’s icon will appear in the Unit List (left sidebar). You
may start adding tenant records to the unit (see Adding a Tenant, page 12.)
MANAGEMENT UNIT
PAGE 7
UNIT MANAGEMENT
UNIT CONFIGURATION
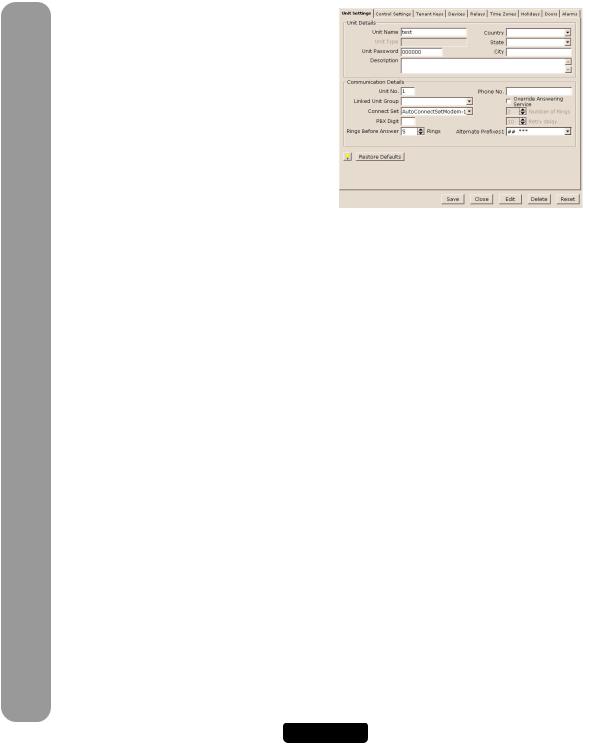
Unit Settings Reference
The Unit Settings windows allow you to modify a unit definition. It can be accessed by selecting Unit >> Configure >> Settings from the main menu, or from the tool bar click the Unit Configuration icon >> Settings.
Unit Settings Reference
•Unit Name: Name that you will assign to a single unit. This is a REQUIRED FIELD when creating a new unit.
•Unit Type: N/A.
•Country: Select which country that the EL25 is located in from the drop-down menu or enter name.
•State/Prov.: Enter the state that the EL25 is located or select it from the drop-down menu.
•City: Enter the city that the EL25 is located in.
•Unit Password: Displays the unit’s current password. The unit will not allow you to program the system unless you
know the unit password. The password must have six digits (000000-999999).
•Description: Use this box to enter optional information about the unit.
•Unit No.: Up to seven (7) EL25 units can be installed on a single telephone line. Each unit must have a unique number from 1 to 7. The unit number identifies each unit within a chain. Adding or removing EL25 units will require the unit ID’s to be re-entered. Versa XS CANNOT change the unit number during programming. The Unit can ONLY be changed at the unit’s keypad.
•Linked Unit Group: Select an existing group name or enter a new one.
•Connect Set: Allows you to select a pre-defined set of instructions that tells Versa XS how to connect with the unit. A connect set can include instructions for direct connection (RS232 and COM port) or modem connection (modem type, baud rate, and COM port). Connect sets are created when configuring your communications settings.
•PBX Digit: If a EL25 unit is connected to a PBX telephone system, it can be directed to dial a specified digit, pause briefly (so the PBX can give the system an outside line) and then dial any 7-digit (or longer) telephone number that has been programmed into the system.
•Rings Before Answer: Sets the number of rings before the system answers a remote call to program the EL unit. Number can be between 0-15 (default: 5 rings). A value of 0 will NOT allow the EL25 to be programmed remotely.
•Phone No.: Enter the telephone number of the phone line currently connected to the EL25 unit.
•Override Answering Service: When enabled, Versa XS will override the answering service by dialing the line attached to your unit, letting the phone ring the specified “Number of Rings”, and then hanging up. After a few
seconds, Versa XS will dial the same number again. The unit will immediately answer the second call.
•Number of Rings: Determines the number of rings allowed to connect to the unit when “Override Answering Service” is enabled. Max. 9 rings.
•Retry Delay: Sets the length of time (in seconds) before Versa XS will retry to connect. When “Override Answering Service” is enabled.
•Alternate Prefixes: When the homeowner or manager presses ## or *** on the resident phone, the unit will disconnects from the telephone line and allow the person to send a Direct Command (##) or program the system (***), to wait for commands. Some telephone companies offer special features that require the person to press a preceding “#” or “*”.
•Restore Defaults: Resets the unit settings to their default values.
PAGE 8
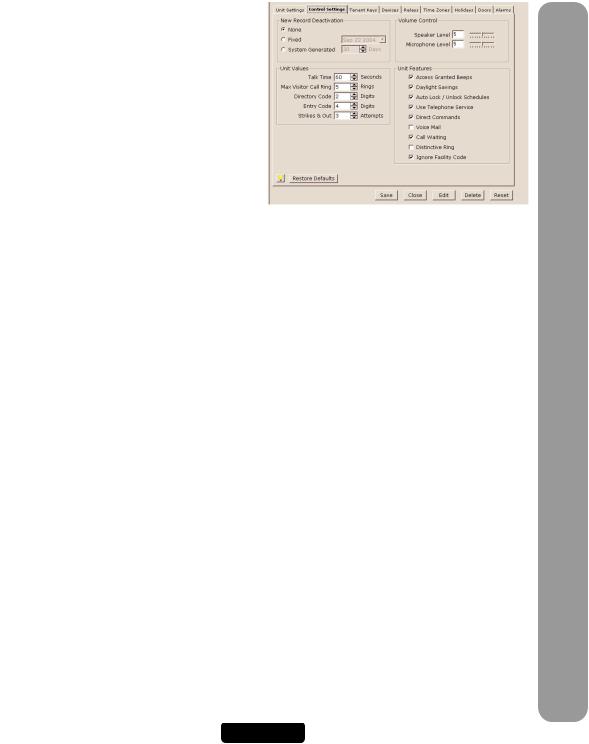
Control Settings Reference
•Record Deactivation: Allows you to preset how long the record will be active.
•None: Records never expire.
•Fixed: Allows you to set a date when records will become inactive.
•System Generated: Allows you to set the number of days (from the date the record was created) before it becomes inactive (1-1000 days, default: 30).
•Talk Time: Sets the number of seconds the visitor is allowed to talk with the tenant (15-250 seconds, default: 60 seconds).
•Max Visitor Call Rings: Sets the number of rings
(1-9) the unit will allow before it cancels a visitor call to the residence (default: 5 rings).
•Directory Code: Sets the directory code length to 1 or 2 digits. Decreasing the number of digits may make longer directory codes invalid. You will need to change the longer directory codes to fit the shorter directory code length (default 2 digits).
•Entry Code: Sets the entry code length between 3 and 9 digits. Decreasing the number of digits may make longer entry codes invalid. You will need to change the longer entry codes to fit the shorter entry code length (default 4 digits).
•Strikes and Out: Sets the maximum number of allowable keypad errors. The Strikes and Out feature prohibits unauthorized persons from guessing an entry code or unit password. Anyone entering an entry code or unit password will have a set number of times to correctly enter his/her code. Each time the code is entered erroneously, it is a “strike”. After x number of “strikes”, the system will not allow code or password entry at the unit for 3 minutes (default: 3 attempts). Note, the system will still allow program entry from other sources (i.e. remote location).
• On Hook Threshold Count: Sensitivity of unit to detect On-Hook from resident phone.
• Off Hook Threshold Count: Sensitivity of unit to detect Off-Hook from resident phone.
•Speaker Level: The speaker enables the visitor to hear the resident at the unit. If the speaker’s volume is too low or too high, you may adjust it accordingly. (1 is low; 10 is high; Mute = 0: Default = 5).
•Microphone Level: The microphone receives and transmits the sounds/speech from the unit to the resident. If the sounds are indistinguishable, or the residents are having difficulty hearing the visitor’s speech, you may adjust the microphone volume. (1 is low; 10 is high; Mute = 0: Default = 5).
•Enable Anti-Passback: The Anti-Passback feature deters someone from “passing back” his/her access code/card to unauthorized individuals so they can gain entry into a restricted area.
1.Timed: Requires residents to wait a defined period of time before using the same access code (card, entry code, etc) again on the same entry device (reader, keypad, etc.). Time can be set between 1-60 minutes (default: 3 minutes).
2.True: Requires residents to exit before entering again (and vice versa).
•Reset Credentials @ Midnight: If True anti-passback is enabled, this setting will “reset” all access codes (cards) at midnight.
•Access Granted Beeps: When enabled, the system will respond with short beeps when the unit grants a resident entry. However, you can disable the sound if the beeping will be disruptive to others such as a resident living or working nearby (default: Enabled).
MANAGEMENT UNIT
PAGE 9
UNIT MANAGEMENT
(Control Settings Reference Continued)
•Daylight Savings: When enabled, the system will automatically adjust the clock for daylight savings time (default: Enabled).
•Auto Lock / Unlock Schedules: Enables Auto Lock/Unlock Schedules (a.k.a. Time Zones) for the unit. These schedules allow you to create time periods to grant or deny access to a building or complex. Assign an
Auto Lock/Unlock Schedule to a door if you want the door to automatically unlock and lock on specific days and times. For example, you can assign a schedule to a door so that it unlocks at 8AM and locks at 5PM (default: Enabled). For more information about Time Zones (or other scheduling features) see Times Zones on pages 26-28 of this manual.
•Use Telephone Service: Enable this check box if the unit will use the telephone line. If this feature is disabled, the unit will ignore its telephone line if it has one and all Telco features (e.g., call forwarding and call waiting) will be disabled (default: Enabled).
•Direct Commands: With the Direct Command feature enabled, you can perform various functions (e.g., unlock a door) from your phone. This feature is only available for a single family residence or a manager’s phone sharing a phone line with the unit (default: Enabled).
•Voice Mail: If there is a voice mail system connected to a resident’s telephone line, the system allows the visitor to dial an extension during a resident call. To use this feature, the visitor places a resident call, the voice mail system answers the call, and then the visitor can dial an extension on the unit keypad. If disabled, the visitor will be prohibited from dialing extensions during a resident call (default: Disabled).
•Enable Call Waiting: If your telephone is in use when the visitor attempts to contact you from the unit, you will
hear 2 short tones to signal that a visitor is attempting to call. You can press “2” on your phone to toggle between the telephone call and the visitor. This feature is only available for a single-family residence or a manager’s phone sharing a phone line with the EL25 (default: Enabled).
•Distinctive Ring: Changes how the resident phone rings when a visitor calls. This feature is ONLY available for a single family residence.
•Ignore Facility Code: When enabled, Versa XS will ignore the facility code of cards and transmitters (default: Enabled).
•Restore Defaults: Resets the unit settings to their default values.
Tenant Response Keys Reference
The Tenant Response Keys window allows you to define which keys on the EL25 unit will perform which functions from the tenant/resident telephone.
•Open Door 1: Activates the relay group for Door 1.
•Open Door 2: Activates the relay group for Door 2.
•Open Door 3: Activates the relay group for Door 3.
•Open Door 4: Activates the relay group for Door 4.
•Toggle Call Waiting: Toggles between another telephone call and the visitor.
•Extend Talk Time: Extends the amount of time you may talk with a visitor.
•Hang Up: Hang up and deny access to the visitor.
PAGE 10
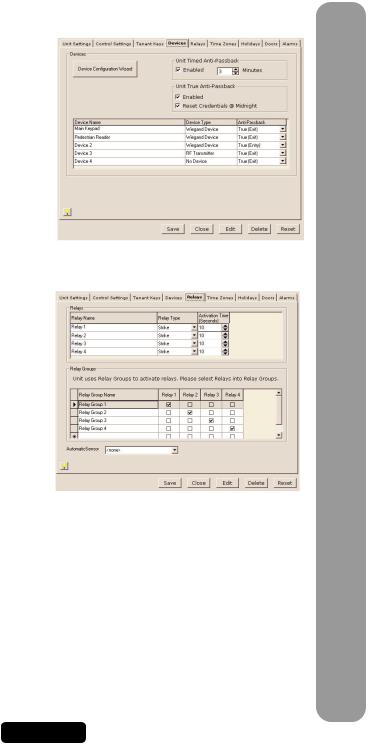
Devices
This window allows you to set up the devices attached to the EL25 unit.
•Device Configuration Wizard: Will open the Device Configuration Wizard which allows you to define what devices are attached to the EL25.
•Unit Timed Anti-Passback: Used to enable/disable and define the keypad strike out time for the Timed AntiPassback feature.
•Unit True Anti-Passback: Used to enable/disable True Anti-Passback and the Reset Credentials @ Midnight features.
•Device Name: This field is used to give the device a descriptive name. The Main Keypad may not be renamed.
•Device Type: This field is used to define the type of device that is attached to the EL25 unit.
•Anti-Passback: This field is used to define Anti-Passback settings for the selected device.
Relays
The EL25 unit must have all external access control device options configured into it. You must tell the unit what is wired to it and how you want the devices to behave. This screen allows you to configure each input and outputs for each relay.
•Relays: This area allows you to name and define relay settings.
•Relay Groups: This area is used to define relay groups.
•Automatic Sensors: This field is used to define any automatic sensors you may have attached to the EL25.
UNIT MANAGEMENT
PAGE 11
Loading...