Jensen VR209TP User Manual

 VR209TP Quick Reference Guide
Basic Operation
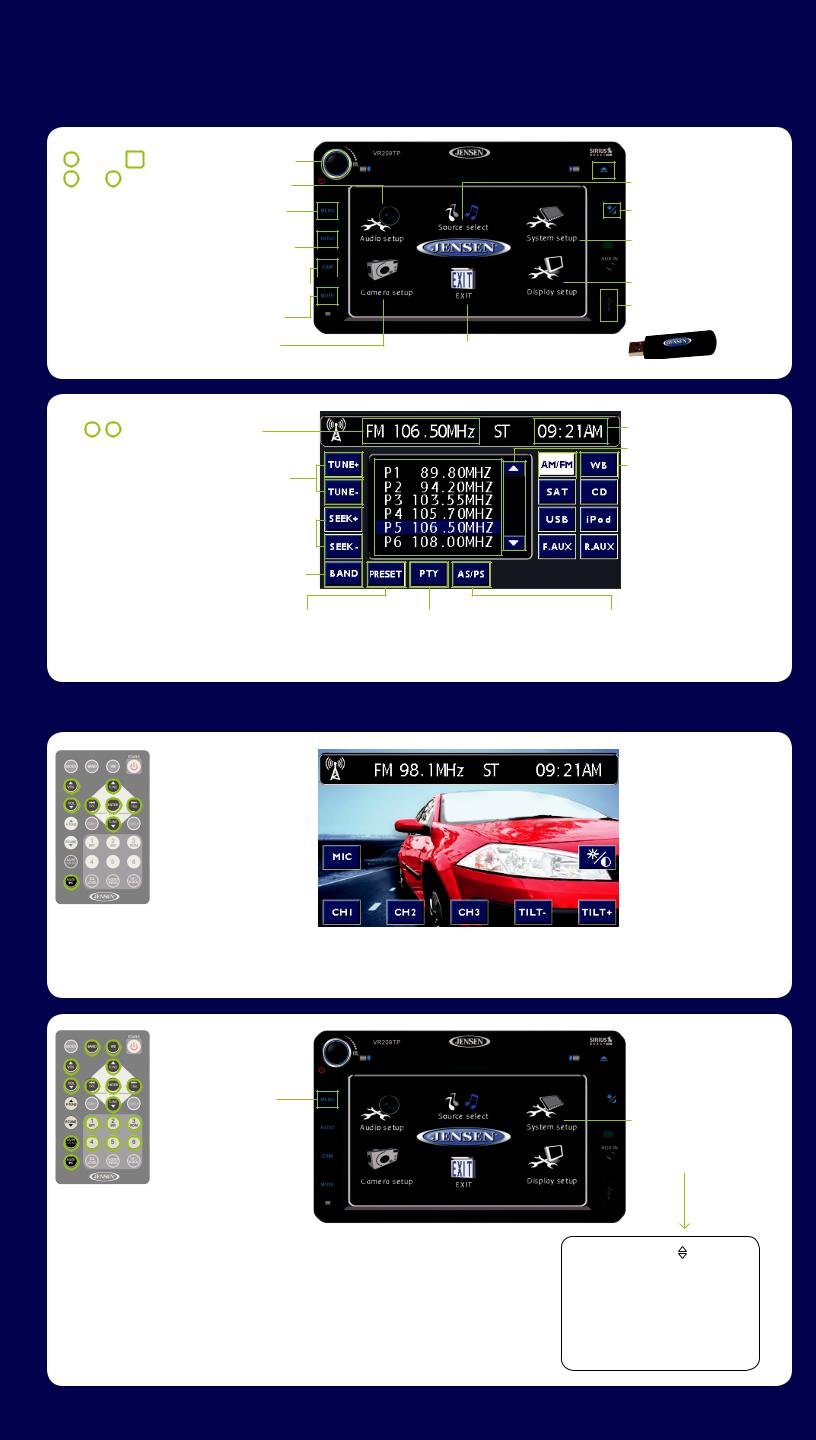
Power On/Off: Push to turn ON or OFF. Push & hold to turn screen OFF. Touch screen to turn back ON.
AUDIO SETUP: Touch to adjust USER AUDIO SETTINGS.
MENU: Press to access main USER SETTING MENU. Press & hold to access SYSTEM SETUP MENU.
AUDIO: Press & hold to access AUDIO MENU. Press to return to current playback mode.
CAM: Press to access CAMERA 
 mode. Press & hold to access
CAMERA SETTINGS MENU.
MUTE: Press to MUTE audio. Press again to release function.
CAMERA SETUP: Touch to adjust USER CAMERA SETTINGS.
EXIT: Touch to EXIT User Setting Menu.
 EJECT: Press to EJECT CD.
SOURCE SELECT: Touch to choose current PLAYBACK mode.
DAY/NIGHT: Press to switch between stored DAY/NIGHT user settings. Touch & hold to access DISPLAY SETUP menu to adjust DAY/NIGHT settings..
SYSTEM SETUP: Touch to choose SYSTEM SETUP mode.
 AUX IN: Connect portable audio player.
DISPLAY SETUP: Touch to adjust USER DISPLAY SETTINGS.
USB: Connect a USB Jump Drive. NOT FOR iPOD CONTROLS.
AM/FM/WB Tuner Controls
Current Tuned Station
TUNE: Touch + or – to tune to
NEXT or PREVIOUS station.
SEEK: Touch + or – to seek to NEXT 

 or PREVIOUS strongest station.
BAND: Touch to select preset group  FM (18 channel memory locations) or
AM (12 channel memory locations).
PRESET: Touch to display station preset list. Press & hold desired preset number to store current channel playing. Momentarily press to recall stored channel. NOTE: You can store up to 30 channels (18 FM and 12 AM).
Current Time
SCROLL: Touch to page
UP or DOWN in the list.
WB: Touch to listen to WEATHERBAND.

 AM/FM: Touch to access
AM/FM Mode.
PTY: Touch to view program type categories |
AS/PS: Touch to SCAN through |
list. Touch desired program type and then |
currently stored presets. Touch & |
touch SEEK + or – to start search. |
hold to STORE strongest broad- |
|
cast stations in your area. |
Camera Controls*
Clock Settings
Touch here to display the |
|
|
|
|
|
|
|
|
|
|
|
|
|
|
|
|
|
|
|
|
|
|
|
|
|
|
|
|
|
|
|
|
|
|
|
|
|
|
|
|
|
||
current playback information. |
|
|
|
|
|
|
|
|
|
|
|
|
|
|
|
|
|
|
|
||
Touch again to remove current |
|
|
|
|
|
|
|
|
|
|
|
|
|
|
|
|
|
|
|
||
playback information. |
|
|
|
|
|
|
|
|
|
|
|
|
|
|
|
|
|
|
Touch here while viewing |
||
|
|
|
|
|
|
|
|
|
|
|
|
|
|
|
|
|
|
||||
|
|
|
|
|
|
|
|
|
|
|
|
|
|
|
|
|
|
|
|
|
camera image to display |
|
|
|
|
|
|
|
|
|
|
|
|
|
|
|
|
|
|
|
|
|
the camera controls. |
MIC: Touch to turn camera |
|
|
|
|
|
|
|
|
|
|
|
|
|
|
|
|
|
|
|
CONTROLS: Touch to adjust |
|
|
|
|
|
|
|
|
|
|
|
|
|
|
|
|
|
|
|
|
|||
|
|
|
|
|
|
|
|
|
|
|
|
|
|
|
|
|
|
||||
microphone audio ON or OFF. |
|
|
|
|
|
|
|
|
|
|
|
|
|
|
|
|
|
|
BRIGHTNESS, CONTRAST, |
||
|
|
|
|
|
|
|
|
|
|
|
|
|
|
|
|
|
|
||||
|
|
|
|
|
|
|
|
|
|
|
|
|
|
|
|
|
|
|
|
|
& COLOR settings. |
NOTE: Current playing audio will be muted when |
|
|
|
|
|
|
|
|
|
|
|
|
|
|
|
|
|
|
|
||
|
|
|
|
|
|
|
|
|
|
|
|
|
|
|
|
|
|
|
|||
|
|
|
|
|
|
|
|
|
|
|
|
|
|
|
|
|
|
|
|||
vehicle is put into reverse and while the rear camera |
|
|
|
|
|
|
|
|
|
|
|
|
|
|
|
|
|
|
|
||
image appears on the screen. Current audio will |
CHANNELS: Touch to select |
TILT: Touch |
+ or – to TILT |
||||||||||||||||||
resume once vehicle is no longer in reverse. |
camera display CH1, CH2, or CH3. |
camera UP or DOWN. |
|||||||||||||||||||
1. Press & hold to access SYSTEM SETUP MENU.
2. SYSTEM SETUP: Touch to choose SYSTEM SETUP mode.
3. Touch the CLOCK field to view the CLOCK SET screen.
NOTE: If SIRIUS Satellite Radio is activated, SIRIUS will automatically |
4. |
Use the on-screen touch pad to |
|
|
|
|
|
: |
|
|
|
|
|
|
AM |
|
|
|
|
|
|
|
|
|
|
|
|
|
|
||||||||
|
|
|
|
|
|
|
|
|
|
|
|
|
|
|
|
|||
update the clock time based on the user settings for Time Zone and Day- |
|
enter 4 digits representing the time. |
1 |
|
|
|
|
2 |
|
|
3 |
|
ok |
|||||
light Savings Time. It is necessary to manually change the Time Zone and |
|
|
|
|
|
|
|
|
|
|
|
|
|
|
|
|
|
|
|
|
|
|
|
|
|
|
|
|
|
|
|
|
|
|
|
|
|
Daylight Savings Time settings by accessing the SYSTEM SETUP MENU. |
5. |
Touch AM/FM to toggle between |
|
|
|
|
|
|
|
|
|
|
|
|
|
|
|
|
|
|
AM and FM mode. |
4 |
|
|
|
|
5 |
|
|
6 |
|
|
|||||
|
6. |
Touch OK to set desired time. |
|
|
|
|
|
|
|
|
|
|
|
|
|
|
|
|
|
|
|
7 |
|
|
|
|
8 |
|
|
9 |
|
0 |
|||||
www.asaelectronics.com |
*Some features may not be available depending on installed factory options. Features NOT available for play will be ghosted. |
www.JENSENRVDirect.com |
*Remote Control sold separately. |
 Loading...