


User’s
Guide
These symbols are internationally accepted symbols that warn of potential hazards with electrical products.The lightning flash means that there are dangerous voltages present within the unit.The exclamation point indicates that it is necessary for the user to refer to the owners manual.
These symbols warn that there are no user serviceable parts inside the unit. Do not open the unit. Do not attempt to service the unit yourself. Refer all servicing to qualified personnel. Opening the chassis for any reason will void the manufacturer’s warranty. Do not get the unit wet. If liquid is spilled on the unit, shut it off immediately and take it to a dealer for service.
Disconnect the unit during storms to prevent damage.
Electromagnetic Compatibility
Operation is subject to the following conditions: •This device may not cause harmful interference.
•This device must accept any interference received, including interference that may cause undesired operation.
•Use only shielded interconnecting cables.
•Operation of this unit within significant electromagnetic fields should be avoided.
Warning
For your protection, please read the following:
Water and Moisture: Appliances should not be used near water (e.g. near a bathtub, washbowl, kitchen sink, laundry tub, in a wet basement, or near a swimming pool, etc.) Care should be taken so that objects do not fall and liquids are not spilled into the enclosure through openings.
Power Sources: The appliance should be connected to a power supply only of the type described in the operating instructions or as marked on the appliance.
Grounding or Polarization: Precautions should be taken so that the grounding or polarization means of an appliance is not defeated.
Power Cord Protection: Power supply cords should be routed so that they are not likely to be walked on or pinched by items placed upon or against them, paying particular attention to cords at plugs, convenience receptacles, and the point where they exit from the appliance.
Servicing: To reduce the risk of fire or electrical shock, the user should not attempt to service the appliance beyond that described in the operating instructions. All other servicing should be referred to qualified service personnel.
For units equipped with externally accessible fuse receptacle: Replace fuse with same type and rating only.
DECLARATION OF CONFORMITY
Manufacturer’s Name: |
DigiTech |
Manufacturer’s Address: |
8760 S. Sandy Parkway |
|
Sandy, Utah 84070, USA |
declares that the product: |
|
Product name: |
RP300 |
Note: Product name may be suffixed by the letters EX, EU, JA, and UK.
Product option: |
all (requires Class II power adapter that conforms to the |
|
requirements of EN60065, EN60742, or equivalent.) |
conforms to the following Product Specifications: |
|
Safety: |
IEC60065 (1998) |
|
EN 60065 (1993) |
EMC: |
EN 55013 (1990) |
|
EN 55020 (1991) |
Supplementary Information:
The product herewith complies with the requirements of the Low Voltage Directive 72/23/EEC and the EMC Directive 89/336/EEC as amended by Directive 93/68/EEC.
DigiTech / Johnson
8760 S. Sandy Parkway
Sandy, Utah 84070, USA
Date: January 4, 2001
European Contact:Your local DigiTech / Johnson Sales and Service Office or
Harman Music Group
8760 South Sandy Parkway
Sandy, Utah
84070 USA
Ph: (801) 566-8800
Fax: (801) 568-7573
Warranty
We at DigiTech are very proud of our products and back-up each one we sell with the following warranty:
1.The warranty registration card must be mailed within ten days after purchase date to validate this warranty.
2.Digitech warrants this product, when used solely within the U.S., to be free from defects in materials and workmanship under normal use and service.
3.Digitech liability under this warranty is limited to repairing or replacing defective materials that show evidence of defect, provided the product is returned to Digitech WITH RETURN AUTHORIZATION, where all parts and labor will be covered up to a period of one year. A Return Authorization number may be obtained from Digitech by telephone.The company shall not be liable for any consequential damage as a result of the product's use in any circuit or assembly.
4.Proof-of-purchase is considered to be the burden of the consumer.
5.Digitech reserves the right to make changes in design, or make additions to, or improvements upon this product without incurring any obligation to install the same on products previously manufactured.
6.The consumer forfeits the benefits of this warranty if the product's main assembly is opened and tampered with by anyone other than a certified Digitech technician or, if the product is used with AC voltages outside of the range suggested by the manufacturer.
7.The foregoing is in lieu of all other warranties, expressed or implied, and Digitech neither assumes nor authorizes any person to assume any obligation or liability in connection with the sale of this product. In no event shall Digitech or its dealers be liable for special or consequential damages or from any delay in the performance of this warranty due to causes beyond their control.
NOTE:The information contained in this manual is subject to change at any time without notification. Some information contained in this manual may also be inaccurate due to undocumented changes in the product or operating system since this version of the manual was completed.The information contained in this version of the owner's manual supersedes all previous versions.
Table of Contents |
|
Safety Information............................................................. |
I |
Declaration of Conformity ............................................. |
I |
Warranty............................................................................ |
II |
Table of Contents............................................................ |
II |
Section One - Introduction |
|
Getting Acquainted .......................................................... |
1 |
Included Items ................................................................... |
1 |
A Guided Tour................................................................... |
2 |
Front Panel ...................................................................... |
2 |
Rear Panel ....................................................................... |
3 |
Getting Started ................................................................. |
4 |
Making Connections ........................................................ |
4 |
Mono Operation............................................................ |
4 |
Stereo Operation .......................................................... |
4 |
Applying Power ................................................................. |
5 |
About the RP300.............................................................. |
6 |
The Presets...................................................................... |
6 |
Performance Mode........................................................ |
6 |
Bypass Mode ................................................................... |
6 |
Tuner Mode ..................................................................... |
6 |
Learn-A-Lick ................................................................... |
7 |
Jam-A-Long...................................................................... |
7 |
Rhythm Trainer ............................................................... |
7 |
Section Two - Editing Functions |
|
Editing/Creating Presets.................................................. |
8 |
The Matrix ......................................................................... |
8 |
Storing/Copying................................................................. |
9 |
Section Three - Effects and Parameters
About the Effects |
...........................................................10 |
Effect Definitions ............................................................ |
10 |
Pickup/Wah................................................................... |
10 |
Compressor.................................................................. |
11 |
Amp Modeling .............................................................. |
11 |
EQ................................................................................... |
12 |
Cabinet/Gate ................................................................ |
12 |
Effects............................................................................. |
13 |
Chorus. ....................................................................... |
13 |
Flanger......................................................................... |
13 |
Triggered Flange......................................................... |
13 |
Phaser.......................................................................... |
14 |
Triggered Phaser........................................................ |
14 |
Tremolo ....................................................................... |
14 |
Panner.......................................................................... |
14 |
Vibrato ......................................................................... |
15 |
Rotary.......................................................................... |
15 |
Ya Ya™ ......................................................................... |
15 |
Auto Ya™.................................................................... |
15 |
SynthTalk™ ................................................................ |
16 |
Envelope...................................................................... |
16 |
Detune ........................................................................ |
16 |
Pitch Shift.................................................................... |
16 |
Whammy™ ................................................................ |
16 |
Delay............................................................................... |
17 |
Reverb............................................................................ |
17 |
Section Four - Other Functions |
|
Expression Pedal............................................................. |
18 |
V-Switch............................................................................ |
19 |
LFO.................................................................................... |
19 |
Factory Reset.................................................................. |
20 |
Expression Pedal Calibration....................................... |
20 |
V-Switch Sensitivity ........................................................ |
21 |
Section Five - Appendix |
|
Preset List ........................................................................ |
22 |
Specifications ................................................................... |
23 |
Section-1 Introduction
Getting Acquainted
Congratulations on your purchase of the RP300.You now have the most complete guitar processing system ever available.With the flexibility, and power included in the RP300, your sound creations are as unlimited as your imagination. The features and functions of the RP300’s knob based matrix editing system are extremely user friendly. However, we recommend that you take a few minutes to become better acquainted with what the RP300 has to offer by going through this User’s Guide with your RP300 in front of you. It is your key to unlocking the full potential within the RP300.
Included Items
Before you get started, please make sure that the following items have been included:
•RP300
•PS0913B Power Supply
•User’s Guide
•Warranty Card
The utmost care was taken while your RP300 was being manufactured. Everything should be included and in perfect working order. If anything is missing, contact the factory at once. Please help us become acquainted with you and your needs by completing your warranty card. It is your safeguard should a problem arise with your RP300.
1
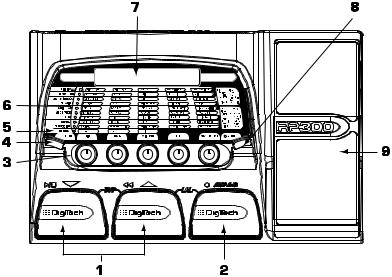
A Guided Tour of the RP300
The Front Panel


 WHAZUP30


1. Up/Down Footswitches - These 2 Footswitches are used to select Presets, access the Tuner, or bypass the RP300.The Footswitch on the left will decrease, and the middle Footswitch will increase the Preset number. Pressing both Footswitches together will bypass the currently selected Preset. Pressing and holding both Footswitches will access the Tuner.
2. Amp A/B Footswitch - This Footswitch is used to switch between two amp channels for the selected preset.This switch is also used in conjunction with the Up Footswitch, to access the Learn-A-Lick mode.
3.Knobs - These knobs perform various functions depending on which mode is currently active in the RP300. In performance mode, the knobs control the Amp Gain, Bass EQ, Mid EQ,Treble EQ, and Master Level. In Edit mode, these knobs adjust the Parameter values listed directly above each knob for the selected effect. In Rhythm Trainer, these knobs control the Pattern,Tempo, and Level. In Tuner mode, these knobs are used to select the desired tuning reference.
4.Select Button - This button is used to enter the Edit mode, and to select individual effects
to be edited. Successive presses of this button will advance through all available Effects. It is also used to change playback speed in Learn-A-Lick mode.
5. Rhythm - The Rhythm button is used to turn on and off the Rhythm Trainer drum loop. When the Rhythm feature is active, the Rhythm LED lights and the selected drum pattern plays continuously.
6. Matrix - The matrix provides information regarding the current Preset, and Parameter edit functions. In performance mode, the LEDs running down the left side of the Matrix will provide a visual indication of which effects are in use for the currently selected Preset. In Edit mode, the LEDs indicate the Effect currently selected for editing.
2
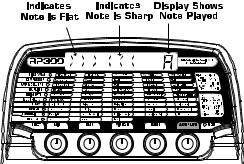
7. Display - The Display provides information for different functions depending on the mode that is active. In Performance mode, the Display will show the currently selected Preset name and numeric location. In Edit mode, the Display will show the name and value of the selected parameter. In Tuner mode, the Display will show the note being played and whether the note is sharp, flat, or in tune.
8.Store - The Store button is used to save your custom edits to the user Presets.
9.Expression Pedal - The Expression Pedal adjusts the RP300’s assigned Effect Parameter in
real time. Almost every Parameter is available for Expression Pedal control.
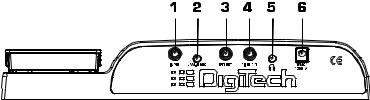
Rear Panel
1.Input - Connect your instrument to this jack.
2.Jam-A-Long/Learn-A-Lick Jack - Connect this jack to the headphone output of a tape or
CD player in order to jam along with the music, or to record a musical passage into the Learn-A-Lick phrase recorder. Use an 1/8” stereo plug for this connection.
See page 7 for more on using the Jam-A-Long and Learn- A-Lick functions.
3. Left Output - Connect from this jack to the input of a single amplifier for mono applications. For stereo applications, connect this output to the input of the left amp, left channel of a power amp, or left channel of a mixing console.
4. Right Output - Connect from this jack to the input of the right amp, right channel of a power amp, or right channel of a mixing console.
5.Headphones - Connect a pair of stereo headphones to this 1/8” jack.
6.Power Input - Connect only the DigiTech PS0913B power supply to this jack.
3
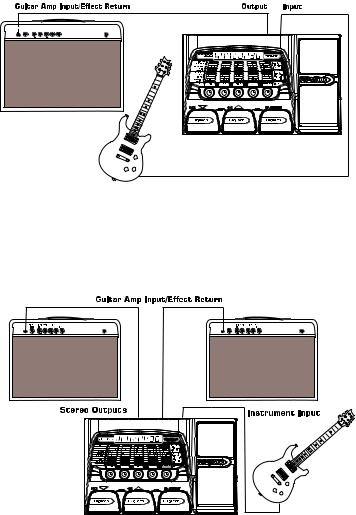
Getting Started Making Connections
There are several different connection options available with the RP300. Before connecting the RP300, make sure that the power to your amplifier and the RP300 is turned off.There is no power switch on the RP300.To turn the RP300 on or off, simply connect or disconnect the included PS0913B power supply from the Power Jack to an AC outlet.
Mono Operation
Connect your guitar to the Input of the RP300. Connect a single mono instrument cable from the Left Output of the RP300 to the instrument input or effect return on your amplifier, to a channel input of a mixer, or to the line input of a power amp. If connecting to a mixing console, be sure to engage the RP300’s Cabinet Emulator. See page 12 for more on selecting the Cabinet Emulator.
Stereo Operation
For stereo operation connect the guitar to the Input of the RP300. Connect the Left Output to the input of one amplifier, channel of a mixer, or power amp. Connect the Right Output to a second amplifier, second channel of a mixer, or power amp. If connecting to a mixing console, set the pan controls of the mixer hard left and right in order to retain stereo separation and be sure to engage the RP300’s Cabinet Emulator. See page 12 for more on selecting the Cabinet Emulator.
NOTE: When using a guitar amp, it may be best to connect the guitar to the Input of the RP300 and the Output of the RP300 to the effect return of the amplifier.
4
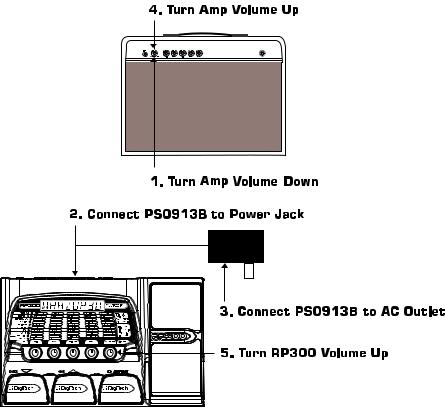
Applying Power
Before applying power to anything, set your amp(s) to a clean tone and set the tone controls to a flat EQ response (on most amps, this would be 0 or 5 on the tone controls).Then follow the steps listed below.
1.Turn the amp volume all the way down.
2.Connect the plug of the PS0913B power supply to the Power Jack on the rear panel of the RP300.
3.Connect the other end of the PS0913B power supply to an AC outlet.
4.Turn the power of your amplifier(s) to the on position and adjust the volume(s)to a normal playing level.
5.Gradually increase the RP300’s Master Level to achieve the desired volume.
5
About the RP300
The Presets
Presets are named and numbered locations of programmed sounds which reside in the RP300. Presets are recalled with the Footswitches.The active effects in each Preset will be indicated by the lighted LEDs in the Effect Matrix.The RP300 comes with 40 User Presets (Presets 1-40) and 40 Factory Presets (Presets 41-80).The User Presets are locations where your creations may be stored.The Factory Presets will not allow you to store any changes to them. From the factory, the 40 User Presets are exact duplicates of the 40 Factory Presets.This allows you to create your own Presets without the worry of losing any of the sounds that came with the RP300.
Performance Mode
When you first apply power to the RP300, it will power up in Performance mode. Performance mode provides access to all of the Presets within the RP300 via the Up and Down Footswitches.The Number 1 Knob (left) will adjust the Gain for the selected Amp Type, the Number 2 Knob (second from the left) will adjust the amount of Bass enhancement, the Number 3 Knob (middle) will adjust the amount of Mid-range enhancement, the Number 4 Knob (second from the right) will adjust the amount of Treble (high frequency) enhancement, and the Number 5 Knob (right) will adjust the Master Level (volume).
Bypass Mode
The RP300 Presets can be bypassed for a clean, unprocessed guitar tone.To bypass the RP300, press both the Up and Down Footswitches simultaneously.The Display will read Bypass indicating the Preset is bypassed. Pressing any of the 3 Footswitches will exit Bypass and return the RP300 to the previously selected Preset.
Tuner Mode
The Tuner in the RP300 allows you to quickly tune or check the tuning on your guitar. Enter Tuner mode by pressing and holding the Up and Down Footswitches simultaneously.The Display will briefly show TUNER indicating that you are in Tuner mode. To begin tuning, play a note on your guitar (a harmonic at the 12th fret usually works best).The right 2 characters in the Display will show the note being played.The left characters in the Display indicate whether you are sharp or flat.Arrows pointing to the left (<<<) indicate the note is sharp and should be tuned down.Arrows pointing to the right (>>>) indicate the note is flat and should be tuned up.When the note is in tune, the Display will show TUNED.
In Tuner mode, you can change your tuning reference.The default factory setting is A=440 Hz. (displayed as A=440). Rotating the Number 1 Knob will select alternate dropped tunings. Alternate tunings are A = Ab (displayed as A=A&),A = G (displayed as A=G), and A = Gb (displayed as A=G&).The display window will briefly flash the currently selected tuning preference.
The output is muted in Tuner mode.The Expression Pedal will unmute the output allowing signal to be heard while tuning. Exit tuner mode by pressing any of the 3 Footswitches.
6
 Loading...