


12
Port Binding
12.1 Overview
This chapter describes how to configure the port binding settings.
Port binding allows you to aggregate port connections into logical groups. You may bind WAN PVCs to Ethernet ports and WLANs to specify how traffic is forwarded. Different ATM QoS settings can be specified for each WAN PVC to meet bandwidth requirements for the type of traffic to be transferred.
For example, three port binding groups could be created on the device (R1) for three different WAN PVC connections. The first PVC (PVC0) is for non time-sensitive data traffic. The second and third PVCs (PVC1 and PVC2) are for time sensitive Media-On-Demand (MOD) video traffic and VoIP traffic, respectively.
Figure 73 Port Binding Groups
Data
PVC0
R1
VoIP |
|
|
|
|
|
PVC1 |
|
|
|
S1 |
|
|
|
|
|
|
|
|
|||
|
|
|
|
|
|
|
|
|||
|
|
|
|
|
|
|
|
|||
|
|
|
|
|
|
|
|
|||
|
|
|
|
|
|
|
|
|
||
|
|
|
|
|
|
|
|
|
|
|
|
|
|
|
R1 |
|
|
|
|
||
|
|
|
|
|
||||||
|
|
|
|
|
|
|
|
|||
|
|
|
|
|
|
|
|
|
|
|
MOD |
|
|
|
S2 |
PVC2
R1
AMG1302/AMG1202-TSeries User’s Guide
161 |
Chapter 12 Port Binding
If a WAN PVC is bound to an ethernet port, traffic from the ethernet port will only be forwarded through the specified WAN PVC and vice versa. If a port is not in a port binding group, traffic to and from the port will be forwarded according to the routing table. See the tutorial section (Section on page 37) for more details on configuring port binding for multiple WAN connections.
12.1.1What You Can Do in the Port Binding Screens
•Use the General screen (Section 12.3 on page 162) to activate port binding.
•Use the Port Binding screen (Section 12.3 on page 162) to set up port binding groups.
•Use the Port Binding Summary screen (Section 12.3.1 on page 163) to view configured port binding groups.
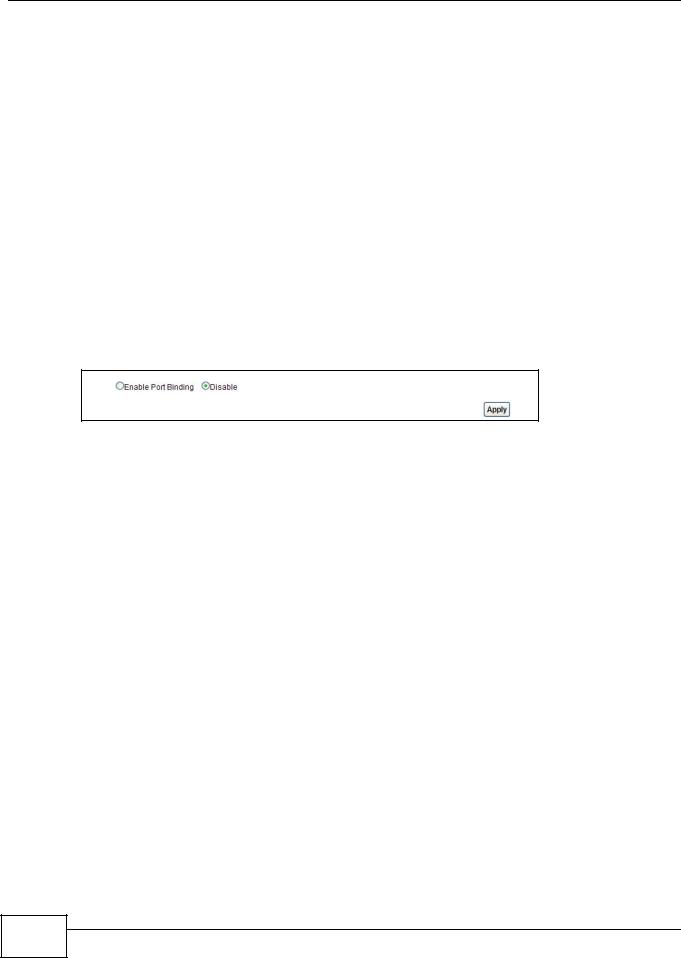
12.2 The Port Binding General Screen
Use this screen to activate port binding and set up port binding groups. Click Network Setting > Port Binding to display the following screen.
Figure 74 Network Setting > Port Binding
The following table describes the labels in this screen.
Table 54 Network Setting > Port Binding
LABEL |
DESCRIPTION |
Activated Port Binding |
Activate or deactivate the port binding feature. |
|
|
Apply |
Add the selected port binding group configuration. |
|
|
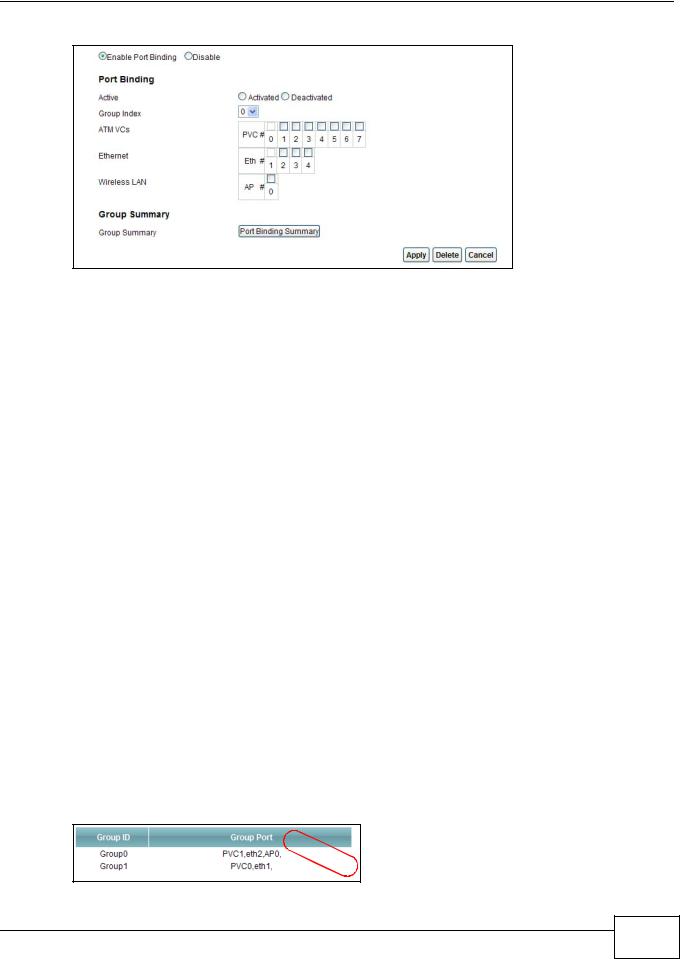
12.3 The Port Binding Screen
Use this screen to set up port binding groups. Click Network Setting > Port Binding > Port Binding to display the following screen.
162 |
AMG1302/AMG1202-TSeries User’s Guide
Chapter 12 Port Binding
Figure 75 Network Setting > Port Binding > Port Binding
The following table describes the labels in this screen.
Table 55 Network Setting > Port Binding > Port Binding
LABEL |
DESCRIPTION |
Port Binding |
|
|
|
Active |
Activate or deactivate port binding for the port binding group. |
|
|
Group Index |
Select the index number for the port binding group. |
|
When a port is assigned to a port binding group, traffic will be forwarded to the other |
|
ports in the group, but not to ports in other groups. If a port is not included in any |
|
groups, traffic will be forwarded according to the routing table. |
|
|
ATM VCs |
Select the ATM VC (PVC) to include in the port binding group. Each ATM VC can only |
|
be bound to one group. |
|
|
Ethernet |
Select the Ethernet (Eth) ports to include in the port binding group. Each Ethernet |
|
port can only be bound to one group. |
|
|
Wireless LAN |
Select the WLAN (AP) connection to include in the port binding group. Additional APs |
|
can be enabled on the More AP screen (Section 7.3 on page 98). |
|
|
Group Summary |
|
|
|
Port Binding |
Click this to view a summary of configured port binding groups. |
Summary |
|
|
|
Apply |
Add the selected port binding group configuration. |
|
|
Delete |
Delete the selected port binding group configuration. |
|
|
Cancel |
Click this to restore your previously saved settings. |
|
|
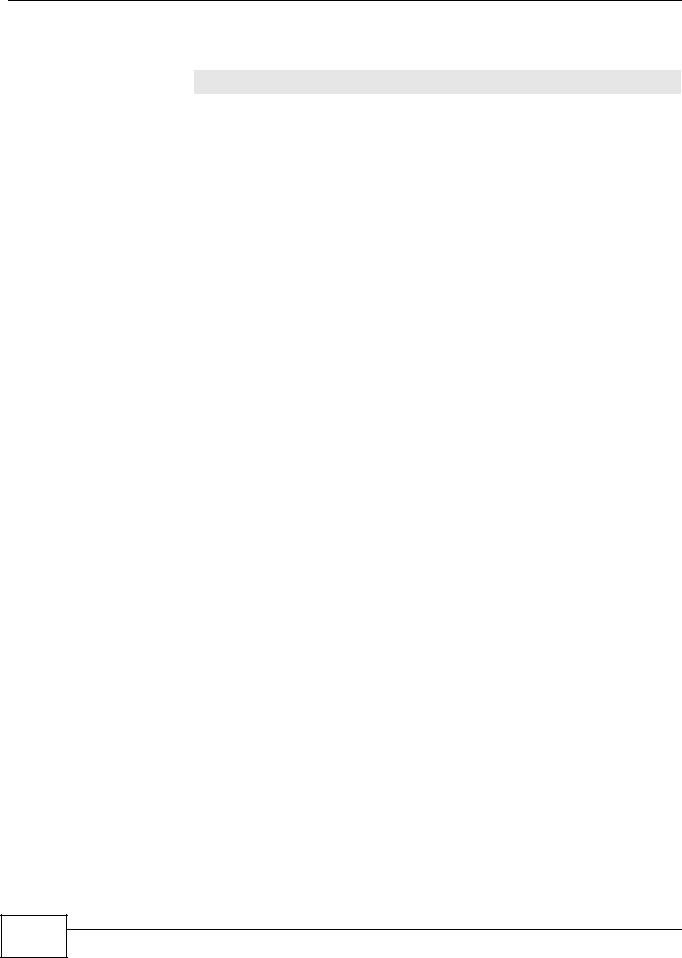
12.3.1 Port Binding Summary Screen
Use this screen to view configured port binding groups.
In the Port Binding screen, click the Port Binding Summary button in the Group Summary section to display the following screen.
Figure 76 Network Setting > Port Binding > Port Binding Summary
AMG1302/AMG1202-TSeries User’s Guide
163 |
Chapter 12 Port Binding
The following table describes the labels in this screen.
Table 56 Network Setting > Port Binding > Port Binding Summary
LABEL |
DESCRIPTION |
Group ID |
This field displays the group index number. |
|
|
Group port |
This field displays the ports included in the group. |
|
|
164 |
AMG1302/AMG1202-TSeries User’s Guide

13
Dynamic DNS Setup
13.1 Overview
Dynamic DNS allows you to update your current dynamic IP address with one or many dynamic DNS services so that anyone can contact you (in NetMeeting, CU-SeeMe, etc.). You can also access your FTP server or Web site on your own computer using a domain name (for instance myhost.dhs.org, where myhost is a name of your choice) that will never change instead of using an IP address that changes each time you reconnect. Your friends or relatives will always be able to call you even if they don't know your IP address.
First of all, you need to have registered a dynamic DNS account with www.dyndns.org. This is for people with a dynamic IP from their ISP or DHCP server that would still like to have a domain name. The Dynamic DNS service provider will give you a password or key.
13.1.1 What You Can Do in the DDNS Screen
Use the Dynamic DNS screen (Section 13.2 on page 165) to enable DDNS and configure the DDNS settings on the AMG1302/AMG1202-TSeries.
13.1.2 What You Need To Know About DDNS
DYNDNS Wildcard
Enabling the wildcard feature for your host causes *.yourhost.dyndns.org to be aliased to the same IP address as yourhost.dyndns.org. This feature is useful if you want to be able to use, for example, www.yourhost.dyndns.org and still reach your hostname.
If you have a private WAN IP address, then you cannot use Dynamic DNS.
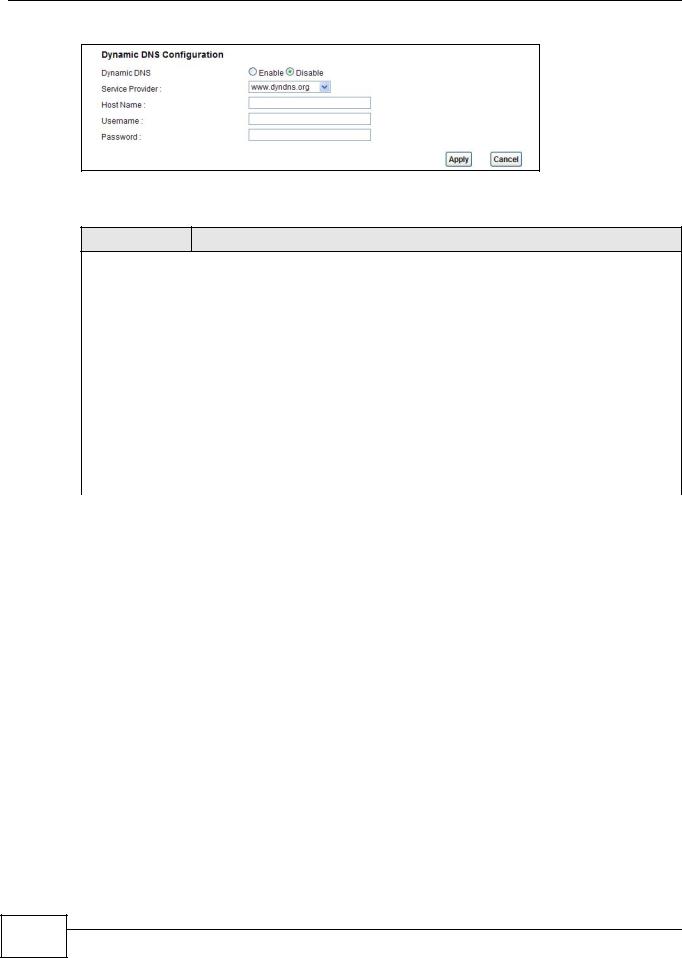
13.2 The Dynamic DNS Screen
Use this screen to change your AMG1302/AMG1202-TSeries’s DDNS. Click Network Setting > Dynamic DNS. The screen appears as shown.
AMG1302/AMG1202-TSeries User’s Guide
165 |
Chapter 13 Dynamic DNS Setup
Figure 77 Network Setting > Dynamic DNS
The following table describes the fields in this screen.
Table 57 Network Setting > Dynamic DNS
LABEL DESCRIPTION
Dynamic DNS Setup
Active Dynamic |
Select this check box to use dynamic DNS. |
DNS |
|
|
|
Service Provider |
This is the website of your Dynamic DNS service provider. |
|
|
Host Name |
Type the domain name assigned to your AMG1302/AMG1202-TSeries by your Dynamic |
|
DNS provider. |
|
You can specify up to two host names in the field separated by a comma (","). |
|
|
Username |
Type your user name. |
|
|
Password |
Type the password assigned to you. |
|
|
Enable Wildcard |
Select the check box to enable DynDNS Wildcard. |
Option |
|
|
|
Apply |
Click this to save your changes. |
|
|
Cancel |
Click this to restore your previously saved settings. |
|
|
166 |
AMG1302/AMG1202-TSeries User’s Guide

14
Filters
14.1 Overview
This chapter introduces three types of filters supported by the AMG1302/AMG1202-TSeries. You can configure rules to restrict traffic by IP addresses, MAC addresses, IPv6 addresses and/or URLs.
14.1.1What You Can Do in the Filter Screens
•Use the IP/MAC Filter screen (Section 14.2 on page 167) to create IP and MAC filter rules.
•Use the IPv6/MAC Filter screen (Section 14.3 on page 170) to create IPv6 and MAC filter rules.
14.1.2What You Need to Know About Filtering
URL
The URL (Uniform Resource Locator) identifies and helps locates resources on a network. On the Internet the URL is the web address that you type in the address bar of your Internet browser, for example “http://www.zyxel.com”.
URL and IP Filter Structure
The URL, IP and IPv6 filters have individual rule indexes. The AMG1302/AMG1202-TSeries allows you to configure each type of filter with its own respective set of rules.
14.2 The IP/MAC Filter Screen
Use this screen to create and apply IP and MAC filters. Click Security > Filter > IP/MAC Filter. The screen appears as shown.
AMG1302/AMG1202-TSeries User’s Guide
167 |
Chapter 14 Filters
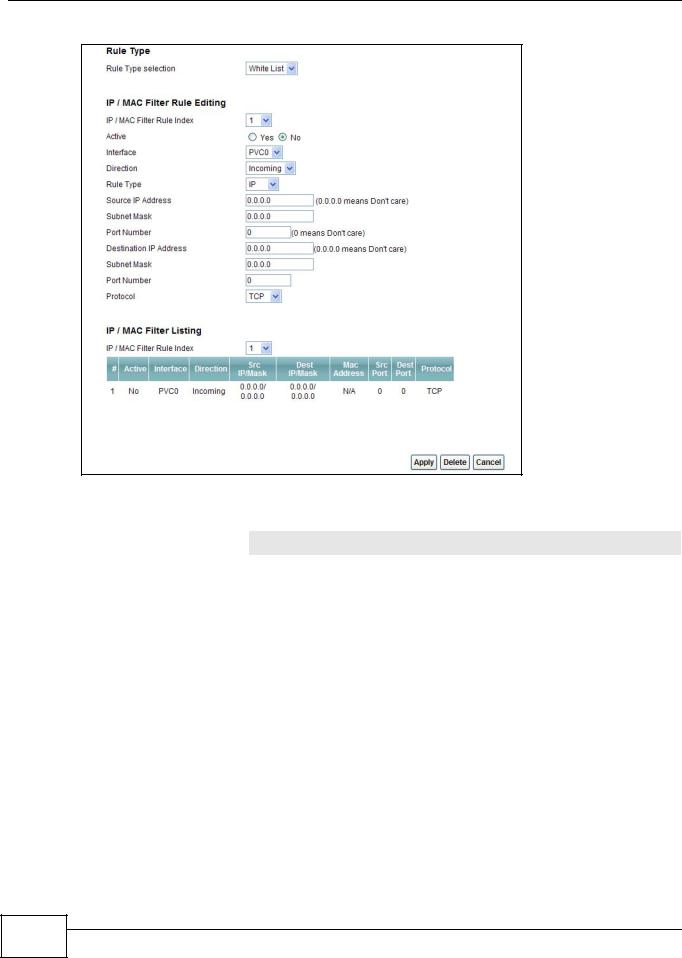
Figure 78 Security > Filter > IP/MAC Filter
The following table describes the labels in this screen.
Table 58 Security > Filter > IP/MAC Filter
LABEL |
DESCRIPTION |
Rule Type |
|
|
|
Rule Type selection |
Select White List to specify traffic to allow and Black List to specify traffic to |
|
disallow. |
|
|
IP / MAC Filter Rule Editing |
|
|
|
IP / MAC Filter Rule Index |
Select the index number of the filter rule. |
|
|
Active |
Use this field to enable or disable the filter rule. |
|
|
Interface |
Select the PVC to which to apply the filter. |
|
|
Direction |
Apply the filter to Incoming or Outgoing traffic direction. |
|
|
Rule Type |
Select IP or MAC type to configure the rule. |
|
Use the IP Filter to block or allow traffic by IP addresses. |
|
Use the MAC Filter to block or allow traffic by MAC address. |
|
|
Source IP Address |
Enter the source IP address of the packets you wish to filter. This field is |
|
ignored if it is 0.0.0.0. |
|
|
Subnet Mask |
Enter the IP subnet mask for the source IP address |
|
|
Port Number |
Enter the source port of the packets that you wish to filter. The range of this |
|
field is 0 to 65535. This field is ignored if it is 0. |
|
|
Destination IP Address |
Enter the destination IP address of the packets you wish to filter. This field is |
|
ignored if it is 0.0.0.0. |
|
|
168 |
AMG1302/AMG1202-TSeries User’s Guide

|
|
Chapter 14 Filters |
|
|
|
|
Table 58 Security > Filter > IP/MAC Filter (continued) |
|
|
LABEL |
DESCRIPTION |
|
Subnet Mask |
Enter the IP subnet mask for the destination IP address. |
|
|
|
|
Port Number |
Enter the destination port of the packets that you wish to filter. The range of |
|
|
this field is 0 to 65535. This field is ignored if it is 0. |
|
|
|
|
Protocol |
Select ICMP, TCP or UDP for the upper layer protocol. |
|
|
|
|
IP / MAC Filter Listing |
|
|
|
|
|
IP / MAC Filter Rule Index |
Select the index number of the filter set from the drop-down list box. |
|
|
|
|
# |
This is the index number of the rule in a filter set. |
|
|
|
|
Active |
This field shows whether the rule is activated. |
|
|
|
|
Interface |
This is the interface that the filter set applies to. |
|
|
|
|
Direction |
The filter set applies to this traffic direction. |
|
|
|
|
Src IP/Mask |
This is the source IP address and subnet mask when you select IP as the rule |
|
|
type. |
|
|
|
|
Dest IP/Mask |
This is the destination IP address and subnet mask. |
|
|
|
|
Mac Address |
This is the MAC address of the packets being filtered. |
|
|
|
|
Src Port |
This is the source port number. |
|
|
|
|
Dest Port |
This is the destination port number. |
|
|
|
|
Protocol |
This is the upper layer protocol. |
|
|
|
|
Apply |
Click this to apply your changes. |
|
|
|
|
Delete |
Click this to remove the filter rule. |
|
|
|
|
Cancel |
Click this to restore your previously saved settings. |
|
|
|
AMG1302/AMG1202-TSeries User’s Guide
169 |

Chapter 14 Filters
14.3 IPv6/MAC Filter
Use this screen to create and apply IPv6 filters. Click Security > Filter > IPv6/MAC Filter. The screen appears as shown.
Figure 79 Security > Filter > IPv6/MAC Filter
The following table describes the labels in this screen.
Table 59 Security > Filter > IPv6/MAC Filter
LABEL |
DESCRIPTION |
Rule Type |
|
|
|
Rule Type selection |
Select White List to specify traffic to allow and Black List to specify traffic to |
|
block. |
|
|
IPv6 / MAC Filter Rule Editing |
|
|
|
IPv6 / MAC Filter Rule Index |
Select the index number of the filter rule. |
|
|
Active |
Use this field to enable or disable the filter rule. |
|
|
Interface |
Select the PVC to which to apply the filter. |
|
|
Direction |
Apply the filter to Incoming or Outgoing traffic direction. |
|
|
Rule Type |
Select IP or MAC type to configure the rule. |
|
Use the IP Filter to block or allow traffic by IPv6 addresses. |
|
Use the MAC Filter to block or allow traffic by MAC address. |
|
|
Source IP Address |
Enter the source IPv6 address of the packets you wish to filter. This field is |
|
ignored if it is ::. |
|
|
Source Prefix Length |
Enter the prefix length for the source IPv6 address |
|
|
Destination IPv6 Address |
Enter the destination IPv6 address of the packets you wish to filter. This field is |
|
ignored if it is ::. |
|
|
170 |
AMG1302/AMG1202-TSeries User’s Guide
|
|
|
Chapter 14 Filters |
|
|
|
|
|
Table 59 Security > Filter > IPv6/MAC Filter (continued) |
||
|
LABEL |
DESCRIPTION |
|
|
Destination Prefix Length |
Enter the prefix length for the destination IPv6 address. |
|
|
|
|
|
|
ICMPv6 Type |
Select the ICMPv6 message type to filter. The following message types can be |
|
|
|
selected: |
|
|
|
1 / Destination Unreachable: 0 - no route to destination; 1 - |
|
|
|
communication with destination administratively prohibited; 3 - address |
|
|
|
unreachable; 4 - port unreachable |
|
|
|
2 / Packet Too Big |
|
|
|
3 / Time Exceeded: 0 - hop limit exceeded in transit; 1 - fragment |
|
|
|
reassembly time exceeded |
|
|
|
4 / Parameter Problem: 0 - erroneous header field encountered; 1 - |
|
|
|
unrecognized Next Header type encountered; 2 - unrecognized IPv6 option |
|
|
|
encountered |
|
|
|
128 |
/ Echo Request |
|
|
129 / Echo Response |
|
|
|
130 |
/ Listener Query - Multicast listener query |
|
|
131 |
/ Listener Report - Multicast listener report |
|
|
132 |
/ Listener Done - Multicast listener done |
|
|
143 |
/ Listener Report v2 - Multicast listener report v2 |
|
|
133 |
/ Router Solicitation |
|
|
134 |
/ Router Advertisement |
|
|
135 |
/ Neighbor Solicitation |
|
|
136 |
/ Neighbor Advertisement |
|
|
137 |
/ Redirect - Redirect message |
|
|
|
|
|
Protocol |
This is the (upper layer) protocol that defines the service to which this rule |
|
|
|
applies. By default it is ICMPv6. |
|
|
|
|
|
|
IPv6 / MAC Filter Listing |
|
|
|
|
|
|
|
IPv6 / MAC Filter Rule Index |
Select the index number of the filter set from the drop-down list box. |
|
|
|
|
|
|
# |
This is the index number of the rule in a filter set. |
|
|
|
|
|
|
Active |
This field shows whether the rule is activated. |
|
|
|
|
|
|
Interface |
This is the interface that the rule applies to. |
|
|
|
|
|
|
Direction |
The filter set applies to this traffic direction. |
|
|
|
|
|
|
ICMPv6 Type |
The ICMPv6 message type to filter. |
|
|
|
|
|
|
Src IP/PrefixLength |
This displays the source IPv6 address and prefix length. |
|
|
|
|
|
|
Dest IP/PrefixLength |
This displays the destination IPv6 address and prefix length. |
|
|
|
|
|
|
Mac Address |
This is the MAC address of the packets being filtered. |
|
|
|
|
|
|
Protocol |
This is the (upper layer) protocol that defines the service to which this rule |
|
|
|
applies. By default it is ICMPv6. |
|
|
|
|
|
|
Apply |
Click this to apply your changes. |
|
|
|
|
|
|
Delete |
Click this to remove the filter rule. |
|
|
|
|
|
|
Cancel |
Click this to restore your previously saved settings. |
|
|
|
|
|
AMG1302/AMG1202-TSeries User’s Guide
171 |

Chapter 14 Filters
172 |
AMG1302/AMG1202-TSeries User’s Guide
15
Firewall
15.1 Overview
This chapter shows you how to enable the AMG1302/AMG1202-TSeries firewall. Use the firewall to protect your AMG1302/AMG1202-TSeries and network from attacks by hackers on the Internet and control access to it. The firewall:
•allows traffic that originates from your LAN computers to go to all other networks.
•blocks traffic that originates on other networks from going to the LAN.
•blocks SYN and port scanner attacks.
By default, the AMG1302/AMG1202-TSeries blocks DDOS, LAND and Ping of Death attacks whether the firewall is enabled or disabled.
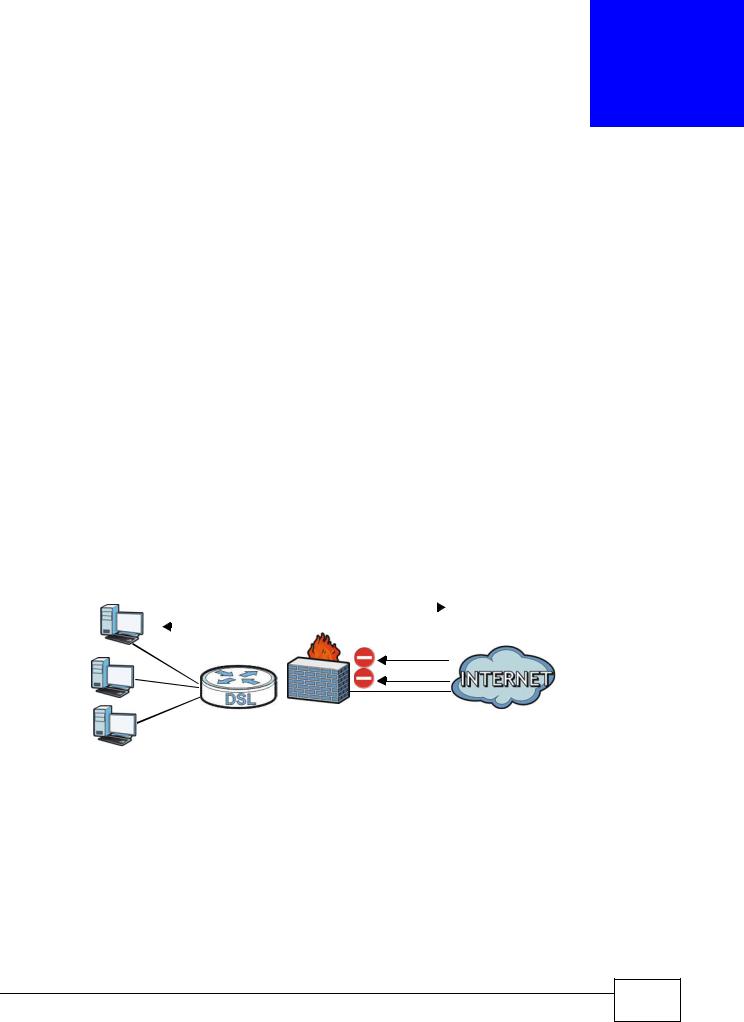
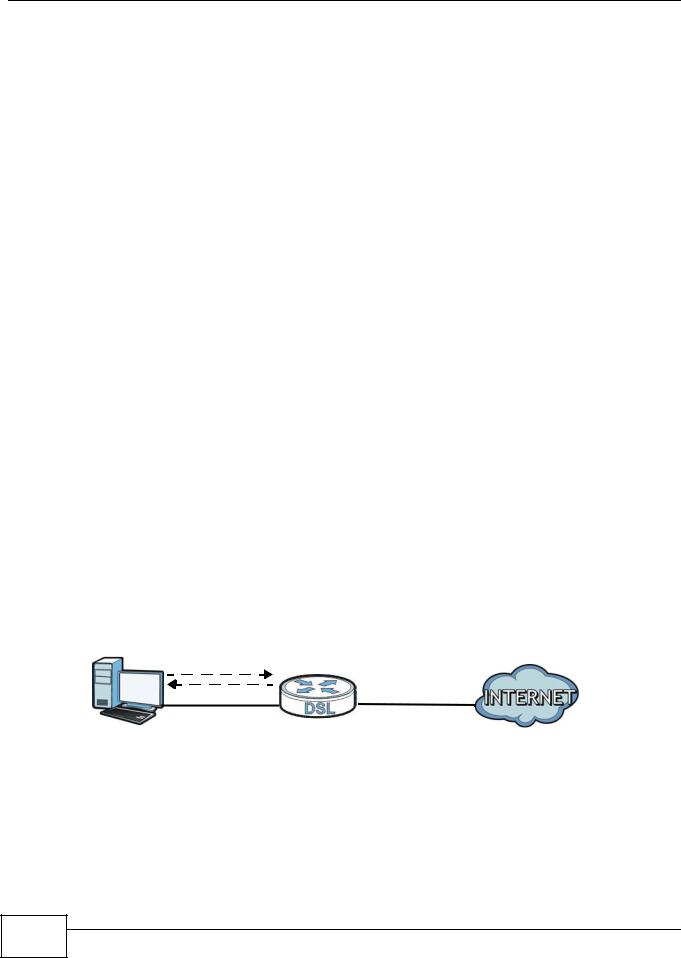
The following figure illustrates the firewall action. User A can initiate an IM (Instant Messaging) session from the LAN to the WAN (1). Return traffic for this session is also allowed (2). However other traffic initiated from the WAN is blocked (3 and 4).
Figure 80 Default Firewall Action
LAN |
WAN |
|
||
A |
|
|
1 |
|
|
|
2 |
|
|
3
4
15.1.1What You Can Do in the Firewall Screens
•Use the General screen (Section 15.2 on page 175) to select the firewall protection level on the AMG1302/AMG1202-TSeries.
•Use the Default Action screen (Section 15.3 on page 176) to set the default action that the firewall takes on packets that do not match any of the firewall rules.
•Use the Rules screen (Section 15.4 on page 178) to view the configured firewall rules and add, edit or remove a firewall rule.
•Use the Dos screen (Section 15.5 on page 184) to set the thresholds that the AMG1302/ AMG1202-TSeries uses to determine when to start dropping sessions that do not become fully established (half-open sessions).
AMG1302/AMG1202-TSeries User’s Guide
173 |

Chapter 15 Firewall
15.1.2 What You Need to Know About Firewall
SYN Attack
A SYN attack floods a targeted system with a series of SYN packets. Each packet causes the targeted system to issue a SYN-ACK response. While the targeted system waits for the ACK that follows the SYN-ACK, it queues up all outstanding SYN-ACK responses on a backlog queue. SYNACKs are moved off the queue only when an ACK comes back or when an internal timer terminates the three-way handshake. Once the queue is full, the system will ignore all incoming SYN requests, making the system unavailable for legitimate users.
DoS
Denials of Service (DoS) attacks are aimed at devices and networks with a connection to the Internet. Their goal is not to steal information, but to disable a device or network so users no longer have access to network resources. The AMG1302/AMG1202-TSeries is pre-configured to automatically detect and thwart all known DoS attacks.
DDoS
A Distributed DoS (DDoS) attack is one in which multiple compromised systems attack a single target, thereby causing denial of service for users of the targeted system.
LAND Attack
In a Local Area Network Denial (LAND) attack, hackers flood SYN packets into the network with a spoofed source IP address of the target system. This makes it appear as if the host computer sent the packets to itself, making the system unavailable while the target system tries to respond to itself.
Ping of Death
Ping of Death uses a "ping" utility to create and send an IP packet that exceeds the maximum 65,536 bytes of data allowed by the IP specification. This may cause systems to crash, hang or reboot.
SPI
Stateful Packet Inspection (SPI) tracks each connection crossing the firewall and makes sure it is valid. Filtering decisions are based not only on rules but also context. For example, traffic from the WAN may only be allowed to cross the firewall in response to a request from the LAN.
RFC 4890 SPEC Traffic
RFC 4890 specifies the filtering policies for ICMPv6 messages. This is important for protecting against security threats including DoS, probing, redirection attacks and renumbering attacks that can be carried out through ICMPv6. Since ICMPv6 error messages are critical for establishing and maintaining communications, filtering policy focuses on ICMPv6 informational messages.
174 |
AMG1302/AMG1202-TSeries User’s Guide
Chapter 15 Firewall
Anti-Probing
If an outside user attempts to probe an unsupported port on your AMG1302/AMG1202-TSeries, an ICMP response packet is automatically returned. This allows the outside user to know the AMG1302/AMG1202-TSeries exists. The AMG1302/AMG1202-TSeries supports anti-probing, which prevents the ICMP response packet from being sent. This keeps outsiders from discovering your AMG1302/AMG1202-TSeries when unsupported ports are probed.
ICMP
Internet Control Message Protocol (ICMP) is a message control and error-reporting protocol between a host server and a gateway to the Internet. ICMP uses Internet Protocol (IP) datagrams, but the messages are processed by the TCP/IP software and directly apparent to the application user.
DoS Thresholds
For DoS attacks, the AMG1302/AMG1202-TSeries uses thresholds to determine when to drop sessions that do not become fully established. These thresholds apply globally to all sessions. You can use the default threshold values, or you can change them to values more suitable to your security requirements.
15.2 The Firewall General Screen
Use this screen to select the firewall protection level on the AMG1302/AMG1202-TSeries. Click Security > Firewall > General to display the following screen.
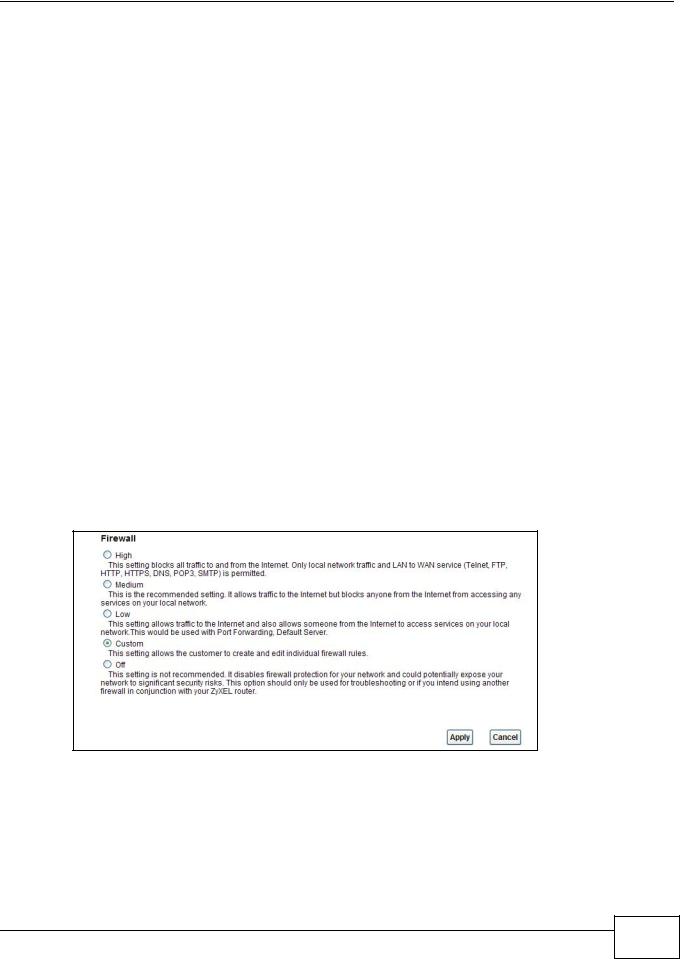
Figure 81 Security > Firewall > General
AMG1302/AMG1202-TSeries User’s Guide
175 |
Chapter 15 Firewall
The following table describes the labels in this screen.
Table 60 Security > Firewall > General
LABEL |
DESCRIPTION |
High |
This setting blocks all traffic to and from the Internet. Only local network traffic and LAN to WAN |
|
service (Telnet, FTP, HTTP, HTTPS, DNS, POP3, SMTP) is permitted. |
|
|
Medium |
This is the recommended setting. It allows traffic to the Internet but blocks anyone from the |
|
Internet from accessing any services on your local network. |
|
|
Low |
This setting allows traffic to the Internet and also allows someone from the Internet to access |
|
services on your local network. This would be used with Port Forwarding, Default Server. |
|
|
Custom |
This setting allows the customer to create and edit individual firewall rules. |
|
Firewall rules can be created in the Default Action screen (Section 15.3 on page 176) and Rules |
|
screen (Section 15.4 on page 178). |
|
|
Off |
This setting is not recommended. It disables firewall protection for your network and could |
|
potentially expose your network to significant security risks. This option should only be used for |
|
troubleshooting or if you intend using another firewall in conjunction with your ZyXEL router. |
|
|
Apply |
Click this to save your changes. |
|
|
Cancel |
Click this to restore your previously saved settings. |
|
|
15.3 The Default Action Screen
Use this screen to set the default action that the firewall takes on packets that do not match any of the firewall rules. Click Security > Firewall > Default Action to display the following screen.
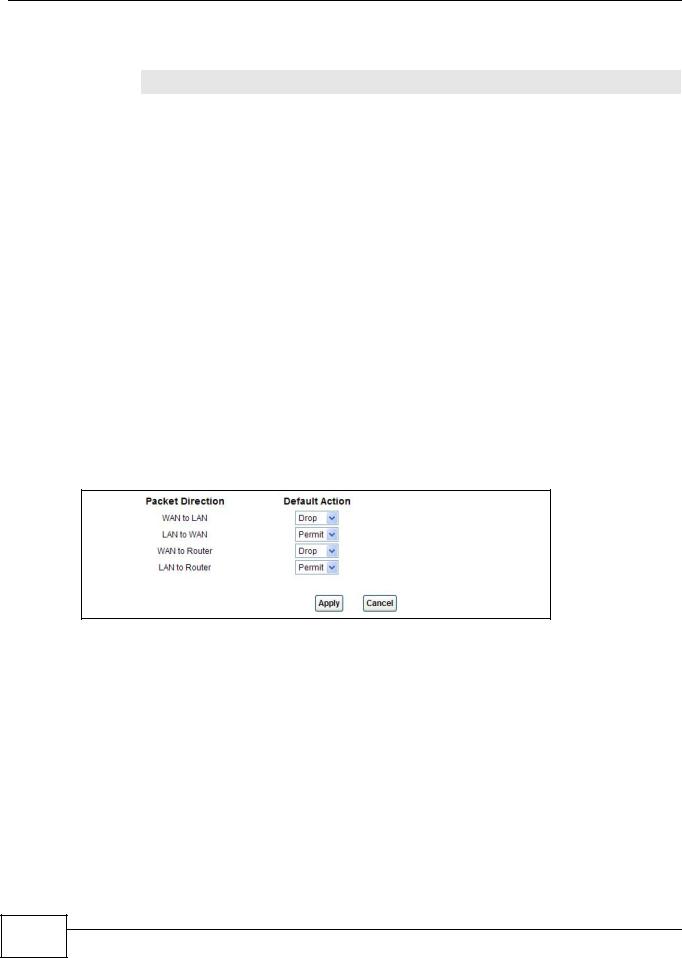
Figure 82 Security > Firewall > Default Action
176 |
AMG1302/AMG1202-TSeries User’s Guide

Chapter 15 Firewall
The following table describes the labels in this screen.
Table 61 Security > Firewall > Default Action
LABEL |
DESCRIPTION |
Packet Direction |
This is the direction of travel of packets (LAN to Router, LAN to WAN, WAN to Router, |
|
WAN to LAN). |
|
Firewall rules are grouped based on the direction of travel of packets to which they apply. |
|
For example, LAN to Router means packets traveling from a computer/subnet on the |
|
LAN to the AMG1302/AMG1202-TSeries itself. |
|
|
Default Action |
Use the drop-down list boxes to select the default action that the firewall is to take on |
|
packets that are traveling in the selected direction and do not match any of the firewall |
|
rules. |
|
Select Drop to silently discard the packets without sending a TCP reset packet or an ICMP |
|
destination-unreachable message to the sender. |
|
Select Reject to deny the packets and send a TCP reset packet (for a TCP packet) or an |
|
ICMP destination-unreachable message (for a UDP packet) to the sender. |
|
Select Permit to allow the passage of the packets. |
|
|
Apply |
Click this to save your changes. |
|
|
Cancel |
Click this to restore your previously saved settings. |
|
|
AMG1302/AMG1202-TSeries User’s Guide
177 |
Chapter 15 Firewall
15.4 The Rules Screen
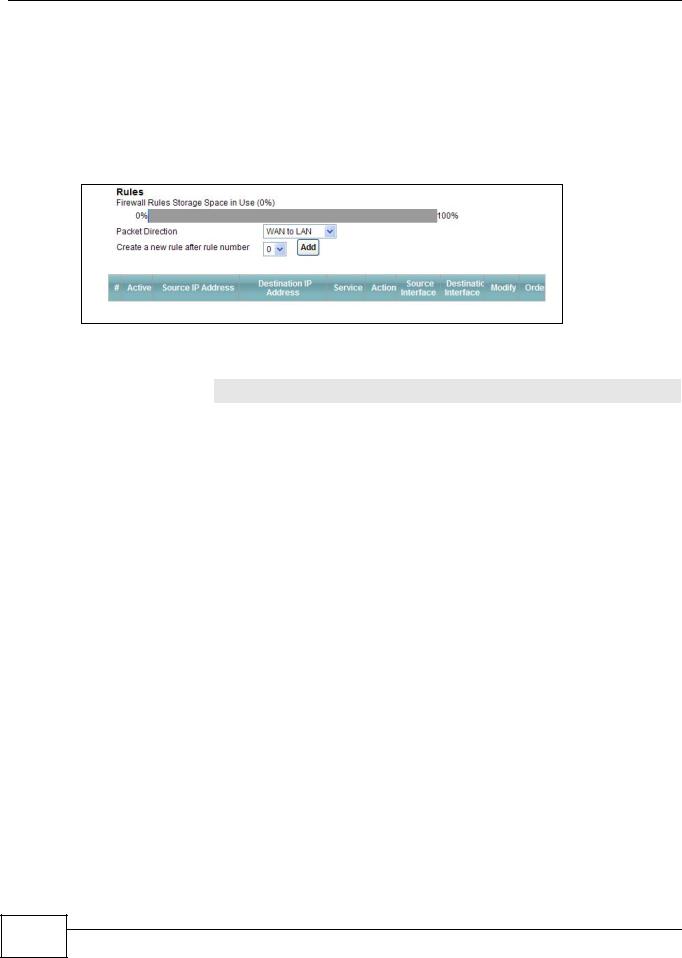
Click Security > Firewall > Rules to display the following screen. This screen displays a list of the configured firewall rules. Note the order in which the rules are listed.
Note: The firewall configuration screen shown in this section is specific to the following devices: P-The ordering of your rules is very important as rules are applied in turn.
Figure 83 Security > Firewall > Rules
The following table describes the labels in this screen.
Table 62 Security > Firewall > Rules
LABEL |
DESCRIPTION |
Firewall Rules Storage |
This read-only bar shows how much of the AMG1302/AMG1202-TSeries's memory for |
Space in Use |
recording firewall rules it is currently using. When you are using 80% or less of the |
|
storage space, the bar is green. When the amount of space used is over 80%, the |
|
bar is red. |
|
|
Packet Direction |
Use the drop-down list box to select a direction of travel of packets for which you |
|
want to configure firewall rules. |
|
|
Create a new rule |
Select an index number and click Add to add a new firewall rule after the selected |
after rule number |
index number. For example, if you select “6”, your new rule becomes number 7 and |
|
the previous rule 7 (if there is one) becomes rule 8. |
|
|
|
The following read-only fields summarize the rules you have created that apply to |
|
traffic traveling in the selected packet direction. The firewall rules that you configure |
|
(summarized below) take priority over the general firewall action settings in the |
|
General screen. |
|
|
# |
This is your firewall rule number. The ordering of your rules is important as rules are |
|
applied in turn. |
|
|
Active |
This field displays whether a firewall is turned on or not. Select the check box to |
|
enable the rule. Clear the check box to disable the rule. |
|
|
Source IP Address |
This column displays the source addresses or ranges of addresses to which this |
|
firewall rule applies. Please note that a blank source or destination address is |
|
equivalent to Any. |
|
|
Destination IP Address |
This column displays the destination addresses or ranges of addresses to which this |
|
firewall rule applies. Please note that a blank source or destination address is |
|
equivalent to Any. |
|
|
Service |
This column displays the services to which this firewall rule applies. See Appendix F |
|
on page 305 for more information. |
|
|
Action |
This field displays whether the firewall silently discards packets (Drop), discards |
|
packets and sends a TCP reset packet or an ICMP destination-unreachable message |
|
to the sender (Reject) or allows the passage of packets (Permit). |
|
|
Source Interface |
This column displays the source interface to which this firewall rule applies. This is |
|
the interface through which the traffic entered the AMG1302/AMG1202-TSeries. |
|
Please note that a blank source interface is equivalent to Any. |
|
|
178 |
AMG1302/AMG1202-TSeries User’s Guide
|
|
Chapter 15 Firewall |
|
|
|
|
Table 62 Security > Firewall > Rules |
|
|
LABEL |
DESCRIPTION |
|
Destination Interface |
This column displays the destination interface to which this firewall rule applies. This |
|
|
is the interface through which the traffic is destined to leave the AMG1302/ |
|
|
AMG1202-TSeries. Please note that a blank source interface is equivalent to Any. |
|
|
|
|
Modify |
Click the Edit icon to go to the screen where you can edit the rule. |
|
|
Click the Remove icon to delete an existing firewall rule. A window displays asking |
|
|
you to confirm that you want to delete the firewall rule. Note that subsequent firewall |
|
|
rules move up by one when you take this action. |
|
|
|
|
Apply |
Click this to save your changes. |
|
|
|
|
Cancel |
Click this to restore your previously saved settings. |
|
|
|
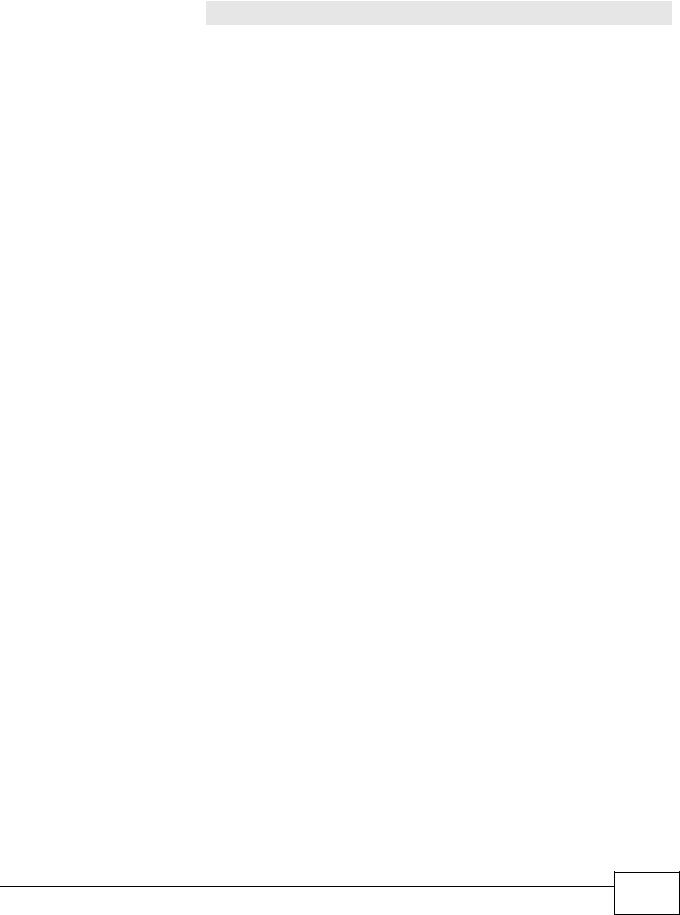
15.4.1 The Rules Add Screen
Use this screen to configure firewall rules. In the Rules screen, select an index number and click Add or click a rule’s Edit icon to display this screen and refer to the following table for information on the labels.
AMG1302/AMG1202-TSeries User’s Guide
179 |
Chapter 15 Firewall
Figure 84 Security > Firewall > Rules > Add
The following table describes the labels in this screen.
Table 63 Security > Firewall > Rules > Add
LABEL |
DESCRIPTION |
Active |
Select this option to enable this firewall rule. |
|
|
Action for Matched |
Use the drop-down list box to select whether to discard (Drop), deny and send an |
Packets |
ICMP destination-unreachable message to the sender of (Reject) or allow the |
|
passage of (Permit) packets that match this rule. |
|
|
IP Version Type |
Select the IP version, IPv4 or IPv6, to apply this firewall rule to. |
|
|
Rate Limit |
Set a maximum number of packets per second, minute, or hour to limit the |
|
throughput of traffic that matches this rule. |
|
|
Maximum Burst |
Set the maximum number of packets that can be sent at the peak rate. |
Number |
|
|
|
Log |
This field determines if a log for packets that match the rule is created or not. |
|
|
Rules/Destination Address
180 |
AMG1302/AMG1202-TSeries User’s Guide
|
|
Chapter 15 Firewall |
|
|
|
|
Table 63 Security > Firewall > Rules > Add |
|
|
LABEL |
DESCRIPTION |
|
Address Type |
Do you want your rule to apply to packets with a particular (single) IP, a range of IP |
|
|
addresses (for instance, 192.168.1.10 to 192.169.1.50), a subnet or any IP address? |
|
|
Select an option from the drop-down list box that includes: Single Address, Range |
|
|
Address, Subnet Address and Any Address. |
|
|
|
|
Start IP Address |
Enter the single IP address or the starting IP address in a range here. |
|
|
|
|
End IP Address |
Enter the ending IP address in a range here. |
|
|
|
|
Subnet Mask |
Enter the subnet mask here, if applicable. |
|
|
|
|
Source Mac Address |
Specify a source MAC address of traffic to which to apply this firewall rule applies. |
|
|
Please note that a blank source MAC address is equivalent to any. |
|
|
|
|
Source Interface |
Specify a source interface to which this firewall rule applies. This is the interface |
|
|
through which the traffic entered the AMG1302/AMG1202-TSeries. Please note that a |
|
|
blank source interface is equivalent to any. |
|
|
|
|
Destination Interface |
Specify a destination interface to which this firewall rule applies. This is the interface |
|
|
through which the traffic is destined to leave the AMG1302/AMG1202-TSeries. Please |
|
|
note that a blank source interface is equivalent to any. |
|
|
|
|
Services |
|
|
|
|
|
Available Services |
Please see Appendix F on page 305 for more information on services available. Select |
|
|
a service from the Available Services box. |
|
|
|
|
Edit Customized |
Click the Edit Customized Service button to bring up the screen that you use to |
|
Service |
configure a new custom service that is not in the predefined list of services. |
|
|
|
|
TCP Flag |
Specify any TCP flag bits the firewall rule is to check for. |
|
|
|
|
Schedule |
Select the days and time during which to apply the rule. Select Everyday and All |
|
|
Day to always apply the rule. |
|
|
|
|
Apply |
Click this to save your changes. |
|
|
|
|
Cancel |
Click this to restore your previously saved settings. |
|
|
|
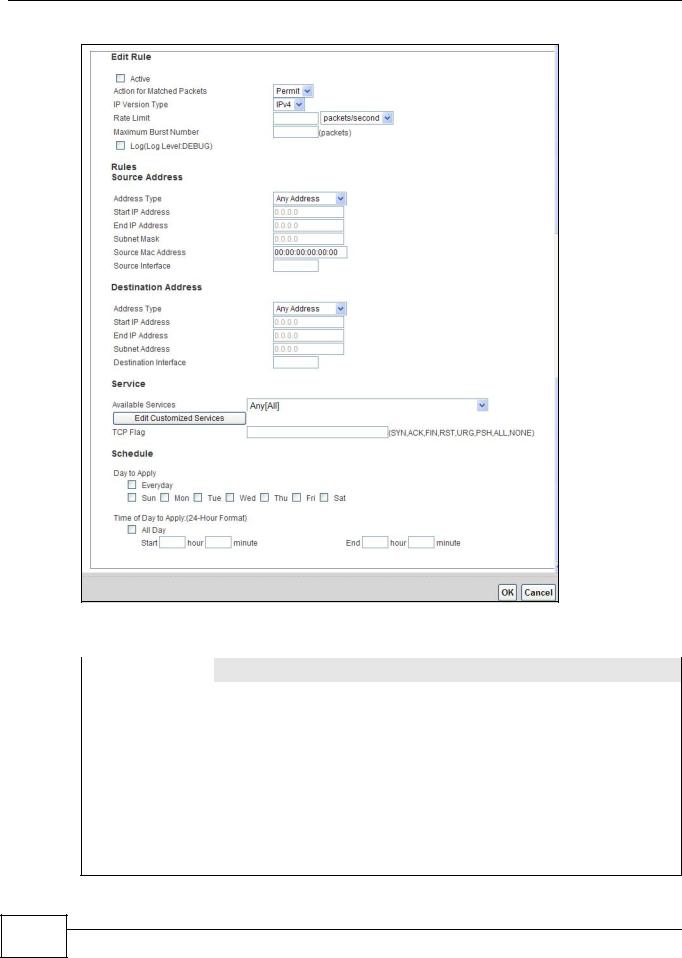
15.4.2 Customized Services
Configure customized services and port numbers not predefined by the AMG1302/AMG1202TSeries. For a comprehensive list of port numbers and services, visit the IANA (Internet Assigned Number Authority) website. See Appendix F on page 305 for some examples. Click the Edit Customized Services button while editing a firewall rule to configure a custom service port. This displays the following screen.
AMG1302/AMG1202-TSeries User’s Guide
181 |
Chapter 15 Firewall
Figure 85 Security > Firewall > Rules: Edit: Edit Customized Services
The following table describes the labels in this screen.
Table 64 Security > Firewall > Rules: Edit: Edit Customized Services
LABEL DESCRIPTION
#This is the number of your customized port.
Name |
This is the name of your customized service. |
|
|
Protocol |
This shows the IP protocol (TCP or UDP) that defines your customized service. |
|
|
Port Type |
This is the port number or range that defines your customized service. |
|
|
Start Port |
This is a single port number or the starting port number of a range that defines your |
|
customized service. |
|
|
End Port |
This is a single port number or the ending port number of a range that defines your customized |
|
service. |
|
|
Modify |
Click this to edit a customized service. |
|
|
Add |
Click this to configure a customized service. |
|
|
Back |
Click this to return to the Firewall Edit Rule screen. |
|
|
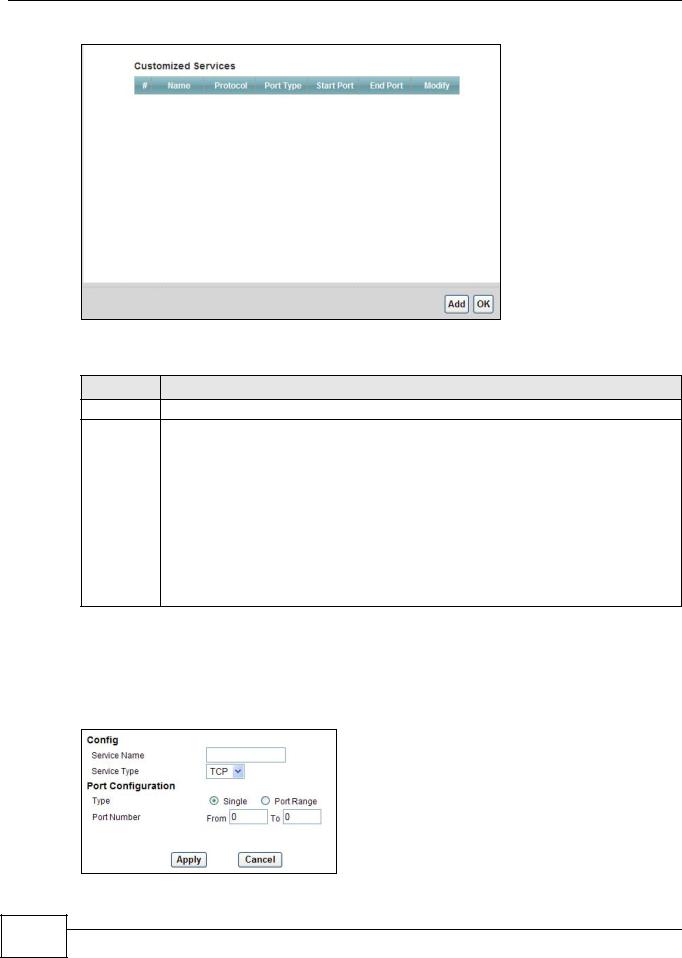
15.4.3 Customized Service Add/Edit
Use this screen to add a customized rule or edit an existing rule. Click Add or the Edit icon next to a rule number in the Firewall Customized Services screen to display the following screen.
Figure 86 Security > Firewall > Rules: Edit: Edit Customized Services: Add/Edit
182 |
AMG1302/AMG1202-TSeries User’s Guide
Chapter 15 Firewall
The following table describes the labels in this screen.
Table 65 Security > Firewall > Rules: Edit: Edit Customized Services: Add/Edit
LABEL |
|
DESCRIPTION |
Config |
|
|
|
|
|
Service Name |
|
Type a unique name for your custom port. |
|
|
|
Service Type |
|
Choose the IP port (TCP or UDP) that defines your customized port from the drop down list |
|
|
box. |
|
|
|
Port Configuration |
|
|
|
|
|
Type |
|
Click Single to specify one port only or Port Range to specify a span of ports that define |
|
|
your customized service. |
|
|
|
Port Number |
|
Type a single port number or the range of port numbers that define your customized |
|
|
service. |
|
|
|
Back |
|
Click this to return to the previous screen without saving. |
|
|
|
Apply |
|
Click this to save your changes. |
|
|
|
Cancel |
|
Click this to restore your previously saved settings. |
|
|
|
Delete |
|
Click this to delete the current rule. |
|
|
|
AMG1302/AMG1202-TSeries User’s Guide
183 |
Chapter 15 Firewall
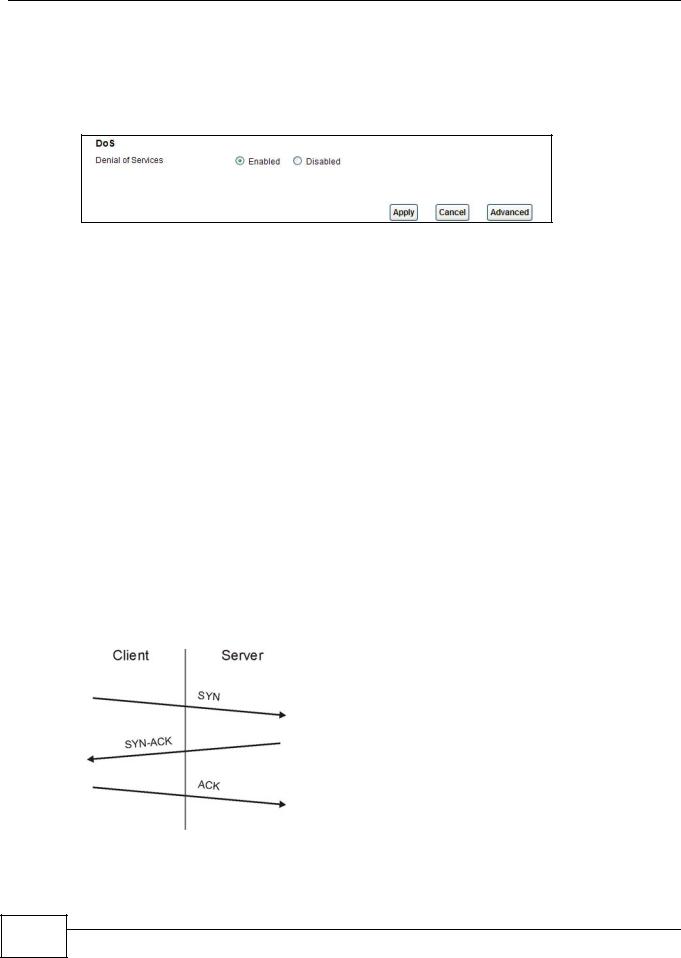
15.5 The DoS Screen
Use this screen to enable DoS protection. Click Security > Firewall > Dos to display the following screen.
Figure 87 Security > Firewall > Dos
The following table describes the labels in this screen.
Table 66 Security > Firewall > Dos
LABEL |
DESCRIPTION |
Denial of Services |
Enable this to protect against DoS attacks. The AMG1302/AMG1202-TSeries will drop |
|
sessions that surpass maximum thresholds. |
|
|
Apply |
Click this to save your changes. |
|
|
Cancel |
Click this to restore your previously saved settings. |
|
|
Advanced |
Click this to go to a screen to specify maximum thresholds at which the AMG1302/ |
|
AMG1202-TSeries will start dropping sessions. |
|
|
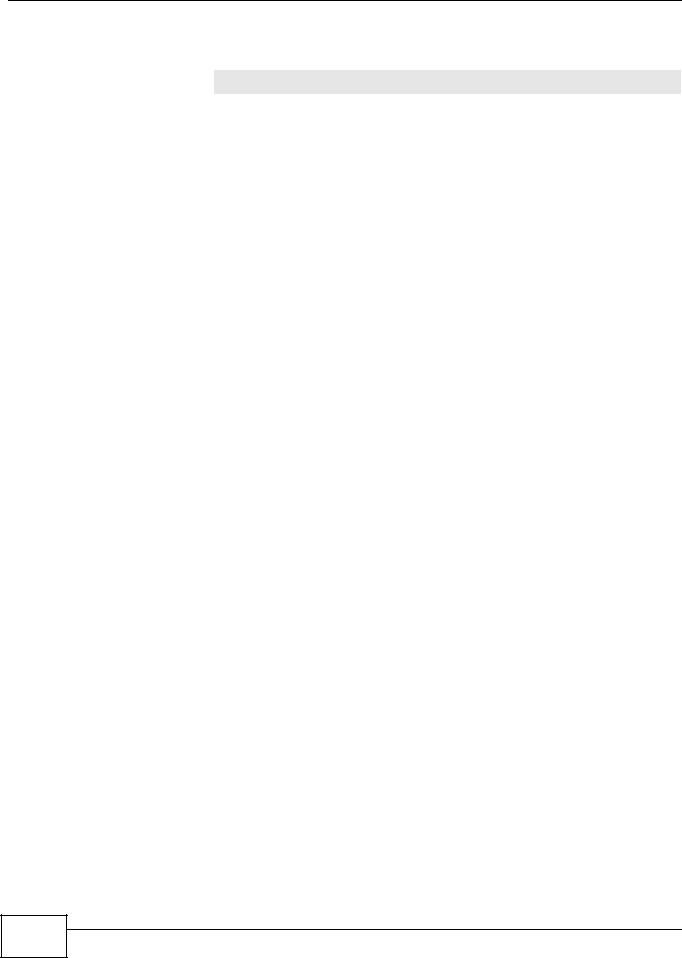
15.5.1 The DoS Advanced Screen
For DoS attacks, the AMG1302/AMG1202-TSeries uses thresholds to determine when to start dropping sessions that do not become fully established (half-open sessions). These thresholds apply globally to all sessions.
For TCP, half-open means that the session has not reached the established state-the TCP three-way handshake has not yet been completed. Under normal circumstances, the application that initiates a session sends a SYN (synchronize) packet to the receiving server. The receiver sends back an ACK (acknowledgment) packet and its own SYN, and then the initiator responds with an ACK (acknowledgment). After this handshake, a connection is established.
Figure 88 Three-Way Handshake
For UDP, half-open means that the firewall has detected no return traffic. An unusually high number (or arrival rate) of half-open sessions could indicate a DOS attack.
184 |
AMG1302/AMG1202-TSeries User’s Guide
Chapter 15 Firewall
15.5.1.1 Threshold Values
If everything is working properly, you probably do not need to change the threshold settings as the default threshold values should work for most small offices. Tune these parameters when you believe the AMG1302/AMG1202-TSeries has been receiving DoS attacks that are not recorded in the logs or the logs show that the AMG1302/AMG1202-TSeries is classifying normal traffic as DoS attacks. Factors influencing choices for threshold values are:
1The maximum number of opened sessions.
2The minimum capacity of server backlog in your LAN network.
3The CPU power of servers in your LAN network.
4Network bandwidth.
5Type of traffic for certain servers.
Reduce the threshold values if your network is slower than average for any of these factors (especially if you have servers that are slow or handle many tasks and are often busy).
•If you often use P2P applications such as file sharing with eMule or eDonkey, it’s recommended that you increase the threshold values since lots of sessions will be established during a small period of time and the AMG1302/AMG1202-TSeries may classify them as DoS attacks.
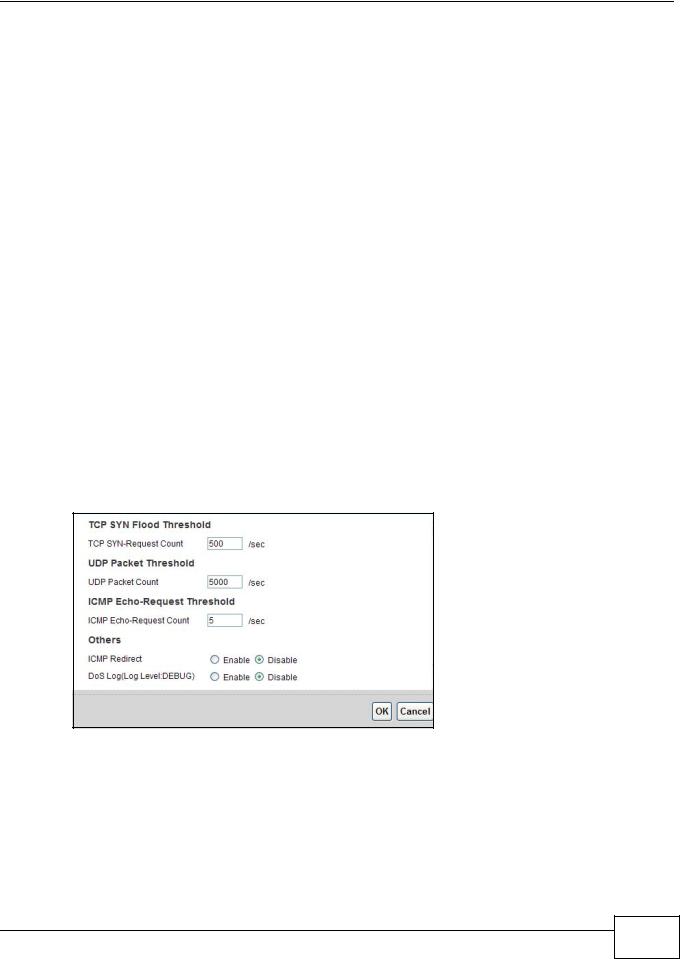
15.5.2Configuring Firewall Thresholds
Click Security > Firewall > DoS > Advanced to display the following screen.
Figure 89 Security > Firewall > DoS > Advanced
AMG1302/AMG1202-TSeries User’s Guide
185 |
Chapter 15 Firewall
The following table describes the labels in this screen.
Table 67 Security > Firewall > DoS > Advanced
LABEL |
DESCRIPTION |
TCP SYN-Request |
This is the rate of new TCP half-open sessions per second that causes the firewall to |
Count |
start deleting half-open sessions. When the rate of new connection attempts rises |
|
above this number, the AMG1302/AMG1202-TSeries deletes half-open sessions as |
|
required to accommodate new connection attempts. |
|
|
UDP Packet Count |
This is the rate of new UDP half-open sessions per second that causes the firewall to |
|
start deleting half-open sessions. When the rate of new connection attempts rises |
|
above this number, the AMG1302/AMG1202-TSeries deletes half-open sessions as |
|
required to accommodate new connection attempts. |
|
|
ICMP Echo-Request |
This is the rate of new ICMP Echo-Request half-open sessions per second that causes |
Count |
the firewall to start deleting half-open sessions. When the rate of new connection |
|
attempts rises above this number, the AMG1302/AMG1202-TSeries deletes half-open |
|
sessions as required to accommodate new connection attempts. |
|
|
Back |
Click this button to return to the previous screen. |
|
|
Apply |
Click this to save your changes. |
|
|
Cancel |
Click this to restore your previously saved settings. |
|
|
15.6 Firewall Technical Reference
This section provides some technical background information about the topics covered in this chapter.
15.6.1 Firewall Rules Overview
Your customized rules take precedence and override the AMG1302/AMG1202-TSeries’s default settings. The AMG1302/AMG1202-TSeries checks the source IP address, destination IP address and IP protocol type of network traffic against the firewall rules (in the order you list them). When the traffic matches a rule, the AMG1302/AMG1202-TSeries takes the action specified in the rule.
Firewall rules are grouped based on the direction of travel of packets to which they apply:
• |
LAN to Router |
• |
WAN to LAN |
• |
LAN to WAN |
• |
WAN to Router |
Note: The LAN includes both the LAN port and the WLAN.
By default, the AMG1302/AMG1202-TSeries’s stateful packet inspection allows packets traveling in the following directions:
•LAN to Router
These rules specify which computers on the LAN can manage the AMG1302/AMG1202-TSeries (remote management).
Note: You can also configure the remote management settings to allow only a specific computer to manage the AMG1302/AMG1202-TSeries.
186 |
AMG1302/AMG1202-TSeries User’s Guide

Chapter 15 Firewall
•LAN to WAN
These rules specify which computers on the LAN can access which computers or services on the WAN.
By default, the AMG1302/AMG1202-TSeries’s stateful packet inspection drops packets traveling in the following directions:
•WAN to LAN
These rules specify which computers on the WAN can access which computers or services on the LAN.
Note: You also need to configure NAT port forwarding (or full featured NAT address mapping rules) to allow computers on the WAN to access devices on the LAN.
•WAN to Router
By default the AMG1302/AMG1202-TSeries stops computers on the WAN from managing the AMG1302/AMG1202-TSeries. You could configure one of these rules to allow a WAN computer to manage the AMG1302/AMG1202-TSeries.
Note: You also need to configure the remote management settings to allow a WAN computer to manage the AMG1302/AMG1202-TSeries.
You may define additional rules and sets or modify existing ones but please exercise extreme caution in doing so.
For example, you may create rules to:
•Block certain types of traffic, such as IRC (Internet Relay Chat), from the LAN to the Internet.
•Allow certain types of traffic, such as Lotus Notes database synchronization, from specific hosts on the Internet to specific hosts on the LAN.
•Allow everyone except your competitors to access a web server.
•Restrict use of certain protocols, such as Telnet, to authorized users on the LAN.
These custom rules work by comparing the source IP address, destination IP address and IP protocol type of network traffic to rules set by the administrator. Your customized rules take precedence and override the AMG1302/AMG1202-TSeries’s default rules.
15.6.2 Guidelines For Enhancing Security With Your Firewall
6Change the default password via web configurator.
7Think about access control before you connect to the network in any way.
8Limit who can access your router.
9Don't enable any local service (such as telnet or FTP) that you don't use. Any enabled service could present a potential security risk. A determined hacker might be able to find creative ways to misuse the enabled services to access the firewall or the network.
10For local services that are enabled, protect against misuse. Protect by configuring the services to communicate only with specific peers, and protect by configuring rules to block packets for the services at specific interfaces.
AMG1302/AMG1202-TSeries User’s Guide
187 |
Chapter 15 Firewall
11Protect against IP spoofing by making sure the firewall is active.
12Keep the firewall in a secured (locked) room.
15.6.3Security Considerations
Note: Incorrectly configuring the firewall may block valid access or introduce security risks to the AMG1302/AMG1202-TSeries and your protected network. Use caution when creating or deleting firewall rules and test your rules after you configure them.
Consider these security ramifications before creating a rule:
1Does this rule stop LAN users from accessing critical resources on the Internet? For example, if IRC is blocked, are there users that require this service?
2Is it possible to modify the rule to be more specific? For example, if IRC is blocked for all users, will a rule that blocks just certain users be more effective?
3Does a rule that allows Internet users access to resources on the LAN create a security vulnerability? For example, if FTP ports (TCP 20, 21) are allowed from the Internet to the LAN, Internet users may be able to connect to computers with running FTP servers.
4Does this rule conflict with any existing rules?
Once these questions have been answered, adding rules is simply a matter of entering the information into the correct fields in the web configurator screens.
15.6.4Triangle Route
When the firewall is on, your AMG1302/AMG1202-TSeries acts as a secure gateway between your LAN and the Internet. In an ideal network topology, all incoming and outgoing network traffic passes through the AMG1302/AMG1202-TSeries to protect your LAN against attacks.
Figure 90 Ideal Firewall Setup
LAN WAN
1
2
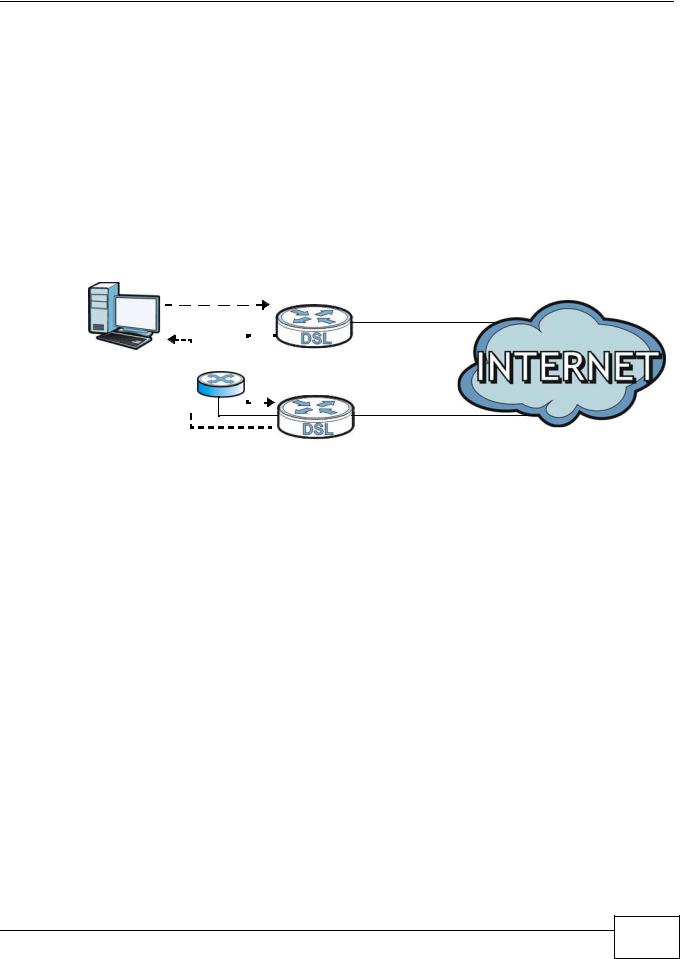
15.6.4.1 The “Triangle Route” Problem
A traffic route is a path for sending or receiving data packets between two Ethernet devices. You may have more than one connection to the Internet (through one or more ISPs). If an alternate gateway is on the LAN (and its IP address is in the same subnet as the AMG1302/AMG1202TSeries’s LAN IP address), the “triangle route” (also called asymmetrical route) problem may occur. The steps below describe the “triangle route” problem.
188 |
AMG1302/AMG1202-TSeries User’s Guide
Chapter 15 Firewall
1A computer on the LAN initiates a connection by sending out a SYN packet to a receiving server on the WAN.
2The AMG1302/AMG1202-TSeries reroutes the SYN packet through Gateway A on the LAN to the WAN.
3The reply from the WAN goes directly to the computer on the LAN without going through the AMG1302/AMG1202-TSeries.
As a result, the AMG1302/AMG1202-TSeries resets the connection, as the connection has not been acknowledged.
Figure 91 “Triangle Route” Problem |
|
LAN |
WAN |
1 |
|
ISP 1
|
|
|
|
|
|
|
|
|
3 |
|
|
|
2 |
|
|
|
|
|
|
|
|
|
|
|||
|
|
|
|
|
|
|||
|
|
|
|
|
|
|||
|
|
|
|
|
|
|||
|
|
|
|
|
|
|||
|
|
|
|
|
|
|||
|
|
|
|
|
|
|||
|
|
|
|
|
|
|
|
|
|
|
|
|
|
|
|
|
|
|
|
|
|
|
|
|
|
|
ISP 2
A
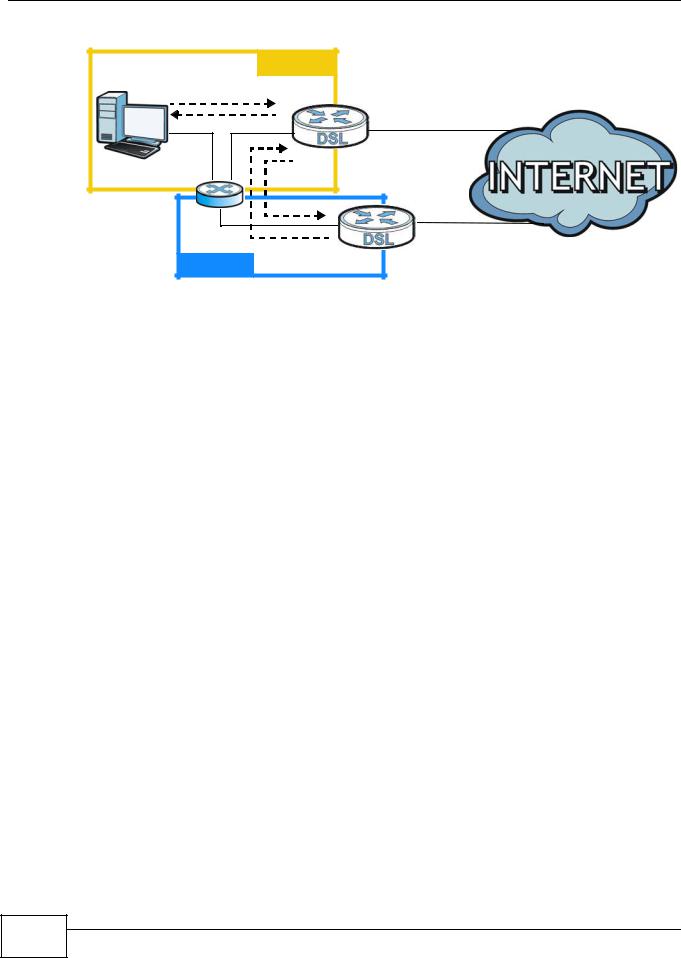
15.6.4.2 Solving the “Triangle Route” Problem
If you have the AMG1302/AMG1202-TSeries allow triangle route sessions, traffic from the WAN can go directly to a LAN computer without passing through the AMG1302/AMG1202-TSeries and its firewall protection.
Another solution is to use IP alias. IP alias allows you to partition your network into logical sections over the same Ethernet interface. Your AMG1302/AMG1202-TSeries supports up to three logical LAN interfaces with the AMG1302/AMG1202-TSeries being the gateway for each logical network.
It’s like having multiple LAN networks that actually use the same physical cables and ports. By putting your LAN and Gateway A in different subnets, all returning network traffic must pass through the AMG1302/AMG1202-TSeries to your LAN. The following steps describe such a scenario.
1A computer on the LAN initiates a connection by sending a SYN packet to a receiving server on the WAN.
2The AMG1302/AMG1202-TSeries reroutes the packet to Gateway A, which is in Subnet 2.
3The reply from the WAN goes to the AMG1302/AMG1202-TSeries.
4The AMG1302/AMG1202-TSeries then sends it to the computer on the LAN in Subnet 1.
AMG1302/AMG1202-TSeries User’s Guide
189 |
Chapter 15 Firewall
Figure 92 |
IP Alias |
|
|
|
LAN |
Subnet 1 |
WAN |
|
|
||
|
1 |
|
|
|
4 |
|
ISP 1 |
|
|
2 |
|
|
|
3 |
ISP 2 |
|
Subnet 2 |
A |
|
|
|
||
|
|
|
190 |
AMG1302/AMG1202-TSeries User’s Guide
 Loading...