


 Loading...
User’s Guide
ARMOR X1 (WAP6806)
AC2100 Dual-Band Wireless Gigabit Access Point/Range
Extender
Default Login Details
Version 1.00 Edition 2, 07/2018
LAN IP |
|
|
|
|
|
http://zyxelsetup |
|
|
|
|
|
|
|
||||||||
Address |
|
|
|
|
|
http://192.168.1.2 |
|
|
|
|
|
|
|||||||||
|
|
|
|
|
|
|
|
|
|
|
|||||||||||
Password |
1234 |
|
|
|
|
|
|
|
|
|
|||||||||||
|
|
|
|
|
|
|
|
|
|
|
|
|
|
|
|
|
|
|
|
|
|
|
|
|
|
|
|
|
|
|
|
|
|
|
|
|
|
|
|
|
|
|
|
|
|
|
|
|
|
|
|
|
|
|
|
|
|
|
|
|
|
|
|
|
|
|
|
|
|
|
|
|
|
|
|
|
|
|
|
|
|
|
|
|
|
|
|
|
|
|
|
|
|
|
|
|
|
|
|
|
|
|
|
|
|
|
|
|
|
|
|
|
|
|
|
|
|
|
|
|
|
|
|
|
|
|
|
|
|
|
|
|
|
|
|
|
|
|
|
|
|
|
|
|
|
|
|
|
|
|
|
|
|
|
|
|
|
|
|
|
|
|
|
|
|
|
|
|
|
|
|
|
|
|
|
|
|
|
|
|
|
|
|
|
|
|
|
|
|
|
|
|
|
|
|
|
|
|
|
|
|
|
|
|
|
|
|
|
|
|
|
|
|
|
|
|
|
|
|
|
|
|
|
|
|
|
|
|
|
|
|
|
|
|
|
|
|
|
|
|
|
|
|
|
|
|
|
|
|
|
|
|
|
|
|
|
|
|
|
|
|
|
|
|
|
|
|
|
|
|
|
|
|
|
|
|
|
|
|
|
|
|
|
|
|
|
|
|
|
|
|
|
|
|
|
|
|
|
|
|
|
|
|
|
|
|
|
Copyright © 2018 Zyxel Communications Corporation

IMPO RTANT!
READ C AREFULLY BEFO RE USE.
KEEP THIS G UIDE FO R FUTURE REFERENC E.
Screenshots and graphics in this book may differ slightly from what you see due to differences in release versions or your computer operating system. Every effort has been made to ensure that the information in this manual is accurate.
Re la te d Do c um e nta tio n
•Quick Start Guide
The Quick Start Guide shows how to connect the managed device.
•More Information
Go to suppo rt.zyxe l.c o m to find other information on the WAP6806.
WAP6806 User’s Guide
2

Contents Overview
C o nte nts O ve rvie w
Use r’s G uide ........................................................................................................................................ |
8 |
Introduction ............................................................................................................................................. |
9 |
WAP6806 Modes ................................................................................................................................... |
15 |
Repeater Mode .................................................................................................................................... |
17 |
Access Point Mode .............................................................................................................................. |
23 |
Client Mode .......................................................................................................................................... |
27 |
The Web Configurator ......................................................................................................................... |
30 |
Connection Wizard .............................................................................................................................. |
33 |
Status ...................................................................................................................................................... |
44 |
Te c hnic a l Re fe re nc e ........................................................................................................................ |
48 |
Monitor ................................................................................................................................................... |
49 |
Operation Mode .................................................................................................................................. |
52 |
Ethernet ................................................................................................................................................. |
60 |
Wireless LAN .......................................................................................................................................... |
62 |
Management ........................................................................................................................................ |
74 |
Maintenance ........................................................................................................................................ |
76 |
Troubleshooting .................................................................................................................................... |
83 |
WAP6806 User’s Guide
3

Table of Contents
Ta ble o f C o nte nts
Co nte nts O ve rvie w ............................................................................................................................. |
3 |
Ta ble o f Co nte nts ................................................................................................................................. |
4 |
Pa rt I: Use r’s G uide ............................................................................................ |
8 |
|
C ha pte r 1 |
|
|
Intro duc tio n .......................................................................................................................................... |
9 |
|
1.1 |
Overview ........................................................................................................................................... |
9 |
1.2 |
Securing the WAP6806 ................................................................................................................... |
10 |
1.3 |
Panel Views ..................................................................................................................................... |
10 |
1.4 |
WPS Button ...................................................................................................................................... |
12 |
|
1.4.1 Wi-Fi Protected Setup ........................................................................................................... |
12 |
1.5 |
Reset Button .................................................................................................................................... |
12 |
|
1.5.1 Procedure to Use the Reset Button ..................................................................................... |
12 |
1.6 |
2-way Installation ............................................................................................................................ |
13 |
|
1.6.1 Stand ...................................................................................................................................... |
13 |
|
1.6.2 Wall Mounting ....................................................................................................................... |
13 |
C ha pte r 2 |
|
|
WAP6806 Mo de s ................................................................................................................................ |
15 |
|
2.1 |
Overview ......................................................................................................................................... |
15 |
|
2.1.1 Device Modes ....................................................................................................................... |
15 |
C ha pte r 3 |
|
|
Re pe a te r Mo de .................................................................................................................................. |
17 |
|
3.1 |
Overview ......................................................................................................................................... |
17 |
3.2 What You Can Do .......................................................................................................................... |
17 |
|
3.3 What You Need to Know ............................................................................................................... |
17 |
|
|
3.3.1 Setting your WAP6806 to Repeater Mode ......................................................................... |
18 |
3.4 |
Repeater Mode Status Screen ...................................................................................................... |
18 |
3.5 |
WPS Screen ..................................................................................................................................... |
20 |
C ha pte r 4 |
|
|
Ac c e ss Po int Mo de ............................................................................................................................ |
23 |
|
4.1 |
Overview ......................................................................................................................................... |
23 |
4.2 What You Can Do .......................................................................................................................... |
23 |
|
4.3 What You Need to Know ............................................................................................................... |
23 |
|
|
WAP6806 User’s Guide |
|
4

|
Table of Contents |
|
|
4.3.1 Setting your WAP6806 to AP Mode ..................................................................................... |
24 |
|
4.3.2 Configuring your WLAN, LAN and Maintenance Settings ................................................ |
24 |
4.4 |
AP Mode Status Screen ................................................................................................................. |
24 |
C ha pte r 5 |
|
|
Clie nt Mo de ........................................................................................................................................ |
27 |
|
5.1 |
Overview ......................................................................................................................................... |
27 |
5.2 What You Can Do .......................................................................................................................... |
27 |
|
5.3 What You Need to Know ............................................................................................................... |
27 |
|
5.4 |
Setting your WAP6806 to Client Mode ......................................................................................... |
27 |
5.5 |
Client Mode Status Screen ............................................................................................................ |
28 |
C ha pte r 6 |
|
|
The We b Co nfig ura to r........................................................................................................................ |
30 |
|
6.1 |
Overview ......................................................................................................................................... |
30 |
6.2 |
Accessing the Web Configurator ................................................................................................. |
30 |
|
6.2.1 Login Screen .......................................................................................................................... |
30 |
|
6.2.2 Password Screen ................................................................................................................... |
31 |
6.3 |
Resetting the WAP6806 .................................................................................................................. |
32 |
C ha pte r 7 |
|
|
Co nne c tio n Wiza rd ............................................................................................................................ |
33 |
|
7.1 |
Overview ......................................................................................................................................... |
33 |
7.2 |
Using the Web Configurator Wizard ............................................................................................. |
33 |
7.3 Configuring the WAP6806 to AP Mode ........................................................................................ |
33 |
|
7.4 |
Configuring the WAP6806 to Client Mode .................................................................................. |
35 |
7.5 Configuring the WAP6806 to Repeater Mode ............................................................................ |
38 |
|
C ha pte r 8 |
|
|
Sta tus ................................................................................................................................................... |
|
44 |
8.1 |
WAP6806 Status .............................................................................................................................. |
44 |
8.2 |
Navigation Panel ............................................................................................................................ |
46 |
Pa rt II: Te c hnic a l Re fe re nc e ........................................................................... |
48 |
|
C ha pte r 9 |
|
|
Mo nito r................................................................................................................................................ |
|
49 |
9.1 |
Overview ......................................................................................................................................... |
49 |
9.2 What You Can Do .......................................................................................................................... |
49 |
|
9.3 |
System Log ...................................................................................................................................... |
49 |
9.4 |
Statistics ........................................................................................................................................... |
50 |
|
WAP6806 User’s Guide |
|
5

Table of Contents |
|
9.5 WLAN Station Status ....................................................................................................................... |
51 |
C ha pte r 10 |
|
O pe ra tio n Mo de ................................................................................................................................ |
52 |
10.1 Overview ....................................................................................................................................... |
52 |
10.2 What You Can Do ........................................................................................................................ |
52 |
10.3 Operation Mode Setup ............................................................................................................... |
52 |
10.3.1 Client Mode Setup ............................................................................................................. |
53 |
10.3.2 Repeater Mode Setup ....................................................................................................... |
53 |
10.4 AP Connection ............................................................................................................................. |
55 |
10.4.1 WEP Encryption ................................................................................................................... |
57 |
10.4.2 WPA-Personal / WPA2-Personal / WPA/WPA2-Personal Mixed ..................................... |
58 |
C ha pte r 11 |
|
Ethe rne t............................................................................................................................................... |
60 |
11.1 Overview ....................................................................................................................................... |
60 |
11.2 What You Can Do ........................................................................................................................ |
60 |
11.3 LAN Setup Screen ......................................................................................................................... |
60 |
11.4 IP Alias Screen ............................................................................................................................... |
61 |
C ha pte r 12 |
|
Wire le ss LAN ....................................................................................................................................... |
62 |
12.1 Overview ....................................................................................................................................... |
62 |
12.2 What You Can Do ........................................................................................................................ |
62 |
12.3 What You Should Know ............................................................................................................... |
62 |
12.3.1 Wireless Security Overview ................................................................................................. |
62 |
12.4 General Wireless LAN Screen ..................................................................................................... |
63 |
12.5 Wireless LAN Advanced Screen ................................................................................................. |
65 |
12.6 Security .......................................................................................................................................... |
66 |
12.7 WPS Screen ................................................................................................................................... |
69 |
12.7.1 Connecting to a Wireless Network Using WPS ................................................................. |
70 |
C ha pte r 13 |
|
Ma na g e m e nt ..................................................................................................................................... |
74 |
13.1 Overview ....................................................................................................................................... |
74 |
13.2 What You Can Do ........................................................................................................................ |
74 |
13.3 MCL Screen ................................................................................................................................... |
74 |
13.4 One Connect Screen ................................................................................................................... |
75 |
C ha pte r 14 |
|
Ma inte na nc e ...................................................................................................................................... |
76 |
14.1 Overview ....................................................................................................................................... |
76 |
14.2 What You Can Do ........................................................................................................................ |
76 |
WAP6806 User’s Guide |
|
6

|
Table of Contents |
|
14.3 |
System ............................................................................................................................................ |
76 |
14.3.1 General Screen ................................................................................................................... |
76 |
|
14.3.2 Time Setting Screen ............................................................................................................ |
77 |
|
14.4 Firmware Upgrade Screen .......................................................................................................... |
78 |
|
14.5 |
Backup / Restore Screen ............................................................................................................. |
80 |
14.5.1 Export Setting ....................................................................................................................... |
81 |
|
14.5.2 Import Setting ...................................................................................................................... |
81 |
|
14.5.3 Restore to Factory Defaults ................................................................................................ |
82 |
|
14.6 |
Reboot ........................................................................................................................................... |
82 |
C ha pte r 15 |
|
|
Tro uble sho o ting .................................................................................................................................. |
83 |
|
15.1 Power, Hardware Connections, and LED .................................................................................. |
83 |
|
15.2 WAP6806 Access and Login ........................................................................................................ |
84 |
|
15.3 |
Internet Access ............................................................................................................................. |
85 |
15.4 |
Resetting the WAP6806 to Its Factory Defaults ......................................................................... |
86 |
15.5 |
Wireless Problems .......................................................................................................................... |
86 |
Appendix A Customer Support ....................................................................................................... |
88 |
|
Appendix B Setting Up Your Computer’s IP Address..................................................................... |
94 |
|
Appendix C Legal Information ...................................................................................................... |
121 |
|
Inde x ................................................................................................................................................. |
|
128 |
WAP6806 User’s Guide
7

PA RT I
Use r’s G uide
8
C HA PTER 1
Intro duc tio n
1.1 O ve rvie w
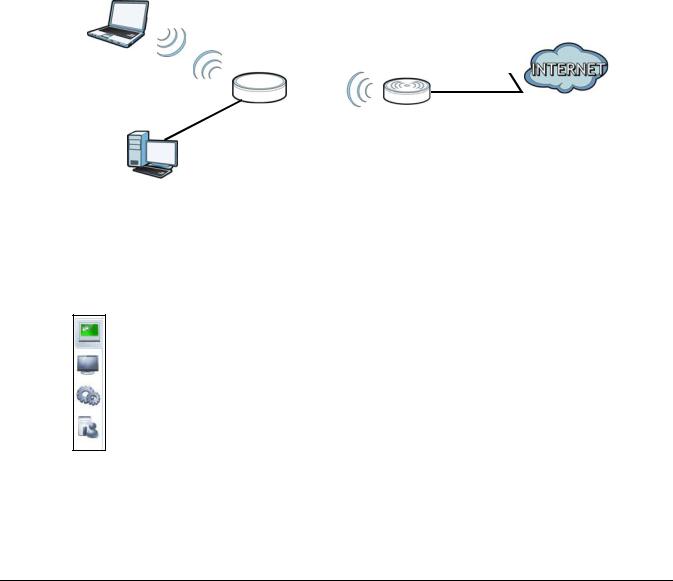
The [Product Name (long)] makes it fast and easy to easily extend existing IEEE 802.11 b/g/n/ac wireless networks. Simply plug the WAP6806 directly into a power outlet and the LED signal strength indicator allows you to determine the ideal installation location. The one-click Wi-Fi Protected Setup (WPS Button on page 12) provides frustration-free wireless client setup and completes the instant network access setup.
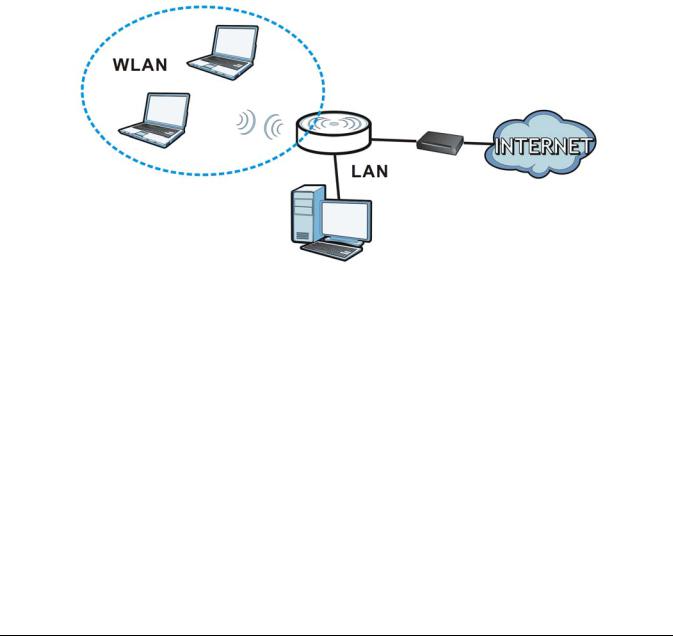
Fig ure 1 Universal Repeater
WLAN |
|
|
LEW |
|||
|
|
|
|
|
|
|
|
REPEATER |
AP |
|
|
||
|
|
|
||||
|
|
|
|
|||
|
LAN |
|
|
|
|
|
|
|
|
|
|
|
|
|
|
|
|
|
|
|
|
|
|
|
|
|
|
Your can create the following connections using the WAP6806:
• LAN. You can connect network devices via the Ethernet port of the WAP6806 so that they can communicate with each other and access the Internet.
• WLAN. Wireless clients can connect to the WAP6806 to access network resources.
Use a (supported) web browser to manage the WAP6806.
See Chapter 8 on page 44 for more information.
WAP6806 User’s Guide
9
Chapter 1 Introduction
1.2 Se c uring the WAP6806
Do the following things regularly to make the WAP6806 more secure and to manage the WAP6806 more effectively.
•Change the password. Use a password that’s not easy to guess and that consists of different types of characters, such as numbers and letters.
•Write down the password and put it in a safe place.
•Back up the configuration (and make sure you know how to restore it). Restoring an earlier working configuration may be useful if the device becomes unstable or even crashes. If you forget your password, you will have to reset the WAP6806 to its factory default settings. If you backed up an earlier configuration file, you would not have to totally re-configure the WAP6806. You could simply restore your last configuration.
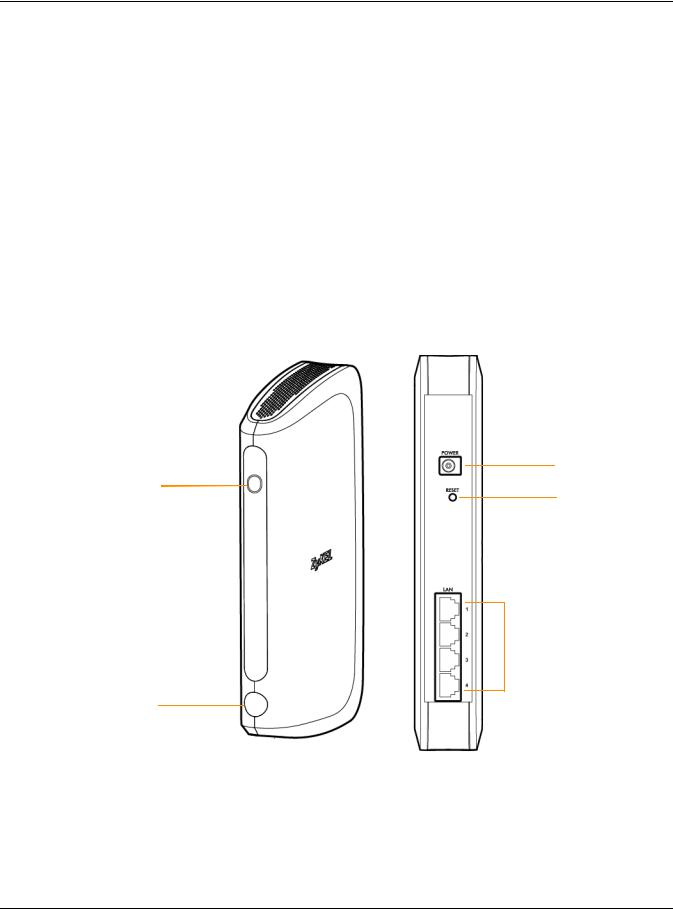
1.3Pa ne l Vie ws
Fig ure 2 Panel Views
Power
LED
Reset Button
 Ethernet Ports
WPS Button
WAP6806 User’s Guide
10
Chapter 1 Introduction
The following table describes the LED status.
Table 1 WAP6806 LED Status
FUNC TIO N |
STATUS |
DESC RIPTIO N |
|
|
|
Power |
On (Green) |
The WAP6806 is receiving power and functioning properly. |
|
|
|
|
Blinking |
The WAP6806 is booting. |
|
(Green) |
|
|
|
|
|
Off |
The WAP6806 is not receiving power. |
|
|
|
Connection Status |
|
The device uses the LED to generate the following three signal colors: |
|
|
• Red: signifies a signal strength under 50% |
|
|
• Orange: signifies a signal strength under 75% |
|
|
• Green: signifies a signal strength over 75% |
|
|
|
System |
Blinking |
The WAP6806 has an error. |
|
(Red) |
|
|
|
|
|
Blinking (all |
The WAP6806 is resetting to the factory default or upgrading the firmware. |
|
colors) |
|
|
|
|
WPS |
Blinking |
The WAP6806’s WPS function is in progress. |
|
(Amber) |
|
|
|
|
The following table describes the LED combination status of 2.4G and 5G for dual uplink in repeater mode.
Table 2 LED Combination Status of 2.4G and 5G
|
|
EXC ELLENT |
G O O D |
PO O R |
|
C O MBINATIO N |
BAND |
|
|
|
RESULT |
|
|
(100% ~ 70% ) |
(69% ~ 51% ) |
(50% ~ 0% ) |
|
|
|
|
|
|
|
1 |
2.4G |
Green |
|
|
Green |
|
|
|
|
|
|
|
5G |
Green |
|
|
|
|
|
|
|
|
|
2 |
2.4G |
Green |
|
|
Green |
|
|
|
|
|
|
|
5G |
|
Amber |
|
|
|
|
|
|
|
|
3 |
2.4G |
|
Amber |
|
Green |
|
|
|
|
|
|
|
5G |
Green |
|
|
|
|
|
|
|
|
|
4 |
2.4G |
Green |
|
|
Amber |
|
|
|
|
|
|
|
5G |
|
|
Red |
|
|
|
|
|
|
|
5 |
2.4G |
|
Amber |
|
Amber |
|
|
|
|
|
|
|
5G |
|
Amber |
|
|
|
|
|
|
|
|
6 |
2.4G |
|
Amber |
|
Amber |
|
|
|
|
|
|
|
5G |
|
|
Red |
|
|
|
|
|
|
|
7 |
2.4G |
|
|
Red |
Amber |
|
|
|
|
|
|
|
5G |
|
Amber |
|
|
|
|
|
|
|
|
8 |
2.4G |
|
|
Red |
Amber |
|
|
|
|
|
|
|
5G |
Green |
|
|
|
|
|
|
|
|
|
9 |
2.4G |
|
|
Red |
Red |
|
|
|
|
|
|
|
5G |
|
|
Red |
|
|
|
|
|
|
|
WAP6806 User’s Guide
11

Chapter 1 Introduction
1.4 WPS Butto n
The WPS button can be used to configure 2.4G and 5G settings.
Table 3 WPS Button Functions
AC TIO N |
RESULT |
|
|
Client Mode |
|
|
|
Push once for less than 5 |
The WAP6806 triggers uplink WPS. |
seconds |
|
|
|
AP Mode |
|
|
|
Push once for less than 5 |
The WAP6806 triggers both 2.4G and 5G primary Service Set Identity (SSID) at the same |
seconds |
time. |
|
|
Repeater Mode |
|
|
|
Push once for less than 5 |
The WAP6806 triggers uplink WPS. |
seconds |
|
|
|
Push twice for less than 5 |
The WAP6806 triggers downlink WPS. |
seconds |
|
|
|
1.4.1 WiFi Pro te c te d Se tup
Your WAP6806 supports Wi-Fi Protected Setup (WPS), which is an easy way to set up a secure wireless network. WPS is an industry standard specification, defined by the Wi-Fi Alliance.
WPS allows you to quickly set up a wireless network with strong security, without having to configure security settings manually. Each WPS connection works between two devices. Both devices must support WPS (check each device’s documentation to make sure).
Depending on the devices you have, you can either press a button (recommended) on the device itself, or in its configuration utility or enter a PIN (a unique Personal Identification Number that allows one device to authenticate the other) in each of the two devices. When WPS is activated on a device, it has two minutes to find another device that also has WPS activated. Then, the two devices connect and set up a secure network by themselves.
For more information on using WPS, see Section 12.7 on page 69.
1.5 Re se t Butto n
If you forget your password or IP address, or you cannot access the Web Configurator, you will need to use the RESETbutton at the back of the WAP6806 to reload the factory-default configuration file. This means that you will lose all configurations that you had previously saved, the password will be reset to “1234” and the IP address of the WAP6806 will be reset to “192.168.1.2”.
1.5.1 Pro c e dure to Use the Re se t Butto n
1Make sure the power LED is on.
2Press the RESETbutton for one to five seconds to reboot the WAP6806.
WAP6806 User’s Guide
12

Chapter 1 Introduction
3Press the RESETbutton for longer than five seconds to set the WAP6806 back to its factory-default configuration.
1.62- wa y Insta lla tio n
The WAP6806 can be used for 2-way installation: vertical and wall mounted.
1.6.1 Sta nd
To have your WAP6806 as a stand-alone device, put you WAP6806 vertically into the stand as shown below.
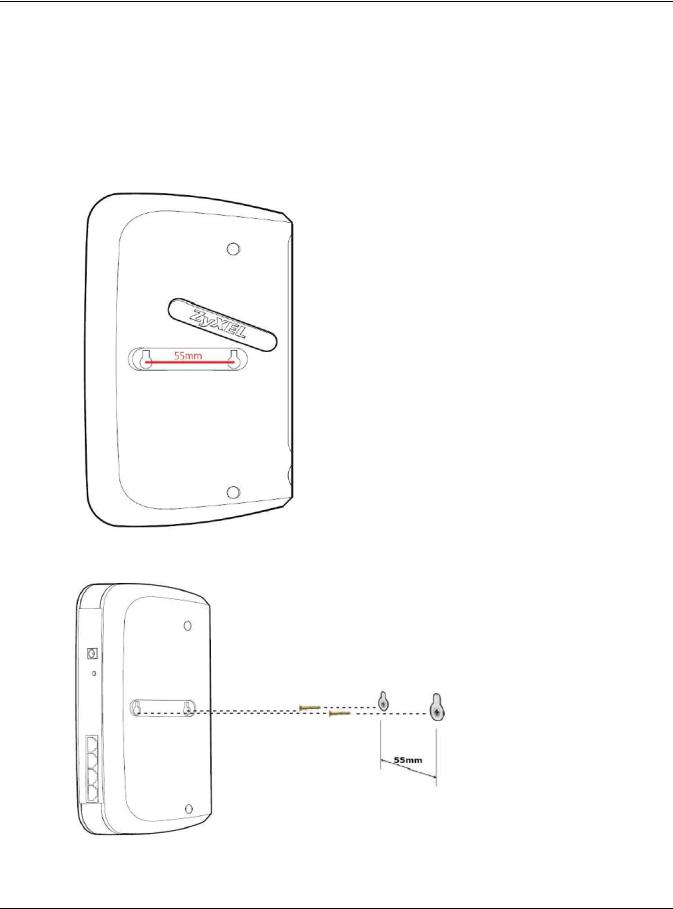
1.6.2 Wa ll Mo unting
The following are the dimensions of a screw anchor and M3 tap screw used for wall mounting. All measurements are in millimeters (mm).
WAP6806 User’s Guide
13
Chapter 1 Introduction
1Locate a high position on a wall that is free os obstructions. Use a sturdy wall.
2For a concrete or brick wall find a drill bit with the same diameter as the screw anchors. If you do not need the screw anchors, find a drill bit slightly smaller in diameter than the included screws.
3Drill two screw holes in the wall. Make sure the distance between the centers of the holes is the same as the wall-mount holes.
Note: Be careful to avoid damaging pipes or cables located inside the wall when drilling holes for the screws.
4Align the holes on the back of the WAP6806 with the screws on the wall. Hang the WAP6806 on the screws.
WAP6806 User’s Guide
14
C HA PTER 2
WAP6806 Mo de s
2.1 O ve rvie w
This chapter introduces the different modes available on your WAP6806.
• De vic e m o de . This is the operating mode of your WAP6806, or simply how the WAP6806 is being used in the network.
2.1.1 De vic e Mo de s
This refers to the operating mode of the WAP6806, which can act as a:
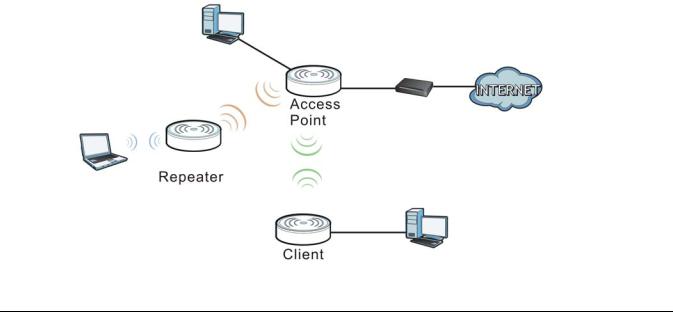
• Re pe a te r: In this mode, the WAP6806 can be an access point and a wireless client at the same time. Go to Section 3.4 on page 18 to view the Sta tus screen in this mode. Use this mode if there is an existing wireless router or access point in your network and you also want to allow clients to connect to the WAP6806 wirelessly.
• Ac c e ss Po int: Use this mode if you want to extend your network by allowing network devices to connect to the WAP6806 wirelessly. Go to Section 4.4 on page 24 to view the screen in this mode.
• C lie nt: Use this mode if there is an existing wireless router or access point in the network to which you want to connect your local network. Go to Section 5.5 on page 28 to view the Sta tus screen in this mode. In Client mode, you should know the SSID and wireless security details of the access point to which you want to connect.
The following figure illustrates the device configuration modes of the WAP6806.
Fig ure 3 Device Mode Example
WAP6806 User’s Guide
15

Chapter 2 WAP6806 Modes
Note: Choose your device mode carefully to avoid having to change it later.
Under Repeater mode, the WAP6806 supports three WPS behaviors: Normal mode, Range boost mode, and Speed boost mode. These behaviors are only available in Repeater mode through the
screen. See Section 10.3.2 on page 53 for details.
WAP6806 User’s Guide
16

C HA PTER 3
Re pe a te r Mo de
3.1 O ve rvie w
In repeater mode, your WAP6806 can act as an access point and wireless client at the same time. The WAP6806 can connect to an existing network through another access point and also lets wireless clients connect to the network through it. This helps you expand wireless coverage when you have an access point or wireless router already in your network.
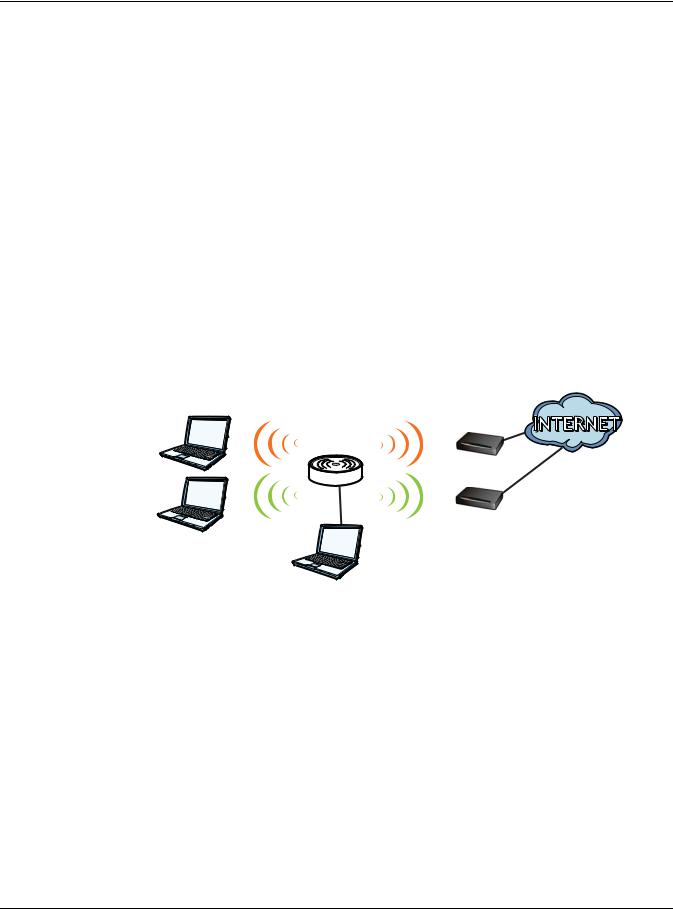
In the example below, the WAP6806 (A) is configured as a repeater. It has three clients that want to connect to the Internet. The WAP6806 wirelessly connects to the available access point (B).
Fig ure 4 Repeater Mode
A B
After the WAP6806 and the access point connect, the WAP6806 acquires its IP address from the access point. The clients of the WAP6806 can now surf the Internet.
3.2Wha t Yo u C a n Do
•Use the Sta tus screen (Section 3.4 on page 18) to view read-only information about your WAP6806.
•Use the Ethe rne t > IP Alia s screen (Section 11.4 on page 61) to set the IP address for your WAP6806.
•Use the Wire le ss LAN > WPS screen (Section 12.7 on page 69) to configure WPS on the WAP6806 to associate to another access point.
•Use the Ne two rk > Wire le ss LAN (2.4G / 5G ) > Se c urity screen (Section 12.6 on page 66) to configure the wireless security between the WAP6806 and another access point.
•Use other Wire le ss LAN screens (Section 12.5 on page 65) to configure the wireless settings between the wireless clients and the WAP6806.
3.3Wha t Yo u Ne e d to Kno w
With the exception of the O pe ra tio n Mo de other configuration screens in the Repeater mode are similar to the ones in Access Point Mode. See Chapter 2 on page 15 of this User’s Guide.
WAP6806 User’s Guide
17
Chapter 3 Repeater Mode
3.3.1 Se tting yo ur WAP6806 to Re pe a te r Mo de
1To use your WAP6806 as a repeater, see Section 2.1.1 on page 15.
2Connect your computer to the LAN port of the WAP6806.
3Open a web browser such as Internet Explorer and type http://zyxelsetup or http://192.168.1.2 as the web address in your web browser.
4Enter “1234” (default) as the password and click Lo g in.
5Type a new password and retype it to confirm, then click C ha ng e . Otherwise, click Skip. See Section 7.5 on page 38 for details.
Note: You have to log in to the Web Configurator again when you change modes. As soon as you do, your WAP6806 is already in Repeater mode.
Note: If a client is connected to the WAP6806 through the wired Ethernet connection, the client can only directly access the 5 GHz Wi-Fi. In the following figure, the LAN Client is only able to directly communicate with devices in the 5 GHz wireless network.
Fig ure 5 Repeater Mode Overview
5 GHz |
5 GHz |
5 GHzAP
REPEATER
5 GHz
WRE
2.4 GHz
2.4 GHzAP
2.4 GHz |
2.4 GHz |
LAN Client
3.4 Re pe a te r Mo de Sta tus Sc re e n
Click  to open the Sta tus screen.
WAP6806 User’s Guide
18

Chapter 3 Repeater Mode
Fig ure 6 Status: Repeater Mode
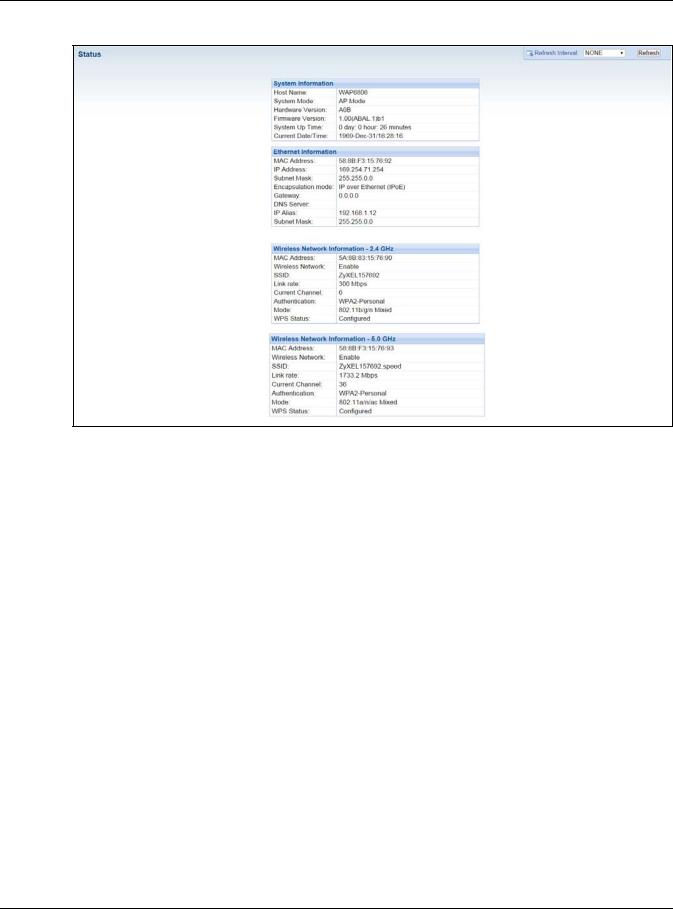
The following table describes the labels shown in the Sta tus screen.
Table 4 Status Screen: Repeater Mode
LABEL |
DESC RIPTIO N |
|
|
System Information |
|
|
|
Host Name |
This is the WAP6806’s model name. |
|
|
System Mode |
This is the device mode (Section 2.1.1 on page 15) to which the WAP6806 is set - Re pe a te r Mo de . |
|
|
Hardware Version |
This displays the hardware version of the device. |
|
|
Firmware Version |
This displays the firmware version and the date created. |
|
|
System Up Time |
This displays the total time the WAP6806 has been on. |
|
|
Current Date/Time |
This displays the WAP6806’s present date and time. |
|
|
Ethernet Information |
|
|
|
MAC Address |
This shows the LAN Ethernet adapter MAC Address of your device. |
|
|
IP Address |
This shows the LAN port’s IP address. |
|
|
IP Subnet Mask |
This shows the LAN port’s subnet mask. |
|
|
Encapsulation mode |
This shows the protocol for encapsulating packages the WAP6806 uses. |
|
|
Gateway |
This shows the gateway of the WAP6806. |
|
|
DNS Server |
This shows the IP address of the DNS Server. |
|
|
WAP6806 User’s Guide
19

|
Chapter 3 Repeater Mode |
|
|
Table 4 Status Screen: Repeater Mode (continued) |
|
LABEL |
DESC RIPTIO N |
|
|
IP Alias |
This shows the IP address of the WAP6806. |
|
|
Subnet Mask |
This shows the subnet mask of the WAP6806. |
|
|
AP Connection Status - 2.4G / 5G |
|
|
|
MAC Address |
This shows the wireless adapter MAC Address of the root AP. |
|
|
SSID |
This shows a descriptive name used to identify the root AP in the wireless LAN. |
|
|
Channel |
This shows the channel number which you select manually or the root AP automatically scans |
|
and selects. |
|
|
Security |
This shows the level of wireless security the root AP is using. |
|
|
Status |
This shows the current status of the Wireless LAN. |
|
|
Wireless Network Information - 2.4G / 5G |
|
|
|
MAC Address |
This shows the wireless adapter MAC Address of your WAP6806. |
|
|
Wireless Network |
This shows whether the wireless LAN function is enabled or disabled. |
|
|
SSID |
This shows a descriptive name used to identify the WAP6806 in the wireless LAN. |
|
|
Link Rate |
This shows the data transfer rate of the wireless network. |
|
|
Current Channel |
This shows the channel number which you select manually or the WAP6806 automatically scans |
|
and selects. |
|
|
Authentication |
This shows the wireless security mode used to protect the information that is sent in the wireless |
|
network. |
|
|
Mode |
This shows which IEEE 802.1b/g/n wireless networking standards the wireless device supports. |
|
|
WPS Status |
This shows the current status of the WPS. |
|
|
3.5 WPS Sc re e n
Use this screen to connect to another AP. Go to Co nfig ura tio n > Ne two rk > Wire le ss LAN (2.4G / 5G ) > WPS to open the following screen.
Note: Wireless clients cannot use WPS to set up a wireless network with the WAP6806 in repeater mode.
WAP6806 User’s Guide
20
Chapter 3 Repeater Mode
Fig ure 7 Repeater: Configuration > Network > Wireless LAN (2.4G/5G) > WPS
Fig ure 8 AP: Configuration > Network > Wireless LAN (2.4G/5G) > WPS
The following table describes the labels in this screen.
Table 5 Repeater: Configuration > Network > Wireless LAN (2.4G / 5G) > WPS
|
LABEL |
DESC RIPTIO N |
|
|
|
|
WPS Setup |
|
|
|
|
|
WPS |
Select this to enable or disable the WPS feature. |
|
|
|
|
Confirm |
Click C o nfirm to save your changes. |
|
|
|
|
WPS Setup |
|
|
|
|
|
Configured |
This displays Ye s when the WAP6806 has connected to a wireless network using WPS or when |
|
|
Ena ble is selected. |
|
|
|
|
WPS SSID |
This displays the network name for the WPS connection. |
|
|
|
|
WPS Auth Mode |
This displays the security protocol selected for the WPS connection. |
|
|
|
|
|
|
|
|
WAP6806 User’s Guide |
21

|
|
Chapter 3 Repeater Mode |
|
|
|
|
Table 5 Repeater: Configuration > Network > Wireless LAN (2.4G / 5G) > WPS (continued) |
|
|
LABEL |
DESC RIPTIO N |
|
|
|
|
WPS Encryption |
This displays the type of wireless encryption employed by the access point to which you want |
|
Type |
to connect. |
|
|
|
|
PIN Code |
This displays the previous PIN number the system generated. |
|
|
|
|
Generate New |
Click G e ne ra te Ne w PIN to have the WAP6806 generate a PIN number. |
|
PIN |
|
|
|
|
|
Release |
Click this button to remove all configured wireless and wireless security settings for WPS |
|
Configuration |
connections on the WAP6806. |
|
|
|
|
WPS Progress |
|
|
|
|
|
WPS Mode |
Select whether the WAP6806 performs wireless security information synchronization using the |
|
|
PIN configuration method or the Push Button Configuration (PBC) method. |
|
|
|
|
PIN Code |
Type the same PIN number generated in the wireless station’s utility. |
|
|
|
|
Confirm |
Click C o nfirm to save your changes. |
|
|
|
|
WPS Status |
|
|
|
|
|
Status |
This displays the current WPS process. |
|
|
Idle - It means there is no active WPS. |
|
|
Sta rt WSC Pro c e ss - The WPS is activated to set up a wireless network. |
|
|
WPS Suc c e e de d - The client is successfully connected with an AP. |
|
|
WSC Fa ile d - The client fails to connect with an AP. |
|
|
|
|
Progress |
This is an indication bar displaying the WPS connecting progress. |
|
|
|
WAP6806 User’s Guide
22
C HA PTER 4
Ac c e ss Po int Mo de
4.1 O ve rvie w
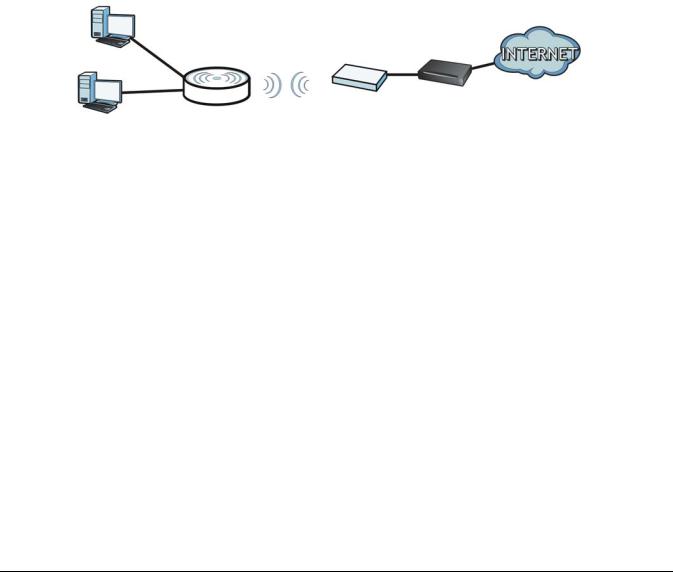
In Access Point (AP) mode your WAP6806 bridges a wired network (LAN) and wireless LAN (WLAN) in the same subnet. See the figure below for an example.
Fig ure 9 Wireless Internet Access in Access Point Mode
4.2Wha t Yo u C a n Do
•Use the Sta tus screen (Section 4.4 on page 24) to view read-only information about your WAP6806.
•Use the IP Alia s screen (Section 11.4 on page 61) to set the IP address for your WAP6806 acting as an access point.
•Use the Wire le ss LAN > WPS screen (Section 12.7 on page 69) to configure WPS on the WAP6806 to associate with another access point.
4.3Wha t Yo u Ne e d to Kno w
With the exception of the O pe ra tio n Mo de , other configuration screens in Access Point mode are similar to the ones in Repeater mode. See Chapter 2 on page 15 of this User’s Guide.
WAP6806 User’s Guide
23

Chapter 4 Access Point Mode
4.3.1 Se tting yo ur WAP6806 to AP Mo de
By default, AP mode in the WAP6806 is not configured with a static IP address. To setup your WAP6806 in AP mode for the first time, the directly-connected router must have the DHCP server function enabled.
1Connect one end of an Ethernet cable to the Ethernet port on the WAP6806 and the other end to your router.
2Connect your computer to your network, make sure both the WAP6806 and computer are under the same subnet.
3Open a web browser window and type “http://zyxelsetup” or “http://192.168.1.2” in the web address. The login screen displays.
4Enter “1234” (default) as the password and click Lo g in.
5Type a new password and retype it to confirm, then click C ha ng e . Otherwise, click Skip.
The WAP6806 Web Configurator displays, which allows you to configure the AP mode. See Section 7.3 on page 33 for details.
4.3.2 C o nfig uring yo ur WLAN, LAN a nd Ma inte na nc e Se tting s
•See Chapter 12 on page 62 and Chapter 11 on page 60 for information on configuring your wireless network and LAN settings.
•See Chapter 14 on page 76 for information on configuring your Maintenance settings.
4.4AP Mo de Sta tus Sc re e n
Click  to open the Sta tus screen.
WAP6806 User’s Guide
24
Chapter 4 Access Point Mode
Fig ure 10 Status Screen: Access Point Mode
The following table describes the labels shown in the Sta tus screen.
Table 6 Status Screen: Access Point Mode
LABEL |
DESC RIPTIO N |
|
|
System Information |
|
|
|
Host Name |
This is the WAP6806’s model name. |
|
|
System Mode |
This is the device mode (Section 2.1.1 on page 15) to which the WAP6806 is set - AP Mo de . |
|
|
Hardware Version |
This displays the hardware version of the device. |
|
|
Firmware Version |
This displays the firmware version and the date created. |
|
|
System Up Time |
This displays the total time the WAP6806 has been on. |
|
|
Current Date/Time |
This displays the WAP6806’s present date and time. |
|
|
Ethernet Information |
|
|
|
MAC Address |
This shows the LAN Ethernet adapter MAC Address of your device. |
|
|
IP Address |
This shows the LAN port’s IP address. |
|
|
IP Subnet Mask |
This shows the LAN port’s subnet mask. |
|
|
Encapsulation mode |
This shows the protocol for encapsulating packages the WAP6806 uses. |
|
|
Gateway |
This shows the gateway of the WAP6806. |
|
|
DNS Server |
This shows the IP address of the DNS Server. |
|
|
IP Alias |
This shows the IP address of the WAP6806. |
|
|
Subnet Mask |
This shows the subnet mask of the WAP6806. |
|
|
Wireless Network Information - 2.4G / 5G |
|
|
|
MAC Address |
This shows the wireless adapter MAC Address of your WAP6806. |
|
|
Wireless Network |
This shows whether the wireless LAN function is enabled or disabled. |
|
|
WAP6806 User’s Guide
25

|
Chapter 4 Access Point Mode |
|
|
Table 6 Status Screen: Access Point Mode (continued) |
|
LABEL |
DESC RIPTIO N |
|
|
SSID |
This shows a descriptive name used to identify the WAP6806 in the wireless LAN. |
|
|
Link Rate |
This shows the data transfer rate of the wireless network. |
|
|
Current Channel |
This shows the channel number which you select manually or the WAP6806 automatically scans |
|
and selects. |
|
|
Authentication |
This shows the wireless security mode used to protect the information that is sent in the wireless |
|
network. |
|
|
Mode |
This shows which IEEE 802.1b/g/n wireless networking standards the wireless device supports. |
|
|
WPS Status |
This shows the current status of the WPS. |
|
|
WAP6806 User’s Guide
26
C HA PTER 5
C lie nt Mo de
5.1 O ve rvie w
Your WAP6806 can act as a wireless client. In wireless client mode, it can connect to an existing network via an access point. Use this mode if you already have an access point or wireless router in your network.
In the example below, one WAP6806 (A) is configured as a wireless client and another is used as an access point (B). The WAP6806 has two wired clients that need to connect to the Internet. The WAP6806 wirelessly connects to the available access point (B).
Fig ure 11 Wireless Client Mode
B
A
After the WAP6806 and the access point connect, the WAP6806 acquires its WAN IP address from the access point. The clients of the WAP6806 can now surf the Internet.
5.2Wha t Yo u C a n Do
•Use the Sta tus screen (Section 5.5 on page 28) to view read-only information about your WAP6806.
•Use the Ethe rne t screen (Chapter 11 on page 60) to set the IP address for your WAP6806.
5.3Wha t Yo u Ne e d to Kno w
With the exception of the Wire le ss LAN screens, the Ethe rne t, Mo nito r, C o nfig ura tio n and Ma inte na nc e screens in Client mode are similar to the ones in Access Point Mode. See Chapter 11 on page 60 through
Chapter 14 on page 76 of this User’s Guide.
5.4 Se tting yo ur WAP6806 to C lie nt Mo de
1 Connect your computer to the LAN port of the WAP6806.
WAP6806 User’s Guide
27
Chapter 5 Client Mode
2The default IP address of the WAP6806 is “192.168.1.2”. In this case, your computer must have an IP address in the range between “192.168.1.3” and “192.168.1.254”.
3Click Sta rt > Run on your computer in Windows. Type “cmd” in the dialog box. Enter “ipconfig” to show your computer’s IP address. If your computer’s IP address is not in the correct range then see Appendix B on page 94 for information on changing your computer’s IP address.
4After you’ve set your computer’s IP address, open a web browser such as Internet Explorer and type “ http://zyxelsetup” or “http://192.168.1.2” as the web address in your web browser.
5Enter “1234” (default) as the password and click Lo g in.
6Type a new password and retype it to confirm, then click C ha ng e . Otherwise, click Skip.
Note: You have to log in to the Web Configurator again when you change modes. As soon as you do, your WAP6806 is already in Client mode.
Note: The client mode IP address is always the same as the access point mode IP address. If you changed the IP address of your WAP6806 while in access point mode, use this IP address in client mode.
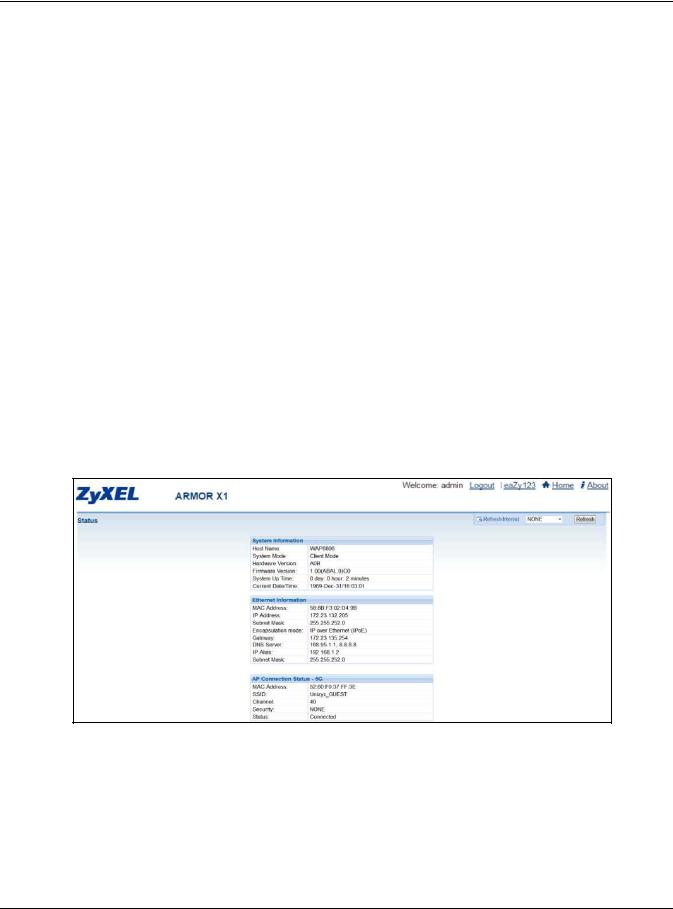
5.5C lie nt Mo de Sta tus Sc re e n
Click  to open the status screen.
Fig ure 12 Status: Client Mode
The following table describes the labels shown in the Sta tus screen.
Table 7 Status Screen: Client Mode
LABEL |
DESC RIPTIO N |
|
|
Device Information |
|
|
|
Host Name |
This is the WAP6806’s model name. |
|
|
System Mode |
This is the device mode (Section 2.1.1 on page 15) to which the WAP6806 is set - C lie nt Mo de . |
|
|
Hardware Version |
This displays the hardware version of the device. |
|
|
WAP6806 User’s Guide
28

|
Chapter 5 Client Mode |
|
|
Table 7 Status Screen: Client Mode |
|
LABEL |
DESC RIPTIO N |
|
|
Firmware Version |
This displays the firmware version and the date created. |
|
|
System Up Time |
This displays the total time the WAP6806 has been on. |
|
|
Current Date/Time |
This displays the WAP6806’s present date and time. |
|
|
Ethernet Information |
|
|
|
MAC Address |
This shows the LAN Ethernet adapter MAC Address of your device. |
|
|
IP Address |
This shows the LAN port’s IP address. |
|
|
Subnet Mask |
This shows the LAN port’s subnet mask. |
|
|
Encapsulation Mode |
This shows the protocol for encapsulating packets the WAP6806 uses. |
|
|
Gateway |
This shows the gateway of the WAP6806. |
|
|
DNS Server |
This shows the IP address of the DNS Server. |
|
|
IP Alias |
This shows the IP address of the WAP6806. |
|
|
Subnet Mask |
This shows the subnet mask of the WAP6806. |
|
|
AP Connection Status - 2.4G / 5G |
|
|
|
MAC Address |
This shows the wireless adapter MAC Address of the root AP. |
|
|
SSID |
This shows a descriptive name used to identify the root AP in the wireless LAN. |
|
|
Channel |
This shows the channel number which you select manually or the root AP automatically scans |
|
and selects. |
|
|
Security |
This shows the level of wireless security the root AP is using. |
|
|
Status |
This shows the current status of the Wireless LAN. |
|
|
WAP6806 User’s Guide
29

C HA PTER 6
The We b C o nfig ura to r
6.1 O ve rvie w
This chapter describes how to access the WAP6806 Web Configurator and provides an overview of its screens.
The Web Configurator is an HTML-based management interface that allows easy setup and management of the WAP6806 via Internet browser. Use a browser that supports HTML5, such as Internet Explorer 9.0 and later versions, Mozilla Firefox 21 and later versions, or Safari 6.0 and later versions or Google Chrome 26.0 and later versions. The recommended screen resolution is 1024 by 768 pixels.
In order to use the Web Configurator you need to allow:
•Web browser pop-up windows from your device. Web pop-up blocking is enabled by default in Windows XP SP (Service Pack) 2.
•JavaScript (enabled by default).
•Java permissions (enabled by default).
Refer to Chapter 15 Troubleshooting to see how to make sure these functions are allowed in Internet Explorer.
6.2 Ac c e ssing the We b C o nfig ura to r
1Make sure your WAP6806 hardware is properly connected and prepare your computer or computer network to connect to the WAP6806 (refer to the Quick Start Guide).
2Launch your web browser.
3Open a web browser such as Internet Explorer and type “http://zyxelsetup” or “http://192.168.1.2” as the web address in your web browser.
6.2.1Lo g in Sc re e n
The Web Configurator initially displays the following login screen.
WAP6806 User’s Guide
30
Loading...