


ES-116S
Ethernet Switch
User’s Guide
Version 1.00
Edition 1
11/2006
v
Table of Contents
ENGLISH 1
РУССКИЙ 13
Copyright © 2006. All rights reserved.
ENGLISH
1 Introduction
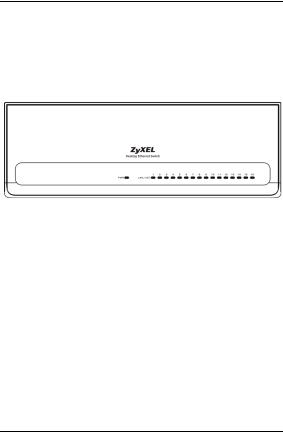
The ES-116S is a 16-port switch that can be used to build high-performance switched networks. The ES-116S is a store-and-forward device that offers low latency for highspeed networking.
1.1 Small Workgroup Application
The ES-116S can be used as a standalone switch to which computers, servers and a printer are directly connected to form a small workgroup.
2 Hardware Installation
The ES-116S is suitable for an office environment where it can be placed on a desktop. If you want to mount it on a wall instead, see section 5.
1 Make sure the ES-116S is clean and dry.
1
ENGLISH
2Set the ES-116S on a smooth, leveled and sturdy flat space strong enough to support the weight of the ES116S and the connected cables. Make sure there is a power outlet nearby.
"Do NOT block the ventilation holes.
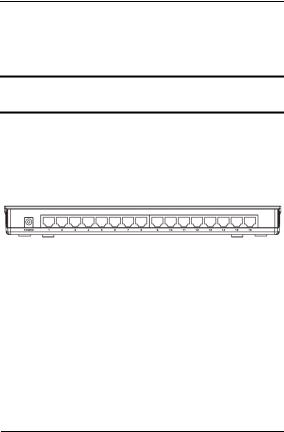
3 Rear Panel Connections
The RJ-45 ports and the power port are located on the rear panel.
3.1 RJ-45 Auto-negotiating Ports
The 10Base-T/100Base-TX RJ-45 ports are autonegotiating and auto-crossover.
An auto-negotiating port can detect and adjust to the optimum Ethernet speed (10/100Mpbs) and duplex mode (full duplex or half duplex) of the connected device.
An auto-crossover (auto-MDI/MDI-X) port automatically works with a straight-through or crossover Ethernet cable.
2
ENGLISH
"Make sure the cable length between connections does not exceed 100 meters (328 feet).
3.2Power
Use the included power cable to connect your ES-116S to a power source.
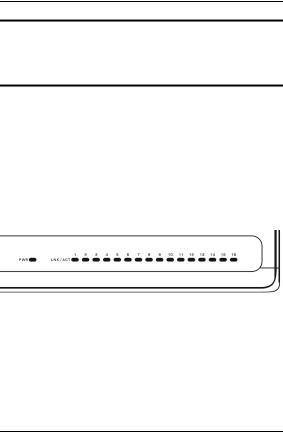
4 LEDs
The LEDs are located on the top panel.
The following table describes the LEDs.
LED |
Status |
Description |
PWR |
On |
The ES-116S is on and receiving power. |
|
|
|
|
Off |
The ES-116S is not receiving power. |
|
|
|
3

|
|
ENGLISH |
|
|
|
LED |
Status |
Description |
LINK/ |
On |
The port is connected to an Ethernet |
ACT |
|
network. |
|
|
|
|
Blinking |
The port is receiving or transmitting data. |
|
|
|
|
Off |
The port is not connected to an Ethernet |
|
|
network. |
|
|
|
5 Wall Mounting (optional)
See the product specifications for the size of screws to use and how far apart to place them.
1Locate a high position on wall that is free of obstructions. Use a sturdy wall.
2Drill two holes for the screws. Make sure the distance between the centers of the holes matches what is listed in the product specifications appendix.
"Be careful to avoid damaging pipes or cables located inside the wall when drilling holes for the screws.
3Do not screw the screws all the way into the wall. Leave a small gap of about 0.5 cm between the heads of the screws and the wall.
4

ENGLISH
4Make sure the screws are snugly fastened to the wall. They need to hold the weight of the Prestige with the connection cables.
5Align the holes on the back of the Prestige with the screws on the wall. Hang the Prestige on the screws.
6 Product Specifications
The following table lists the specifications.
Ethernet Standard |
IEEE802.3 10BASE-T Ethernet |
|
IEEE802.3u 100BASE-TX Fast Ethernet |
|
ANSI/IEEE802.3 Auto-negotiation |
|
IEEE802.3x Flow Control |
|
|
Protocol |
CSMA/CD |
|
|
Technology |
Store-and-Forward switching architecture |
|
Supports broadcast storm control |
|
|
Non-blocking Wire |
3.2 Gbps |
Speed |
|
|
|
Transfer Rate |
Ethernet: 10Mbps (half duplex), 20Mbps (full |
|
duplex) |
|
Fast Ethernet: 100 Mbps (half duplex), |
|
200Mbps (full duplex) |
|
|
Data Forwarding |
14880 pps for 10Base-T (Ethernet) |
Rate |
148800 pps for 100Base-T (Fast Ethernet) |
|
|
Connector |
RJ-45; Auto-MDIX on all ports |
|
|
MAC Address |
8K MAC address table |
|
|
5

|
ENGLISH |
|
|
Memory Buffer |
160 KB |
|
|
Network Cable |
10BASE-T: 100Ω 2-pair UTP/STP Cat. 3, 4, 5 |
|
100BASE-TX: 100Ω 2-pair UTP/STP Cat. 5 |
|
|
Power Supply |
External; 12 V, 1 A (100 - 240 V, 50 - 60 Hz) |
|
|
Temperature |
Operating: 0ºC ~ 45ºC (32ºF ~ 122ºF) |
|
|
Humidity |
Operating: 10% ~ 90% (Non-condensing) |
|
|
Dimensions |
293 (L) x 101.5 (W) x 33.7 (H) mm |
|
|
Screw Size |
M3.5 * 15 mm (for wall mounting) |
|
(not provided) |
|
|
Distance Between |
200 mm (center-to-center) |
Holes |
|
|
|
EMI & Safety |
FCC Class A, CE, C-Tick |
|
|
Certifications
Federal Communications Commission (FCC)
Interference Statement
This device complies with Part 15 of FCC rules. Operation is subject to the following two conditions:
•This device may not cause harmful interference.
•This device must accept any interference received, including interference that may cause undesired operations.
6

ENGLISH
FCC Warning
This device has been tested and found to comply with the limits for a Class A digital switch, pursuant to Part 15 of the FCC Rules. These limits are designed to provide reasonable protection against harmful interference in a commercial environment. This device generates, uses, and can radiate radio frequency energy and, if not installed and used in accordance with the instruction manual, may cause harmful interference to radio communications. Operation of this device in a residential area is likely to cause harmful interference in which case the user will be required to correct the interference at his own expense.
CE Mark Warning
This is a class A product. In a domestic environment this product may cause radio interference in which case the user may be required to take adequate measures.
Notices
Changes or modifications not expressly approved by the party responsible for compliance could void the user's authority to operate the equipment.
This Class A digital apparatus complies with Canadian ICES-003.
7

ENGLISH
Cet appareil numérique de la classe A est conforme à la norme NMB-003 du Canada.
Taiwanese BSMI (Bureau of Standards, Metrology
and Inspection) A Warning:
Viewing Certifications
Refer to the product page at www.zyxel.com.
Safety Warnings
"For your safety, be sure to read and follow all warning notices and instructions.
•Do NOT use this product near water, for example, in a wet basement or near a swimming pool.
•Do NOT expose your device to dampness, dust or corrosive liquids.
8
 Loading...