

Page 1
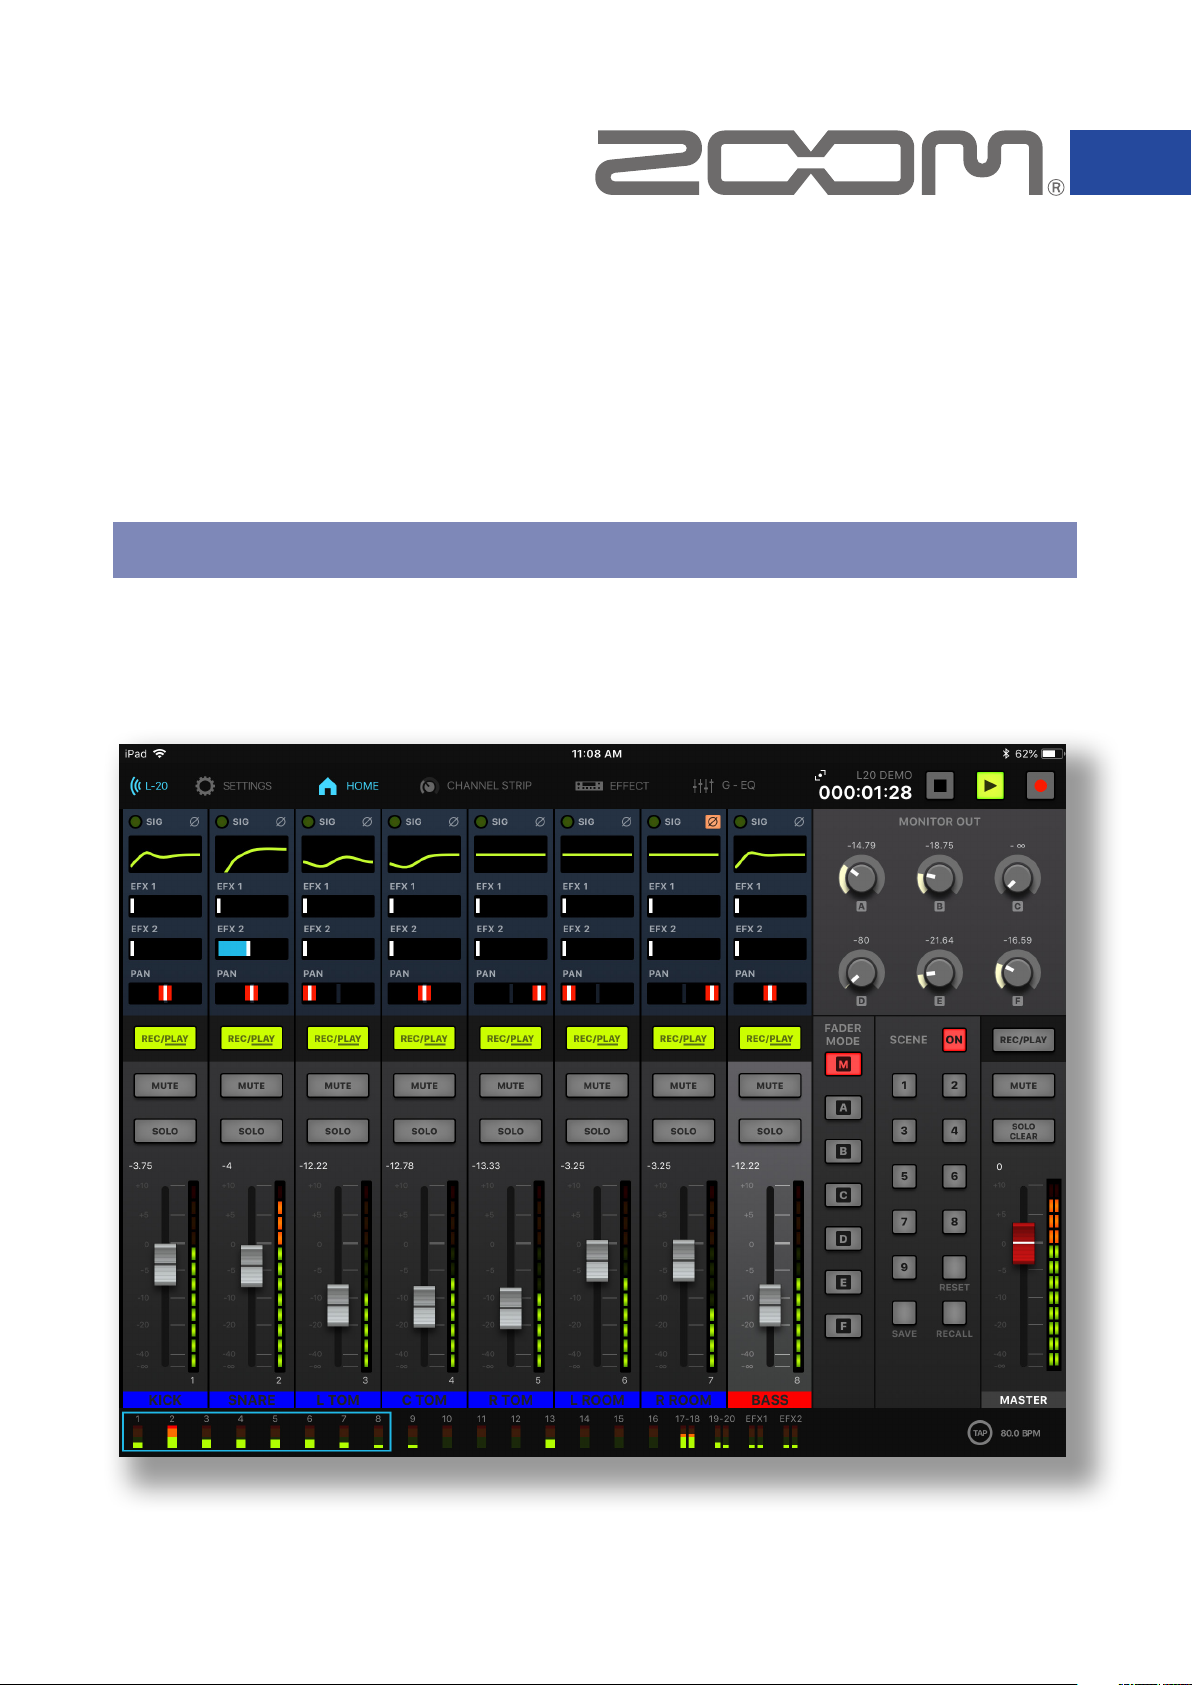
L-20 Control
Version 2.0
Operation Manual
This document cannot be displayed properly on black-and-white displays.
© 2019 ZOOM CORPORATION
Copying or reprinting this manual in part or in whole without permission is prohibited.
Page 2
Contents
Introduction . . . . . . . . . . . . . . . . . . . . . . . . . . . . . . . . . . . . . . . . . . . . . . . . . . . . . . . . . . . 3
Copyrights . . . . . . . . . . . . . . . . . . . . . . . . . . . . . . . . . . . . . . . . . . . . . . . . . . . . . . . . . . . . 3
Functions added in Version 2.0 . . . . . . . . . . . . . . . . . . . . . . . . . . . . . . . . . . . . . . . . . . . . 3
Installing L-20 Control . . . . . . . . . . . . . . . . . . . . . . . . . . . . . . . . . . . . . . . . . . . . . . . . . . . 3
Pairing (connecting) with the
Operation screen overview . . . . . . . . . . . . . . . . . . . . . . . . . . . . . . . . . . . . . . . . . . . . . . . 5
Main Areas . . . . . . . . . . . . . . . . . . . . . . . . . . . . . . . . . . . . . . . . . . . . . . . . . . . . . . . . . . 5
Navigation between views . . . . . . . . . . . . . . . . . . . . . . . . . . . . . . . . . . . . . . . . . . . . . 5
Input Channels . . . . . . . . . . . . . . . . . . . . . . . . . . . . . . . . . . . . . . . . . . . . . . . . . . . . . . . 6
Channel Strip . . . . . . . . . . . . . . . . . . . . . . . . . . . . . . . . . . . . . . . . . . . . . . . . . . . . . . . . 6
Effects . . . . . . . . . . . . . . . . . . . . . . . . . . . . . . . . . . . . . . . . . . . . . . . . . . . . . . . . . . . . . . 7
Graphic EQ . . . . . . . . . . . . . . . . . . . . . . . . . . . . . . . . . . . . . . . . . . . . . . . . . . . . . . . . . 7
Master Section . . . . . . . . . . . . . . . . . . . . . . . . . . . . . . . . . . . . . . . . . . . . . . . . . . . . . . . 8
Large Record Panel . . . . . . . . . . . . . . . . . . . . . . . . . . . . . . . . . . . . . . . . . . . . . . . . . . . 8
Controlling the Mix . . . . . . . . . . . . . . . . . . . . . . . . . . . . . . . . . . . . . . . . . . . . . . . . . . . . . 9
Mixing Input Channels . . . . . . . . . . . . . . . . . . . . . . . . . . . . . . . . . . . . . . . . . . . . . . . . 9
Making Channel Strip Adjustments . . . . . . . . . . . . . . . . . . . . . . . . . . . . . . . . . . . . . 10
Adding an Effect to a Channel . . . . . . . . . . . . . . . . . . . . . . . . . . . . . . . . . . . . . . . . . 12
Editing Effects . . . . . . . . . . . . . . . . . . . . . . . . . . . . . . . . . . . . . . . . . . . . . . . . . . . . . . 12
Graphic EQ . . . . . . . . . . . . . . . . . . . . . . . . . . . . . . . . . . . . . . . . . . . . . . . . . . . . . . . . 13
Recording Tracks . . . . . . . . . . . . . . . . . . . . . . . . . . . . . . . . . . . . . . . . . . . . . . . . . . . . . . 14
Record Setup . . . . . . . . . . . . . . . . . . . . . . . . . . . . . . . . . . . . . . . . . . . . . . . . . . . . . . . 14
Recording . . . . . . . . . . . . . . . . . . . . . . . . . . . . . . . . . . . . . . . . . . . . . . . . . . . . . . . . . . 14
. . . . . . . . . . . . . . . . . . . . . . . . . . . . . . . . . 4
Playing Tracks . . . . . . . . . . . . . . . . . . . . . . . . . . . . . . . . . . . . . . . . . . . . . . . . . . . . . . . . . 15
Using Scenes . . . . . . . . . . . . . . . . . . . . . . . . . . . . . . . . . . . . . . . . . . . . . . . . . . . . . . . . . 16
Saving Scenes . . . . . . . . . . . . . . . . . . . . . . . . . . . . . . . . . . . . . . . . . . . . . . . . . . . . . . 16
Recalling Scenes . . . . . . . . . . . . . . . . . . . . . . . . . . . . . . . . . . . . . . . . . . . . . . . . . . . . 16
Adjusting the Monitor Out A - F Mixes . . . . . . . . . . . . . . . . . . . . . . . . . . . . . . . . . . . . 17
Copying a Mix . . . . . . . . . . . . . . . . . . . . . . . . . . . . . . . . . . . . . . . . . . . . . . . . . . . . . . 17
Using multiple iPads to control an
(new function in Version 2.0) . . . . 18
2
Page 3

Introduction
L-20 Control is a remote control application specifically designed for the ZOOM
LiveTrak
and other functions, this app allows you to operate an
iPad.This manual does not explain the operation of
selves.See the Operation Manual for detailed information about all its functions.
and . With control of recording, playback, mixer adjustments
or from an
and mixers them-
Copyrights
iPad is a trademark of Apple Inc., registered in the U.S. and other countries. iOS
is a trademark or registered trademark of Cisco in the U.S. and other countries
and is used under license. App Store is a service mark of Apple Inc.
®
The Bluetooth
SIG, Inc. and these marks are used under license by Zoom Corporation. Other
trademarks and trade names are the property of their respective companies.
All trademarks and registered trademarks in this document are for identifica-
word mark and logo are registered trademarks of Bluetooth
tion purposes only and are not intended to infringe on the copyrights of their
respective owners.
Functions added in Version 2.0
The following function have been added in L-20 Control Version 2.0.
• Multiple iPads can be used to control an
This allows individual performers using different iPads to adjust their own
monitor mixes.
.
Installing L-20 Control
Open the App Store on the iPad and search for “L-20 Control”.
1.
Tap "GET" on the L-20 Control screen.
2.
This will install L-20 Control on the device.
NOTE
· When you launch L-20 Control, you must pair it with the or that it will operate (
→
“Pairing (connecting) with the
3
” on page 4).
Page 4
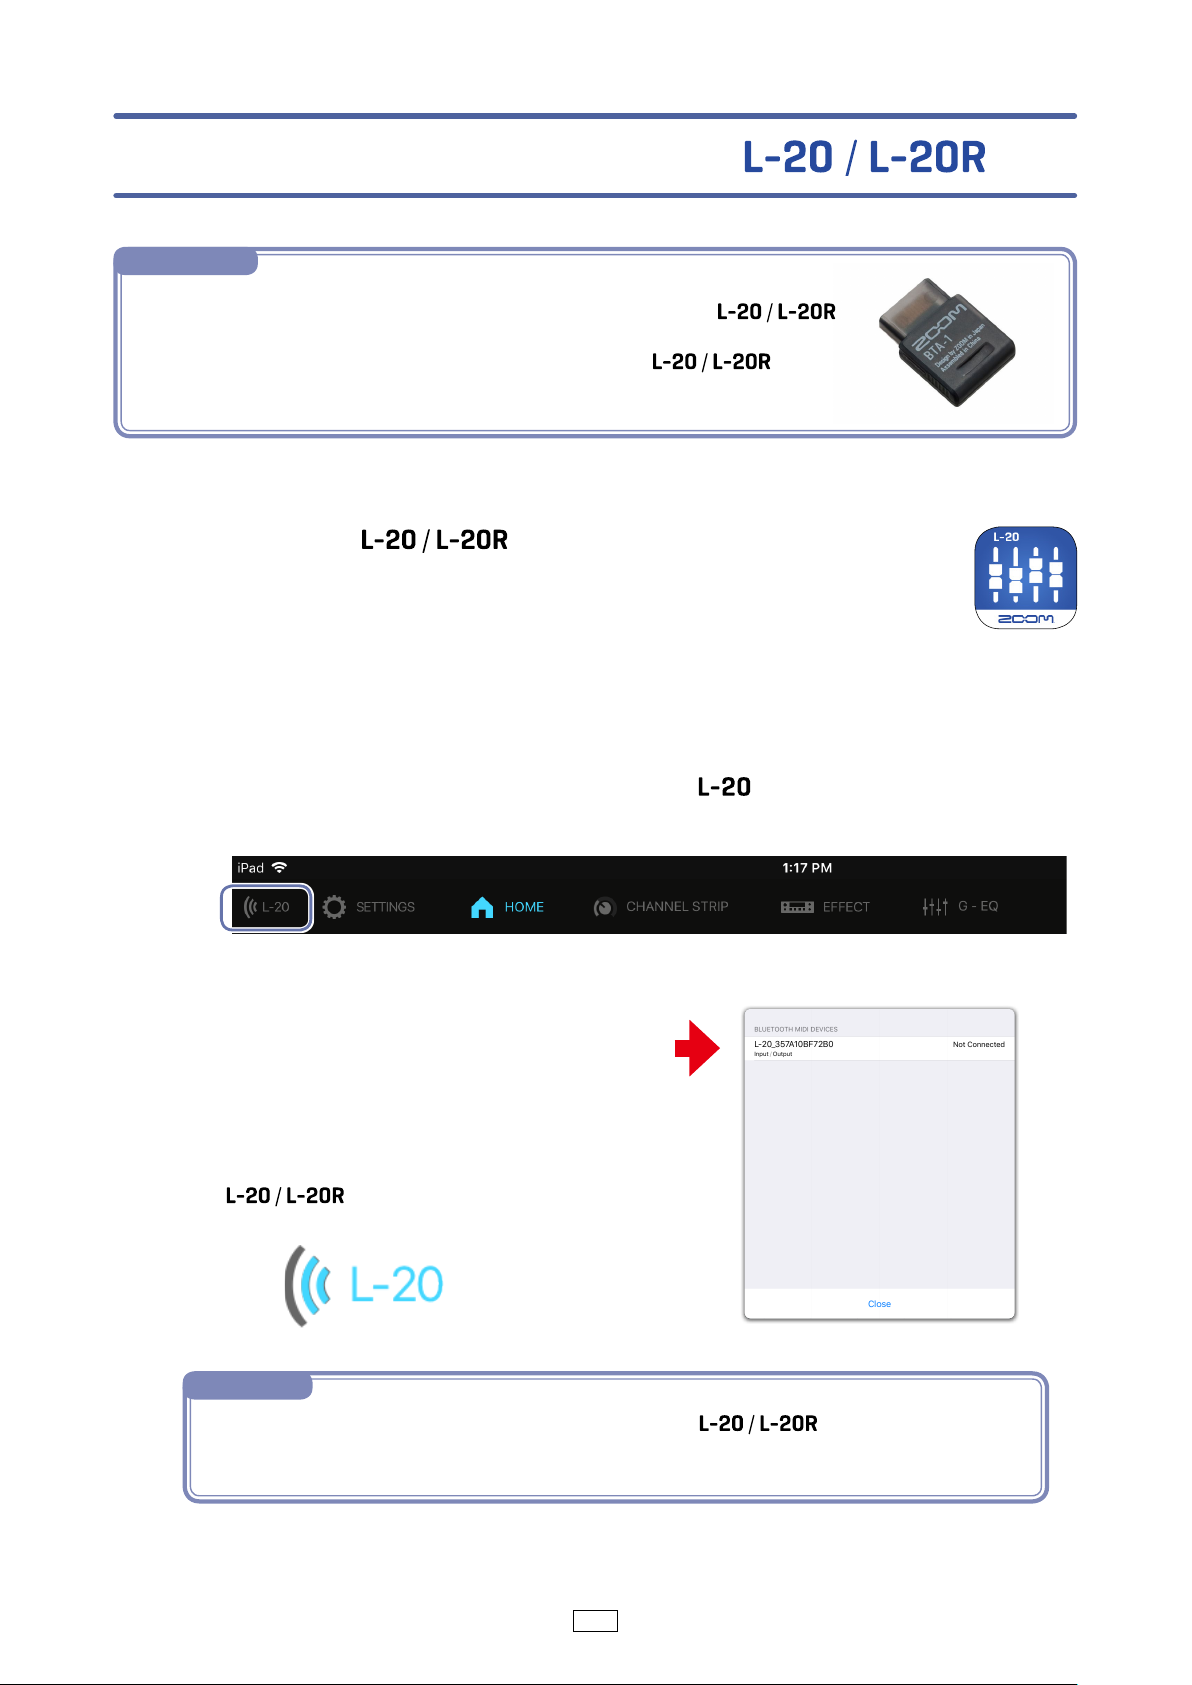
Pairing (connecting) with the
NOTE
· A separate ZOOM BTA-1 Bluetooth adapter must be installed in the to
remotely control it from an iPad. With a BTA-1, transmission up to 10 m is possible
when used indoors without obstacles. For details, see the
manual.
Turn on the
1.
Tap the L-20 Control app icon.
2.
L-20 Control will launch.
.
operation
The Bluetooth MIDI Devices List will appear when it is launched.
3.
To open the Bluetooth Device list tap the
Tap the Device Name/ID to connect.
4.
Tap Close.
The L-20 icon in the tool bar changes to
blue when the app is connected to the
.
button in the toolbar.
NOTE
· If pairing is not successful, move the iPad closer to the or move both to a place
where nothing interferes with radio waves and try connecting again.Confirm also that the Bluetooth function of the iPad can be used.
4
Page 5
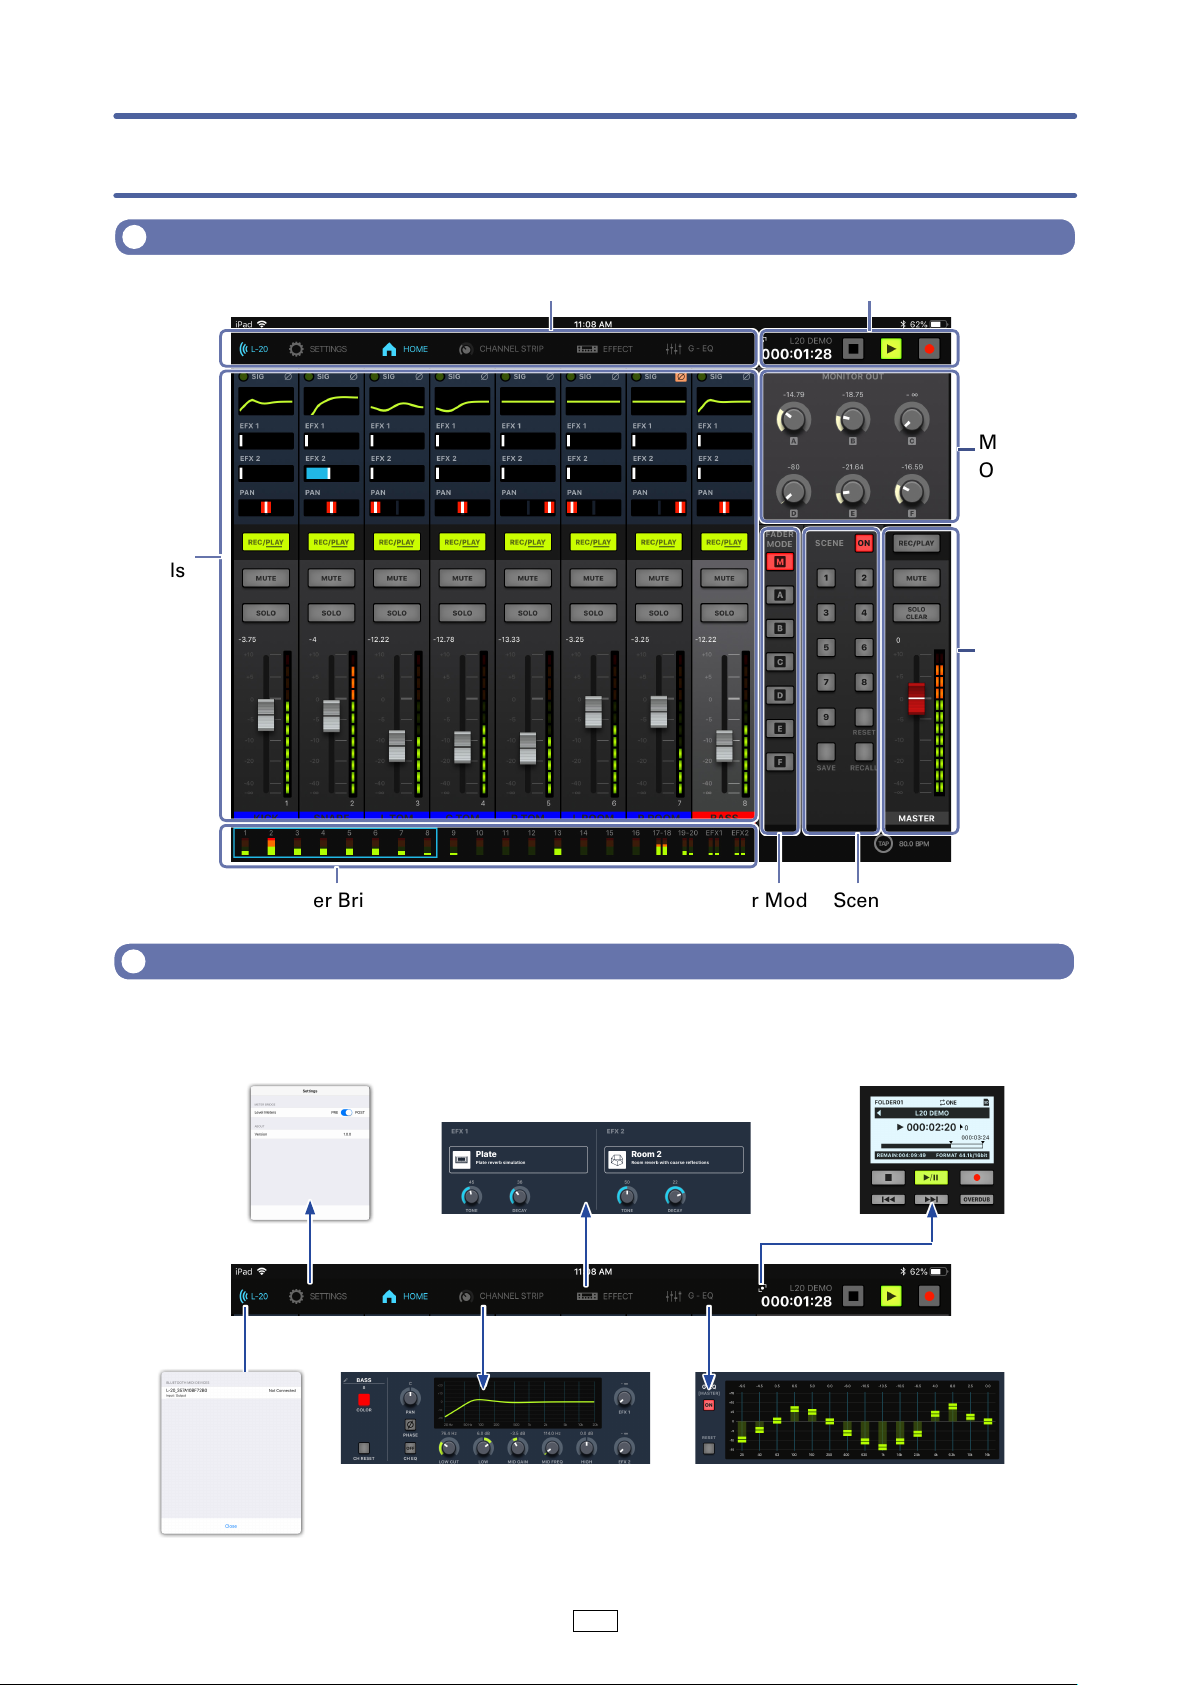
Operation screen overview
Main Areas
Input
Channels
Toolbar
Transport
Monitor
Out
Master
Out
Meter Bridge
Fader Mode Scene
Navigation between views
Tap the buttons in the toolbar to access other views.
Setting Window
Effects
Record Panel
Device List
Graphic EQChannel Strip
5
Page 6
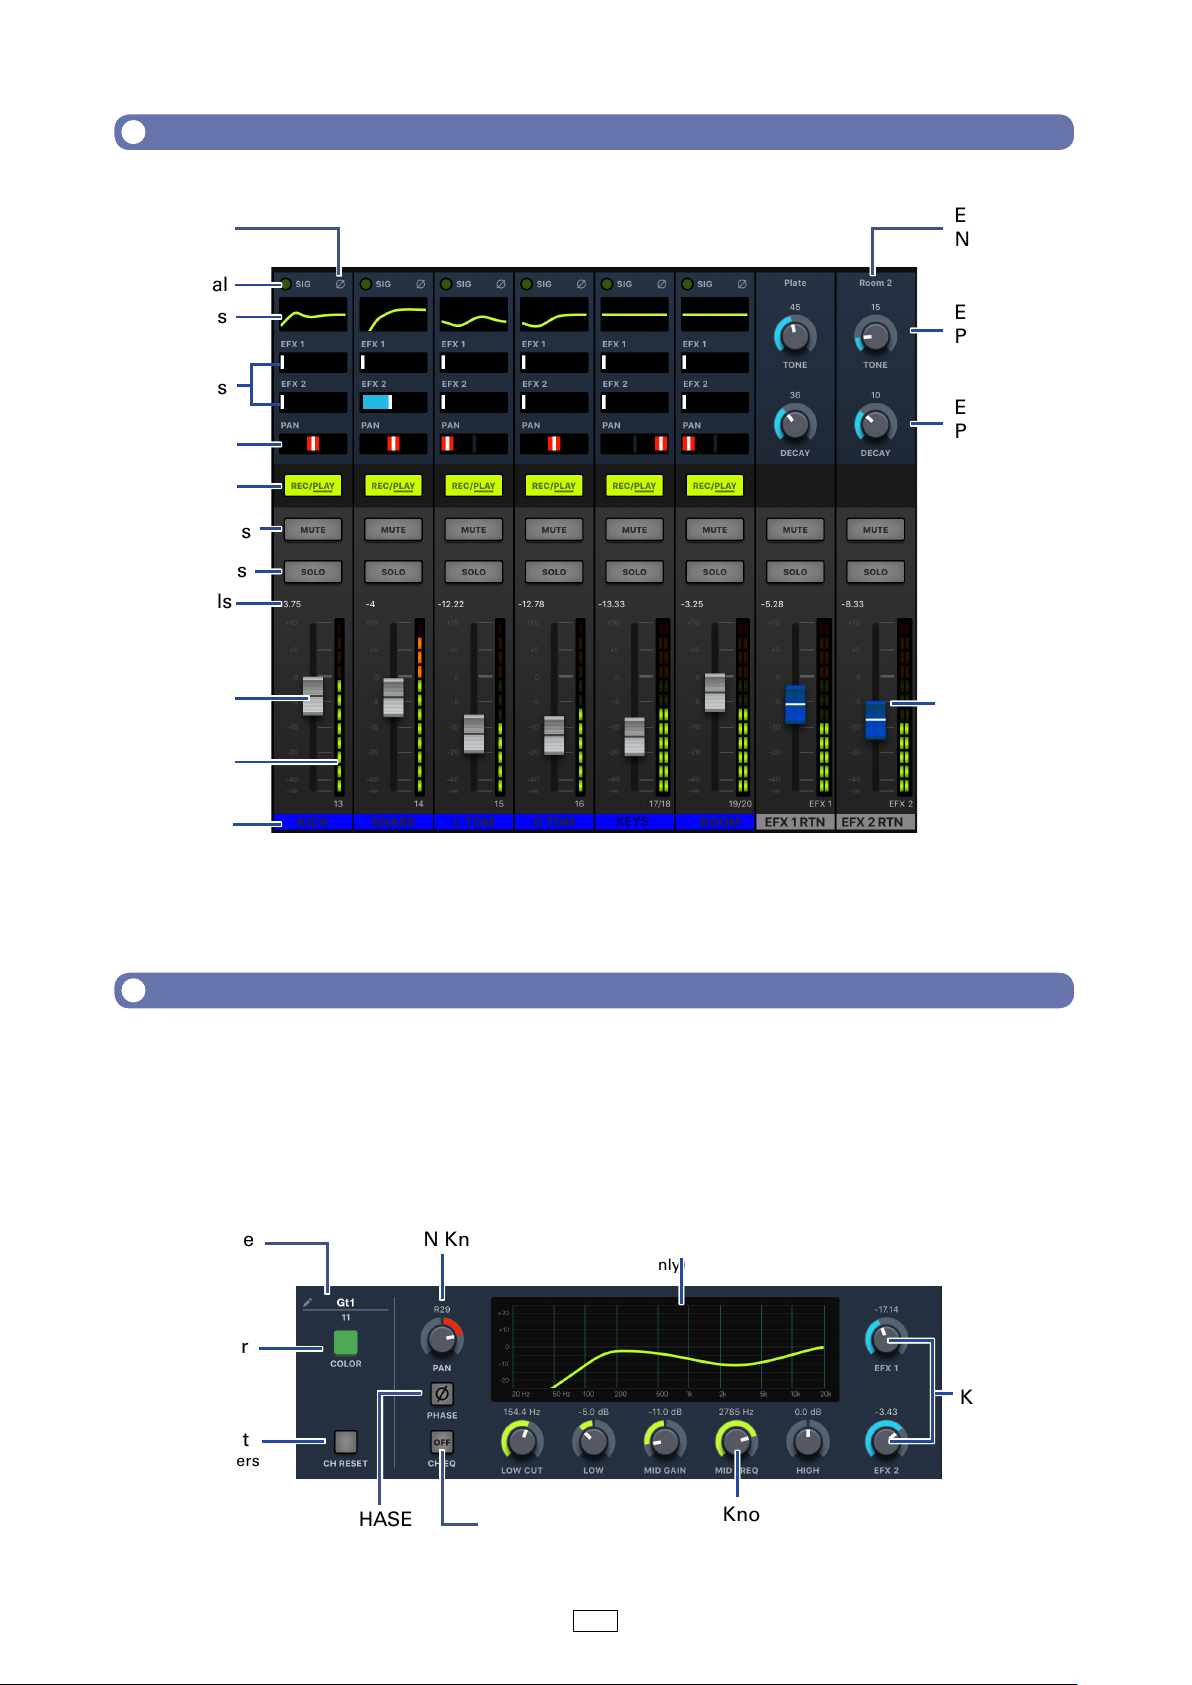
Input Channels
Phase on
Indicators
Input Signal
EQ Displays
EFX1, 2
Send faders
Pan faders
REC/PLAY
Buttons
MUTE Buttons
SOLO Buttons
Fader Levels
Channel
Faders
Level
Meters
Effect
Names
Effect
Parameter 1
Effect
Parameter 2
Effect Return
Faders
Channel
Names
Channel Strip
The channel strip displays the settings for the selected channel. From here you can
make detailed parameter adjustments. This includes: Channel Name, Channel Color,
Pan, Phase, EQ Low Cut, EQ Low, EQ MID Gain, EQ MID Frequency , EQ High, Effects
Send 1 and Send 2 Levels.
Channel Name
(Tap to edit)
Channel Color
(Tap to edit)
PAN Knob
EQ Curve Plot
(Display Only)
Send EFX
Knobs
Channel Reset
Sets all parameters
to their default
settings
PHASE
Button
EQ OFF
(Tap to bypass EQ)
6
EQ Knobs
Page 7

Effects
The Effects page lets you see and change which effects are assigned and adjust their parameters.
Effect Name and Description
(Tap to select a different effect)
Parameter 2 Knob
Parameter 1 Knob
Graphic EQ
The 15-band Graphic EQ lets you adjust the tone of the Master Out. The only
way to access the Graphic EQ is using the L-20 Control application.
Graphic EQ Faders
G-EQ ON/OFF
(Tap to turn ON/OFF)
RESET
Tap to set all faders
to 0 dB.
Frequency
Labels
Gain Values
7
Page 8
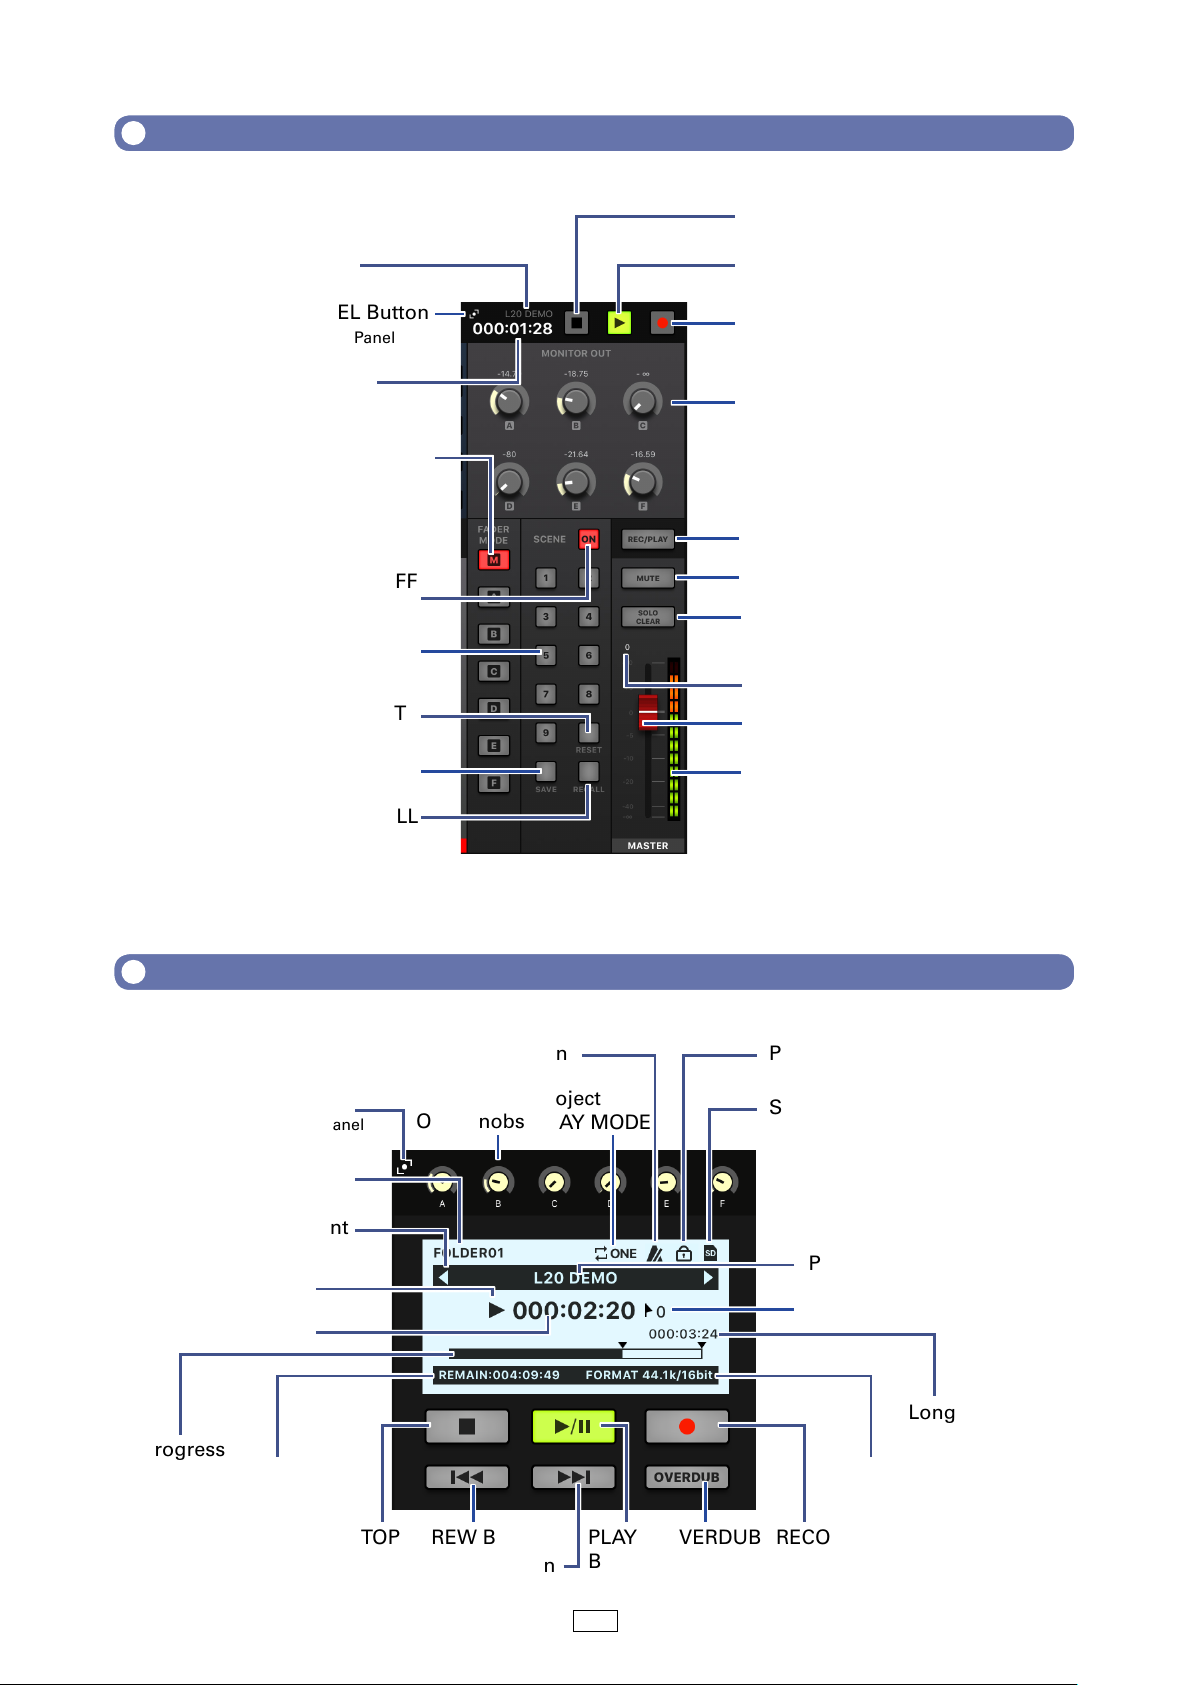
Master Section
STOP Button
Project Name
CHANGE PANEL Button
Tap to view Record Panel
Project Counter
FADER MODE Buttons
Create separate mixes for
Monitor A-F outputs
SCENE ON/OFF
Button
1 - 9 Buttons
SCENE RESET
SCENE SAVE
SCENE RECALL
PLAY Button
RECORD Button
MONITOR OUT Knobs
MASTER REC/PLAY Button
MUTE Button
SOLO CLEAR Button
Tap to unsolo any solo’d channels
Master Fader Level
Master Level Fader
Master Level Meters
Large Record Panel
CHANGE PANEL Button
Tap to view MONITOR OUT Panel
Project Folder Location
Prev/next project present
Project Status icon
Counter
Progress
Bar
Available
Record Time
STOP
Button
MONITOR
OUT Knobs
REW Button
FF Button
Project
PLAY MODE
PLAY
Button
OVERDUB
Button
Project Protected IconMetronome Enabled Icon
SD Card detected Icon
Project Name
Mark Number
Longest File Time
in Project
Project Audio
Format
RECORD
Button
8
Page 9

Controlling the Mix
Mixing Input Channels
Tap on the Toolbar.
1.
Adjust parameter settings
2.
on the Home Screen.
■ Adjusting pan faders
1
2
Drag a pan fader left and right to adjust its value.
NOTE
· Double-tap a fader to reset it to the default value.
■ Adjusting send faders
Drag a send fader left and right to adjust its value.
■ Adjusting level faders
Drag a level fader up and down to adjust its value.
NOTE
· To make fine adjustments, tap the fader cap, slide your
finger to right or left and then up and down.
9
Page 10

Making Channel Strip Adjustments
Tap a channel to select it.
1.
Tap on the Toolbar.
2.
3
The Channel Strip is
3.
displayed above the
channels.
■ Adjusting Channel Strip knobs
2
1
■ Editing Channel Color
Slide a control knob left and right (or up and down) to adjust
its value. The parameter popup appears while adjustments
are made.
NOTE
· To make Channel Strip changes to a different channel,
just tap the desired channel.
Tap the COLOR button and select a color from the Color popup.
The color on the bottom of the channel is updated.
10
Page 11

■ Editing the Channel Name
Tap the Channel Name and edit it using the on-screen keyboard. Tap done and the edited name
will appear in the channel.
NOTE
· The Channel Name can have up to 8 characters.
· The following characters can be used in the Channel Name:
(space) ! # $ % & ‘ ( ) + , - 0 1 2 3 4 5 6 7 8 9 ; = @
A B C D E F G H I J K L M N O P Q R S T U V W X Y Z [ ] ^ _ ` a b c d e f g h i j k l m n o p q r
s t u v w x y z { ~ }
■ Channel Reset
To reset all channel settings to their default values, tap the CH RESET button. A confirmation
popup will appear asking you to confirm.
11
Page 12

Adding an Effect to a Channel
Tap a channel to select it.
1.
Adjust the EFX1, 2 Send
2.
Level.
4
2
Adjust the EFX1, 2 Return
3.
Level Fader.
Tap the button.
4.
Editing Effects
Tap the button in the toolbar.
1.
Tap the current effect name
2.
The effect select screen appears.
1
3
2
Tap another effect icon to select it.
3.
The select screen closes.
Tap and slide the effect controls to
4.
adjust the effect parameters.
3
4
12
Page 13

Graphic EQ
The Graphic EQ lets you adjust the tone of the Master Out.
The G-EQ is only controllable from the L-20 Control application. Graphic EQ settings are stored on the
.
3
2
Tap the button in the toolbar.
1.
Turn the G-EQ on by tapping .
2.
Slide the faders up to increase gains or down to decrease gains at desired
3.
frequencies.
NOTE
· To make fine adjustments, tap the fader cap, slide your finger to right or left and then up and
down.
· Double-tap a fader to reset it to the default value.
· Tapping
· If the
sets all faders to 0 dB.
is turned off and on again, the graphic EQ will be set off.
13
Page 14

Recording Tracks
Record Setup
Setting up to record is done primarily on the
Recording resolution
■
Making physical connections
■
Adjusting the input gain, compression level
■
Metronome settings
■
Once setup is complete, with the L-20 Control application, you can:
Check the
■
Enable channels for record and playback
■
Control channel levels, effects
■
■
Set the Tempo
Start/stop the transport
■
Enable Overdub
■
recording settings
mixer. This includes:
Recording
Ta p
1.
tion” on page 8).
Tap repeatedly on the channels you
2.
want to record until they are record enabled
In the Record panel, tap .
3.
When ready to start recording, tap
to open the Record Panel (→“Master Sec-
.
.
NOTE
· To record additional takes in the current project, you must
enable Overdub.
14
Page 15

Playing Tracks
Tap
1.
tion” on page 8).
Tap repeatedly on the channels you
2.
want to playback until they are playback enabled
to open the Record Panel (→“Master Sec-
.
In the Record panel, tap .
3.
15
Page 16

Using Scenes
Saving Scenes
Tap to enable it.
1.
Tap .
2.
Buttons
Adjusting input levels
and blink if they do not.
Tap
Tap one of the buttons labeled to where you
3.
want to save the scene.
Recalling Scenes
Tap to enable it.
1.
to will light if they have saved scenes
again if you do not want to save a scene.
Tap .
2.
Buttons
not.
Tap
Tap the button for the scene you want to recall.
3.
The scene for the selected number is recalled.
to will blink if they have saved scenes and lights off if they do
again if you do not want to recall a scene.
16
Page 17

Adjusting the Monitor Out A - F Mixes
Tap to button to select the output to mix.
1.
The selected output button lights and operation of all the
channel faders is enabled.
Use the channel faders to adjust the volumes.
2.
Copying a Mix
While tapping and holding , to for the output you want
1.
to copy, press a blinking copy destination ( , to ).
This copies the mix from the source to the destination.
17
Page 18
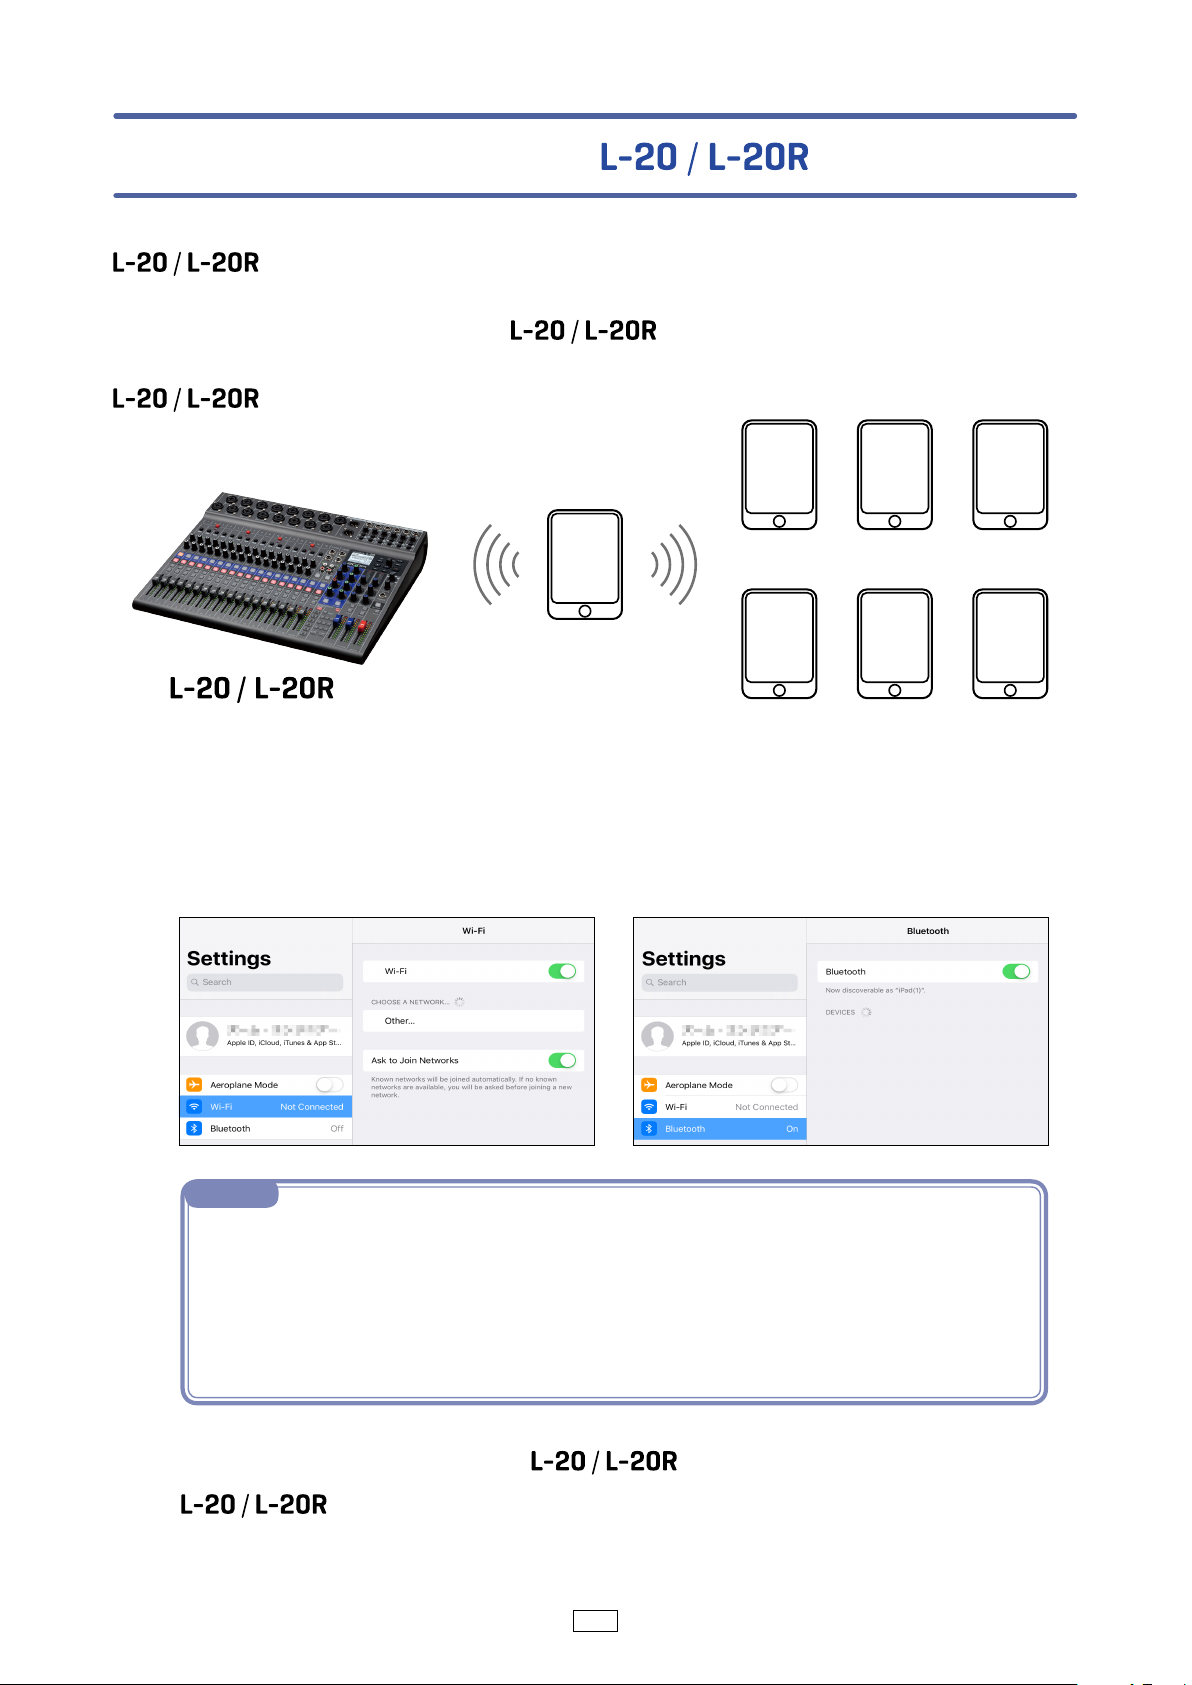
Using multiple iPads to control an
(new function in Version 2.0)
Using L-20 Control (Version 2.0 or later), multiple iPads can be connected to an
and used to control it.
One iPad acts as the hub device and relays transmissions between the other
iPads (remote devices) and the
. Up to 6 iPads can be connected
as remote devices, making a maximum of 7 that can be used to control an
simultaneously.
iPad(2) iPad(3)
iPad(1)
Hub device
iPad(5) iPad(6) iPad(7)
Remote devices (up to 6)
Confirm that the wireless LAN and Bluetooth functions are activated on the
1.
hub and remote devices.
iPad(4)
NOTE
· Hub and remote devices can communicate even if they are not connected to the same wireless
LAN access point.
· Connecting hub and remote devices to the same wireless access point can increase the maximum communication distance. In this case, the maximum communication distance depends
on the specifications of the connected wireless LAN access point.
· If communication with the remote device is unstable, moving closer to the connected wireless
LAN access point might improve it.
Connect the hub device to the (→“Pairing (connecting) with the
2.
” on page 4).
18
Page 19

Launch L-20 Control on a remote device.
3.
Hub devices that can be connected appear on the remote device.
4.
If this does not appear, tap the
On the remote device, tap the device name/ID under HUB DEVICES to connect
5.
them.
key to show it.
A message confirming connection with the remote device appears on the hub
6.
device. Select “Yes” to accept the connection.
When connection succeeds, an icon showing the number of connected devices
appears at the bottom right of the hub device screen.
On the remote device, the icon in the toolbar changes to a REMOTE
MODE icon.
NOTE
· Only MONITOR OUT A-F can be controlled from a remote device.
· Only pre-fader levels can be shown by the level meters on the remote device.
19
Page 20

ZOOM CORPORATION
4-4-3 Kanda-surugadai, Chiyoda-ku, Tokyo 101-0062 Japan
www.zoom.co.jp
Z2I-3418-02
 Loading...