

Page 1
V^;í4£fí;f
ri'J-' - .
■ !. ( c /
.■* ; ■-■
,¿T-
:í :
. ; ■ ti' '•
É'-;-- -.".ht
■ r|“L';|
f. ■.iiiïiv.'»'-'.--
■ir.. -.nu x:' .-'■-■i-'J ;■■ Í ti :■:'■■;■■
•;^кc£'l^iîí'.■-
■.:r::v-;.: ;
-■. -r-i ;
:■■...'■.
■*
h
■■■; .-'h -.ííjíí iií?Í-í.íí:tíilTíi'
vi
íí . ... ., : . ■fí'jfS'-"
í ■ > fyi'.k'iri'y:--'
Owner’s Guide
Spielanleitung
Mode d'emploi
Manual del Propietario
Page 2

Congratulations!
Herzlichen
Glückwunsch
Félicitations!
'Enhorabuena!
You are now the proud owner of a Yamaha
PortaTone. Your PortaTone is a highquality musical instrument that
incorporates advanced Yamaha digital
technology along with many versatile
features. In order to obtain maximum
performance and enjoyment from your
PortaTone, we urge you to read this
Owner's Guide thoroughly while trying out
the various features described. Be sure to
keep this Owner's Guide in a safe place
for later reference.
Und vielen Dank für den Kauf des
Yamaha PortaTunes PSR-7. Bei Ihrem
Portalbne PSR-7 handelt es sich um ein
hochwertiges Keyboard, das auf der
wegweisenden Yamaha
Digitaltechnologie basiert und Ihnen
zahlreiche praktische Funktionen bietet,
Bitte lesen Sie sich zunächst diese
Anleitung sorgfältig durch und
probieren Sie gleichzeitig die
beschriebenen Funktionen aus, damit
Sie das großartige Potential dieses
Instruments kennenlemen. Danach
sollten Sie diese Anleitung zur späteren
Bezugnahme an einem sicheren Ort
auibe wahren.
Vous voilà à présent le fier propriétaire
d'un PortaTone Yamaha. Votre PortaTone
est un instrument de musique de très
grande qualité incorporant les toutes
dernières innovations de la technologie
numérique de Yamaha et une très grande
variété de fonctions ultra-perfectionnées.
Afin d'obtenir des performances
maximales de votre PortaTone et d’en tirer
le plus de satisfactions possibles, nous
vous conseillons de lire très attentivement
ce mode d'emploi tout en essayant les
fonctions qui y sont décrites. Cionserver le
mode d'emploi en lieu sûr afin de pouvoir
vous y reporter ultérieurement si besoin
est.
Usted es un oi^lloso propietario de un
Yamaha PortaTbne. Su PortaTbne es un
instrumento musical de alta calidad que
incorpora la avanzada tecnología digital
de Yamaha y muchas versátiles
características. Para aprovechar al
máximo su rendimiento y disfrutar con
el Portalbne, le aconsejamos que lea
toda este Manual del í^pietario
mientras intenta las diversas
características descritas. Guarde el
Manual del Propietario en un lugar
seguro para poderlo consultar en el
futuro.
CONTENTS
1. BEFORE YOU BEGIN.........................3
Power Supply
Using Batteries..............................3
Using an Optional
Power Adaptor ..............................4
Remove the Protective Film
Setting Up the Music Stand
Taking Care of Your Portatone
2. NOMENCLATURE
Top Panel Controls
Rear Panel Connectors
3. ENJOY THE
DEMONSTRATION
....................................
.............
..............
........
..............................
............................
.....................
............................
INHALT
L VOR DEM SPIELEN
3
4
4
4
6
6
7
8
Stromversorgung..............................3
Stromversorgung über
Batterien
......................................
Stromversorgung über getrennt
erhältlichen Adapter
Entfernen der Schutzfolie
Anbringen des Notenständers
Vorsichtsmaßnahmen
......................
2. BEZEICHNUNG
DER TEILE
Bedienelemente................................6
Anschlüsse auf der Rückseite
................................
3. DEMO-WIEDERGABE.............8
.................
...................
................
..........
..........
TABLE DES MATIERES
1. AVANT DE COMMENCER
3
Alimentation électrique
3
4
4
4
4
6
7
Fonctionnement sur piles
Utilisation d'un adaptateur secteur
en option
Retrait de la pellicule protectrice......4
Mise en place du pupitre
Entretien du PortaTone
2. NOMENCLATURE
Commandes du panneau
supérieur.............................................6
Prises du panneau arrière.................7
3. ECOUTE DE LA MUSIQUE DE
DEMONSTRATION
........................................
................
.....................
...........
...................
....................
..............................
.............................
INDICE
3
L ANTES DE COMENZAR
3
3
Alimentación
Empleo de las pilas
Empleo de un adaptador de
4
alimentación opcional
Extracción de la película
4
4
6
protectora.........................................4
Colocación del portapartituras
Cuidados del PortaTbne
2. NOMENCLATURA..................6
Controles del panel superior
Conectores del panel posterior
3. DEMOSTRACION ...................8
8
..................................
.........
.....................
.................
.......
..................
...........
.......
3
3
3
4
4
4
6
7
Page 3

4. SELECTING AND PLAYING
VOICES................................................9
Selecting a Voice
Adjusting the Volume
Adding Effects
5. USING THE ACCOMPANIMENT
SECTION ..........................................12
Rhythm Accompaniment
Selecting an
Accompaniment Style
Adjusting the Accompaniment
Volume .............................................12
Starting the Accompaniment
Setting the Tempo
Starting the Accompaniment
with a Introduction...........................14
Adding Fill-ins
Stopping the Accompaniment
Manual Bass ....................................15
Auto Bass Chord
Accompaniment
Single Finger Accompaniment
Setting the Accompaniment
Volume
Setting the Tempo
Fingered Accompaniment
6. USING THE REAL-TIME
MELODY MEMORY
Recording.........................................22
Playback
7. OPTIONAL ACCESSORIES ... 25
8. SPECIFICATIONS.............................26
..........................................
..............................
.....................
.................................
................
.....................
..........
...........................
.................................
........
...............................
.......
.........................................
......................
..............
..........................
11
10
12
12
13
13
14
14
17
17
19
19
20
22
23
4. WÄHLEN UND SPIELEN
VON STIMMEN .............................9
9
Stimmenwahl
Einstellen der Lautstärke
Zuschalten von Effekten
5. DIE BEGLEITUNGSFUNKTIONEN
Schlagzeugbegleitung
Wahl des Begleitungsstils
Einstellen der
Begleitungslautstärke ....................12
Auslösen der Begleitung
Einstellen des Tempos
Beginnen der Begleitung mit
Auftakt
..........................................
Einfilgen von Fill-ins
Stoppen der Begleitung .................14
Manualteilung für manuelle
Baßbegleitung
Auto-Baß/Akkordbegleitung ... 17
Single Finger-Funktion
Einstellen der
Begleitungslautstärke
Einstellen des Tempos...............19
Fingered-Funktion
6. DER ECHTZEIT
MELODIESPEICHER
Aufzeichnung.................................22
Wedergabe
....................................
7. SONDERZUBEHÖR
8. TECHNISCHE DATEN
...................................
..............
...............
............................
....................
.............
................
..................
....................
................................
.................
................
........................
.................
....................
...............
10
11
12
12
12
13
13
14
14
15
17
19
20
22
23
25
26
4. SELECTION ET EXECUTION
D’UNE VOIX
9
Sélection d'une voix
Réglage du volume..........................10
Addition d’effets
5. UTILISATION DE LA SECTION
D'ACCOMPAGNEMENT...................12
Accompagnements rythmiques
Sélection d'un style
d’accompagnement
Réglage du volume de
l'accompagnement
Début de l’accompagnement
Réglage du tempo............................13
Début de l’accompagnement
avec introduction
Addition de fill-ins............................14
Arrêt de l'accompagnement
Accompagnement manuel
Accompagnement
automatique......................................17
Accompagnement à un
seul doigt
Réglage du volume de
l’accompagnement
Réglage du tempo
Accompagnement
à plusiuers doigts
6. UTILISATION DE LA MEMOIRE
DE MELODIE EN
TEMPS REEL
Enregistrement
Reproduction
7. ACCESSOIRES EN OPTION ... 25
8. FICHE TECHNIQUE .........................26
........................................
.........................
..............................
.........................
..........................
.............................
..........................................
......................
............................
....................................
................................
...................................
.....
.........
............
.............
....................
11
12
12
12
13
14
14
15
17
19
19
20
22
22
23
4. SELECCIONE
9
9
INTERPRETACION DE
VOCES.......................................9
Selección de una voz
Ajuste del volumen
Adición de efectos
5. EMPLEO DE LA SECCION
DE ACOMPAÑAMIENTO .... 12
Acompañamiento rítmico
Selección de un estilo de
acompañamiento
Ajuste del volumen del
acompañamiento
Inicio del acompañamiento
Ajuste del tempo
Inicio del acompañamiento
con una introducción
Adición de rellenos
Parada del acompañamiento
Acompañamiento de bajo
manual
......................................
Acompañamiento automático
de bajo y acordes......................17
Acompañamiento de un dedo ..17
Ajuste del volumen del
acompañamiento
Ajuste del tempo
Acompañamiento para acordes .... 20
6. USO DE LA MEMORIA DE
MELODIA DE
TIEMPO REAL
Grabación
Reproducción
.................................
...........................
7. ACCESORIOS
OPCIONALES ........................25
8. ESPECIFICACIONES
..................
.................
...................
.........
......................
......................
......
.....................
................
..................
.....
.................
..................
.......................
.............
9
10
11
12
12
12
13
13
14
14
14
15
19
19
22
22
23
26
Page 4
BEFORE YOU
VOR DEM
AVANT DE
ANTES DE
BEGIN
Power Supply
Your PSR-7 will run on either batteries or
through an optional power adaptor. Follow
the instructions below for the power
source you intend to use.
Using Batteries
Six "D" size, R-20 or equivalent alkaline
batteries (sold separately) must first be
installed in the PSR-7 battery
compartment.
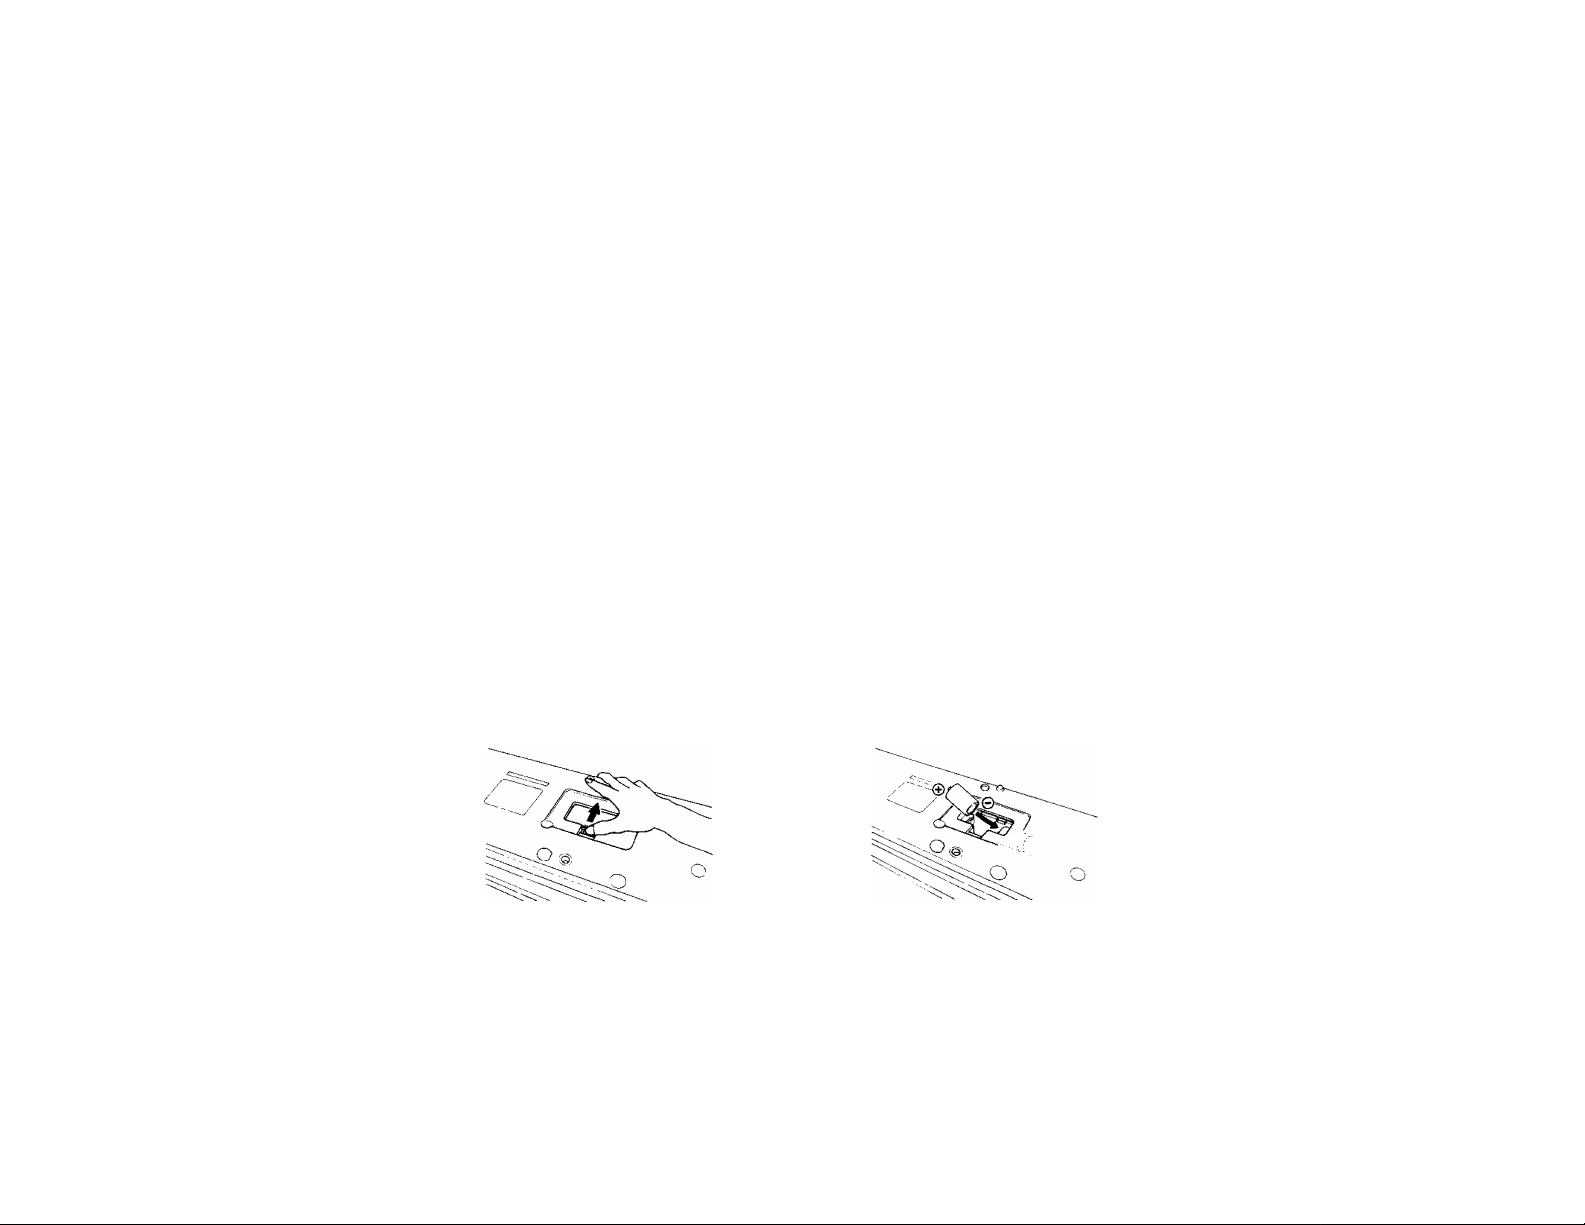
1. Open the battery compartment cover
located on the instrument's bottom
panel.
2. Insert six batteries. Be sure to align
them with the polarity markings on the
inside of the compartment.
3. Replace the compartment cover,
making sure that it locks firmly in
place.
SPIELEN
Stromversorgung
Ihr PSR-7 kann über Batterien oder
aber über einen getrennt erhältlichen
Netzadapter oder Autobatterieadapter
betrieben werden. Befolgen Sie die
nachfolgenden Anweisungen für die
jeweilig verwendete Stromquelle.
Stromversorgung über
Batterien
Legen Sie zunächst sechs 1,5 V SUM-1
Monozellen der Größe "D", R-20 oder
entsprechende Alkalibatterien (getrennt
erhältlich) in das Batteiiefach des
PSR-7 ein.
1. Öffnen Sie den Batteriefachdeckel
auf der Unterseite des PSR-7.
2. Richten Sie die Batteriepole
entsprechend den Markierungen im
Batteriefach aus und legen Sie die
Batterien ein.
3. Bringen Sie den Batteriefachdeckel
wieder an und achten Sie darauf,
daß er einrastet.
COMMENCER
Alimentation électrique
Le PSR-7 peut être alimenté au moyen de
piles ou au moyen de l'adaptateur secteur
en option. Suivre les instructions
appropriées en fonction de la source
d'alimentation utilisée.
Fonctionnement sur piles
Utiliser six piles de 1,5 V SUM-1, R-20,
de format "D" ou des piles alcalines
équivalentes (vendues séparément) et les
placer dans le compartiment des piles du
PSR-7.
1. Ouvrir le couvercle du compartiment
des piles situé sur le panneau
inférieur de l'instrument.
2. Introduire les six piles en prenant bien
soin de respecter les indications de
polarité se trouvant à l'intérieur du
compartiment.
3. Reposer le couvercle et veiller à ce
qu'il se verrouille bien en place.
COMENZAR
Alimentación
Su PSR-7 funcionará con pilas o con el
adaptador de alimentación opcional.
Siga las instrucciones siguientes de
acuerdo con la fuente de alimentación
que desee utilizar.
Empleo de las pilas
Deben instalarse seis pilas SUM-1,
tamaño "D" de 1,5V o pilas alcalinas
equivalentes (que se venden por
separado) en el compartimiento de las
pilas del PSR-7.
1. Abra la tapa del compartimiento de
las pilas situado en el panel inferior
del instrumento.
2. Inserte seis pilas, teniendo cuidado
de respetar las marcas de las
polaridades del interior del
compartimiento.
3. Vuelva a colocar la tapa del
compartimiento, cerciorándose de
que queda bien cerrada.
Caution:
1. When the batteries run down, replace them with
a complete set of six new batteries. NEVER mix
old and new batteries.
2. To prevent possible damage due to battery
leakage, remove the batteries from ttte
instrument if it is not to be used tor an extended
period of time.
Achtung:
1. Wenn die Batterien schwach werden, stets alle
Batterien zugleich als Satz austauschen.
NIEMALS alte und neue Batterien zusammen
verwenden.
2. Bei längerem Nichtgebrauch die Batterien aus
dem Keyboard entfernen, um m^liche
Srdiäden durch auslaufende Batterien zu
verhindern.
Attention:
1. Lorsque les piles se vident, les remplacer toutes
à la fois. NE JAMAIS utiliser en même temps
des piles neuves et des piles usées.
2. Pour prévenir tout endommagement que
pourrait provoquer une fuito des piles, retira les
piles de l'Instrument lorsqu'il ne doit pas être
utilisé pendant une période prolongée.
РгесгшсШи
1. Cuando se gastan las pilas, reemplácelas por
un juego completo de seis pilas nuevas.
NUNCA mezcle pilas usadas y púas nuevas.
2. Para evitar posibles daños debidos a fugas de
las pilas, extraiga las pilas del instrumento si
no tiene la intención de utilizarlo durante
períodos largos de tiempo.
Page 5

Using an Optional Power Adaptor
For AC Mains Power
Use ONLY a Yamaha PA-1. PA-1 B, PA-3,
PA-4, or PA-40 AC Adaptor to power your
instrument from the AC mains. Refer to
”Rear-panei Jacks" on page 7 for more
details.
For Car Battery Power
The Yamaha CA-1 Car Battery Adaptor
plugs into your car cigarette lighter socket,
providing power to your instrument from
the car battery.
Refer to "Rear-panel Jacks" on page 7 for
more details.
Stromversorgung über getrennt
erhältlichen Adapter
Netzadapter
Nur den Yamaha Netzadapter PA-1,
PA-IB, PA-3, PA-4 oder PA-40 für den
Netzanschluß verwenden. Einzelheiten
hierzu finden Sie unter "Anschlüsse auf
der Rückseite" auf Seite 7.
Autobatterieadapter
Der Yamaha CA-1 Autobatterieadapter
erlaubt den Anschluß an den
Zigarettenanzünder Ihres Fahrzeugs,
wodurch Sie Ihr Instrument über die
Autobatterie betreiben können.
Einzelheiten hierzu finden Sie unter
"Anschlüsse auf der Rückseite" auf Seite
7.
Utilisation d'un adaptateur secteur
en option
Fonctionnement sur secteur
SEUL un adaptateur secteur Yamaha
PA-1, PA-1 B, PA-3. PA-4 ou PA-40 peut
être utilisé pour alimenter l'instrument sur
secteur. Pour plus de détails, voir "Prises
du panneau arrière" à la page 7.
Fonctionnement sur une batterie automobile
Pour alimenter l'instrument à partir d'une
batterie automobile, brancher l'adaptateur
de batterie Yamaha CA-1 dans la prise de
l'allume-cigares. Pour plus de détails, voir
"Prises du panneau arrière" à la page 7.
Empleo de un adaptador de
alimentación opcional
Para la red eléctrica de CA
Emplee SOLO un adaptador de CA
Yamaha PA-1, PA-lB, PA-3, PA- 4 o
PA-40 para alimentar el instrumento
con la red eléctrica de CA Consulte las
"Ibmas del panel posterior" de la página
7 para más detalles.
Para alimentación con la batería de
automóvil
El adaptador para batería de automóvil
Yamaha CA-1 se enchuFa en el
receptáculo del encendedor de dgairilos
del automóvil, alimentando el
instrumento con la batería del
automóvil. Consulte las "Tbmas del
panel posterior" de la página 7 para más
detalles.
Remove the Protective Film
Before using your instrument, please
remove the protective film covering the
display section.
Setting up the Music Stand
Insert the two pegs protruding from the
bottom edge of the music stand into the
two holes located at the top of the PSR-7
control panel.
Taking Care of Your PortaTone
Your PortaTone will remain in excellent
playing condition if care is taken
concerning the following:
1. When you use AC power, be sure to
use the optional AC Power
PA-1 /PA-1 B/PA-3/PA-4/PA-40
adaptor. Before use, read the adaptor
instructions carefully.
In particular, please note that in some
cases the PA-1/PA-1 B/PA-3/PA-4/
PA—40 is provided with a voltage
selector, so confirm that this selector
is correctly set.
Entfernen der Schutzfolie
Ziehen Sie vor der Inbetriebnahme die
Schutzfolie vom Display ab.
Anbringen des Notenständers
Führen Sie die zwei Füße an der
Unterseite des Notenständers in die
zwei Löcher oben auf der Bedienkonsole
des PSR-7 ein.
Vorsichtsmaßnahmen
Wenn Sie die nachfolgenden Hinweise
zur Pflege befolgen, bleiben Aussehen
und Leistung Ihres Keyboards über
Jahre erhalten.
1. Zum Netzanschluß nur den getrennt
erhältlichen Yamaha Netzadapter
PA-l/PA-lB/PA-3/PA-^A-^O
verwenden.
Vor dem Anschluß die
Bedienungsanleitung des
Netzadapters lesen.
Außerdem ist zu beachten, daß der
PA-l/PA-lB/PA-3/PA-4/PA-^0 für
verschiedene Bestimmungsländer
Retrait de la pellicule
protectrice
Retirer la pellicule protectrice recouvrant
l'affichage avant d'utiliser l'instrument.
Mise en place du pupitre
Introduire les deux chevilles se trouvant
sur le bord inférieur du pupitre dans les
orifices situés sur le panneau de
commande du PSR-7.
Entretien du PortaTone
Le PortaTone restera en excellent état si
les points suivants sont observés.
1. En cas d'alimentation sur secteur,
veiller à utiliser un adaptateur secteur
PA-1/PA-1 B/PA-3/PA-4/PA-40 en
option. Lire attentivement le mode
d'emploi de l'adaptateur avant
d'utiliser celui-ci. A noter que dans
certains cas le PA-1/PA-1 B/PA-3/
PA-4/PA-40 est muni d'un sélecteur
de tension; le cas échéant, veiller
donc à régler correctement ce
sélecteur.
Extracción de la película protectora
Antes de utilizar el instrumento, saque
la película protectora que cubre la
sección del visualizador.
Colocación del portaparti turas
Inserte los dos apéndices que sobresalen
del borde inferior del portapartituras en
los dos orificios situados en la parte
superior del panel de control del PSR-7.
Cuidados del PortaTone
El PortaTbne permanecerá en excelentes
condiciones de interpretación si se tiene
cuidado con lo siguiente.
1. Cuando emplee el la red eléctrica de
CA, cerciórese de utilizar el
adaptador de CA opcional PA-1,
PA-lB/ PA—3/PA—4 o PA—40. Antes
de su utilización, lea las
instrucciones del adaptador. En
particular, tenga presente que en
algunos casos el PA-l/PA-lB/PA-3/
PA—4 o PA—40 está provisto de un
selector de tensión, por lo que
deberá confirmar si el selector está
Page 6

2. The optional car battery adaptor CA-1
is only for use with a negative ground
12V battery. Ensure that this is the
case before connecting the adaptor.
3. Connections made between the
PortaTone and any other device
should be made with both units turned
off.
4. Do not set the MASTER VOLUME
control at MAX when you connect the
PortaTone to a stereo system. Use the
stereo system's volume control to
adjust the sound level.
5. Avoid placing the instrument in
excessively humid areas.
6. Do not subject the unit to physical
shock, and avoid placing anything
heavy on it.
7. The PortaTone should not be placed
in direct sunlight for a long time.
8. Do not place the instrument near any
heating appliance, or leave it inside a
car in direct sunlight for any length of
time. Direct sunshine can raise the
interior temperature of a car with
closed doors and windows to as high
as 80®C. Temperatures in excess of
60°C can cause physical and/or
electrical damage not covered by
warranty.
9. Use a damp or dry cloth for cleaning.
10. When you areni using the PortaTone,
we recommend keeping it in the case
to protect it.
mit einem Spannungswähler
ausgestattet ist. Daher vor dem
Anschließen sicherstellen, daß der
Spannungswähler korrekt auf die
örtliche Netzspannung eingestellt
ist.
2. Der getrennt erhältliche
Autobatterieadpater ist auf
Batterien ausgelegt, deren Minuspol
an Masse (z. B. Minuspol mit
Karosserie verbunden) gelegt ist.
Daher die Batterie vor dem
Anschluß auf Eignung prüfen.
3. Vor dem Anschluß von
Zusatzgeräten diese Geräte und das
PortaTbne ausschalten.
4. Den MASTER VOLUME-Regler
NICHT auf MAX stellen, wenn das
PortaTane an eine Stereoanlage
angeschlossen ist. Die Lautstärke
über die Stereoanlage einstellen.
5. Das Gerät vor Feuchtigkeit
schützen.
6. Das Gerät vor Stoß schützen und
keine schweren Gegenstände auf
das Gerät stellen,
7. Das PortaTbne niemals über längere
Zeit direkter Sonneneinstrahlung
aussetzen.
8. Das Gerät nicht in der Nähe von
Wärmequellen aufstellen. Ebenso
das Gerät nicht über längere Zeit in
einem Fahrzeug lassen, das im
prallen Sonnenlicht steht. Direkte
Sonneneinstrahlung kann die
Temperatur im Fahrzeug! nnern auf
bis zu 80 Grad erhöhen.
Temperaturen von über 60 Grad
können mechanische und
elektrische Schäden am Instrument
verursachen, die nicht von der
Garantie abgedeckt sind,
9. Zum Reinigen das Instrument mit
einem trockenen oder leicht
angefeuchteten Tuch abwischen.
10. Nach dem Spielen das PortaTbne
zur Aufbewahrung wieder in die
Schutzhülle stecken.
2. L'adapatateur de batterie automobile
CA-1 en option ne doit être utilisé
qu'avec une batterie à masse
négative de 12 V. Confirmer ce point
avant de brancher l'adaptateur.
3. Avant de procéder à tout
branchement, veiller à couper
l'alimentation du PortaTone et de
l'autre appareil.
4. En cas de branchement du PortaTone
sur un système de sonorisation
stéréo, ne jamais mettre la commande
MASTER VOLUME sur MAX. Utiliser
la commande de volume de la chaîne
stéréo pour régler le niveau sonore.
5. Eviter de placer l'instrument dans un
endroit extrêmement humide.
6. Ne pas soumettre l'instrument à des
chocs et ne pas y placer d'objets
lourds.
7. Ne pas laisser le PortaTone en plein
soleil pendant longtemps.
8. Ne pas placer l'instrument à proximité
d'un appareil de chauffage et ne
jamais le laisser à l'intérieur d'un
véhicule stationné au soleil. La
température à l'intérieur d'un véhicule
stationné et fermé peut atteindre
80°C. Exposer l’instrument à des
températures dépassant 60°C peut
provoquer des dommages physiques
et/ou électriques qui ne seront pas
couverts par ta garantie.
9. Utiliser un chiffon sec ou légèrement
humide pour nettoyer l'instrument.
10. Pour protéger l'instrument, il est
conseillé de le laisser dans son étui
lorsqu'il n'est pas utilisé.
correctamente ajustado.
2. El adaptador para batería de
automóvil CA-1 es sólo para su
empleo con batería de 12 V de tierra
negativa. Cerciórese de que la
batería es de este tipo antes de
conectar el adaptador,
3. Las conexiones efectuadas entre el
PortaTbne y cualquier otro
dispositivo deberán realizarse con
ambos aparatos desconectados.
4. NO ajuste el control MASTER
VOLUMEN en la posición MAX
cuando conecte el PortaTbne a un
sistema estéreo. Emplee el control
de volumen del equipo estéreo para
ajustar el nivel de sonido,
5. No coloque el instrumento en
lugares demasiado húmedos.
6. No someta el aparato a golpes
físicos, y no ponga nada pesado
encima del mismo.
7. El PortaTbne no debe colocarse bajo
la luz directa del sol durante
períodos prolongados.
8. No coloque el instrumento cerca de
aparatos de calefacción, ni lo deje
dentro de un automóvil bajo la luz
directa del sol durante mucho
tiempo. La luz directa del sol puede
elevar la temperatura del interior
del automóvil con las puertas y
ventanillas cerradas hasta a 80®C.
Las temperaturas que excedan 60°C
pueden causar daños físicos y/o
eléctricos que no quedan cubiertos
por la garantía.
9. Emplee un paño seco o húmedo para
la limpieza.
10. Cuando no utilice el PortaTbne, le
recomendatos que lo guarde en el
estuche para protegerlo.
Page 7
NOMENCLATURE BEZEICHNUNG
DER TEILE
NOMENCLATURE
NOMENCLATURA
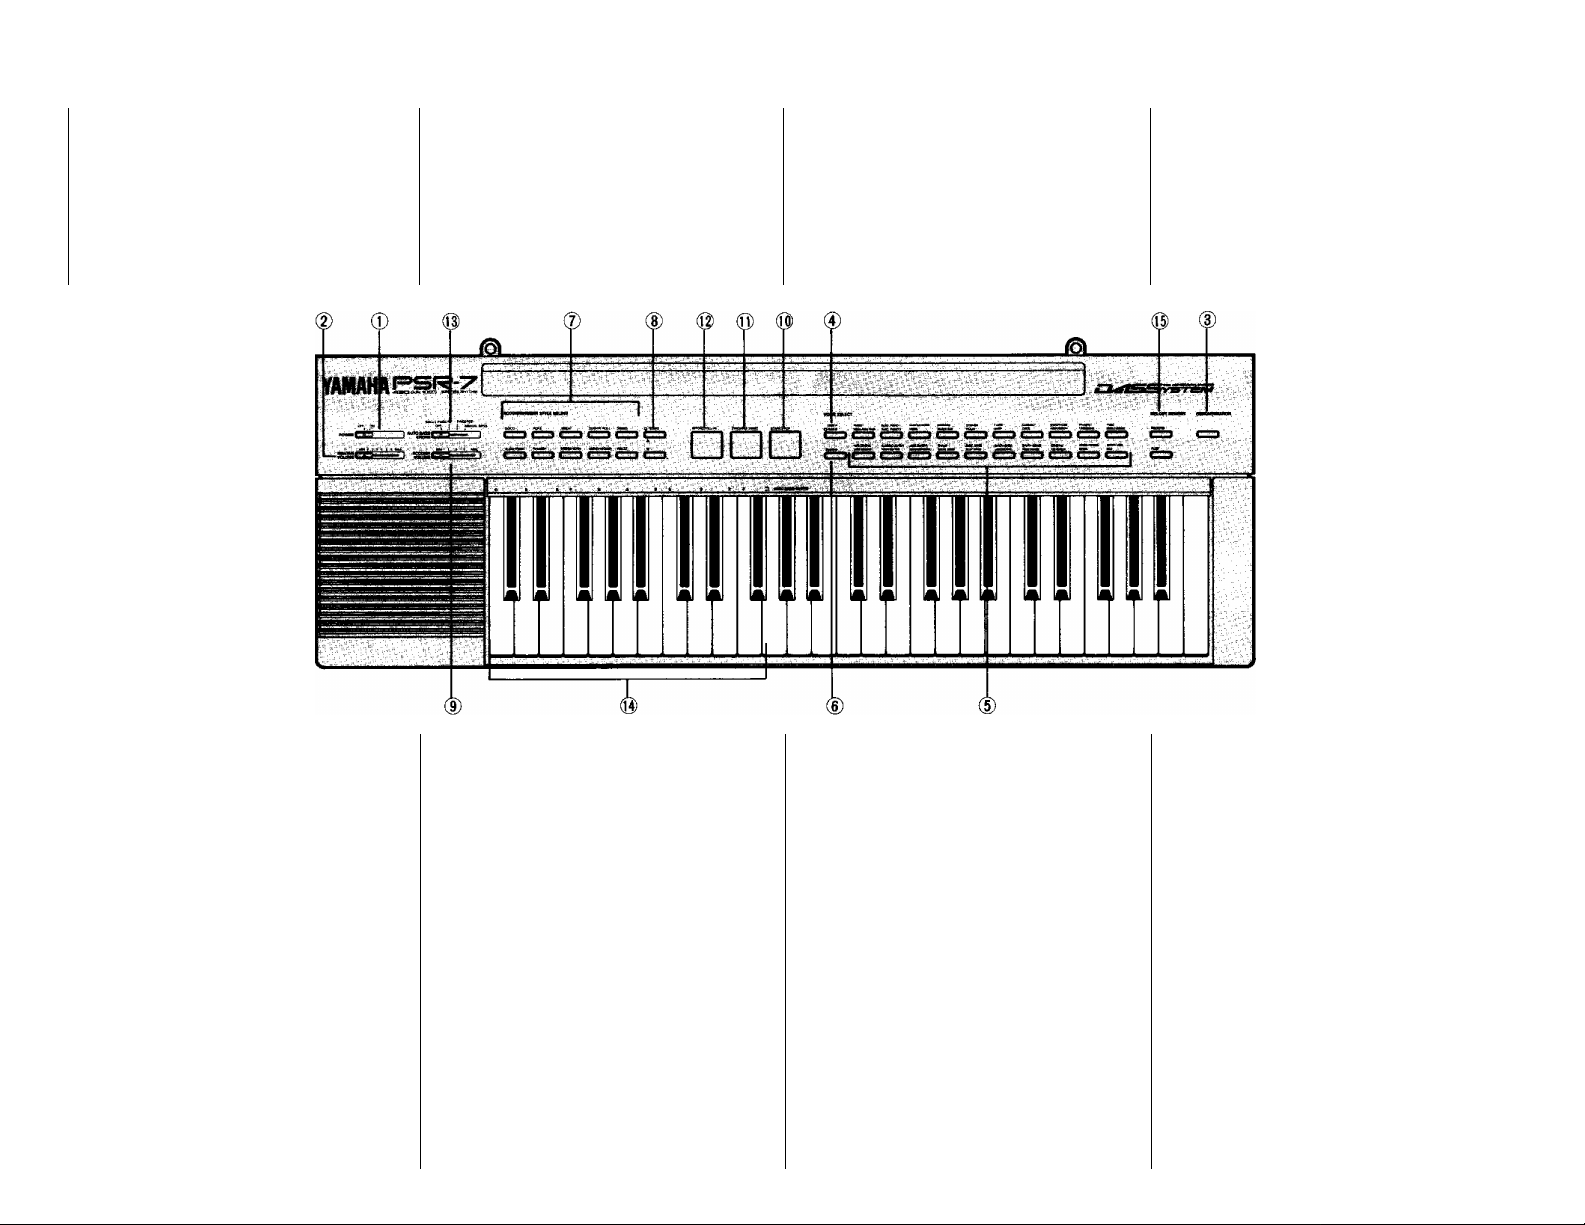
Top Panel Controls
POWER Switch (page 8)
Ф
MASTER VOLUME Control
(D
(радев)
DEMONSTRATION Button
®
(page 9)
SIDE A/B Select Button (page 9)
VOICE SELECT Buttons (page 9)
SUSTAIN Button (page 11)
®
ACCOMPANYMENT STYLE SELECT
Buttons (page 12)
TEMPO Buttons (page 13)
ACCOMPANYMENT VOLUME
®
Control (page 19)
START/STOP Button
(page 13 and 14)
Bedienelemente
Commandes du panneau
supérieur
0 Ein/Aus-Schalter (Seite 8)
0 Lautstärkeregler (Seite 8)
0 Demo-Wiedergabetaste (Seite 9)
0 Stimmengruppen-Wahltaste A/B
(Seite 9)
0 Stimmenwahltasten (Seite 9)
0 Halltaste (Seite 11)
0 Begleitstilwahltasten (Seite 12)
0 Thmpotasten (Seite 13)
0 Begleitungslautstärkeregler 0 Touche d'effet (page 11)
(Seite 19)
(|3) Start/Stopptaste (Seite 13 und 14)
0 Interrupteur d'alimentation
(page 8)
© Commande de volume principale
(pages)
Ф Touche demonstration (page 9)
0 Touche de sélection de côté A/B
(page 9)
0 Touches de sélection des voix
(page 9)
0 Touches de sélection des styles
d'accompagnement (page 12)
0 Touches de tempo (page 13)
0 Commande de volume
d'accompagnement (page 19)
® Touche de début/arrêt
(pages 13 et 14)
Controles del panel superior
(X) Interruptor de alimentación
(Página 8)
(2) Control del volumen principal
(Página 8)
(3) Botón de demostración
(Página 9)
0 Botón de selección de la cara
A/B (Página 9)
0 Botones de selección de voz
(Pàgina 9)
0 Botón de sostenido (Página 11)
0 Botones de selección de estilo de
acompañamiento (Página 12)
0 Botones de tempo (Página 13)
0 Control del volumen de
acompañamiento (Página 19)
0) Botón de inicio/parada
(Pàgina 13 y 14)
Page 8
® SYNCHRO START Button (page 13) (Q) INTROypILL-iN Button (page 14)
(Q) AUTO BASS CHORD Selector
(page IS)
(g) AUTO BASS CHORD KEY Section
(page IS)
® MELODY MEMORY Buttons
(page 22)
Synchronstarttaste (Seite 13)
Auftakt/Zwìschentakttaste
(Seite 14)
Q Auto-Begleitfunktionswähler
(Seite 15)
® Auto-Baß/Akkordbegleittasten
(Seite 15)
® Melodiespeichertasten (Seite 22)
(Q) Touche de début synchronisé
(page 13)
(g) Touche d'introduction/flM-ln
(page 14)
(Q) Sélecteur accords et basses
automatiques (page 15)
(Q) Section accords et basses
automatiques (page 15)
® Touches de mémoire de mélodie
(page 22)
® Botón de inicio sincronizado
(Página 13)
(Q) Botón de introducción/relleno
(Página 14)
@ Selector de acompañamiento
automático de b^jo y acordes
(Página 15)
(Q) Sección de teclas de
acompañamiento automático de
bajo y acordes (Página 15)
(]^ Botones de memoria de melodía
(Página 22)
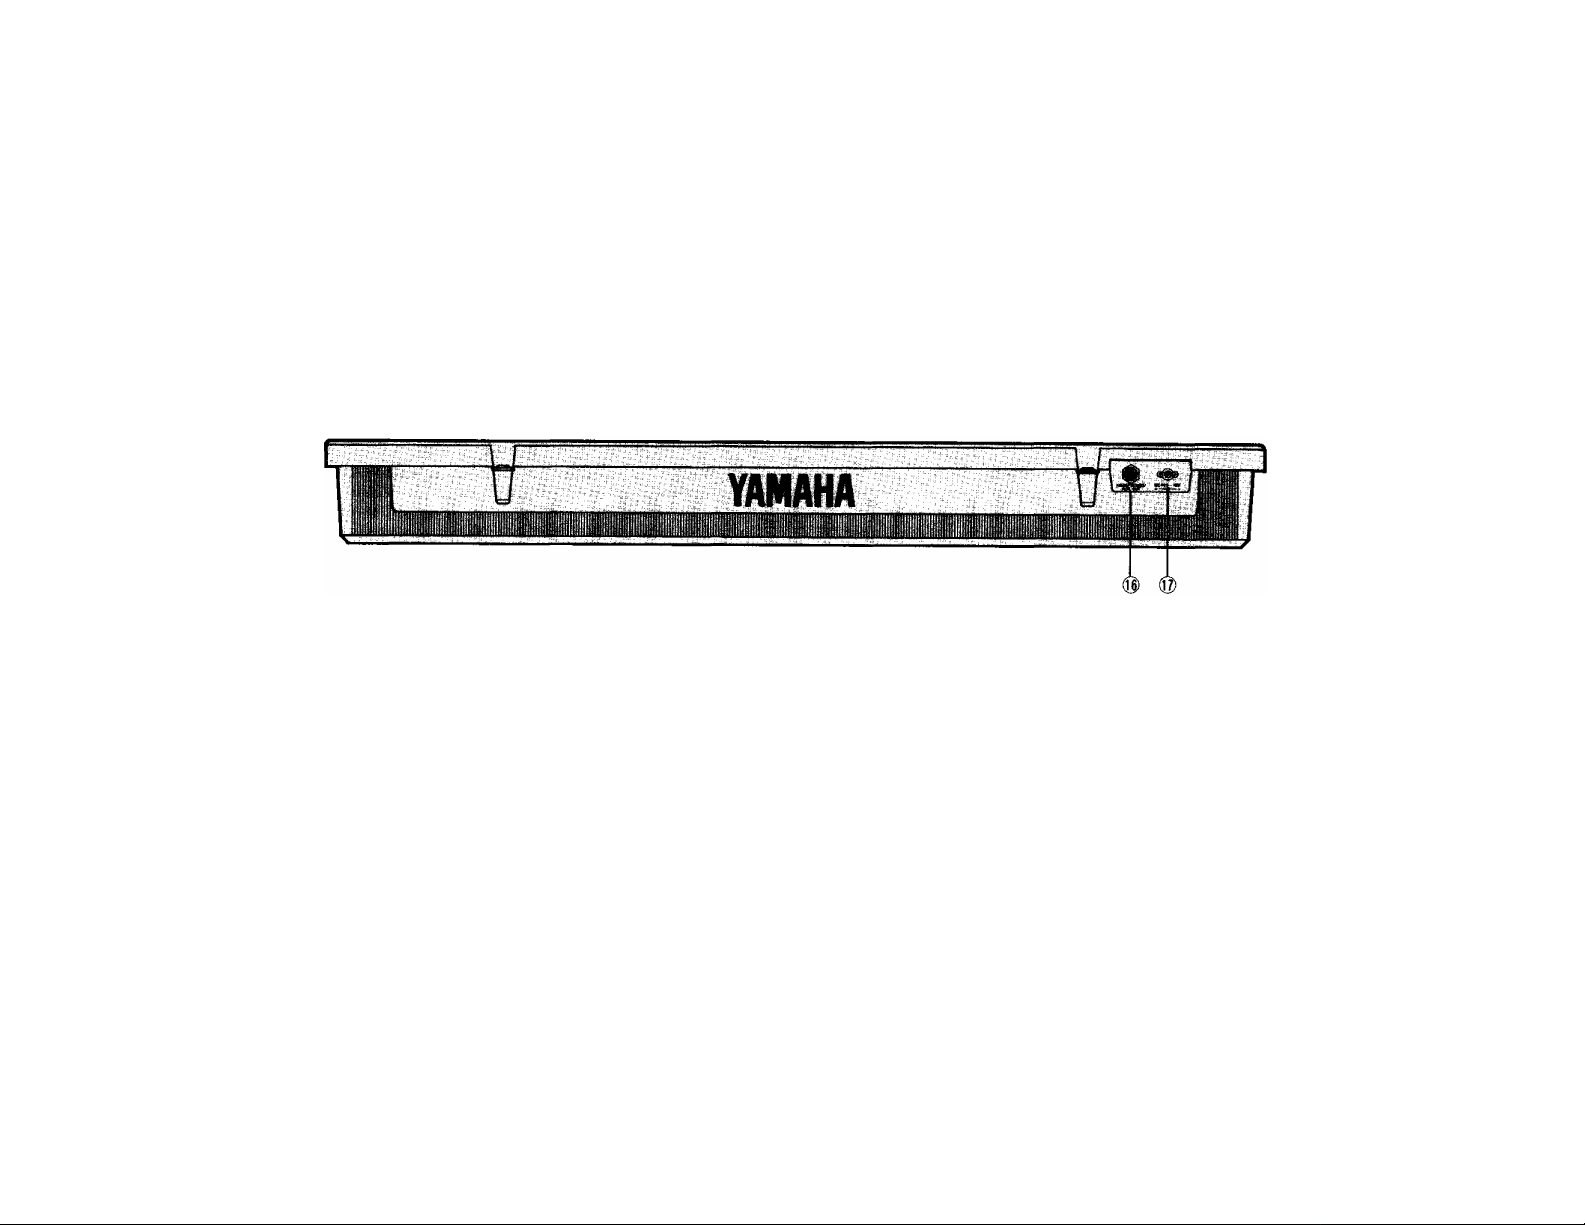
Rear Panel Connectors
® HEADPHONES/AUX OUT Jack
A standard pair of headphones can be
plugged in here for private practice or
late-night playing. The internal
speaker system is automatically shut
off when a pair of headphones is
plugged into the HEADPHONE jack.
The HEADPHONES/AUX OUT jack
can also be used to deliver the output
of the PSR-7 to a keyboard amplifier,
stereo hi-fi system, mixing console or
tape recorder, (refer to page 25)
* Use a relatively low MASTER
VOLUME control setting when
connecting the PSR-7 to a stereo
sound system. Use the stereo
systems's volume control to adjust
volume.
Anschlüsse auf der Rückseite
® Kopfhörer/Zusatzausgang
An diese Buchse können Sie für
mitternächtliche Etüden einen
herkömmlichen Stereokopfhörer
anschließen. Beim Anschluß eines
Kopfhörers an die HEADPHONESBuchse wird das interne
Lautsprechersystem des PSR-7
automatisch stummgeschaltet. Die
Buchse HEADPHONES/AUX OUT
dient auch zum Anschließen an
einen Keyboard-Verstärker, eine
Stereoanlage, ein Mischpult oder ein
Cassettendeck. (Siehe Seite 25)
* Beim Anschluß an eine
Stereoanlage den MASTER
VOLUME-Regler des PSR-7 auf
einen relativ niedrigen Wert
einstellen. Die Lautstärke über
den Lautstärkeregler der
Stereoanlage einstellen.
Prises du panneau arrière
Prise de sortie aux/casque d'écoute
Un casque d'écoute stéréo standard
peut être branché à cette prise en cas
d'utilisation de l'instrument la nuit. Les
haut-parleurs internes sont
automatiquement coupés lorsqu'un
casque est branché à la prise
HEADPHONES. La prise
HEADPHONES/AUX OUT peut être
également utilisée pour transmettre la
sortie du PSR-7 à un amplificateur de
clavier, un système de sonorisation
stéréo, une table de mixage ou un
enregistreur de bande. (Voir page 25)
* Le réglage de la commande
MASTER VOLUME doit être
relativement bas lorsque le PSR-7
est connecté à un système de
sonorisation stéréo. Utiliser la
commande de volume du système
de sonorisation stéréo pour régler le
niveau sonore.
Conectores del panel
posterior
Toma de aurìculares/salìda
auxiliar
Pueden enchufarse unos auriculares
normales a esta toma para poder
practicar en privado o para tocar por
la noche. El sistema de altavoces
interino queda automáticamente
desactivado cuando se enchufan los
auriculares a la toma
HEADPHONE. La toma
HEADPHONE/AUX OUT también
puede utilizarse para suministrar la
salida del PSR-7 a un amplificador
de teclado, sistema de sonido
estéreo, consola de mezcla o
grabadora de cintas.
(consulte la página 25)
* Emplee un ajuste del control
MASTER VOLUME relativamente
bajo cuando conecte el PSR-7 a un
sistema estéreo. Emplee el control
del volumen del sistema para
ajustar el volumen.
Page 9
® DC (9-12V) IN Jack
The DC output cord from the optional
Yamaha PA-1/PA-1 B/PA-3/PA-4/
PA-40 Power Adaptor should be
plugged in here when the PSR-7 is
powered from the AC mains supply
{refer to "Power Supply" on page 3 for
more details).
® Gleichspannungsbuchse
(DC (9-12V) IN)
An diese Buchse wird das
Ausgangskabel des getrennt
erhältlichen Yamaha Netzadapters
PA-1/PA-1B/PA-3/PA-4/PA-40
angeschlossen, wenn das PSR-7
über Netzstrom betrieben werden
soll. (Einzelheiten, siehe unter
"Stromversorgung auf Seite 3").
® Prise d'entrée CC (DC (9-12V) IN)
Le cordon de sortie CC de
l'adaptateur secteur Yamaha
PA-1/PA-1B/PA-3/PA-4/PA-40 fourni
doit être branché à cette prise lorsque
le PSR-7 doit être alimenté par le
secteur (Pour plus de détails, voir
"Alimentation électrique" à la page 3).
@ Toma de entrada de
alimentación exterior
(DC (a-12V) IN)
El cable de salida de CC del
adaptador de alimentación Yamaha
PA-1, PA-IB, PA-3, PA-^ o PA-40
debe enchufarse a esta toma cuando
se desee alimentar el PSR-7 con la
red eléctrica de CA (consulte
"Alimentación" de la página 3 para
más detalles.
ENJOY THE DEMONSTRATION
To give you an idea of the PSR-7’s
sophisticated capabilities, it is
programmed with a demonstratbn
sequence which plays automatically while
demonstrating a number of the
instrument's voices.
1. Switch ON
Slide the POWER switch (¡)to the ON
position. The TEMPO light indicates
when the POWER is ON.
2. Set an Initial Volume Level
Slide the MASTER VOLUME control
0to a position about halfway
between the "MIN" and "MAX"
settings. You can set this control for
the most'desirable volume level after
playback begins.
DEMO
WIEDERGABE
Um Ihnen eine Vorstellung von den
vielseitigen Funktionen des PSR-7 zu
geben, haben wir ein kleines Demostück
einprogrammiert, das automatisch
abgespielt werden kann und Ihnen
einige Stimmen des PSR-7
demonstriert.
L Das Gerät einschalten.
Schieben Sie den POWER-Schalter
0in die Position ON. Bei
eingeschaltetem Keyboard leuchtet
die TEMPO-Anzeige auf.
POWER
2. Die Anfangslautstärke
einstellen.
Schieben Sie den MASTER
VOLUME-Regler ©ungefähr in die
Mitte zwischen "MIN"- und "MAX"Stellung. Nach Spielbeginn können
Sie den Regler dann auf die
gewünschte Lautstärke einstellen.
ECOUTE DE LA MUSIQUE DE DEMONSTRATION
Afin de donner une idée des possibilités
sophistiquées de l'instrument, le PSR-7 a
été programmé avec une séquence
musicale reproduite automatiquement qui
démontre un certain nombre des voix de
l'instrument.
1. Mise sous tension
Faire coulisser l'interrupteur POWER
0sur la position ON. L'affichage
TEMPO s'allume lorsque l'instrument
est mis sous tension.
2. Réglage d'un niveau de volume
initial
Faire coulisser la commande
MASTER VOLUME ©sur une
position à mi-chemin entre les
positions "MIN" et "MAX". Régler cette
commande pour un niveau d'écoute
confortable après le début de la
reproduction.
DEMOSTRACION
Para que usted se haga una idea de la
sofisticadas capacidades del PSR-7, está
programado con una secuencia de
demostración que reproduce
automáticamente mientras demuestra
ciertas voces del instrumento.
I. Conexión
Deslice el interruptor POWER 0 a
la posición ON. Se encenderá la
visualización de TEMPO cuando se
conecte la alimentación.
2. .^uste un nivel de volumen
inicial
Deslice el control MASTER
VOLUMEN ©a una posición
intermedia entre "MIN" y MAX".
Podrá ajustar este control al nivel de
volumen más apropiado después de
haberse iniciado la reproducción.
8
Page 10

MASTER
VOLUME
Miw 1 I \ I I 1 MAX
3. Press the DEMONSTRATION Button
The demonstration music will begin
playing as soon as you press the
DEMONSTRATION button ®. The
demonstration will play continuously
until the DEMONSTRATION button (D
is pressed a second time.
The demonstration music can also be
stopped by pressing the START/STOP
button (0).
Not»:
No sound win be produced by playing dte keyboard
during demanstradon fdayback.
3. DieDEMONSTRATION-l^ste drücken.
Durch Drücken der
DEMONSTRATION-Tkste (Dlösen
Sie die Demo-V^edergabe aus.
Das Demostück wird kontinuierlich
abgespielt. Zum Abbrechen der
Demo-M^edergabe müssen Sie nur
die DEMONSTRATION-T^te
erneut drücken.
* Die Demo-Wiedergabe kann auch
durch Drücken von START/STOP @
gestoppt werden.
HINWEIS:
Während der Demo-Väedergabe nickt auf dem
Manual gespielt werden.
3. Appuyer sur la touche
DEMONSTRATION
La reproduction de la séquence de
démonstration commence dès que la
touche DEMONSTRATION ®est
enfoncée. La séquence de
démonstration est reproduite d'une
manière continue, jusqu'à ce que la
touche DEMONSTRATION soit
enfoncée une seconde fois.
DEMOHSTRATION
II est également possible d'arrêter la
mélodie de démonstration en appuyant
sur la touche START/STOP (0).
Remarque:
Aucun son ne sera produit en jouant au davier
pendant la reproducdon de la mélodie de
démonstration.
3. Presione el botón DEMONSTRATION.
Se iniciará la música de
demostración así que usted presione
el botón DEMONSTRATION ®. La
demostración se tocará
continuamente, hasta que se
presione por segunda vez el botón
DEMONSTRATION ®.
* La melodía de demostración puede
también pararse presionando el botón
START/STOP®.
Nota:
No se producirá ningún sonido tocando el teclado
durante la reproducción de demostración.
SELECTING AND
PLAYING VOICES
Selecting a Voice
Select any of 40 desired voices from the
display. Each button functions to select
one of two different voices when used in
combination with the SIDE A/SIDE B
button. SIDE A voices are listed in the first
WAHLEN UND
SPIELEN VON
STIMMEN
Stimmenwahl
Es stehen Ihnen 40, in zwei Gruppen (A
+ B) zusammengefaßte Stimmen zur
Wahl. Jede der Stimmenwahl tasten
gewährt in Kombination mit der SIDE
A/SIDE B-Taste Zugriff auf zwei
SELECTION ET
EXECUTION D'UNE
VOIX
Sélection d'une voix
Sélectionner une des 40 voix à l'aide de
l'affichage. Utilisée en combinaison avec
la touche SIDE A/SIDE B, chaque touche
permet de sélectionner deux voix
différentes. Les voix "SIDE A" sont
SELECCION E
INTERPRETA
CION DE VOCES
Selección de una voz
Seleccione cualquiera de las 40 voces
deseada desde el visualizados Cada
botón funciona para seleccionar una de
dos voces diferentes cuando se usa en
combinación con el botón SIDE A/SIDE
B. Las voces de SIDE A se listan en la
Page 11

row above the selection buttons, and SIDE
B voices are listed second. The LED light
indicates when a SIDE B voice has been
selected, and turns off when a SIDE A
voice is selected.
Stimmen. Die unter SIDE A
zusammengefaßten Stimmen sind in der
Reihe direkt über den Stimmentasten
aufgeführt, während die SIDE BStimmen in der zweiten Reihe Über den
Ihsten aufgelistet sind. Sie schalten
zwischen den beiden Stimmengruppen
mit der SIDE A/SIDE B-Thste um. Die
LED-Anzeige neben der Tsiste leuchtet
auf, wenn auf Stimmen der SIDE B
geschaltet ist imd erlischt, wenn
Stimmen der SIDE A abgerufen werden.
indiquées sur la première rangée audessus des touches de sélection et tes
voix ”SIDE B" sont indiquées sur la rangée
au-dessous. La LED s'allume lorsqu'une
voix "SIDE B" a été sélectbnnée et elle
s'éteint lorsque c'est une voix "SIDE A" qui
est sélectionnée.
primera fila de endma de los botones de
selecdón, y las voces de SIDE B se listan
en la segunda. El LED se endende para
indicar cuando se ha selecdonado una
voz de SIDE B, y se apaga cuando se
selecdona una voz de SIDE A.
* Maximum number of notes playable
simultaneously:
Norma!: 8 notes
Normal + Rhythm: 5 notes
Normal + Auto Bass Chord
(including rhythm): 4 notes
Adjusting the Volume
The selected voice can now be played on
the instrument's keyboard. Adjust the
MASTER VOLUME control 2)while
playing to set the desired volume level.
Adding Effects
SUSTAIN:
Press the SUSTAIN button located among
the VOICE SELECT buttons ©once, and
notes played on the keyboard will decay
gradually after you lift your fingers from the
keys. Press the SUSTAIN button a second
time to turn the sustain effect off.
* Max. Anzahl von simultan spielbaren
Noten:
Normal: 8 Noten
Normal + Rhythmus : 5 Noten
Normal + AUTO BASS CHORD
(einschl. Rhythmus): 4 Noten
Einstellen der Lautstärke
Stellen Sie nun die Lautstärke mit dem
MASTER VOLUME-Regler ©während
dem Spielen auf den gewünschten Pegel
ein.
MASTER
VOLUME
Zuschalten von Effekten
SUSTAIN:
Ihr PSR-7 bietet einen SUSTAIN- oder
Nachhalleffekt. Wenn Sie die Taste
SUSTAIN ©zwischen den VOICE
SELECT-Tasten einmal antippen,
klingen die Noten nach dem Ix>slassen
der Tasten allmählich aus. Zum
Ausschalten des SUSTAIN-Effekts wird
" Nombre maximal de notes jouées
simultanément:
Normal : 8 notes
Normal + rythme : 5 notes
Normal + AUTO BASS CHORD
(y compris rythme) : 4 notes
Réglage du volume
Utiliser la commande MASTER VOLUME
©tout en jouant pour régler le niveau du
volume d'ensemble.
Addition d'effets
SUSTAIN:
Appuyer une première fois sur la touche
SUSTAIN ©, située parmi
les touches VOICE SELECT pour que les
notes jouées au clavier chutent
graduellement une fois que les doigts ont
quittés les touches. Appuyer une
deuxième fois sur la touche SUSTAIN
* Número máximo de notas que se
pueden tocar simultáneamente:
Normal : 8 notas
Normal + Ritmo : 5 notas
Normal + Acompañamiento automático
de bajo y acordes
(incluyendo ritmo) : 4 notas
Ajuste del volumen
Ajuste el control MASTER VOLUMEN
©mientras toca para gustar el nivel del
volumen deseado.
Adición de efectos
SUSTAIN:
Presione una vez el botón SUSTAIN
situado entre los botones de selección de
voz una vez y las notas tocadas en el
teclado disminuirón gradualmente
después de soltar las teclas. Presione
otra vez el botón SUSTAIN para
desactivar el efecto de sostenido.
10
Page 12

die SUSTAIN-'Ibste einfach ein zweites
Mal gedrückt.
pour arrêter l'effet de sustain.
* The SUSTAIN effect will not function for
CHORD VOICE, BASS VOICE, or
RHYTHM VOICE.
* The length of SUSTAIN reverberation
varies with each VOICE selection.
* Even in the "on" position, the SUSTAIN
will terminate with any change of VOICE.
DUAL VaCE:
Iwo separate voices can be played
together by simultaneously pressing the
corresponding buttons, as long as both
voices are featured on the same side.
Choose either SIDE A or SIDE B, and
press any two select buttons together for
DUAL VOICE play.
* Der SUSTAIN-Effekt wirkt nicht auf
Rhythmus- oder
Baß/Akkordbegleitung.
* Die Abklingzeiten sind von Stimme zu
Stimme unterschiedlich.
* Wenn bei aktiviertem SUSTAIN-Effekt
auf die Stimme gewechselt wird,
schaltet sich der SUSTAIN-Effekt aus.
DUAL VOICE:
Dank der DUAL VOICE-Funktion
können Sie zwei Stimmen gleichzeitig
über das ganze Manual legen, falls beide
Stimmen der gleichen Gruppen (SIDE A
oder B) zugehören. Wählen Sie daher
mit SIDE A/SIDE B die Stimmengruppe,
drücken Sie dann zwei Stimmenwahl
tasten gleichzeitig, um die
entsprechenden Stimmen abzurufen.
VOICE SELECT
" L'effet SUSTAIN ne peut pas être
appliqué à CHORD VOICE. BASS
VOICE et RHYTHM VOICE,
" La durée de l'effet de SUSTAIN varie en
fonction de la voix sélectionnée.
" Même lorsque la touche SUSTAIN est en
position activée, l'effet se terminera à
tout changement de voix.
DUAL VaCE:
Il est possible de jouer deux voix en même
temps en appuyant simultanément sur les
touches de sélection correspondantes, à
condition que les deux voix soient du
même côté. Sélectionner soit SIDE A, soit
SIDE B et appuyer simultanément sur
deux touches de sélection des voix pour
activer ta fonction DUAL VOICE.
* E1 efecto de SUSTAIN no puede
aplicarse al acompañamiento o ritmo.
* La duración real de SUSTAIN varía
según la voz seleccionada.
" Incluso en la posición "ON" (activado),
el sostenido terminará con cualquier
cambio de voz.
DUAL VOICE:
Se pueden tocar juntas dos voces
separadas presionando
simultáneamente los bot<mes
correspondientes, siempre y cuando
ambas voces se sitúen en el mismo lado.
Elija entre SIDE A o SIDE B, y presione
juntos dos de cualquiera de los latones
de selección para la reproducción.
* DUAL VOICE cannot be applied to
accompaniment or rhythm.
* When DUAL VOICE is ON, the number
of notes that can be played
simultaneously is reduc^ by half.
1 1
" Der DUAL VOICE-Effekt wirkt nicht
auf Rhythmus- oder Baß/Akkord
begleitung.
* Bei aktiviertem DUAL VOICE-Effekt
reduziert sich die Anzahl der simultan
erzeugbaren Noten auf die Hälfte.
* La fonction DUAL VOICE ne peut pas
être appliquée à l'accompagnement ou
au rythme.
* Lorsque la fonction DUAL VOICE est
activée, le nombre de notes pouvant être
jouées simultanément est réduit de
moitié.
* DUAL VOICE no puede aplicarse al
acompañamiento ni ritmo.
* Cuando la función DUAL VOICE está
activada, el número de notas que
pueden tocarse simultáneamente se
reduce a la mitad.
Page 13

USING THE
DIE
UTILISATION DE
EMPLEO DE LA
ACCOMPANIMENT
SECTION
Rhythm Accompaniment
Selecting an Accompaniment
Style
Press any of the 10 ACCOMPANIMENT
STYLE SELECT buttons 0for the type of
rhythm you wish to have as
accompaniment.
* When the power is initially turned ON,
the DISCO rhythm is automatically
selected.
* Only one ACCOMPANIMENT style can
be selected at a time.
Adjusting the
Accompaniment Volume
Use the ACCOMP. VOLUME control d)to
adjust the volume of the rhythm in relation
to the melody played on the keyboard.
BEGLEITUNGS
FUNKTIONEN
Schlagzeugbegleitung
Wahl des
Begleitungsstils
Beim PSR-7 können Sie durch Drücken
der entsprechenden
ACCOMPANIMENT SELECT-Thste ®
zwischen 10 Begleitstilen wählen.
ACCOMPANIMErn- STYLE SELECT
* Beim Einschalten des Keyboards wird
der Stil DISCO automatisch
vorgewählt.
* Sie können jeweils nur einen
Begleitungsstil auf einmal wählen.
Einstellen der Begleitungslautstärke
Mit dem ACCOMPANIMENT
VOLUME-Regler ® des PSR-7 können
Sie die Lautstärke der Schlagzeug
Begleitung getrennt einstellen und somit
das Lautstärkeverhältnis zwischen
Begleitung und Keyboardspiel optimal
abgleichen.
LA SECTION
D'ACCOMPAGNE
MENT
Accompagnement
rythmique
Sélection d'un styie
d'accompagnement
Le PSR-7 offre 10 styles
d'accompagnement différents qui peuvent
être sélectionnés en appuyant sur la
touche ACCOMPANIMENT STYLE
correspondante ®.
ROCKU' ROLL SWING
MARC4/POLKA WALTZ
* Le style d'accompagnement DISCO est
automatiquement sélectbnné à la mise
sous tension.
* il n'est possible de sélectionner qu'un
seul style d'accompagnement à la fois.
Réglage du volume de
l'accompagnement
La commande ACCOMPANIMENT
VOLUME (Dpermet de régler le volume
du rythme par rapport à celui de la
mélodie jouée au clavier.
SECCION DE
ACOMPAÑAMIEN
-TO
Acompañamiento
rítmico
Selección de un estilo de acompañamiento
El PSR-7 ofrece 10 estilos de
acompañamiento distintos que pueden
seleccionarse presionando simplemente
el botón ACCOMPANIMENT STYLE
SELECT ©apropiado.
* Cuando se conecta la alimentación, se
selecciona automáticamente el estilo de
acompañamiento DISCO.
* Sólo puede seleccionarse un estilo de
acompañamiento a la voz.
Ajuste del volumen del
acompañamiento
El control ACCOMP. VOLUME ®del
PSR-7 le permite ajustar el volumen
del ritmo en relación con la melodía
tocada en el teclado.
12
Page 14

starting the Accompaniment
Press the START/STOP button (Q)to start
the selected rhythm immediately, or press
the SYNCHRO START button ©if you
want the rhythm to start when you play the
first note on the keyboard. If you use the
SYNCHRO START button, the rhythm will
start as soon as you play any of the 19
lowest keys on the keyboard (up to F#2).
Auslösen der Begleitung
Wenn Sie die gewählte Begleitung direkt
starten wollen, müssen Sie nur die
START-Taste (Jjantippen. Falls die
Begleitung jedoch erst mit dem
Anschlägen der ersten Note im AUTO
BASS CHORD-Manualbereich einsetzen
soll, müssen Sie stattdessen SYNCHRO
START ©drücken. Wenn Sie die Taste
SYNCHRO START betätigen, startet die
Rhythmusbegleitung mit dem
Anschlägen einer der 19 tiefsten Tasten
auf dem Manual (bis F#2).
SYNCHRO START START/STQP
□ Ш
Début de l'accompagnement
Appuyer sur la touche START/STOP ®
pour lancer immédiatement le rythme
sélectionné, ou appt^er sur la touche
SYNCHRO START (¡J)pour que te rythme
commence brsque la première note est
jouée sur le clavier. Lorsque la touche
SYNCHRO START a été sollicitée, le
rythme commence dès que l'une des 19
touches les plus graves du clavier (jusqu'à
F#2) est jouée.
Inicio del acompañamiento
Presione el botón START/STOP ©para
iniciar el ritmo seleccionado
inmediatamente, o presione el botón
SYNCHRO START ©si quiere que el
ritmo se inicie cuando toque la primera
nota en el teclado. Si usa el botón
SYNCHRO START, el ritmo se iniciará
tan pronto toque cualquiera de las 19
teclas más bajas del teclado (hasta F#2).
Setting the Tempo
Use the TEMPO buttons 0to adjust the
Speed (tempo) of the rhythm. Pressing the
A button decreases the tempo, and
pressing the T button increases it.
* A "standard tempo" of 120 beats per
minute is automatically selected when
the power is initially turned ON. The
standard tempo setting can be
immediately recalled at any time by
pressing both TEMPO buttons (8)
simultaneousty.
Einstellen des Tempos
Die TEMPO-Tasten (8) steuern die
Geschwindigkeit (Tfempo) des
Begleitrhythmus. Durch Drücken der
TEMPO-Taste A (perhöhen Sie und
durch die TEMPO-Taste ▼ vermindern
Sie das Tfempo der Begleitung.
Beim Einschalten des PSR-7 wird
automatisch das Normaltempo von 120
Tbktschlägen/Minute voreingestellt.
Das Normaltempo kann durch
gleichzeitiges Drücken der TEMPO-
Tftsten A und ▼ (8) jederzeit
rückgerufen werden.
Réglage du tempo
Utiliser les touches TEMPO (8) pour régler
la vitesse (tempo) du rythme. Appuyer sur
la touche A pour ralentir le tempo et sur la
touche ▼ pour l'accélérer.
* Le lempo standard" de 120 temps par
minute est automatiquement sélectionné
à la mise sous tension. Le réglage
standard du tempo peut être rétabli à
tout moment en appuyant simultanément
sur les touches TEMPO ®.
Ajuste del tempo
Use los botones TEMPO ® para ajustar
la velocidad (tempo) del ritmo. La
presión del botón A disminuye el tempo,
y la presión del botón ▼ lo aumenta.
* Se selecciona automáticamente un
"tempo estándar" de 120 tiempos por
minuto cuando se conecta inicialmente
la alimentación. El ajuste del tempo
estándar puede llamarse
automáticamente en cualquier
momento presionando
simultáneamente ambos botones
TEMPO®.
13
Page 15

starting the Accompaniment with an introduction
Any of the PSR-7 acx»mpaniment styles
can be started with a 1 -measure
introductory pattern by pressing the
INTRO./FILL-IN button ©before pressing
the START/STOP button ®.
Beginnen der Begleitung
mit Auftakt
Wenn Sie vor dem Drücken der STARTTaste ©die INTR07FILL IN- lkste 0
0 antippen, beginnt die Begleitung mit
einem 1-taktigen Auftakt.
Début de l*accompagnement avec introduction
Tous tes styles d'accompagnement du
PSR-7 commenceront avec une
introduction de 1 mesure lorsque la touche
INTRO./FILL IN ©est sollicttée avant la
touche START ©,
Inicio del acompañamiento con una introducción
Cualqmera de los patrones de
acompañamiento del PSR-7 puede
iniciarse con un patrón de introducción
de 1 compases presionando el botón
INTRO./FILL ©antes de presionar el
botón START/STOP.
Adding Fill-ins
To add a fill-in (rhythm variation) at any
time while the accompaniment is playing,
press the INTRO./FILL-IN button ©. The
fill-ins have a maximum length of one
measure, but the actual length depends on
precisely when in the current measure you
press the FILL-IN button. A fill-in lasts from
the point at which the button is pressed
until the end of the current measure. To
stop a fill-in before the current measure,
press the FILL-IN button a second time.
Holding the FILL-IN button will cause the
pattern to repeat until the button is
released.
Stopping the Accompaniment
Press the START/STOP button (Jj)a
second time to stop the rhythm.
Einfügen von Fill-ins
Sie können jederzeit während der
Begleitung ein Pill-in
(Rhythmusvariation) einfügen, indem
Sie die INTR07FILL IN-Taste ©
antippen. Das Fill-ins geht maximal
über einen ganzen Takt, die genaue
Länge hängt jedoch vom Zeitpunkt ab,
zu dem Sie die Tkste antippen. Das Fillin dauert vom Zeitpunkt des
Tastendrucks bis zum Ende des
gegenwärtigen Takts. Sie können ein
Pill-in vor dem Taktende abbrechen,
indem Sie die INTRO/FILL IN-Taste ein
zweites Mal drücken. Wenn Sie die
Taste kontinuierlich drücken, wiederholt
sich das Pill-in, bis Sie die Taste
loslassen.
(NTOflO/FUL IN
stoppen der Begleitung
Zum Stoppen der Begleitung müssen
Sie nur die STARTR/STOP-Tkste ©ein
zweites Mal drücken.
Addition de fiii-ins
Appuyer sur la touche INTR07FILL IN (gl
pour introduire un fill-in
(variation rythmique) à tout moment
pendant la reproduction d'un
accompagnement. Bien que le fill-in ait
une durée maximale de 1 mesure, sa
durée réelle dépend du moment de la
mesure où ta touche FILL IN a été
sollicitée. Le fill-in commence au moment
où la touche est sollicitée et se termine à
ta fin de la mesure en cours. Le fill-in peut
être arrêté avant la fin de la mesure en
appuyant une deuxième fois sur la touche
FILL IN. Si la touche FILL IN est
maintenue enfoncée, le fill-in sera répété
jusqu'à ce que la touche soit relâchée.
Arrêt de i'accompagnement
Appuyer sur la touche START/STOP (JJ)
une deuxième fois pour arrêter
l'accompagnement.
Adición de rellenos
Para añadir un relleno (variación
rítmica) en cualquier momento
mientras se está reproduciendo el
acompañamiento, presione el botón
INTROyPILL IN ©. Los rellenos tienen
una longitud máxima de un compás,
pero la longitud actual depende con
precisión de cuándo en el compás actual
usted presiona el botón FILL IN. El
relleno dura desde el punto en el cual se
ha presionado el botón hasta el fin del
compás actual. Para parar el relleno
antes del compás actual, presione el
botón FILL IN una segunda vez. Si se
mantiene presionado el botón FILL IN,
el patrón se repetirá hasta que se suelte
el botón.
Parada del acompañamiento
Presione el botón START/STOP ®una
segunda vez para parar el ritmo.
14
Page 16

ACCOMPANIMENT can be changed at
any moment during play. TEMPO will
remain the same throughout
ACCOMPANIMENT changes unless
readjusted.
* Der Begleitstil kann während der
Rhythmuswiedergabe jederzeit
gewechselt werden. Das Tempo bleibt
jedoch gleich, falls es nicht über die
TEMPO-Tasten ^verändert wird.
L'accompagnement peut être changé à
tout moment pendant la reproduction. Le
TEMPO restera le même quel que soit
l’accompagnement sélectionné, à moins
qu'il soit de nouveau réglé.
* E1 acompañamiento puede cambiarse
en cualquier momento durante la
reproducción. El tempo permanecerá
igual en todos los cambios de
acompañamiento a menos que se
reajuste.
Manual Bass
The PSR-7 allows you to play two voices
at once - a bass voice with the left hand
and one with the right. The bass voice can
be played on the AUTO BASS CHORD
KEYS (0), up to the "]** mark immediately
above the keyboard. You can select any of
the PSR-7s 40 voices to play on the
upper section of the keyboard, but the
bass voice is determined by the
accompanyment style you select.
1. Select the MANUAL BASS Mode
Slide the AUTO BASS CHORD
selector (0)to the MANUAL BASS
position.
Manualteilung für
manuelle Baßbegleitung
Mit der BASS MANUAL-Funktion des
PSR-7 können Sie zwei Stimmen
zugleich spielen: eine Melodiestimme im
rechten Manualbereich und eine
Baßstimme im linken. Die Baßstimme
wird in dem durch Auto Bass Chord @
gekennzeichneten und durch die
Markierung"]" abgegrenzten
Manualbereich gespielt. Für den rechten
Manualbereich können Sie eine der 40
Stimmen des PSR-7 wählen, die
Baßstimme ist jedoch durch den
gewählten Begleitstil vorgegeben.
L Auf MANUAL BASS-Modus
schalten.
Schieben Sie den AUTO BASS
CHORD-Wähler ®in die MANUAL
BASS-Stellung.
Accompagnement manuel
Le PSR-7 permet de jouer deux voix
simultanément: une voix de la main
gauche et une voix de la main droite. La
voix d’accompagnement peut être jouée
sur la section AUTO BASS CHORD ®
allant jusqu'au repère "J" situé
immédiatement au-dessus du clavier. Il est
possible de sélectionner n'importe laquelle
des 40 voix du PSR-7 pour ta section
haute du clavier, alors que la voix de la
section basse sera déterminée par le style
d'accompagnement sélectionné.
1. Sélectionner le mode MANUAL
BASS
Faire coulisser le sélecteur AUTO
BASS CHORD ®sur la position
MANUAL BASS.
Acompañamiento de bajo
manual
El PSR-7 le permitirá tocar dos voces a
la vez; una voz de bajo con la mano
izquierda y otra con la derecha. La voz
de bajo puede tocarse en las teclas de
AUTO BASS CHORD (¡J hasta la marca
"]" inmediatamente encima del teclado.
Usted podrá seleccionar cualquiera de
las 40 voces del PSR-7 para tocar en la
sección superior del teclado, pero la voz
de bajo queda determinada por el estilo
de acompañamiento que usted
selecciona.
L Seleccione el modo de MANUAL
BASS.
Deslice el selector AUTO BASS
CHROD ® a la posición MANUAL
BASS.
15
Page 17

I fingered
I I MANUAL BASS
2. Select an ACCOMPANIMENT
STYLE
If you intend to use the MANUAL
BASS feature while a rhythm
accompaniment is playing, simply
select the desired accompaniment
style. If you do not intend to use
rhythm accompaniment, try pressing
different ACCOMPANIMENT STYLE
buttons ® and playing a few notes on
the lower (Auto Bass Chord) section
of the keyboard each time. Among the
10 ACCOMPANIMENT STYLES,
there are 3 different bass voices
available.
3. Select an Upper Keyboard Vbice
Select the desired upper voice in the
normal way (if the DUAL effect is
selected, you can select two voices
one after the other).
4. Adjust the Volume Balance
In the MANUAL mode, the volume of
the lower keyboard bass voice is
controlled by the ACCOMPANIMENT
VOLUME oontrold). Use the
ACCOMPANIMENT VOLUME and
MASTER VOLUME controls ®to set
tup the desired balance between the
bwer and upper keyboard voices.
‘ In the MANUAL BASS mode, the
maximum number of notes that can be
played simultaneously on the upper
keyboard is 4. If the DUAL VOICE
feature is used at the same time, the
maximum number of simultaneous
upper-keyboard note is 2.
2. Einen Begleitstil wählen.
Falls Sie die manuelle
Baßbegleitung zu einer
Rhythmusbegleitung spielen wollen,
müssen Sie nur den Begleitstil
wählen. Falls Sie keine
Rhythmusbegleitung wünschen,
sollten Sie verschiedene
ACCOMPANIMENT STYLE-Tbsten
drücken, und jeweils ein paar Noten
im AUTO BASS CHORD-Bereich
anschlagen. Die zehn Begleitstile
bieten drei verschiedene
Baßstimmen.
Wählen Sie einen Stil mit passender
Baßstimme.
3. Eine Stimme für den rechten
Manualbereich wählen.
Wählen Sie dann die Stimme für
den rechten Manualbereich mit dem
normalen Verfahren. Bei
zugeschaltetem DUAL VOICEEffekt können Sie zwei Stimmen
nacheinander wählen.
4. Abstimmen der Lautstärke von
oberer und unterer Stimme
Im MANUAL BASS-Modus wird die
Lautstärke der Stimme des unteren
Manualbereichs über den
ACCOMPANIMENT VOLUMERegler (Deingestellt. Verwenden Sie
den ACCOMPANIMENT VOLUMEund den MASTER VOLUME-Regler
(2), um das Lautstärkeverhältnis
zwischen Baß und Melodiestimme(n)
abzustimmen.
* Im MANUAL BASS-Modus können auf
der oberen Manualhälfte maximal 4
Noten zugleich erzeugt werden. Bei
aktiviertem DUAL VOICE-Effekt
reduziert sich die Anzahl der
gleichzeitig spielbaren Noten auf 2.
2. Sélectionner un style
d'accompagnement
Pour utiliser la fonction MANUAL
BASS pendant la reproduction d'un
accompagnement rythmique,
sélectionner simplement le style
d'accompagnement souhaité. Si vous
ne voulez pas d'accompagnement
rythmique, appuyer sur diverses
touches ACCOMPANIMENT STYLE
(2) et essayer à chaque fois de jouer
quelques notes sur la section basse
(AUTO BASS CHORD) du clavier. 3
voix basses différentes sont
disponibles parmi les 10 styles
d'accompagnement.
3. Sélectionner une voix pour la
section haute
Sélectionner la voix de ta section
haute de ta manière normale (lorsque
la fonction DUAL a été activée, il est
possible de sélectionner deux voix
l'une après l'autre).
4. Régler l'équilibre du volunw
En mode MANUAL, le volume de la
voix de la section basse du clavier
peut être réglé à l'aide de la
commande ACCOMPANIMENT
VOLUME ®. Utiliser les commandes
ACCOMPANIMENT VOLUME et
MASTER VOLUME ®pour établir
l'équilibre entre la voix de la section
basse et celle de la section haute.
^ En mode MANUAL BASS, le nombre
maximal de notes pouvant être jouées
simultanément sur la section haute du
clavier est de 4. Lorsque la fonction
DUAL VOICE est utilisée, le nombre
maximal de notes pour la section haute
du clavier est de 2.
2. Seleccione un
ACCOMPANIMENT STYLE.
Si intenta emplear la fundón
MANUAL BASS mientras se está
tocando un acompañamiento
rítmico, pruebe presionando botones
de ACCOMPANIMENT STYLE ®
distintos y tocando algunas notas en
la secdón inferior (AUTO BASS
CHORD) del teclado cada vez. Entre
los 10 estilos de acompañamiento
(ACCOMPANIMENT STYLES), hay
3 voces de bajo distintas disponibles.
3. Seleccione la voz del teclado
superior
Selecdone la voz del teclado superior
en la forma normal (si se selecdona
el efecto DUAL, usted podrá
selecciona dos voces, una después de
otra).
4. Ajuste el balance del volumen.
En el modo MANUAL, el volumen
de la voz de bajo del teclado inferior
se controla con el control
ACCOMPANIMENT VOLUME ®.
Emplee los controles
ACCOMPANIMENT VOLUME y
MASTER VOLUME ® para «gustar
el balance deseado entre las voces
del teclado inferior y superior.
' En el modo MANUAL BASS, el número
máximo de notas que pueden tocarse
simultáneamente en el teclado superior
es de 4. Si se usa la función DUAL
VOICE al mismo tiempo, el número
máximo de notas simultáneas del
teclado superior es de 2.
16
Page 18

Try playing this in the Manual Bass
mode.
(A Little Brown Jug)
Play the bass part on the lower keyboard
and the melody part on the upper
keyboard.
Panel Settings
Accompaniment Style:Swing
Tempo: J =120
AUTO BASS CHORD Selector: MANUAL BASS
position
Upper Voice: Clarinet
Melody
Bass
Versuchen Sie einmal dieses
Essayer de jouer ceci en mode
Stück im MANUAL BASS-Modus BASS MANUAL
zu Spielen
(A Little Brown Jug)
Spielen Sie die Baßstimme im tiefen und
die Melodiestimme im oberen
Manualbereich.
Einstellungen:
Begleitungsstü: Swing
Tempo: J =120
AUTO BASS CHORD-Wähler: MANUAL
BASS-Position
Stimme für oberen Manualbereich: Clarinet
(A Little Brown Jug)
Jouer la partie basse sur la section basse
et la mélodie sur la section haute du
clavier.
Réglages de panneau
Style d'accompagnement: Swing
Tempo: J =120
Sélecteur AUTO BASS CHORD; Position
MANUAL BASS
Voix : Clarinet
A Intente tocar esto en el modo
MANUAL BASS
(A Little Brown Jug)
Tbque la parte del bajo en la sección del
teclado inferior y la parte de la melodía
en el teclado superior.
Ajustes del panel
Estilo de acompañamiento: Swing
Tempo: j =120
Selector AUTO BASS CHORD: Posición
MANUAL BASS
Voz superior: Clarinet
Auto Bass Chord
Accompaniment
The PSR-7 includes a sophisticated auto
accompaniment system can provide
automated rhyhtm and chord backup in a
variety of ways.
Single Finger Accompaniment
SINGLE FINGER accompaniment makes
it simple to produce chord accompaniment
using major, seventh, minor, and minorseventh chords by pressing a minimum
number of keys in the Auto Bass Chord
Key ©section of the keyboard.
17
AutoBaß/Akkordbegleitung
Das PSR-7 bietet Ihnen interessante
automatische Baß- und
Akkordbegleitungsfunktionen, die Ihnen
beim Spielen auf verschiedenste Weise
Baß- und Akkordbegleitung liefern.
Single Finger-Funktion
Mit der SINGLE FINGER-Funktion
können Sie ganz einfach eine
interessante, im Thkt erklingende
Ch*chesterbegleitung aus Dur-,
Septimen-, Moll- und Moll-
Septimenakkorden erzeugen, indem Sie
nur maximal drei Tasten im AUTO
BASS CHORD-Manualbereich ®
zugleich anschlagen, während eine
Baßlinie automatisch dazu gespielt wird.
Accompagnement
automatique
Le PSR-7 offre un système sophistiqué
d'accompagnement nautomatique AUTO
BASS CHORD permettant de produire un
accompagnement en accords et basses
automatique de diverses manières.
Accompagnement à un seul doigt
L'accompagnement en mode SINGLE
FINGER permet de produire facilement un
très bel accompagnement orchestral,
utilisant des accords majeur, septième,
mineur et septième mineure, en appuyant
sur un nombre minimal de touches de la
section AUTO BASS CHORD ©du
clavier.
Acompañamiento
automático de bajo y
acordes
El PSR—7 incluye un sistema de
acompañamiento sofisticado automático
de bajo y acordes que puede
proporcionar el bajo y los acordes
automáticos de muchas formas.
Acompañamiento de un
dedo
El acompañamiento SINGLE FINGER
simplifica la producción de bellos
acompañamiento orquestales empleando
acordes mayores, de séptima, menores y
menores de séptima, presionando un
número mínimo de teclas en la sección
de teclas de acompañamiento
automático de bajo y acordes ©del
teclado.
Page 19

1. Select the SINGLE FINGER Mode
Slide the AUTO BASS CHORD
selector ®to the SINGLE FINGER
position.
L Auf SINGLE FINGER-Modus
schalten.
Schieben Sie den AUTO BASS
CHORD-Wähler ® in die Stellung
SINGLE FINGER.
SINGLE FINGER
AUTO BASS
CHORD
__
1. Sélectionner le mode SINGLE
FINGER
Faire coulisser le sélecteur AUTO
BASS CHORD ® sur la position
SINGLE FINGER.
OFF
I MANUAL BASS
I
L Seleccione el modo SINGLE
FINGER.
Deslice el selector AUTO BASS
CHORD ® a la posición SINGLE
FINGER.
2. Select an Accompaniment
Press the ACCOMPANIMENT SPi^LE
SELECT button ©for the rhythm you
wish to use, then press either the
START/STOP button ®or the
SYNCHRO START button ®. If you
press the START/STOP button (JJ), the
rhythm will begin playing immediately
without chord accompaniment.
3. Press a Key In the Auto Bass Chord
Key ® Section
Pressing any of the 19 lowest keys on
the keyboard will cause the automatic
chord and bass accompanyment to
begin. If you press a "C" key, for
example, a C-major accompaniment
will be played.
Press another key in the Auto Bass
Chord Key (Q) section to select a new
chord. The key you press will always
determine the "root" of the chord
played.
2. Einen Begleitstil wählen.
Wählen Sie mit den
ACCOMPANIMENT STYLE
SELECT-Tasten (7) einen
Begleitrhythmus und lösen Sie den
Rhythmus mit START/STOP ®oder
SYNCHRO START ©aus. Falls Sie
START/STOP ©drücken, beginnt
der Rhjrthmus sofort.
3. Eine Taste im AUTO BASS
CHORD-Manualbereich ®
anschlagen.
Wenn Sie eine der 19 tiefsten Tasten
auf dem Manual anschlagen, setzt
die Begleitung mit Bass und
Akkorden ein. Wenn Sie z. B. ein "C"
anschlagen, spielt die Begleitung
mit C-Dur Akkorden und
entsprechender Baßlinie. Um auf
einen anderen Akkord zu wechseln,
müssen Sie nur eine andere Tbste
im AUTO BASS CHORD-Feld
anschlagen. Die gedrückte Taste
bestimmt jeweils den Grundton des
gespielten Akkords (z. B. C für CAkkorde).
2. Sélectionner un accompagnement
Appuyer sur une des touches
ACCOMPANIMENT STYLE SELECT
©pour sélectionner le rythme
souhaité et appuyer ensuite sur la
touche START/STOP ®ou sur la
touche SYNCHRO START ®. Si la
touche START/STOP ©est sollicitée,
le rythme commencera
immédiatement sans accords
d'accompagnement.
3. Appuyer sur une touche de la
section AUTO BASS CHORD du
clavier ®
Le fait d'appuyer sur l'une des 19
touches graves du clavier lance
l'accompagnement en accords et
basses automatique. Si on appuie sur
une touche "Do", par exemple, un
accompagnement en Do majeur sera
joué. Appuyer sur une autre touche de
la section AUTO BASS CHORD ®du
clavier pour sélectionner un autre
accord. La touche enfoncée détermine
toujours la note fondamentale de
l’accord joué (par ex. "Do" pour un
accord en Do).
2. Seleccione un acompañamiento
Presione el botón
ACCOMPANIMENT STYLE
SELECT ©para el ritmo que desee
utilizar, luego presione el botón
START/STOP ©o el botón
SYNCHRO START ®. Si presiona
el botón START/STOP ©, el ritmo
empezará a reproducirse
inmediatamente sin
acompañamiento de acordes.
3. Pulse una tecla de la sección de
acompañamiento automático de
bajo y acordes ®
Al presionar cualquiera de las 19
teclas inferiores del teclado hará que
se inicie el acompañamiento
automático de bajo y acordes. Si
presiona una tecla "C", por ejemplo,
se tocará un acompañamiento el C
mayor. Presione otra tecla de la
sección de acompañamiento
automático de bajo y acordes para
seleccionar un nuevo acorde. La
tecla que usted presione siempre
determinará la "raíz" del acorde
tocado (es decir, "C" para un acorde
de C).
18
Page 20

Playing Minor, Seventh, and Minorseventh Chords in the Single-finger
Mode
• For a minor chord, press the root key
and the first black key to its left.
• For a seventh chord, press the root
key and the next white key to its left.
• For a minor-seventh chord, press the
root key and both the next white and
the next black keys to its left.
Spielen von Moll-, Septimen- und
Moll-Septimenakkorden im SINGLE
FINGER-Modus.
• Für Moll-Akkorde den Grundton
und die nächste schwarze Tsiste
links davon anschlagen.
• Für Septimenakkorde den
Grundton und die nächste weiße
Thste links davon anschlagen,
• Für Moll-Septimenakkorde den
Grundton und die nächste weiße
und schwarze Taste links davon
anschlagen.
Exécution d'accords mineur, septième
et septième mineure en mode
SINGLE FINGER
• Pour un accord mineur, appuyer sur
la touche de la note fondamentale et
sur la touche noire immédiatement à
gauche.
• Pour un accord septième, appuyer
sur la touche de la note
fondamentale et sur la touche
blanche immédiatement à gauche.
• Pour un accord septième mineure,
appuyer sur la touche de la note
fondamentale et sur la touche
blanche et la touche noire
immédiatement à gauche.
Interpretación de acordes menores,
de séptima, y menores de séptima en
el modo SINGLE FINGER
• Para un acorde menor, presione la
tecla de raíz y la primera tecla
negra de su izquierda.
• Para un acorde de séptima,
presione la tecla de raíz y la tecla
blanca de su lado de la izquierda.
• Para un acorde menor de séptima,
presione la tecla de raíz y las teclas
blanca y negra de su lado de la
izquierda.
* The automatic accompaniment will
continue playing even if you lift your
fingers from the Auto Bass Chord
keys ®. You only need to press the
Auto Bass Chord keys when
changing chords.
4. Stop the Auto Accompaniment
Press the START/STOP button
stop the Auto Bass Chord
Accompaniment.
Setting the Accompaniment Volume
Set the volume of the Auto Bass Chord
sound using the ACCOMP. VOLUME
control d).
Setting the Tempo
Use the TEMPO button ® to set the
desired accompaniment tempo (see
"Setting the Tempo" on page 13 for more
details).
* Die automatische Begleitung spielt
auch nach Loslassen der AUTO
BASS CHORD-lksten ©weiter.
Sie müssen nur Ihsten drücken,
wenn Sie den Akkord wechseln
wollen.
4. Stoppen der automatischen Begleitung
Zum Stoppen der Begleitung die
START/STOP-Taste ©drücken.
Einstellen der
Begleitungslautstärke
Die Lautstärke der Begleitung kann mit
dem ACCOMPANIMENT VOLUMERegler ©eingestellt werden. Die
Gesamtlautstärke hingegen wird vom
MASTER VOLUME-Regler festgelegt.
Einstellen des Tempos
Stellen Sie das Tempo der Begleitung
mit den TEMPO-Tasten ®ein (siehe
Einzelheiten hierzu unter "Einstellen
des Tempos" auf Seite 13).
* L'accompagnement automatique se
poursuivra même une fois que les
touches de la section AUTO BASS
CHORD ©sont retâchées. Il n'est
nécessaire d'appuyer sur ces
touches que pour changer d'accords.
4. Arrêter raccompagnement
automatique
Appuyer sur la touche STOP ®, pour
arrêter l'accompagnement.
Réglage du volume de
raccompagnement
Régler le volume de l'accompagnement
automatique à l'aide de la commande
ACCOMPANIMENT VOLUME ®.
Réglage du tempo
Utiliser les commandes TEMPO ° pour
régler le tempo de l'accompagnement
(Pour plus de détails, voir "Réglage du
tempo" à la page 13).
* El acompañamiento automático
seguirá aunque usted suelte las
teclas de AUTO BASS CHORD ©.
Usted sólo necesita presionar la
teclas de acompañamiento
automático de bajo y acordes para
cambiar de acordes.
4. Pare el acompañamiento automático
Presione el botón START/STOP ®
para detener el acompañamiento.
Ajuste del volumen de
acompañamiento
Ajuste el volumen del sonido del
acompañamiento automático empleando
el control ACCOMPANIMENT
VOLUME ®.
Ajuste del tempo
Emplee los controles de TEMPO ®para
ajustar el tempo deseado del
acompañamiento (vea "Ajuste del tempo"
de la página 13 para más detalles).
19
Page 21

Fingered Accompaniment
The FINGERED mode is ideal if you
already know how to play chords on a
keyboard, since it allows you to supply
your own chords for the Auto Bass Chord
feature.
1. Select the FINGERED Mode
Slide the AUTO BASS CHORD
selector jJ)to the FINGERED position.
Fingered-Funktion
Der FINGERED-Modus eignet sich
besonders für diejenigen, die bereits die
Akkordgriffe beherrschen und eigene
Akkorde für die Auto-Baß/
Akkordbegleitung liefern können.
1. Auf FINGERKD-Modus schalten.
Schieben Sie den AUTO BASS
CHORD-Wähler ®in die Stellung
FINGERED.
R FINGERED
AUTO BASS (
CHORD
Accompagnement à
piusiuers doigts
Le mode FINGERED est idéal pour ceux
qui savent déjà jouer des accords sur un
clavier, du fait qu'il permet de produire des
accords personnels pour la fonction
d'accompagnement automatique.
1. Sélectionner le mode FINGERED
Faire coulisser le sélecteur AUTO
BASS CHORD ® sur la position
FINGERED.
I I MANUAL BASS
Acompañamiento para acordes
El modo FINGERED es ideal si usted ya
sabe tocar acordes en un teclado, porque
le permitirá suministrar sus propios
acordes para la función de
acompañamiento automático de bajo y
acordes.
L Seleccione el modo FINGERED.
Deslice el selector AUTO BASS
CHROD (0)a la posición
FINGERED.
2. Select an Accompaniment Style
Select the desired rhythm then press
either the START/STOP button ®or
the SYNCHRO START button ®.
3. Play a Chord on the Auto Bass
Chord Keys (g)
As soon as you play any chord (up to
[4] notes) in the Auto Bass Chord Key
©section, the PSR-7 will
automatically begin to play the chord
abng with the selected rhythm and an
appropriate bass line.
2. Einen Begleitstil wählen.
Wählen Sie mit den
ACCOMPANIMENT STYLE
SELECT-Tasten ©einen
Begleitrhythmus und lösen Sie den
Rhythmus mit START/STOP ©oder
SYNCHRO START (gaus.
3. Einen Akkord im AUTO BASS
CHORD-Manualbereich ©
anschlagen.
Sobald Sie im AUTO BASS CHORDManualbereich einen Akkord (aus
maximal 4 Noten) anschlagen,
beginnt das PSR-7 diesen Akkord
im gewählten Rhythmus zu spielen
und liefert eine passende Baßlinie
dazu.
Cm
2. Sélectionner un accompagnement
Sélectionner le rythme souhaité et
appuyer ensuite sur la touche
START/STOP ©ou sur la touche
SYNCHRO START®.
3. Jouer un accord sur les touches
AUTO BASS CHORD©
Dès que l'on joue un accord (jusqu' à
4 notes) sur la section AUTO BASS
CHORD ©du clavier, le PSR-7
commence automatiquement à jouer
l'accord, en même temps que le
rythme sélectionné et une ligne de
basses appropriée.
C7 Cm?
2. Seleccione un estilo de
acompañamiento
Seleccione el ritmo deseado, y luego
presione el botón START/STOP ©o
el botón SYNCHRO START ®.
3. Toque un acorde en las teclas de
la sección de acompañamiento
automático de bajo y acordes ©
Tan pronto como toque un acorde
(hasta [4] notas) en la sección de
teclas de acompañamiento
automático de bajo y acordes ©, el
PSR-7 empezará automáticamente
a reproducir el acorde junto con el
ritmo seleccionado y una la línea de
bajo apropiada.
20
Page 22

The PSR-7 will accept the following
chord types:
• Major
• Minor
• Major seventh
• Minor seventh
• Minor seventh with a flatted fifth
• Seventh
• Seventh with a suspended fourth
* All other FINGERED mode operations
are the same as in the SINGLE FINGER
mode.
Das PSR-7 erkennt die folgenden
Akkordtypen: ist.
• Dur
•Moll
• Dur-Septimenakkord
• Moll-Septimenakkord
• Moll-Septimenakkord mit
verminderter Quinte
• Septimenakkord
• Septimenakkord mit
vorgehaltener Quarte
* Alle anderen Bedienvorgänge von
FINGERED- und SINGLE
FINGERED-Modus sind identisch.
Le PSR-7 accepte les types
d'accords suivants:
• Majeur
• Mineur
• Septième majeure
• Septième mineure
• Quinte bémol septième mineure
• Septième
• Quarte suspendue septième
Pour toutes les autres opérations, leB
mode FINGERED est identique au mode
SINGLE FINGER.
El PSR-7 aceptará los siguientes
tipos de acordes:
• Mayor
• Menor
• Mayor de séptima
• Menor de séptima
• Menor de séptima quinta bemol
• Séptima
• Séptima cuarta suspendida
Tbdas las otras operaciones del modo
FINGERED son las mismas que en el
modo SINGLE FINGER,
Try playing this using the Single
Finger mode or Fingered mode.
(Brahms’ Lullaby)
Play the chord part on the lower keyboard
section and the melody part on the upper
keyboard. Chords can be played using
either the Single Finger or Fingered
method.
Panel Settings
Accomp^iment StyleiWaltz
Tempo: J =126
AUTO BASS CHORD Selector: SINGLE
FINGER or FINGERED position
Upper Voice: Harp
SINGLE FINGER
CHORD
FINGERED
CHORD
UJIUU
Versuchen Sie einmal dieses
Stück im SINGLE FINGER- oder
FINGERED-Modus zu spielen.
(Brahms* Lullaby)
Spielen Sie die Akkorde im tiefen
Manualbereich mit SINGLE FINGER
oder FINGERED und die
Melodiestimme im rechten
Manualbereich.
Einstellungen
Begleitstil: Waltz
Tempo: J =126
AUTO BASS CHORD-Wähler: SINGLE
FINGER oder FINGERED
Stimme für rechte Manualhälile; Harp
Essayer de jouer ceci en mode SINGLE
FINGER ou en mode FINGERED.
(Brahms' Lullaby)
Jouer les accords sur la section basse du
clavier et la mélodie sur la section haute.
Les accords peuvent être joués en mode
SINGLE FINGER ou en mode
FINGERED.
Réglages de panneau
Style d'accompagnement: Waltz
Tempo: J =126
Sélecteur AUTO BASS CHORD: Position
SINGLE FINGER ou FINGERED Voix : Harp
Dm
Intente tocar esto empleando el
modo de acordes SINGLE
FINGER o modo FINGERED.
(Brahms* Lullaby)
Tbque la parte de acordes en la secdón
del teclado inferior y la parte de melodía
en el teclado superior. Los acordes
pueden tocarse empleando el método
SINGLE FINGER o FINGERED.
Ajustes del panel
Estilo de acompañamiento: Waltz
Tempo: J =126
Selector AUTO BASS CHORD: Posidón
SINGLE FINGER o FINGERED
Voz superior Harp
21
Page 23

USING THE REAL
DER ECHTZEIT-
UTILISATION DE
USO DE LA
TIME MELODY
MEMORY
The MELODY MEMORY ©aitows you to
record and then playback a single-line
melody of your own performance on the
keyboard.
Recording
1. To Set the Record-ready Mode
Press the RECORD button and the
tempo LED will begin flashing at the
rate of the set tempo. A metronome
will also sound the tempo. At the same
time the SYNCHRO-START function is
placed on stand-by.
MELODIESPEI-
CHER
Mit der MELODY MEMORY-Funktion
©des PSR-7 können Sie Meldoien aus
einzelnen Noten aufzeichnen und
wiedergeben.
Aufzeichnung
L Auf Aufnahmebreitschaft
schalten.
Drücken Sie dazu die RECORDThste» wonach die Tfempo-Anzeige
entsprechend des eingestellten
Ifempos blinkt. Gleichzeitig ertönt
ein Metronomklang und das PSR-7
ist auf Synchronstart geschaltet.
LA MEMOIRE DE
MELODIE EN
TEMPS REEL
MELODY MEMORY ©permet
d'enregistrer et de reproduire une mélodie
à une seule ligne exécutée au clavier.
Enregistrement
1. Mettre en mode prêt à
l'enregistrement
Appuyer sur la touche RECORD, le
témoin à LED de tempo se met alors
à clignoter au tempo réglé. Un
métronome marque également le
tempo. La fonction SYNCHRO START
est mise en attente.
MELODY MEMORY
MEMORIA DE
MELODIA DE
TIEMPO REAL
La función de MELODY MEMORY ©le
permite grabar y luego reproducir una
melodía de línea sencilla de su propia
interpretación en el teclado.
Grabación
L Ajuste del modo preparado para
grabación
Presione el botón RECORD y el LED
del tempo empezará a parpadear a
la velocidad del tempo ajustado. El
metrónomo también hará sonar el
tempo. Al mismo tiempo la función
SYNCHRO START se establecerá en
el modo de reserva.
2. To Adjust the Tempo
Use the TEMPO buttons ®to set the
desired recording tempo.
3. To Select an Accompaniment Style
Press the ACCOMPANIMENT STYLE
SELECT button ®for the rhythm you
wish as accompaniment to your
melody.
* The selected rhythm will NOT be
recorded along with the melody.
2. Das Tempo einstellen.
Mit den TEMPO-Tasten (8) das
Tempo für die Aufnahme einstellen.
3. Einen Begleitstil wählen.
Wählen Sie mit den
ACCOMPANIMENT STYLE
SELECT-Tasten ©einen Begleitstil,
der zur Aufzeichnung paßt.
‘ Der gewählte Rhythmus wird
NICHT aufgezeichnet
2. Régler le tempo
Utiliser les touches TEMPO ® pour
régler le tempo d’enregistrement
souhaité.
3. Sélectionner un style
d'accompagnement
Appuyer sur une des touches
ACCOMPANIMENT STYLE SELECT
©pour sélectionner le rythme
souhaité pour accompagner la
mélodie.
* Le rythme sélectionné NE SERA
PAS enregistré avec la mélodie.
2. Ajuste del tempo
Use los botones TEMPO ®para
ajustar el tempo de grabación
deseado.
3. Selección del estilo de
acompañamiento
Presione el botón
ACCOMPANIMENT STYLE
SELECT ©para el ritmo que dese
como acompañamiento en su
melodía.
* El ritmo seleccionado NO se
grabará durante la melodía.
22
Page 24

4. To Start Recording
Recording will begin automatically
with the playing of any key on the
keyboard. The selected rhythm will
begin playing at the same instant.
Remember: You can ONLY record
single notes.
* Recording can also be initiated by
pressing either the INTRO/FILL IN
button ©or the START/STOP
button ®.
* Staccato notes will not record. Each
note played will be recorded until the
following note is played.
* The MELODY MEMORY will record
a maximum of 69 notes, after which
recording will cease.
5. To Stop Recording
Stop recording by pressing the
MELODY MEMORY PLAY button ®.
the rhythm START/STOP button
or the RECORD button dl).
Playback
To Play Back the Recorded Melody
Press the PLAY button to play back the
recorded melody along with the selected
rhythm. The rhythm or voice can be
changed at any time.
4. Die Aufoahme auslosen
Die Aufnahme beginnt automatisch
mit der ersten gespielten Note. Die
Rhythmusbegleitung setzt
gleichzeitig ein.
Achtung: Sie können Noten NUR
einzeln aufzeichnen.
* Die Aufnahme kann auch durch
Drücken von INTRO/FILL IN ®
oder START/STOP ©ausgelöst
werden.
* Stakkato-Noten werden nicht
aufgezeichnet. Jede angeschlagene
Note wird aufgezeichnet, bis die
nächste Note gespielt wird.
* Die MELODY MEMORY-Funktion
zeichnet maximal 69 Noten auf.
Danach stoppt die Aufnahme
automatisch.
5. Aufiiahme stoppen.
Drücken Sie dazu entweder die
START/STOP-lhste ®, die
MELODY MEMORY PLAY-Thste
oder die RECORD-Thste ®,
Wiedergabe
Drücken Sie die Taste MELODY
MEMORY PLAY, um die Wiedergabe der
Melodie zusammen mit dem gewählten
Begleitrhythmus auszulösen. Der
Rhythmus oder die Stimme kann
jederzeit geändert werden.
4. Lancer l'enregistrement
L'enregistrement commencera
automatiquement dès qu'une note est
jouée sur le clavier. La reproduction
du rythme sélectionné sera tancée au
même moment. Attention: Il n'est
possible d'enregistrer qu'une SEULE
note à la fois.
* L'enregistrement peut être
également lancé en appuyant, soK
sur la touche INTRO/FILL IN ®, soit
sur la touche START\STOP ®.
^ Des notes en staccato ne peuvent
pas être enregistrées. Chaque note
jouée sera enregistrée jusqu'à ce
que la note suivante soit jouée.
* La mémoire MELODY MEMORY
permet d'enregistre un maximum de
69 notes, après quoi l'enregistrement
s'arrête.
5. Arrêt de raccompagnement
Arrêter l'accompagnement en
appuyant sur la touche MELODY
MEMORY PLAY ®, ou sur la touche
START/STOP ©, ou encore sur la
touche RECORD (j|).
Reproduction
Reproduction de la mélodie enregistrée
Appuyer sur la touche PLAY pour
reproduire la mélodie enregistrée en
même temps que le rythme sélectionné.
Le rythme et la voix peuvent être changés
à tout moment.
4. Inicio de la grabación
La grabación empezará
automáticamente cuando toque
cualquier tecla del teclado. El ritmo
seleccionado empezará a
reproducirse en el mismo instante.
Recuerde: Usted SOLO puede
grabar notas sencillas.
* La grabación también puede
iniciarse presionando el botón
INTROTFILL IN ®o el botón
START/STOP®.
* Las notas de staccato no se
grabarán. Cada nota tocada se
podrá grabar hasta que se toque la
siguiente nota.
* MELODY MEMORY grabará un
máximo de 69 notas, después de
lo cual la grabación se terminará.
5* Para parar la grabación
Para la grabación presionando el
botón MELODY MEMORY PLAY ®,
el botón START/STOP del ritmo ®,
o el botón RECORD ®.
Reproducción
Para reproducir la melodía grabada
Presione el botón PLAY para reproducir
la melodía grabada junto con el ritmo
seleccionado. El ritmo o la voz pueden
cambiarse en cualquier momento.
* Melody playback can be stopped at any
time by pressing the PLAY button again,
or by pressing the START/STOP button
®.
* The MELODY MEMORY is erased when
the power is turned OFF.
Remember: There is no memory back
up.
23
Die \Wedergabe der Melodie kann zu
jedem Zeitpunkt durch erneutes
Drücken der PLAY-Taste oder der
START/STOP-Taste ©gestoppt
werden.
Beim Ausschalten des PSR-7 wird der
Inhalt des Melodiespeichers gelöscht,
Achtung: Der Speicher des PSR-7 ist
flüchtig.
La reproduction de la mélodie peut être
arrêtée à tout moment en appuyant à
nouveau sur la touche PLAY, ou en
appuyant sur la touche START/STOP ©.
Le contenu de la mémoire MELODY
MEMORY sera effacé à la mise hors
tension de rinstrument.
Attention: Aucun dispositif de
conservation de la mémoire n'est prévu.
* La reproducción de la melodía puede
pararse en cualquier momento
presionando el botón PLAY otra vez, o
presionando el botón START/STOP 0,
* La memoria de melodía se borrará
cuando se desconecte la alimentación.
Recuerde: No hay memoria auxiliar.
Page 25

Try recording this melody using the
MELODY MEMORY Function
(When The Saints Go
Marching in)
Record this metody.
When playing it back later, you can play
another part along with it.
Panel Settings
Accompaniment Style: Swing
Tempo: J =144
AUTO BASS CHORD Selector: SINGLE
FINGER or FINGERED position
Upper Voice: Trumpet
Versuchen Sie einmal diese
Melodie mit der MELODY
MEMORY-Funktion
aufouzeichnen.
(When The Saints Go
Marching In)
Nehmen Sie diese Melodie auf* Sie
können die Wiedergabe dann begleiten.
Einstellungen
Begleitstil: Swing
Tempo: J =144
AUTO BASS CHORD-Wählen SINGLE
Stimme: TVumpet
Essayer d'enregistrer cette mélodie
avec MELODY MEMORY
(When The Saints Go
Marching In)
II sera possible de jouer un autre morceau
pendant la reproduction de cette mélodie.
Réglages de panneau
Style d'accompagnement: Swing
Tempo: J =144
Sélecteur AUTO BASS CHORD: Position
SiNGLE
Voix section haute: Trumpet
Pruebe a grabar la melodía
usando la función de MELODY
MEMORY
(When The Saints Go
Marching In)
Grabe esta melodía. Cuando la
reproduzca más tarde, puede tocar otra
parte con ella.
Ajustes del panel
Estilo de acompañamiento: Swing
Tempo: J =144
Selector AUTO BASS CHORD: Posición
SINGLE
Voz superior TRUMPET
24
Page 26

OPTIONAL
SONDERZUBE
ACCESSOIRES EN
ACCESORIOS
ACCESSORIES
• AC Power Adaptor
(PA-1/PA-1B/PA-3/PA-H4/PA-40)
Transforms AC voltage to DC voltage.
• Car Battery Adaptor (CA-1)
Enables you to provide power to the
instrument from a car battery using the
cigarette lighter socket.
• Headphones (HPE-3/HPE-5)
• Stand (L-2/L-4)
• Bench (BC-6)
• Soft Carrying Case (SCC-31)
• Stereo Connection Cord (PSC-3)
Use this cord to connect your PSR-7 to
a stereo hi-fi system.
• Stereo Conversion Plug (PCP-1)
Converts stereo pin jacks to a stereo
phone plug.
HÖR
• Netzadapter
(PA^l/PA-lB/PA-3/PA-4/PA-40)
Wandelt Netzspannung in
Gleichspannung um.
• Autobatterieadapter (CA~1)
Ermöglicht das Betreiben des PSR-7
mit Autobatteriestrom über
Zigarettenanzünder.
• Kopfhörer (HPE-^/HPE-5)
• Ständer (L-2/L-4)
- Bank (BC-6)
• Tragetasche (SCC-31)
• Stereo-^Anschlußkabel (PSC-^)
Dieses Kabel dient zum Anschließen
des PSR-7 an eine HiFi-Stereoanlage.
• Stereo-Adapterstecker (PCP-1)
Dieser Stereo-Klinkenstecker erlaubt
den Anschluß von Cinchsteckerkabeln.
OPTION
• Adaptateur secteur
(PA-1/PA-1 B/PA-^/PA-4/PA-40)
Transforme le courant alternatif en
courant continu.
• Adaptateur de batterie automobile
(CA-1)
Permet d'alimenter l'instrument à partir
d'une batterie automobile via la prise de
l'allume-cigares.
• Casque d'écoute (HPE-3/HPE-6)
• Support (L-2/L-^)
• Banc (B(^)
• Etui souple (SCC-31)
• Câble de raccordement stéréo
(PSC-^)
Utiliser ce câble pour connecter le
PSR-7 à une chaîne Hi-Fi stéréo.
• Connecteur stéréo (PCP-1)
Pour brancher des prises à broche
stéréo à une prise de jack stéréo.
OPCIONALES
• Adaptador de alimentación de CA
(PA-lÆA-lBPA-3Æ>A-4/PA-40)
Transforma la tensión de CA en
tensión de CC.
• Adaptador de la batería de
automóvil (CA-1)
Habilita el suministro de alimentación
al instrumento desde la batería del
automóvil usando el receptáculo de
encendedor de cigarrillos.
• Auriculares (HPE-.3/HPE-5)
• Soporte (L-2/L—1)
• Banqueta (BC-6)
• Estuche blando (SCC-31)
• Cable de conexión estéreo (PSC-3)
Emplee este cable para conectar el
PSR-7 a un sistema estéreo de alta
fidelidad.
• Clavija de conversión estéreo
(PCP-1)
Convierte las clavijas normales estéreo
a clavijas telefónicas estéreo.
Some optional accessories may not be
available in all areas.
* Manches Sonderzubehör ist in
gewissen Bestimmungsländern nicht
erhältlich.
* Certains accessoires peuvent ne pas
être disponibles dans certaines régbns.
* Algunos accesorios opcionales no están
disponibles en todos los países.
Page 27

SPECIFICATIONS TECHNISCHE
FICHE TECHNIQUE
ESPECIFICACIO
DATEN
Keyboard
49 Keys (Cl-(^)
Voicas
Piano/Honl^-Tonk Piano, Elec. Piano1/Elec. Piano2,
HarpsichordA/beB. MarlmbaAlueic Box, StrinssAiiolln,
Flute/Harp, Clarinet, Oboe, Saxophone/Aocordion,
Trumpet/Tronbone, Tuba/Brass Enserrble, Pipe C^an/Jazz
Organ, Classic Gultar/ForK Jazz (^Itar/Distortion Guitar,
Banjo/Acoustic Bass, Elec. Bass/Slap Bass,Synth
Bass/Landsooape, Synth Brass/Fuzz Brass, Crystal/loe Box,
African Percuss. ®irds, Synth Vox/Owl
Controla:
Vbice Setect Buttons, SIDE A/B Buttons
Effacts
Sustain, Dual Voice
Accompanimant Stylaa
№oo, Pops, 16 Beal, Rockn RoH, Swing. Slow Rock, Rhumba.
BossaNova, MarctVPolka, Waltz
Conttole; Steuerelemente:
Accompaniment Style Select Buttons, Tempo Control Buttons
(A, ▼), Accompaniment Volume, Intro. / FIN In Button, Synchro
Start Button, ^arVStop Button
Auto Baas Chord
Controls;
Auto Bass Chord Selector (Off, Single Finger, Fingered, Manual
Bass)
Melody Memory
Controls:
Record Button. Play Button
Other Controls
Power Switch, Master \tolume. Demonstration Buttons
Auxiliary Jacks
HEADPHONES/AUX. OUT, DC (9-12V) IN
Main Amplifiar
2.5Wx1(RMS)
Spaakar
12cm (4-3/4') X 1
Rated Voltage
DC 9V (Six SUM-1 ,-D*5ize. R-20 or equivalent batteries), AC
Power Adaptor (PA-1, PA-IB, PA-3, PA-4, PA-40) or Car
Bmery Adaptor (CA-1)
Dimensions (W x D x H)
861 mm X 209mm x 94mm (33-7/0- x 11-3^8" x 3-3/4")
Weight
3.8 kg (6.4 bs)
- SpedfmtonsaiBsut^ecttociiSUigewkboutno^.
Manual
49Tssten(Cl-CS)
Stimmen
Piano/Honky-Tbrik I^no, Elec. Pianol/Elec. Piano2,
Harpsichwd/lribea, Marimba/Munc Box, Strings/lfìolin,
Flute/Harp, Clarinet, Oboe, Saxophone/Accordim,
Trumpet/Ttombone, Tuba/Вгам Ensmnble, Pipe Organ/Jazz
Organ, Classic Guitar/Fock Guitar, Jazz G^itar/DisU»tion
Guitar, Banjc/Acoustic Bass, Elec. Bass/Slap Base,Synth
Bass/Landscoape, Synth Brass/Puzz Brass, Ciystal/be Box,
African Percuss. ®irds. Synth Voac/Ow!
Bedienelemente:
Voice Select'Iksten, SIDE A/B-Tasten
Effekte
Sustain, Dual Voice
Begleitstile
Diaco, Pepa, 16 Beat, Rockri ИЫ1, Swing, Slow Rock,
Rhumba, BosaaNova, March/Polka, Waltz
Accompaniment !%yle Select-Wahltasten, Ibmpo-Tksten (A ,
▼), Accompaniment Volume-R^ler, lntro/РШ in-Tkate,
Synchro Start-Tkste, Start/Stop-lkete
Auto Bass Chord
Bedieneiemente:
Auto Bass Chord-Wähler (Off, Single Finger, Fingred,
Manual Bass)
Melody Memory
Bedienelemente:
Record-lkste, Flay-Tkete
Andere Bedieneiemente
Power-Schalter, Master Volume, Demonstratton-lkste
Zusafzbucbsen
HEADPHONES/AUX. OUT, DC (9-I2V) IN
Hanptverstarker
2,ew X 1 (RMS)
Lautsprecher
12 cm X 1
Stromversorgung
9V Gleichspannung (sechs SUM-1, Monozellen, GrOSe "D"
oder entsprechend), Netzadapter (PA-1, PA-IB, PA-3, PA-4,
PA-40) oder Aulobatterieadapter (CA-1)
Abmeesui^n (B x H X T)
861 mm X 289 mm x 94 mm
Gewicht
3.8 kg
- Dos Recht zu ÀnderuTigen oAnc Vorankündigung Meibt
vorlfehtdten,
Ciavisr
49 touches (Dol - Oo5)
Voix
Piarw/Honky-Tonk Piano. Elee. Pianol/Elec. Pianos,
Harpsichord/Vibes, Marimba/Music Box, Strings/Vlolin,
Flute/Harp, Clarinet. Oboe, Saxophone/Acoordion,
Trumpet/Trombone, Tuba/Brass Ensemble, Pipe Organ/Jazz
Organ, Classic Guttar/Fork Guitar. Jazz Guhar/Di&toiiion (àultar.
Banio/Aooustlc Bass, Elec. Bass®lap Bass,Synth
Bass/Landscoape, Syrrth Brass/Fuzz Brass, Crystal/Ice Box,
African Percuss. ®trds, Synth Vòx/Owl
Commandes:
Touches de séiection des voix, touche SIDE A/S
Effets
Sustain, Dual Vbioe
Styles cf accompagnement
Disco, Peps, 16 Beai, Rock'n Roil, Swing, Slow Rock, Rhumba,
BoesaNova. MarcfVPolka, Waltz
Commandes;
Touches de sélection des styles d'accompagnement, touches
de réglage du tempo (A, V), commande du volume
(facoorripagnement, touche Intro/Fill in, touche de début
synchronisé, touche de début/touche d'arrêt
Accords et basses automatiques
Commandas;
Sélecteur accords et basses automatiques (Off, Single Finger,
Fingered, Manual Bass)
Mémoire des mélodies
Commandes;
Touche d'enregstremerrt, touche de reproduction
Autres commandes
interrupteur d'alimentation. Master Volume, Touche de
démonstration
Prises auxiliaires
HEADPHONES/AUX. OUT, DC (9-12V) IN
Amplificateur principal
2,5W X 1 (off.)
Haut-parleurs
12cm X 1
Tension nominale
CC, 9V (Six pHes SUM-1, R-20, de format "D" ou des piles
équivalentes), adaptateur secteur (PA-1, PA-1 B. PA-3, PA-4,
PA-40) ou adaptateur de batterie d'automobile (CA-1)
Dimensions (L x P x H)
861 mm X 289mm x 94mm
Poids
38 kg
- les spédftstions sont susceptij/ds d'être modifiées sans
autre forme d'ave
NES
Teclado
49 teclas (Cl-CS)
Vocee
PianoAIoiü^-lbnlc Baño, Klec. Pianol/Elec. Piano2,
НагрпсЬоп1Л^Ьм, Marímba/Music Вок, Stringa/Vialin,
Flute/Harp, Clarinet, Oboe, ЗахорЬопв/АсоопЬоп,
Trumpet/Tnmibone, IbbaÆraw Eneemble, Pipe Organ/Jaxa
Organ, Classic GuitarÆ'ork Guitar, Jazi C^tai/Distutiwi
Guitar, Bapjo/Acoustic Base, Elec. Bass/Slap Bass,Synth
Basebandscoape, Synth Brase/Fuzi Brass, Cryital/Ice Box,
African Percuss. ®irdi, Synth VwtWw!
Contrôlée:
Botones selectores de voces, boUVn 8ЮЕ A/В
Efecioe
Sostenido, voz doble
Eetíloe de acompañamiento
Disco, Pops, 16 Beat, Rock'n Roll, Swing, Slow Bock,
Rhumba, BossaNova, March/Polka. Waltz
Contrôlée:
Botones de selecci<ki de estilo de acMupaiiamiento botones de
contri de tempo (A , ▼}, control del volumen del
acompañamiento, botdn de introducdón/relleno, botdti de
inicio sincronizado, botdn de perada,
Acompañamiento antomáti<M> de bajo y
acorde«
Contrôlée:
Selector de acompañamiento automático de bajo y acwdes
(OS', Single Finger, Fingered, Manual Bass)
Memoria de Meldodia
Contrôlée:
Bolán de grabación, botón de reproducción
Otroe contrôlée
Interruptor de alimentación, volumen principal, botones de
demostración.
Tomae anxiliaree
HEADPHONES/AUX. OUT, DC (9-12V) IN
Amplificad^' principal
2,5W X 1CRMS)
Altavoz
12 cm X 1
Tensión nominal
DC 9V (sÓB SUM-1, tamaño T‘, B-20 o púas equivalentes),
Adaptador de alimentación de CA (PA-I, PA-IB, PA-3, PA-4
o PA-40) o Adaptadm- de batería de automóvil (CA-1)
861 mm X 289 mm x 94 mm
Peso
3.8 kg
* hoB eiptcifusa/áaneB natán niájetas a сатЫов sin pnwío
i(AnXPcfXAl)
9Л
Page 28

Attention users in the U. S. A.
PortaTone PSR-7 prepared in accordance with
FCC rules.
The PortaTone PSR-7 uses frequencies tíiat appear in the radio
frequency range, and if irtstailed in the immedaite proxinvty (witNn
dtree meters) of some types of auáo or wdeo devices intórference
may occur.
The PortaTone PSR-7 has been type tested and found to
comply vfith die spedfícatíons set for a Class B cofnputing device in
accordance mth those spedñcadons listed in Subpart J of Part 15
of die FCC rules. These rules are designed to provide a reasonable
measure of protection against such kiterference. However, this does
not guarantee that interference wkl not occur.
If your PortaTone PSR-7 should be suspected of causing
interference with other elecdorvc dewoes, verification can be made
by tmtingyour PortaTone PSR-7 off andón.
If the kiterference continues vidten your PortaTone PSR-7 is off,
the PortaTone PSR-7 is not the source of die hterfererxe. If your
PortaTone PSR-7 does appear to be the sotM-ce of dte interterence,
you should try to correct die sitijation by using one or more of the
following measures.
This applies only u> products distributed by Yamaha Corporation of America.
Dies bezieht sidi nur auf die von der Yamaha Coipaiation of America vetriebenen Produkte.
C^i ne s'ap^ique qu'aux produits distribués par Yamaha Corporation of Mierica.
Esto sc aplica solamentc a pioductos distzibuidos рот Yamaha Copormtitm of America.
Relocate either die PortaTone PSR-7 die electronic device that
is being affected by die interference.
Utilize power outlets tor the PortaTone PSR-7 and the device
being affected that are on (Afferent brandi (circuit breaker or fuse)
drcuits, or ktstall A/C line ftiters.
In die case of radio-TV kiterference, relocate the antenna or. if
die antenna lead-in is a 300 ohm ribbon lead, change the lead-in to
a co-axal type cable.
If these correcsVe measures do not produce satisfactory results,
friease amtaci jK>ur Authorized Yamaha Consumer Producís dea/er
tor suggestions and/or corrective measures.
If you cannot locate an Audiorized Yamaha Consumer Products
dealer in your general area, contact the Ctmsumer Producto Service
Center, Yamaha Corporation of America, 6600 Orangethorpe Ave,
Buena Park, CA 90620.
If tor any reason you should need-additional ktformation relating
to radio or TV irderference, you may Snd a booklet prepared fy die
Federal Commurtications Commission helpful: "How to Identify and
Resolve Radio-TV interference Problems", This booklet is avalatde
from the U.S. Government Prin^g Office, Washington D.C. 20402Stock 004-000-345-4.
Wichitiger Hinweis für dìe Benutzung in der Bundesrepublik Deutschland.
Hiermit wird bescheinigt, daß der/die/das
Musikinstrument Typ PSR-7
(Gerät, тур, Bezeichnung)
in Übereinstimmung mit den Bestimmungen der
VERFÜGUNG 1046«4
(AmtsblattverfÜgui^)
funk-entstäri ist.
Der Deutschen Bundespost wurde das Inverkehrbringen dieses Gerätes
angezeigt und die Berechtigung zur UberprUfui^ der Serie auf Einhal-tung
der Bestimmungen eingeräumt.
Yamaha Europa GmbH
Name des Importeurs
This applies only to products distributed by Ysunaha Europa GmbH.
Dies bezieht sich nur auf die von der ^Sunaha Europa GmbH vertriebenen Produkte.
Ced ne s'applique qu'aux produits distribués par Yamaha Europa GmbH.
Esto se aphea solamente a productos distribuidos por Yamaha Europa GmbH.
THIS DIGITAL APPARATUS DOES NOT EXCEED THE -CLASS B' LIMITS FOR RADIO
NOISE EMISSIONS FROM DIGITAL APMRATUS SET OUT IN THE RADIO
INTERFERENCE REGULATION OF THE CANADIAN DEPARTMENT OF COMMUNICATX)NS.
LE PRESENT APPAREIL NUMERIQUE N*EMET PAS DE BRUITS RADIOELECTRIQUES
DEPASSANT LES UMITES APPLICABLES AUX APPAREILS NUMERIQUES DE LA
YAMAHA
YAMAHA CORPORATION
P.O.Box 1. Hamamatsu, Japan
XUSSE B- PRESCRITES DANS LE REGLEMENT SUR LE BROUILLAGE
RADIOELECTRIQUE EDICTE WR LE MINISTERE DES COMMUNICATIONS DU CANADA.
This applies only to products distributed by Yamaha Canada Music Ltd.
Dies bezieht sich nur auf dìe von der Yamaha Canada Music Ltd. vertriebenen
Produkte.
Ceci ne s'applique qu'aux produits distribués par Yamaha Canada Music Ltd.
Esto ae aplica solamente a productos distribuddos por Yamaha Canada Music Ltd
Beecheiniguns dee Importeure
The serial number of this product may be found on
the bottom of the unit. You should noto this serial
number in the space provided below and retain this
manual as a permanent record of your purchase to
aid identification in the event of theft.
Model No. PSR-7
Serial No.
Concerning the Warranty
This product was made for international distribution,
and since the warranty for titis type of product varies
from marketing area to marketing area, please
contact the selling agency for information
concerning toe applicable warranty and/or service
policies.
Dìe Seriennummer befindet sich an der
Unterseite des Instruments. Wir empfehlen, diese
Nummer sicherheitshalber an der unten
vorgesehenen Stelle einzutragen, um sie auch im
Falle eines Diebstahls jederzeit zur Hand zu
haben.
Model-Nr. PSB-7
Serien-Nr.
Hinweis zur Garantie
Dieses Produkt wird international vertrieben,
und die Garantiebedingungen sind von
Vertriebsland zu Vetriebsland verschieden. Ihr
Händler gibt Ihnen gerne ganauere
Informationen zu den in Ihrem Land gültigen
Garantie und/oder Serviesbedingungen..
Le numéro de série de ce produit figure sur le socle
de l'appareil, il conviendra de noter ce numéro de
série dans l'espace réservé ci-dessous et de
conserver ce manuel: celui-ci constitue le document
permanent de votre achat et permet l'identification
en cas de vol.
Modèle No. PSR-7
No. de série:
Remarque relative à la garantie
Ce modèle est destiné à être distribué à Téchelle
internationale. Etant donné que les conditions de
garantie pour ce type de produit varient en tonction
des zones de commercialisation, prière de prendre
contact avec Tagence chargée des ventes pour tous
renseignements relatifs aux conditions de garantie
et de service après-vente.
E1 número de serie de este producto se encuentra
en la parte inferior de la unidad. Sírvase anotar
este número de serie en el espacio proporcionado
debigo y guarde este manual como comprobante
de compra para ayudar a la identificación en caso
de robo.
N” de modelo PSB-7
N° de serie
Concemieiite a la garantía
Este producto ha sido fabricado para ser
distribuido internacionalmente y, como la
garantía para este tipo de producto varía en
relación a su área de comercialización, sírvase
consultar con el agente de ventas sobre la
información en tomo a la garantía aplicable y/o
politices de servicio.
8906 VH36080 Printed in Japan ^
 Loading...