


Health & Safety, Use & Care and Installation guide
www.whirlpool.eu/register

ENGLISH . . . . . . . . . . . . . . . . . . . . . . . . . . . . . . . . . . . . . . . . . . . . . . . . . . p ..3
2

EN
ENGLISH
HEALTH & SAFETY, USE & CARE and INSTALLATION GUIDES
THANK YOU FOR BUYING A WHIRLPOOL PRODUCT.
In order to receive a more complete assistance,
please register your appliance on www.whirlpool.eu/register
Index
SAFETY RECOMMENDATIONS . . . . . . . . . . . . . . . . . . . . . . . . . . . . . . . . . 5
IMPORTANT SAFETY INSTRUCTIONS.. . . . . . . . . . . . . . . . . . . . . . . . . . . . . . . . . . . . . . . . . . . . . . . . . . . . . . . . . . . . . . . . . . . 5
SAFEGUARDING THE ENVIRONMENT. . . . . . . . . . . . . . . . . . . . . . . . . . . . . . 9 DECLARATION OF CONFORMITY.. . . . . . . . . . . . . . . . . . . . . . . . . . . . . . 10 PRODUCT DESCRIPTION . . . . . . . . . . . . . . . . . . . . . . . . . . . . . . . . . . . 11
APPLIANCE.. . . . . . . . . . . . . . . . . . . . . . . . . . . . . . . . . . . |
. . . . . . . . . . . . . . . . . . . . . . . . . . . . . . . . . . . . . . . . . . . . . . . . . . . . . . . 11 |
DETERGENT DISPENSER.. . . . . . . . . . . . . . . . . . . . . . . |
. . . . . . . . . . . . . . . . . . . . . . . . . . . . . . . . . . . . . . . . . . . . . . . . . . . . . . . 11 |
CONTROL PANEL. . . . . . . . . . . . . . . . . . . . . . . . . . . . . . . . . . . . . . |
. . . . . . . . . . . . . . . . . . . . . . . . . . . . . . . . . . . . . . . . . . . . . . . 12 |
TECHNICAL DATA FOR WATER CONNECTION.. . . |
. . . . . . . . . . . . . . . . . . . . . . . . . . . . . . . . . . . . . . . . . . . . . . . . . . . . . . . 13 |
DOOR .. . . . . . . . . . . . . . . . . . . . . . . . . . . . . . . . . . . . . . . . |
. . . . . . . . . . . . . . . . . . . . . . . . . . . . . . . . . . . . . . . . . . . . . . . . . . . . . . . 14 |
DRUM LIGHT (if available) . . . . . . . . . . . . . . . . . . . . . . . . . . . . . |
. . . . . . . . . . . . . . . . . . . . . . . . . . . . . . . . . . . . . . . . . . . . . . . 14 |
ACCESSORIES.. . . . . . . . . . . . . . . . . . . . . . . . . . . . . . . . . . |
. . . . . . . . . . . . . . . . . . . . . . . . . . . . . . . . . . . . . . . . . . . . . . . . . . . . . . 14 |
HOW TO USE THE APPLIANCE . . . . . . . |
. . . . . . . . . . . . . . . . . . . . . . . . . 15 |
FIRST TIME USE .. . . . . . . . . . . . . . . . . . . . . . . . . . . . . . . . . . . . . . . . . . . . . . . . . . . . . . . . . . . . . . . . . . . . . . . . . . . . . . . . . . . . . . 15 DAILY USE .. . . . . . . . . . . . . . . . . . . . . . . . . . . . . . . . . . . . . . . . . . . . . . . . . . . . . . . . . . . . . . . . . . . . . . . . . . . . . . . . . . . . . . . . . . . 16
SORTING YOUR LAUNDRY.. . . . . . . . . . . . . . . . . . . . . . . . . . . . . . . . . . . . . . . . . . . . . . . . . . . . . . . . . . . . . . . . . . . . . . . . . . . . . . . . . . . . . . . . . . . . . . . . . 16 HOW TO USE THE WASHING MACHINE.. . . . . . . . . . . . . . . . . . . . . . . . . . . . . . . . . . . . . . . . . . . . . . . . . . . . . . . . . . . . . . . . . . . . . . . . . . . . . . . . . . . . . 17
PROGRAMMES AND OPTIONS.. . . . . . . . . . . . . . . . . . . . . . . . . . . . . . . . . . . . . . . . . . . . . . . . . . . . . . . . . . . . . . . . . . . . . . . . 20
3

FUNCTIONS. . . . . . . . . . . . . . . . . . . . . . . . . . . . . . . . . . . . . . . . . . . . . . . . . . . . . . . . . . . . . . . . . . . . . . . . . . . . . . . . . . . . . . . . . . |
28 |
INDICATORS .. . . . . . . . . . . . . . . . . . . . . . . . . . . . . . . . . . . . . . . . . . . . . . . . . . . . . . . . . . . . . . . . . . . . . . . . . . . . . . . . . . . . . . . . . |
30 |
AUTO DOSING FUNCTION: AUTOMATIC DOSING OF DETERGENT / FABRIC SOFTENER.. . . . . . . . . . . . . . . . . . . |
31 |
AUTO DOSING / FIRST USE. . . . . . . . . . . . . . . . . . . . . . . . . . . . . . . . . . . . . . . . . . . . . . . . . . . . . . . . . . . . . . . . . . . . . . . . . . . . |
32 |
AUTO DOSING / DAILY USE.. . . . . . . . . . . . . . . . . . . . . . . . . . . . . . . . . . . . . . . . . . . . . . . . . . . . . . . . . . . . . . . . . . . . . . . . . . . |
36 |
SAVING TIPS .. . . . . . . . . . . . . . . . . . . . . . . . . . . . . . . . . . . . . . . . . . . . . . . . . . . . . . . . . . . . . . . . . . . . . . . . . . . . . . . . . . . . . . . . . |
37 |
CLEANING & MAINTENANCE. . . . . . . . . . . . . . . . . . . . . . . . . . . . . . . . |
38 |
CLEANING THE OUTSIDE OF THE WASHING MACHINE.................................................. |
38 |
CHECKING THE WATER SUPPLY HOSE .. . . . . . . . . . . . . . . . . . . . . . . . . . . . . . . . . . . . . . . . . . . . . . . . . . . . . . . . . . . . . . . . . |
39 |
CLEANING THE MESH FILTERS IN THE WATER SUPPLY HOSE.. . . . . . . . . . . . . . . . . . . . . . . . . . . . . . . . . . . . . . . . . . . . |
40 |
CLEANING THE DETERGENT DISPENSER.. . . . . . . . . . . . . . . . . . . . . . . . . . . . . . . . . . . . . . . . . . . . . . . . . . . . . . . . . . . . . . . |
41 |
CLEANING THE WATER FILTER / DRAINING RESIDUAL WATER.. . . . . . . . . . . . . . . . . . . . . . . . . . . . . . . . . . . . . . . . . . . |
43 |
TRANSPORT AND HANDLING .. . . . . . . . . . . . . . . . . . . . . . . . . . . . . . . . . . . . . . . . . . . . . . . . . . . . . . . . . . . . . . . . . . . . . . . . |
45 |
TROUBLESHOOTING. . . . . . . . . . . . . . . . . . . . . . . . . . . . . . . . . . . . . 46 |
|
DOOR – HOW TO OPEN IT IN CASE OF A FAILURE, TO TAKE OUT YOUR LAUNDRY |
|
(Available only on certain models).. . . . . . . . . . . . . . . . . . . . . . . . . . . . . . . . . . . . . . . . . . . . . . . . . . . . . . . . . . . . . . . . . . . . |
51 |
AFTER-SALES SERVICE. . . . . . . . . . . . . . . . . . . . . . . . . . . . . . . . . . . . . . . . . . . . . . . . . . . . . . . . . . . . . . . . . . . . . . . . . . . . . . . . |
52 |
Installation Guide .. . . . . . . . . . . . . . . . . . . . . . . . . . . . . . . . . . . . . . . . . . . . . . . . . . . . . . . . . . . . . . . . . . . . . . . . . . . . . . . . . . . |
53 |
4

Health and Safety guide
EN
SAFETY RECOMMENDATIONS
IMPORTANT SAFETY INSTRUCTIONS
YOUR SAFETY AND SAFETY OF OTHERS IS VERY IMPORTANT.
This manual and the appliance itself provide important safety warnings, to be read and observed at all times..
This is the safety alert symbol.. This symbol alerts you to potential hazards that can kill or hurt you and others..
All safety messages will follow the safety alert symbol and either the word DANGER or WARNING.. These words mean:
 DANGER
Indicates a hazardous situation which, if not avoided, will cause serious injury..
 WARNING
Indicates a hazardous situation which, if not avoided, could cause serious injury..
All safety warnings give specific details of the potential risk presented and indicate how to reduce risk of injury, damage and electric shock resulting from improper use of the appliance.. Carefully observe the following instructions..
Failure to observe these instructions may lead to risks.. The Manufacturer declines any liability for injury to persons or animals or damage to property if the above advice and precautions are not respected..
Keep these instructions close at hand for future reference..
Do not store explosive substances such as aerosol cans and do not place
or use gasoline or other flammable materials in or near the appliance: a fire may break out if the appliance is inadvertently switched on..
When scrapping the appliance, make it unusable by cutting off the power cable and removing the doors and shelves (if present) so that children cannot easily climb inside and become trapped..
Do not leave the appliance unattended even for a few days, since it is a potential source of danger for children..
Remove the transport bolts The washing machine is fitted with transport bolts to avoid any possible damage to the interior during transport.. Before using the machine, it is imperative that the transport bolts are removed..
After their removal, cover the openings with the 4 enclosed plastic caps..
Never open the door forcibly or use it as a step..
INTENDED USE OF THE PRODUCT
This appliance is designed solely for use as domestic usage.. To aim the appliance as professional use is forbidden.. The manufacturer declines
all responsibility for inappropriate use or incorrect setting of the controls..
The appliance is not intended to be operated by means of an external timer or separate remote control system..
5

Do not use the appliance outdoors..
This washing machine is exclusively destined to treat machine washable laundry in quantities which are usual for private households..
INSTALLATION
Installation and repairs must be carried out by a qualified technician, in compliance with the manufacturer’s instructions and local safety regulations.. Do not repair or replace any part of the appliance unless specifically stated in the user manual..
Use protective gloves to perform all unpacking and installation operations..
The appliance must be disconnected from the power supply before carrying out any installation operation..
Only activate the appliance when the installation procedure has been completed..
After unpacking the appliance, make sure that it has not been damaged during transport.. In the event of problems, contact the dealer or your nearest After-sales Service..
During installation, make sure the appliance does not damage the power cable..
The appliance must be handled and installed by two or more persons..
When installing the appliance make sure that the four feet are stable and resting on
the floor, adjusting them as required, and check that the appliance is perfectly level using a spirit level..
Remove the bottom protection by tilting and turning the washing machine on one rear bottom corner.. Make sure that the plastic part of the bottom protection (if available on the model) remains in the packing and not in the machine bottom.. This is important, as otherwise the plastic part could damage the washing machine during operation..
If the appliance was exposed to the cold prior to delivery, keep it at room temperature for a few hours before operating..
Do not install your appliance where it may be exposed to extreme conditions, such as: poor ventilation, temperature below 5°C or above 35°C..
In case of wooden or so-called “floating floors” (for instance certain parquet or laminate floors), place the appliance on a sheet of plywood at least 60 x 60 cm wide/ deep and
at least 3 cm thick which is
secured to the floor..
Use only new hoses to connect the appliance to the water supply.. Used hoses must
not be used and should be discarded..
Move the appliance without lifting it by the worktop..
Connect the water inlet hose(s) to the water supply in accordance with the
regulations of your local water company..
For models dedicated only for cold water: Do not connect to the hot water supply..
For models with hot fill: the hot water inlet temperature must not exceed 60 °C..
Make sure that the ventilation openings in the base of
your washing machine (if available on your model) are not obstructed by a carpet or other material..
The supply water pressure must be in range 0..1-1 MPa..
If you want to place a dryer on top of your washing machine, first contact our After-Sales Service or your specialist dealer to verify if this is possible.. This is only admitted if the dryer is fixed on the washing machine by using an appropriate stacking kit available through our After-
6

Sales Service or your specialist dealer..
ELECTRICAL WARNINGS
Make sure the voltage specified on the rating plate corresponds to that of your home..
The power supply ranges are indicated on the rating plate..
Regulations require that the appliance is earthed..
For installation to comply with current safety regulations,
an omnipolar switch with minimum contact gap of 3mm is required..
If the power cable is damaged it must be replaced with an identical one.. The power cable must only be replaced by a qualified technician
in compliance with the manufacturer instruction and current safety regulations.. Contact an authorized service center..
The electrical components must not be accessible to the user after installation..
The power cable must be long enough for connecting the appliance, once fitted in its housing, to the main power supply..
Do not use extension leads..
Do not pull the power supply cable..
Do not use multiple plug adaptors if the appliance is fitted with a plug..
For appliances with fitted
plug, if the plug is not suitable for you socket outlet, contact a qualified technician..
Do not touch the appliance with any wet part of the body and do not operate it when barefoot..
Do not operate this appliance if it has a damaged mains cord or plug, if it is not working properly, or if it has been damaged or dropped.. Do not immerse the mains cord or plug in water.. Keep the cord away from hot surfaces..
When using a residual current circuit breaker (RCCB), only use a model marked with
ELECTRICAL CONNECTION FOR GREAT BRITAIN AND IRELAND ONLY
Fuse replacement
If the mains lead of this appliance is fitted with a BS 1363A 13amp fused plug, to change a fuse in this type of plug use an A..S..T..A.. approved fuse to BS 1362 type and proceed as follows:
1..Remove the fuse cover (A) and fuse(B)..
2..Fit replacement 13A fuse into fuse cover..
3..Refit both into plug..
EN
Important:
The fuse cover must be refitted when changing a fuse and if the fuse cover is lost the plug must not be used until a correct replacement is fitted.. Correct replacement are identified by the colour insert or the colour embossed in words on the base of the plug.. Replacement fuse covers
are available from your local electrical store..
For the Republic of Ireland only
The information given in respect of Great Britain will frequently apply, but a third type of plug and socket is also used, the 2-pin, side earth type..
Socket outlet / plug (valid for both countries)
If the fitted plug is not suitable for your socket outlet, please contact After-sales Service for further instruction.. Please do not attempt to change plug yourself.. This procedure needs to be carried out by a qualified technician in compliance with the manufactures instructions and current standard safety regulations..
CORRECT USE
Only use detergents and/or additives that are specifically produced for domestic washing machines/tumble dryers..
Do not exceed the maximum load allowed.. Check the maximum load allowed in the programme chart..
Turn off the tap when not in use..
7

Do not use any solvents (e..g.. turpentine, benzene), detergents containing solvents, scouring powder, glass or general purpose
cleaners, and flammable fluids; do not machine wash fabrics that have been treated with solvents or flammable liquids..
CHILDREN SAFETY
Very young (0-3 years) and young children (3-8 years) shall be kept away unless continuously supervised.. Children from 8 years old and above and persons with reduced physical, sensory or mental capabilities or lack of experience and knowledge can use this appliance only if they are supervised or have been given instructions on safe appliance use and
if they understand the hazards involved.. Children shall not play with the appliance.. Cleaning and user maintenance shall not be made by childern without supervision..
Keep the packaging materials (plastic bags, polystyrene parts, etc..) out of reach of children..
CLEANING AND
MAINTENANCE
The appliance must be disconnected from the power supply before carrying out any cleaning or maintenance operation..
Never use steam cleaning equipment..
8
SAFEGUARDING THE ENVIRONMENT
EN
DISPOSAL OF PACKAGING MATERIALS
The packaging material is 100% recyclable and is marked with the recycle symbol:
The various parts of the packaging must therefore be disposed of responsibly and in full compliance with local
authority regulations governing waste disposal..
SCRAPPING OF HOUSEHOLD APPLIANCES
This appliance is manufactured with recyclable or reusable materials.. Dispose of it in accordance with local waste disposal regulations..
For further information on the treatment, recovery and
recycling of household electrical appliances, contact your competent local authority, the collection service for household waste or the store where you purchase the appliance..
This appliance is marked in compliance with European Directive 2012/19/EU, Waste Electrical and Electronic Equipment (WEEE)..
By ensuring this product is disposed of correctly, you will help prevent potential
negative consequences for the environment and human health, which could otherwise be caused by inappropriate waste handling of this product..
This symbol on the product or on the accompanying documentation indicates
that it should not be treated as domestic waste but must be taken to an appropriate collection centre for the recycling of electrical and electronic equipment..
9

DECLARATION OF CONFORMITY
This appliance has been designed, manufactured and marketed in compliance with:
›safety objectives of the “Low Voltage” Directive 2006/95/CE (which replaces 73/23/ CEE and subsequent amendments);
›the protection requirements of Directive “EMC” 2004/108/ EC. Electrical safety of the appliance can only be guaranteed if it is correctly connected to an approved earthing system..
10

Use and Care guide
EN
PRODUCT DESCRIPTION
APPLIANCE
1. |
1. |
Worktop |
||
2. |
|
|
2. |
Detergent dispenser |
|
|
|||
|
|
3. |
|
|
3. |
Control panel |
|||
|
|
|
4. |
Door handle |
|
|
|
5. |
Door |
|
|
|
6. |
Water filter / Emergency drain hose (if available) |
|
|
|
|
- behind plinth - |
4. |
7. |
Plinth (removable) |
||
5. |
8. |
Adjustable feet (4) |
||
6.
7.

 8.
8.
DETERGENT DISPENSER
Automatic dosing:
IMPORTANT: Only use liquid detergent to fill the detergent tanks (“1” and “2”); never use powder detergent..
1. Tank 1
•Liquid generic detergent OR
•Liquid specific detergent (e..g.. for colours, wool, sports garments etc..)
Maximum filling quantity: 600 ml..
IMPORTANT: Never fill Fabric Softener in Tank 1. 2. Tank 2
•Fabric softener OR
•Liquid detergent (generic or specific detergent such as colour, wool or sport detergent)
Maximum filling quantity: 400 ml..
Choose your preferred configuration among those mentioned in section AUTO DOSING - FIRST USE in the USE AND CARE GUIDE.. The labels on the tank flaps can be turned or exchanged to remind you the chosen configuration..
2
|
2 |
4 |
1 |
|
|
|
|
3
1 |
|
2 |
Softener |
|
Softener
11

Manual Dosing:
3. Detergent compartment for manual dosing
•Powder or liquid detergent
•Additives
If you use powder detergent, make sure to fill the compartment only up to the “max” mark..
4. Release button
Press down to remove the detergent dispenser for cleaning..
Detergent recommendations for various types of laundry
Type of laundry
White robust laundry
White delicate laundry
Light/pastelshaded colours
Intensive colours
Black/dark colours
Temperature range |
Recommended type of detergent |
|
(cold-95°C) |
Heavy duty detergents |
|
(cold-40°C) |
Mild detergents containing whitener and/or |
|
optical brighteners |
||
|
||
(cold-60°C) |
Detergents containing whitener and/or optical |
|
brighteners |
||
|
||
(cold-60°C) |
Colour detergents without whitener / optical |
|
brighteners |
||
|
||
(cold-60°C) |
Special detergents for black/dark laundry |
* Find water softener appropriate for your washing machine under www..bauknecht..eu
CONTROL PANEL
13.12.
MAX
60°
40°
|
1. |
2. |
3. |
4. |
5. |
6. |
|
7. |
8. |
9. |
10. |
11. |
1. |
On/Off button |
|
|
|
|
|
7. |
Finish in button |
|
|||
|
(if held: Reset/Drain) |
|
|
|
|
|
8. |
Temperature button |
||||
2. |
Programme button |
|
|
|
|
|
9. |
Spin Speed button |
||||
3. |
Auto dosing / Tank 1 |
|
|
|
|
|
10.Options button |
|
||||
4. |
Auto dosing / Tank 2 |
|
|
|
|
|
|
(if held: Key lock) |
|
|||
5. |
Fresh Care button |
|
|
|
|
|
11. Start/Pause button |
|||||
6. |
Knob |
|
|
|
|
|
12.Display |
|
|
|
||
|
(turn to select and press to confirm) |
|
|
|
|
13. Programmes area |
||||||
12

TECHNICAL DATA FOR WATER CONNECTION
EN
WATER CONNECTION |
|
WATER SUPPLY |
Cold |
WATER TAP |
3/4” threaded hose connector |
MINIMUM WATER SUPPLY PRESSURE |
100 kPa (1 bar) |
MAXIMUM WATER SUPPLY PRESSURE |
1000 kPa (10 bar) |
13

DOOR
To open the door, pull the handle |
To close the door, hold the handle and push so that |
|
you can hear it click shut.. |
DRUM LIGHT (if available)
•During programme selection: the light goes on for laundry loading
•After programme start, the light fades on and off while the laundry load is detected..
•After programme end, when you open the door, the light goes on for a while for unloading the laundry.. Then it goes off to save energy; touch any button to switch it on again..
ACCESSORIES
Contact our After-Sales Service to check if the following accessories are available for your washing machine (and dryer) model
PEDESTAL
Can be installed beneath your washing machine, to raise the appliance and allow for a more comfortable laundry loading and unloading..
STACKING KIT SHELF
by which your dryer can be fixed on top of your washing machine to save space and to facilitate loading and unloading your dryer in the higher position..
14

HOW TO USE THE APPLIANCE
FIRST TIME USE
EN
If you plug in the washing machine, it will switch on automatically.. You will be asked to set the desired language for the display..
Turn the knob to select the desired language, then press the knob to confirm..
Afterwards you can adapt the water hardness setting of your washing machine to your regional water hardness.. This is recommended in order to optimize the Dosing Aid function.. Turn the knob to choose between soft / medium / hard and confirm by pressing the knob..
To remove any residues from the manufacturing process..
1. Select programme “Cotton” with temperature 95°C..
2. Add a small amount of detergent to the manual dosing compartment 
 of the detergent dispenser (maximum 1/3 of the quantity the detergent manufacturer recommends for lightly soiled laundry)..
Deactivate the buttons for Auto dosing (Tank 1 and Tank 2): press them so that the button light goes off..
3. Start the programme without adding any laundry..
See section “DAILY USE” for more information on how to select and start a programme..
AUTO DOSING FUNCTION
The detergent dispenser of the washing machine is equipped with a two tanks system for the automatic dispensing of liquid detergent and softener..
Before using this function, follow the instructions in the USE AND CARE GUIDE/AUTO DOSING – FIRST USE to:
1.Set the correct water hardness level
2.Set tank 2 content. By default, Tank 1 is set for a detergent (your main detergent), and Tank 2 is set for fabric softener.. If you do not use fabric softener, set Tank 2 for another detergent..
3.Check/adjust the preset dosing quantities.
By default, the system comes with the following dosing values:
• 80 ml detergent for Tank 1
• 30 ml softener for Tank 2
You need to adjust these preset dosing values to the dosing values reported on the detergent and softener package that you intend to use..
After the Auto Dosing function is set for use, fill the tanks with the appropriate content and install the labels on the tanks accordingly, as explained in the USE AND CARE GUIDE / AUTO DOSING – FIRST USE..
15

DAILY USE
SORTING YOUR LAUNDRY
1. REMOVE ALL OBJECTS FROM POCKETS
• Coins, pins etc.. can damage your laundry as well as parts of the washing machine..
•Objects like paper handkerchiefs will tear into small pieces which must be removed manually after the wash..
2.CLOSE ZIP FASTENERS, BUTTONS OR HOOKS. TIE LOOSE BELTS OR RIBBONS TOGETHER.
•Wash small items (e..g.. nylon stockings, belts etc..) and items with hooks (e..g.. bras) in a laundry bag or pillow case with zip fastener.. Always remove curtain rings, or wash curtains with the rings safely tied inside a cotton bag..
3. TYPE OF FABRIC / CARE LABEL SYMBOL
Cottons, mixed fibres, easy care / synthetics, wool, handwash items..
•Colour
separate coloured and white items.. Wash new coloured articles separately..
•Size
Wash items of different sizes in the same wash load, to improve washing efficiency and distribution of the articles in the drum..
•Delicates
Wash delicate items separately; they require gentle treatment..
16
EN
HOW TO USE THE WASHING MACHINE
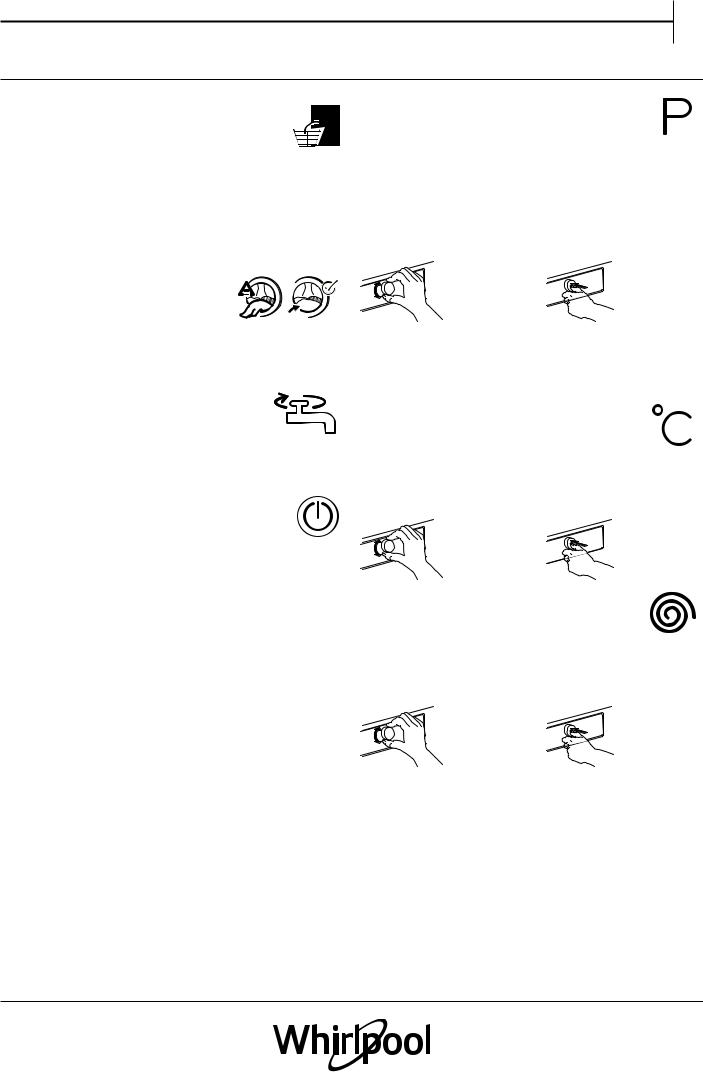
1. LOAD LAUNDRY
• Open the door and load the laundry.. Load the articles one at a time loosely
into the drum, without overfilling.. Observe the load sizes given in the programme chart.. Overloading the machine will result in unsatisfactory washing results and creased laundry..
2. CLOSE DOOR
• Make sure that no laundry gets stuck between door glass and
rubber seal..
• Close the door so that you can hear it click shut..
3. OPEN WATER TAP
•Make sure that the washing machine is connected to the mains..
•Open the water tap..
4. SWITCH ON WASHING MACHINE
•Press the On/Off button until the programme button lights up.. An
animation will appear, and there will be a sound.. Afterwards the washing machine is ready to be operated..
•The programme setting which you used last will appear on the control panel..
5.SET THE DESIRED PROGRAMME
GUIDED MODE
the button light will guide you through setting a programme in the following order: selection of programme / temperature / spin speed / options.. As soon as you confirm a selection by pressing the knob, the button light will jump to the next step..
Select programme
Make sure that the programme button lights up.. Turn the knob to select the
desired programme.. The indicator of the selected programme lights up, and the programme and its default duration appear on the display..
Confirm the desired programme by pressing the knob.. The maximum possible laundry load for the selected programme is indicated on the display..
Find more information regarding programmes in section PROGRAMMES, OPTIONS AND FUNCTIONS and in the Daily Reference Guide..
Change temperature, if needed
If you want to change the temperature indicated on the display, make sure that the Temperature button lights up..
Turn the knob to select the desired temperature, then press the knob to confirm
Change spin speed, if needed
If you want to change the spin speed indicated on the display, make sure that the Spin button lights up..
Turn the knob to select the desired spin speed, or Rinse hold  , then press the knob to confirm..
If you select spin speed “0”, the programme ends with draining the rinse water.. No final spin cycle will be applied..
If you select “Rinse hold”, the programme will stop after the rinse phase.. The laundry will remain immerged in the last rinse water.. See more information in section PROGRAMMES, OPTIONS
AND FUNCTIONS / Rinse hold.
17

Select options, if needed
If you want to select additional options, make sure that the options button lights
up.. The options which are selectable for your programme are indicated by lighting arrows.. Turn the knob to select the desired options.. The symbol of the selected optionblinks..
To confirm it, press the knob.. The option symbol lights up solidly..
Options may not be combinable with each other.. When selecting an option, the non-combinable option will be deactivated automatically if this is the case..
Some options / functions can be selected by directly pressing the button:
1 |
|
|
2 |
|
|
|
|
||
|
|
|
|
|
If such an option is not selectable for the programme, it switches off automatically when the button is pressed..
Refer to section PROGRAMMES AND OPTIONS for more information..
INDIVIDUAL MODE
After you have switched on the washing machine, you are not forced to follow the GUIDED MODE.. It is up to you which order you choose to set your
programme.. To do a setting, first press the relevant button, then turn the knob to select, and finally press the knob to confirm..
The range of temperatures, spin speeds and options depend on the programme selected.. Therefore it is recommended to start your setting with selecting the programme..
6. ADD DETERGENT
•If you want to add the detergent manually, pull out the detergent
dispenser and add detergent (and additives) now, as indicated in section DETERGENT DISPENSER.. Observe the dosing recommendations on the detergent pack.. If you have selected PREWASH or FINISH IN, observe the instructions in section PROGRAMMES AND OPTIONS, and FUNCTIONS.. Afterwards carefully close the detergent
dispenser..
•If you want the washing machine to dose the detergent automatically, simply make sure the Auto Dosing function is activated (refer to section OPTIONS, FUNCTIONS AND INDICATORS / Auto dosing).. The detergent is added by the Auto dosing system after programme start..
To assure correct dosage, make sure that the Auto dosing system is adapted to your detergents / softener (refer to AUTO DOSING / AILY USE)..
Correct dosing of detergent / additives is important, because
•it optimizes the cleaning result
•it avoids irritating residues of surplus detergent in your laundry
•it saves money by avoiding waste of surplus detergent
•it protects the washing machine by avoiding calcification of components
•it respects the environment by avoiding unnecessary environmental burden
7.START PROGRAMME
• Press and hold “Start/Pause” until the button lights up solidly; the programme starts..
•The drum turns, and the load is detected.. The display indicates the load sensing, while on the control panel an animation occurs..
•The remaining programme duration which is indicated on the display can vary.. Factors like unbalance in the wash load, or foam formation, can have an effect on the programme duration.. Whenever the remaining programme duration is calculated newly, the display indicates the sensing, and an animation occurs on the control panel..
•If the washing machine detects an unbalance in the laundry load, the washing machine automatically tries to create a balance.. The display indicates the load balancing..
Refer to section Troubleshooting for more information on unbalance in the laundry load..
8.CHANGE THE SETTINGS OF A RUNNING PROGRAMME, IF NEEDED
You can still change the settings while a programme is running.. The changes will be applied, provided the respective programme phase
18
 Loading...