Welch Allyn 206EL User Manual
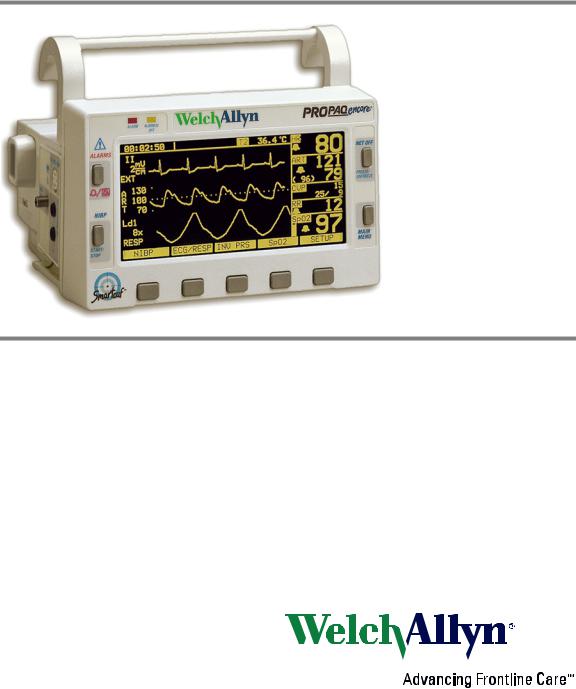
Propaq® Encore
Vital Signs Monitor
Reference Guide
Models 202EL, 204EL, 206EL
Software version 2.5X
ii |
Welch Allyn Propaq Encore Vital Signs Monitor |
© 2008 Welch Allyn. All rights are reserved. No one is permitted to reproduce or duplicate, in any form, this manual or any part thereof without permission from Welch Allyn.
Welch Allyn assumes no responsibility for any injury to anyone, or for any illegal or improper use of the product, that may result from failure to use this product in accordance with the instructions, cautions, warnings, or statement of intended use published in this manual.
Welch Allyn, Propaq, Acuity, and Smartcuf are registered trademarks of Welch Allyn.
SET and Masimo are registered trademarks of Masimo Corporation. Possession or purchase of a Masimo SpO2-equipped monitor does not convey any express or implied license to use the device with unauthorized sensors or cables which would, alone or in combination with this device, fall within the scope of one or more of the patents relating to this device.
Nellcor and Oximax are registered trademarks of Nellcor Puritan Bennett.
Software in this product is copyright by Welch Allyn or its vendors. All rights are reserved. The software is protected by United States of America copyright laws and international treaty provisions applicable worldwide. Under such laws, the licensee is entitled to use the copy of the software incorporated with this instrument as intended in the operation of the product in which it is embedded. The software may not be copied, decompiled, reverse-engineered, disassembled or otherwise reduced to human-perceivable form. This is not a sale of the software or any copy of the software; all right, title and ownership of the software remain with Welch Allyn or its vendors.
For information about any Welch Allyn product, call the nearest Welch Allyn representative:
USA |
+ 1 315 685 4560 |
|
|
Australia |
+ 61 2 9638 3000 |
|
|
800 535 6663 |
|
|
|
|
800 074 793 |
Canada |
800 561 8797 |
|
|
|
China |
+ 86 216 327 9631 |
European Call Center |
+ 35 3 46 906 7790 |
|
|
France |
+ 33 1 60 09 33 66 |
|
Germany |
+ 49 7477 92 71 86 |
|
|
Japan |
+ 81 3 3219 0071 |
|
Latin America |
+ 1 305 669 9003 |
|
|
Netherlands |
+ 31 15 750 5000 |
|
Singapore |
+ 65 6419 8100 |
|
|
South Africa |
+ 27 11 777 7555 |
|
United Kingdom |
+ 44 20 7365 6780 |
|
|
Sweden |
+ 46 8 58 53 65 51 |
|
REF 810-1719-XX (CD) |
|
|
|
|
|
|
REF 810-2106-XX (Printed, English only) |
|
|
||||
Manual Part Number 810-0640-05 Ver A 2008-06 |
|
|
||||
|
|
|
|
|
|
|
|
|
|
|
|
|
|
|
|
Welch Allyn Ltd |
|
|
||
Welch Allyn, Inc. |
|
Navan Business Park |
|
|
||
8500 SW Creekside Place |
Dublin Road, Navan |
|
|
|||
Beaverton, OR 97008-7107 USA |
County Meath, Republic of Ireland |
|
||||
www.welchallyn.com

iii
Contents
1 - General information . . . . . . . . . . . . . . . . . . . . . . . . . . . . . . . . . . . . . . 1
Safety summary . . . . . . . . . . . . . . . . . . . . . . . . . . . . . . . . . . . . . . . . . . . . . . . . . . 1 Propaq Encore documentation . . . . . . . . . . . . . . . . . . . . . . . . . . . . . . . . . . . . . . . 5
2 - Getting started. . . . . . . . . . . . . . . . . . . . . . . . . . . . . . . . . . . . . . . . . . . 7
Introducing the Propaq Encore . . . . . . . . . . . . . . . . . . . . . . . . . . . . . . . . . . . . . . . 7 Using the Propaq Encore . . . . . . . . . . . . . . . . . . . . . . . . . . . . . . . . . . . . . . . . . . . 9 Monitor setup . . . . . . . . . . . . . . . . . . . . . . . . . . . . . . . . . . . . . . . . . . . . . . . . . . . 20 Printer functions . . . . . . . . . . . . . . . . . . . . . . . . . . . . . . . . . . . . . . . . . . . . . . . . . 25 Learning the Propaq Encore . . . . . . . . . . . . . . . . . . . . . . . . . . . . . . . . . . . . . . . . 26
3 - Patient monitoring . . . . . . . . . . . . . . . . . . . . . . . . . . . . . . . . . . . . . . 29
ECG/RESP. . . . . . . . . . . . . . . . . . . . . . . . . . . . . . . . . . . . . . . . . . . . . . . . . . . . . . 29 Invasive pressure . . . . . . . . . . . . . . . . . . . . . . . . . . . . . . . . . . . . . . . . . . . . . . . . 37 NIBP . . . . . . . . . . . . . . . . . . . . . . . . . . . . . . . . . . . . . . . . . . . . . . . . . . . . . . . . . . 42 Temperature . . . . . . . . . . . . . . . . . . . . . . . . . . . . . . . . . . . . . . . . . . . . . . . . . . . . 50 Pulse oximetry (SpO2) . . . . . . . . . . . . . . . . . . . . . . . . . . . . . . . . . . . . . . . . . . . . 52 Capnography (CO2). . . . . . . . . . . . . . . . . . . . . . . . . . . . . . . . . . . . . . . . . . . . . . . 57
4 - Alarms and limits . . . . . . . . . . . . . . . . . . . . . . . . . . . . . . . . . . . . . . . 69
Description of alarm and alert tone patterns. . . . . . . . . . . . . . . . . . . . . . . . . . . . 69 Silence an active patient alarm or equipment alert tone for 90 seconds . . . . . . 69 Inhibit alarm and alert tones for four minutes: 4 SUSPND . . . . . . . . . . . . . . . . . 70 Inhibit alarm and alert tones indefinitely: ALL ALARMS. . . . . . . . . . . . . . . . . . . 71 Summary of alarm and alert keys and Acuity Central Station messages . . . . . . 72 Alarm holdoffs . . . . . . . . . . . . . . . . . . . . . . . . . . . . . . . . . . . . . . . . . . . . . . . . . . 73 Setting alarm limits . . . . . . . . . . . . . . . . . . . . . . . . . . . . . . . . . . . . . . . . . . . . . . . 74 Power-up equipment alert: program fault, settings lost . . . . . . . . . . . . . . . . . . . 75 Troubleshooting system error messages . . . . . . . . . . . . . . . . . . . . . . . . . . . . . . 75
5 - Trends. . . . . . . . . . . . . . . . . . . . . . . . . . . . . . . . . . . . . . . . . . . . . . . . . 77
The trend status window and menu. . . . . . . . . . . . . . . . . . . . . . . . . . . . . . . . . . 77 How trends are accumulated . . . . . . . . . . . . . . . . . . . . . . . . . . . . . . . . . . . . . . . 77 NIBP trends . . . . . . . . . . . . . . . . . . . . . . . . . . . . . . . . . . . . . . . . . . . . . . . . . . . . 78 Displaying trends . . . . . . . . . . . . . . . . . . . . . . . . . . . . . . . . . . . . . . . . . . . . . . . . 78
6 - Printing. . . . . . . . . . . . . . . . . . . . . . . . . . . . . . . . . . . . . . . . . . . . . . . . 79
Printing patient data . . . . . . . . . . . . . . . . . . . . . . . . . . . . . . . . . . . . . . . . . . . . . . 79 Printing trends . . . . . . . . . . . . . . . . . . . . . . . . . . . . . . . . . . . . . . . . . . . . . . . . . . 83
7 - Acuity Central Monitoring system. . . . . . . . . . . . . . . . . . . . . . . . . . 85
Intended use. . . . . . . . . . . . . . . . . . . . . . . . . . . . . . . . . . . . . . . . . . . . . . . . . . . . 85
iv |
Contents |
Welch Allyn Propaq Encore Vital Signs Monitor |
Connecting to the Acuity system . . . . . . . . . . . . . . . . . . . . . . . . . . . . . . . . . . . . 85 Press NET OFF to disconnect from Acuity . . . . . . . . . . . . . . . . . . . . . . . . . . . . . 87 Printing at Acuity. . . . . . . . . . . . . . . . . . . . . . . . . . . . . . . . . . . . . . . . . . . . . . . . . 87 Network alert message . . . . . . . . . . . . . . . . . . . . . . . . . . . . . . . . . . . . . . . . . . . 88
8 - Power sources . . . . . . . . . . . . . . . . . . . . . . . . . . . . . . . . . . . . . . . . . . 89
Power adapter intended use. . . . . . . . . . . . . . . . . . . . . . . . . . . . . . . . . . . . . . . . 89 Battery care . . . . . . . . . . . . . . . . . . . . . . . . . . . . . . . . . . . . . . . . . . . . . . . . . . . . 91
9 - Care and maintenance . . . . . . . . . . . . . . . . . . . . . . . . . . . . . . . . . . . 93
Avoid electrostatic discharge . . . . . . . . . . . . . . . . . . . . . . . . . . . . . . . . . . . . . . . 93 Inspect and clean the monitor and accessories . . . . . . . . . . . . . . . . . . . . . . . . . 93 Maintenance. . . . . . . . . . . . . . . . . . . . . . . . . . . . . . . . . . . . . . . . . . . . . . . . . . . . 94 Recycling monitor components . . . . . . . . . . . . . . . . . . . . . . . . . . . . . . . . . . . . . 95 Monitor care . . . . . . . . . . . . . . . . . . . . . . . . . . . . . . . . . . . . . . . . . . . . . . . . . . . . 95 Printer maintenance . . . . . . . . . . . . . . . . . . . . . . . . . . . . . . . . . . . . . . . . . . . . . . 96 Customer services . . . . . . . . . . . . . . . . . . . . . . . . . . . . . . . . . . . . . . . . . . . . . . . 97
10 - Specifications. . . . . . . . . . . . . . . . . . . . . . . . . . . . . . . . . . . . . . . . . . 99
ECG. . . . . . . . . . . . . . . . . . . . . . . . . . . . . . . . . . . . . . . . . . . . . . . . . . . . . . . . . . . 99 Real-time ECG analog/defib sync . . . . . . . . . . . . . . . . . . . . . . . . . . . . . . . . . . . 101 Impedance pneumography (RESP) . . . . . . . . . . . . . . . . . . . . . . . . . . . . . . . . . . 102 Invasive pressure . . . . . . . . . . . . . . . . . . . . . . . . . . . . . . . . . . . . . . . . . . . . . . . 103 NIBP . . . . . . . . . . . . . . . . . . . . . . . . . . . . . . . . . . . . . . . . . . . . . . . . . . . . . . . . . 104 Temperature . . . . . . . . . . . . . . . . . . . . . . . . . . . . . . . . . . . . . . . . . . . . . . . . . . . 105 Pulse oximetry (SpO2) . . . . . . . . . . . . . . . . . . . . . . . . . . . . . . . . . . . . . . . . . . . 106 Capnography (CO2) . . . . . . . . . . . . . . . . . . . . . . . . . . . . . . . . . . . . . . . . . . . . . . 108 Alarms. . . . . . . . . . . . . . . . . . . . . . . . . . . . . . . . . . . . . . . . . . . . . . . . . . . . . . . . 111 Trends . . . . . . . . . . . . . . . . . . . . . . . . . . . . . . . . . . . . . . . . . . . . . . . . . . . . . . . . 111 Display . . . . . . . . . . . . . . . . . . . . . . . . . . . . . . . . . . . . . . . . . . . . . . . . . . . . . . . 112 Monitor (environmental) . . . . . . . . . . . . . . . . . . . . . . . . . . . . . . . . . . . . . . . . . . 113 Monitor (physical) . . . . . . . . . . . . . . . . . . . . . . . . . . . . . . . . . . . . . . . . . . . . . . . 114 Printer . . . . . . . . . . . . . . . . . . . . . . . . . . . . . . . . . . . . . . . . . . . . . . . . . . . . . . . . 115 Power . . . . . . . . . . . . . . . . . . . . . . . . . . . . . . . . . . . . . . . . . . . . . . . . . . . . . . . . 116 Power adapters. . . . . . . . . . . . . . . . . . . . . . . . . . . . . . . . . . . . . . . . . . . . . . . . . 117 Factory default settings . . . . . . . . . . . . . . . . . . . . . . . . . . . . . . . . . . . . . . . . . . 118 In-service simulated values . . . . . . . . . . . . . . . . . . . . . . . . . . . . . . . . . . . . . . . 120 EMC compliance. . . . . . . . . . . . . . . . . . . . . . . . . . . . . . . . . . . . . . . . . . . . . . . . 121
Glossary . . . . . . . . . . . . . . . . . . . . . . . . . . . . . . . . . . . . . . . . . . . . . . . . 125
Index . . . . . . . . . . . . . . . . . . . . . . . . . . . . . . . . . . . . . . . . . . . . . . . . . . . 131

1
1 General information
Safety summary
This Safety Summary should be read by all Propaq Encore users. Specific warnings and cautions will be found throughout the Propaq Encore documentation where they apply.
WARNING This monitor is to be operated by qualified personnel only. The operator of this monitor should read this entire manual, the monitor reference guide or directions for use, and all accessory directions for use before operating the monitor.
WARNING Place the Propaq monitor and accessories in locations where they cannot harm the patient if they fall from their shelf or mount. Lift the monitor only by its handle; do not lift it by any attached cables.
WARNING Do not connect more than one patient to a monitor. Do not connect more than one monitor to a patient.
WARNING Do not use the Propaq Encore in an MRI suite or a hyperbaric chamber.
WARNING Do not autoclave the Propaq. Autoclave accessories only if the manufacturer's instructions clearly approve it. Many accessories can be severely damaged by autoclaving.
WARNING Inspect the power adapter cord periodically for fraying or other damage, and replace the adapter as needed. Do not operate the apparatus from mains power with a damaged power adapter cord or plug.
WARNING When using a power adapter with this monitor, be sure to connect the power adapter to a three-wire, grounded, hospital-grade receptacle. Do not under any circumstances attempt to remove the grounding conductor from the power plug of the power adapter. Do not plug the power adapter into an extension cord. If there is any doubt about the integrity of the protective earth ground of the receptacle for the power adapter, do not plug in the power adapter; operate the monitor only on battery power. Contact your biomedical engineering department for assistance in identifying the proper power receptacle and making appropriate power connections.
WARNING Make frequent electrical and visual checks on cables and electrode wires.
WARNING Avoid electrosurgery burns at monitoring sites by ensuring proper connection of the electrosurgery return circuit so that the return paths cannot be made through monitoring electrodes and probes.

2 |
General information |
Welch Allyn Propaq Encore Vital Signs Monitor |
WARNING During defibrillation, keep the discharge paddles away from ECG and other electrodes, as well as other conductive parts in contact with the patient. Avoid contact with any accessories connected to the Propaq’s left side panel.
WARNING To ensure patient safety, the conductive parts of the ECG electrodes (including associated connectors) and other patient-applied parts should not contact other conductive parts, including earth ground, at any time.
WARNING Do not operate this product in the presence of flammable anesthetics or other flammable substance in combination with air, oxygenenriched environments, or nitrous oxide; explosion can result.
WARNING Within certain governmental jurisdictions, all interconnected accessory equipment must be labeled by an approved testing laboratory. After interconnection with accessory equipment, risk (leakage) current and grounding requirements must be maintained.
WARNING To ensure conformance to risk (leakage) current requirements when operating from an ac mains power source, use only a Welch Allyn® 503-0054 series power adapter.
WARNING This monitor should only be repaired by qualified service personnel. The operator should not attempt to open the monitor case or perform any maintenance on the monitor except for procedures explicitly described in this manual that can be performed by operators such as inspection and cleaning.
WARNING To ensure patient safety, use only accessories recommended or supplied by Welch Allyn. For a list of those accessories, see Products and Accessories (810-0409-XX), which accompanies this manual. Accessories must be used according to your hospital’s standards and the manufacturer’s recommendations. Always refer to the manufacturer’s directions for use. Use of accessories not recommended by Welch Allyn may result in increased electromagnetic emissions or decreased electromagnetic immunity of the equipment.
WARNING Safe interconnection between the Propaq monitor and other devices must comply with applicable medical systems safety standards such as IEC 60601-1-1. Within certain governmental jurisdictions, all interconnected accessory equipment must be labeled by an approved testing laboratory. After interconnection with accessory equipment, risk (leakage) current and grounding requirements must be maintained.
WARNING As with all medical equipment, carefully route the patient cabling to reduce the possibility of patient entanglement or strangulation.
WARNING A product that has been dropped or severely abused should be checked by qualified service personnel to verify proper operation and acceptable risk (leakage) current values.
WARNING The pulse oximetry channel should NOT be used as an apnea monitor.
WARNING Do not use the pulse oximeter as a replacement or substitute for ECG-based arrhythmia analysis.

Reference Guide |
General information |
3 |
WARNING If the monitor detects an unrecoverable problem, an error message window appears containing an error number and a short message. Report such errors to Welch Allyn.
WARNING When taking NIBP measurements, periodically observe the patient’s limb to make sure that the circulation is not impaired for a prolonged period of time. Also make sure the blood pressure cuff is properly placed according to
Propaq Encore Directions for Use or Propaq Encore Reference Guide. Be especially careful when using the short-term automatic mode (TURBOCUF). Prolonged impairment of circulation or improper cuff placement can cause contusions.
WARNING The range of values measured by the monitoring parameters is provided in the Specifications section of Propaq Encore Directions for Use or Propaq Encore Reference Guide. Operation of the monitor outside the range of specified values is not recommended and may cause inaccurate results.
WARNING Electronic equipment that emits very strong electromagnetic or radio frequency signals can cause electrical interference with monitor operation, including causing the monitor to turn off power. Avoid operating this monitor near such equipment. For guidance about electromagnetic emissions and the recommended separation distance between the monitor and such equipment, refer to the specifications section of this manual.
Caution Changes or modifications not expressly approved by Welch Allyn could void the purchaser’s authority to operate the equipment.
Caution Federal (U.S.A.) law restricts this device to sale, distribution, or use by or on the order of a licensed medical practitioner.
The Propaq Encore should be serviced only by a Welch Allyn service technician while under warranty. Propaq Encore Service Manual (810-0696-XX) is available from Welch Allyn to assist the biomedical engineer during post-warranty period service.
Symbols
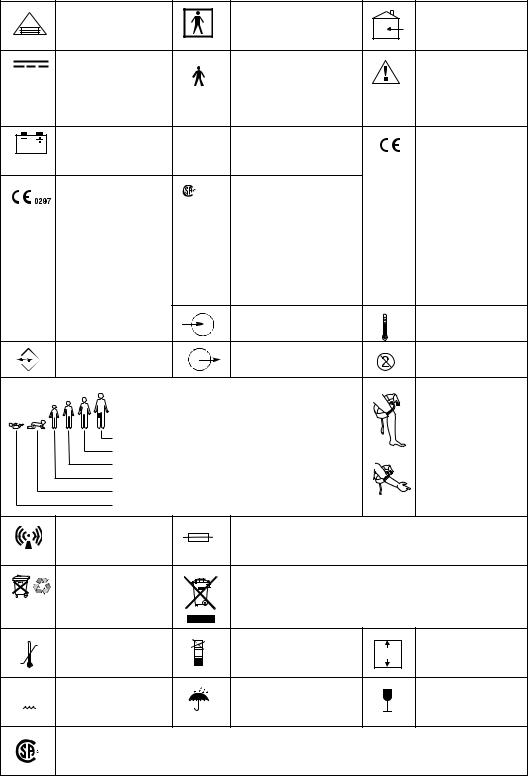
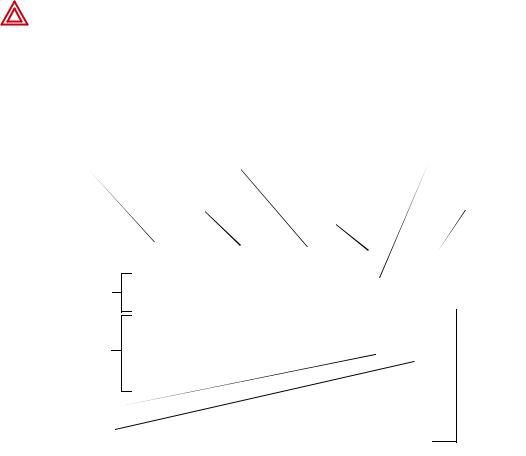
The following symbols may appear on the Propaq Encore monitor or accessories or documentation. These internationally recognized symbols are defined by the International Electrotechnical Commission, IEC 878 and IEC 417A.
WARNING Indicates conditions that could lead to illness, injury, or death.
 Caution In this manual, indicates conditions that could damage equipment or other property.
Caution On the product, means “Consult the accompanying documentation.”
|
|
Off (Standby) |
|
|
|
|
|
|
|
Patient connections are |
|
Transformer meets |
|
|
|
|
|
|
|
|
|
|
Type CF, isolated for direct |
|
requirements of a |
|
|
|
|
|
|
|
|
|
|
|
||
|
|
|
|
|
|
|
|
|
|
|
||
|
|
|
|
|
|
|
|
|
|
cardiac application, and |
|
short-circuit-proof |
|
|
|
|
|
|
|
|
|
|
protected against |
|
safety-isolating power |
|
|
|
|
|
|
|
|
|
|
defibrillation. |
|
transformer. |
|
|
|
|
|
|
|
|
|
|
|
|
|
|
|
On |
|
|
|
|
|
|
|
|
|
Alternating current |
|
|
|
|
|
|
|
|
|
|
|||
|
|
|
|
|
|
|
|
|
|
|
|
|
|
|
|
|
|
|
|
|
|
|
|
|
|
4 |
General information |
Welch Allyn Propaq Encore Vital Signs Monitor |
|
For continued fire |
|
Patient connections are |
For indoor use only (on |
|
protection, use only |
|
Type BF, and protected |
power adapter only) |
|
the specified fuse. |
|
against defibrillation. |
|
|
Direct current |
|
Patient connections are |
Caution: On the |
|
|
|
Type B. |
product, means |
|
|
|
|
“Consult |
|
|
|
|
accompanying |
|
|
|
|
documentation.” |
|
Battery charging when |
IPX1 |
Enclosure Protection Drip |
The CE Mark signifies |
|
green indicator |
|
proof: Classification IPX1 |
the device has met all |
|
illuminated |
|
per IEC Publication 529 |
essential |
|
The CE Mark and |
|
The Canadian |
requirements of |
|
|
European Medical |
||
|
Notified Body |
|
StandardsAssociation has |
|
|
Evaluated to CSA 601-1 |
Device Directive |
||
|
Registration Number |
NRTL/C |
evaluated this device |
|
|
and UL2601-1 |
93/42/EEC for a Class |
||
|
signify the device has |
|
according to CSA 601-1 |
|
|
|
1 product. (This |
||
|
met all essential |
|
and Underwriters |
|
|
|
symbol is on the |
||
|
requirements of |
|
Laboratory Standard UL |
|
|
|
Universal Power |
||
|
European Medical |
|
2601-1. (This symbol is on |
|
|
|
Adapter.) |
||
|
Device Directive |
|
the Universal Power |
|
|
|
|
||
|
93/42/EEC. |
|
Adapter.) |
|
|
|
|
Input port |
Temperature sensor |
|
|
|
|
input |
|
Two way |
|
Output port |
Single-use only (not |
|
communication port |
|
|
reusable). |
|
|
|
|
Apply the NIBP cuff as |
|
|
|
|
shown. |
|
NIBP cuff sizes: |
|
|
|
|
Thigh |
|
|
|
|
Large adult |
|
|
|
|
Adult |
|
|
|
|
Small adult |
|
|
|
|
Child |
|
|
|
|
Infant |
|
|
|
|
Non-ionizing |
|
Fuse |
|
|
electromagnetic |
|
|
|
|
radiation |
|
|
|
|
Separate lead acid |
|
Recycle the monitor and battery separately from other |
|
|
battery from other |
|
disposables. |
|
Pb |
disposables for |
|
www.welchallyn.com/weee |
|
recycling |
|
|
|
|
|
|
|
|
|
|
Temperature limits |
|
Stacking limit (by number) |
Altitude limit |
|
|
n |
|
n |
n% |
Humidity limit |
|
Keep away from rain |
Fragile |
|
|
|
|
|
This device has been tested and certified by the Canadian Standards Association International to comply with applicable U.S. and Canadian medical safety standards.
C US
Reference Guide |
General information |
5 |
Propaq Encore documentation
The documentation set
The Propaq Encore documentation set consists of documents for the clinician, the biomedical technician, and the department head or purchaser of accessories for the Propaq Encore monitors.
This Propaq Encore Reference Guide contains important safety and operating information for the clinician.
Propaq Encore Service Manual (810-0696-XX) contains information on how to properly maintain the Propaq Encore through routine calibration, inspection, and maintenance.
Welch Allyn Products & Accessories (810-0409-XX) provides a comprehensive list of accessories recommended for Propaq Encore monitors and options.
About this reference guide
This Reference Guide provides descriptions and operating information for the Propaq Encore models 202EL, 204EL, and 206EL, including all available options at the time of this manual's printing.
Statement of expectations of the reader
This Reference Guide was written for the clinician. Although this guide may describe some monitoring techniques, Welch Allyn expects that you are a trained clinician who knows how to take and interpret a patient’s vital signs. The Propaq Encore has been designed as a quality monitor; however, inherent limitations require that good clinical judgment always prevails.
6 |
General information |
Welch Allyn Propaq Encore Vital Signs Monitor |

7
2 Getting started
Introducing the Propaq Encore
Intended use
Before using the Propaq Encore on a patient, be sure you understand the Safety Summary at the front of this book. It provides important information about safely using the Propaq Encore. The Propaq Encore monitor is intended to be used by skilled clinicians for multiparameter vital signs monitoring of neonatal, pediatric, and adult patients in health care facility bedside applications; as well as for intraand interfacility transport.
Propaq Encore monitors that do not include CO2 or printer options are able to withstand light rain exposure over short periods of time (uniform distribution of approximately 1 mm of water/ minute for 10 minutes or less).
Propaq Encore models and options
Three models of Propaq Encore monitors are available.
Features common to all models |
ECG, 3-lead or 5-lead configurations, 0.05-40/0.5-40 Hz |
|
NIBP, with neonatal, pediatric and adult modes |
|
Temperature, 2 channels: YSI 400 and 700 series-compatible connectors |
|
Defibrillator Synchronization |
|
Real-time Analog output of ECG |
|
Electrocautery noise suppression on all channels except Impedance |
|
Pneumography |
206EL |
Two Invasive Pressure Channels |
204EL |
One Invasive Pressure Channel |
202EL |
No Invasive Pressure |
Options available for each model |
Pulse Oximetry (SpO2) |
|
Capnography (CO2) (available only with SpO2): |
|
Mainstream Capnography (MCO2) |
|
Sidestream Capnography (SCO2) |
Dualstream Capnography (Both MCO2 and SCO2)
Impedance Pneumography (RESP) (available only with SpO2)
Printer
HP-compatible side panel
8 |
Getting started |
Welch Allyn Propaq Encore Vital Signs Monitor |
Expansion module
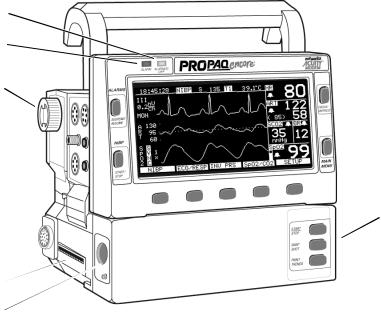
The Propaq Encore Expansion Module attaches to the monitor and houses additional capabilities. The Expansion Module can be fitted with the SpO2, CO2, and Printer options.
ALARM(S)
OFF Light
ALARM Light
SpO2 Option
Mainstream |
Expansion |
|
CO2 |
Option |
Module |
Printer |
Option |
|
Sidestream
CO2 Option
Propaq Encore pulse oximetry option (SpO2)
The Propaq Encore Pulse Oximetry option (SpO2) is installed in the Expansion Module or in a smaller unit that attaches to the rear of the monitor:
Masimo® Pulse Oximetry option
Nellcor® Pulse Oximetry option
Capnography (CO2) options
The Propaq Encore CO2 options allow carbon-dioxide monitoring. The mainstream CO2 option and sidestream CO2 option allow CO2 monitoring directly in the breathing circuit of a ventilator. The sidestream CO2 option also allows CO2 monitoring of non-intubated patients through a cannula. The CO2 options can be installed separately, or together as Dualstream CO2 in the Expansion Module. These options require the Pulse Oximetry (SpO2) option.
Impedance pneumography (RESP) option
The RESP option detects the rate or absence of respiratory effort, and is configured with the Pulse Oximetry option.
Printer option
The Expansion Module with Printer (EMP) provides a lightweight 3-channel recorder.
Reference Guide |
Getting started |
9 |
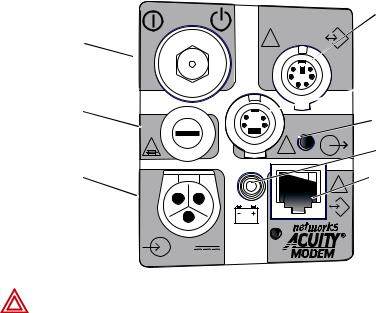
Propaq-to-Acuity® option
This option allows communication between the Propaq Encore and the Acuity Central Monitoring System by means of an ethernet network system installed in your facility. The Acuity System operator can view the patient data and control most of the bedside Propaq functions. The Propaq Encore connects to the Acuity System through an Acuity network cable that plugs into the Propaq right side panel.
Modem-Propaq option
This option allows telecommunication between a Propaq Encore and the Acuity System by means of external modems. This option is configured with the Propaq-to-Acuity option. For more information refer to Modem-Propaq Reference Guide.
HP-compatible side panel option
The HP connector-compatible option makes the Propaq Encore compatible with many Hewlett-Packard sensors and accessories used with the Hewlett Packard Component Monitoring System. This option replaces the standard Propaq Encore left side panel.
Using the Propaq Encore
System controls (right side panel)
MONITOR |
DEFIB SYNCHRO |
|
On/Off Switch |
! |
|
Input Fuse |
|
|
3A |
EKG x 1000 |
|
2AG |
||
|
!
Power Input |
! |
Connector |
|
|
12-28V, 3A |
Defib Sync Connector Contact Welch Allyn technical support for information (for specifications, see page 101)
Real-time ECG Output
Connector
Speaker
Battery Charging Light
Connector for Acuity or Modem-Propaq
WARNING Safe interconnection between the Propaq Encore and other devices must comply with applicable medical systems safety standards such as
IEC 60101-1.
On/Off switch
This switch turns the monitor on and off. The switch is recessed to prevent accidentally turning off the monitor, which would result in losing patient data.
10 |
Getting started |
Welch Allyn Propaq Encore Vital Signs Monitor |
Input fuse
The input fuse, which protects the Propaq Encore against power surges, is a 3-Ampere fuse, externally replaceable by qualified service personnel. See “Replacing the fuse” on page 92 for fuse replacement instructions.
Power input connector
This receptacle accepts the Welch Allyn ac power adapter, which must be used for ac mains operation and battery charging. The Propaq Encore is also designed to operate with other 12-28 volt, dc-only power sources, such as a vehicle battery system.
Defib sync connector
This connector allows connection with a LIFEPAK 5 or LIFEPAK 6s defibrillator for synchronized cardioversion. See “Real-time ECG analog/defib sync” on page 101.
Real-time ECG output connector
This connector provides a real-time analog ECG signal output.
Battery charging light
This green light turns on when a power source (ac power adapter or external dc source) is connected and the battery is charging. Although the monitor may be turned off, battery charging continues when an external power source is connected.
Connector for Acuity or Modem-Propaq
This connector allows either direct connection to an Acuity System, or connection to an external modem for telecommunication to an Acuity System. For more information about the Acuity System, see “Acuity Central Monitoring system” on page 85. For more information about the Modem-Propaq, refer to Modem-Propaq Reference Guide.
Alarm lights
Alarms and limits are described in detail beginning on “Alarms and limits” on page 69.
ALARM light
When an alarm limit is violated, the red ALARM light turns on.
ALARM(S) OFF light
When any alarm limit is turned off, the yellow ALARM(S) OFF light turns on.

Reference Guide |
Getting started |
11 |
Power-up screen
WELCH ALLYN
MODEL PROPAQ 204
DIAGNOSTICS IN PROGRESS
BATTERY: 8.3 VOLTS
SOFTWARE VERSION 2.50.00
(c) WELCH ALLYN PROTOCOL INC. 1988-2007
When you first turn on the monitor, the power-up screen displays information about the Propaq Encore and the monitor runs diagnostic tests to ensure proper functioning.
A few seconds later, the top two lines of the screen are replaced with text indicating the current patient mode (adult, pediatric, or neonatal).
PEDIATRIC MODE
DIAGNOSTICS IN PROGRESS
BATTERY: 8.3 VOLTS
SOFTWARE VERSION 2.50.00
(c) WELCH ALLYN PROTOCOL INC. 1988-2007
WARNING Before you use a Propaq on a new patient, always turn off the Propaq for a few seconds, then turn it on again. This clears the prior patient’s trend values, alarm limit settings, and NIBP cuff inflation target.
1.If the Propaq Encore has been used for a previous patient, switch the monitor off, then on again. The monitor will turn on in the powerup patient mode with the associated settings.
Note Verify that the powerup tone is produced. If the monitor has SpO2, verify two tones are produced to make sure that both speakers are working.
2.Verify the monitor is in the correct patient mode according to the patient’s age. If the patient mode is not correct, change it. (See “Monitor setup” on page 20 to change the patient mode.)
WARNING Always check the patient mode when monitoring a new patient. The patient mode determines default alarm limits, maximum cuff inflation pressure, and internal algorithm settings.
3.Verify the battery voltage is sufficient for monitoring. If it is less than 7.4 V, connect to a power adapter (see “Power adapter intended use” on page 89 for information about the power adapter).
Power-up equipment alert: program fault, settings lost
If a PROGRAM FAULT: SETTINGS LOST, TIME/DAY RESET equipment alert appears when you turn on the monitor, the monitor cannot recall the programmed custom settings and current time and date. This can occur if the battery is drained or after new software has been installed.
If this occurs, the monitor provides a special sequence of display windows to help you regain use of your monitor as quickly as possible. Do the following:
1.Connect an ac power adapter to recharge the battery (if the battery is drained).
12 |
Getting started |
Welch Allyn Propaq Encore Vital Signs Monitor |
2.Press any button below the equipment alert screen to acknowledge the alert. The monitor will display the Mode Setup window (shown on page 23).
3.Press these buttons to select one of the Factory patient modes for use:
Factory Adult mode |
POWERUP*, YES. |
Factory Pediatric mode |
NEXT, POWERUP*, YES. |
Factory Neonatal mode |
NEXT, NEXT, POWERUP*, YES. |
After you press YES, the monitor will display the Time/Day window.
4.Press NEXT, UP, and DOWN as needed to set the time and date. Then press ENTER to store the new time and date.
Note These display screens are only displayed in this order if the PROGRAM FAULT equipment alert occurs.
5. Turn off the monitor, then turn it on again so the settings will take effect.
The monitor is ready for use. If you want to store some customized patient mode program settings, refer to page 23.
If you follow these steps and the equipment alert reappears at powerup, the monitor may need to be serviced and the battery replaced. Contact a qualified service person.
Reference Guide |
Getting started |
13 |
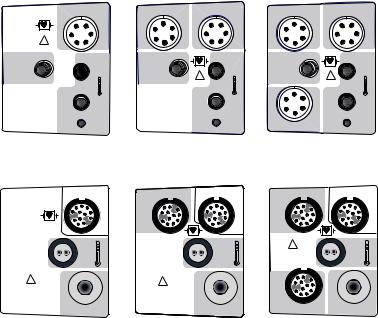
Patient connections
The left side panels differ depending on the Propaq Encore model. All models have ECG, NIBP, and two temperature connectors. The Propaq Encore 204 left side panel includes one invasive-pressure connector, and the Propaq Encore 206 includes two invasivepressure connectors.
|
ECG /EKG RESP |
|
! |
NIBP |
|
PSNI |
T1 |
|
|
|
T2 |
Propaq Encore 202 EL
ECG /EKG RESP
! |
P |
|
S |
COMPATIBLE |
N |
HP |
I |
NIBP
INV. BP |
P1 ECG /EKG RESP |
NIBP |
|
PSNI |
T1 |
|
|
|
! |
|
T2 |
Propaq Encore 204 EL
INV. BP |
P1 ECG /EKG RESP |
! |
P |
|
S |
||
COMPATIBLE |
N |
|
I |
||
HP |
||
|
NIBP
INV. BP |
P1 |
ECG /EKG |
RESP |
NIBP |
|
|
|
PSNI |
|
|
T1 |
|
|
! |
|
|
|
|
|
|
|
|
T2 |
INV. BP |
P2 |
|
|
Propaq Encore 206 EL |
|||
INV. BP |
P1 |
ECG /EKG |
RESP |
!
COMPATIBLE
HP
P
S
N
I
INV. BP |
P2 |
NIBP |
202 HP |
204 HP |
206 HP |
On Propaqs with the Hewlett-Packard connector option, all models have only one temperature connector, the YSI 400 connector.
14 |
Getting started |
Welch Allyn Propaq Encore Vital Signs Monitor |
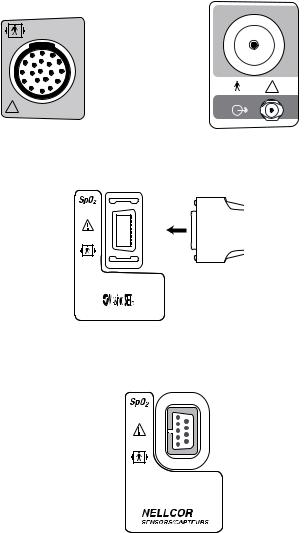
Option connectors
CO2
CO2
|
! |
! |
|
Mainstream CO2 |
Sidestream CO2 |
Connector |
Connector |
Cable: see Products and
Accessories (810-0409-XX)
Masimo SpO2 Connector
(motion tolerant)
Nellcor SpO2 Connector
Reference Guide |
Getting started |
15 |
Propaq Encore display
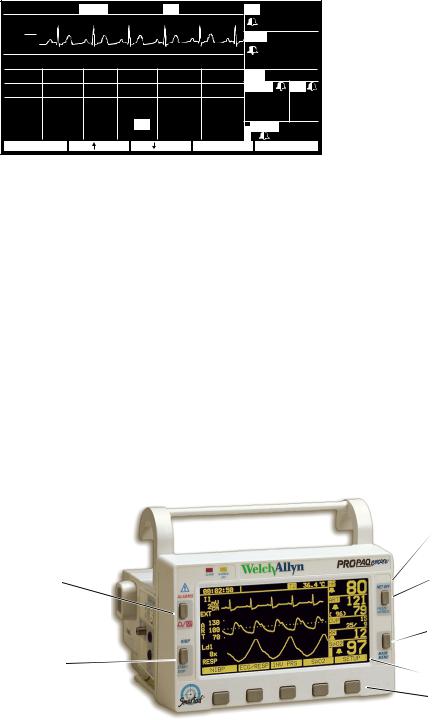
The display shows waveforms, vital sign numeric values, Propaq Encore status, and alarm information in different windows. Different vital sign numeric values (such as heart rate and blood pressures) have upper and lower range limits. If the Propaq Encore detects a vital sign value outside of the Propaq's measurable range, the monitor displays – – –
(below the range) or + + + (above the range) instead of the vital sign value.
WARNING The Propaq Encore will show + + + for HR numerics between 301350 beats per minute. Above 350 beats per minute, it may display incorrectly low heart rates, due to intermittent picking of R-waves.
Note Due to differences in software versions and standards required by different countries, the displays shown in this reference guide may be slightly different than the display on your Propaq Encore.
Time of day, caution and status |
Temperature values are displayed |
Bells indicate alarm limit status |
messages. |
here. |
|
Noninvasive blood |
Heart Rate Source: |
pressure values can |
HR indicates ECG; |
appear here. |
PR indicates blood pressure |
|
or SpO2. |
Heart Rate in beats per minute.
Waveform window
Status window
ETCO2 concentration
Breath Rate from CO2 
Oxygen saturation is a percentage value.
18:45:28 |
|
|
|
S 122 |
T1 |
102.3F |
|
|
|
|
|
|
|
60 |
|
|||||
NIBP |
|
HR |
|
|
|
|
|
|||||||||||||
IIImV |
|
|
|
|
|
|
|
|
|
|
|
|
|
|
|
|
||||
1 |
|
|
|
|
|
|
|
|
|
ART |
|
|
122 |
|
||||||
MONcm |
|
|
|
|
|
|
|
|
|
|
|
|
||||||||
|
|
|
|
|
|
|
|
|
|
|
|
|
|
|
||||||
CO2 |
|
|
|
|
|
|
|
|
( 85) |
58 |
|
|||||||||
|
|
|
|
|
|
|
|
|
||||||||||||
GAS COMPENSATION: OFF |
|
PA |
35/ 18 |
|
||||||||||||||||
RESPONSE |
|
|
|
: NORMAL |
|
MCO2 |
|
|
BR |
|
|
|||||||||
|
|
|
|
|
35g |
12 |
|
|||||||||||||
CO2 SOURCE |
: MAINSTREAM |
|
|
|
||||||||||||||||
SWEEP SPEED |
: 6.25 mm/s |
|
mmH |
|
|
|
|
|
||||||||||||
|
|
|
|
|
|
|
|
|
|
|
p |
|
|
|
|
|
||||
|
|
|
|
|
|
|
|
|
|
|
|
|
|
|
|
|||||
BAROMETER |
: 762.2 mmHg |
|
|
S O2 |
92 |
|
||||||||||||||
|
|
|
|
|||||||||||||||||
GAS COMP |
RESPONSE |
SOURCE |
|
|
|
PREV MENU |
|
|
||||||||||||
|
|
|
|
|
|
|
|
|
|
|
|
|
|
|
|
|
|
|
|
|
Systolic, diastolic, and (if space permits) mean pressures are displayed.
The screenspace is reallocated when vital signs are added or removed. By changing the size of the numeric windows below the heart rate, the Propaq Encore provides the best possible view of all numerics for vitals signs being monitored.
16 |
Getting started |
Welch Allyn Propaq Encore Vital Signs Monitor |
You can select up to three waveforms to be shown on the Propaq. When only one waveform is selected, a trend window automatically appears below the waveform. While changing Propaq Encore settings, a status window may appear below the waveform.
12:45:28 |
NIBP |
S |
122 T1 102.3F |
HR |
|
80 |
|
|||
IIImV |
|
|
|
|
|
|
|
|
|
|
1 |
|
|
|
|
|
|
ART |
122 |
Patient waveform and trend information |
|
MONcm |
|
|
|
|
|
|
||||
|
|
RESP TREND |
|
|
( 85) |
58 |
can be simultaneously displayed, while |
|||
TIME HR/PR SpO2 |
|
BR |
ETCO2 INCO2 PA |
35/ 18 |
numeric values are continuously updated. |
|||||
HH:MM |
BPM |
% |
Br/M |
mmHg |
mmHg MCO2 |
BR |
|
|||
10:00 |
101 |
98 |
|
11 |
30 |
3 |
mmH35g |
12 |
|
|
9:58 |
88 |
SRCH |
|
11 |
31 |
3 |
|
|||
9:56 |
93 |
OFF |
|
5 |
30 |
10 |
SpO2 |
92 |
|
|
9:54 |
91 |
100 |
|
10 |
30 |
2 |
|
|||
|
|
|
NXT TRND |
OXYCRG |
|
|||||
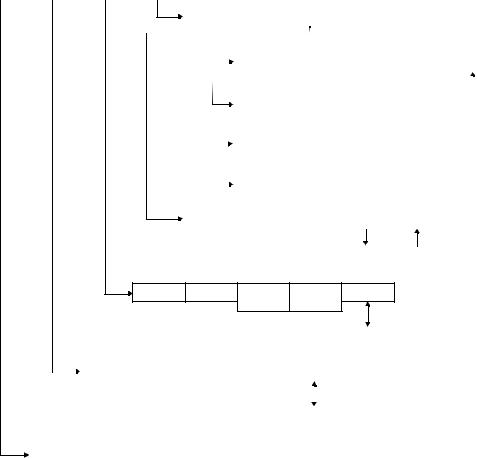
Propaq Encore buttons
The four buttons at the sides of the screen are reserved for the most commonly used functions.
ALARMS |
Silences or resumes alarm tone. |
START/STOP |
Starts and stops NIBP measurements. The STOP function will |
|
automatically vent the cuff. |
NET OFF |
Disconnects the monitor from the Acuity network (if |
|
connected). |
FREEZE/UNFREEZE Freezes or “unfreezes” the waveforms. If only one or two waveforms are displayed and you press FREEZE, the frozen waveform(s) are shown along with an active waveform so you can continue to monitor the patient’s condition.
MAIN MENU |
Pressing MAIN MENU always returns the monitor to the top |
|
level menu. |
|
NET OFF |
ALARMS |
FREEZE/ |
|
UNFREEZE |
|
MAIN MENU |
START/STOP
(NIBP) The five labels above the associated
buttons
The five buttons below the screen, and their associated labels located on the screen, provide access to the menus.
Later in this manual, the notation A , B , C is used as a shorter way to say “Press Button A, then B, then C.”
Reference Guide |
Getting started |
17 |
Propaq Encore menus
Menus for some patient vital signs are displayed only if that option is included in your Propaq.
MAIN MENU
NIBP |
ECG/RESP |
INV PRS |
SpO2/CO2 |
SETUP |
|
|
|
|
|
|
|
|
|
|
|
|
SpO2 |
|
CO2 |
PREV MENU |
|
|
||||
|
|
|
|
|
|
|
|
|
|
|
|
|
|
|
|
|
|
|
|
|
|
|
|
|
|
|
|
|
|
|
|
|
|
|
|
|
|
|
|
|
|
|
|
|
|
|
|
|
|
|
|
|
|
|
CO2 MENU 1 |
|
|
|
|
|
|
|
|
|
|
||
|
|
|
|
|
RANGE |
mm/s |
|
|
|
MORE |
PREV MENU |
|||||
|
|
|
|
|
|
|
|
|||||||||
|
|
|
|
|
|
|
|
|
|
|
|
|
|
|
|
|
|
|
|
|
|
|
|
|
|
|
|
||||||
|
|
|
|
CO2 MENU 2A (NO CO2 SENSORS) |
|
|
|
|
|
|
||||||
|
|
|
|
|
GAS COMP |
RESPONSE |
|
|
|
|
|
PREV MENU |
||||
|
|
|
|
|
|
|
|
|
|
|
||||||
|
|
|
|
|
|
|
|
|
|
|
|
|
|
|
||
|
|
|
|
CO2 MENU 2B (MAINSTREAM CO2 ACTIVE) |
|
|
|
|
||||||||
|
|
|
|
|
GAS COMP |
|
RESPONSE |
|
SOURCE |
|
|
PREV MENU |
||||
|
|
|
|
|
|
|
||||||||||
|
|
|
|
|
|
|
|
|
|
|
|
|||||
|
|
|
|
CO2 MENU 2C (SIDESTREAM CO2 ACTIVE) |
|
|
|
|
||||||||
|
|
|
|
|
GAS COMP |
RESPONSE |
|
SOURCE |
FLOWRATE |
PREV MENU |
||||||
|
|
|
|
|
|
|
||||||||||
|
|
|
|
|
|
|
|
|
|
|
|
|
|
|
|
|
SpO2 MENU 1
SIZE |
|
|
MORE |
PREV MENU |
|
|
|
|
|
SpO2 MENU 2
RESPONSE |
C-LOCK |
|
|
PREV MENU |
|
|
|
|
|
INV PRS MENU 1
RANGE |
RESCALE |
ZERO P1 |
ZERO P2 |
MORE |
|
|
CANCEL |
CANCEL |
|
INV PRS MENU 2
LABEL P1 |
FORMAT 1 |
LABEL P2 |
FORMAT 2 |
PREV MENU |
|
|
|
|
|
|
|
|
ECG/RESP MENU 1 |
|
|
|
|
|
|
|
|
|
ECG SIZE |
ECG LEAD |
RESP SZE |
MORE |
|
|
|
|
|
|||||
|
|
|
|
|
|
|
|
|
|
|
|
ECG/RESP MENU 2 |
|
|
|
|
|
|
|
|
|
|
|
|
||
|
|
|
|
|
|
|
||
|
|
|
NEXT |
CHANGE |
|
|
PREV MENU |
|
NIBP MENU |
|
|
|
|
|
|
|
|
|
|
|
|
|
|
|
||
|
|
|
|
|
|
|
|
|
START |
|
AUTO/MAN |
INTERVAL |
TURBOCUF |
PREV MENU |
|
|
|
STOP |
|
|
|
|
|
|
|
|
|
|
|
|
|
|
|
||
|
|
|
|
|
|
|
|
|

18 |
Getting started |
Welch Allyn Propaq Encore Vital Signs Monitor |
Key-press route to setup menu 1
|
NIBP |
ECG/RESP |
INV PRS |
SpO2/CO2 |
SETUP |
|
|
|
|
|
|
|
|
|
|
|
|
|
|
|
SETUP MENU 1
|
|
STATSCALE |
|
|
ALARMS |
|
WAVE SEL |
|
|
TRENDS |
|
|
MORE |
|
|
|
|
|
|
|
|
|
|
|
|||||
|
|
|
|
|
|
|
|
|
|
|
|
|
|
|
TRENDS MENU
(MORE button takes you to next Setup Menu)
|
|
|
|
|
|
NXT TRND |
OXYCRG |
|
|
|
|
|
|
|
|||
|
|
|
|
|
|
ALARMS MENU
STAT SET |
4 SUSPND |
|
LIMITS |
PREV MENU |
|
|
RESUME |
|
|
|
|
|
|
|
|
|
|
|
|
|
|
|
|
ALARM LIMITS MENU*
NEXT |
UP |
DOWN |
ON/OFF |
NEXT PAGE |
|
|
|
|
|
(*ON/OFF button is not displayed for HR/PR alarm limits if the HR/PR ALARM LIMITS setting is set to CANNOT TURN OFF.)

Reference Guide Getting started 19
Key-press route to setup menu 2
NIBP |
ECG/RESP |
INV PRS |
|
SpO2/CO2 |
|
|
SETUP |
|
|
|
|
|
|
|
|
|
|
|
|
|
||||||
|
|
|
|
|
|
|
|
|
|
|
|
|
|
|
|
|
|
|
|
|
|
|
|
|
|
|
|
|
|
|
|
|
|
|
|
|
|
|
|
|
|
|
|
|
|
|
|
|
|
|
|
|
|
SCATSCALE |
ALARMS |
WAVE SEL |
|
TRENDS |
|
|
MORE |
|
*(Service menu tests are for use by authorized |
|||||||||||||||||
|
|
|
|
|
|
|
|
|
|
|
|
|
|
|
||||||||||||
SETUP MENU 2 |
|
|
|
|
|
|
|
|
|
|
|
|
|
|
service personnel only, and are available only |
|||||||||||
|
|
|
|
|
|
|
|
|
|
|
|
|
|
|
|
|
when in the Adult patient mode.) |
|||||||||
NEXT |
CHANGE |
WAVE SEL |
|
PRINTER |
|
|
MORE |
|
|
|||||||||||||||||
|
|
|
|
|
|
|
|
|
|
|
|
|
|
|
|
|||||||||||
|
|
|
|
|
|
|
|
|
|
|
|
|
|
|
TIME/DAY MENU |
|
|
|
|
|
|
|
|
|
||
|
|
|
|
|
|
|
|
|
|
|
|
|
|
|
|
|
|
|
|
|
|
|
|
|||
|
|
|
|
|
|
|
|
|
|
|
|
|
|
|
|
|
|
|
|
|
|
|
|
|
|
|
|
|
|
|
|
|
|
|
|
NEXT |
|
|
UP |
|
DOWN |
|
ENTER |
|
SERVICE |
|
|
||||||
|
|
|
|
|
|
|
|
|
|
|
|
|
|
|
|
|
|
|
|
|
|
|
|
|
|
|
|
|
|
|
|
|
|
|
|
|
|
|
|
|
|
|
|
|
|
|
|
|
PREV MENU |
|
|
||
|
|
|
|
|
|
|
|
|
|
|
|
|
|
|
|
|
|
|
|
|
|
|
|
|
|
|
|
|
|
|
|
|
|
|
|
|
|
|
|
|
|
|
|
|
|
|
|
|
|
|
|
|
|
|
|
|
|
|
|
|
|
SERVICE MENU 1* |
|
|
|
|
|
|
|
|
|
|
|
|
|
|||||
|
|
|
|
|
|
|
|
|
|
|
|
|
|
|
|
|
|
|
|
|
|
|
|
|
||
|
|
|
|
|
|
|
|
|
NIBP TEST |
|
IBP TEST |
|
SpO2 TST |
|
CO2 TEST |
|
|
MORE |
|
|
|
|||||
|
|
|
|
|
|
|
|
|
|
|
|
|
|
|
|
|
|
|
|
|
|
|
|
|
|
|
|
|
|
|
|
|
|
|
SERVICE MENU 2* |
|
|
|
|
|
|
|
|
|
|
|
|
|
|||||
|
|
|
|
|
|
|
|
|
|
|
|
|
|
|
|
|
|
|
|
|
|
|
|
|
|
|
|
|
|
|
|
|
|
|
|
TEMP TEST |
|
PIXL TST |
|
NET TEST |
|
|
|
|
MORE |
|
|
|
|||||
|
|
|
|
|
|
|
|
|
|
|
|
|
|
|
|
|
|
|
|
|
|
|
|
|
|
|
|
|
|
|
|
|
|
|
SERVICE MENU 3* |
|
|
|
|
|
|
|
|
|
|
|
|
|
|||||
|
|
|
|
|
|
|
|
|
|
|
|
|
|
|
|
|
|
|
|
|
|
|
|
|
|
|
|
|
|
|
|
|
|
|
|
SETTINGS |
|
KEY TEST |
|
SYSTEM |
|
|
|
|
MORE |
|
|
|
|||||
|
|
|
|
|
|
|
|
|
|
|
|
|
|
|
|
|
|
|
|
|
|
|
|
|
|
|
|
|
|
|
|
|
|
|
|
|
|
|
|
|
|
SETTINGS MENU |
|
|
|
|
|
|
|
|
|
||
|
|
|
|
|
|
|
|
|
|
|
|
|
|
|
|
|
|
|
|
|
|
|
|
|||
|
|
|
|
|
|
|
|
|
|
|
|
|
|
|
|
|
|
|
|
|
|
|
|
|
|
|
|
|
|
|
|
|
|
|
|
|
NEXT |
|
CHANGE |
|
ALL ALRM |
|
|
|
|
PREV MENU |
|
||||||
|
|
|
|
|
|
|
|
|
|
|
|
|
|
|
|
|
|
|
|
|
||||||
|
|
|
|
|
|
|
|
PRINTER SETUP MENUS |
|
(Printer Setup status |
|
|
|
|
|
|||||||||||
|
|
|
|
|
|
|
|
|
|
NEXT |
|
CHANGE |
|
PR TREND |
|
MORE |
|
PREV MENU |
|
|
||||||
|
|
|
|
|
|
|
|
|
|
|
|
|
|
|
|
|||||||||||
|
|
|
|
|
|
|
|
|
|
|
|
|
|
|
|
|
|
|
|
|
|
|
|
|
|
|
(Patient Mode menu is accessed when CHANGE is pressed for PATIENT MODE.)
(Printer Trend Select status window)
NEXT |
CHANGE |
PR TREND |
MORE |
PREV MENU |
|
|
|
|
|
WAVE SELECT MENU
NEXT |
ON/OFF |
INSERV |
|
PREV MENU |
|
|
NO INSRV |
|
|
|
|
|
|
PATIENT MODE MENU
NEONATAL |
PED |
ADULT |
SETUP |
PREV MENU |
|
|
|
|
|
MODE SETUP MENU
NEXT |
POWERUP* |
USE NOW |
SAVE |
PREV MENU |
|
|
|
|
|

20 |
Getting started |
Welch Allyn Propaq Encore Vital Signs Monitor |
Monitor setup
Setup Menu 1 is accessed by pressing the SETUP button on the Main Menu.
STATSCALE |
ALARMS |
|
WAVE SEL |
TRENDS |
|
|
MORE |
|
|
|
|
|
|
|
|
|
|
|
|
STATSCALE |
Automatically readjusts all waveform scales. |
|
|
|
|||||||||||||||
ALARMS |
Allows access to the Alarms menu. |
|
|
|
|
|
|
|
|
||||||||||
WAVE SEL |
Allows you to turn on and off desired waveforms or NIBP numerics |
||||||||||||||||||
|
|
for display. |
|
|
|
|
|
|
|
|
|
|
|
|
|
|
|
|
|
TRENDS |
Allows access to the Trend settings and display. |
|
|
|
|||||||||||||||
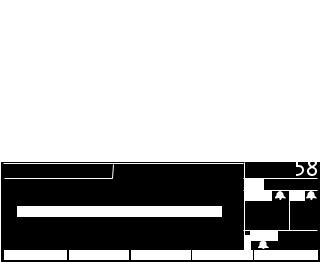
MORE |
Displays the next setup menu and the following status window: |
||||||||||||||||||
|
|
|
|
|
|
|
|
|
|
|
|
|
|
|
|
|
|
|
|
|
|
|
SETUP |
|
|
|
HR/PR |
RR/BR |
( 85) |
|
|
|
|||||||
|
|
|
CURRENT SOURCE |
: |
|
ECG |
MCO2 |
PA |
35/ 18 |
|
|||||||||
|
|
|
SELECTED SOURCE : |
ART |
--- |
MCO2 |
|
|
BR |
|
|
||||||||
|
|
|
SWEEP (mm/s) |
: 12.5 |
|
3.13 |
mmH35g |
12 |
|
||||||||||
|
|
|
ALARM TONE |
: HIGH |
|
|
|
|
|||||||||||
|
|
|
HR/PR TONE |
: LOW |
|
|
|
|
|
|
|
|
|
|
|
||||
|
|
|
|
|
|
|
SpO2 |
92 |
|
||||||||||
|
|
|
PATIENT MODE |
|
: |
ADULT |
|
|
|
|
|
|
|||||||
|
|
|
|
|
|
|
|
|
|
|
|||||||||
|
|
|
NEXT |
CHANGE |
|
WAVE SEL |
|
PRINTER |
|
|
MORE |
|
|||||||
NEXT |
Selects the next setting in the status window. |
|
|
|
|||||||||||||||
CHANGE |
Changes the currently selected display setting. (Pressing CHANGE |
||||||||||||||||||
|
|
at PATIENT MODE allows you to choose between Adult, Pediatric, |
|||||||||||||||||
|
|
and Neonatal in a Patient Mode window.) |
|
|
|
|
|
|
|
|
|||||||||
PRINTER |
Allows access to the Printer Menu. |
|
|
|
|
|
|
|
|
||||||||||
MORE |
Allows access to the Time/Day window. |
|
|
|
|
|
|
|
|
||||||||||
CURRENT |
When the selected HR/PR source is no longer available, the current |
||||||||||||||||||
SOURCE |
source is the active source with highest priority. The RR/BR source |
||||||||||||||||||
|
|
cannot be manually selected. It will always be CO2 if CO2 is active. |
|||||||||||||||||
|
|
Otherwise, it will be ECG/RESP. |
|
|
|
|
|
|
|
|
|
|
|
||||||
SELECTED |
The user-selected HR/PR source is displayed along with the HR/PR |
||||||||||||||||||
SOURCE |
source currently being used by the monitor. |
|
|
|
|||||||||||||||
SWEEP (mm/s) The selectable sweep speeds for HR/PR are 12.5, 25, and 50 mm/ sec. The sweep speeds for RR/BR are 3.13, 6.25, and 12.5 mm/sec.
ALARM TONE Sets the Alarm Tone volume to HIGH, MEDIUM, or LOW.
Reference Guide |
Getting started |
21 |
HR/PR TONE Sets the Heart Tone volume to HIGH, MEDIUM, LOW, or OFF.
PATIENT MODE Pressing CHANGE in this selection displays the following Patient Mode window:
|
PATIENT MODE |
BATTERY: 9.2 VOLTS ( 85) |
|
|
|
|||||||||||
|
SELECT PATIENT MODE BASED ON AGE: |
PA |
|
35/ 18 |
|
|||||||||||
|
MCO2 |
|
BR |
|
|
|||||||||||
|
NEO |
: < 44 WEEKS GEST. AGE |
|
mmHg35 12 |
|
|||||||||||
|
PED |
: > 44 WEEKS GEST. AGE, |
|
|
||||||||||||
|
|
< 9 |
YEARS |
|
|
|
|
|
|
|
|
|
||||
|
|
|
|
SpO2 |
|
92 |
|
|||||||||
|
ADULT: > 9 |
YEARS |
|
|
|
|
||||||||||
|
|
|
|
|
|
|||||||||||
|
NEONATAL |
|
PED |
|
ADULT |
|
SETUP |
|
|
PREV MENU |
|
|||||
|
If you press NEONATAL, PED, or ADULT, a confirmation window |
|||||||||||||||
|
appears, requiring you to confirm your selection: |
|
|
|
||||||||||||
|
|
|
|
|
|
|
|
|
|
|||||||
|
PATIENT MODE |
|
|
|
|
( 85) |
|
|
|
|||||||
|
|
CHANGING SETTINGS AND MODE |
PA |
35/ 18 |
|
|||||||||||
|
|
|
|
|
TO: |
|
MCO2 |
|
BR |
|
||||||
|
|
|
CUSTOM: ADULT |
|
mmH35g |
12 |
|
|||||||||
|
ADULT ALARM LIMITS WILL BE SET |
|
||||||||||||||
|
|
ARE YOU SURE? |
SpO2 |
92 |
|
|||||||||||
|
|
|
|
YES |
|
|
|
NO |
|
|
|
|
|
|
|
|
Note |
Whenever you change the patient mode, the alarm limit settings are |
|||||||||||||||
|
automatically changed to the defaults for that mode. If Custom |
|||||||||||||||
|
settings have been set for that mode, the defaults are the Custom |
|||||||||||||||
|
mode settings. If no Custom settings have been set, the defaults are |
|||||||||||||||
the Factory Mode settings. See page 23 for more information about patient modes.
If you change the patient mode, the CO2 alarm limits in the new mode might vary slightly from the originally-programmed CO2 limits for the new mode. Check the CO2 alarm limits.
If you press SETUP in the previous Patient Mode window, the Mode Setup window appears. This allows you to set custom patient modes and powerup defaults as described on page 23.

22 |
Getting started |
Welch Allyn Propaq Encore Vital Signs Monitor |
Selecting waveforms for display
To select waveforms for display, press SETUP, WAVE SEL. Use the NEXT and ON/OFF buttons to turn on the desired waveforms in the wave select window:
SETUP |
|
|
|
|
WAVE SELECT |
( 85) |
|
|
|
||||||
ECG |
: ON |
RESP : OFF |
|
PA |
35/ 18 |
||||||||||
|
MCO2 |
|
|
BR |
|
|
|||||||||
ART |
: |
ON |
|
SpO2 : ON |
|
|
|
|
|||||||
|
|
mmH35g |
12 |
||||||||||||
PA |
: OFF |
NIBP : ON |
|
||||||||||||
CO2 |
: OFF |
|
|
|
|
|
|
|
|
|
|
|
|||
|
|
|
|
SpO2 |
|
92 |
|||||||||
|
|
|
|
|
|||||||||||
|
|
|
|
|
|
|
|
|
|
|
|
||||
NEXT |
|
|
ON/OFF |
INSERV |
|
|
|
PREV MENU |
|
||||||
Display priorities
You can turn on more than three waveforms, but only the first three waveforms listed in the wave select window that are monitored are displayed. The patient parameters being monitored are listed in the order they will be displayed if all are turned on.
Because of the critical nature of the ECG waveform, you cannot turn off ECG. However, if ECG is not monitored, another waveform will occupy its place.
The displayed waveforms are also the ones printed if a printer is attached.
Setting the time and date
To set the time and date, from the Main Menu press SETUP, MORE, MORE. The monitor displays the Time/Day window:
TIME/DAY |
|
BATTERY: 9.2 VOLTS ( 85) |
|
|
|
||||||||||
|
|
|
|
|
|
|
|
PA |
35/ 18 |
||||||
TIME |
|
|
DAY |
MCO2 |
|
|
BR |
|
|||||||
|
mmH35g |
12 |
|||||||||||||
H:MIN:S |
|
|
MO/DA/YR |
||||||||||||
07: |
45 |
:32 |
|
06/12/97 |
|
SpO2 |
|
92 |
|||||||
|
|
|
|||||||||||||
|
|
|
|
|
|
|
|
|
|
|
|
||||
NEXT |
|
UP |
|
DOWN |
ENTER |
|
PREV MENU |
|
|||||||
Press NEXT, UP, and DOWN as needed to set the time and date. Then press ENTER to store the new time and date.
Time/day settings and trends
WARNING Changing the hour/minute/second setting for the monitor in the Time/Day window can cause the monitor to erase previously stored patient trend data.
When you change the hour/minute/second setting for the monitor in the Time/Day window, the monitor deletes any patient trend data that is older than five hours for nonNIBP trends or older than eight hours for NIBP trends according to the new clock setting.
However, if the monitor has not yet stored the full capacity of trends and you change the hour/minute/second setting to a time that is within the stored trend period, previously stored trends are not erased.
Changing the day, month, or year setting does not affect the stored patient trends.

Reference Guide |
Getting started |
23 |
Changing the date format, filter, and units
To change the date format, ECG filter, or some measurement units, first make sure you are in the Adult patient mode. Then press SETUP, MORE, MORE, SERVICE, YES (to access the Service Menu), MORE, MORE, SETTINGS. The monitor displays the Settings window:
SETTINGS |
|
|
BATTERY: 9.2 VOLTS ( 85) |
|
|
|
|
||||||||
DATE |
: |
MO/DA/YR |
|
|
PA |
35/ 18 |
|
||||||||
FILTER |
: 60 Hz |
MCO2 |
|
|
BR |
|
|
||||||||
TEMP F/C : C |
|
|
|
|
mmH35g |
12 |
|
||||||||
DECIMAL |
: . |
|
|
|
|
|
|||||||||
HR/PR ALARM LIMITS: CAN TURN OFF |
|
|
|
|
|
|
|
|
|
||||||
|
SpO2 |
92 |
|
||||||||||||
CO2 UNITS: mmHg |
|
|
|||||||||||||
|
|
|
|
||||||||||||
NEXT |
CHANGE |
|
|
|
PREV MENU |
|
|
||||||||
NEXT |
|
|
Selects the next setting in the status window. |
||||||||||||
CHANGE |
Changes the currently selected display setting. |
||||||||||||||
DATE |
|
|
Sets the date format: Month/Day/Year, Day.Month.Year, or Year/Month/ |
||||||||||||
|
|
|
Day. |
|
|
|
|
|
|
|
|
|
|||
FILTER |
|
|
Sets the ECG filter frequency. Make sure it is set to your ac mains |
||||||||||||
|
|
|
frequency. |
|
|
|
|
|
|
|
|
|
|||
TEMP F/C |
Sets the temperature display units: either degrees Fahrenheit or |
||||||||||||||
|
|
|
Celsius. If you change the units, the TEMP trends will not be cleared. |
||||||||||||
DECIMAL |
Sets the decimal character as either a period (.) or a comma (,). |
||||||||||||||
HR/PR |
|
|
Allows or prohibits turning off the HR/PR alarm limits. If CANNOT TURN |
||||||||||||
ALARM |
|
|
OFF is selected, the ON/OFF button is not displayed on the HR/PR |
||||||||||||
LIMITS |
|
|
Alarm Limits Menu. |
|
|
|
|
|
|
|
|
|
|||
CO2 UNITS |
Sets the CO2 display units as mmHg, kPa, or percent (%). If you change |
||||||||||||||
the units, the CO2 trends will be cleared and CO2 alarm limit settings change to the factory default settings for the currently-used patient mode.
Note Any time you change the Date, Filter, Temp F/C, Decimal, HR/PR Alarm Limits (CAN or CANNOT TURN OFF) or CO2 Units setting, the new setting also becomes the powerup default setting.
Setting the current, custom, and power-up modes
The Propaq Encore has two sets of patient mode settings:
•Factory patient modes. The powerup settings and alarm limits for these patient modes are preset and cannot be changed. They are listed in “Factory default settings” on page 118.
•Custom patient modes. You can customize the power-up settings and alarm limits for these patient modes. (See SAVE on page 24.)
WARNING If any alarms are set to OFF and you select SAVE to store the settings for that CUSTOM patient mode, those alarms will be OFF whenever the Propaq powers up in that CUSTOM patient mode or when that CUSTOM patient mode is selected. Consider carefully before setting CUSTOM patient mode powerup alarms to OFF.

24 |
Getting started |
Welch Allyn Propaq Encore Vital Signs Monitor |
Note The alarm for apnea cannot be turned off at any time.
You can program the Propaq Encore to power up in any of the Factory patient modes or the Custom patient modes. You can also change the current patient mode during operation.
Note Whenever you change the patient mode, the alarm limit settings automatically change to the settings for that mode.
From the Main Menu, press SETUP, MORE, CHANGE, SETUP. The Mode Setup window appears:
MODE SETUP |
BATTERY: 9.3 VOLTS |
|
ZEROED |
|||||||||
FACTORY: |
|
*ADULT |
|
PED |
NEO |
P2 |
|
NO |
ZERO |
|||
|
MCO2 |
|||||||||||
|
BR |
|
||||||||||
CUSTOM : |
|
ADULT |
PED |
NEO |
|
|
|
|||||
|
mmH38g |
12 |
||||||||||
|
|
|
|
|
|
|||||||
* = PATIENT MODE ON POWERUP |
Sp02 |
97 |
||||||||||
|
|
|
|
|
|
|
|
|
|
|||
NEXT |
POWERUP* |
USE NOW |
SAVE |
|
PREV MENU |
|
||||||
The asterisk (*) indicates which patient mode is currently selected for powerup.
NEXT |
Selects the next setting in the status window. |
POWERUP* Selects the highlighted patient mode (and its associated settings) as the powerup mode. The selected powerup mode is marked by an asterisk (*). (This does not change the current patient mode.)
USE NOW |
Selects the highlighted patient mode (and its associated settings) as |
|
|
the current patient mode. (This does not affect the powerup mode.) |
|
SAVE |
Use this button to reprogram the settings of Custom patient mode: |
|
|
1. |
Make sure the patient mode you want to reprogram (ADULT, PED |
|
|
or NEO) is currently used. (To change patient modes, highlight the |
|
|
desired mode and press USE NOW, YES.) |
|
2. |
Exit the Mode Setup window, then use other menus and buttons to |
|
|
set the monitor settings and alarm limits as desired. |
|
3. |
Re-enter the Mode Setup window, highlight the desired Custom |
|
|
mode, and press SAVE, YES. |
Reference Guide |
Getting started |
25 |
Printer functions
Press SETUP, MORE, PRINTER to display the printer menu and setup window.
18:45:28 |
|
|
NIBP |
S |
122 |
T1 |
102.3F |
|||||
IIImV |
|
|
|
|
|
|
|
|
|
|
|
|
|
1cm |
|
|
|
|
|
|
|
|
|
|
|
MON |
|
|
|
|
|
|
|
|
|
|
|
|
|
PRINTER |
|
|
|
SETUP PAGE |
|||||||
|
CONTINUOUS |
: |
25.0 mm/s |
|||||||||
|
AUTO PRINT |
: |
15 minutes |
|||||||||
|
ALARM PRINT |
: |
OFF |
|
|
|
|
|||||
|
NIBP TICKET |
: OFF |
||||||||||
|
APNEA TICKET |
: OFF |
||||||||||
|
OXYCRG ON ALARM: OFF |
|||||||||||
|
NEXT |
|
CHANGE |
|
|
PR TREND |
MORE |
|||||
HR 80
ART 122
( 85) 58
PA 35/ 18
MCO2 BR
BR
mmHg35 12  SpO2 92 PREV MENU
NEXT |
Selects the next setting in the status window. |
CHANGE |
Changes the currently selected display setting. |
PR TREND |
Prints all trends turned on in the Printer Trend Select Window. |
MORE |
Pressing the MORE button displays another menu and status |
|
window. |
PREV MENU |
Returns you to the previous menu. |
CONTINUOUS |
Sets the print speed for real time (continuous) measurements to |
|
6.25, 12.5, or 25 mm/sec. This sets the print speed for a printout |
|
obtained by pressing the START/STOP button on the printer. |
AUTO PRINT |
Automatically prints 8 seconds of patient information every 15 |
|
minutes, 30 minutes, 1 hour, 2 hours, or 4 hours. This is the |
|
latest patient information (real time). The print speed is |
|
automatically set to 25 mm/sec. |
ALARM PRINT |
Automatically prints upon an alarm. The Propaq Encore prints 20 |
|
seconds of patient information. The first 12 seconds contain |
|
information prior to the alarm. The print speed is automatically |
|
set to 25 mm/sec. |
NIBP TICKET |
Automatically prints an NIBP Ticket when the measurement is |
|
taken. |
APNEA TICKET |
When turned on, an Apnea Ticket is printed at the conclusion of |
|
an apnea alarm and at the one-minute clock interval if the apnea |
|
alarm does not cease. |
OXYCRG ON |
When turned on, an oxycardiorespirogram will print if an HR/PR, |
ALARM |
SpO2, or RR/BR alarm occurs. For more information on OxyCRG, |
|
see “OxyCRG” on page 82. |
26 |
Getting started |
Welch Allyn Propaq Encore Vital Signs Monitor |
PRINTER FAULT messages
These PRINTER FAULT messages can appear in an equipment alert window.
LOW BATTERY, |
This message appears when the Propaq’s battery voltage is |
PRINTER DISABLED |
less than 7.6 volts. To continue operation, plug the ac power |
|
adapter into the Propaq. |
CHECK DOOR |
The door on the bottom of the printer is open. Close door to |
|
remove this message. |
PAPER OUT |
To add printer paper, see “Printer maintenance” on page 96. |
OVERHEATING |
The printer is overheating. Service may be required. |
The front panel of the printer lets you control the basic printer functions.
Hold down top and bottom keys simultaneously to generate a test strip.
START STOP
SNAP
SHOT
TRENDS
Manually starts and stops a printout of patient information as it is monitored (continuous or real time).
Hold down top two keys simultaneously to generate a paper feed.
Prints the last 8 seconds of data for nonrespiration waveforms and 32 seconds of compressed waveform history for respiration waveforms.
Prints all trends that are enabled in the Printer Trend Select Window.
If you press FREEZE prior to pressing SNAPSHOT, the printer prints the 8 seconds of patient information obtained prior to when you pressed FREEZE.
Learning the Propaq Encore
Using in-service mode
You can practice using the Propaq Encore without a patient simulator by using the Propaq's in-service mode of operation. The in-service mode cannot be activated while you are monitoring a patient. The message “SIMULATING” alternates with the time of day and patient mode on the display.
To begin practicing with your Propaq, disconnect all patient cables connected to the monitor. Leave the cuff connected so you can take NIBP measurements. If you have been monitoring a patient, turn off the Propaq Encore and turn it back on. From the Main Menu, press SETUP, WAVE SEL, INSERV.
The Propaq Encore has two sets of simulated patient information—an initial set and an alternate set. To change between them, press the INSERV button again.
If you connect a patient cable or set the NIBP channel to automatically take pressure measurements, the Propaq Encore stops simulating, goes through its powerup tests, and erases any simulated trend data it might have stored.
 Loading...