


VIZIO VHT510 User Manual
Dear VIZIO Customer,
Congratulations on your new VIZIO High Definition Sound Bar System purchase. Thank you for your support. For maximum benefit, please read these instructions before making any adjustments, and retain them for future reference. We hope you will experience many years of enjoyment from your new VIZIO HD Sound Bar System.
For assistance, please call (877) 668-8462 or visit us at www.vizio.com
To purchase or inquire about accessories and installation services for your Sound Bar, please visit our website at www.vizio.com or call toll free at (888) 849-4623.
We recommend you register your Sound Bar at our website www.VIZIO.com or fill in your registration card and mail it in. For peace of mind and to protect your investment beyond the standard warranty, VIZIO offers extended warranty service plans. These plans give additional coverage during the standard warranty period. Visit our website or call us to purchase a plan.
Write down the serial number located on the back of your Sound Bar.
__ __ __ __ __ __ __ __ __ __ __ __ __
Purchase Date _____________________
Manufactured under license from Dolby Laboratories.
Dolby and the double-D symbol are trademarks of Dolby Laboratories.
 and
and  are trademarks of SRS Labs, Inc.
CircleCinemaHD and TruVolume technologies are incorporated under license from SRS Labs, Inc.
iPhone, iPod, iPod Classic, iPod nano, iPod shuffle, and iPod touch are trademarks of Apple Inc., registered in the U.S. and other countries.
Manufactured under license under U.S. Patent #’s: 5,451,942; 5,956,674; 5,974,380; 5,978,762; 6,487,535 & other U.S. and worldwide patents issued & pending. DTS and the Symbol are registered trademarks, & DTS 2.0 Channel and the DTS logos are trademarks of DTS, Inc. Product includes software. © DTS, Inc. All Rights Reserved.
© 2010. All rights reserved. The V, VIZIO, VIZIO XVT, VIZIO VIA, TruLED, 240Hz SPS, Slim Line, Smooth Motion, Where Vision Meets Value names, phrase and symbols are trademarks or registered trademarks of VIZIO, Inc. All other trademarks are of their respective owners. Contents subject to change without notice.
Version 5/25/2010 |
1 |
|
www.VIZIO.com |

VIZIO VHT510 User Manual
Important Safety Instructions
Your Sound Bar is designed and manufactured to operate within defined design limits, and misuse may result in electric shock or fire. To prevent your Sound Bar from being damaged, the following rules should be observed for its installation, use, and maintenance. Please read the following safety instructions before operating your Sound Bar. Keep these instructions in a safe place for future reference.
To reduce the risk of electric shock or component damage, switch off the power before connecting other components to your Sound Bar.
Unplug the power cord before cleaning your Sound Bar. A damp cloth is sufficient for cleaning. Do not use a liquid or a spray cleaner on your Sound Bar. Do not use abrasive cleaners.
Always use the accessories recommended by the manufacturer to insure compatibility.
When moving your Sound Bar from an area of low temperature to an area of high temperature, condensation may form in the housing. Wait before turning on your Sound Bar to avoid causing fire, electric shock, or component damage.
A distance of at least 3 feet should be maintained between your Sound Bar and any heat source, such as a radiator, heater, oven, amplifier etc. Do not install your Sound Bar close to smoke. Operating your Sound Bar close to smoke or moisture may cause fire or electric shock.
Slots and openings in the back and bottom of the cabinet are provided for ventilation. To ensure reliable operation of your Sound Bar and to protect it from overheating, be sure these openings are not blocked or covered. Do not place your Sound Bar in a bookcase or cabinet unless proper ventilation is provided.
Never push any object into the slots and openings on your Sound Bar enclosure. Do not place any objects on the top of your Sound Bar. Doing so could short circuit parts causing a fire or electric shock. Never spill liquids on your Sound Bar.
Your Sound Bar should be operated only from the type of power source indicated on the label on the AC/DC Adapters. If you are not sure of the type of power supplied to your home, consult your dealer or local power company.
Only power of the marked voltage can be used for your Sound Bar. Any other voltage than the specified voltage may cause fire or electric shock
The power cord must be replaced when using different voltage than the voltage specified. For more information, contact your dealer.
Your Sound Bar AC/DC Adapters are equipped with a three-pronged grounded plug (a plug with a third grounding pin). This plug will fit only into a grounded power outlet. This is a safety feature. If your outlet does not accommodate the three-pronged, have an electrician install the correct outlet, or use an adapter to ground your Sound Bar safely.
Do not defeat the safety purpose of the grounded plug.
When connected to a power outlet, power is always flowing into your Sound Bar. To totally disconnect power, unplug the power cord.
The lightning flash with arrowhead symbol within an equilateral triangle is intended to alert the user to the presence of un-isolated, dangerous voltage within the inside of your Sound Bar that may be of sufficient magnitude to constitute a
risk of electric shock to persons.
The exclamation point within an equilateral triangle is intended to
alert the user to the presence of important operating and servicing instructions in the literature accompanying your Sound Bar.
Do not overload power strips and extension cords. Overloading can result in fire or electric shock.
The wall socket should be located near your Sound Bar and be easily accessible.
2
www.VIZIO.com
VIZIO VHT510 User Manual
Do not touch the power cord during lightning. To avoid electric shock, avoid handling the power cord during electrical storms.
Unplug your Sound Bar during a lightning storm or when it will not be used for long periods of time. This will protect your Sound Bar from damage due to power surges.
Do not attempt to repair or service Sound Bar yourself. Opening or removing the front cover may expose you to high voltages, electric shock, and other hazards. If repair is required, contact your dealer and refer all servicing to qualified service personnel.
Keep your Sound Bar away from moisture. Do not expose your Sound Bar to rain or moisture. If water penetrates into your Sound Bar, unplug the power cord and contact your dealer. Continuous use in this case may result in fire or electric shock.
Do not use your Sound Bar if any abnormality occurs. If any smoke or odor becomes apparent, unplug the power cord and contact your dealer immediately. Do not try to repair your Sound Bar yourself.
Avoid using dropped or damaged appliances. If your Sound Bar is dropped and the housing is damaged, the internal components may function abnormally. Unplug the power cord immediately and contact your dealer for repair. Continued use of your Sound Bar may cause fire or electric shock.
Do not install your Sound Bar in an area with heavy dust or high humidity. Operating your Sound Bar in environments with heavy dust or high humidity may cause fire or electric shock.
Ensure that the power cord and any other cables are unplugged before moving your Sound Bar.
When unplugging your Sound Bar, hold the power plug, not the cord. Pulling on the power cord may damage the wires inside the cord and cause fire or electric shock. When your Sound Bar will not be used for an extended period of time, unplug the power cord.
To reduce risk of electric shock, do not touch the connector with wet hands.
Insert the remote control battery in accordance with instructions. Incorrect polarity may cause the battery to leak which can damage the remote control or injure the operator.
If any of the following occurs, contact the dealer:
The power cord fails or frays.
Liquid sprays or any object drops into your Sound Bar.
Sound Bar is exposed to rain or other moisture.
Sound Bar is dropped or damaged in any way.
The performance of your Sound Bar changes substantially.
Version 5/25/2010 |
3 |
|
www.VIZIO.com |
VIZIO VHT510 User Manual
Table of Contents
Important Safety Instructions ................................................................................................................... |
2 |
Table of Contents..................................................................................................................................... |
4 |
Chapter 1 Introduction................................................................................................................................ |
5 |
Opening the Package .............................................................................................................................. |
5 |
Wall Mounting your Sound Bar ................................................................................................................ |
6 |
Wall Mounting the Satellite Speakers ...................................................................................................... |
6 |
Chapter 2 Basic Controls and Connections............................................................................................. |
7 |
Sound Bar Connections........................................................................................................................... |
7 |
Subwoofer Connections........................................................................................................................... |
7 |
Satellite Speaker Connections................................................................................................................. |
8 |
Top Panel Buttons ................................................................................................................................... |
8 |
Chapter 3 Connecting Equipment ............................................................................................................. |
9 |
Digital Connection.................................................................................................................................... |
9 |
Analog Connection................................................................................................................................... |
9 |
Wired Connection to an iPod Dock (not supplied by VIZIO).................................................................. |
10 |
Connecting speakers to the subwoofer ................................................................................................. |
11 |
Sub-Woofer Placement.......................................................................................................................... |
11 |
Chapter 4 VIZIO Remote Control ............................................................................................................. |
12 |
Remote Control Buttons...................................................................................................................... |
12 |
Remote Control Range........................................................................................................................ |
13 |
Remote Control Precautions ............................................................................................................... |
13 |
Replacing the Battery in the Remote Control...................................................................................... |
13 |
Programming a Universal Remote ...................................................................................................... |
14 |
Controlling Volume using a VIZIO Universal Remote Control ............................................................ |
14 |
Chapter 5 Using your Sound Bar ............................................................................................................ |
15 |
Sound Bar Indicator and LED Status..................................................................................................... |
15 |
Volume Indicators................................................................................................................................ |
15 |
Input Indicators.................................................................................................................................... |
15 |
Sound Bar Modes .................................................................................................................................. |
16 |
Hub Mode............................................................................................................................................ |
16 |
Client Mode ......................................................................................................................................... |
16 |
Hub/Client Mode LEDs— .................................................................................................................... |
16 |
Chapter 6 Maintenance and Troubleshooting........................................................................................ |
17 |
Maintenance .......................................................................................................................................... |
17 |
Pairing.................................................................................................................................................... |
17 |
Troubleshooting Guide........................................................................................................................... |
18 |
Telephone & Technical Support ............................................................................................................ |
19 |
Compliance ............................................................................................................................................ |
19 |
Chapter 7 Specifications .......................................................................................................................... |
20 |
VHT510 Specifications........................................................................................................................... |
20 |
FCC Class B Radio Interference Statement.......................................................................................... |
21 |
ONE-YEAR LIMITED WARRANTY ON PARTS AND LABOR ................................................................. |
22 |
Index........................................................................................................................................................... |
23 |
4 |
|
www.VIZIO.com |
|
VIZIO VHT510 User Manual
Chapter 1 Introduction
Opening the Package
Your Sound Bar and its accompanying accessories are carefully packed in a cardboard carton that has been designed to protect it from transportation damage. Once you have opened the carton, check that your Sound Bar is in good condition and that all of the contents are included.
IMPORTANT: Save the carton and packing material for future shipping.
Package Contents
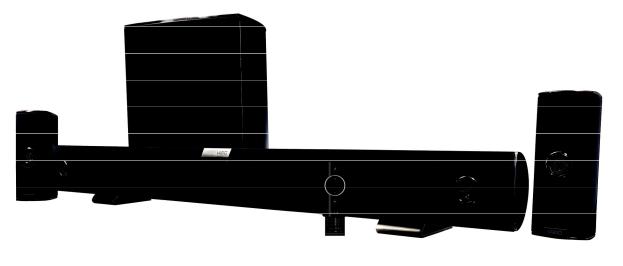
VIZIO High Definition Sound Bar
Wireless Subwoofer
Satellite Speakers with 20 foot speaker cable (2)
Power adapter for Sound Bar
Power cable for subwoofer
Remote control and battery
Sound Bar stands & screws (pre-installed) (2)
RCA stereo cable
User Manual
Quick Start Guide
Version 5/25/2010 |
5 |
|
www.VIZIO.com |
VIZIO VHT510 User Manual
Wall Mounting your Sound Bar
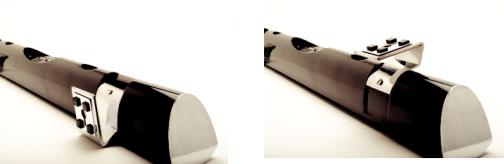
Your Sound Bar can either be kept on the stand or mounted on the wall. If you choose to mount your Sound Bar on the wall, follow the instructions below for removing the stand.
1.Remove the stands from their original configuration as shown in Figure 1.
2.Flip the stand over and re-attach to your Sound Bar as shown in Figure 2.
3.Connect Audio and Video Cables to your Sound Bar (see Connecting Equipment on page 15 for detailed steps).
4.Connect the power cord to the power cord connector on the back of your Sound Bar.
5.Mark and drill holes in the desired location. Use anchors (not included) if you are not drilling into studs.
6.Insert screws (not included), leaving room for your Sound Bar stands.
7.Hang your Sound Bar on the screws.
Caution:
Make sure that there are no electrical cables hidden behind walls before you begin to drilling.
If wall mounting of your Sound Bar is planned, purchase a right-angle RCA cable to avoid mounting interference.
Figure 1 |
Figure 2 |
Wall Mounting the Satellite Speakers
The satellite speakers can either be placed on a stand or table or they can be mounted to the wall. You have two options for mounting your satellite speakers to the wall: keyhole or threaded insert. Follow the instructions included with the speaker mount bracket (not included) to hang your satellite speakers on a wall.
6
www.VIZIO.com

VIZIO VHT510 User Manual
Chapter 2 Basic Controls and Connections
Sound Bar Connections
1.SERVICE—Service connection for system upgrades performed by service personnel only.
2.24V DC—Plug the connector from the power adapter here.
3.SWITCH—Set your Sound bar into Hub or Client mode. Leave the switch in Hub mode unless you have more than one product with VIZIO HD Wireless Audio technology. See Sound Bar Modes on page 16 for more information about Sound Bar modes.
4.OPTICAL (S/PDIF)—Optical connector for connection from a device such as a home theater system, amplifier, receiver, set top box, or DVD player.
5.IN (ANALOG L/R)—Connect the analog audio from a device such as a TV, set top box, DVD player, or gaming system.
Subwoofer Connections
1.Link Button—Press this button to pair (or link) to your Sound Bar. Your Sound Bar and Subwoofer are paired from the factory. See Pairing on page 17 for more information on pairing.
2.Power—Connect the power cable here.
3.CONNECTOR—Connect the speaker wire from the satellite speakers here.
4.ON/OFF—Press to turn the subwoofer on or off.
Version 5/25/2010 |
7 |
|
www.VIZIO.com |
 Loading...