


SB36512-F6

QUICK START GUIDE
Model: SB36512-F6
VIZIO Home Theater Sound System
Please read this guide before using the product.

English - ii
Your Unit is designed and manufactured to operate within dened design limits, and misuse may result in electric shock or re. To prevent your Unit
from being damaged, the following rules should be observed for its installation, use, and maintenance. Please read the following safety instructions
before operating your Unit. Keep these instructions in a safe place for future reference.
• Read these instructions.
• Keep these instructions.
• Heed all warnings.
• Follow all instructions.
• Do not use this apparatus near water.
• Clean only with a dry cloth.
• Do not block any ventilation openings. Install in accordance with the manufacturer’s instructions.
• Do not install near any heat sources such as radiators, heat registers, stoves, or other apparatus (including ampliers) that produce heat.
• Do not defeat the safety purpose of the polarized or grounding-type plug. A polarized plug has two blades with one wider than the other. A
grounding type plug has two blades and a third grounding prong. The wide blade or the third prong are provided for your safety. If the provided
plug does not t into your outlet, consult an electrician for replacement of the obsolete outlet.
• Protect the power cord from being walked on or pinched, particularly at plugs, convenience receptacles, and the point where they exit from the
apparatus.
• Only use attachments/accessories specied by the manufacturer.
• Use only with the cart, stand, tripod, bracket, or table specied by the manufacturer, or sold with the apparatus. When a cart is used,
use caution when moving the cart/apparatus combination to avoid injury from tip-over.
• Unplug this apparatus during lightning storms or when unused for long periods of time.
• Refer all servicing to qualied service personnel. Servicing is required when the apparatus has been damaged in any way, such as when the power
supply cord or plug is damaged, liquid has been spilled or objects have fallen into the apparatus, the apparatus has been exposed to rain or
moisture, does not operate normally, or has been dropped.
• To reduce the risk of electric shock or component damage, switch o the power before connecting other components to your Unit.
• Unplug the power cord before cleaning your Unit. A damp cloth is sucient for cleaning. Do not use a liquid or a spray cleaner on your Unit. Do not
use abrasive cleaners.
• Always use the accessories recommended by the manufacturer to insure compatibility.
• When moving your Unit from an area of low temperature to an area of high temperature, condensation may form in the housing. Wait before
turning on your Unit to avoid causing re, electric shock, or component damage.
• Slots and openings in the back and bottom of the cabinet are provided for ventilation. To ensure reliable operation of your Unit and to protect it
from overheating, be sure these openings are not blocked or covered. Do not place your Unit in a bookcase or cabinet unless proper ventilation is
provided.
• Never push any object into the slots and openings on your Unit enclosure. Do not place any objects on the top of your Unit. Doing so could short
circuit parts causing a re or electric shock. Never spill liquids on your Unit.
• Never use the subwoofer in the upright, vertical position without installing the legs
• Do not block the subwoofer ports. Allow for 1-2 inches of space around all sides for ventilation.
• WARNING: Exposure to loud sounds can damage your hearing causing hearing loss and tinnitus (ringing or buzzing in the ears). With continued
IMPORTANT SAFETY INSTRUCTIONS
English - iii
exposure to loud noises, ears may become accustomed to the sound level, which may result in permanent damage to hearing without any noticeable
discomfort.
• When connected to a power outlet, power is always owing into your Unit. To totally disconnect power, unplug the power cord.
• Do not overload power strips and extension cords. Overloading can result in re or electric shock.
• The wall socket should be located near your Unit and be easily accessible
• Keep your Unit away from moisture. Do not expose your Unit to rain or moisture. If water penetrates into your Unit, unplug the power cord and
contact your dealer. Continuous use in this case may result in re or electric shock.
• Do not use your Unit if any abnormality occurs. If any smoke or odor becomes apparent, unplug the power cord and contact your dealer
immediately. Do not try to repair your unit yourself.
• Avoid using dropped or damaged appliances. If your Unit is dropped and the housing is damaged, the internal components may function abnormally.
Unplug the power cord immediately and contact your dealer for repair. Continued use of your Unit may cause re or electric shock.
• Do not install your Unit in an area with heavy dust or high humidity. Operating your Unit in environments with heavy dust or high humidity may
cause re or electric shock.
• Ensure that the power cord and any other cables are unplugged before moving your Unit.
• When unplugging your Unit, hold the power plug, not the cord. Pulling on the power cord may damage the wires inside the cord and cause re or
electric shock. When your Unit will not be used for an extended period of time, unplug the power cord.
• To reduce risk of electric shock, do not touch the connector with wet hands.
• Insert the remote control batteries in accordance with instructions. Incorrect polarity may cause the battery to leak which can damage the remote
control or injure the operator.
• See the important note and rating located on the back of the unit.
• WARNING - This equipment is not waterproof. To prevent a re or shock hazard, do not place any container lled with liquid near the equipment
(such as a vase or ower pot) or expose it to dripping, splashing, rain, or moisture.
• CAUTION - Danger of explosion or re if batteries are mistreated. Replace only with the same or specied type.
• Do not leave the batteries exposed to direct sunlight for a long period of time with doors and windows closed. Do not disassemble the batteries or
dispose of it in re.
• Where the MAINS plug or appliance coupler is used as the disconnect device, the disconnect device shall remain readily operable.
• No naked ame sources,such as lighted candles,should be placed on the apparatus.
• The ventilation should not be impeded by covering the ventilation openings with items,such as newspapers, table-cloths, curtains, etc.
• The equipment shall be used at maximum 35 degree C ambient temperature.
WARNING: To reduce the risk of re or electric shock, do not expose this apparatus to rain or moisture.
CAUTION
RISK OF ELECTRIC
SHOCK DO NOT OPEN
The lighting ash with arrowhead symbol
within an equilateral triangle is intended
to alert the user to the presence of not
isolated dangerous voltage within the
product that may be sucient magnitude
to constitute a risk of shock to persons.
The exclamation point within an equilateral
triangle is intended to alert the user to
the presence of important operating and
servicing instructions in the literature
accompanying the appliance.
Warning: This equipment is a Class II or
double insulated electrical appliance. It has
been designed in such a way that it does
not require a safety connection to electrical
earth.

English - iv
TABLE OF CONTENTS
Package contents ............................................................................................................................................5
Controls & Connections ..................................................................................................................................6
First-Time Setup...............................................................................................................................................10
Proper Placement ............................................................................................................................................16
Using the Remote ............................................................................................................................................17
Using your tablet or smartphone as a remote .............................................................................................18
LED Indicators ..................................................................................................................................................19
Using Button Combinations ...........................................................................................................................24
Programming the Sound Bar .........................................................................................................................25
Bluetooth Audio Pairing ..................................................................................................................................26
Using Bluetooth mode ....................................................................................................................................27
Advanced Setup ...............................................................................................................................................28
Advanced Setup - HDMI .................................................................................................................................. 29
Connecting with HDMI ARC ............................................................................................................................30
Connecting a Subwoofer ...............................................................................................................................32
Wall-Mounting the Sound Bar ........................................................................................................................ 33
Wall-Mounting the Satellite Speakers ...........................................................................................................35
Help & Troubleshooting ..................................................................................................................................38
Frequently Asked Questions ..........................................................................................................................39
Limited Warranty .............................................................................................................................................40
Legal & Compliance .........................................................................................................................................43
English - 5
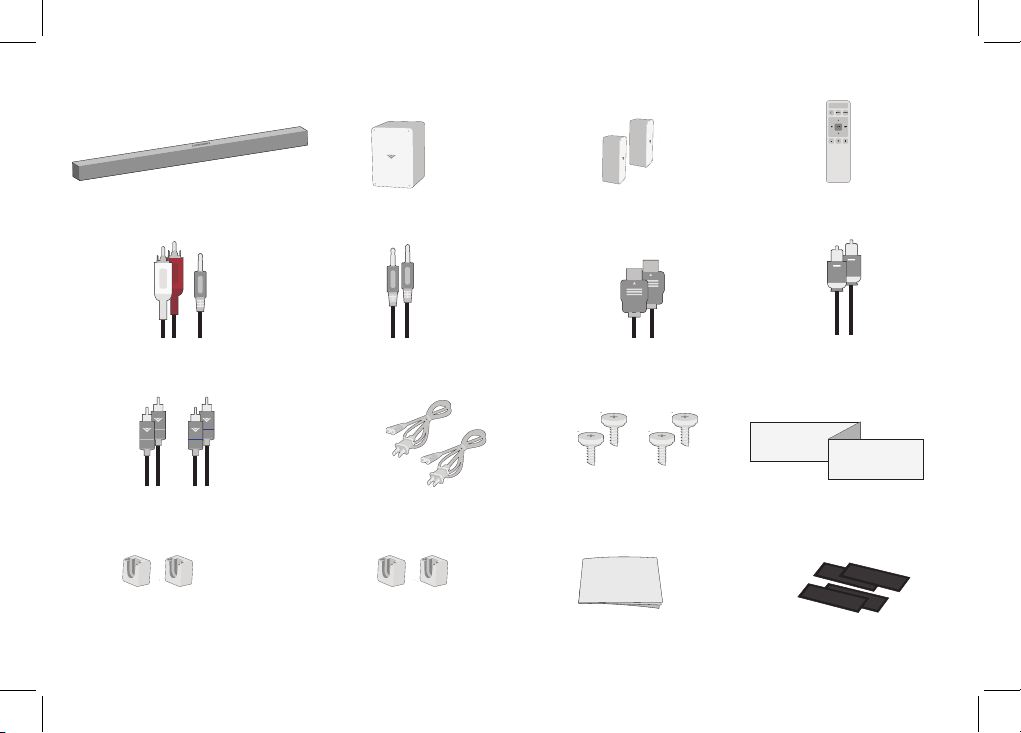
PACKAGE CONTENTS
4 x Wall
Mount Screws
Digital Optical
Cable
2 x Power Cables
Quick Start Guide
VIZIO Sound Bar
Remote Control
with 2x AAA Batteries
Wireless Subwoofer
2 x Satellite
Speakers
Stereo RCA to
3.5mm Audio Cable
3.5mm to 3.5mm
Audio Cable
2 x Satellite Speaker
Audio Cables
2 x Wall
Mount Brackets
(Sound Bar)
2 x Wall
Mount Brackets
(Satellite Speakers)
HDMI Cable
4 x Cable Ties
Wall Mount Template
Front
Top
Back
Side
Angle
HOME THEATER DISPLAY | QUICK START GUIDE
Installation Guide | Models:
HOME THEATER DISPLAY | QUICK START GUIDE
Installation Guide | Models:

English - 6
CONTROLS & CONNECTIONS
Power Port
OPTICAL
Digital Optical Audio In
3.5mm IN
Analog Audio In
(Stereo 3.5mm)
Back of Sound Bar

English - 7
USB*
USB In
* Supports .WAV and .MP3 le format playback only.
HDMI IN
HDMI In
HDMI OUT
HDMI Out (ARC)
Ethernet
Ethernet In
Front
Top
Back

English - 8
Top of Sound Bar
Input Press to change
the audio source.
Volume Increase or decrease
the loudness of the audio.
Power Press to turn
soundbar on or o.
Bluetooth Input Hold to pair.
(See ‘Bluetooth Audio Pairing’
for more information.)
Front
Top
Back
Side
Angle

English - 9
Back of Subwoofer
Back of Satellite Speaker
Satellite Speaker Ports
Connects to Left(blue cable)/Right (gray cable) Satellite Speakers
Satellite Speaker Port
(Connects to subwoofer)
Power Button
Power Port
LED Indicator
Pairing Button
English - 10
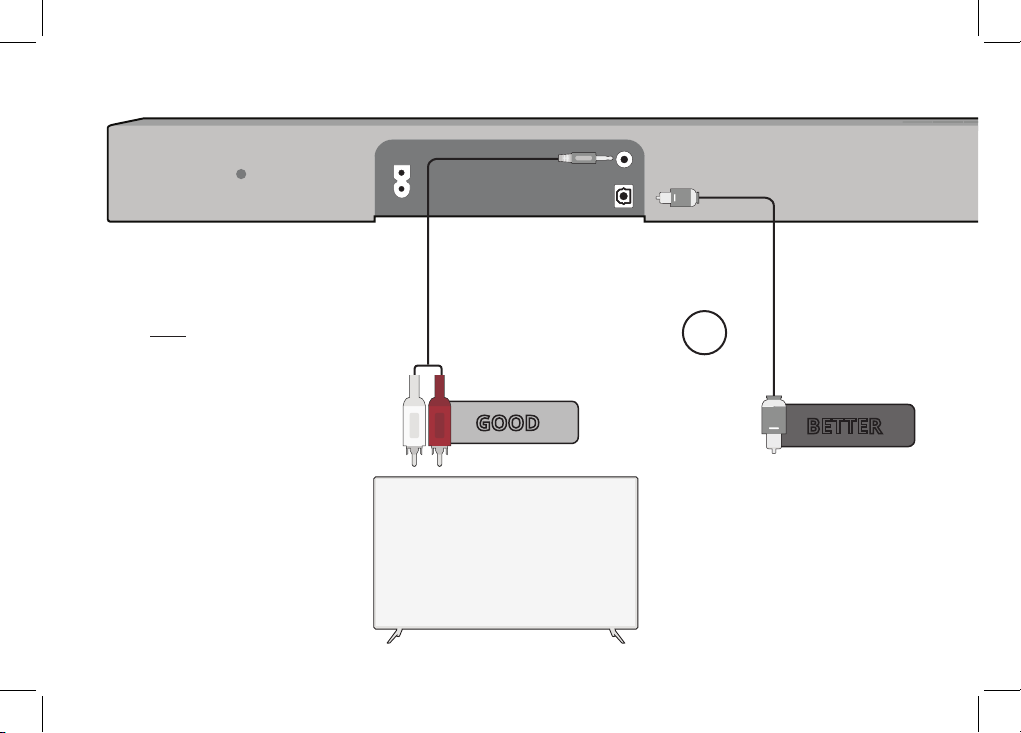
Back of Sound Bar
FIRST-TIME SETUP
* Not all TVs/Displays have the audio outputs shown
above. To connect the Sound Bar directly to your
other devices (Blu-Ray player, game system, etc.)
see your device’s user manual.
and connect it to your tv
1
CHOOSE ONE CABLE*
3.5MM TO
RCA CABLE
GOOD
HOME THEATER DISPLAY | QUICK START GUIDE
Installation Guide | Models:
OR
BETTER
DIGITAL OPTICAL
CABLE
†
† When using the Digital Input, if there is no audio:
(A) try setting the TV/Display output to PCM or
(B) Connect directly to your Blu-ray/other source,
some TV/Display do not pass through digital audio.
English - 11
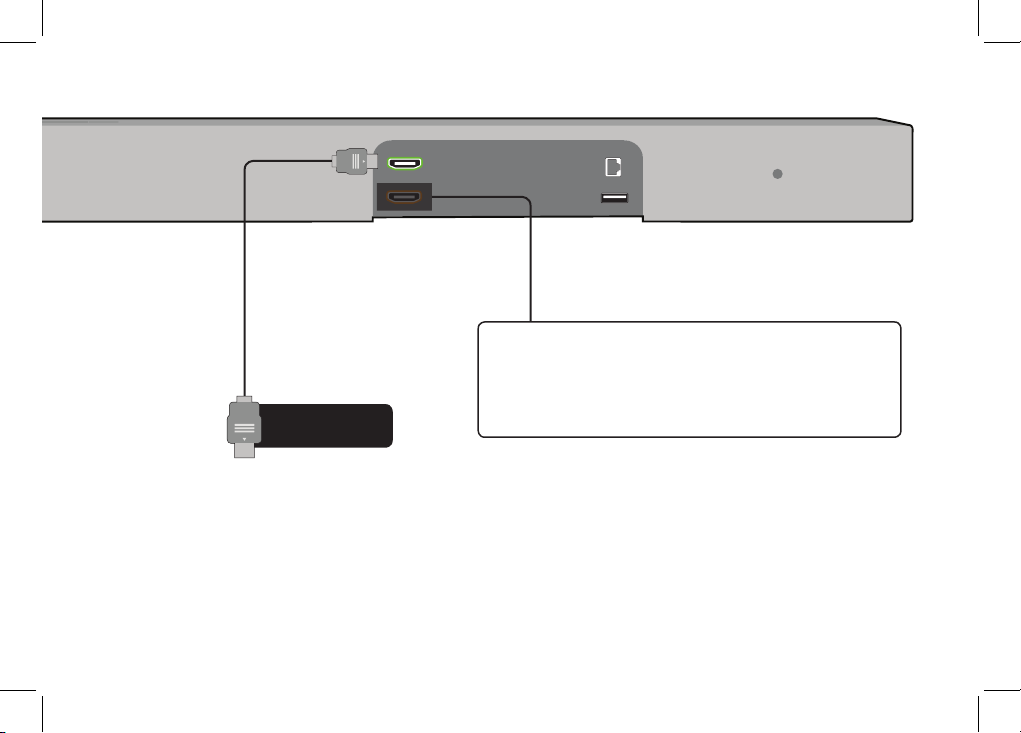
Front
Top
Back
HDMI cables send Video (Out) and receive
Audio from the TV/Display. See the
Connecting with HDMI
section for more
information.
Do not use HDMI IN for First-Time Setup.
See Advanced Setup if you would like to connect
HDMI devices (such as Blu-ray™ players, cable
boxes, and game consoles) to your Sound Bar.
Connect the Sound Bar to your TV/Display* using
one of the connection types to the left. Choose the
best possible connection type. Be sure the TV/Display
port is an audio output, not an audio input.
BEST
HDMI ARC
CABLE

English - 12
Back of Sound Bar
2
Connect the power cable to the sound bar AC
IN as shown.
Plug the power cable into an electrical outlet.
The sound bar will automatically begin
searching for an active input.*
The LED indicators on the front of the sound
bar will begin cycling in pairs through inputs
until an audio source is detected.**
Tip: Pressing the INPUT button will
stop the auto detect function.
*Occurs only during rst-time set up.
**Auto detect function only occurs once when the sound bar is rst powered on. To enable this feature again, you must do a Factory Reset (see the Using Button
Combinations section for more information) or press and hold the INPUT button for 3 seconds.
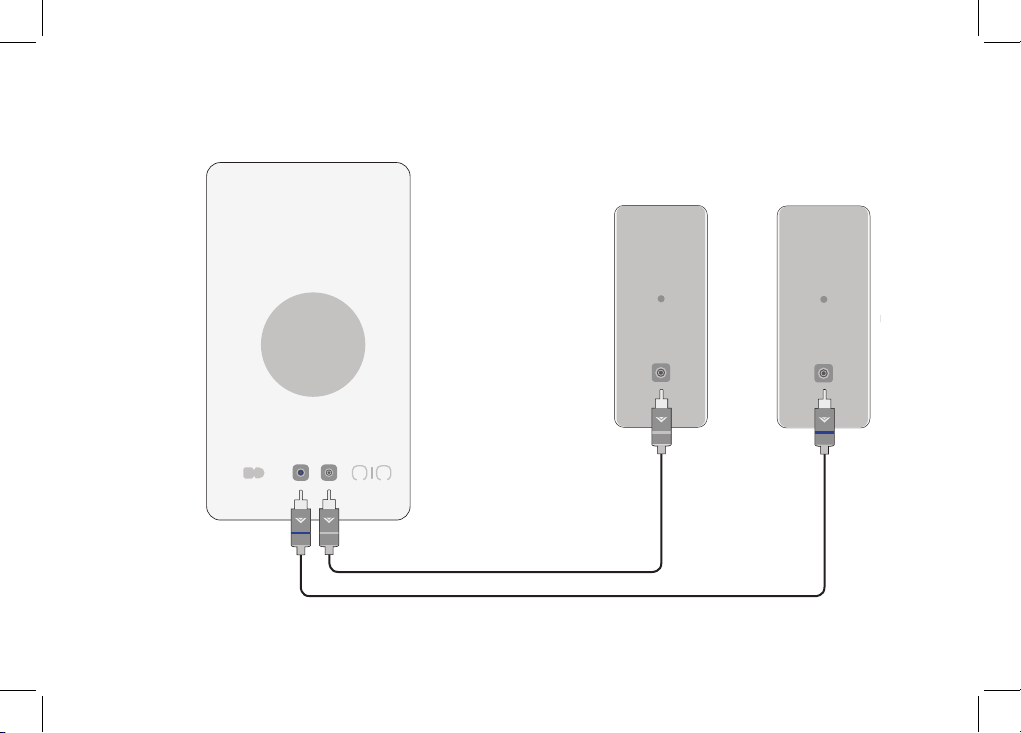
English - 13
Connect the satellite speakers to the subwoofer using the included satellite speaker
audio cables.
3
Match the color coded speaker cable to the matching speaker
port color. Blue for left surround and gray is for right surround.

English - 14
5
7
4
6
Connect a power cable
to the subwoofer.
Plug the power cable
into a power outlet.
The subwoofer will
automatically power
on and link to the
sound bar when
plugged in. The LED
will glow solid to
conrm.
 Loading...