


V23CLTT/V27CMTT/V30CMTT
LCD-TV
Service Manual
Date: Aug 10, 2004
Ver. : 1.0
0

Table of contents
1.Precautions & Notice.......................................………………….3
2.Features & Specifications............................................………….5
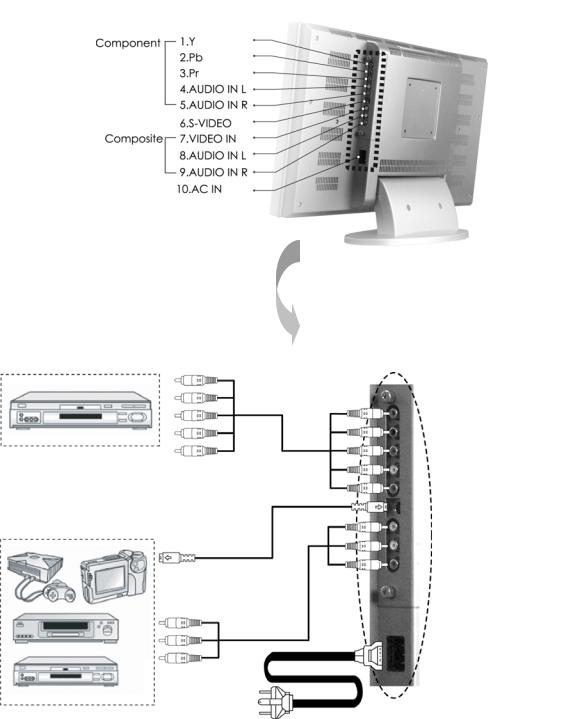
3.Connection & Applications…………………….....……………..9
4. Controls Location ......................................................................... |
11 |
5.Remote Control.............................................…….……….….....12
6.Disassembly Instructions.......................…………………..……14
7.Block Diagram....................................................……..…………19
8.Troubleshooting Flow Chart.............................................……..20
9.Electronic Circuit Description................................................…23
10.Circuit Diagram....................................................…………….27
11.PCB Layout....................................................…………………46
12. Electrical Part List.............................................. …………….61
13. Mechanical Disassembly....….......... …....................………....62

1. Precautions & Notice
1.1 Safety Precautions
1)Cleaning: Unplug the power cord from the AC outlet before cleaning the product. Use a damp cloth to clean the product. Do not use liquid cleaners or aerosol cleaners.
2)Heat sources: Keep the product away from heat sources such as radiators, heaters, stoves and other heat-generating products (including amplifiers).
3)For added protection for this television equipment during a lightning storm, or when it is left unattended and unused for long periods of time, unplug it
from the wall outlet and disconnect the antenna. This will prevent damage to the equipment due to lightning and power-line surges.
4)If an outside antenna is connected to the television equipment, be sure the antenna system is grounded so as to provide some protection against voltage surges.
Example of antenna grounding
As per national electrical code
Antenna lead in wire
Ground clamp |
Antenna discharge |
|
|
||
|
unit |
|
Electric service |
Grounding conductors |
|
equipment |
||
Ground clamps |
||
|
||
|
Power service |
|
|
grounding |
|
|
Electrode system unit |
5)An outside antenna system should not be located in the vicinity of overhead power lines or other electric light or power circuits, or where it can fall into
such power lines or circuits. When installing an outside antenna system, extreme care should be taken to keep from touching such power lines or
circuits as contact with them might be fatal.
6)Ventilation-The vents and other openings in the cabinet are designed for ventilation. Do not cover or block these vents and openings since insufficient ventilation can cause overheating and/or shorten the life of the product. Do
not place the product on a bed, sofa, rug or other similar surface, since they
can block ventilation opening. This product is not designed for built-in installation; do not place the product in an enclosed place such as a bookcase
or rack, unless proper ventilation is provided or the manufacturer's instructions are followed.
1.2Product Safety Notice
1)Many electrical and mechanical parts in this chassis provide special visual safety protection. The protection afforded by them cannot necessarily be obtained by using replacement components rated for higher voltage, wattage, etc.
2)Before replacing any of these components, read the parts list manual carefully.
The use of substitute replacement parts, which do not have the same safety characteristics, as specified in the parts list may create shock, fire or other hazards.
1.3 Service Notes
1)When replacing parts or circuit boards, wrap the wires around terminals before soldering.
2)Keep wires away from high temperature components.
3)Keep cable and their shielding in their original position so as to reduce interference.
|
|
2. Specifications |
|
|
|
|
|
|
Specification |
|
|
|
V23CLTT |
|
|
|
|
ITEMS |
SPECIFICATION |
|
|
|
|
|
|
Screen size |
23” wide TFT-LCD panel |
|
|
Aspect Ratio |
15 9 |
|
|
Resolution |
1280 x 768 (WXGA) |
|
Display |
Contrast ratio |
400:1(typ) |
|
|
Brightness |
450cd/m2 (typ) |
|
|
Viewing Angle |
Over 170 (Hor.) / 170 (Vert.) |
|
|
OSD Language |
Chinese , English, French , German , Spanish |
|
|
TV standard (CCIR) |
NTSC |
|
TV I/P |
TV Turning system |
PLL 181 Ch. |
|
STEREO |
MTS+SAP |
|
|
|
||
|
|
CATV |
125 CH. |
|
|
Composite Signal |
CVBS |
|
Video I/P |
Y, C Signal |
S-Video |
|
Composite Signal |
|
|
|
|
|
|
|
|
Y, Pb/Cb, Pr/Cr |
HDTV system (720p, 1080i) |
|
|
Signal I/P |
Analog 15 pin D-Sub Connector |
|
|
PnP compatibility |
DDC / 2B |
|
PC I/P |
I/P Frequency |
Analog FH 31.5KHz to 60KHz |
|
|
FV 56Hz to 75Hz |
|
|
|
|
|
|
|
Recommended |
Analog 1024X768 (60Hz) |
|
|
|
Audio 1 CVBS & S-Video |
|
Audio I/P |
Audio I/P L/Rx3 |
Audio 2 Y, Pb/Cb, Pr/Cr |
|
|
|
Audio 3 PC |
|
Video O/P |
Composite Signal |
TV only |
|
|
|
Speaker (Build-in) 5W+5W (rms) |
|
Audio O/P |
Audio O/P L/Px3 |
3.5mm miniature stereo phone jack |
|
|
|
Sound level output: 500 mV(rms) |
|
|
PIP,VoV,3D De-interlace, 3D |
Yes |
|
Other Functions |
comb-filter ,V-Chip, C.C. Settings |
|
|
|
Aspect Ration Switching |
Normal → Periscope → Zoom →Full |
|
Power |
Power Supply |
AC 110V ~ 240V, 50/60Hz |
|
Power Consumption |
115W |
|
|
|
||
|
Panel Tilt |
Forwards/ Backwards /Rotation |
-5 / +20 / ± 180 |
|
Wight (net) |
10.5Kg (Without Accessories) |
|
Accessories |
Remote Control, Batteries, AC cord, 15 Pin D-Sub Signal Cable |
|
|
V27CMTT
|
ITEMS |
SPECIFICATION |
|
|
|
|
|
|
Screen size |
27 wide TFT-LCD panel |
|
|
Aspect Ratio |
16 9 |
|
|
Resolution |
1280 x 720(WXGA) |
|
Display |
Contrast ratio |
500:1 (typ) |
|
|
Brightness |
500cd/m2 (Typ) |
|
|
Viewing Angle |
Over 170 (Hor.) / 170 (Vert.) |
|
|
OSD Language |
Chinese, English, French, German, Spanish |
|
|
TV standard (CCIR) |
NTSC |
|
TV I/P |
TV Turning system |
PLL 181 Ch. |
|
STEREO |
MTS+SAP |
||
|
|||
|
CATV |
125 CH. |
|
|
Composite Signal |
CVBS |
|
Video I/P |
Y, C Signal |
S-Video |
|
Composite Signal |
HDTV system (720p, 1080i) |
||
|
|||
|
Y, Pb/Cb, Pr/Cr |
||
|
|
||
|
Signal I/P |
Analog 15 pin D-Sub Connector |
|
|
PnP compatibility |
DDC / 2B |
|
PC I/P |
I/P Frequency |
Analog FH 31.5KHz to 60KHz |
|
|
FV 56Hz to 75Hz |
||
|
|
||
|
Recommended |
Analog 1024X768 (60Hz) |
|
|
|
Audio 1 CVBS & S-Video |
|
Audio I/P |
Audio I/P L/R x 3 |
Audio 2 Y, Pb/Cb, Pr/Cr |
|
|
|
Audio 3 PC |
|
Video O/P |
Composite Signal |
TV only |
|
|
|
Speaker (Build-in) 10W+10W (rms) |
|
Audio O/P |
Audio O/P L/P x 3 |
3.5mm miniature stereo phone jack |
|
|
|
Sound level output: 500 mV(rms) |
|
|
PIP,VOV,3D De-interlace, 3D |
Yes |
|
Other Functions |
comb-filter ,V-Chip, C.C. Settings |
||
|
Aspect Ration Switching |
Normal → Periscope → Zoom →Full |
|
Power |
Power Supply |
AC 110V ~ 240V, 50/60Hz |
|
Power Consumption |
140W |
||
|
|||
Panel Tilt |
Forwards/ Backwards /Rotation |
-5 / +20 / ± 180 |
|
Wight (net) |
14.5Kg (Without Accessories) |
|
|
Accessories |
Remote Control, Batteries, AC cord, 15 Pin D-Sub Signal Cable |
||
|
|
|
|
V30CMTT
|
ITEMS |
SPECIFICATION |
|
|
|
|
|
|
Screen size |
29.6 wide TFT-LCD panel |
|
|
Aspect Ratio |
15 9 |
|
|
Resolution |
1280 x 768 (WXGA) |
|
Display |
Contrast ratio |
500:1(typ) |
|
|
Brightness |
500cd/m2 (Typ) |
|
|
Viewing Angle |
Over 170 (Hor.) / 170 (Vert.) |
|
|
OSD Language |
Chinese , English, French , German , Spanish |
|
|
TV standard (CCIR) |
NTSC |
|
TV I/P |
TV Turning system |
PLL 181 Ch. |
|
STEREO |
MTS+SAP |
||
|
|||
|
CATV |
125 CH. |
|
|
Composite Signal |
CVBS |
|
Video I/P |
Y, C Signal |
S-Video |
|
Composite Signal |
HDTV Ready (720p, 1080i) |
||
|
|||
|
Y, Pb/Cb, Pr/Cr |
||
|
|
||
|
Signal I/P |
Analog 15 pin D-Sub Connector |
|
|
PnP compatibility |
DDC / 2B |
|
PC I/P |
I/P Frequency |
Analog FH 31.5KHz to 60KHz |
|
|
FV 56Hz to 75Hz |
||
|
|
||
|
Recommended |
Analog 1024X768 (60Hz) |
|
|
|
Audio 1 CVBS & S-Video |
|
Audio I/P |
Audio I/P L/Rx3 |
Audio 2 Y, Pb/Cb, Pr/Cr |
|
|
|
Audio 3 PC |
|
Video O/P |
Composite Signal |
TV only |
|
|
|
Speaker (Build-in) 10W+10W (rms) |
|
Audio O/P |
Audio O/P L/Px3 |
3.5mm miniature stereo phone jack |
|
|
|
Sound level output: 500 mV(rms) |
|
|
PIP,VoV,3D De-interlace, 3D |
Yes |
|
Other Functions |
comb-filter ,V-Chip, C.C. Settings |
||
|
Aspect Ration Switching |
Normal → Periscope → Zoom →Full |
|
Power |
Power Supply |
AC 110V ~ 240V, 50/60Hz |
|
Power Consumption |
150W |
||
|
|||
Panel Tilt |
Forwards/ Backwards /Rotation |
-5 / +20 / ± 180 |
|
Wight (net) |
15.2Kg (Without Accessories) |
|
|
Accessories |
Remote Control, Batteries, AC cord, 15 Pin D-Sub Signal Cable |
||
|
|
|
|

PC I/P
Preset Timing
|
Mode Name |
H.Freq. (kHz) |
H. Polarity |
Pixel |
|
Mode NO. |
CLK |
||||
Resolution |
V.Freq. (Hz) |
V. Polarity |
|||
|
(MHZ) |
||||
|
|
|
|
||
1 |
VGA 70Hz |
31.469 |
|
25.175 |
|
640X350 |
70.087 |
|
|||
|
|
||||
|
|
|
|
|
|
2 |
VGA 60Hz |
31.469 |
|
25.175 |
|
640X480 |
59.941 |
|
|||
|
|
||||
|
|
|
|
|
|
3 |
VGA 72Hz |
37.861 |
|
31.5 |
|
640X480 |
72.81 |
|
|||
|
|
||||
|
|
|
|
|
|
4 |
VGA 75Hz |
37.5 |
|
31.5 |
|
640X480 |
75.0 |
|
|||
|
|
||||
|
|
|
|
|
|
5 |
SVGA 60Hz |
35.16 |
|
36.0 |
|
800X600 |
56.25 |
|
|||
|
|
||||
|
|
|
|
|
|
6 |
SVGA 60Hz |
37.876 |
|
40.0 |
|
800X600 |
60.317 |
|
|||
|
|
||||
|
|
|
|
|
|
7 |
SVGA 72Hz |
48.077 |
|
50.0 |
|
800x600 |
72.118 |
|
|||
|
|
||||
|
|
|
|
|
|
8 |
SVGA 75Hz |
46.875 |
|
49.5 |
|
800x600 |
75.0 |
|
|||
|
|
||||
|
|
|
|
|
|
9 |
XGA 60Hz |
48.363 |
|
65.0 |
|
1024x768 |
60.004 |
|
|||
|
|
||||
|
|
|
|
|
|
10 |
XGA 70Hz |
56.476 |
|
75.0 |
|
1024x768 |
70.069 |
|
|||
|
|
||||
|
|
|
|
|
|
11 |
XGA 75Hz |
60.023 |
|
78.75 |
|
1024x768 |
75.029 |
|
|||
|
|
||||
|
|
|
|
|
|
12 |
MAC VGA |
35.0 |
|
30.24 |
|
640X480 |
66.667 |
|
|||
|
|
||||
|
|
|
|
|
|
13 |
MAC VGA |
49.725 |
|
57.283 |
|
832x624 |
74.550 |
|
|||
|
|
||||
14 |
US TEXT |
31.469 |
|
28.322 |
|
720x400 |
70.087 |
|
|||
|
|
||||
|
|
|
|
|
|
15 |
WXGA |
47.73 |
|
80 |
|
1280x768 |
60.0 |
|
|||
|
|
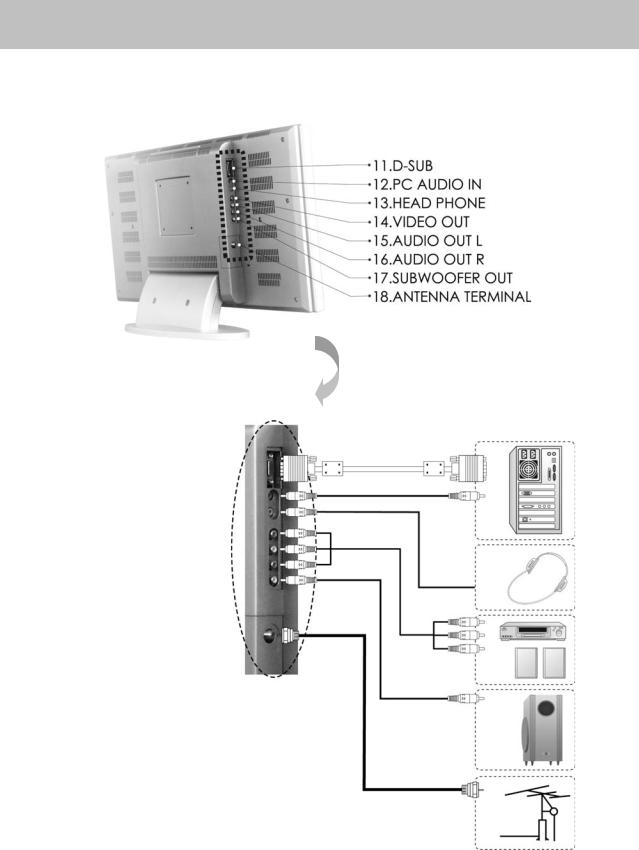
3. Connection & Applications
Note: |
|
z |
Audio out: The level of Audio O/P is constant. It won’t be affected by aligning volume, treble and bass. |
|
This connecter should be connected to outer audio amplifier to enlarge the volume. |
zVideo O/P: When user wants to connect Audio and Video O/P of our LCD-TV to VCR for recording
program, the O/P has only one choice that is TV mode.
zAudio O/P: IF the main display is TV, the Audio O/P must be TV sound; otherwise, if sub display is TV, the
Audio I/P must be selected to “Sub”, so that the Audio O/P will be TV sound.
4. Control Location
These buttons control your TV’s basic features, include the on-screen mean. To use the more advanced features, you must the remote control.
POWER: |
turn on or turn off the LCD TV. |
SOURCE: |
set up the input source (PC,VIDEO,SV,TV,CV). |
MENU: |
display the main menu. |
CHANEL (down/up): |
change channels on sequence. |
VOLUME(+/-): |
turn up or turn down the volume. |
ASPECT RATIO: set up the display (Normal, Periscope, Zoom or Full).
Speaker |
Speaker |
Remote sensor window
Aim the remote control towards this region on the TV.
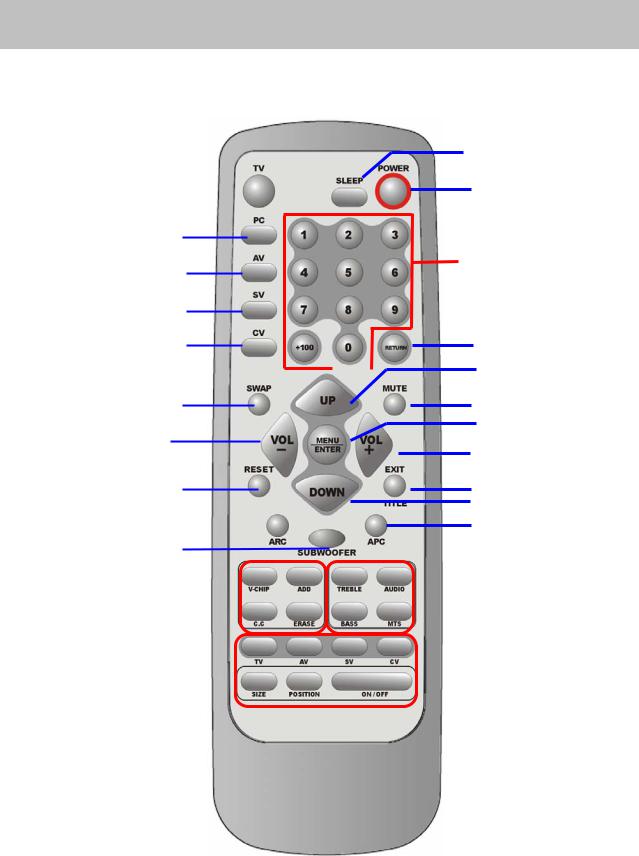
5. Remote Control
The remote control pad works almost as same as ordinary TV remote control that includes the basic function needed while viewing a live video:
|
|
|
|
|
|
|
|
|
|
Sleep |
TV |
|
|
|
|
|
|
|
|
|
Power |
|
|
|
|
|
||||||
PC |
|
|
|
|
|
|
|
|
|
|
AV |
|
|
|
|
|
|
|
|
|
Number Buttons |
|
|
|
|
|
|
|
|
|
|
|
SV |
|
|
|
|
|
|
|
|
|
|
CV |
|
|
|
|
|
|
|
|
|
Return |
|
|
|
|
|
|
|
|
|
|
Channel UP |
|
|
|
|
|
|
|
|
|
|
|
SWAP |
|
|
|
|
|
|
|
|
|
Mute |
VOL |
|
|
|
|
|
|
|
|
|
MENU/Enter |
|
|
|
|
|
|
|
|
|
VOL+ |
|
|
|
|
|
|
|
|
|
|
|
|
Reset |
|
|
|
|
|
|
|
|
|
TITLE / EXIT |
|
|
|
|
|
|
|
|
|
|
Channel DOWN |
ARC |
|
|
|
|
|
|
|
|
|
APC |
|
|
|
|
|
||||||
Subwoofer |
|
|
|
|
|
|
|
|
|
|
Other Function |
|
|
|
|
|
|
|
|
|
Audio Function |
|
|
|
|
|
|
|
|
|
||
PIP Function |
|
|
|
|
|
|
|
|
|
|
|
|
|
|
|
|
|
|
|
|
Summary of Control Button
Power control
Press POWER button
Selecting the signal source
Press TV button
Press AV button
Press SV button
Press CV button
Press PC button
Menu Setting
Press MENU/ENTER button Press TITLE/EXIT button
Changing Channels
Press UP button
Press DOWN button
Press 0~9 +100 button
Press RETURN button
Sound Control
Press VOL+ button
Press VOLbutton
Press MUTE button
Press MTS button
Press AUDIO button Press TREBLE button Press BASS button
Press SUBWOOFER button.
PIP Control
Press ON/OFF button
Press TV AV SV CV button Press SIZE button
Press POSITION button
Other Function
Press SWAP button
Press RESET button
Press ARC button
Press APC button
Press SLEEP button
Press V-CHIP button
Press C.C button
Press ADD button
Press ERASE button
Direct to turn on or turn off the display
Direct to switch to the TV mode.
Direct to switch to the AV Video mode.
Direct to S-Video mode.
Direct to switch to the Component mode (Y Pb Pr).
Direct to switch to the PC mode.
Display the main on-screen menu or enter the next menu.
Display the current channel digits/Exit from the menu.
Press Up to change channel on the TV.
Press Down to change channel on the TV.
To select channels directly on the TV.
Return to the previous channel on the TV.
Press to turn up the volume. Press to turn down the volume.
Press to temporarily cut off the sound.
Press to choose stereo, mono or separate audio program supply the multi-channel sound services.
Select present audio is main display or sub display. Adjust the treble of audio.
Adjust the bass of audio. Open the subwoofer function.
Press to watch one of video sources on sub display. Press again to make the sub display disappear.
Press to select one of the PIP window input source. To make the PIP window double, large or small.
Press to move the PIP window to Top Left→Top Right→Bottom Right→ Bottom Left→Repeat
Change main display and sub display. Return to the original factory settings.
In PC source Set the picture window to full or normal.
In Video source Set the picture window to normal→full→periscope→zoom. Select Normal, Clear, Dark, and Theater mode for picture control.
Press to select a present time interval for shut off. Set Parent Control function.
Set the caption of TV programs show on or off. Add the channel of TV programs in TV source. Erase the channel of TV programs in TV source.
6.Disassembly Instructions
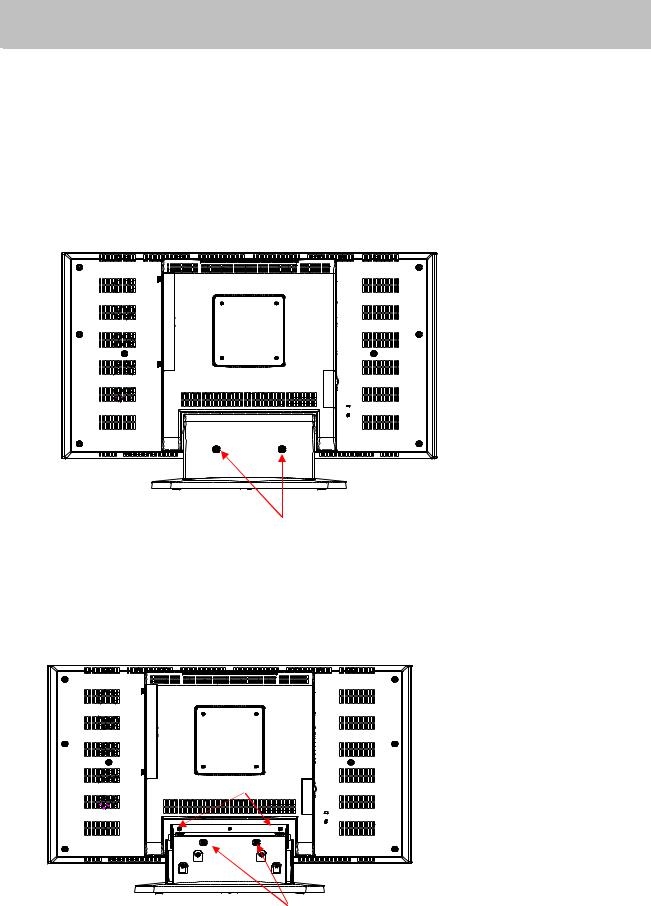
1.Face down the LCD-TV :
Face down the LCD-TV on a smooth plane with a soft material to protect the panel faceplate.
2. Base Neck Removal Procedure :
2.1Remove 2 screws from Neck Cover. (Indicated as “ A “)
Then you could take the Back Cover of neck apart from the LCD-TV
A
3.Base Removal Procedure:
3.1Remove 4 screws from the Back Cover. (Indicated as “ B ” and “ C ”) Then you could take Base (assembly) apart from the LCD-TV.
B
C

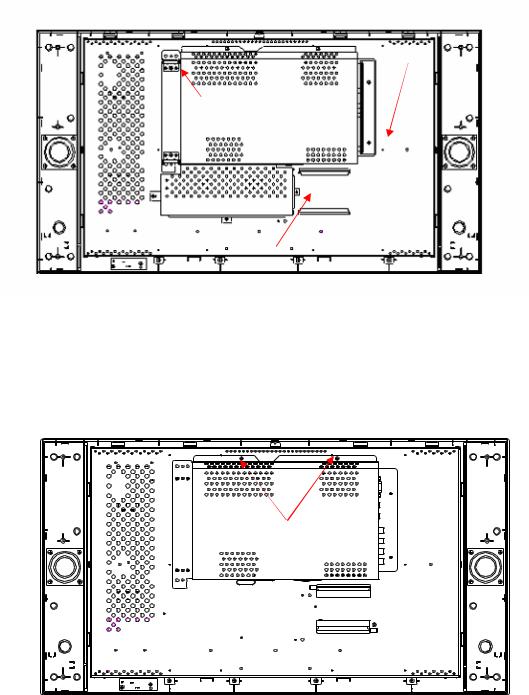
4. Tuner Cover & AV Cover Removal Procedure:
4.1 Remove Tuner Cover. |
(Indicated as “D”) |
4.2 Remove AV Cover before, you should be loose the screw (Indicated as “E”)
 E D
E D
5.Back Cover Removal Procedure:
5.1Remove 8 screws from the Back Cover. ( Indicated as “ F “and “ G “ )
5.2Remove a screw from the Tuner Board. (Indicated as “ I ”)
5.3Take slide of tuner board.
Then you could take Back Cover apart from the LCD-TV.
 F F
F F
 G G
G G
I
6. . Right/Left Side Covers and Tuner Board Removal Procedure:
6.1Remove 4 screws from Slide of AV PCB & left side Covers. (Indicated as “ H ”)
6.2Remove a screw from the Tuner Board. (Indicated as “ I ”)
6.3Remove 3 screws from the power case assembly. (Indicated as “ J ”)
Then you could take Slide of AV PCB, Power case, and Left Side Covers Removal.
 H
H
 H
H
 J
J
7 Main PCB Shield Removal :
7.1 Remove 2 screws from Main PCB Shield. (Indicated as “ K”)
Then you could take Main PCB Shield apart from Main Bracket and the PCB Board will be shown on it .
K
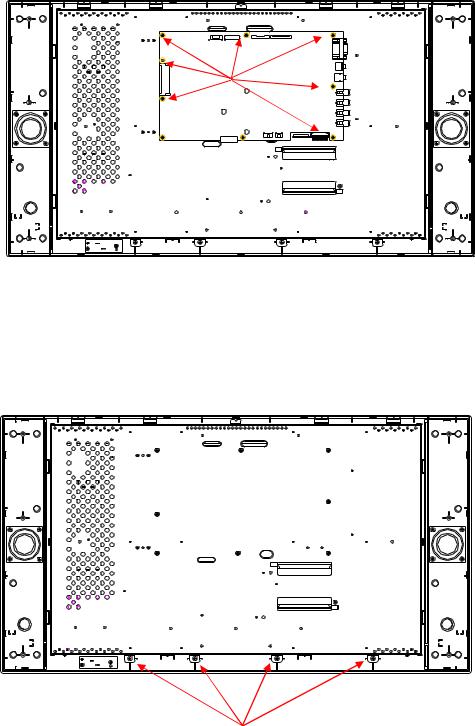
8. Main PCB Removal procedure:
8-1 Remove 9 screws from the Main PCB. (indicated “ L “) Then you could take Main PCB apart from the LCD-TV .

 L
L
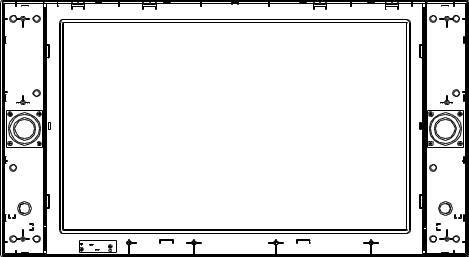
9. Panel Bracket Removal procedure:
9-1 Remove 4 screws from the Panel Bracket. (Indicated as “ M ”) Then you could take Panel Bracket apart from the Front Cover.
M
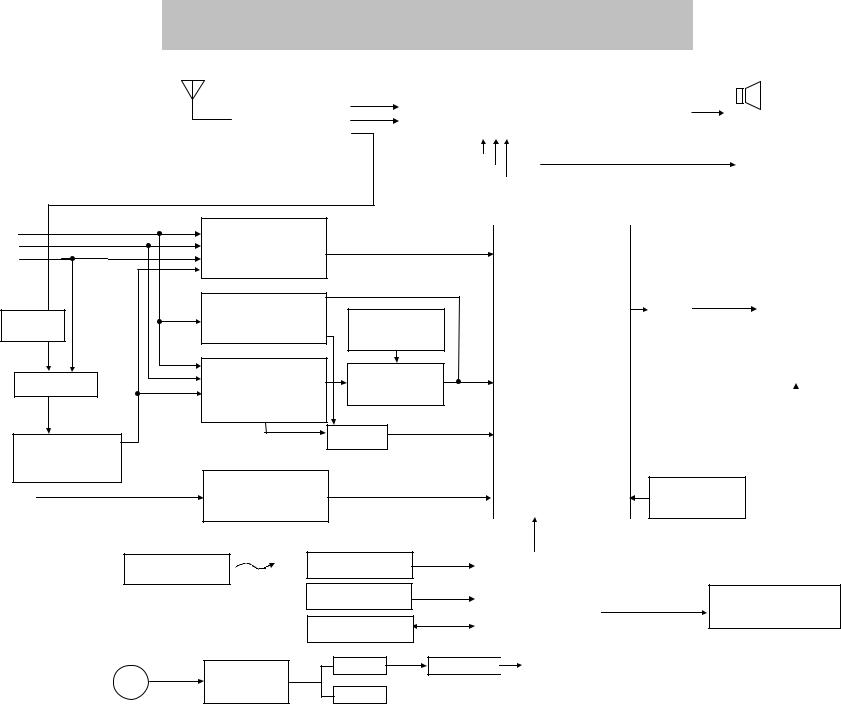
7. Block Diagram
ANT
UT01 |
|
I044 |
|
I010 |
|
|
|
10W + 10W |
|||||||
TV – Tuner |
SIF |
4:1 |
|
|
|
|
Audio Amp. |
|
|
|
Speaker |
||||
(Philips) |
Audio |
MTS & Audio Processor |
|
LA4282 |
|
|
|
|
|||||||
|
|
|
|
|
|||||||||||
FQ1236 MK3 |
Video |
MSP3440G |
|
(or TFA9843) |
|
|
|
Headphone |
|||||||
|
|
|
|||||||||||||
|
|
CV Audio |
|
|
|
|
|
|
|
|
|
|
Subwoofer |
||
|
|
|
|
|
|
|
|
|
|
|
|
||||
|
|
|
|
|
|
|
|
|
|||||||
|
SV/AV Audio |
|
|
|
|
|
|
|
|
||||||
|
|
|
|
|
|
|
|
|
|||||||
|
|
PC Audio |
|
|
|
|
|
|
|
|
|
|
|
|
|
|
|
|
|
|
|
|
|
|
|
|
|
|
|||
|
|
Interlaced |
I018 |
|
|
CV |
|
Video Decoder |
|
||
SV |
|
|
SAA7118 |
|
|
AV |
|
(or SAA7119) |
|
||
|
|
|
|||
I033 |
|
Progressive |
I006 |
|
|
|
|
ADC |
I038 |
||
V-Chip |
|
|
|||
|
|
AD9883A |
RAM |
||
Z8612912 |
Interlaced |
HY57V64 |
|||
I024 |
|
I031 |
I037 |
||
|
Video Decoder |
||||
|
De-Interlace |
||||
PI5V330 |
|
SAA7118 |
|||
TV/AV |
SiI504C |
||||
I035 |
|
(or SAA7119) |
I032 |
||
|
|
|
|||
3D Comb filter |
|
|
P15V330 |
||
TC90A65F |
|
I001 |
|
||
(or UPD64083) |
|
|
|||
|
|
|
|||
VGA |
PC / Component Video |
ADC |
|
||
|
|
AD9883A |
|
||
|
|
|
|
||
|
|
Remote Control |
|
IR Pad |
|
|
|
|
|
||
|
|
|
|
Key Pad |
|
|
|
|
I013 |
E2PROM |
|
|
|
|
Power |
+ 5V |
|
AC100~240V 50/60Hz |
|
|
|||
Module |
+ 24V |
||||
|
|
||||
|
I019 |
8 bit |
Port V(Sub) |
|
Scaler
TP6760
(or TP6761)
24 bit |
Port B(Main) |
|||
|
|
|||
Sync. |
|
|
||
24 bit Port A(Main) |
||||
|
|
|
|
|
|
I012 |
I2C |
||
|
|
|
||
|
|
|
||
|
Micro Controller |
|
||
|
|
|
SM59264 |
|
|
|
|
( or TP2808) |
|
|
|
|
|
|
I009 |
LCD |
|
Interface |
|
|
THC63 |
|
|
LVDM83A |
|
Panel |
|
|
|
|
|
|
|
|
23” |
|
|
|
I020
RAM
HY57V16
INVERTER
Regulator |
|
3.3V |
Note: Main Board |
|
2.5V |
PWB-0610-01~04 uses SAA7118 TP6760 TC90A65F |
|
|
|
1.8V |
|
|
|
PWB-0610-11above uses SAA7119 TP6761 UPD64083 |
|
|
|
|
 Loading...