


VIZIO XVT423SV/XVT473SV/XVT553SV User Manual
Dear VIZIO Customer,
Congratulations on your new VIZIO XVT423SV/XVT473SV/XVT553SV television purchase. To get the most out of your new VIZIO HDTV, read these instructions before making any adjustments, and retain them for future reference. We hope you will experience many years of enjoyment from your new VIZIO HDTV High Definition Television.
For assistance, call 877-MYVIZIO (877-698-4946) or e-mail us at www.VIZIO.com.
To purchase or inquire about accessories and installation services for your VIZIO HDTV, visit our website at www.VIZIO.com or call toll free at 888-849-4623.
We recommend you register your VIZIO HDTV either at our website www.VIZIO.com or fill out and mail your registration card. For peace of mind and to protect your investment beyond the standard warranty, VIZIO offers on-site extended warranty service plans. These plans give additional coverage during the standard warranty period. Visit our website or call us to purchase a plan.
Write down the serial number located on the back of your HDTV for easy reference when obtaining warranty support:
Serial #: _____________________ |
Purchase Date _____________________ |
VIZIO is a registered trademark of VIZIO, Inc. dba V, Inc.
HDMI logo and “High Definition Multimedia Interface” are registered trademarks of HDMI Licensing LLC. Manufactured under license from Dolby Laboratories.
Dolby and the double-D symbol are trademarks of Dolby Laboratories.
 and
and  are trademarks of SRS Labs, Inc.
TruSurround HD and TruVolume technologies are incorporated under license from SRS Labs, Inc.
This product qualifies for ENERGY STAR in the “factory default (Home Use)” setting and this is the setting in which power savings will be achieved. Changing the factory default picture setting or enabling other features will increase power consumption that could exceed the limits necessary to qualify for Energy Star rating.
THE TRADEMARKS SHOWN HEREIN ARE THE PROPERTY OF THEIR RESPECTIVE OWNERS; IMAGES USED ARE FOR ILLUSTRATION PURPOSES ONLY. VIZIO, THE V LOGO, WHERE VISION MEETS VALUE AND OTHER VIZIO TRADEMARKS ARE THE INTELLECTUAL PROPERTY OF VIZIO INC. PRODUCT SPECIFICATIONS ARE SUBJECT TO CHANGE WITHOUT NOTICE. © 2010 VIZIO INC. ALL RIGHTS RESERVED.
Version 4/26/2010 |
1 |
|
www.VIZIO.com |
VIZIO XVT423SV/XVT473SV/XVT553SV User Manual
Important Safety Instructions
Your HDTV is designed and manufactured to operate within defined design limits. Misuse may result in electric shock or fire. To prevent your HDTV from being damaged, the following rules should be observed for the installation, use, and maintenance of your HDTV. Read the following safety instructions before operating your HDTV. Keep these instructions in a safe place for future reference.
To reduce the risk of electric shock or component damage, switch off the power before connecting other components to your HDTV.
Unplug the power cord before cleaning your HDTV. A damp cloth is sufficient for cleaning your HDTV. Do not use a liquid or a spray cleaner for cleaning your HDTV. Do not use abrasive cleaners.
Always use the accessories recommended by the manufacturer to insure compatibility.
When moving your HDTV from an area of low temperature to an area of high temperature, condensation may form in the housing. Wait before turning on your HDTV to avoid causing fire, electric shock, or component damage.
Use only with the cart, stand, tripod, bracket, or table specified by manufacturer or sold with your HDTV. When a cart is used, use caution when moving the cart/HDTV combination to avoid injury from tip-over. Do not place
your HDTV on an unstable cart, stand, or table. If your HDTV falls, it can injure a person and cause serious damage to your HDTV. Use only a cart or stand recommended by the manufacturer or sold with your HDTV.
A distance of at least three feet should be maintained between your HDTV and any heat source, such as a radiator, heater, oven, amplifier etc. Do not install your HDTV close to smoke. Operating your HDTV close to smoke or moisture may cause fire or electric shock.
Slots and openings in the back and bottom of the cabinet are provided for ventilation. To ensure reliable operation of your HDTV and to protect it from overheating, be sure these openings are not blocked or covered. Do not place your HDTV in a bookcase or cabinet unless proper ventilation is provided.
Never push any object into the slots and openings on your HDTV cabinet. Do not place any objects on the top of your HDTV. Doing so could short circuit parts causing a fire or electric shock. Never spill liquids on your HDTV.
Your HDTV should be operated only from the type of power source indicated on the label. If you are not sure of the type of power supplied to your home, consult your dealer or local power company.
Do not apply pressure or throw objects at your HDTV. This may compromise the integrity of the display. The manufacturer’s warranty does not cover user abuse or improper installations.
The power cord must be replaced when using different voltage than the voltage specified. For more information, contact your dealer.
Your HDTV is equipped with a three-pronged grounded plug (a plug with a third grounding pin). This plug will fit only into a grounded power outlet. This is a safety feature. If your outlet does not accommodate the three-pronged, have an electrician install the correct outlet, or use an adapter to ground your HDTV safely. Do not defeat the safety purpose of the grounded plug.
When connected to a power outlet, power is always flowing into your HDTV. To totally disconnect power, unplug the power cord.
The lightning flash with arrowhead symbol within an equilateral triangle is intended to alert the user to the presence of un-isolated, dangerous voltage within the inside of your HDTV that may be of
sufficient magnitude to constitute a risk of electric shock to persons.
The exclamation point within an equilateral triangle is intended to alert the user to the presence of important operating and servicing instructions in the literature accompanying your HDTV.
Do not overload power strips and extension cords. Overloading can result in fire or electric shock.
2
www.VIZIO.com
VIZIO XVT423SV/XVT473SV/XVT553SV User Manual
The wall socket should be installed near your HDTV and easily accessible.
Only power of the marked voltage can be used for your HDTV. Any other voltage than the specified voltage may cause fire or electric shock
Do not touch the power cord during lightning. To avoid electric shock, avoid handling the power cord during electrical storms.
Unplug your HDTV during a lightning storm or when it will not be used for long period of time. This will protect your HDTV from damage due to power surges.
Do not attempt to repair or service your HDTV yourself. Opening or removing the back cover may expose you to high voltages, electric shock, and other hazards. If repair is required, contact your dealer and refer all servicing to qualified service personnel.
Keep your HDTV away from moisture. Do not expose your HDTV to rain or moisture. If water penetrates into your HDTV, unplug the power cord and contact your dealer. Continuous use in this case may result in fire or electric shock.
Do not use your HDTV if any abnormality occurs. If any smoke or odor becomes apparent, unplug the power cord and contact your dealer immediately. Do not try to repair your HDTV yourself.
Avoid using dropped or damaged appliances. If your HDTV is dropped and the housing is damaged, the internal components may function abnormally. Unplug the power cord immediately and contact your dealer for repair. Continued use of your HDTV may cause fire or electric shock.
Do not install your HDTV in an area with heavy dust or high humidity. Operating your HDTV in environments with heavy dust or high humidity may cause fire or electric shock.
Follow instructions for moving your HDTV. Ensure that the power cord and any other cables are unplugged before moving your HDTV.
When unplugging your HDTV, hold the power plug, not the cord. Pulling on the power cord may damage the wires inside the cord and cause fire or electric shock. When your HDTV will not be used for an extended period of time, unplug the power cord.
To reduce risk of electric shock, do not touch the connector with wet hands.
Insert batteries in accordance with instructions. Incorrect polarities may cause the batteries to leak which can damage the remote control or injure the operator.
If any of the following occurs, contact the dealer:
o The power cord fails or frays.
o Liquid sprays or any object drops into your HDTV. o Your HDTV is exposed to rain or other moisture. o Your HDTV is dropped or damaged in any way.
o The performance of your HDTV changes substantially.
Version 4/26/2010 |
3 |
|
www.VIZIO.com |
VIZIO XVT423SV/XVT473SV/XVT553SV User Manual
Television Antenna Connection Protection
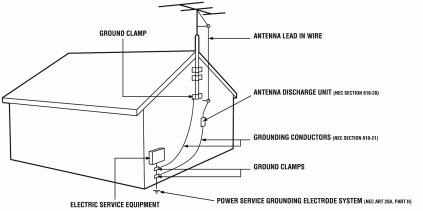
External Television Antenna Grounding
If an outside antenna/satellite dish or cable system is to be connected to the TV, make sure that the antenna or cable system is electrically grounded to provide some protection against voltage surges and static charges.
Article 810 of the National Electrical Code, ANSI/NFPSA 70, provides information with regard to proper grounding of the mast and supporting structure, grounding of the lead-in wire to an antenna discharge unit, size of the grounding conductors, location of antenna discharge unit, connection to grounding electrodes, and requirements of the grounding electrode.
Lightning Protection
For added protection of the TV during a lightning storm or when it is left unattended or unused for long periods of time, unplug the TV from the wall outlet and disconnect the antenna or cable system.
Power Lines
Do not locate the antenna near overhead light or power circuits, or where it could fall into such power lines or circuits.
Remember, the screen of the coaxial cable is intended to be connected to earth in the building installation.
4
www.VIZIO.com
VIZIO XVT423SV/XVT473SV/XVT553SV User Manual
Advisory of the DTV Transition
The nationwide switch to digital television broadcasting will be complete on June 12, 2009, but your local television stations may switch sooner. After the switch, analog-only television sets that receive TV programming through an antenna will need a converter box to continue to receive over-the-air TV. Watch your local stations to find out when they will turn off their analog signal and switch to digital-only broadcasting. Analog-only TVs should continue to work as before to receive low power, Class A or translator television stations and with cable and satellite TV services, gaming consoles, VCRs, DVD players, and similar products.
For additional information, contact the parties listed below, as appropriate:
FCC (US Federal Communications Commission)
http://www.fcc.gov/
Phone: 1-888-CALL-FCC (1-888-225-5322)
TTY: 1-888-TELL-FCC (1-888-835-5322)
Fax: 1-866-418-0232
E-mail: fccinfo@fcc.gov
NTIA (National Telecommunications and Information Administration) http://www.ntia.doc.gov/
1-888-DTV-2009
Listings of US Television Stations
http://www.high-techproductions.com/usTVstations.htm
Note: Your VIZIO HDTV is capable of receiving Digital Broadcasts, and no Digital Converter Box is required.
Version 4/26/2010 |
5 |
|
www.VIZIO.com |
VIZIO XVT423SV/XVT473SV/XVT553SV User Manual
Table of Contents
Important Safety Instructions..................................................................................................................... |
2 |
Television Antenna Connection Protection ............................................................................................... |
4 |
Advisory of the DTV Transition.................................................................................................................. |
5 |
CHAPTER 1 SETTING UP YOUR HDTV................................................................................... |
10 |
Finding a Location for Your HDTV .......................................................................................................... |
10 |
Wall Mounting your HDTV....................................................................................................................... |
11 |
CHAPTER 2 BASIC CONTROLS AND CONNECTIONS.......................................................... |
12 |
Front Panel .............................................................................................................................................. |
12 |
Jag Wheel Control................................................................................................................................... |
12 |
Rear Panel Connections.......................................................................................................................... |
13 |
Side Panel Connections .......................................................................................................................... |
14 |
CHAPTER 3 VIZIO REMOTE CONTROL .................................................................................. |
14 |
Installing the Batteries ............................................................................................................................. |
14 |
Activating Your Bluetooth Remote .......................................................................................................... |
14 |
Remote Control Buttons .......................................................................................................................... |
15 |
Basic TV Functions .............................................................................................................................. |
15 |
A/V Functions....................................................................................................................................... |
16 |
VIA Functions....................................................................................................................................... |
16 |
Making it Your Universal Remote............................................................................................................ |
17 |
Remote Control Range............................................................................................................................ |
17 |
VIZIO Remote Control Precautions......................................................................................................... |
17 |
CHAPTER 4 GETTING STARTED............................................................................................. |
18 |
CHAPTER 5 USING YOUR HDTV FOR THE FIRST TIME ....................................................... |
19 |
Connecting to the Internet ....................................................................................................................... |
19 |
Select Input Source ................................................................................................................................. |
19 |
Watching a TV Program .......................................................................................................................... |
19 |
Viewing Digital TV Program Information ................................................................................................. |
20 |
Exploring VIZIO Internet Apps (VIA) ....................................................................................................... |
21 |
CHAPTER 6 CONNECTING EQUIPMENT ................................................................................ |
22 |
Which Video Connection Should I Use? ................................................................................................. |
22 |
Connecting Your Cable or Satellite Box.................................................................................................. |
23 |
Using HDMI (Best) ............................................................................................................................... |
23 |
HDMI Connections for Cable or Satellite Boxes with DVI ................................................................... |
23 |
Using Component Video (Better)......................................................................................................... |
24 |
Using Composite Video (Good) ........................................................................................................... |
24 |
Using Coaxial (Antenna) (Good).......................................................................................................... |
24 |
Connecting Your DVD Player.................................................................................................................. |
25 |
Using HDMI (Best) ............................................................................................................................... |
25 |
HDMI Connections for DVD Players with DVI ..................................................................................... |
25 |
Using Component Video (Better)......................................................................................................... |
26 |
Using Composite (AV) Video (Good)................................................................................................... |
26 |
Connecting Coaxial (RF) ......................................................................................................................... |
27 |
Using Your Antenna or Digital Cable for Standard or Digital TV ......................................................... |
27 |
Connecting Your VCR or Video Camera................................................................................................. |
27 |
Connecting a Home Theater System ...................................................................................................... |
28 |
Using RCA............................................................................................................................................... |
28 |
Connecting the cables ......................................................................................................................... |
28 |
Turning TV speakers off....................................................................................................................... |
28 |
6 |
|
www.VIZIO.com |
|
|
VIZIO XVT423SV/XVT473SV/XVT553SV User Manual |
|
Using Optical (S/PDIF) ............................................................................................................................ |
|
28 |
Connecting a Computer........................................................................................................................... |
|
29 |
RGB (VGA) .......................................................................................................................................... |
|
29 |
Using HDMI.......................................................................................................................................... |
|
29 |
Ethernet Connection................................................................................................................................ |
|
30 |
CHAPTER 7 USING VIA ............................................................................................................ |
|
31 |
Connecting to the Internet ....................................................................................................................... |
|
31 |
Navigating the VIA Dock ......................................................................................................................... |
|
31 |
Using VIZIO Internet Apps (VIA) ............................................................................................................. |
|
32 |
Navigating Apps................................................................................................................................... |
|
32 |
Adding Apps......................................................................................................................................... |
|
32 |
Using Profiles....................................................................................................................................... |
|
33 |
Updating your TV..................................................................................................................................... |
|
34 |
CHAPTER 8 ADJUSTING YOUR HDTV SETTINGS................................................................. |
35 |
|
Using the On-screen Display (OSD) ....................................................................................................... |
|
35 |
Input Menu............................................................................................................................................... |
|
35 |
Wide Menu .............................................................................................................................................. |
|
36 |
CC (Closed Caption) Menu ..................................................................................................................... |
|
37 |
Analog Closed Caption ........................................................................................................................ |
|
37 |
Digital Closed Caption ......................................................................................................................... |
|
37 |
Digital CC Style.................................................................................................................................... |
|
37 |
Sleep Timer Menu ................................................................................................................................... |
|
37 |
TV Settings Menu.................................................................................................................................... |
|
37 |
Input Source......................................................................................................................................... |
|
37 |
Picture.................................................................................................................................................. |
|
38 |
Audio.................................................................................................................................................... |
|
40 |
Tuner.................................................................................................................................................... |
|
42 |
Name Input .......................................................................................................................................... |
|
43 |
Device Setup........................................................................................................................................ |
|
44 |
Parental Controls ................................................................................................................................. |
|
45 |
Menu Language ................................................................................................................................... |
|
47 |
Time & Local Settings.......................................................................................................................... |
|
47 |
PIP Menu................................................................................................................................................. |
|
48 |
PIP Mode ............................................................................................................................................. |
|
48 |
Source.................................................................................................................................................. |
|
48 |
Position ................................................................................................................................................ |
|
48 |
Size ...................................................................................................................................................... |
|
48 |
Audio.................................................................................................................................................... |
|
48 |
Network Menu ......................................................................................................................................... |
|
49 |
Wired Connection ................................................................................................................................ |
|
49 |
Manual Setup....................................................................................................................................... |
|
49 |
Wireless Connection............................................................................................................................ |
|
49 |
Bluetooth Menu.................................................................................................................................... |
|
50 |
Help Menu ............................................................................................................................................... |
|
51 |
System Info .......................................................................................................................................... |
|
51 |
Reset TV Settings ................................................................................................................................ |
|
51 |
Clear Memory (Factory Default) .......................................................................................................... |
|
51 |
Guided Setup ....................................................................................................................................... |
|
51 |
CHAPTER 9 MAINTENANCE AND TROUBLESHOOTING...................................................... |
52 |
|
Cleaning the TV and Remote Control ..................................................................................................... |
|
52 |
Troubleshooting Guide ............................................................................................................................ |
|
52 |
TV/Display Troubleshooting................................................................................................................. |
|
52 |
Version 4/26/2010 |
7 |
|
|
www.VIZIO.com |
|
VIZIO XVT423SV/XVT473SV/XVT553SV User Manual |
|
Audio Troubleshooting......................................................................................................................... |
55 |
Bluetooth Troubleshooting................................................................................................................... |
55 |
VIZIO Internet Apps Troubleshooting .................................................................................................. |
55 |
Remote Control Troubleshooting......................................................................................................... |
56 |
Internet Connection Troubleshooting................................................................................................... |
56 |
Media Viewer Troubleshooting ............................................................................................................ |
57 |
Telephone & Technical Support .............................................................................................................. |
57 |
Compliance.............................................................................................................................................. |
58 |
FCC Class B Radio Interference Statement ........................................................................................... |
58 |
CHAPTER 10 SPECIFICATIONS .............................................................................................. |
59 |
XVT423SV Specifications ....................................................................................................................... |
59 |
XVT473V Specifications.......................................................................................................................... |
60 |
XVT553V Specifications.......................................................................................................................... |
61 |
Preset PC Resolutions ............................................................................................................................ |
63 |
Resolution through RGB Input ................................................................................................................ |
64 |
WARRANTY ............................................................................................................................... |
65 |
Index........................................................................................................................................................ |
66 |
8
www.VIZIO.com
VIZIO XVT423SV/XVT473SV/XVT553SV User Manual
Opening the Package
Your HDTV and its accompanying accessories are carefully packed in a cardboard carton that has been designed to protect it from transportation damage. After you have opened the carton, check that your HDTV is in good condition and that all of the contents are included.
The screen can easily be scratched or broken, so handle your HDTV gently and never place your HDTV with the glass facing downwards on a surface without protective padding.
IMPORTANT: Save the carton and packing material for future shipping.
Package Contents
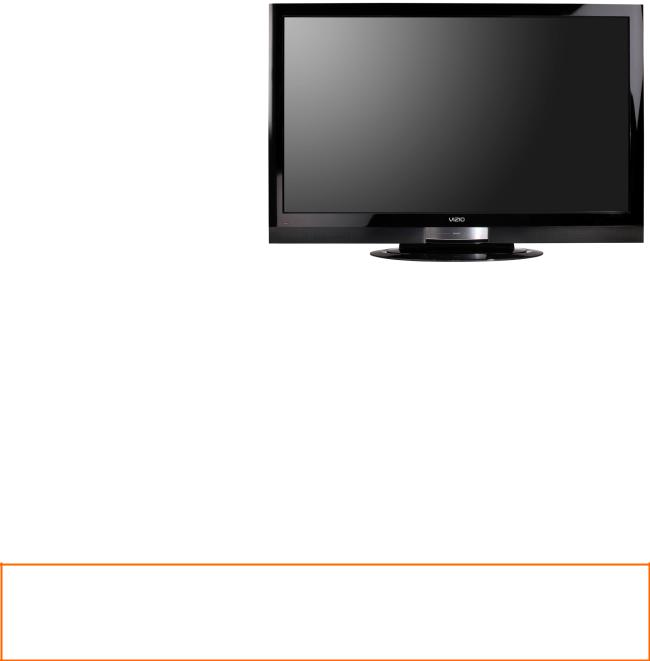
VIZIO XVT423SV, XVT473SV, or XVT553SV
VIZIO remote control VUR10
AA batteries for the remote control (2)
Detachable base and thumb screw
Power cord
VIZIO cloth
Safety strap
This user manual
Quick Setup Guide
Registration Card
HDTV Accessories and Services
Additional certified accessories for your HDTV are sold separately, including:
Wall mounts
High Definition cables
Extra or replacement remote controls
Sound Bars
Blu-ray DVD Players
VIZIO also offers installation services and extended warranty services for your HDTV.
To purchase or inquire about additional accessories and services for your VIZIO HDTV, visit our website at www.VIZIO.com or call us toll free at 877-MYVIZIO (877-698-4946).
Caution: Do not apply pressure or throw objects at your HDTV (including game controllers).
This may compromise the integrity of the display. The manufacturer’s warranty does not cover user abuse or improper installations.
Version 4/26/2010 |
9 |
|
www.VIZIO.com |
VIZIO XVT423SV/XVT473SV/XVT553SV User Manual
Chapter 1 Setting Up Your HDTV
Finding a Location for Your HDTV
The power consumption of your HDTV is about 147W AVG (XVT423SV), 189W AVG (XVT473SV) or 225W AVG (XVT553SV).
o Use the included power cord.
oWhen an extension cord is required, use one with the correct power rating. The 3- pronged cord must be grounded and the grounding feature (3rd prong) must not be compromised.
To take full advantage of your TV, you will need an Internet connection. Set up the Internet connection using the initial Setup App or the Network Menu in the HDTV Settings App. Your HDTV has 802.11n dual-band wireless built-in (which is also compatible with 802.11b and 802.11g wireless networks), so you can connect your TV to the Internet through your wireless home network. Or you can connect to the Internet by plugging in an Ethernet cable from your Internet connection to the Ethernet port on your HDTV. A wired connection may provide a more consistent connection depending on the conditions in your home environment See Network Menu on page 49 for detailed information on setting up your Internet connection.
Install your HDTV on a flat surface to avoid tipping.
For proper ventilation, you must allow space between the back of your HDTV and the wall.
Avoid installing your HDTV in places with high humidity, dust, or smoke so you do not shorten the service life of the electronic components.
Install your HDTV in a level, landscape orientation, with the VIZIO logo at the bottom to prevent poor ventilation and excessive component damage.
If you want to mount your HDTV on the wall, see below for additional information.
Read this user manual carefully before installing your HDTV.
VIZIO offers professional installation services including home networking. Contact VIZIO for more information on these services at 877-MYVIZIO (877-698-4946) or www.VIZIO.com.
10
www.VIZIO.com
VIZIO XVT423SV/XVT473SV/XVT553SV User Manual
Wall Mounting your HDTV
Your HDTV can be mounted on the wall for viewing. If you choose to mount your HDTV on the wall, follow the instructions below.
1.Write down the serial number located on the back of your HDTV in the space provided on page 1 to have it handy if you need to call for support.
2.Remove the stand base and neck:
a.Disconnect the cables from your HDTV.
b.Place your HDTV face down on a soft, flat surface to prevent damage to the screen.
c.Remove the four screws holding the stand neck, and then remove the neck and base.
Note: To remove the base from the neck, unscrew thumbscrew on bottom.
3.Mount your HDTV on the wall:
a.Attach your HDTV to a wall mount (sold separately) using the mounting holes in the back panel of your HDTV.
b.Read the instructions that came with your specific wall mount to properly hang your HDTV.
Wall Mounting Specifications - XVT423SV
Screw Size |
|
M6 |
|
|
|
Screw Length |
|
16.0 mm |
|
|
|
Screw Pitch |
|
0.7 mm |
|
|
|
Hole Pattern |
|
VESA standard 200 x 200 mm spacing |
|
|
|
Wall Mounting Specifications – XVT473SV
Screw Size |
|
M6 |
|
|
|
Screw Length |
|
16.0 mm |
|
|
|
Screw Pitch |
|
0.7 mm |
|
|
|
Hole Pattern |
|
VESA standard 200 x 200 mm spacing |
|
|
|
Wall Mounting Specifications – XVT553SV
Screw Size |
|
M8 |
|
|
|
Screw Length |
|
16.0 mm |
|
|
|
Screw Pitch |
|
1.25 mm |
|
|
|
Hole Pattern |
|
VESA standard 200 x 400 mm spacing |
|
|
|
Version 4/26/2010 |
11 |
|
www.VIZIO.com |
VIZIO XVT423SV/XVT473SV/XVT553SV User Manual
Chapter 2 Basic Controls and Connections
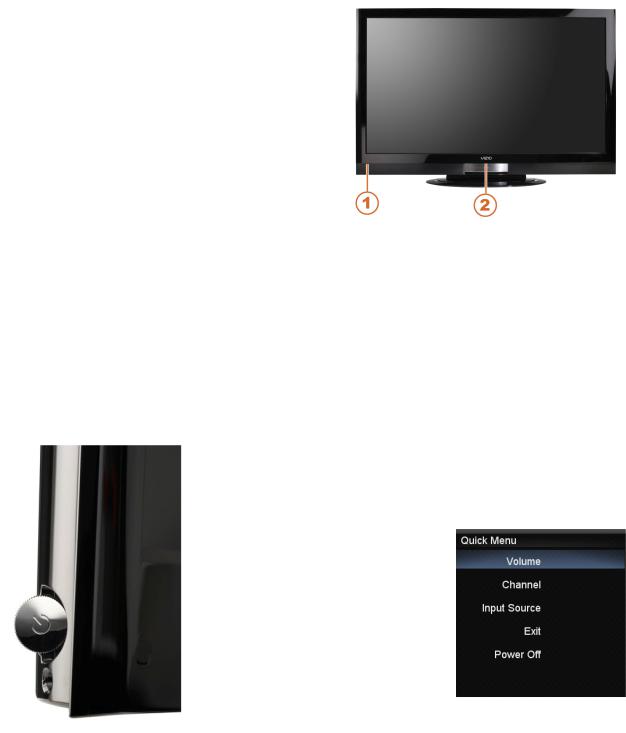
Front Panel
1.Remote Control Sensor—Point the remote control directly at this window on the lower left corner of your HDTV for the best response to the remote signal.
2.POWER ‘VIZIO’ LIGHT—The VIZIO name lights white when powered on and orange when powered off.
Jag Wheel Control
The Jag wheel on the side of your HDTV performs all of the same functions you might see as buttons on other TVs, including volume, power, input source, and channel change. All of these functions have been combined into a single wheel on your XVT423SV/XVT473SV/XVT553SV.
Press the Jag wheel once to turn your HDTV on.
Press and hold the Jag wheel for three seconds to turn your HDTV off.
When watching TV, scroll the Jag wheel up and down to turn the volume up and down.
To open the Quick Menu, press the Jag wheel for two seconds, scroll the wheel up and down to highlight an option, and then press in the wheel again to confirm your selection. If you do not press anything, the menu will automatically close after 10 seconds.
oVolume—Press to increase or decrease the speaker volume.
oChannel—Press to open a channel list. Choose the channel with the wheel and then press the wheel to go to that channel.
oInput Source—Press to cycle through the various devices connected to your TV (called Inputs). The inputs cycle in the following sequence: TV, AV, Comp, HDMI-1, HDMI-2, HDMI-3, HDMI-4, HDMI SIDE, and RGB. After you have stepped through the entire sequence, you will return to the beginning.
o Exit—Press to close the Quick Menu.
o Power Off—Press to turn your HDTV off.
Note: The Jag wheel does not operate in the OSD menu. Please use your remote control to change your HDTV settings.
12
www.VIZIO.com
VIZIO XVT423SV/XVT473SV/XVT553SV User Manual
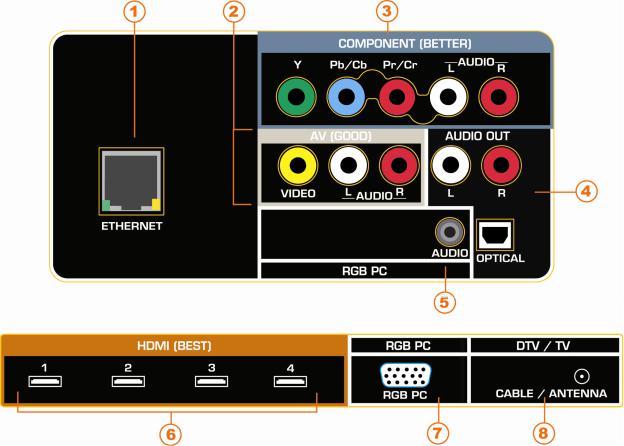
Rear Panel Connections
1.ETHERNET—Connect an Ethernet cable to access the Internet. Set up the Internet connection using the initial Setup App or the Network Menu in the HDTV Settings App. Your HDTV also has 802.11n wireless, so you can connect your TV to the Internet through you wireless home network. See Network Menu on page 49 for detailed information on setting up your Internet connection.
2.AV—Connect Composite video devices, such as a VCR or game console. Use the white and red connectors to connect the external audio from the same source.
3.COMPONENT (Y Pb/Cb Pr/Cr with L/R Audio)—Connect Component video devices such as a DVD Player or Set Top Box here.
4.AUDIO OUT:
a.OPTICAL—Connect the audio from the HDTV to an external device equipped with an Optical input, such as a Vizio Sound Bar, Home Theater System, external amplifier, or stereo.
b.ANALOG L/R—Connect the audio from the HDTV to an external device, such as a Home Theater System, external amplifier, or stereo. Speakers cannot be connected directly here.
5.RGB PC AUDIO—Connect a 1/8” mini plug stereo connector from the computer to the TV if you want the sound to come from the HDTV speakers.
6.HDMI 1, 2, 3, and 4—Connect digital video devices such as a DVD player or Set-Top Box through this all digital connector. There is an additional HDMI connector on the side.
7.RGB PC VIDEO—Connect the video from a computer here.
8.DTV/TV—Connect to an antenna or digital cable source. For digital TV stations in your area visit www.antennaweb.org. For Cable and Satellite Set Top Boxes, we recommend that you use a HDMI or Component cable connection for high definition image quality.
Version 4/26/2010 |
13 |
|
www.VIZIO.com |

VIZIO XVT423SV/XVT473SV/XVT553SV User Manual
Side Panel Connections
1.USB 1, 2, and 3:
Reserved for future functions.
Service port for use by a professional service technician.
2.HDMI SIDE—Connect digital video devices such as a DVD player or SetTop Box through this all digital connector. There are additional HDMI connectors on the back.
Chapter 3 VIZIO Remote Control
Your new VIZIO HDTV comes with an IR / Bluetooth-enabled universal remote that lets you interact with Internet content delivered to your HDTV. You can also use it to program other A/V devices connected to your TV, such as DVD or Blu-ray player, Cable/Satellite set-top box, DVR, home theater, and more.
Installing the Batteries
1.Remove the battery cover.
2.Insert two AA batteries into the remote control. Make sure that you match the (+) and (-) symbols on the batteries with the (+) and (-) symbols inside the battery compartment
3.Replace the battery cover.
Precautionary Tips for Inserting the Batteries:
Only use quality AA batteries.
Do not mix new and old batteries. This may result in cracking or leakage that may cause a fire or lead to personal injury.
Inserting the batteries incorrectly may also result in cracking or leakage that may cause a fire or lead to personal injury.
Dispose of batteries according to local hazardous waste regulations.
Keep the batteries away from children and pets.
Activating Your Bluetooth Remote
You will activate your Bluetooth remote control in the Setup App. Follow the instructions on the screen to complete the activation.
You can also activate your remote control using the HDTV Settings App. See Bluetooth Menu on page 50 for more information on activating your remote control.
14
www.VIZIO.com
VIZIO XVT423SV/XVT473SV/XVT553SV User Manual
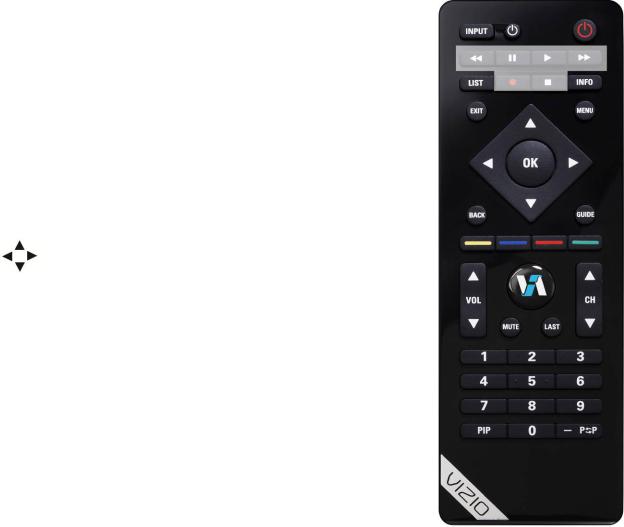
Remote Control Buttons
Basic TV Functions
INPUT—Press to cycle through the various devices connected to your TV (called Inputs). You can name your inputs when you set them up during the HDTV Settings App. The inputs cycle in the following sequence: TV, AV (Composite), COMP (Component), HDMI-1, HDMI-2, HDMI-3, HDMI-4, HDMI side, and RGB (VGA). Once you have stepped through the entire sequence, you will return to the beginning.
Device Power ( next to INPUT button)—Press to turn the device connected to the active input (i.e. HDMI, COMP) ON and OFF. The device must first be set up during the Setup App or using Device Setup in the HDTV Settings App.
Power ( top right corner)—Press to turn the TV on from the standby mode. Press it again to return to standby mode.
LIST—Press to display a list of available channels. If a DVR has been programmed to work with this remote, this button will display the list of recorded programs.
INFO—Press to display program information. If a device has been programmed to work with this remote, this button will act as the INFO button for that device.
EXIT—Press to exit from open menus.
MENU—Press to launch the VIZIO Internet Apps (VIA) Dock on the bottom of the TV, including the HDTV Settings App, used to make adjustments to your TV. This button also opens the menu for the device connected to the active input (i.e. HDMI, COMP).
Press to navigate open menus, adjust other TV settings such as brightness and contrast, or turn menu options on and off.
OK—Press to select an option in the menu.
BACK—Press to go back to the previous page in open menus.
GUIDE—Press to display detailed information when viewing a digital TV program.
YELLOW—Press to perform the same function as the “A” button on your Cable/Satellite box.
BLUE—Press to perform the same function as the “B” button on your Cable/Satellite box.
RED—Press to perform the same function as the “C” button on your Cable/Satellite box.
GREEN—Press to perform the same function as the “D” button on your Cable/Satellite box.
VOL ▲/▼—Press to turn the volume up or down.
VIA—Press to launch the VIZIO Internet Apps (VIA) Dock on the bottom
of the TV, including the HDTV Settings App, used to make adjustments to your TV. This button also opens the menu for the device connected to the active input (i.e. HDMI, COMP).
MUTE—Press to turn the sound on and off. LAST—Press to recall the previously viewed channel. CH ▲/▼—Press to change the channels up or down.
Number Button Pad—Press to select a channel or enter a password.
PIP—Press to activate the picture-in-picture feature. The screen will display the sub-screen in the corner over the main screen. Press it again to display the POP (Picture Outside Picture) option.
Version 4/26/2010 |
15 |
|
www.VIZIO.com |

VIZIO XVT423SV/XVT473SV/XVT553SV User Manual
—(DASH)—Press to insert a dash between the main and sub-channels. For example, digital channel 28- 2 would be selected by the button sequence 2, 8, DASH, 2.
A/V Functions
Use these buttons on your remote control to control your pre-programmed DVR, DVD Player or Cable/Satellite Box.
Fast Reverse ( )—Press to reverse playback.
Pause (II)—Press to pause playback. Play (►)—Press to start playback.
Fast Forward ( )—Press to skip to the next chapter.
(●)—Press to begin recording.
Stop ( )—Press to stop playback/recording.
VIA Functions
Use these buttons on your remote control to control the VIZIO Internet Apps (VIA) functions on your HDTV. See Using VIA on page 31 for more information about the VIA functions on your HDTV.
Press to switch between different video screen sizes when the Sidebar is open.
Press to move or delete  an App from the VIA
Dock. Or, create a new App and add it to your
VIA Dock.
Slide the keyboard open to input letters and characters in various Apps. You must activate your remote control during the initial Setup App that plays when you first turn on your TV in order to use the sliding keyboard.
Press to exit an App or from the VIA Dock
Press to view settings for the active App
Press to launch the VIA Dock. The Apps in the dock let you watch movies, TV shows, listen to music, and much more.
16
www.VIZIO.com

VIZIO XVT423SV/XVT473SV/XVT553SV User Manual
Making it Your Universal Remote
The Setup App that runs when you first turn on your TV will help you set up your various devices that are connected to your HDTV, so that you can use your VIZIO remote control for all of your devices.
You can also set up your devices by accessing the HDTV Settings App. See Device Setup on page 44 for more information on setting up your remote.
Remote Control Range
When in IR mode (factory default):
Point the remote control directly at the sensor for the best response to the remote signal.
Do not place any obstacles between the remote control and the remote control sensor.
The effective range of the remote control is approximately 30 feet (10 meters) from the front of the remote control sensor, 30° to the left and right, 20° up and down.
When in Bluetooth mode:
Your remote control also has Bluetooth
and when paired with your HDTV, allows you to point the remote control anywhere to control the TV.
The effective range of the remote control is approximately 30 feet (10 meters) from the front of the remote control sensor.
VIZIO Remote Control Precautions
The remote control should be kept dry and away from heat sources. Avoid humidity.
If the TV responds erratically to the remote control or does not respond at all, check the batteries. If the batteries are low or exhausted, replace them with fresh batteries.
When not using the remote control for a long period of time, remove the batteries.
Do not take the batteries apart, heat them, or throw them into a fire.
Do not subject the remote control to undue physical stress, such as striking or dropping it.
Do not attempt to clean the remote control with a volatile solvent. Wipe it with a clean, damp cloth.
Version 4/26/2010 |
17 |
|
www.VIZIO.com |

VIZIO XVT423SV/XVT473SV/XVT553SV User Manual
Chapter 4 Getting Started
Your VIA-enabled HDTV has a built-in Setup App that plays when you turn on your TV for the first time. Follow the on-screen directions to easily setup your new HDTV.
1.Insert batteries into the remote control.
2.Connect the power cord to the power cord connector on your HDTV, and then plug the power cord into an AC wall socket.
3.Gather the devices your want to connect to your HDTV. Don’t connect them yet. We will help you do that in the Setup App.
4.Turn on your TV. The Setup App will automatically play and guide your thru the initial setup of your HDTV. Use the arrow and OK buttons to navigate through the Setup App. During the setup process you will:
Activate your new remote control for Bluetooth
Connect to the Internet
Add your TV channels (unless you have a Cable/Satellite set-top box)
Connect your devices and set up your remote to control them
18
www.VIZIO.com
VIZIO XVT423SV/XVT473SV/XVT553SV User Manual
Chapter 5 Using your HDTV for the first time
Connecting to the Internet
Set up the Internet connection using the initial Setup App or the Network Menu in the HDTV Settings App. Your HDTV has 802.11n dual-band wireless, so you can connect your TV to the Internet through your wireless home network. Or you can also connect to the Internet by plugging in an Ethernet cable from your Internet connection into the Ethernet port on your HDTV. A wired connection may provide a more consistent connection depending on the conditions in your home environment. See Network Menu on page 49 for detailed information on setting up your Internet connection.
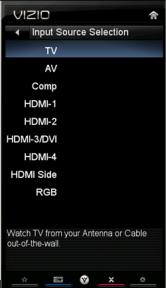
Select Input Source
Select the input source for your HDTV by pressing INPUT on the remote control or the side of your TV. Pressing this button will cycle you through the following options: TV, AV, Comp, HDMI-1, HDMI-2, HDMI-3, HDMI-4,
HDMI SIDE, and RGB.
Turn on your device and you will see a picture on your HDTV. If there is no picture, make sure you have selected the correct input on your HDTV.
Note: If the selected device is RF connected, your HDTV must be in TV mode and on either channel 3 or channel 4 matching the channel which has been selected on the back of the VCR, Cable Box, External TV Tuner or Satellite Receiver. Refer to Owner or User’s Manual of such equipment for details.
Watching a TV Program
Before you start watching TV, make sure that any Cable, Satellite or off-air
antenna connections are secure. Also, verify that the power cord is plugged into a correctly grounded electrical outlet or surge protector.
1.Press the power button on the remote control. The VIZIO logo on the front will light up white.
2.Select the input to which your device is connected that provides TV programming (e.g. TV, HDMI, COMP).
Note: You should be able to see a picture. If you do not, make sure that all of your HDTV connections are secure and you have selected the correct video input source. Each press of INPUT on the remote control will cycle through the available inputs. Press the button until the input associated with the device you want to view is shown.
3.When using the TV input, press the channel buttons on the remote control or press the Jag wheel on the TV to launch the Quick Menu to change the channel. The channel buttons will not work if you are watching a program using HDMI, Component, or AV inputs.
Note: If your HDTV is in TV mode, pressing CH+ and CH- will not work until a channel scan has been been run. See Auto Channel Search on page 42.
Version 4/26/2010 |
19 |
|
www.VIZIO.com |

VIZIO XVT423SV/XVT473SV/XVT553SV User Manual
Viewing Digital TV Program Information
When the channel is changed an information header is shown over the picture for a few seconds. Press GUIDE to display more information about the program and schedule. Press INFO repeatedly to display additional information for that channel.
20
www.VIZIO.com
VIZIO XVT423SV/XVT473SV/XVT553SV User Manual
Exploring VIZIO Internet Apps (VIA)
VIA Sidebar
Select an App and press OK to launch the Sidebar. The Sidebar contents vary by App.
Press the VIA button to bring up the dock.
VIA Dock
Press ◄ or ► to scroll through all of the Apps in the
VIA Dock. Press OK to open an App.
Widget Gallery
Select this to discover more Apps and download them to the TV. This gallery is constantly being updated so check back often!
|
Profile App |
|
HDTV Settings App |
Create a unique name, |
|
picture and set of Apps in |
||
Adjust TV functions like |
||
the VIA Dock. Set up a |
||
brightness, contrast, |
||
profile for each member of |
||
Parental Controls, and |
||
your household. |
||
Network settings. |
||
|
Version 4/26/2010 |
21 |
|
www.VIZIO.com |
 Loading...