


 Loading...
USER MANUAL
M50-D1, M55-D0, M60-D1, M65-D0, M70-D3, & M80-D3

Safety Information
IMPORTANT SAFETY INSTRUCTIONS - M-SERIES DISPLAY
Your display is designed and manufactured to operate within defined design limits. Misuse may result in electric shock or fire. To prevent your display from being damaged, the following instructions should be observed for the installation, use, and maintenance of your display. Read the following safety instructions before operating your display. Keep these instructions in a safe place for future reference.
•Toreducetheriskofelectricshockorcomponentdamage,switchoffthepowerbeforeconnectingothercomponentstoyourdisplay.
•Read these instructions.
•Keep these instructions.
•Heed all warnings.
•Follow all instructions.
•Do not use this apparatus near water.
•Clean only with dry cloth.
•Do not block any ventilation openings. Install in accordance with the manufacturer’s instructions.
•Do not install near any heat sources such as radiators, heat registers, stoves, or other apparatus (including amplifiers) that produce heat.
•Do not defeat the safety purpose of the polarized or grounding-type plug. A polarized plug has two blades with one wider than the other. A grounding type plug has two blades and a third grounding prong. The wide blade or the third prong are provided for your safety. If the provided plug does not fit into your outlet, consult an electrician for replacement of the obsolete outlet.
•Protect the power cord from being walked on or pinched particularly at plugs, convenience receptacles, and the point where they exit from the apparatus.
•Only use attachments/accessories specified by the manufacturer.
•Useonlywiththecart,stand,tripod,bracket,ortablespecifiedbythemanufacturer,orsoldwiththeapparatus.When a cart is used, use caution when moving the cart/apparatus combination to avoid injury from tip-over.
•Unplug this apparatus during lightning storms or when unused for long periods of time.
•Refer all servicing to qualified service personnel. Servicing is required when the apparatus has been damaged in any
way, such as power-supply cord or plug is damaged, liquid has been spilled or objects have fallen into the apparatus, the apparatus has been exposed to rain or moisture, does not operate normally, or has been dropped.
•Unplug the power cord before cleaning your display.
•When moving your display from an area of low temperature to an area of high temperature, condensation may form in the housing. Wait before turning on your display to avoid causing fire, electric shock, or component damage.
•A distance of at least three feet should be maintained between your display and any heat source, such as a radiator, heater, oven, amplifier etc. Do not install your display close to smoke. Operating your display close to smoke or moisture may cause fire or electric shock.
•Slots and openings in the back and bottom of the cabinet are provided for ventilation. To ensure reliable operation of your display and to protect it from overheating, be sure these openings are not blocked or covered. Do not place your display in a bookcase or cabinet unless proper ventilation is provided.
•Never push any object into the slots and openings on your display cabinet. Do not place any objects on the top of your display. Doing so could short circuit parts causing a fire or electric shock. Never spill liquids on your display.
•Your display should be operated only from the type of power source indicated on the label. If you are not sure of the type of power supplied to your home, consult your dealer or local power company.
•Do not apply pressure or throw objects at your display. This may compromise the integrity of the display. The manufacturer’s warranty does not cover user abuse or improper installations.
•Thepowercordmustbereplacedwhenusingdifferentvoltagethanthevoltagespecified.Formoreinformation,contactyourdealer.
•When connected to a power outlet, power is always flowing into your display. To totally disconnect power, unplug the power cord.
•The lightning flash with arrowhead symbol within an equilateral triangle is intended to alert the user to the presence of un-isolated, dangerous voltage within the inside of your display that may be of sufficient magnitude to constitute a risk of electric shock to persons.
•Do not overload power strips and extension cords. Overloading can result in fire or electric shock.
•The wall socket should be installed near your display and easily accessible.
•Only power of the marked voltage can be used for your display. Any other voltage than the specified voltage may cause fire or electric shock.
•Do not touch the power cord during lightning. To avoid electric shock, avoid handling the power cord during electrical storms.
•Unplug your display during a lightning storm or when it will not be used for long period of time. This will protect your display from damage due to power surges.
•Do not attempt to repair or service your display yourself. Opening or removing the back cover may expose you to high voltages, electric shock, and other hazards. If repair is required, contact your dealer and refer all servicing to qualified service personnel.
•WARNING: Keep your display away from moisture. Do not expose your display to rain or moisture. If water penetrates into your display, unplug the power cord and contact your dealer. Continuous use in this case may result in fire or electric shock.
•Do not use your display if any abnormality occurs. If any smoke or odor becomes apparent, unplug the power cord and contact your dealer immediately. Do not try to repair your display yourself.
•Avoid using dropped or damaged appliances. If your display is dropped and the housing is damaged, the internal components may function abnormally. Unplug the power cord immediately and contact your dealer for repair. Continued use of your display may cause fire or electric shock.
•Do not install your display in an area with heavy dust or high humidity. Operating your display in environments with heavy dust or high humidity may cause fire or electric shock.
•Follow instructions for moving your display. Ensure that the power cord and any other cables are unplugged before moving your display.
•When unplugging your display, hold the AC/DC power adapter, not the cord. Pulling on the power cord may damage the wires inside the cord and cause fire or electric shock. When your display will not be used for an extended period of time, unplug the power cord.
•To reduce risk of electric shock, do not touch the connector with wet hands.
•Insert batteries in accordance with instructions. Incorrect polarities may cause the batteries to leak which can damage the remote control or injure the operator. Do not expose batteries to excessive heat such as sunshine, fire or the like.
•If any of the following occurs, contact the dealer:
•The power cord fails or frays.
•Liquid sprays or any object drops into your display.
•Your display is exposed to rain or other moisture.
•Your display is dropped or damaged in any way.
•The performance of your display changes substantially.
•This apparatus shall not be exposed to dripping or splashing and no objects filled with liquids, such as vases, shall be placed on the apparatus.
•The mains plug or appliance coupler is used as the disconnect device, the disconnect device shall remain readily operable.
•CAUTION - These servicing instructions are for use by qualified service personnel only. To reduce the risk of electric shock, do not
perform any servicing other than that contained in the operating instructions unless you are qualified to do so.
ofuninsulatedDANGEROUSVOLTAGEwithintheproduct’senclosurethatmaybeofsufficientmagnitudetoconstitute H a risk of electrical shock to persons.
•Please use caution around the display: pulling or pushing on the display may cause the display to tip or fall over
resulting in personal injury and/or property damage.
• This apparatus is intended to be supported by a UL Listed Wall Mount Bracket or the equivalent.
ii
IMPORTANT SAFETY INSTRUCTIONS - XR6 TABLET REMOTE
Read all the safety information below before using your VIZIO XR6 Tablet Remote. For additional information, read the User Manual available directly through an application in your Tablet Remote.
DRIVING SAFELY
Use of your Tablet Remote while driving may cause distractions and may be prohibited in some places. Always comply with local laws and regulations when driving. Driving safely is your primary responsibility, but if using your Tablet Remote, NEVER type or read content, navigate on the web or perform any other activity that takes your attention from driving. ALWAYS keep your eyes on the road and your hands on the wheel, use voice-activated commands and focus on your driving.
SEIZURES/BLACKOUTS
Some people may be susceptible to epileptic seizures or strokes when exposed to flashing lights such as when playing games or watching video, even if those conditions have not been previously diagnosed. If you or anyone in your family has a history of seizures or strokes, or if you have any other reason to think you or someone under your supervision may be susceptible to epileptic seizures or strokes, consult a doctor before playing games or watching video. If you experience headaches, blackouts, seizures, convulsion, eye or muscle twitching, loss of awareness, involuntary movement, or disorientation stop using your Tablet and consult a doctor. To reduce risk hold your Tablet Remote at a distance from your eyes, use it in a well-lit room, take frequent breaks and stop if you are tired.
WARNING ABOUT HEARING DAMAGE
Exposure to loud sounds can damage your hearing causing hearing loss and tinnitus (ringing or buzzing in the ears). With continued exposure to loud noises, ears may become accustomed to the sound level, which may result in permanent damage to hearing without any noticeable discomfort.
LOUD SOUNDS + TIME = HEARING LOSS
The more time you spend exposed to loud sounds, the more likely you are to damage your hearing.
•Limit the amount of time you spend using headphones, or earpieces.
•Do not turn up the volume to block out surrounding noise.
•If you can’t hear people speaking, turn down the volume.
If you experience a sensation of pressure or fullness in your ears, ringing in your ears, or muffled speech or believe you may have experienced noise induced hearing loss, you should have your hearing checked by an ear doctor.
REPETITIVE MOTION
Repetitively performing actions such as pressing keys or typing, may result in occasional discomfort in your hands, arms, shoulders, neck, or other parts of your body. Take breaks often and if you continue to have discomfort during or after such use, stop use and see a doctor.
GLASS PARTS
Your Table Remote may contain glass parts. Dropping your Tablet Remote on a hard surface or a substantial impact to your Tablet Remote could break this glass. If the glass breaks, do not touch or attempt to remove it. Stop using your Tablet Remote until the glass is replaced by an authorized service center.
POTENTIALLY EXPLOSIVE ATMOSPHERE
When you are in an area with potentially explosive atmosphere turn off your Tablet Remote. Do not remove, install, or charge batteries to avoid creating sparks that can cause an explosion or fire resulting in serious injury or even death. Areas with potentially explosive atmospheres are often, but not always, clearly marked. Potential areas may include fueling areas, fuel or chemical transfer or storage facilities, or areas where the air contains chemicals or particles, such as grain dust, or metal powders, or areas where you would normally be advised to turn off your engine.
CARE AND MAINTENANCE
Do not use volatile solvents to clean this product. Such chemicals may damage it. To clean product, gently wipe it with a clean, dry, soft cloth.
BATTERY DISPOSAL AND RECYCLING
You must dispose of this product properly, according to local laws and regulations. Because this product contains electronic components and a battery, it must be disposed of separately from household waste. Contact local authorities to learn about disposal and recycling options. For more information, visit www.vizio.com/environment.
RADIO FREQUENCY (RF) EXPOSURE
Your Tablet Remote contains radio transmitters and receivers. The antenna on your Tablet Remote is around the perimeter. For optimal device performance, and to be sure that human exposure to RF energy does not exceed the guidelines set forth in the relevant standards, always follow these instructions and precautions: place your Tablet Remote with the antenna away from your body.
Your Tablet Remote is designed to comply with local regulatory requirements concerning exposure to RF energy. For more information about your Tablet Remote compliance with the Specific Absorption Rates (SAR) limits set by the FCC visit www.vizio.com. For additional information from the FCC about exposure to RF energy, see: https://www. fcc.gov/encyclopedia/radio-frequency-safety.
The World Health Organization (WHO) notes that present scientific information indicates that exposure to RF within the limits set by the ICNIRP guidelines (from 0-300 GHz) does not produce any known adverse health effect. Additional information can be found at www.who.int/emf.
RF ENERGY INTERFERENCE/COMPATIBILITY
RF transmitting electronic equipment such as your Tablet Remote is subject to, and may cause, interference with other electronic equipment. Always follow instructions to avoid interference problems and turn off your Tablet Remote in any location where posted notices instruct you to do so.
AIRCRAFT
Turn off your Tablet Remote whenever instructed to do so by airline staff. If your Tablet Remote has an airplane mode or similar feature, consult airline staff about using it in flight.
IMPLANTABLE MEDICAL DEVICES
If you have an implantable medical device, such as a pacemaker or defibrillator, consult with your doctor before using your Tablet Remote. Persons with implantable medical devices should observe the following precautions:
When your Tablet Remote is ON, always keep it more than 15 centimeters (6 inches) away from the implantable medical device.
Immediately turn your Tablet Remote OFF if you have any reason to suspect that interference is taking place.
Read and follow the directions from the manufacturer of your implantable medical device. If you have any questions about using your Tablet Remote with your implantable medical device, consult with your doctor.
OPERATING TEMPERATURE
Your Tablet Remote is designed to operate between the temperatures of 32° to 95° F (0° to 35° C).
iii
Table of Contents
Getting Started......................................................... |
5 |
M-Series Display................................................................................ |
5 |
Overview - Front......................................................................... |
5 |
Overview - Back.......................................................................... |
6 |
Basic Remote..................................................................................... |
7 |
Overview...................................................................................... |
7 |
Inserting and replacing batteries.............................................. |
7 |
Tablet Remote................................................................................... |
8 |
Overview...................................................................................... |
8 |
Charging...................................................................................... |
8 |
Basic Tablet Remote Gestures.................................................. |
9 |
Basic Android Functions............................................................ |
10 |
Organizing your Android Home screens.................................. |
12 |
First-Time Setup....................................................... |
13 |
Pairing the Tablet Remote with M-Series Display.......................... |
14 |
VIZIO SmartCast™ App.............................................. |
17 |
Register for a MyVIZIO account....................................................... |
17 |
Navigating the SmartCast™ App....................................................... |
18 |
User Profile Settings......................................................................... |
20 |
Picking something to Watch............................................................. |
22 |
Picking something to Listen to......................................................... |
24 |
Watchlists........................................................................................... |
26 |
Collections......................................................................................... |
30 |
Watching Live TV............................................................................... |
33 |
Managing Categories........................................................................ |
37 |
Device Settings......................................................... |
38 |
Setting up additional SmartCast Devices........................................ |
38 |
Adjusting Picture Settings................................................................ |
41 |
Adjusting the Picture Mode Edit Settings................................. |
45 |
Adjusting the Color Calibration Settings.................................. |
48 |
Adjusting Audio Settings.................................................................. |
50 |
Adjusting Timer Settings................................................................... |
52 |
Activating the Sleep Timer......................................................... |
53 |
Setting the Auto Power Off Feature.......................................... |
53 |
Adjusting Network Settings.............................................................. |
54 |
Using the Network Connection menu...................................... |
55 |
Renaming Devices on the Input Menu............................................ |
58 |
Renaming Devices on the Input Menu..................................... |
59 |
Enabling HDMI Color Subsampling........................................... |
59 |
Changing the Display System Settings............................................ |
60 |
Viewing System Information..................................................... |
61 |
Changing the On-Screen Menu Language............................... |
62 |
Set Country.................................................................................. |
62 |
Setting the Time and Local Settings.......................................... |
63 |
Adjusting the CEC Settings......................................................... |
63 |
Turning the Power Indicator On or Off.................................... |
64 |
Adjusting the Reset & Admin Settings...................................... |
65 |
Manage mobile devices.................................................................... |
67 |
Paired Mobile Devices................................................................ |
68 |
Troubleshooting....................................................... |
69 |
Specifications............................................................ |
70 |
Warranty Information.............................................. |
76 |
Legal & Regulatory................................................... |
79 |
iv
Getting Started |
1 |
|
|
M-SERIES DISPLAY
Overview - Front
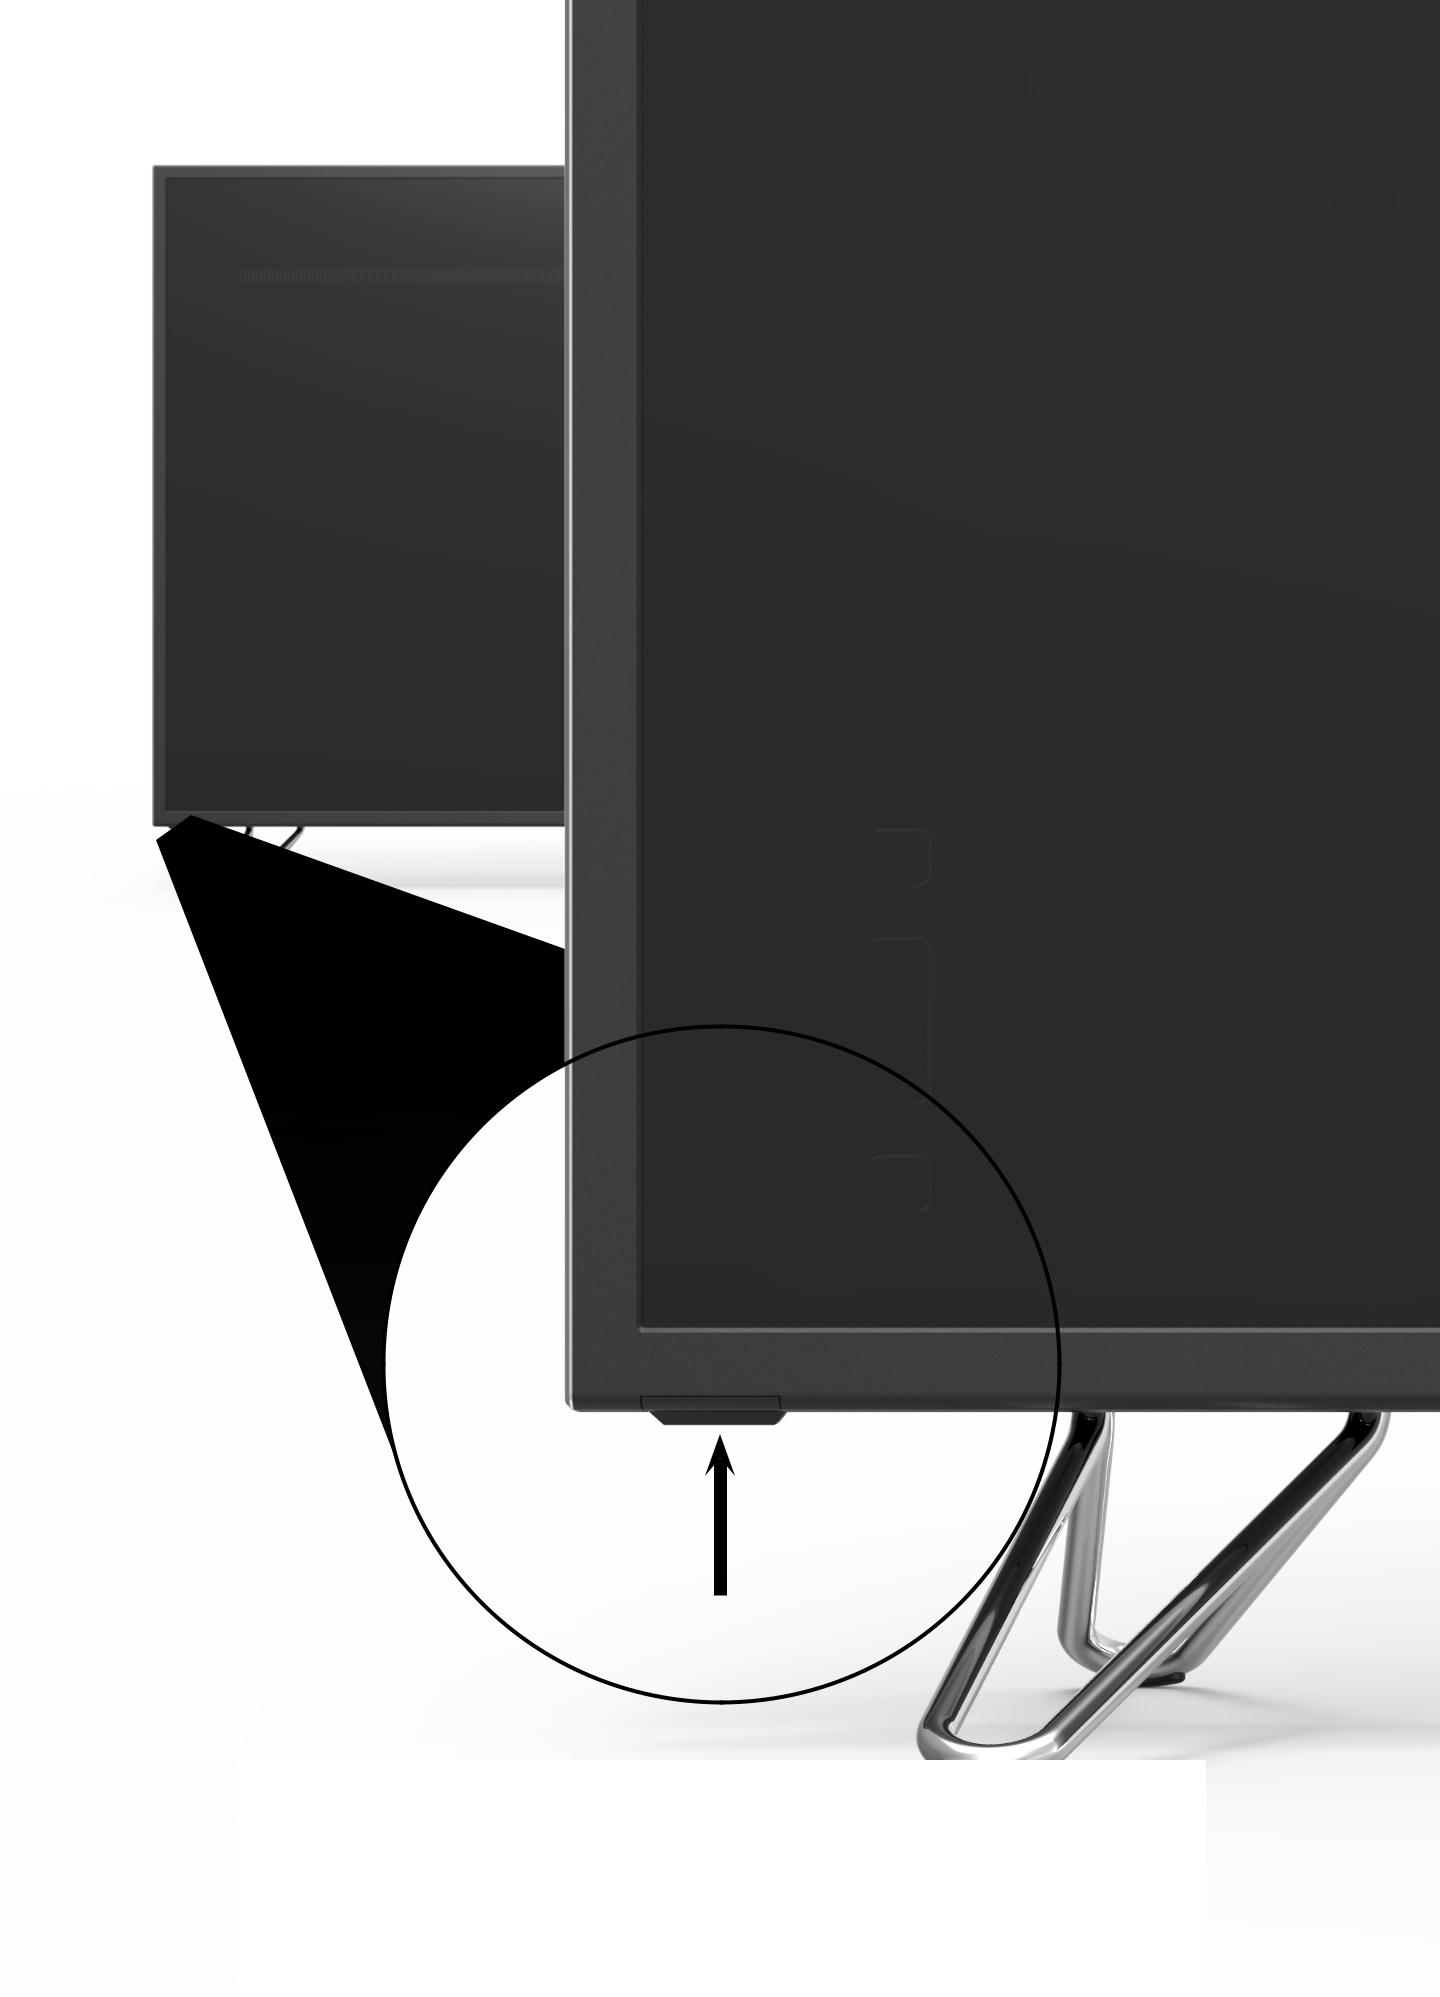
Remote Sensor & Power Indicator
When using the Basic Remote, aim it directly at this sensor.
The power indicator lights up when the Display turns on, then goes out after several seconds. To keep the power indicator LED on as long as the Display is on, see Turning the Power
Indicator On or Off on page 64.
5

1
Overview - Back
2
3
1
Power Button
1 Volume Up/Down Buttons
Input Button
USB 2.0 Ports
2
Component Ports
HDMI Port
Optical/SPDIF Audio Out Port
HDMI Ports
3
RCA Audio Out Ports
Ethernet Port
Note: The image shown here is for illustrative purposes only and may be subject to change.The actual number of ports and their locations may vary, depending on the model.
6
1
BASIC REMOTE
Overview
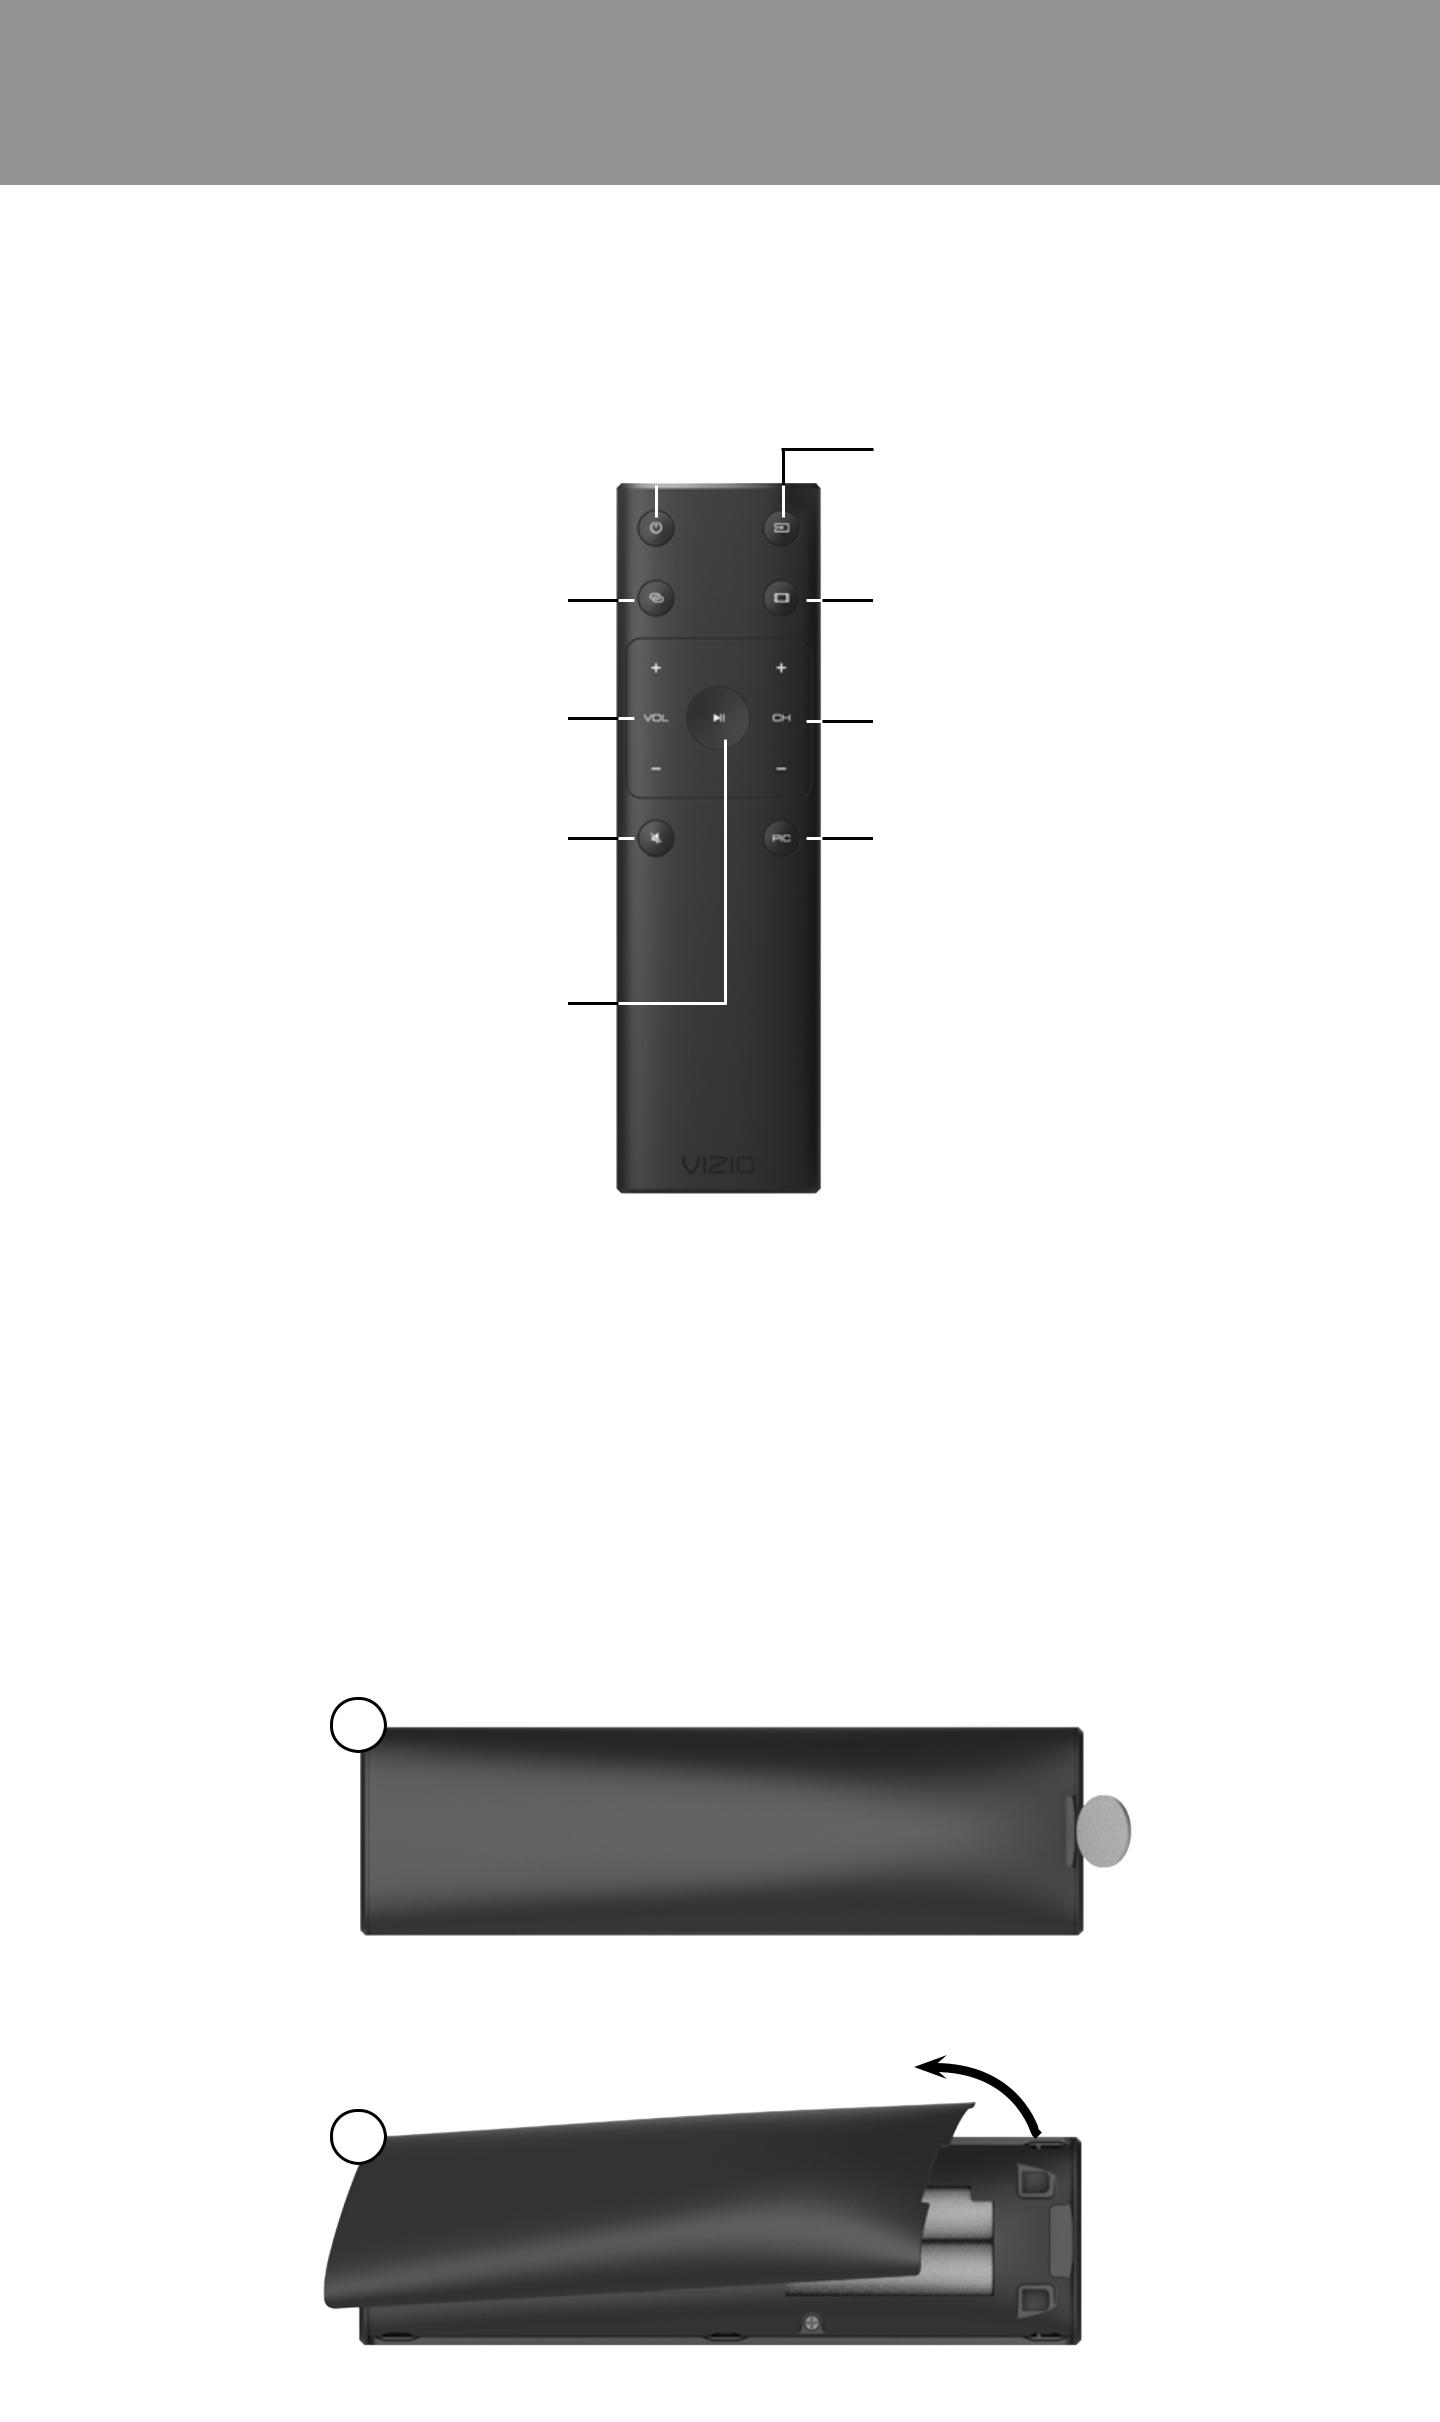
Use the Basic Remote to control the basic functions of the M-Series Display.
Power
Turn the Display on or off. 
Link
Activate pairing mode.
(Between Display and Tablet Remote)
Volume Up/Down
Increase/decrease the loudness of the audio.
Mute
Turn the audio on or off.
Play/Pause
Play or pause content.
Inserting and replacing batteries
Input
Change the currently displayed input.
Aspect Ratio
Cycle through the different aspect ratio modes.
Channel Up/Down
(Not supported)
Picture Mode
Cycle through the different picture modes.
Two AAA batteries are included for you to use with the basic remote control.
To insert/replace the batteries:
1.Find the notch on the back of the remote. Insert a coin and pry open the back cover.
2.Remove the back cover and insert two AAA batteries (included). Be sure to align the + and − symbols on the batteries and remote.
1
2
7
1
TABLET REMOTE
Overview
The 6″ Android Tablet Remote brings the way you interact up to speed with the rest of your entertainment experience. Simply tap, swipe, or use voice controls to access a virtually limitless library of casting content.
Power/Sleep/Wake |
|
|
|
Headphone port |
|
|
|
||
|
Top |
|||
Volume buttons
Left Front
USB port
Bottom
Charging
Your Tablet Remote is charged and ready for you to use. When you need to recharge the battery, simply plug the Tablet Remote into a power outlet using the USB power cable and power adapter.
To charge your Tablet Remote using the wireless charging dock, connect it to a wall outlet using the USB cable and power adapter. Then simply place the Tablet Remote on the dock.
Power |
USB Power Cable |
|
|
adapter |
|
OR
Wireless charging dock
USB power cable
8
1
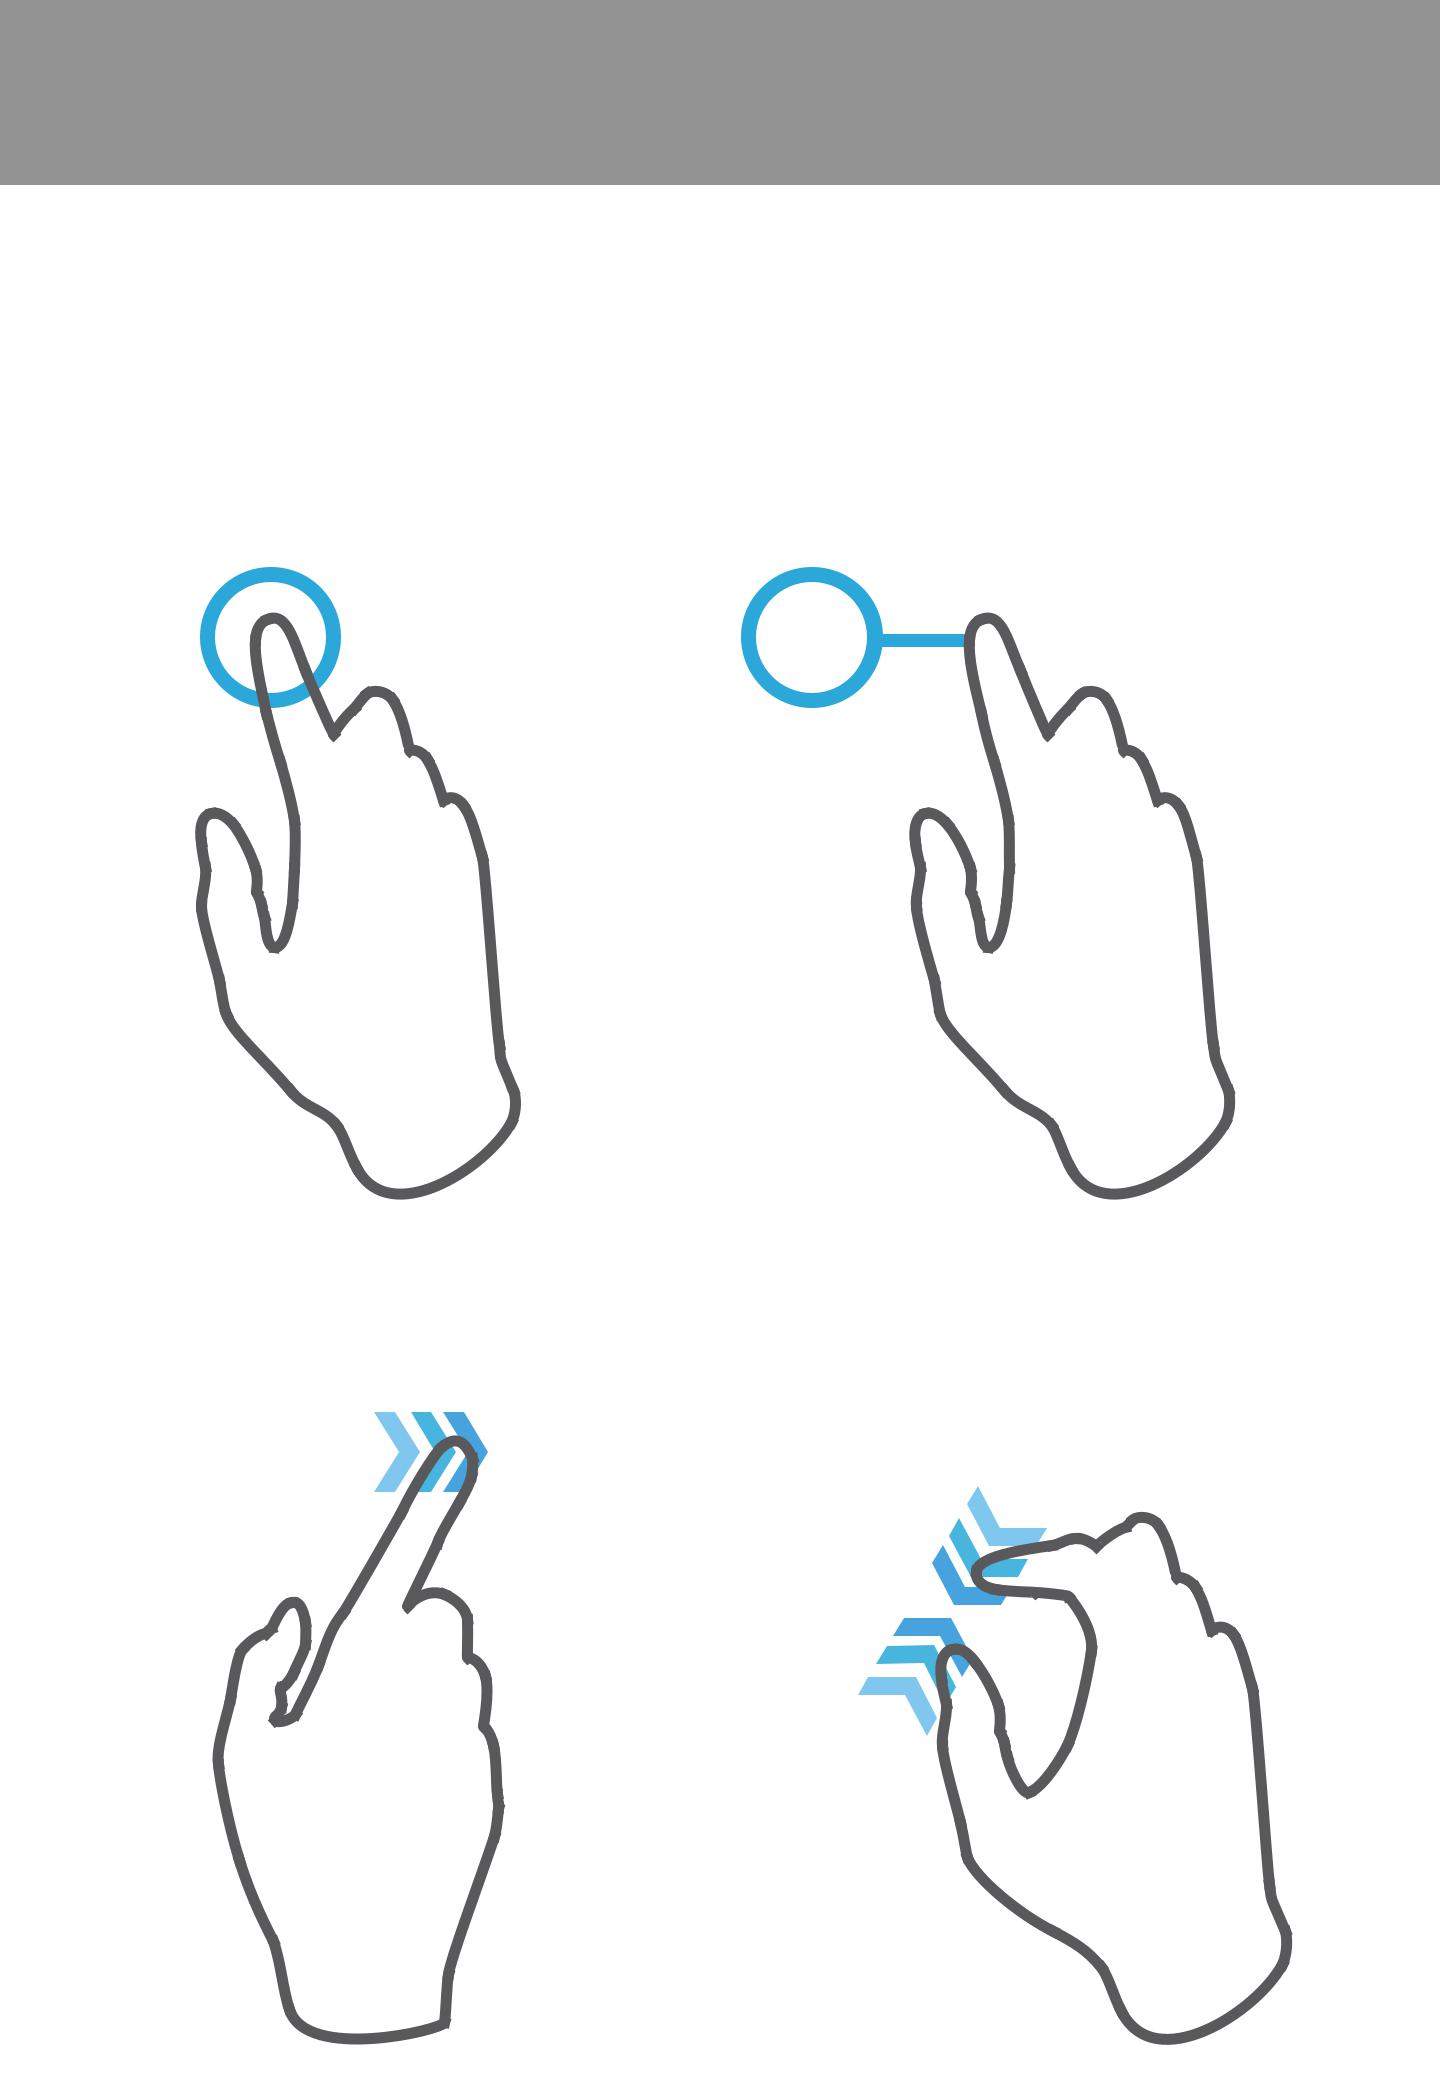
Basic Tablet Remote Gestures
The 6″ Android Tablet Remote brings the way you interact up to speed with the rest of your entertainment experience. A few hand gestures are all you need to access a virtually limitless library of casting content.
Tap |
Drag |
Swipe |
Pinch |
9
1
Basic Android Functions
There are a few basic functions that you should be familiar with before diving any deeper into the Android Tablet Remote.
Power/Sleep/Wake button
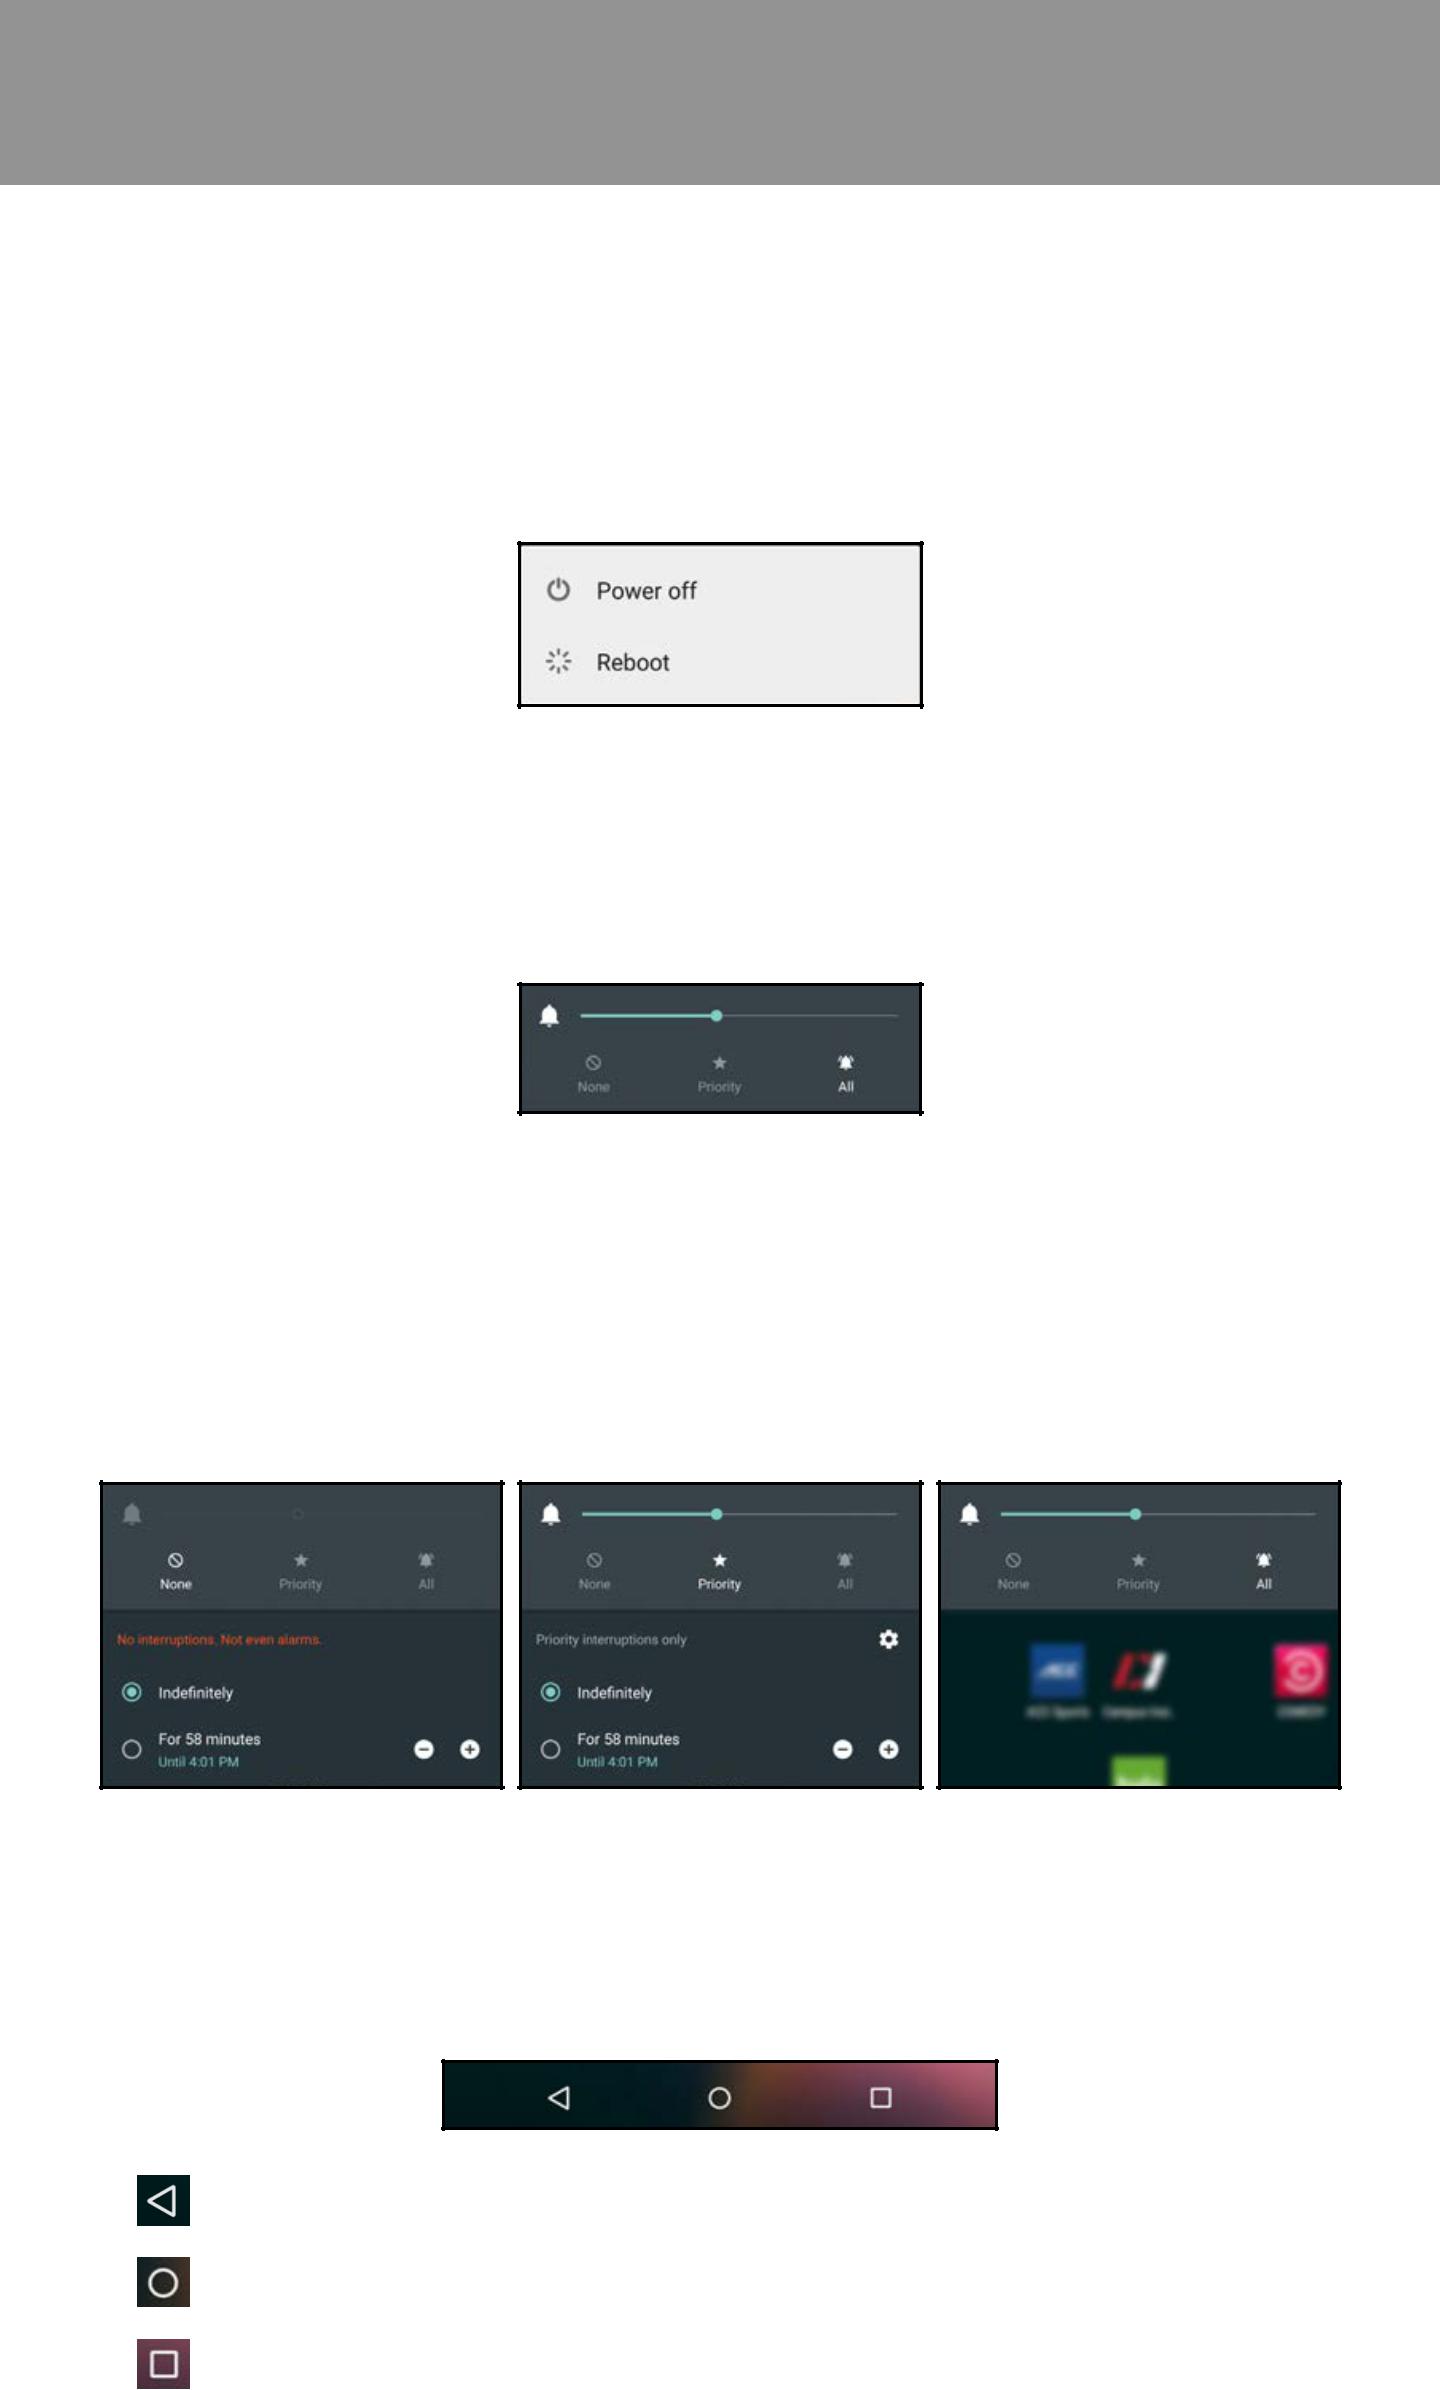
Press and hold the power button for a few seconds to power on the tablet. To turn off or reboot the tablet, press and hold the power button for a few seconds. A dialogue box appears, giving you the option to Power off or Reboot the tablet.
Volume buttons
Press the volume buttons to increase and decrease the audio levels of the tablet. As you press the buttons, a dialogue box appears on the top of the screen.
You can use your finger to adjust the audio levels by dragging the bar left (lower)/ right (higher).
There are three preset volume modes None, Priority, and All.
•None - Mute all notifications, including alarms. Choose either Indefinitely or specify an amount of time.
•Priority - Mute certain notifications, specify a priority list and settings by tapping the  icon. Choose either Indefinitely or specify an amount of time.
•All - Allow all notifications.
None |
Priority |
All |
Navigation bar and buttons
The navigation bar is located on the bottom of the screen. It contains the navigation buttons and is visible all the time.
Back - Displays the previous screen you were on.
Home - Displays the Home screen. Swipe up to open Google Now.
Overview - Displays a list of screens you’ve been on. To open one, tap on it. To remove one, swipe it left/right or tap on the X in the top right corner.
10
1
Android Quick Settings
Use the Quick Settings menu to easily access frequently used settings such as Wi-Fi, Bluetooth, and brightness controls. To access the Quick Settings menu, swipe down from the top of the screen with two fingers (or twice with one finger).
Display brightness
Slide the icon to lower or increase the brightness of your screen. Left to lower, right to increase.
Wi-Fi network
Tap the icon to turn Wi-Fi on or off. Tap the Wi-Fi network name to open the Wi-Fi settings menu.
Bluetooth settings
Tap the icon to turn Bluetooth on or off. Tap the word Bluetooth to open the Bluetooth settings menu.
Airplane mode
Taptoturnairplanemodeonoroff.Airplanemodemeansyourtablet won’t connect to a Wi-Fi signal, even when one is available.
Location
Tap to turn location services on or off. When turned on, certain apps can give you more relevant information, such as nearby restaurants or traffic conditions.
Cast screen
Tap to cast your tablet’s screen to Google Cast enabled devices.
11
1
Organizing your Android Home screens
Change your wallpaper, add a widget, or change screen order by touching and holding the background of any Home screen.
You can have an unlimited number of Home screens to the right. To add a new screen, swipe to the rightmost screen and drag an app or widget to the right edge of the screen. (The screen to the left of the main Home screen is only for Google Now)
To create a folder, simply drag and drop one app over another on a Home screen. Name or rename a folder by opening it and tapping the name.
Changing the wallpaper
1.Tap and hold the background of a Home screen. Then tap the Wallpapers icon  .
.
2.Choose an included wallpaper image or an image from your Photos, Downloads, or Drive by tapping Pick Image.
Adding an app icon to a Home screen
1.Navigate to the Home screen that you want to place the app icon.
2.Tap the All Apps icon  .
.
3.Tap and hold the app until the Home screen appears. Let go of the app to place the icon to the Home screen.
Widgets
Widgets provide a quick view or way to access information on your home screen.
1.To add a Widget, tap and hold the background a Home screen. Then tap the Widgets icon  .
.
2.Select a Widget by tapping and holding on it. Continue holding on to it and hover over the Home screen you want to place the Widget on. Release your finger to place the Widget.
To move an app or widget:
1.Tap and hold the app icon or widget.
2.Positionitwhereyoulikeandreleaseyourfinger.TomovebetweenHome screens, slide your finger (while holding) to the edge of the screen.
12

First-Time Setup |
2 |
|
|
Welcome to VIZIO SmartCast!
Your new VIZIO Home Theater Display™ is part of the all-new collection of home theater displays, sound bars and home audio speakers that can all be controlled by one ingenious app: the VIZIO SmartCast app.
With the app, you can browse movies, TV shows, music and more from multiple sources or apps in one view, without having to switch back and forth between those apps or sources. And then just tap to cast the content to your VIZIO display - from anywhere in your home. It works over WiFi, so you can control your VIZIO display from any room, and keep using your VIZIO Tablet Remote to continue browsing, play games, text or even watch another show, without disrupting what’s playing on your display. With VIZIO SmartCast, what you love doesn’t change, but how you experience it will never be the same.
Now let’s get you into setup so you can start casting!
13
2
PAIRING THE TABLET REMOTE WITH M-SERIES DISPLAY
Need help installing the Display?
Refer to the printed Quick Start Guide (included) for detailed instructions on how to install your new M-Series Display. You can also find a digital copy on support.vizio.com.
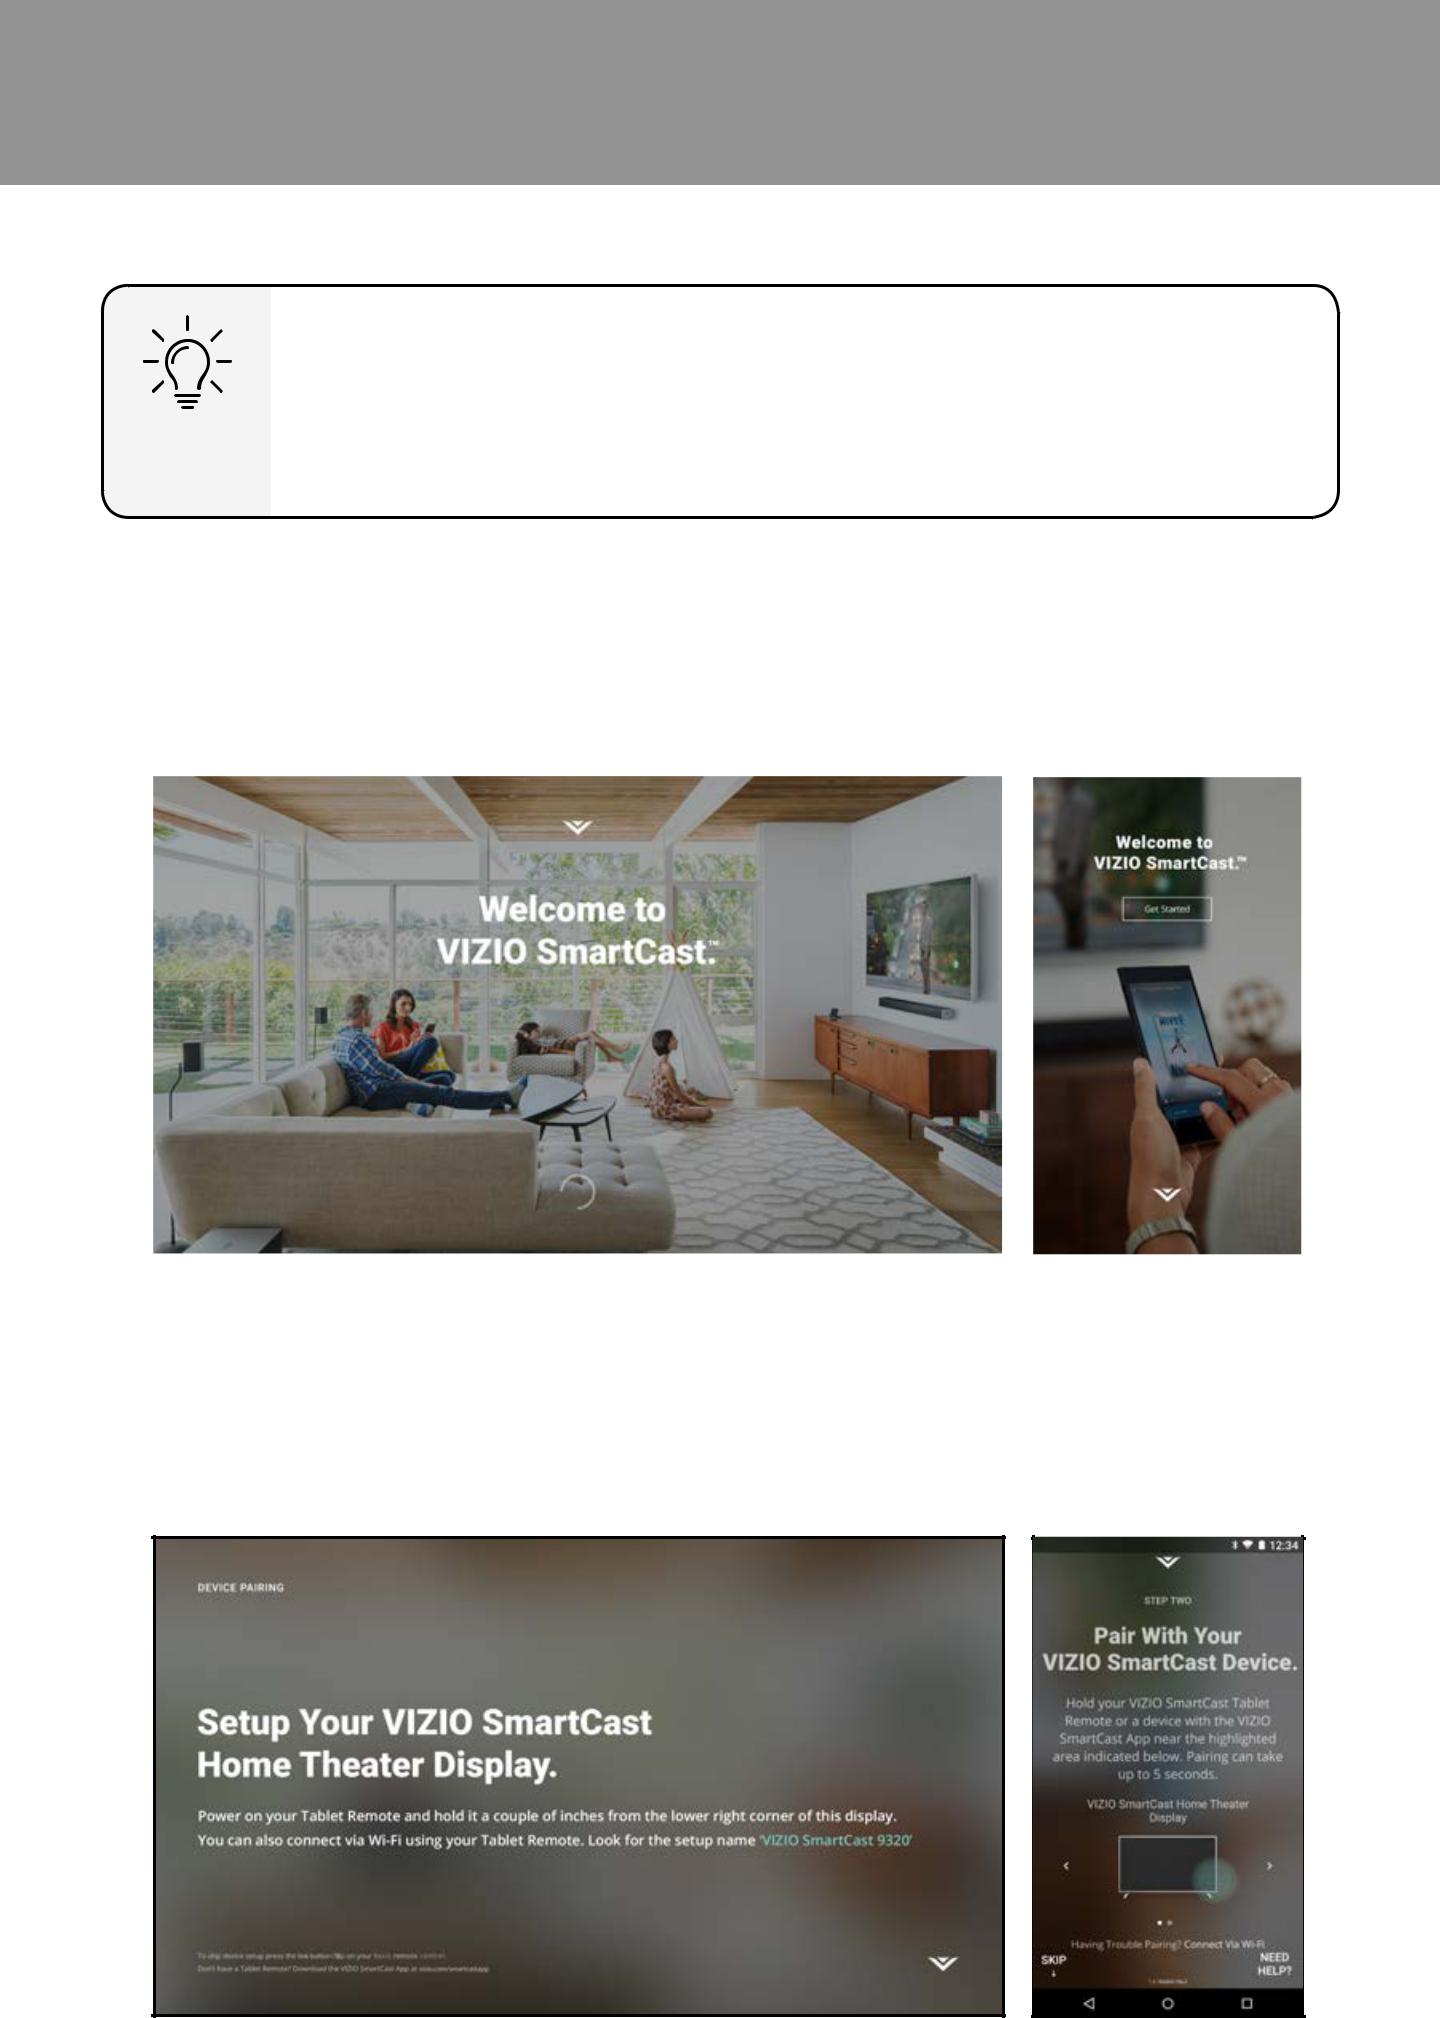
1.Turn on the M-Series Display by pressing the Power button on the back of the Display or by pressing the Power button on the Basic Remote Control. TurnontheTabletRemotebypressingandholdingthePowerbuttonfora few seconds. Tap Get Started on the tablet to begin the First-Time Setup.
|
|
|
Display |
Tablet Remote |
|
2.Select your language and tap Next to continue.
3.Hold the Tablet Remote close to the VIZIO logo on the bottom right corner of the display for a few seconds to pair it with the M-Series Display.
14
2
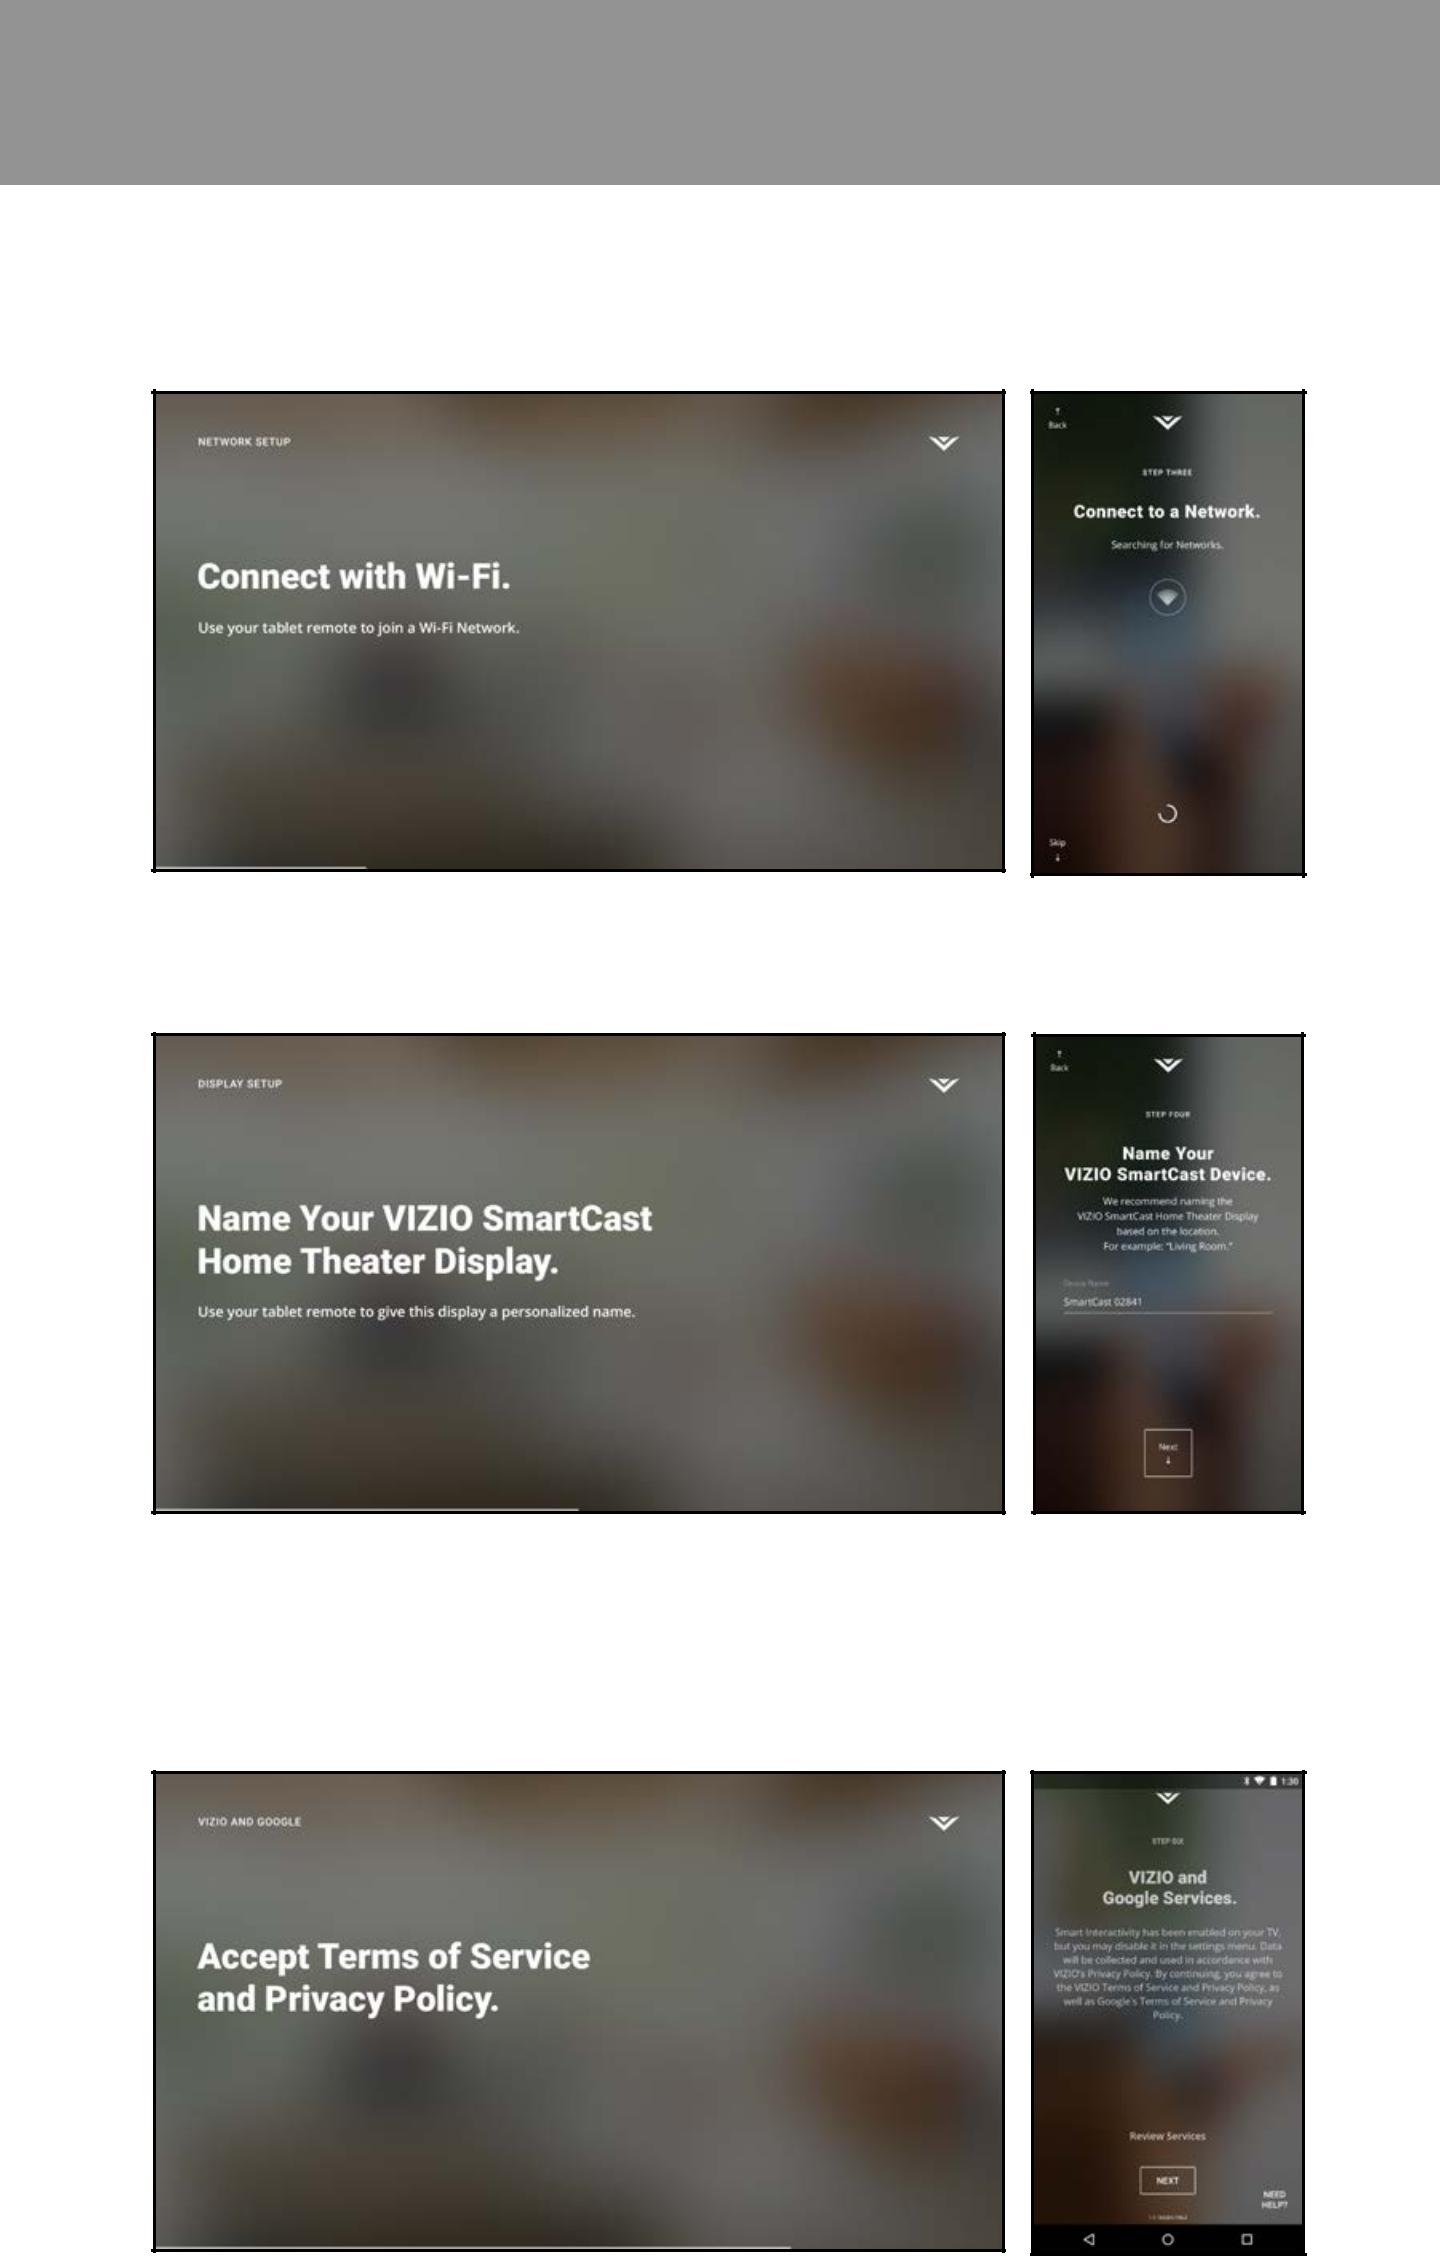
4.The tablet begins to search for a wireless network to connect to. Select your wireless network from the list and enter your password.
5.Use the tablet to name your M-Series Display.
6.Take a moment to read the VIZIO Terms of Service and Privacy Policy, as well as Google’s Terms of Service and Privacy Policy. When you are done, tap NEXT to continue.
15
2
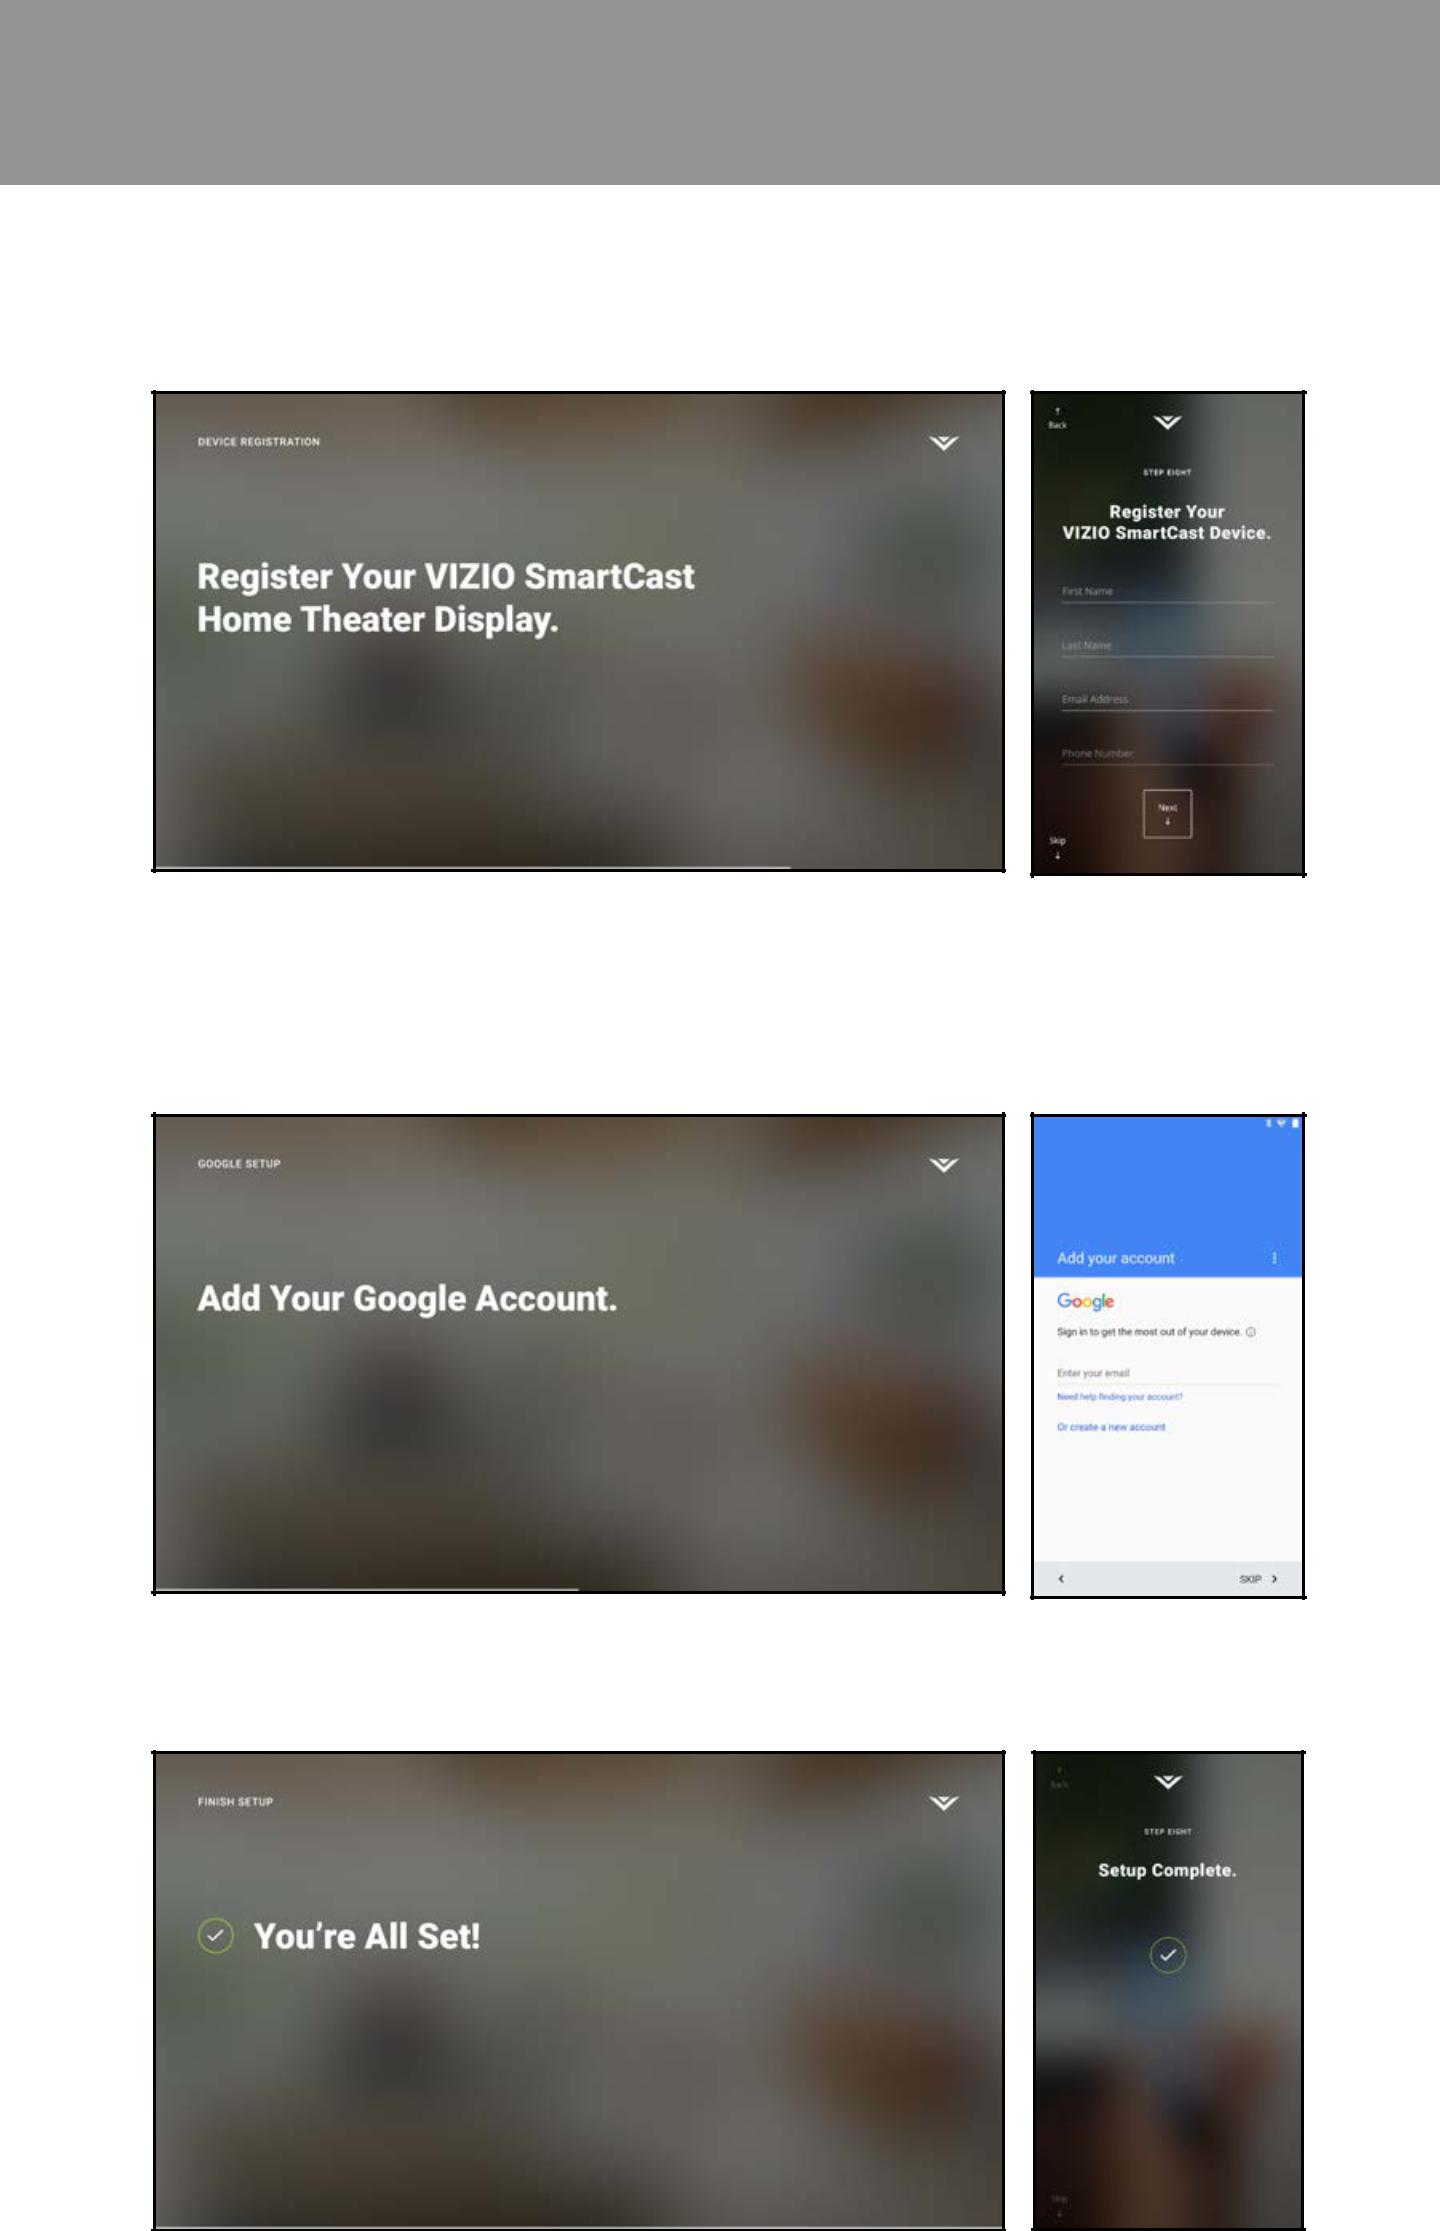
7.Use the tablet to register your M-Series Display. If you do not wish to register, tap Skip in the lower left corner.
8.Use the tablet to sign into your existing Google account. If you do not have one, tap Or create a new account to create a new account. Follow the on-screen instructions to complete the First-Time Setup.
9.The First-Time setup is complete. The VIZIO SmartCast™ App is displayed.
16
VIZIO SmartCast™ App 3
The VIZIO SmartCast™ app lets you swipe or use voice search to find your favorite content, across multiple apps and even live TV* together in one simply aggregated screen, making it easy to discover and enjoy movies, shows, music and more.
REGISTER FOR A MYVIZIO ACCOUNT
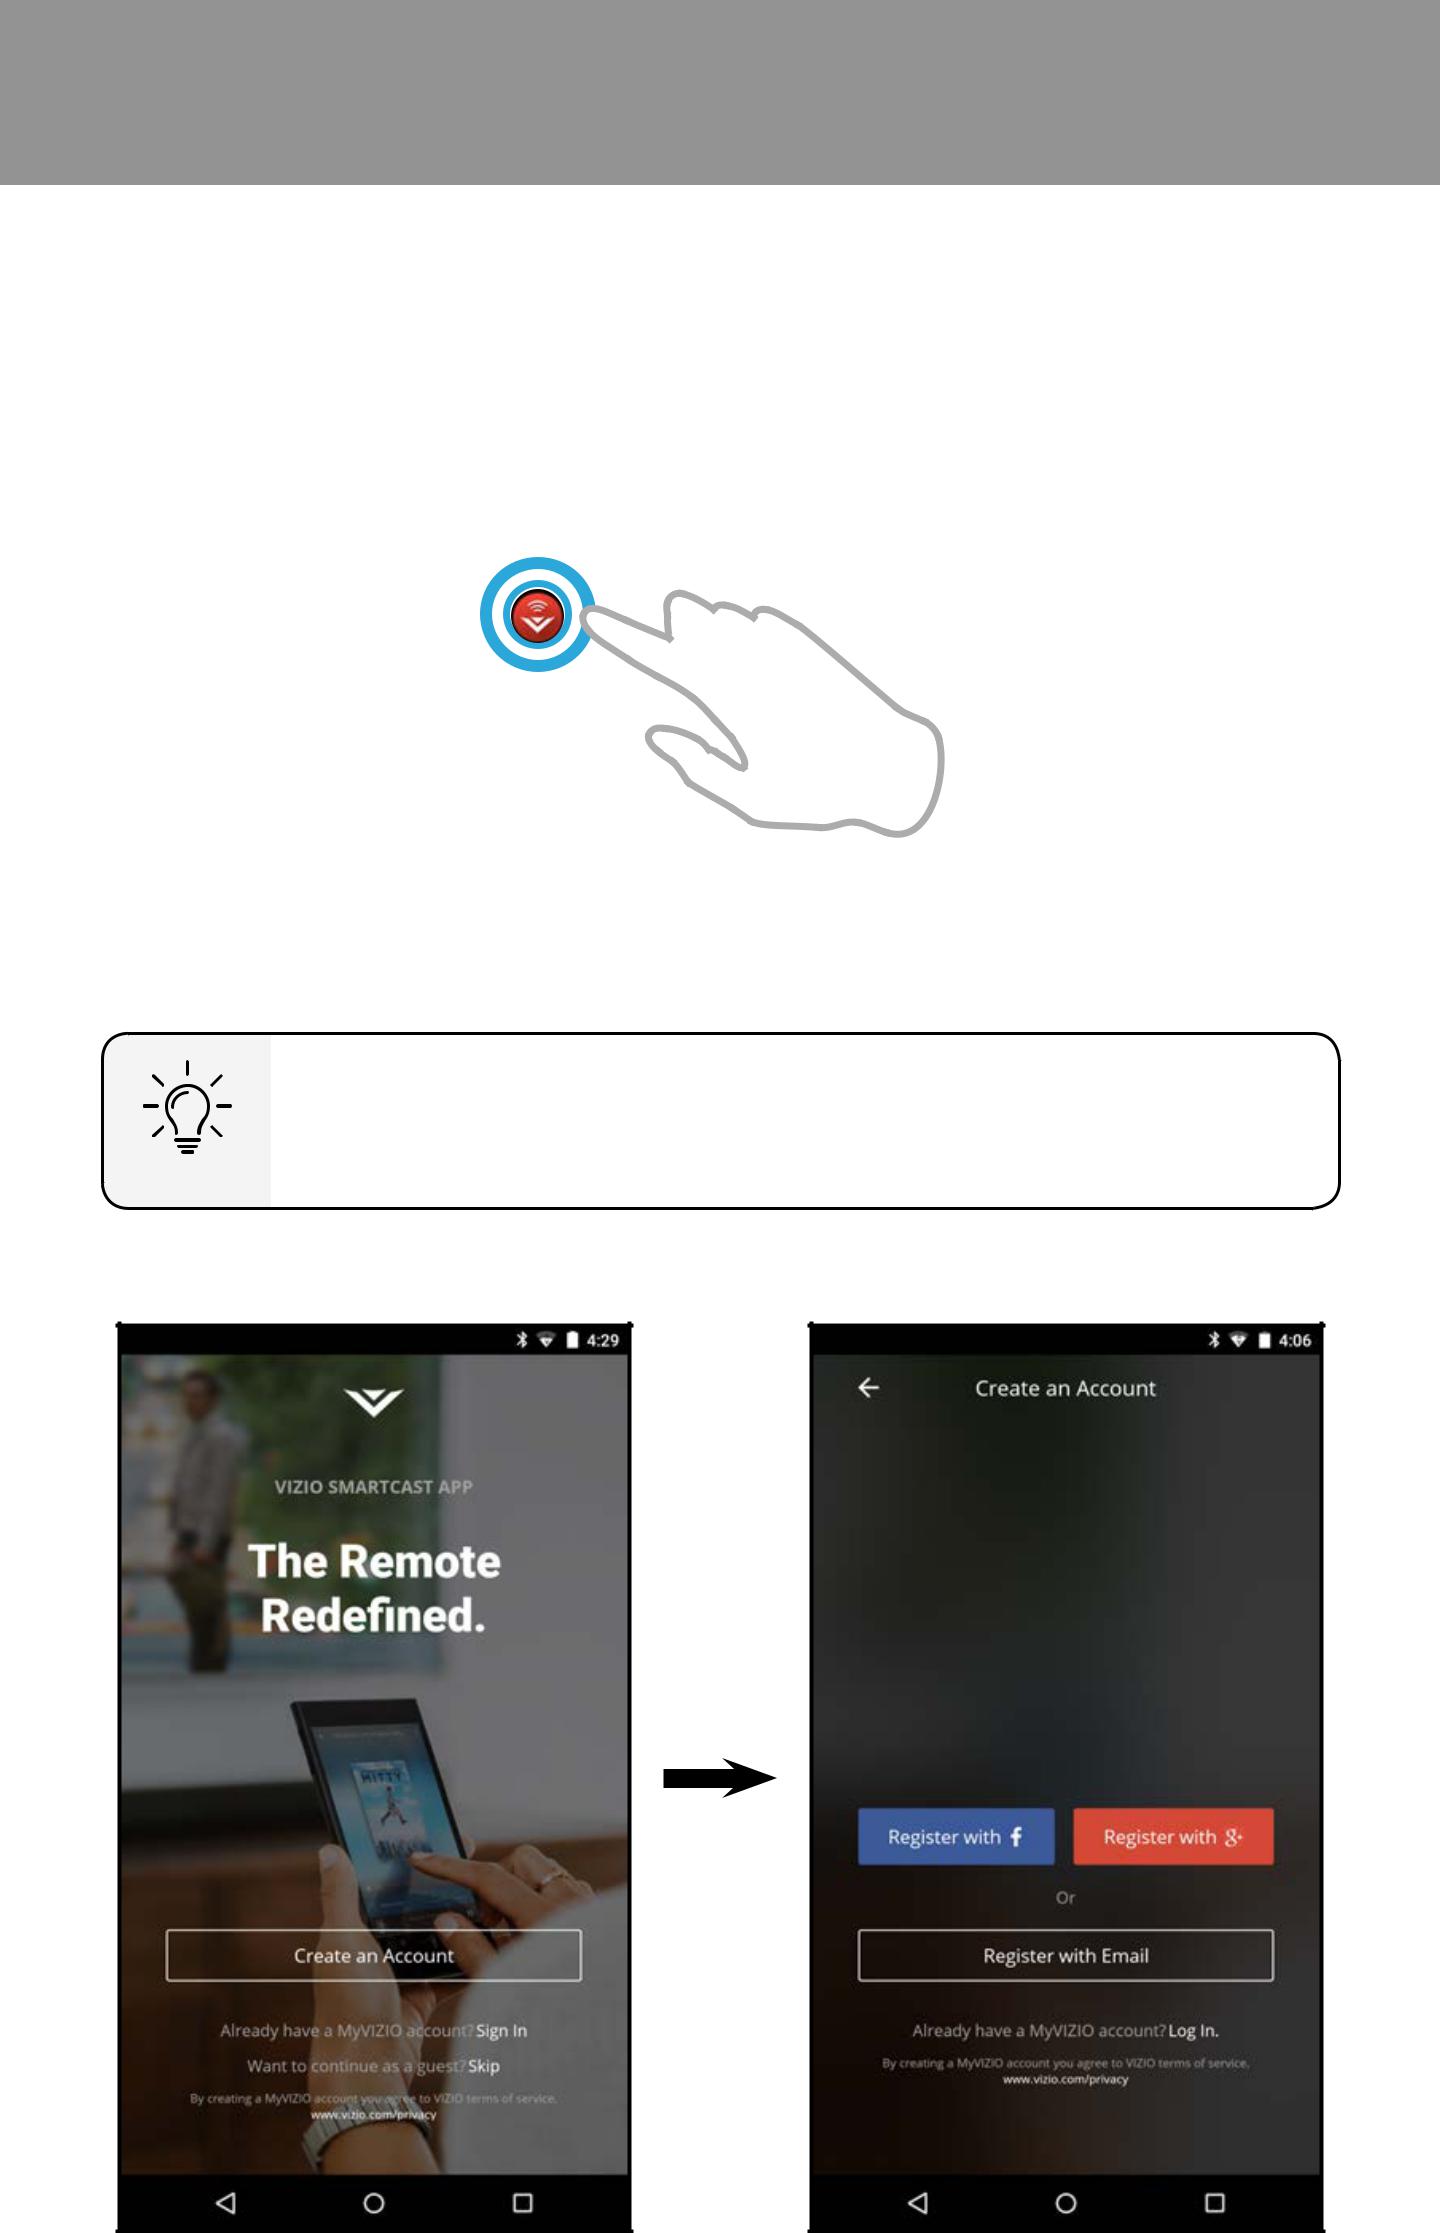
1.Launch the VIZIO SmartCast™ app.
2.Tap Create an Account to register for a MyVIZIO account. Follow the on-screen instructions to complete the registration process. If you do not want to register for a MyVIZIO account, tap Skip to continue.
To take full advantage of the VIZIO SmartCast™ app, VIZIO recommends you register for a MyVIZIO account.
Note: The images shown here are for illustrative purposes only and may be subject to change. The actual on-screen image and text may vary, depending on the model.
17
3
NAVIGATING THE SMARTCAST™ APP
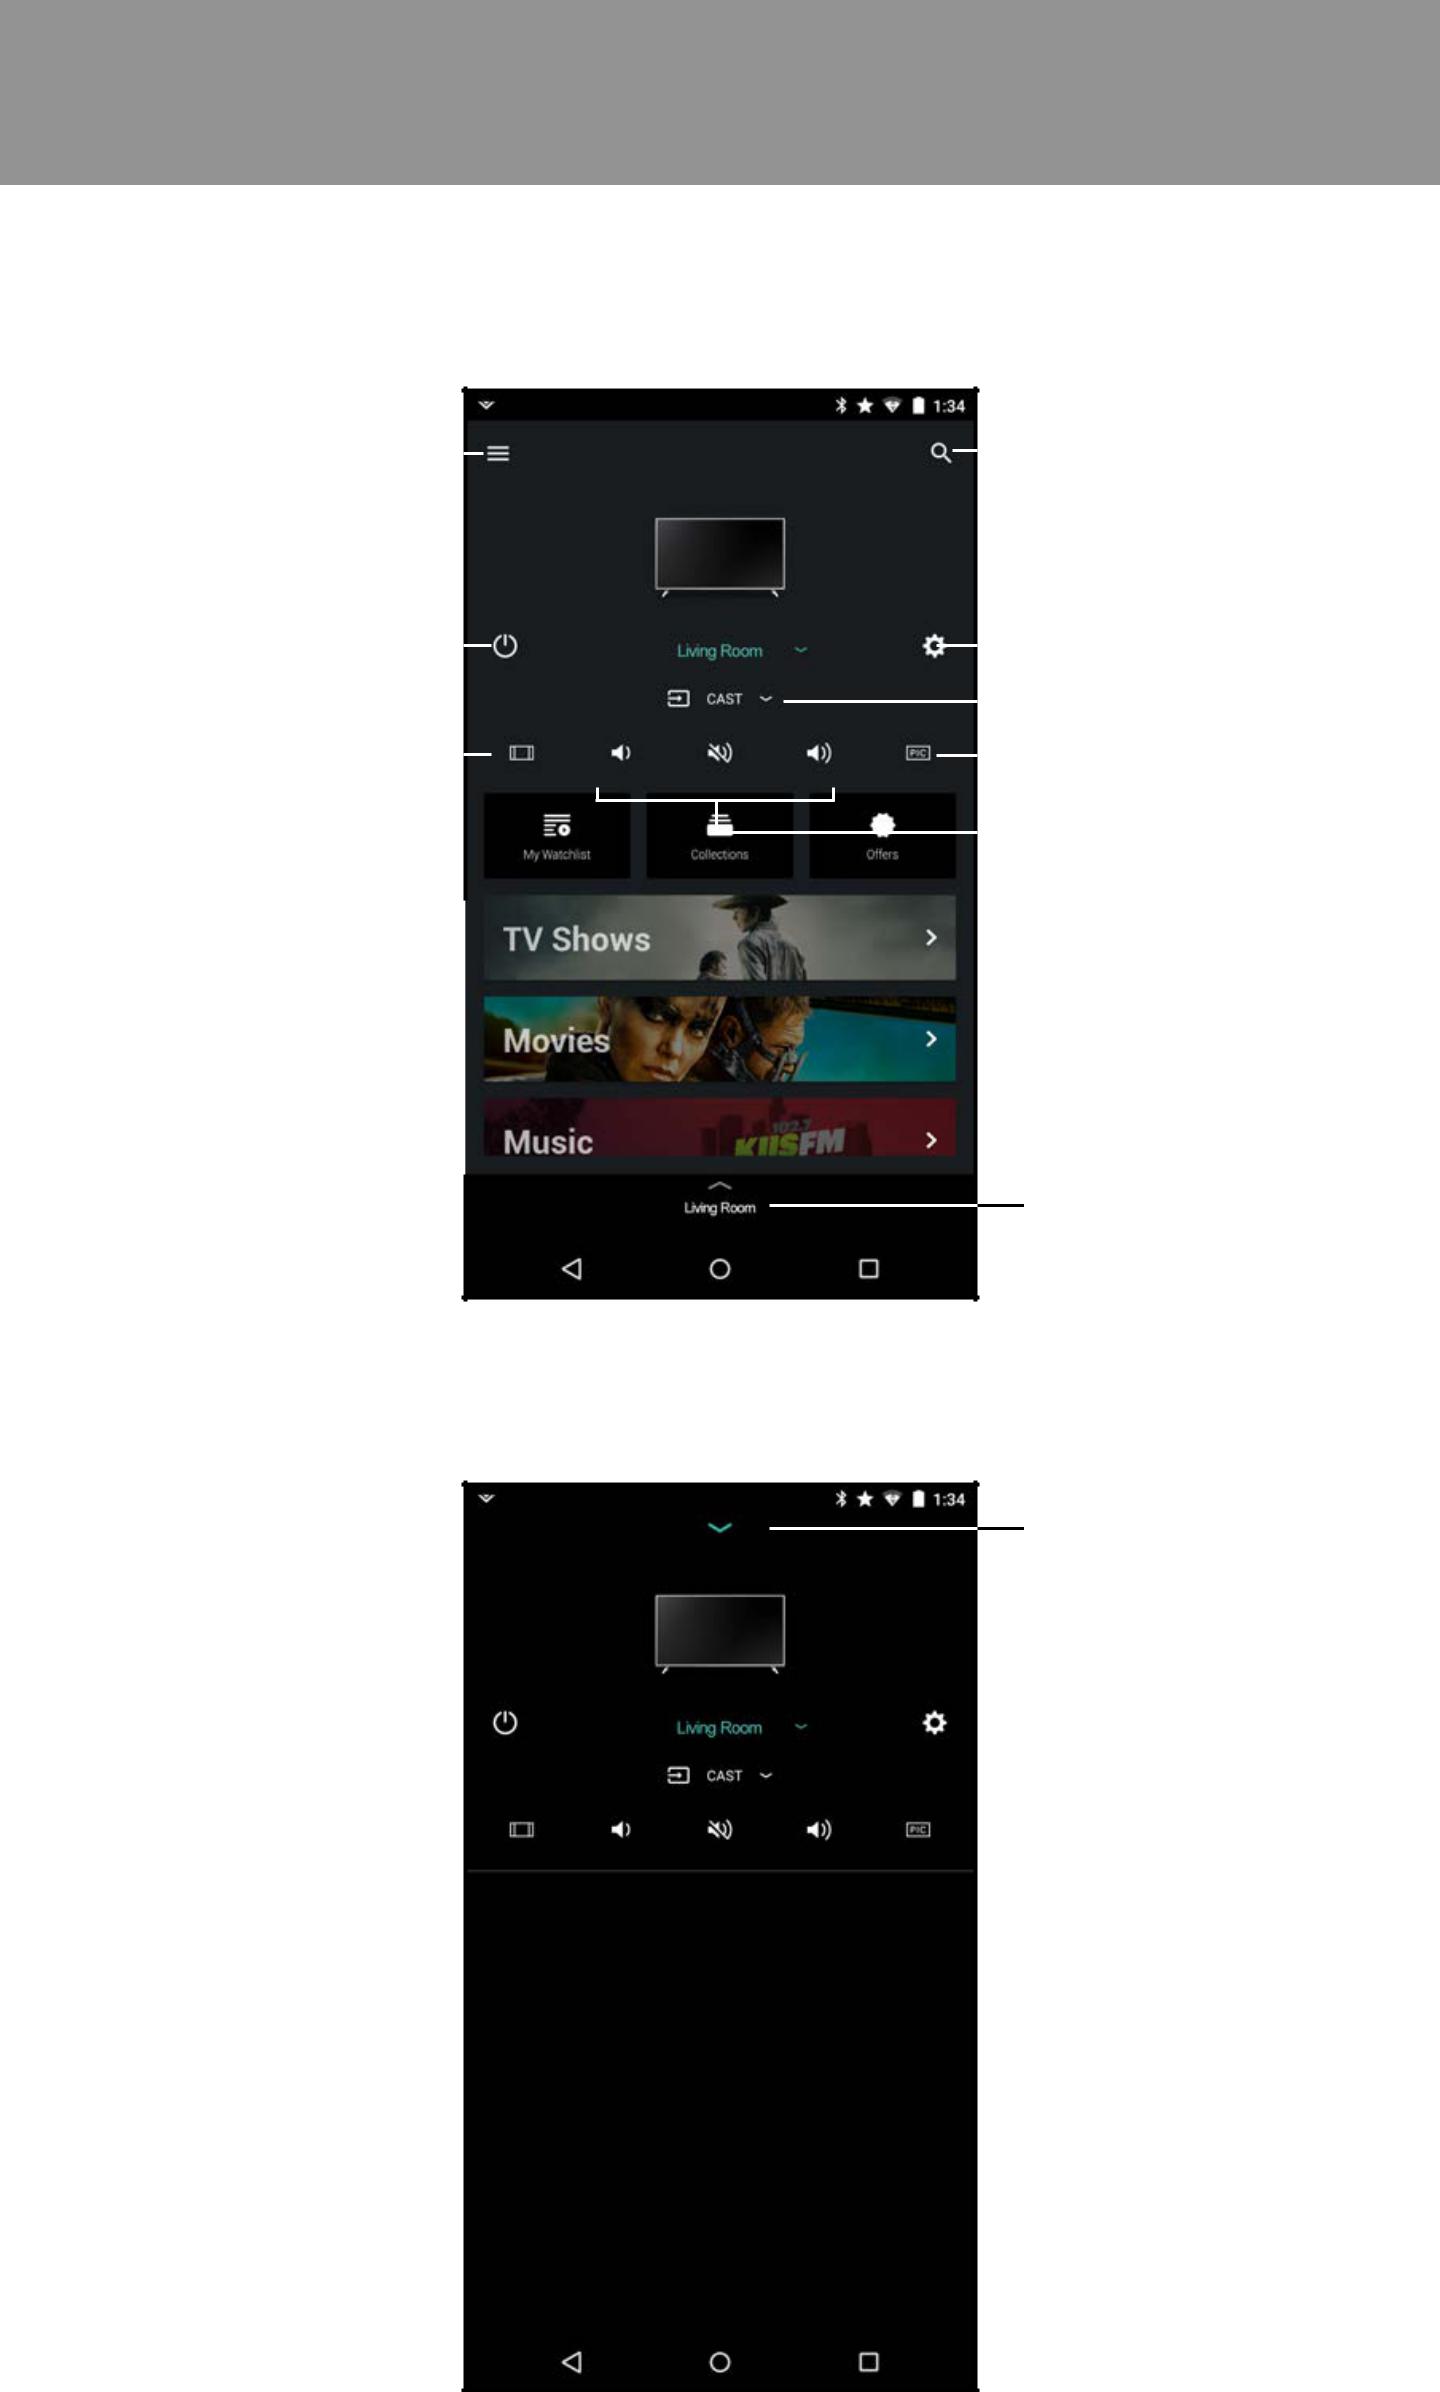
After you Creating/Logging into your MyVIZIO account, the home page of the SmartCast™ app is displayed.
|
|
|
|
|
|
Search |
|||
Menu |
|
|
|
|
|
|
|||
|
|
|
|
|
|
|
|
|
Device Power |
|
|
Device Settings |
|||
|
|
|
|
|||
|
|
|
|
|
|
|
|
|
|
|
|
|
Device Input |
|
|
|
|
|
|
|
|
|
|
|
|
|
|
Aspect Ratio |
|
|
|
|
Picture Settings |
|
|
|
|
||||
|
|
|
|
|
|
|
|
|
|
|
|
|
Volume Controls |
|
|
|
|
|
|
|
|
|
|
|
|
|
|
|
|
|
|
|
|
|
Device Menu
The Device Menu is available throughout the SmartCast app, allowing you to easily access the device controls.
Tap to minimize
Note: The images shown here are for illustrative purposes only and may be subject to change. The actual on-screen image and text may vary, depending on the model.
18
3
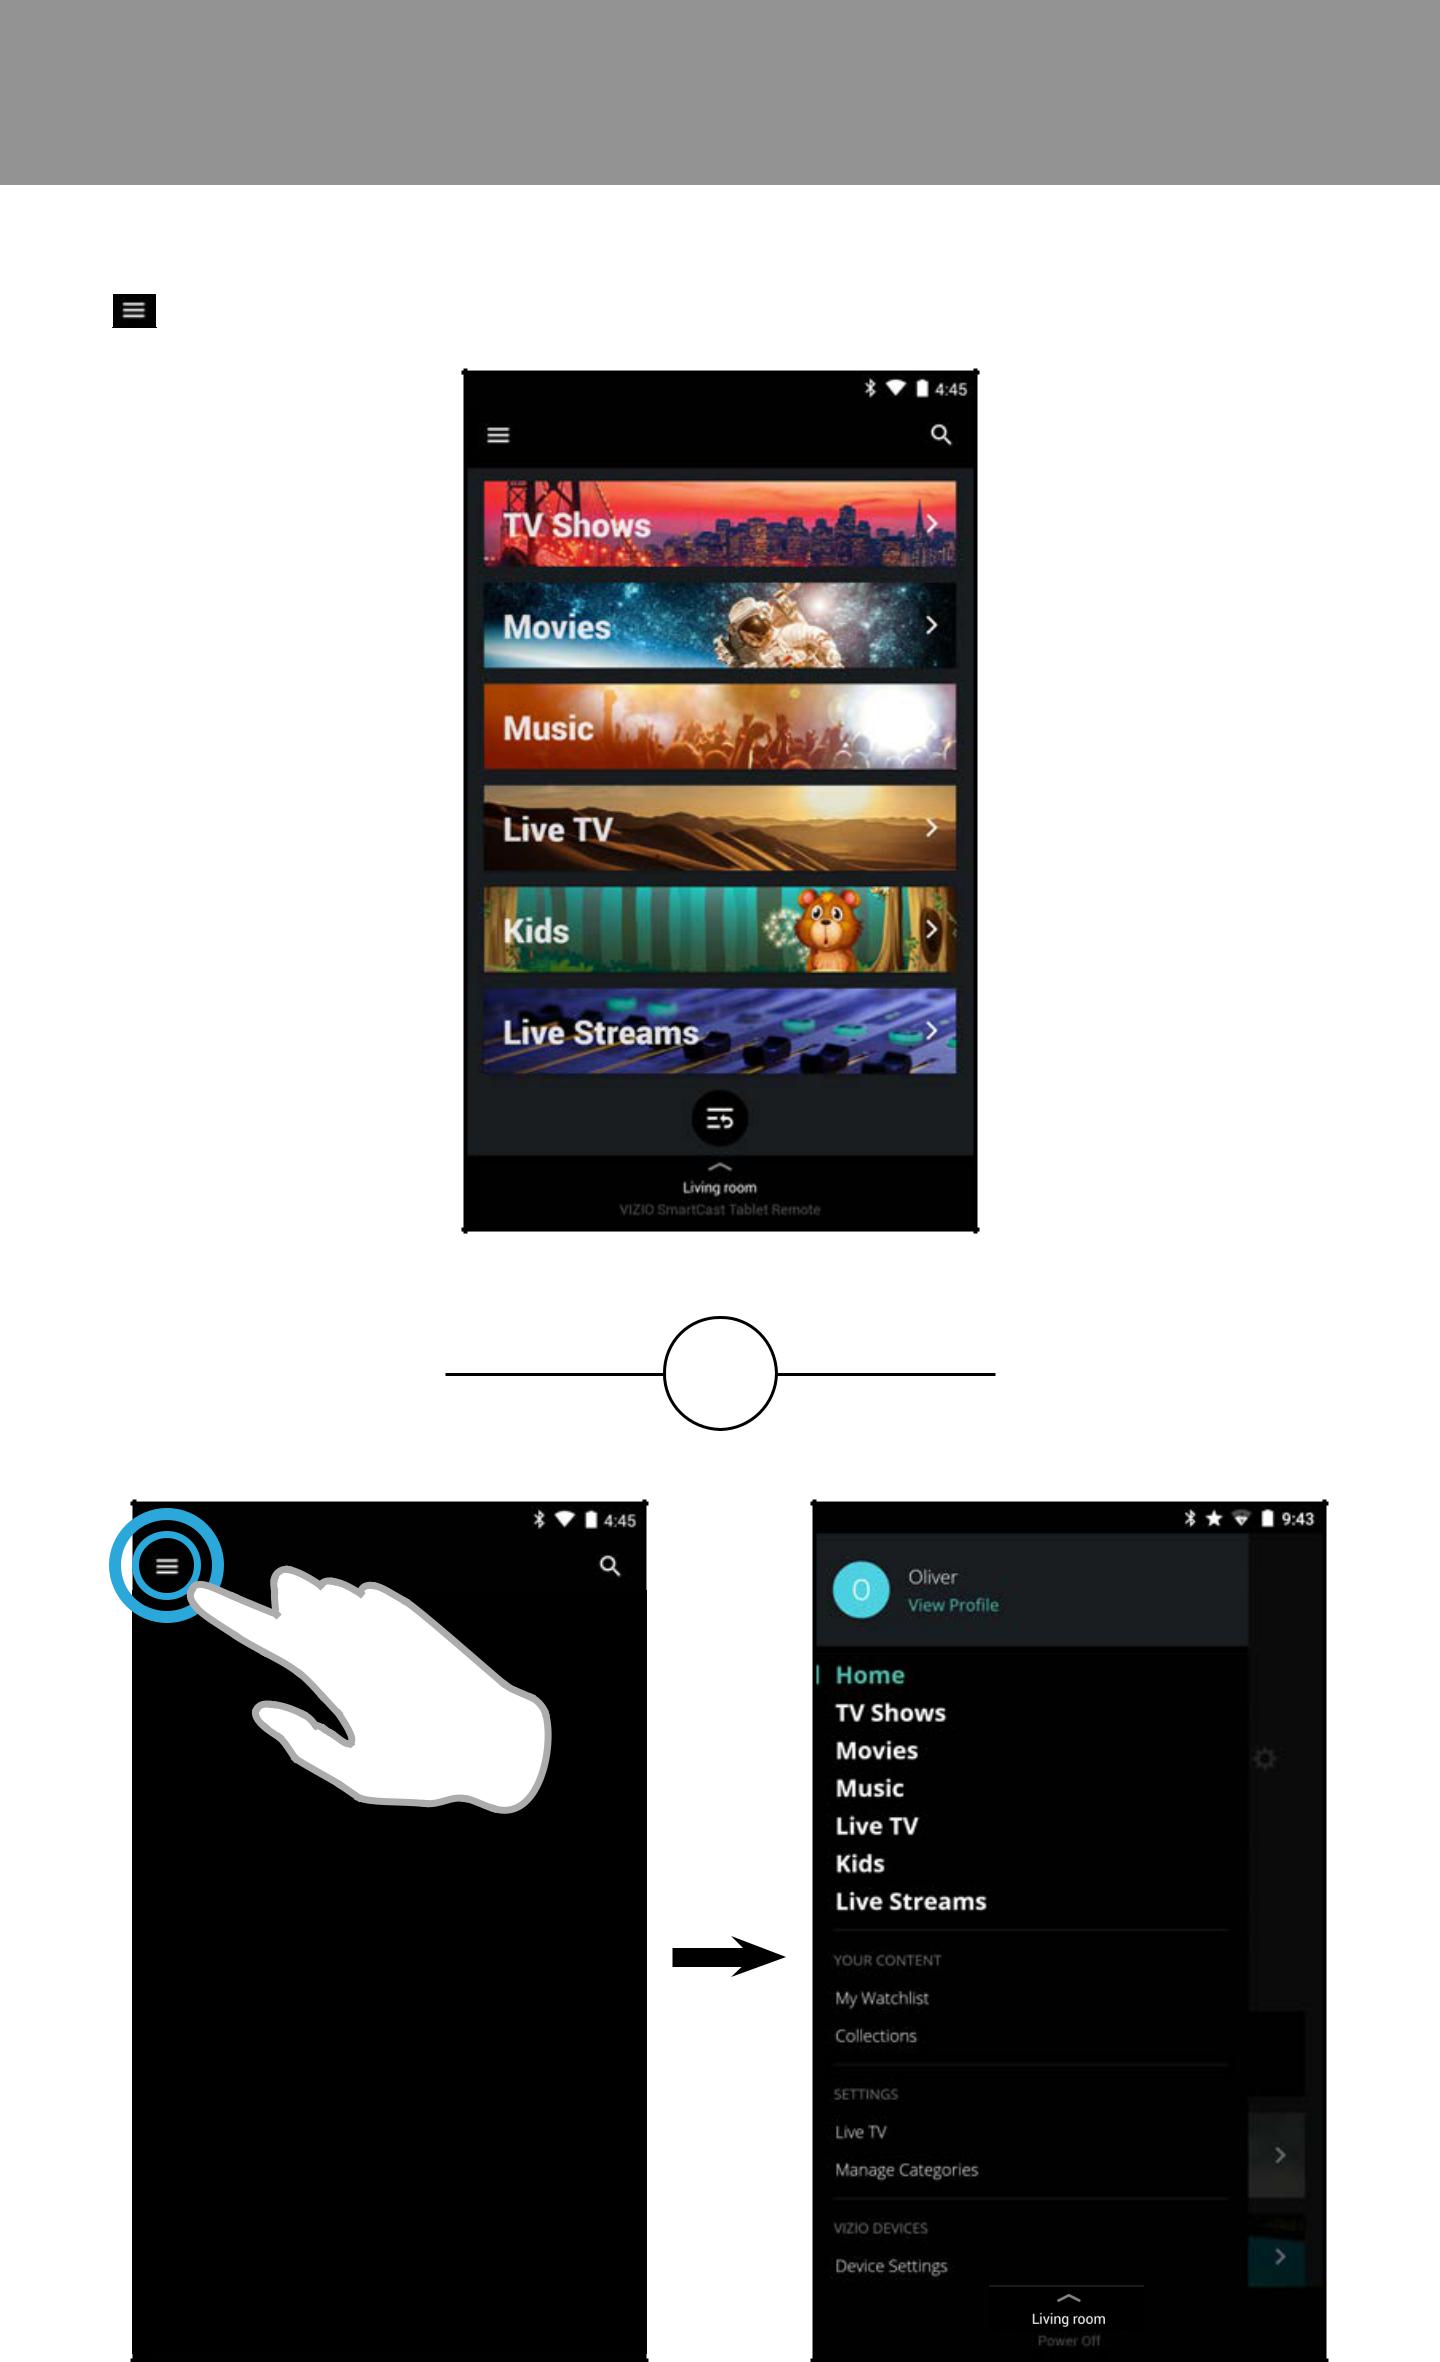
Swipe to reveal a list of content categorized into TV Shows, Movies, Music, Live TV, Kids, and Live Streams. You can also access these categorizes by tapping the 
 button in the top left corner.
OR
Note: The images shown here are for illustrative purposes only and may be subject to change. The actual on-screen image and text may vary, depending on the model.
19
3
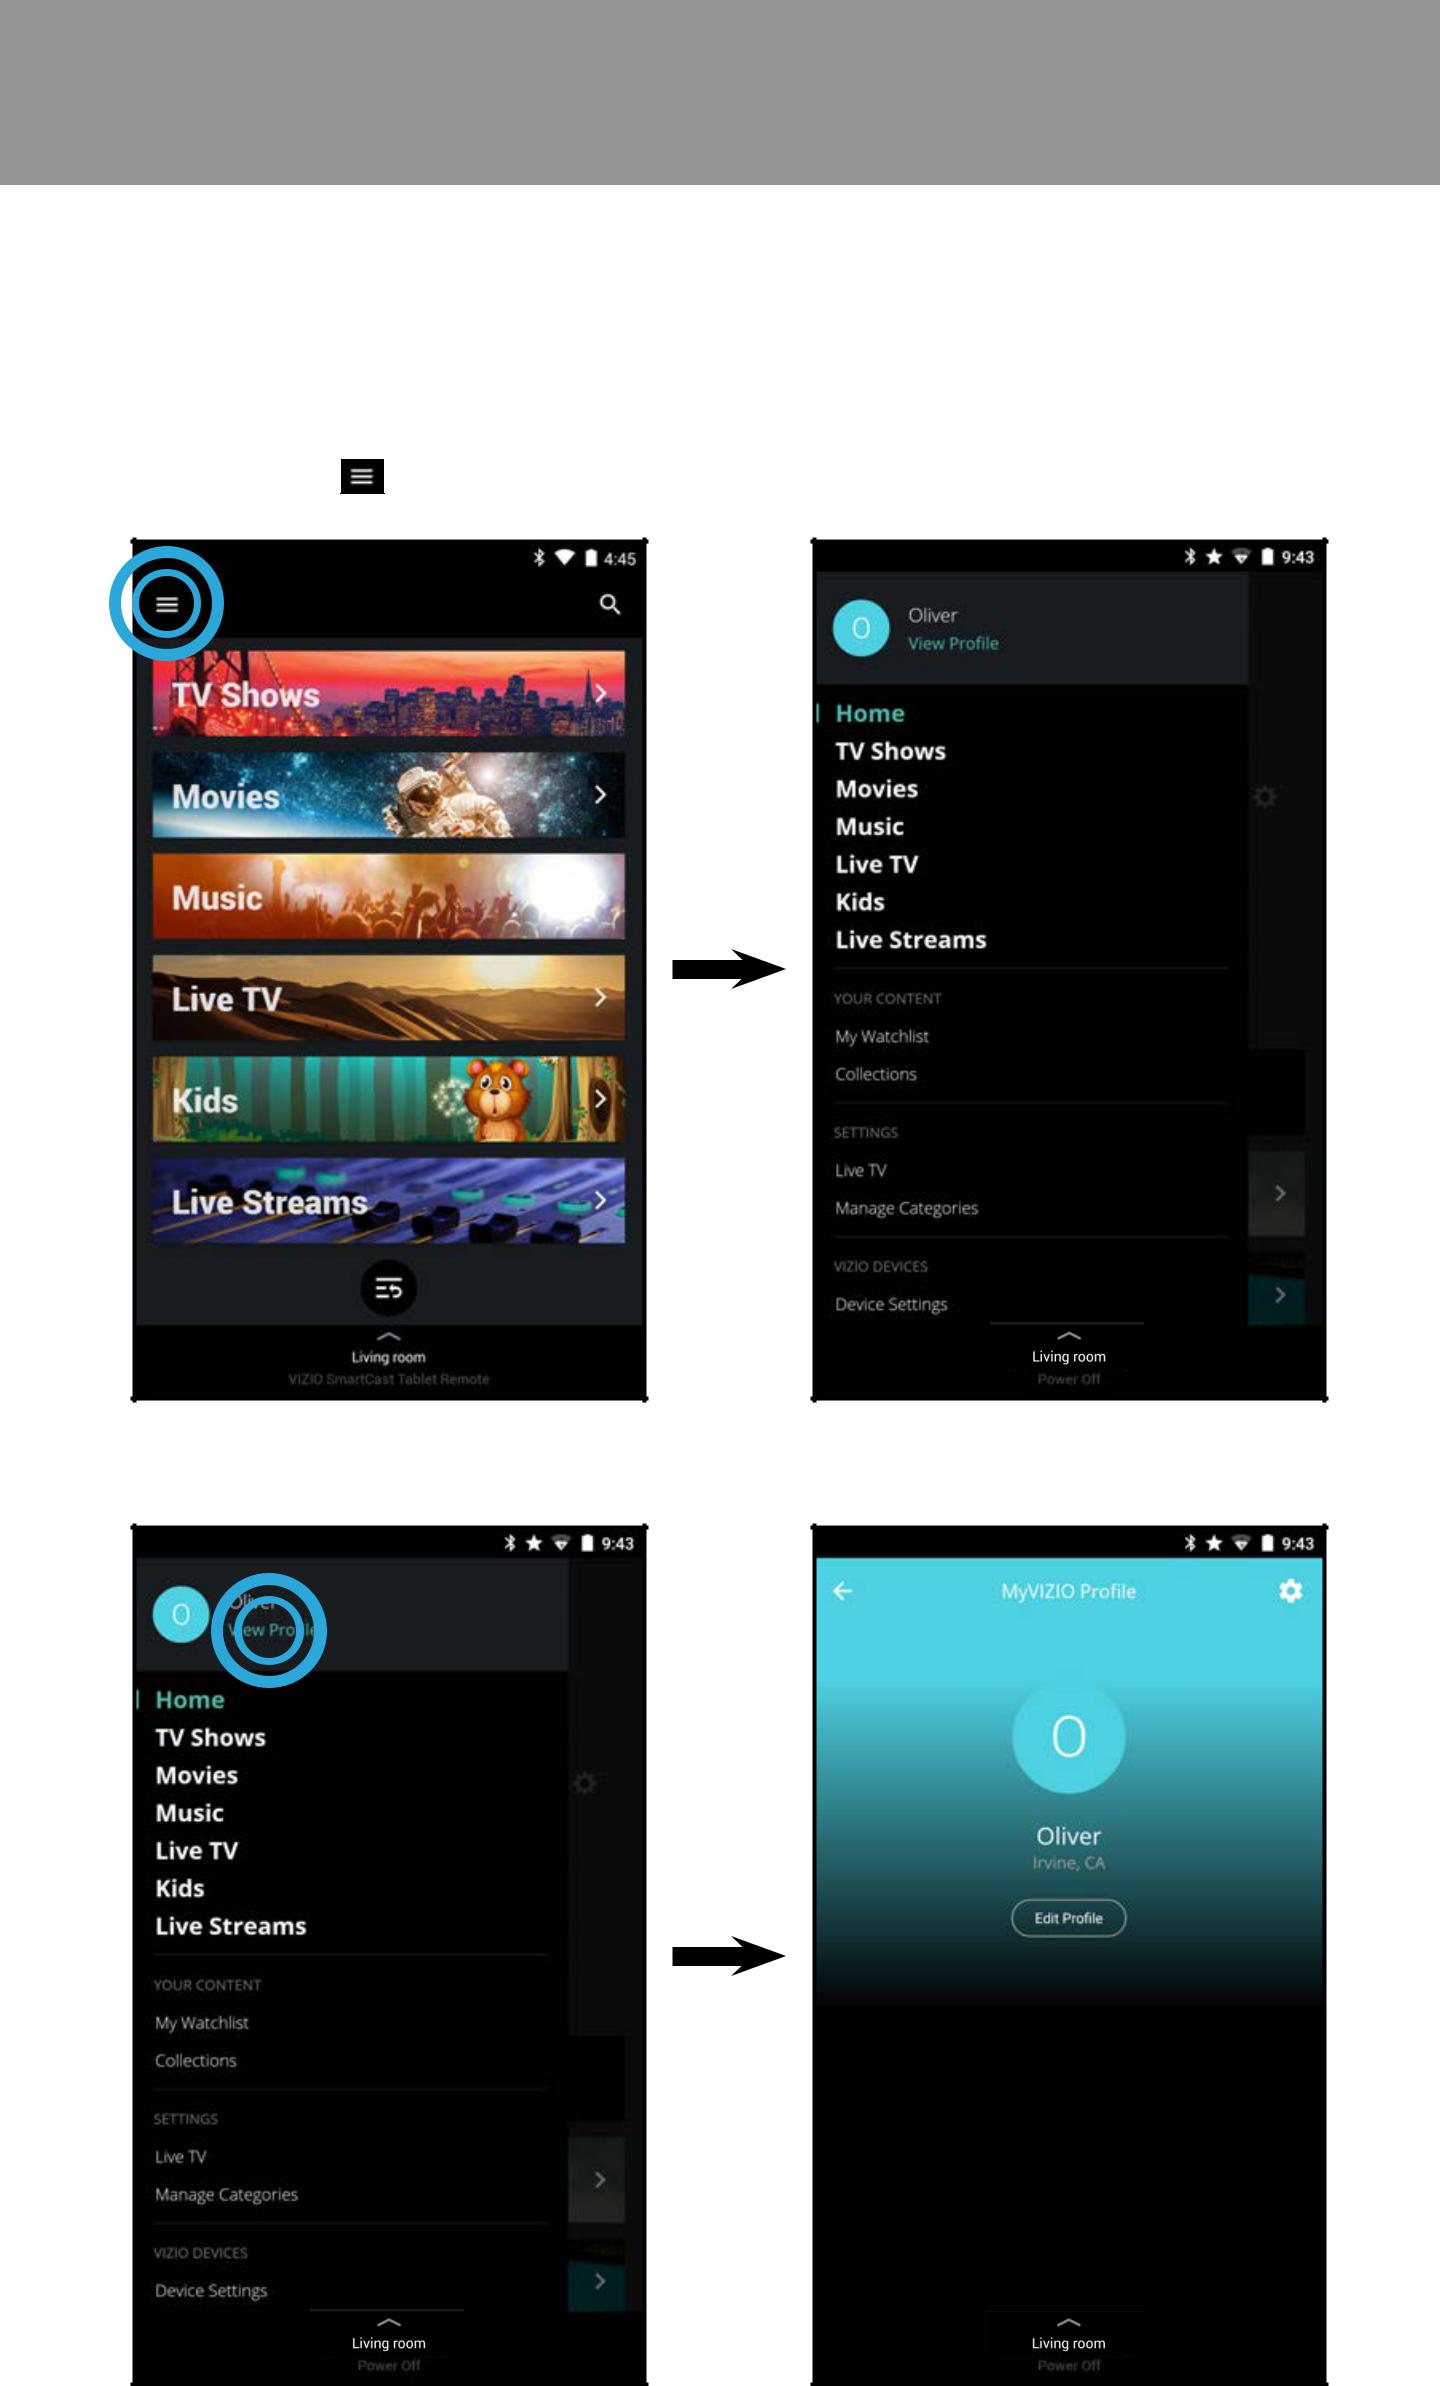
USER PROFILE SETTINGS
Everyusercanregistertheirveryownuserprofile(MyVIZIO,Facebook,orGoogle), keeping their personalized watchlists and collections.
To access the Profile page:
1.Tap the

 button to reveal the side menu.
2.Tap View Profile.
Note: The images shown here are for illustrative purposes only and may be subject to change. The actual on-screen image and text may vary, depending on the model.
20
3
To modify the account settings:
1.Tap the  button to access the account settings page. You can change the First Name, Last Name, E-mail Address, and password by tapping on each of them.
To edit profile settings:
1.From the Profile page, tap Edit Profile. You can edit the Profile Color, Profile Name, and Location by taping on each of them.
Note: The images shown here are for illustrative purposes only and may be subject to change. The actual on-screen image and text may vary, depending on the model.
21

3
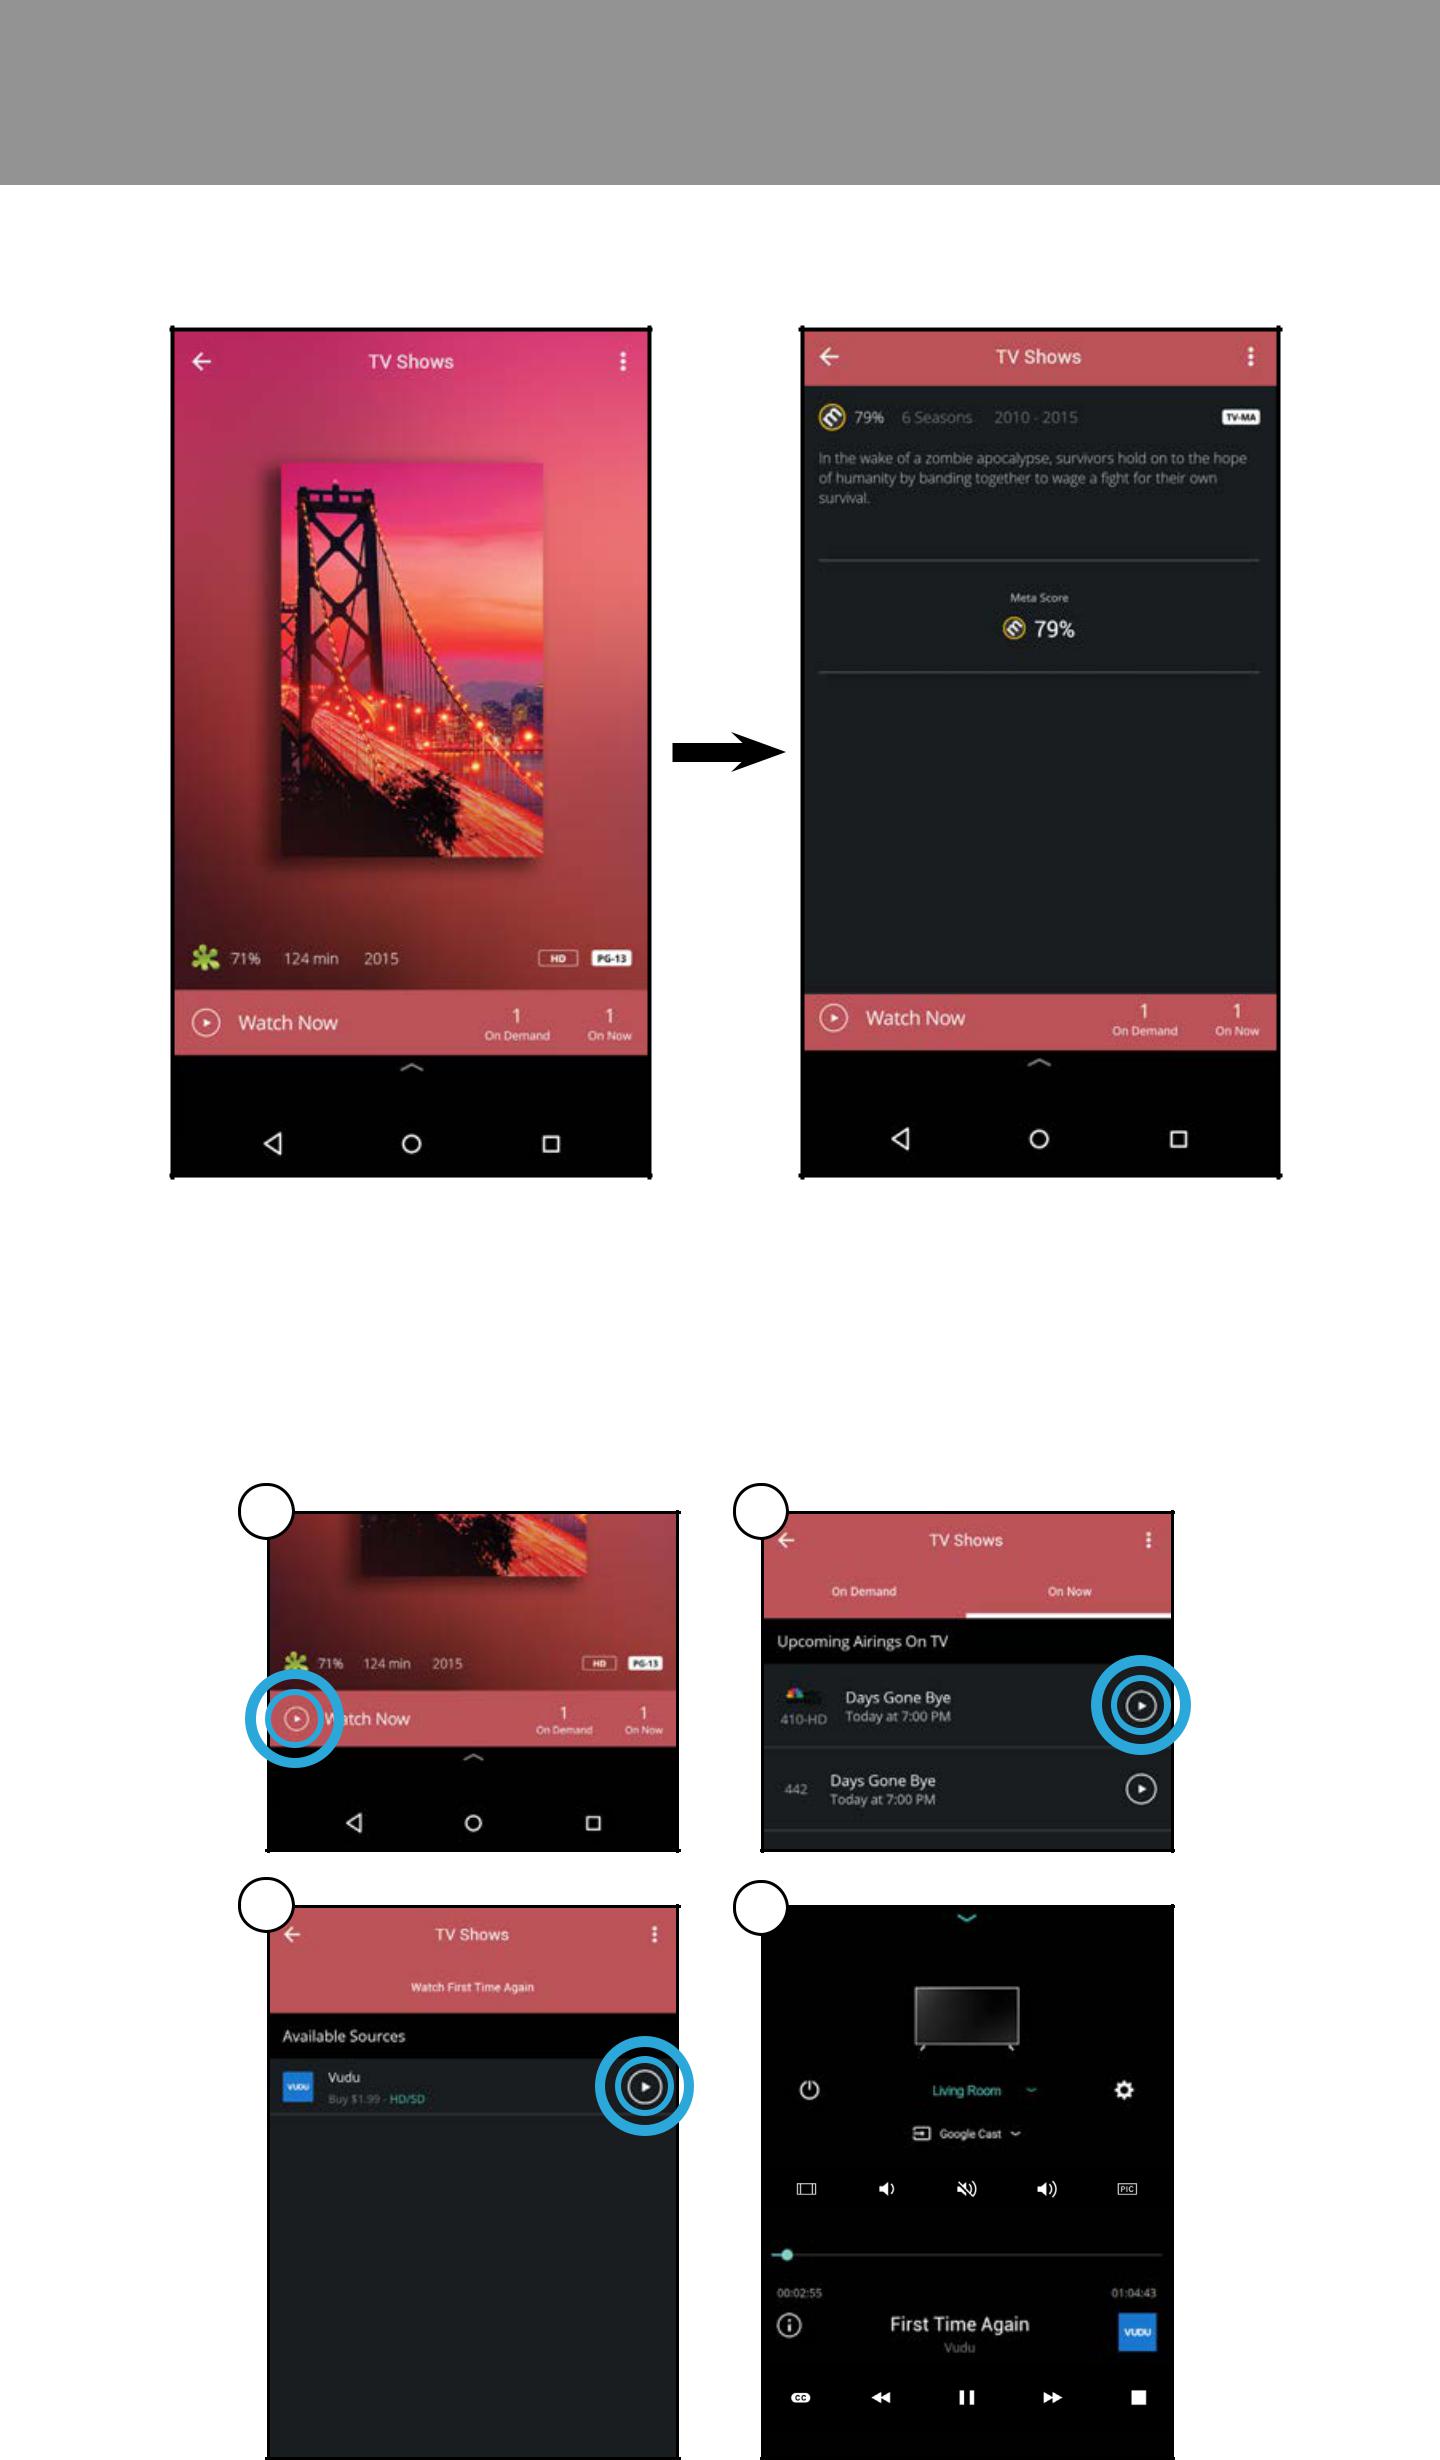
PICKING SOMETHING TO WATCH
After you get the hang of using the SmartCast app, it’s time for you pick and choose something to watch.
1.Tap on TV Shows, Movies, Live TV, Kids, or Live Steam from the Home page.
2.Depending on which category you pick, the content will be organized into several collections (scroll up and down to reveal additional collection).
You can pick your content from the list or search for a title by tapping the search icon  .
.
Note: The images shown here are for illustrative purposes only and may be subject to change. The actual on-screen image and text may vary, depending on the model.
22
3
3.Tap on the title you want to watch to see information regarding the cast, meta scores, and etc.
4.A) Tap on the play button.
B)Select On Demand or On Now (Online feed*) and tap the play button.
C)For On Demand: Select a source and tap the play button.
D)Your title begins playing on your display. The Device Menu is displayed − allowing you to control your display settings and content.
A B
C D
Note: The images shown here are for illustrative purposes only and may be subject to change. The actual on-screen image and text may vary, depending on the model.
* Separate user account may be required to access content. |
23 |
|
3
PICKING SOMETHING TO LISTEN TO
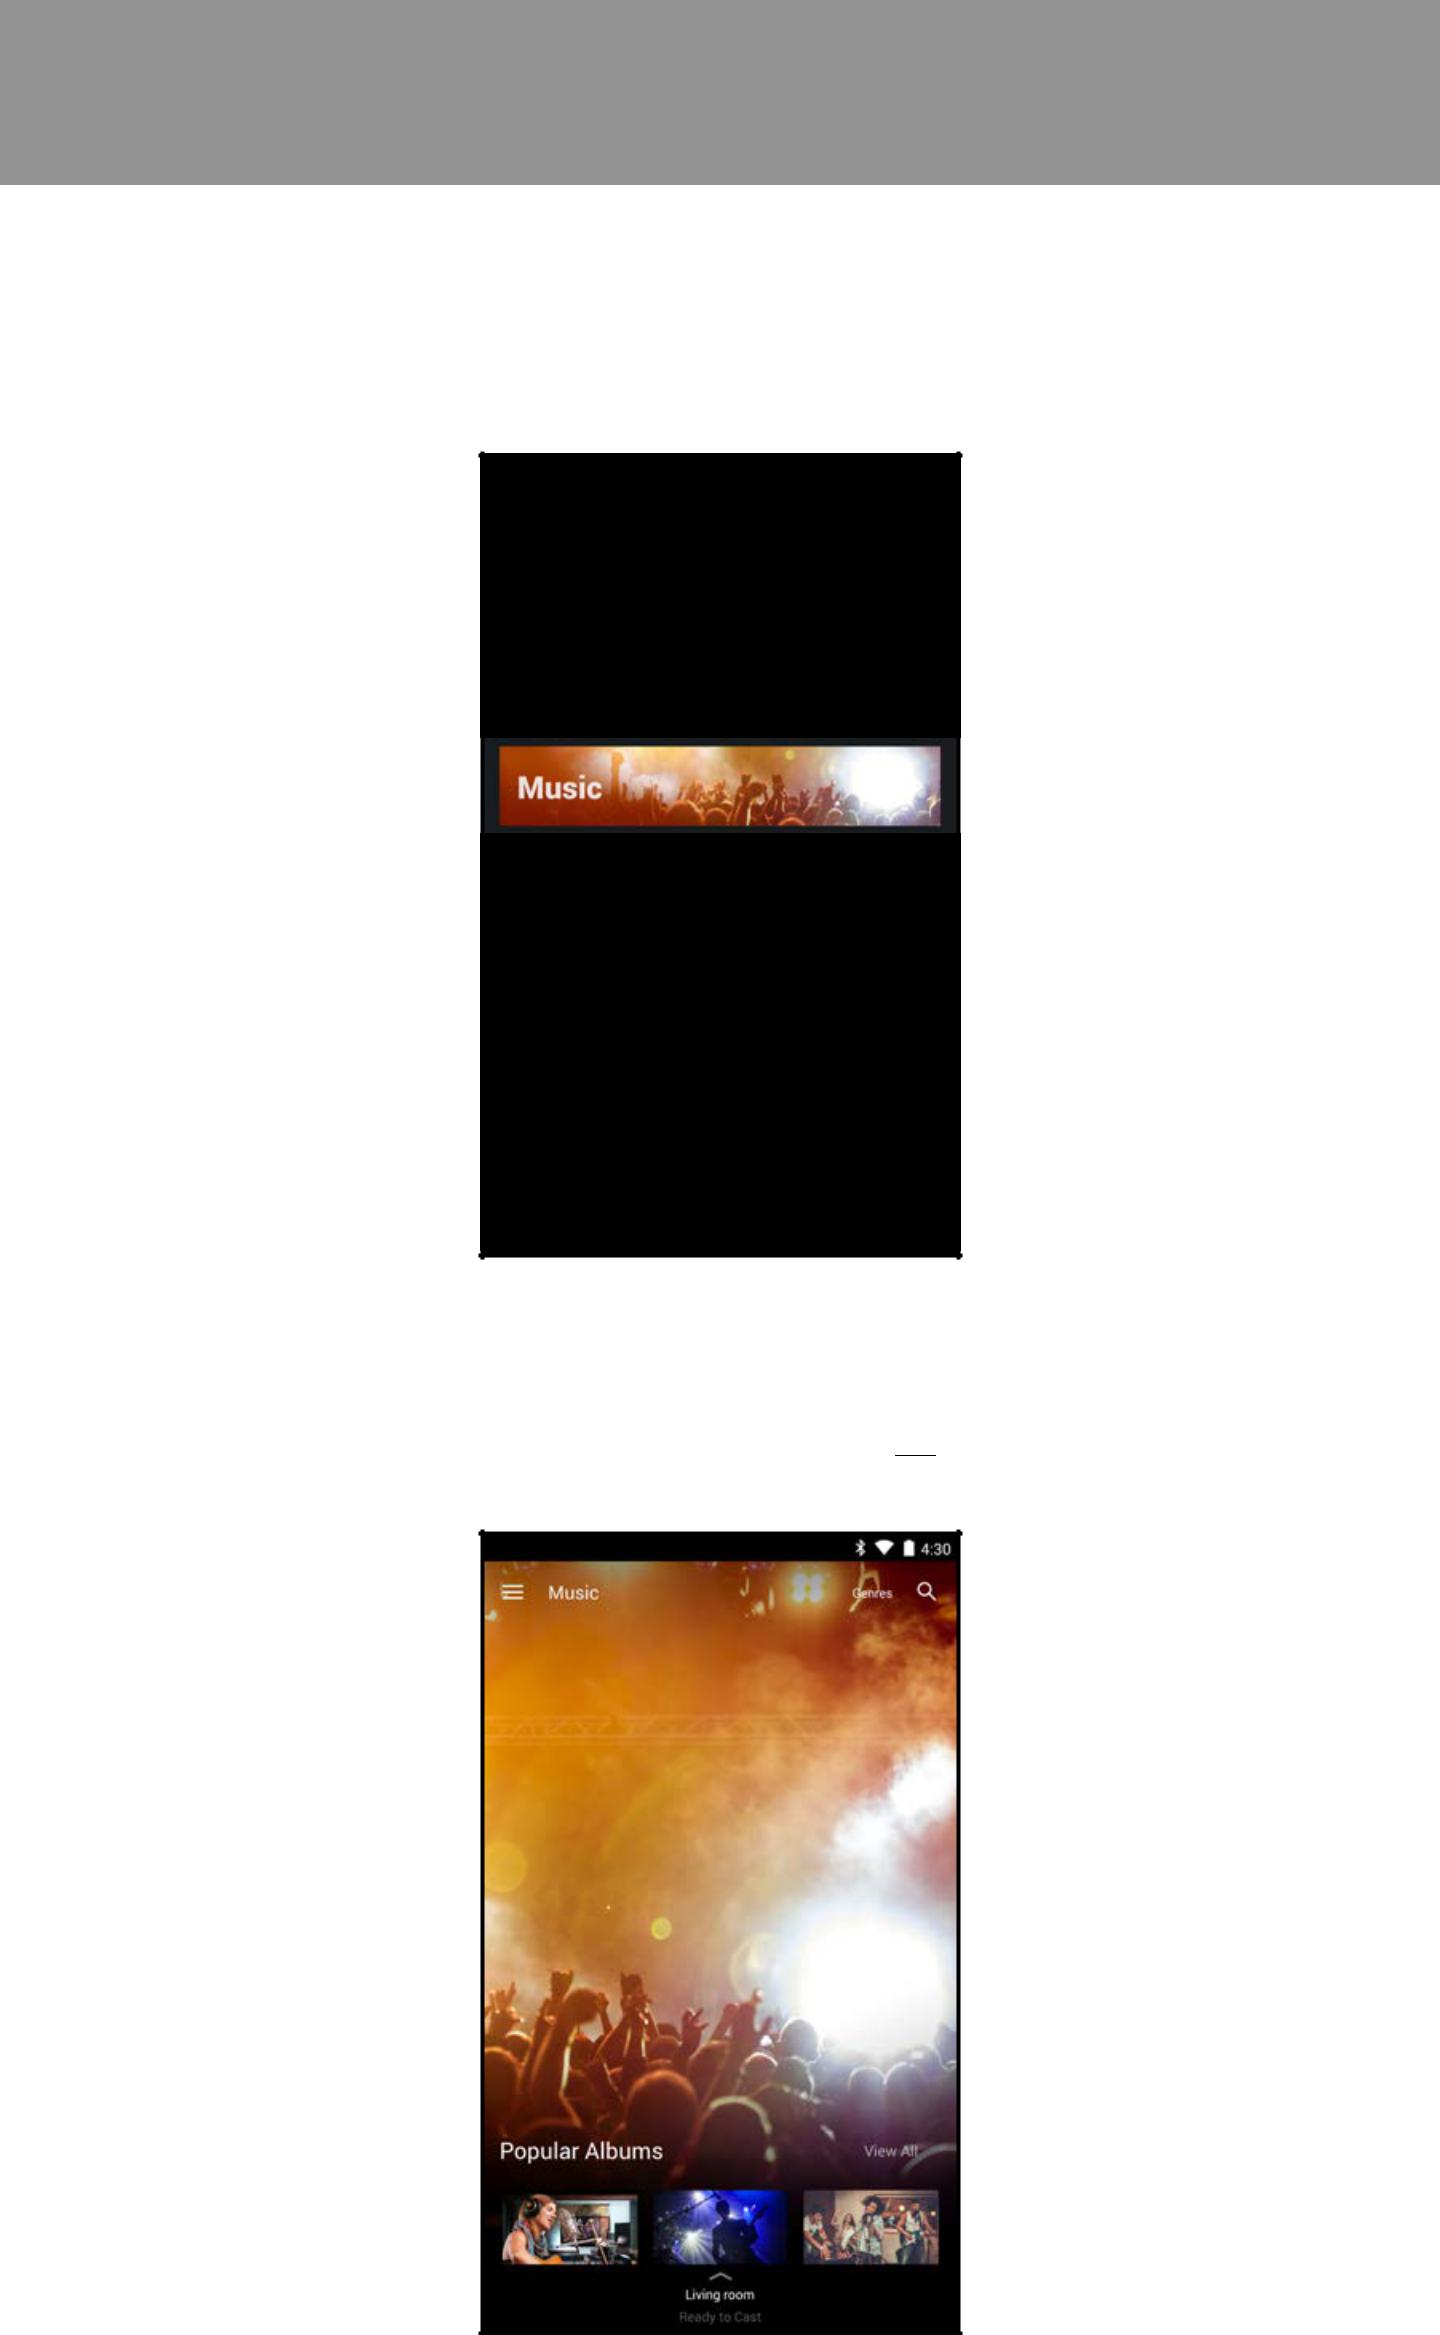
If you are in the mood to listen to some music, you can also browse directly from the SmartCast app.
1.Tap on Music from the Home page.
2.Music will be organized into several collections (scroll up and down to reveal additional collection). You can pick your content from the list or search for a title by tapping the search icon  .
.
Note: The images shown here are for illustrative purposes only and may be subject to change. The actual on-screen image and text may vary, depending on the model.
24

3
3.Tap on the content you want to listen to.
4.A) Tap on the play button.
B)Select On Demand or On Now (Online feed*) and tap the play button.
C)For On Demand: Select a source and tap the play button.
Your content begins playing on your SmartCast device. The Device
Menu is displayed − allowing you to control your device settings and content.
A B
C
Note: The images shown here are for illustrative purposes only and may be subject to change. The actual on-screen image and text may vary, depending on the model.
* Separate user account may be required to access content. |
25 |
|
Loading...