


VIZIO
USER MANUAL
Models E32-C1 and E32h-C1

7KLV SURGXFW TXDOLȴHV IRU (1(5*< 67$5 LQ WKH ȊIDFWRU\ GHIDXOWȋ
setting and this is the setting in which power savings will be
DFKLHYHG &KDQJLQJ WKH IDFWRU\ GHIDXOW SLFWXUH VHWWLQJV RU HQDEOLQJ RWKHU IHDWXUHV ZLOO LQFUHDVH SRZHU FRQVXPSWLRQ WKDW FRXOG H[FHHG WKH OLPLWV QHFHVVDU\ WR TXDOLI\ IRU (1(5*< 67$5 UDWLQJ )RU PRUH LQIRUPDWLRQ RQ WKH (1(5*< 67$5 SURJUDP JR WR HQHUJ\VWDU JRY
)RU '76 SDWHQWV VHH
KWWS SDWHQWV GWV FRP
0DQXIDFWXUHG XQGHU OLFHQVH IURP '76 /LFHQVLQJ /LPLWHG '76 WKH 6\PERO '76 DQG WKH 6\PERO WRJHWKHU DUH UHJLVWHUHG WUDGHPDUNV DQG '76 6WXGLR 6RXQG LV D WUDGHPDUN RI '76 ΖQF k '76 ΖQF $OO 5LJKWV 5HVHUYHG
0DQXIDFWXUHG XQGHU OLFHQVH IURP 'ROE\ /DERUDWRULHV 'ROE\ DQG WKH GRXEOH ' V\PERO DUH WUDGHPDUNV RI 'ROE\ /DERUDWRULHV
+'0Ζ WKH +'0Ζ ORJR DQG +LJK 'HȴQLWLRQ 0XOWLPHGLD ΖQWHUIDFH DUH WUDGHPDUNV RU UHJLVWHUHG WUDGHPDUNV RI +'0Ζ /LFHQVLQJ //&

Welcome
THANK YOU FOR CHOOSING VIZIO
And congratulations on your new VIZIO HDTV.
To get the most out of your new VIZIO product, read these instructions before using your product and retain them for future reference. Be sure to inspect the package contents to ensure there are no missing or damaged parts.
PRODUCT REGISTRATION
To purchase or inquire about accessories and installation services for your VIZIO product, visit our website at www.VIZIO.com or call toll free at (877) 698-4946.
We recommend that you either:
•Register your VIZIO product at www.VIZIO.com.
•Complete and mail the enclosed registration card.
Extended Warranties
For peace of mind, and to protect your investment beyond
WKH VWDQGDUG ZDUUDQW\ 9Ζ=Ζ2 R HUV RQ VLWH H[WHQGHG ZDUUDQW\
service plans. These plans provide additional coverage during the
VWDQGDUG ZDUUDQW\ SHULRG DQG PXVW EH SXUFKDVHG ZLWKLQ WKH ȴUVW \HDU DIWHU SXUFKDVH 7R SXUFKDVH DQ H[WHQGHG ZDUUDQW\ VHUYLFH
plan, visit www.vizio.com.
This symbol alerts you to important warnings or notices as part of the operating instructions.
WHEN READING THIS MANUAL
 7KLV V\PERO LGHQWLȴHV KHOSIXO WLSV
IMPORTANT SAFETY INSTRUCTIONS
<RXU 79 LV GHVLJQHG DQG PDQXIDFWXUHG WR RSHUDWH ZLWKLQ GHȴQHG GHVLJQ OLPLWV 0LVXVH PD\ UHVXOW LQ HOHFWULF VKRFN RU ȴUH 7R
prevent your TV from being damaged, the following instructions should be observed for the installation, use, and maintenance of your TV. Read the following safety instructions before operating your TV. Keep these instructions in a safe place for future reference.
•To reduce the risk of electric shock or component damage,
VZLWFK R WKH SRZHU EHIRUH FRQQHFWLQJ RWKHU FRPSRQHQWV to your TV.
•Read these instructions.
•Keep these instructions.
•Heed all warnings.
•Follow all instructions.
•Do not use this apparatus near water.
•Clean only with dry cloth.
•Do not block any ventilation openings. Install in accordance with the manufacturer’s instructions.
•Do not install near any heat sources such as radiators, heat
UHJLVWHUV VWRYHV RU RWKHU DSSDUDWXV LQFOXGLQJ DPSOLȴHUV that produce heat.
•Do not defeat the safety purpose of the polarized or grounding-type plug. A polarized plug has two blades with one wider than the other. A grounding type plug has two blades and a third grounding prong. The wide blade or the
third prong are provided for your safety. If the provided
SOXJ GRHV QRW ȴW LQWR \RXU RXWOHW FRQVXOW DQ HOHFWULFLDQ IRU replacement of the obsolete outlet.
•Protect the power cord from being walked on or pinched,
particularly at plugs, convenience receptacles, and the point
ZKHUH WKH\ H[LW IURP WKH DSSDUDWXV
•2QO\ XVH DWWDFKPHQWV DFFHVVRULHV VSHFLȴHG E\ WKH manufacturer.

•Use only with the cart, stand, tripod, bracket,
RU WDEOH VSHFLȴHG E\ WKH PDQXIDFWXUHU RU sold with the apparatus. When a cart is used, use caution when moving the cart/apparatus combination to avoid injury from tip-over.
•Unplug this apparatus during lightning storms or when unused for long periods of time.
•5HIHU DOO VHUYLFLQJ WR TXDOLȴHG VHUYLFH SHUVRQQHO 6HUYLFLQJ is required when the apparatus has been damaged in any way, such as power-supply cord or plug is damaged, liquid
has been spilled or objects have fallen into the apparatus,
WKH DSSDUDWXV KDV EHHQ H[SRVHG WR UDLQ RU PRLVWXUH GRHV not operate normally or has been dropped.
•Unplug the power cord before cleaning your TV.
•When moving your TV from an area of low temperature to an area of high temperature, condensation may form in the
housing. Wait before turning on your TV to avoid causing
ȴUH HOHFWULF VKRFN RU FRPSRQHQW GDPDJH
•A distance of at least three feet should be maintained
between your TV and any heat source, such as a radiator,
KHDWHU RYHQ DPSOLȴHU HWF 'R QRW LQVWDOO \RXU 79 FORVH WR
smoke. Operating your TV close to smoke or moisture may
FDXVH ȴUH RU HOHFWULF VKRFN
•6ORWV DQG RSHQLQJV LQ WKH EDFN DQG ERWWRP RI WKH FDELQHW are provided for ventilation. To ensure reliable operation of your TV and to protect it from overheating, be sure these openings are not blocked or covered. Do not place your
TV in a bookcase or cabinet unless proper ventilation is provided.
•Never push any object into the slots and openings on your
TV cabinet. Do not place any objects on the top of your TV.
'RLQJ VR FRXOG VKRUW FLUFXLW SDUWV FDXVLQJ D ȴUH RU HOHFWULF shock. Never spill liquids on your TV.
•Your TV should be operated only from the type of power
source indicated on the label. If you are not sure of the type of power supplied to your home, consult your dealer or local power company.
•Do not apply pressure or throw objects at your TV. This may compromise the integrity of the display. The manufacturer’s warranty does not cover user abuse or improper installations.
•7KH SRZHU FRUG PXVW EH UHSODFHG ZKHQ XVLQJ GL HUHQW YROWDJH WKDQ WKH YROWDJH VSHFLȴHG )RU PRUH LQIRUPDWLRQ contact your dealer.
•:KHQ FRQQHFWHG WR D SRZHU RXWOHW SRZHU LV DOZD\V ȵRZLQJ into your TV. To totally disconnect power, unplug the power cord.
•7KH OLJKWQLQJ ȵDVK ZLWK DUURZKHDG V\PERO ZLWKLQ DQ equilateral triangle is intended to alert the user to the
presence of un-isolated, dangerous voltage within the
LQVLGH RI \RXU 79 WKDW PD\ EH RI VXɝFLHQW PDJQLWXGH WR constitute a risk of electric shock to persons.
•'R QRW RYHUORDG SRZHU VWULSV DQG H[WHQVLRQ FRUGV 2YHUORDGLQJ FDQ UHVXOW LQ ȴUH RU HOHFWULF VKRFN
•The wall socket should be installed near your TV and easily accessible.
•Only power of the marked voltage can be used for your TV. $Q\ RWKHU YROWDJH WKDQ WKH VSHFLȴHG YROWDJH PD\ FDXVH ȴUH or electric shock.
•Do not touch the power cord during lightning. To avoid electric shock, avoid handling the power cord during electrical storms.
•Unplug your TV during a lightning storm or when it will not be used for long period of time. This will protect your TV from damage due to power surges.
•Do not attempt to repair or service your TV yourself.
2SHQLQJ RU UHPRYLQJ WKH EDFN FRYHU PD\ H[SRVH \RX WR high voltages, electric shock, and other hazards. If repair
is required, contact your dealer and refer all servicing to
TXDOLȴHG VHUYLFH SHUVRQQHO

•WARNING: Keep your TV away from moisture. Do not
H[SRVH \RXU 79 WR UDLQ RU PRLVWXUH ΖI ZDWHU SHQHWUDWHV LQWR
your TV, unplug the power cord and contact your dealer.
&RQWLQXRXV XVH LQ WKLV FDVH PD\ UHVXOW LQ ȴUH RU HOHFWULF shock.
•Do not use your TV if any abnormality occurs. If any smoke or odor becomes apparent, unplug the power cord and contact your dealer immediately. Do not try to repair your TV yourself.
•Avoid using dropped or damaged appliances. If your TV is dropped and the housing is damaged, the internal components may function abnormally. Unplug the power
cord immediately and contact your dealer for repair.
&RQWLQXHG XVH RI \RXU 79 PD\ FDXVH ȴUH RU HOHFWULF VKRFN
•Do not install your TV in an area with heavy dust or high
humidity. Operating your TV in environments with heavy
GXVW RU KLJK KXPLGLW\ PD\ FDXVH ȴUH RU HOHFWULF VKRFN
•Follow instructions for moving your TV. Ensure that the power cord and any other cables are unplugged before moving your TV.
•When unplugging your TV, hold the AC/DC power adapter,
not the cord. Pulling on the power cord may damage the
ZLUHV LQVLGH WKH FRUG DQG FDXVH ȴUH RU HOHFWULF VKRFN :KHQ \RXU 79 ZLOO QRW EH XVHG IRU DQ H[WHQGHG SHULRG RI WLPH unplug the power cord.
•To reduce risk of electric shock, do not touch the connector with wet hands.
•Insert batteries in accordance with instructions. Incorrect polarities may cause the batteries to leak which can
damage the remote control or injure the operator. Do not
H[SRVH EDWWHULHV WR H[FHVVLYH KHDW VXFK DV VXQVKLQH ȴUH RU the like.
•If any of the following occurs, contact the dealer:
-The power cord fails or frays.
-Liquid sprays or any object drops into your TV.
<RXU 79 LV H[SRVHG WR UDLQ RU RWKHU PRLVWXUH
- Your TV is dropped or damaged in any way.
- The performance of your TV changes substantially.
• 7KLV DSSDUDWXV VKDOO QRW EH H[SRVHG WR GULSSLQJ RU
VSODVKLQJ DQG QR REMHFWV ȴOOHG ZLWK OLTXLGV VXFK DV YDVHV shall be placed on the apparatus.
• The mains plug or appliance coupler is used as the disconnect device, the disconnect device shall remain readily operable.
• CAUTION - These servicing instructions are for use by
TXDOLȴHG VHUYLFH SHUVRQQHO RQO\ 7R UHGXFH WKH ULVN RI electric shock, do not perform any servicing other than
that contained in the operating instructions unless you are
TXDOLȴHG WR GR VR
7KH OLJKWQLQJ ȵDVK ZLWK DUURZKHDG V\PERO ZLWKLQ DQ
h equilateral triangle is intended to alert the user to the
SUHVHQFH RI XQLQVXODWHG '$1*(5286 92/7$*( ZLWKLQ WKH SURGXFWȇV HQFORVXUH WKDW PD\ EH RI VXɝFLHQW PDJQLWXGH WR
constitute a risk of electrical shock to persons.
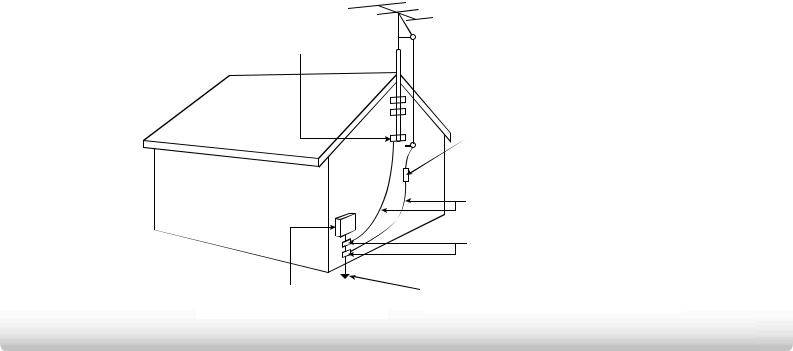
TELEVISION ANTENNA CONNECTION PROTECTION
If an outside antenna/satellite dish or cable system is to be connected to the TV, make sure that the antenna or cable system is electrically grounded to provide some protection against voltage surges and static charges.
$UWLFOH RI WKH 1DWLRQDO (OHFWULFDO &RGH $16Ζ 1)36$ SURYLGHV information with regard to proper grounding of the mast and supporting structure, grounding of the lead-in wire to an antenna discharge unit, size of the grounding conductors, location of antenna discharge unit, connection to grounding electrodes, and requirements of the grounding electrode.
Ground Clamp
Lightning Protection
For added protection of the TV during a lightning storm or when it is left unattended or unused for long periods of time, unplug the TV from the wall outlet and disconnect the antenna or cable system.
Power Lines
Do not locate the antenna near overhead light or power circuits, or
where it could fall into such power lines or circuits. Remember, the
VFUHHQ RI WKH FRD[LDO FDEOH LV LQWHQGHG WR EH FRQQHFWHG WR HDUWK LQ the building installation.
 Antenna Lead In Wire
Antenna Discharge Unit
1(& 6HFWLRQ
Grounding Conductors
1(& 6HFWLRQ
Ground Clamps
3RZHU 6HUYLFH *URXQGLQJ (OHFWURGH 6\VWHP (OHFWULF 6HUYLFH (TXLSPHQW 1(& $57 SDUW +

Table of Contents |
|
Installing the TV ..................................................... |
3 |
Inspecting the Package Contents . . . . . . . . . . . . . . . . . . . . . |
. 3 |
Installing the TV . . . . . . . . . . . . . . . . . . . . . . . . . . . . . . . . . . . |
. 3 |
Installing the TV Stands ......................................................... |
3 |
Installing the Stands . . . . . . . . . . . . . . . . . . . . . . . . . . . . . . . . |
. 4 |
Installing the Stands . . . . . . . . . . . . . . . . . . . . . . . . . . . . . . . . |
. 5 |
Installing the TV on a Wall ..................................................... |
6 |
Controls and Connections..................................... |
7 |
Rear Panel . . . . . . . . . . . . . . . . . . . . . . . . . . . . . . . . . . . . . . . . |
. 7 |
Side Panel . . . . . . . . . . . . . . . . . . . . . . . . . . . . . . . . . . . . . . . . |
. 8 |
Front Panel . . . . . . . . . . . . . . . . . . . . . . . . . . . . . . . . . . . . . . . |
. 9 |
Remote Control Front . . . . . . . . . . . . . . . . . . . . . . . . . . . . . . |
10 |
Replacing the Batteries........................................................ |
11 |
Connecting Your Devices..................................... |
12 |
Connecting A Device. . . . . . . . . . . . . . . . . . . . . . . . . . . . . . . . |
12 |
Connecting a Device - Audio and Video Cable Types ........ |
13 |
AV CABLE .......................................................................... |
13 |
COAXIAL CABLE ................................................................ |
13 |
COMPONENT CABLE ........................................................ |
14 |
HDMI CABLE ..................................................................... |
14 |
Connecting an Audio Device . . . . . . . . . . . . . . . . . . . . . . . . . |
15 |
Connecting an Audio Device - Audio Cable Types ............. |
16 |
RCA CABLE ........................................................................ |
16 |
OPTICAL/SPDIF CABLE ..................................................... |
16 |
HDMI CABLE ..................................................................... |
16 |
Connecting an Audio Device - ARC . . . . . . . . . . . . . . . . . . . . |
17 |
Without HDMI ARC ............................................................... |
17 |
With HDMI ARC..................................................................... |
17 |
Connecting to your Network . . . . . . . . . . . . . . . . . . . . . . . . . |
18 |
Connecting to a Wired Network (Best) ............................... |
18 |
Connecting to a Wireless Network...................................... |
18 |
Completing the First-Time Setup ........................ |
19 |
Using the On-Screen Menu ................................. |
21 |
Navigating the On-Screen Menu . . . . . . . . . . . . . . . . . . . . . . |
21 |
Changing the Input Source . . . . . . . . . . . . . . . . . . . . . . . . . . |
22 |
Changing the Screen Aspect Ratio . . . . . . . . . . . . . . . . . . . . |
22 |
Viewing Video with the Menu Open . . . . . . . . . . . . . . . . . . . |
23 |
Adjusting the Picture Settings . . . . . . . . . . . . . . . . . . . . . . . . |
24 |
Adjusting the More Picture Settings ................................... |
25 |
Adjusting the Color Temperature ....................................... |
26 |
Adjusting the Picture Mode Edit Settings ........................... |
26 |
Adjusting the Color Calibration Settings ............................ |
27 |
Adjusting the Color Tuner Settings ..................................... |
27 |
Creating a Custom Picture Mode ........................................ |
30 |
Locking and Unlocking the Custom Picture Modes ........... |
31 |
Deleting a Custom Picture Mode ........................................ |
31 |
Adjusting the Audio Settings . . . . . . . . . . . . . . . . . . . . . . . . . |
32 |
Changing the Equalizer Settings ......................................... |
33 |
Delete the Custom Audio Mode.......................................... |
33 |
Setting Timers . . . . . . . . . . . . . . . . . . . . . . . . . . . . . . . . . . . . . |
34 |
Setting the Sleep Timer........................................................ |
34 |
6HWWLQJ WKH $XWR 3RZHU 2 )HDWXUH.................................... |
34 |
Enabling the Screen Saver ................................................... |
34 |
Blanking the Screen ............................................................. |
35 |
Using the Network Connection Menu. . . . . . . . . . . . . . . . . . |
36 |
Connecting to a Wireless Network...................................... |
36 |
1

Changing the Manual Setup Settings.................................. |
36 |
Finding MAC Addresses for Network Setup ....................... |
37 |
Connecting to a Hidden Network........................................ |
37 |
Setting Up Channels . . . . . . . . . . . . . . . . . . . . . . . . . . . . . . . . |
38 |
Selecting a Channel Source ................................................. |
38 |
Finding Channels.................................................................. |
38 |
Adding New Channels.......................................................... |
39 |
Skipping Channels................................................................ |
40 |
Changing the Audio Language ............................................ |
41 |
Setting Up Closed Captioning . . . . . . . . . . . . . . . . . . . . . . . . |
42 |
Changing the Appearance of Digital Closed Captions....... |
42 |
Renaming Inputs (Using the Devices Menu) . . . . . . . . . . . . |
44 |
Changing the TV Settings . . . . . . . . . . . . . . . . . . . . . . . . . . . . |
45 |
Viewing System Information ............................................... |
45 |
Changing the On-Screen Menu Language.......................... |
46 |
Setting the Time Zone.......................................................... |
46 |
Using the Parental Controls ................................................ |
47 |
Accessing the Parental Controls Menu .......................... |
47 |
Enabling or Disabling Program Ratings.......................... |
47 |
Locking and Unlocking Channels.................................... |
47 |
Blocking and Unblocking Content by Rating.................. |
48 |
Changing the Parental Control Passcode....................... |
48 |
Resetting the Content Locks ........................................... |
48 |
Changing the View Mode Settings ...................................... |
49 |
Adjusting the Wide Mode (Aspect Ratio) ............................ |
49 |
Changing Your TV's DLNA Name......................................... |
50 |
Controlling Other Devices with CEC.................................... |
50 |
7XUQLQJ WKH 3RZHU ΖQGLFDWRU 2Q RU 2 ............................... |
51 |
Restoring the TV to Factory Default Settings ..................... |
52 |
Enabling and Disabling Smart Interactivity ........................ |
52 |
Using the Guided Setup Menu . . . . . . . . . . . . . . . . . . . . . . . |
53 |
Using the Info Window. . . . . . . . . . . . . . . . . . . . . . . . . . . . . . |
54 |
Using the USB Media Player................................ |
55 |
Using the USB Media Player . . . . . . . . . . . . . . . . . . . . . . . . . |
55 |
Preparing your USB drive to display USB Media ............... |
55 |
Displaying USB Media .......................................................... |
55 |
Removing the USB drive from the TV ................................. |
55 |
Using VIZIO Internet Apps Plus® (V.I.A. Plus) ..... |
59 |
Using the V.I.A. Plus App Dock . . . . . . . . . . . . . . . . . . . . . . . |
59 |
Using the App Launcher Keys.............................................. |
59 |
Using the Fullscreen V.I.A. Plus Apps Window . . . . . . . . . . . |
60 |
Fullscreen V.I.A. Plus Apps Window Overview . . . . . . . . . . . |
61 |
Customizing the V.I.A. Plus Apps Window . . . . . . . . . . . . . . |
62 |
Adding an App to the My Apps Tab .................................... |
62 |
Deleting an App from the My Apps Tab ............................. |
62 |
Moving an App in My Apps .................................................. |
63 |
Troubleshooting & Technical Support................ |
64 |
6SHFLȴFDWLRQV ....................................................... |
67 |
Limited Warranty ................................................. |
69 |
Parts and Labor .................................................................... |
69 |
Type of Service ..................................................................... |
69 |
Limitations and Exclusions .................................................. |
69 |
Personal Data ....................................................................... |
69 |
Zero Bright Pixel Defect Guarantee .................................... |
69 |
Legal & Compliance ............................................. |
70 |
2
Installing the TV |
1 |
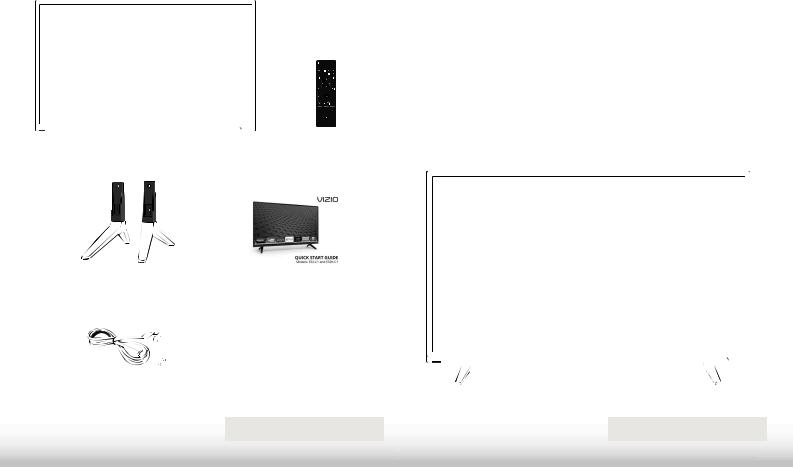
INSPECTING THE PACKAGE CONTENTS |
INSTALLING THE TV |
Before installing your new TV, take a moment to inspect the package contents. Use the images below to ensure nothing is missing or damaged.
VIZIO LED HDTV |
Remote Control |
|
|
with Batteries |
|
|
|
|
|
|
|
TV Stands |
Quick Start Guide |
(interchangeable) |
|
Power Cord |
[ 0 ɋPP |
|
Phillips Screws |
PACKAGE CONTENTS
After removing the TV from the box and inspecting the package contents, you can begin installing the TV. Your TV can be installed in two ways:
•2Q D ȵDW VXUIDFH XVLQJ WKH LQFOXGHG VWDQG
•On a wall, using a VESA-standard wall mount (not included)
Installing the TV Stands
Your TV includes stands designed to support the weight of the TV and keep it from falling over. However, the TV can still fall over if:
•It is placed on an uneven, unstable, or non-level surface
•It is pushed, pulled, or otherwise improperly moved
•If an earthquake occurs and the TV is not properly secured.
TV ON STAND
3

1
INSTALLING THE STANDS
To install the stands:
Remove any plastic wrapping from the TV and the stands.
3ODFH WKH 79 VFUHHQ GRZQ RQ D FOHDQ ȵDW VXUIDFH 7R SUHYHQW VFUDWFKHV RU GDPDJH WR WKH VFUHHQ place the TV on a soft surface such as a blanket and avoid any sharp edges.
4
1
INSTALLING THE STANDS
Insert the left and right stands into the base of the TV (the stands are identical).
6HFXUH HDFK VWDQG WR WKH 79 ZLWK WZR 0 ɋPP 3KLOOLSV VFUHZV LQFOXGHG ΖQVHUW WKH VFUHZV LQWR WKH EDFN RI WKH 79 DQG WLJKWHQ WKHP using a Phillips screwdriver.
:KHQ \RX DUH ȴQLVKHG SODFH WKH 79 RQ D VWDEOH OHYHO VXUIDFH
5

Installing the TV on a Wall
To mount your TV on a wall, you will need a wall mount. Consult
WKH LQIRUPDWLRQ EHORZ WR ȴQG WKH DSSURSULDWH PRXQW IRU \RXU 79 model:
Installing a TV on a wall requires lifting. To prevent injury or damage to the TV, ask someone to help you.
|
E32-C1 |
E32h-C1 |
|
|
|
Screw Size: |
M4 |
M4 |
Hole Pattern: ɋPP 9 [ ɋPP + ɋPP 9 [ ɋPP +
Weight w/o Stand: |
11.31 lbs |
11.02 lbs |
Be sure the mount you choose is capable of supporting the weight of the TV. After you have determined that you have the correct mount for your TV, you can begin the installation.
To install your TV on a wall:
1.Disconnect any cables connected to your TV.
2.3ODFH WKH 79 IDFH GRZQ RQ D FOHDQ ȵDW VWDEOH VXUIDFH %H VXUH the surface is clear of debris that can scratch or damage the TV.
3.Remove the base by loosening and removing the screws.
4.Attach your TV and wall mount to the wall, carefully following the instructions that came with your mount.
Use only with a UL-listed wall mount bracket rated for the weight/load of this TV.
6
1
WALL MOUNT SCREW LOCATIONS

Controls and Connections |
2 |
USB - Connect a USB thumb drive to play photos, music, or video.
HDMI - Connect an HDMI device.
Optical Audio Out - Connect an optical/SPDIF audio device, such as home audio receiver.
Stereo Audio Out - Connect an RCA audio device, such as sound bar.
DTV/TV (Coaxial) - Connect a coaxial cable from a cable or satellite box, or from an antenna.
Component/Composite - Connect a component or composite device.
Ethernet - Connect an Ethernet cable from a home network.
HDMI - Connect an HDMI device.
REAR PANEL
7

2
POWER Press to turn the TV on.
Press and hold WR WXUQ WKH 79 R
INPUT Press to change the input source.
SIDE PANEL
8
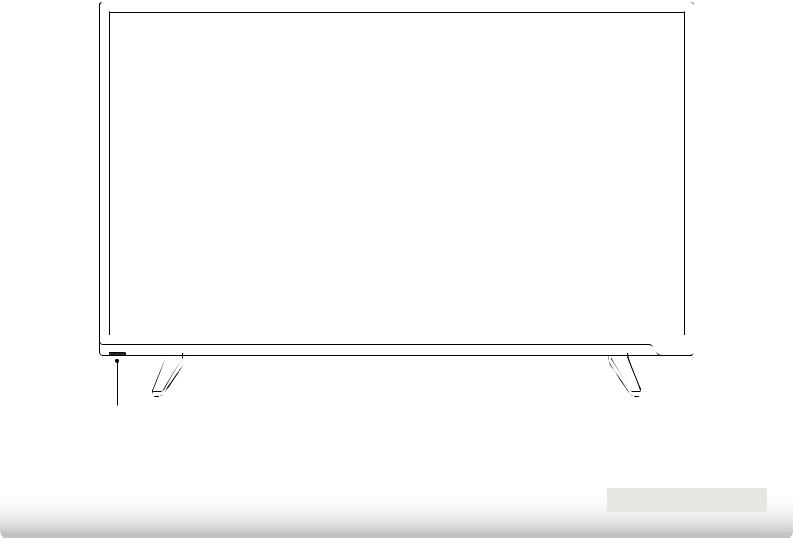
2
FRONT PANEL
REMOTE SENSOR & POWER INDICATOR
When using the remote, point it directly at this sensor.
7KH SRZHU LQGLFDWRU ȵDVKHV RQ ZKHQ WKH 79 WXUQV RQ WKHQ JRHV RXW DIWHU
several seconds. To keep the power indicator on as long as the TV is on, see 7XUQLQJ WKH 3RZHU ΖQGLFDWRU 2Q RU 2 on page 51.
FRONT PANEL
9

INPUT
Change the currently displayed input.
A/V CONTROLS
Control USB media player and video streaming playback.
CLOSED CAPTIONS
7XUQ FORVHG FDSWLRQV RQ DQG R
EXIT
Close the on-screen menu.
OK
Select the highlighted option.
BACK
Go to the previous on-screen menu.
VOLUME UP/DOWN
Increase or decrease loudness of the audio.
MUTE
7XUQ WKH DXGLR R RU RQ
WIDE
Change the display mode.
NUMBER PAD
Manually enter a channel.
ENTER
&RQȴUP FKDQQHO RU SDVVFRGH entered using the Number Pad.
2
APP LAUNCHER
Quickly launch the pictured App.
$OVR WXUQV RQ WKH 79 LI LW LV R
POWER
7XUQ 79 RQ RU R
MENU
Display the on-screen menu.
INFO
Display the info window.
ARROW
Navigate the on-screen menu.
GUIDE
Display the info window.
CHANNEL UP/DOWN
Change the channel.
V BUTTON
Open the VIZIO Internet Apps Plus® (V.I.A.
3OXV GRFN
LAST
Return to the channel last viewed.
PIC
Opens the Picture Mode menu.
DASH
Use with number pad to manually
enter a digital sub-channel.
)RU H[DPSOH RU
REMOTE CONTROL
10

2
Replacing the Batteries
1.To remove the battery cover, press on the logo and slide the cover out.
2.Insert two batteries into the remote control. Make sure that
WKH DQG V\PEROV RQ WKH EDWWHULHV PDWFK WKH DQG symbols inside the battery compartment.
3.Replace the battery cover.
11
Connecting Your Devices
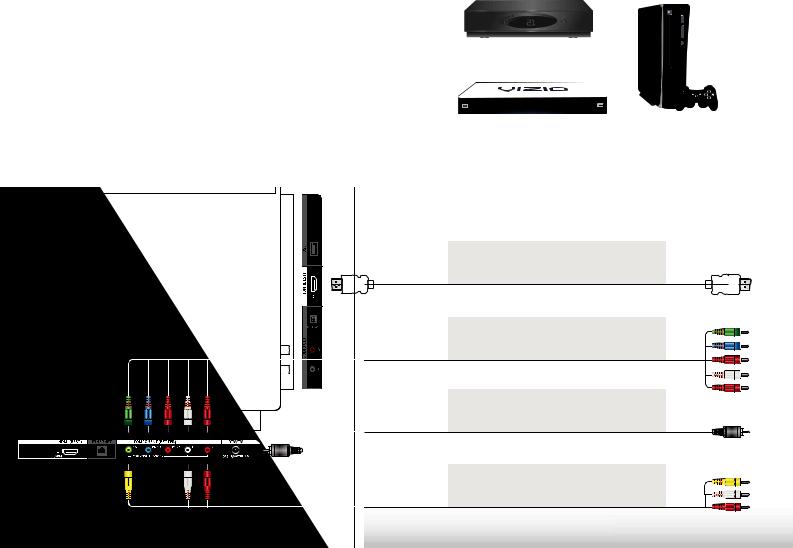
CONNECTING A DEVICE
Your TV can be used to display output from most devices.
1.Verify that your device has a video port that matches an available port on the TV (HDMI-1, HDMI-2, Comp, etc.).
2.7XUQ WKH 79 DQG \RXU GHYLFH R
3.Connect the appropriate cable (not included) to the TV and the device.
4.Turn the TV and your device on. Set the TV’s input to match the connection you used (HDMI-1, HDMI-2, Comp, etc.).
3
Cable/Satellite Box
DVD/Blu-ray Player |
|
Game Console |
|
HDMI CABLE* |
• DIGITAL |
|
BEST |
• HD VIDEO (1080p)** |
|
• HD AUDIO |
|
|
COMPONENT CABLE* |
• ANALOG |
|
BETTER |
|
|
• HD VIDEO (1080p)** |
|
|
|
|
|
|
• STEREO AUDIO |
|
COAXIAL CABLE* |
• ANALOG |
|
BETTER |
|
|
• HD VIDEO (1080i)** |
|
|
|
|
|
|
• STEREO AUDIO |
|
AV CABLE* |
• ANALOG |
|
GOOD |
|
|
• VIDEO (480i)** |
|
|
|
|
|
|
• STEREO AUDIO |
BACK OF TV |
|
|
12 |
* Cables not included. |
** Maximum resolution. |
|
|

3
CONNECTING A DEVICE - AUDIO AND VIDEO CABLE TYPES
AV CABLE |
COAXIAL CABLE |
AV cables (or Composite cables) are the traditional way |
Coaxial cables are the traditional way of connecting |
of connecting your devices to your TV. Video signals are |
antennas and cable television signals to your TV. Coaxial |
sent over the yellow connector while audio is sent over |
cables carry both audio and video signals through a |
the red and white connectors. |
single connector. |
• Video resolutions up to 480i |
• HD video resolutions up to 1080i |
||||||||||||
• |
Analog connection |
• |
Analog connection |
||||||||||
• |
Audio and video signals |
• |
Audio and video signals |
||||||||||
|
|
|
|
|
|
|
|
|
|
|
|
|
|
|
|
|
|
|
|
|
|
|
|
|
|
|
|
|
|
|
|
|
|
|
|
|
|
|
|
|
|
Y/V |
|
L |
|
R |
Cable/Antenna |
|||||||
|
|
|
|
|
|
|
|
|
|
|
|
|
|
|
|
|
|
|
|
|
|
|
|
|
|
|
|
|
|
|
|
|
|
|
|
|
|
|
|
|
|
|
|
|
|
|
|
|
|
|
|
|
|
|
|
|
|
|
|
|
|
|
|
|
|
|
|
|
|
|
|
|
|
|
|
|
|
|
|
|
|
|
|
|
|
|
|
|
|
|
|
|
|
|
|
|
|
|
|
|
|
|
|
|
|
|
|
|
|
|
|
|
|
|
|
|
|
|
|
|
|
|
|
|
|
|
|
|
|
|
|
|
|
|
|
|
|
|
|
|
|
|
|
|
|
|
|
|
|
|
|
|
|
|
|
|
|
|
|
|
|
|
|
|
|
|
|
|
|
|
|
|
|
|
|
|
|
|
|
|
|
|
|
|
|
|
|
|
|
|
|
|
|
|
|
|
|
|
|
|
|
|
|
|
|
|
|
|
|
|
|
|
|
|
|
|
|
|
|
|
|
|
|
|
|
|
|
|
|
|
|
|
|
GOOD |
BETTER |
||||
|
|
|
|
|
|
13

COMPONENT CABLE
Component cables are designed to carry HD (high
GHȴQLWLRQ YLGHR VLJQDOV DORQJ ZLWK DGGLWLRQDO DXGLR connections. Colors are delivered with color information over three connectors for video (separated into red, blue and green signals) and the left and right audio connectors (red and white).
•HD video resolutions up to 1080i
•Analog connection
•Audio and video signals
|
|
|
|
|
|
|
|
|
|
|
|
|
|
|
|
|
|
|
|
|
|
|
|
|
|
|
|
|
|
|
|
|
|
|
|
|
|
|
|
|
Y/V |
Pb/Cb Pr/Cr |
|
L |
|
R |
|||||||||||||
|
|
|
|
|
|
|
|
|
|
|
|
|
|
|
|
|
|
|
|
|
|
|
|
|
|
|
|
|
|
|
|
|
|
|
|
|
|
|
|
|
|
|
|
|
|
|
|
|
|
|
|
|
|
|
|
|
|
|
|
|
|
|
|
|
|
|
|
|
|
|
|
|
|
|
|
|
|
|
|
BETTER
14
3
HDMI CABLE
HDMI is the intelligent, all-digital interface that delivers both dazzling quality and unmatched ease of use. HDMI technology transmits crystal-clear digital video along with multi-channel surround audio. HDMI-connected devices have the ability to automatically adjust themselves for optimal viewing.
•HD video resolutions up to 1080p
•HD audio
•Digital connection
•Audio and video signals
BEST
CONNECTING AN AUDIO DEVICE
Your TV can output sound to an audio device, such as a receiver or sound bar.
1.Verify that your device has an audio port that matches an available port on the TV (HDMI, Optical, or RCA).
2.7XUQ WKH 79 DQG \RXU DXGLR GHYLFH R
3.Connect the appropriate cable to the TV and the device.
4.Turn the TV and your device on.
3
Home Audio Receiver
VIZIO Sound Bar
HDMI CABLE*
• ARC 2-WAY COMMUNICATION BEST • 2.0-5.1 DIGITAL AUDIO
• PCM, DTS, DOLBY DIGITAL
OPTICAL/SPDIF CABLE*
• PCM STREAM BETTER • DOLBY DIGITAL 5.1 CHANNEL
• DTS 5.1 CHANNEL
|
RCA CABLE* |
|
|
|
GOOD |
• ANALOG STEREO CONNECTION |
|
|
|
|
|
|
|
• 2.0 CHANNEL |
|
|
|
|
|
* Cables not included.
15

3
CONNECTING AN AUDIO DEVICE - AUDIO CABLE TYPES
RCA CABLE
RCA cables (or composite cables) are the traditional way of connecting your devices to your audio device. Audio signals are sent over the red and white connectors.
OPTICAL/SPDIF CABLE
Optical/SPDIF cables transmit audio signals as
pulses of light through a cable made of plastic
ȴEHUV $XGLR VLJQDOV DUH GLJLWDOO\ WUDQVPLWWHG between devices.
HDMI CABLE
HDMI technology transmits crystal-clear digital multi-channel surround audio through a single HDMI cable. Audio Return Channel-enabled (ARC) TVs allow audio to be sent over an already connected HDMI cable, eliminating the need for a separate audio cable. See Connecting an Audio Device - ARC on page 17.
• |
Quality Stereo Connection |
• |
PCM Stream (Lossless) |
• |
CEC 2-way Communication |
|||||||||||||
• |
2.0 Channel |
|
|
|
• |
Dolby Digital 5.1 Channel |
|
(Auto setup) |
||||||||||
|
|
|
|
|
|
|
||||||||||||
• |
Analog Connection |
• |
DTS 5.1 Channel |
• PCM, DTS, Dolby Digital |
||||||||||||||
|
|
|
|
|||||||||||||||
• |
Audio Signal Only |
|
|
|
• |
Digital Connection |
• |
2.0 - 5.1 Scaleable Lossless |
||||||||||
|
|
|
|
Digital Audio Connection |
||||||||||||||
|
|
|
|
|
|
|
|
|
|
• |
Audio Signal Only |
|
||||||
|
|
|
|
|
|
|
|
|
|
• Audio and Video Signals |
||||||||
|
|
|
|
|
|
|
|
|
|
|
|
|
|
|
||||
|
|
L |
R |
|
Optical/SPDIF |
|
|
|
|
|||||||||
|
|
|
|
|
|
|
|
|
|
|
|
|
|
|
|
|
|
|
|
|
|
|
|
|
|
|
|
|
|
|
|
|
|
|
|
|
|
|
|
|
|
|
|
|
|
|
|
|
|
|
|
|
|
|
|
|
|
|
|
|
|
|
|
|
|
|
|
|
|
|
|
|
|
|
|
|
|
|
|
|
|
|
|
|
|
|
|
|
|
|
|
|
|
|
|
|
|
|
|
|
|
|
|
|
|
|
|
|
|
|
|
|
|
|
|
|
|
|
|
|
|
|
|
|
|
|
|
|
|
|
|
|
|
|
|
|
|
|
|
|
|
|
|
|
|
|
|
|
|
|
|
|
|
|
|
|
|
|
|
|
|
|
|
|
|
|
|
|
|
|
|
|
|
|
|
|
|
|
|
|
|
|
|
|
|
|
|
|
|
|
|
|
|
|
|
|
|
|
|
|
|
|
|
|
|
|
|
|
|
|
|
|
|
|
|
|
|
|
|
|
|
|
|
|
|
|
|
|
|
|
|
|
|
|
|
|
|
|
|
|
|
|
|
|
|
|
|
|
|
|
|
|
|
|
|
|
|
|
|
|
|
|
|
|
|
|
|
|
|
|
|
|
|
|
|
|
|
|
|
|
|
|
|
|
|
|
|
|
|
|
|
|
|
|
|
|
|
|
|
|
|
|
|
|
|
|
|
|
|
|
|
|
|
|
|
|
|
|
|
|
|
|
|
|
|
|
|
|
|
|
|
|
|
|
|
|
|
|
|
|
|
GOOD |
BETTER |
BEST |
||||||
|
|
|
|
|
|
|
|
|
|
|
|
|
|
|
|
|
|
16
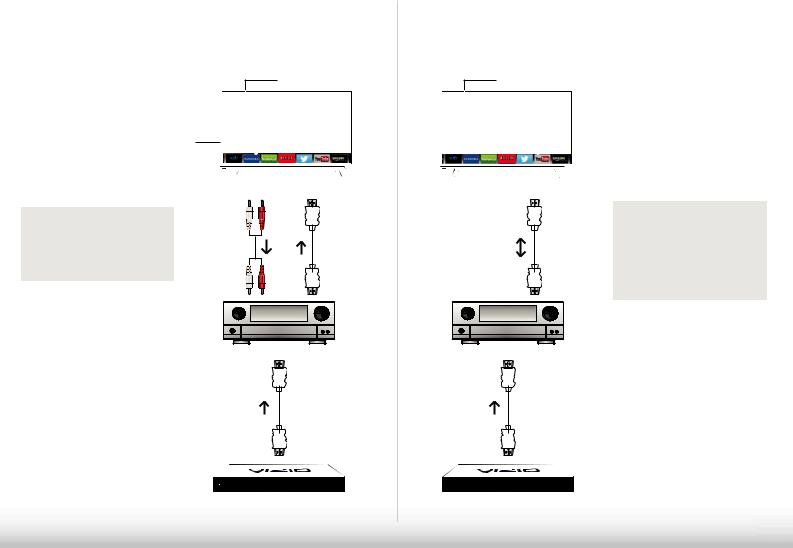
CONNECTING AN AUDIO DEVICE - ARC
Without HDMI ARC
Built-in Tuner
VIZIO Internet Apps Plus®
|
|
Your TV |
|
Without an HDMI ARC setup, |
|
|
|
your TV needs an extra cable |
|
|
|
to connect it to your home |
RCA (Audio) |
HDMI |
|
audio receiver. The audio |
|||
|
|
||
signal is analog-only. |
|
|
Your Home Audio Receiver
HDMI
Your Blu-ray Player
3
With HDMI ARC
Built-in Tuner

 VIZIO Internet Apps Plus®
Your TV
HDMI
Your Home Audio Receiver
HDMI
HDMI ARC transmits all-digital audio from your TV to your home audio receiver, with no need for an extra cable. The single HDMI cable
also carries digital HD (high
GHȴQLWLRQ YLGHR WR \RXU 79
Your Blu-ray Player
17
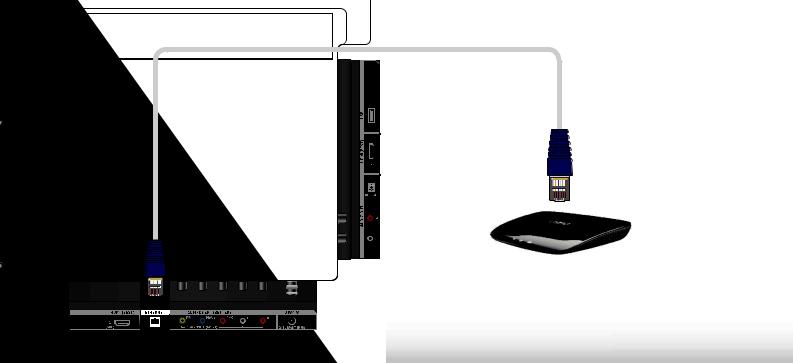
CONNECTING TO YOUR NETWORK
Your TV is Internet-ready. It can be connected to your home network with a Wired or Wireless connection.
Connecting to a Wired Network (Best)
1.Connect an Ethernet cable to your router and to the Ethernet port on the back of the TV. See below.
2.8VH WKH *XLGHG 1HWZRUN 6HWXS WR FRQȴJXUH WKH 79 6HH Using the Guided Setup Menu on page 53.
3
Connecting to a Wireless Network
1.Ensure you have a router or modem broadcasting as high-speed wireless signal (802.11n recommended).
2.8VH WKH *XLGHG 1HWZRUN 6HWXS WR FRQȴJXUH WKH 79 6HH Using the Guided Setup Menu on page 53.
Ethernet Cable
Router / Modem
18
 Loading...