

CD 2737B
CD 2537U
CD 2327G
English
Français
Deutsch
CD 2217G
User manual
Mode d’e emploi
Bedienungsanleitung
Gebruiksaamwijzing
Instuzioni d’uso
Instrucctiones de manejo
Modo de emprego
Bruksanvisning
Betenningsveiledning
Käyttöohje
Εγχειρίδιο χρήστη
Nederlands
Italiano
Español
Português
Dansk
Svenska
Suomi
www.vdodayton.com
Έλληνικά

2
A
wma
SOURCE
REL
PWR
MUTE
SAM
AST
SOUND
BAND
PTY
TA
AF
1
SCN
2
RPT
3
RND
4
-10
5
+10
6
ID3
AUX IN
CD 2327G
IR
1
3
2
9
8
10
5
6
4
7
11
12
13 14
15
16
17
1
3
2
9
8
10
5
6
4
7
11
12
13 14
15
16
17
wma
REL
SOURCE
PWR
MUTE
SAM
AST
SOUND
CD 2737B
IR
BAND
PTY
AF
TA
1
SCN
2
RPT
3
RND
4
-10
5
+10
6
ID3
AUX IN
CARD IN
18
EJ
CARD IN
EJ
18
B
C
D
3
1
3
2
188mm
58mm
E
1
3
2
5
12
6
4
7
8
9
10
11
R
TALK
SD
USB
F
The Remote Control is a separate accessory.
Please contact your dealer.
G
I
H
J
K
4
L
RL-
RL+
FL-
FL+
FR-
FR+
RR-
RR+
N.C.
N.C. N.C.
15A
12V
R
SDVC
A
B
C
C1
C2C3
Pink
Tel.Mute
Blue
SWRC+
Brown
SWRC-
Gray
R. Amp.
BT Mic.
White
Red
L
R
Preamp
Out
Illumination Ground
Microphone Ground
Illumination Switch
Microphone-In + Talk
Illumination Power
Illumination Blink
(Headunit)
M
N
O
P
Q T
R
S
5
U V
6

INTRODUCTION
Before Starting
Thank you for purchasing this VDO Dayton product, which has been designed and manufactured
according to applicable Safety Regulations, following the highest standards and subjected to rigorous testing. Kindly familiarize yourself with the product by reading this user manual carefully. Use the
product as intended, and keep this manual handy in your car for future reference.
Environment
This booklet is printed on low-chlorine recyclable paper.
Preventive Maintenance
To ensure good connection between the set and the detachable front, it is advisable to clean the con-
nectors periodically with a cotton swab slightly moistened with cleaning uid or alcohol.
TECHNICAL AND FUNCTION DATA
CD2217G CD2327G CD2537U CD2737B
Power Supply 12V 12V 12V 12V
Max. Power [W] 4 x 40 4 x 40 4 x 50 4 x 50
Sinus Power [W] 4 x 20 4 x 20 4 x 25 4 x 25
Quiescent Current ≤ 3mA ≤ 3mA ≤ 3mA ≤ 3mA
Illumination Switchable
Steering Wheel
Remote Control
Speed Dependent
Volume Control
FM 3 Bands (including 1
MW/LW 2 MW Bands (includ-
MP3 Format
(with ID3 Tag)
WMA Format - Yes Yes Yes
CD (with ESP) Yes Yes Yes Yes
SD / MMC - - Reads up to 2 GB
USB - - V1.1 speed; reads up
Bluetooth - - - V2.0 + EDR
BT Proles - - - HSP, HFP, A2DP
Preamp Out 2-Channel (2V) 2-Channel (2V) 2-Channel (2V) 2-Channel (2V)
Front Panel Flip down, Detachable Flip down, Detachable Flip down, Detachable Flip down, Detachable
Telephone Mute Single y lead cable Single y lead cable Single y lead cable Single y lead cable
Dimensions
(WxHxD)
(orange / green /
dual)
Programmable Programmable Programmable Programmable
Needs calibration Needs calibration Needs calibration Needs calibration
AST band)
ing 1 AST band), 1 LW
Band
Yes Yes Yes Yes
178 x 50 x 160 mm 178 x 50 x 160 mm 178 x 50 x 160 mm 178 x 50 x 160 mm
Switchable
(orange / green /
dual)
3 Bands (including 1
AST band)
2 MW Bands (including 1 AST band), 1 LW
Band
Switchable
(orange / green /
dual)
3 Bands (including 1
AST band)
2 MW Bands (including 1 AST band), 1 LW
Band
memory
to 2 GB memory
Switchable
(orange / green /
dual)
3 Bands (including 1
AST band)
2 MW Bands (including 1 AST band), 1 LW
Band
Reads up to 2 GB
memory
V1.1 speed; reads up
to 2 GB memory
English
7

CONTENT PAGE
INTRODUCTION .......................................7
Before Starting...........................................7
Environment ..............................................7
Preventive Maintenance ............................7
TECHNICAL AND FUNCTION DATA .......7
CONTENT PAGE ......................................8
GENERAL INFORMATION .......................9
Disclaimer ..................................................9
Class 1 Laser Product ...............................9
Disposal of batteries and accumulators
(Directive 2006/66/EC) ..............................9
FCC Compliance .......................................9
CE Compliance..........................................9
Protecting your headunit from theft .........10
CD player and care..................................10
FEATURES INFORMATION ...................10
Notes on RDS..........................................10
Notes on audio CDs ................................10
Notes on MP3 les ..................................11
Notes on WMA les .................................11
Notes on folders ......................................11
Notes on SD/MMC...................................12
Notes on USB ..........................................12
Notes on Bluetooth® Technology ............12
Notes on Priority ......................................12
INSTALLATION .......................................13
Connection ..............................................13
Connection in vehicles equipped with
standard ISO connectors .........................13
Connection in vehicles without
standard ISO connectors .........................13
Preparation ..............................................13
Connectors (g. L, M and N) ...................13
Connector A 1) .........................................13
Connector B 1) ........................................13
Preamp Out .............................................13
Wires of Steering Wheel Remote
Control (SWRC) .......................................13
Wire of Telephone Mute ...........................14
Wire of Remote Amplier .........................14
MOUNTING .............................................14
Metal Sleeve (g. J & K) ..........................14
Connecting the Headunit (g. L & M) ......14
Mounting the Headunit (g. U & V) ..........14
Front Mounting (DIN slot) ........................14
Rear Mounting (JIN slot)..........................14
Removing the Headunit (g. T & U) .........14
Replacing the Fuse (g. L & M) ...............14
Interference suppression .........................14
Location of the Bluetooth Microphone
Module .....................................................15
SECURITY ..............................................15
Removing the Front (g. O - Q) ..............15
Inserting the Front (g. R - T) ..................15
FRONT PANEL AND REMOTE
CONTROL ...............................................16
GENERAL OPERATION .........................18
Switching On / Off ....................................18
Selecting a Source ..................................18
AUDIO .....................................................18
Setting the Start-up Volume.....................18
SOUND Menu..........................................18
Mute (silence) ..........................................18
Balancing the Volume for Different
Sources ...................................................18
RADIO .....................................................18
Region Setting .........................................18
AM Band ..................................................19
Select a Waveband .................................19
Select a Station .......................................19
Auto-Seek Tuning ....................................19
Manual Tuning .........................................19
Storing a Station ......................................19
Auto Store (AST) .....................................19
Manual Store ...........................................19
RADIO DATA SYSTEM (RDS) ................19
Display of Station Name (PS) ..................19
Alternate Frequency (AF) ........................19
Trafc Programme (TP) and Trafc
Announcement (TA) .................................19
Presetting TA Volume ..............................19
TA Activation / De-activation ....................19
Interrupting TA .........................................20
Enhanced other Network (EON) ..............20
Programme Type (PTY) ...........................20
Searching for a Programme Type ............20
PTY Activation / De-activation .................20
RDS Regionalization ...............................20
CD OPERATION .....................................20
Loading CD into the Headunit .................20
Ejecting a CD...........................................20
Playing a CD-R or CD-RW ......................20
Playing a “Copy-Protected” non-
conforming audio CD ...............................20
Listening to Music ....................................21
Multi-Session Disc ...................................21
TA / NEWS Interruption ...........................21
Track Selection ........................................21
8
Fast-Forward or Fast-Backward a Track .... 21
Scan Feature ...........................................21
Repeat Feature........................................21
Random Feature......................................21
USB AND SD/MMC OPERATION ...........21
General ....................................................21
Auto-Play .................................................21
Operations of USB and SD/MMC ............21
TA / NEWS Interruption ...........................21
BLUETOOTH OPERATION ....................22
General ....................................................22
Controls (g. K)........................................22
Pairing .....................................................22
Paired Devices ........................................22
Hands-Free Call ......................................22
Answer a call ...........................................22
Reject a call .............................................22
Hang-up a call .........................................22
Music Streaming ......................................22
AUX OPERATION ...................................22
SPECIAL FUNCTIONS ...........................22
Clock........................................................22
Telephone Mute .......................................23
Brightness Control ...................................23
Illumination Colour ...................................23
Security LED............................................23
Speed Dependent Volume Control (SDVC)....23
Calibration ...............................................23
Steering Wheel Remote Control (SWRC) .....23
SOFTWARE ACCESS MENU (SAM) .....25
TROUBLESHOOTING ............................28
NO POWER Verication ..........................28
NO SOUND Verication...........................28
SOUND TROUBLE Verication ...............28
CD ERRORS Verication ........................28
USB & SD / MMC ERRORS Verication .....28
Class 1 Laser Product
English
Caution:
Any inappropriate use of the device
may expose the user to invisible laser rays. Which exceed the limits for
Class 1 laser products.
Disposal of batteries and
accumulators (Directive 2006/66/EC)
In many countries it is forbidden to dispose empty batteries with normal domestic waste. Please
nd out the regulations that apply in your area
regarding the disposal of used batteries. Please
take care that damaged or leaked batteries will
be disposed in a professional way.
FCC Compliance
This device complies with part 15 of the FCC
Rules. Operation is subject to the following two
conditions: (1) This device may not cause harmful interference, and (2) this device must accept
any interference received, including interference
that may cause undesired operation.
CE Compliance
GENERAL INFORMATION
Disclaimer
The designs and specications stated in this
user manual are subjected to changes without
prior notice.
VDO Dayton accepts no responsibility for data
loss on your storage cards and/or USB devices if
the data is lost while using this headunit.
Hereby, Siemens VDO Trading GmbH declares
that this device complies with the essential
requirements and other relevant provisions of
Directive 1999/5/EC.
The Declaration of Conformity is available upon
request at the following address:
Siemens VDO Trading GmbH,
Kruppstraße 105,
60388 Frankfurt am Main, Germany.
9

Protecting your headunit from theft
The front panel can be detached from the headunit and stored in the provided protective case to
prevent theft.
Important:
Never use force or grip the display and the
buttons too tightly when removing or attaching.
Avoid subjecting the front panel to excessive
shocks.
Keep the front panel out of direct sunlight and
high temperature.
CD player and care
Please use normal, round CDs only. If you
insert irregular, non-round, shaped CDs,
they may jam inside the headunit or not play
properly.
Check all CDs for cracks, scratches or warp-
ing before playing. Do not play CDs with one
of these symptoms.
Avoid touching or leaving ngerprints on the
recorded (non-printed) surface when handling the CDs.
Always store audio CDs in their protective
covers when not in use.
Always ensure that CDs are clean and dry
before inserting.
Keep CDs out of direct sunlight and do not
expose the CDs to high temperatures.
Do not attach labels, write on or apply chemi-
cals to the surface of the CDs.
To clean a CD, wipe the CD with a soft cloth
outward from the centre.
If the heater is used in cold weather, moisture
may form on components inside the headunit. Condensation may cause the headunit
to malfunction. If you think that condensation
is a problem, turn off the headunit for an hour
or so to allow it to dry out and wipe any damp
CDs with a soft cloth to remove the moisture.
Road shocks may interrupt CD playback.
FEATURES INFORMATION
Notes on RDS
Many VHF stations transmit RDS (Radio Data
System) information. This radio evaluates the
RDS telegram and offers the following advantages:
PS (Program Service name): Display of sta-
tion name
PTY (Programme TYpe): Station selection by
programme type
AF (Alternative Frequency): Automatic re-tun-
ing to best alternative frequency for clearer
reception
TA (Trafc Announcement): Trafc announce-
ments of reported road conditions
EON (Enhanced Other Network): Automatic
fade-in of trafc announcements of other
stations
PTY-NEWS: Fading in of messages and
items of news
Notes on audio CDs
You can play 12 cm CDs on your headunit.
The use of 8 cm CDs (with or without adapters) and of CDs with irregular shapes is not
recommended.
Please use CDs (Compact Discs) that has
this Compact Disc Digital Audio marking as
shown below.
The following CD formats are supported by the
headunit:
CD Audio (CD-DA in accordance with the
Red Book);
CD Text is not supported
CD-ROM (in accordance with Yellow Book);
CD-R/RW (in accordance with Orange Book,
part 2/3);
CD mixed mode (in accordance with Light
Yellow Book);
Only the audio tracks will be the played.
Multi-session CD (in accordance with multi-
session CD specication 1.0).
10

Notes on MP3 les
MP3 file
structure
A
A-1
A-1-1
A-1-1-1
A-2
A-2-1
A-2-1-1
A-1-1-1-1
A-1-1-1-1-1
A-1-1-1-2
A-1-2
A-1-2-1
A-2-1-2
B
B-1
C
C-1
C-1-1
L1 L2 L3 L4 L5 L6
L7
(001.mp3/wma)
(021.mp3/wma)
(001.mp3/wma)
(021.mp3/wma)
(031.mp3/wma)
(002.mp3/wma)
(071.mp3/wma)
(003.mp3/wma)
(011.mp3/wma)
(022.mp3/wma)
(007.mp3/wma)
(009.mp3/wma)
(031.mp3/wma)
(002.mp3/wma)
(008.mp3/wma)
(006.mp3/wma)
(023.mp3/wma)
(024.mp3/wma)
(091.mp3/wma)
(102.mp3/wma)
(231.mp3/wma)
(402.mp3/wma)
(731.mp3/wma)
(005.mp3/wma)
(999.mp3/wma)
(902.mp3/wma)
(765.mp3/wma)
(345.mp3/wma)
(667.mp3/wma)
(665.mp3/wma)
(882.mp3/wma)
(305.mp3/wma)
(402.mp3/wma)
(409.mp3/wma)
(599.mp3/wma)
(702.mp3/wma)
The following MP3 les are supported by the
headunit:
Files conforming with MPEG 1/2 or 2.5,
Layer-3
Up to 65k titles in up to 255 directories (each
data name with maximum of 32 characters)
Bit rate: This headunit can play recordings
with bit rates of 32 kbps to 320 kbps, constant or variable bit rate (VBR). The sound
quality of MP3 les generally becomes better
with an increased bit rate. To enjoy sound of
a certain quality, we recommend using discs
recorded with a bit rate of at least 128 kbps.
ID3 tag display: ID3 tag V1 and ID3 tag V2.
MP3 tracks can contain additional information
such as artist, track and album names (ID3
tags with maximum of 32 characters). Char-
acters other than upper case and lower case
letters ("Aa to Zz") and underscore ("_") may
not display properly.
The headunit may not play the tracks in the
order that you wrote them to the storage
media.
The headunit plays on the rst session if the
disc contains both CD audio tracks and MP3
les.
When playing a track with VBR, the elapsed
playing time in the display may not be accurate.
Make sure that a MP3 CD-R/RW is burned
and formatted as a data disc and NOT as an
audio disc.
MP3 les are not compatible with packet
write data transfer.
There is no "m3u" play list compatibility.
There is no MP3i (MP3 interactive) nor MP3
PRO formats compatibility.
The MP3 symbol on the display will be shown
if a MP3 track is being played.
Notes on WMA les
WMA is short for Windows Media® Audio and
refers to the audio compression technology that
is developed by Microsoft Corporation. Micro-
soft®, Windows Media and the Windows® logo
are trademarks or registered trademarks of Microsoft Corporation in the United States and/or
other countries.
This headunit may not playback all types of
encoded WMA les correctly, depending on
the application used to encode the les.
There may be a slight delay when starting
playback of WMA les encoded with image
data.
The headunit may not display folder name
longer than 32 characters correctly.
For les recorded in Romeo le system, only
the rst 64 characters will be displayed.
The headunit will playback WMA les en-
coded by Windows Media Player version 9
or before. Some les encoded by newer versions may not playback.
Bit rate: This headunit can play recordings
with bit rates of 32 kbps to 320 kbps, constant or variable bit rates (VBR). The sound
quality of WMA les generally becomes bet-
ter with an increased bit rate. To enjoy sound
of a certain quality, we recommend using on
discs recorded with a bit rate of at least 128
kbps.
The headunit does not support WMA les en-
coded in WMA Professional, WMA Lossless,
WMA Voice format or WMA with DRM.
Notes on folders
An outline of a CD-ROM with MP3/WMA les is
shown below.
Sub-folders are shown as folders in the selected
folder.
The headunit assigns the order of the folders
for playback automatically.
Folders without any MP3/WMA les will be
skipped automatically.
Up to 8-tier (layer) of folders is supported.
However, there may be a delay in the reading
of table of content (TOC) of the disc with numerous tiers. For this reason, we recommend
creating discs with no more than two tiers.
It is possible to playback up to 255 folders on
1 disc and up to 255 tracks in 1 folder.
11
English

Notes on SD/MMC
The headunit can support the following SD
or MMC card that has one of these markings
shown below.
The headunit can support memory cards with
up to 2 GB of memory and does not support
HC-SD (4 GB and above).
The headunit may not play SD cards with
lock function.
The headunit may not be able to read some
mini-SD or micro-SD cards with adapters.
Important Note: This headunit cannot guarantee
100% compatibility and readability for all SD or
MMC cards.
The headunit has been tested with the follow-
ing brands:
SD card (SanDisk, Toshiba & Kingston)
Mini-SD (Toshiba & Kingston)
Micro-SD (Toshiba & Kingston)
MMCMobile card (Kingston)
The headunit will support memory cards
formatted in FAT8, FAT16 or FAT32 only.
Memory cards formatted in NTFS le format
may not read correctly.
The headunit will automatically playback
tracks recorded in MP3 or WMA formats from
the memory cards upon insertion of the card
into the right slot.
Notes on USB
The headunit can support most passive USB
memory sticks and battery-operated USB music
players.
The headunit can support USB device with
up to 2 GB of memory.
The headunit may not be able to read some
USB devices with more than 2 GB or some
battery-operated USB music players. Port-
able hard disks are mostly not supported as
they sourced high current.
The headunit supports USB specications
version 1.1. USB devices conforming to
USB specications version 2.0 or above are
mostly backward compatible.
Important Note: This headunit cannot guarantee
100% compatibility and readability for all USB
devices.
The headunit has been tested with the follow-
ing brands:
Toshiba
Kingston
Imation
The headunit will support USB devices for-
matted in FAT8, FAT16 or FAT32 only. USB
devices formatted in NTFS le format may
not read correctly.
Notes on Bluetooth® Technology
Bluetooth is a short-range wireless radio connectivity technology used mainly for mobile
phones, hand-held PCs and other devices.
Bluetooth SIG Inc. owns the Bluetooth word,
marking and logos; and any use of such
marks is under license. Other trademarks
and trade names are those of their respective
owners.
Bluetooth operates in 2.4 GHz frequency
range and transmits voice and data at speeds
of up to 1 mbps within a range of up to 10 m.
The headunit supports the Handset Prole
(HSP), Handsfree Prole (HFP) and Advanced Audio Distribution Prole (A2DP).
The headunit has been veried and certied
by Bluetooth Qualication Program (BQP) for
compliance to the Bluetooth standards. For
more information, please check the Bluetooth
web site (http://www.bluetooth.com/Bluetooth/Connect/Products/) for the BQP product
listing.
Notes on Priority
For you to understand your headunit better, the
priorities of events and interruptions are summarized in a table. Incoming event with same or
higher priority (than current event) will interrupt
current event.
Priority Event
1 User-activated Mute or incoming Telephone
2 * Bluetooth (prole is according to the SAM
3 TP lost and incoming TP/TA
4 * PTY-News (if activated in SAM)
5 USB, SD/MMC and Bluetooth (other proles
6 PTY
7 Tuner (FM, MW and LW) and AUX
8 Volume-0
* Depends on SAM settings
Mute
setting, e.g. ‚HFP 1ST‘)
not nominated as higher-priority)
12

INSTALLATION
Use the supplied mounting sleeve and the
rear screw to mount the headunit rmly in the
dashboard. Only use the supplied screws for
installation. Keep leftover installation equipment
for future use. If the installation requires drilling
of holes or other modications to the vehicle,
please contact your dealer. This headunit is designed for the installation in the DIN-sized radio
space in the dashboard of your vehicle.
Connection
Connection in vehicles equipped with
standard ISO connectors
The headunit may be installed without major
preparation in vehicles with ISO connectors. However, some signals may have to be
adapted or connected to the ISO connectors.
Connection in vehicles without standard
ISO connectors
For vehicles with different connection require-
ment, ask your dealer for an adaptor cable. If
no adaptor cable is available for your vehicle,
connect the headunit as described in the
"Connectors" section.
Preparation
The device must be connected to a 12V DC
electrical system with a negative terminal to
earth (car chassis).
Warning:
Installation that does not conform
to these requirements may result in
malfunction, damage or re!
To avoid the risk of short circuit during installation, disconnect the negative terminal of the
battery until the headunit has been securely
installed and connected.
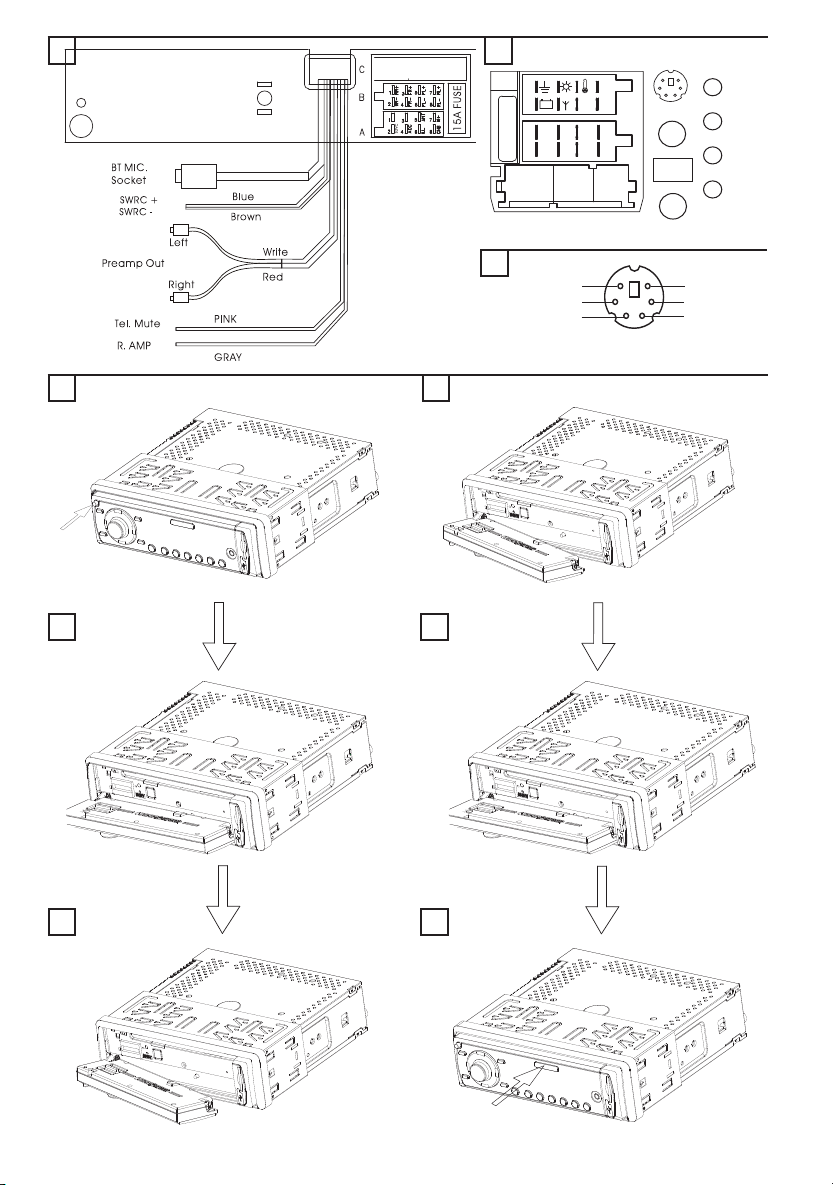
Connectors (g. L, M and N)
Connector A 1)
(optional) A1: Connect to the speed signal
from the speedometer of your vehicle. Some
vehicles are already prepared for it. Please
consult your dealer.
A4: Connect to the switched 12V supply
(switched on/off by the car ignition)
A5: Connect to the power supply for an elec-
tronic antenna or the control wire for the relay
of an automatic motorized antenna. Do not
use this connection for direct power supply to
the antenna motor.
(optional) A6: Connect to corresponding
dashboard wiring for the lighting control for
in-vehicle illumination.
A7: Connect to a permanent 12V supply. This
is the main power supply. Ensure that this
connection can handle a current of up to 15A.
A8: Connect to earth/ground (vehicle chassis
or negative terminal of the battery).
Pin Signal Pin Signal
[A1] SDVC [A5] Antenna control
[A2] - [A6] Pilot Light
[A3] - [A7] Battery
[A4] Ignition [A8] Ground
Connector B 1)
Connector for loudspeakers (use 4-ohm loudspeakers only) wiring. Do not connect any of
the loudspeaker leads to earth or directly to
a booster/amplier without high-level input
or via an external fader! You can connect the
loudspeaker leads directly to an amplier with
high-level inputs. The connection is shown in the
following table.
Side & pol. Front / colour Pin Rear / colour Pin
Left (+) Green [B5] White [B7]
Left (-) Green / black [B6] White / black [B8]
Right (+) Grey [B3] Blue [B1]
Right (-) Grey / black [B4] Blue / black [B2]
1) For this accessory, please contact your dealer.
Preamp Out
You can connect a power amplier with 2 or 4
(need to share) additional loudspeakers to this
headunit using the RCA cable (refer to pasted
connection label).
Red RCA to right channel
White RCA to left channel
Wires of Steering Wheel Remote Control
(SWRC)
Some main functions of this headunit can be
operated from your existing in-vehicle SWRC, if
available and suitable for usage. If your vehicle’s
SWRC is based on 2-wire RC-3 compatible
conguration, it can be directly connected to the
headunit’s pair of SWRC wires.
Please program the headunit to recognise
your vehicle's SWRC commands rst before
using.
You may need to turn on the SWRC inside
the SAM after programming. Please check
the SAM.
In case you are not sure of the steps, please
contact your dealer for assistance.
English
13

Wire of Telephone Mute
If your mounted hands-free car kit of your mobile phone provides a mute signal wire, you can
connect this wire to the headunit’s telephone
mute wire to enable automatic interruption of
the headunit’s sound output during an incoming
phone call.
Please ensure that both wires are secured
properly and not tensioned, otherwise any
strong vibration inside the vehicle will break
the contacts apart.
Please tape and cover the connection ends
to prevent any accidental short-circuit to the
in-vehicle metal chassis.
Wire of Remote Amplier
For certain models, there is a remote ampli-
er wire connected at the rear of the headunit.
Connect this wire to the “enable” signal of your
remote power amplier, and connecting the
Preamp Out to the audio input too.
Otherwise (if there is no remote amplier wire),
you might have to share the ‘[A5] Antenna con-
trol’ signal with the remote antenna.
Note: Check the current requirements of both
your remote amplier and remote antenna and
make sure they do not exceed 300 mA.
MOUNTING
Metal Sleeve (g. J & K)
Install the metal sleeve in the dashboard. For
optimal performance of the headunit, the metal
sleeve should be positioned horizontally (be-
tween -10° and +30°). Fix the metal sleeve into
place with the aid of a screwdriver.
Connecting the Headunit (g. L & M)
Ensure that the battery is disconnected.
Insert the power supply connector A into
socket A.
Insert loudspeaker connector B into socket B.
(Optional) Connect the preamp out RCA-
pair to the leads of the power amplier (if
present) using a pair of male-RCA cable (not
provided).
Inset the aerial plug into the aerial socket
(good reception is only possible with a good
aerial). If an antenna adaptor is needed,
please consult your dealer.
Mounting the Headunit (g. U & V)
This headunit can be properly installed either
from the conventional Front Mounting and/or
from Rear Mounting.
Front Mounting (DIN slot)
Slide the headunit into the metal sleeve until
the springs at either side of the headunit
snap into the openings of the sleeve.
Finally reconnect the negative car battery
terminal.
Rear Mounting (JIN slot)
Remove the frame front of your headunit.
Insert the headunit through the backside of
the dashboard until the brackets on either
side is aligned with the screw holes.
Screw both sides of your headunit with
M5 x 6 mm max. length screws (for these
items, please contact your dealer).
Mount the frame front,
Finally, reconnect the negative car battery
terminal.
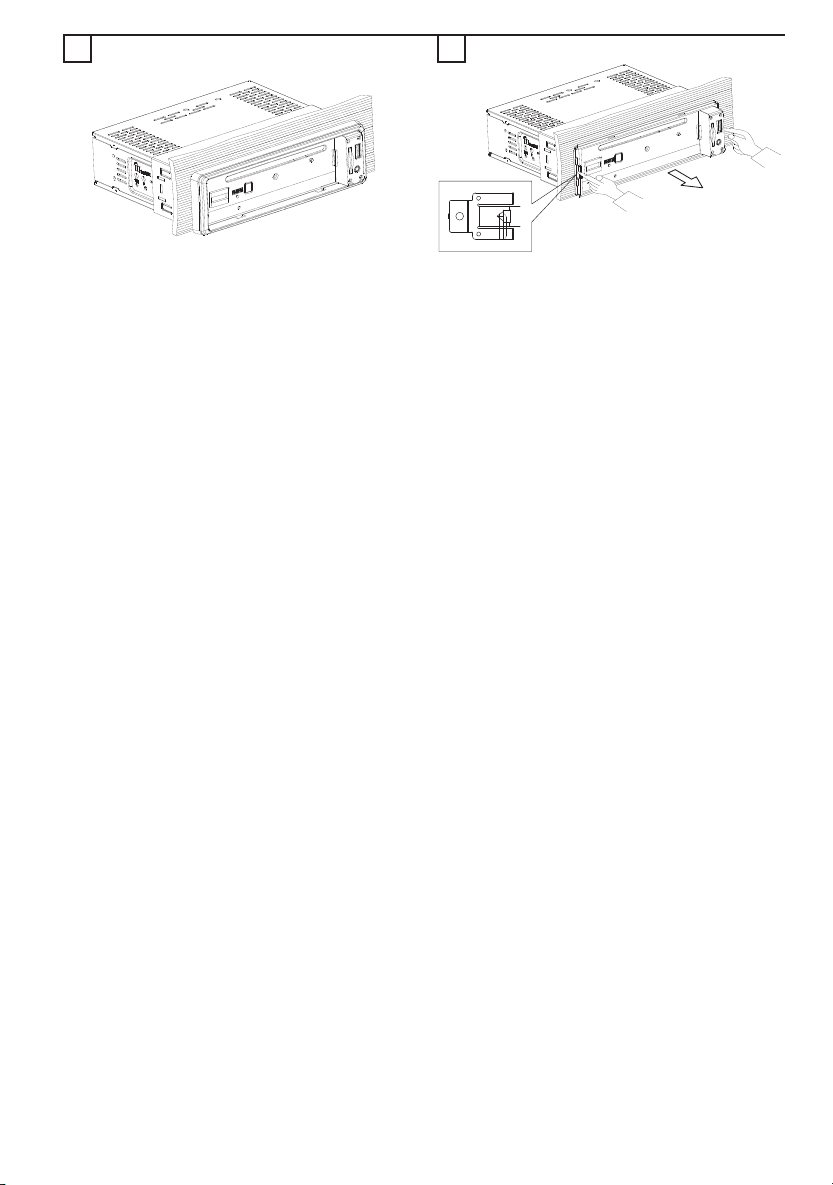
Removing the Headunit (g. T & U)
Press the REL button and detach the front
panel.
Insert both removal keys into the holes on the
front of the headunit until they lock.
Press (inward) the two catches on the side
until they unlock.
Pull out the headunit.
Replacing the Fuse (g. L & M)
Replace with a 15A blade-type fuse.
The new fuse must be of exact value and
type, otherwise the headunit will not be adequately protected. Ignoring this procedure
may lead to damage of the headunit, which
will invalidate the guarantee.
Interference suppression
Most modern cars have sufcient interference
suppression. If you experience interference
generated by the vehicle, please consult your
dealer.
14

Location of the Bluetooth
Microphone Module
The distance between driver and the Blue-
tooth Microphone Module should be within
700 mm with no obstacle in-between. The
said module should be placed in the front
near the centre console, for example, besides the headunit.
SECURITY
Removing the Front (g. O - Q)
Press the REL button, to ip-down the front.
1.
Push the front lightly to the left side and pull
2.
the front towards you.
Take the detachable front with you when you
3.
leave your vehicle.
Keep the front in the provided protective
4.
case.
Inserting the Front (g. R - T)
Take the front from its protective case.
1.
Align the front against the left-side hinge of
2.
the headunit.
Push the front lightly against the left-side
3.
hinge and insert the front into the headunit
until it clicks into position.
Close the front until it clicks into position.
4.
English
15

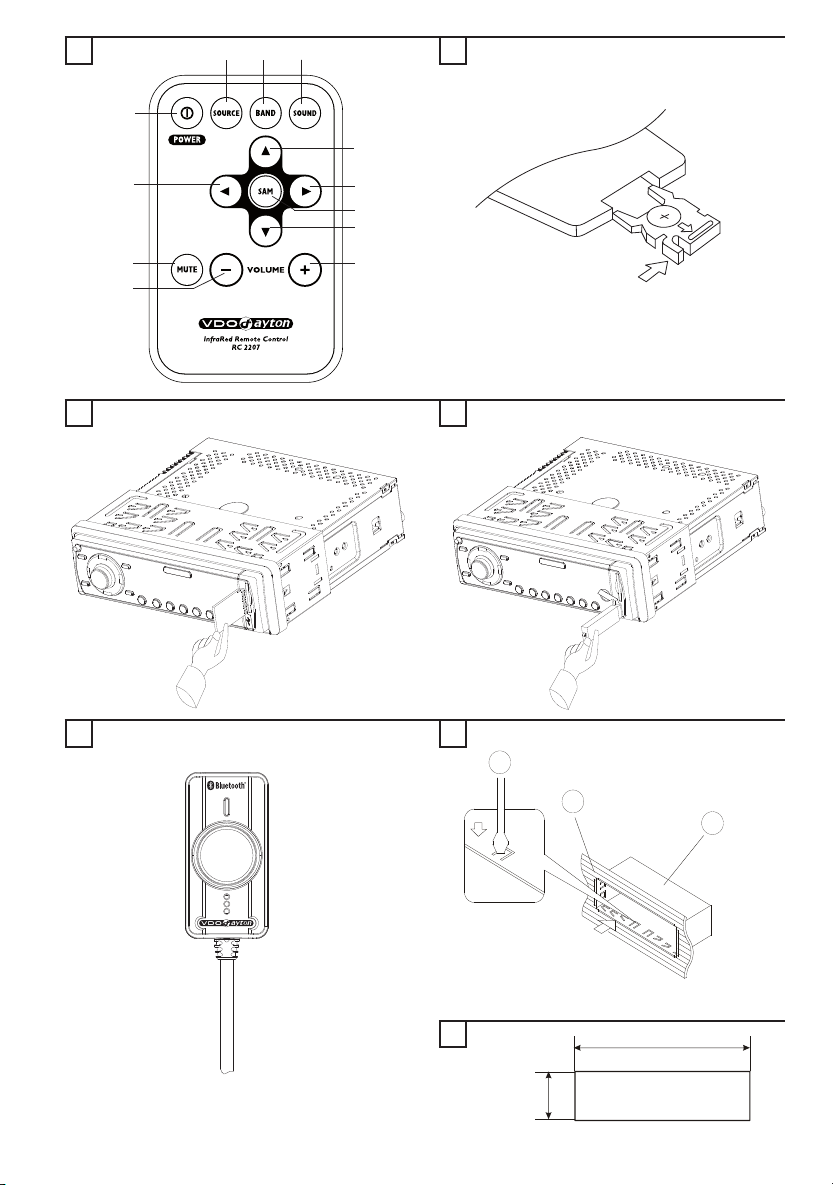
FRONT PANEL AND REMOTE CONTROL
PWR
MUTE
SOURCE
SAM
AST
SOUND
BAND
PTY
AF
TA
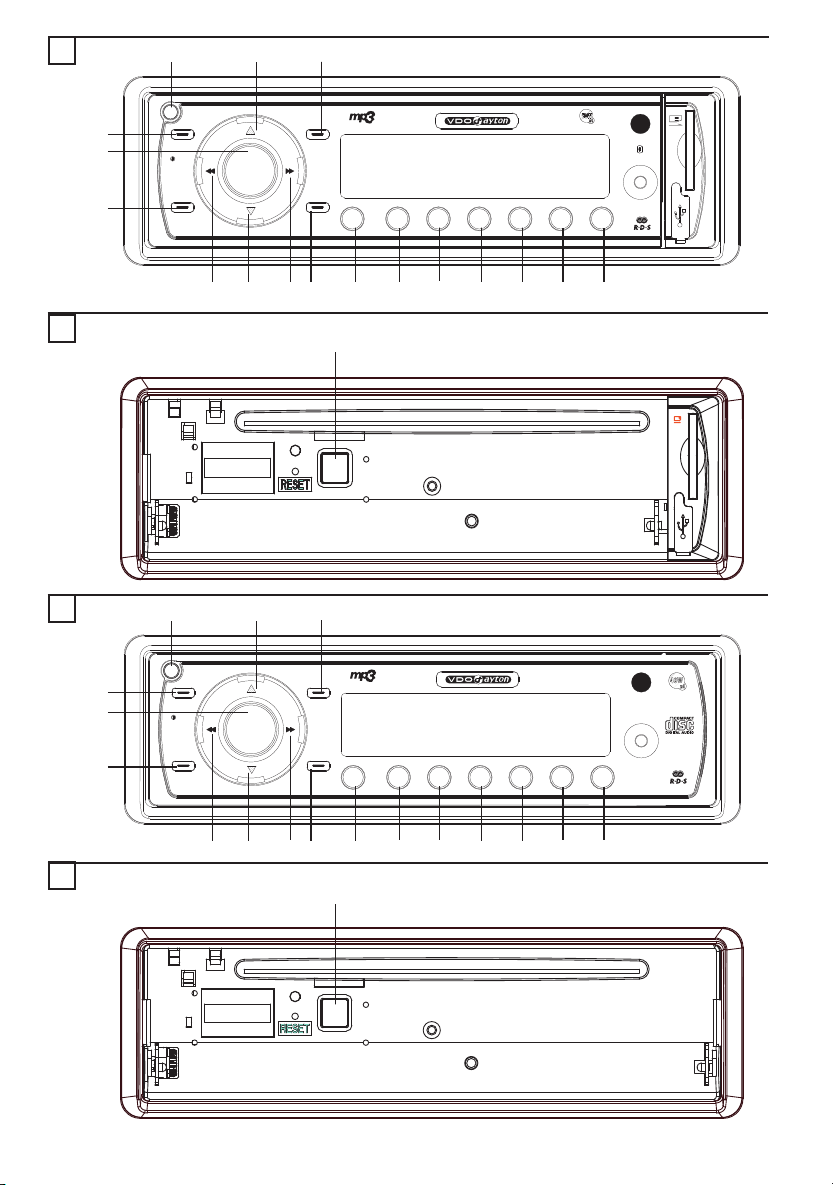
See gures A and B.
Headunit
(1)
(2)
Remote
Control
(2)
(1)
(11)
(10)
(2)
Action Tuner
SP Mute
LP Power On / Off
CCW
CW
SP
Decrease (lower)
volume
Increase (higher)
volume
Change source
CD, USB *, SD /
MMC * & Aux
Decrease (lower) volume
Increase (higher) volume
Blue-
tooth *
SAM, SOUND
Select previous option (for
current menu
item)
Select next
option (for
current menu
item)
(n.a.)
- LP
(3)
(3)
- LP Activate Auto Store (n.a.) (n.a.)
(4)
(4)
- LP
(5)
(5)
- LP
(6)
-
(7) (6)
Enter SAM menu
SP
SP
Enter SOUND menu
SP
SP Activate / Deactivate Trafc Announcement
LP Activate / Deactivate Alternate Frequency
SP
LP
Change Tuner
Band
Activate / deactivate station search by programme
type
Manual search
frequency up
(PTY mode: select
next programme
type)
Change to Tuner mode
Track fast-forward
(continuously press)
Select
next track
(A2DP
mode)
In SAM menu:
Select next
item
In SOUND
menu: Enter
SAM menu
In SAM menu:
Exit SAM
menu
In SAM menu:
Enter SOUND
menu
In SOUND
menu: Select
next item
In SOUND
menu: Exit
SOUND menu
(n.a.)
(n.a.)
Select next
menu item
16

Headunit
1
SCN
2
RPT
3
RND
4
-10
5
+10
6
ID3
REL
EJ
(8) (9)
(9)
(10)
(11)
(12)
(13)
(14)
(15)
(16)
(17)
Remote
Control
Action Tuner
SP
Auto search frequency down
LP
(PTY mode: select
previous programme type)
(12)
SP
Auto search frequency down
(PTY mode: starts
LP
program search
down)
(7)
SP
LP
Manual search
frequency up
(PTY mode: starts
program search up)
SP Select preset 1
LP
Store current station into preset 1
SP Select preset 2
LP
Store current station into preset 2
SP Select preset 3
LP
Store current sta-
tion into preset 3
SP Select preset 4
-
LP
Store current station into preset 4
SP Select preset 5
-
LP
Store current station into preset 5
SP Select preset 6
LP
Store current station into preset 6
- - Release the front
CD, USB *, SD /
MMC * & Aux
Track fast-rewind
(continuously press)
Select previous track
Select next track
Toggle SCAN mode
(off / 10 sec per track)
Toggle REPEAT
mode
(off / single / folder
/ all)
Toggle RANDOM
mode
(off / folder / all)
Jump 10 tracks backward
(for CA playback
only)
Select previous folder
(for CA playback with
folders)
Jump 10 tracks for-
ward
for CA playback only)
Select next folder
(for CA playback with
folders)
Toggle ID3 text
(only for MP3)
Blue-
SAM, SOUND
tooth *
Select
previous
track
(A2DP
Select previous menu
item
mode)
Select
previous
track
(A2DP
Select previous menu
item
mode)
Select
next track
(A2DP
Select next
menu item
mode)
(n.a.) (n.a.)
(n.a.) (n.a.)
(n.a.) (n.a.)
(n.a.) (n.a.)
(n.a.) (n.a.)
(n.a.) (n.a.)
English
(18)
Note:
* Depending on model CA: Compressed Audio (n.a.): No Action
SP: Short Press LP: Long Press CCW: Counter-clockwise CW: Clockwise
- - Eject the CD (if a CD is inside)
17

GENERAL OPERATION
PWR
MUTE
PWR
MUTE
SOURCE
SOUND
SOUND
PWR
MUTE
Switching On / Off
To switch on the headunit, short-press the
knob.
To switch off the headunit, long-press the
button.
Selecting a Source
Your headunit is designed for different types of
sources, depending on your headunit model.
RADIO
CD
AUX
USB
SD/MMC
BLUETOOTH
Short-press the
button to change the
source. If the external media, e.g. CD or SD
card, is connected or inserted, the corresponding source will become available for selection.
AUDIO
Setting the Start-up Volume
Navigate the SAM * to select ‘START’.
1.
* Please see ‘SOFTWARE ACCESS MENU (SAM)’ section
for steps on navigating the menu.
2. Turn the knob to adjust the starting volume to
a comfortable level.
Note: If the headunit was previously at a higher
volume level when you turned it off, after you
turn on the headunit, it will use the starting volume. Otherwise, the headunit will remember the
previous volume level.
SOUND Menu
You can select the different sound settings from
the SOUND menu. To navigate the SOUND
menu:
Short-press the
SOUND menu.
Short-press either or button to select
the next SOUND item; or short-press the
either or button to select the previous
SOUND item.
Turn the knob clockwise or counter-clockwise
to choose the option.
Long-press the
Note: The headunit will automatically exit the
SOUND menu after 6 seconds of inaction.
button to enter the
button to exit the menu.
Option Setting
(◄/▼ or ►/▲) (turn the knob)
LOUDNESS [OFF, 1, 2, 3]
STYLE
BASS
(only in ‘USER’ style)
TREBLE
(only in ‘USER’ style)
BALANCE [L7 to 0 to R7]
FADER [F7 to 0 to B7]
[JAZZ, POP, CLASSIC,
USER, VOCAL, FLAT]
[-7 to 0 to +7]
[-7 to 0 to +7]
Mute (silence)
When the headunit is switched on, short-press
the
knob to mute the sound. If a media
(e.g. CD, USB or SD/MMC) is playing, it will be
paused. Short-press the same knob again to
un-mute the sound and the media will continue
playing.
Note: Turning the volume knob to ‘VOLUME
0’ will also mute the sound, but if the current
source is USB, SD / MMC or CD, the media will
continue playing in the background.
Balancing the Volume for Different
Sources
You can adjust the volume offset between your
sources, with reference to the tuner, so that inbetween switching from one source to another,
there is less annoying sudden change in volume
level and you may not need to adjust the volume
again.
You can adjust the volume-offset level for CD,
compressed audio, auxiliary and Bluetooth individually. For example, to adjust the volume offset
level of the CD:
Navigate the SAM to select ‘CD LEVEL’.
1.
Turn the knob clockwise / anti-clockwise to
2.
change the offset level (relative to tuner volume level).
Do the same thing for rest of the sources / types,
if necessary, to your preferences.
RADIO
Region Setting
This headunit is customizable according to the
region that you live in for best-reception. To
change the region:
Navigate the SAM to select ‘REGION’.
1.
Turn the knob clockwise / anti-clockwise to
2.
select your region.
18

AM Band
BAND
PTY
BAND
PTY
SAM
AST
BAND
PTY
AF
TA
SAM
AST
AF
TA
For ease of operation, you may turn-off the AM
bands, totally or individually for MW or LW, in the
case that you do not need to use them. To toggle
the AM setting:
Navigate the SAM to select ‘AM’.
1.
Turn the knob clockwise / anti-clockwise to
2.
turn on or off MW, LW or both (AM).
Note: After turning off a certain band (e.g. LW
OFF), LW band is not selectable when you press
the
button.
Select a Waveband
Your headunit is designed for reception of the
FM, MW and LW wavebands.
FM1
FM2
FM3 (AST)
MW1
MW2 (AST)
LW
Short-press the
1.
button to change the
waveband.
Select a Station
Auto-Seek Tuning
Short-press either (frequency down)
1.
or (frequency up) button to seek for a
station. The headunit will scan for the next
strong station.
Manual Tuning
Short-press either (frequency up) or
1.
(frequency down) button to change the radio
frequency. Continue pressing until the desired station is selected.
Storing a Station
Auto Store (AST)
Long-press the
or MW band and the headunit will automatically
search for the rst six strong stations and store
them automatically on FM3 (FM auto-store while
in FM band) or MW2 (MW auto-store while in
MW band); and under the preset memory buttons 1 to 6.
Note: AST function will work only in the Tuner
mode, otherwise nothing will happen in other
modes (to prevent accidental activation of AST
when trying to enter SAM).
button in any of the FM band
Manual Store
Short-press the
1.
button to select the de-
sired band – FM1, FM2, FM3, MW1, MW2
or LW.
Tune to a desired radio station.
2.
Long-press any of the six preset buttons to
3.
store the current radio station.
The number (of a preset station) will be displayed next to the radio frequency. For each
band, you can store up to six radio stations.
RADIO DATA SYSTEM (RDS)
This feature is only available in the FM band.
Many FM stations broadcast RDS information.
This headunit uses RDS information to offer you
many advantages, including:
Display of Station Name (PS)
The radio displays the name of the station instead of its frequency.
Alternate Frequency (AF)
The headunit remains tuned to the current station by continually searching for the best possible alternate frequency for reception.
Note: You can switch off the AF function, if not
required. Long-press the
or toggle off the AF function. Alternatively, go to
SAM and change the ‘AF’ menu item.
Trafc Programme (TP) and Trafc
Announcement (TA)
You can activate the TA mode (includes TP) to
give priority to hear announcements related to
trafc subjects, even if you are listening to the
radio. This function is only available with RDS
on.
Presetting TA Volume
With this option, the volume for Trafc Announcements can be preset to the required
level.
Short-press the
1.
volume setting is the rst menu item.
Turn the knob clockwise / anti-clockwise to
2.
set the preferred TA volume.
TA Activation / De-activation
Short-press
1.
vate TA. The indication "TP" in the display
will reect the availability of the TA. When
trafc announcement is selected and infor-
mation is received, "TA" appears on the
display.
button to activate / de-acti-
button to toggle on
button to enter SAM. TA
English
19

Interrupting TA
AF
TA
BAND
PTY
PWR
MUTE
REL
If you do not wish to continue listening to a par-
ticular Trafc Announcement broadcast, you can
interrupt it without switching off the TA mode.
Short-press the
1.
button once, the headunit will return to the previous operating
mode.
Enhanced other Network (EON)
EON information allows the updating of RDS
information for programme services other than
the currently tuned station. By default, this EON
function is enabled. To toggle the settings:
Navigate the SAM to select ‘TA EON’.
1.
Turn the knob clockwise / anti-clockwise to
2.
toggle the modes (Off, Local or Distant).
Note: The reception of distant stations, which
may be weaker due to its distance, may be bad
and the audio output may be distorted as a result.
Programme Type (PTY)
This function is available with FM only. It enables
you to select stations by programme type. There
is a coding of up to 28 pre-dened programme
types – e.g. (in Europe): PTY1 News, PTY6
Drama, PTY11 Rock music.
Searching for a Programme Type
Long-press
1.
function.
Short-press either button or button to
2.
select the desired programme type.
Short-press either button or button
3.
to search for PTY stations.
PTY Activation / De-activation
To change the operation mode of the PTY, you
need to change the setting in the SAM.
Navigate the SAM to select ‘PTY’.
1.
Turn the knob clockwise / anti-clockwise to
2.
toggle the PTY setting.
Note: Setting ‘PTY’ menu item to ‘NEWS INT’
will allow PTY-NEWS to interrupt (in a similar
way as TA interruption) when there is an incoming NEWS.
RDS Regionalization
To change the way this headunit reacts to the
environmental conditions affecting the quality of
the radio stations, you can change the setting in
the SAM.
Navigate the SAM to select ‘REG-RDS’.
1.
Turn the knob clockwise / anti-clockwise to
2.
toggle the REG-RDS setting.
button to activate the PTY
CD OPERATION
Loading CD into the Headunit
If not already on, short-press the
1.
to turn on the headunit.
Press the
2.
Insert the CD (label facing up) into the CD
3.
button to ip down the front.
slot.
Close the front.
4.
The display should show “CD READ” while
5.
still reading the disc.
When a disc is loaded, it will start playing automatically.
Note: If a CD does not automatically load, DO
NOT FORCE it into the slot. This could damage
the CD and the headunit.
Ejecting a CD
Press the REL button to ip down the front.
1.
Press the EJECT button to eject the disc.
2.
Remove the disc.
3.
Close the front.
4.
Playing a CD-R or CD-RW
Depending on the type of CD-R / CD-RW CD,
surface condition of the disc, as well as the performance and condition of the CD writer, certain
CD-R / CD-RW CD may not operate normally on
this headunit.
Playing a “Copy-Protected” nonconforming audio CD
Due to the use of copy protection schemes of
some audio CDs, which are non-conforming to
international audio CDs standards (Red Book),
these types of copy-protected disc(s) may not
play on this headunit.
In the case of multi-session disc with such
schemes, you may try to disable the multi-ses-
sion ability by changing the SAM setting to allow
reading of at least the rst session.
Navigate the SAM to select ‘MULTI-S’.
1.
Turn the knob clockwise / anti-clockwise to
2.
toggle the multi-session support.
Try playing the “copy-protected” disc again.
Note: Remember to enable the multi-session
support again in the SAM after playing this disc!
button
20

Listening to Music
1
SCN
1
SCN
2
RPT
3
RND
PWR
MUTE
Multi-Session Disc
For multi-session discs, if the rst track is a data
track, the disc will be treated as compressed
audio disc. However, if no compressed audio
le was found throughout the disc, then it will be
treated as an audio disc.
If the rst track is an audio track, the disc will be
treated as an audio disc.
TA / NEWS Interruption
If TA and/or NEWS are set to ON, incoming announcements will interrupt CD playback. Your
CD will be paused and it will resume playing
after the interruption.
Track Selection
Short-press either or button to skip to
1.
the previous or next track respectively.
Fast-Forward or Fast-Backward a Track
Press and hold either the or but-
1.
ton to fast-forward or fast-backward the track
respectively.
Scan Feature
Short-press
1.
function.
SCN OFF – No scanning of songs
SCN ON – Scan each song for between 5 to
20 seconds, depending on SAM setting
To stop scanning, short-press
To set the scan time in the SAM:
Navigate the SAM to select 'SCAN TIME'.
1.
Turn the knob clockwise / anti-clockwise to
2.
toggle the scan time (5 secs, 10 secs or 20
secs).
Repeat Feature
Short-press
the Repeat function.
RPT OFF – No repeat
RPT SONG – Repeat current song
RPT DIR – Repeat current directory / folder
(for compressed audio disc with more than 1
folder only)
RPT ALL – Repeat the whole disc
Random Feature
Short-press
the Random function.
RND OFF – No random mode
RND DIR – Random-playback all songs in
current directory / folder (for compressed
audio disc with more than 1 folder only)
RND ALL – Random-playback all songs on
the whole disc
button to toggle the Scan
button again.
button (a few times) to toggle
button (a few times) to toggle
USB AND SD/MMC
OPERATION
General
Refer to sections on ‘Notes on SD/MMC’ and
on ‘Notes on USB’ for more information on the
compatibility and support of multimedia cards
and devices.
Auto-Play
You can use the SD or MMC card or an USB
device to play music les.
If not already on, short-press the
1.
to turn on the headunit.
Insert the card or device into their respective
2.
SD/MMC card slot or USB port.
Note: When the card or device is inserted, it will
play automatically, unless the current event (e.g.
Trafc Announcement) is of higher priority. Refer
to ‘Notes on Priority’ for more information.
Operations of USB and SD/MMC
The operations of the USB function and the
SD/MMC function are similar to the CD function.
Please refer to the section on ‘CD OPERATION’
for handling these features:
Track Selection
Fast-Forward or Fast-Backward
Scan
Repeat
Random
TA / NEWS Interruption
If TA and/or NEWS are set to ON, incoming announcements will interrupt media playback. Your
media will be paused and it will resume playing
after the interruption.
button
English
21

BLUETOOTH OPERATION
PWR
MUTE
TALK
TALK
TALK
PWR
MUTE
TALK
SOURCE
SOURCE
General
You can use the Bluetooth in your car to make a
phone call hands-free or stream music onto your
in-car speakers (via this headunit).
Controls (g. K)
Bluetooth status
Button
* Only when 'HFP 1ST‘ is selected inside the SAM.
Inactive
(n.a.)
Press more
than 2 secs
to start
pairing
Handsfree
(HFP/HSP)
Reject phone
(incoming call)
Answer phone
(incoming call)
Hang-up phone
(call active)
Pairing
To pair your Bluetooth-enabled device to this
headunit, make sure that no device is currently
streaming to this headunit rst.
Press the
1.
button for more than 2 seconds
to enter the pairing mode. The headunit will
enter into a “Find Me” mode.
Enable your device to perform a scan of
2.
available devices to nd the headunit.
For more details, please check the user manual
of your Bluetooth-enabled device.
3. Once found, you should see “DAYTON” as
the found device and you can pair your device with the headunit.
4. The default 4-digit pin is “0000”.
Note: Whenever there is at least one paired
device active, the headunit will light-up the Bluetooth icon.
Paired Devices
This headunit is able to store up to eight Bluetooth-enabled devices (consisting of a mixture of
mobile phones or music-players). If a ninth device starts pairing, it will replace the device that
was used longest ago.
Hands-Free Call
Answer a call
You will hear the ring tone from the in-car speakers.
To answer the call, simply short-press the
1.
button.
Reject a call
If you do not wish to answer the incoming
1.
call, simply short-press the
Music-
streaming
(A2DP)
-
Answer
phone *
(incoming
call)
button.
Hang-up a call
After you have answered the phone call, and
1.
you wish to hang-up, simply short-press the
button again.
Music Streaming
If your Bluetooth-enabled music device has already been paired with this headunit before, sim-
ply turn on the Bluetooth function of your music
device and the headunit will react accordingly.
If 'A2DP 1ST' was selected in SAM, then the
headunit will automatically switch to Bluetooth source and starts music streaming onto
the in-car speakers.
If 'HFP 1ST' was selected in SAM, then the
headunit will light-up the (if not already
lighted-up) only. You need to short-press the
button a few times to select Bluetooth.
If '1STDEVICE' was selected in SAM:
No Bluetooth connection active:- Behav-
iour is same as ‘HFP 1ST’ condition
An existing Bluetooth connection is ac-
tive:- status quo as the current Bluetooth
connection is rst connected.
AUX OPERATION
This headunit comes with an Auxiliary input (3.5
mm jack) on the front for ease of streaming your
music from your portable devices.
Insert your 3.5 mm plug (connected to your
1.
portable device) into the front Aux input.
Short-press the
2.
button a few times until
the display shows “AUX”.
Play your portable device.
3.
SPECIAL FUNCTIONS
Clock
You can select automatic update of the clock
via the RDS radio signal or manually adjust the
clock yourself. The clock will be displayed when
the headunit is powered-off. In case you need
to save battery life, you may turn off the clock
display too.
Navigate the SAM to select ‘CLOCK’.
1.
Turn the knob clockwise / anti-clockwise to
2.
select the type of clock functions (RDS clock,
manual clock or clock off).
Note: If you select ‘MAN CLK’, menu item,
‘CLOCKSET’, is selectable as the next menu
item. Refer to the ‘SOFTWARE ACCESS MENU
(SAM)’ for adjusting the clock.
22

Telephone Mute
PWR
MUTE
SOUND
SAM
AST
PWR
MUTE
SOURCE
This headunit was designed to interface with different types of hands-free kits that provide telephone mute cables. Please read the instruction
manual of your hands-free kit on its mute logic
level (either mute-high or mute-low).
Navigate the SAM to select ‘TEL MUTE’.
1.
Turn the knob clockwise / anti-clockwise
2.
to toggle the logic level according to your
hands-free kit type.
Note: In the case that your headunit always
remains in ‘TEL MUTE’ mode, that is, sound
is muted, you can try to reverse the logic level
(e.g. from ‘TELM HI’ to ‘TELM LO’). If this still
does not work, perhaps your hands-free kit is
not compatible with this headunit and it is best to
turn the ‘TEL MUTE’ function to ‘TELM OFF’.
Brightness Control
This headunit comes with two levels of brightness level. To adjust the brightness:
Navigate the SAM to select ‘BRIGHTNESS’.
1.
Turn the knob clockwise / anti-clockwise to
2.
select the brightness level.
Illumination Colour
To allow best integration into your car dashboard, the headunit comes with three types
of colours scheme, namely Orange, Green or
Mixed of Orange and Green. To change the
illumination colour:
Navigate the SAM to select ‘COLOR’.
1.
Turn the knob clockwise / anti-clockwise to
2.
select the colour scheme.
Security LED
The blinking security LED can deter potential
theft of your headunit, even after your front panel
is removed. However, if you wish to save your
battery life, you can turn off this LED.
Navigate the SAM to select ‘LED’.
1.
Turn the knob clockwise / anti-clockwise to
2.
turn on or off the blinking LED.
Speed Dependent Volume Control
(SDVC)
To compensate for surrounding noise, this function automatically increases the volume of the
headunit with respect to the car’s speed. There
are two compensation levels selectable from the
SAM. Level 1 gives a smaller increase (in volume) and level 2 gives a higher increase.
Calibration
CAUTION: To avoid unnecessary distraction, we advise that this procedure
be carried out with the assistance of
somebody else (front passenger).
While the car is stationary, press-and-hold
1.
both
The headunit will mute and show “RE-CALIB”
2.
and
buttons at the same time.
and “50 KM/H” alternatively.
Within 30 seconds, drive your car to 50 km/h
3.
(about 30 mph).
Important note: Always obey the Highway Code
and the current trafc restrictions and conditions!
4. Once the speed is reached, short-press the
button and you will hear a beep and the
display will show “CALIB OK”.
5. Turn off and then turn on your headunit again
and level 1 of the SDVC is automatically
selected.
Note: This headunit’s SDVC works on frequency-based signal (PCM) rather than on widthbased signal (PWM). Some vehicles come with
PWM signals and are therefore not compatible
with this SDVC function.
Steering Wheel Remote Control
(SWRC)
This headunit is specially designed with a programmable Steering Wheel Remote Control
(SWRC) to suit your car built-in SWRC as much
as possible.
Important note: This function supports SWRCs
that are based on analogue RC3-standard
only. Other SWRCs, especially those based on
CAN-bus, are not supported. For these SWRCs,
please consult your dealer for a suitable converter, if available.
While the car is stationary, press-and-hold
1.
both
The headunit will mute and show “PROG
2.
SWRC” for one second.
After that, the headunit will prompt you the
3.
rst programmable function, that is, “VOL-
UME-”.
Rotate the volume knob clockwise or anti-
4.
clockwise to navigate through the functions.
Match a suitable SWRC buttons (e.g. “VOL-”
5.
or “-”) with the one of the pre-dened functions that is displayed (e.g. “VOLUME-”)
by pressing and holding the corresponding
SWRC button for more than 2 secs.
If the headunit recognizes the input as stable,
6.
it will capture the key-press input, give a con-
rmation beep, and will show “PROG OK”.
and
buttons at the same time.
English
23

Continue programming your SWRC’s buttons
SAM
AST
PWR
MUTE
7.
to the pre-dened as much as possible with
the same steps.
For those buttons that you do not need,
8.
please disabled them by selecting “-DIS-
ABLE-” and press-and-hold the unwanted
buttons for more than 2 seconds.
Important Note: In the case that you did not
disable the unwanted SWRC buttons, due to the
complexity of the programming to cater to most
types of SWRC, the headunit may recognise an
unwanted key-press on your SWRC as one of
the valid input.
9. Continue to select “-DISABLE-” and repeat
the process to disable all unwanted buttons.
10. To exit the programming mode and SAVE all
settings, short-press the
button.
11. To exit the programming mode and DISCARD
all settings, short-press the
button.
These pre-dened functions emulate the buttons
on the front panel:
Volume-
Volume+
Source
Right
Left
Up
Down
Mute
-Disable-
Please refer to the section on "FRONT PANEL
AND REMOTE CONTROL" for buttons' function-
alities.
24

SOFTWARE ACCESS MENU (SAM)
SAM
AST
SAM
AST
It is possible to customize your headunit settings to your personal preferences via the SAM. To navigate the SAM, here are the steps:
Short-press the
Short-press or button to select the next SAM menu item; or short-press the or but-
ton to select the previous SAM menu item.
Turn the knob clockwise or counter-clockwise to choose the desired option.
Long-press the
Note: The headunit will automatically exit SAM after 6 seconds of inaction.
Option Setting
(◄/▼ or ►/▲) (turn the knob)
TAVOL [1 to 26] Select the volume level of Trafc Announcement, News bulletins
START [1 to 26] Limit the starting volume when the headunit is turned on (to pre-
CD LEVEL [-2, -1, 0, +1, +2] Select the Compact Disc volume offset relative to the tuner volume
CA LEVEL [-2, -1, 0, +1, +2] Select the Compressed Audio (MP3 or WMA) volume offset relative
AUX LEVEL [-2, -1, 0, +1, +2] Select the Auxiliary volume offset relative to the tuner volume
BT LEVEL [-2, -1, 0, +1, +2] Select the Bluetooth volume offset relative to the tuner volume
BEEP [OFF, ON] Activate / Deactivate the conrmation beep tone
SDVC [OFF, 1, 2] Select the Speed Dependent Volume Control (SDVC) compensa-
SWRC [OFF, ON] Activate / Deactivate the steering wheel remote control
TEL MUTE [OFF, LO, HI] Select the logic level of your connected hands-free car kit (HFK)
CLOCK [OFF, RDS,
CLOCK SET
(available
when 'CLOCK
MAN' is selected)
button to enter the SAM.
button to exit the SAM.
MAN]
[12H hh:mm,
24H HH:MM]
Usage
and Alarm messages.
vent sudden loud surprise to the driver especially)
If the last-volume (before the headunit is turned off) is higher
than the starting volume or muted, then after turning on, the
turn-on volume is limited at the starting volume
If the last-volume is lower than the starting volume (except
muted), the turn-on volume will be at the same level as the
last-volume
to the tuner volume
tion level (only when pin A1 is connected and calibrated; please
refer to the ‚INSTALLATION‘ page)
Level 1 gives a smaller increase (in volume) while level 2 gives
a greater increase (in volume) with respect to the vehicle’s
speed
mute cable
Select ‘TELM OFF’ if no HFK is connected
Select ‘TELM LO’ if the incoming HFK mute signal is at 0V
Select ‘TELM HI’ if the incoming HFK mute signal is at 12V
Please refer to the instruction manual of your purchased HFK.
Select ‚CLOCK RDS‘ to activate the RDS clock or ‚CLOCK MAN‘ to
set the clock manually.
Note: Selecting ‚CLOCK OFF‘ will disable the clock display when
the headunit is in stand-by / off mode; hence, it will help prolong
your battery.
If ‚CLOCK MAN‘ is selected, this menu item is available for customization.
Short-press or button to select the 12H/24H-digit,
hour-digit or minute-digit
Rotate the knob to adjust the selected digits
English
25

Option Setting
1
SCN
(◄/▼ or ►/▲) (turn the knob)
Usage
BRIGHTNESS [1, 2] Select the level (1 or 2) of brightness for the display and button
illumination.
Level 2 is brighter than level 1
COLOR [ORANGE,
Select the colour of the display and button illuminations.
GREEN,
MIXED]
LOGIC [OFF, ON] Logic On:
When the headunit is in stand-by mode (or power-on mode) be-
fore your vehicle ignition is turned off, the headunit will remain
in stand-by mode (or will turn-on mode) after the same ignition
is turn on again.
You may still operate the headunit for 1 hour even when your
vehicle ignition is turned off.
Logic Off:
The headunit will remain in stand-by mode when the vehicle
ignition is turned on again regardless of its previous state.
Turning-on the headunit is prevented when the vehicle ignition
is not turned on
Note: 'LOGIC' function will work correctly only when both A4 and
A7 pins are connected correctly (refer to ‘INSTALLATION’ page).
LED [OFF, ON] Select 'LED OFF' to turn off the ashing security light when the
detachable front panel is removed.
MULTI-S [OFF, ON] Select 'MULTI OFF' to turn off support for multi-session discs and
only the 1st session is playable. This is useful for playing copy-protected discs.
SCROLL [OFF, ONCE,
ON]
SCAN TIME [5S, 10S, 20S]
Select the scroll mode for the song details (e.g. title, artists, etc).
'SCRL ONCE' will scroll the song details once
'SCRL ON' will continuously scroll the song details
Select the scanning time (5 sec, 10 sec or 20 sec) for the
feature when playing the inserted media (e.g. CD, USB, SD /
MMC)
REGION [EUROPE,
Select the tuner according to the regional standards.
AMERICA,
ASIA, LATAM]
AF [OFF, ON] Select 'AF OFF' to prevent the headunit from choosing alternate
frequencies.
AM [AM OFF, MW
OFF, LW OFF,
AM ON]
REG-RDS [RDS OFF, REG
OFF, REG ON,
REG AUTO]
Choose your AM modes:
'AM OFF’ will disable MW and LW bands
'MW OFF' will suppress MW bands
'LW OFF' will suppress LW band
Select the various Radio Data System (RDS) modes:
Select 'REG ON' to maintain regional programme
Select 'REG AUTO' to switch programme when the next signal
is stronger
Select 'REG OFF' to directly switch to the program of the next
region
Select 'RDS OFF' to turn off the RDS feature
26

Option Setting
(◄/▼ or ►/▲) (turn the knob)
Usage
TA EON [OFF, LO, DX] Select 'EON DX' to allow distant EON stations broadcast.
Note: The quality of reception (and hence sound output) of the
distant EON stations may be poor
PTY [PTY OFF, PTY
ON, NEWS INT]
Select the various Programme Type (PTY) modes:
Select 'PTY OFF' to turn off this PTY function
Select 'PTY ON' to turn on this PTY function
Select 'NEWS INT' to turn on the PTY function and to allow
NEWS interrupt on top of the TA interrupt
BLUETOOTH [BT OFF, HFP
1ST, A2DP 1ST,
1ST DEVICE]
Activate the Bluetooth function as follows:
Select 'HFP 1ST' to allow the rst detected Bluetooth handsfree
device (HFP or HSP prole) to take priority (including interrupting current A2DP connection)
Select 'A2DP 1ST' to allow the rst detected Bluetooth music
streaming device (A2DP prole) to take priority (including interrupting current HFP/HSP connection)
Select '1ST DEVICE' to allow the rst connected Bluetooth
device to maintain connection (no interruption)
Select 'BT OFF' to de-activate the Bluetooth function
English
27

TROUBLESHOOTING
Maybe, it will happen that your headunit will not
function as you expected it to be. Before calling
for service, please read this user manual and
review carefully the setting values. You may nd
that a function cannot work properly with the
values you dened. Nevertheless, if you need to
send your headunit for reparation, always send
it complete with detachable front (do not try to
open the headunit to service it by yourself).
In the case whereby your headunit freezes,
please ip down the front and use a pen or pencil to poke the "RESET" hole.
NO POWER Verication
The headunit does not function.
Make sure that the headunit is well inserted
in the dashboard (see MOUNTING).
Make sure that the headunit is well connect-
ed (see INSTALLATION).
Switch on the headunit again.
The headunit does not function and the dis-
play screen does not light up.
Check the fuse (see INSTALLATION).
NO SOUND Verication
The display screen lights up but the headunit
gives no sound (or only a whistle).
Increase the volume; and if you are listening
to the radio station, move to an area where
the reception of the station is better.
Check the antenna and its connection (see
INSTALLATION).
Check if the radio station search is nished.
Verify the speakers' connections (see IN-
STALLATION) and the speakers balance
(SOUND SETTINGS).
There is no sound from the loudspeak-
ers (front and rear) from any of the
sources.
There is no sound from the sub woofer
after having connected an external am-
plier.
Verify your external amplier installation.
Check the connection of the external
amplier to the PREAMP OUT (see
INSTALLATION).
SOUND TROUBLE Verication
The sound level is too low during trafc announcements.
Adjust the volume setting for trafc an-
nouncements (see "Presetting TA Volume").
CD ERRORS Verication
During playback, the headunit does not func-
tion and displays “CD ERROR”.
Make sure that the CD is properly inserted
into the headunit.
Check whether the headunit contains a CD.
Make sure that the CD is correctly inserted;
not dirty, exotic or damaged; and the front of
the headunit is properly shut.
USB & SD / MMC ERRORS Verication
The headunit cannot connect to the MP3 player /
USB / SD / MMC device.
The inserted device must use the Microsoft
Windows FAT System.
The headunit does not support portable USB
hard disk (note that the sourcing current of
the portable hard disk is beyond the headunit's capability)
Check the encoding formats of the songs on
your device (see "Notes on MP3" and "Notes
on WMA").
28

E
8
 Loading...