


e-STUDIO 3515AC
Table of contents
 Loading...
Toshiba e-STUDIO 3515AC, e-STUDIO AC, e-STUDIO 4515AC, e-STUDIO 2010AC, e-STUDIO 2510AC Operator's Manual
...
MULTIFUNCTIONAL DIGITAL COLOR SYSTEMS /
MULTIFUNCTIONAL DIGITAL SYSTEMS
Operator’s Manual for
IP Fax Function

© 2018 TOSHIBA TEC CORPORATION All rights reserved
Under the copyright laws, this manual cannot be reproduced in any form without prior written permission of TTEC.

Preface
Thank you for purchasing TOSHIBA Multifunctional Digital Systems or Multifunctional Digital Color Systems.
This manual describes how to use the IP Fax function.
Read this manual before using the functions.
How to read this manual
Symbols in this manual
In this manual, some important items are described with the symbols shown below. Be sure to read these items
before using this equipment.
Indicates a potentially hazardous situation which, if not avoided, could result in death, serious
injury, or serious damage, or fire in the equipment or surrounding objects.
Indicates a potentially hazardous situation which, if not avoided, may result in minor or
moderate injury, partial damage to the equipment or surrounding objects, or loss of data.
Indicates information to which you should pay attention when operating the equipment.
Describes handy information that is useful to know when operating the equipment.
Pages describing items related to what you are currently doing. See these pages as required.
Target audience for this manual
This is a manual that is aimed at general users and administrators.
Description of original/paper direction
Paper or originals of A4, B5 or LT size can be placed either in a portrait direction or in a landscape direction. In this
manual, “-R” is added to this paper size when this size of paper or original is placed in a landscape direction.
Example: A4 size original on the original glass
Placed in a portrait direction: A4 Placed in a landscape direction: A4-R
Preface 3

Model and series names in this manual
In this manual, each model name is replaced with the series name as shown below.
Model name Series name in this manual
e-STUDIO2010AC/2510AC e-STUDIO5015AC Series
e-STUDIO2515AC/3015AC/3515AC/4515AC/5015AC
e-STUDIO2018A/2518A/3018A/3518A/4518A/5018A e-STUDIO5018A Series
e-STUDIO5516AC/6516AC/7516AC e-STUDIO7516AC Series
e-STUDIO5518A/6518A/7518A/8518A e-STUDIO8518A Series
Optional equipment
For the available options, refer to the Quick Start Guide.
Screens in this manual
In this manual, Windows10 is taken for explanation purposes to describe the screens and operation procedures in
Windows.
The details on the screens may differ depending on your model and how the equipment is used, such as the status of
the installed options, the OS version and the applications.
Abbreviations in this manual
In this manual, “Dual Scan Document Feeder” (DSDF) and “Reversing Automatic Document Feeder” (RADF) are
collectively referred to as “Automatic Document Feeder” (ADF).
Trademarks
For trademarks, refer to the Safety Information.
4 Preface

CONTENTS
Preface................................................................................................................................................. 3
Chapter 1 IP Fax Function Overviews
About IP Fax ......................................................................................................................................... 8
Chapter 2 Installing the license
Checking the license............................................................................................................................ 12
Installing the license ........................................................................................................................... 13
Chapter 3 Setting the IP Fax Function
Setting the IP Fax Function from TopAccess .......................................................................................... 16
Setting procedure ...................................................................................................................................................... 16
General settings ......................................................................................................................................................... 17
IP Fax Settings............................................................................................................................................................ 18
Address Book ............................................................................................................................................................. 30
Chapter 4 Using the IP Fax Function
Using the IP Fax Function from the Touch Panel..................................................................................... 36
Sending/Receiving ..................................................................................................................................................... 36
User Functions ........................................................................................................................................................... 47
Using the IP Fax Function from the N/W-Fax Driver ................................................................................ 56
Sending IP Faxes ........................................................................................................................................................ 56
Specifying Recipients of IP Faxes .............................................................................................................................. 60
Removing recipients .................................................................................................................................................. 68
Setting up the [Send] tab........................................................................................................................................... 69
Setting up the [Device Settings] tab ......................................................................................................................... 72
Using the IP Fax Function from TopAccess ............................................................................................. 74
Log .............................................................................................................................................................................. 74
Template .................................................................................................................................................................... 77
Inbound FAX routing .................................................................................................................................................. 79
Role Management ...................................................................................................................................................... 80
Notification Setting.................................................................................................................................................... 83
IP Fax Received Forward (Admin) ............................................................................................................................. 84
Chapter 5 Troubleshooting
Transmission/Reception Trouble .......................................................................................................... 98
Error Codes for IP Faxing...................................................................................................................... 99
Chapter 6 Appendix
Lists and Reports Functions for IP Faxing .............................................................................................102
FUNCTION LIST (Administrator).............................................................................................................................. 102
IP Fax Functions Displayed on Lists and Reports ................................................................................................... 103
Specification for IP Fax function ..........................................................................................................104
INDEX .........................................................................................................................................................105
CONTENTS 5

6 CONTENTS

1.IP Fax Function Overviews
About IP Fax.......................................................................................................................8
0.About IP Fax
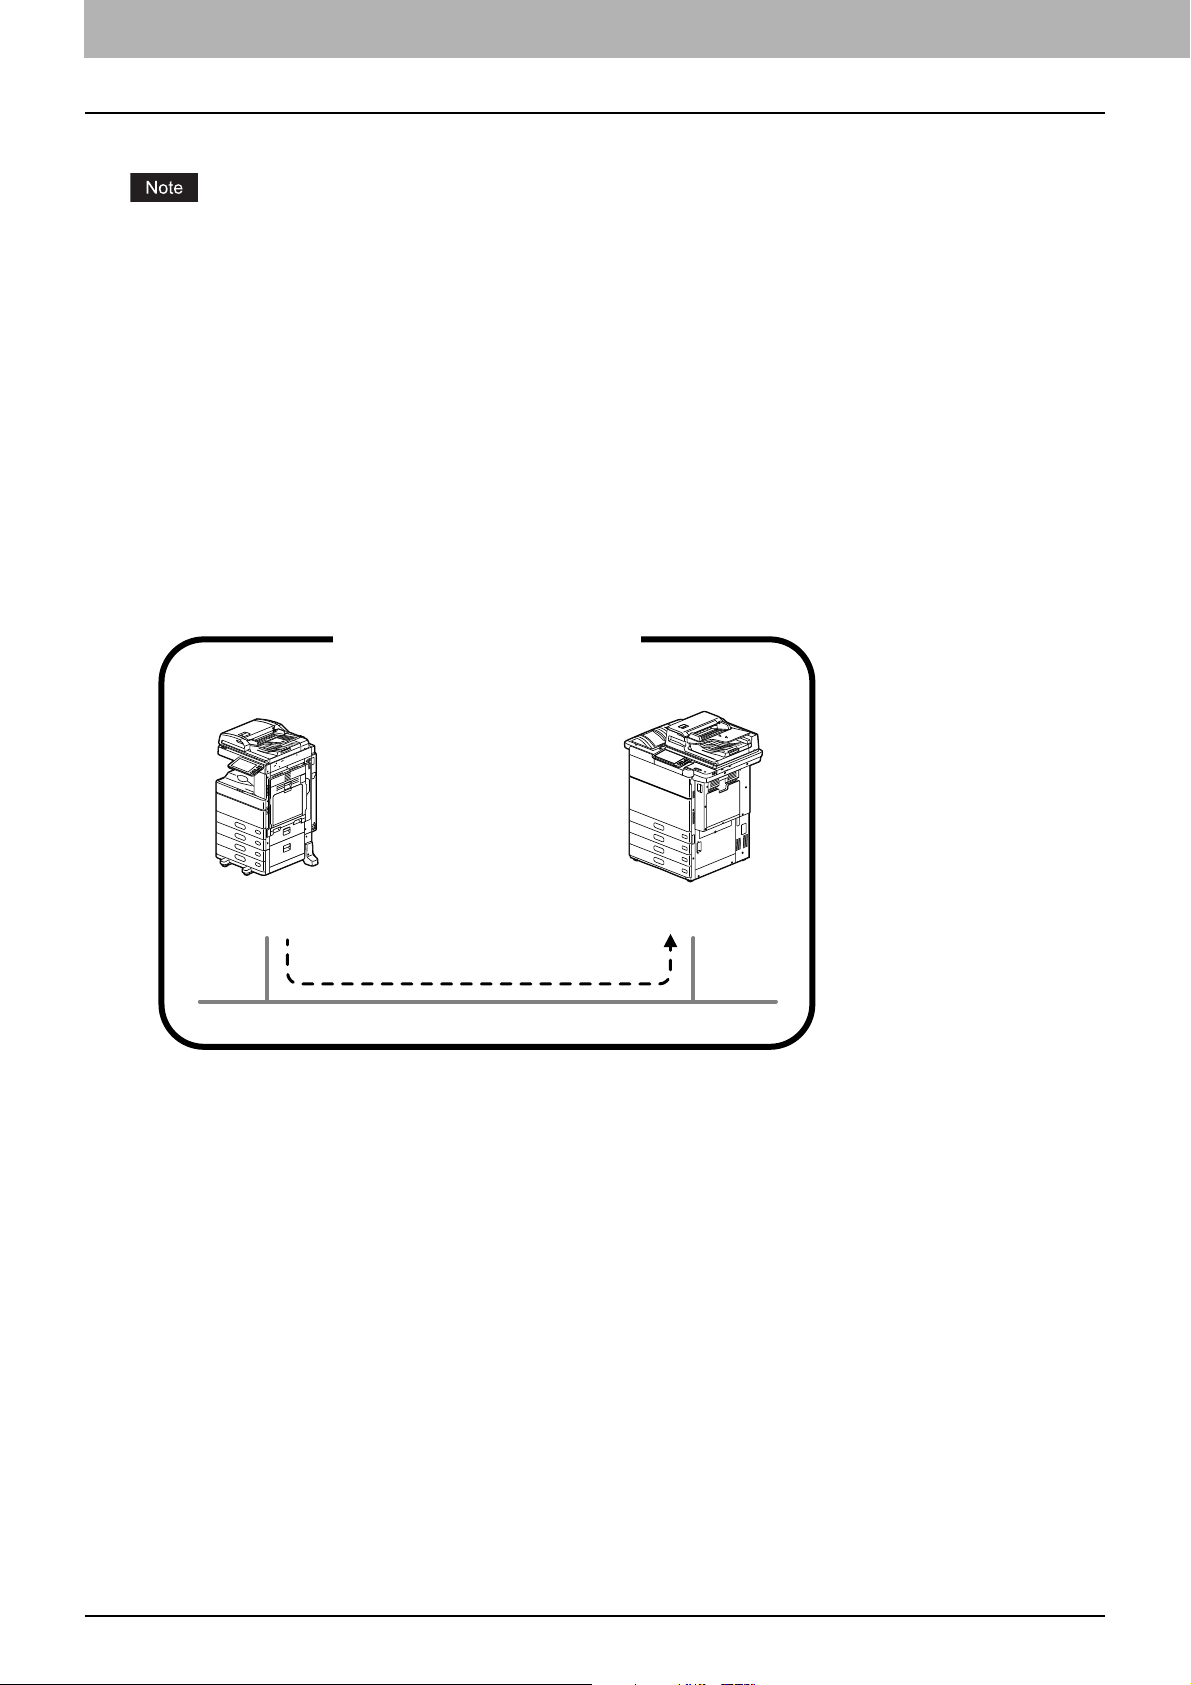
Oice A Oice B
IP Fax
Transmitter
IP Fax
Receiver
Inside the Intranet
The IP Fax is a function for sending and receiving fax jobs on an IP network.
An IP Fax Enabler is required in order to use the IP Fax function. If you are using e-STUDIO2010AC/2510AC or
e-STUDIO2018A/2518A/3018A, Extended Memory (4GB) must be installed. For details, contact your service
technician or service representative.
Sending and receiving fax jobs by means of the IP Fax are guaranteed only for communication between Toshiba
MFPs.
When the IP Fax Enabler is installed, the available energy saving mode is Sleep mode.
The fax function of AirPrint does not support the IP Fax.
When security is required for sending/receiving fax jobs by the IP Fax, use an IPsec option.
When a wireless LAN is used, a communication error may occur.
Sending and receiving fax jobs by the IP Fax are not available under a network being connected by Wi-Fi Direct.
Within the IP Fax, the following sending and receiving operations are possible.
Sending/Receiving fax jobs between MFPs
Sending and receiving in an intranet is performed between MFPs which support IP Fax. An IP address, host name or
SIP URI is used for the destination. For details about SIP URI, see P.30 “Address Book”.
8 About IP Fax

1.IP Fax Function Overviews
SIP Server
Oice A Oice B
IP Fax
Transmitter
IP Fax
Receiver
Inside the Intranet
T.38 Supporting
Gateway
Oice A Oice C
IP Fax
Transmitter
G3 Fax Machine
Inside the Intranet
Public
Network Line
Sending/Receiving fax jobs via a SIP server
Sending and receiving is performed in an intranet between MFPs which support IP Fax via a SIP server. An IP Fax
number is used for the destination.
IP Fax Function Overviews
A SIP server manages and controls the IP telephone service using SIP (Session Initiation Protocol). We have
performed an operation test using Cisco Unified Communication Manager Express 14.0.
Sending/Receiving fax jobs from a G3 Fax machine via a T.38 supporting gateway
Sending/Receiving from a G3 Fax machine is performed from an IP Fax transmitter via a T.38 supporting gateway. A
telephone number is used for the destination.
A T.38 supporting gateway is a device for relaying the IP network and the public telephone line. We have performed
an operation test using Cisco C2911-CME-SRST/K9 + EM-HAD-6FXO.
About IP Fax 9

1.IP Fax Function Overviews
10 About IP Fax

2.Installing the license
Checking the license .........................................................................................................12
Installing the license.........................................................................................................13

0.Checking the license
An IP Fax Enabler is required in order to use the IP Fax function. For details, contact your service technician or service
representative.
You can check whether or not the IP Fax Enabler is installed in the equipment as below.
Press [User Functions -User-] and the [Admin] tab. Select [General] and then [License Management]. If the license of
[IP Fax Enabler] or [IP Fax Enabler (license)] is registered, the IP Fax function is available.
MFP Management Guide”SETTING ITEMS (Admin)” - “Managing the option licenses” - “Viewing product
information”
12 Checking the license

0.Installing the license
If the IP Fax Enabler is not installed in the equipment, install it by referring to the following manual.
MFP Management Guide”SETTING ITEMS (Admin)” - “Managing the option licenses” - “Installing an option” or
“Activating the license”
Installing the license
Installing the license 13

2.Installing the license
14 Installing the license

3.Setting the IP Fax Function
Setting the IP Fax Function from TopAccess........................................................................16
Setting procedure ................................................................................................................................................16
General settings ...................................................................................................................................................17
IP Fax Settings......................................................................................................................................................18
Address Book .......................................................................................................................................................30

0.Setting the IP Fax Function from TopAccess
Perform the necessary settings from TopAccess in order to use the IP Fax function.
P.16 “Setting procedure”
P.17 “General settings”
P.18 “IP Fax Settings”
P.30 “Address Book”
For how to operate TopAccess, refer to the TopAccess Guide.
Setting procedure
This explains about the settings to use the IP Fax function.
For necessary information, such as telephone numbers, related to the setting and registration of each device (SIP
server, T.38 supporting gateway) used for receiving/sending an IP Fax, contact the administrator of each device.
Setting
Operation Description Reference
1 IP Fax Send/IP Fax Receive
functions confirmation
2 General settings Specify the settings related to the IP Fax
3 SIP settings Set the necessary settings when a SIP server
4 Gateway settings Set the necessary settings when a T.38
5 Address book settings Set or edit the recipients of the address
Check that [Enable] is set for the IP Fax Send
and the IP Fax Receive functions.
operation from the touch panel.
is used.
supporting gateway is used.
book.
P.17 “Functions”
P.18 “General Setting”
P.22 “SIP Setting”
P.26 “Gateway Setting”
P.30 “Address Book”
16 Setting the IP Fax Function from TopAccess

3.Setting the IP Fax Function
1
2
3
General settings
You can select whether to enable or disable the IP Fax Send function and the IP Fax Receive function.
Set the necessary settings from the [Administrator] tab displayed by logging into TopAccess by means of the
administrator privilege (access policy mode).
Click the [Administrator] tab and then [Setup] > [General Settings].
P.17 “Functions”
Functions
For details on items other than for IP Faxing, refer to the TopAccess Guide.
Item name Description
1 IP Fax Send Selects whether to enable or disable the IP Fax Send function.
2 IP Fax Receive Selects whether to enable or disable the IP Fax Receive function.
3 Network IP Fax Selects whether to enable or disable the network IP Fax function.
Setting the IP Fax Function
Setting the IP Fax Function from TopAccess 17

3.Setting the IP Fax Function
1
2
3
4
5
6
7
8
9
10
11
12
13
14
15
16
17
18
IP Fax Settings
You can set up the IP Fax settings.
P.18 “General Setting”
P.22 “SIP Setting”
General Setting
On the General Setting menu, set the IP Fax operation setting performed from the touch panel.
Access TopAccess. Log into TopAccess in access policy mode as an administrator.
Click the [Administrator] tab and then [Setup] > [IP Fax].
Item name Description
18 Setting the IP Fax Function from TopAccess
1 Terminal ID Enters the terminal ID name (company name) to identify this equipment.
2 IP Fax Number Enters the IP Fax number of this equipment. This IP Fax number will be
Depending on the settings of this equipment, the IP Fax number is sometimes not printed.
When [ON] is set for [TTI for IP Fax], this name will be printed at the leading
edge of all documents transmitted.
printed at the leading edge of all documents transmitted.
3.Setting the IP Fax Function
Item name Description
3 Resolution Selects the default resolution for sending IP Faxes.
4 Original Mode Selects the default image quality mode for sending IP Faxes.
5 Exposure Selects the default exposure for sending IP Faxes.
6 TTI Selects whether to print a transmission header (TTI) on received IP Faxes to
Standard — Select this to use the standard mode as the default
resolution.
This mode is suitable when you are frequently transmitting text
documents with normal size characters.
Fine — Select this to use the fine mode as the default resolution.
This mode is suitable when you are transmitting documents with small
size characters or fine drawings.
Ultra Fine — Select this to use the ultra fine mode as the default
resolution.
This mode is suitable when you are transmitting documents with very
small size characters or detailed drawings.
Text — Select this to set the Text mode as the default image quality mode.
This mode is suitable for sending text originals.
Text/Photo — Select this to set the Text/Photo mode as the default image
quality mode.
This mode is suitable for sending originals containing both text and
photos.
Photo — Select this to set the Photo mode as the default image quality
mode.
This mode is suitable for sending photo originals.
Select [Auto] to apply the ideal contrast automatically according to the
original or select the contrast manually in 11 stages.
identify their senders.
Setting the IP Fax Function
The printed time is the transmission time of each page.
7 RTI Selects whether to print a reception header (RTI) on received IP Faxes to
clearly identify their time, date, and page count.
8 Discard Selects whether to discard the lower portion of the received image if it is
larger than the recording paper.
9 Reduction Selects whether to reduce the received image if it is larger than the effective
printing area of the recording paper.
10 Duplex Print Selects whether to print the received images on both sides of the recording
paper.
Available only when the Automatic Duplexing Unit is installed.
11
Rotate Sort
*1
Selects whether to rotate the output direction in the tray for each reception.
12 Recovery Transmit Selects whether to retransmit an original stored in a memory by operating
on the touch panel after the initially specified number of redial attempts has
been failed.
When this is enabled, select the stored time length from 1 to 24 hours.
13 Journal Auto Print Selects whether to print a transmission and reception journal automatically
at every specified numbers of the communication. 40 or 120 can be set as
the numbers of the communication. For details, refer to the MFP
Management Guide.
Setting the IP Fax Function from TopAccess 19

3.Setting the IP Fax Function
Item name Description
14 Memory Transmission Report Selects how to print a result report after a memory transmission.
OFF — Select this to not print a memory transmission report.
Always — Select this to print a memory transmission report with all page
images for each memory transmission completed.
ON ERROR — Select this to print a memory transmission report with all
page images only when the memory transmission is not successfully
completed.
Always (Print 1st Page Image) — Select this to print a memory
transmission report with the 1st page image for each memory
transmission completed.
ON ERROR (Print 1st Page Image) — Select this to print a memory
transmission report with the 1st page image only when the memory
transmission is not successful.
15 Multi Transmission Report Selects how to print a result report after a multi-address transmission.
OFF — Select this to not print a multi-address transmission report.
Always — Select this to print a multi-address transmission report with all
page images for each multi-address transmission completed.
ON ERROR — Select this to print a multi-address transmission report with
all page images only when the multi-address transmission is not
successfully completed.
Always — Select this to print a multi-address transmission report with the
1st page image for each multi-address transmission completed.
ON ERROR (Print 1st Page Image) — Select this to print a multi-address
transmission report with the 1st page image only when the multi-address
transmission is not successful.
16 RX End Tone Selects how to sound the RX end tone after the completion of reception.
OFF — The RX end tone does not sound.
Print End — The RX end tone sounds at the completion of printing.
Receive End — The RX end tone sounds at the completion of reception.
17 TX End Tone Selects how to sound the TX end tone after the completion of transmission.
OFF — The TX end tone does not sound.
Always — The TX end tone sounds at the completion of transmission.
ON ERROR — The TX end tone sounds in the case of a transmission failure.
Normal End — The TX end tone sounds at the normal completion of
transmission.
20 Setting the IP Fax Function from TopAccess

3.Setting the IP Fax Function
Item name Description
18 Secure Receive You can set the Secure Receive function to store received IP Fax jobs in the
equipment without printing them.
With this function, you can prevent the leaking of confidential information
in an IP Fax received when no people are present in your office, such as
nighttime or holidays, or when an unspecified number of people visit your
office.
Enable — Select this to enable the Secure Receive function.
Disable — Select this to disable the Secure Receive function.
Weekly Schedule — Select this to set whether the Secure Receive
function is enabled or disabled for each day of the week.
You can set the time to enable and disable the Secure Receive function
(24-hour display).
- For a day on which you want to enable the Secure Receive function all
day, specify “00:00” for “Disable” and “00:00” for Enable.
- For a day on which you want to disable the Secure Receive function all
day, specify “00:00” for “Disable” and “24:00” for Enable.
To print the IP Fax jobs the Secure Receive function received, you must set
[Password] and [Retype Password]. For the password, you can enter up to
20 alphanumerical characters and symbols (! # ( ) * + , - . / : ; = ? @ $ ^ _ ` { | }
~ \).
*1 This function is not available for some models.
Setting the IP Fax Function
Setting the IP Fax Function from TopAccess 21

3.Setting the IP Fax Function
1
2
3
4
5
6
7
8
9
10
11
12
13
14
15
16
17
SIP Setting
Set the necessary settings when a SIP server is used.
P.26 “Gateway Setting”
P.27 “[Add Gateway] screen”
P.28 “Report Setting”
It may take a while until the connection can be confirmed when SIP settings are changed.
22 Setting the IP Fax Function from TopAccess

3.Setting the IP Fax Function
Item name Description
1 Enable SIP Selects whether to enable or disable the SIP settings. [Disable] is set as the
2 Transport Protocol Selects the transport protocol for sending a request from SIP.
3 Reception Port Number Enters the port number which receives SIP packets. You can enter a value in
4 User Name Enters the SIP user name registered in the SIP server. You can enter up to 64
5 Enable SIP Server Selects whether to enable or disable the SIP server. [Disable] is set as the
If there is no registration in [Server Address] of the registrar and the proxy server, [Enable] cannot be
selected and saving will fail.
When [Enable] is selected for [Enable SIP Server], set [Disable] in [Enable VoIP Gateway] in Gateway Setting.
When [Enable] is selected for [Enable VoIP Gateway], transmission not using a SIP server is also accepted.
6 Accept Transmission without
SIP Server
7 Address Mode Selects the address mode to receive an IP address manually or to obtain
default.
UDP — Select this to use UDP.
TCP — Select this to use TCP.
the range from 1 to 65535. Generally the default value “5060” is used.
alphanumerical characters and symbols ( &()=+$,;?/-_.!~*').
default.
Selects whether to enable or disable the direct transmission to an MFP
supporting the IP Fax function without using a SIP server. This setting is
applied when [Enable] is set for [Enable SIP Server]. [Disable] is set as the
default.
from a network automatically.
Manual — Select this to set the SIP server address manually.
Auto — Select this to obtain the SIP server address notified from a DHCP
server automatically.
Auto(DHCPv6) — Select this to obtain the SIP server address notified
from a DHCPv6 server automatically.
Setting the IP Fax Function
Auto(DHCPv6) — This can be selected regardless of whether the stateless or stateful if the [Use DHCPv6 Server
Option] check box is chosen in [IPv6] under [Basic Setting] of [Network].
Setting the IP Fax Function from TopAccess 23

3.Setting the IP Fax Function
Item name Description
8 Registrar Server Setting -
Primary
9 Registrar Server Setting -
Secondary
When the settings are specified for both [Primary] and [Secondary] in
[Registrar Server Setting], those for [Primary] are used.
Connection Status — Displays the last connection status.
(Blank) — A server address is not specified.
Registered — The IP address or the host name of the SIP server has been
registered.
Available — The IP address or the host name of the SIP server to be used
can be registered; however, another server has been connected.
Failed — The registration of the IP address or the host name of the SIP
server to be used has failed.
Server IP Address * — Enters the host name or the IP address of a primary
registrar. You can enter up to 128 characters. This will not be displayed if
[Auto] or [Auto(DHCPv6)] has been selected in Address Mode.
Port Number — Enters the port number for sending packets to a primary
registrar. You can enter a value in the range from 1 to 65535. Generally the
default value “5060” is used.
User Name — Enters a user name to be authenticated in a primary registrar.
You can enter up to 64 characters.
Password — Enters a password to be authenticated in a primary registrar.
You can enter up to 64 characters.
Retype Password — Enters the same password again for a confirmation.
When a primary registrar cannot be used, a secondary one will be utilized.
Connection Status — Displays the last connection status.
(Blank) — A server address is not specified.
Registered — The IP address or the host name of the SIP server has been
registered.
Available — The IP address or the host name of the SIP server to be used
can be registered; however, another server has been connected.
Failed — The registration of the IP address or the host name of the SIP
server to be used has failed.
Server IP Address * — Enters the host name or the IP address of a
secondary registrar. You can enter up to 128 characters. This will not be
displayed if [Auto] or [Auto(DHCPv6)] has been selected in Address Mode.
Port Number — Enters the port number for sending packets to a secondary
registrar. You can enter a value in the range from 1 to 65535. Generally the
default value “5060” is used.
User Name — Enters a user name to be authenticated in a secondary
registrar. You can enter up to 64 characters.
Password — Enters a password to be authenticated in a secondary
registrar.
You can enter up to 64 characters.
Retype Password — Enters the same password again for a confirmation.
24 Setting the IP Fax Function from TopAccess

3.Setting the IP Fax Function
Item name Description
10 Proxy Server Setting - Primary When the settings are specified for both [Primary] and [Secondary] in [Proxy
Server Setting], those for [Primary] are used.
Server IP Address * — Enters the host name or the IP address of a primary
proxy server. You can enter up to 128 characters. This will not be displayed if
[Auto(DHCP)] or [Auto(DHCPv6)] has been selected in Address Mode.
Port Number — Enters the port number for sending packets to a primary
registrar. You can enter a value in the range from 1 to 65535. Generally the
default value “5060” is used.
User Name — Enters a user name to be authenticated in a primary proxy
server. You can enter up to 64 characters.
Password — Enters a password to be authenticated in a primary proxy
server. You can enter up to 64 characters.
Retype Password — Enters the same password again for a confirmation.
11 Proxy Server Setting -
Secondary
When a primary proxy server cannot be used, a secondary one will be
utilized.
Server IP Address * — Enters the host name or the IP address of a
secondary proxy server. You can enter up to 128 characters. This will not be
displayed if [Auto] or [Auto(DHCPv6)] has been selected in Address Mode.
Port Number — Enters the port number for sending packets to a secondary
proxy server. You can enter a value in the range from 1 to 65535. Generally
the default value “5060” is used.
User Name — Enters a user name to be authenticated in a secondary proxy
server. You can enter up to 64 characters.
Password — Enters a password to be authenticated in a secondary proxy
server.
You can enter up to 64 characters.
Retype Password — Enters the same password again for a confirmation.
12 T.38 Transport Sets the transport protocol to be used preferentially in the T.38 session.
After the SIP session has been established, select the protocol for sending/
receiving data.
UDP — Select this to use UDP.
TCP — Select this to use TCP.
13 T.38 Media Type Sets the type of the media stream to be used in the T.38 session.
After the SIP session has been established, select the type of the media
stream for sending/receiving data.
Image — Select this to send or receive data in an image format.
Application — Select this to send or receive data in an application format.
14 T.38 Reception Port Number Enters the port number for receiving the T.38 session. You can enter a value
in the range from 1 to 65535. Generally the default value “5006” is used.
15 RTP Reception Port Number Enters the port number for receiving RTP (Real-time Transport Protocol).
You can enter a value in the range from 1 to 65535. Generally the default
value “5004” is used.
16 Incoming Reply Delay Time Enters the delay time until the reception operation has started after it has
been detected.
You can enter a value in the range from 0 to 32 sec. Generally the default
value “0” is used.
17 Maximum Use Bandwidth
(kbps)
Enters the maximum bandwidth for IP Fax communication. You can enter a
value in the range from 64 to 65535. Generally the default value “1000” is
used.
* If IPv6 is used for Server IP Address, put the value in brackets ([ ]). (Link Local Address is not available.)
Example: [2001:0db8::1234:5678:90ab:cdef]
Setting the IP Fax Function
Setting the IP Fax Function from TopAccess 25
3.Setting the IP Fax Function
1
2
3
4
11
12
13
14
5
7
8
9
10
6
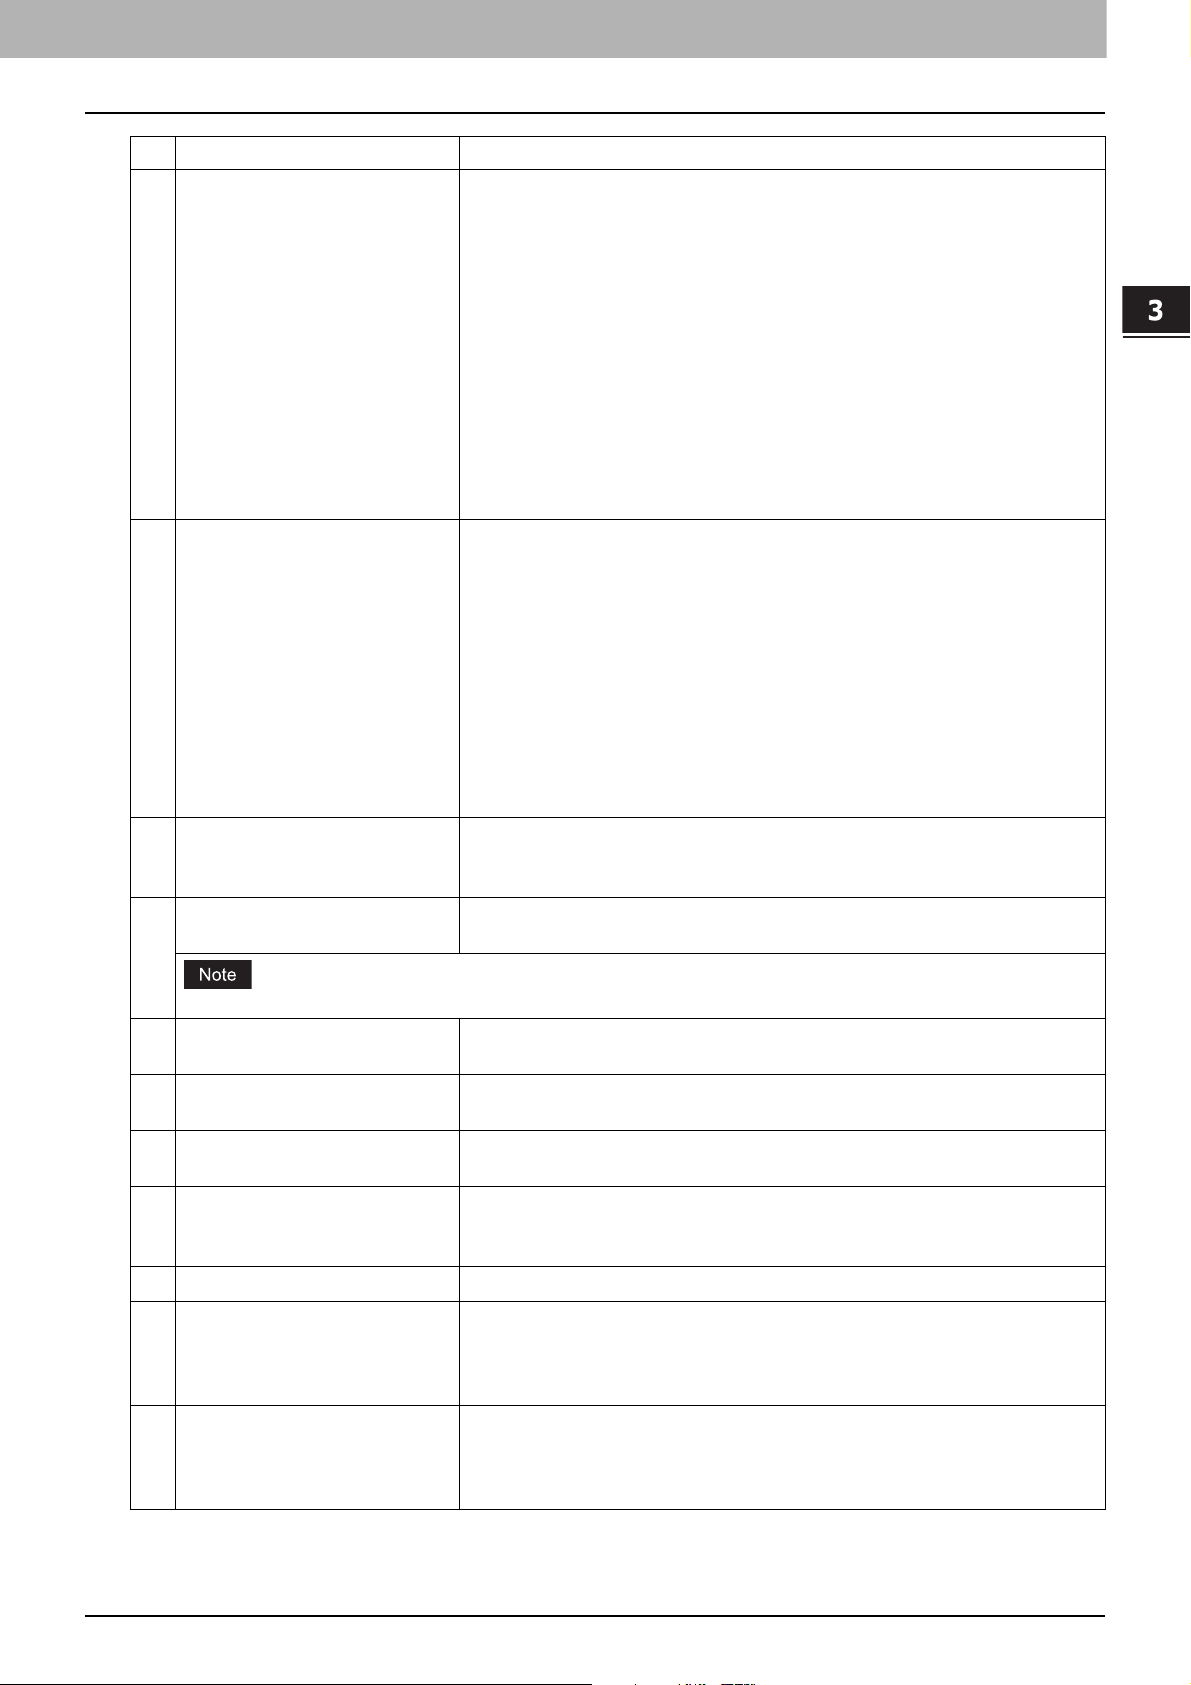
Gateway Setting
Set the necessary settings when a T.38 supporting gateway is used.
Up to 50 units of T.38 supporting gateway can be registered.
Item name Description
1 Enable VoIP Gateway Selects whether enable or disable a T.38 supporting gateway. [Disable] is set
When [Enable] is selected for [Enable SIP Server], set [Disable] in [Enable VoIP Gateway] in Gateway Setting.
When [Enable] is selected for [Enable VoIP Gateway], transmission not using a SIP server is also accepted.
2 SIP Transport Selects the transport protocol for sending a request from SIP to a T.38
3 SIP Reception Port Number Enters the port number which receives SIP packets for a T.38 supporting
4 Add Select this to add a new T.38 supporting gateway.
5 Delete Select this to delete the T.38 supporting gateway from the list.
6 Check box Selects the check box for the T.38 supporting gateways to be deleted.
7 No. The registration number of the T.38 supporting gateway is displayed.
8 Transmission Condition The number registered in [Transmission Condition] in the [Add Gateway]
9 IP Address The host name or the IP address of the T.38 supporting gateway registered
10 Port Number The number registered in [Port Number] in the [Add Gateway] screen is
26 Setting the IP Fax Function from TopAccess
as the default.
supporting gateway.
UDP — Select this to use UDP.
TCP — Select this to use TCP.
gateway. You can enter a value in the range from 1 to 65535. Generally the
default value “5060” is used.
P.27 “[Add Gateway] screen”
screen is displayed.
P.27 “[Add Gateway] screen”
in [IP Address] in the [Add Gateway] screen is displayed.
P.27 “[Add Gateway] screen”
displayed. You can enter the port number in the range from 1 to 65535 for
sending packets to the T.38 supporting gateway. Generally the default value
“5060” is used.
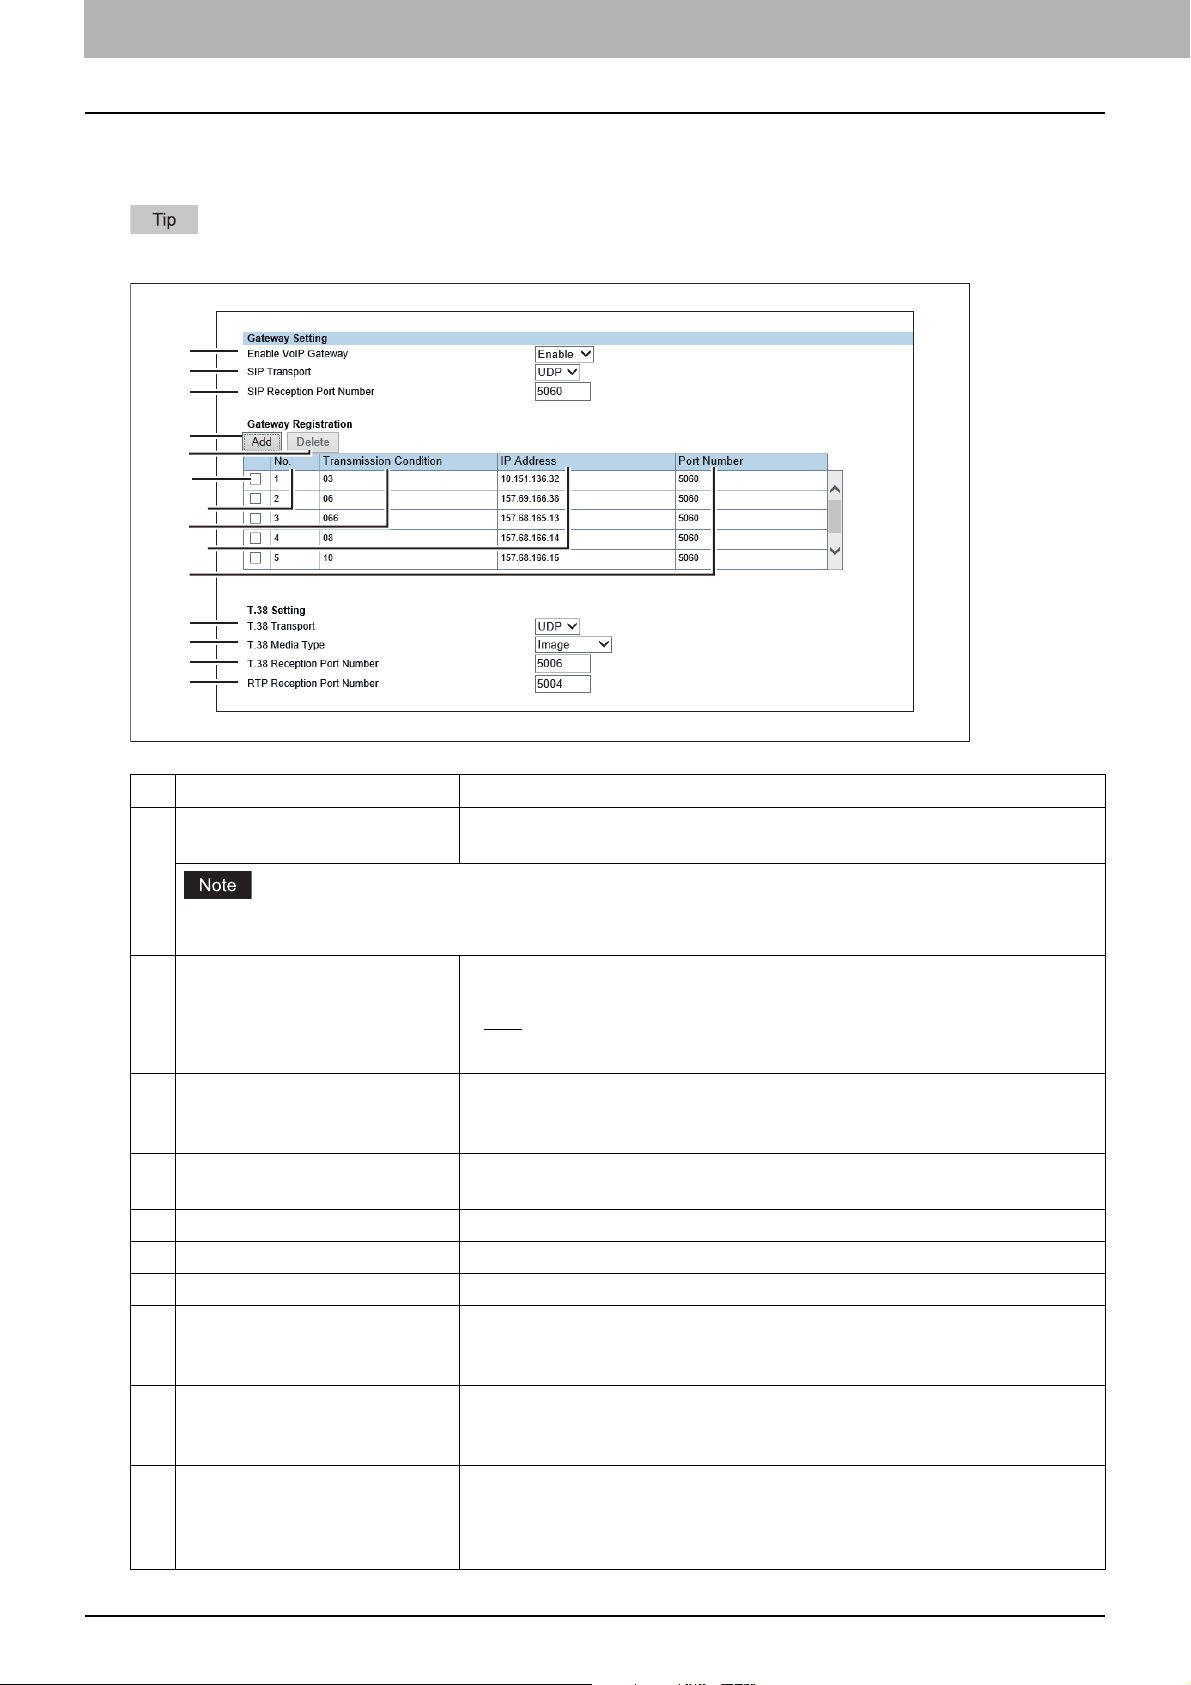
3.Setting the IP Fax Function
3
4
5
1
2
Item name Description
11 T.38 Transport Sets the transport protocol to be used preferentially in the T.38 session.
After the SIP session has been established, select the protocol to be used for
sending/receiving data.
UDP — Select this to use UDP.
TCP — Select this to use TCP.
12 T.38 Media Type Sets the type of the media stream to be used in the T.38 session.
After the SIP session has been established, select the type of the media
stream to be used for sending/receiving data.
Image — Select this to send or receive data in an image format.
Application — Select this to send or receive data in an application format.
13 T.38 Reception Port Number Enters the port number for receiving the T.38 session. You can enter a value
in the range from 1 to 65535. Generally the default value “5006” is used.
14 RTP Reception Port Number Enters the port number for receiving RTP (Real-time Transport Protocol).
You can enter a value in the range from 1 to 65535. Generally the default
value “5004” is used.
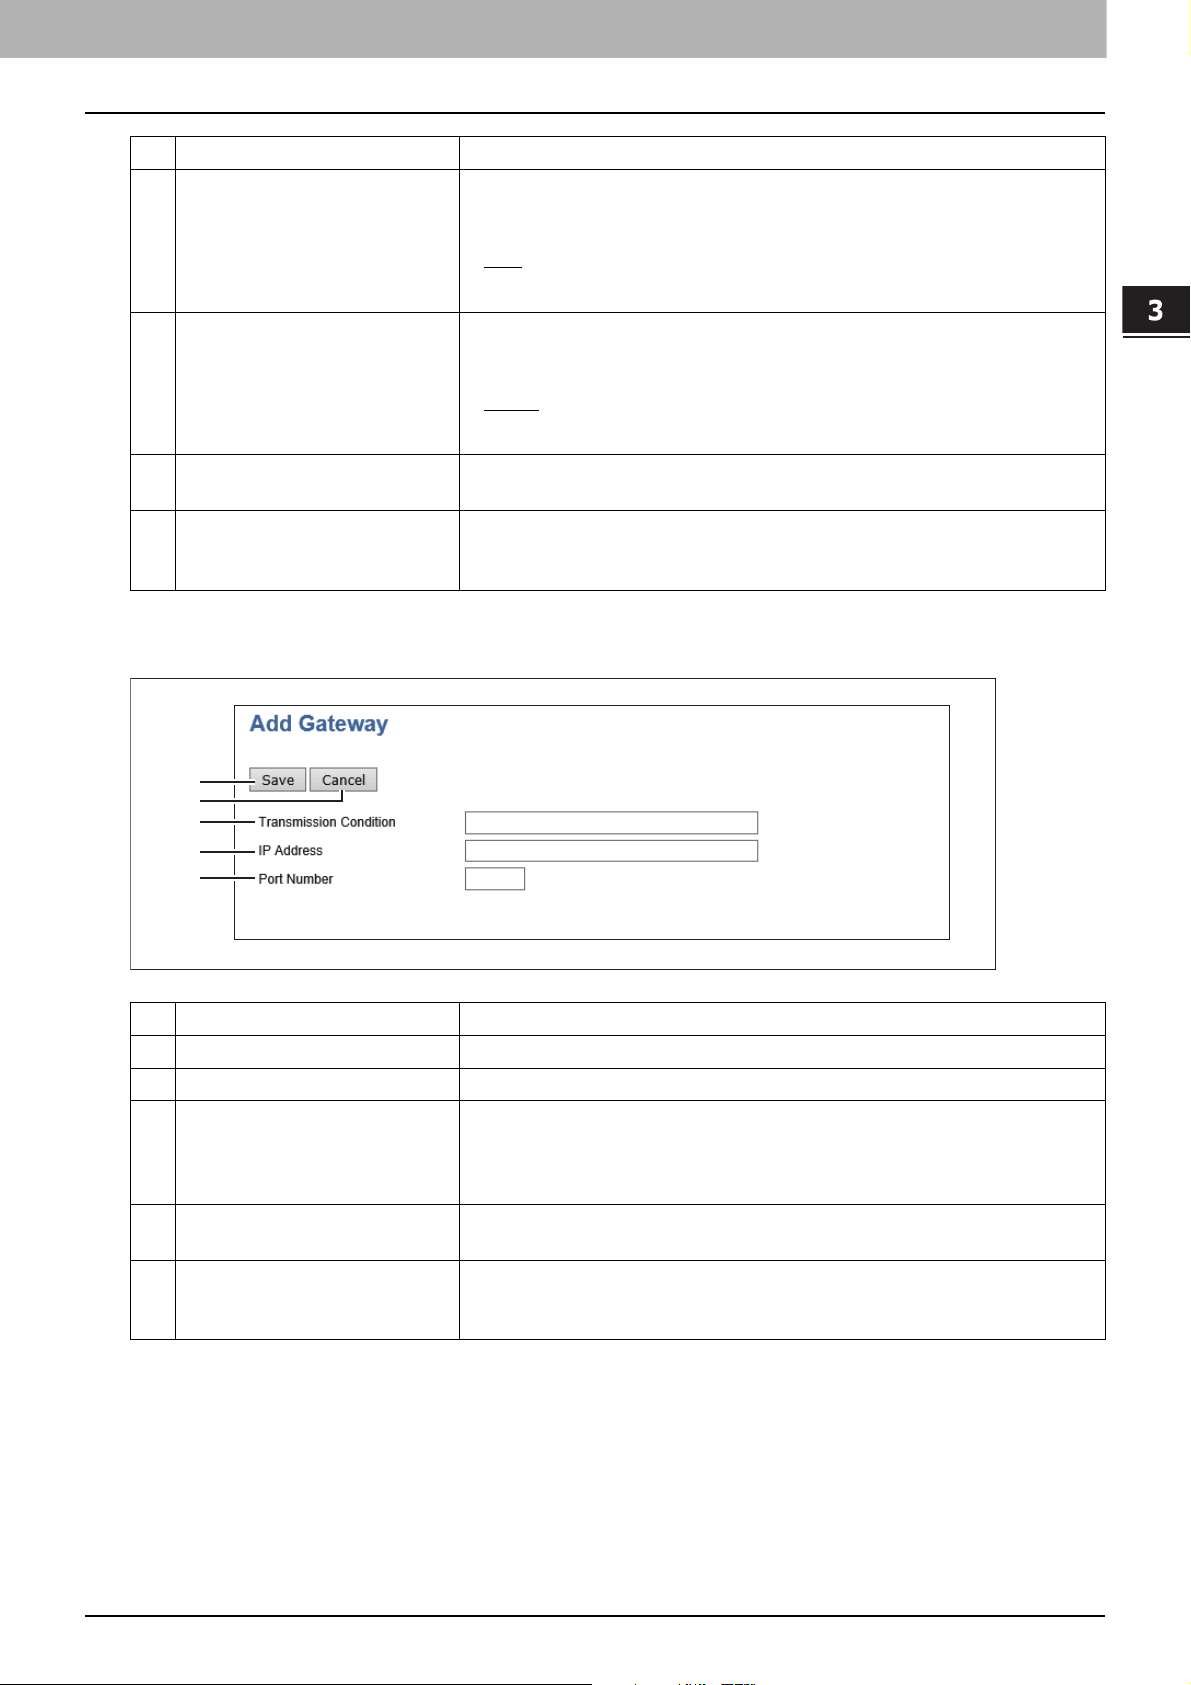
[Add Gateway] screen
You can register a new T.38 supporting gateway.
Setting the IP Fax Function
Item name Description
1[Save] button Select this to save the established T.38 supporting gateway.
2 [Cancel] button Select this to cancel the registration of the T.38 supporting gateway.
3 Transmission Condition The first few digits of the recipient’s fax number are displayed as the
transmission condition. You can enter up to 12 characters using numbers, #,
* and -. Only one unit of the T.38 supporting gateway can be registered
without the digits being entered in this field.
4 IP Address * Enters the host name or the IP address of the T.38 supporting gateway.
You can enter up to 128 alphanumerical characters and symbols.
5 Port Number Enters the port number for sending packets to the T.38 supporting gateway.
You can enter a value in the range from 1 to 65535. Generally the default
value “5060” is used.
* If IPv6 is used for Server IP Address, put the value in brackets ([ ]). (Link Local Address is not available.)
Example: [2001:0db8::1234:5678:90ab:cdef]
Setting the IP Fax Function from TopAccess 27

3.Setting the IP Fax Function
1
2
3
4
5
6
3
Report Setting
You can set the result report of the IP Fax.
Item name Description
1 Select Agent You can make detailed settings by selecting one of the following items, and
then clicking [Select Agent].
Print — Select this to print. There are no settings available in [Select Agent].
Save as file — Select this to save as a file. Click [Select Agent] to make
settings for [Save as file Setting] and [Common Setting].
Email — Select this to send an E-mail. Click [Select Agent] to make address
settings, and settings for [Email Setting] and [Common Setting].
For details about [Email Setting], [Save as file Setting] and [Common Setting], refer to the TopAccess Guide.
2 Use login user address (User
Authentication)
Sets whether or not to use the E-mail address for a login user as the
destination for E-mail transmission during user authentication. You can set
the following items when you select this check box.
Use Email Address which was registered Local User — The E-mail address
for a user set in MFP Local Authentication is used as the destination for Email transmission.
Use Email Address which was LDAP registered — The E-mail address for a
server registered in LDAP Client is used as the destination for E-mail
transmission. Click [Server Assignment]. Up to 4 LDAP servers can be
For details about [LDAP Client settings], refer to the TopAccess Guide.
3 [1st Destination]/[2nd
Destination] button
assigned.
This is enabled when you select [Email] from Report Settings, and then click
the [Select Agent] button.
Click to display the address list where you can set addresses.
For details about the [1s Destination] and [2nd Destination] buttons, refer to the TopAccess Guide.
28 Setting the IP Fax Function from TopAccess
3.Setting the IP Fax Function
Item name Description
4 [Email Setting] button This is enabled when you select [Email] from Report Settings, and then click
For details about [Email Setting], refer to the TopAccess Guide.
5 [Save as file Setting] button This is enabled when you select [Save as file] from Report Settings, and then
the [Select Agent] button.
You can set the following items on the agent settings page.
Subject
From Address
From Name
Body
File Name
click the [Select Agent] button.
You can set the following items on the agent settings page.
Destination
File Name
Setting the IP Fax Function
For details about [Save as file Setting], refer to the TopAccess Guide.
6 [Common Setting] button This is enabled when you select [Email] or [Save as file] from Report
Settings, and then click the [Select Agent] button.
You can set the following items on the agent settings page.
File Format
Encryption
For details about [Email Setting], [Save as file], and [Common Setting], refer to the TopAccess Guide.
Setting the IP Fax Function from TopAccess 29

3.Setting the IP Fax Function
1
2
3
5
6
7
8
9
10
4
11
Address Book
You can manage a recipient list to be used in IP Fax transmission.
Access TopAccess. Click the [Registration] tab > [Address Book].
P.30 “[Address Book] screen”
P.31 “[Create Destination information]/[Edit Destination information] screen”
P.33 “[Search Address List] screen”
P.34 “[Create Group information]/[Edit Group information] screen”
For details about Address Book, refer to the TopAccess Guide.
Address Book can be also managed using the touch panel.
P.49 “Address (User)”
P.51 “Managing groups in address book (User)”
[Address Book] screen
Item name Description
1 [Add Address] button Select this to add a new recipient to the address book.
2 [Search] button Select this to search a recipient from the address book. For details about the
3 Group Select a group to display in the address list.
This is only available when [Shared Setting] - [Shared Address Book] is set to [Enable (Primary)] or [Enable
(Secondary)].
4 Select Page Selects a page when there are 101 items or more.
5 ID The registered ID of the recipient is displayed.
30 Setting the IP Fax Function from TopAccess
6 Name The name registered to the recipient is displayed.
7 Email Address The E-mail address registered to the recipient is displayed.
P.31 “[Create Destination information]/[Edit Destination information]
screen”
[Search Contact] screen, refer to the TopAccess Guide.
All Groups — Displays all the groups.
Local — Displays the local address book.
Shared — Displays the shared address book.
P.31 “[Create Destination information]/[Edit Destination information]
screen”
P.31 “[Create Destination information]/[Edit Destination information]
screen”
P.31 “[Create Destination information]/[Edit Destination information]
screen”
Loading...