

Page 1

- Data Brochure
Difference Setpoint Control 157
D 157
06/10
The Difference Setpoint Control 157 is designed to operate a variable speed pump to transfer heat from a heat source
to a storage tank. Varying the speed of the pump provides fast and accurate temperature control to maintain the target
temperature difference (T). Additional minimum and maximum setpoints turn off the pump when heat transfer is no longer
desirable. Potential applications include using solar collectors or a wood boiler as a heat source.
Additional functions include:
120 V (ac) powered pump outputs
•
Second On/Off pump with 4 modes of operation
•
Optional auxiliary sensor input to be used in heat dump and heat supplement modes
•
Freeze Protection
•
Displays total amount of energy transfer in BTU or kWh
•
Certified to CSA and UL standards for use in the USA and Canada
•
NEW Solar Sensor 085 immersion type sensor included!
•
VIEW
Item
ΔT
F
1
%
2
Black
Red
Blue
Green
Input
Solar Sensor
Included
1 of 16 © 2010 D 157 - 06/10
Input
Universal Sensor
Included
Input
Universal Sensor
Optional
Input
Demand
Signal
Input
24 V (ac)
Power Supply
Input
120 V (ac)
Power Supply
Output
On/Off
Pump
Output
Variable
Speed Pump
Ground
Page 2

How to Use the Data Brochure
This brochure is organized into three main sections.
They are: 1) Sequence of Operation, 2) Installation, and
3) Control Settings
Table of Contents
User Interface ...............................................................2
Display .......................................................................... 3
Symbol Description .......................................................3
Sequence of Operation .................................................4
Section A: General ................................................... 4
Section B: Modes of Operation ................................4
Section C: Targets and Differentials ......................... 5
Section D: Control Features .....................................6
Section E: Energy Calculation .................................. 7
The Control Settings section of this brochure describes
the various items that are adjusted and displayed by the
control. The control functions of each adjustable item are
described in the Sequence of Operation.
Installation ....................................................................8
Control Settings ......................................................... 10
DIP Switch Settings ................................................ 10
VIEW Menu ............................................................ 11
ADJUST Menu ....................................................... 12
Test Routine................................................................ 14
Error Messages .......................................................... 15
Technical Data ............................................................ 16
Limited Warranty ....................................................... 16
User Interface
The 157 uses a Liquid Crystal Display (LCD) as the method
of supplying information. Use the LCD in order to set up
and monitor the operation of your system. The 157 has
three push buttons (Item, ▲, ▼) for selecting, viewing, and
adjusting settings. When programming the control, record
settings in the Adjust menu table which is found in the
second half of this brochure.
Item
The selected item will be displayed using the segments
available in the screen. To view the next available item,
press and release the Item button. Once you have reached
the last available item, pressing and releasing the Item
button will return the display to the first item.
Item
Adjust
To make an adjustment to a setting in the control, press
and hold simultaneously for 1 second all three (3) buttons.
The display will then show the word ADJUST in the top left
corner. Select the desired item using the Item button. Finally,
use the ▲ or ▼ button to make the adjustment.
Item
© 2010 D 157 - 06/10 2 of 16
Page 3
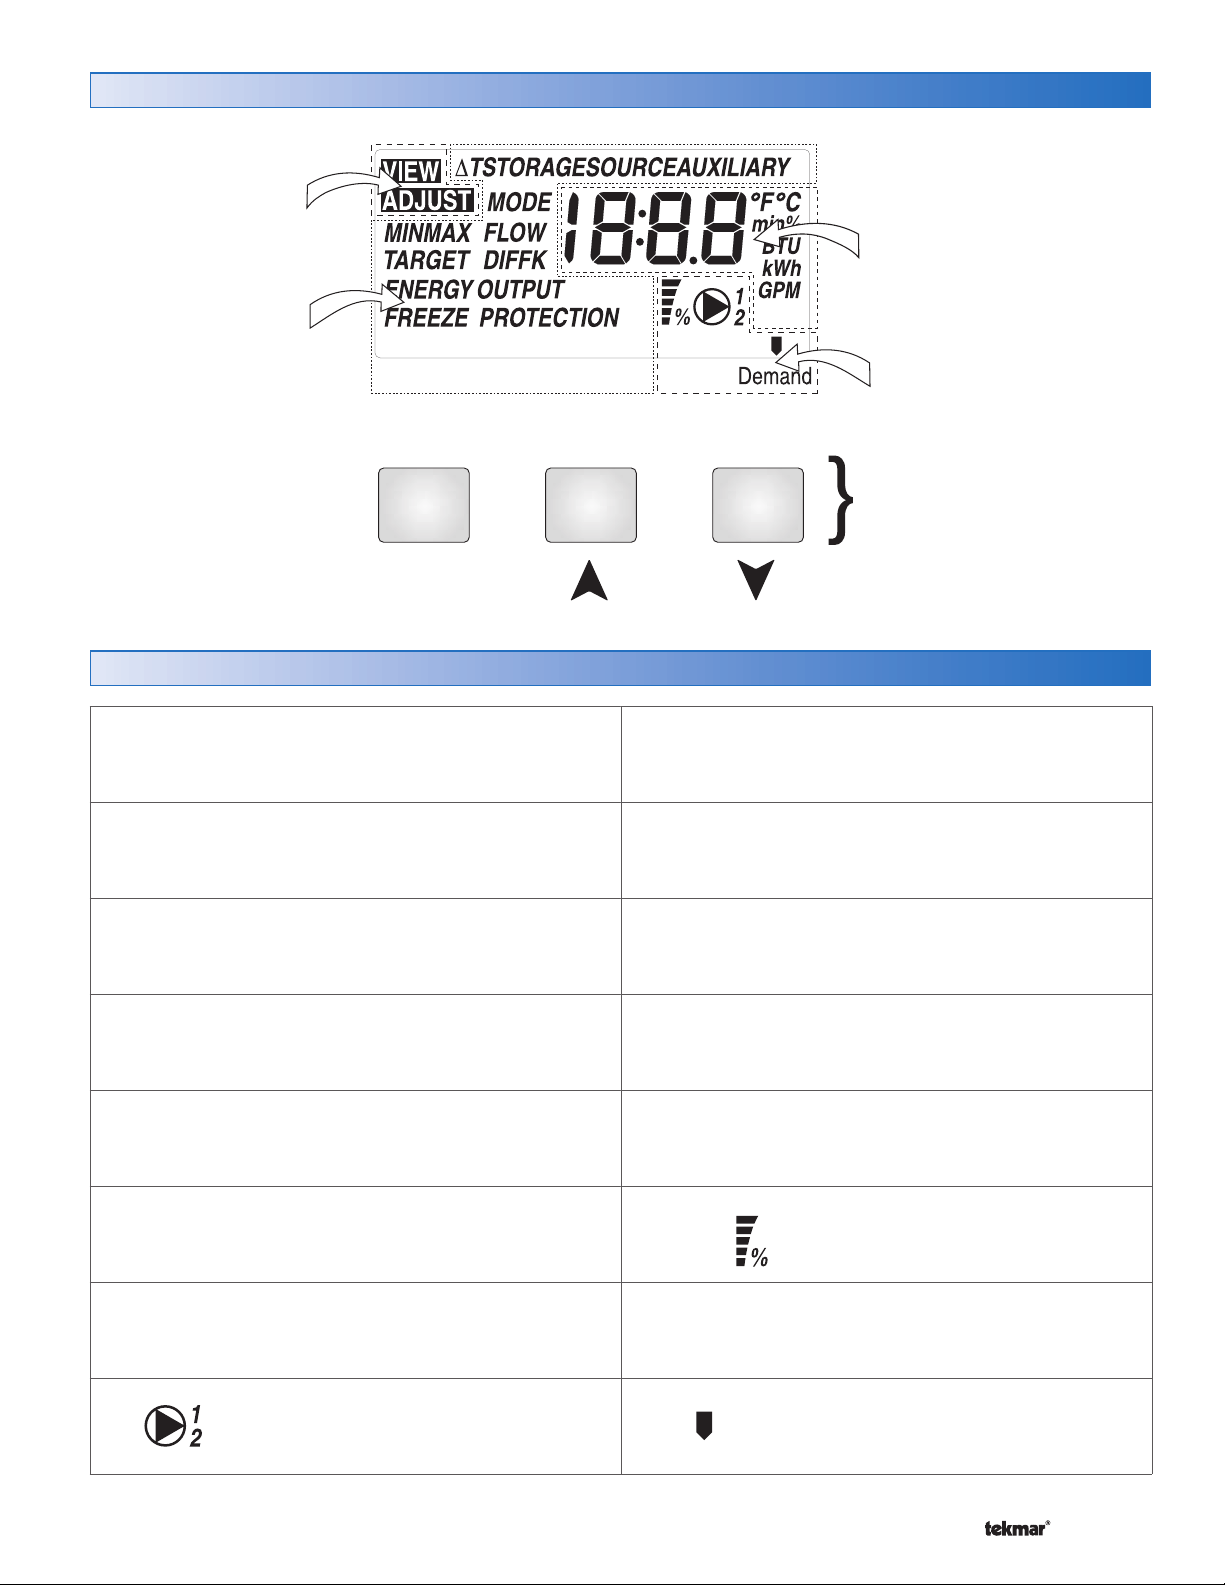
Display
Menu Field
Displays the
current menu
Item Field
Displays the current
item selected.
Symbol Description
Number Field
Displays the current value
of the selected item
Status Field
Displays the current
status of the relay.
Buttons
Selects Menus, Items
and adjusts settings
Item
ΔT
SOURCE
MODE
FLOW
DIFF
ENERGY
Delta T
Displays the temperature difference
between the source and storage
sensors.
Source
Displays the temperature at the source
sensor.
Mode
Displays the modes of operation for the
on/off pump, P2.
Flow
Displays the maximum flow rate of the
variable speed pump.
Differential
Displays any differential.
Energy
Displays the total number of BTU’s or
kWh’s accumulated by the control’s
energy calculation.
STORAGE
AUXILIARY
MINMAX
TARGET
K
OUTPUT
Storage
Displays the temperature at the
storage sensor.
Auxiliary
Displays the temperature at the
auxiliary sensor.
Minimum and Maximum
Displays the min and max sensor
temperatures.
Target
Displays any target.
Fluid Constant K
Used to calculate heat transfer. Look
up fluid constant in this data brochure.
Output
Displays the % output of variable speed
pump. Each bar represents 20% output.
FREEZE
PROTECTION
3 of 16 © 2010 D 157 - 06/10
Freeze Protection
Displays the status of the freeze
protection function of the control.
Pump
Displays the status of the variable
speed (1) and secondary (2) pump.
°F,°C, min,
% ,BTU, kWh,
GPM
Units of Measurement
Demand Pointer
Displays if a demand is applied to the
control.
Page 4
Sequence of Operation
Section A – General
Powering Up The Control
When the Difference Setpoint Control 157 is powered up,
all segments are displayed in the LCD for 2 seconds, and
then the type number is displayed for 2 seconds. Next,
Source
Sensor
Heat
Source
Pump
Heat
Storage
Storage
Sensor
the software version is displayed for 2 seconds. Finally,
the control enters into the normal operating mode and by
default the LCD displays the current T temperature.
Turn On
Variable Speed Pump
A manufacturer approved wet rotor circulator is connected to
the 157 at the back of the control (see Table 1 for approved
pumps). The 157 increases or decreases the power output
When the variable speed pump turns on, it will operate
at 100% output for an adjustable amount of time before
operating at a variable speed starting at the minimum
pump speed setting.
to the circulator to vary the speed and maintain the target
difference setpoint temperature (∆T) between the source
and the storage sensors. As the ∆T increases, the pump
speed increases and as the ∆T decreases, the pump speed
decreases. The current % output of the variable speed
pump is displayed in the view menu.
Turn Off
If the temperature difference falls below the ∆T target less
the ∆T differential, or below 1°F (0.5°C), the variable
speed pump will operate at the minimum pump speed for
2 minutes before shutting off. The minimum off time for the
variable speed pump is fixed at 2 minutes.
Table 1: Manufacturer approved pump models
Grundfos (F) Taco B & G Armstrong Wilo
15-42 15-58 26-64 43-75 003 007 0010 0012 NRF 9NRF 22NRF
** *** ** *** 25BU 30 50 * ** *** S21FX 17FX 30F
33
Astro Star S16FX Star
*Speed 1,**Speed 2, ***Speed 3
These circulators have been tested and approved by the manufacturer for use with tekmar variable speed electronics.
Section B – Modes of Operation
The 157 has a second 120 V (ac) powered output wired
through the back of the control for an on/off pump. The
second pump has 4 adjustable modes of operation
depending on the application.
Mode Off
is for applications where the second pump is
not used. The second pump relay is non-operational. Refer
to application A157-1.
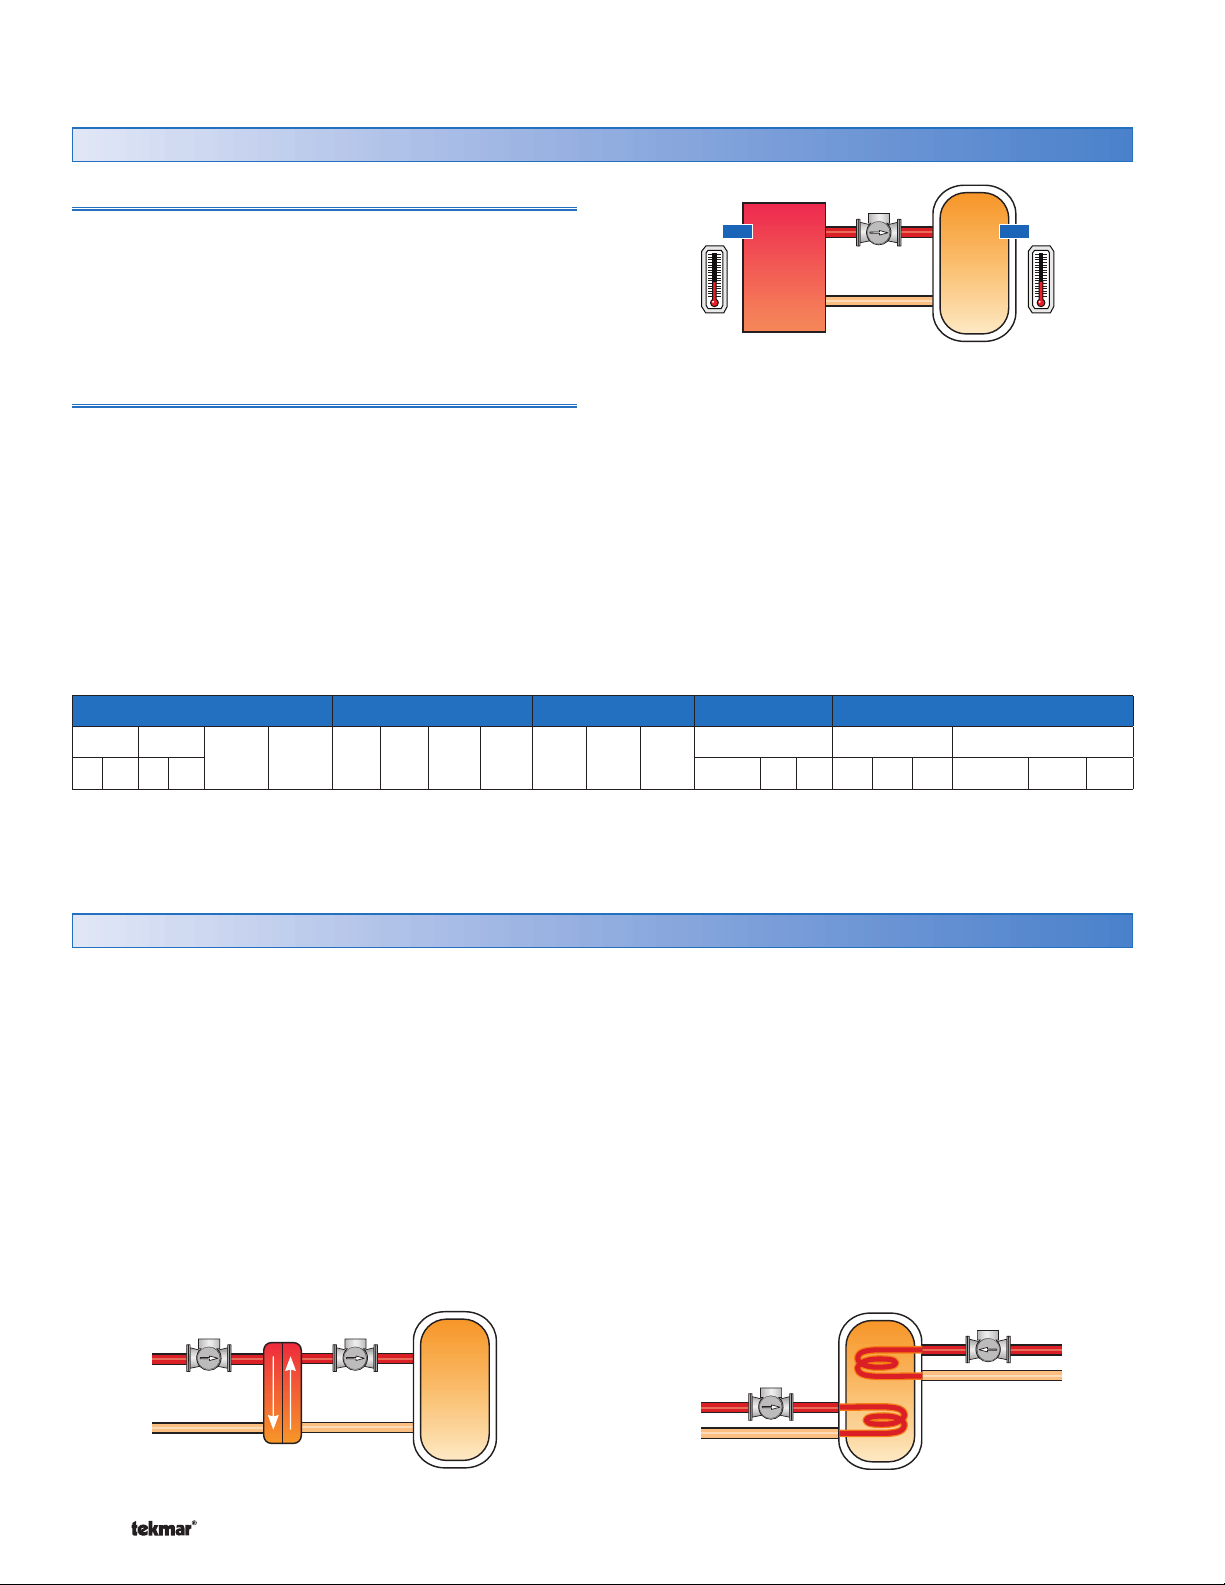
Mode 1 Heat Exchanger is for applications where the
heat exchanger pump is needed to transfer heat between
an external heat exchanger and the storage tank. The heat
exchanger pump relay will operate whenever the variable
speed pump is above 0% output. Refer to application
A157-2.
Variable
Speed Pump
Heat Exchanger
Pump
Heat
Storage
Mode 2 Heat Supplement
is for applications where the
heat supplement pump transfers heat from a supplemental
heat source (i.e. back-up boiler) to maintain the storage tank
above the minimum storage target. The auxiliary sensor is
optional in this mode. Install the auxiliary sensor in the upper
portion of the storage tank. Refer to application A157-3.
If the boiler is not flow activated, the heat supplement pump
output could provide a heat demand to another controller
to turn on the boiler.
In this mode, the minimum on and off time for the heat
supplement pump is fixed at 30 seconds.
Supplemental
Heat Pump
Variable
Speed Pump
Heat
Storage
© 2010 D 157 - 06/10 4 of 16
Page 5

Mode 3 Heat Dump is for applications where an
alternative heat sink can be utilized when the storage tank
and collector are both above their maximum target. The
variable speed pump turns off when the tank exceeds its
max setpoint. The heat dump pump turns on when both
the tank and collectors exceed their max setpoints. If
during a heat dump the storage temperature falls below
its maximum targets less differential, the heat dump pump
relay is turned off and the variable speed pump is allowed
to operate normally. The auxiliary sensor is optional in this
mode. Install the auxiliary sensor in the heat dump. Refer
to application A157-4.
Mode 4 Booster Pump
is for drain back applications
where a booster pump is used to overcome high head upon
system startup. When the T rises above the T target,
the control turns on the booster pump and operates the
variable speed pump at 100% output. After an adjustable
time, the control turns off the booster pump and operates
the variable speed pump above the minimum pump speed
setting. Refer to application A157-5.
Variable
Speed Pump
Heat Dump
Pump
Heat
Storage
Booster
Pump
Variable
Speed
Pump
Heat
Storage
Table 2: Second Pump Mode Summary
MODE NAME DESCRIPTION APPLICATION
Off Off Only the variable speed pump is operational. A157-1
1
2
3 Heat Dump
4
Heat
Exchanger
Heat
Supplement
Booster
Pump
Heat exchanger pump operates together with the variable speed pump. A157-2
Heat supplement pump operates independently of the variable speed pump
to maintain the storage tank at the minimum storage target.
Heat dump pump operates when the storage and source temperatures rise
above their max targets to dump excess heat from the collectors.
Booster pump operates together with the variable speed pump at start up for
an adjustable amount of time to overcome high head in drain back systems.
A157-3
A157-4
A157-5
Section C: Targets and Differentials
MAXIMUM SOURCE TARGET
(Mode = off, 1, 2, and 4)
If the source temperature rises above the maximum source
target, the variable speed pump is turned off. In a drain
back system, turning off the pump allows the fluid to drain
back into a separate tank which protects the collectors from
overheating. Ceasing operation may also protect equipment
like the pump impeller from damage. The pump remains
off until the source temperature falls below the maximum
source target less differential.
Table 3: Outlines when the variable speed pump and heat
dump pump are allowed to operate normally in mode 3.
Table 3 Scenario
1234
Max Storage Setpoint below
Max Source Setpoint below below
above above
above above
below
Variable Speed Pump on off off on
Heat Dump Pump off off on off
(Mode = 3, Heat Dump)
In order for the heat dump pump to turn on, the storage
temperature must be above the Maximum Storage Setpoint
and the source temperature must be above the Maximum
Source Setpoint. If the source or storage temperatures
fall below their maximum targets less differential, the heat
dump pump is turned off. The variable speed pump operates
normally whenever the storage temperature falls below its
maximum setpoint less differential. This setting ensures
MINIMUM SOURCE TARGET
If the source temperature drops below the minimum source
target, the variable speed pump is turned off. In a drain
back system, turning off the pump allows the fluid to drain
back into a separate tank which protects the collectors from
freezing. The pump remains off until the source temperature
rises above the minimum source target plus differential. This
item is only available if freeze protection is turned off.
that the water being supplied to the heat dump is at least
the Maximum Source Target temperature.
5 of 16 © 2010 D 157 - 06/10
Page 6

MAXIMUM STORAGE TARGET
If the storage temperature rises above the maximum storage
target, the variable speed pump is turned off. This protects
the tank from overheating by stopping the transfer of heat
from the collectors. The pump remains off until the storage
temperature falls below the maximum storage target less
differential.
MINIMUM STORAGE TARGET
(Mode = 2, Heat Supplement)
This item is only available in Heat Supplement Mode 2.
The heat supplement pump will operate independently of
the variable speed pump to maintain the minimum storage
target at the storage sensor, or optional auxiliary sensor
if connected. If the temperature falls below the minimum
storage target, the heat supplement pump will turn on and
remain on until the temperature rises above the minimum
storage target plus differential. This ensures that there is
heat available in the storage tank for important loads like
domestic hot water.
CAUTION: If storage is used for domestic hot water,
anti-scald protection may be required by some local
codes.
Figure 1 shows an example of how to set up the max and
min storage targets and differentials.
ΔT TARGET
The T target is the turn on point for the variable speed
pump. Once the T rises above this target the variable
speed pump will operate based on the minimum output
(%), and maximum output (minutes) settings. The control
will continue to vary the speed of the pump until the T
falls below the T target less differential at which point
the pump will run at the minimum output (%) for 2 minutes
before turning off.
MAX AUXILIARY TARGET
This item is only available in Heat Dump Mode 3. If the
auxiliary sensor temperature rises above the maximum
auxiliary target, the heat dump pump is turned off. The
heat dump pump remains off until the auxiliary sensor
temperature drops below the maximum auxiliary target less
differential. Using the auxiliary sensor will prevent the heat
dump, like a pool or second tank, from overheating. There
are no minimum on/off times for the heat dump pump.
MAX AUX TARGET Operation
MAX AUX
Target
OFF
OFF
Supplemental Heat Operation
200
P1
190
OFF
180
170
160
150
140
130
120
MIN Storage
Storage Temperature (°F)
110
100
Target
MAX Storage
Differential
P1
ON
ON
P2
Time
P2
OFF
P1
OFF
MIN Storage
Differential
P1
ON
MAX Storage
Target
P2
OFF
P2
ON
Figure 1: Turn on /off points for the variable speed pump
(P1) and the heat supplement pump (P2) in Mode 2. The
min storage target is below the max storage target. Each
have a 10°F (5.5°C) differential.
Section D – Control Features
FREEZE PROTECTION
If freeze protection is enabled and the source temperature
falls below 35°F (2°C), the variable speed pump will
operate at 100% output for twice as long as it takes the
source temperature to increase to 40°F (4°C). This is
limited to 20 minutes after source temperature reaches
40°F (4°C). This allows the water from the storage tank
to reach the collectors AND flow back to the storage tank
to provide freeze protection to ALL outdoor components.
This item is only available if not in Mode 4.
MAX AUX
Differential
ON ON
Increasing Temperature
Time
Figure 2: On and off points of the heat dump pump, using
an auxiliary sensor in heat dump mode.
This item should only be turned on if:
1) other forms of freeze protection, like drain back, are
not being used
and
2) the heat transfer fluid in the collectors is 100% water
and
3) the outdoor air temperature rarely falls below 35°F
(2°C)
© 2010 D 157 - 06/10 6 of 16
Page 7

MINIMUM OUTPUT, %
This item selects the minimum speed the variable speed
pump will run in order to avoid unwanted drain back when
the pump is running at low speeds in a drain back system.
At low speeds, some pumps stall and provide no flow. It is
important to set the minimum pump speed above this stall
point. This setting is adjustable between 0% and 100%.
At 100% output the variable speed pump operates as an
on/off pump.
MAXIMUM OUTPUT, minutes
When the variable speed pump turns on, it will operate at
100% output for this adjustable amount of time to overcome
high head when filling a drain back system. If the control
is in booster pump mode 4, the variable speed pump and
the booster pump will operate together at 100% output for
this adjustable amount of time.
This item can be used in drainback applications with or
without a booster pump. Set this item to the time it takes
the fluid to circulate through the collectors and into the
drainback tank.
This item can also be used to prevent short cycling of
the pump upon startup in non-drain back applications.
When the variable speed pump turns on, the warm water
in the collector passes by the source sensor causing its
temperature to rise. Once all this water has passed, the
cooler water in the pipe before the collector will pass by the
source sensor causing the temperature to drop; potentially
enough to loose the delta T and thus turn off the pump.
This sequence could happen a number of times before
the system stabilizes and the variable speed pump runs
continuously.
Setting the maximum pump speed (minutes) to the time it
takes the fluid in the storage tank to reach the collectors
will force the system to stabilize and thus reduce any short
cycling of the pump at startup. This is especially important
when the ambient outdoor temperature is very cool.
MONITORING TEMPERATURES
The control includes monitoring of minimum and maximum
Source, Storage, and Auxiliary temperatures in the view
menu. These items may be reset to their respective current
sensor temperature by pressing and holding the ▲ and
▼ buttons simultaneously for 1 second while viewing the
selected item. ‘Clr’ will then be displayed followed by
the value being reset to its respective current sensor
temperature when the buttons are released.
PUMP 2 RUNNING HOURS
The control includes monitoring of the second pump’s
running hours in the view menu where 1 count equals 1
hour. This item may be reset to zero by pressing and holding
the ▲ and ▼ buttons simultaneously for 1 second while
viewing this item. ‘Clr’ will then be displayed followed by the
value being reset to zero when the buttons are released.
Section E – Energy Calculation
To calculate the amount of heat the system has transferred
from the solar collectors to the storage tank, the control
uses the following equation and displays ENERGY in the
view menu in BTU’s or kWh:
Total Heat Transferred = (%T hours) x (Flow) x K
Where:
%T hours is calculated by the control.
•
Flow is the amount of fluid the variable speed pump moves
•
through the system in US Gallons per minute.
K is a fluid constant to be programmed in the adjust menu.
•
K
K is a constant calculated by multiplying the properties of the
fluid; specific heat (BTU/lbm°F) by density (lbm/USGal) by
60 (min/hr). For example, 100% water has a specific heat of
1 BTU/lbm°F and a density of 8.33 lbm/USGal. Therefore
the value of K in this case is 1 x 8.33 x 60 = 500.
The value of K depends on the percent of glycol added to
the heat transfer fluid. Select an appropriate K value from
table 1 and program it into the adjust menu. If 100% water
is used, select K = 500.
Table 4: K values for different heat transfer solutions based
on % glycol.
Ethylene Glycol Solution
% Freezing
Point (°F)
0 32 500 0 32 500
10 23 492 10 26 495
20 14 483 20 18 489
30 2 471 30 7 480
40 -13 453 40 -8 463
50 -36 433 50 -29 443
60 -70 412 60 -55 422
K @
40°F
Propylene Glycol Solution
% Freezing
Point (°F)
K @
40°F
FLOW
In the adjust menu, enter the actual flow rate of the variable
speed pump operating at 100% output in US Gallons per
minute (GPM).
Note: BTU = British Thermal Unit
lbm = Pound Mass
USGal = US Gallon
GPM = Gallon Per Minute
7 of 16 © 2010 D 157 - 06/10
Page 8

Installation
Caution
Improper installation and operation of this control could
result in damage to the equipment and possibly even
personal injury. It is your responsibility to ensure that this
control is safely installed according to all applicable codes
and standards. This electronic control is not intended
for use as a primary limit control. Other controls that are
intended and certified as safety limits must be placed into
the control circuit.
Step One — Getting Ready
Check the contents of this package. If any of the contents
listed are missing or damaged, please contact your
wholesaler or tekmar sales representative for assistance.
Type 157 includes: One Difference Setpoint Control 157, One
Universal Sensor 071, One Solar Sensor, 085, Data Brochures
D 157, D 070, D 085, D 001, Application Brochure A 157.
Note: Carefully read the details of the Sequence of
Operation to ensure that you have chosen the proper
control for your application.
Step Two — Mounting
The control is mounted in accordance with the instructions in the Data Brochure D 001.
Step Three — Rough-in Wiring
The variable speed pump and second pump wiring
terminates in the electrical box. All other wiring terminates
in the two wiring chambers on the control. Determine
whether the low voltage wiring enters the wiring chamber
through the back or the bottom of the control. The wiring
is roughed-in to the electrical box prior to installation of the
control (see Brochure D 001). Standard 18 AWG solid wire
is recommended for all low voltage wiring, and multi-strand
16 AWG wire is recommended for 120 V (ac) wiring.
Power must not be applied to any of the wires during
the rough-in wiring stage.
Install the Source Sensor 085 and Storage Sensor 071
•
according to the instructions in the Data Brochures D 085
and D 070, and run the wiring back to the control.
Run wires from the 24 V (ac) power to the control. Use a
•
clean power source to ensure proper operation.
Step Four — Testing the Wiring
No wires should be connected to the control during testing.
The following tests are to be performed using standard
testing practices and procedures, and should only be
carried out by properly trained and experienced persons.
A good quality electrical test meter, capable of reading from
at least 0 - 300 V (ac) and at least 0 - 2,000,000 Ohms, is
essential to properly test the wiring and sensors.
Test the Sensors
In order to test the sensors, the actual temperature at
each sensor location must be measured. A good quality
digital thermometer with a surface temperature probe is
recommended for ease of use and accuracy. Where a
© 2010 D 157 - 06/10 8 of 16
digital thermometer is not available, a spare sensor can be
strapped alongside the one to be tested, and the readings
compared. Test the sensors according to the instructions
in the Data Brochures D 085 and D 070.
Page 9

Test the Power Supply
Make sure exposed wires and bare terminals are not in
contact with other wires or grounded surfaces. Turn on
the power and measure the voltage across the 24 V (ac)
power supply with an AC voltmeter. The reading should be
between 20 and 28 V (ac).
LN
Class 2
Transformer
RC
Step Five — Electrical Connections to the Control
Test the Outputs
Variable Speed and Second Pump
Connect the power supply L and N directly to each pump
and use the panel breaker switch to test for 100% output.
If the pump does not operate, check the wiring and refer
to any installation or troubleshooting information supplied
with the pump. If the pump operates properly, turn off the
power at the breaker and follow wiring instructions to provide
power through the control.
The installer should test to confirm that no voltage is present
at any of the wires.
Powered Input Connections
24 V (ac) Power
Connect the 24 V (ac) power supply to the Power C and
Power R terminals (6 and 7). This connection provides
power to the microprocessor and display of the control.
LN
567
Power
RC
Enable/Disable Demand
To generate a demand, terminal 5 must be connected to
terminal 7 (R) through a switching device.
24 V (ac)
Demand
Switch
Dem C R
567
Power
Dem C R
2.5A 250V (ac). Contact your tekmar sales representative
for details on the repair procedures if this circuit is blown.
Connect one of the wires from the variable speed pump
to the blue wire at the back of the control. Connect the
black wire from the back to the live (L) side of the 120 V
(ac) power source. The other wire on the variable speed
injection pump must be connected to the neutral (N) side
of the 120 V (ac) power supply. Connect the green wire on
the back of the control to ground.
Second Pump
Connect one of the wires from the Second pump to the
red wire at the back of the control. Connect the black
wire from the back of the control to the live (L) side of the
120 V (ac) power source if not already connected. The
other wire on the Second pump must be connected to the
neutral (N) side of the 120 V (ac) power supply. Connect
the green wire on the back of the control to ground if not
already connected.
157 bottom view
Second
Black
Red
Blue
Green
Pump
(Connect
Pump
to Red
on 157)
Output Connections
Variable Speed Pump
The 157 can vary the speed of a permanent capacitor,
impedance protected, or equivalent pump motor that has a
locked rotor current of less than 2.4A. Most small wet rotor
circulators are suitable as described in table 1. The 157
has an internal overload protection circuit which is rated at
9 of 16 © 2010 D 157 - 06/10
Variable
Speed
Pump
(Connect
to Blue
on 157)
Pump
LN
G
120 V (ac)
Page 10

Sensor and Un-powered Input Connections
Do not apply power to these terminals as this will damage
the control.
Source Sensor
Connect the two wires from the Source Sensor 085 to the
Com and Src terminals (1 and 2). The Source Sensor is
used by the 157 to measure the solar collector temperature.
Insert the Solar Sensor 085 into a temperature well, or
alternatively strap the Solar Sensor 085 on the outlet pipe
close to the heat source with a stainless steel clamp.
Storage Sensor
Connect the two wires from the Storage Sensor 071
to the Com and Stor terminals (1 and 3). The Storage
Sensor is used by the 157 to measure the Storage tank
temperature.
Auxiliary Sensor
The auxiliary sensor can only be used when the control is
in either mode 3, heat supplement, or mode 4, heat dump.
The 157 will auto detect when an auxiliary sensor is wired
to terminals 1 and 4.
Connect two wires from the Auxiliary Sensor 071 to the Com
and Aux terminals (1 and 4). The Auxiliary Sensor is used
by the 157 to measure either the heat dump temperature
or the upper storage tank temperature.
Do not apply power
1234
Com
Src Stor Aux
Do not apply power
1234
Com
Src Stor Aux
Do not apply power
1234
Com
Src Stor Aux
Solar Collector
Mode 3
Auxiliary
Heat
From
Collector
Mode 4
From
Collector
Control Settings
DIP Switch Settings
Demand: Enable / Disable
The Enable / Disable DIP switch is used to select whether
the demand will enable or disable the control. If a demand is
present, a pointer will be displayed at the bottom right hand
corner of the LCD pointing to the word Demand. Applying
a demand resets any minimum on/off times.
If Enable is selected, the outputs will remain off until the
demand is powered and the control is enabled, allowing
the outputs to operate normally.
If Disable is selected, the outputs will operate normally
until the demand is powered and the control is disabled,
turning off all outputs.
Item
Heat
Dump
1
%
2
© 2010 D 157 - 06/10 10 of 16
Page 11

Display Menus
View Menu (1 of 2)
View Next Item
Item
Item Field Range Description
-99 to 300°F
(-73 to 149°C)
2 to 90°F
(1 to 50°C)
-30 to 300°F
(-34 to 149°C)
-30 to 300°F
(-34 to 149°C)
The View menu items display current operating
temperatures and system status information.
Item button to view items in this menu.
DELTA T
Current temperature difference between the source and storage
sensors.
DELTA T TARGET
The target temperature difference between the source and
storage sensors as programmed in the adjust menu.
SOURCE TEMPERATURE
Current source temperature as measured by the source
sensor.
STORAGE TEMPERATURE
Current storage temperature as measured by the storage
sensor.
Use the
VIEW MENU
-30 to 300°F
(-34 to 149°C)
-30 to 300°F
(-34 to 149°C)
-30 to 300°F
(-34 to 149°C)
-30 to 300°F
(-34 to 149°C)
-30 to 300°F
(-34 to 149°C)
-30 to 300°F
(-34 to 149°C)
AUXILIARY TEMPERATURE
Current auxiliary temperature as measured by the auxiliary
sensor. Note: this item is only available if the auxiliary sensor is
connected to the control.
SOURCE MAXIMUM
Maximum source temperature since this item was last cleared. To
clear, press and hold the up and down buttons for 1 second.
SOURCE MINIMUM
Minimum source temperature since this item was last cleared. To
clear, press and hold the up and down buttons for 1 second.
STORAGE MAXIMUM
Maximum storage temperature since this item was last cleared. To
clear, press and hold the up and down buttons for 1 second.
STORAGE MINIMUM
Minimum storage temperature since this item was last cleared. To
clear, press and hold the up and down buttons for 1 second.
AUXILIARY MAXIMUM
Maximum auxiliary temperature since this item was last cleared.
To clear, press and hold the up and down buttons for 1 second.
Note: this item is only available if the auxiliary sensor is connected
to the control.
Continued on next page.
11 of 16 © 2010 D 157 - 06/10
Page 12

View Menu (2 of 2)
Item Field Range Description
-30 to 300°F
(-34 to 149°C)
AUXILIARY MINIMUM
Minimum auxiliary temperature since this item was last cleared.
To clear, press and hold the up and down buttons for 1 second.
Note: this item is only available if the auxiliary sensor is connected
to the control.
0 to 100%
0 to 1,999,999
BTU or kWh
VIEW MENU
0 to 1,999,999 hours
After the last item, the control returns to the first item in the menu.
PUMP SPEED
Current % output of the variable speed pump.
ENERGY TRANSFER
Total amount of BTU’s or kWh’s transferred from the source to
the storage since this item was last cleared. To clear, press and
hold the up and down buttons for 1 second.
1 count = 1000 BTU.
PUMP 2 RUNNING HOURS
The total running time of pump 2 since this item was last cleared.
To clear this item, press and hold the up and down buttons for
one second. 1 count = 1 hour.
Adjust Menu (1 of 3)
Next ItemEnter Adjust Menu
ItemItem
Change Value
The Program menu items are the programmable settings
used to operate the system. Press and hold all three
buttons simultaneously to enter the Program menu.
Item Field Range Description Actual Setting
MODE
OFF, 1, 2, 3, 4
Default = OFF
2 to 90°F
(1 to 50°C)
Default = 15°F
(8°C)
2 to 45°F
(1 to 25°C)
Default = 10°F
ADJUST MENU
Continued on next page.
© 2010 D 157 - 06/10 12 of 16
(5.5°C)
50 to 200°F
(10 to 93°C)
Default = 180°F
(82°C)
Mode of operation for Second pump, P2.
Mode 1 = Heat Exchanger, Mode 2 = Heat
Supplement, Mode 3 = Heat Dump, Mode 4 =
Booster Pump, Mode = Off (no P2 operation)
DELTA T TARGET
The variable speed pump, P1, will try to maintain
the temperature difference between the source and
storage at this target.
DELTA T DIFFERENTIAL
When the delta T drops this differential below the
delta T target the variable speed pump, P1, will
run at the minimum % output for 2 minutes then
turn off.
MAXIMUM STORAGE TARGET
If the storage temperature rises above this maximum
target, the variable speed pump is turned off.
Page 13

Adjust Menu (2 of 3)
Item Field Range Description Actual Setting
ADJUST MENU
2 to 45°F
(1 to 25°C)
Default = 10°F
(5.5°C)
70 to 190°F
(21 to 88°C)
Default = 140°F
(60°C)
2 to 45°F
(1 to 25°C)
Default = 10°F
(5.5°C)
190 to 260°F,
OFF
(88 to 127°C,
OFF
Default = OFF
2 to 45°F
(1 to 25°C)
Default = 10°F
(5.5°C)
OFF, 50 to
185°F
(OFF, 10 to
85°C)
Default = OFF
2 to 45°F
(1 to 25°C)
Default = 10°F
(5.5°C)
MAXIMUM STORAGE DIFFERENTIAL
The variable speed pump will turn back on when
the storage temperature falls this differential below
the Max Storage Target.
MINIMUM STORAGE TARGET
(Mode 2)
The supplemental heat pump, P2, will turn on when
the storage temperature falls below this target.
Optional Auxiliary Sensor.
MINIMUM STORAGE DIFFERENTIAL
(Mode 2)
The supplemental heat pump will turn off when the
storage temperature rises this differential above the
Min Storage Target. Optional Auxiliary Sensor.
MAXIMUM SOURCE TARGET
The variable speed pump will turn off if the source
temperature rises above the Maximum Source
Target. See Table 3 for Mode 3 operation.
MAXIMUM SOURCE DIFFERENTIAL
(Maximum Source Target
The heat dump pump will turn off when the
storage temperature falls this differential below
the Maximum Source Target.
MINIMUM SOURCE TARGET
If the source temperature drops below this setpoint
the injection pump is turned off
MINIMUM SOURCE DIFFERENTIAL
(Min Source Target ≠ Off)
The variable speed pump will turn back on when
the source temperature rises this differential above
the Minimum Source Target.
≠
Off)
50 to 220°F
(10 to 104°C)
Default = 100°F
(38°C)
2 to 45°F
1 to 25°C
Default = 10°F
(5.5°C)
ON, OFF
Default = OFF
Continued on next page.
13 of 16 © 2010 D 157 - 06/10
MAXIMUM AUXILIARY TARGET
(Mode 3)
The heat dump pump will turn off when the auxiliary
temperature rises above this target.
MAXIMUM AUXILIARY DIFFERENTIAL
(Mode 3)
The heat dump pump will turn on when the
auxiliary temperature falls this differential below
the Maximum Auxiliary Target.
FREEZE PROTECTION
(Mode ≠ 4)
If the source temperature falls below 35°F (2°C),
the variable speed pump will turn on at 100% output
until the source temperature rises to 40°F (4°C).
Page 14

Adjust Menu (3 of 3)
Item Field Range Description Actual Setting
0% to 100%
Default = 0%
OFF,
0:10 to 10:00
minutes
Default = 3:00
Min
MINIMUM OUTPUT, %
Minimum pump speed for the variable speed pump
to prevent unwanted drainback at low speeds. At
100% Output, the pump operates as an On/Off
pump.
MAXIMUM OUTPUT, MINUTES
Time the variable speed pump operates at 100%
output upon startup to fill a drainback system. If in
Mode 4, Booster Pump, this is also the time the
booster pump will run upon startup.
400 to 500
Default = 500
0 to 45 GPM
Default = 5.0
ADJUST MENU
°F, °C
Default = °F
After the last item, the control returns to the first item in the menu.
K
Fluid constant to be used to calculate total energy
transfer in BTU’s or kWh.
MAXIMUM FLOW
The actual flowrate of the variable speed pump, P1,
at 100% output. Used to calculate the total energy
transfer in BTU’s. (Depends on head, see pump
curve or measure independently).
UNITS
Pressing the up or down button on this item changes
the units of measure for the control between Celsius
and Fahrenheit.
ESCAPE
This item exits the ADJUST menu by pressing
either the up or down button.
Field Test
Press and hold the up button for 3 seconds to enter the test
routine. The number field will display tSt until the button is
released and then the test routine will begin.
Step 1: The variable speed pump ramps up to 100% over
10 seconds.
Step 2: The variable speed pump ramps down to 0% over
10 seconds.
Step 3: The second pump turns on for 10 seconds.
Once step 3 is completed the test routine is finished. The
control will then resume normal operation.
The test routine can be paused at any time by pressing the
up button during any of the 3 steps. This is important so that
the installer can fill the system or check to see where the
stall point is or check the operation of the second pump. If
the test is paused for 24 hours, the control will exit the test
routine and resume normal operation.
© 2010 D 157 - 06/10 14 of 16
The down button can be pressed during step 1 to toggle on
and off P2. The down button can be pressed during step 3
to turn off the second pump and exit the test routine. This
test sequence is only available in the View menu.
Item
Page 15

Error Messages
All errors are latching. If the error condition has been repaired, the control will continue to operate normally. The error
message can be manually cleared by pressing the item button.
EEPROM READ ERROR
The control was unable to read a piece of information from its EEPROM. This error can be
caused by a noisy power source. The control will load the factory defaults and stop operation
until all the settings are verified. To clear, view all items in the ADJUST menu.
STORAGE SENSOR ERROR
The control is no longer able to read the Storage Sensor due to an open or short circuit.
Locate and repair the problem as described in the Data Brochure D 070. The relays will
remain off until the error is cleared and the 5 minute minimum off time has elapsed.
SOURCE SENSOR ERROR
The control is no longer able to read the Source Sensor due to an open or short circuit.
Locate and repair the problem as described in the Data Brochure D 085. The relays will
remain off until the error is cleared and the 5 minute minimum off time has elapsed. If freeze
protection is enabled, the relays will remain on as a fail safe.
AUXILIARY SENSOR ERROR
The control is no longer able to read the Auxiliary Sensor due to an open or short circuit.
Locate and repair the problem as described in the Data Brochure D 070. The relays will
remain off until the error is cleared. If the sensor was connected then deliberately removed
after power up, power cycle the control to clear the error.
15 of 16 © 2010 D 157 - 06/10
Page 16

Technical Data
Difference Setpoint Control 157 Variable Speed
Literature — D 157, A 157, D 001, D 070, D 085
Control — Microprocessor control; This is not a safety (limit) control
Packaged weight — 1.5 lb. (670 g)
— Enclosure C, White PVC Plastic
Dimensions — 4-3/4” H x 2-7/8” W x 7/8” D (120 x 74 x 22 mm)
o
Approvals — CSA C US, CSA 22.2 N
ICES & FCC Part 15
Ambient conditions — Indoor use only, -20 to 120°F (-30 to 50°C),
< 90% RH non-condensing
Power supply — 24 V (ac) ±10%, 50/60 Hz, 3 VA
Var. Pump — 120 V (ac) 2.4 A 1/6 hp, fuse T2.5 A 250 V
Pump 2 — 120 V (ac) 5 A 1/6 hp
Demand — 24 V (ac) 2 VA
Sensors — NTC thermistor, 10 kΩ @ 77°F (25°C ±0.2°C) ß=3892
included: — 1 of Solar Sensor 085
— 1 of Universal Sensor 071
24 and UL 873, meets class B:
Limited Warranty and Product Return Procedure
Item
ΔT
F
1
%
2
Limited Warranty The liability of tekmar under this warranty is limited. The Purchaser, by taking receipt of any tekmar product (“Product”), acknowledges the terms of the Limited Warranty in effect at
the time of such Product sale and acknowledges that it has read
and understands same.
The tekmar Limited Warranty to the Purchaser on the Products sold
hereunder is a manufacturer’s pass-through warranty which the
Purchaser is authorized to pass through to its customers. Under
the Limited Warranty, each tekmar Product is warranted against
defects in workmanship and materials if the Product is installed and
used in compliance with tekmar’s instructions, ordinary wear and
tear excepted. The pass-through warranty period is for a period of
twenty-four (24) months from the production date if the Product is
not installed during that period, or twelve (12) months from the documented date of installation if installed within twenty-four (24) months
from the production date.
The liability of tekmar under the Limited Warranty shall be limited to, at
tekmar’s sole discretion: the cost of parts and labor provided by tekmar
to repair defects in materials and/or workmanship of the defective product; or to the exchange of the defective product for a warranty replacement product; or to the granting of credit limited to the original cost of the
defective product, and such repair, exchange or credit shall be the sole
remedy available from tekmar, and, without limiting the foregoing in any
way, tekmar is not responsible, in contract, tort or strict product liability, for any other losses, costs, expenses, inconveniences, or damages,
whether direct, indirect, special, secondary, incidental or consequential,
arising from ownership or use of the product, or from defects in workmanship or materials, including any liability for fundamental breach of
contract.
The pass-through Limited Warranty applies only to those defective Products returned to tekmar during the warranty period. This Limited Warranty does not cover the cost of the parts or labor to remove or transport
the defective Product, or to reinstall the repaired or replacement Product,
all such costs and expenses being subject to Purchaser’s agreement and
warranty with its customers.
Any representations or warranties about the Products made by Purchaser
to its customers which are different from or in excess of the tekmar Limited Warranty are the Purchaser’s sole responsibility and obligation. Purchaser shall indemnify and hold tekmar harmless from and against any
and all claims, liabilities and damages of any kind or nature which arise
out of or are related to any such representations or warranties by Purchaser to its customers.
The pass-through Limited Warranty does not apply if the returned Product has been damaged by negligence by persons other than tekmar,
accident, fire, Act of God, abuse or misuse; or has been damaged by
modifications, alterations or attachments made subsequent to purchase
which have not been authorized by tekmar; or if the Product was not
installed in compliance with tekmar’s instructions and/or the local codes
and ordinances; or if due to defective installation of the Product; or if the
Product was not used in compliance with tekmar’s instructions.
THIS WARRANTY IS IN LIEU OF ALL OTHER WARRANTIES, EXPRESS
OR IMPLIED, WHICH THE GOVERNING LAW ALLOWS PARTIES TO
CONTRACTUALLY EXCLUDE, INCLUDING, WITHOUT LIMITATION,
IMPLIED WARRANTIES OF MERCHANTABILITY AND FITNESS FOR
A PARTICULAR PURPOSE, DURABILITY OR DESCRIPTION OF THE
PRODUCT, ITS NON-INFRINGEMENT OF ANY RELEVANT PATENTS
OR TRADEMARKS, AND ITS COMPLIANCE WITH OR NON-VIOLATION OF ANY APPLICABLE ENVIRONMENTAL, HEALTH OR SAFETY
LEGISLATION; THE TERM OF ANY OTHER WARRANTY NOT HEREBY
CONTRACTUALLY EXCLUDED IS LIMITED SUCH THAT IT SHALL NOT
EX TEND BEYOND TWEN TY- FOU R (24) MON THS FRO M TH E PROD UCTION DATE, TO THE EXTENT THAT SUCH LIMITATION IS ALLOWED BY
THE GOVERNING LAW.
Product Warranty Return Procedure All Products that are believed to
have defects in workmanship or materials must be returned, together
with a written description of the defect, to the tekmar Representative
assigned to the territory in which such Product is located. If tekmar
receives an inquiry from someone other than a tekmar Representative,
including an inquiry from Purchaser (if not a tekmar Representative) or
Purchaser’s customers, regarding a potential warranty claim, tekmar’s
sole obligation shall be to provide the address and other contact information regarding the appropriate Representative.
tekmar Control Systems Ltd., Canada
tekmar Control Systems, Inc., U.S.A.
Head Office: 5100 Silver Star Road
Vernon, B.C. Canada V1B 3K4
(250) 545-7749 Fax. (250) 545-0650
Web Site: www.tekmarcontrols.com
Product design, software and literature are Copyright © 2010 by:
tekmar Control Systems Ltd. and tekmar Control Systems, Inc.
16 of 16
All specifications are subject to change without notice.
Printed in Canada. D 157 - 06/10.
 Loading...