


EN
DE
ES
PT
ActiFry Genius XL 2in1
www.tefal.com
7
8
9
10
11
12
14 
6
15 16
19 5 20
2
1
3
5
4
13
17
18
21

 22
22
7
23

1
1 |
2 |
3 |
2
|
1 |
|
4 |
5 |
6 |
7 |
2 |
1 |
|
|
|
|
|
8 |
9 |
10 |
11 |
12 |
13 |
14 |
15 |
7
16  17 5 18
|
|
7 |
19 |
20 |
21 |
22 |
23 |
24 |
25 |
26 |
27 |
7
28 |
29 |
30 |
31 |
32 |
33 |
34

Welcome to the world of ActiFry Genius XL 2in1!
Here’s how you can make your very own delicious meal.
It’s our patented technology which makes the chips crisp and fluffy. You choose the ingredients, the oil, spices, herbs and seasoning… ActiFry Genius XL 2in1 will take care of the rest.
Only 3 %* fat: 1 spoonful of oil is all you need!
One spoonful of oil of your choice is all you need to make 1.5 kg of real chips. The ActiFry Genius XL 2in1 spoon has a salt measure on the underside which helps you to reduce the amount of salt you use without compromising on taste.
* 1.5 kg of fresh potatoes, cut into chips with a cross section 13 mm x 13 mm, cooked until weight loss of -55% with 20 ml of oil.
So much more than just ordinary steak and chips!
With ActiFry Genius XL 2in1 you can cook a lot of different recipes. Put a bit of variety into your daily diet with some steak and chips, some tender stir-fry vegetables, delicious tasty meatballs, flavoursome prawns, fruits and more…
 : the ActiFry Genius XL 2in1
Also included is a book of recipes prepared by our top chef.
It’s full of original ideas on how to make delicious and nutritional main meals, along with side dishes to accompany them, as well as desserts you can create for the whole of the family.
6

So that you can get the best results from |
EN |
|
your cooking, |
offers you special |
|
advice on potatoes and oils.
The potato: for an enjoyable and balanced diet every day!
Potatoes are a great food for everybody at every age. They are an excellent source of energy and are rich in vitamins. Depending on the varieties, the climatic conditions and cultivation, the potato can vary greatly in terms of: shape, size, quality of taste. Each one has its own characteristics in respect of earliness, yield, size, colour, storage quality and directions for cooking. The cooking results may vary depending on the origin and seasonality.
What variety should be used for ActiFry Genius XL 2in1?
In general, we advise that you use potato varieties that are recommended for making chips such as Maris Piper and King Edward. For newly harvested potatoes which have a high moisture content, we advise that you cook your chips for an extra few minutes.
With ActiFry Genius XL 2in1 it’s also possible to cook frozen chips. Because they are already pre-cooked, there is no need to add any oil.
Where should you store potatoes?
The best places to store potatoes are in a dark cellar, or a cool cupboard (between 6 and 8°C), away from any light.
How should potatoes be prepared for ActiFry Genius XL 2in1?
For best results, you must make sure that the chips do not stick together. For this we recommend you wash the peeled potatoes thoroughly before cutting them and then once again when they have been cut up, until the water has turned clear.
This will allow you to remove the maximum amount of starch. Carefully dry the chips using a dry and highly absorbent clean tea towel. The chips must be perfectly dry before they are put in the ActiFry Genius XL 2in1.
How should the potatoes be cut?
The chip’s crispiness and fluffiness depends on its size. The more thinly cut your chips are, the crispier they will be and vice-versa, the thicker they are the fluffier they will be on the inside. Depending on your preference, you can vary the size of your chips and change the cooking time accordingly:
Thickness: Thin American style: 8 x 8 mm / Standard: 10 x 10 mm / Thick: 13 x 13 mm Length up to 9 cm.
The maximum recommended chip thickness is 13 x 13 mm and a length of up to 9 cm.
Try using different oils which are good for you
If you fancy treating yourself to a different taste, then choosing one spoonful of a different oil is all you need. All the fatty acids which are essential for life can be found in vegetable oils. They all contain in different proportions, the nutrients which are essential for a balanced diet. It’s important to vary the oils you use in order to provide your body with everything it needs! With ActiFry Genius XL 2in1, you can use a very large variety of oils:
7

•Standard oils: sunflower, olive, corn, rapeseed, grapeseed, groundnut (peanut), soya.
•Flavoured oils: oils infused with herbs, garlic, peppers, lemon…
•Speciality oils: hazelnut*, sesame*, safflower*, almond*, avocado*, argan* (cooking time
varies according to the manufacturer).
*Note: Some of these oils are not available in the UK.
The ActiFry Genius XL 2in1 technology with its low quantity of fats, allows you to retain the good fatty acids which are essential for providing you with the energy you need.
With ActiFry Genius XL 2in1, you can treat yourself and your friends too! To find out more or if you’ve any questions, please visit www.actifry.co.uk
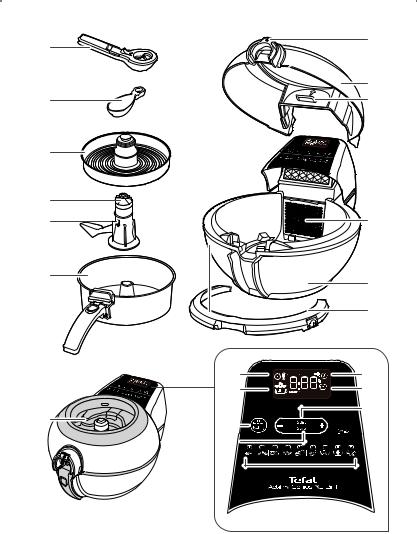
DESCRIPTION
1 |
Lid |
13 |
Removable turn-over ring |
2 |
Lid opening button |
14 |
Cooking pan handle |
3 |
Lid latch |
15 |
Cooking time |
4 |
Base |
16 |
Cooking pan or tray in use indicator |
5 |
Removable filter |
17 |
Delayed start display |
6 |
Viewing window |
18 |
Keep warm display |
7 |
Cooking tray handle (removable) |
19 |
Button for activating the 2in1 function |
8 |
Measuring spoon (20 ml) |
20 |
+ and – button for adjusting cooking |
9 |
2in1 cooking tray with “MAX level” |
|
time |
10 |
Removable mixing paddle |
21 |
Start/Stop cooking |
11 |
Paddle release button |
22 |
Manual mode |
12 |
Removable cooking pan |
23 |
Cooking modes |
INSTRUCTIONS FOR USE
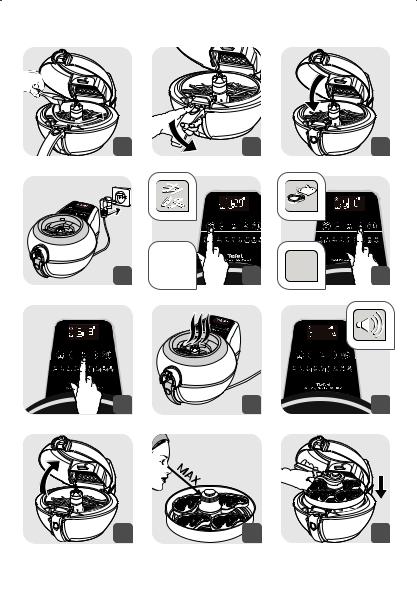
Before using for the first time
•Remove all the stickers and any packaging.
•Open the lid by pressing on the lid opening button - fig.1.
•Remove the measuring spoon.
•Remove all polystyrene packing which you can then throw away - fig. 2.
•To remove the turn-over ring, pull the clips outwards, then lift it off - fig 3.
•Remove the tray using the cooking tray handle - fig. 4.
•Lift the pan handle to a horizontal position until you hear a “CLICK” as it locks - fig.5.
•Remove the paddle by pushing the release button - fig.6.
•Take out the cooking pan - fig.7.
•Push up the latch to remove the lid - fig. 8
•Remove the detachable filter - fig.9.
•All the removable parts are dishwasher safe, except the tray handle (7) - fig.10 or can be cleaned using a non abrasive sponge and some washing up liquid.
•Clean the body of the appliance and the handle with a damp sponge and washing up liquid - fig.11.
8

• Dry carefully before putting everything back in place. |
EN |
• Reposition the paddle until you hear the «CLICK» - fig.12. |
|
• To replace the turn-over ring, place it at the edge of the pan, centre it on the pan and press |
|
down until you hear a “CLICK”. |
|
NOTE: |
|
•Never immerse the base unit in water or any other liquid.
•On first use, to obtain the best results from your new product, we advise you to prepare a recipe that cooks for 30 minutes or more.
COOKING
When you are not using it, the appliance will automatically switch itself off after 10 minutes.
Some helpful advice
•When using the appliance for the first time you may notice a harmless smell. This smell, which will not affect the appliance in any way, will quickly disappear.
•So as not to damage your appliance make sure you stick to the quantities of ingredients and liquid given in the instruction booklet and recipe book.
•Never overload the cooking pan or the tray and do not exceed the recommended quantities.
•Never exceed the height indicated by the maximum level marker on the tray.
•This appliance is not suitable for recipes with a high-liquid content (eg. soups, cook-in sauces...).
•Never leave your ActiFry spoon or the tray handle in the appliance whilst it is on.
•Never place the tray in the appliance without the pan.
•Never put the paddle in without the pan.
•Place the tray in the appliance when the reminder beep sounds and not at the the beginning of cooking (except if the cooking time in the pan and the tray are the same).
•Never leave the appliance unattended whilst in operation.
•Never operate your appliance when empty.
•When using the cooking pan on its own, never place the tray in the appliance.
•Never use the removable turn-over ring on the tray, either when using it alone or in 2in1 mode. Only use the removable turn-over ring on the cooking pan - fig. 33-35.
•Place the removable turn-over ring on the cooking pan to cook large quantities.
USING THE PAN ON ITS OWN
Preparing the food
Do not leave the measuring spoon inside the pan while cooking food.
•Open the lid - fig.1.
•Remove the spoon inside the pan.
•Prepare your ingredients as indicated in the recipe book or these instructions.
•Place the food in the cooking pan, distributing it evenly, making sure that you respect the maximum quantity (see cooking tables p. 12 to p. 14)
•Add the oil to the food with the spoon (1 Actifry Genius spoonful = 14 ml) - fig.13 distributing it evenly.
•Unlock the handle and push it right back into its housing - fig.14.
• Close the lid - fig.15. |
9 |
|

Start cooking
•Plug the appliance into an electrical socket outlet - fig. 16. The appliance will emit 2 beeps and the screen will flashing.
2 ways of setting the cooking time:
Automatic cooking mode:
The 9 cooking modes automatically adjust the cooking temperature and whether the paddle rotates according to the type of food selected.
•Once you have closed the lid and plugged in the appliance the icon  flashes on the screen.
•To select the cooking mode press the + button until the required mode 1 to 9 is displayed - fig.18.
•Press start key - fig.19.
•Adjust cooking time by pressing +/- button.
Note: Adjust the cooking time after starting the appliance.
•When using the automatic cooking mode follow the instructions in the recipe book on where to position food in the pan.
Note: The paddle does not turn at the beginning of cooking for programs 2, 3, 4, 5, 7, 8 and 9.
•To stop the cooking mode, press the START/STOP key.
•To cancel the cooking mode, continually hold down the START/STOP key for 2 seconds and the screen will display the icon  , ‘1’ for mode and 29 min.
1.Chips and fries e.g potato chips, vegetable chips, potato wedges, ...
2.Breaded recipes e.g chicken nuggets, breaded king prawns,
...
3.Battered recipes e.g. battered onion rings, battered calamari rings, ...
4.Spring rolls, samosas and filo pastry snacks
6 Chicken e.g drumsticks and
wings, ...
7.Wok* e.g. fried rice with prawns, sautéed beef, stir fry vegetables, ...
8.World food* e.g lamb tajine, fried noodles with vegetables, ...
9.Desserts e.g apples and pear compote, coconut clusters, ...
5. Meat and Fish
* ‘1 meal in 1 go’ programs
10
Manual mode: |
EN |
• Set to manual mode by pressing the +/- button until ‘M’ is displayed. |
•Set the cooking time by press the temperature/timer button  and set the cooking time in minutes by using the +/- button (see cooking table p. 12 to p. 14)
•Set the cooking in minutes by using the +/- button (see cooking table p. 12 to p. 14).
•Then set the cooking temperature by pressing the temperature/timer button  , and set
the temperature required using the +/- button (see cooking table p. 12 to p. 14).
•Press start.
NOTE:
•The selected time will be displayed and a minute by minute countdown will begin. Time is selected and displayed in minutes. Only time remaining under 1 minute will be displayed in seconds.
•The appliance can be paused. Simply press START/STOP key. Pressing the START/STOP key will restart cooking.
•The time can be changed at any time during cooking by using the +/- buttons - fig.18.
•In the event of an error or to delete the selected time, hold down the START/STOP key for 2 seconds and re-select the time.
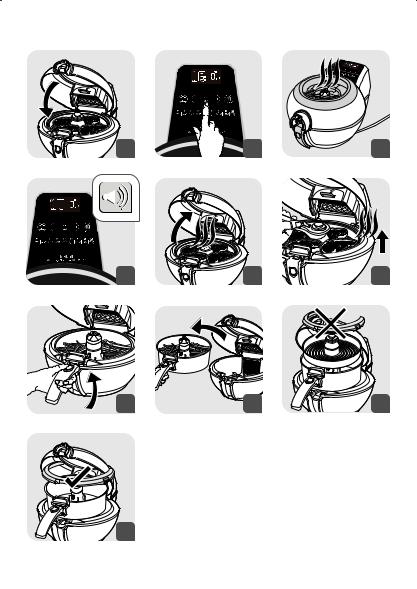
Remove the food
When you open the lid, the appliance stops working. To restart cooking, close the lid and press the START button.
When the lid is left open for over 2 minutes, the appliance will reset.
•Once cooking is completed, the timer beeps.
•Open the lid - fig.22.
•Lift the handle until you hear a “click” that it locks and take out the cooking pan - fig.31&32.
•Serve at once.
•To avoid any risk of burns, do not touch the lid or any part other than the cool touch areas: pan handle and lid opening button.
Cooking times FOR PAN ONLY
The cooking times are given as an approximate guide and may vary depending on the seasonality of the food, its size, the quantities used and individual tastes, as well as the voltage. The amount of oil indicated may be increased depending on your taste and needs. If you want crisper chips, you can add a few extra minutes to the cooking time.
11

Potatoes
|
Type |
Quantity |
|
Actifry spoons |
|
Cooking |
|
Cooking time for |
|
|
|
of oil |
|
mode |
|
the pan (mins) |
|||
|
|
|
|
|
|
||||
|
|
750 g |
|
1/2 |
|
1 |
|
25-27 |
|
|
|
|
|
|
|
||||
Fresh chips |
|
|
|
|
|
|
|
|
|
|
1000 g |
|
3/4 |
|
1 |
|
28-30 |
|
|
10 mm x |
Fresh (chips)* |
|
|
|
|
||||
|
|
|
|
|
|
|
|
||
1500 g |
|
1 |
|
1 |
|
36-38 |
|
||
10 mm |
|
|
|
|
|
||||
|
|
1700 g |
|
1 |
|
1 |
|
42-44 |
|
|
|
|
|
|
|
|
|
|
|
Frozen chips |
Frozen |
750 g |
|
None |
|
1 |
|
23-25 |
|
13 mm x 13 |
|
|
|
|
|
|
|
|
|
|
|
|
|
|
|
|
|
||
(chips)** |
1200 g |
|
None |
|
1 |
|
36-38 |
|
|
mm |
|
|
|
|
|||||
|
|
|
|
|
|
|
|
|
|
|
|
|
|
|
|
|
|
|
|
*Freshly harvested potatoes may require a longer cooking time to obtain a crisper more golden brown result.
**For best results we recommend using frozen chips without any wheat flour batter coating as they tend to give less crisp results and the batter may fall off during cooking (check the ingredient list on the packet for details).
Meatpoultry
To add a little flavour to your meat, don’t hesitate to mix spices in with the oil (paprika, curry, mixed herbs, thyme, bay leaf, etc).
|
|
|
|
|
Actifry |
|
Cooking |
|
Cooking time |
|
|
Type |
|
Quantity |
|
|
|
for the pan |
|||
|
|
|
spoons of oil |
|
mode |
|
||||
|
|
|
|
|
|
|
(mins) |
|||
|
|
|
|
|
|
|
|
|
||
|
Fresh or Frozen |
|
750 g |
|
None |
|
2 |
|
10 - 12 |
|
|
|
|
|
|
|
|||||
|
|
|
|
|
|
|
|
|
|
|
Chicken nuggets |
Fresh |
|
1200 g |
|
None |
|
2 |
|
13 - 15 |
|
|
|
|
|
|
|
|
|
|
|
|
|
Frozen |
|
1200 g |
|
None |
|
2 |
|
15 - 17 |
|
Chicken |
Fresh |
|
4 to 6 |
|
None |
|
6 |
|
2022 |
|
drumsticks |
|
|
|
|
|
|||||
|
|
|
|
|
|
|
|
|
|
|
Chicken breast |
Fresh |
|
6 |
|
None |
|
6 |
|
18 - 20 |
|
(boneless) |
Fresh |
|
9 |
|
None |
|
6 |
|
22 - 24 |
|
|
|
|
|
|
|
|
|
|
|
|
Meatballs |
Frozen |
|
750 g |
|
1 |
|
5 |
|
14 - 15 |
|
|
|
|
|
|
|
|
|
|
|
|
Frozen |
|
1200 g |
|
1 1/2 |
|
5 |
|
18 - 20 |
|
|
|
|
|
|
|
|
|||||
12

Rice and Vegetable Dishes |
|
|
EN |
|||
|
|
|
|
|
|
|
|
Type |
Quantity |
Actifry |
Cooking |
Cooking time for the |
|
|
spoons of oil |
mode |
pan (mins) |
|||
|
|
|
||||
|
|
|
|
|
|
|
Ratatouille* |
Frozen |
750 g |
None |
7 |
14 - 16 |
|
|
|
|
|
|
|
|
Frozen |
1000 g |
None |
7 |
23-25 |
|
|
|
|
|||||
Farmer’s stir fry* |
Frozen |
1000 g |
None |
6 |
22-24 |
|
|
|
|
|
|
|
|
Paëlla* |
Frozen |
650 g |
None |
Manual: 220°C |
12 - 14 |
|
Frozen |
1000 g |
None |
Manual: 220°C |
15-17 |
|
|
|
|
|||||
|
|
|
|
|
|
|
* Frozen preparations not available in all countries.
Fish – shellfish
|
Type |
Quantity |
Actifry |
Cooking |
Cooking time for the |
|
|
spoons of oil |
mode |
pan (mins) |
|||
|
|
|
||||
|
|
|
|
|
|
|
Battered |
Frozen |
300 g |
None |
3 |
10-12 |
|
|
|
|
||||
calamari |
500 g |
3 |
11-13 |
|||
|
|
|||||
|
|
|
||||
|
|
|
|
|
|
|
King prawns |
|
300 g |
|
3 |
8-10 |
|
Fresh |
|
None |
|
|
||
(raw) |
450 g |
3 |
8-10 |
|||
|
|
|||||
|
|
|
||||
|
|
|
|
|
|
Vegetables
|
Type |
Quantity |
Actifry spoons of oil |
Cooking mode |
Cooking time for the |
|
|
pan (mins) |
|||||
|
|
|
|
|
||
|
|
|
|
|
|
|
Courgettes |
Strips |
750 g |
1 + 150 ml. water |
7 |
20 - 25 |
|
|
|
|
|
|||
1200 g |
1 + 150 ml. water |
7 |
25-30 |
|||
|
|
|||||
|
|
|
|
|
|
|
Peppers |
Strips |
650 g |
1 + 150 ml. water |
7 |
15 - 18 |
|
|
|
|
|
|||
1200 g |
1 + 150 ml. water |
7 |
20-25 |
|||
|
|
|||||
|
|
|
|
|
|
|
Mushrooms |
Quarters |
650 g |
1 |
7 |
10 - 15 |
|
|
|
|
|
|||
1000 g |
1 |
7 |
16-18 |
|||
|
|
|||||
|
|
|
|
|
|
|
Tomatoes |
Quarters |
650 g |
1 + 150 ml. water |
7 |
12 - 14 |
|
|
|
|
|
|||
1000 g |
1 + 150 ml. water |
7 |
15-17 |
|||
|
|
|||||
|
|
|
|
|
|
|
Onions |
Slices |
500 g |
1 |
Manual: 220°C |
12 - 14 |
|
|
|
|
|
|||
750 g |
1 |
Manual: 220°C |
18-20 |
|||
|
|
|||||
|
|
|
|
|
|
13

Fruit
|
Type |
Quantity |
Actifry spoons of |
Cooking |
Cooking time for the |
|
|
oil and sugar |
mode |
pan (mins) |
|||
|
|
|
||||
|
|
|
|
|
|
|
|
|
5 |
1 + 1 of sugar |
9 |
5-6 |
|
Bananas |
Slices |
|
|
|
|
|
7 |
1 + 1 of sugar |
9 |
5-6 |
|||
|
|
|||||
|
|
|
|
|
|
|
|
|
1000 g |
2 of sugar |
9 |
8-10 |
|
Strawberries |
Quarters |
|
|
|
|
|
1500 g |
2 of sugar |
9 |
10-12 |
|||
|
|
|||||
|
|
|
|
|
|
|
|
|
3 |
1 + 1 of sugar |
9 |
8-10 |
|
Apples |
Halves |
|
|
|
|
|
5 |
1 + 2 of sugar |
9 |
10-12 |
|||
|
|
|||||
|
|
|
|
|
|
|
|
Fresh |
1 |
2 of sugar |
9 |
10-12 |
|
Pineapples |
(peeled & |
|
|
|
|
|
|
|
|
|
|||
cut into |
|
|
|
|
||
|
2 |
2 of sugar |
9 |
15-17 |
||
|
pieces) |
|||||
|
|
|
|
|
||
|
|
|
|
|
|
USING THE TRAY ON ITS OWN
Get your food ready
•Open the lid – fig.1.
•Remove the measuring spoon and removable turn-over ring from the cooking pan.
•Remove the tray – fig.4.
•Place your food on the tray making sure you always keep to the quantities recommended in the cooking tables and/or the recipe book (please see “Cooking table for tray quantities page 17). Never exceed the “MAX” level marker shown on the centre of the tray – fig.23.
•Put the tray back in the appliance using the tray handle - fig. 24.
•Close the lid - fig. 25.
When using the tray on its own, do not put food into the cooking pan.
Start the cooking
•Plug the appliance into an electrical socket outlet.
•The appliance will make a beep sound.
•Press the - button and the  flashes and the mode flashes ‘-’. Press the
  key and the icon


 appears on the screen.
•To select the cooking mode, press the + button until the required mode 2, 3, 4, 5, 6, 9, or M for manual mode is displayed.
•Press Start/Stop key.
•You can adjust the cooking time at any time by pressing +/- button
•The minute countdown starts. The countdown will only be displayed in seconds where there is less than a minute left.
Opening the lid stops the cooking. You can resume cooking by closing the lid and pressing on the start button.
Once the lid has been open for 3 minutes the appliance will go into stand-by mode.
14

Remove your food |
EN |
• When the cooking is finished, the timer will sound and the screen will start flashing and |
displaying 0 min. The appliance automatically stops cooking your food.
• Open the lid - fig.29.
• Remove the tray using the tray handle and take your food out - fig 30. Be careful, the tray is very hot after cooking. Always use the tray handle supplied with your appliance to remove it.
• Serve your food.
Cooking table for the tray ONLY
|
|
|
Type |
|
Quantity for |
|
Actifry |
|
Cooking |
|
Cooking time for |
|
|
|
|
|
tray |
|
spoons of oil |
|
mode |
|
tray (mins) |
||
|
|
|
|
|
|
|
|
|||||
|
Chicken |
|
Fresh or Frozen |
|
500 g |
|
None |
|
2 |
|
13 - 15 |
|
|
|
|
|
|
|
|
||||||
|
nuggets |
|
|
|
|
|
|
|
|
|
|
|
|
Fresh or Frozen |
|
750 g |
|
None |
|
2 |
|
15 - 17 |
|
||
|
|
|
|
|
|
|
|
|||||
|
|
|
|
|
|
|
|
|
|
|
|
|
|
Chicken |
|
Fresh |
|
4 to 6 pieces |
|
None |
|
6 |
|
20 - 22 |
|
|
drumsticks |
|
|
|
|
|
|
|||||
|
|
|
|
|
|
|
|
|
|
|
|
|
|
|
|
|
|
|
|
|
|
|
|
|
|
|
Chicken Wings |
|
Frozen |
|
10 pieces |
|
None |
|
6 |
|
22 |
|
|
|
|
|
|
|
|
|
|
|
|
|
|
|
Chicken breast |
|
Fresh |
|
6 pieces |
|
None |
|
6 |
|
18 - 20 |
|
|
(boneless) |
|
Fresh |
|
9 pieces |
|
None |
|
6 |
|
22 - 24 |
|
|
|
|
|
|
|
|
|
|
|
|
|
|
|
Meatballs |
|
Frozen |
|
500 g |
|
1 |
|
5 |
|
12 - 15 |
|
|
|
|
|
|
|
|
|
|
|
|
|
|
|
Frozen |
|
750 g |
|
1 |
|
5 |
|
15 - 17 |
|
||
|
|
|
|
|
|
|
|
|||||
|
|
|
|
|
|
|
|
|
|
|
|
|
|
Steak |
|
Fresh |
|
4 pieces |
|
1* |
|
5 |
|
8** |
|
|
|
Frozen |
|
4 - 6 pieces |
|
1 1/2* |
|
5 |
|
8 - 10** |
|
|
|
|
|
|
|
|
|
|
|||||
|
|
|
|
|
|
|
|
|
|
|
|
|
*Brush steaks on both sides with oil.
**Cooking time for rare steak. Add additional cooking time for medium and well done steaks.
USING THE 2IN1 PAN + TRAY
Get your food ready
•Open the lid – fig.1.
•Remove the tray and the removable turn-over ring from the cooking pan – fig.4.
•Lift the handle up and remove the pan from the appliance.
•Place your food in the pan making sure you always keep to the quantities recommended in the cooking tables and/or the recipe book. Never exceed the MAX level indicated in the paddle.
•Depending on the food, add the recommended amount of oil in the ActiFry spoon and pour the contents evenly in to the pan – fig.13.
•Put the pan back in the appliance and close the lid - fig. 15.
15

Start the 2in1 cooking
•Plug the appliance, it will make a beep sound and the screen displays the flashing icons  and ‘1’ for mode, and 29 min.
•Choose the cooking program desired for the pan. To select the cooking mode, press the + button until the required mode 1 to 9 is displayed
•The icon  appears on the screen - fig.17.
•Press the key  to select the tray mode. The corresponding icon
  appears on the screen.
•Choose the cooking program desired for the tray using the + button until the required mode 2, 3, 4, 5, 6, or M for manual mode is displayed - fig.18.
•Press START/STOP key - fig.19.
•You can adjust the cooking time at any time by pressing +/- button.
•The cooking of the food in the pan starts.
•The minute by minute countdown starts
•While the food is cooking in the pan, get the food ready for cooking on the tray. Make sure you do not exceed the maximum level mark on the tray - fig.23.
•When the appliance beeps and stops automatically, open the lid and put the tray in - fig.22 & 24.
•Close the lid again - fig.25 and press the START button - fig.26.
•The minute countdown resumes. The countdown will only be displayed in seconds where there is less than a minute left.
•Adjust the cooking time at any time by pressing +/- buttons.
•There is a pre-set time for each cooking mode which you can adjust.
– Adjust the cooking time in minutes using the + and - keys.
– Adjust the cooking temperature by pressing the key |
and the + and - buttons to set the |
temperature desired. |
|
Remove your food
•When the cooking is finished, the timer will sound and the screen will start flashing and displaying ‘0’ min: the appliance automatically stops cooking your food.
•Open the lid - fig.29.
•Remove the tray with the tray handle and take your food out - fig.30. Be careful, the tray is very hot after cooking. Always use the tray handle supplied with your appliance to remove it.
•Lift up the pan handle until you hear the “CLICK” - fig. 31.
•Remove the pan and take your food out - fig. 32.
Cooking table for 2in1
The cooking times given are a guide only, they may vary depending on the size of the food items and on how well done you like your food cooked. At the end of the 2in1 cooking time, if you like your chips or potatoes even more crispy cook them for an few extra minutes after you’ve removed the tray.
16

|
Food in pan |
|
Quantity in |
|
Mode |
|
Time for Pan |
Food in tray |
Tray |
|
Mode |
|
Tray |
EN |
|
|
pan |
|
|
quantity |
|
|
time |
||||||
|
|
|
|
|
|
|
|
|
|
|
||||
|
Fresh potato |
|
1500 g |
|
1 |
|
35 min |
|
4 |
|
5 |
|
8 min** |
|
|
|
|
|
|
|
|
|
|||||||
|
|
1200 g |
|
1 |
|
32 min |
|
4 |
|
5 |
|
7 min** |
|
|
|
chips* |
|
|
|
Steaks |
|
|
|
||||||
|
10 mm x |
|
750 g |
|
1 |
|
27 min |
3 |
|
5 |
|
6 min** |
|
|
|
|
|
|
|
|
|
|
|||||||
|
10mm |
|
|
|
|
|
|
|
|
|
|
|
|
|
|
250 g |
|
1 |
|
15 min |
|
1 |
|
5 |
|
5 min** |
|
||
|
|
|
|
|
|
|
|
|
||||||
|
|
|
|
|
|
|
|
|
|
|
|
|
|
|
|
|
|
1200 g |
|
1 |
|
32 min |
|
8 |
|
6 |
|
15 min |
|
|
Fresh* or |
|
1000 g |
|
1 |
|
30 min |
Chicken |
4 |
|
6 |
|
15 min |
|
|
frozen chips |
|
750 g |
|
1 |
|
27 min |
drumsticks |
3 |
|
6 |
|
15 min |
|
|
|
|
|
|
|
|
|
|
|
|
|
|
|
|
|
|
|
250 g |
|
1 |
|
20 min |
|
1 |
|
6 |
|
10 min |
|
|
|
|
|
|
|
|
|
|
|
|
|
|
|
|
|
Fresh* or |
|
|
|
|
|
|
Home-made |
|
|
|
|
|
|
|
|
1200 g |
|
1 |
|
29 min |
chicken |
14 |
|
2 |
|
8 min |
|
|
|
frozen chips |
|
|
|
|
|
|
|||||||
|
|
|
|
|
|
|
nuggets |
|
|
|
|
|
|
|
|
|
|
|
|
|
|
|
|
|
|
|
|
|
|
|
|
|
|
|
|
|
|
|
|
|
|
|
|
|
|
Fresh* or |
|
1200 g |
|
1 |
|
32 min |
Chicken |
10 |
|
6 |
|
22 min |
|
|
frozen chips |
|
|
|
wings |
|
|
|
||||||
|
|
|
|
|
|
|
|
|
|
|
|
|
||
|
|
|
1200 g |
|
7 |
|
25 min |
|
4 |
|
5 |
|
10 min |
|
|
|
|
|
|
|
|
|
|
|
|
|
|
|
|
|
Courgettes, in |
|
750 g |
|
7 |
|
20 min |
Salmon |
3 |
|
5 |
|
10 min |
|
|
slices |
|
500 g |
|
7 |
|
15 min |
fillet |
2 |
|
5 |
|
8 min |
|
|
|
|
|
|
|
|
|
|
|
|
|
|
|
|
|
|
|
250 g |
|
7 |
|
12 min |
|
1 |
|
5 |
|
7 min |
|
|
Figs cut in |
|
|
|
|
|
|
Filo |
|
|
|
|
|
|
|
|
10 |
|
9 |
|
15 min |
chocolate |
4 |
|
9 |
|
4 min |
|
|
|
pieces |
|
|
|
|
|
|
|||||||
|
|
|
|
|
|
|
parcels |
|
|
|
|
|
|
|
|
|
|
|
|
|
|
|
|
|
|
|
|
|
|
|
|
|
|
|
|
|
|
|
|
|
|
|
|
|
*For fresh chips add oil. For 1200 g add 1 ActiFry spoon, 1000 g add 3/4 spoon, 750 g add 1/2 spoon and 250 g add 1/4 spoon.
**Cooking time for rare steak. Add additional cooking time for medium and well done steaks.
DELAYED START
Delayed start can be set for pan on its own, tray on its own or 2in1 program with one of the 9 automatic cooking modes or manual mode.
–Plug in the appliance.
–First set the cooking mode and cooking time required.
–Then press the Temperature/Timer key  for 3 seconds. The pictogram
  with appear, and the timer will flash ‘0’ min.
–Set the delayed start time using the +/- buttons (Intervals: 10 minutes) (up to a maximum of 9 hours).
–Press START, and the delayed start timer will begin to count down. Cooking will begins once the delayed start timer reaches 0:00.
17

KEEP WARM FUNCTION
•When cooking is finished, if no action is done after 3 minutes, the  keep warm mode automatically starts (except for mode 1 – Chips).
•After 30 minutes keeping warm, the appliance stops.
•To desactivate « Keep warm » function, press simultaneously + and – buttons for a long time (3 seconds).
•To re-activate « Keep warm » function, press simultaneously + and – buttons for a long time (3 seconds).
ACTIFRY GENIUS COOKING TIPS
•Do not add salt to chips while the chips are in the cooking pan. Only add salt once the chips are removed from the cooking pan.
•When adding dried herbs and spices to ActiFry, mix them with some oil or liquid. If you try sprinkling them directly into the pan they will just get blown around by the hot air system.
•Strong coloured spices may slightly stain the paddle and parts of the appliance. This is normal.
•Prepare all food in evenly sized pieces to ensure that they all cook at the same time.
•Prepare vegetables, especially root vegetables, in small pieces or cut to stir fry size to ensure they cook through.
•If using onions in ActiFry recipes they are best thinly sliced rather than chopped as they cook better. Separate the onion rings before adding them to the cooking pan and give them a
quick stir so that they are evenly distributed. For the automatic cooking mode only:
•For selected cooking modes, ingredients should be placed in the cooking pan as stated in the ActiFry Genius recipe book. This ensures the right level of cooking for each ingredient. Those which require a longer cooking time are put in the top half of the pan. Those requiring a shorter cooking time are put next to the handle.
EASY TO CLEAN
Cleaning the appliance
Never immerse the appliance in water or any other liquid. Do not use any corrosive or abrasive cleaning products. The removable filter must be cleaned regularly. To ensure your removable cooking pan and tray last longer, never use any metal ustensils.
We do not recommend the use of any detergent other than washing up liquid to clean any part of the appliance.
•Leave the appliance to cool completely before cleaning.
•Open the lid by pressing the button - fig.1 and push up the latch to remove the lid - fig.8.
•Remove the tray.
•Lift the pan handle until you hear a «CLICK».
•Remove the paddle by pushing the release button - fig.6.
•Take out the cooking pan - fig.7.
•Remove the detachable filter - fig.9.
•To remove the turn-over ring, pull the clips outwards, then lift it off.
18

• All the removable parts, except the tray handle (7), are dishwasher safe - fig.10 or can be |
EN |
cleaned using a non abrasive sponge and some washing up liquid. |
•Clean the inside and outside of the appliance and the handle with a damp sponge and a little washing up liquid - fig.11. Dry carefully before putting everything back in place.
•If food gets stuck or burnt onto the pan or paddle, leave them to soak in warm water before cleaning.
A FEW TIPS IN CASE OF PROBLEMS…
Problems |
Causes |
Solutions |
|
|
|
|
|
|
The appliance is not plugged in |
Make sure the appliance is properly |
|
|
properly. |
plugged in to a mains power socket. |
|
|
You have not yet pressed START/ |
Press START/STOP button . |
|
|
STOP button . |
||
|
|
||
|
|
|
|
|
You have pressed START/STOP |
|
|
|
button but the appliance does not |
Close the lid. |
|
|
operate. |
|
|
The appliance does |
|
|
|
The appliance is not heating. |
Call the customer Helpline (see below) |
||
not work. |
|||
|
|
||
|
The paddle does not turn at the beginning |
||
|
|
||
|
|
of cooking in cooking modes 2, 3, 4, 5, 7, |
|
|
|
8 and 9. Restart using the manual mode |
|
|
The paddle does not turn. |
to check the paddle turns. If it does not |
|
|
turn, check that it is correctly in place and |
||
|
|
||
|
|
adjust until you hear a “CLICK” sound. If |
|
|
|
it still does not operate contact our the |
|
|
|
customer Helpline. |
|
The paddle does |
The paddle is not locked. |
Reposition the paddle until you hear it |
|
not stay in place |
«CLICK» - fig.12. |
||
|
|||
|
|
|
|
The tray does not turn. |
The tray is not locked. |
Adjust the position until you hear the |
|
“CLICK” sound. |
|||
|
|
||
|
|
|
|
The food has not been |
You have not used the paddle. |
Put it in position. |
|
The food / chips have not been cut |
|
||
cooked uniformly. |
Cut the food / chips all to the same size. |
||
uniformly. |
|||
|
|
||
|
|
|
|
|
|
Choose a variety of potato suitable for |
|
|
|
chips such as Maris Piper or King Edward |
|
|
You are using a variety of potatoes |
for best results. Freshly harvested potatoes |
|
|
unsuitable for chips. |
may have a high moisture content, either |
|
|
|
cook for a few minutes more or try using a |
|
The chips are not |
|
different batch and/or variety of potatoes. |
|
The potatoes haven’t been |
Wash, drain and dry the potatoes |
||
crispy enough. |
|||
sufficiently washed and dried. |
thoroughly before cooking. |
||
|
|||
|
The chips are too thick. |
Cut them more thinly. |
|
|
|
|
|
|
There’s not enough oil. |
Increase the quantity of oil (see “Cooking |
|
|
table”). |
||
|
|
||
|
The filter (5) is blocked. |
Clean the filter. |
|
|
|
|
19

|
Problems |
Causes |
Solutions |
|
The food won’t turn |
|
|
|
The food is too thick. |
Reduce the thickness of your food. |
|
|
with the tray. |
||
|
|
|
|
|
|
|
|
|
The food in the pan |
The tray was put on the pan when |
Only put the tray in during the second half |
|
isn’t cooked when |
||
|
the cooking started. |
of the cooking phase. |
|
|
using for 2in1 cooking. |
||
|
|
|
|
|
The chips become |
You are using too large a quantity |
Reduce the quantity of potatoes and |
|
broken whilst they are |
adjust cooking time. Or do not cut chips |
|
|
or the chips are too long. |
||
|
being cooked. |
longer than 9 cm in length. |
|
|
|
||
|
|
|
|
|
|
|
Comply with the maximum quantities |
|
|
|
shown on the cooking table. |
|
The food remains on |
The pan has too much food. |
Put the turn-over ring in place when |
|
|
cooking chips. |
|
|
the edge of the pan. |
|
|
|
|
Reduce the amount of food. |
|
|
|
|
|
|
|
|
|
|
|
Maximum level recommended |
Reduce the quantities. |
|
|
exceeded. |
|
|
|
|
|
|
The LCD screen does |
The appliance is not plugged in. |
Plug the appliance in. |
|
not work. |
The lid is open. |
Close the lid. |
|
|
|
|
|
The appliance is |
You suspect there is a problem in |
|
|
the way the appliance motor is |
Call the customer Helpline below. |
|
|
abnormally noisy. |
||
|
working. |
|
|
|
|
|
20
TEFAL/T-FAL* INTERNATIONAL LIMITED GUARANTEE |
EN |
|
: www.tefal.com |
||
|
This product is repairable by TEFAL/T-FAL*, during and after the guarantee period.
Accessories, consumables and end-user replaceable parts can be purchased, if locally available, as described on the TEFAL/T-FAL internet site www.tefal.com
The Guarantee**:
TEFAL/T-FAL guarantees this product against any manufacturing defect in materials or workmanship during the guarantee period within those countries*** as stated in the attached country list, starting from the initial date of purchase or delivery date. The international manufacturer’s guarantee covers all costs related to restoring the proven defective product so that it conforms to its original specifications, through the repair or replacement of any defective part and the necessary labour. At TEFAL/T-FAL’s choice, an equivalent or superior replacement product may be provided instead of repairing a defective product. TEFAL/T-FAL’s sole obligation and your exclusive resolution under this guarantee are limited to such repair or replacement.
Conditions & Exclusions:
TEFAL/T-FAL shall not be obliged to repair or replace any product which is not accompanied by a valid proof of purchase. The product can be taken directly in person or must be adequately packaged and returned, by recorded delivery (or equivalent method of postage), to a TEFAL/T-FAL authorised service centre. Full address details for each country’s authorised service centres are listed on TEFAL/T-FAL website (www.tefal.com) or by calling the appropriate consumer service centre set out in the attached country list. In order to offer the best possible after-sales service and constantly improve customer satisfaction, TEFAL/T-FAL may send a satisfaction survey to all customers who have had their product repaired or exchanged in a TEFAL/T-FAL authorised service centre.
This guarantee applies only for products purchased and used for domestic purposes and will not cover any damage which occurs as a result of misuse, negligence, failure to follow TEFAL/T-FAL instructions, or a modification or unauthorised repair of the product, faulty packaging by the owner or mishandling by any carrier. It also does not cover normal wear and tear, maintenance or replacement of consumable parts, or the following:
–damages or poor results specifically due to wrong voltage or frequency as stamped on the product ID or specification
–using the wrong type of water or consumable
–mechanical damages, overloading
–ingress of water, dust or insects into the product (excluding appliances with features specifically designed for insects)
–scaling (any de-scaling must be carried out according to the instructions for use)
–damage as a result of lightning or power surges
–damage to any glass or porcelain ware in the product
–accidents including fire, flood, etc
–professional or commercial use
Consumer Statutory Rights:
This international TEFAL/T-FAL guarantee does not affect the Statutory Rights a consumer may have or those rights that cannot be excluded or limited, nor rights against the retailer from which the consumer purchased the product. This guarantee gives a consumer specific legal rights, and the consumer may also have other legal rights which vary from State to State or Country to Country. The
consumer may assert any such rights at his sole discretion. |
|
|
|
***Where a product purchased in a |
listed country and then used in |
another listed |
country, the international TEFAL/T- |
FAL guarantee duration is the period |
for the country of usage, even |
if the product |
was purchased in a listed country |
with a lon ger guarantee duration. The repair process may require a longer time if |
the product is not locally sold by |
||
TEFAL/T-FAL in th e country of usage. If the product is not repairable in the new |
country of usage, the international |
||
TEFAL/T-FAL guarantee i s limited to |
a replacement by a similar or |
alternative product at similar cost, where possible. |
|
*TEFAL household appliances appear under the T-FAL brand in some territories like America and Japan. TEFAL/T-FAL are registered trademarks of Groupe SEB.
Please keep this document for your reference should you wish to make a claim under the guarantee.
**For Australia only:
Our goods come with guarantees that cannot be excluded under the Australian Consumer Law. You are entitled to a replacement or refund for a major failure and compensation for any other reasonably foreseeable loss or damage. You are also entitled to have the goods repaired or replaced if the goods fail to be of acceptable quality and the failure does not amount to a major failure.
**For India Only:
Your Tefal product is guaranteed for 2 years. The guarantee covers exclusively the repair of a defective product, but at TEFAL’s choice, a replacement product may be provided instead of repairing a defective product. It is mandatory that the consumer, to have his product repaired, has to log a service request on the dedicated Smartphone application TEFAL SERVICE APP or by calling TEFAL Consumer Care Center at 1860-200-1232, Opening hours Mon-Sat 09 AM to 06 PM. Products returned by Post will not be covered by the guarantee. As a proof of purchase consumer needs to provide both this stamped guarantee card and cash memo.
21

Willkommen in der Welt von ActiFry Genius XL 2in1!
Bereiten Sie ein komplettes, leckeres Gericht in einem Gerät zu.
Dank der patentierten Technologien wie etwa dem rotierenden Rührarm, der das Öl gleichmäßig verteilt und der schnell zirkulierenden Heißluft, gelingen Pommes Frites besonders lecker und knusprig ohne Austrocknen. Sie wählen die Zutaten, das Öl, die Gewürze, die Kräuter aus ActiFry Genius XL 2in1 kümmert sich um den Rest!
Nur 3%* Fett und die richtige Menge Salz: Nur mit einem Löffel Öl!
Mit einem Löffel Öl Ihrer Wahl können Sie Pommes frites aus 1,5 kg frischen Kartoffeln zubereiten. Der Dosierlöffel des ActiFry Genius XL 2in1 ermöglicht es Ihnen, das Salz zu dosieren und so die Verwendung auf ein Optimum zu verringern, ohne Abstriche beim Geschmack zu machen.
* Pommes frites aus 1,5 kg frischen Kartoffeln, Durchmesser 10 x 10 mm, beim Garen -55% Gewichtsverlust mit 20 ml Öl.
Steaks mit Pommes und noch viel mehr!
Neben Steak mit Pommes frites und vielen anderen Kartoffelspezialitäten wie Bratkartoffeln, können Sie Ihren täglichen Speiseplan mit knackigen Gemüsepfannen, zarten und leckeren Fleischgerichten, knusprigen Meeresfrüchten, cremigen Rissottos, Früchten uvm. bereichern. Weil es so einfach geht, können Sie mit ActiFry Genius XL 2in1 ganz nebenbei kochen - täglich aus frischen Zutaten!
 : the ActiFry Genius XL 2in1
Ein in Zusammenarbeit mit einem Koch zusammengestelltes Rezeptheft bietet Ihnen bekannte Rezepte. originelle Ideen für Fleisch, Fisch, Gemüse sowie Pommes frites für die ganze Famile.


 Tipps zu Kartoffeln und Ölen, damit Ihre Zubereitungen stets gelingen.
Die Kartoffel: Ausgewogene und leckere
Ernährung für jeden Tag
Kartoffeln sind eine ausgezeichnete Energiequelle und enthalten viele Vitamine. Form, Größe und Geschmack der Kartoffeln hängen von der Sorte, den klimatischen Bedingungen und der Anbauweise ab. Jede Kartoffelsorte besitzt ihre eigenen, charakteristischen Eigenschaften in Bezug auf Reifezeit, Größe, Farbe, Haltbarkeit und Eignung zu verschiedenen Zubereitungen. Die Garergebnisse können je nach Ursprung, Jahreszeit und Lagerung variieren.
22
 Loading...