


TEAC SL-D920 Owner's Manual
Z
SL- D920
D01123020C
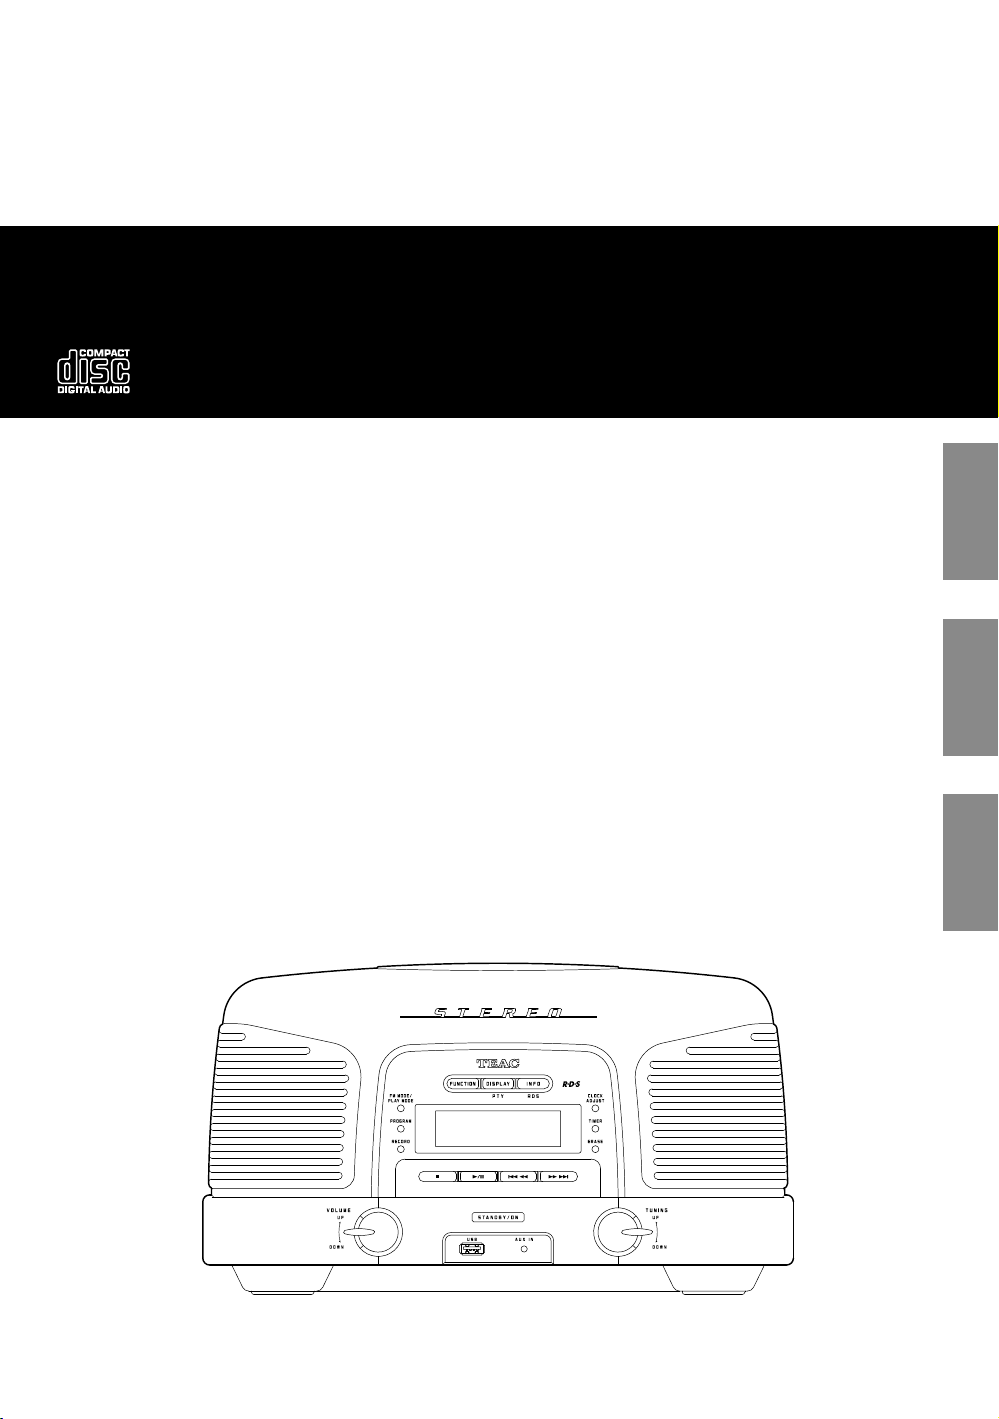
STEREO CD RADIO
OWNER’S MANUAL
MODE D'EMPLOI
MANUAL DEL USUARIO
ESPAÑOLENGLISH FRANÇAIS
IMPORTANT SAFETY INSTRUCTIONS
1) Read these instructions.
CAUTION: TO REDUCE THE RISK OF ELECTRIC SHOCK,
DO NOT REMOVE COVER (OR BACK). NO USERSERVICEABLE PARTS INSIDE. REFER SERVICING TO
QUALIFIED SERVICE PERSONNEL.
The lightning flash with arrowhead in an
equilateral triangle is intended to alert
the user to the presence of uninsulated
“dangerous voltage” within the product’s
enclosure that could be of sufficient
magnitude to constitute a risk of electric
shock to persons.
The exclamation point in an equilateral
triangle is intended to alert the user to
the presence of important operating and
maintenance (servicing) instructions in the
literature accompanying the appliance.
2) Keep these instructions.
3) Heed all warnings.
4) Follow all instructions.
5) Do not use this apparatus near water.
6) Clean only with dry cloth.
7) Do not block any ventilation openings. Install in
accordance with the manufacturer’s instructions.
8) Do not install near any heat source such as a radiator,
heat register, stove, or other apparatus (including an
amplifier) that produces heat.
9) Do not defeat the safety purpose of the polarized or
grounding-type plug. A polarized plug has two blades
with one wider than the other. A grounding type plug
has two blades and a third grounding prong. The wide
blade or the third prong is provided for your safety. If
the provided plug does not fit into your outlet, consult
an electrician for replacement of the obsolete outlet.
10) Protect the power cord from being stepped on or
pinched particularly at plugs, convenience receptacles,
and the point where it exits from the apparatus.
11) Only use attachments/accessories specified by the
manufacturer.
12) Use only with a cart, stand, tripod,
bracket, or table specified by the
manufacturer, or sold with the
apparatus. When a cart is used, use
caution when moving the cart/
apparatus combination to avoid
injury from it tipping-over.
13) Unplug this apparatus during lightning storms or when
unused for long periods of time.
14) Refer all servicing to qualified service personnel.
Servicing is required when the apparatus has been
damaged in any way, such as when the power-supply
cord or plug is damaged, liquid has been spilled or
objects have fallen into the apparatus, it has been
exposed to rain or moisture, it does not operate
normally, or it has been dropped.
2
< Do not expose this apparatus to drips or splashes.
< Do not place any object filled with liquid, such as a vase,
on the apparatus.
< Do not install this apparatus in a confined space such as
in a bookcase or similar furniture.
< The apparatus draws nominal non-operating power
from the AC outlet with its POWER or STANDBY/ON
switch not in the ON position.
< The apparatus should be located close enough to the
AC outlet so that you can easily grasp the power cord
plug at any time.
< The power plug is used as the disconnect device, and
this disconnect device should remain readily operable.
< Products with
power supply cord that has a grounding plug.
The cord of such a product must be plugged into an AC
outlet that has a protective grounding connection.
< If the product uses batteries (including a battery pack
or installed batteries), they should not be exposed to
sunshine, fire or excessive heat.
< CAUTION for products that use replaceable lithium
batteries: there is danger of explosion if a battery is
replaced with an incorrect type of battery. Replace only
with the same or equivalent type.
< Caution should be taken when using earphones or
headphones with the product because excessive sound
pressure (volume) from earphones or headphones can
cause hearing loss.
Class 1 construction are equipped with a
WARNING: TO PREVENT FIRE OR SHOCK
HAZARD, DO NOT EXPOSE THIS APPLIANCE
TO RAIN OR MOISTURE.
CAUTION
< DO NOT REMOVE EXTERNAL CASES OR CABINETS TO
EXPOSE THE ELECTRONICS. NO USER SERVICEABLE
PARTS ARE WITHIN!
< IF YOU ARE EXPERIENCING PROBLEMS WITH THIS
PRODUCT, CONTACT TEAC FOR A SERVICE REFERRAL. DO
NOT USE THE PRODUCT UNTIL IT HAS BEEN REPAIRED.
This product is protected by certain intellectual property
rights of Microsoft. Use or distribution of such technology
outside of this product is prohibited without a license from
Microsoft.
Supply of this product does not convey a license nor imply
any right to distribute MPEG Layer-3 compliant content
created with this product in revenue-generating broadcast
systems (terrestrial, satellite, cable and/or other distribution
channels), streaming applications (via Internet, intranets
and/or other networks), other content distribution systems
(pay-audio or audio-on-demand applications and the like)
or on physical media (compact discs, digital versatile discs,
semiconductor chips, hard drives, memory and the like).
An independent license for such use is required. For details,
please visit http://mp3licensing.com.
MPEG Layer-3 audio coding technology licensed from
Fraunhofer IIS and Thomson.
< USE OF CONTROLS OR ADJUSTMENTS OR
PERFORMANCE OF PROCEDURES OTHER THAN THOSE
SPECIFIED HEREIN COULD RESULT IN HAZARDOUS
RADIATION EXPOSURE.
3

Contents
Before Use
Thank you for choosing TEAC. Read this manual
carefully to get the best performance from this unit.
Contents .............................................4
Before Use ...........................................4
Discs .................................................6
RESET Switch .........................................7
Connections .........................................8
Names of Controls ..................................10
Remote Control .....................................13
Basic Operation .....................................14
Listening to a CD/MP3/WMA disc ....................15
Listening to MP3/WMAs (USB) .......................16
Controlling playback (disc/USB) ......................16
Program Playback ...................................18
Repeat/Shuffle Playback .............................20
Listening to the Radio ...............................21
Preset Tuning ........................................22
RDS .................................................23
RDS (PTY Search) ....................................23
Read this before operation
< As the unit might become warm during operation,
always leave sufficient space around the unit for
ventilation.
< The voltage supplied to the unit should match the
voltage that is printed on the rear panel. If you are in
any doubt regarding this matter, consult an electrician.
< Choose the location for placement of the unit carefully.
Avoid placing it in direct sunlight or close to a source of
heat. Also avoid locations that are subject to vibrations
or excessive dust, heat, cold or moisture.
< Do not place the unit on an amplifier/receiver.
< Do not open the cabinet as this could result in damage
to the circuitry or electrical shock. If a foreign object
should get into the unit, contact your dealer or service
agency.
< When removing the power plug from the wall outlet,
always pull directly on the plug, never yank the cord.
< To keep the laser pickup clean, do not touch it, and
always close the disc tray when not using the CD
player.
4
Listening to an External Source ......................24
Before Recording ....................................25
Recording to USB ....................................25
Deleting a file from USB .............................26
Setting the Clock ....................................27
Setting the Timer ....................................28
Specifications .......................................30
Troubleshooting .....................................31
< Do not attempt to clean the unit with chemical
solvents as this might damage the finish. Use a clean,
dry cloth.
< Keep this manual in a safe place for future reference.
DO NOT MOVE THE UNIT DURING PLAYBACK
During playback, the disc rotates at high speed. Do
NOT lift or move the unit during playback. Doing so
could damage the disc.
WHEN MOVING THIS UNIT
When changing the location of placement or packing
the unit for transportation, be sure to remove the disc
and close the disc compartment cover. Then, press the
power switch to turn the power off, and disconnect the
power cord. Moving this unit with a disc loaded could
result in damage to this unit.
Maintenance
If the surface of the unit gets dirty, wipe with a soft
cloth or use diluted neutral cleaning liquid. Be sure
to remove any fluid completely. Do not use thinner,
benzene or alcohol as they could damage the surface
of the unit.
Beware of condensation
When the unit (or a disc) is moved from a cold to
a warm place, or used after a sudden temperature
change, there is a danger of condensation. Vapour in
the air could condense on the internal mechanism,
making correct operation impossible. To prevent this,
or if this occurs, leave the unit for one or two hours
with the power turned on. The unit will stabilize at the
temperature of its surroundings.
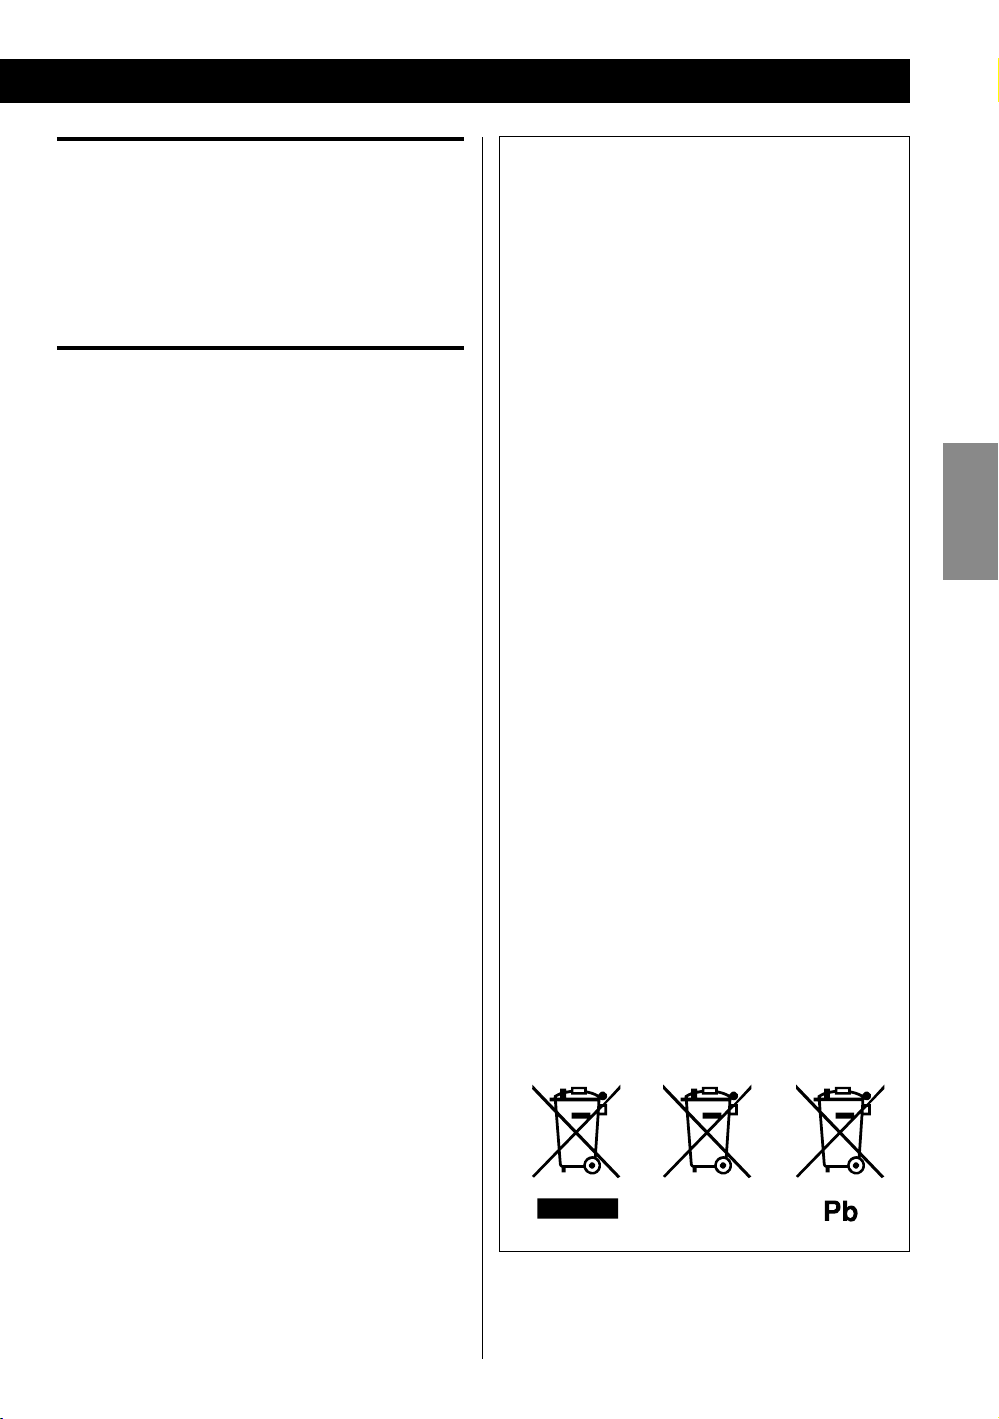
Information for users on the collection and
disposal of old equipment and used batteries
The following symbols displayed on products,
packaging, and/or accompanying documents mean
that used electrical and electronic products and
batteries should not be mixed with general household
waste. For proper treatment, recovery and recycling
of old products and used batteries, please take them
to appropriate collection points in accordance with
national laws and directives 2002/96/EC and 2006/66/
EC.
By disposing of these products and batteries properly,
you will help save valuable resources and prevent
any potential negative effects to human health and
the environment that could otherwise arise from
inappropriate waste handling.
For more information about the collection and
recycling of old products and batteries, please contact
your local municipality, your waste disposal service or
the point of sale where you purchased the items.
Information about disposal in other countries
outside the European Union
ENGLISH
These symbols are only valid in the European Union.
If you wish to discard these items, please contact
local authorities or your dealer and ask for the
correct method of disposal.
Note about the battery symbol (middle and
bottom right examples):
This symbol might be used in combination with a
chemical symbol. In this case it complies with the
requirements set by the directive for the chemical
indicated.
5
Discs
Discs that can be played on this unit
< Commercial audio CD’s bearing the “Compact Disc
Digital Audio” logo
< Properly finalized CD-R/CD-RW discs
Note:
< Depending on the quality of the disc and/or the
condition of the recording, some CD-R discs might not
be playable.
< Copy-protected discs and other discs that do not
conform to the CD standard might not play back
correctly in this player.
If you use such discs in this unit, TEAC Corporation
and its subsidiaries cannot be responsible for any
consequences or guarantee the quality of reproduction.
If you experience problems with such nonstandard
discs, you should contact the producers of the disc.
< Always load the disc with the label side up. (Only one
side of Compact Discs can be played and recorded.)
< Never use such chemicals as record sprays, antistatic
sprays or fluids, benzene or thinner to clean the discs.
Such chemicals will do irreparable damage to the disc’s
plastic surface.
< Discs should be returned to their cases after use to
avoid dust and scratches that could cause the laser
pickup to “skip”.
< Do not expose discs to direct sunlight or high humidity
and temperature for extended periods. Long exposure
to high temperatures will warp a disc.
< CD-R/CD-RW discs are more sensitive to the effects
of heat and ultraviolet rays than ordinary CDs. It is
important that they are stored in a location where
direct sunlight does not shine on them and that is away
from heat sources such as radiators and heat-generating
electrical devices.
< Printable CD-R/CD-RW discs are not recommended
because the label side might be sticky and could
damage the unit.
< Do not stick papers or protective sheets on the discs
and do not use any protective coating spray.
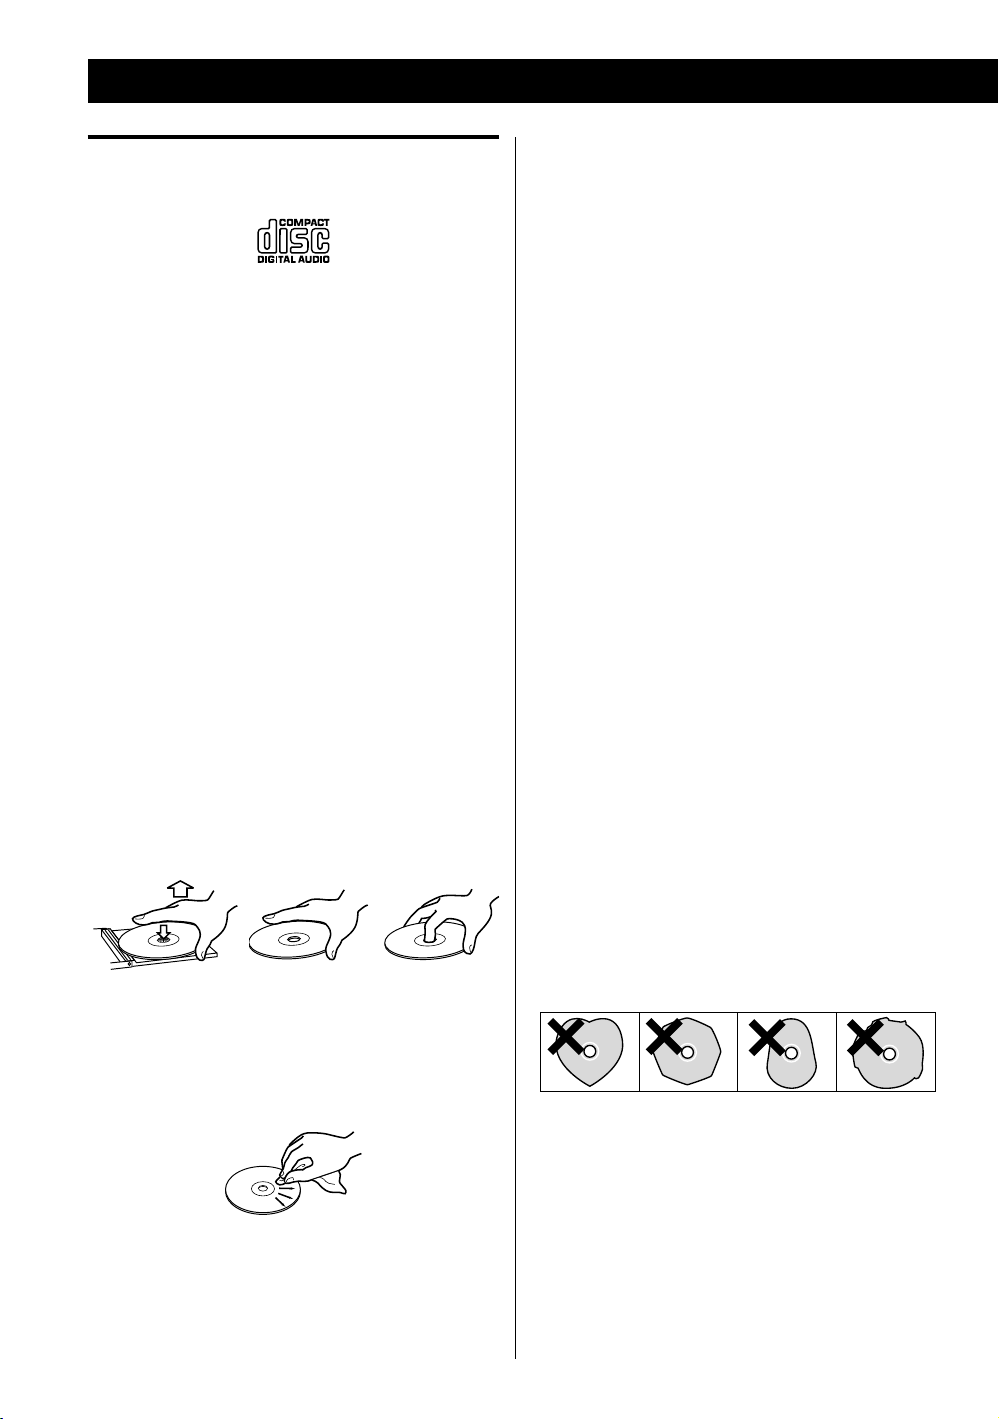
< To remove a disc from its storage case, press down on
the centre of the case and lift the disc out, holding it
carefully by the edges.
How to remove a disc How to hold a disc
< Should a disc become dirty, wipe the surface radially
with a soft, dry cloth. Never clean a disc using a circular
motion.
< Use a soft, oil-based, felt-tipped pen when writing on
the label side. Never use a ballpoint or hard-tipped pen,
because this could damage the recorded side.
< Never use a stabilizer. Using commercially-available CD
stabilizers with this unit will damage the mechanisms
and cause them to malfunction.
< Do not use irregularly-shaped CDs (octagonal, heart-
shaped, etc.). They could damage the unit.
< If you are in any doubt as to the care and handling of a
CD-R/CD-RW disc, read the precautions supplied with
the disc, or contact the disc manufacturer directly.
6
MP3/WMA compatibility
This unit can play MP3/WMA files recorded on a CD-R,
CD-RW disc, or USB memory. Refer the instruction manual
of software when making an MP3 or a WMA file using a PC.
< This unit can play back monaural and stereo MP3/WMA
files that are in the MPEG-1 Audio Layer 3 format with
a sampling rate of 44.1 or 48 kHz and a bit rate of 320
kbps or less.
< The WMA file must be sampling rate 44.1 kHz, bit-rate
192 kbps or less.
< This unit is not compatible with discs that have been
recorded using multiple sessions. Only the first session
can be played back.
< This unit cannot play copyright protected files.
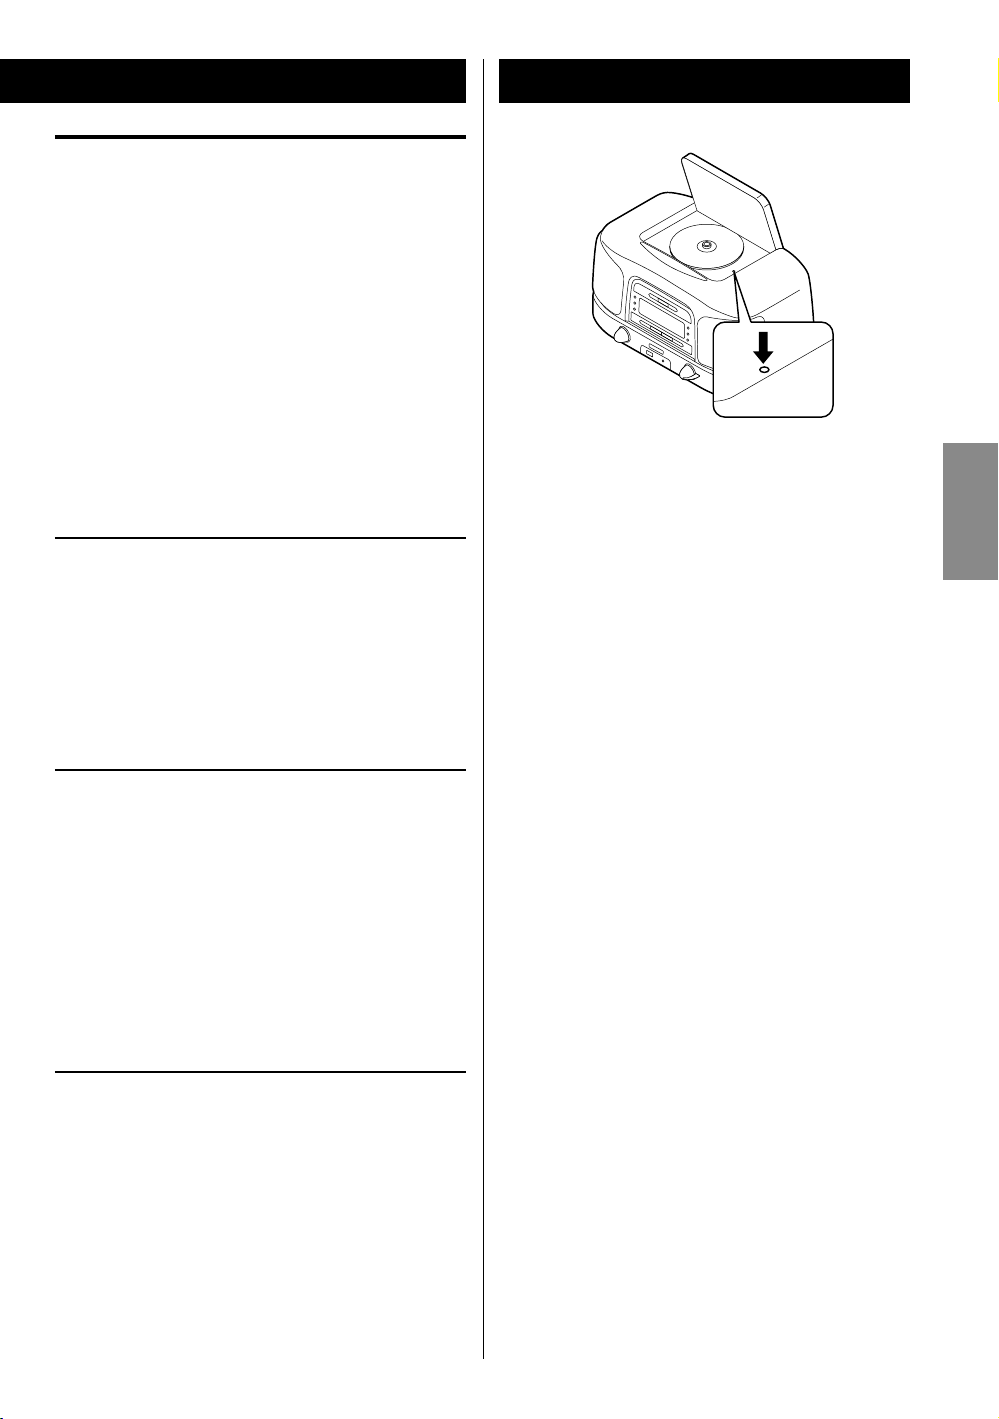
RESET Switch
In the following cases, function buttons might not
work properly.
ENGLISH
File information display
The display of this unit can only show single-byte letters
and numbers.
< If a file information uses Japanese, Chinese or other
double-byte characters, playback is possible but the
name will not be shown correctly.
Cautions when preparing MP3/WMA files using a
computer or other device
< Always include the extension in the file name. This unit
recognizes MP3 files by their “.mp3”, WMA files by their
“.wma” file extensions.
< Always close the session (complete disc creation).
This unit cannot play discs if the session has not been
closed.
< Carefully read the manual for the software that you are
using when you create an MP3/WMA disc.
Discs/USB memories that are unplayable or only
partially playable
< If the system is damaged by some electrical shock.
< If the power supply is irregular or has electrical noise.
In these cases, press the RESET switch once or twice
lightly with a pencil or a ballpoint pen.
< Files without extensions cannot be played. Files that are
not in the MP3/WMA format cannot be played even if
they have extensions.
< Variable bit rate files might not play back correctly.
< If the disc has more than 999 files or 99 folders, this unit
can not play back correctly.
< Depending on disc conditions, this unit might not be
able to play a disc or skipping might occur.
7
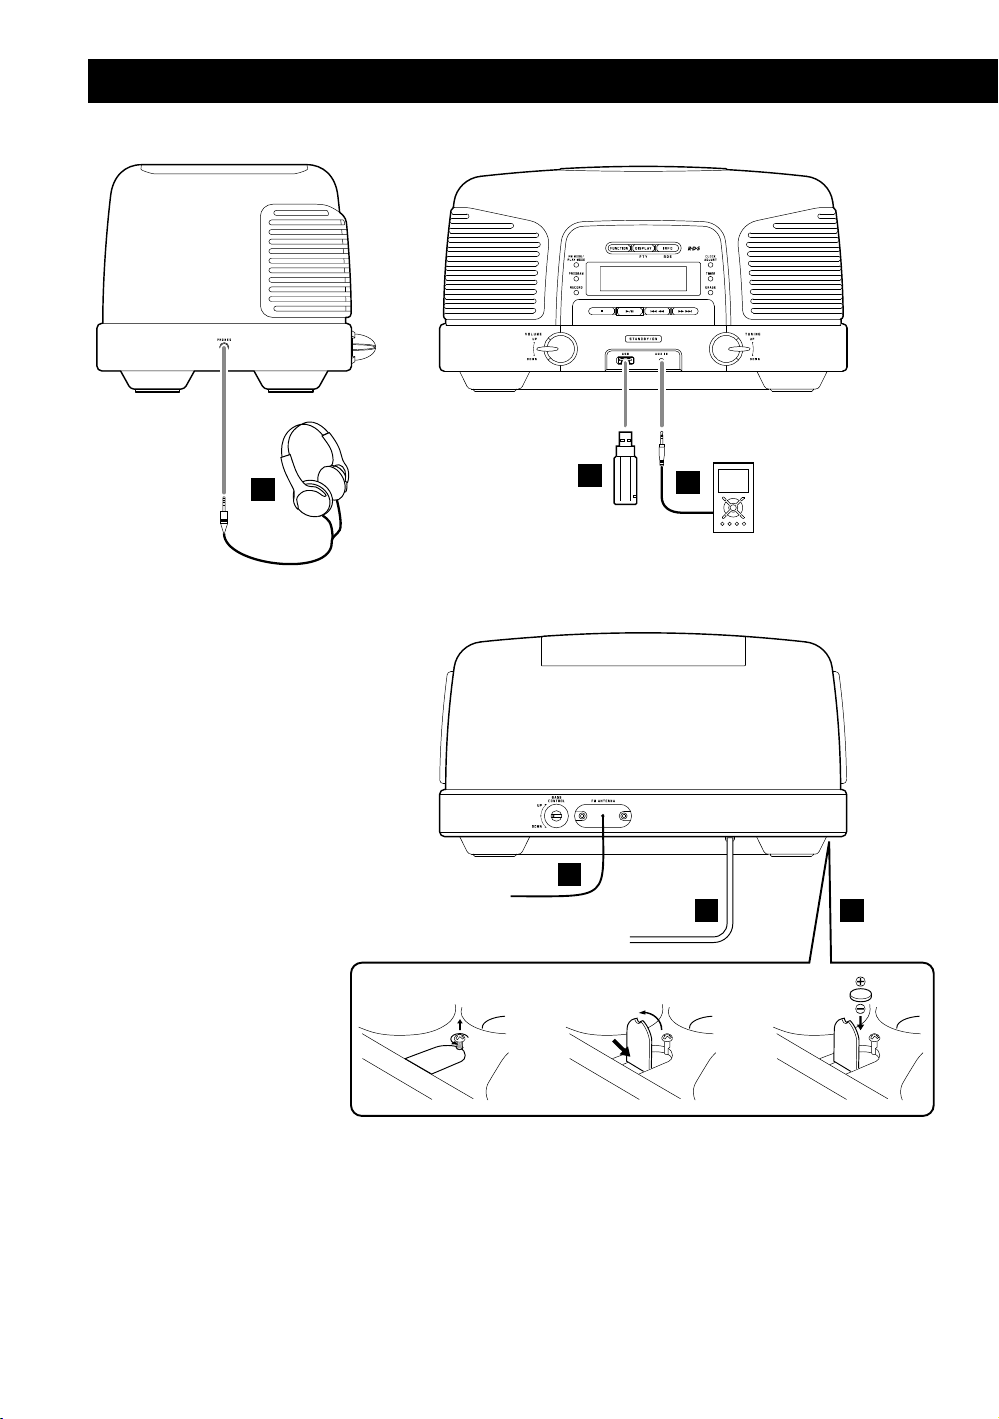
Connections
A
B
C
D
E F
123
8
CAUTION
< Turn off the power before making connections.
< Read the instructions for each component that you
intend to use with this unit.
< Be sure to insert each plug securely. To prevent hum
and noise, do not bundle the connection cords.

PHONES
A
For private listening, connect the headphones
plug into this jack, and adjust the volume using the
VOLUME knob.
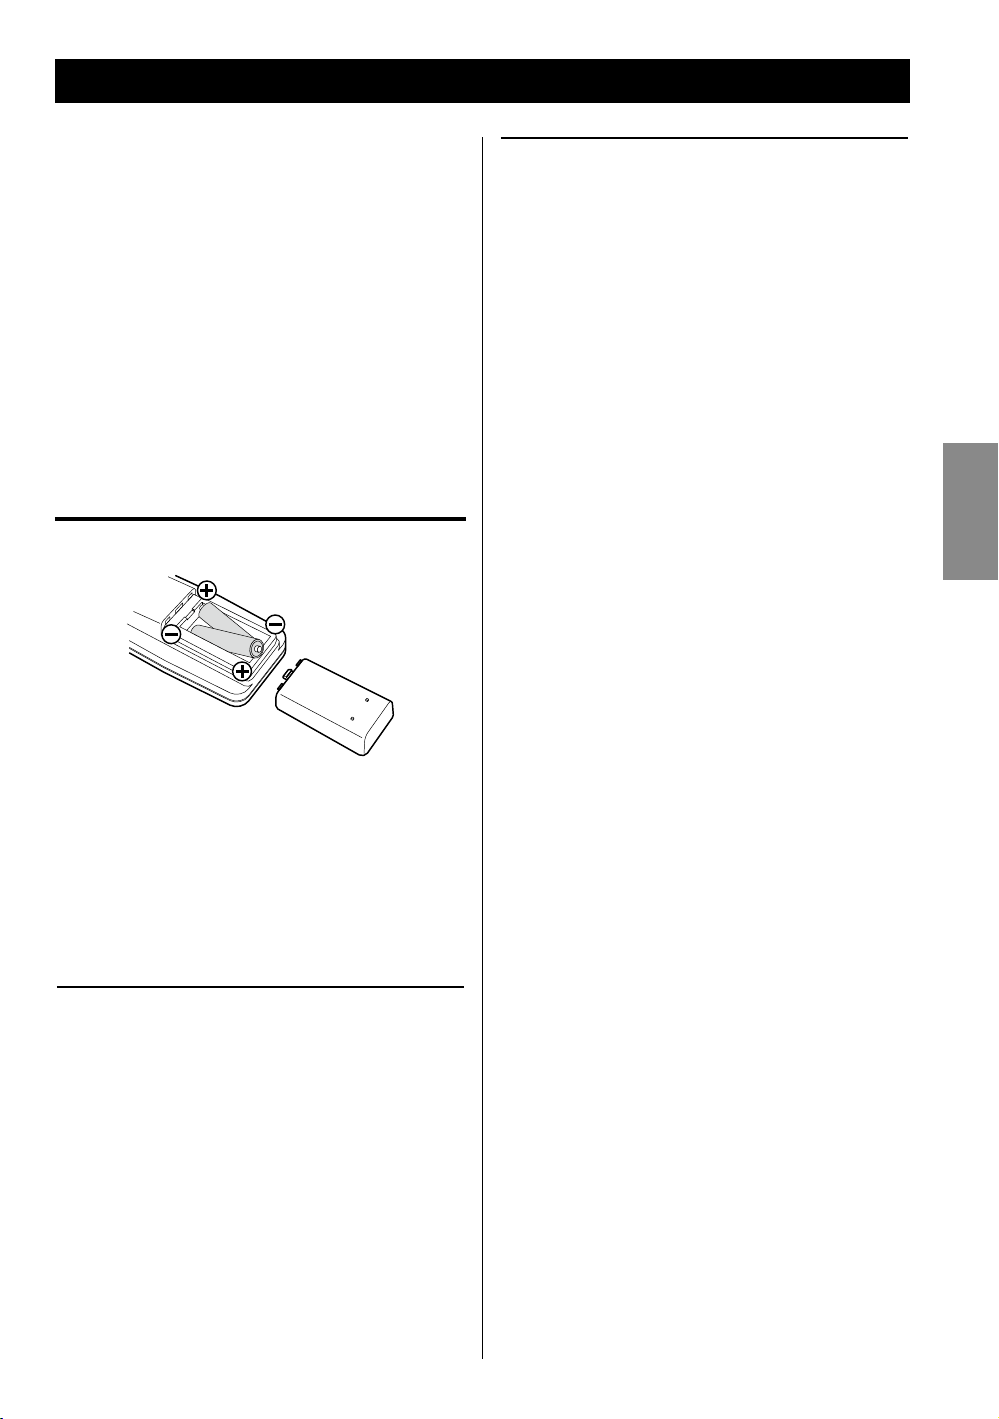
Battery installation
1. Loosen the fixing screw.
2. Push the other end of the cover to open the
compartment.
USB connector
B
This connector is for connecting USB memory that
contains MP3/WMA music files.
AUX IN jack
C
You can connect a portable audio player to this jack.
Connect it to the audio output jack (LINE OUT or
PHONES) of the player using
plug cable.
When using the PHONES jack of an audio player, you
must also adjust the volume of that audio player or
you might hear no sound from this unit.
< Turning the volume of the audio player up too high
might cause the sound from this unit to be distorted.
In this case, reduce the volume of the audio player
until the distortion stops and then adjust the volume
level of this unit to a comfortable listening level.
FM antenna
D
While in FM mode, tune in to an FM station and
extend the lead to find the best position for reception.
This antenna may need to be repositioned if you
move your unit to a new location.
the included stereo mini-
3. Insert a CR2032 lithium-ion battery with the positive
(+) side facing the cover.
4. Close the cover.
Battery replacement
If the clock begins to indicate the wrong time, replace
the battery with a new one.
ENGLISH
Precautions concerning button-shaped batteries
< Be sure to insert the battery with the correct positive
(+) and negative (-) polarities.
< Do not heat or disassemble a battery and never
dispose of an old battery by throwing it in a fire.
AC power cord
E
Plug the AC power cord into an AC outlet.
Battery compartment
F
This battery supplies backup power to the builtin clock and memory when the unit is temporarily
disconnected from the AC outlet.
9
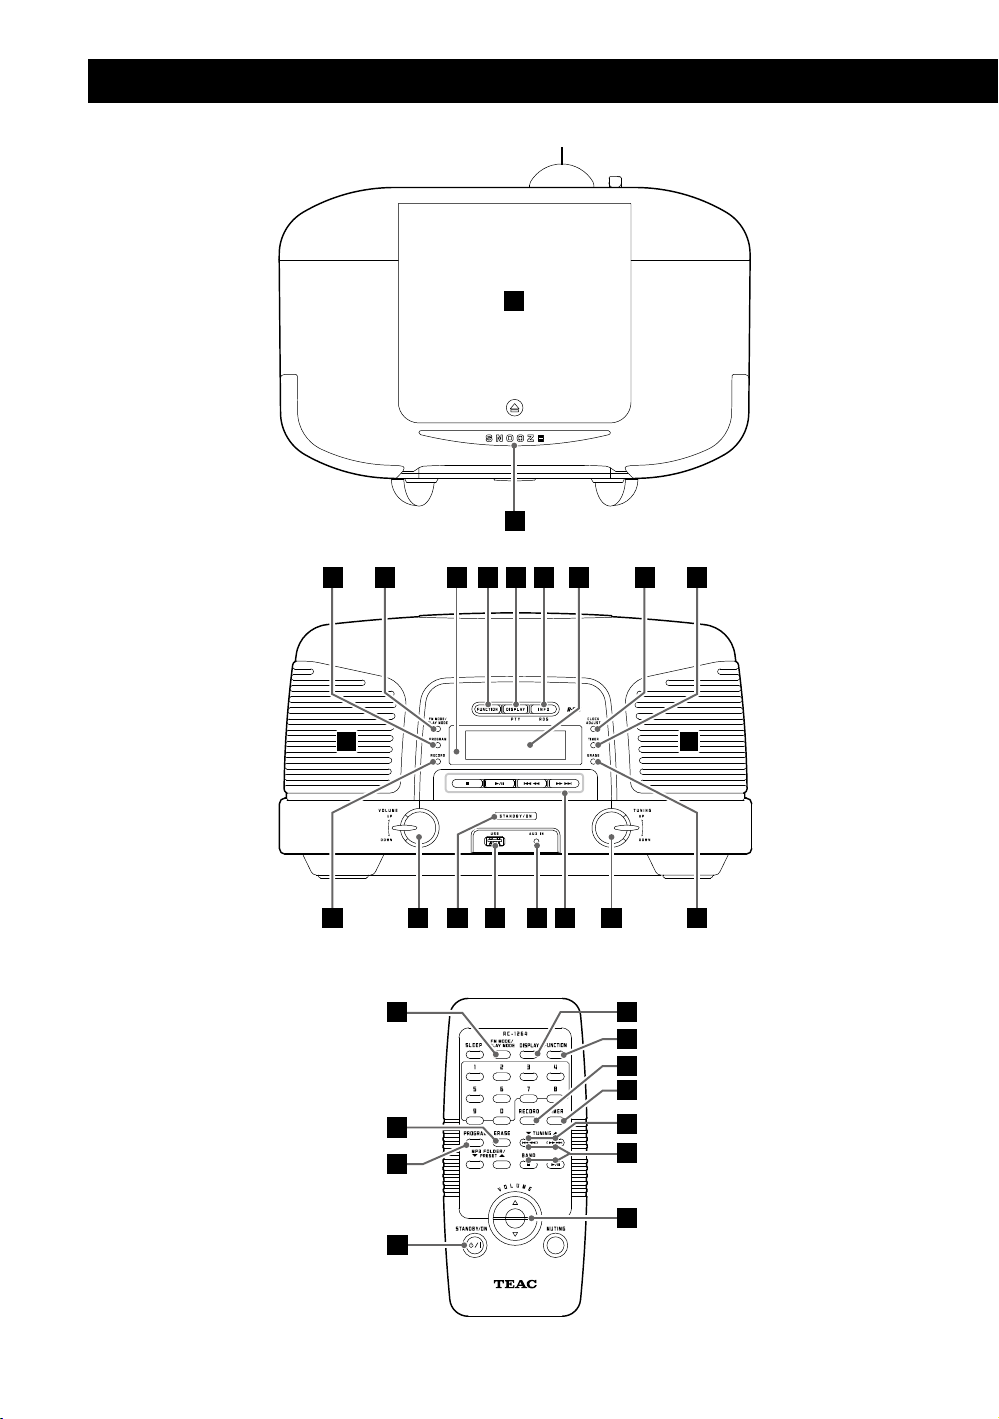
Names of Controls 1
A
B
TOP
C D F G HE
L L
T
S R QRP O N
D
JI K
G
F
T
K
M
C
N
O
FRONT
M
REMOTE CONTROL
10
S

A
Disc compartment cover
Push the L mark on the cover to open the cover
upwards.
B
SNOOZE
After the TIMER ON time is reached, use this button to
turn the unit off for 5 minutes.
C
PROGRAM
In CD or USB mode, use this button to program tracks/
files.
In TUNER mode, use this button to store preset channels
in memory.
D
FM MODE/PLAY MODE
In FM TUNER mode, use this button to select stereo or
mono.
In CD or USB mode, use this button to select repeat,
shuffle or intro playback.
E
Remote sensor
When operating the remote control, point it toward
here.
F
FUNCTION
Use this button to select the source (TUNER, CD, AUX
or USB).
G
DISPLAY
Press this button to show the clock.
H
INFO/RDS
In FM TUNER mode, use this button to select an RDS
mode.
During playback of an MP3/WMA disc or USB memory,
use this button to display the current file name, title,
artist, album and folder number/file number.
I
Display
N
TUNING
Turn this knob to tune in to a station.
During playback of an MP3/WMA disc or a USB memory,
use this knob to select a folder on the disc or USB
memory.
O
Disc/USB memory operation buttons
When TUNER or AUX is selected, these buttons will not
work.
STOP (H)
Use this button to stop playback.
PL AY/PAUSE (y/J)
Use this button to start or pause playback.
SKIP/SEARCH (.m/,/)
Press these buttons to skip tracks/files.
Hold down these buttons to search for a part of a track/
file.
In TUNER mode, use these buttons to select a preset
station.
P
AUX IN jack
Connect external sources to the unit here.
Q
USB connector
Connect USB memory to the unit here.
R
STANDBY/ON
Press this switch to turn the unit on or put it in standby.
S
VOLUME
Turn this knob right and left (or use the 5 and b
buttons on the remote control) to adjust the volume.
T
RECORD
Use this button to record to USB memory.
ENGLISH
J
CLOCK ADJUSTMENT
Use this button to adjust the clock.
K
TIMER
Use this button to set the timer.
L
Speakers (stereo)
M
ERASE
Use this button to erase a file from USB memory.
11
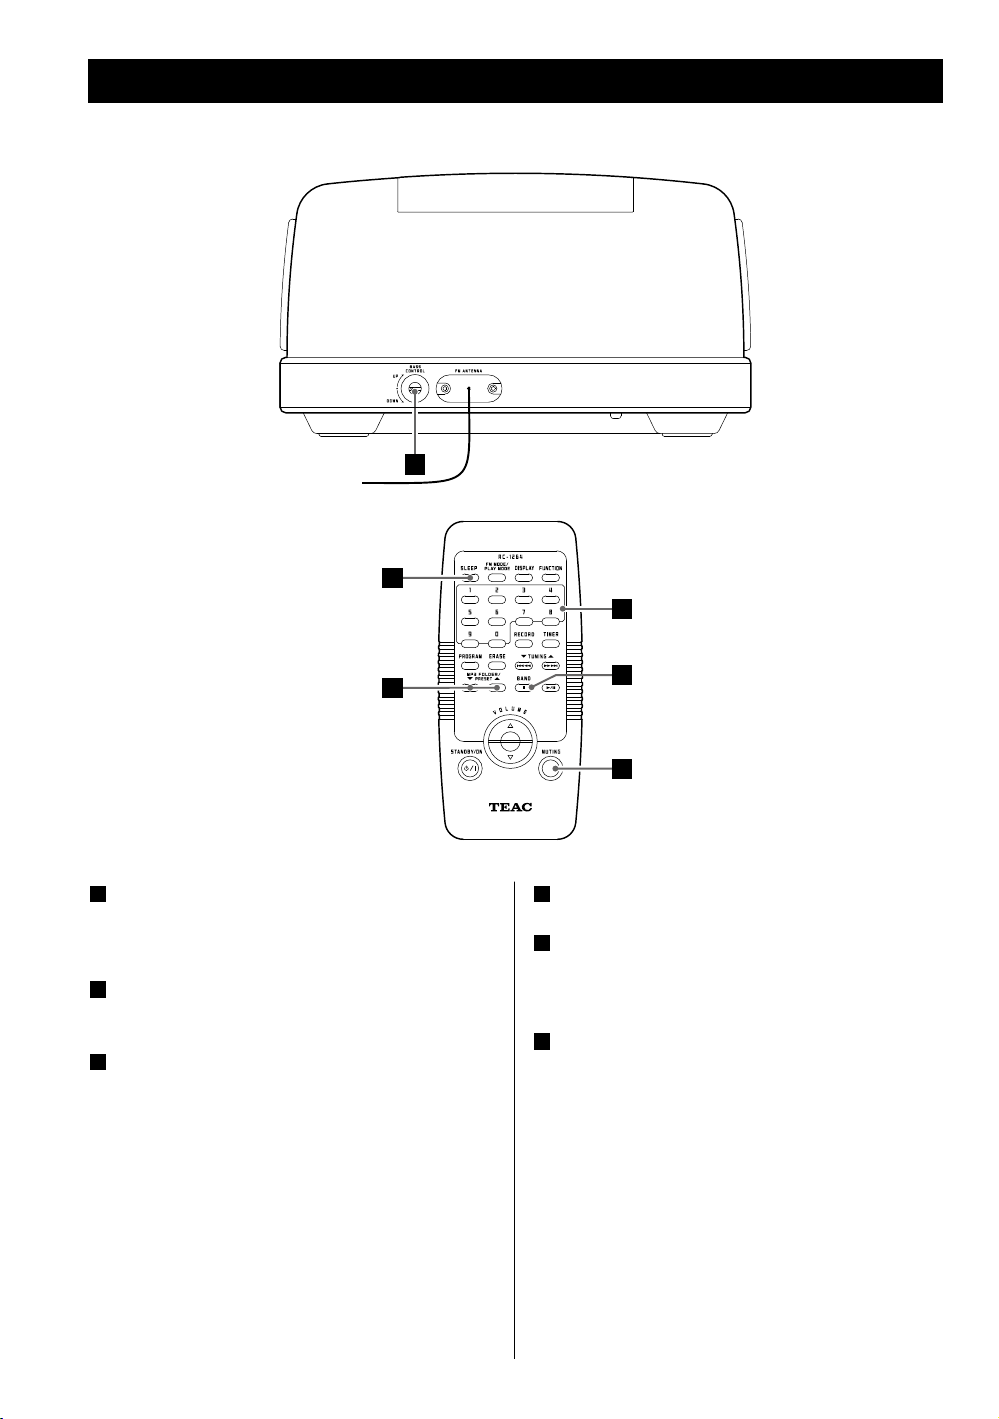
Names of Controls 2
U
REMOTE CONTROL
V
X
REAR
W
U
BASS CONTROL knob
Use this knob to raise and lower the loudness of bass
frequencies.
V
SLEEP
Use this button to set the sleep timer.
W
MP3 FOLDER/PRESET
In TUNER mode, use this button to select preset
stations.
During playback of an MP3/WMA disc or a USB
memory, use this button to select a folder on the disc
or USB memory.
Y
Z
X
Number buttons
Y
BAND
Use this button to switch between AM and FM radio
bands.
Z
MUTING
Use this button to mute the sound.
12
Remote Control
The included remote control allows the main unit to be
operated from a distance.
When operating the remote control, point it towards the
remote sensor on the front panel of the unit.
< Even if the remote control is operated within the
effective range (5 m), remote control operation might
be impossible if there are any obstacles between the
unit and the remote control.
< If the remote control is operated near other products
that generate infrared rays, or if other remote control
devices that use infrared rays are used near the unit,
it might operate incorrectly. Likewise, other products
might also operate incorrectly.
Battery installation
Precautions concerning batteries
< Be sure to insert the batteries with the positive “+” and
negative “_” polarities oriented correctly.
< Use batteries of the same type. Never use different
types of batteries together.
< Rechargeable and non-rechargeable batteries can be
used. Refer to the precautions on their labels.
< When the remote control will not be used for a long
time (more than a month), remove the batteries from
the remote control to prevent them from leaking. If
they do leak, wipe away the leakage inside the battery
compartment and replace the batteries with new ones.
< Do not heat or disassemble batteries and never dispose
of old batteries by throwing them in a fire.
ENGLISH
1. Remove the battery compartment cover.
2. Insert two AAA (R03 or UM-4) dry batteries. Make sure
that the batteries are inserted with their positive “+”
and negative “_” polarities oriented correctly.
3. Close the cover.
Battery replacement
If the maximum distance from which the remote control
can operate the main unit decreases, the batteries are
probably exhausted. In this case, replace the batteries with
new ones.
13
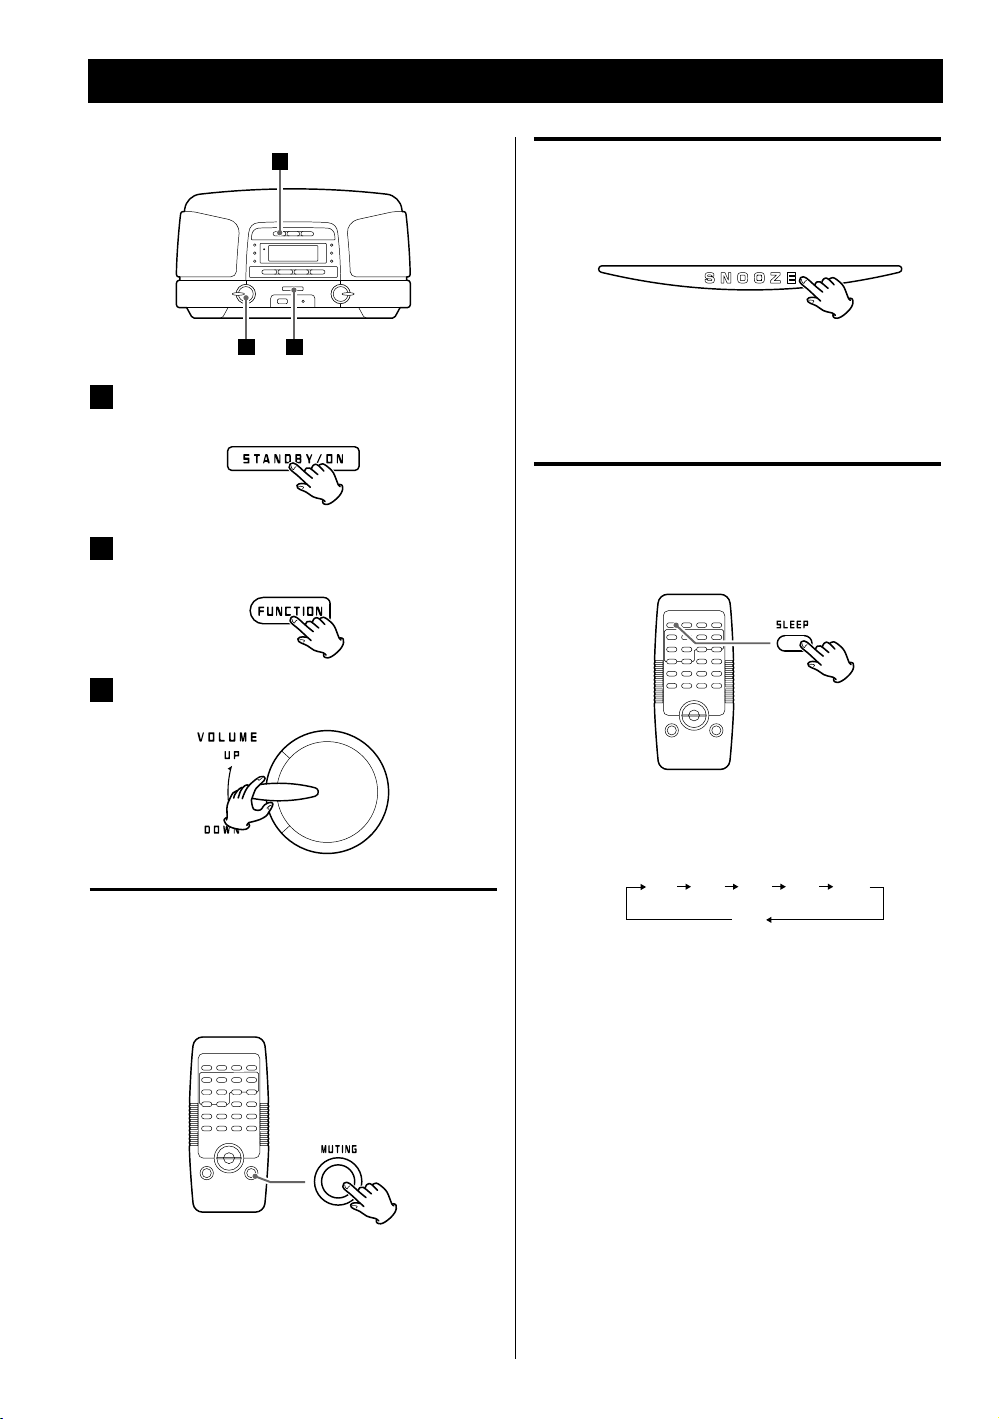
Basic Operation
2
13
Press the STANDBY/ON switch to turn the unit
1
on.
Press the FUNCTION button to select a source.
2
Play the source and adjust the volume using the
3
VOLUME knob.
Dimmer
You can change the brightness of the front panel
display.
Push the SNOOZE button to darken the display.
Push it again to restore regular brightness.
This function also works in standby mode.
Sleep Timer
Each press of the SLEEP button changes the amount
of time (between
automatically switches to Standby mode.
15 and 90 minutes) until the unit
14
Muting
To mute the sound temporarily, press the MUTING
button. Press the MUTING button again or adjust the
volume to restore the sound.
< While muting is activated, the MUTING indicator
lights up.
< When the FUNCTION button is pressed, muting will
be cancelled.
Press the SLEEP button to cycle through the time
options as shown in the following illustration.
15 30 9045 60
O
< To check the remaining time, press the SLEEP button
once.
< While the sleep timer is activated the display is
dimmed.
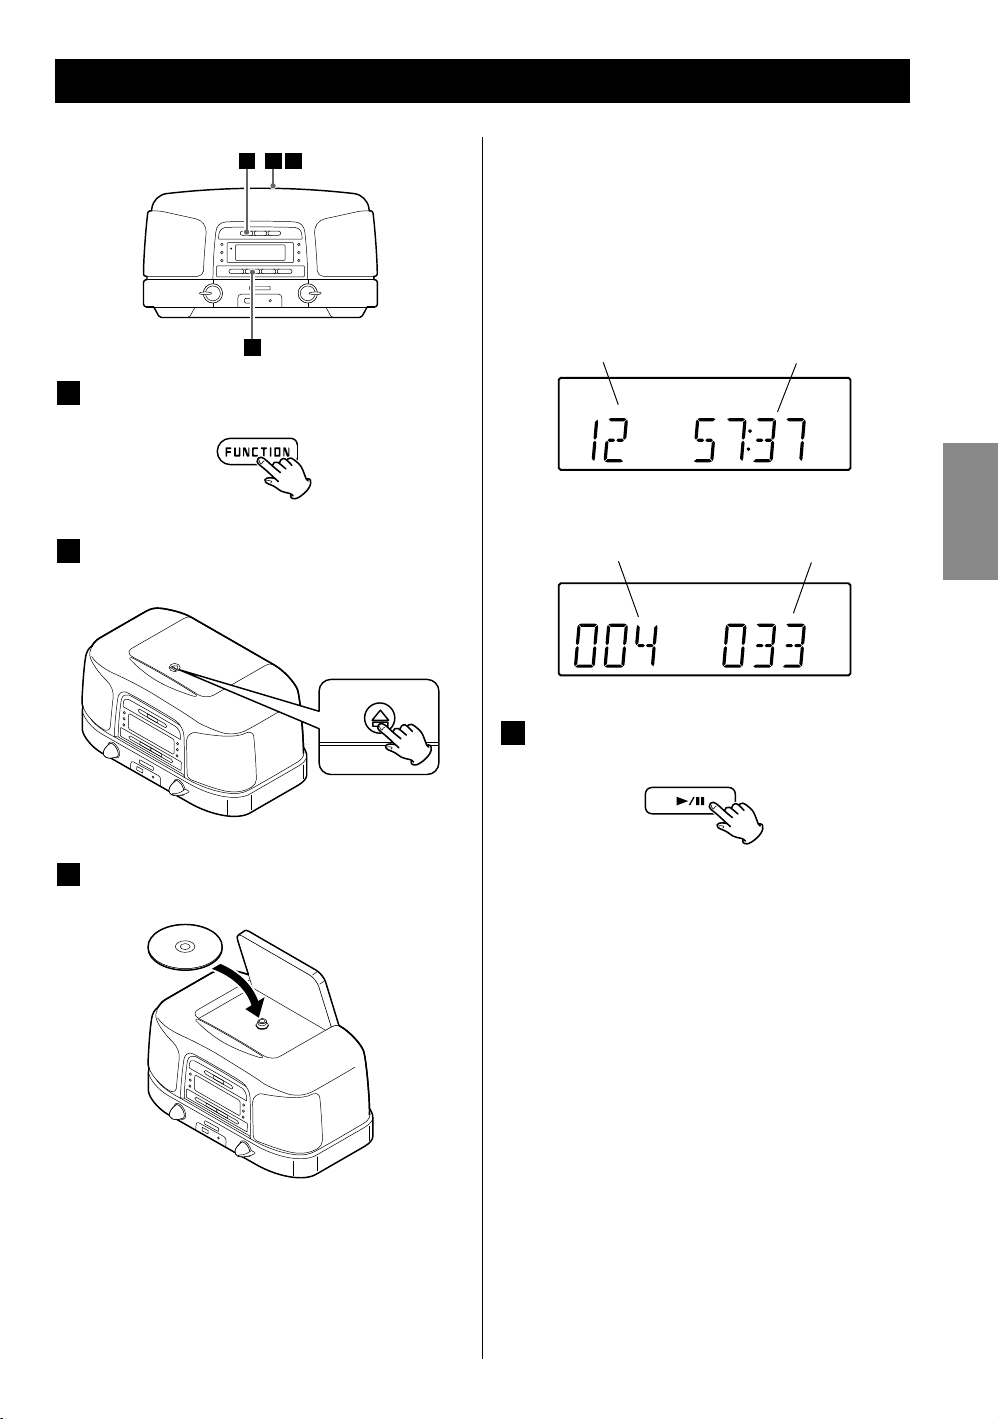
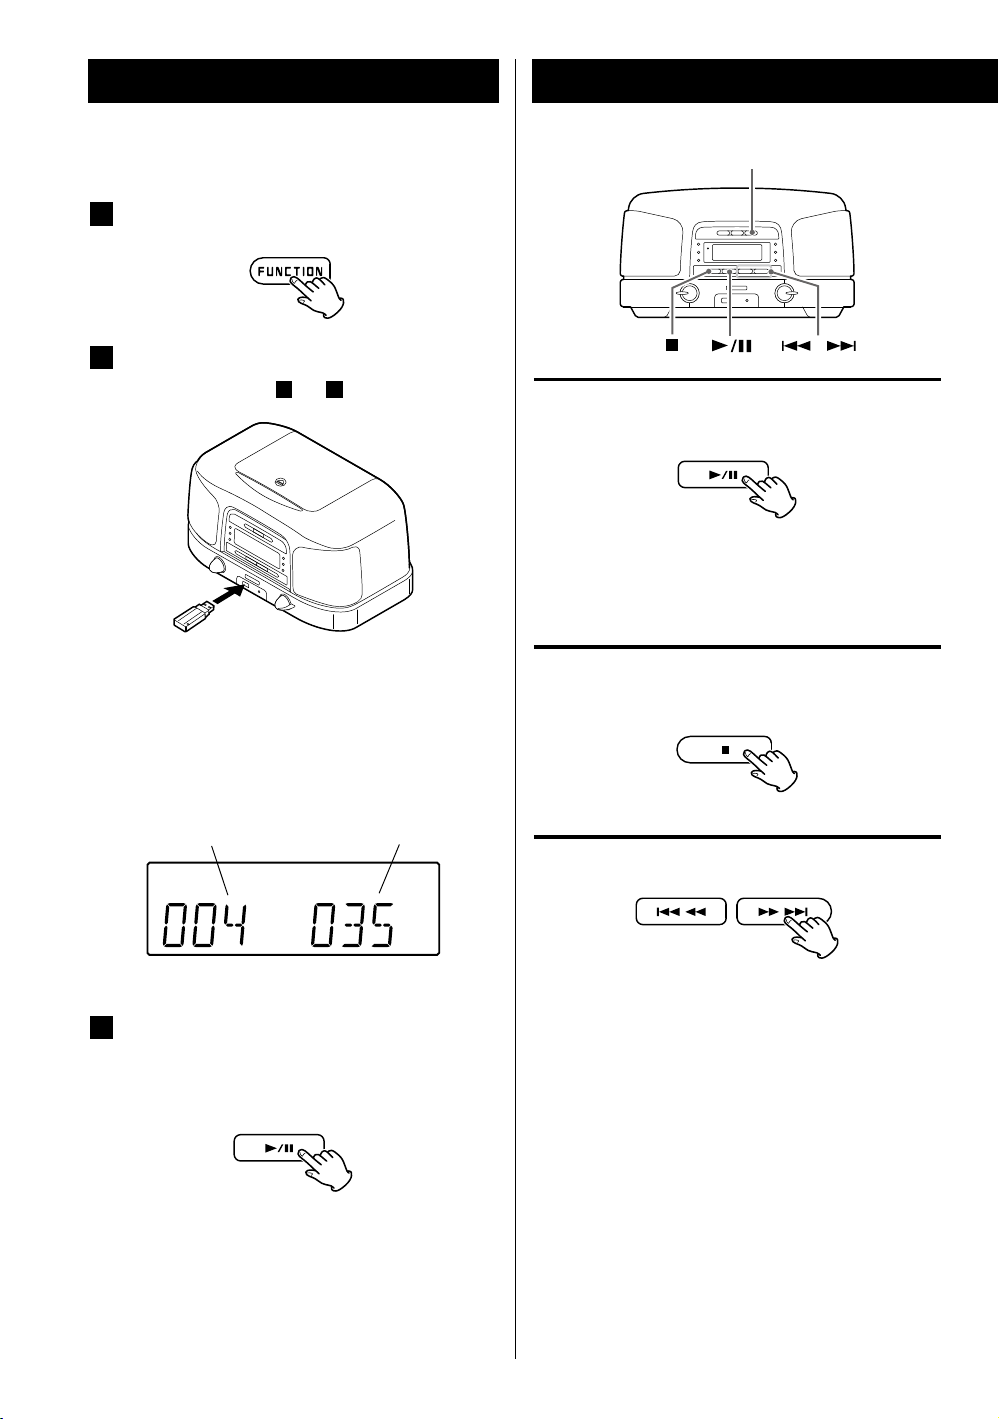
Listening to a CD/MP3/WMA disc
2 31
4
Press the FUNCTION button to select “CD”.
1
Push the L mark on the cover to open the disc
2
compartment.
< It takes a few seconds for the unit to load the disc. No
buttons will work during loading. Wait until the total
number of tracks/files and the total play time of the
disc are displayed.
< When no disc is loaded in the CD player, “NO DISC” is
displayed.
When a CD is loaded
Total tra ck s
When an MP3/WMA disc is loaded
Total number of folders Total number of files
Total playing time
ENGLISH
Place a disc with the printed label face up, and
3
close the cover by hand.
< Never place more than one disc in the unit.
< Ensure that the disc is correctly seated.
Press the PLAY/PAUSE (y/J) button to start
4
playback.
Playback starts from the first track/file on the disc.
< MP3/WMA files not stored in folders are automatically
treated as being in the “ROOT” folder, and playback
starts from the first file in the ROOT folder.
< When playback of all the tracks/files has finished, the
unit stops automatically.
Do not open the disc compartment cover when
a disc is playing. Doing so is dangerous because
the disc will pop out.
15
Listening to MP3/WMAs (USB)
Controlling playback (disc/USB)
< Do NOT use high-capacity USB hard discs with this
unit.
Press the FUNCTION button to select “USB”.
1
Plug your USB memory into the USB connector.
2
1
< You can reverse steps
< The unit takes a few seconds to load USB memory. No
buttons will work during loading. Wait until the total
number of the files and the total number of folders
on the USB memory are displayed.
and 2.
INFO
Suspending playback temporarily
(pausing)
Press the PLAY/PAUSE (G/J) button during playback
to stop playback at the current position. To resume
playback, press the PLAY/PAUSE (G/J) button again.
Stopping playback
Press the STOP button (H) to stop playback.
When USB memory is loaded
Total number of filesTotal number of folders
Press the PLAY/PAUSE (y/J) button to start
3
playback.
Playback starts from the first file on the USB memory.
< MP3/WMA files not stored in folders are automatically
treated as being in the “ROOT” folder, and playback
starts from the first file in the ROOT folder.
< When playback of all the files has finished, the unit
stops automatically.
Skipping to the next or previous track/file
During playback, press a SKIP (. or /) button
repeatedly until the desired track/file is found. The
selected track/file will be played from the beginning.
When the unit is stopped, press a SKIP (. or /)
button repeatedly until the desired track/file is found.
Press the PLAY/PAUSE (G/J) button to start playback
from the selected track/file.
< If the . button is pressed during playback, the
current track/file will be played from the beginning. To
return to the beginning of the previous track/file, press
the . button twice.
< During programmed playback, press the . or /
button to play the next or previous track/file in the
program.
16
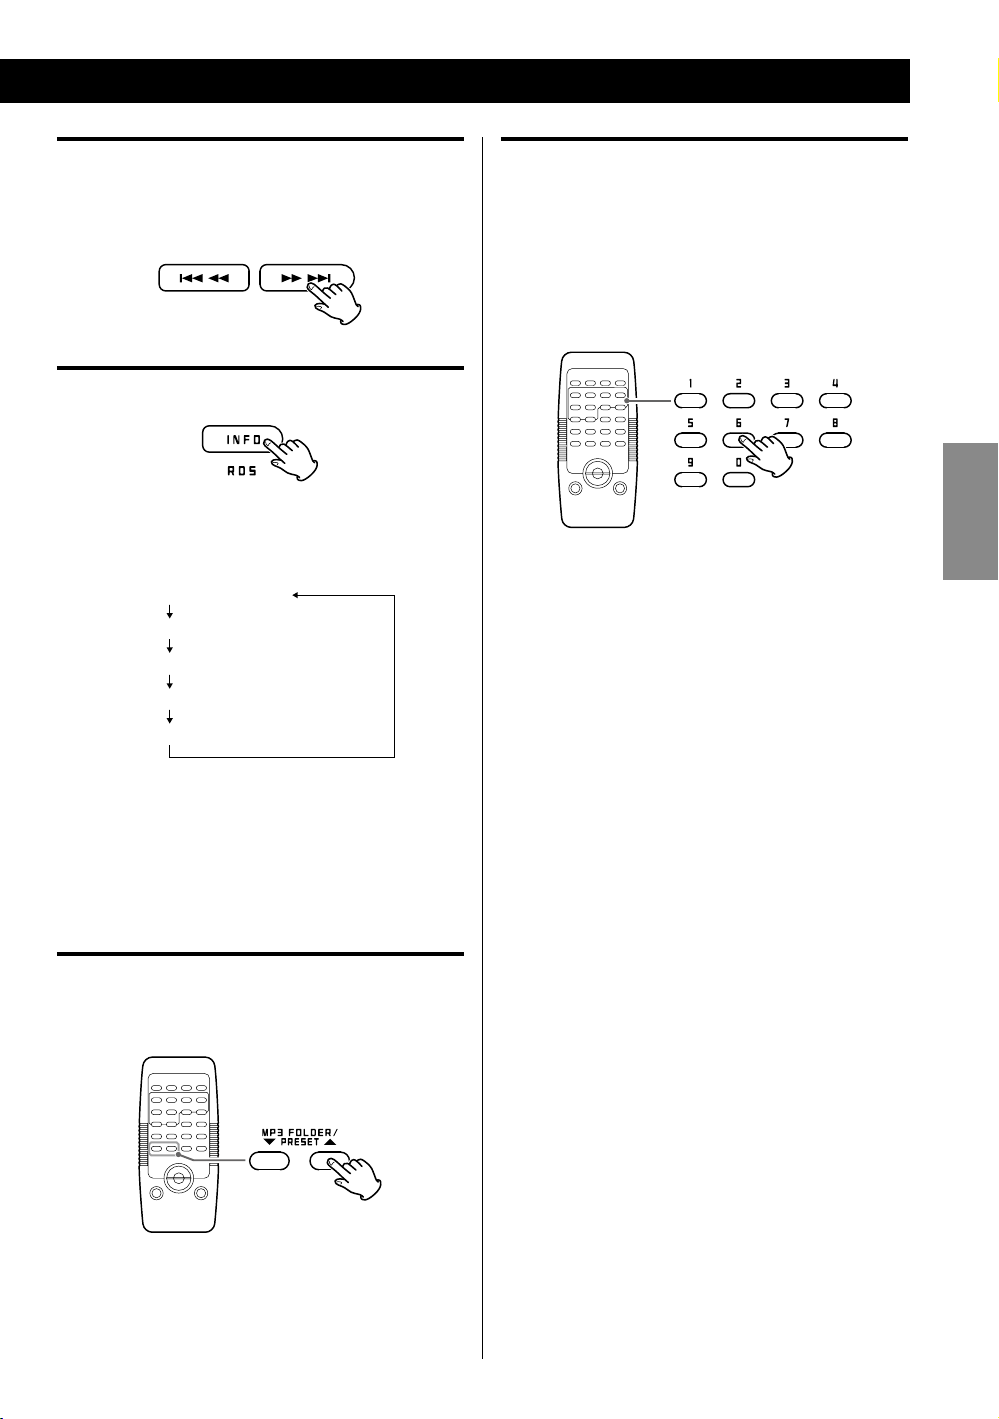
Searching for a part of a track/file
During playback, hold down a SKIP (. or /)
button and release it when the desired part is found.
Displaying the MP3/WMA information
During playback of an MP3/WMA disc/USB memory,
press the INFO button to show information about the
current file in the following order:
Direct playback
When the unit is stopped or playing back, you can use
the number buttons on the remote control to select
tracks/files.
Press a number buttons to select a track/file.
Playback starts from the selected track/file.
ENGLISH
To play tracks/files 1 to 9, simply press the
corresponding button (1 to 9).
< Direct playback is not possible during shuffle playback
or programmed playback.
< The screen will return to normal (displaying elapsed
playback time) if the unit is inactive for two seconds
while the folder or file number is displayed.
< The first 30 characters of title, artist and album are
shown.
Skip to the next folder (MP3/WMA)
Press the MP3/WMA FOLDER button to skip to next
folder.
< You can also use the TUNING knob to skip to next
folder.
17
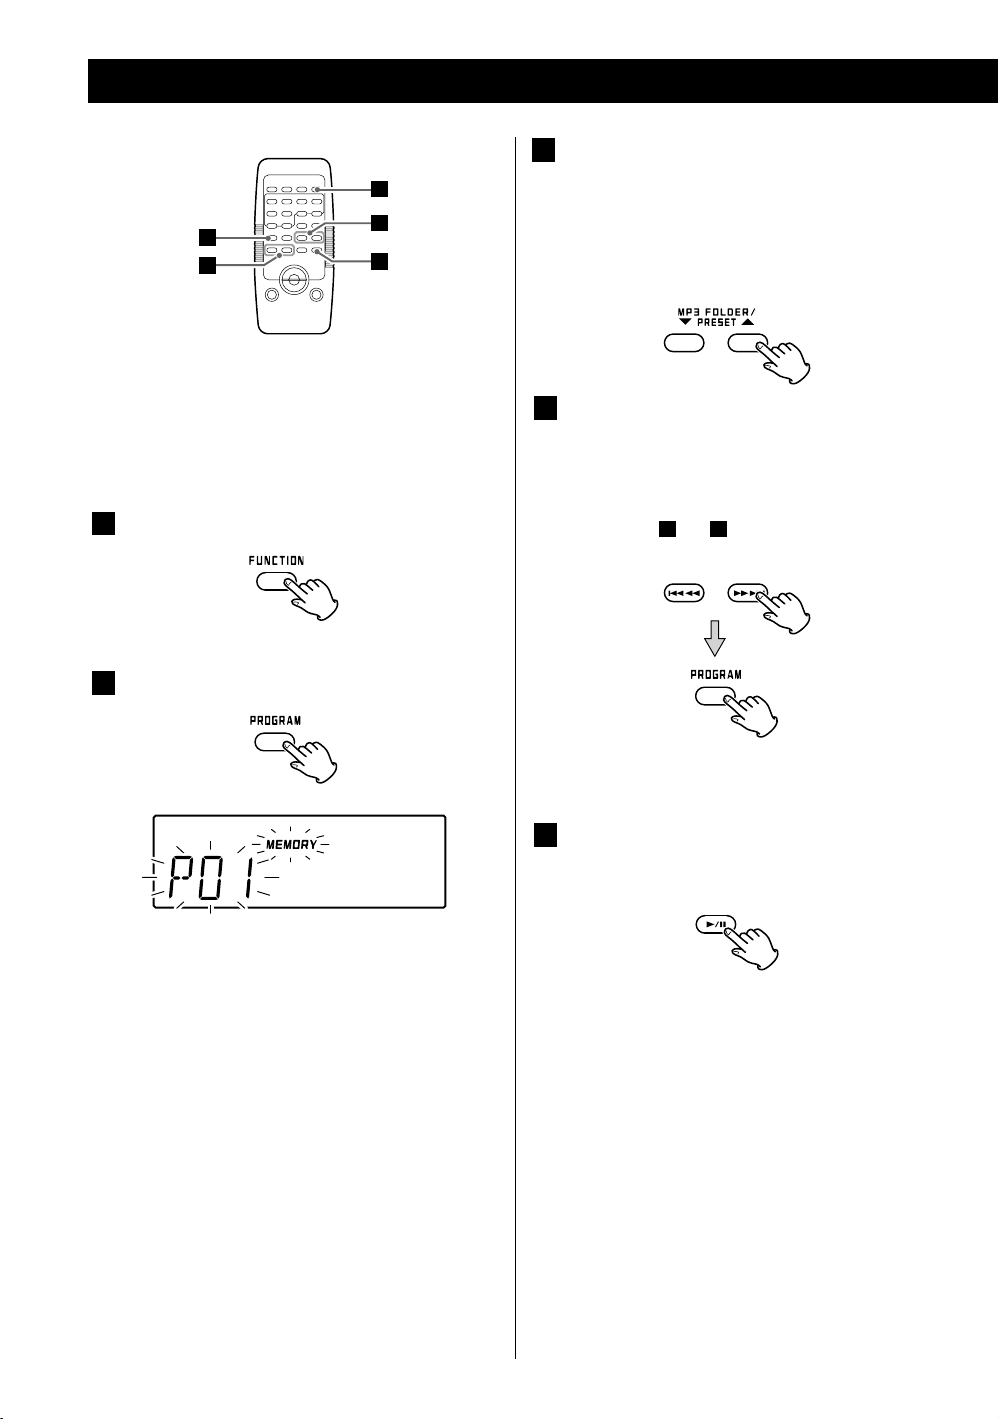
Program Playback
1
2
3
Up to 32 tracks/files can be programmed in the desired
order.
Shuffle and Intro functions do not work during
programmed playback.
Press the FUNCTION button to select “CD” or
1
“USB”.
4
5
Press the MP3/WMA FOLDER buttons
3
repeatedly to select a folder on an MP3/WMA
disc or USB memory.
< MP3/WMA files not stored in folders are treated as
being in the “001” (root) folder.
< Skip this step when playing an ordinary CD.
Press a SKIP (. or /) button repeatedly to
4
select a track/file, and then press the PROGRAM
button.
The track/file is programmed, and “P02” is shown.
< Repeat steps
< You can program up to 32 tracks/files.
3
and 4 to program more tracks/files.
Press the PROGRAM button.
2
“MEMORY” and the programmed number blink on
the display.
< To cancel programmed playback mode, press the
STOP (H) button.
< To cancel programming after P01 has been
programmed, press the STOP(H) button twice.
When you are done adding tracks/files to the
5
program, press the PLAY/PAUSE (G/J) button
to start programmed playback.
< When the playback of all the programmed tracks/files
has finished, or the STOP button is pressed twice, the
MEMORY indicator will disappear and programmed
playback mode will be ended.
The program is retained in memory until you
open the disc compartment cover or the power is
interrupted. You can return to programmed playback
by pressing the PROGRAM button and the PLAY/
PAUSE (G/J) button.
18
This unit can record from CDs onto USB memory
devices in a programmed order.
For detailed information on how to record, see page
25.

PROGRAM
Adding a track/file to the end of the
programme
When the unit is stopped, press the PROGRAM button
repeatedly until “PXX” blinks on the display. Select a
folder number using the MP3/WMA FOLDER button
and a track/file number using a SKIP (. or /)
button and then press the PROGRAM button. The
track/file is added to the end of the programme.
Checking the programmed order
When the unit is stopped, press the PROGRAM button
repeatedly. The track/file number and program number
will be shown on the display.
To clear the program
< When you press the FUNCTION button.
< When you have programmed a CD, opening the disc
compartment cover clears the programme contents.
< When you have programmed USB memory, pulling out
the memory clears the programme contents.
< If the power supply is interrupted, the programmed
contents will also be cleared.
Replacing a track/file in the programme
When the unit is stopped, press the PROGRAM
button repeatedly until the programme number to be
changed appears on the display.
Select a new folder number using the MP3/WMA
FOLDER button and a new track/file number using
a SKIP (. or /) button and then press the
PROGRAM button.
ENGLISH
19
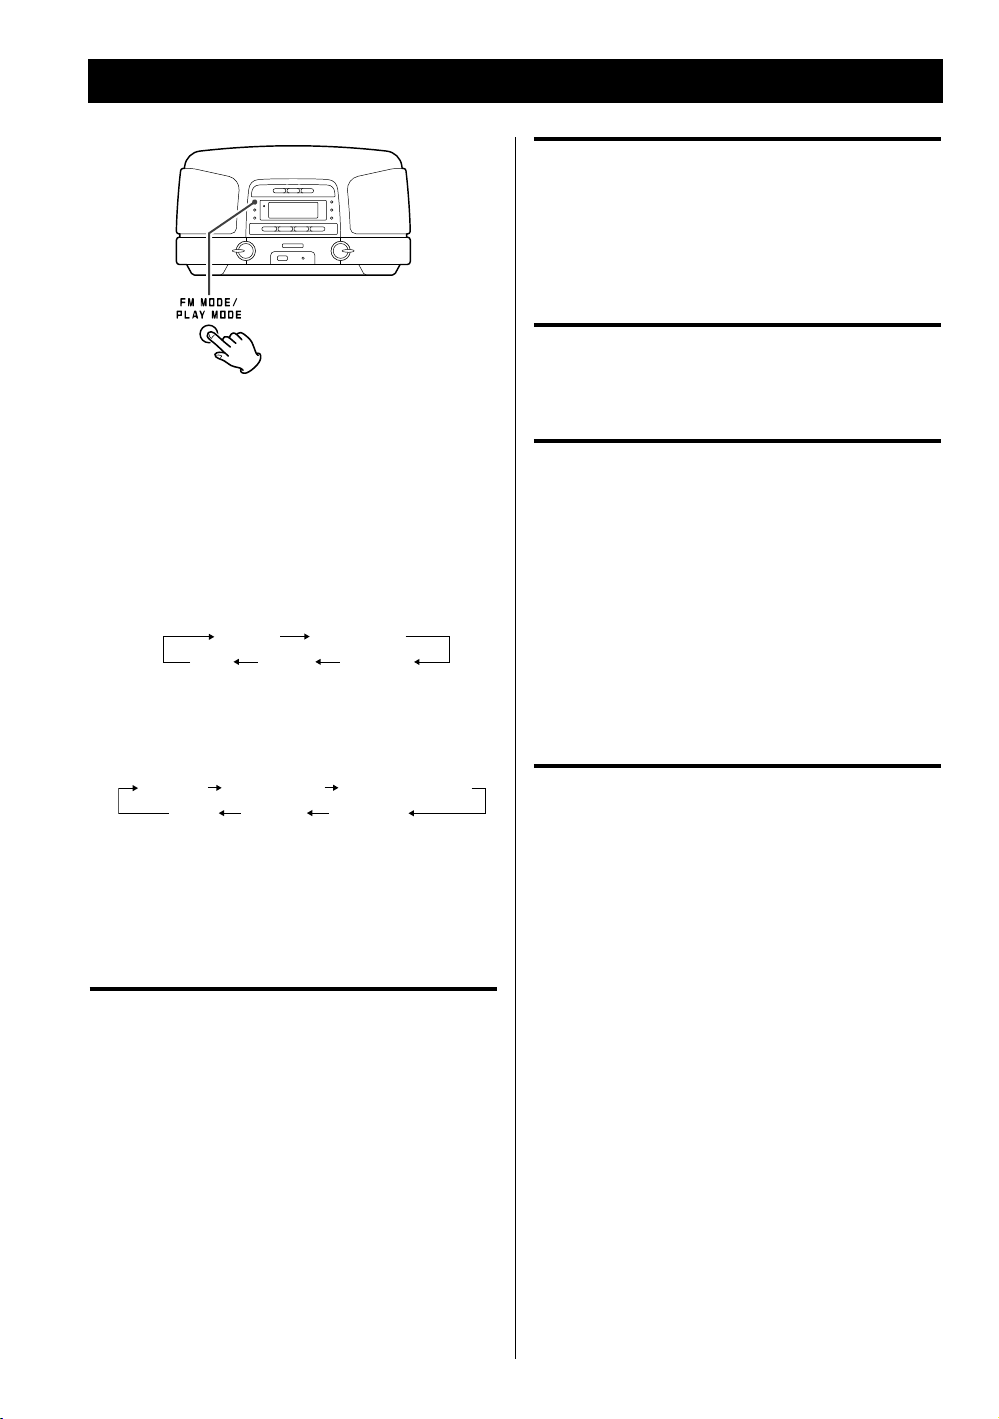
Repeat/Shuffle/Intro Playback
Change the play mode to make tracks/files play
repeatedly, play in random order or play only their
beginnings.
Select the play mode during playback or press
the PLAY/PAUSE (G/J) button to start playback.
Each time the PLAY MODE button is pressed, the mode
is changed in the following order:
When a CD is loaded
REPEAT REPEAT ALL
(o)
SHUFFLEINTRO
Repeat all tracks/files
To play back all the tracks/files repeatedly, press the
PLAY MODE button repeatedly until “REPEAT ALL”
appears.
During programmed playback, the programmed
tracks/files will be played back repeatedly.
Repeat all the files in a folder (MP3/WMA)
To play back all the files in a folder repeatedly, press the
PLAY MODE button twice. “REPEAT FOLDER” lights.
Play the tracks/files randomly
Press the PLAY MODE button repeatedly until “SHUFFLE”
appears.
< If you press the / button during shuffle playback,
the next track/file will be randomly selected and
played back. If you press the . button once, the
currently played track/file will be played back from the
beginning.
When an MP3/WMA disc or USB memory is
loaded
REPEAT REPEAT FOLDER
< Repeat mode will be cancelled when you open the disc
compartment cover, when you pull out USB memory,
or when one of the following buttons is pressed: STOP,
FUNCTION, STANDBY/ON.
REPEAT ALL
(o) INTRO SHUFFLE
Repeat one track/file
Press the PLAY MODE button once during playback.
“REPEAT” lights.
The current track/file will be played back repeatedly.
If you press a SKIP (. or /) button and select
another track/file, the track/file you selected will be
played back repeatedly.
You can also select a track/file to be repeated when the
unit is stopped. Press the PLAY MODE button, select a
track/file using a SKIP (. or /) button, and then
press the PLAY/PAUSE (G/J) button to start playback.
< Shuffle playback does not work during programmed
playback.
Play only the beginnings of tracks/files
Press the PLAY MODE button repeatedly until “INTRO”
appears to play back only the first 10 seconds of all
tracks/files.
< Intro playback does not work during programmed
playback.
20
During programmed playback, the curren
will be played back repeatedly.
t tracks/files
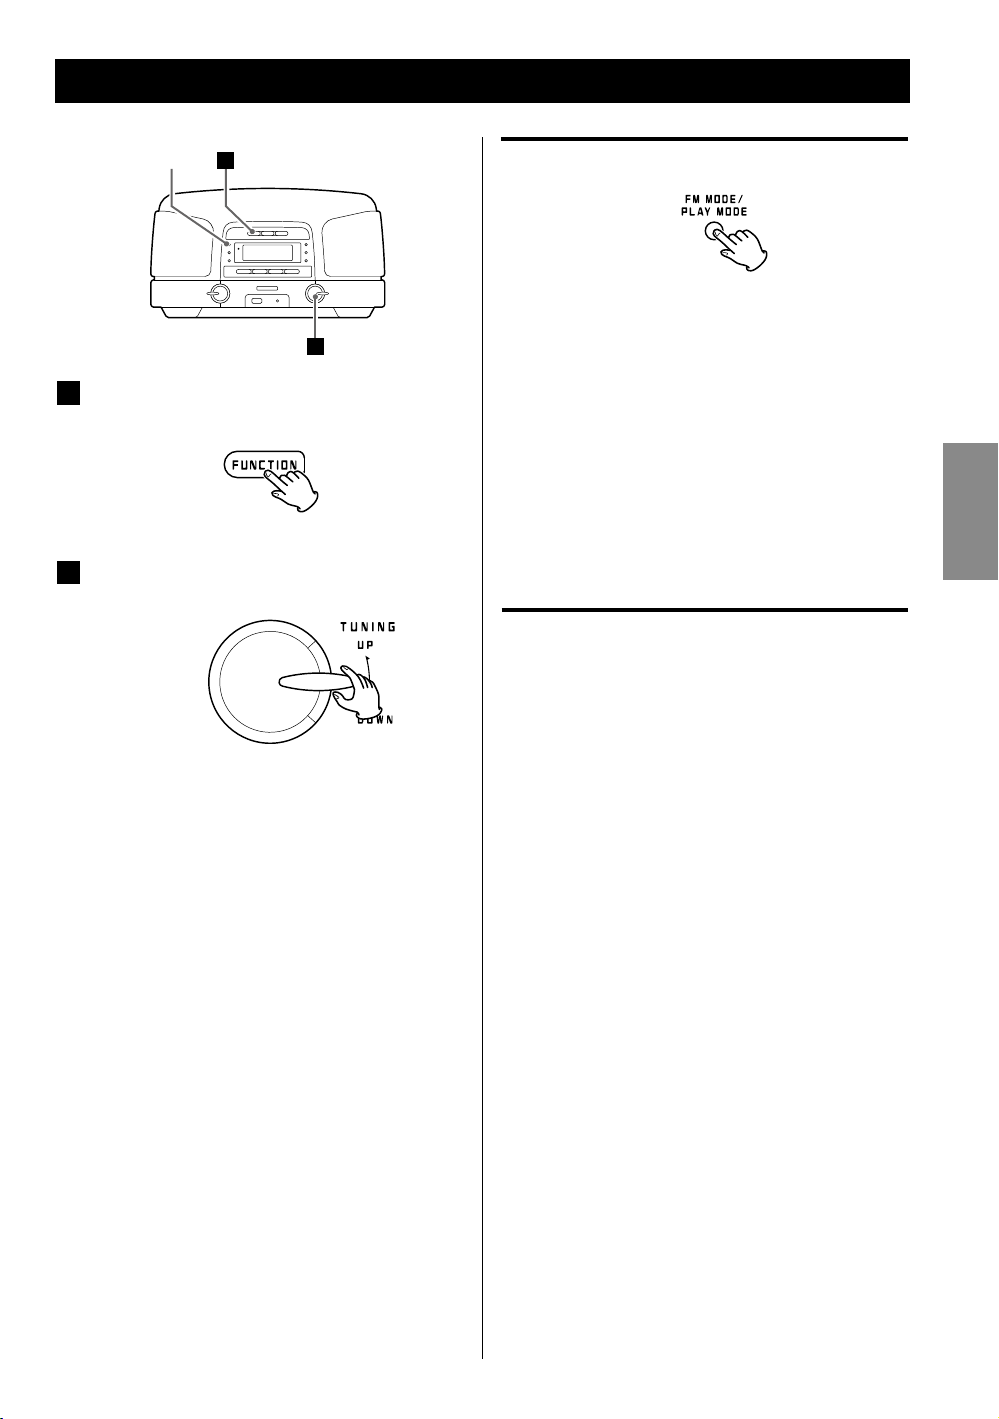
Listening to the Radio
FM MODE
Press the FUNCTION button to select “AM” or
1
“FM”.
Select the station you want to listen to (auto
2
selection).
1
2
FM MODE button
Press this button to alternate between STEREO and
MONO modes.
STEREO
FM stereo broadcasts are received in stereo, and the
“STEREO” indicator lights.
MONO
Select this mode in areas where FM stereo reception is
weak. Reception is forced to mono, reducing unwanted
noise.
If reception is poor
AM broadcast
Turn the unit to find the best position for receiving AM
stations.
ENGLISH
Move the TUNING knob up or down until the
frequency display begins to change.
When a station is tuned in, the tuning process will
stop automatically.
< Turn the TUNING knob to stop auto selection.
< Use the TUNING buttons when using the remote
control.
Selecting stations that cannot be tuned
automatically (manual selection)
Turn the TUNING knob up or down to change the
frequency in small increments. Release it when you
find the station that you want.
< Use the TUNING buttons when using the remote
control.
FM broadcast
Turn the antenna so that you can receive stations
clearly.
< Unplug USB memory when listening to radio
broadcasts.
21
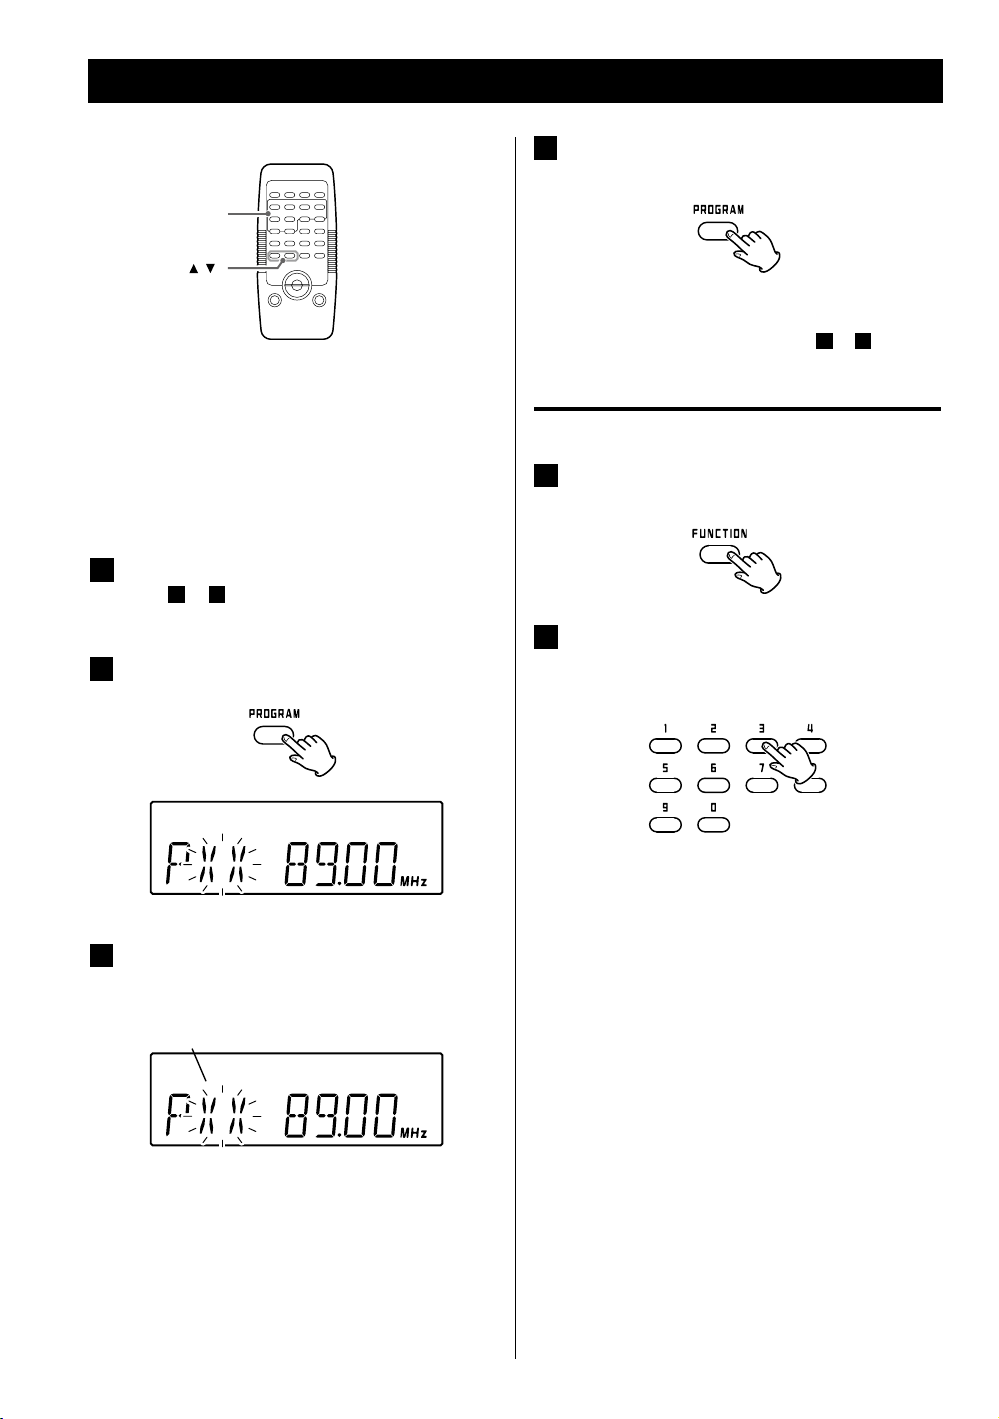
Preset Tuning
1, 2, 3....
MP3/PRESET ( / )
You can store 20 FM and 20 AM stations as preset
channels.
If the power supply is interrupted
dies, the settings kept in memory (clock, preset
stations, timer setting) will be erased.
Tune in to a station that you want to hear (see
1
1
steps
Press the PROGRAM button.
2
to 3 on page 21).
and the battery
Within 10 seconds, press the PROGRAM button.
4
The station is stored. The preset number and the
MEMORY indicator stop blinking.
To store more stations, repeat steps
1
to 4.
How to select preset stations
Press the FUNCTION button to select “AM” or
1
“FM”.
Select a preset channel using the number
2
buttons or the PRESET (5 / b) buttons on the
remote control.
22
Within 5 seconds, use the SKIP buttons to select
3
a preset number to store the station.
Preset number
< On the main unit, use the skip button (. / /) to
select a preset station.
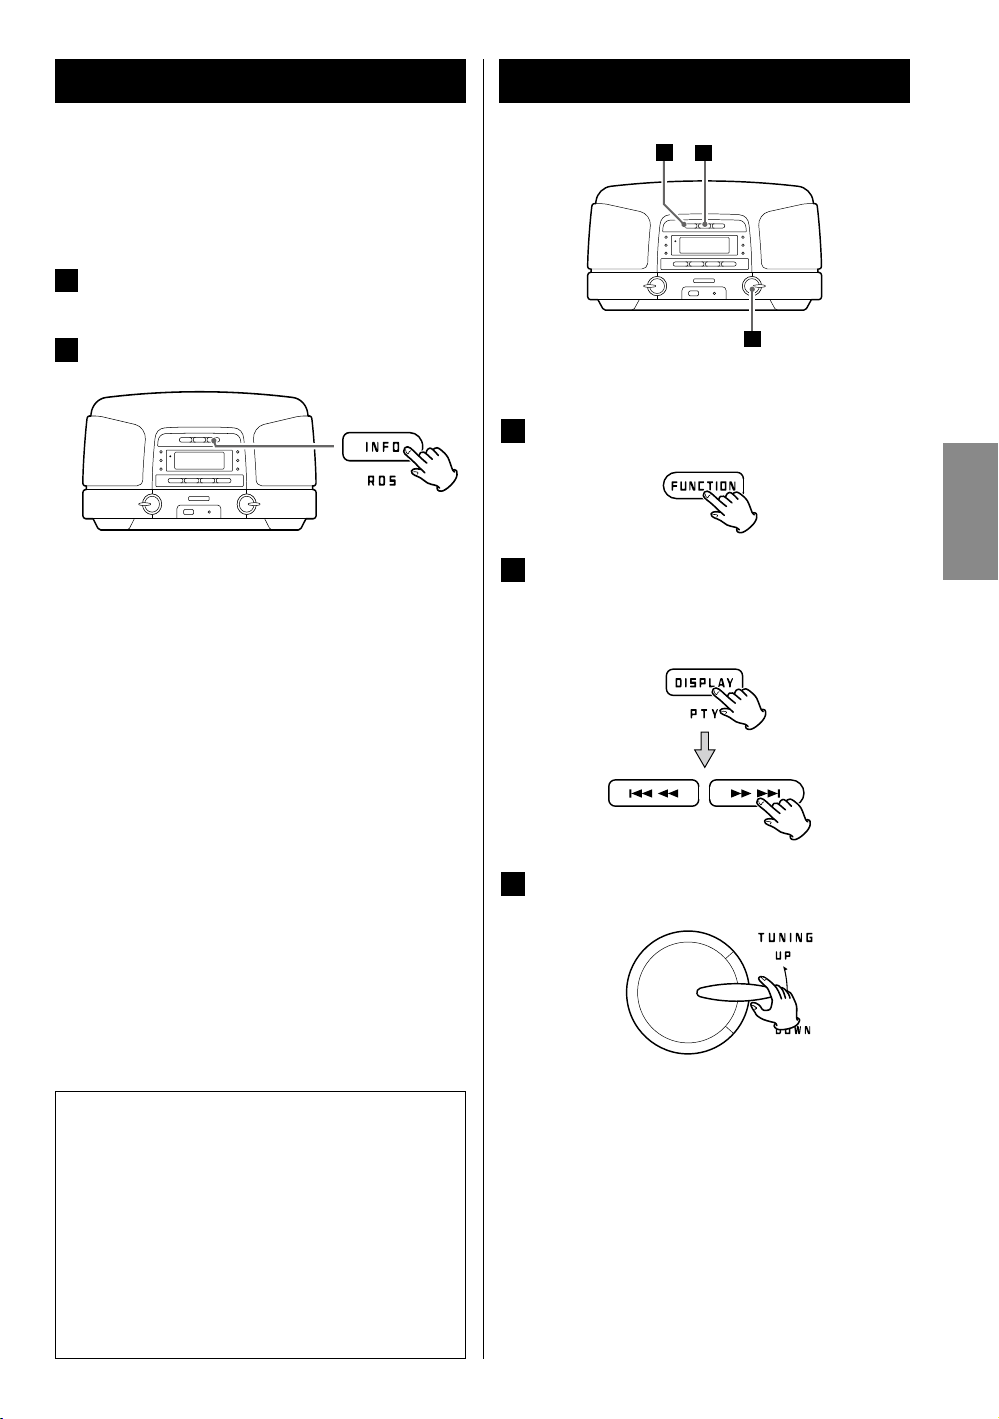
RDS RDS (PTY Search) 1
The Radio Data System (RDS) is a broadcasting service that
allows stations to send additional information along with
regular radio programme signals.
RDS works on the FM waveband in Europe only.
Tune in to an FM RDS station (see page 21).
1
The RDS indicator appears.
Press the RDS button.
2
Press the RDS button again to cycle through the following
RDS information display modes:
PS (Programme Service name)
When you select PS, the station’s name will be displayed.
If there is no PS data, “NO PS” will be displayed.
1
2
3
A station can be searched by this function.
Press the FUNCTION button to select FM.
1
Press and hold the PTY button for more than 2
2
seconds. Then press the SKIP buttons
repeatedly to select the desired programme
type.
ENGLISH
PTY (Programme Type)
When you select PTY, the programme type will be
displayed.
If there is no PTY data, “NO PTY” will be displayed.
RT (Radio Text)
When you select RT, up to 64 characters of information
transmitted by the station will be displayed.
If there is no RT data, “NO TEXT” will be displayed.
CT (Clock Time)
When you select CLOCK TIME, the clock time provided
from the station will be displayed.
If there is no CT data, “NO CT” will be displayed.
RDS Clock Time (CT)
The clock setting will be automatically adjusted
according to the CT data.
If you tune in to an RDS station broadcasting incorrect
CT data, the clock could be set incorrectly, and this
could affect timer operation.
No matter which RDS mode is selected, the unit receives
CT data and adjusts the clock.
To turn the CT mode on or off, press and hold the
INFO button for more than 2 seconds, then turn
the volume knob to select on or off.
Within 5 seconds, turn the TUNING knob.
3
Searching will start.
< When the programme type that you have selected is
found, searching will stop and the programme type
will be displayed.
< If the selected programme type is not found during
PTY Search, it will stop at the beginning frequency.
< If you want to stop searching, press the PTY button.
23
RDS (PTY Search) 2
PTY (Programme Type)
NEWS: Brief announcements, events, public opinion,
reports and real situations
AFFAIRS: Various kinds of information other than
news, including practical announcements,
documents, discussions and analyses
INFO: Daily information and topics such as weather
forecasts, consumer guides and medical
assistance
SPORT: Sports related programmes
EDUCATE: Educational and cultural information.
DRAMA: All kinds of radio concerts and serial dramas
CULTURE:
SCIENCE: Programmes on natural science and
VARIED: Popular programmes such as quizzes,
POP M: Programmes of commercial and popular
ROCK M: Modern music generally composed and
EASY M : Popular music with songs usually lasting less
LIGHT M: Classical, instrumental, choral and light music
CLASSICS: Orchestral music including great operas,
OTHER M: Other music styles, including rhythm & blues,
WEATHER: Weather reports and forecasts
FINANCE: Financial reports and information about
CHILDREN: Children’s programmes
SOCIAL: Social affairs
RELIGION: Religious programmes
PHONE IN: Programmes in which the public expresses its
TRAVEL: Travel reports
LEISURE: Programs about recreational activities
JAZZ: Jazz music
COUNTRY: Country music
NATION M: National music
OLDIES: Music from the so-called golden age of
FOLK M: Folk music
DOCUMENT: Documentaries
TEST
ALARM: Programme with notifications about
All aspects of national and local culture,
including religious events, philosophy, social
science, language and theatre
technology
entertainment, personal interviews, comedy
and satire
songs, information about sales volume of
discs, etc.
played by young musicians
than 5 minutes
favoured by nonprofessionals
symphonies and chamber music
and reggae
commerce and trade
view by phone
popular music
emergencies and natural disasters
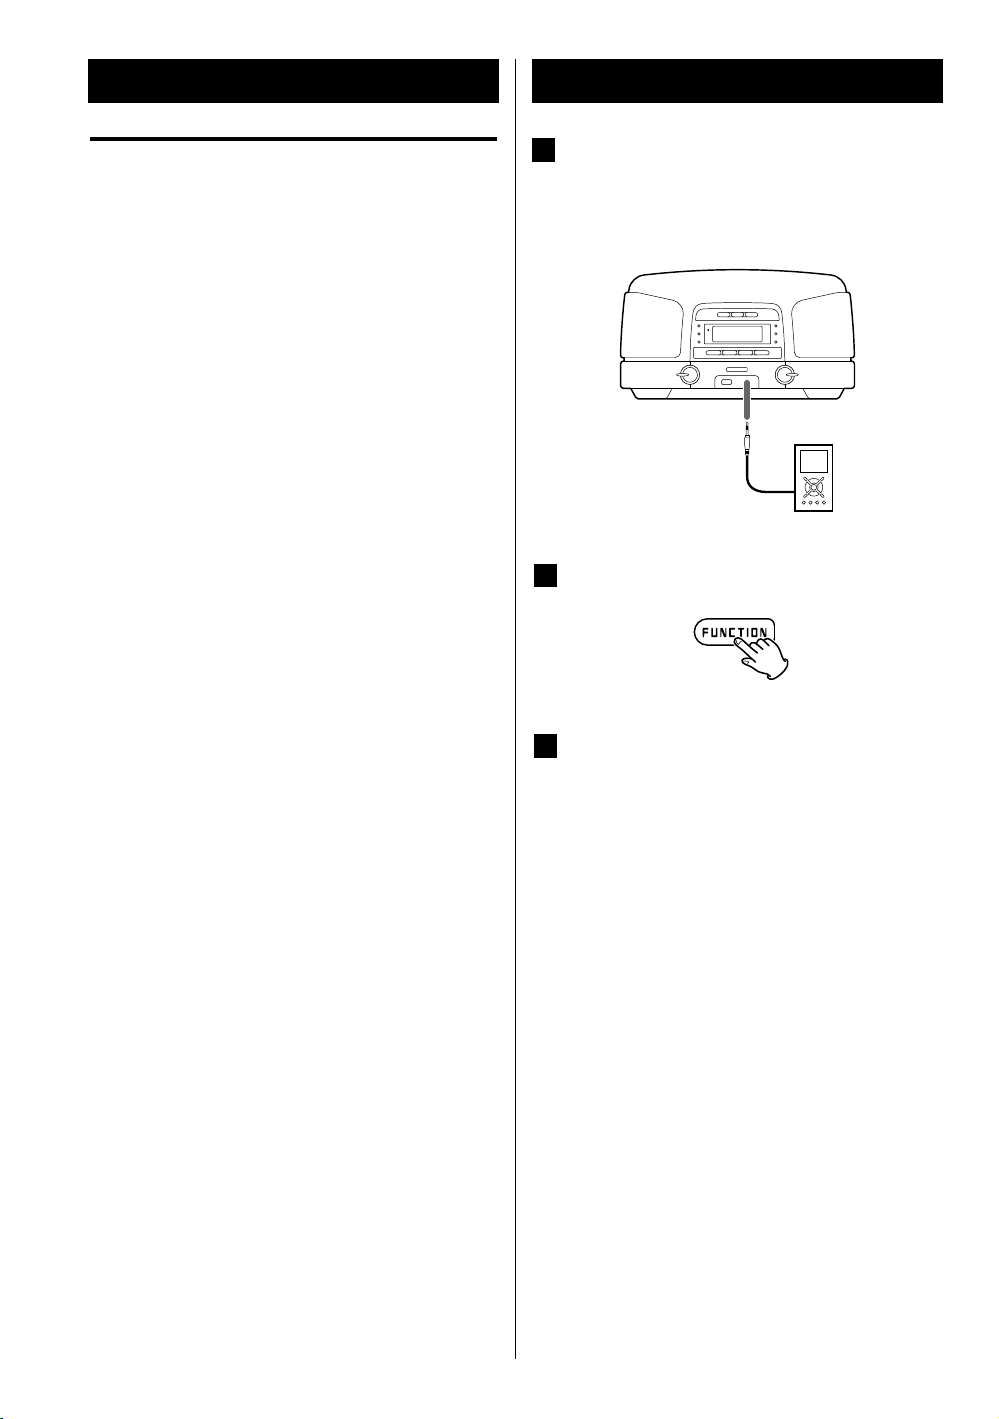
Listening to an External Source
Connect the PHONES jack (audio output jack) of
1
a portable audio player to the AUX IN jack of
this unit using a stereo mini-plug cable.
Press the FUNCTION button to select AUX.
2
Play the source, and adjust the volume using
3
the VOLUME knob of this unit and the controls
of the audio player.
When using the PHONES jack of an audio player, you
must adjust the volume of the audio player or you
might not hear any sound from this unit. Do not turn
the volume of the audio player up too high, however,
because doing so might cause the sound from this
unit to be distorted.
24
Before Recording
Recording to USB 1
This unit can record from CDs, radio and the AUX IN jack
as MP3 files onto USB memory devices, .
CAUTION
< Do not disconnect the USB memory during recording.
Do not disconnect the power cord during recording.
Doing so could damage the products.
< When recording from the AUX IN, adjust the volume
of the external audio source to a suitable level before
recording.
If you do not, the recording quality might be poor.
Note
< A "RECORD" folder is made, and the recorded files are
saved in the following subfolders.
A CDRECE** , COPY_E** or LINE_I** folder is made for
each recording session.
File names are assigned automatically in a regular
sequence as shown in the following illustration.
“RECORD” (root)
CDRECE01 (from an audio CD)
FILE_001.MP3
FILE_002.MP3
FILE_003.MP3
CDRECE02
FILE_001.MP3
FILE_002.MP3
FILE_003.MP3
LINE_I01 (from radio or AUX IN)
FILE_001.MP3
FILE_002.MP3
FILE_003.MP3
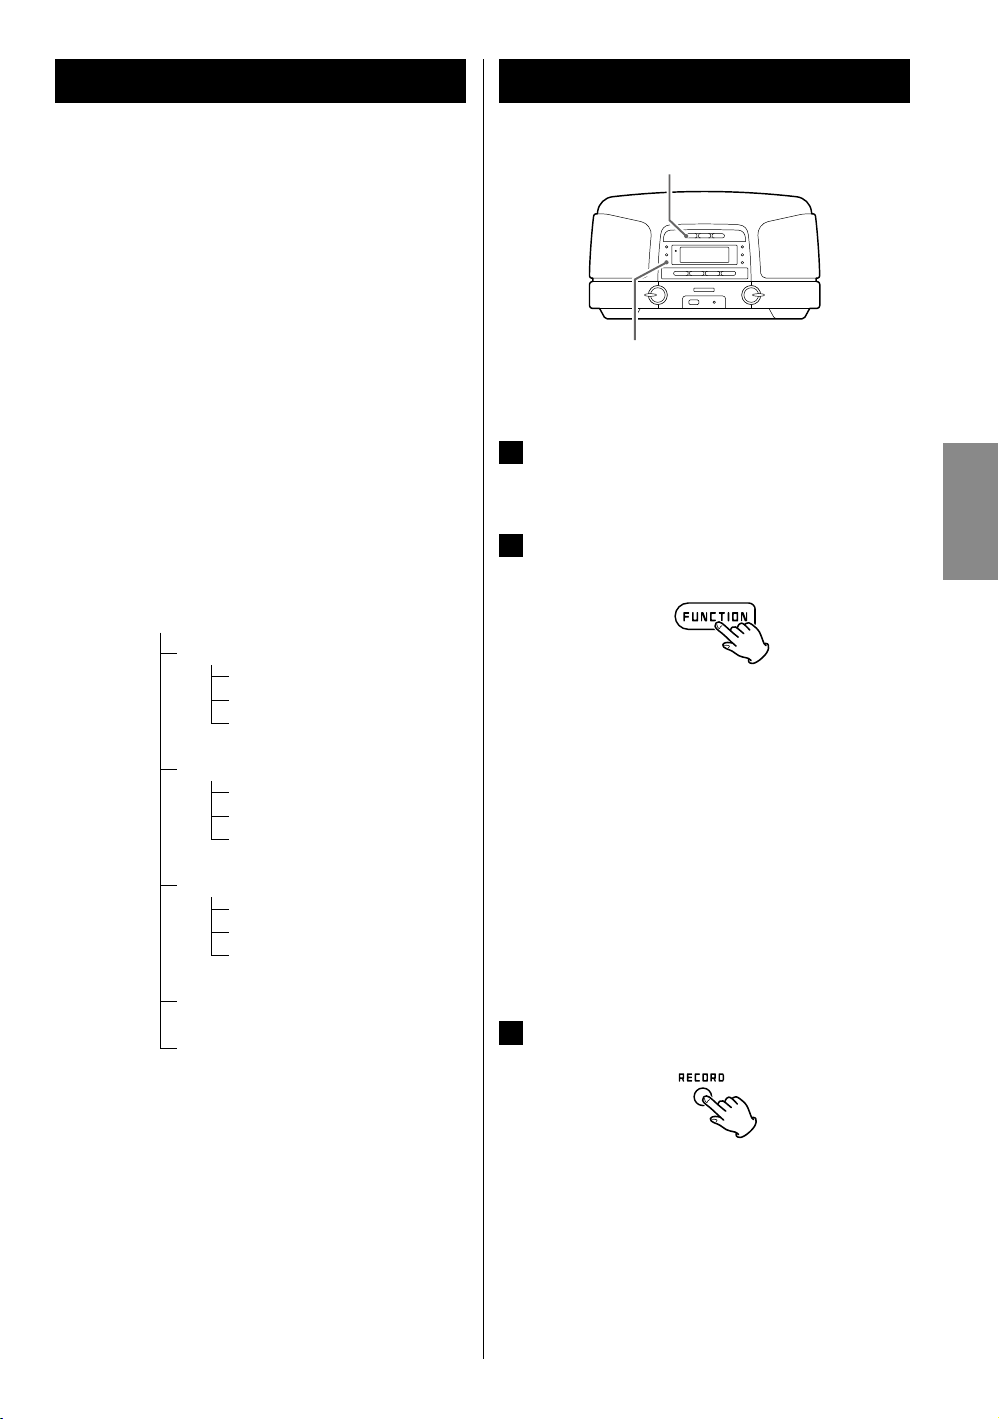
FUNCTION
RECORD
You can record a CD, a radio broadcast or from an external
device as MP3 files onto a USB memory device.
Connect the USB memory device to the USB port
1
of the unit.
Select the source to be recorded (CD, AM, FM, or
2
AUX).
< When the source is radio, tune in to a radio station you
want to record. (page 21)
< When the source is your external input device, play the
source you want to record. (page 24)
In this case, the recording level (recording volume) is
determined by the output volume of your external
input device and thus you cannot adjust the recording
level using this unit. To adjust the recording volume to
the appropriate level, try recording first as a test.
< If you want to record CD tracks in a programmed
order, program the order of CD tracks as shown in
page 18 and then press the STOP(H) button. (The
MEMORY indicator comes on.)
ENGLISH
LINE_I02
COPY_E01 (from an MP3/WMA disc)
< Before recording check the remaining capacity of the
USB memory device using a computer.
You cannot check the remaining memory capacity with
this unit.
< This unit can record up to 999 files in each folder.
Up to 99 files can be made by this unit.
< USB storage devices with capacities of up to 4 GB can
be used with this unit.
Press the RECORD button to start recording.
3
< The recording level (recording volume) is fixed at a
certain level except when an external input device is
used for recording.
< When the source is a CD, playback and recording start
automatically when the RECORD button is pressed.
25
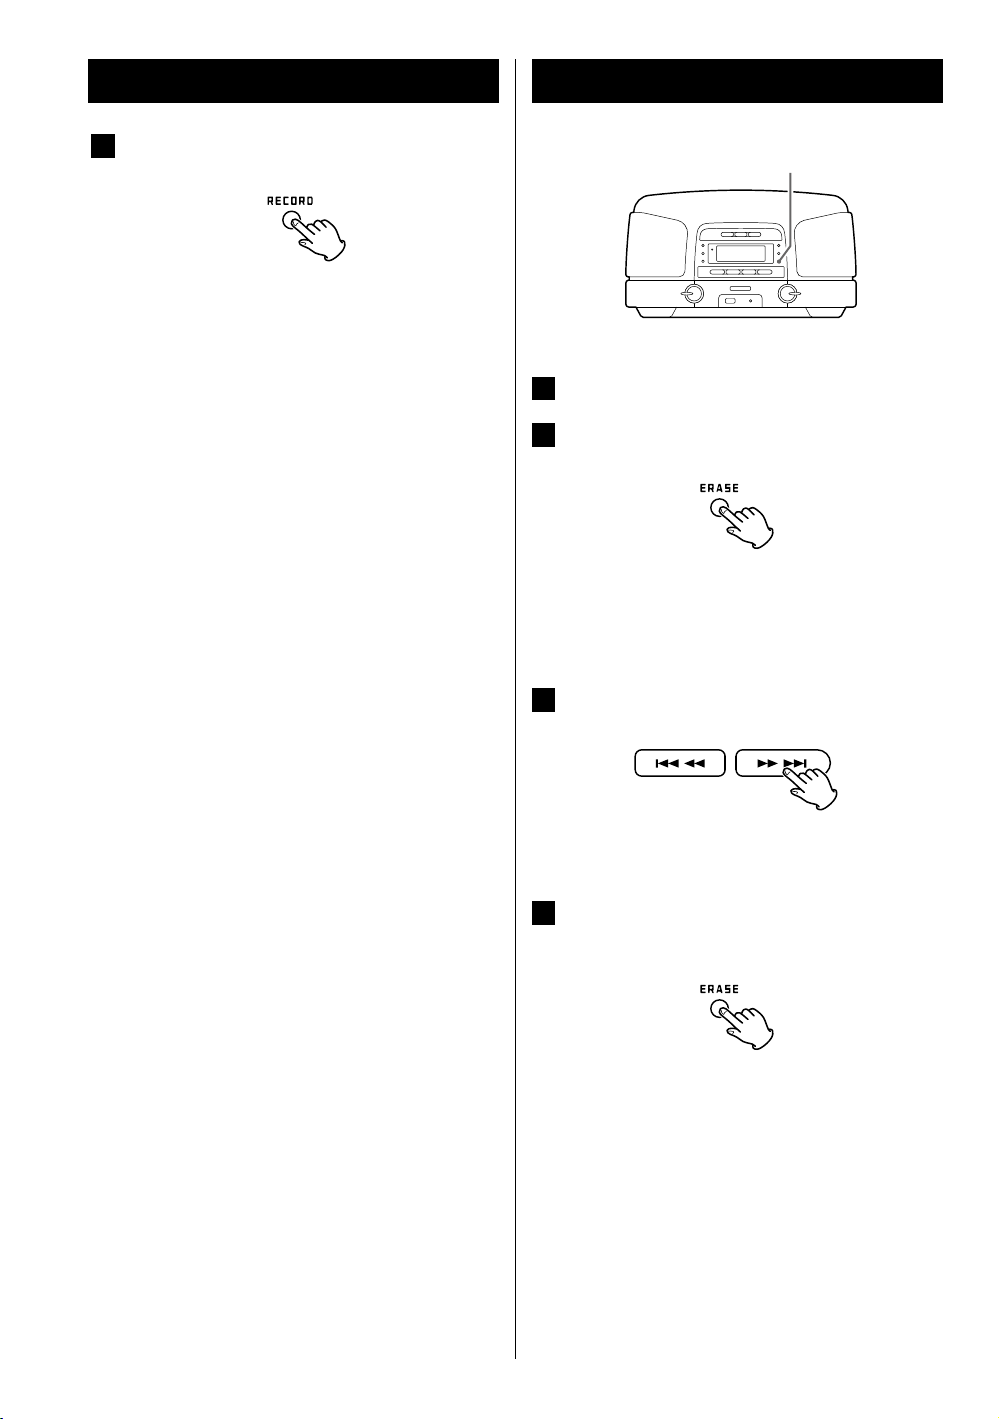
Deleting a file from USBRecording to USB 2
4 If you want to stop recording, press the RECORD
button again.
< Only the RECORD button and the volume knob can be
used while recording. The volume knob only affects
the recorded level when recording from the AUX IN.
< You cannot record to a USB memory device if it has no
free space or the device is locked.
< Timer recording is also available. (page 28)
ERASE
Play the file that you want to delete.
1
Press the ERASE button.
2
< “CANCEL” is displayed.
If you want to cancel the erasing, press the ERASE
button again.
Press the SKIP button (. / /).
3
26
< ERASE is displayed.
Within 10 seconds, press the ERASE button
4
again.
< Deletion will be cancelled if you do not press the
ERASE button again within 10 seconds.
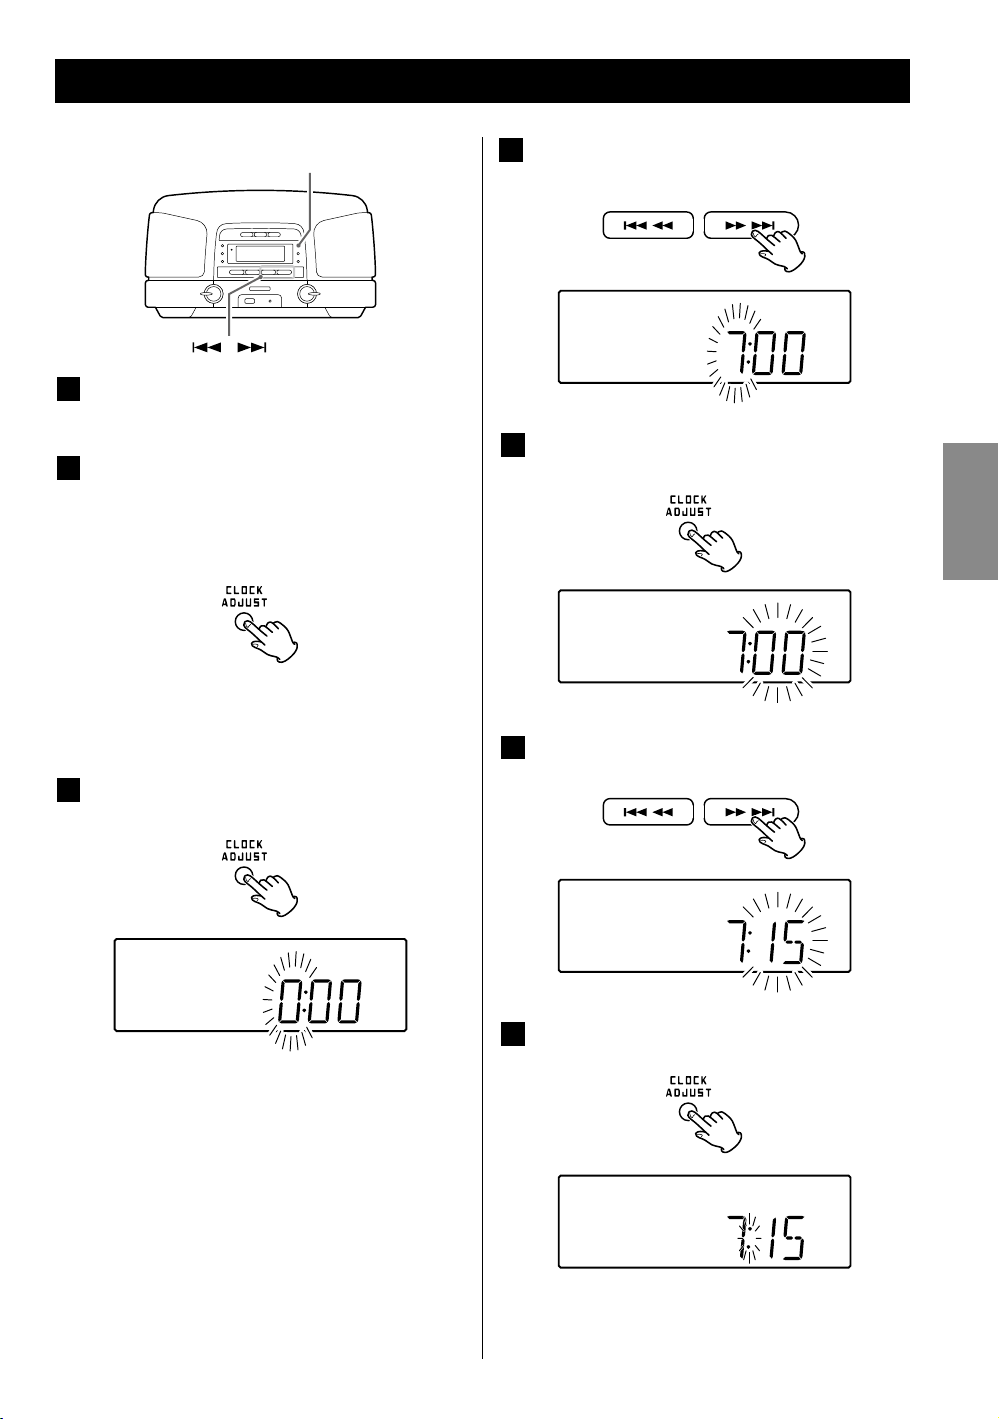
Setting the Clock
CLOCK ADJ
The clock can be set both when the power is on
1
and when the unit is in standby.
Press the CLOCK ADJ button for more than 2
2
seconds.
“12 H” or “24 H” blinks on the display. If you want to
change the clock display mode, press the . or
/ button.
Use the SKIP (.//) buttons to set the
4
current hour.
Press the CLOCK ADJ button again.
5
The “minute” value blinks.
ENGLISH
< If no button is pressed for 10 seconds, clock setting
mode will end.
Press the CLOCK ADJ button again.
3
The “hour” value blinks.
Use the SKIP (.//) buttons to set the
6
current minute.
Press the CLOCK ADJ button again.
7
The clock starts.
27
 Loading...