

41009606-A101
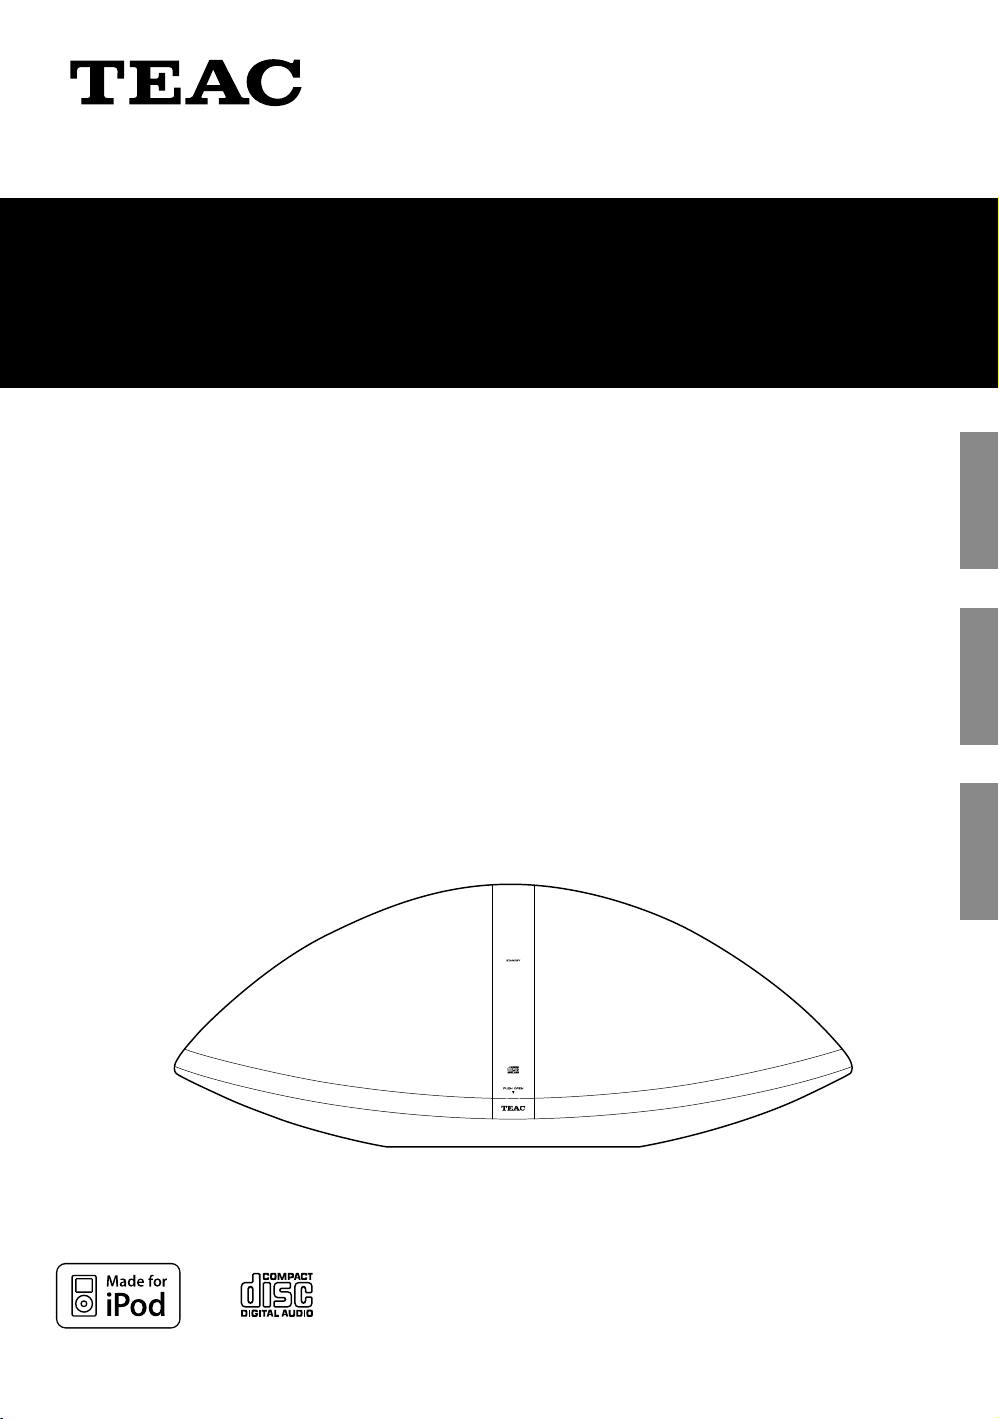
SR-100i
Hi-Fi TABLE RADIO/CD
OWNER’S MANUAL
MODE D'EMPLOI
MANUAL DEL USUARIO
ENGLISH FRANÇAIS ESPAÑOL
IMPORTANT SAFETY INSTRUCTIONS
1) Read these instructions.
CAUTION: TO REDUCE THE RISK OF ELECTRIC SHOCK,
DO NOT REMOVE COVER (OR BACK). NO USERSERVICEABLE PARTS INSIDE. REFER SERVICING TO
QUALIFIED SERVICE PERSONNEL.
The lightning flash with arrowhead symbol,
within an equilateral triangle, is intended to
alert the user to the presence of uninsulated
“dangerous voltage” within the product’s
enclosure that may be of sufficient magnitude
to constitute a risk of electric shock to persons.
The exclamation point within an equilateral
triangle is intended to alert the user to the
presence of important operating and
maintenance (servicing) instructions in the
literature accompanying the appliance.
2) Keep these instructions.
3) Heed all warnings.
4) Follow all instructions.
5) Do not use this apparatus near water.
6) Clean only with dry cloth.
7) Do not block any ventilation openings. Install in
accordance with the manufacturer’s instructions.
8) Do not install near any heat sources such as radiators,
heat registers, stoves, or other apparatus (including
amplifiers) that produce heat.
9) Do not defeat the safety purpose of the polarized or
grounding-type plug. A polarized plug has two blades
with one wider than the other. A grounding type plug
has two blades and a third grounding prong. The wide
blade or the third prong are provided for your safety. If
the provided plug does not fit into your outlet, consult
an electrician for replacement of the obsolete outlet.
MPEG Layer-3 audio coding technology licensed from
Fraunhofer IIS and Thomson.
This product is protected by certain intellectual property
rights of Microsoft. Use or distribution of such technology
outside of this product is prohibited without a license from
Microsoft.
iPhone, iPod, iPod classic, iPod nano, iPod shuffle, and iPod
touch are trademarks of Apple Inc., registered in the U.S.
and other countries.
“Made for iPod” means that an electronic accessory
has been designed to connect specifically to iPod and
has been certified by the developer to meet Apple
performance standards.
Apple is not responsible for the operation of this device or
its compliance with safety and regulatory standards.
Other company names and product names in this
document are the trademarks or registered trademarks of
their respective owners.
2
10) Protect the power cord from being walked on or
pinched particularly at plugs, convenience receptacles,
and the point where they exit from the apparatus.
11) Only use attachments/accessories specified by the
manufacturer.
12) Use only with the cart, stand,
tripod, bracket, or table specified
by the manufacturer, or sold with
the apparatus. When a cart is used,
use caution when moving the cart/
apparatus combination to avoid
injury from tip-over.
13) Unplug this apparatus during lightning storms or when
unused for long periods of time.
14) Refer all servicing to qualified service personnel.
Servicing is required when the apparatus has been
damaged in any way, such as power-supply cord or
plug is damaged, liquid has been spilled or objects
have fallen into the apparatus, the apparatus has been
exposed to rain or moisture, does not operate normally,
or has been dropped.
< Do not expose this apparatus to drips or splashes.
For U.S.A.
< Do not place any objects filled with liquids, such as
vases, on the apparatus.
< Do not install this apparatus in a confined space such as
a book case or similar unit.
< The apparatus draws nominal non-operating power
from the AC outlet with its POWER or STANDBY/ON
switch not in the ON position.
< The apparatus should be located close enough to the
AC outlet so that you can easily grasp the power cord
plug at any time.
< The mains plug is used as the disconnect device, the
disconnect device shall remain readily operable.
< If the product uses batteries (including a battery pack
or installed batteries), they should not be exposed to
sunshine, fire or excessive heat.
< CAUTION for products that use replaceable lithium
batteries: there is danger of explosion if a battery is
replaced with an incorrect type of battery. Replace only
with the same or equivalent type.
< Caution should be taken when using earphones or
headphones with the product because excessive sound
pressure (volume) from earphones or headphones can
cause hearing loss.
WARNING: TO PREVENT FIRE OR SHOCK
HAZARD, DO NOT EXPOSE THIS APPLIANCE
TO RAIN OR MOISTURE.
This equipment has been tested and found to comply
with the limits for a Class B digital device, pursuant
to Part 15 of the FCC Rules. These limits are designed
to provide reasonable protection against harmful
interference in a residential installation. This equipment
generates, uses, and can radiate radio frequency energy
and, if not installed and used in accordance with the
instructions, may cause harmful interference to radio
communications. However, there is no guarantee that
interference will not occur in a particular installation.
If this equipment does cause harmful interference to
radio or television reception, which can be determined
by turning the equipment off and on, the user is
encouraged to try to correct the interference by one or
more of the following measures:
r Reorient or relocate the equipment and/or the
receiving antenna.
r Increase the separation between the equipment and
receiver.
r Connect the equipment into an outlet on a circuit
different from that to which the receiver is connected.
r Consult the dealer or an experienced radio/TV
technician for help.
CAUTION
Changes or modifications to this equipment not
expressly approved by TEAC CORPORATION for
compliance will void the user’s warranty.
This product has been designed and manufactured
according to FDA regulations “title 21, CFR, chapter 1,
subchapter J, based on the Radiation Control for Health
and Safety Act of 1968“, and is classified as class 1 laser
product. There is not hazardous invisible laser radiation
during operation because invisible laser radiation emitted
inside of this product is completely confined in the
protective housings.
The label required in this regulation is as follows:
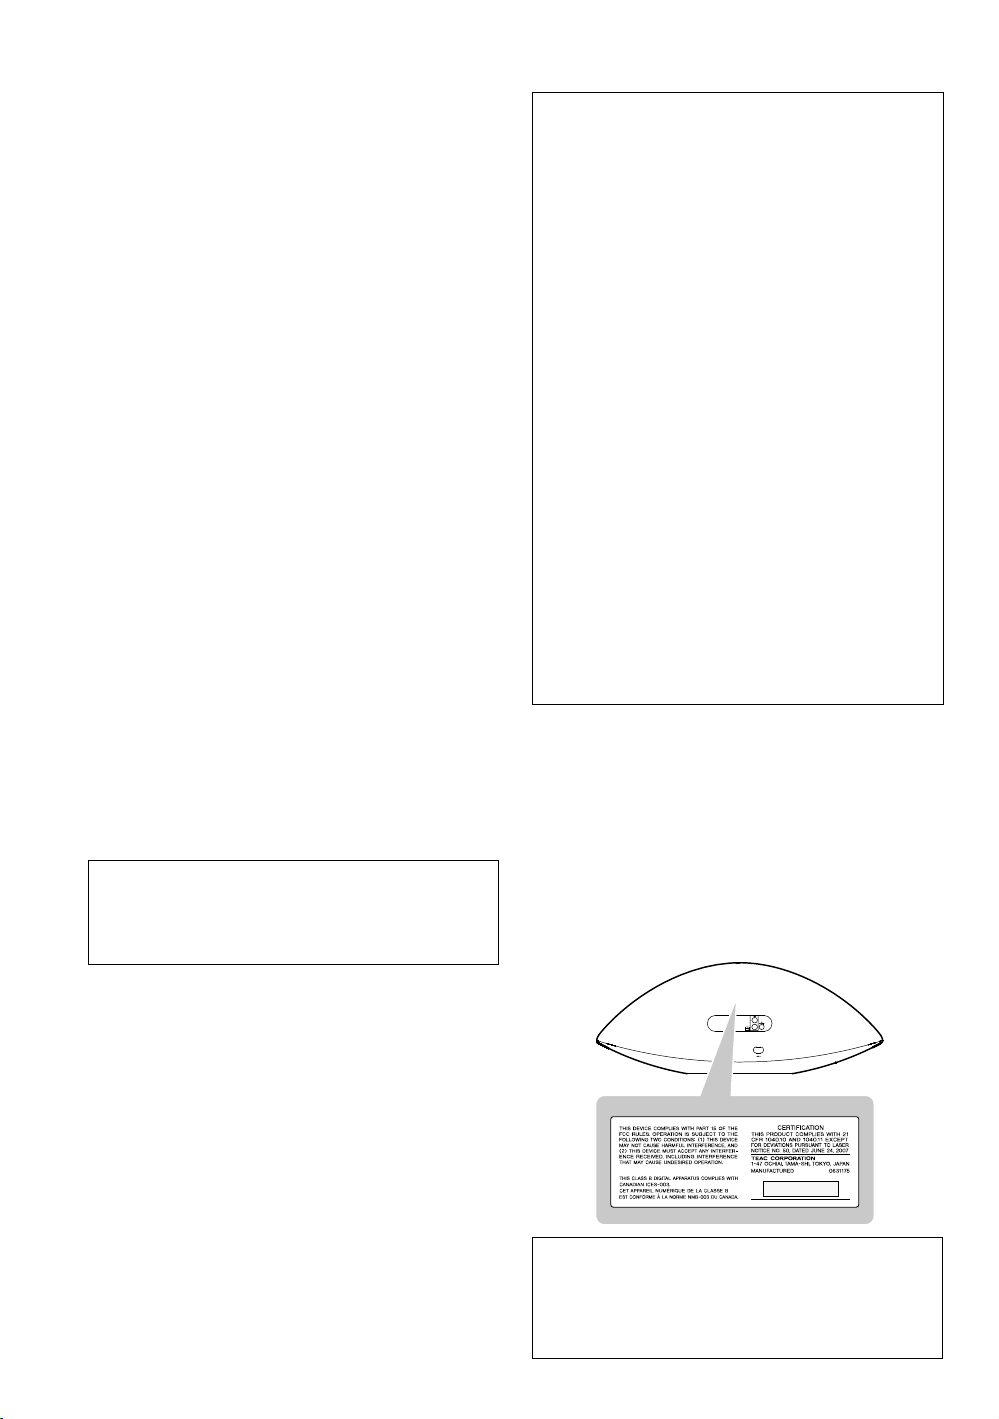
For U.S.A.
Back of the unit
CAUTION
< DO NOT REMOVE THE EXTERNAL CASES OR CABINETS
TO EXPOSE THE ELECTRONICS. NO USER SERVICEABLE
PARTS ARE WITHIN!
< IF YOU ARE EXPERIENCING PROBLEMS WITH THIS
PRODUCT, CONTACT TEAC FOR A SERVICE REFERRAL. DO
NOT USE THE PRODUCT UNTIL IT HAS BEEN REPAIRED.
< USE OF CONTROLS OR ADJUSTMENTS OR
PERFORMANCE OF PROCEDURES OTHER THAN THOSE
SPECIFIED HEREIN MAY RESULT IN HAZARDOUS
RADIATION EXPOSURE.
Optical pickup
Type : KHS-313A
Manufacturer : Sony Electronics Inc.
Laser output : 7 mW
Wavelength : 770 - 800 nm
3

Contents
Thank you for choosing TEAC. Read this manual
carefully to get the best performance from this unit.
Before Using the Unit ..................................5
Discs ..................................................6
USB Storage Devices. . . . . . . . . . . . . . . . . . . . . . . . . . . . . . . . . . .7
MP3/WMA Compatibility ..............................7
Compatible iPod ......................................8
Connections ..........................................9
Identifying the Parts (Main Unit) ......................10
Identifying the Parts (Remote Control Unit) ...........12
Remote Control Unit .................................14
Setting the Clock .....................................15
Basic Operation ......................................16
iPod
Listening to an iPod ..................................18
CD USB
Listening to a Disc ....................................20
Listening to a USB Storage Device ....................21
Basic Playback ........................................22
Programmed Playback ...............................24
Repeat Playback ......................................26
Shuffle Playback ......................................27
AUX
Listening to an External Source .......................27
FM
Listening to the FM Radio. . . . . . . . . . . . . . . . . . . . . . . . . . . . .28
Preset Tuning .........................................29
Wake Up Timer .......................................30
Troubleshooting ......................................31
MP3/WMA Playback Order ............................33
Specifications ........................................33
4
Before Using the Unit
What’s in the box
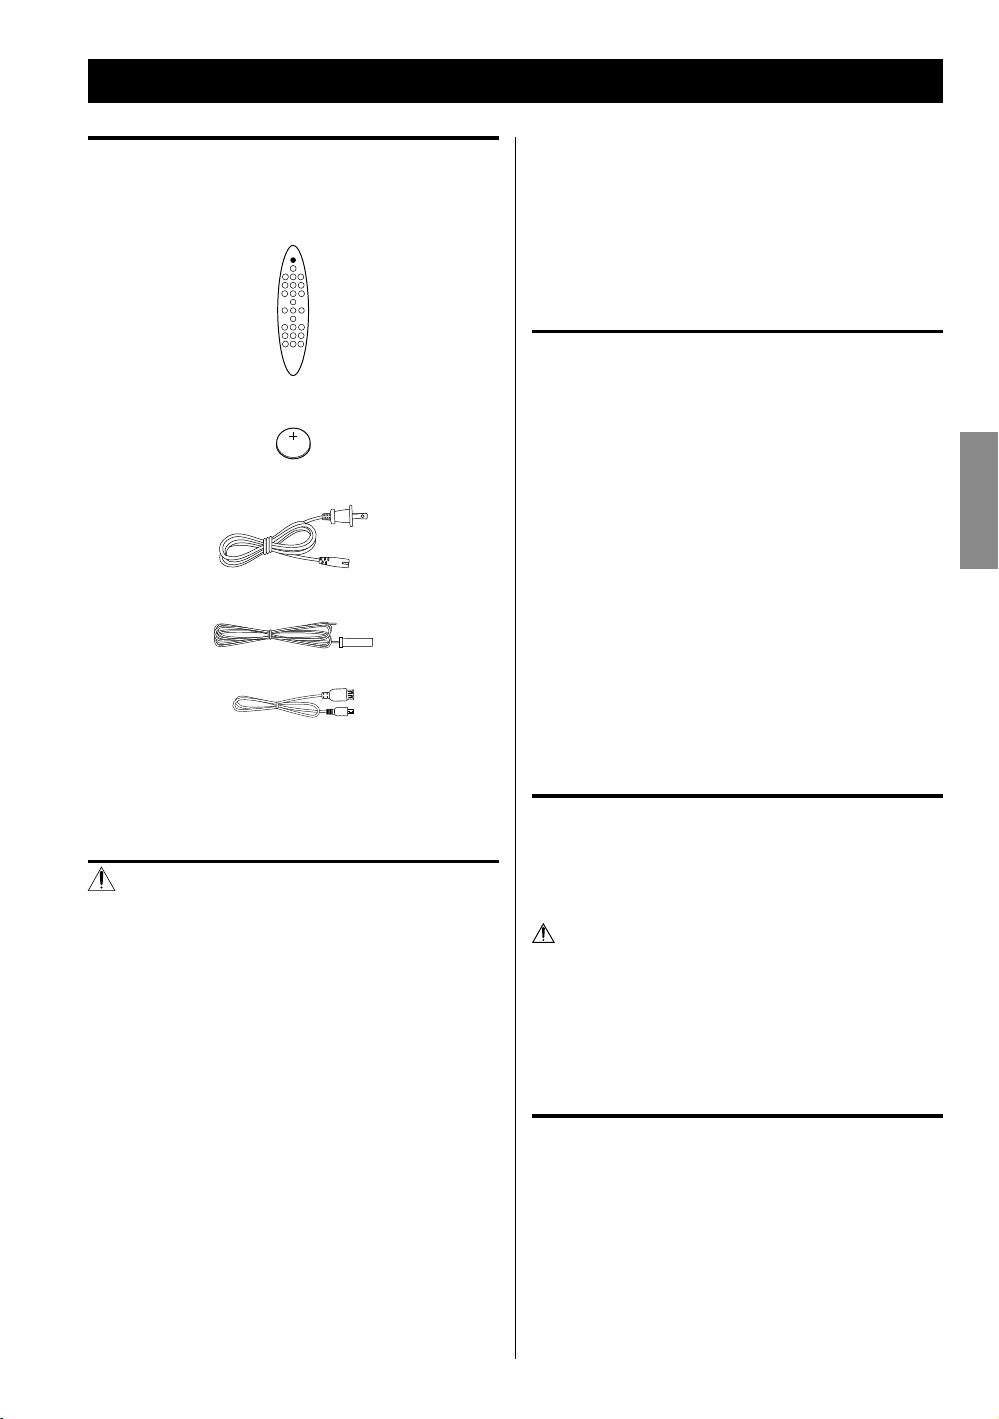
Confirm the supplied standard accessories.
Remote control unit (RC-1265) x 1
Battery (CR2025) for remote control unit x 1
AC power cord x 1
FM antenna x 1
USB cable x 1
Owner’s manual (this document) x 1
< Keep this manual in a safe place for future reference.
< When removing the AC power plug from the wall
socket, always pull directly on the plug, never yank on
the cord.
< Always remove the disc before relocating or moving
this unit. Moving the unit with a disc inside it could
cause malfunction.
Placement of the unit
< Choose the installation location of your unit carefully.
Avoid placing it in direct sunlight or close to a source of
heat. You should also avoid locations that are subject to
vibration, excessive dust, heat, cold or moisture.
< As the unit may become warm during operation, always
leave sufficient space around it for ventilation.
< Do not place the unit on an amplifier, a receiver or any
other device that generates heat.
< When the unit is turned on, if a TV is turned on nearby
lines might appear on the TV screen depending on the
frequency of the TV broadcast. This is not a malfunction
of the unit or the TV. If you see such lines, move the unit
and the TV further apart.
ENGLISH
Warranty card x 1
CAUTION
< Do not tilt the unit with a disc inserted. It may damage
the disc and cause a malfunction.
< Do not move the unit during disc playback.
During playback, the disc rotates at high speed. Do not
lift or move the unit during playback. Doing so might
damage the disc or the unit.
< The voltage supplied to the unit should match the
voltage as printed on the rear panel. If you are in any
doubt regarding this matter, consult an electrician.
< Do not open the cabinet because this might result in
damage to the circuitry or electrical shock. If a foreign
object should get into the unit, contact your dealer or
service company.
Maintenance
If the surface of the unit gets dirty, wipe with a soft cloth or
use a diluted mild liquid soap. Allow the surface of the unit
to dry completely before using.
For safety, disconnect the power cord from the outlet
before cleaning.
< Never spray liquid directly on this unit.
< Do not use thinner or alcohol as they could damage the
surface of the unit.
Beware of condensation
When the unit is moved from a cold to a warm place,
or used after a sudden temperature change, there is a
danger of condensation on the lens of CD player. Vapour
in the air could condense on internal mechanisms, making
correct operation erratic or impossible. To prevent this,
or if this occurs, leave the unit turned on for one or two
hours. Then the unit will stabilize at the temperature of its
surroundings.
5
Discs
Discs that can be played on this unit
CDs that bear the “COMPACT disc DIGITAL AUDIO”
logo (12 cm).
Do not use 8 cm discs with this unit.
CD-R and CD-RW discs that have been correctly
recorded in the audio CD format and finalized.
Finalized CD-R and CD-RW discs that contain MP3/
WMA files.
Caution:
Playback of any other type of disc could cause
loud noise and damage to speakers as well as
harm hearing. Never play back any other type of
disc.
< Copy-protected discs and other discs that do not
conform to the CD standard might not play correctly
in this player. If you use such discs in this unit, TEAC
Corporation and its subsidiaries will not be responsible
for any consequences or guarantee the quality of
reproduction. If you experience problems with such
non-standard discs, you should contact their issuers.
Caution:
< Do not use 8cm discs. Using them could cause
malfunction or damage the unit.
< Do not play any disc that is warped, deformed or
damaged. Playing such discs could cause irreparable
harm to the playing mechanisms.
< Printable CD-R and CD-RW discs are not recommended
because their label sides could be sticky and damage
the unit.
< Do not stick papers or protective sheets on the discs
and do not use any protective coating sprays.
< Use a soft oil-based felt-tipped pen to write information
on the label side. Never use a ball-point or hard-tipped
pen, as this could cause damage to the recorded side.
< Never use a stabilizer. Using commercially available CD
stabilizers with this unit will damage the mechanisms
and cause them to malfunction.
< Do not use irregularly-shaped discs (octagonal, heart-
shaped, business card size, etc.). CDs with these shapes
could damage the unit.
About CD-R/CD-RW discs
This unit can play back CD-R and CD-RW discs that have
been recorded in the audio CD (CD-DA), MP3, and WMA
format.
< Discs created by a CD recorder must be finalized before
use with this unit.
< Depending on disc quality and recording conditions,
playback of some discs might not be possible. Please
see the manual for the device that you used to create
the disc.
< If you are uncertain about the handling of a CD-R
or CD-RW disc, please contact the seller of the disc
directly.
6
Handling precautions
< Always insert a disc with the label side facing you. Only
one side of a Compact Disc can be played.
< To remove a disc from its storage case, press down on
the center of the case and lift the disc out, holding it
carefully by the edges.
How to remove the disc How to hold the disc
MP3/WMA Compatibility
Storage precautions
< Discs should be returned to their cases after use to
avoid dust and scratches that could cause the laser
pickup to “skip.”
< Do not expose discs to direct sunlight or high-
temperature and humidity for extended periods. Long
exposure to high temperatures will warp discs.
< CD-R and CD-RW discs are more sensitive to the effects
of heat and ultraviolet rays than ordinary CDs. It is
important that they are not stored in locations where
they will be exposed to direct sunlight. They should also
be kept away from sources of heat, such as radiators and
heat-generating electrical devices.
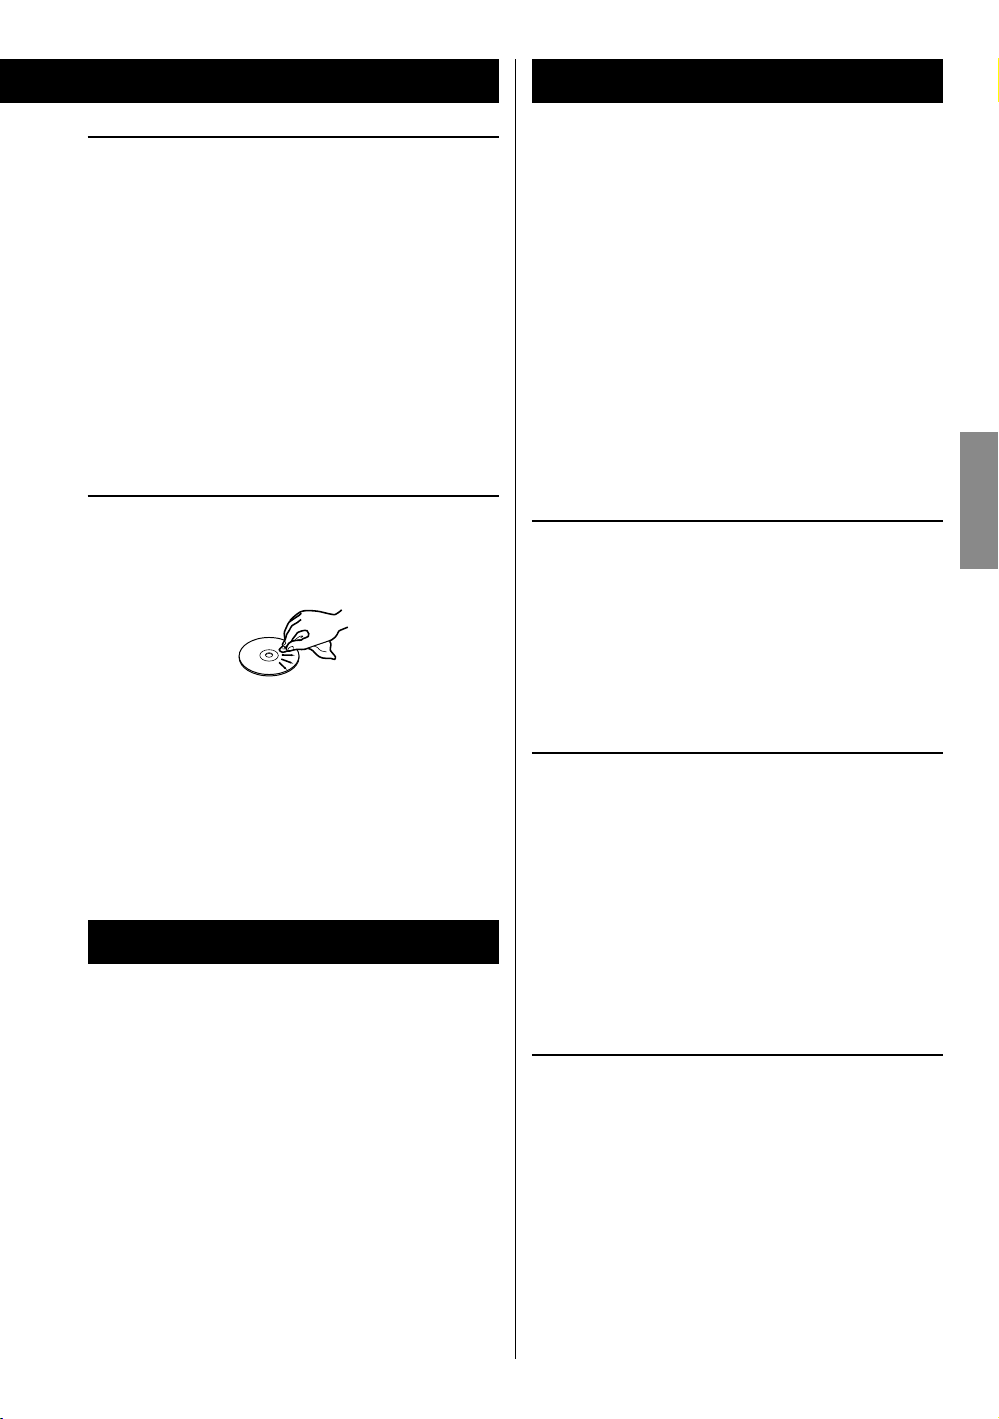
Maintenance
< If a disc becomes dirty, wipe its surface radially from the
center hole outward towards the outer edge with a soft,
dry cloth.
< Never clean discs using chemicals such as record sprays,
antistatic sprays and fluids, benzene and thinner. Such
chemicals will do irreparable damage to the disc’s
plastic surface.
This unit can play MP3/WMA files recorded on a CD-R,
CD-RW discs and USB storage device. Refer the instruction
manual of the software when making an MP3 or a WMA
file using a PC.
< This unit can play back monaural and stereo MP3
files that are in the MPEG-1 Audio Layer 3 format with
a sampling rate of 44.1 or 48 kHz and a bit rate of
320 kbps or less.
< WMA file must have a sampling rate of 44.1 kHz, and a
bit-rate of 192 kbps or less.
< This unit is not compatible with discs that have been
recorded using multiple sessions. Only the first session
can be played back.
< This unit cannot play copyright protected files.
File information display
The display of this unit can only show single-byte letters
and numbers.
< If the file information contains Japanese, Chinese or
other double-byte characters, playback is possible but
the name will not be shown correctly.
Cautions when preparing MP3/WMA files using a
computer or other device
ENGLISH
USB Storage Devices
Compatibility
< Only USB flash memory can be used.
< Some flash memory players that charge from a USB
terminal cannot be used for playback.
< Hard disk drives, CD/DVD drives, and other devices
connected via USB cannot be used.
< This unit cannot copy or move files.
< Playable formats: FAT16, FAT32
< NTFS, HFS and HFS+ formats cannot be used.
< Max. number of playable folders: 99
< Max. number of playable files: 99
< Depending on the conditions of a USB storage device,
this unit might not be able to play the files on it or
skipping might occur.
< Always include the extension in the file name. This unit
recognizes MP3 files by their “.mp3”, and WMA files by
their “.wma” file extensions.
< Always close the session (complete disc creation).
This unit cannot play discs if the session has not been
closed.
< Carefully read the manual for the software that you are
using when you create an MP3/WMA disc.
Files that are unplayable or only partially playable
< Files without extensions cannot be played. Files that are
not in the MP3/WMA format cannot be played even if
they have extensions.
< Variable bit rate files might not play back correctly.
< If the disc/USB storage device contains more than
99 files or 99 folders, this unit can not play it back
correctly.
< Depending on disc/USB storage device conditions, this
unit might not be able to play a disc or skipping might
occur.
7
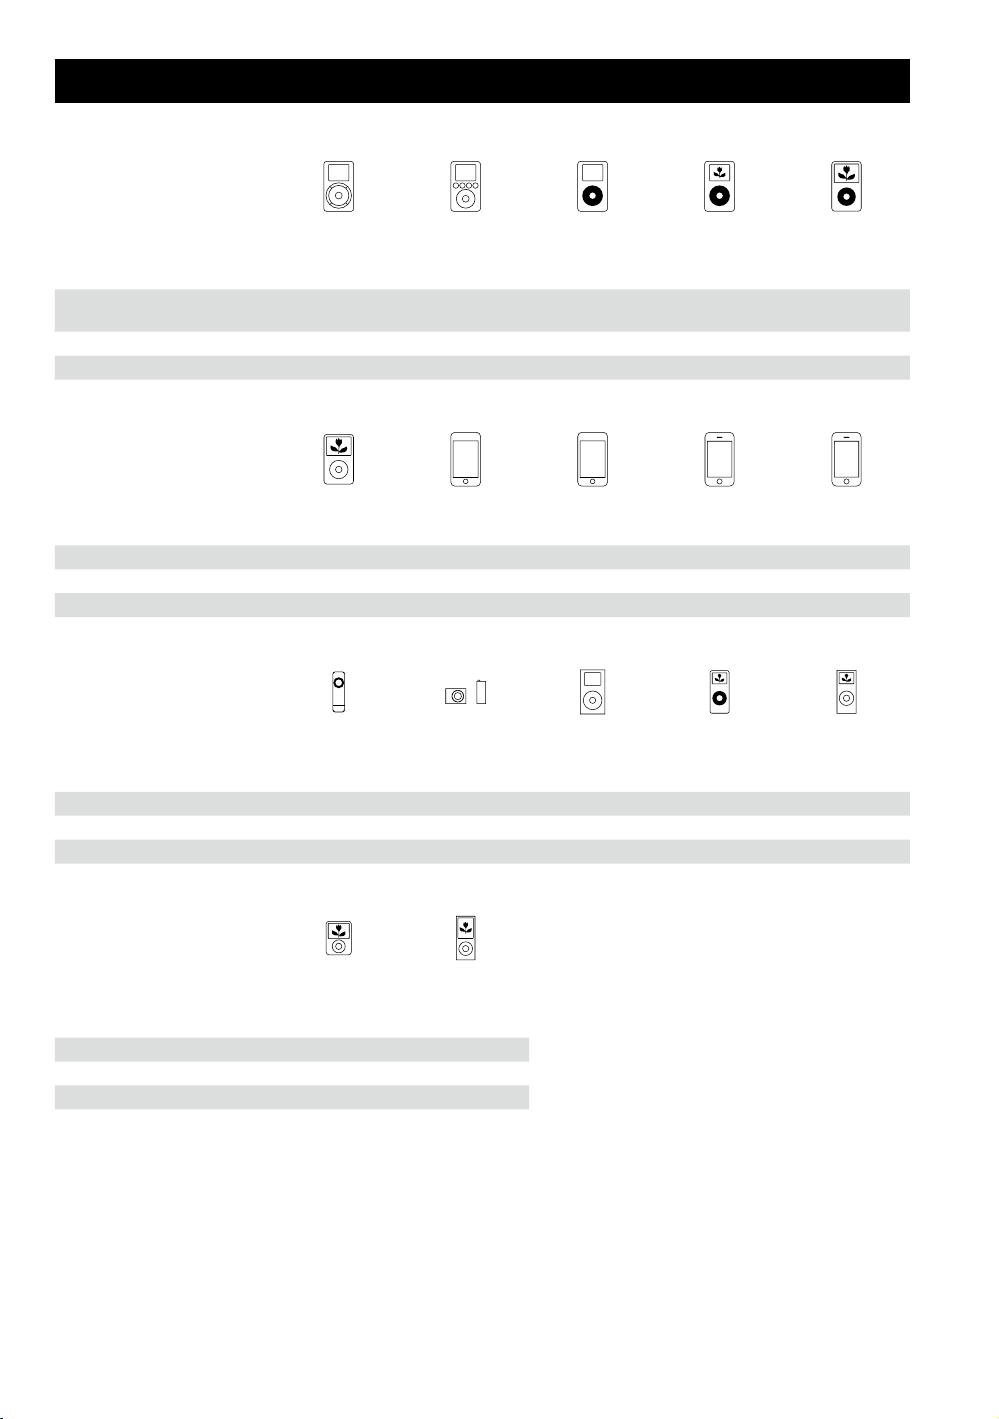
Compatible iPod
iPod
1st + 2nd generation
Capacity 5/10/20GB
Connection to SR-100i AUX Dock Dock Dock Dock
Charging through SR-100i No No Yes Yes Yes
iPod classic
Capacity 80/120/160GB 8/16/32GB 8/16/32/64GB 4/8/16GB 8/16/32GB
Connection to SR-100i Dock Dock Dock Dock** Dock**
Charging through SR-100i Yes Yes Yes Yes Yes
iPod shuffle
1st generation
Capacity 512MB/1GB 1/2/4GB 4/6GB 1/2/4GB 2/4/8GB
Connection to SR-100i AUX AUX Dock Dock Dock
Charging through SR-100i No No Yes Yes Yes
iPod
3rd generation
10/15/20/
30/40GB
iPod touch
1st generation*
iPod shuffle
2nd/3rd generation
iPod
4th generation
20/40G/U2 20/30/40/60GB/U2 30/60/80GB
iPod touch
2nd/3rd generation*
iPod mini
iPod
4th generation
(colo r)
iPhone
1st generation*
iPod nano
1st generation
iPod
5th generation
(video)
iPhone 3G/3GS*
iPod nano
2nd generation
(aluminium)
iPod nano
3rd generation
(video)
Capacity 4/8GB 8/16GB
Connection to SR-100i Dock Dock
Charging through SR-100i Yes Yes
iPod nano
4th/5th generation
* When using an iPod touch/iPhone with this unit, if you use any application other than the iPod application, the SR-100i
power might turn on again soon after it is turned off (put in standby). Since the unit cannot turn the iPod touch/iPhone
power off when such an application is running, you must quit the application before turning SR-100i off (putting it in
standby).
** Works in Airplane mode.
If your iPod does not work with SR-100i or the remote control unit, a software update might solve the problem. Visit the
Apple website and download the latest iPod software.
8
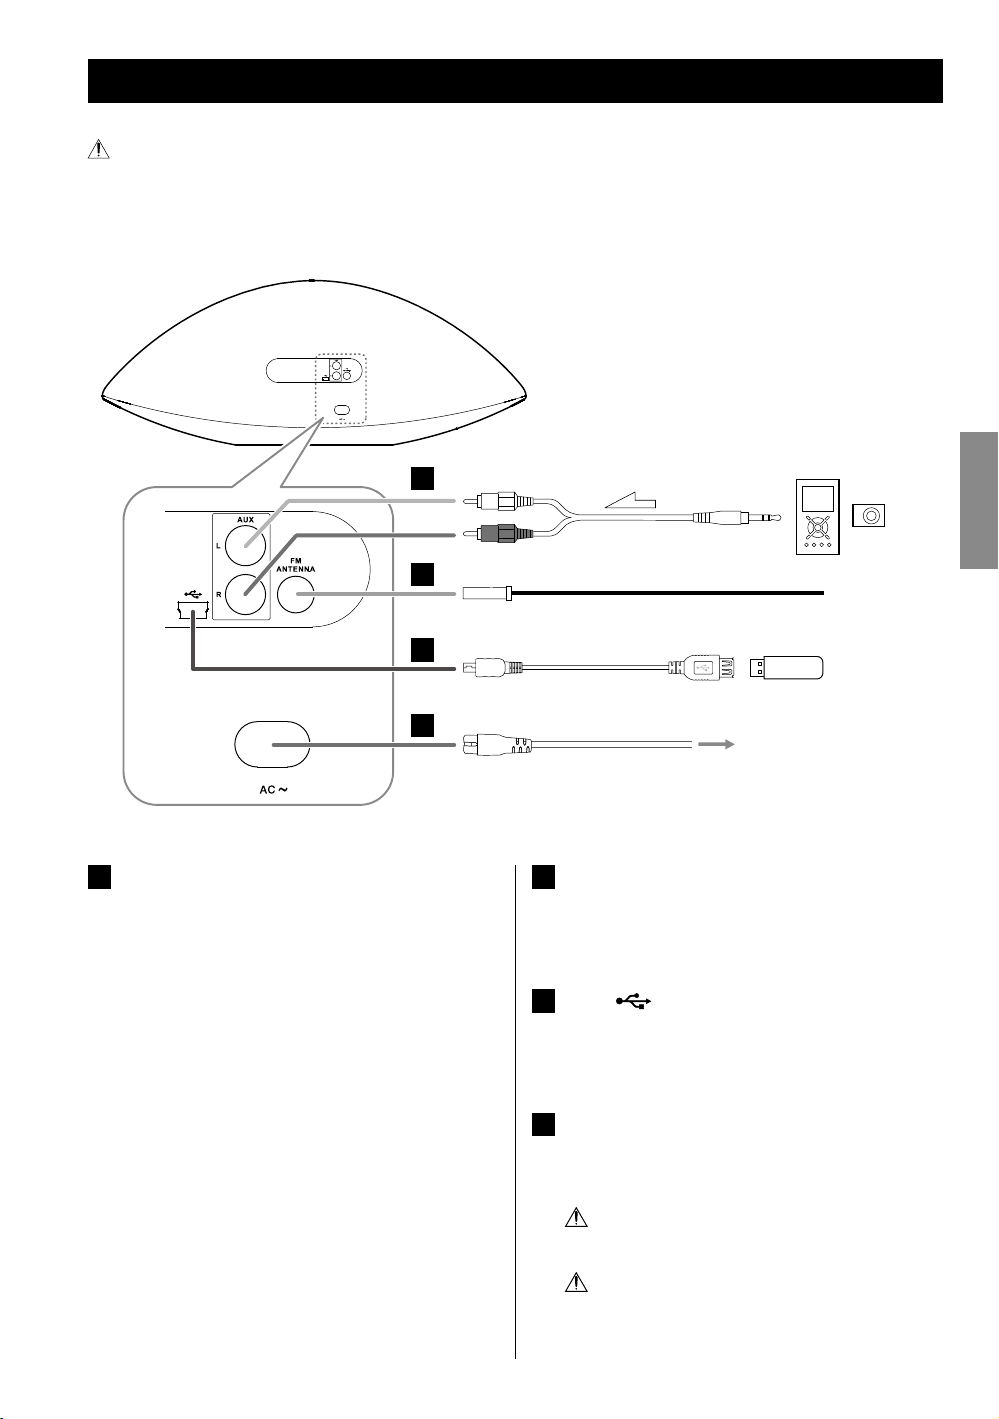
Connections
After all connections are complete, connect the power cord’s plug to the AC wall socket.
< Read the instructions of each device that you intend to use with this unit.
< Be sure to connect each plug securely. To avoid hum and noise, do not bundle the connection cords.
Back
A
(Optional cable)
B
Portable audio
player
ENGLISH
C
D
AUX in jacks
A
These jacks transmit an analog 2-channel audio signal.
Connect a portable audio player using commercially
available RCA pin-stereo mini plug cable.
Be sure to connect the cables as follows:
White plug e White jack (L: left channel)
Red plug e Red jack (R: right channel)
< When using the headphones jack of the component,
if you do not adjust its volume, you might not hear
any sound from SR-100i.
< Turning the volume of the connected component
up too high might cause the sound from SR-100i to
be distorted. In this case, reduce the volume of the
component until the distortion stops and then adjust
the volume level of SR-100i to a comfortable listening
level.
< Be sure to insert each plug securely. To prevent hum
and noise, avoid bundling the signal interconnection
cables together with the AC power cord or speaker
cables.
USB flash memory
AC wall socket
FM ANTENNA terminal
B
Connect the supplied FM antenna. Extend fully and
position for the best reception and attach it to a
window frame or wall with thumbtacks or the like.
USB (
C
You can connect a USB storage device to this port
using the supplied USB cable.
AC in
D
After all other connections have been completed,
connect the plug to an AC wall socket.
Be sure to connect the power cord to an AC outlet
Hold the power plug when plugging or
) port
which supplies the correct voltage.
unplugging the power cord.
9
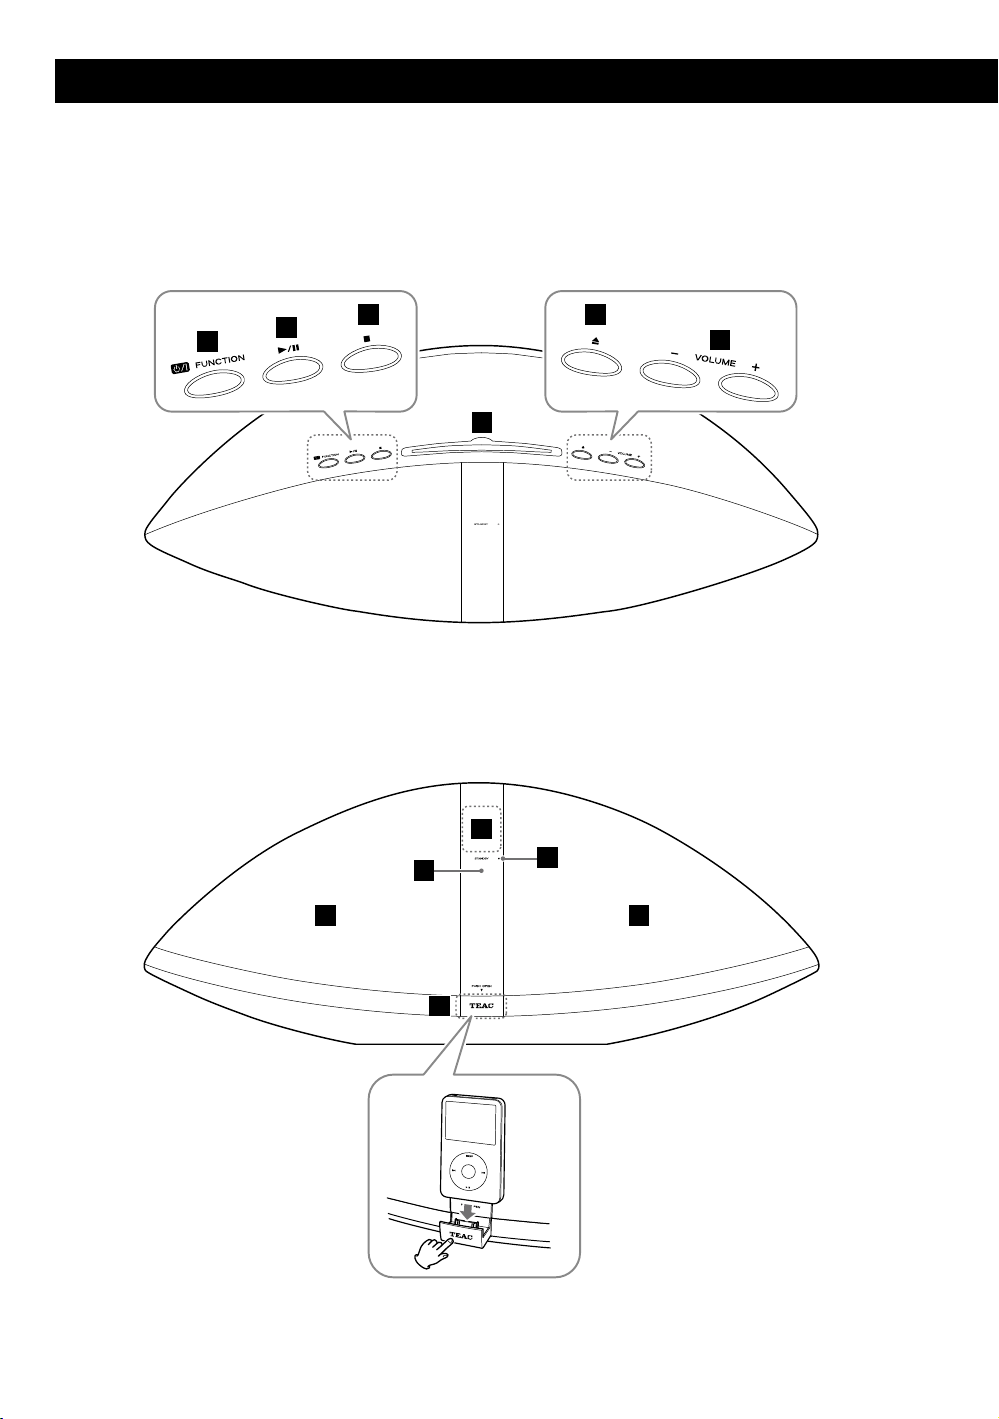
Top
Identifying the Parts (Main Unit)
Front
A
B
C
D
G
H
E
F
I
10
J J
KK

A
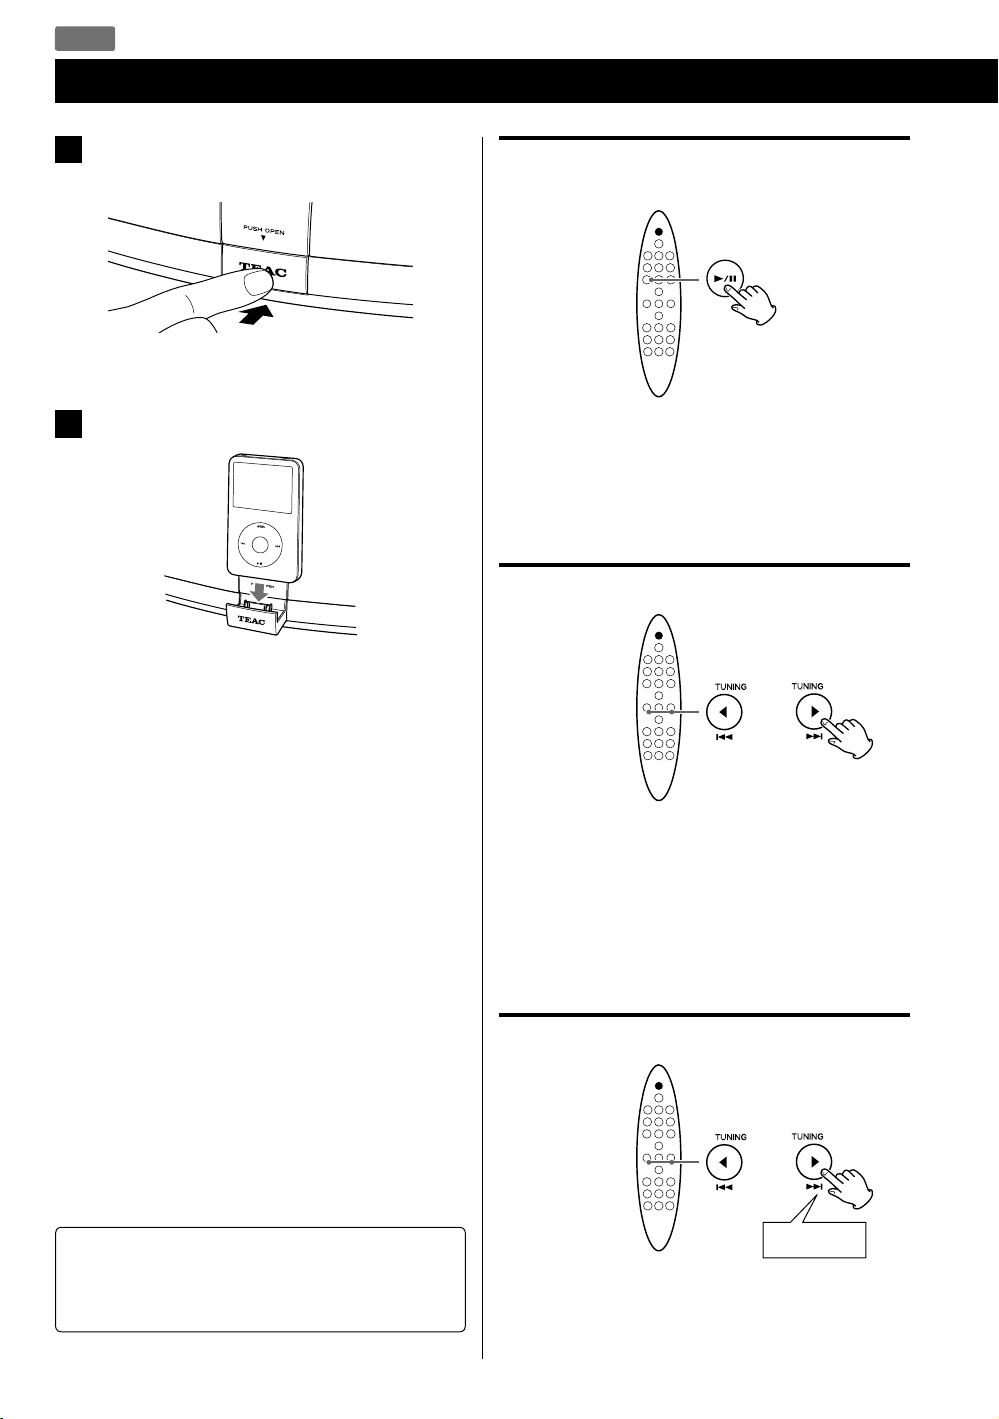
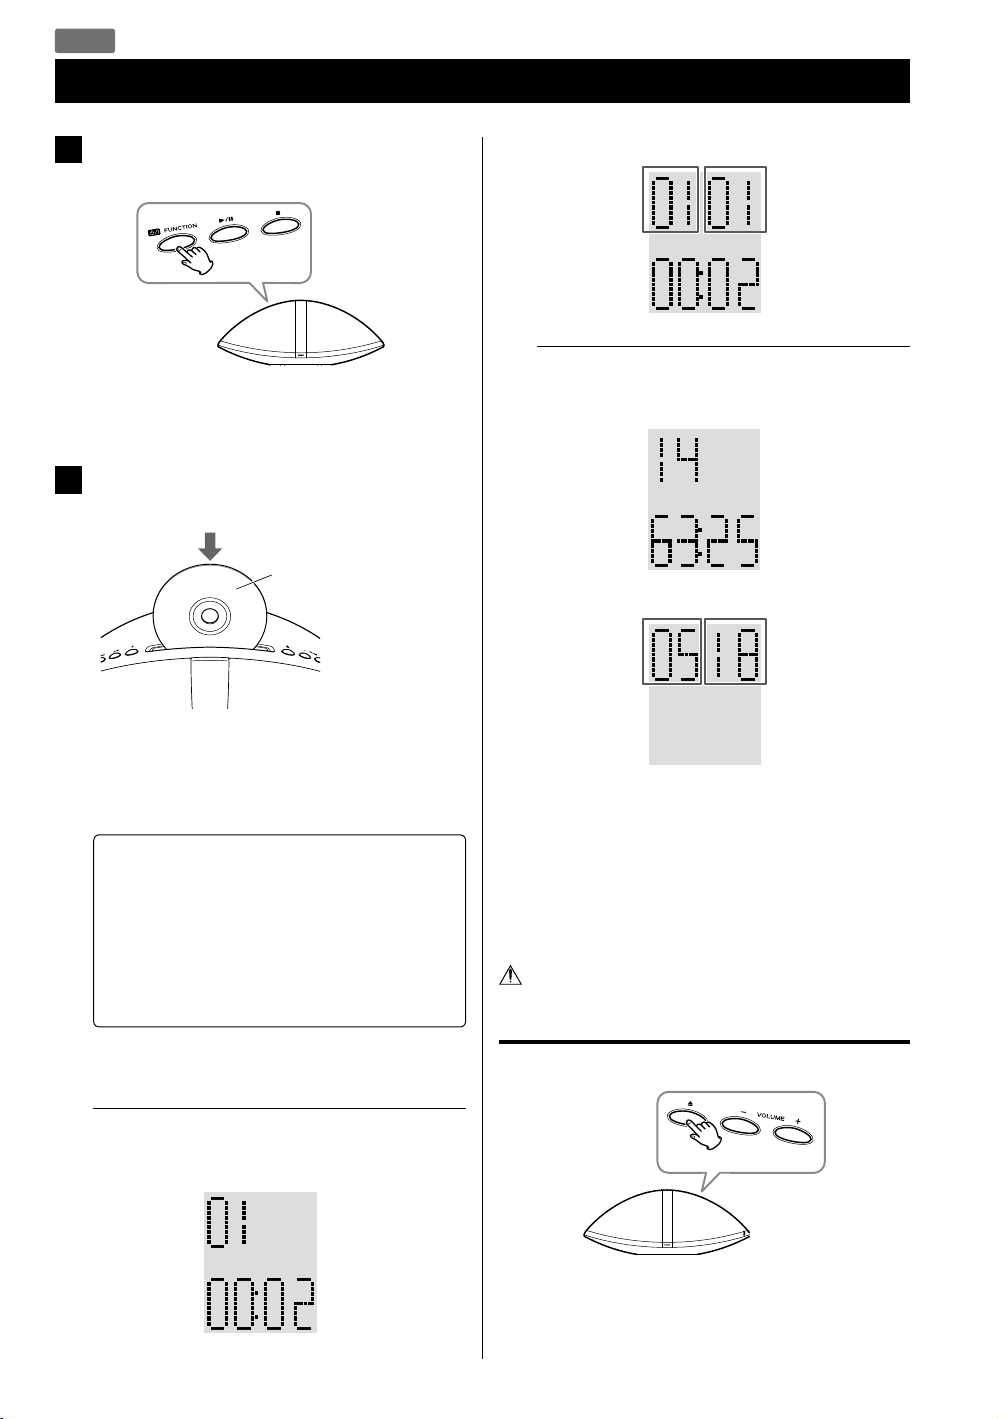
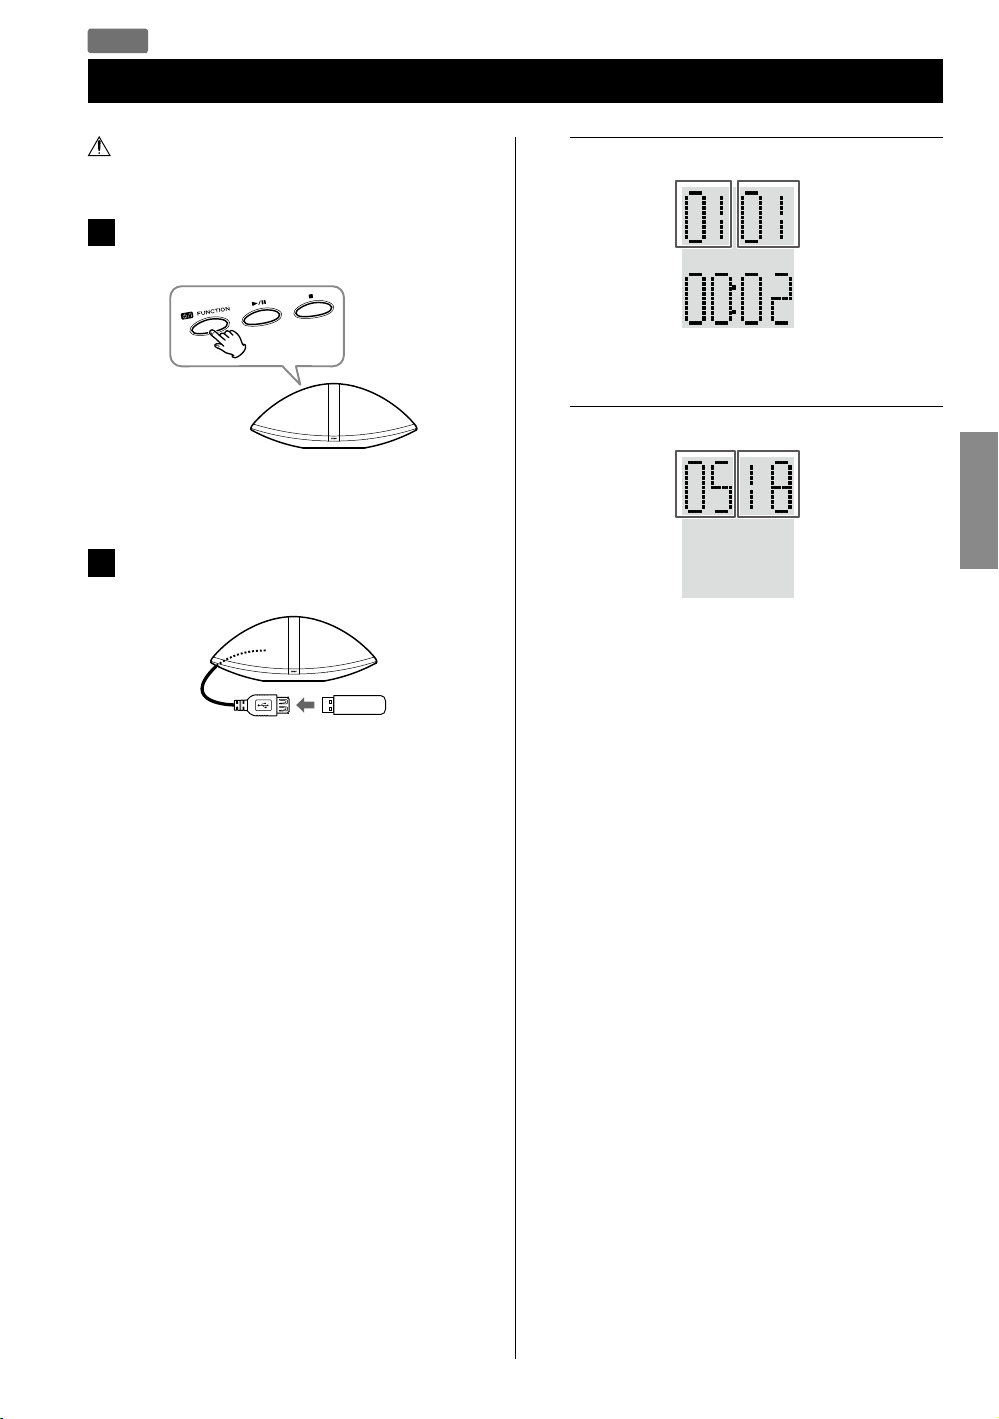
Standby/On ( )/FUNCTION
Use this button to turn the unit on and off (standby).
To turn off unit, hold down this button for more than
3 seconds.
When an iPod is not connected to the dock:
e “ECO PWR” appears on the display for a few
seconds. Then the unit is turned off (put in
standby) and the STANDBY indicator lights.
When an iPod is connected to the dock:
e The clock appears on the display and the iPod
battery is charged. If you disconnect the iPod
and no button is pressed for 90 seconds, the unit
is turned off (put in standby) and the STANDBY
indicator lights.
Use this button also to select a source.
B
Play/Pause (y/J)
In CD, USB or iPod mode, use this button to start or
pause playback.
G
Display
Displays the clock, track number, etc.
H
Remote sensor
When operating the remote control unit, point it
towards here.
I
STANDBY indicator
This indicator lights when the unit is in standby mode.
J
Speakers (Stereo)
K
iPod dock
Push the “TEAC” mark to open the dock. Connect an
iPod to the dock connector.
Push to close the dock when not in use.
ENGLISH
C
Stop (H)
In CD or USB mode, use this button to stop playback.
D
Disc insertion slot
Insert a disc with the printed label side facing you.
E
Eject (L)
Use this button to eject the disc.
F
VOLUME ( + / – )
Use these buttons to adjust the volume level.
While setting the clock or the wake up timer, use these
buttons to change the value.
11
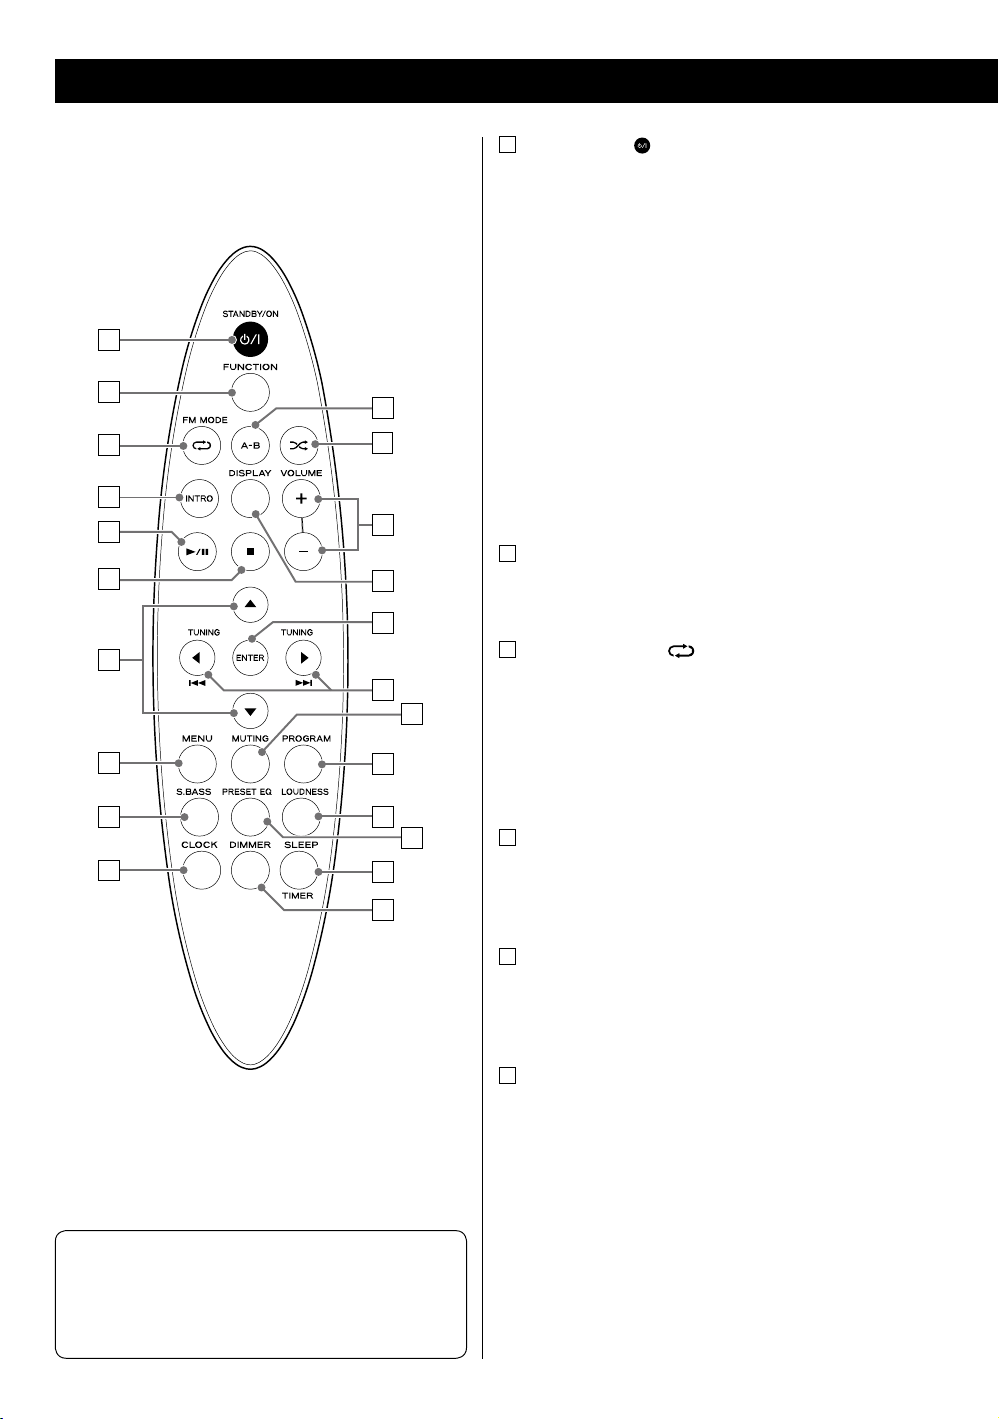
Identifying the Parts (Remote Control Unit)
a
STANDBY/ON ( )
Use this button to turn the unit on and off.
When the unit is turned off, and an iPod is not
connected to the dock:
e “ECO PWR” appears on the display for a few
seconds. Then the unit is turned off (put in
standby) and the STANDBY indicator lights.
a
b
k
c
l
d
e
f
m
n
o
g
p
q
When the unit is turned off, and an iPod is connected
to the dock:
e The clock appears on the display and the iPod
battery is charged. If you disconnect the iPod
and no button is pressed for 90 seconds, the unit
is turned off (put in standby) and the STANDBY
indicator lights.
b
FUNCTION
Use this button to select a source.
c
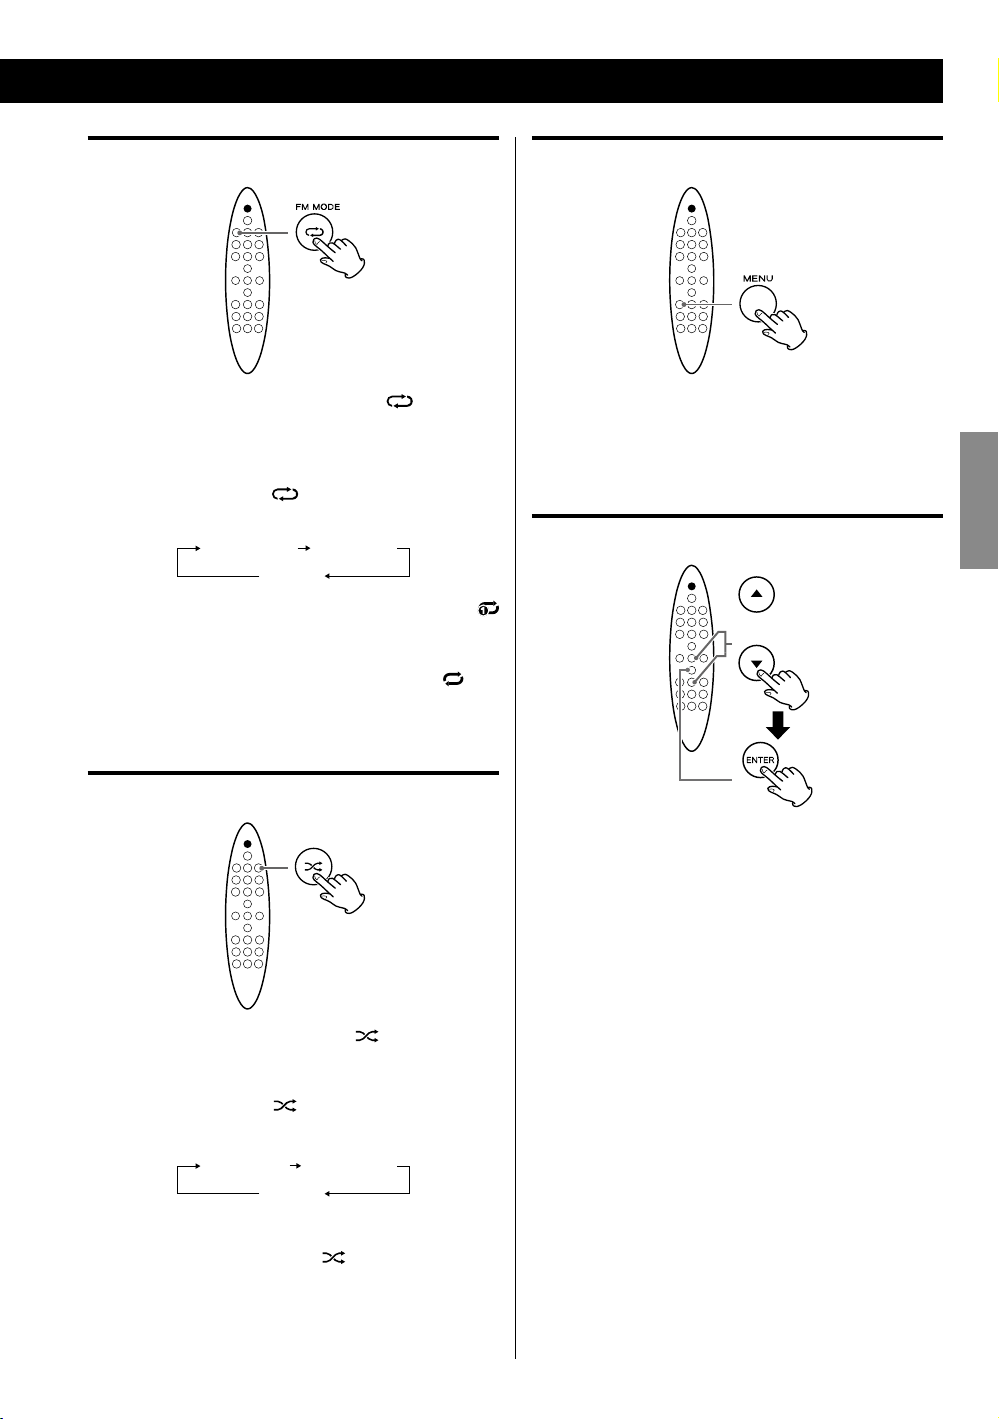
FM MODE/Repeat ( )
In FM mode, use this button to select Auto or Mono
mode.
h
i
r
s
t
j
u
v
Note
To simplify explanations, instructions in this manual
might refer to the main unit or remote control unit only.
In such cases, the same controls on the remote control
and main unit will operate similarly.
In CD, USB or iPod mode, use this button to set the
repeat function.
d
INTRO
In CD or USB mode, use this button to play the
beginning of each track/file consecutively (page 23).
e
Play/Pause (y/J)
In CD, USB or iPod mode, use this button to start or
pause playback.
f
Stop (H)
In CD or USB mode, use this button to stop playback.
12

g
Scroll (˙ / ¥)
In CD or USB mode, use these buttons to select a folder
(MP3/WMA disc and USB storage device only).
In iPod mode, use these buttons to scroll up and down
in a menu. These buttons have the same functions as
the Click Wheel of an iPod.
In FM mode, use these buttons to select a preset
station.
MENU
h
In iPod mode, use this button to go back to the previous
menu. This button has the same functions as its iPod
counterpart.
i
S.BASS
Use this button to reinforce the bass sound.
j
CLOCK
Use this button to display the clock.
When the unit is turned off, use this button to display or
set the clock (page 15).
o
ENTER
In iPod mode, use this button to confirm a selection in a
menu. This button has the same functions as the center
button of the Click Wheel of an iPod.
p
TUNING/Cursor (ß / å)/Skip (.//)
In CD, USB or iPod mode, use these buttons to skip to
the next or previous track/file. Hold these buttons to
search for a specific part of a track/file.
In FM tuner mode, use these buttons to tune in a
station.
q
MUTING
Use this button to mute the sound.
r
PROGRAM
In CD or USB mode, use this button to program tracks/
files (page 24).
In FM tuner mode, use this button to preset stations
(page 29).
ENGLISH
k
A-B
In CD or USB mode, use this button to set the points for
A-B repeat (page 26).
l
Shuffle ( )
In CD, USB or iPod mode, use this button to set the
shuffle function.
m
VOLUME ( +/ – )
Use these buttons to adjust the volume level.
While setting the clock or the wake up timer, use these
buttons to change the value.
n
DISPLAY
During playback of a disc or USB storage device, use this
button to display the track/file information.
s
LOUDNESS
Use this button to increase the bass sound at low
volume.
t
PRESET EQ
Use this button to select a preset equalizer (page 17).
u
SLEEP/TIMER
Use this button to set the sleep timer (page 17).
When the unit is turned off, use this button to set the
wake up timer (page 30).
v
DIMMER
Use this button to set the brightness of the display.
13

Remote Control Unit
The supplied remote control unit allows the unit to be
operated from a distance.
When using the remote control unit, point it towards the
remote sensor within 60° horizontally and 20° vertically of
the front of the unit.
< Even if the remote control is used within its effective
operation range (16ft/5 m), the unit might not respond
to the remote if there are any obstacles between them.
< The remote control might function incorrectly if it is
operated near other products that generate infrared
rays or if other remote control devices that use infrared
rays are operated near the unit. Likewise, the other
products might also function incorrectly.
Battery installation
Battery Precautions
< Be sure to insert the battery with the positive “+” and
negative “ - ” polarities correctly positioned.
< If the battery leaks, wipe away the leakage inside the
battery compartment and replace the battery with a
new one.
< If the remote control unit is not to be used for a long
time (more than a month), remove the battery from the
remote control unit to prevent it from being exhausted.
< Do not use any batteries other than those specified.
< Do not heat or disassemble batteries. Never throw them
in fire or water.
< Do not carry or store batteries with other metallic
objects. The batteries could short circuit, leak or
explode.
Remove the battery compartment cover.
1
Put the lithium-ion battery (CR2025, 3 V) in with the “+”
2
side up.
Close the cover.
3
Battery replacement
If the distance required between the remote control unit
and main unit decreases, the battery is exhausted. In this
case, replace the battery with a new one.
< For information about the collection of batteries, please
contact your local municipality, your waste disposal
service or the place where you purchased them.
14
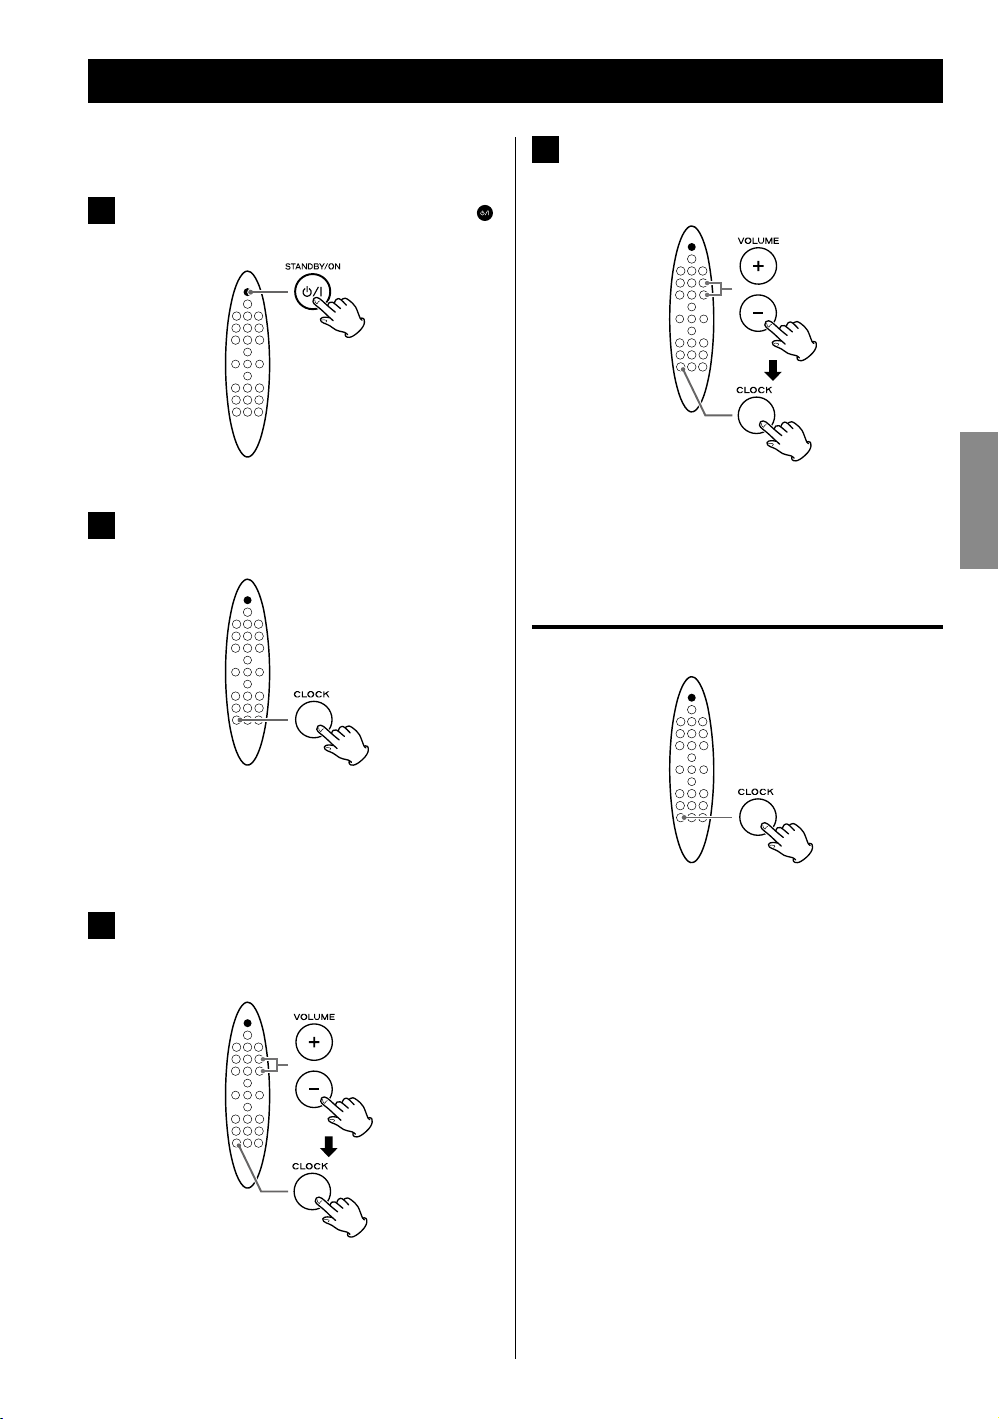
Setting the Clock
Set the clock before any operations.
If the unit is on, press the STANDBY/ON (
1
button to turn it off.
Press the CLOCK button repeatedly until
2
“CLK SET” appears on the display.
Press the VOLUME ( + / – ) buttons repeatedly to
4
set the current minute, then press the CLOCK
)
button.
Setting the clock is now completed, and the clock
starts from 00 seconds.
Checking the clock
ENGLISH
The hour value blinks.
< If no button is pressed for 30 seconds, the clock
setting mode will be cancelled.
Press the VOLUME ( + / – ) buttons repeatedly to
3
set the current hour, then press the CLOCK
button.
The minute value blinks.
Press the CLOCK button and the clock will be shown on
the display for a few seconds.
15

iPod CD USB FM AUX
Basic Operation
This chapter describes the basic operation which is
available in every mode.
Press the Standby/On (
1
unit on.
< The unit turns on with the source that was last
selected.
Press the FUNCTION button (same as the
2
Standby/On button) repeatedly to select a
source.
) button to turn the
Play the source, and adjust the volume using
3
the VOLUME ( + / – ) buttons.
The volume can be adjusted from MIN (0) to MAX
(31).
Reinforcing the bass
You can reinforce the bass sound.
The source changes as follows:
iPod
CD
USB
FM
AUX
< To listen to an external component connected to the
AUX jack, select “AUX”.
16
Press the S.BASS button.
To cancel the function, press the S.BASS button again.
< When the LOUDNESS function is set to on, the S.BASS
function is set to off automatically.
Loudness
You can increase the bass and treble sound effect at low
volume. Set this function to off when listening at normal
levels.
Press the LOUDNESS button.
To cancel the function, press the LOUDNESS button
again.
< When the S.BASS function is set to on, the LOUDNESS
function is set to off automatically.
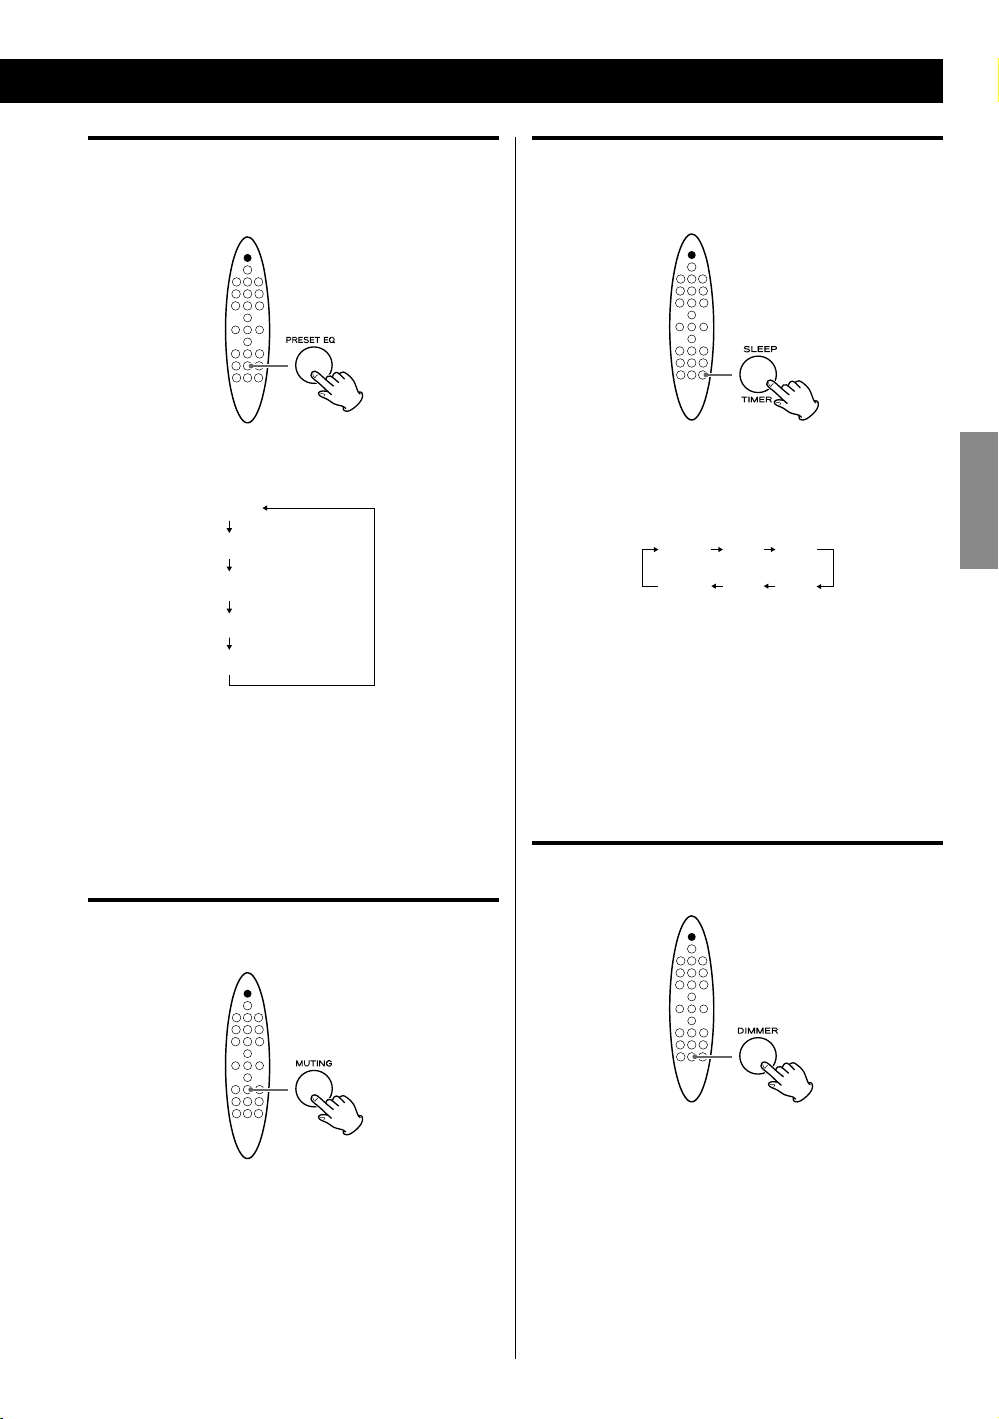
Equalizer
You can adjust the sound according to the genre of the
music or your taste.
Sleep timer
You can set the sleep timer so that the unit turns itself off
after a specified amount of time.
Each time the PRESET EQ button is pressed, the
equalizer is changed as follows:
POP
JAZZ
CLASSIC
ROCK
FLAT (Default)
< If you are also using the equalizer setting on your iPod
or other audio player, the effects will be combined and
might not sound as expected.
We recommend that you use either this unit’s equalizer
or the equalizer on your audio player in most cases.
Muting
You can mute the sound temporarily.
Each time the SLEEP button is pressed, the time is
changed at 10 minute intervals.
The unit will automatically will be turned off when the
time elapses.
10 20 3 0
--
90
(Off )
< If you want to check the remaining time, press the
SLEEP button once.
The remaining time is displayed for a few seconds.
< To cancel the sleep timer, press the SLEEP button
repeatedly until “--” is displayed.
N N N N
Dimmer
You can change the brightness of the display.
ENGLISH
Press the MUTING button.
Press the MUTING button again to restore the sound.
< “MUTE” blinks on the display while muting is engaged.
< If you change the volume or source when the sound is
muted, muting is cancelled.
Press the DIMMER button to set the brightness to one
of three levels.
17
iPod
Listening to an iPod
Push the “TEAC” mark on the front of this unit
1
to open the iPod dock.
Stopping playback temporarily
(Pause mode)
Connect an iPod to the dock.
2
The iPod automatically turns on and starts playback
from the iPod’s play list.
If an iPod is already connected, press the FUNCTION
button repeatedly to select “IPod”. Playback starts
automatically.
< The battery of an iPod is recharged whenever the
iPod is docked and SR-100i is connected to the AC
power supply.
Some of the iPod devices cannot be recharged
through the dock. For details of recharging
compatibility, see page 8.
< When you turn off the unit with an iPod connected
to the dock, the clock appears on the display and
the iPod battery is charged. If you disconnect the
iPod and no button is pressed for 90 seconds, the
unit is turned off (put in standby) and the STANDBY
indicator lights.
< If headphones are plugged into the iPod, sound
comes out from both the headphones and the
speakers of SR-100i.
During playback, press the Play/Pause (G/J) button.
Playback stops at the current position.
To resume playback, press the Play/Pause (G/J) button
again.
To skip to the next or previous track
During playback, press the Skip (.//) button
repeatedly until you find the desired song.
The selected song will be played from the beginning.
< If the . button is pressed once during playback, the
current song will be played from the beginning.
Searching for a part of a track
Note for iPod touch
If you want to hear the sound of video from an iPod
touch, connect the iPod touch to the dock first, then
operate SR-100i and the iPod touch.
18
Hold down
During playback, hold the Skip (.//) button to
search a part of a song.
Release it when you find the part you want to listen to.
Activating the repeat mode
Returning to the previous iPod menu
During playback, press the Repeat ( ) button to
select the repeat mode. “REP MODE” appears on the
display.
Each time the Repeat (
REPEAT setting changes as follows:
Repeat one Repeat all
< If you select “Repeat one” to play only one song, the
icon appears on the iPod’s display.
< If you select “Repeat all” to play all songs, the
appears on the iPod’s display.
) button is pressed, the iPod
Off
icon
Activating the shuffle mode
Press the MENU button.
This button has the same functions as its iPod
counterpart.
Selecting an iPod menu item
Press the Scroll (˙ / ¥) buttons to select the menu item
you want, then press the ENTER button.
ENGLISH
During playback, press the Shuffle ( ) button to select
the shuffle mode. “RANDOM” appears on the display.
Each time the Shuffle (
SHUFFLE setting changes as follows:
Songs Albums
< During shuffle playback, the icon appears on the
iPod’s display.
) button is pressed, the iPod
Off
19
CD
Listening to a Disc
Press the FUNCTION button repeatedly to
1
select “CD”.
< When no disc is loaded, “NO DISC” appears on the
display.
Insert a disc with the printed label side facing
2
you.
Printed label side
MP3/WMA disc
Current folder
number
Elapsed time
of the current
file
Example: Display when playback is stopped
Audio CD
Total number
of tracks
Total playing
time
MP3/WMA disc
Total number
of folders
Current file
number
Total number
of files
The disc is automatically loaded into the player. Let
go of the disc when it starts loading.
Playback starts from the first track/file automatically.
M Do not push the disc forcibly.
M Do not insert more than one disc.
M Do not attach adhesive label, etc. to either side
of the disc.
M Do not use irregular-shaped discs.
Doing so may cause malfunction or damage the
unit.
< It takes a few seconds for the unit to load the disc. No
buttons will work during loading.
Example: Display during playback
Audio CD
Current track
number
Elapsed time
of the current
track
20
< MP3/WMA files that are not placed in folders are
automatically put in the “01 (root)” folder. Playback
starts from the first file in the “01 (root)” folder.
< When playback of all the tracks/files has finished,
playback stops automatically.
< See page 33 for information about the playback order
of MP3/WMA files.
Do not tilt the unit with a disc inserted. It may
damage the disc and cause a malfunction.
Removing the disc
Press the Eject (L) button.
< To reinsert a disc, insert after the disc is completely
ejected.
USB
Listening to a USB Storage Device
Do not use a high-capacity USB hard discs. Only
USB flash memory can be used.
Press the FUNCTION button repeatedly to
1
select “USB”.
< When no USB storage device is connected, “NO USB”
appears on the display.
Connect your USB storage device to the
2
supplied USB cable connected to the unit.
Example: Display during playback
Current folder
number
Elapsed time
of the current
file
Example: Display when playback is stopped
Total number
of folders
< MP3/WMA files that are not placed in folders are
automatically put in the “01 (root)” folder. Playback
starts from the first file in the “01 (root)” folder.
Current file
number
Total number
of files
ENGLISH
Pay attention to the
insertion direction.
Playback starts automatically from the first file on the
USB storage device.
< See page 33 for information about the playback order
of MP3/WMA files.
21
CD USB
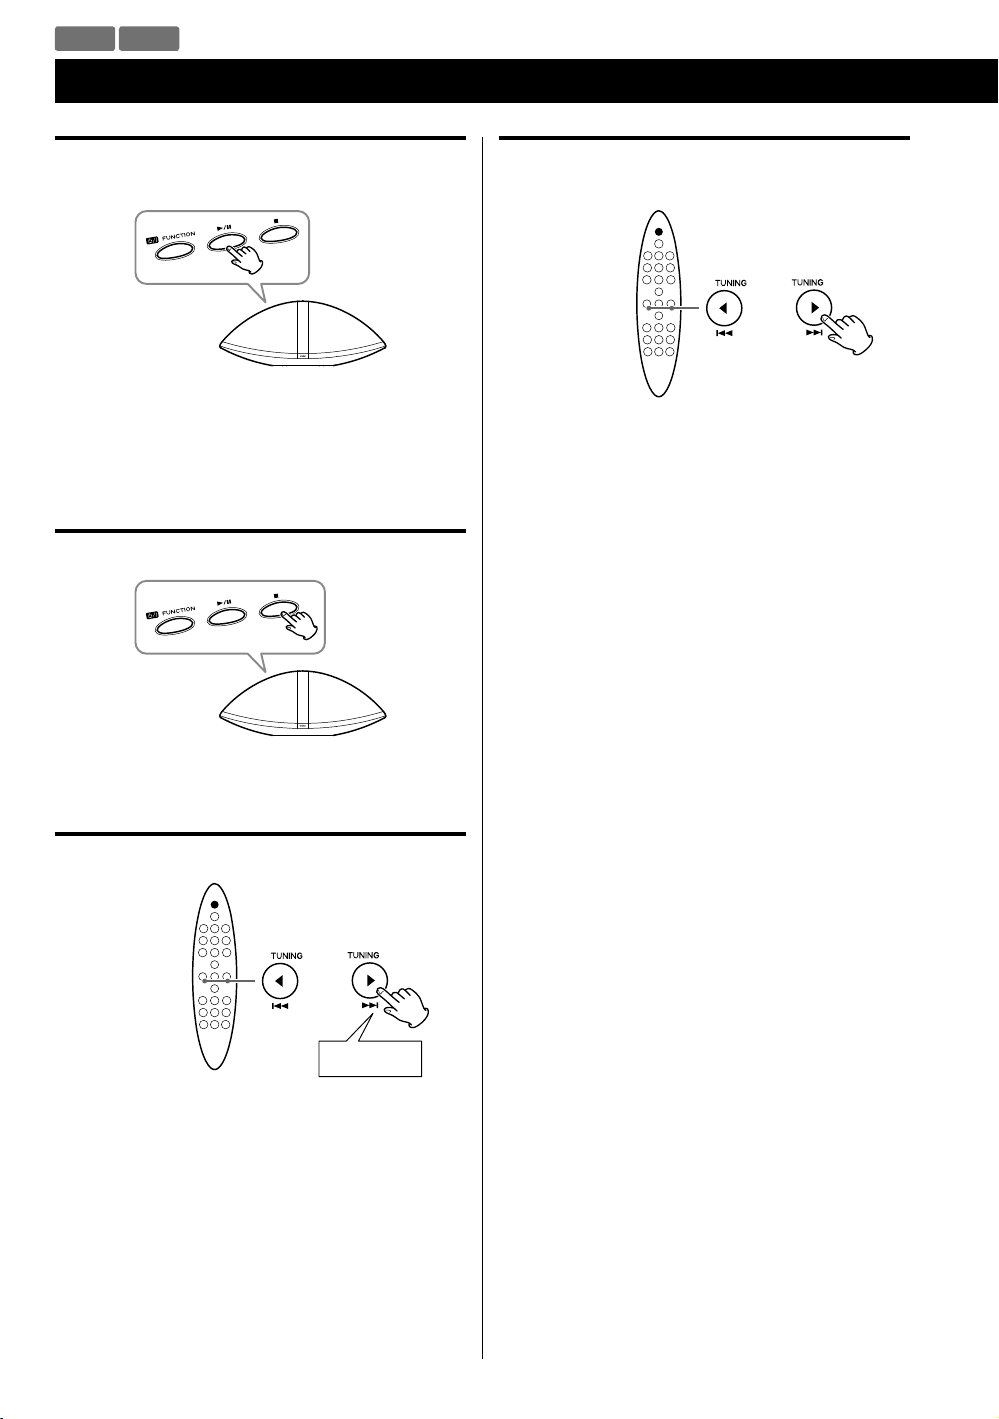
Basic Playback
Stopping playback temporarily
(Pause mode)
During playback, press the Play/Pause (y/J) button.
Playback stops at the current position.
To resume playback, press the Play/Pause (y/J) button
again.
Stopping playback
Skipping to the next or a previous track/
file
Press the Skip (.//) button repeatedly until you
find the desired track/file.
The selected track/file will be played from the
beginning.
< If the . button is pressed once during playback,
the track/file being played will be played from the
beginning.
< During programmed playback, the next or previous
track/file in the program is played.
< When playback is stopped, this function does not work
with Audio CDs.
Press the Stop (H) button.
Searching for a part of a track/file
Hold down
During playback, hold the Skip (.//) button.
Release it when you have found the part you want to
listen to.
22
Selecting a folder
(MP3/WMA disc or USB storage device)
Displaying information
Press the Scroll (˙ / ¥) button to skip to the next or
previous folder.
Intro playback
You can play the beginning of each track/file consecutively.
Press the INTRO button to start intro playback.
“INTR ON” appears on the display.
This unit plays back the first 10 seconds of each track/
file consecutively.
To continue listening to the current track/file, press the
INTRO button again. “INTR OFF” appears on the display.
Audio CD
During playback, each time the DISPLAY button is
pressed, the second line of the display changes as
follows:
Elapsed time of current track
Remaining time of current track
Elapsed time of the disc
Remaining time of the disc
MP3/WMA file
During playback, press the DISPLAY button to show
scrolling information about the current file as follows:
Title
Artist
Album
< The first 30 characters of TITLE/ARTIST/ALBUM can be
displayed.
ENGLISH
< The display of this unit can only show single-byte letters
and numbers. If the file information contains Japanese,
Chinese or other double-byte characters, playback is
possible but the name will not be shown correctly.
23
CD USB
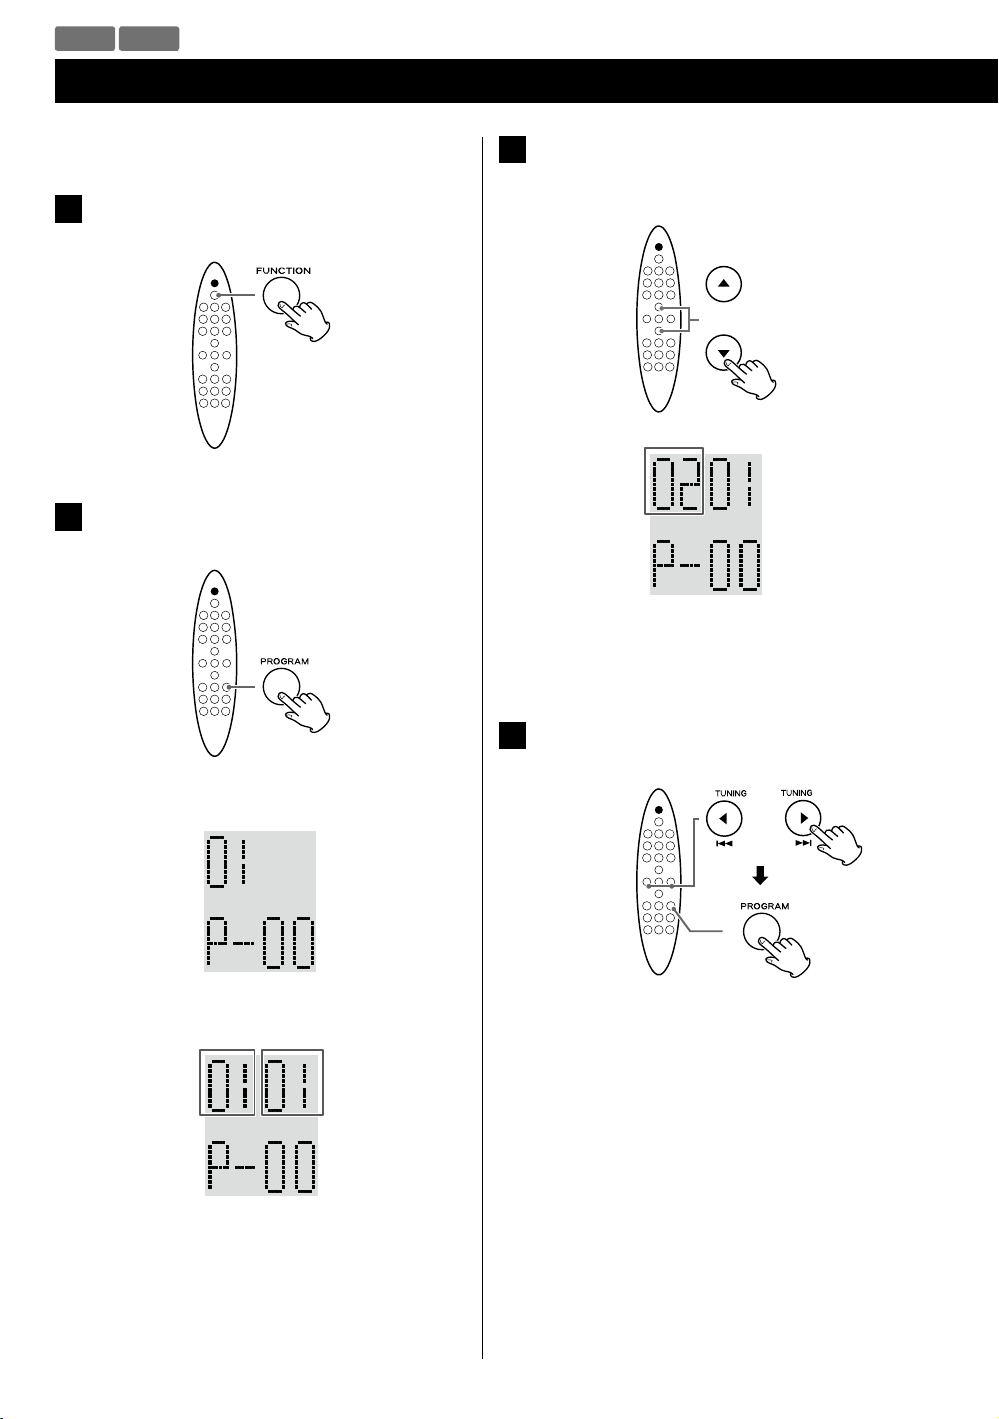
Programmed Playback
Up to 20 tracks/files can be programmed in the desired
order.
Press the FUNCTION button repeatedly to
1
select “CD” or “USB”.
Press the PROGRAM button when playback
2
stops.
(When programming MP3/WMA files)
3
Press the Scroll (˙ / ¥) buttons to select a folder
on the MP3/WMA disc or USB storage device.
Example:
Folder
number
< MP3/WMA files that are not placed in folders are put
in the “01” (root) folder.
Example: Audio CD
Tra ck number
Program
number
Example: MP3/WMA file
Folder
number
Program
number
< To cancel the program mode, press the Stop (H)
button.
File number
Press the Cursor (ß / å) buttons to select a
4
track/file, then press the PROGRAM button.
24
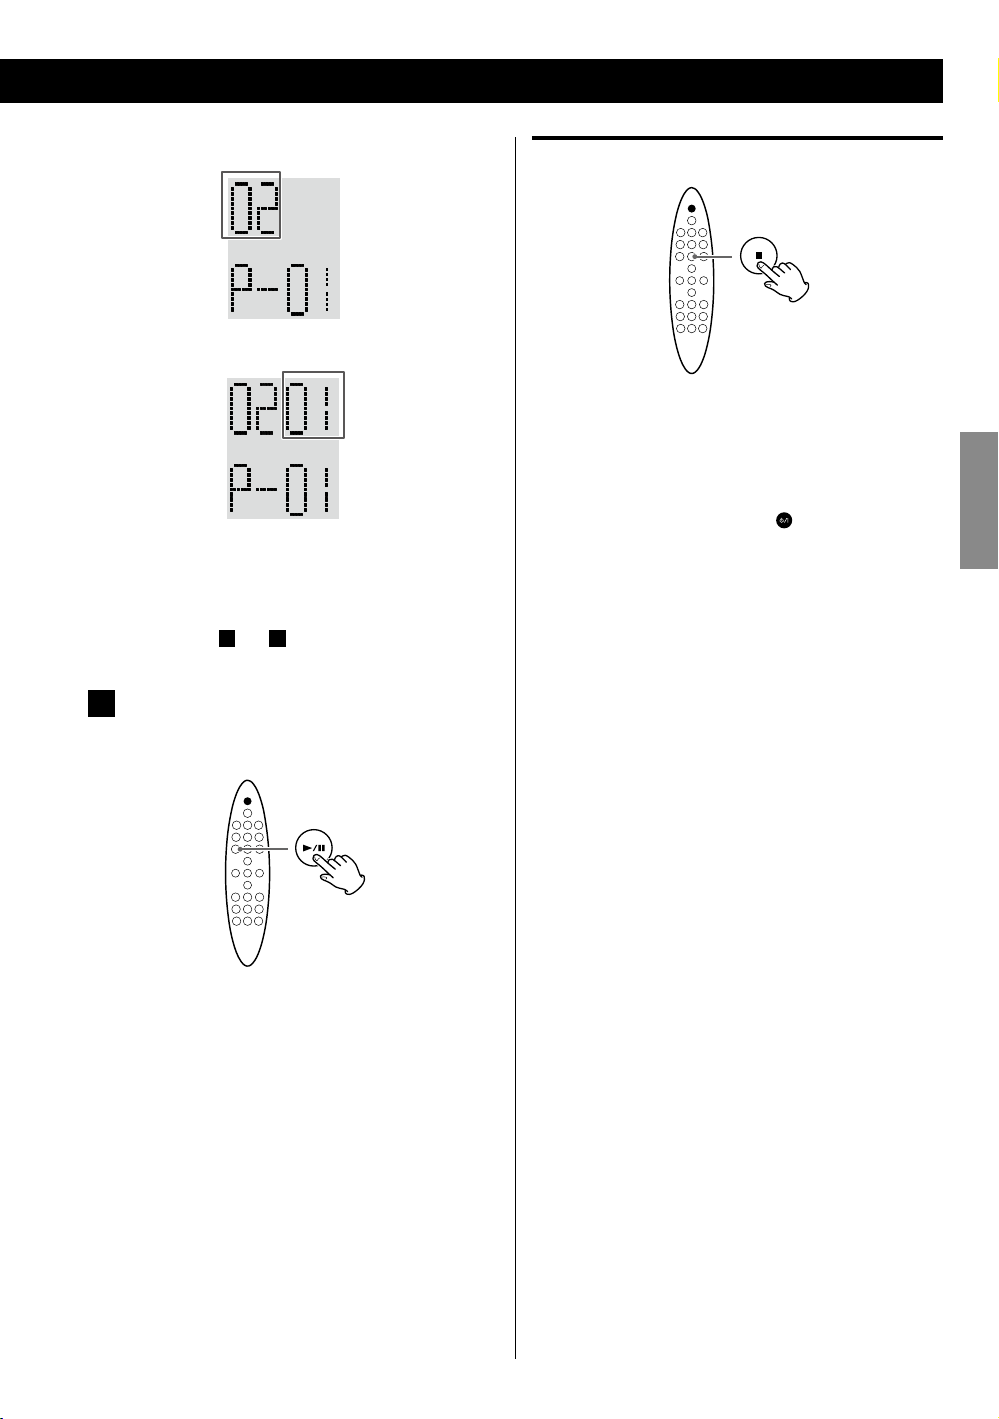
Example: Audio CD
Tra ck number
Example: MP3/WMA file
Clearing the program
File
number
The track/file is programmed, and the program
number (“P-01”) is displayed.
3
< Repeat steps
When you have finished selecting track/file
5
numbers, press the Play/Pause (G/J) button
to start program playback.
and 4 to program more tracks/files.
In the stop mode, press the Stop (H) button.
< In the following cases, the programmed contents will
also be cleared:
Changing the source
Pressing the STANDBY/ON (
Ejecting the disc
Disconnecting the USB storage device
Disconnecting the AC power cord
) button
ENGLISH
< After playback of all the programmed tracks/files has
finished or you stop the programmed playback, press
the Play/Pause (G/J) button to play the program
again.
< You can use Skip (.//) button during program
playback to select and play other tracks/files in the
program.
< The shuffle function does not work during
programmed playback.
25
CD USB
Repeat Playback
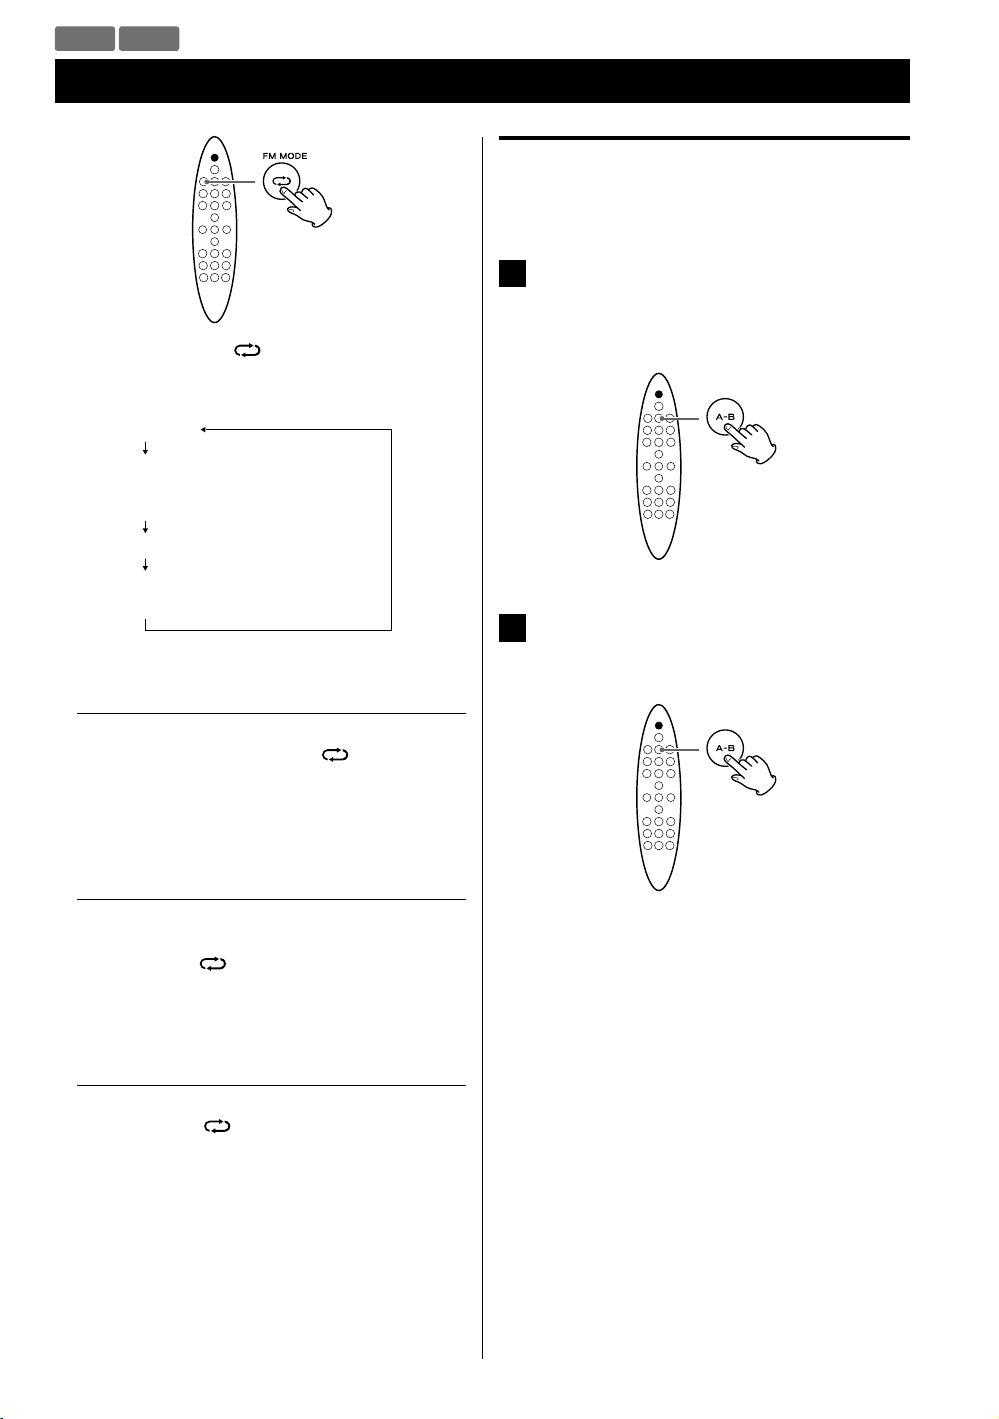
Each time the Repeat ( ) button is pressed, the mode
is changed as follows:
REP ONE
REP ALB
(MP3/WMA disc/USB storage device
only)
REP ALL
REP OFF
(Repeat of f)
A-B repeat playback
This function allows repeat playback of any desired section
of the track/file.
During playback, designate the point at which
1
repeat playback should start by pressing the
A-B button.
“A-” appears on the display.
When the point at which repeat playback
2
should end is reached, press the A-B button
again.
REP ONE (Repeat one)
During playback, press the Repeat (
“REP ONE” appears on the display.
The track being played will be played repeatedly.
REP ALB (Repeat folder)
(MP3/WMA disc/USB storage device only)
Press the Repeat (
“REP ALB” appears on the display and all the tracks in
the folder will be played repeatedly.
REP ALL (Repeat all)
Press the Repeat (
MP3/WMA files).
“REP ALL” appears on the display and all the tracks will
be played repeatedly.
During programmed playback, the programmed tracks
will be played repeatedly.
) button twice.
) button twice (or three times for
) button once.
The designated section will be played back
repeatedly.
< To return to normal play, press the A-B button or the
Stop (H) button.
< There must be more than 3 seconds between A and
B.
< The starting point and the end point must be in a
same track/file. If the file/track changes after you set
the starting point, the A-B repeat playback mode will
be cancelled.
26
CD USB AUX
Shuffle Playback
During playback, press the Shuffle ( ) button.
“RAN ON” appears on the display and the tracks/files
will be played randomly.
< If the / button is pressed during shuffle playback,
the next track/file will be randomly selected and
played.
If the . button is pressed during shuffle playback,
the currently played track/file will be played from the
beginning.
If the . button is pressed twice or more, another
track/file will be randomly selected and played.
< During shuffle playback, a track/file that has completed
playback will not be played again.
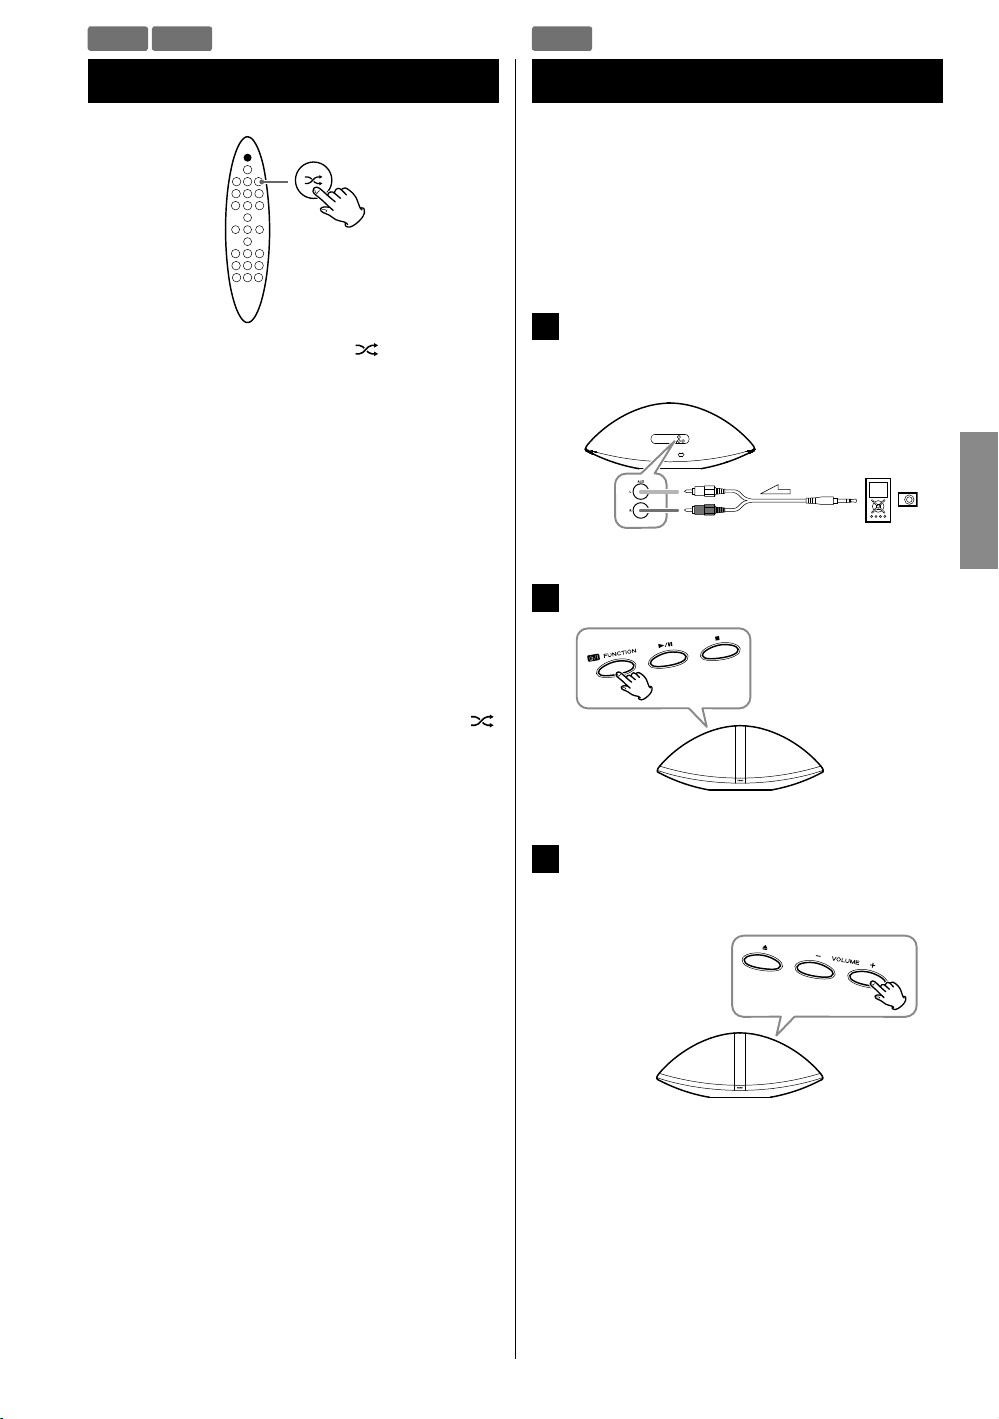
Listening to an External Source
You can listen to the sound from an external portable
audio player connected to the AUX in jacks.
< You can use this means to listen to an iPod that cannot
be connected to the iPod dock. For information on iPod
compatibility, see page 8.
Connect an external portable audio player to
1
the AUX in jacks of SR-100i using commercially
available RCA pin-stereo mini plug cable.
Press the FUNCTION button to select “AUX”.
2
ENGLISH
< To cancel shuffle playback, press the Shuffle (
button. “RAN OFF” appears on the display.
< To stop shuffle playback, press the Stop (H) button. This
operation also cancels shuffle playback.
)
Play the source, and adjust the volume of both
3
SR-100i and the connected external
component.
< When using the headphones jack of the component,
if you do not adjust its volume, you might not hear
any sound from SR-100i.
< Turning the volume of the connected component
up too high might cause the sound from SR-100i to
be distorted. In this case, reduce the volume of the
component until the distortion stops and then adjust
the volume level of SR-100i to a comfortable listening
level.
27
FM
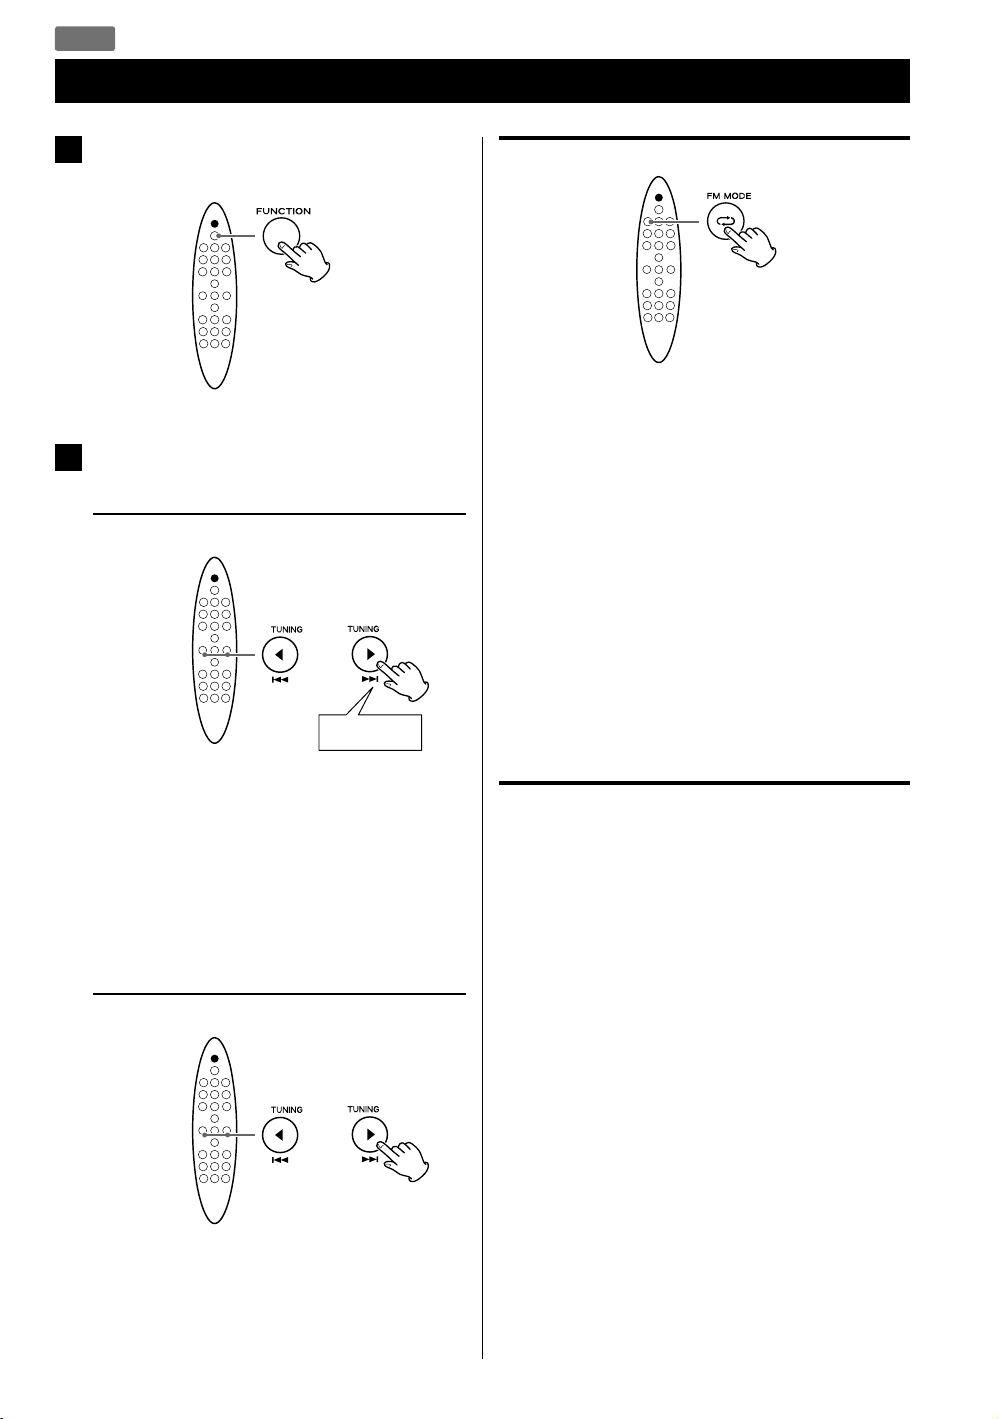
Listening to the FM Radio
Press the FUNCTION button repeatedly to
1
select “FM”.
FM Mode
Pressing the FM MODE button alternates between Auto
mode and Mono mode.
Select the station you want to listen to.
2
Automatic selection
Hold down
Hold the TUNING button and release it when the
automatic tuning process starts. When a station is
tuned in, the tuning process will stop automatically.
Repeat this step until the station you want to listen to
is found.
< To stop the automatic tuning process, press the
TUNING button briefly.
Manual selection
Auto
When a program is broadcast in stereo, you hear stereo
sound. When in monaural, you hear monaural sound.
< If the sound is distorted, the signal is not strong enough
for good stereo reception. In this case, change to Mono
mode.
Mono
To compensate for weak FM stereo reception, select
this mode. Reception will now be forced into monaural,
reducing unwanted noise.
If the reception is poor
Extend the FM antenna or change its position to
improve the reception of a station.
Press the TUNING button repeatedly.
The frequency changes by a fixed step. Press
repeatedly until the station you want to listen to is
found.
28
FM
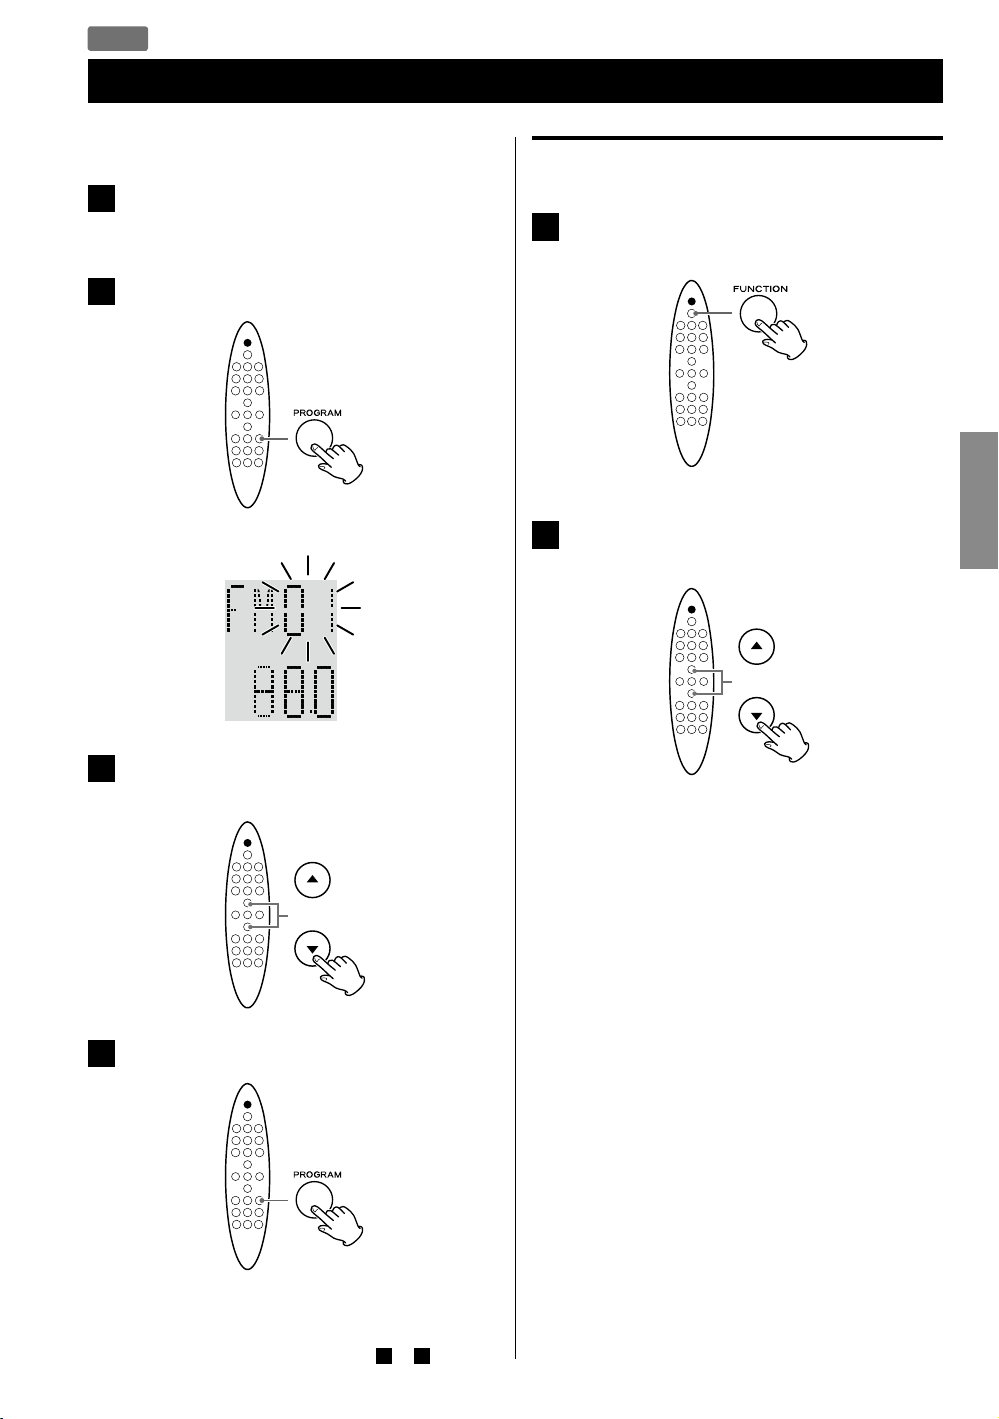
Preset Tuning
You can store up to 20 FM stations.
Tune in to the station you want to store
1
(page 28).
Press the PROGRAM button.
2
The preset number blinks.
Example:
Selecting a preset station
Press the FUNCTION button repeatedly to
1
select “FM”.
Press the Scroll (˙ / ¥) buttons to select the
2
desired preset station.
ENGLISH
Press the Scroll (˙ / ¥) buttons to select a
3
preset number for storing the station.
Press the PROGRAM button.
4
The tuned station is stored in the selected preset
number.
To store more stations, repeat steps
to 4 .
1
29

Wake Up Timer
You can set the unit to turn on at specific times.
< Adjust the clock before setting the wake up timer
(page 15).
Setting the wake up timer
If the unit is on, press the STANDBY/ON (
1
button to turn it off.
Press the TIMER button repeatedly until
2
“ALM SET” appears on the display.
Press the VOLUME ( + / – ) buttons to set the
4
minute, then press the TIMER button.
The current setting value blinks.
Press the VOLUME ( + / – ) buttons to select “ON”,
5
then press the TIMER button.
)
The timer set has been set. “ON” and the current time
is displayed.
When the setting time arrives, the last selected
source starts playback.
< To turn off the wake up timer, select “OFF” in step
When the timer reaches the timer-on time, the unit
is set to “SLEEP 60” automatically and the power will
be switched off (standby) 60 minutes later.
If you want to listen continuously, press the SLEEP button
repeatedly to select “--” after reaches the timer-on-time.
.
5
The clock hour value blinks.
< If no button is pressed for 30 seconds, the timer
setting mode will be cancelled.
Press the VOLUME ( + / – ) buttons to set the
3
hour, then press the TIMER button.
The clock minute value blinks.
30
Note for use with an iPod touch
(When using SR-100i wake up timer with an iPod
touch as the source)
< If you turn the power of the iPod touch off (“Slide
to power off”), you cannot use it with the wake up
timer even if it is docked in this unit. To use the wake
up timer with an iPod touch as the source, do not
select “Slide to power off” on the iPod touch. (The
screen of the iPod touch can be turned off without
any problem.)
< If Video is displayed on the iPod touch’s screen, you
cannot use it with the wake up timer even if it is
docked in this unit. To use the wake up timer with
an iPod touch as the source, select any item other
than Video on the iPod touch.

Troubleshooting (1)
If you a have problem with your system, read this page and
try to solve the problem yourself before calling your dealer
or a TEAC service Center.
General
No power
e Check the connection to the AC power supply. Check
whether or not the AC source is a switched socket. If it
is, confirm that the switch is turned on.
e Confirm that there is power to the AC wall socket by
plugging another item such as a lamp or fan into it.
No sound from the speakers.
e Select the source by pressing the FUNCTION button.
e Adjust the volume.
e If “MUTE” blinks, press the MUTING button.
The sound is noisy.
e The unit is too close to a TV or similar device. Relocate
it away from the interfering device or turn it off.
e A fan for dispersing heat is built into the left side
of the main unit. Depending on the surrounding
environment, you might hear the sound of it rotating.
This noise is not a malfunction.
iPod Player
Cannot connect the iPod.
e Remove dust or obstacles from the dock connector of
SR-100i and the iPod, then connect the iPod again.
Cannot operate the iPod.
e Release the iPod HOLD switch.
Cannot play.
e Remove the iPod from the dock, wait a few seconds,
then connect it again.
e A software update might solve the problem. Visit the
Apple website and download the latest iPod software.
ENGLISH
FM Tuner
Cannot listen to any station, or the signal is too
weak.
e Tune in to a station properly.
e Rotate the FM antenna until you receive the station
clearly.
The remote control does not work.
e Press the Standby/On (
e If the battery is exhausted, replace it with a new one.
e Use the remote control unit within the operation
range (16ft/5 m) and point it at the remote sensor on
the front panel.
e Remove obstacles between the remote control unit
and the main unit.
e If a bright light is near the unit, turn it off.
Power cannot be turned off (put in standby) when
using an iPod touch as the sound source.
e When using an iPod touch with this unit, if you use
any application other than the iPod application, the
SR-100i power might turn on again soon after it is
turned off (put in standby). Since the unit cannot turn
the iPod touch power off when such an application is
running, you must quit the application before turning
SR-100i off (putting it in standby).
The sound drops temporarily when changing the
volume from 6 to 7 or from 7 to 6.
e The sound drops for about a half second as the
operation of the internal circuit switches. This is not a
malfunction.
) button to turn the unit on.
CD Player
Cannot play.
e Load a disc with the label side facing you.
e If the disc is dirty, clean the surface of the disc.
e A blank disc may be loaded. Load a prerecorded disc.
e Depending on the disc, etc. it may not be possible to
play back a CD-R/RW disc. Try again with another disc.
e You cannot play back unfinalized CD-R/RW discs.
Finalize such a disc using a CD recorder and try again.
31

Troubleshooting (2)
MP3/WMA
Cannot play.
e Check the MP3/WMA file extension. This unit
recognizes MP3 files by their “.mp3”, and WMA files by
their “.wma” file extensions.
e MP3/WMA file data might have been corrupted.
e The file data format might not be an MP3/WMA
format.
e The sampling frequency of the MP3 file might be
other than 44.1 or 48 kHz.
e The bit-rate of the MP3 file might be more than
320 kbps.
e The sampling frequency of the WMA file might be
other than 44.1 kHz.
e The bit-rate of the WMA file might be more than
192 kbps.
Cannot display the file information correctly.
e If the file information contains Japanese, Chinese or
other double-byte characters, playback is possible but
the name will not be shown correctly.
Sleep Timer
Even when the set time is reached, power does not
turn off (change to standby) when using an iPod
touch as the sound source.
e When using an iPod touch with this unit, if you use
any application other than the iPod application, the
SR-100i power might turn on again soon after the
sleep timer turns it off (puts it in standby). Since the
unit cannot turn the iPod touch power off when
such an application is running, you must quit the
application to make it possible for the sleep timer to
turn SR-100i off (put it in standby).
Wake Up Timer
The wake up timer does not work.
e If the unit is turned on, press the Standby/On (
button to turn it off.
e (When an iPod touch is the sound source)
If you turn the power of an iPod touch off (“Slide to
power off”), you cannot use it with the wake up timer
even if it is docked in SR-100i. To use the wake up
timer with an iPod touch as the source, do not select
“Slide to power off” on the iPod touch. (The screen
of the iPod touch can be turned off without any
problem.)
e (When an iPod touch is the sound source)
If Video is displayed on an iPod touch’s screen, you
cannot use it with the wake up timer even if it is
docked in SR-100i. To use the wake up timer with your
iPod touch as the source, select any item other than
Video on the iPod touch.
)
32

MP3/WMA Playback Order
Specifications
MP3/WMA files on a CD or a USB storage device can be
stored in folders in the same way that files are managed on
a computer. Moreover, multiple folders can be contained
inside another folder.
Here is an example of the file and folder structure of
an MP3/WMA disc or a USB storage device, showing
the order of the folders (01 “root” to 05) and the
playback order of the files (
01 “root”
MP3/WMA file
1
MP3/WMA file
2
02 folder
MP3/WMA file
3
MP3/WMA file
4
04 folder
03 folder
MP3/WMA file
5
folder
to 9 ).
1
6
7
MP3/WMA file
MP3/WMA file
Tuner section
FM frequency range ............87.5 MHz to 108.0 MHz
CD player section
Compatible disc type .........CD/CD-R/CD-RW (12 cm)
Compatible format..................CD-DA, MP3/WMA
Frequency response ............20 to 20,000 Hz (±1 dB)
Wow and flutter ........................Unmeasurable
Total harmonic distortion ...........0.05 % (1 kHz, 0 dB)
Amplifier Section
Total output power (maximum)........... 50 W + 50 W
Speaker system section
Type............................... Tweeter: 38 mm x 2
Woofer: 91 mm x 2
Impedance .....................................8 ohms
General
Power requirements ....................AC 120 V, 60 Hz
Power consumption (nominal) . . . . . . . . . . . . . . . . . . . . 60 W
Dimension (W x H x D)
22 7/16” x 9 1/16” x 8 5/8” (570 x 230 x 220 mm)
Weight (Net)...........................11 7/8 lb (5.4 kg)
Standard accessories
Remote control unit (RC-1265) x 1
Battery (CR2025) for remote control unit x 1
AC power cord x 1
FM antenna x 1
USB cable x 1
Owner’s manual (this document) x 1
Warranty card x 1
ENGLISH
05 folder
MP3/WMA file
8
MP3/WMA file
9
< The order shown in the figure above might be changed
if files or folders are added, deleted or moved.
< Design and specifications are subject to change without
notice.
< Weight and dimensions are approximate.
< Illustrations may differ slightly from production models.
33

Sommaire
Nous vous remercions d’avoir choisi TEAC. Lisez
ce manuel avec attention pour tirer les meilleures
performances de cet appareil.
Avant d'utiliser l'appareil ..............................35
Disques ..............................................36
Supports USB ........................................37
Compatibilité MP3/WMA .............................37
iPod compatibles .....................................38
Raccordements ......................................39
Identification des parties (unité principale) ............40
Identification des parties (télécommande) ............42
Boîtier de télécommande ............................44
< N'exposez pas cet appareil aux gouttes ni aux
éclaboussures.
< Ne placez pas d'objet rempli de liquide sur l'appareil,
comme par exemple un vase.
< N’installez pas cet appareil dans un espace confiné
comme une bibliothèque ou un meuble similaire.
< L’appareil tire un courant nominal de veille de la prise
secteur quand son interrupteur POWER ou STANDBY/
ON n’est pas en position ON.
< L’appareil doit être placé suffisamment près de
la prise de courant pour que vous puissiez à tout
moment attraper facilement la fiche du cordon
d’alimentation.
< La fiche secteur est utilisée comme dispositif de
déconnexion et doit donc toujours rester disponible.
< Si le produit utilise des batteries (y compris un
pack d'accus ou des piles), elles ne doivent pas être
exposées au soleil, au feu ou à une chaleur excessive.
< PRÉCAUTION pour les produits utilisant des batteries
au lithium remplaçables : Il existe un danger
d’explosion en cas de remplacement par un type de
batterie incorrect. Remplacez-les par des modèles
identiques ou équivalents.
< Des précautions doivent être prises pour l'emploi
d'écouteurs ou d'un casque avec le produit car une
pression acoustique (volume) excessive dans les
écouteurs ou dans le casque peut provoquer une
perte d’audition.
Réglage de l'horloge .................................45
Fonctionnement de base .............................46
iPod
Écoute d’un iPod .....................................48
CD USB
Écoute d’un disque ...................................50
Écoute d’un support USB .............................51
Lecture de base ......................................52
Lecture programmée .................................54
Lecture en boucle ....................................56
Lecture aléatoire .....................................57
AUX
Écoute d’une source externe .........................57
FM
Écoute de la radio FM ................................58
Syntonisation préréglée (preset) ......................59
Réveil ................................................60
Guide de dépannage .................................61
Ordre de lecture d'un disque MP3/WMA ..............63
Caractéristiques techniques ..........................63
34

Avant d'utiliser l'appareil
Contenu de l'emballage
Vérifiez la présence des accessoires fournis en standard.
Télécommande (RC-1265) x 1
Pile (CR2025) pour télécommande x 1
Cordon d’alimentation x 1
Antenne FM x 1
Câble USB x 1
Mode d’emploi (ce document) x 1
< Conservez ce livret dans un endroit sûr pour référence
ultérieure.
Carte de garantie x 1
< Retirez toujours le disque avant de déplacer ou de
transporter cet appareil. Transporter cet appareil avec
un disque à l'intérieur peut entraîner un mauvais
fonctionnement.
Emplacement de l'appareil
< Choisissez soigneusement l’emplacement de votre
appareil.
Évitez de l’exposer directement aux rayons solaires ou
à une source de chaleur. Évitez aussi les endroits sujets
aux vibrations, à une poussière excessive, à la chaleur,
au froid et à l’humidité.
< Il est possible que l’appareil devienne chaud durant
l’utilisation, laissez donc toujours un espace suffisant
autour de lui pour la ventilation.
< Ne placez pas l'appareil sur un amplificateur, un
récepteur ou tout autre dispositif générant de la
chaleur.
< Quand cet appareil est en service, allumer un téléviseur
à proximité peut entraîner l’apparition de lignes sur
l’écran de celui-ci, en fonction de la fréquence de la
télédiffusion. Ce n’est pas un mauvais fonctionnement
de l’appareil ni du téléviseur. Si vous voyez de telles
lignes, éloignez l'appareil du téléviseur.
Entretien
Si la surface de l’appareil est sale, essuyez-la avec un chiffon
doux ou utilisez un savon liquide léger dilué. Laissez la
surface de l'appareil sécher complètement avant utilisation.
FRANÇAIS
ATTENTION
< N'inclinez pas l'appareil quand un disque est inséré.
Cela peut endommager le disque et causer un mauvais
fonctionnement.
< Ne déplacez pas l'appareil durant la lecture d'un disque.
Durant la lecture, le disque tourne à haute vitesse. Ne
soulevez et ne déplacez pas l'appareil durant la lecture.
Cela endommagerait le disque ou l'appareil.
< La tension d’alimentation doit correspondre à la tension
imprimée sur le panneau arrière. Si vous avez des doutes
à ce sujet, consultez un électricien.
< N’ouvrez pas le boîtier car cela peut endommager
les circuits ou causer un choc électrique. Si un objet
étranger pénètre dans l’appareil, consultez votre
revendeur ou le service après-vente.
< Quand vous débranchez le cordon d'alimentation de
la prise secteur, tirez toujours sur la prise, jamais sur le
cordon.
Par sécurité, débranchez le cordon d'alimentation de la
prise secteur avant tout nettoyage.
< Ne vaporisez jamais du liquide directement sur cet
appareil.
< N’utilisez pas de diluant ou alcool car ils peuvent
endommager la surface de l’appareil.
Attention à la condensation
Si l’appareil est déplacé d’un endroit froid à un endroit
chaud, ou utilisé après un changement soudain de
température, il existe un risque de condensation. La vapeur
de l’air peut se condenser sur les mécanismes internes et
rendre le fonctionnement normal erratique ou impossible.
Pour empêcher cela, ou si cela se produit, laissez l'appareil
allumé une heure ou deux. Il se stabilisera alors à la
température ambiante.
35

Disques
Disques lisibles par cet appareil
CD qui portent le logo “COMPACT disc DIGITAL
AUDIO” (12 cm).
N'utilisez pas de disque de 8 cm avec cet
appareil.
CD-R et CD-RW qui ont été correctement
enregistrés au format CD audio et finalisés.
CD-R et CD-RW finalisés contenant des fichiers MP3/
WMA.
Attention :
La lecture de tout autre type de disque pourrait
causer un bruit fort et des dommages aux
enceintes et à votre audition. Ne lisez jamais un
autre type de disque.
< Les disques protégés contre la copie et les disques
ne se conformant pas à la norme CD peuvent ne pas
être correctement lus par cet appareil. Si vous utilisez
de tels disques dans cet appareil, TEAC Corporation et
ses filiales ne pourront être tenues pour responsables
des conséquences quelles qu'elles soient ni garantir
la qualité de reproduction. Si vous rencontrez des
problèmes avec de tels disques non standard, vous
devez contacter leurs diffuseurs.
À propos des CD-R et CD-RW
Attention :
< N'utilisez pas de disque de 8 cm. Cela pourrait faire mal
fonctionner ou endommager l'appareil.
< Ne faites pas lire de disque gondolé, déformé ou
endommagé. Faire lire de tels disques pourrait causer
des dommages irréparables aux mécanismes de
lecture.
< Les CD-R et CD-RW imprimables ne sont pas
recommandés car le côté étiquette peut être collant et
risque d'endommager l'appareil.
< Ne collez pas de papiers ou de feuillets protecteurs sur
les disques et n'utilisez aucun aérosol de revêtement
protecteur.
< Utilisez un stylo-feutre tendre à huile pour écrire du
côté sérigraphié. N'utilisez jamais de stylo à bille ou de
stylo à pointe dure car cela pourrait abîmer la surface
enregistrée du disque.
< N'utilisez jamais de stabilisateurs. L’utilisation de
stabilisateurs pour CD disponibles dans le commerce
pourrait endommager les mécanismes de cet appareil
et provoquer son dysfonctionnement.
< N'utilisez pas de disques ayant une forme irrégulière
(octogonale, en forme de cœur, de la taille d'une
carte de visite, etc.). Des CD ayant ces formes peuvent
endommager l'appareil.
Cet appareil peut lire les CD-R et CD-RW ayant été
enregistrés au format CD audio (CD-DA), MP3 et WMA.
< Les disques créés par un enregistreur de CD doivent
être finalisés pour être utilisés avec cet appareil.
< Selon la qualité du disque et les conditions de
l'enregistrement, certains disques risquent de ne pas
pouvoir être lus. Veuillez lire le mode d'emploi de
l'appareil ayant servi à créer le disque.
< En cas d'incertitude quant à la gestion d'un CD-R ou
CD-RW, veuillez directement contacter le vendeur du
disque.
36
Précautions de manipulation
< Chargez toujours un disque avec sa face sérigraphiée
vers vous. Les CD ne peuvent être lus que d'un côté.
< Pour sortir un disque de son boîtier, appuyez sur le
centre du boîtier et soulevez le disque, en le tenant
soigneusement par la tranche.
Comment sortir le disque Comment tenir le disque

Compatibilité MP3/WMA
Précautions de rangement
< Les disques doivent être rangés dans leurs boîtiers
après utilisation afin d’éviter la poussière et les rayures
qui pourraient provoquer des “sauts” du capteur laser.
< N'exposez pas les disques directement au soleil, à une
température élevée et à l'humidité durant une période
prolongée. Une exposition prolongée à des hautes
températures les fera gondoler.
< Les CD-R et CD-RW sont plus sensibles aux effets de la
chaleur et des rayons ultraviolets que les CD ordinaires.
Il est important de ne pas les conserver dans des lieux
directement exposés au soleil. Ils doivent aussi être
tenus à l'écart des sources de chaleur telles que les
radiateurs et chauffages électriques.
Entretien
< Si un disque est sale, essuyez sa surface d'un
mouvement radial (du trou central vers le bord externe)
avec un chiffon sec et doux.
< Ne nettoyez jamais les disques avec des produits
chimiques tels que des aérosols pour disque, des
aérosols ou liquides antistatiques, du benzène ou du
diluant. Ces produits chimiques provoqueraient des
dégâts irréparables à la surface en plastique du disque.
Supports USB
Compatibilité
< Seule une mémoire flash USB peut être utilisée.
<
Certains lecteurs à mémoire flash qui se chargent depuis
un port USB ne peuvent pas être utilisés pour la lecture.
<
Les disques durs, lecteurs de CD/DVD et autres supports
connectables via USB ne peuvent pas être utilisés.
< Cet appareil ne peut pas copier ni déplacer les fichiers.
< Formats lisibles : FAT16, FAT32
< Les formats NTFS, HFS et HFS+ ne peuvent pas être
employés.
< Nombre maximal de dossiers lisibles : 99
< Nombre maximal de fichiers lisibles : 99
< Selon les caractéristiques du support USB, cet appareil
peut ne pas être à même de lire les fichiers qu'il
contient ou des sauts peuvent se produire.
Cet appareil peut lire les fichiers MP3/WMA enregistrés sur
CD-R, CD-RW et mémoire USB. Reportez-vous au mode
d'emploi du logiciel quand vous créez un fichier MP3 ou
WMA à l'aide d'un ordinateur.
< Cet appareil peut lire les fichiers MP3 mono et stéréo au
format MPEG-1 Audio Layer 3 et ayant une fréquence
d'échantillonnage de 44,1 ou 48 kHz et un débit binaire
de 320 kb/s ou moins.
< Un fichier WMA doit avoir une fréquence
d'échantillonnage de 44,1 kHz et un débit binaire de
192 kb/s ou moins.
< Cet appareil n'est pas compatible avec les disques ayant
été enregistrés en plusieurs sessions. Seule la première
session peut être lue.
< Cet appareil ne peut pas lire les fichiers avec protection
des droits d'auteur.
Affichage des informations de fichier
L'écran de cet appareil ne peut afficher que les lettres et
chiffres à simple octet.
< Si des informations de fichier utilisent des caractères
japonais, chinois ou autres à double octet, la lecture est
possible mais le nom ne sera pas affiché correctement.
Précautions à suivre pour préparer des fichiers MP3/
WMA à l'aide d'un ordinateur ou d'un autre appareil
< Incluez toujours l'extension dans le nom de fichier. Cet
appareil reconnaît les fichiers MP3 par leur extension de
fichier “.mp3” et les fichiers WMA par leur extension de
fichier “.wma”.
< Fermez toujours la session (création d'un disque
complet). Cet appareil ne peut pas lire les disques dont
la session n'a pas été fermée.
< Lisez attentivement le mode d'emploi du logiciel que
vous employez pour créer le disque de MP3/WMA.
Fichiers illisibles ou partiellement lisibles
< Les fichiers sans extension ne peuvent pas être lus.
Les fichiers qui ne sont pas au format MP3/WMA ne
peuvent pas être lus même s'ils portent cette extension.
< Les fichiers à débit binaire variable peuvent ne pas être
lus correctement.
< Si le disque/support USB contient plus de 99 fichiers ou
99 dossiers, cette unité ne peut pas le lire correctement.
< Selon l'état du disque/support USB, cet appareil peut
être incapable de le lire ou des sauts peuvent survenir.
FRANÇAIS
37

iPod compatibles
iPod
1re et 2e génération
Capacité 5/10/20 Go
Connexion au SR-100i AUX Dock Dock Dock Dock
Charge par le SR-100i Non Non Oui Oui Oui
iPod classic
Capac ité 80/120/16 0 Go 8/16 /32 Go 8/16/32 /64 G o 4/8/16 Go 8/16 /32 Go
Connexion au SR-100i Dock Dock Dock Dock** Dock**
Charge par le SR-100i Oui Oui Oui Oui Oui
iPod shuffle
1re génération
Capacité 512 Mo/1 Go 1/2/4 Go 4/6 Go 1/2/4 Go 2/4/8 Go
Connexion au SR-100i AUX AUX Dock Dock Dock
Charge par le SR-100i Non Non Oui Oui Oui
iPod
3e génération
10/15/20/
30/40 Go
iPod touch
1re génération*
iPod shuffle
2e/3e génération
iPod
4e génération
20/40 Go/U2
iPod touch
2e/3e génération*
iPod mini
iPod
4e génération
(couleur)
20/30/40/
60 Go/U2
iPhone
1re génération*
iPod nano
1re génération
iPod
5e génération
(vidéo)
30/60/80 Go
iPhone 3G/3GS*
iPod nano
2e génération
(aluminium)
iPod nano
3e génération
(vidéo)
Capacité 4/8 Go 8/16 Go
Connexion au SR-100i Dock Dock
Charge par le SR-100i Oui Oui
iPod nano
4e/5e génération
* Quand vous employez un iPod touch ou un iPhone avec cette unité, si vous utilisez une quelconque application autre que
les applications iPod, l'alimentation du SR-100i peut se rétablir peu après avoir été coupée (mise en veille). Comme l'unité
ne peut pas éteindre l'iPod touch/iPhone quand une telle application est en cours, vous devez quitter cette application
avant d'éteindre le SR-100i (de le mettre en veille).
** Fonctionne en mode Avion.
Si votre iPod ne fonctionne pas avec le SR-100i ou avec la télécommande, mettre à jour le logiciel peut résoudre le
problème. Consultez le site Web Apple et téléchargez le dernier logiciel pour iPod.
38

Raccordements
Une fois tous les branchements terminés, raccordez le cordon d'alimentation à une prise secteur.
< Lisez les modes d'emploi de tous les éléments que vous comptez employer avec cet appareil.
< Assurez-vous que chaque fiche est bien enfoncée. Pour éviter tout ronflement ou bruit parasite, ne regroupez pas les
câbles de connexion.
Arrière
Lecteur audio
A
(Câble optionnel)
B
portable
C
D
Prises AUX
A
Ces prises transmettent les signaux audio analogiques
à 2 canaux. Branchez un lecteur audio portable à l'aide
d'un câble mini-jack stéréo-RCA du commerce.
Assurez-vous de connecter les câbles de la façon
suivante :
fiche blanche e
fiche rouge e prise rouge(R : canal droit)
< Quand vous utilisez la prise casque de l'appareil
connecté, si vous ne réglez pas son volume, vous
risquez de ne rien entendre par le SR-100i.
< Trop monter le volume de l'appareil connecté peut
entraîner une distorsion du son produit par votre
SR-100i. Dans ce cas, réduisez le volume de l'appareil
connecté jusqu'à ce que la distorsion disparaisse puis
réglez le volume du SR-100i à un niveau d'écoute
confortable.
< Assurez-vous que chaque fiche est bien enfoncée.
Pour éviter tout ronflement ou bruit parasite, ne
regroupez pas les câbles de modulation avec
le cordon d’alimentation secteur ou les câbles
d’enceinte.
prise blanche (L : canal gauche)
Mémoire flash USB
Prise secteur
Prise FM ANTENNA
B
Branchez ici l'antenne FM fournie. Déployez
complètement et positionnez l’antenne sur un
encadrement de fenêtre ou mur offrant la meilleure
réception puis fixez-la en utilisant des punaises ou des
accessoires similaires.
Port USB (
C
Vous pouvez connecter un support USB à ce port à
l'aide du câble USB fourni.
Entrée d'alimentation
D
Une fois tous les autres branchements terminés,
branchez la fiche dans une prise secteur.
Veillez à brancher le cordon d'alimentation dans
Quand vous branchez ou débranchez le cordon
)
une prise secteur fournissant la tension correcte.
d'alimentation, saisissez-le par sa fiche.
FRANÇAIS
39

Identification des parties (unité principale)
Vue supérieure
A
Vue avant
B
C
D
G
H
E
F
I
40
J J
KK

A
Standby/On ( )/FUNCTION
Utilisez cette touche pour allumer et éteindre l’appareil
(standby).
Pour éteindre l'appareil, maintenez enfoncée cette
touche plus de 3 secondes.
S'il n'y a pas d'iPod connecté au dock :
e “ECO PWR” s'affiche quelques secondes. Puis
l'appareil s'éteint (se met en veille) et le voyant
STANDBY s'allume.
Si un iPod est connecté au dock :
e L'horloge s'affiche et la batterie de l'iPod se
charge. Si vous déconnectez l'iPod et ne pressez
aucun bouton durant 90 secondes, l'appareil
s'éteint (se met en veille) et le voyant STANDBY
s'allume.
Utilisez cette touche pour sélectionner une source.
B
Lecture/Pause (y/J)
En mode CD, USB ou iPod, utilisez cette touche pour
lancer la lecture ou la mettre en pause.
G
Écran
H
Capteur de télécommande
Quand vous utilisez la télécommande, pointez-la vers
ce capteur.
I
Voyant STANDBY
Ce voyant s'allume quand l'appareil est en veille.
J
Haut-parleurs (stéréo)
K
Dock iPod
Appuyez sur le logo “TEAC” pour ouvrir le dock.
Connectez un iPod au connecteur du dock.
Repoussez le dock pour le fermer si vous ne l'employez
pas.
FRANÇAIS
C
Stop (H)
En mode CD ou USB, utilisez cette touche pour arrêter
la lecture.
D
Fente d'insertion du disque
Insérez un disque avec sa face sérigraphiée vers vous.
E
Éjection (L)
Utilisez cette touche pour éjecter le disque.
F
VOLUME ( + / – )
Utilisez ces touches pour régler le niveau de volume.
Pour régler l'horloge ou le réveil, changez les valeurs à
l'aide de ces touches.
41

Identification des parties (télécommande)
a
STANDBY/ON ( )
Utilisez cette touche pour mettre l'appareil en et hors
service.
Si l'unité est éteinte et s'il n'y a pas d'iPod connecté
au dock :
e “ECO PWR” s'affiche quelques secondes. Puis
l'appareil s'éteint (se met en veille) et le voyant
a
b
k
c
l
d
e
f
m
n
b
o
STANDBY s'allume.
Si l'unité est éteinte et si un iPod est connecté au
dock :
e L'horloge s'affiche et la batterie de l'iPod se
charge. Si vous déconnectez l'iPod et ne pressez
aucun bouton durant 90 secondes, l'appareil
s'éteint (se met en veille) et le voyant STANDBY
s'allume.
FUNCTION
Utilisez cette touche pour sélectionner une source.
g
p
q
h
i
r
s
t
j
u
v
Note
Pour simplifier les explications, les instructions de ce
manuel peuvent ne se référer qu'à l'appareil ou à la
télécommande. Les mêmes commandes fonctionnent
alors de façon similaire sur la télécommande et sur
l'appareil lui-même.
c
FM MODE/Lecture en boucle ( )
En mode FM, utilisez cette touche pour sélectionner un
mode Auto ou Mono.
En mode CD, USB ou iPod, utilisez cette touche pour
obtenir une lecture en boucle.
d
INTRO
En mode CD ou USB, utilisez cette touche pour lire le
début de chaque fichier/piste (page 53).
e
Lecture/Pause (y/J)
En mode CD, USB ou iPod, utilisez cette touche pour
lancer la lecture ou la mettre en pause.
f
Stop (H)
En mode CD ou USB, utilisez cette touche pour arrêter
la lecture.
42

g
Défilement (˙ / ¥)
En mode CD ou USB, utilisez ces touches pour
sélectionner un dossier (disque MP3/WMA et support
USB uniquement).
En mode iPod, utilisez ces touches pour faire défiler
le menu. Ces touches ont les mêmes fonctions que la
molette cliquable d'un iPod.
En mode FM, utilisez ces touches pour sélectionner une
station préréglée (preset).
MENU
h
En mode iPod, utilisez cette touche pour revenir au
menu précédent. Cette touche a les mêmes fonctions
que son homologue sur l'iPod.
i
S.BASS
Utilisez cette touche pour renforcer les graves.
j
CLOCK
Utilisez cette touche pour afficher l'horloge.
Quand l'appareil est éteint, utilisez cette touche pour
afficher ou régler l'horloge (page 45).
o
ENTER
En mode iPod, utilisez cette touche pour confirmer une
sélection dans un menu. Cette touche a les mêmes
fonctions que la touche centrale de la molette cliquable
d'un iPod.
p
TUNING/Curseur (ß / å)/Saut (.//)
En mode CD, USB ou iPod, utilisez ces touches pour
sauter au fichier/piste suivant ou précédent. Maintenezles enfoncées pour rechercher un passage spécifique
d'un fichier/piste.
En mode tuner FM, utilisez ces touches pour rechercher
une station.
q
MUTING
Utilisez cette touche pour couper le son.
r
PROGRAM
En mode CD ou USB, utilisez cette touche pour
programmer des pistes/fichiers (page 54).
En mode tuner FM, utilisez cette touche pour prérégler
des stations (page 59).
FRANÇAIS
k
A-B
En mode CD ou USB, utilisez cette touche afin de régler
les points pour la lecture en boucle A-B (page 56).
l
Lecture aléatoire ( )
En mode CD, USB ou iPod, utilisez cette touche pour
régler la lecture aléatoire.
m
VOLUME ( + / – )
Utilisez ces touches pour régler le niveau de volume.
Lorsque vous réglez l'horloge ou le réveil, utilisez ces
touches pour changer la valeur.
n
DISPLAY
Durant la lecture d'un disque ou d'un support USB,
utilisez cette touche pour afficher les informations de
fichier/piste.
s
LOUDNESS
Utilisez cette touche pour augmenter les graves à faible
volume.
t
PRESET EQ
Appuyez sur cette touche pour sélectionner une
correction tonale préréglée (page 47).
u
SLEEP/TIMER
Utilisez cette touche pour régler la minuterie
d'extinction (page 47).
Quand l'appareil est éteint, utilisez cette touche pour
régler le réveil (page 60).
v
DIMMER
Utilisez cette touche pour changer la luminosité de
l'écran.
43

Boîtier de télécommande
Le boîtier de télécommande fourni permet la commande à
distance de l’appareil.
Quand vous utilisez le boîtier de télécommande, pointez-le
vers le capteur de télécommande en respectant un angle
de 60° à l'horizontale et de 20° à la verticale par rapport à
l'avant de l'appareil.
< Même si la télécommande est employée à portée de
fonctionnement (5 m), l'appareil peut ne pas répondre
s’il y a des obstacles entre eux.
< La télécommande peut mal fonctionner si elle est
employée près d’autres appareils générant des rayons
infrarouges, et si d’autres télécommandes utilisant
des rayons infrarouges sont utilisées près de l'appareil.
De même, les autres produits peuvent aussi mal
fonctionner.
Mise en place de la pile
Précautions concernant la pile
< Veillez à insérer la pile en respectant les polarités
positive “+” et négative “ - ” correctes.
< Si une pile coule, essuyez le liquide dans le
compartiment de pile et remplacez la pile par une
neuve.
< Si la télécommande ne doit pas être utilisée durant une
période prolongée (plus d’un mois), retirez sa pile pour
éviter qu’elle ne se décharge.
< N’utilisez pas d’autres piles que celles spécifiées.
< Ne chauffez pas et ne démontez pas les piles. Ne jetez
jamais les piles dans un feu ou dans de l’eau.
< Ne conservez et ne transportez pas les piles avec
d’autres objets métalliques. Les piles pourraient entrer
en court-circuit, couler ou exploser.
Retirez le couvercle du compartiment de pile.
1
Placez la pile au lithium-ion (CR2032, 3 V) avec son côté
2
+ vers le haut.
Refermez le couvercle.
3
Remplacement de la pile
Si vous remarquez que la distance de fonctionnement
entre le boîtier de télécommande et l'appareil se réduit,
c'est que la pile est usée. Dans ce cas, remplacez-la par une
neuve.
< Pour des informations sur la collecte des piles,
veuillez contacter votre mairie, votre service d’ordures
ménagères ou le point de vente dans lequel vous les
avez achetées.
44

Réglage de l'horloge
Réglez l'horloge avant toute autre opération.
Si l'appareil est en service, appuyez sur la
1
touche STANDBY/ON ( ) pour le mettre en
veille.
Appuyez plusieurs fois sur la touche CLOCK
2
jusqu'à ce que “CLK SET” s'affiche.
Appuyez répétitivement sur une touche
4
VOLUME ( + / – ) pour régler les minutes, puis
appuyez sur la touche CLOCK.
Le réglage de l'heure est maintenant terminé et
l'horloge démarre à la seconde 00.
Vérification de l'heure
FRANÇAIS
La valeur des “heures” clignote.
< Si aucune touche n'est pressée durant 30 secondes,
le mode de réglage d'horloge est abandonné.
Appuyez répétitivement sur une touche
3
VOLUME ( + / – ) pour régler les heures, puis
appuyez sur la touche CLOCK.
La valeur des “minutes” clignote.
Appuyez sur la touche CLOCK et l'horloge s'affichera
quelques secondes.
45

iPod CD USB FM AUX
Fonctionnement de base
Ce chapitre décrit le fonctionnement de base valable dans
tous les modes.
Appuyez sur la touche Standby/On (
1
allumer l’appareil.
< L'appareil s'allume avec comme source la dernière
ayant été sélectionnée.
Appuyez sur la touche FUNCTION (la même que
2
la touche Standby/On) plusieurs fois pour
sélectionner une source.
) pour
Faites jouer la source, et réglez le volume avec
3
les boutons VOLUME ( + / – ).
Le volume peut être réglé de MIN (0) à MAX (31).
Renforcement des graves
Vous pouvez renforcer les graves.
La source change comme suit :
iPod
CD
USB
FM
AUX
< Pour écouter une source externe branchée à la prise
AUX, sélectionnez “AUX”.
Appuyez sur la touche S.BASS.
Pour annuler la fonction, appuyez à nouveau sur la
touche S.BASS.
< Quand la fonction LOUDNESS est activée, la fonction
S.BASS est automatiquement désactivée.
Loudness
Vous pouvez augmenter l'effet graves et des aigus à faible
volume. Désactivez cette fonction pour une écoute à
niveau normal.
Appuyez sur la touche LOUDNESS.
Pour annuler la fonction, appuyez à nouveau sur la
touche LOUDNESS.
46
< Quand la fonction S.BASS est activée, la fonction
LOUDNESS est automatiquement désactivée.

Égaliseur (correcteur tonal)
Vous pouvez affiner le son en fonction du genre de
musique ou de votre goût.
Minuterie d'extinction
Vous pouvez régler la minuterie d'extinction pour que
l'appareil s'éteigne tout seul après un temps donné.
Chaque fois que vous appuyez sur la touche PRESET EQ,
le réglage d'égaliseur change comme suit :
POP
JAZZ
CLASSIC
ROCK
FLAT (par défaut)
< Si vous utilisez aussi l'égaliseur de votre iPod ou d'un
autre lecteur audio, les effets se cumuleront et peuvent
ne pas donner le son escompté.
Nous vous recommandons dans la plupart des cas de
n'utiliser qu'un seul égaliseur, celui de cette unité ou
celui de votre lecteur audio.
Coupure du son
Vous pouvez temporairement couper le son.
Chaque fois que l'on appuie sur la touche SLEEP, le
temps change par intervalles de 10 minutes.
L'appareil s'éteint automatiquement une fois le temps
écoulé.
10 20 3 0
--
90
(Off )
< Si vous voulez contrôler le temps restant, appuyez une
fois sur la touche SLEEP.
Le temps restant s'affiche durant quelques secondes.
< Pour annuler la minuterie, appuyez répétitivement sur la
touche SLEEP jusqu'à ce que “--” s'affiche.
N N N N
Atténuateur de luminosité (Dimmer)
Vous pouvez changer la luminosité de l'écran.
FRANÇAIS
Appuyez sur la touche MUTING.
Appuyez à nouveau sur la touche MUTING pour rétablir
le son.
< “MUTE” clignote dans l'afficheur quand le son est coupé.
< Si vous changez le volume ou la source quand le son
est coupé, le son revient.
Appuyez sur la touche DIMMER pour régler la luminosité
sur un des trois niveaux.
47

iPod
Écoute d’un iPod
Appuyez sur le logo “TEAC” en face avant de cet
1
appareil pour ouvrir le dock d'iPod.
Arrêt temporaire de la lecture
(mode de pause)
Connectez un iPod au dock.
2
L’iPod se met automatiquement sous tension et
démarre la lecture à partir de sa liste de lecture.
Si un iPod est déjà connecté, appuyez plusieurs fois
sur la touche FUNCTION jusqu'à sélection de “IPod”.
La lecture démarre automatiquement.
< La batterie de l'iPod se recharge quand il est connecté
au dock et que le SR-100i est raccordé au secteur.
Certains modèles d'iPod ne peuvent pas être
rechargés par le dock. Pour des détails sur la
compatibilité de charge, voir page 38.
< Quand vous éteignez l'appareil alors qu'un iPod est
connecté au dock, l'horloge s'affiche et la batterie
de l'iPod se charge. Si vous déconnectez l'iPod et ne
pressez aucun bouton durant 90 secondes, l'appareil
s'éteint (se met en veille) et le voyant STANDBY
s'allume.
< Si un casque est aussi branché à l'iPod, le son sort à la
fois par le casque et par les haut-parleurs du SR-100i.
Pendant la lecture, appuyez sur la touche Lecture/Pause
(G/J). La lecture s'arrête à la position actuelle.
Pour reprendre la lecture, appuyez de nouveau sur la
touche Lecture/Pause (G/J).
Pour sauter à la piste suivante ou
précédente
Durant la lecture, appuyez répétitivement sur la touche
de saut (.//) jusqu'à ce que vous ayez atteint le
morceau désiré.
Le morceau sélectionné sera lu depuis son début.
< Si la touche . est pressée une fois durant la lecture,
la lecture du morceau en cours reprend au début.
Recherche d'un passage de piste
Note pour iPod touch
Si vous souhaitez entendre le son de la vidéo d'un iPod
touch, connectez d'abord l'iPod touch au dock, puis
faites fonctionner le SR-100i et l'iPod touch.
48
Maintenez pressée
Durant la lecture, maintenez pressée la touche de saut
(.//) pour retrouver un passage de morceau.
Relâchez-la quand vous avez atteint le passage à écouter.

Activation du mode de lecture en boucle
Retour au menu d'iPod précédent
Pendant la lecture, appuyez sur la touche de lecture en
boucle (
boucle. “REP MODE” s'affiche.
Chaque fois que vous appuyez sur la touche de lecture
en boucle (
l'iPod change comme suit :
< Si vous sélectionnez “Repeat one” pour ne lire qu'un
seul morceau, l'icône (
< Si vous sélectionnez “Repeat all” pour lire tous les
morceaux, l'icône (
) pour sélectionner le mode de lecture en
), le réglage de lecture en boucle de
Repeat one Repeat All
Off
) apparaît sur l’écran de l’iPod.
) apparaît sur l’écran de l’iPod.
Activation du mode de lecture aléatoire
Appuyez sur la touche MENU.
Cette touche a les mêmes fonctions que son
homologue sur l'iPod.
Sélection d'une rubrique de menu d'iPod
FRANÇAIS
Utilisez les touches de défilement (˙ / ¥ ) pour
sélectionner la rubrique de menu voulue puis appuyez
sur la touche ENTER.
Pendant la lecture, appuyez sur la touche de lecture
aléatoire (
aléatoire. “RANDOM” s'affiche.
Chaque fois que vous appuyez sur la touche de lecture
aléatoire (
change comme suit :
< Pendant la lecture aléatoire, l’icône de lecture aléatoire
(
) apparaît sur l’écran de l’iPod/iPhone.
) pour sélectionner le mode de lecture
), le réglage de lecture aléatoire de l'iPod
Songs Albums
Off
49

CD
Écoute d'un disque
Appuyez répétitivement sur la touche
1
FUNCTION afin de sélectionner “CD”.
< Si aucun disque n'est chargé, “NO DISC” s'affiche.
Insérez un disque avec sa face sérigraphiée vers
2
vous.
Côté sérigraphié
Le disque est automatiquement chargé dans le
lecteur. Laissez le disque se faire avaler.
Disque de MP3/WMA
Numéro du
dossier actuel
Temps écoulé
dans le fichier
actuel
Exemple : Affichage avec la lecture à l'arrêt
CD audio
Nombre total
de pistes
Durée totale
de lecture
Disque de MP3/WMA
Nombre total
de dossiers
Numéro du
fichier actuel
Nombre total
de fichiers
La lecture démarre de la première piste ou du premier
fichier du disque.
M Ne forcez pas sur le disque.
M N'insérez pas plus d'un disque.
M Ne collez aucune étiquette, etc. à une
quelconque face du disque.
M N'utilisez pas de disques à formes irrégulières.
Cela pourrait faire mal fonctionner ou
endommager l'appareil.
< Il faut quelques secondes à l'appareil pour charger
le disque. Aucune touche ne fonctionne pendant ce
chargement.
Exemple : Affichage durant la lecture
CD audio
Numéro de la
piste actuelle
Temps écoulé
dans la piste
actuelle
50
< Les fichiers MP3/WMA qui ne sont pas enregistrés
dans des dossiers sont automatiquement placés dans
le dossier racine “01 (root)”. La lecture démarre par le
premier fichier du dossier “01 (root)”.
< Quand la lecture de tous les fichiers/pistes est
terminée, la lecture s'arrête automatiquement.
< Voir page 63 pour des informations sur l'ordre de
lecture des fichiers MP3/WMA.
N'inclinez pas l'appareil quand un disque est
inséré. Cela peut endommager le disque et
causer un mauvais fonctionnement.
Retrait du disque.
Appuyez sur la touche Éjection (L).
< Pour insérer à nouveau un disque, insérez-le après
éjection complète.

USB
Écoute d'un support USB
N'utilisez pas de disques durs USB haute capacité.
Seule une mémoire flash USB peut être utilisée.
Appuyez répétitivement sur la touche
1
FUNCTION afin de sélectionner “USB”.
< Si aucun support USB n'est connecté, “NO USB”
s'affiche.
Branchez votre support USB au câble USB
2
fourni lui-même connecté à l'appareil.
Faites attention au
sens d'insertion.
Exemple : Affichage durant la lecture
Numéro du
dossier actuel
Temps écoulé
dans le fichier
actuel
Exemple : Affichage avec la lecture à l'arrêt
Nombre total
de dossiers
< Les fichiers MP3/WMA qui ne sont pas enregistrés
dans des dossiers sont automatiquement placés dans
le dossier racine “01 (root)”. La lecture démarre par le
premier fichier du dossier “01 (root)”.
< Voir page 63 pour des informations sur l'ordre de
lecture des fichiers MP3/WMA.
Numéro du
fichier actuel
Nombre total
de fichiers
FRANÇAIS
La lecture démarre automatiquement à partir du
premier fichier du support USB.
51

CD USB
Lecture de base
Arrêt temporaire de la lecture
(mode de pause)
Pendant la lecture, appuyez sur la touche Lecture/Pause
(y/J).
La lecture s'arrête à la position actuelle.
Pour reprendre la lecture, appuyez de nouveau sur la
touche Lecture/Pause (y/J).
Arrêt de la lecture
Saut au fichier/piste suivant ou précédent
Appuyez répétitivement sur la touche de saut
(.//) jusqu'à ce que vous ayez atteint le fichier/
piste désiré.
La piste ou le fichier sélectionné sera lu depuis son
début.
< Si la touche . est pressée une fois durant la lecture,
la lecture du fichier/piste en cours reprend au début.
< Durant la lecture programmée, c'est le fichier/piste
suivant ou précédent dans le programme qui est lu.
< Quand la lecture est arrêtée, cette fonction n'agit pas
avec les CD audio.
Appuyez sur la touche Stop (H).
Recherche d'un passage de fichier/piste
Maintenez
pressée
Durant la lecture, gardez pressée une touche de saut
(.//).
Relâchez-la quand vous avez atteint le passage à
écouter.
52

Sélection d'un dossier
(disque MP3/WMA ou support USB)
Affichage des informations
Appuyez sur la touche de défilement (˙ / ¥) pour
sauter au dossier suivant ou précédent.
Lecture des introductions
Vous pouvez faire lire à la suite le début de chaque fichier/
piste.
Appuyez sur la touche INTRO pour lancer la lecture des
introductions. “INTR ON” s'affiche.
Cet appareil lit les 10 premières secondes de chaque
fichier/piste à la suite.
Pour continuer l'écoute du fichier/piste ainsi commencé,
appuyez à nouveau sur la touche INTRO. “INTR OFF”
s'affiche.
CD audio
Durant la lecture, chaque fois que l'on appuie sur la
touche DISPLAY, la seconde ligne de l'affichage change
comme suit :
Temps écoulé dans la piste actuelle
Temps restant dans la piste actuelle
Temps écoulé dans le disque
Temps restant dans le disque
Fichier MP3/WMA
Durant la lecture, appuyez sur la touche DISPLAY pour
afficher des informations défilantes sur le fichier actuel,
comme suit :
Titre
Artiste
Album
FRANÇAIS
< Les 30 premiers caractères de titre/artiste/album
peuvent être affichés.
< L'écran de cet appareil ne peut afficher que les lettres
et chiffres à simple octet. Si des informations de fichier
utilisent des caractères japonais, chinois ou autres à
double octet, la lecture est possible mais le nom ne
sera pas affiché correctement.
53

CD USB
Lecture programmée
20 fichiers/pistes peuvent être programmés dans l'ordre
désiré.
Appuyez répétitivement sur la touche
1
FUNCTION afin de sélectionner “CD” ou “USB”.
Appuyez sur la touche PROGRAM alors que la
2
lecture est arrêtée.
(Pour programmer des fichiers MP3/WMA)
3
Utilisez les touches de défilement (˙ / ¥) pour
sélectionner un dossier dans le disque MP3/
WMA ou le support USB.
Exemple :
Numéro de
dossier
< Les fichiers MP3/WMA qui ne sont pas enregistrés
dans des dossiers sont automatiquement placés dans
le dossier racine “01 (root)”.
Exemple : CD audio
Numéro de
piste
Position
dans le
programme
Exemple : Fichier MP3/WMA
Numéro de
dossier
Position
dans le
programme
< Pour annuler le mode programme, appuyez sur la
touche Stop (H).
Numéro de
fichier
Appuyez sur les touches de curseur (ß / å) pour
4
sélectionner un fichier/piste, puis appuyez sur
la touche PROGRAM.
54

Exemple : CD audio
Numéro de
piste
Exemple : Fichier MP3/WMA
Effacement du programme
Numéro de
fichier
La fichier ou la piste est programmé, et la position
suivante dans le programme (“P-02”) s'affiche.
3
< Répétez les étapes
fichiers/pistes supplémentaires.
Une fois la sélection de fichiers/pistes terminée,
5
appuyez sur la touche Lecture/Pause (G/J)
pour lancer la lecture du programme.
et 4 pour programmer des
À l'arrêt, appuyez sur la touche Stop (H).
< Dans les cas suivants, le contenu programmé sera
également effacé :
Changement de source
Pression de la touche STANDBY/ON (
Éjection du disque
Déconnexion du support USB
Déconnexion du cordon d'alimentation
)
FRANÇAIS
< Une fois tous les fichiers/pistes programmés lus,
ou quand vous avez arrêté la lecture programmée,
appuyez sur la touche Lecture/Pause (G/J) pour lire
à nouveau le programme.
< Vous pouvez utiliser les touches de saut (.//)
durant la lecture programmée pour sélectionner et
lire d'autres fichiers/pistes du programme.
< La fonction de lecture aléatoire ne fonctionne pas
durant la lecture programmée.
55

CD USB
Lecture en boucle
Chaque fois que vous appuyez sur la touche de lecture
en boucle (
REP ONE
REP ALB
(disque MP3/WMA ou support USB
uniquement)
REP ALL
REP OFF
(Répétition hors service)
), le mode change comme suit :
Lecture en boucle A-B
Cette fonction permet la lecture en boucle de toute
section désirée d'un fichier/piste.
Durant la lecture, désignez le point duquel doit
1
commencer la lecture en boucle en pressant la
touche A-B.
“A-” s'af fiche.
Quand le point auquel doit se terminer la
2
lecture en boucle est atteint, appuyez à
nouveau sur la touche A-B.
REP ONE (lecture en boucle d'un titre)
Durant la lecture, appuyez une fois sur la touche de
lecture en boucle (
“REP ONE” s'affiche.
La piste sera lue en boucle.
REP ALB (lecture en boucle d'un dossier)
(disque MP3/WMA et support USB uniquement)
Appuyez deux fois sur la touche de lecture en boucle
(
).
“REP ALB” s'affiche et toutes les pistes du dossier sont
lues en boucle.
REP ALL (lecture en boucle de la totalité)
Appuyez deux fois sur la touche de lecture en boucle
(
) (ou trois fois pour des fichiers MP3/WMA).
“REP ALL” s'affiche et toutes les pistes seront lues en
boucle.
Durant la lecture de programme, les pistes
programmées seront lues en boucle.
).
La section ainsi déterminée sera lue en boucle.
< Pour revenir à la lecture normale, pressez la touche
A-B ou la touche Stop (H).
< Il doit y avoir plus de 3 secondes entre le point A et le
point B.
< Le point de début et le point de fin doivent appartenir
au même fichier/piste. Si vous changez de fichier/
piste après avoir réglé le point de début, le mode de
lecture en boucle A-B sera annulé.
56

CD USB AUX
Lecture aléatoire
Durant la lecture, appuyez sur la touche de lecture
aléatoire (
“RAN ON” s'affiche et les fichiers/pistes sont lus en ordre
aléatoire.
< Si vous appuyez sur la touche / durant la lecture
aléatoire, le prochain fichier/piste lu sera choisi
aléatoirement.
Si la touche . est pressée une fois durant la lecture
aléatoire, la lecture du fichier/de la piste en cours
reprend au début.
Si la touche . est pressée deux fois ou plus, un autre
fichier/piste sera sélectionné aléatoirement et lu.
).
Écoute d'une source externe
Vous pouvez écouter le son d'un lecteur audio portable
externe branché aux prises AUX.
< Vous pouvez employer ce moyen pour écouter un iPod
non branché au dock iPod. Pour des informations sur la
compatibilité des iPod, voir page 38.
Branchez un lecteur audio portable externe aux
1
prises AUX du SR-100i à l'aide d'un câble minijack stéréo-RCA du commerce.
Appuyez sur la touche FUNCTION pour
2
sélectionner “AUX”.
FRANÇAIS
< Durant la lecture aléatoire, une piste ou un fichier déjà
lu n'est pas lu de nouveau.
< Pour annuler la lecture aléatoire, appuyez sur la touche
de lecture aléatoire (
< Pour arrêter la lecture aléatoire, appuyez sur la touche
Stop (H). Cette opération annule également la lecture
aléatoire.
). “RAN OFF” s'affiche.
Faites jouer la source, et réglez le volume à la
3
fois sur le SR-100i et sur l'élément externe
connecté.
< Quand vous utilisez la prise casque de l'appareil
connecté, si vous ne réglez pas son volume, vous
risquez de ne rien entendre par le SR-100i.
< Trop monter le volume de l'appareil connecté peut
entraîner une distorsion du son produit par votre
SR-100i. Dans ce cas, réduisez le volume de l'appareil
connecté jusqu'à ce que la distorsion disparaisse puis
réglez le volume du SR-100i à un niveau d'écoute
confortable.
57

FM
Écoute de la radio FM
Appuyez répétitivement sur la touche
1
FUNCTION afin de sélectionner “FM”.
Sélectionnez la station que vous souhaitez
2
écouter.
Sélection automatique
Mode FM
Appuyer sur la touche FM MODE permet d’alterner
entre le mode Auto et le mode Mono.
Auto
Quand un programme est diffusé en stéréo, vous
entendez un son stéréo. Quand il est en mono, vous
entendez un son mono.
< Si le son souffre de distorsion, c'est que le signal n'est
pas assez fort pour une bonne réception stéréo. Dans
ce cas, passez en mode Mono.
Maintenez
enfoncée
Maintenez enfoncée la touche TUNING et relâchez-la
quand le processus de syntonisation automatique a
démarré. Quand une station est trouvée, le processus
de syntonisation s'arrête automatiquement.
Répétez cette étape jusqu’à ce que vous ayez trouvé
la station souhaitée.
< Pour arrêter le processus de syntonisation
automatique, appuyez brièvement sur la touche
TUNING.
Sélection manuelle
Mono
Pour compenser une faible réception FM stéréo,
sélectionnez ce mode. La réception est alors forcée en
mono, ce qui réduit les parasites indésirables.
Si la réception est mauvaise
Déployez l'antenne FM ou changez sa position pour
améliorer la réception d'une station.
Appuyez répétitivement sur une touche TUNING.
La fréquence change par pas fixes. Appuyez
répétitivement jusqu’à ce que vous ayez trouvé la
station souhaitée.
58

FM
Syntonisation préréglée (preset)
Vous pouvez mémoriser un maximum de 20 stations FM.
Réglez la station que vous souhaitez mémoriser
1
(page 58).
Appuyez sur la touche PROGRAM.
2
Le numéro de preset (mémoire de préréglage)
clignote.
Exemple :
Sélection d'une station préréglée (preset)
Appuyez répétitivement sur la touche
1
FUNCTION afin de sélectionner “FM”.
Appuyez sur les touches de défilement (˙ / ¥)
2
pour sélectionner la station préréglée (preset)
désirée.
FRANÇAIS
Appuyez sur les touches de défilement (˙ / ¥)
3
pour sélectionner un numéro de preset où
mémoriser la station.
Appuyez sur la touche PROGRAM.
4
La station reçue est mémorisée dans le numéro de
preset sélectionné.
Pour mémoriser d’autres stations, répétez les étapes
à 4 .
1
59

Réveil
Vous pouvez régler des heures spécifiques de mise en
service de l'appareil.
< Réglez l'horloge avant de régler le réveil (page 45).
Réglage de l'heure de réveil
Si l'appareil est en service, appuyez sur la
1
touche STANDBY/ON ( ) pour le mettre en
veille.
Appuyez plusieurs fois sur la touche TIMER
2
jusqu'à ce que “ALM SET” s'affiche.
Appuyez répétitivement sur une touche
4
VOLUME ( + / – ) pour régler les minutes, puis
appuyez sur la touche TIMER.
La valeur actuelle de réglage clignote.
Appuyez répétitivement sur une touche
5
VOLUME ( + / – ) pour sélectionner “ON” puis
appuyez sur la touche TIMER.
L'heure de réveil a été réglée. “ON” et l'heure actuelle
sont affichés.
Quand l'heure de réveil arrive, la dernière source
sélectionnée entre en reproduction.
< Pour couper le réveil, sélectionnez “OFF” à l'étape
Si l'heure de réveil est atteinte, l'appareil passe
automatiquement en mode “SLEEP 60” et repasse
donc en veille 60 minutes plus tard.
Si vous désirez une écoute continue, appuyez
répétitivement sur la touche SLEEP pour sélectionner “--”
après que l'heure de réveil ait été atteinte.
.
5
La valeur des heures clignote.
< Si aucune touche n'est pressée durant 30 secondes,
le mode de réglage de réveil est abandonné.
Appuyez répétitivement sur une touche
3
VOLUME ( + / – ) pour régler les heures, puis
appuyez sur la touche TIMER.
La valeur des minutes de l'horloge clignote.
60
Note d'emploi avec un iPod touch
(si vous utilisez le réveil du SR-100i avec un iPod
touch comme source)
< Si vous éteignez l'iPod touch (“Slide to power off”),
vous ne pouvez pas l'utiliser avec le réveil même
s'il est sur le dock de l'appareil. Pour utiliser le réveil
avec un iPod touch comme source, ne sélectionnez
pas "Slide to power off" sur l'iPod touch (l'écran de
l'iPod touch peut être éteint sans aucun problème).
< Si Vidéo est affiché sur l'écran de l'iPod touch, vous
ne pouvez pas l'utiliser avec le réveil même s'il est
sur le dock de l'appareil. Pour utiliser le réveil avec un
iPod touch comme source, sélectionnez toute autre
rubrique que Vidéo sur l'iPod touch.

Guide de dépannage (1)
Si vous avez des problèmes avec votre système, lisez cette
page et essayez de résoudre vous-même le problème
avant d'appeler votre revendeur ou un service après-vente
TEAC.
Généralités
Pas d’alimentation
e Vérifiez le branchement à l'alimentation secteur.
Vérifiez si la source de courant est une prise commutée
ou non. Si c'est le cas, vérifiez que son interrupteur est
enclenché.
e Contrôlez que la prise secteur délivre bien du courant
en y branchant un autre appareil tel qu'une lampe ou
un ventilateur.
Aucun son ne sort des enceintes.
e Sélectionnez la source en appuyant sur la touche
FUNCTION.
e Réglez le volume.
e Si “MUTE” clignote, appuyez sur la touche MUTING.
Le son est parasité.
e L'appareil est trop proche d'un téléviseur ou appareil
similaire. Éloignez-le de l'appareil qui interfère ou
éteignez-le.
e Un ventilateur pour dissiper la chaleur est monté
sur le côté gauche de l'unité principale. Selon
l'environnement ambiant, vous pouvez entendre le
bruit de sa rotation. Ce bruit n'est pas un mauvais
fonctionnement.
La télécommande ne fonctionne pas.
e Appuyez sur la touche Standby/On (
l’appareil.
e Si la pile est épuisée, remplacez-la par une neuve.
e Utilisez la télécommande à portée de fonctionnement
(5 m) et pointez-la vers le capteur de télécommande
de la face avant.
e Retirez les obstacles entre la télécommande et
l’appareil.
e S’il y a un fort éclairage près de l’appareil, éteignez-le.
L'alimentation ne peut pas être éteinte (mise en
veille) quand un iPod touch sert de source sonore.
e
Quand vous employez un iPod touch ou un iPhone avec
cette unité, si vous utilisez une quelconque application
autre que les applications iPod, l'alimentation du
SR-100i peut se rétablir peu après avoir été coupée
(mise en veille). Comme l'unité ne peut pas éteindre
l'iPod touch quand une telle application est en cours,
vous devez quitter cette application avant d'éteindre le
SR-100i (de le mettre en veille).
) pour allumer
Le son chute temporairement quand on fait passer
le volume de 6 à 7 ou de 7 à 6.
e L'action de commutateurs de circuit internes fait
chuter le son durant environ une demi-seconde. Ce
n'est pas un mauvais fonctionnement.
Lecteur iPod
Impossible de connecter l’iPod.
e Retirez la poussière ou les obstacles du connecteur
de dock du SR-100i et de l'iPod, puis connectez à
nouveau l'iPod.
Impossible de commander l’iPod.
e Libérez le commutateur HOLD de l'iPod.
Lecture impossible.
e Retirez l’iPod du dock, attendez quelques secondes et
insérez-le de nouveau.
e Une mise à jour du logiciel peut résoudre le problème.
Consultez le site Web Apple et téléchargez le dernier
logiciel pour iPod.
Tuner FM
Aucune station ne peut être captée, ou le signal est
trop faible.
e Réglez correctement une station.
e Tournez l'antenne FM jusqu'à ce que la station soit
reçue nettement.
Lecteur de CD
Lecture impossible.
e Chargez un disque avec sa face sérigraphiée vers vous.
e Si le disque est sale, nettoyez sa surface.
e Un disque vierge a été chargé. Chargez un disque déjà
enregistré.
e Selon le disque etc., la lecture de certains CD-R/RW
peut ne pas être possible. Essayez de nouveau avec
un autre disque.
e Vous ne pouvez pas lire les CD-R/RW non finalisés.
Finalisez un tel disque dans un enregistreur de CD et
réessayez.
61
FRANÇAIS

Guide de dépannage (2)
MP3/WMA
Lecture impossible.
e Vérifiez l'extension de fichier MP3/WMA. Cet appareil
reconnaît les fichiers MP3 par leur extension de fichier
“.mp3” et les fichiers WMA par leur extension de fichier
“.w ma”.
e Les données du fichier MP3/WMA sont peut-être
endommagées.
e Le format de données du fichier n'est peut-être pas
MP3/WMA.
e La fréquence d'échantillonnage du fichier MP3 est
peut-être autre que 44,1 ou 48 kHz.
e Le débit binaire du fichier MP3 dépasse peut-être
320 kb/s.
e La fréquence d'échantillonnage du fichier WMA est
peut-être autre que 44,1 kHz.
e Le débit binaire du fichier WMA dépasse peut-être
192 kb/s.
Impossible d'afficher correctement les informations
de fichier.
e Si des informations de fichier utilisent des caractères
japonais, chinois ou autres à double octet, la
lecture est possible mais le nom ne sera pas affiché
correctement.
Réveil
Le réveil ne fonctionne pas.
e Si l'appareil est en service, appuyez sur la touche
Standby/On (
e (Quand un iPod touch est la source sonore)
Si vous éteignez l'iPod touch (“Slide to power off”),
vous ne pouvez pas l'utiliser avec le réveil même s'il
est sur le dock du SR-100i. Pour utiliser le réveil avec un
iPod touch comme source, ne sélectionnez pas “Slide
to power off” sur l'iPod touch (l'écran de l'iPod touch
peut être éteint sans aucun problème).
e (Quand un iPod touch est la source sonore)
Si Vidéo est affiché sur l'écran de l'iPod touch, vous
ne pouvez pas l'utiliser avec le réveil même s'il est
sur le dock du SR-100i. Pour utiliser le réveil avec un
iPod touch comme source, sélectionnez toute autre
rubrique que Vidéo sur l'iPod touch.
) pour le mettre en veille.
Minuterie d'extinction
Même une fois le temps avant extinction écoulé, pas
d'extinction (mise en veille) quand un iPod touch
sert de source sonore
e Quand vous employez un iPod touch ou un iPhone
avec cette unité, si vous utilisez une quelconque
application autre que les applications iPod,
l'alimentation du SR-100i peut se rétablir après que
la minuterie d'extinction l'ait coupée (mise en veille).
Comme l'unité ne peut pas éteindre l'iPod touch
quand une telle application est en cours, vous devez
quitter cette application pour permettre à la minuterie
d'extinction d'éteindre le SR-100i (de le mettre en
veille).
62

Ordre de lecture d'un disque MP3/WMA
Caractéristiques techniques
Les fichiers MP3/WMA d'un CD ou d'un support USB
peuvent être rangés dans des dossiers de la même façon
que les fichiers d'un ordinateur. De plus, un dossier peut
contenir lui-même plusieurs dossiers.
Voici un exemple de structure de fichiers et de
dossiers dans un disque MP3/WMA ou un support
USB, montrant l'ordre de classement des dossiers
(01 “root” ou racine jusqu'à 05) et l'ordre de lecture
des fichiers (
01 “root”
Fichier MP3/WMA
1
2
Fichier MP3/WMA
Dossier 02
Dossier 03
à 9 ).
1
Fichier MP3/WMA
3
Fichier MP3/WMA
4
Dossier 04
5
Fichier MP3/WMA
Fichier MP3/WMA
6
7
Fichier MP3/WMA
Section Tuner
Plage de fréquences FM.......... 87,5 MHz à 108,0 MHz
Section Lecteur CD
Types de disque compatibles . CD/CD-R/CD-RW (12 cm)
Formats compatibles ...............CD-DA, MP3/WMA
Réponse en fréquence...........20 à 20 000 Hz (±1 dB)
Pleurage et scintillement................Non mesurable
Distorsion harmonique totale .......0,05 % (1 kHz, 0 dB)
Section amplificateur
Puissance totale de sortie (maximale) .....50 W + 50 W
Section Système de Haut-parleurs
Type...............................Tweeter : 38 mm x 2
Woofer : 91 mm x 2
Impédance .....................................8 ohms
Générales
Alimentation électrique.................CA 120 V, 60 Hz
Consommation électrique (nominale).............60 W
Dimensions (L x H x P)..............570 x 230 x 220 mm
Poids (net) ....................................... 5,4 kg
Accessoires Standard
Télécommande (RC-1265) x 1
Pile (CR2025) pour télécommande x 1
Cordon d’alimentation x 1
Antenne FM x 1
Câble USB x 1
Mode d’emploi (ce document) x 1
Carte de garantie x 1
FRANÇAIS
Dossier
Dossier 05
Fichier MP3/WMA
8
Fichier MP3/WMA
9
< L'ordre indiqué dans le schéma peut être changé si
des fichiers ou dossiers sont ajoutés, supprimés ou
déplacés.
< Conception et caractéristiques techniques sont sujettes
à changements sans préavis.
< Le poids et les dimensions sont des valeurs approchées.
< Les illustrations peuvent légèrement différer des
modèles de production.
63

< No exponga este aparato a salpicaduras ni goteras.
Índice
Gracias por elegir TEAC. Lea este manual
atentamente para obtener el mejor rendimiento de
esta unidad.
Antes de utilizar la unidad ............................65
Discos ................................................66
Dispositivos de almacenamiento USB .................67
Compatibilidad MP3/WMA ...........................67
Compatible con iPod .................................68
Conexiones ..........................................69
Identificación de las partes (unidad principal) .........70
Identificación de las partes (mando a distancia) .......72
Mando a distancia ....................................74
< No coloque objetos que contengan líquidos, como
por ejemplo vasos, sobre el aparato.
< No instale este aparato en lugares cerrados tales
como estanterías o similares.
< Este aparato libera corriente nominal no válida para
el funcionamiento a través de la toma de corriente,
aún cuando el interruptor de encendido y activación
(POWER o STANDBY/ON) no esté en la posición de
encendido (ON).
< Este aparato debe situarse lo suficientemente
cerca de una toma de electricidad como para
poder alcanzar fácilmente el cable de corriente en
cualquier momento.
< El enchufe que se conecta a la red es el dispositivo
de desconexión, por lo que deberá permanecer
siempre en prefecto estado de uso.
< Si el producto utiliza pilas (esto incluye las baterías
incorporadas y los “packs”), se evitará su exposición
directa al sol, al fuego o a cualquier otra fuente de
calor excesivo.
< PRECAUCIÓN con los productos que emplean
baterías de litio reemplazables: existe peligro de
explosión si la batería se reemplaza por otra de tipo
incorrecto. Reemplácela sólo por otra igual o de tipo
equivalente.
Ajuste del reloj .......................................75
Funcionamiento básico ...............................76
iPod
Escuchar un iPod .....................................78
CD USB
Escuchar un disco ....................................80
Escuchar un dispositivo de almacenamiento USB .....81
Reproducción básica .................................82
Reproducción programada ...........................84
Reproducción repetida ...............................86
Reproducción aleatoria ...............................87
AUX
Escuchar una fuente externa .........................87
FM
Escuchar la radio FM ..................................88
Sintonización de presintonías .........................89
Temporizador despertador ...........................90
Solución de posibles fallos ............................91
Orden de reproducción MP3/WMA ...................93
Especificaciones ......................................93
< Deberá llevar cuidado si utiliza auriculares con
este producto, ya que una excesiva presión sonora
(volumen) procedente de los mismos puede causar
perdidas de audición.
64

Antes de utilizar la unidad
Qué hay en la caja
Confirme los accesorios suministrados de serie.
Mando a distancia (RC-1265) x 1
Pila (CR2025) para el mando a distancia x 1
Cable de corriente x 1
Antena de FM x 1
Cable USB x 1
Manual del usuario (este documento) x 1
< Guarde este manual en un lugar seguro para futuras
consultas.
Tarjeta de garantía x 1
PRECAUCIÓN
< No incline la unidad con un disco dentro. Puede dañar
el disco y causar anomalías de funcionamiento.
< No mueva la unidad durante la reproducción del disco.
Durante la reproducción, el disco gira a alta velocidad.
No levante ni mueva la unidad durante la reproducción.
Si lo hace puede dañar el disco o la unidad.
< El voltaje suministrado a la unidad deberá coincidir con
el voltaje impreso en el panel posterior. Si tiene dudas al
respecto, consulte a un electricista.
< No abra la carcasa porque podría causar daños en los
circuitos o una descarga eléctrica. En caso de que se
introduzca un objeto extraño en la unidad, contacte
con su distribuidor o con un servicio técnico autorizado.
< Cuando desenchufe el cable de corriente de un toma
eléctrica, tire siempre directamente del conector, nunca
del cable.
< Quite siempre el disco antes de cambiar de sitio o
mover esta unidad. Mover la unidad con un disco
dentro podría originar problemas de funcionamiento.
Emplazamiento de la unidad
< Elija con cuidado el emplazamiento para la instalación
de la unidad.
Evite colocarla donde le dé la luz solar directa o cerca
de una fuente de calor. Evite también lugares sujetos a
vibraciones y a polvo, calor, frío o humedad excesivos..
< Como la unidad puede calentarse durante el
funcionamiento, deje siempre suficiente espacio a su
alrededor para la ventilación.
< No sitúe la unidad sobre un amplificador o receptor ni
sobre cualquier otro aparato que genere calor.
< Cuando la unidad está encendida, al encender una
televisión pueden aparecer líneas en la pantalla de la
televisión, dependiendo de la frecuencia de la emisión
de televisión. Esto no significa un mal funcionamiento
de la unidad ni de la televisión. Si se ven tales líneas,
aleje lo más posible esta unidad del aparato de
televisión.
Mantenimiento
Si la superficie de esta unidad se ensucia, límpiela con un
paño suave o use jabón líquido suave diluido. Deje secar la
superficie de la unidad completamente antes de usarla.
Por seguridad, desconecte el cable de corriente de la
toma eléctrica antes de proceder a la limpieza.
< Nunca aplique líquidos directamente sobre esta unidad.
< No use disolvente, bencina o alcohol, ya que pueden
dañar la superficie de la unidad.
Advertencia sobre la condensación
Cuando la unidad se traslada de un sitio frío a otro cálido,
o si se usa después de un cambio brusco de temperatura,
existe peligro de condensación. El vapor del aire podría
condensarse en los mecanismos internos, imposibilitando
el funcionamiento correcto. Para evitarlo, o si esto ocurre,
deje la unidad encendida durante una o dos horas.
Después la unidad se estabilizará a la temperatura
ambiente del entorno.
65
ESPAÑOL

Discos
Discos que pueden ser reproducidos en esta unidad:
CDs que lleven el logo “COMPACT disc DIGITAL
AUDIO” (12 cm).
No utilice discos de 8 cm con esta unidad.
Discos CD-R y CD-RW que hayan sido correctamente
grabados en formato CD Audio y finalizados.
Discos CD-R y CD-RW finalizados que contengan
archivos MP3/WMA.
Precaución:
La reproducción de cualquier otro tipo de disco
podría causar ruido a alto volumen y daños
tanto a los altavoces como a sus oídos. Nunca
reproduzca otro tipo de disco.
< Los discos protegidos contra copia, y otros discos que
no cumplan los estándares de los CDs pueden no
reproducirse correctamente en este reproductor. Si
utiliza dichos discos en esta unidad, TEAC Corporation
y sus subsidiarias no se responsabilizan de las
consecuencias ni garantizan la calidad de reproducción.
Si experimenta problemas con tales discos no
estandarizados, deberá ponerse en contacto con
quienes los editan.
Precaución:
< No use discos de 8 cm. Si los utiliza, puede provocar
daños o anomalías de funcionamiento en la unidad.
< No reproduzca ningún disco arqueado, deformado o
dañado. Reproducir tales discos puede causar daños
irreparables a los mecanismos de reproducción.
< No se recomienda el uso de discos CD-R y CD-RW
imprimibles, ya que la cara de la etiqueta podría estar
pegajosa y dañar la unidad.
< No pegue papeles ni hojas protectoras en los discos ni
utilice sprays con recubrimientos protectores.
< Utilice un rotulador indeleble de punta blanda para
escribir información sobre la cara de la etiqueta. Nunca
utilice un bolígrafo o rotulador de punta dura, ya que
podrían causar daños a la cara grabada.
< Nunca utilice un estabilizador. El uso de estabilizadores
de CD de los disponibles en el mercado dañará los
mecanismos de esta unidad y hará que funcionen mal.
< No utilice discos de formas irregulares (octagonales, con
forma de corazón, del tamaño de una tarjeta de visita,
etc.). Los CDs con estas formas podrían dañar la unidad.
Acerca de los discos CD-R/CD-RW
Esta unidad puede reproducir discos CD-R y CD-RW que
hayan sido grabados en formatos de CD Audio (CD-DA),
MP3 y WMA.
< Los discos creados por una grabadora de CD deben ser
finalizados antes de usarlos con esta unidad.
< Dependiendo de la calidad y de las condiciones de
grabación del disco, la reproducción de algunos discos
podría no ser posible. Por favor, consulte el manual del
dispositivo utilizado para la creación del disco.
< Si no está seguro del manejo de un disco CD-R o
CD-RW, por favor contacte directamente con el
vendedor del disco.
66
Precauciones de manejo
< Introduzca siempre el disco con la cara de la etiqueta
impresa mirando hacia usted. Los discos compactos
sólo se pueden reproducir por una cara.
< Para sacar un disco de su caja, presione hacia abajo
en el centro de la caja y levante el disco tirando hacia
afuera, sujetándolo con cuidado por los bordes.
Cómo quitar el disco Cómo sujetar el disco

Compatibilidad MP3/WMA
Precauciones de almacenamiento
< Los discos deben guardarse en su caja después de
usarlos, para evitar polvo y arañazos que pueden
provocar que el lector láser “salte”.
< No exponga los discos directamente a la luz del sol,
ni a altas temperaturas ni a humedad durante mucho
tiempo. La exposición durante largo tiempo a altas
temperaturas deformará el disco.
< Los discos CD-R y CD-RW son más sensibles a los
efectos del calor y de los rayos ultravioleta que los CDs
ordinarios. Es importante que no se guarden en ningún
sitio donde les pueda dar directamente la luz solar.
También deben estar alejados de fuentes de calor como
radiadores o aparatos eléctricos que generen calor.
Mantenimiento
<
Si el disco se ensucia, limpie la superficie radialmente
desde el agujero central hacia los bordes con un paño
suave y seco
< Nunca limpie los discos usando sustancias químicas
como sprays para vinilos o antiestáticos, ni fluidos,
bencina o disolvente. Tales sustancias químicas dañarán
sin remedio la superficie plástica del disco.
.
Dispositivos de almacenamiento USB
Compatibilidad
< Sólo se pueden usar memorias flash USB.
< Algunos reproductores de memorias flash que se cargan
en terminales USB no pueden usarse para reproducir.
< No se pueden utilizar discos duros, unidades de CD/
DVD, ni otros dispositivos que se conectan vía USB.
< Esta unidad no puede copiar ni mover archivos.
< Formatos reproducibles: FAT16, FAT32
< Los formatos NTFS, HFS y HFS+ no se pueden utilizar.
< Máximo de carpetas reproducibles: 99
< Máximo de archivos reproducibles: 99
< Dependiendo de las condiciones de un dispositivo de
almacenamiento USB concreto, esta unidad podría
no reproducir los archivos en él contenidos o podrían
producirse saltos en la reproducción.
Esta unidad puede reproducir archivos MP3/WMA
grabados en un disco CD-R, CD-RW y en un dispositivo de
almacenamiento USB. Remítase al manual de instrucciones
del software al crear un archivo MP3 o WMA en un PC.
< Esta unidad puede reproducir archivos MP3
monoaurales y estéreo que están en formato MPEG-1
Audio Layer 3 con una frecuencia de muestreo de 44.1
o 48 kHz y una velocidad de bits de 320 kbps o menor.
< Los archivos WMA deben tener una velocidad de
muestreo de 44.1 kHz, y una velocidad de bits de 192
kbps o menor.
< Esta unidad no es compatible con discos que hayan
sido grabados usando múltiples sesiones. Solamente se
puede reproducir la primera sesión.
< Esta unidad no puede reproducir archivos con
protección de copia (“copyright protected”).
Información en pantalla del archivo
La pantalla de esta unidad solamente puede mostrar letras
y números de byte único.
< Si la información de un archivo utiliza caracteres
japoneses, chinos u otros de doble byte, la reproducción
del archivo es posible pero el nombre no se mostrará
correctamente.
Precauciones al preparar archivos MP3/WMA usando
un ordenador u otro dispositivo
< Incluya siempre la extensión en el nombre del archivo.
Esta unidad reconoce los archivos MP3 por su extensión
“.mp3”, y los archivos WMA por su extensión “.wma”.
< Cierre siempre la sesión (complete la creación del disco).
Esta unidad no puede reproducir discos si la sesión no
ha sido cerrada.
< Lea atentamente el manual del software que esté
utilizando cuando cree un disco MP3/WMA.
Archivos que son irreproducibles o solamente
reproducibles parcialmente
< Los archivos sin extensiones no se pueden reproducir.
Los archivos que no estén en formato MP3/WMA no se
pueden reproducir aunque tengan las extensiones.
< Los archivos con velocidad de bits variable pueden no
reproducirse correctamente.
< Si el disco/dispositivo USB tiene más de 99 archivos
o 99 carpetas, esta unidad no puede reproducirlos
correctamente.
< Dependiendo de las condiciones del disco/dispositivo
USB, esta unidad podría no reproducirlo o producirse
saltos.
ESPAÑOL
67

Compatible con iPod
iPod
1ª + 2ª generación
Capacidad 5/10/20GB
Conexión al SR-100i AUX base Dock base Dock base Dock base Dock
Carga a través SR-100i No No Sí Sí Sí
iPod classic
Capacidad 80/120/160GB 8/16/32GB 8/16/32/64GB 4/8/16GB 8/16/32GB
Conexión al SR-100i base Dock base Dock base Dock base Dock** base Dock**
Carga a través del SR-100iSíSíSíSíSí
iPod shuffle
1ª generación
Capacidad 512MB/1GB 1/2/4GB 4/6GB 1/2/4GB 2/4/8GB
Conexión al SR-100i AUX AUX base Dock base Dock base Dock
Carga a través del SR-100i No No Sí Sí Sí
iPod
3ª generación
10/15/20/
30/40GB
iPod touch
1ª generación*
iPod shuffle
2ª/3ª generación
iPod
4ª generación
20/40G/U2 20/30/40/60GB/U2 30/60/80GB
iPod touch
2ª/3ª generación*
iPod mini
iPod
4ª generación
(colo r)
iPhone
1ª generación*
iPod nano
1ª generación
iPod
5ª
generación
(vídeo)
iPhone 3G/3GS*
iPod nano
2ª generación
(aluminio)
iPod nano
generación
3ª
(vídeo)
Capacidad 4/8GB 8/16GB
Conexión al SR-100i base Dock base Dock
Carga a través del SR-100i Sí Sí
iPod nano
4ª/5ª generación
* Cuando use un iPod touch o un iPhone con esta unidad, si utiliza cualquier aplicación que no sea las aplicaciones del iPod,
el SR-100i podría volver a encenderse al poco tiempo de ser apagado (puesto en reposo o “standby"). Como la unidad no
puede apagar el iPod touch/iPhone cuando una de estas aplicaciones está funcionando, deberá salir de dicha aplicación
antes de apagar el SR-100i (ponerlo en modo de reposo o “standby").
** Funciona en “modo Avión".
Si su iPod no funciona con el SR-100i o con el mando a distancia, una actualización de software podría resolver el problema.
Visite la página web de Apple y descargue el software más reciente para iPod.
68

Conexiones
Una vez terminadas todas las conexiones, conecte el cable de corriente a la toma de electricidad.
< Lea las instrucciones de cada aparato o componente que vaya a utilizar con esta unidad.
< Asegúrese de fijar bien todas las conexiones. Para evitar ruidos y zumbidos, no agrupe los cables de las conexiones.
Parte posterior
Reproductor de
A
(Cable opcional)
B
audio portátil
C
D
Terminales AUX
A
Estos terminales transmiten una señal de audio
analógico de 2 canales. Conecte un reproductor de
audio portátil usando un cable de tipo RCA/mini-jack
estéreo de los que se venden en el mercado.
Asegúrese de conectar los cables como sigue:
Conector blanco e Terminal blanco (L: canal
izquierdo.)
Conector rojo e Terminal rojo (R: canal
derecho.)
< Cuando use la salida de auriculares del componente
externo, si no ajusta su volumen, podría no escuchar
sonido procedente del SR-100i.
< Si sube mucho el volumen del componente
conectado, podría causar distorsión en el sonido
del SR-100i. En ese caso, reduzca el volumen del
componente hasta que la distorsión desaparezca
y luego ajuste el volumen del SR-100i a un nivel de
escucha confortable.
< Asegúrese de insertar bien todos los conectores. Para
prevenir ruido y zumbido, evite agrupar los cables de
interconexiones que transportan señal con los cables
de altavoces o con el cable de corriente.
Memoria flash USB
Toma de electricidad
Terminal FM ANTENNA
B
Conecte la antena de FM suministrada. Extiéndala del
todo para una recepción óptima y sujétela al marco de
una ventana o a una pared con chinchetas o similares.
Puerto USB (
C
Puede conectar un dispositivo de almacenamiento
USB a este puerto utilizando el cable USB
suministrado.
Entrada de corriente AC
D
Una vez terminadas todas las demás conexiones,
conecte el enchufe del cable de corriente a una toma
de electricidad.
Asegúrese de conectar el cable de corriente a
una toma de electricidad que suministre el voltaje
corriente.
Sujete el cable de corriente por el conector del
enchufe al conectarlo y desconectarlo de la toma
de electricidad.
)
ESPAÑOL
69

Identificación de las partes (unidad principal)
Parte superior
A
Frontal
B
C
D
G
H
E
F
I
70
J J
KK

A
Reposo/encendido ( )/FUNCTION
Use este botón para encender y apagar (reposo) la
unidad.
Para apagar la unidad, mantenga pulsado este botón
durante más de 3 segundos.
G
Pantalla
H
Sensor remoto
Cuando utilice el mando a distancia, diríjalo hacia aquí.
Cuando no hay un iPod conectado a la base Dock:
e “ECO PWR” aparece en la pantalla durante unos
segundos. Después la unidad se apaga (se pone
en reposo) y se ilumina el indicador STANDBY.
Cuando hay un iPod conectado a la base Dock:
e El reloj aparece en la pantalla y la batería del iPod
permanece cargándose. Si desconecta el iPod y
no se pulsa ningún botón durante 90 segundos,
la unidad se apaga (se pone en reposo) y se
ilumina el indicador STANDBY.
Utilice este botón también para seleccionar una fuente
de sonido.
B
Reproducción/Pausa (y/J)
En modo CD, USB o iPod, utilice este botón para
comenzar o poner en pausa la reproducción.
C
Parada (H)
En modo CD o USB, utilice este botón para detener la
reproducción.
I
Indicador luminoso STANDBY
Este indicador se ilumina cuando la unidad está en
modo de reposo.
J
Altavoces (estéreo)
K
Base Dock para iPod
Empuje sobre el rótulo “TEAC” para abrir la base Dock.
Conecte un iPod al conector de base Dock.
Empuje para cerrar la base Dock cuando no esté en uso
ESPAÑOL
D
Ranura para la inserción del disco
Introduzca un disco con la cara de la etiqueta impresa
mirando hacia usted.
E
Expulsión (L)
Utilice este botón para expulsar el disco.
F
VOLUME ( + / – )
Utilice estos botones para ajustar el nivel de volumen.
Cuando ajuste el reloj o el temporizador despertador,
utilice estos botones para cambiar el valor.
71

Identificación de las partes (mando a distancia)
a
STANDBY/ON ( )
Use este botón para encender y apagar la unidad.
Cuando se apaga la unidad y no hay un iPod
conectado a la base Dock:
e “ECO PWR” aparece en la pantalla durante unos
segundos. Después la unidad se apaga (se pone
en reposo) y se ilumina el indicador STANDBY.
a
b
k
c
l
d
e
f
m
n
o
Cuando se apaga la unidad y no hay un iPod
conectado a la base Dock:
e El reloj aparece en la pantalla y la batería del iPod
permanece cargándose. Si desconecta el iPod y
no se pulsa ningún botón durante 90 segundos,
la unidad se apaga (se pone en reposo) y se
ilumina el indicador STANDBY.
b
FUNCTION
Utilice este botón para seleccionar una fuente de
sonido.
g
p
q
h
i
r
s
t
j
u
v
Nota
Para simplificar las explicaciones, las instrucciones de
este manual pueden referirse a la unidad principal o
al mando a distancia solamente. En tales casos, los
mismos controles en el mando a distancia y en la
unidad principal funcionan de manera similar.
c
FM MODE/Repetición ( )
En el modo de FM, use este botón para seleccionar
modo Auto o modo Mono.
En modo CD, USB o iPod, utilice este botón para
configurar la función de repetición.
d
INTRO
En modo CD o USB, utilice este botón para reproducir el
principio de cada pista/archivo de manera consecutiva
(página 83).
e
Reproducción/Pausa (y/J)
En modo CD, USB o iPod, utilice este botón para
comenzar o poner en pausa la reproducción.
f
Parada (H)
En modo CD o USB, utilice este botón para detener la
reproducción.
72

g
Desplazamiento (˙ / ¥)
En modo CD o USB, use estos botones para seleccionar
una carpeta (discos MP3/WMA y dispositivos de
almacenamiento USB solamente).
En modo iPod, utilice estos botones para desplazarse
hacia arriba y hacia abajo por un menú. Estos botones
tienen las mismas funciones que la rueda de clic de un
iPod.
En modo FM, use estos botones para seleccionar una
emisora presintonizada.
MENU
h
En modo iPod, utilice este botón para regresar al menú
anterior. Este botón tiene las mimas funciones que su
homólogo en el iPod.
i
S.BASS
Utilice este botón para reforzar el sonido de los graves.
j
CLOCK
Utilice este botón para ver en pantalla el reloj.
Con la unidad apagada, utilice este botón para ver en
pantalla el reloj o para ajustarlo (página 75).
k
A-B
En modo CD o USB, utilice este botón para determinar
los puntos de una repetición A-B (página 86).
o
ENTER
En modo iPod, utilice este botón para confirmar una
selección en un menú. Este botón tiene las mismas
funciones que el botón central de la rueda de clic de
un iPod.
p
TUNING/Cursor (ß / å)/Salto (.//)
En modo CD, USB o iPod, utilice estos botones para
saltar a la siguiente o anterior pista/archivo. Mantenga
pulsados estos botones para buscar una parte específica
de una pista/archivo.
En modo de sintonizador FM, utilice estos botones para
sintonizar una emisora.
q
MUTING
Utilice este botón para silenciar el sonido.
r
PROGRAM
En modo CD o USB, utilice este botón para programar
pistas/archivos (página 84).
En modo de sintonizador FM, utilice este botón para
presintonizar emisoras (página 89).
s
LOUDNESS
Utilice este botón para aumentar o disminuir el sonido
de los graves a bajo volumen.
ESPAÑOL
l
Reproducción Aleatoria ( )
En modo CD, USB o iPod, utilice este botón para
configurar la reproducción aleatoria.
m
VOLUME ( +/ – )
Use estos botones para ajustar el nivel de volumen.
Cuando esté ajustando el reloj o el temporizador
despertador, utilice estos botones para cambiar el valor.
n
DISPLAY
Durante la reproducción de un disco o de un dispositivo
de almacenamiento USB, utilice este botón para mostrar
en pantalla la información de la pista/archivo.
t
PRESET EQ
Utilice este botón para seleccionar un ecualizador
prefijado (página 77).
u
SLEEP/TIMER
Utilice este botón para configurar el temporizador de
apagado (página 77).
Con la unidad apagada, utilice este botón para
configurar el temporizador despertador (página 90).
v
DIMMER
Utilice este botón para ajustar el brillo de la pantalla.
73

Mando a distancia
El mando a distancia suministrado permite manejar la
unidad desde la distancia.
Cuando utilice el mando a distancia, oriéntelo hacia el
sensor de control remoto dentro de un rango de 60°
horizontalmente y 20° verticalmente del panel frontal de la
unidad principal.
< Incluso aunque el mando a distancia se utilice dentro de
su alcance de efectividad (5 metros), la unidad podría
no responder a las órdenes del mando si se interponen
obstáculos entre ambas unidades.
< El mando a distancia podría no funcionar correctamente
si se utiliza cerca de otros productos que generen rayos
infrarrojos o si se utilizan otros mandos a distancia
que empleen rayos infrarrojos. Igualmente, los otros
productos podrían funcionar también mal.
Instalación de la pila
Precauciones con la pila
< Asegúrese de introducir la pila con las polaridades
positiva “+” y negativa “ - ” correctamente.
< Si la pila se sulfata o pierde líquido, limpie
completamente el líquido del compartimento de la pila
y sustituya la pila por otra nueva.
< Si el mando a distancia no se va a usar durante mucho
tiempo (más de un mes), quite la pila del mando a
distancia para evitar que se gaste.
< No utilice otras pilas que no sean las especificadas.
< No caliente ni desarme las pilas. Nunca las tire ni al
fuego ni al agua.
< No transporte ni almacene pilas con otros objetos
metálicos. Las pilas podrían cortocircuitarse, sulfatarse o
explotar.
Quite la tapa del compartimento de las pila.
1
Introduzca una pila de ion-litio (CR2025, 3 V) con el lado
2
“+” hacia arriba.
Cierre la tapa.
3
Sustitución de la pila
Si la distancia requerida entre el mando a distancia y la
unidad principal disminuye, la pila está gastada. En ese
caso, reemplace la pila por una nueva.
< Para más información sobre la recogida de pilas,
póngase en contacto con su autoridad municipal, con
el servicio de recogida de residuos de su ayuntamiento
o con la tienda donde las haya comprado.
74

Ajuste del reloj
Ajuste el reloj antes de hacer ninguna otra operación.
Si la unidad está encendida, pulse el botón
1
STANDBY/ON ( ) para apagarla.
Pulse el botón CLOCK repetidamente hasta que
2
aparezca en la pantalla “CLK SET”.
Pulse los botones VOLUME ( + / – ) repetidamente
4
para ajustar los minutos actuales y después
pulse el botón CLOCK
El ajuste del reloj está ahora terminado y el reloj
comienza desde 00 segundos.
.
Comprobación del reloj
El valor de las horas parpadea.
< Si no se pulsa ningún botón durante 30 segundos, el
modo de ajuste del reloj se cancelará.
Pulse los botones VOLUME ( + / – ) repetidamente
3
para ajustar la hora actual y después pulse el
botón CLOCK.
El valor de los minutos parpadea.
ESPAÑOL
Pulse el botón CLOCK y el reloj se mostrará en la
pantalla durante unos segundos.
75

iPod CD USB FM AUX
Funcionamiento básico
Este capítulo describe el funcionamiento y operaciones
básicas disponibles en cada modo.
Pulse el botón de Reposo/Encendido (
1
encender la unidad.
< La unidad se enciende con la fuente de sonido que
estuviese seleccionada la última vez.
Pulse el botón FUNCTION (el mismo que el
2
botón de Reposo/Encendido) repetidamente
para seleccionar una fuente de sonido.
) para
Reproduzca la fuente de sonido y ajuste el
3
volumen usando los botones ( + / – ).
El volumen se puede ajustar desde MIN (0) hasta
MAX (31).
Refuerzo de graves
Existe la posibilidad de reforzar el sonido de los graves.
La fuente cambia como sigue:
iPod
CD
USB
FM
AUX
< Para escuchar un componente externo conectado al
terminal AUX, seleccione "AUX".
Pulse el botón S.BASS.
Para cancelar la función, pulse otra vez el botón S.BASS.
< Cuando se activa la función LOUDNESS, la función
S.BASS se desactiva automáticamente.
Función “Loudness" (compensador)
Usted puede incrementar el efecto de sonido de los graves
y los agudos a bajo volumen. Desactive (off) esta función
cuando escuche a volúmenes normales.
Pulse el botón LOUDNESS.
Para cancelar la función, pulse el botón LOUDNESS otra
vez.
< Cuando la función S.BASS está activada, la función
LOUDNESS se desactiva automáticamente.
76

Ecualizador
Usted puede ajustar el sonido de acuerdo al género de
música o a sus gustos personales.
Cada vez que se pulsa el botón PRESET EQ, el botón
cambia como sigue:
POP
JAZZ
Temporizador de apagado
Usted puede configurar el temporizador de apagado de
manera que la unidad se apague ella sola después de
transcurrida una cantidad de tiempo especificada.
Cada vez que se pulsa el botón SLEEP, se cambia la
cantidad de tiempo en intervalos de 10 minutos.
La unidad se apagará automáticamente cuando esa
cantidad de tiempo haya transcurrido.
CLASSIC
ROCK
FLAT
(plano, por defecto)
< Si también está utilizando algún ajuste del ecualizador
en su iPod u otro reproductor de audio, los efectos se
combinarán y podría no sonar como usted espera.
Le recomendamos que, en la mayoría de los casos, use
o bien el ecualizador de la unidad o bien el ecualizador
de su reproductor de audio.
Silenciamiento
El sonido se puede silenciar temporalmente.
10 20 3 0
--
90
(desact.)
< Si quiere comprobar el tiempo que falta, pulse el botón
SLEEP una vez.
El tiempo que falta aparecerá en la pantalla durante
unos segundos.
< Para cancelar el temporizador de apagado, pulse el
botón SLEEP repetidamente hasta que “--” aparezca en
la pantalla.
N N N N
Atenuador
Usted puede cambiar el brillo de la pantalla.
ESPAÑOL
Pulse el botón MUTING.
Pulse el botón MUTING otra vez para restaurar el sonido.
< “MUTE” parpadea en la pantalla mientras está activada
la función de silenciamiento.
< Si cambia el volumen o la fuente cuando el sonido está
silenciado, la función de silenciamiento se cancelará.
Pulse el botón DIMMER para fijar el brillo en uno de los
tres niveles posibles.
77

iPod
Escuchar un iPod
Pulse el rótulo “TEAC” en el frontal de esta
1
unidad para abrir la base Dock para iPod.
Detener la reproducción temporalmente
(modo de Pausa)
Conecte un iPod a la base Dock.
2
El iPod se enciende automáticamente y comienza la
reproducción de la lista de reproducción del iPod.
Si ya hay un iPod conectado, pulse el botón
FUNCTION repetidamente para seleccionar “IPod”. La
reproducción comienza automáticamente.
< La batería del iPod se recarga siempre que el iPod
esté conectado a la base Dock y el SR-100i esté
conectado a una toma de corriente eléctrica.
Algunos tipos de iPod no se pueden recargar
mediante la base Dock. Para más detalles sobre la
compatibilidad de recarga, vea la página 68.
< Cuando apague la unidad con un iPod conectado a la
base Dock, en la pantalla aparecerá el reloj y la batería
del iPod se recargará. Si desconecta el iPod y no se
pulsa ningún botón durante 90 segundos, la unidad
se apagará (se pondrá en reposo) y se iluminará el
indicador STANDBY.
< Si hay unos auriculares conectados al iPod, el sonido
saldrá tanto por los auriculares como por los altavoces
del SR-100i.
Durante la reproducción, pulse el botón de
Reproducción/Pausa (G/J).
La reproducción se detiene en la posición actual.
Para reanudar la reproducción, pulse el botón de
Reproducción/Pausa (G/J) otra vez.
Saltar a la pista siguiente o anterior
Durante la reproducción, pulse un botón de Salto
(.// ) repetidamente hasta que encuentre
la canción deseada. La canción seleccionada se
reproducirá desde el principio.
< Si se pulsa una vez el botón . durante la
reproducción, la canción en curso se reproducirá desde
el principio.
Buscar una parte de una pista
Nota para iPod touch
Si quiere oír el sonido del vídeo de un iPod touch,
conecte primero el iPod touch a la base Dock y
después opere con el SR-100i y el iPod touch.
78
Mantener pulsado
Durante la reproducción, mantenga pulsado un botón
de Salto (.//) para buscar una parte de una
canción.
Suéltelo cuando encuentre la parte que quiera oír.

Activar el modo de repetición
Regresar al menú anterior del iPod
Durante la reproducción, pulse el botón de Repetición
(
) para seleccionar el modo de repetición.
“REP MODE” aparece en la pantalla.
Cada vez que se pulsa el botón de Repetición (
ajuste de repetición para el iPod cambia como sigue:
Repeat one Repeat all
desactivada
< Si selecciona “Repeat one” (repetir una) para reproducir
una sola canción, el icono
del iPod.
< Si selecciona “Repeat all” (repetir todas) para reproducir
todas las canciones, el icono
del iPod.
aparecerá en la pantalla
aparecerá en la pantalla
), el
Activar el modo de reproducción aleatoria
Pulse el botón MENU.
Este botón tiene las mismas funciones que su
homólogo en el iPod.
Seleccionar un apartado en el menú del iPod
ESPAÑOL
Pulse los botones de Desplazamiento (˙ / ¥ ) para
seleccionar el apartado del menú que desee y después
pulse el botón ENTER.
Durante la reproducción, pulse el botón de
Reproducción Aleatoria (
de reproducción aleatoria. “RANDOM” aparece en la
pantalla.
Cada vez que se pulsa el botón de Reproducción
Aleatoria (
el iPod cambia como sigue:
< Durante la reproducción aleatoria, el icono aparece
en la pantalla del iPod.
), el ajuste de reproducción aleatoria para
Songs (canciones) Albums (álbumes)
desactivada
) para seleccionar el modo
79

CD
Escuchar un disco
Pulse el botón FUNCTION repetidamente para
1
seleccionar “CD”.
< Si no hay ningún disco cargado, “NO DISC” aparecerá
en la pantalla.
Introduzca un disco con la cara de la etiqueta
2
impresa mirando hacia usted.
Cara de la etiqueta
impresa
El disco se carga automáticamente en el reproductor.
Deje que el disco entre cuando vea que empieza a
cargarse.
Disco MP3/WMA
Número de
carpeta en
curso
Tiempo
transcurrido
del archivo
en curso
Número de
archivo en
curso
Ejemplo:
Pantalla cuando la reproducción está detenida
CD de audio
Número total
de pistas
Tiempo
total de
reproducción
Disco MP3/WMA
Número total
de carpetas
Número total
de archivos
La reproducción empieza automáticamente desde la
primera pista/archivo.
M No empuje el disco a la fuerza.
M Ni introduzca más de un disco.
M No pegue ningún adhesivo, etc. en ninguna
cara del disco.
M No utilice discos con formas irregulares.
Si no sigue estas indicaciones, puede causar daños
o anomalías de funcionamiento en la unidad.
< El disco tarda unos segundos en cargarse en la
unidad. Ningún botón funcionará durante la carga.
Ejemplo: Pantalla durante la reproducción
CD de audio
Número de
pista en curso
Tiempo
transcurrido de la
pista en curso
80
< Los archivos MP3/WMA que no están situados en
carpetas, automáticamente son colocados en la
carpeta raíz “01 (root)”. La reproducción empieza
desde el primer archivo de la carpeta raíz “01 (root)”.
< Una vez terminada la reproducción de todas las
pistas/archivos, la reproducción se detiene
automáticamente.
< Ver página 93 para más información acerca del orden
de reproducción de los archivos MP3/WMA.
No incline la unidad con un disco dentro. Puede
dañar el disco y causar un mal funcionamiento.
Sacar el disco
Pulse el botón (L).
< Para introducir otro disco, hágalo después de que el
disco haya sido expulsado totalmente.

USB
Escuchar un dispositivo de almacenamiento USB
No utilice discos duros USB de alta capacidad.
Solamente se pueden usar tarjetas de memoria
flash USB.
Pulse el botón FUNCTION repetidamente para
1
seleccionar “USB”.
< Si no hay ningún dispositivo de almacenamiento USB
conectado, “NO USB” aparecerá en la pantalla.
Conecte su dispositivo de almacenamiento USB
2
al cable USB y a su vez conecte éste a la unidad.
Fíjese en la dirección
de inserción.
La reproducción comienza automáticamente desde
el primer archivo del dispositivo de almacenamiento
USB.
Ejemplo: Pantalla durante la reproducción
Número de
carpeta en
curso
Tiempo
transcurrido
del archivo en
curso
Ejemplo:
Pantalla cuando la reproducción está detenida
Número total
de carpetas
< Los archivos MP3/WMA que no están situados en
carpetas, automáticamente son colocados en la
carpeta raíz “01 (root)”. La reproducción empieza
desde el primer archivo de la carpeta raíz “01 (root)”.
< Ver página 93 para más información acerca del orden
de reproducción de los archivos MP3/WMA.
Número de
archivo en
curso
Número total
de archivos
ESPAÑOL
81

CD USB
Reproducción básica
Detener la reproducción temporalmente
(modo de Pausa)
Durante la reproducción, pulse el botón de
Reproducción/Pausa (y/J).
La reproducción se detiene en la posición actual.
Para reanudar la reproducción, pulse de nuevo el botón
de Reproducción/Pausa (y/J).
Detener la reproducción
Saltar a la pista/archivo siguiente o anterior
Pulse un botón de Salto (.//) repetidamente
hasta que encuentre la pista/archivo deseado.
La pista/archivo seleccionado se reproducirá desde el
principio.
< Si se pulsa el botón . una vez durante
la reproducción, la pista/archivo que se esté
reproduciendo empezará a reproducirse desde el
principio.
< Durante la reproducción programada, se reproduce la
pista/archivo siguiente o anterior en el programa.
< Cuando la reproducción está detenida, esta función no
está operativa con CDs de audio.
Pulse el botón de Parada (H).
Buscar una parte de una pista/archivo
Mantener pulsado
Durante la reproducción, mantenga pulsado un botón
de Salto (.//).
Suéltelo cuando haya encontrado la parte que desee
escuchar.
82

Seleccionar una carpeta
(Discos MP3/WMA o dispositivos de
almacenamiento USB)
Pulse los botones de Desplazamiento (˙ / ¥ ) para
saltar a la carpeta siguiente o anterior.
Reproducción de introducciones
Usted puede reproducir el principio de cada pista/archivo
consecutivamente.
Información en pantalla
CD de audio
Durante la reproducción, cada vez que se pulsa el botón
DISPLAY, la segunda línea de la pantalla cambia como
sigue:
Tiempo transcurrido de la pista en curso
Tiempo que queda de la pista en curso
Tiempo transcurrido del disco
Tiempo que queda del disco
Archivo MP3/WMA
Durante la reproducción, pulse el botón DISPLAY para
que recorra la pantalla la información del archivo en
curso como sigue:
ESPAÑOL
Pulse el botón INTRO para comenzar la reproducción de
introducciones. “INTR ON” aparecerá en la pantalla.
Esta unidad reproduce los primeros 10 segundos de
cada pista/archivo consecutivamente.
Para continuar escuchando la pista/archivo en curso,
pulse otra vez el botón INTRO. “INTR OFF” aparecerá en
la pantalla.
Título
Artista
Álbum
< En pantalla se pueden mostrar los primeros 30
caracteres del TÍTULO/ARTISTA/ÁLBUM.
< La pantalla de la unidad solamente puede mostrar
letras y números de byte único. Si el archivo contiene
caracteres japoneses, chinos u otros de doble byte,
la reproducción es posible pero los nombres no se
mostrarán correctamente.
83

CD USB
Reproducción programada
Es posible programar hasta un total de 20 pistas/archivos
en el orden deseado.
Pulse el botón FUNCTION repetidamente para
1
seleccionar “CD” o “USB”.
Pulse el botón PROGRAM con la reproducción
2
detenida.
(Cuando se programan archivos MP3/WMA)
3
Pulse los botones de Desplazamiento (˙ / ¥)
para seleccionar una carpeta de un disco MP3/
WMA o de un dispositivo de almacenamiento
USB.
Ejemplo:
Número de
carpeta
< Los archivos MP3/WMA que no están situados en
carpetas se colocan en la carpeta raíz “01”.
Ejemplo: CD de audio
Número de
pista
Número de
programa
Ejemplo: Archivos MP3/WMA
Número de
carpeta
Número de
programa
< Para cancelar el modo de programa, pulse el botón
de Parada (H).
Número de
archivo
Pulse los botones de Cursor (ß / å) para
4
seleccionar una pista/archivo y después pulse
el programa PROGRAM.
84

Ejemplo: CD de audio
Número de
pista
Ejemplo: Archivos MP3/WMA
Borrar el programa
Número de
archivo
La pista/archivo ya está programada y el número de
programa (“P-01”) aparece en la pantalla.
< Repita los pasos 3 y 4 para programar más pistas/
archivos.
Cuando haya terminado de seleccionar
5
números de pistas/archivos, pulse el botón de
Reproducción/Pausa (G/J) para comenzar la
reproducción programada.
Con la reproducción detenida, pulse el botón de Parada (H).
< En los siguientes casos, también se borrará el contenido
de la programación:
Si se cambia la fuente
Si se pulsa el botón STANDBY/ON (
Si se expulsa el disco
Si se desconecta el dispositivo
de almacenamiento USB
Si se desconecta el cable de corriente
)
ESPAÑOL
< Después de que haya terminado la reproducción
de todas las pistas/archivos programados o de que
usted detenga la reproducción programada, pulse el
botón de Reproducción/Pausa (G/J) para volver a
reproducir el programa.
< Puede utilizar los botones de Salto (.//)
durante la reproducción programada para seleccionar
y reproducir otras pistas/archivos del programa.
< La función de reproducción aleatoria no está
operativa durante la reproducción programada.
85

CD USB
Reproducción repetida
Cada vez que se pulsa el botón de Repetición ( ), el
modo cambia como sigue:
REP ONE
REP ALB
(Solamente discos MP3/WMA o
dispositivos de almacenamiento USB)
REP ALL
REP OFF
(Repetición desactivada)
REP ONE (Repetir una)
Durante la reproducción, pulse una vez el botón de
Repetición (
“REP ONE” aparecerá en la pantalla.
).
Reproducción repetida A-B
Esta función permite la reproducción repetida de cualquier
fragmento deseado de una pista/archivo.
Durante la reproducción, designe el punto en el
1
que debería empezar la reproducción repetida
pulsando el botón A-B.
“A-” aparece en la pantalla.
Cuando alcance el punto en el que debería
2
terminar la reproducción repetida, pulse otra
vez el botón A-B.
La pista que esté siendo reproducida se reproducirá
repetidamente.
REP ALB (Repetir carpeta)
(Solamente discos MP3/WMA o dispositivos de
almacenamiento USB)
Pulse dos veces el botón de Repetición (
“REP ALB” aparece en la pantalla y todas las pistas de la
carpeta se reproducirán repetidamente.
REP ALL (Repetir todas)
Pulse dos veces el botón de Repetición (
veces para archivos MP3/WMA).
“REP ALL” aparece en la pantalla y todas las pistas se
reproducirán repetidamente.
Durante la reproducción programada, las pistas
programadas se reproducirán repetidamente.
).
) (o tres
86
El fragmento designado se reproducirá
repetidamente.
< Para regresar a la reproducción normal, pulse el botón
A-B o el botón de Parada (H).
< Debe haber más de 3 segundos entre A y B.
< El punto de comienzo y de final deben estar ambos
en la misma pista/archivo. Si el archivo/pista cambia
después de que usted haya fijado el punto de
comienzo, el modo de reproducción repetida A/B
será cancelado.

CD USB AUX
Reproducción aleatoria
Durante la reproducción, pulse el botón de
Reproducción Aleatoria (
“RAN ON” aparecerá en la pantalla y las pistas/archivos
se reproducirán al azar.
< Si se pulsa el botón / durante la reproducción
aleatoria, la siguiente pista/archivo será seleccionada al
azar y se reproducirá.
Si se pulsa el botón . durante la reproducción
aleatoria, la pista/archivo que se esté reproduciendo en
ese momento se reproducirá desde el principio.
Si se pulsa el botón . dos veces o más, se
seleccionará otra pista/archivo al azar y se reproducirá.
< Durante la reproducción aleatoria, una pista/archivo
que haya terminado de reproducirse no se volverá a
reproducir otra vez.
).
Escuchar una fuente externa
Usted puede escuchar el sonido procedente de un
reproductor de audio portátil externo conectado a los
terminales AUX.
< Mediante esta prestación se puede escuchar un iPod
que no pueda conectarse a la base Dock para iPod.
Para información sobre compatibilidad con iPod, ver
página 68.
Conecte un reproductor de audio portátil
1
externo a los terminales AUX del SR-100i
usando un cable RCA/mini-jack estéreo de los
disponibles a la venta en el mercado.
Pulse el botón FUNCTION para seleccionar
2
“AUX ”.
< Para cancelar la reproducción aleatoria, pulse el botón
de Reproducción Aleatoria (
en la pantalla.
< Para detener la reproducción aleatoria, pulse el botón
de Parada (H). Esta operación también cancela la
reproducción aleatoria.
). “RAN OFF” aparecerá
Reproduzca la fuente y ajuste el volumen del
3
SR-100i y del componente externo conectado.
< Cuando use la salida de auriculares del componente
externo, si no ajusta su volumen, podría no escuchar
sonido procedente del SR-100i.
< Si sube mucho el volumen del componente
conectado, podría causar distorsión en el sonido
del SR-100i. En ese caso, reduzca el volumen del
componente hasta que la distorsión desaparezca
y luego ajuste el volumen del SR-100i a un nivel de
escucha confortable.
ESPAÑOL
87

FM
Escuchar la radio FM
Pulse el botón FUNCTION repetidamente para
1
seleccionar “FM”.
Seleccione la emisora que desee escuchar.
2
Selección automática
Modo de FM
Pulsando el botón FM MODE se alterna entre el modo
Auto y el modo Mono.
Auto
Cuando un programa está emitiendo en estéreo,
usted escucha sonido estéreo. Cuando emite en modo
monoaural, usted escucha sonido monoaural.
< Si el sonido está distorsionado, la señal no es lo
suficientemente fuerte para una buena recepción en
estéreo. En ese caso, cambie al modo Mono.
Mantener pulsado
Mantenga pulsado el botón TUNING y suéltelo
cuando comience el proceso de sintonización
automática. Cuando se sintonice una emisora, el
proceso se detendrá automáticamente.
Repita este paso hasta que encuentre la emisora que
desee escuchar.
< Para detener el proceso de sintonización automática,
pulse brevemente el botón TUNING.
Selección manual
Pulse el botón TUNING repetidamente.
La frecuencia cambia en pasos fijos. Pulse
repetidamente hasta que encuentre la emisora que
desee escuchar.
Mono
Para compensar una recepción débil de FM en estéreo,
seleccione este modo. La recepción será ahora forzada
a monoaural y se reducirá el ruido no deseado.
Si la recepción es pobre
Extienda la antena de FM o cámbiela de posición para
mejorar la recepción de una emisora.
88

FM
Sintonización de presintonías
Usted puede almacenar hasta un total de 20 emisoras de
FM.
Sintonice la emisora que desee almacenar
1
(página 88).
Pulse el botón PROGRAM.
2
El número de presintonía parpadea.
Ejemplo:
Seleccionar una emisora presintonizada
Pulse el botón FUNCTION repetidamente para
1
seleccionar “FM”.
Pulse los botones de Desplazamiento (˙ / ¥)
2
para seleccionar la emisora presintonizada
deseada.
Pulse los botones de Desplazamiento (˙ / ¥)
3
para seleccionar un número de presintonía para
almacenar la emisora.
Pulse el botón PROGRAM.
4
La emisora sintonizada se almacenará en el número
de presintonía seleccionado.
ESPAÑOL
Para almacenar más emisoras, repita los pasos
1
a 4.
89

Temporizador despertador
Usted puede configurar la unidad para que se encienda a
una hora determinada.
< Ajuste el reloj antes de ajustar el temporizador
despertador (página 75).
Ajustar el temporizador despertador
Si la unidad está encendida, pulse el botón
1
STANDBY/ON ( ) para apagarla.
Pulse el botón TIMER repetidamente hasta que
2
“ALM SET” aparezca en la pantalla.
Pulse los botones VOLUME ( + / – ) para fijar los
4
minutos y después pulse el botón TIMER.
El ajuste horario hecho parpadea.
Pulse los botones VOLUME ( + / – ) para
5
seleccionar “ON” (activado) y luego pulse el
botón TIMER.
El temporizador ha quedado configurado. “ON”
(activado) y la hora actual se muestran en la pantalla.
Cuando se llegue al horario establecido, empezará
a reproducirse la fuente que estuviese seleccionada
por última vez.
< Para desactivar el temporizador despertador, seleccione
“OFF” en el paso
Cuando el temporizador alcanza el horario de
encendido, la unidad se pone automáticamente
en “SLEEP 60” y se apagará poniéndose en reposo
(standby) 60 minutos más tarde.
Si quiere escuchar continuadamente, pulse el botón SLEEP
repetidamente para seleccionar “--” después de alcanzar el
horario de encendido.
.
5
El valor de las horas parpadea.
< Si no se pulsa ningún botón durante 30 segundos, el
modo de ajuste del temporizador será cancelado.
Pulse los botones VOLUME ( + / – ) para fijar la
3
hora y después pulse el botón TIMER.
El valor de los minutos en el reloj parpadea.
90
Nota para el uso con un iPod touch
(cuando utilice el temporizador despertador del
SR-100i con un iPod touch como fuente)
< Si apaga el iPod touch (“deslizar para apagar"), no
podrá usarlo con el temporizador despertador
incluso aunque esté conectado a la base Dock
de esta unidad. Para utilizar con el temporizador
despertador un iPod touch como fuente, no
seleccione “deslizar para apagar” en el iPod touch
(la pantalla del iPod touch se puede apagar sin
problemas.)
< No podrá usar la reproducción de vídeo en
la pantalla de un iPod touch para la función de
temporizador despertador ni siquiera aunque esté
conectado a la base Dock de esta unidad. Para
poder utilizar el temporizador despertador con un
iPod touch como fuente, seleccione cualquier otra
opción que no sea vídeo en el iPod touch.

Solución de posibles fallos (1)
Si tiene problemas con su equipo, lea esta página e intente
resolver el problema usted mismo antes de llamar a su
distribuidor o a un servicio técnico TEAC.
General
No hay corriente
e Compruebe la conexión a la corriente. Compruebe si
la toma de corriente es un enchufe con un interruptor.
Si lo es, confirme que el interruptor está encendido.
e Confirme que llega corriente al enchufe conectando
en él otro aparato, como por ejemplo una lámpara o
un ventilador.
No hay sonido en los altavoces.
e Seleccione la fuente pulsando el botón FUNCTION.
e Ajuste el volumen.
e Si “MUTE” parpadea en la pantalla, pulse el botón
MUTING.
El sonido tiene ruidos.
e La unidad está demasiado cerca de una TV o aparato
similar. Póngala lo más lejos posible del aparato
causante de las interferencias o apáguelo.
e En el lado izquierdo de la unidad principal hay un
ventilador interno para dispersar el calor. Dependiendo
del entorno o de lo que haya alrededor, puede
escucharse el sonido de su rotación. Este ruido no
significa que haya un problema de funcionamiento.
El mando a distancia no funciona.
e Pulse el botón Standby/On (
unidad.
e Si la pila está gastada, sustitúyala por una nueva.
e Utilice el mando a distancia dentro del alcance de
efectividad (5 metros) y apunte con él hacia el sensor
de control remoto del panel frontal.
e Quite los obstáculos entre el mando a distancia y la
unidad principal.
e Si hay una luz demasiado intensa cerca de la unidad,
apáguela.
No se puede apagar (poner en reposo o "standby")
cuando se está usando con un iPod touch como
fuente de sonido.
e
Cuando use un iPod touch o un iPhone con esta unidad,
si utiliza cualquier aplicación que no sea las aplicaciones
del iPod, el SR-100i podría volver a encenderse al poco
tiempo de ser apagado (puesto en reposo o "standby").
Como la unidad no puede apagar el iPod touch cuando
una de estas aplicaciones está funcionando, deberá salir
de dicha aplicación antes de apagar el SR-100i (ponerlo
en modo de reposo o "standby").
) para encender la
El sonido cae momentáneamente cuando se cambia
el volumen de 6 a 7 o de 7 a 6.
e El sonido cae durante medio segundo
aproximadamente mientras cambia el circuito interno.
Esto no es un problema de funcionamiento.
Reproductor de iPod
No se puede conectar el iPod.
e Quite el polvo o los obstáculos de los conectores de la
base Dock del SR-100i y del iPod y vuelva a conectar el
iPod otra vez.
No se puede hacer funcionar el iPod.
e Libere el interruptor HOLD del iPod.
No se puede reproducir.
e Quite el iPod de la base Dock, espere unos segundos y
vuelva a conectarlo otra vez.
e Una actualización de software podría resolver el
problema. Visite la página web de Apple y descargue
el último software para iPod.
Sintonizador de FM
No se puede escuchar ninguna emisora o la señal es
demasiado débil.
e Sintonice una emisora correctamente.
e Gire la antena de FM hasta que reciba la emisora
correctamente.
Reproductor de CD
No se puede reproducir.
e Cargue un disco con la cara de la etiqueta hacia arriba.
e Si el disco está sucio, limpie la superficie.
e Se ha cargado un disco vacío. Cargue un disco
pregrabado.
e Dependiendo del disco, etc., puede no ser posible la
reproducción de discos CD-R/RW. Inténtelo otra vez
con otro disco.
e No se pueden reproducir discos CD-R/RW sin finalizar.
Finalice dicho disco en una grabadora de CD e
inténtelo de nuevo.
91
ESPAÑOL

Solución de posibles fallos (2)
MP3/WMA
No se puede reproducir.
e Compruebe la extensión de archivo MP3/WMA. Esta
unidad reconoce los archivos MP3 por su extensión
“.mp3” y los archivos WMA por su extensión “.wma”.
e Los datos del archivo MP3/WMA podrían haberse roto.
e El formato de los datos del archivo podría no ser un
formato MP3/WMA.
e La frecuencia de muestreo del archivo MP3 podría ser
diferente a 44.1 o 48 kHz.
e La velocidad de bits del archivo MP3 podría ser
superior a 320 kbps.
e La frecuencia de muestreo del archivo WMA podría
ser diferente a 44.1.
e La velocidad de bits del archivo WMA podría ser
superior a 192 kbps.
La información del archivo no aparece en pantalla
correctamente.
e Si la información de un archivo utiliza caracteres
japoneses, chinos u otros caracteres de doble byte,
es posible la reproducción pero el nombre no se
mostrará en pantalla correctamente.
Temporizador despertador
El temporizador despertador no funciona.
e Si la unidad está encendida, pulse el botón de Reposo/
Encendido (
e (Cuando un iPod touch es la fuente de sonido) Si
apaga el iPod touch (“deslizar para apagar"), no podrá
usarlo con el temporizador despertador incluso
aunque esté conectado a la base Dock de esta unidad.
Para utilizar con el temporizador despertador un
iPod touch como fuente, no seleccione “deslizar para
apagar” en el iPod touch (la pantalla del iPod touch se
puede apagar sin problemas.)
e (Cuando un iPod touch es la fuente de sonido)
No podrá usar la reproducción de vídeo en la pantalla
de un iPod touch para la función de temporizador
despertador ni siquiera aunque esté conectado a
la base Dock de esta unidad. Para poder utilizar el
temporizador despertador con un iPod touch como
fuente, seleccione cualquier otra opción que no sea
vídeo en el iPod touch.
) para apagarla.
Temporizador de apagado
Incluso cuando se alcanza la hora establecida, no
se puede apagar (cambiar a reposo o "standby")
cuando se está usando con un iPod touch como
fuente de sonido.
e Cuando use un iPod touch o un iPhone con esta
unidad, si utiliza cualquier aplicación que no sea
las aplicaciones del iPod, el SR-100i podría volver a
encenderse al poco tiempo de ser apagado (puesto en
reposo o "standby"). Como la unidad no puede apagar
el iPod touch cuando una de estas aplicaciones está
funcionando, deberá salir de dicha aplicación antes
de apagar el SR-100i (ponerlo en modo de reposo o
"standby").
92

Orden de reproducción MP3/WMA
Especificaciones
Los archivos MP3/WMA de un CD o de un dispositivo de
almacenamiento USB pueden almacenarse en carpetas de
la misma manera que se manejan en un ordenador. Es más,
una carpeta puede a su vez contener múltiples carpetas.
A continuación un ejemplo de la estructura de
archivos y carpetas de un disco MP3/WMA o de un
dispositivo de almacenamiento USB, mostrando el
orden de las carpetas, de la raíz 01 (“root”) a la 05, y
el orden de reproducción de los archivos (de
01 “root”
Archivo MP3/WMA
1
Archivo MP3/WMA
2
Carpeta 02
Archivo MP3/WMA
3
Archivo MP3/WMA
4
a 9 ).
1
Sección del sintonizador
Rango de frecuencias de FM ..... 87.5 MHz a 108.0 MHz
Sección de reproductor de CD
Tipos de discos compatibles
Formatos compatibles ..............CD-DA, MP3/WMA
Repuesta de frecuencias .........20 a 20,000 Hz (±1 dB)
Lloro y fluctuación.........................No medible
Distorsión armónica total ...........0.05 % (1 kHz, 0 dB)
Sección del amplificador
Potencia de salida total (máximo) .........50 W + 50 W
Sección de sistema de altavoces
Tipo ...............................Tweeter: 38 mm x 2
Woofer: 91 mm x 2
Impedancia.....................................8 ohms
General
Requerimientos de alimentación
Consumo de corriente (nominal)..................60 W
Dimensiones (an x al x pro).........570 x 230 x 220 mm
Peso (neto)....................................... 5.4 kg
. . . CD/CD-R/CD-RW (12 cm)
Corriente continua a 120 V, 60 Hz
Carpeta 04
6
Archivo MP3/WMA
Carpeta 03
5
Archivo MP3/WMA
Carpeta
Carpeta 05
< El orden que se muestra en la figura podría cambiar si
se añaden, borran o mueven archivos o carpetas.
7
Archivo MP3/WMA
8
Archivo MP3/WMA
9
Archivo MP3/WMA
Accesorios de serie
Mando a distancia (RC-1265) x 1
Pila (CR2025) para el mando a distancia x 1
Cable de corriente x 1
Antena de FM x 1
Cable USB x 1
Manual del usuario (este documento) x 1
Tarjeta de garantía x 1
< El diseño y las especificaciones están sujetas a cambios
sin previo aviso.
< El peso y las dimensiones son aproximados.
< Las ilustraciones pueden diferir ligeramente de los
modelos de producción.
ESPAÑOL
93

94

95

Z
TEAC CORPORATION
TEAC AMERICA, INC. 7733 Telegraph Road, Montebello, California 90640 U.S.A. Phone: (323) 726-0303
TEAC CANADA LTD. 5939 Wallace Street, Mississauga, Ontario L4Z 1Z8, Canada Phone: (905) 890-8008
TEAC MEXICO, S.A. DE C.V.
TEAC UK LTD. Suites 19 & 20, Building 6, Croxley Green Business Park, Hatters Lane, Watford, Hertfordshire, WD18 8TE, U.K.
Phone: (0845) 130-2511
TEAC EUROPE GMBH Bahnstraße 12, D-65205 Wiesbaden-Erbenheim, Deutschland Phone: 0611-71580
1-47 Ochiai, Tama-shi, Tokyo 206-8530 Japan Phone: (042) 356-9156
Río Churubusco 364, Colonia Del Carmen, Delegación Coyoacàn, CP 04100, México DF, México Phone: (5255)5010-6000
This appliance has a serial number located on the rear panel. Please record the
serial number and retain it for your records.
Model name: SR-100i Serial number
0710.MA-1587B
 Loading...