


Teac TC-X350I User Manual
Z
410 09 978
TC-X350i
Micro HI-Fi System
OWNER’S MANUAL
MODE D’EMPLOI
ENGLISH FRANÇAIS

CAUTION: TO REDUCE THE RISK OF ELECTRIC SHOCK, DO NOT
REMOVE COVER (OR BACK). NO USER-SERVICEABLE PARTS INSIDE.
REFER SERVICING TO QUALIFIED SERVICE PERSONNEL.
The lightning flash with arrowhead symbol, within an
equilateral triangle, is intended to alert the user to the
presence of uninsulated “dangerous voltage” within the
product’s enclosure that may be of sufficient magnitude to
constitute a risk of electric shock to persons.
The exclamation point within an equilateral triangle is
intended to alert the user to the presence of important
operating and maintenance (servicing) instructions in the
literature accompanying the appliance.
WARNING: TO PREVENT FIRE OR SHOCK HAZARD,
DO NOT EXPOSE THIS APPLIANCE TO RAIN OR
MOISTURE.
CAUTION
< DO NOT REMOVE THE EXTERNAL CASES OR CABINETS TO EXPOSE
THE ELECTRONICS. NO USER SERVICEABLE PARTS ARE WITHIN.
< IF YOU ARE EXPERIENCING PROBLEMS WITH THIS PRODUCT,
CONTACT TEAC FOR A SERVICE REFERRAL. DO NOT USE THE
PRODUCT UNTIL IT HAS BEEN REPAIRED.
< USE OF CONTROLS OR ADJUSTMENTS OR PERFORMANCE OF
PROCEDURES OTHER THAN THOSE SPECIFIED HEREIN MAY RESULT
IN HAZARDOUS RADIATION EXPOSURE.
IMPORTANT SAFETY INSTRUCTIONS
1) Read these instructions.
2) Keep these instructions.
3) Heed all warnings.
4) Follow all instructions.
5) Do not use this apparatus near water.
6) Clean only with dry cloth.
7) Do not block any ventilation openings. Install in accordance with
the manufacturer’s instructions.
8) Do not install near any heat sources such as radiators, heat
registers, stoves, or other apparatus (including amplifiers) that
produce heat.
9) Do not defeat the safety purpose of the polarized or groundingtype plug. A polarized plug has two blades with one wider than
the other. A grounding type plug has two blades and a third
grounding prong. The wide blade or the third prong are provided
for your safety. If the provided plug does not fit into your outlet,
consult an electrician for replacement of the obsolete outlet.
10) Protect the power cord from being walked on or pinched
particularly at plugs, convenience receptacles, and the point
where they exit from the apparatus.
11) Only use attachments/accessories specified by the manufacturer.
12) Use only with the cart, stand, tripod, bracket, or
table specified by the manufacturer, or sold with
the apparatus. When a cart is used, use caution
when moving the cart/apparatus combination to
avoid injury from tip-over.
13) Unplug this apparatus during lightning storms or when unused
for long periods of time.
14) Refer all servicing to qualified service personnel. Servicing is
required when the apparatus has been damaged in any way, such
as power-supply cord or plug is damaged, liquid has been spilled
or objects have fallen into the apparatus, the apparatus has been
exposed to rain or moisture, does not operate normally, or has
been dropped.
15) Grounding or Polarization – This product may be equipped with
a polarized alternating-current line plug (a plug having one blade
wider than the other). This plug will fit into the power outlet only
one way. This is a safety feature. If you are unable to insert the
plug fully into the outlet, try reversing the plug. If the plug should
still fail to fit, contact your electrician to replace your obsolete
outlet. Do not defeat the safety purpose of the polarized plug.
Alternate Warnings – This product is equipped with a three-wire
grounding-type plug, a plug having a third (grounding) pin. This
plug will only fit into a grounding-type power outlet. This is a
safety feature. If you are unable to insert the plug into the outlet,
contact your electrician to replace your obsolete outlet. Do not
defeat the safety purpose of the grounding-type plug.
16) Ventilation – Slots and openings in the cabinet are provided for
ventilation and to ensure reliable operation of the product and
to protect it from overheating, and these openings must not be
blocked or covered. The openings should never be blocked by
placing the product on a bed, sofa, rug, or other similar surface.
This product should not be placed in a built-in installation such
as a bookcase or rack unless proper ventilation is provided or the
manufacturer’s instructions have been adhered to.
17) The MAINS plug or an appliance coupler is used as the disconnect
device, the disconnect device shall remain readily operable.
18) Battery pack or battery installed shall not be exposed to excessive
heat such as sunshine, fire or the like.
19) Manufacture date is located on bottom of product.
20)
: CLASS II apparatus with double insulation, and no protective
earth provided.
2

< Do not expose this apparatus to drips or splashes.
< Do not place any objects filled with liquids, such as vases, on the
apparatus.
< Do not install this apparatus in a confined space such as a book
case or similar unit.
< The apparatus draws nominal non-operating power from the
AC outlet with its POWER or STANDBY/ON switch not in the ON
position.
< The apparatus should be located close enough to the AC outlet so
that you can easily grasp the power cord plug at any time.
< The appliance coupler is used as the disconnect device, the
disconnect device shall remain readily operable.
< If the product uses batteries (including a battery pack or installed
batteries), they should not be exposed to sunshine, fire or excessive
heat.
< CAUTION for products that use replaceable lithium batteries: there
is danger of explosion if a battery is replaced with an incorrect type
of battery. Replace only with the same or equivalent type.
< Caution should be taken when using earphones or headphones
with the product because excessive sound pressure (volume) from
earphones or headphones can cause hearing loss.
For U.S.A.
This equipment has been tested and found to comply with the
limits for a Class B digital device, pursuant to Part 15 of the FCC
Rules. These limits are designed to provide reasonable protection
against harmful interference in a residential installation. This
equipment generates, uses, and can radiate radio frequency energy
and, if not installed and used in accordance with the instructions,
may cause harmful interference to radio communications. However,
there is no guarantee that interference will not occur in a particular
installation. If this equipment does cause harmful interference to
radio or television reception, which can be determined by turning
the equipment off and on, the user is encouraged to try to correct
the interference by one or more of the following measures:
r Reorient or relocate the equipment and/or the receiving
antenna.
r Increase the separation between the equipment and receiver.
r Connect the equipment into an outlet on a circuit different
from that to which the receiver is connected.
r Consult the dealer or an experienced radio/TV technician for
help.
CAUTION
Changes or modifications to this equipment not expressly
approved by TEAC CORPORATION for compliance will void the
user’s warranty.
ENGLISH
MPEG Layer-3 audio coding technology licensed from Fraunhofer IIS
and Thomson.
This product is protected by certain intellectual property rights of
Microsoft. Use or distribution of such technology outside of this
product is prohibited without a license from Microsoft.
This product has been designed and manufactured according to
FDA regulations “title 21, CFR, chapter 1, subchapter J, based on the
Radiation Control for Health and Safety Act of 1968“, and is classified
as class 1 laser product. There is not hazardous invisible laser radiation
during operation because invisible laser radiation emitted inside of
this product is completely confined in the protective housings.
The label required in this regulation is as follows:
For U.S.A.
Bottom of the main unit
iPod and iPod classic are trademarks of Apple Inc., registered in the
U.S. and other countries.
“Made for iPod” means that an electronic accessory has been
designed to connect specifically to iPod and has been certified by the
developer to meet Apple performance standards.
Apple is not responsible for the operation of this device or its
compliance with safety and regulatory standards.
Other company names and product names in this document are the
trademarks or registered trademarks of their respective owners.
Optical pickup
Type : KHS-313A
Manufacturer : Sony Electronics Inc.
Laser output : 7mW (CD)
Wavelength : 790+10, -20nm
3

Contents
Thank you for choosing TEAC. Read this manual carefully to
get the best performance from this unit.
Before Use ....................................................5
Discs .........................................................6
USB Storage Devices ..........................................7
MP3/WMA Compatibility ......................................7
Connections .................................................. 8
AM/FM Outdoor Antenna ....................................10
Remote Control Unit .........................................10
Identifying the Parts (Main Unit) ..............................11
Identifying the Parts (Remote Control Unit) ...................12
Setting the Clock ............................................13
Basic Operation ..............................................14
Getting Started with an iPod .................................15
Listening to an iPod ..........................................16
Listening to a Disc ...........................................18
Listening to a USB Memory Device ...........................19
CD/USB Basic Playback .......................................20
CD/USB Displaying Information ...............................21
CD/USB Repeat/Shuffle Playback .............................22
CD/USB Programmed Playback ...............................23
Listening to the Radio ........................................24
Preset Tuning ................................................25
Listening to an External Source ...............................26
Sleep Timer ..................................................26
Wake Up Timer ..............................................27
Troubleshooting .............................................28
Specifications ................................................29
4
Before Use
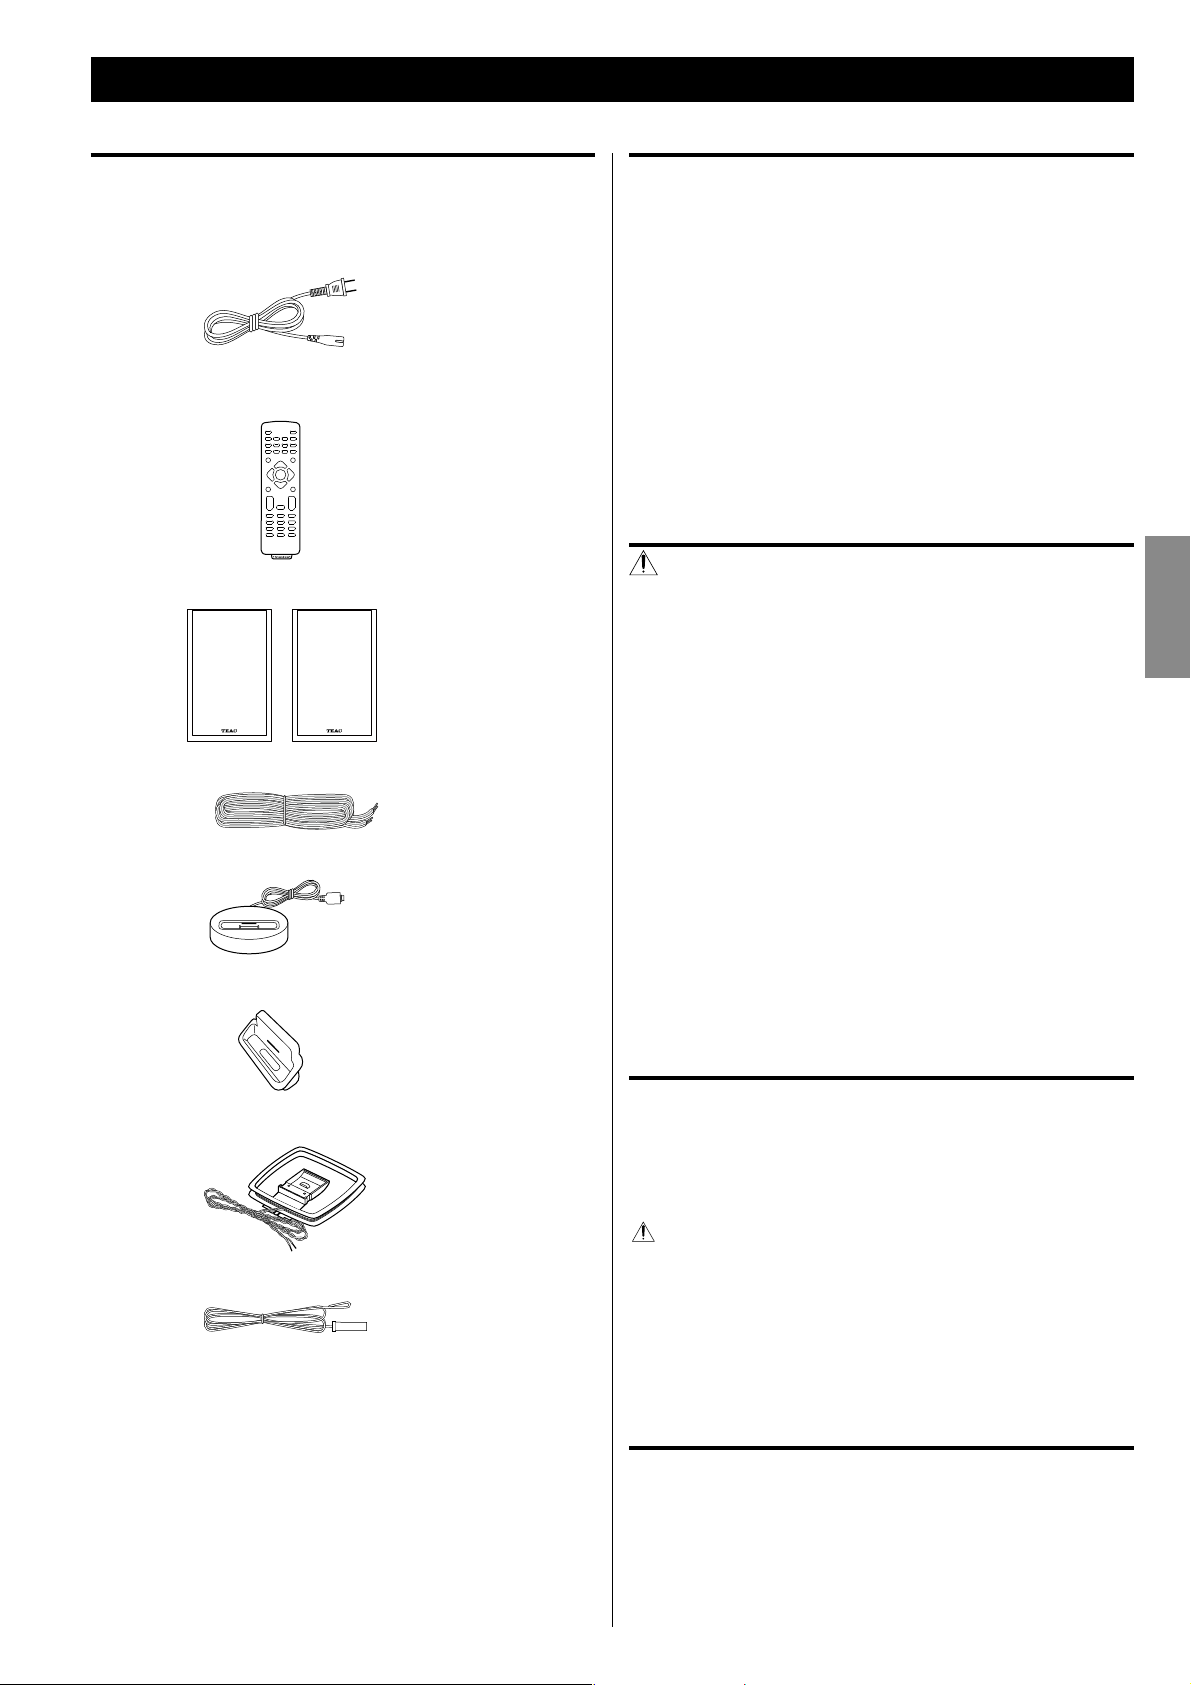
What’s in the box
Confirm the supplied standard accessories.
AC power cord x 1
Remote control unit (RC-1273) x 1
(CR2025 Battery x 1 included)
Speaker x 2
Speaker cable x 2
Placement of the unit
< Choose the installation location of your unit carefully. Avoid placing
it in direct sunlight or close to a source of heat. Also avoid locations
subject to vibrations and excessive dust, heat, cold or moisture.
< As the unit may become warm during operation, always leave
sufficient space around the unit for ventilation.
Make sure there is at least 8” (20cm) of space above and at least 2”
(5cm) of space on each side of the unit. Do not place anything on
top of the unit.
< Do not place the unit on an amplifier or receiver or any other
device that generates heat.
CAUTION
< Do not move the unit during disc playback.
During playback, the disc rotates at high speed. Do not lift or
move the unit during playback. Doing so may damage the disc
or the unit.
< The voltage supplied to the unit should match the voltage as
printed on the rear panel. If you are in any doubt regarding this
matter, consult an electrician.
ENGLISH
iPod dock x 1
Dock adapter x 2
AM loop antenna x 1
FM lead-type antenna x 1
Owner’s manual (this document) x 1
< Keep this manual in a safe place for future reference.
< Do not open the cabinet as this might result in damage to the
circuitry or electrical shock. If a foreign object should get into the
unit, contact your dealer or service company.
< When removing the power plug from the wall outlet, always pull
directly on the plug, never yank on the cord.
< Always remove the disc before relocating or moving this unit.
Moving the unit with a disc inside it could cause malfunction.
Maintenance
If the surface of the unit gets dirty, wipe it with a soft cloth or
use diluted mild liquid soap. Allow the surface of the unit to dry
completely before using.
For safety, disconnect the power cord from the socket before
cleaning.
< Never spray liquid directly on this unit.
< Do not use thinner, benzene or alcohol as they could damage the
surface of the unit.
Warranty card x 1
Beware of condensation
When the unit is moved from a cold to a warm place, or used after a
sudden temperature change, there is a danger of condensation on
the lens of CD player; vapor in the air could condense on the internal
mechanism, making correct operation impossible. To prevent this, or
if this occurs, leave the unit turned on for one or two hours. Then the
unit will stabilize at the temperature of its surroundings.
5
Discs
Discs that can be played on this unit
CDs that bear the “COMPACT disc DIGITAL AUDIO” logo (12cm or
8cm).
CD-R and CD-RW discs that have been correctly recorded in the
audio CD format and finalized.
Finalized CD-R and CD-RW discs that contain MP3/WMA files.
CAUTION
Playback of any other type of disc could cause loud noise
and damage to speakers as well as harm hearing. Never
play back any other type of disc.
< CD-ROMs and similar types of discs can be read by the unit, but
they will make no sound when played back.
< Video CDs, Video and audio DVDs, DVD-ROMs and other types of
DVDs cannot be read and played back by this unit.
< Copy-protected discs and other discs that do not conform to the
CD standard might not play correctly in this player. If you use such
discs in this unit, TEAC Corporation and its subsidiaries will not
be responsible for any consequences or guarantee the quality of
reproduction. If you experience problems with such non-standard
discs, you should contact their issuers.
About CD-R/CD-RW discs
This unit can play back CD-R and CD-RW discs that have been
recorded in the audio CD (CD-DA), MP3, and WMA format.
< Discs created by a CD recorder must be finalized before use with
this unit.
< Depending on disc quality and recording conditions, playback of
some discs might not be possible. Please see the manual for the
device that you used to create the disc.
< If you are uncertain about the handling of a CD-R or CD-RW disc,
please contact the seller of the disc directly.
< Never use a stabilizer. Using commercially available CD stabilizers
with this unit will damage the mechanisms and cause them to
malfunction.
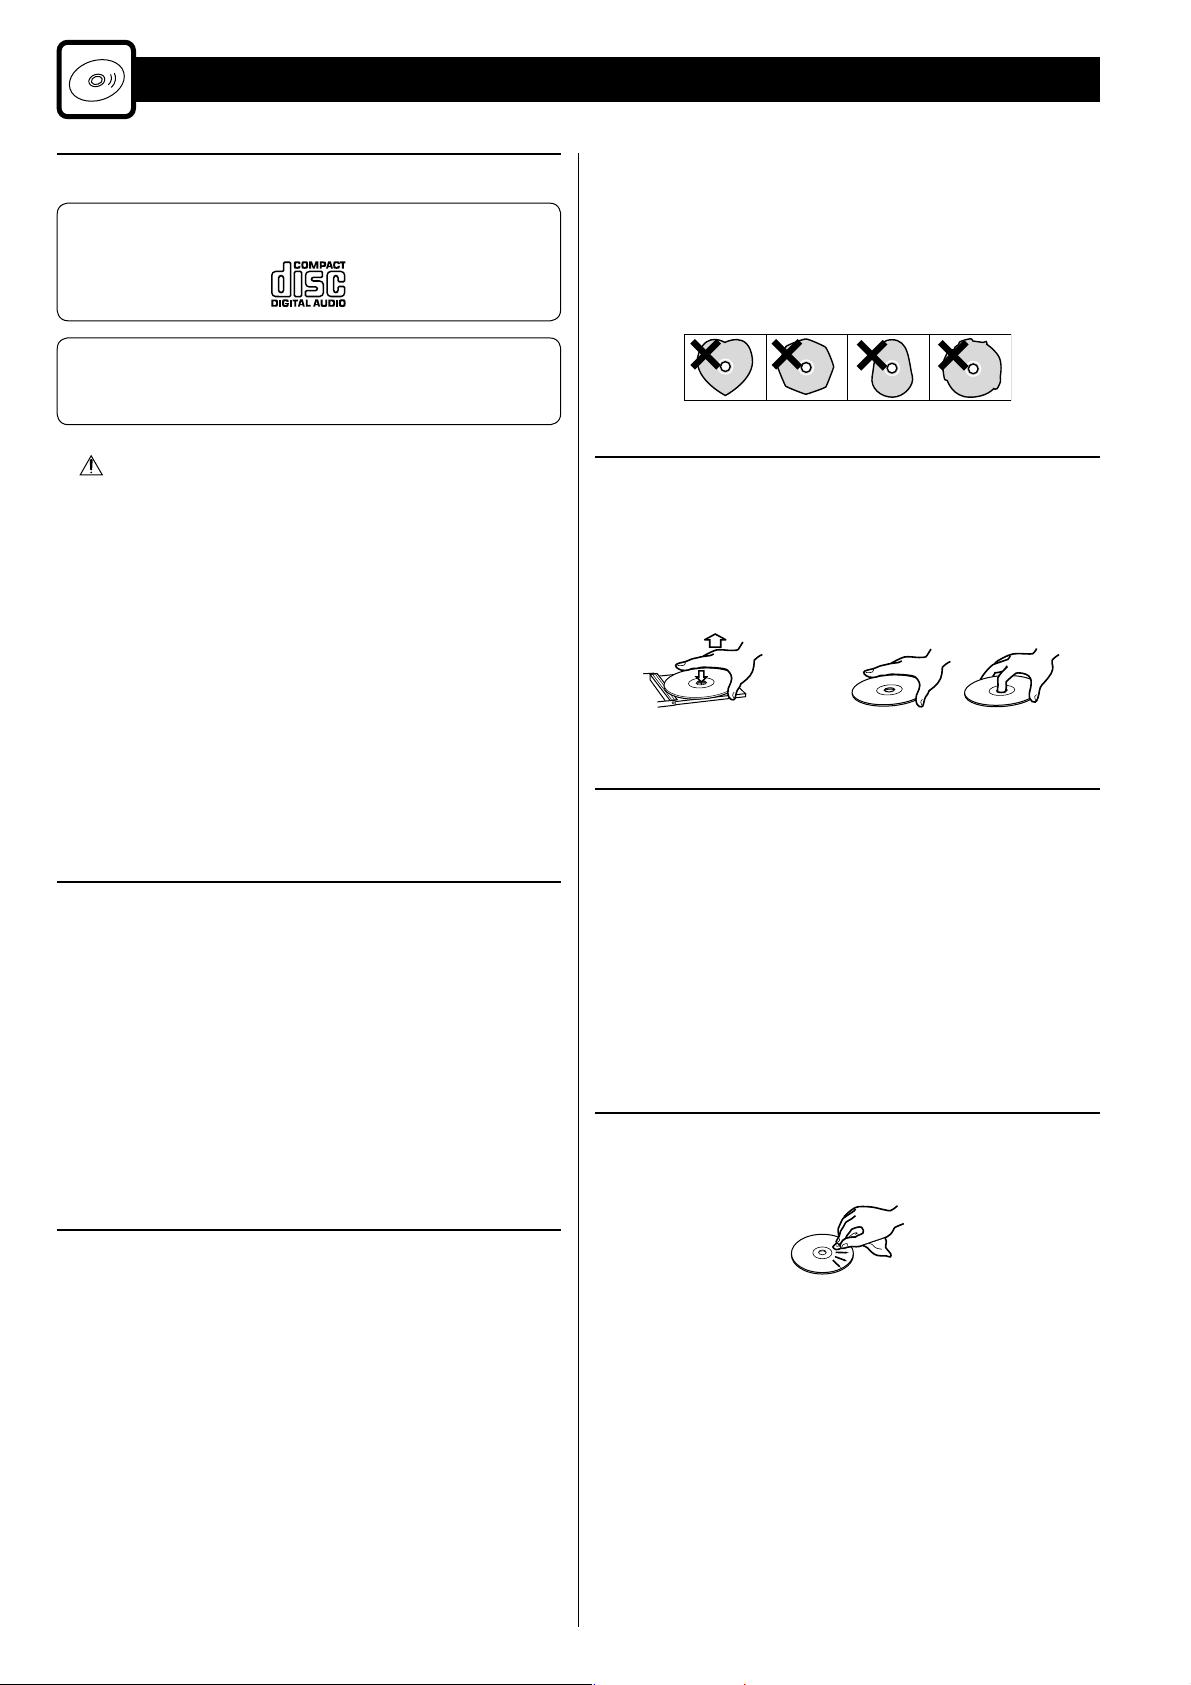
< Do not use irregularly-shaped discs (octagonal, heart-shaped,
business card size, etc.). CDs with these shapes could damage the
unit.
Handling precautions
< Always insert a disc with the label side up. Only one side of a
Compact Disc can be played.
< To remove a disc from its storage case, press down on the center of
the case and lift the disc out, holding it carefully by the edges.
How to remove the disc How to hold the disc
Storage precautions
< Discs should be returned to their cases after use to avoid dust and
scratches that could cause the laser pickup to “skip.”
< Do not expose discs to direct sunlight or high-temperature
and humidity for extended periods. Long exposure to high
temperatures will warp discs.
< CD-R and CD-RW discs are more sensitive to the effects of heat
and ultraviolet rays than ordinary CDs. It is important that they
are not stored in locations where they will be exposed to direct
sunlight. They should also be kept away from sources of heat, such
as radiators and heat-generating electrical devices.
Maintenance
< If a disc becomes dirty, wipe its surface radially from the center
hole outward towards the outer edge with a soft, dry cloth.
Caution
< Do not play any disc that is warped, deformed or damaged.
Playing such discs could cause irreparable harm to the playing
mechanisms.
< Printable CD-R and CD-RW discs are not recommended because
their label sides could be sticky and damage the unit.
< Do not stick papers or protective sheets on the discs and do not
use any protective coating sprays.
< Use a soft oil-based felt-tipped pen to write information on the
label side. Never use a ball-point or hard-tipped pen, as this could
cause damage to the recorded side.
6
< Never clean discs using chemicals such as record sprays, antistatic
sprays and fluids, benzene and thinner. Such chemicals will do
irreparable damage to the disc’s plastic surface.

USB Storage Devices
MP3/WMA Compatibility
< Only USB flash memory can be used. Do NOT use a high-capacity
USB hard disc with this unit.
< Some flash memory players that charge from an USB terminal
cannot be played back.
< Hard disk drives, CD/DVD drives, and other devices than flash
memory connected via USB cannot be used.
< The TC-X350i cannot copy, move, or delete files.
< Playable format: FAT12, FAT16, FAT32
< NTFS, HFS, HFS+ cannot be used.
< Max. number of playable folders: 300
< Max. number of playable files: 650
< Depending on the conditions of a USB storage device, this unit
might not be able to play the files on it or skipping might occur.
This unit can play MP3/WMA files recorded on a CD-R, CD-RW discs
and USB storage device. Refer the instruction manual of the software
when making an MP3 or a WMA file using a PC.
< This unit can play back monaural and stereo MP3 files that are in
the MPEG-1 Audio Layer 3 format with a sampling rate of 44.1 or
48kHz and a bit rate of 320kbps or less.
< WMA file must have a sampling rate of 44.1 kHz, and a bit-rate of
192kbps or less.
< This unit is not compatible with discs that have been recorded
using multiple sessions. Only the first session can be played back.
< This unit cannot play copyright protected files.
< Files are played in alphabetical order.
File information display
The display of this unit can only show single-byte letters and
numbers.
< If the file information contains Japanese, Chinese or other double-
byte characters, playback is possible but the name will not be
shown correctly.
ENGLISH
Cautions when preparing MP3/WMA files using a computer or
other device
< Always include the extension in the file name. This unit recognizes
MP3 files by their “.mp3”, and WMA files by their “.wma” file
extensions.
< Always close the session (complete disc creation). This unit cannot
play discs if the session has not been closed.
< Carefully read the manual for the software that you are using when
you create an MP3/WMA disc.
Files that are unplayable or only partially playable
< Files without extensions cannot be played. Files that are not in the
MP3/WMA format cannot be played even if they have extensions.
< Variable bit rate files might not play back correctly.
< If the disc/USB storage device contains more than 650files or
300folders, this unit can not play it back correctly.
< Depending on disc/USB storage device conditions, this unit might
not be able to play a disc or skipping might occur.
7
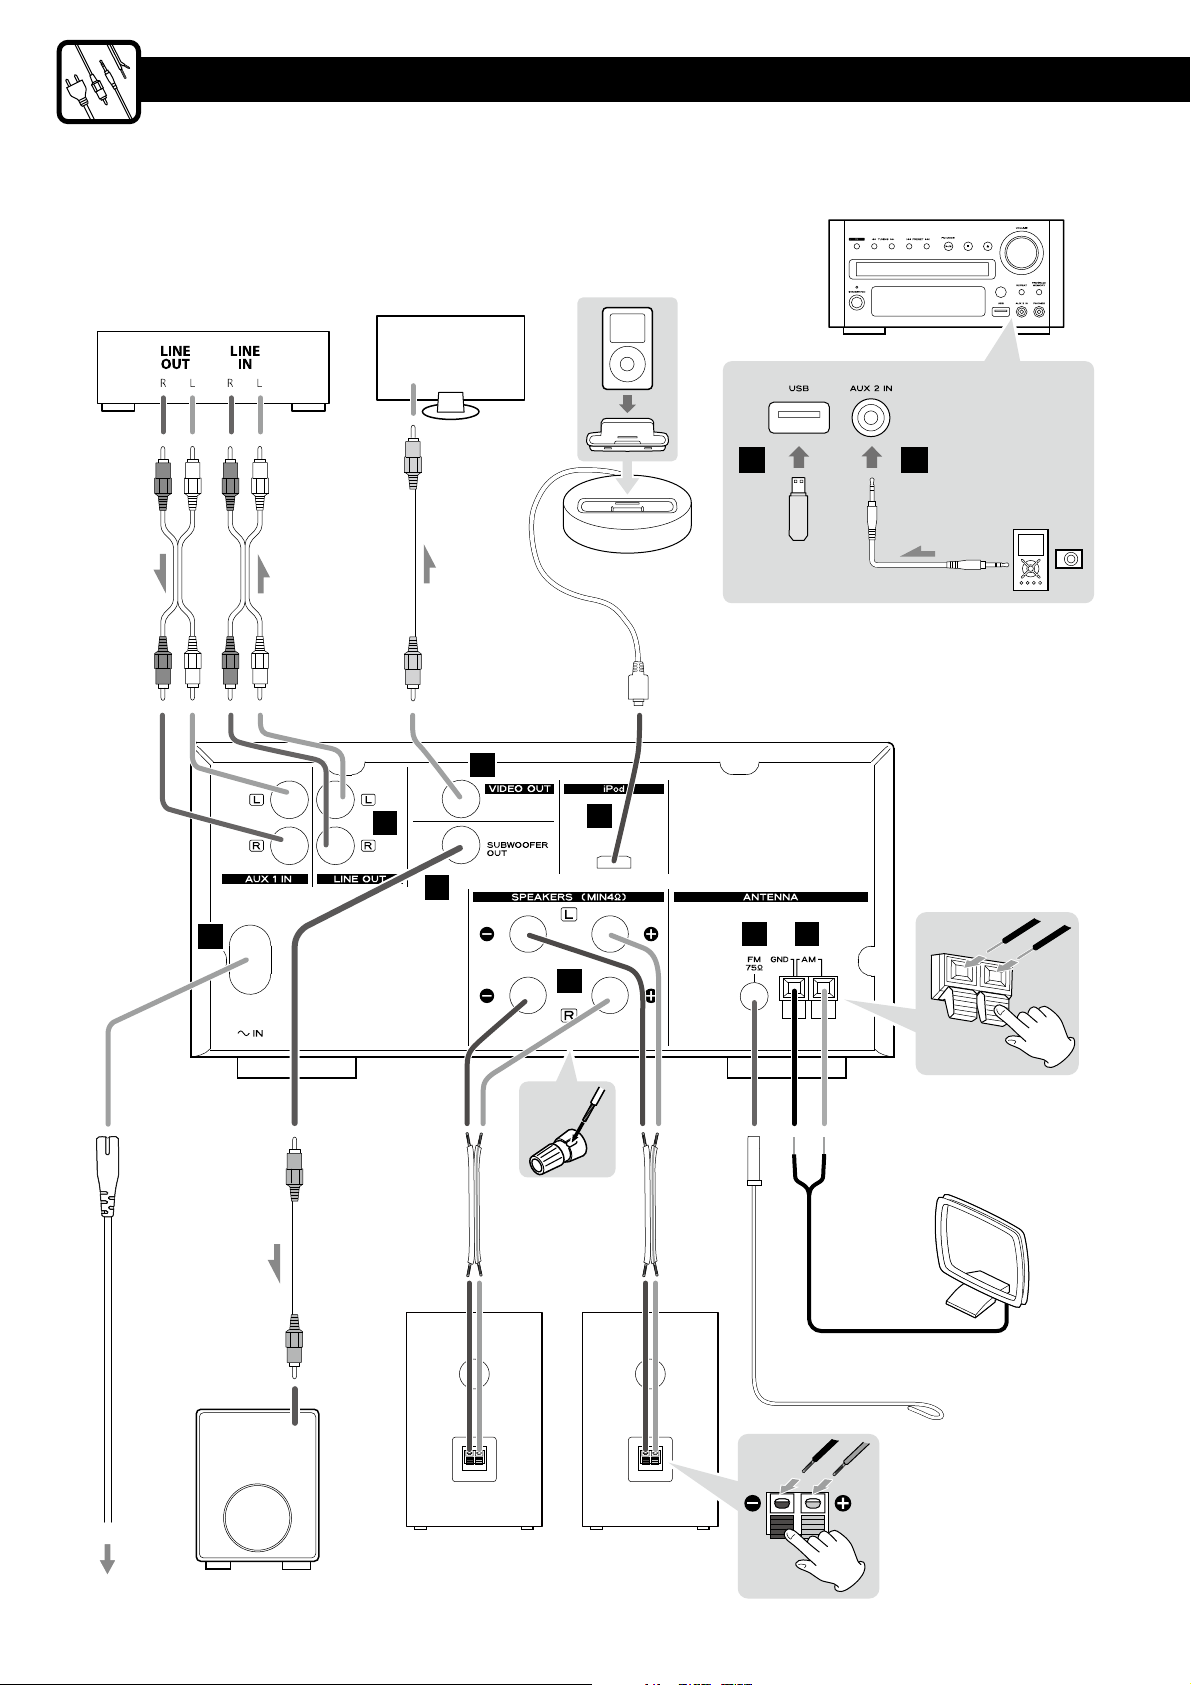
Connections
Front
Cassette tape deck etc.
RCA cables
TV (monitor) etc.
VIDEO
IN
RCA video cable
D
C
A B
Back
E
I
J
FG
H
Wall socket
8
Right speaker Left speaker
Subwoofer
After all connections are complete, connect the power
cord’s plug to the AC wall socket.
< Read the instructions of each component you intend to use
with this unit.
< Be sure to connect each plug securely. To prevent hum and
noise, do not bundle the connection cords.
USB port
A
You can connect a USB memory device to this port.
AUX 2 IN
B
You can connect a portable audio player to this jack. Connect
the PHONES jack or audio output jack of a portable audio player
using commercially available stereo mini plug cable.
AUX 1/LINE OUT
C
Analog 2-channel audio signal is input or output from these
jacks. Connect a cassette tape deck etc. to these jacks using
commerciallyavailable RCA cables.
Make sure to connect:
White plug
Red plug
VIDEO OUT
D
This terminal outputs video signal from an iPod connected to the
dock of the TC-X350i.
Connect the unit to the composite video connector of a
television or monitor using commercially available RCA (pin)
video cable.
Make the following settings on your iPod’s menu to output video
to a TV via the dock.
(iPod touch* does not have this menu.)
* iPod touch 1st generation: Software ver. 2.2 or later
< When you have set [TV OUT] to [Ask], each time you play a video
your iPod prompts you to specify whether to output it to a TV.
< When you output video to a TV from your iPod, the video is not
displayed on the iPod’s screen.
iPod port
E
Insert the dock adapter that fits your iPod into the TC-X350i dock
(see page15). Connect the dock to this port and then insert an
iPod into the dock.
AM loop antenna
F
Connect the supplied AM loop antenna to the AM antenna
terminal. Place the antenna in the direction which gives the best
reception.
To stand the loop antenna on a surface, fix the claw to the slot in
the antenna base.
e White jack (L: left channel)
e Red jack (R: right channel)
In the [Video] menu, select [Video Settings],
and then set [TV OUT] to [On] or [Ask].
Press the lever, insert the end of the cord to the terminal, then
release the lever.
< Make sure it is fastened securely by pulling the cord lightly.
< Make sure only the bare, stripped wire is inserted in the jack and
that no plastic insulation is preventing contact between the
antenna wire and terminal.
FM antenna
G
Connect the supplied lead-type FM antenna to the FM 75Ω
socket and extend the lead.
Adjust the antenna in a suitable location like a window frame or
wall which gives the best reception and then fix the antenna in
that position with thumb tacks or the like.
SPEAKERS
H
Connect the supplied speakers to the SPEAKERS terminals using
the supplied speaker cables.
Make sure to connect:
+ Red terminal
(Using red marked side of the speaker cable)
_ Black terminal
How to connect
e Main unit's terminals
1 Turn the terminal cap counterclockwise to loosen it. The
speaker terminal caps cannot be fully removed from the base.
2 Insert the wire into the terminal fully and turn the terminal cap
clockwise to securely connect it.
e Speaker's terminals
Press the lever, insert the end of the cord to the terminal, then
release the lever.
< Make sure it is fastened securely by pulling the cord lightly.
< Make sure none of the wire insulation is under the terminal, only
the bare, stripped wire.
SUBWOOFER OUT
I
Connect a subwoofer using a commercially available RCA cable.
Use a subwoofer with built-in amplifier referred to as a “powered
subwoofer”.
Power cord receptacle
J
After all other connections have been made, insert the supplied
AC power cord into this receptacle, then connect the other end
of the power cord into the wall socket.
Be sure to connect the power cord to an AC outlet which
supplies the correct voltage.
In order to avoid the risk of electric shock, fire, and so on, use
only the supplied power cord.
e + Red terminal of the speaker
e _ Black terminal of the speaker
ENGLISH
< If you are not going to use the unit for some time, disconnect the
power cord from the wall socket.
9
AM/FM Outdoor Antenna
Remote Control Unit
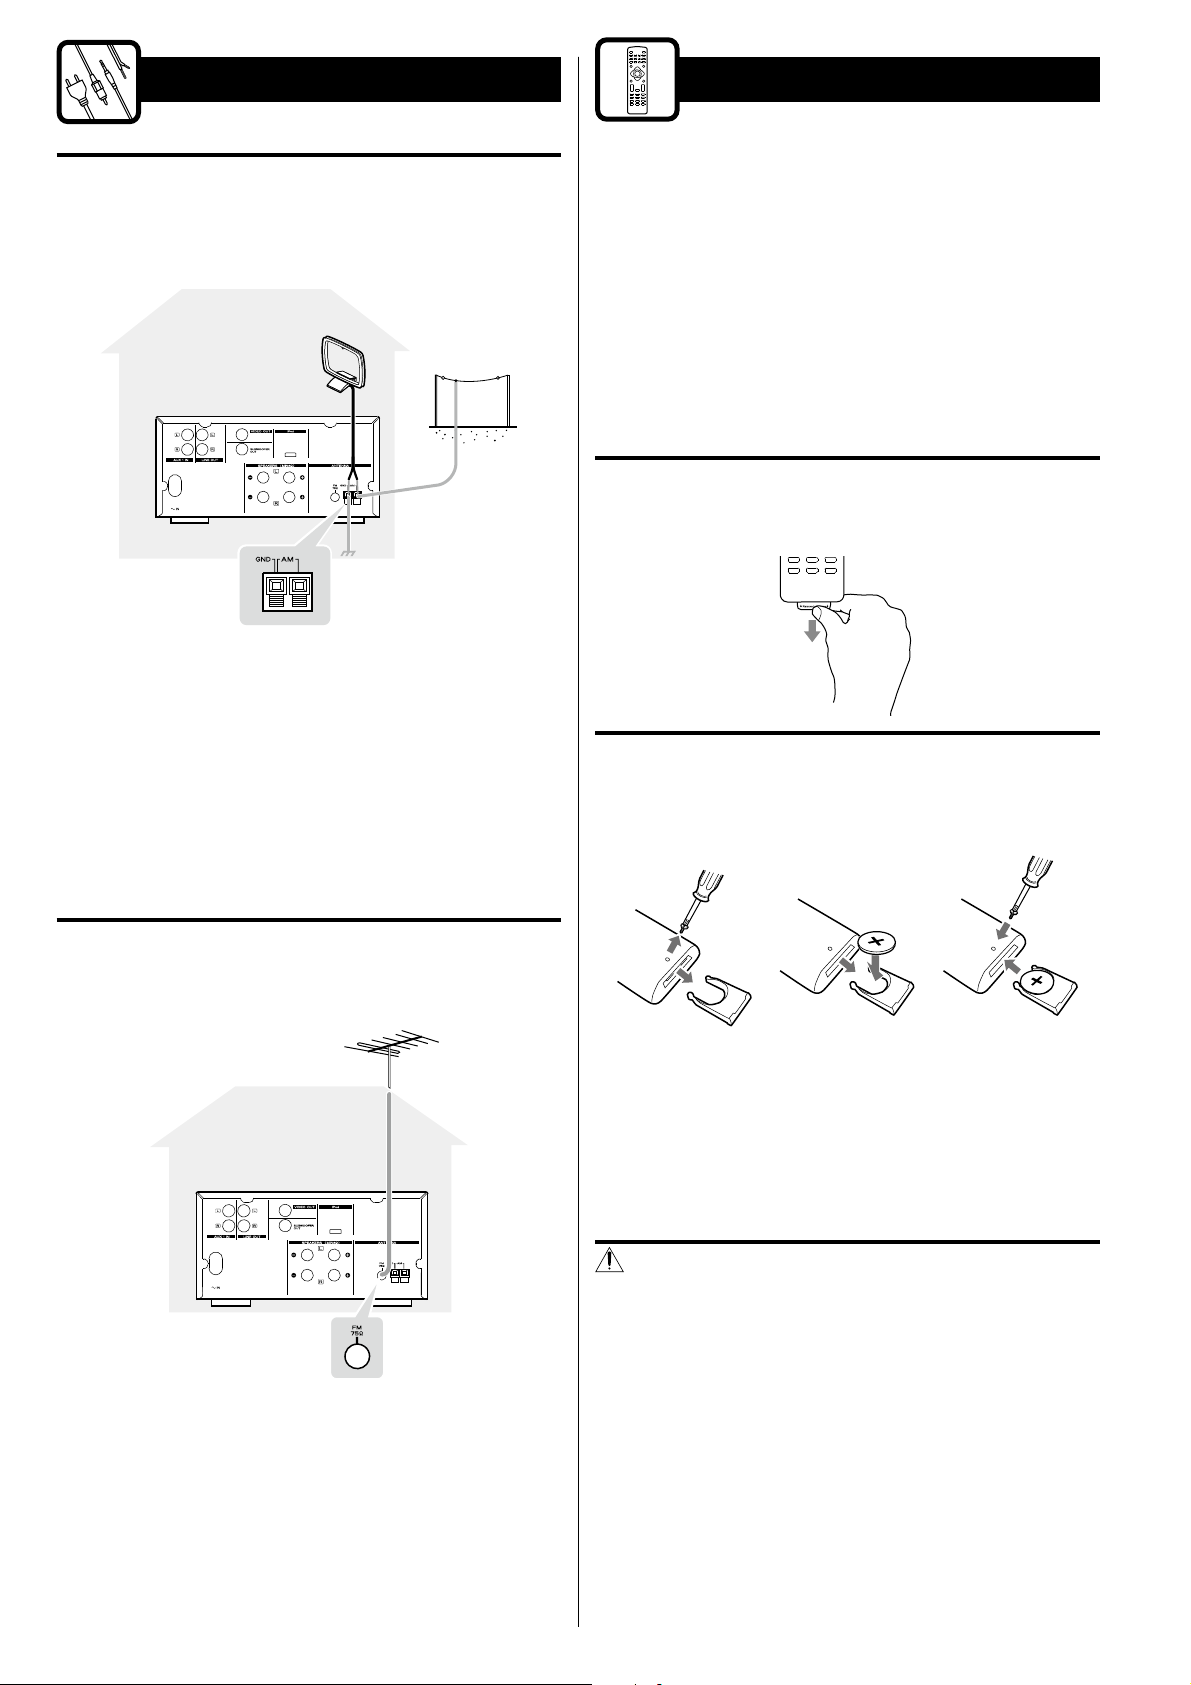
AM outdoor antenna
If the AM loop antenna provided does not deliver sufficient reception
(often due to being too far from the transmitter or in a concrete
building, etc.), it may be necessary to use an outdoor AM antenna.
Use either a high quality commercially available AM antenna or,
if not available, an insulated wire more than 16ft (5m) long, strip
one end, and connect this to the terminal as shown above.
The provided remote control unit allows the unit to be operated from
a distance.
When operating the remote control unit, point it towards the remote
sensor on the front panel of the unit.
< Even if the remote control unit is operated within the effective
range (16 ft/5 m), remote control operation may be impossible if
there are any obstacles between the unit and the remote control.
< If the remote control unit is operated near other products which
generate infrared rays, or if other remote control devices using
infrared rays are used near the unit, it may operate incorrectly.
Conversely, the other products may operate incorrectly.
Before use
Before using the remote control unit, pull out protection sheet from
the battery compartment.
< The antenna wire should be strung outdoors or indoors near a
window. For better reception, connect the GND terminal to a
reliable ground.
< Even when using an outdoor AM antenna, do not disconnect the
AM loop antenna.
FM outdoor antenna
In an area where FM signals are weak, it will be necessary to use a 75Ω
unbalanced-type outdoor FM antenna.
< Generally, a 3-element antenna will be sufficient; if you live in
an area where the FM signals are particularly weak, it may be
necessary to use one with 5 or more elements.
< Disconnect the FM indoor antenna when using an FM outdoor
antenna.
10
Battery replacement
If the distance required between the remote control unit and main
unit decreases, the battery is exhausted. In this case replace the
battery with new one.
12 3
1. Remove the screw, then pull out the battery holder.
2. Put the lithium-ion battery (CR2025, 3 V) in with the “+” side up.
3. Insert the battery holder, then fix it by tightening the screw.
< For information about collection of batteries, please contact your
local municipality, your waste disposal service or the point of sale
where you purchased the items.
Precautions concerning batteries
Misuse of batteries could cause them to rupture or leak leading to fire,
injury or the staining of nearby things. Please read and observe the
following precautions carefully.
< Be sure to insert the battery with the positive “+” and negative “–”
polarities correctly positioned.
< If the battery leaks, wipe away the leakage inside the battery
compartment and replace the battery with a new one.
< If the remote control unit is not to be used for a long time (more
than a month), remove the battery from the remote control unit to
prevent it from being exhausted.
< Do not use any batteries other than those specified.
<
Do not heat or disassemble batteries. Never throw them in fire or water.
< Do not carry or store batteries with other metallic objects. The
batteries could short circuit, leak or explode.
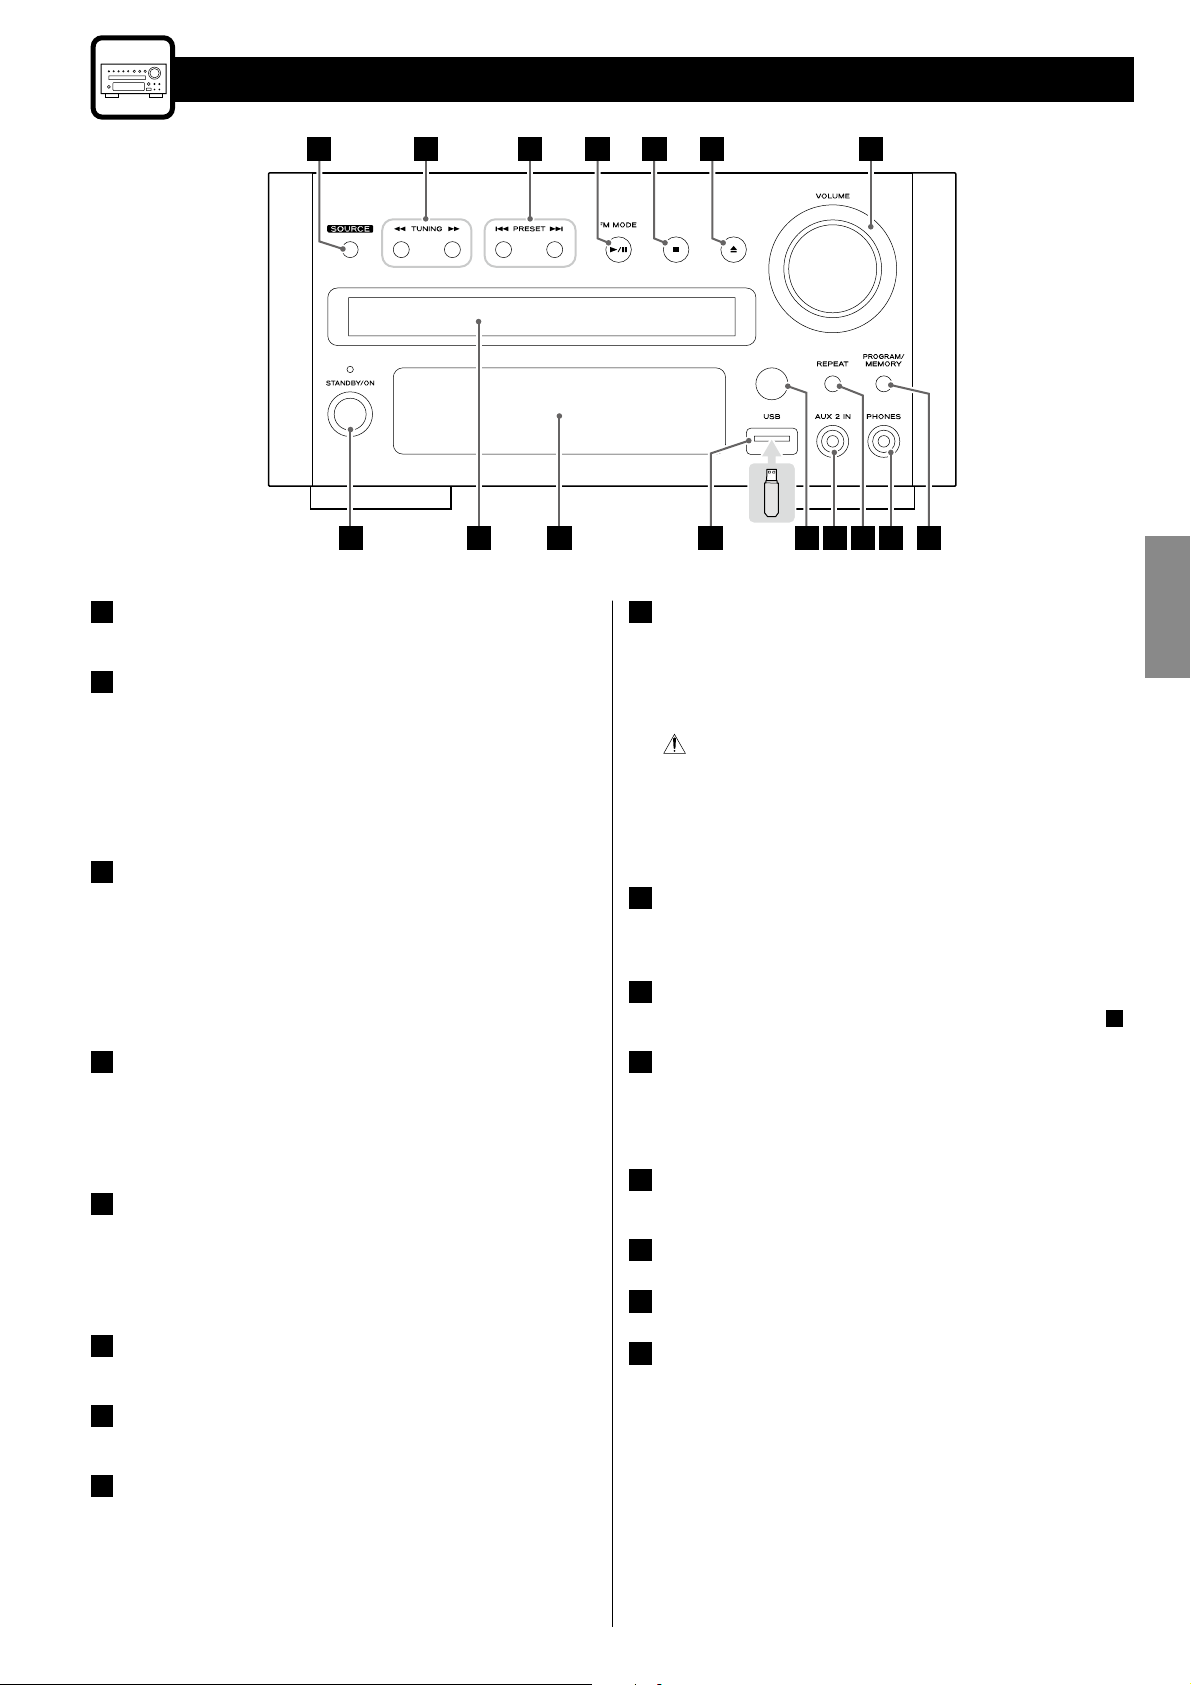
Identifying the Parts (Main Unit)
A
P
SOURCE
A
Use this button to select a source.
Search (m/,)/TUNING
B
When the source is “FM RADIO” or “AM RADIO”, use these buttons
to tune in to a station.
When the source is “iPod”, use these buttons to scroll up and
down in an iPod menu.
When the source is “CD” or “USB”, use these buttons to search for
a part of a track/file.
Skip (.//)/PRESET
C
When the source is “FM RADIO” or “AM RADIO”, use these buttons
to select a preset channel.
When the source is “iPod”, “CD” or “USB”, press these buttons to
skip tracks/files/songs.
When the source is “iPod”, hold down these buttons to search for
a part of a song.
B
O
N
DC
E
F
M
PHONES
I
To listen with headphones, first lower the volume level to the
minimum. Then, connect the headphones plug into the PHONES
jack, and adjust the volume by turning the VOLUME knob.
<
The speakers will make no sound when headphones are plugged in.
AVOID DAMAGING YOUR HEARING
< While wearing headphones, do not connect or disconnect
them with the PHONES jack. Moreover, do not turn the unit
on or off while wearing them. Very loud sound could be
output from the headphones.
< Do not put on headphones until after plugging them in.
REPEAT
J
When the source is “iPod”, “CD” or “USB”, use this button for
repeat playback.
AUX 2 IN
K
You can connect a portable audio player to this jack (pages8, 9 B).
G
J
KL
H
I
ENGLISH
Play/Pause (G/J)/FM MODE
D
When the source is “iPod”, “CD” or “USB”, use this button to start
or pause playback.
When the source is “FM RADIO”, use this button to select stereo
or monaural.
Stop ( H)
E
When the source is “CD” or “USB”, use this button to stop
playback.
When the source is “FM RADIO” or “AM RADIO”, use this button to
preset stations automatically.
Open/Close ( L)
F
Use this button to open and close the disc tray.
VOLUME
G
Turn this knob to adjust the volume level.
PROGRAM/MEMORY
H
When the source is “FM RADIO” or “AM RADIO”, use this button to
preset stations (page25).
When the source is “CD” or “USB”, use this button to programme
tracks/files (page23).
Remote control sensor
L
Receives signals from the remote control unit. Point the remote
control unit at this sensor when operating the remote control
unit.
USB port
M
You can connect an USB memory device to this port.
Display
N
Disc tray
O
STANDBY/ON
P
Use this button to turn the unit on and standby.
< The indicator lights blue when the unit is turned on.
< The indicator lights red when the unit is in the standby mode.
When the unit is turned off, and an iPod is not connected to the dock:
e “SYSTEM ECO POWER” appears on the display for a few
seconds. Then the unit is turned off (put in standby).
When the unit is turned off, and an iPod is connected to the dock:
e The clock appears on the display and the iPod battery is
charged. If you disconnect the iPod and no button is pressed
for 90seconds, the unit is turned off (put in standby).
11

Identifying the Parts (Remote Control Unit)
G
H
A
B
C
STANDBY/ON (
A
Use this button to turn the unit on and standby.
Source buttons (TUNER, CD, USB/iPod and AUX)
B
Use these buttons to select a source.
AUTO SCAN/INTRO
C
When the source is “FM RADIO” or “AM RADIO”, use this button to
preset stations automatically.
When the source is “CD” or “USB”, use this button to play the
beginning of each track/file consecutively (page21).
Shuffle ( )
D
N
O
D
E
F
P
Q
R
S
T
I
When the source is “iPod”, “CD” or “USB”, use this button to set
the shuffle function.
TONE
E
Use this button to adjust bass and treble together with the
VOLUME Knob/buttons.
DIMMER
F
Use this button to change the brightness of the display.
CLOCK
G
Use this button to display the clock.
When the unit is turned off, use this button to set the clock
(page13).
)
J
K
L
M
U
V
W
DISPLAY
H
When the source is “iPod”, use this button to confirm a selection
in an iPod menu.
When the source is “CD” or “USB”, use this button to display the
track/file information.
Skip (.//)/Preset
I
When the source is “FM RADIO” or “AM RADIO”, use these buttons
to select a preset channel.
When the source is “iPod”, “CD” or “USB”, press these buttons to
skip tracks/files/songs.
When the source is “iPod”, hold down these buttons to search for
a part of a song.
Play/Pause (G/J)
J
When the source is “iPod”, “CD” or “USB”, use this button to start
or pause playback.
FOLDER (°/‡)
K
Use these buttons to select folders (MP3/WMA disc and USB
storage device only).
MUTING
L
Use this button to mute the sound.
12
Number buttons
M
When the source is “CD” or “USB”, use these buttons to select
tracks/files.
Setting the Clock
Open/Close ( L)
N
Use this button to open and close the disc tray.
FM mode/Repeat ( )
O
When the source is “FM RADIO”, use this button to select stereo
or monaural.
When the source is “iPod”, “CD” or “USB”, use this button for
repeat playback.
A-B (Repeat)
P
When the source is “CD” or “USB”, use this button to specify a
section and play it repeatedly (page22).
S.BASS
Q
Use this button to reinforce the bass sound.
LOUDNESS
R
Use this button to supplement the bass and treble hearing loss at
low volume.
SLEEP/TIMER
S
When the unit is on, use this button to set the sleep timer
(page26).
When the unit is turned off, use this button to set the wake up
timer (page27).
Search (m/,)/Tuning
T
When the source is “FM RADIO” or “AM RADIO”, use these buttons
to tune in to a station.
When the source is “iPod”, use these buttons to scroll up and
down in an iPod menu.
When the source is “CD” or “USB”, use these buttons to search for
a part of a track/file.
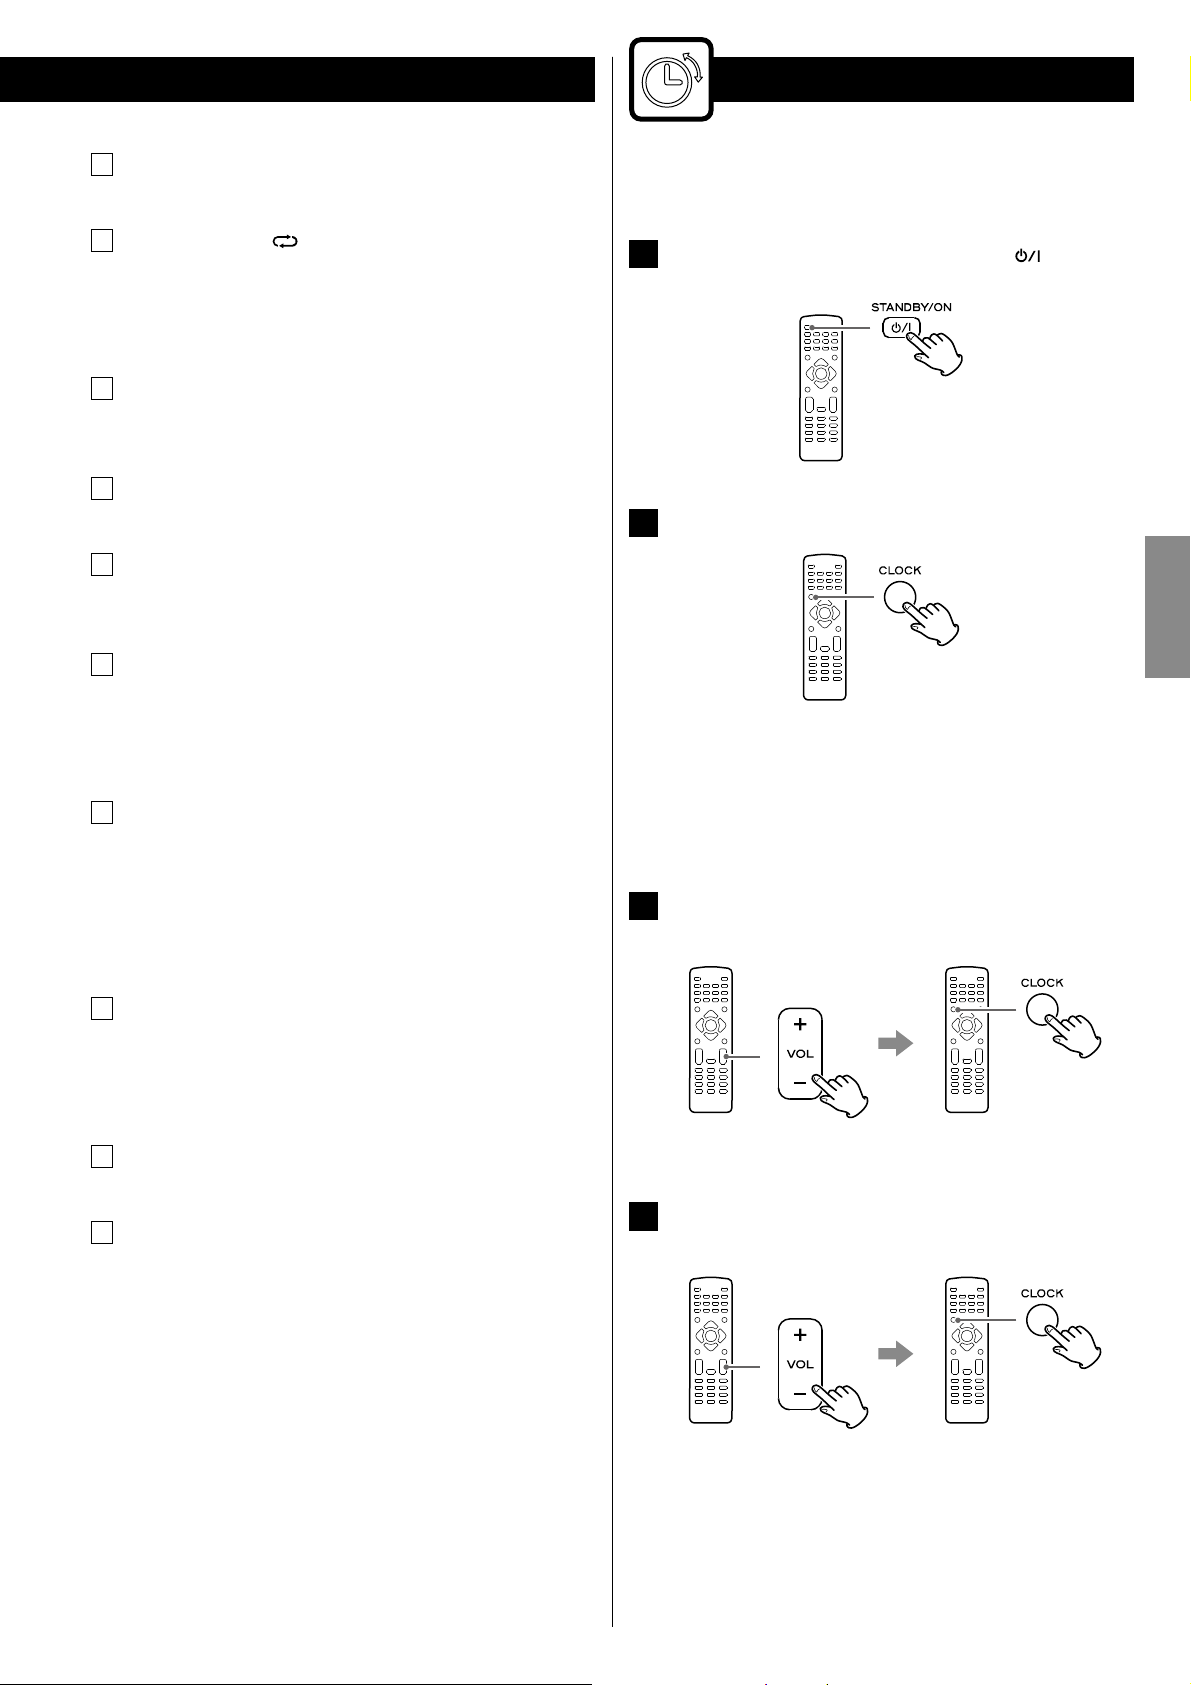
Set the clock when you connect the power cord into the wall socket
and turn on the unit for the first time.
If the unit is on, press the STANDBY/ON (
1
turn it standby.
Press the CLOCK button.
2
“CLOCK SET” appears on the display, and the “hour” value starts
blinking.
< If “- -:- -” blinks on the display, press the CLOCK button again.
< When no button is pressed for 30seconds, the time setting
mode will be cancelled.
Press the Volume (+ / –) buttons to set the current hour.
3
And then press the CLOCK button.
) button to
ENGLISH
Stop ( H)/MENU
U
When the source is “iPod”, use this button to go back to the
previous menu of iPod.
When the source is “CD” or “USB”, use this button to stop
playback.
VOL (+/–) (Volume)
V
Use these buttons to adjust the volume level.
PROGRAM
W
When the source is “FM RADIO” or “AM RADIO”, use this button to
preset stations (page25).
When the source is “CD” or “USB”, use this button to programme
tracks/files (page23).
Note:
To simplify explanations, instructions in this manual might refer to the
main unit or remote control only. In such cases, the same controls on
the remote control and main unit will operate similarly.
The “minute” value starts blinking.
Press the Volume (+ / –) buttons to set the current minute.
4
And then press the CLOCK button.
Setting the clock is now completed, and the clock starts from
00seconds.
13
Basic Operation
This chapter describes the basic operation which is available in every
sound source.
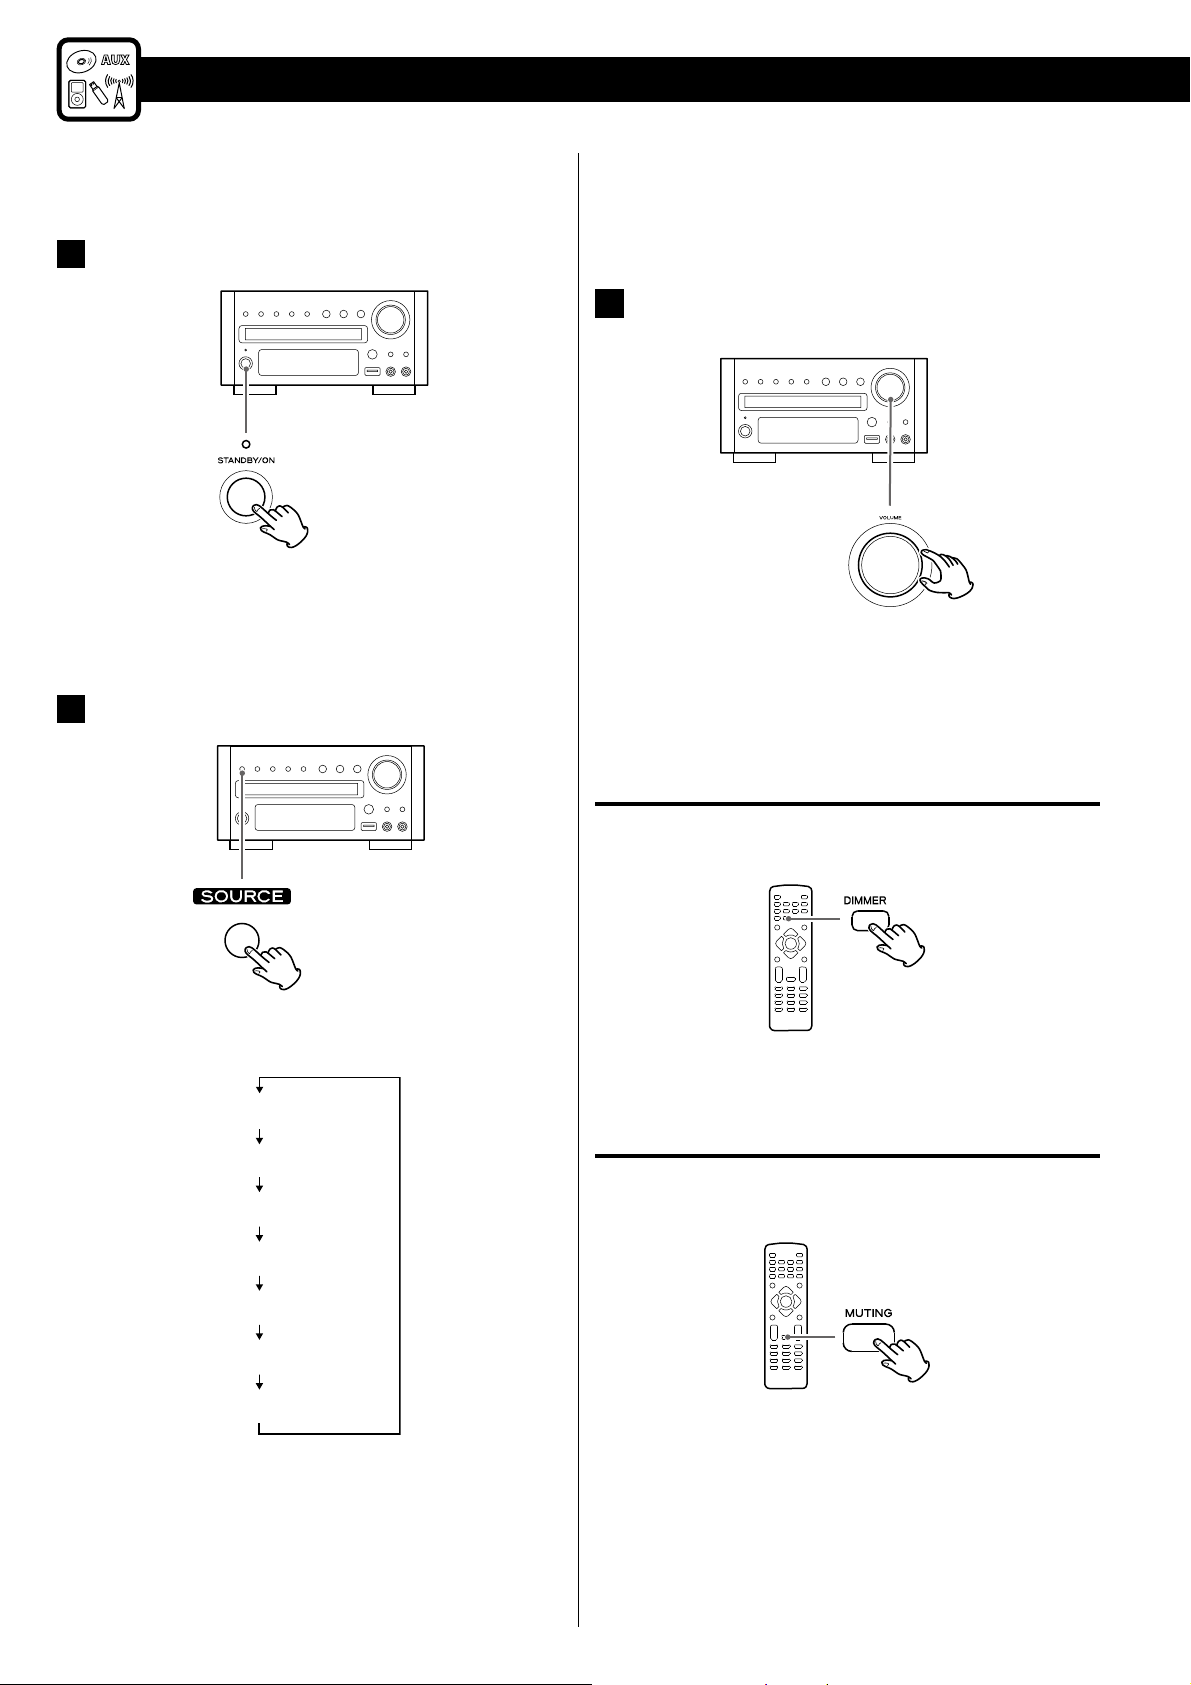
Press the STANDBY/ON button to turn the unit on.
1
< The unit turns on with the source that was last selected.
< You can also use the SOURCE button (or the TUNER, DISC, iPod/
USB or AUX button on the remote control unit) to turn the unit
on.
Press the SOURCE button to select a source.
2
< To listen to an external source connected to the AUX IN jack,
select “AUX1” or “AUX2”.
< You can also select “AUX1” or “AUX2” by pressing the AUX button
on the remote control unit once or twice.
Play the source, and adjust the volume using the VOLUME
3
knob.
< You can hold down the VOLUME (+ / –) buttons on the remote
control unit to reduce or bring up the volume continuously.
< When the source is “AUX1” or “AUX2”, if you press the STANDBY/
ON button to turn the unit standby, it will take a few seconds to
stop the sound from connected subwoofer.
Each time the SOURCE button is pressed, the source changes as
follows:
CD
USB
FM RADIO
AM RADIO
(External source)
AUX1
AUX2 (External source)
iPod
The selected source is shown on the display.
< You can also select “FM RADIO” or “AM RADIO” by pressing the
TUNER button on the remote control unit once or twice.
< You can also select “iPod” or “USB” by pressing the iPod/USB
button on the remote control unit once or twice.
Dimmer
You can change the front panel’s display brightness.
Press the DIMMER button to change the brightness among
3levels.
Muting
You can mute the sound temporarily.
Press the MUTING button.
Press the MUTING button again to restore the sound.
< “MUTING” blinks on the display while muting is engaged.
< If you change the volume or source when the sound is muted,
muting is cancelled.
14
Getting Started with an iPod
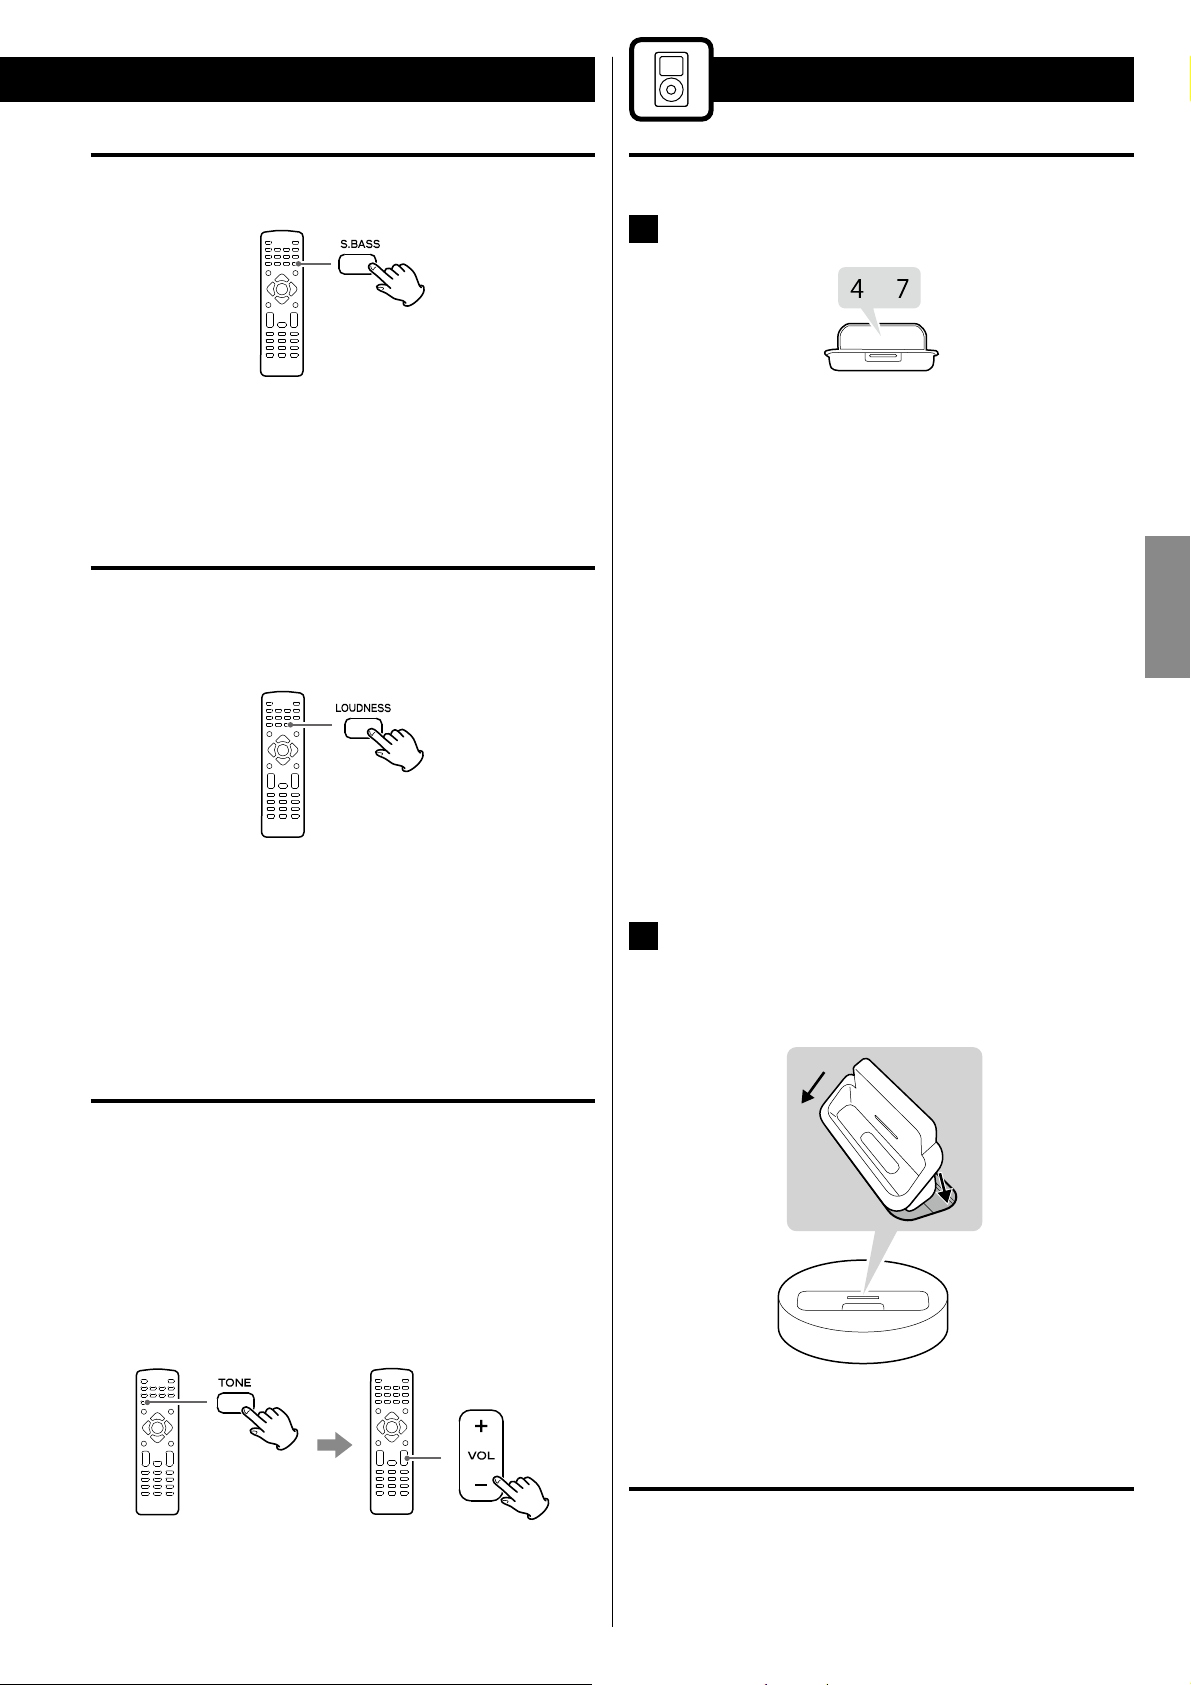
Reinforcing the bass
You can reinforce the bass sound.
Press the S.BASS button.
To cancel the effect, press the S.BASS button again.
< When the LOUDNESS function is set to on, the S.BASS function is
set to off automatically.
Loudness
The loudness of high and low frequency sound is reduced at low
volume. To supplement this hearing loss, turn the loudness function
on. Set this function to off when listening at normal levels.
Setting the dock adapter
Select the dock adapter that fits your iPod.
1
or
No.4 : 20GB + U2
iPod with click wheel 20GB,
iPod with click wheel U2 Special Edition 20GB,
iPod with color display 20/30GB,
iPod with color display U2 Special Edition 20GB,
iPod with video 30GB,
iPod with video U2 Special Edition 30GB,
iPod Classic 80/120GB, 160GB (2009)
No.7 : 60GB(color) + Photo 40/60GB
iPod with click wheel 40GB,
iPod with color display (iPod photo) 40/60GB,
iPod with color display 60GB,
iPod with video 60/80GB,
iPod Classic 160GB (2007)
ENGLISH
Press the LOUDNESS button.
To cancel the effect, press the LOUDNESS button again.
< When the LOUDNESS function is on, the bass and treble sound
level automatically set to “0”. If you want to change the bass and/or
treble sound level, turn the LOUDNESS function off.
< When the S.BASS function is set to on, the LOUDNESS function is
set to off automatically.
Adjusting the bass and treble
You can change the bass and treble sound between “–5” to “+5”.
< If the LOUDNESS function is on, press the LOUDNESS button to
turn it off. (When the LOUDNESS function is on, the bass and treble
sound level automatically set to “0”.)
Press the TONE button repeatedly to select Bass or Treble.
And within 5seconds, press the VOLUME buttons to adjust the
sound level
< If none of the dock adapters supplied with this unit are
compatible with your iPod, use the dock adapter that came with
the iPod or a dock adapter purchased from the Apple Store as an
optional accessory.
Insert the adapter into the TC-X350i dock.
2
Fit the front edge of the adapter into the dock, and then press
the back edge of the adapter onto the dock until a slight “click”
is heard indicating the adapter is inserted correctly.
1
2
The higher the treble number, the more the high frequencies are
emphasized.
The higher the bass number, the more the low frequencies are
emphasized.
< To remove the adapter, hold its left and right sides and gently
pull it up.
Compatible iPod software
If your iPod will not work with the TC-X350i or with the remote control
unit, software update might solve the problem.
15
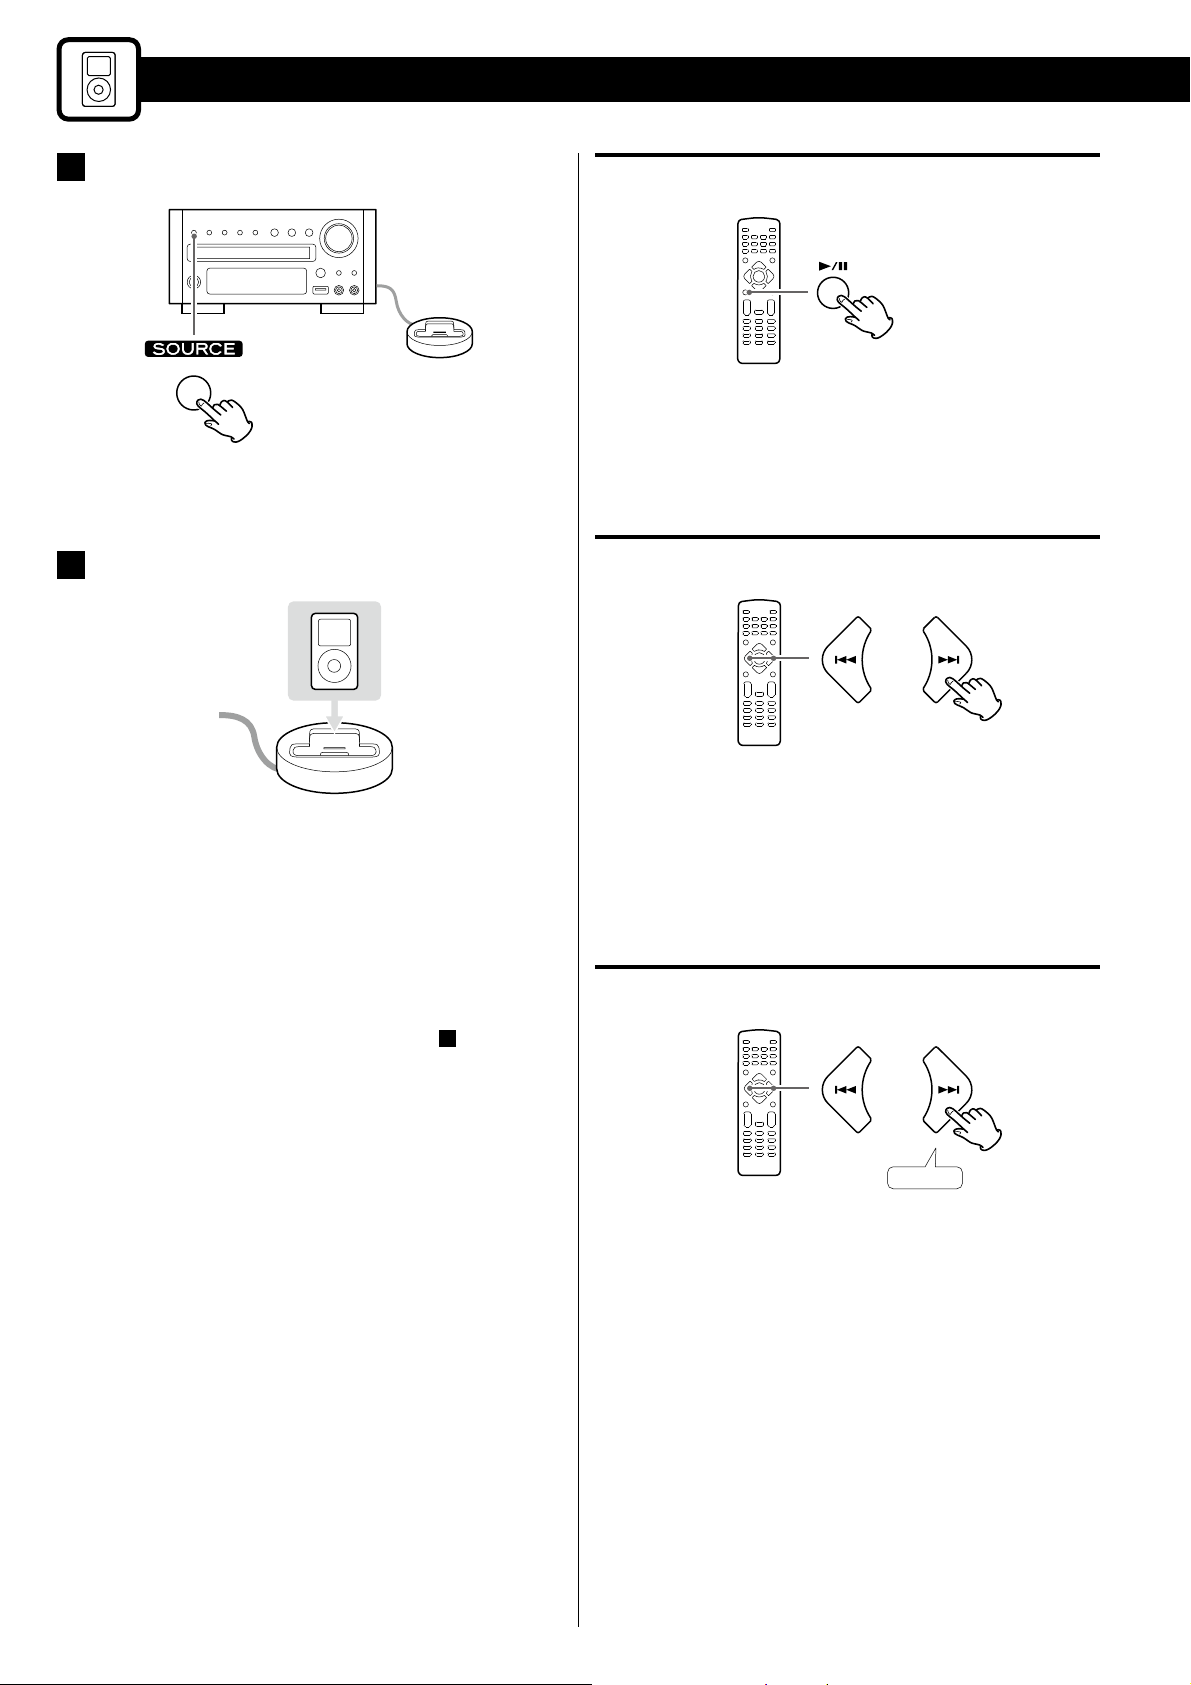
Press the SOURCE button to select “iPod”.
1
Listening to an iPod
Pausing playback temporarily
During playback, press the Play/Pause (G/J) button. Playback
stops at the current position.
< You can also select iPod by pressing the iPod/USB button on the
remote control unit once or twice.
Insert the iPod into the dock.
2
The iPod automatically turns on and the TC-X350i starts playback
from the play list of the iPod.
< When an iPod that is in playback mode is inserted into the dock,
the TC-X350i will automatically turn on and start playback of the
iPod.
< When headphones are plugged into the iPod, sound comes
from both the speakers and the headphones.
< The video signal from a connected iPod can be output from the
VIDEO OUT terminal of the TC-X350i
(pages8, 9 D )
.
< To resume playback, press the Play/Pause (G/J) button again.
Skipping to the next or previous song
During playback, press the Skip (.//) buttons repeatedly
until the desired song is found.
< When the Skip (.) button is pressed during playback, the
current song will be played from the beginning. If you want to play
the previous songs, press the Skip (.) button twice or more.
Searching for a part of a song
16
Hold down
During playback, hold down the Skip (.//) button and
release it when the part you want to listen to is found.

Returning to the previous iPod menu
Activating the repeat mode
Press the MENU button.
This button has the same functions as its iPod counterpart.
Selecting a menu item
Press the Search (m/,) buttons to scroll to the menu item
you want, and then press the DISPLAY button.
Press the Repeat ( ) button to change the repeat mode.
Each time the Repeat (
iPod is changed as follows:
< When the iPod is set to repeat one song, the
the display of iPod.
< When the iPod is set to repeat all songs, the
the display of iPod.
) button is pressed, the repeat setting of
AllOne O
Activating the shuffle mode
Press the Shuffle ( ) button to change the shuffle mode.
Each time the Shuffle (
iPod is changed as follows:
) button is pressed, the shuffle setting of
icon appears on
icon appears on
ENGLISH
AlbumsSongs O
< When iPod is set to shuffle songs or albums, the icon appears
on the display of iPod.
17
 Loading...