


 Loading...
4-675-917-11(1)


 User’s Guide

Notice to Users
©2003 Sony Corporation All rights reserved. This manual and the software described herein, in whole or in part, may not be reproduced, translated or reduced to any machine-readable form without prior written approval.
EXCEPT AS SPECIFICALLY SET FORTH IN THE END-USER LICENSE AGREEMENT, SONY CORPORATION PROVIDES THIS MANUAL, THE SOFTWARE AND THE OTHER INFORMATION CONTAINED HEREIN “AS IS” WITH NO WARRANTY AND HEREBY EXPRESSLY DISCLAIMS ANY IMPLIED WARRANTIES OF MERCHANTABILITY, NONINFRINGEMENT OR FITNESS FOR ANY PARTICULAR PURPOSE WITH REGARD TO THIS MANUAL, THE SOFTWARE, OR SUCH OTHER INFORMATION. IN NO EVENT SHALL SONY CORPORATION BE LIABLE FOR ANY INCIDENTAL, CONSEQUENTIAL,
2 OR SPECIAL DAMAGES, WHETHER
BASED ON TORT, CONTRACT, OR OTHERWISE ARISING OUT OF OR IN CONNECTION WITH THIS MANUAL, THE SOFTWARE, OR OTHER INFORMATION CONTAINED HEREIN OR THE USE THEREOF.
THIS DOES NOT AFFECT YOUR STATUTORY RIGHTS.
Sony Corporation reserves the right to make any modification to this manual or the information contained herein at any time without notice.
The software described herein may also be governed by the terms of a separate user license agreement.
This product contains software owned by Sony Corporation and licensed from third parties. Use of such software is subject to the terms and conditions of license agreements enclosed with this product. Software specifications are subject to change without notice and may not necessarily be identical to current retail versions.
Before using this software, please read the accompanying End-User License Agreement which governs use of this software.
•This software or document is protected by copyright, and distributed under licenses restricting its use, copying, and distribution. No part of this software or document may be reproduced in any form by any means and rental of this software may not be allowed without prior authorization of Sony Corporation.
•Sony Corporation assumes no responsibility for any inconvenience caused by misuse or any use not stated in this document.
•The supplied software cannot be used with any device other than those devices specified herein.
•Some mobile communication devices may not work with AIBO EYES due to unique configurations. Sony Corporation assumes no responsibility, in the case that AIBO EYES does not work with such mobile communication devices.
•The specifications of the supplied software are subject to change without notice.
Customer Support
How to contact AIBO Customer Link.
1-800-427-2988 (USA) E-mail address:
aibosupport@info.sel.sony.com
For more information about “AIBO” ERS-210/220 Series (names of parts, settings, “Memory Stick” installation, safety precautions, etc.), please refer to
the “AIBO” ERS-210/220 Series Operating Instructions.
3

This device complies with Part 15 of the FCC Rules. Operation is subject to the following two conditions: (1) This device may not cause harmful interference, and (2) this device must accept any interference received, including interference that may cause undesired operation.
This equipment has been tested and found to comply with the limits for a Class B digital device, pursuant to Part 15 of the FCC Rules. These limits are designed to provide reasonable protection against harmful interference in a residential installation. This equipment generates, uses, and can radiate radio frequency energy and, if not installed and used in accordance with the instructions, may cause harmful interference to radio communications. However, there is no guarantee that interference will not occur in a particular installation. If this equipment does cause harmful interference to radio or television reception, which can be determined by turning the equipment off and on, the user is encouraged to try to correct the interference by one or more of the following measures:
•Reorient or relocate the receiving antenna.
•Increase the separation between the equipment and receiver.
•Connect the equipment into an outlet on a circuit different from that to which the receiver is connected.
•Consult the dealer or an experienced radio/TV technician for help.
You are cautioned that any changes or modifications not expressly approved in this manual could void your authority to operate this equipment.
Safety Information
Warning
•This product is not intended for children under 8 years of age.
•The AIBO wireless LAN card should be attached to AIBO under the supervision of an adult with knowledge of the proper procedure.
4
“Reproduction in whole or in part without written permission is prohibited. All rights reserved.”
“OPEN-R” is the standard interface for the entertainment robot system that Sony is actively promoting. This interface expands the capability of the entertainment robot through a flexible combination of hardware and interchangeable software to suit various applications. “AIBO EYES” conform to OPEN-R version 1.1 (software specifications).
“AIBO,” the AIBO logo  , “OPEN-R” and the OPEN-R logo
  are registered trademarks of Sony Corporation.
“Memory Stick,” “ ” and “


 ” are trademarks of Sony Corporation.
Microsoft, Windows and Direct X are registered trademarks of Microsoft Corporation in the United States and other countries.
All other system names and product names mentioned herein may be the trademarks or registered trademarks of their respective companies.
In this manual, the “™” and “®” marks have been omitted.
•In this manual, the “ERS-210 Series” is referred to as the “ERS-210”, and the “ERS-220 Series” is referred to as the “ERS-220.”
For more information on AIBO, please refer to the following Internet site: |
|
http://www.aibo.com/ |
5 |

Table of Contents |
|
Notice to Users ................................................................................. |
2 |
Welcome to AIBO EYES ................................................................. |
8 |
Setup Procedure |
|
Confirming system requirements ................................................... |
12 |
AIBO’s network setup .................................................................... |
14 |
Network setup procedure ......................................................... |
14 |
If you have a Memory Stick Reader/Writer ............................ |
15 |
AIBO EYES Setup ......................................................................... |
19 |
Using AIBO EYES |
|
Using AIBO with the Energy Station [ERA-201P1]; |
|
Using AIBO off the Energy Station [ERA-201P1] ........ |
30 |
AIBO MAIL ................................................................................... |
32 |
How to write AIBO MAIL ...................................................... |
32 |
Checking and retrieving AIBO MAIL ..................................... |
32 |
Viewing pictures taken by AIBO ................................................... |
33 |
AIBO’s position while taking pictures .................................... |
34 |
Taking pictures on command ................................................... |
35 |
6

Receiving pictures (photos) AIBO took by e-mail JPEG |
|
|
attachments [PHOTO command] ....................................... |
36 |
|
Directly commanding AIBO to take a picture via Voice |
|
|
command ............................................................................ |
38 |
|
Taking periodic pictures at a set interval [WATCH command] .... |
39 |
|
Sending AIBO a message or song .................................................. |
43 |
|
Having the recipient play back AIBO’s message and song |
|
|
[MSG command] ............................................................... |
44 |
|
Playing back the message or song immediately |
|
|
[PLAY command] .............................................................. |
45 |
|
How to record a unique message and Voice Signature ............ |
46 |
|
AIBO e-mail reception notification ............................................... |
47 |
|
|
|
|
Additional Information |
|
|
Notes on use ................................................................................... |
50 |
|
Troubleshooting ............................................................................. |
52 |
|
|
|
|
Appendix |
|
|
Words understandable to AIBO ..................................................... |
58 |
|
List of codes that can be used for AIBO MAIL commands ........... |
60 |
|
AIBO’s eye and tail lights .............................................................. |
62 |
|
Error e-mail examples .................................................................... |
63 |
|
List of “WLANCONF.TXT” parameters ....................................... |
66 |
7 |
 Welcome to AIBO EYES
AIBO EYES is an AIBO-ware application for the AIBO ERS-210/220 Series. This software lets you control AIBO from your PC or a mobile communication device, using e-mail commands.
Controlling AIBO by utilizing AIBO MAIL. (page 32)
To control AIBO, simply send a command via e-mail to AIBO.
AIBO will check e-mails at set intervals, and upon receipt will execute the particular command.
Picture taking by AIBO utilizing your PC or mobile communication
device. (page 33)
AIBO will take pictures upon receipt of AIBO MAIL or automatically at set intervals, and e-mail the picture back to you.
Sending AIBO message. (page 43)
You can send messages or have AIBO play selected songs to family and friends in close proximity of AIBO’s location.
You can pre-record messages as well.
It’s Dad.
click
AIBO alerts you when it receives e-mail. (page 47)
Upon receiving e-mail, AIBOs indicator light will flash.
8
AIBO can receive and send e-mails.
Via Wireless LAN, AIBO is always connected to the Internet so it can receive and send e-mail independent of a PC*.
(*You must be connected to an "always On" broadband connection. For example; Cable modem, DSL, etc.)
Autonomous mode.
You can also enjoy an autonomous AIBO. AIBO plays with its favorite pink ball and communicates with you. When on its Energy Station (separately available), AIBO alarm can function.
Protection of privacy:
With AIBO EYES, multiple users can send photo command mails to AIBO and view the pictures AIBO took. To protect your privacy, use “Private Mode” which allows the following:
•Restriction of Users
AIBO users can be restricted to a maximum of five users.
•User name notification
AIBO will announce the registered user name when notifying you about picture taking or messages via Voice Signature (page 26).
9

10
Setup Procedure
To setup AIBO EYES, follow these procedures:
 Confirm system requirements (page 12) v
 AIBO’s network setup (page 14)
Connect AIBO to a wireless LAN.
v
 AIBO EYES Setup (page 19)
Set up the e-mail address you would like AIBO to check, and register the users of AIBO EYES.
11
 Confirming system requirements
You must have the following systems to use AIBO EYES.
E-mail server
FTTH/ADSL/
CATV line
to Internet
The system must always be connected to the internet.
Either the modem or the access point must have a router function.
PC (connected to a wired LAN)
Modem
Access point |
PC (connected to |
|
a wireless LAN) |
||
for wireless |
||
|
||
LAN |
|
AIBO Wireless LAN
Card ERA-201D1
AIBO EYES “Memory Stick”
|
AIBO Energy Station |
12 |
ERA-210P1 (optional) |
|

Caution
AIBO EYES cannot be used with a USB-type DSL modem.
A PC is used to setup your network settings for AIBO EYES. The PC can be connected to the access point via a wired or wireless connection.
•To connect the PC to an access point via a wireless LAN, the PC must have an IEEE802.11b-compatible wireless LAN adapter.
•A Web browser must be installed.
•You must set up the POP* (receiving) and SMTP (sending) e-mail servers for your e-mail account.
*The POP server must support the UIDL command (for listing IDs of e-mails). For details about the UIDL command, consult your provider.
•The “Memory Stick” Reader/Writer is not required, but it can be used to setup network settings and back up data, etc.
An AIBO Wireless LAN Card ERA-201D1 is also supplied with AIBO EYES ERF-220AP08. For installation with AIBO ERS-210/220 series, refer to the operating instructions for your AIBO Wireless LAN Card.
The Energy Station ERA-210P1 is not required, but it is useful for taking pictures
from a stationary point at a regular interval. When AIBO is on the Energy Station,
13
AIBO will tell the time.
 AIBO’s network setup
To connect AIBO to a wireless LAN, you may need to change the default network settings of the AIBO Wireless LAN Card, PC and the access point.
Network setup procedure
Do you have a Memory Stick Reader/Writer?
A) If you have a Memory Stick Reader/Writer*
You can change the AIBO EYES “Memory Stick” settings directly to match your network.
For settings, see the next page.
*We recommend that you use a Sony Memory Stick Reader/Writer.
B) If you do not have a Memory Stick Reader/Writer
Please change the settings of your PC and access point to match AIBO's default configuration in order to communicate with default setup of the AIBO Wireless LAN Card.
For settings, see the Operating Instructions of the AIBO Wireless LAN Card (“AIBO’s network setup”).
•AIBO EYES can only be used in (A) and (B) of the four network system samples printed in the “Wireless LAN Network System.”
•You cannot continue to use AIBO EYES after you change the settings of your PC and access point to match the default settings of AIBO. Once you have successfully finished the setup, please reset the network to its original setting.
14

If you have a Memory Stick Reader/Writer
You must change the Wireless LAN setting file “WLANCONF.TXT” and adjust to your network.
1 Insert the AIBO EYES “Memory Stick” into the “Memory Stick” Reader/Writer.
2 Copy the wireless LAN settings file “WLANCONF.TXT” in the SAMPLE folder to a parent directory.
Copy “/OPEN-R/SYSTEM/CONF/WLAN/HTML/SAMPLE/WLANCONF.TXT” to “/OPEN-R/SYSTEM/CONF/WLAN/HTML/”.
3 Edit the copied file “WLANCONF.TXT” by using a text editor.
Settings will be different depending if the DHCP server function* is used. The DHCP server function automatically assigns IP addresses to devices within your network.
*For details of the DHCP sever function, see the instructions of your modem or access point.
15
Confirm if the DHCP server function is used in the network.
(This procedure is for Windows XP only. For other operating systems, please refer to the software help information.)
1 Click the Start button and select Control-Panel.
2 Select Network & Internet Connections, and Network Connections. 3 Right click Network Connection, and select Properties.
4In "This connection uses the following items" select Internet Protocol (TCP/IP) and click the Properties button.
5Confirm the settings.
If Obtain an IP Address automatically is selected, the DHCP server function is used.
If Use the following IP address is selected, the DHCP server function is not used.
In this case, you must enter the IP address manually as follows:
Record the PC IP address that is displayed, and then change it to the AIBO IP address to avoid IP address duplication within the network.
Example: PC IP adress: |
192.168.0.10 |
AIBO IP adress: |
192.168.0.11 |
16
1 When the DHCP server function is used in the network
#
# WLAN
#
HOSTNAME=AIBO
ESSID=AIBONET < Set the SSID for Wireless LAN access point (less than 32 characters)
WEPENABLE=1
WEPKEY=AIBO2 < Set the WEPKEY for Wireless LAN access point (less than 5 characters)
APMODE=1
#
#IP network
USE_DHCP=1
#If DHCP is not used (USE_DHCP=0), you need to specify IP
#network configuration.
#
#USE_DHCP=0 #ETHER_IP=192.168.0.11 #ETHER_NETMASK=255.255.255.0 #IP_GATEWAY=192.168.0.1 #DNS_SERVER_1=192.168.0.1
#
# SSDP
#
SSDP_ENABLE=1
For each parameter, refer to “List of WLANCONF.TXT parameters” on page 64.
17

2 When the DHCP server function is not used in the network
#
# WLAN
#
HOSTNAME=AIBO
ESSID=AIBONET < Set the SSID for Wireless LAN access point (less than 32 characters).
WEPENABLE=1
WEPKEY=AIBO2 < Set the WEPKEY for Wireless LAN access point (less than 5 characters).
APMODE=1
#
#IP network
#USE_DHCP=1
#If DHCP is not used (USE_DHCP=0), you need to specify IP
#network configuration.
#
USE_DHCP=0 |
< Delete # at the head of the line. |
ETHER_IP=192.168.0.11 |
< Enter the AIBO IP address*. |
ETHER_NETMASK=255.255.255.0 |
< Enter the sub-net mask for AIBO. |
IP_GATEWAY=192.168.0.1 |
|
|
Enter the IP address for the router. |
|
|
|
|||
DNS_SERVER_1=192.168.0.1 |
|
|
|
|
|
|
|
||
#
# SSDP
#
SSDP_ENABLE=1
* For confirming the AIBO IP address, refer to page 16.
Lines that start with a sharp symbol (#) are recognized as a comment line and are thus ignored.
For each parameter, refer to “List of WLANCONF.TXT parameters” on page 64.
18
 AIBO EYES Setup
After the network setting is completed, you must now register the e-mail address AIBO will check, along with the registration of AIBO EYES users. When using AIBO EYES in “Private Mode” (page 24), you can register up to five users that can communicate via e-mail with AIBO. Setup is performed by using a Web browser.
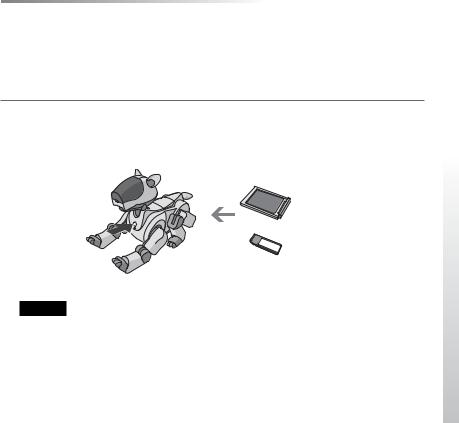
1 Insert the AIBO Wireless LAN Card and AIBO EYES “Memory Stick” into AIBO, and press the chest pause button on AIBO to activate AIBO.
|
AIBO Wireless LAN Card |
Pause button |
ERA-201D1 |
|
|
|
AIBO EYES “Memory Stick” |
Caution
After you set up the network, if you don’t have an AIBO Wireless LAN Card inside AIBO and you activate it, the network settings will reset to the default settings (“/OPEN- R/SYSTEM/CONF/WLAN/HTML/WLANCONF.TXT” file is deleted). In this case, you will need to perform AIBO’s Network Setup procedure again.
19

2 Confirm AIBO’s IP address.
When the “Universal Plug & Play” setting is ON under Windows XP/Windows Me environment, this step is unnecessary.
An AIBO icon will appear in the “My Network Places” folder. Double-click the AIBO icon to show “AIBO EYES TOP PAGE”, and then go step 4.
The method for confirming the IP address will vary, depending on whether your network has a DHCP server function or not (page 16).
When the DHCP server function is used in your network:
1Start the Web browser on the PC and access the equipment being used as the router (modem or access point. Refer to your router operation
manual.)
2Confirm AIBO’s IP address.
For further details, refer to the instruction manual of the equipment being used as the router.
When the DHCP server function is not used in your network:
Remember the AIBO IP address entered manually at “ETHER_IP” in “WLANCONF.TXT” (page 18).
20
3 Start up the Web browser, and access the URL shown below.
http://XXX.XXX.XXX.XXX
Type in the AIBO IP address confirmed in step 2. (for example; 192.168.0.11)
The AIBO EYES TOP PAGE appears.
4 Click “AIBO Owner Setup”.
The AIBO EYES OWNER SETUP window appears.
21
Loading...