


Contents
1 |
Instructions |
50 |
|
|
1.1 |
General safety instructions |
50 |
|
1.2 |
Identification plate |
53 |
|
1.3 |
Manufacturer liability |
53 |
|
1.4 |
Appliance purpose |
53 |
|
1.5 |
Disposal |
53 |
|
1.6 |
This user manual |
54 |
|
1.7 |
How to read the user manual |
54 |
2 Description |
55 |
||
|
2.1 |
General Description |
55 |
|
2.2 |
Control panel |
56 |
|
2.3 |
Controls description |
56 |
|
2.4 |
Side panel |
57 |
|
2.5 |
Available accessories |
57 |
|
2.6 |
Other parts |
58 |
3 Use |
|
59 |
|
|
3.1 |
First use |
59 |
|
3.2 |
First time switching on |
59 |
|
3.3 |
Home screen |
60 |
|
3.4 |
User menu |
60 |
|
3.5 |
Parameters and default values |
62 |
|
3.6 |
Baking modes |
62 |
|
3.7 |
Manual cooking |
62 |
|
3.8 |
Step cooking |
66 |
|
3.9 |
Cooking with a recipe |
68 |
|
3.10 Cooking with the core probe (on some models only) |
72 |
|
|
3.11 Special functions |
75 |
|
|
3.12 Cooking advice |
77 |
|
4 Cleaning and maintenance |
78 |
||
|
4.1 |
Cleaning the appliance |
78 |
|
4.2 |
Cleaning the door |
78 |
|
4.3 |
Cleaning the oven cavity |
81 |
|
4.4 |
Extraordinary maintenance |
83 |
|
4.5 |
If the appliance is not working properly |
86 |
5 |
Installation |
87 |
|
|
5.1 |
Electrical connection |
87 |
|
5.2 |
Water connection |
89 |
|
5.3 |
Positioning |
91 |
TRANSLATION OF THE ORIGINAL INSTRUCTIONS
We advise you to read this manual carefully, as it contains all the instructions for maintaining the appliance’s aesthetic and functional qualities. For further information on the product: www.smegfoodservice.com
EN
49

Instructions
1 Instructions
1.1 General safety instructions
Risk of personal injury
•During use the appliance and its accessible parts become very hot.
•Never touch the heating elements during use.
•Keep children under the age of eight at a safe distance unless they are constantly supervised.
•Children must never play with the appliance.
•Never try to put out a fire or flames with water: Turn off the appliance and smother the flames with a fire blanket or other appropriate cover.
•Keep the oven door closed during cooking.
•Protect your hands by wearing oven gloves when moving food inside the oven.
•Do not touch the heating elements inside the oven.
•Do not pour water directly onto very hot trays.
•Do not allow children to approach the appliance when it is in operation.
•If you need to move food or at the end of cooking, open the door 5 cm for a few seconds, let the steam come out, then open it fully.
•WARNING: opening the door during or after cooking can let out hot steam.
•Cleaning and maintenance must not be carried out by unsupervised children.
•Do not spray any spray products near the appliance.
•Do not use or leave flammable materials near the appliance.
•Do not use plastic cookware or containers when cooking food.
•Do not put sealed tins or containers in the oven.
•Do not leave the appliance unattended during cooking operations where fats or oils could be released.
•Remove all trays and racks which are not required during cooking.
•Do not insert pointed metal objects (cutlery or utensils) into the slots in the appliance.
•Switch off the appliance immediately after use.
•Do not modify this appliance.
50

Instructions
•Have qualified personnel carry out installation and assistance interventions according to the standards in force.
•Do not try to repair the appliance yourself or without the intervention of a qualified technician.
•If the power supply cable is damaged, it must be replaced by the manufacturer, by Technical Support or other qualified personnel in order to ensure a hazard is not created.
•Do not place containers with liquids or food products which can melt during cooking on the upper shelves which are not visible.
•Do not touch the metal tip of the temperature probe after cooking.
•The floor next to the appliance could be very slippery. Be very careful.
•The terminal indicated by the 
symbol links up parts that are normally earthed. Connect the appliances appropriately using this terminal in order to make sure that they are equipotential.
• |
Have the electrical connection |
|
|
performed by authorised technical |
|
|
personnel. |
|
• The appliance must be connected |
EN |
|
|
to ground in compliance with |
|
|
|
|
|
electrical system safety standards. |
|
|
|
|
• Disconnect the mains power |
|
|
|
supply. |
|
• Do not pull the cable to remove |
|
|
|
the plug. |
|
• Use H07RN-F cables that can |
|
|
|
withstand a temperature of at least |
|
|
75°C. |
|
• |
The tightening torque of the |
|
|
screws of the terminal supply wires |
|
|
must be 1.5 - 2 Nm. |
|
Risk of damaging the appliance
•Racks and trays have to be inserted into the side guides until they come to a complete stop. The mechanical safety locks that prevent the rack from being taken out accidentally must face downwards and towards the back of the appliance.
•Do not seat on the appliance.
•Do not use abrasive or corrosive detergents (e.g. scouring powders, stain removers and metallic sponges) on glass parts.
51

Instructions
•Do not use steam jets to clean the appliance.
•Do not obstruct ventilation openings and heat dispersal slots.
•Never leave the appliance unattended during cooking operations where fats or oils could be released.
•Never leave objects on the cooking surface.
•Do not use the appliance to heat rooms for any reason.
•Remove any food residues or large spills from previous cooking operations from the inside of the oven.
•Do not cover the bottom of the oven cavity with aluminium or tin foil sheets.
•If you wish to use greaseproof paper, place it so that it will not interfere with the hot air circulation inside the oven.
•Do not place pans or trays directly on the bottom of the oven cavity.
•Do not pour water directly onto very hot trays.
•Do not leave the temperature probe in the oven cavity when it is not in use.
•Do not use cleaning products containing chlorine, ammonia or bleach on parts made of steel or that have metallic surface finishes (e.g. anodizing, nickelor chromium-plating).
•Do not use abrasive or corrosive detergents (e.g. scouring powders, stain removers and metallic sponges) on glass parts.
•Do not use rough or abrasive materials or sharp metal scrapers.
•Shut off the power supply during cleaning and maintenance procedures.
•A fixed electrical connection must incorporate a means of electrical isolation per electrical wiring code.
For this appliance
•Do not rest any weight or sit on the open door of the appliance.
•Take care that no objects are stuck in the doors.
•Have the condition of the components checked regularly by Technical Support.
•The A-weighted sound pressure level is below 70 dB (A).
52

Instructions
1.2 Identification plate
• The identification plate bears the technical data, serial number and brand name of the appliance. Do not remove the identification plate for any reason.
1.3 Manufacturer liability
The manufacturer declines all liability for damage to persons or property caused by:
•Use of the appliance other than that specified
•Failure to comply with the instructions in the user manual
•Tampering with any part of the appliance
•Use of non-original spare parts.
1.4 Appliance purpose
This appliance is intended for cooking food in the professional catering environment. Every other use is considered improper.
This appliance must not be used by people (including children) of reduced physical or mental capacity, or lacking in experience in the use of electrical appliances, unless they are supervised or instructed by adults who are responsible for their safety.
1.5 Disposal
This appliance must be
disposed of separately from other waste (Directives
2002/95/EC, 2002/96/EC, 2003/108/EC). The appliance does not contain substances in quantities sufficient to be considered hazardous to health and the environment, in accordance with current European directives.
To dispose of the appliance:
• Cut the power supply cable and remove it along with the plug.
Power voltage
Danger of electrocution
•Disconnect the mains power supply.
•Unplug the appliance.
EN
53
Instructions
• Deliver the appliance to the appropriate recycling centre for electrical and electronic equipment waste, or return it to the retailer when purchasing an equivalent product, on a one for one basis.
Our appliances are packaged in non-polluting and recyclable materials.
• Deliver the packing materials to the appropriate recycling centre.
Plastic packaging
Danger of suffocation
•Do not leave the packaging or any part of it unattended.
•Do not let children play with the plastic bags.
1.6 This user manual
This user manual is an integral part of the appliance and must therefore be kept in its entirety and within the user’s reach for the whole working life of the appliance.
Read this user manual carefully before using the appliance.
1.7 How to read the user manual
This user manual uses the following reading conventions:
Instructions
General information on this user manual, on safety and final disposal.
Description
Description of the appliance and its accessories.
Use
Information on the use of the appliance and its accessories,
cooking advice.
Cleaning and maintenance
Information for proper cleaning and maintenance of the appliance.
Installation
Information for the qualified technician: Installation, operation and inspection.
Safety instructions
Information
Advice
1. Sequence of instructions for use.
• Standalone instruction.
54
Description
2 Description
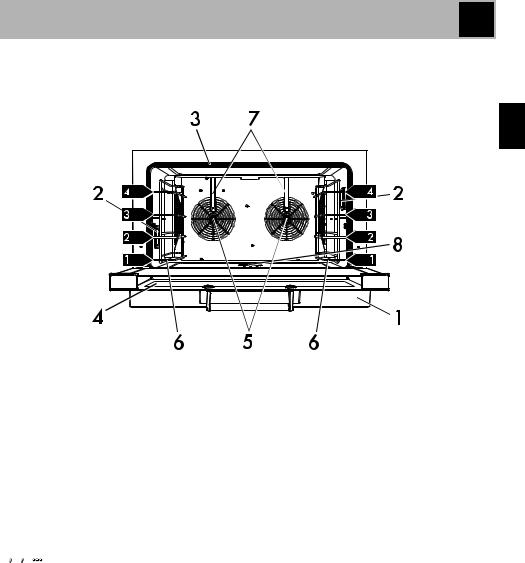
2.1 General Description
EN
1 Control panel
2 Oven lights
3 Seal
4 Door
5 Fans
6 Tray support frames
7 Water intake line
8 Washing water drain (on some models only)  Frame shelf
55
Description
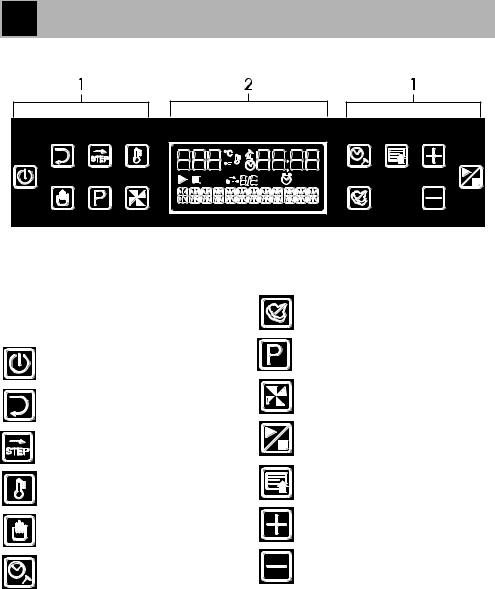
2.2 Control panel
1 Backlit capacitive buttons
2 LCD display and icons
2.3 Controls description
Backlit capacitive buttons
On / Stand-by
Back / previous screen
Step cooking mode
Temp set
Manual cooking
Time settings / Core probe cooking
Humidification
Cooking with a recipe
Fan speed adjustment
Start / end cooking - next screen
Settings menu / save
Increase
Decrease
56

Description
LCD display and icons |
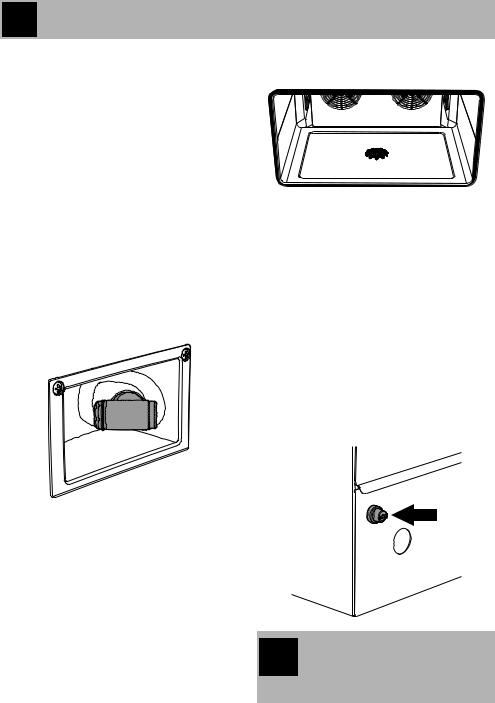
2.4 Side panel |
Alphanumeric display |
|
Temperature and units of |
EN |
measure display |
|
Time display/Core |
|
probe temperature |
|
Step cooking icon and |
|
display |
|
Cooking in progress |
The side panel is located close to the |
|
bottom left corner on the right hand side of |
Stop cooking |
the appliance. |
|
Core probe |
1 Core probe socket (on some |
|
models only). |
||
|
||
Core probe with Δt |
2 USB port. |
|
Cooking duration |
2.5 Available accessories |
|
|
||
|
Core probe (optional, on some models |
|
Delayed start |
only) |
|
|
Using the core probe, it is possible to cook according to the temperature measured at the centre of the food.
57
Description
2.6 Other parts
Shelves
The appliance features shelves to position trays and racks at different heights. The insertion heights are indicated from the bottom upwards (see “General Description”).
Internal ventilation
The internal fans (together with the heating elements) are switched on and off according to the baking mode selected. Depending on the model, the speed of the fans can also be adjusted during cooking.
Retractable spray head (on some models only)
To make cleaning easier, the appliance is fitted with a water spray head located in a special compartment on the right hand side.
Washing water drain (on some models only)
The appliance is fitted with a system for draining the washing water. It is located in the centre of the bottom of the oven and protected by a perforated grille.
Safety thermostat
The appliance is equipped with a safety device that triggers in case of serious malfunction.
Only for the installer/technical support:
1.Unscrew the protective cover for the thermostat with the dedicated tool.
2.To reset the safety thermostat, press the button on the back.
Contact Technical Support immediately after the safety device has triggered to check if there are any faults.
58
Use
3 Use
3.1 First use
1.Remove any protective film from the outside or inside of the appliance, including accessories.
2.Remove any labels (apart from the technical data plate) from the accessories and from the oven cavity.
3.Remove and wash all the appliance accessories (if fitted) (see “Cleaning and maintenance”).
4.Heat the empty oven at the maximum temperature to burn off any residues left by the manufacturing process.
3.2 First time switching on
The oven is designed for a maximum load of 12 kg.
When the appliance is connected to the mains power socket, all the LEDs and the buttons on the display light up for approximately 3 seconds.
When finished, only the 

 button (standby screen) appears on the display.
Setting the language
The factory default language setting is English.
1.From the stand-by screen, press the 

 button.
2.Press  /
/ to select a language.
3.Press  to confirm.
Setting the time, date and stand-by display
• |
“Set time” will appear on the |
|
||
|
alphanumeric display. |
EN |
||
• |
Use the |
button to return to the |
||
|
||||
previous screen.
1. “00:--” appears on the time display. Use the  /
/ buttons to adjust the hours.
2. Press 
 to continue.
3.“Set minutes” will appear on the alphanumeric display.
4.”--:00” appears on the time display. Use
the  /
/ buttons to adjust the minutes.
5. Press 
 to continue.
The same procedure is used to set the current year, month and day in sequence:
• “Set year”, “Set month” and “Set day” will appear in sequence on the display.
• Use the  /
/ buttons to set the year, month and day.
• Use the 

 button to confirm each time you set the required value.
After setting the time and date, you then have to select the stand-by display mode:
• “Stand-by with clock” or “Stand-by without clock” will appear on the display.
1. Use the  /
/ buttons to select an option.
59

Use
2. Press the  button to confirm and return to the stand-by display mode that was selected.
The default setting is for cooking to start automatically after the food has been placed in the oven and the door closed (see “User menu”).
3.3 Home screen
From the home screen, the control panel returns to stand-by mode after 30 minutes of inactivity.
After having entered the first settings, press
the 

 button to switch from stand-by
mode to the home screen, from where you can select the baking mode:
•“Baking type selection” will appear on the display.
•The  button allows you to access the user menu (see “User menu”).
•The 
 button appears only when the
internal temperature of the appliance reaches 60°C to allow the cooling function.
60
3.4 User menu
From the home screen, press the  button for at least 1 second; “User menu” will be displayed. Press the
  and
and  buttons
to display the basic appliance management options. Press  to confirm
the selection or 

 to return to the home screen.
Baking start
When using the “Automatic” option, after having set the cooking parameters, cooking will start automatically after the food has been placed in the oven and the door closed. If the “Manual” option is used, you
have to press the  button to start cooking.
Download
This option allows a file to be created, and copied to a USB device, that stores all the events and the actions that the appliance has performed. This can be used by technical support to identify errors and faults.
•“Insert USB press play” appears on the display.
3. Insert a USB device and press  .
.
•  and “Data download in
progress” appear on the temperature display.
• When the download has been completed, the appliance will emit 4 beeps and “Data download ok” will appear, after which you are taken back to the home screen.
4. Remove the USB device.

Use
Load Recipes
This option can be used to transfer recipes created on another oven, of an identical model, and to load them via the USB port.
Set time
This option allows you to change the current date and time. The procedure is the same as for setting the date and time when the appliance is switched on for the first time (see “First time switching on”).
Display time
This option allows you to select whether to display the time on the stand-by screen. The procedure is the same as the one for the stand-by display when the appliance is switched on for the first time (see “First time switching on”).
Setting the language
This option is used for modifying the current language used by the system. Press the
 /
/ buttons to scroll through the
available languages and  to confirm.
LCD contrast
This option allows you to adjust the brightness of the LCD display and the relative icons. There are 8 levels available
that can be selected using the  and
and 
buttons. Press  to confirm the choice or


 to return to the user menu.
Button LEDs
This option is used to adjust the brightness of the backlit buttons at the sides of the display. There are 4 levels available that
can be selected using the |
and |
EN |
buttons. Press  to confirm the choice or

 to return to the user menu.
Recipes protection
This option can be used to set a password to prevent the recipes from unwanted
modifications. When you press the 
button, “Password” appears and the time display shows options  or
or


 that can be selected using the
  and
and  buttons. If you wish to set a
password, select “YES” and enter the password following the procedure described in section 3.8 (see “Changing an existing recipe”). Lastly, confirm with the
 button to return to the user menu.
61

Use
3.5 Parameters and default values
Parameter |
Default value |
|
|
|
|
Convection |
170°C |
|
Temperature |
||
|
||
|
|
|
Hold temperature |
80 °C |
|
|
|
|
Cooling Threshold |
60 °C |
|
|
|
|
Humidity Threshold |
130 °C |
|
|
|
|
Fan speed |
|
|
(depending on the |
High speed |
|
model) |
|
|
|
|
|
Humidity Level |
OFF (level 0) |
|
|
|
|
Language |
English |
|
|
|
|
Preheating |
On |
|
|
|
|
Start cooking when |
Automatic |
|
the door is closed |
||
|
||
|
|
|
Modify recipe |
Disabled |
|
password |
||
|
||
|
|
3.6 Baking modes
The appliance has three baking modes: 1 Manual cooking (

 button).
2 Step cooking (

 button).
3 Cooking with a recipe (

 button).
3.7 Manual cooking
Whenever a parameter is set or changed, it has to be confirmed by pressing the corresponding flashing button within 10 seconds, otherwise the default value or the previously confirmed value will be used.
From the home screen, press 

 :
:
•The names of the available functions will appear on the display.
1 Convection
This is the main function and the one that allows the food to be cooked using the heating elements and fans.
2 Cooling
This function allows the cavity to be cooled using the internal fans.
3 Hold warm
This function allows you to maintain a constant temperature inside the appliance for a certain period of time.
4 Delayed start
This function allows you to delay the start of cooking or to bring the appliance to the correct temperature before a certain time and to keep it at that temperature.
•Use the 

 button to return to the home screen.
•Use the  /
/ buttons to select a function.
62
 Loading...