


IMPORTANT: |
IMPORTANT : |
IMPORTANTE: |
Read Before Using |
Lire avant usage |
Leer antes de usar |
|
|
|
Operating/Safety Instructions
Consignes de fonctionnement/sécurité
Instrucciones de funcionamiento y seguridad
8601-RL
Call Toll Free for Consumer Information & Service Locations
Pour obtenir des informations |
Llame gratis para |
et les adresses de nos centres |
obtener información |
de service après-vente, |
para el consumidor y |
appelez ce numéro gratuit |
ubicaciones de servicio |
|
1-877-SKIL999 (1-877-754-5999) |
www.skil.com |
|
|
|
|
|
|
|
|
For English Version |
Version française |
Versión en español |
|
|
See page 3 |
Voir page 15 |
Ver la página 28 |
|
|
|
|
|
|
3 1
2  7
7
5 
6 |
6 |
8
4
-2-
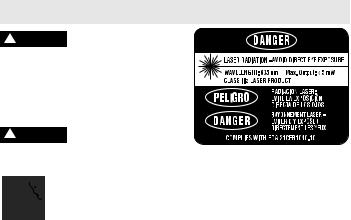
General Safety Rules
! DANGER LASER RADIATION. AVOID DIRECT EYE EXPOSURE.
DO NOT stare into the laser light
source. Never aim light at another
person or object other than the workpiece. Laser light can damage your eyes.
Read all instructions. Failure to follow all
instructions listed below may result in electric shock, fire and/or serious injury.
Do not direct the laser beam at persons or animals and do not stare into the laser beam yourself. This tool produces laser class IIIa laser radiation and complies with 21 CFR 1040.10 and 1040.11 except for deviations pursuant to Laser Notice No. 50, dated June 24, 2007. This can lead to persons being blinded.
Changes or modifications to this equipment not expressly approved by the party responsible for compliance could void the user's authority to operate the equipment.
CAUTION Use of controls or adjustments or performance of procedures other than those specified herein may result in hazardous radiation exposure.
DO NOT remove or deface any warning or caution labels. Removing labels increases the risk of exposure to laser radiation.
Use of controls or adjustments or performance of procedures other than those specified in this manual, may result in hazardous radiation exposure.
ALWAYS make sure that any bystanders in the vicinity of use are made aware of the dangers of looking directly into the laser tool.
DO NOT place the laser tool in a position that may cause anyone to stare into the laser beam intentionally or unintentionally. Serious eye injury could result.
ALWAYS position the laser tool securely. Damage to the laser tool and/or serious injury to the user could result if the laser tool fails.
-3-

ALWAYS use only the accessories that are recommended by the manufacturer of your laser tool. Use of accessories that have been designed for use with other laser tools could result in serious injury.
DO NOT use this laser tool for any purpose other than those outlined in this manual. This could result in serious injury.
DO NOT leave the laser tool “ON” unattended in any operating mode.
DO NOT disassemble the laser tool. There are no user serviceable parts inside. Do not modify the product in any way. Modifying the laser tool may result in hazardous laser radiation exposure.
DO NOT the laser viewing glasses as safety goggles. The laser viewing glasses are used for improved visualization of the laser beam, but they do not protect against laser radiation.
DO NOT use the laser viewing glasses as sun glasses or in traffic. The laser viewing glasses do not afford complete UV protection and reduce color perception.
DO NOT use any optical tools such as, but not limited to, telescopes or transits to view the laser beam. Serious eye injury could result.
DO NOT stare directly at the laser beam or project the laser beam directly into the eyes of others. Serious eye injury could result.
SAVE THESE INSTRUCTIONS
Safe Operating Procedures
Work area safety
Keep work area clean and well lit. Cluttered or dark areas invite accidents.
DO NOT operate the laser tool around children or allow children to operate the laser tool. Serious eye injury
could result.
Electrical safety
Batteries can explode or leak, cause injury or fire. To reduce this risk, always follow all instructions and warnings on the battery label and package.
DO NOT short any battery terminals.
DO NOT charge alkaline batteries. DO NOT mix old and new batteries. Replace all of them at the same time with new batteries of the same brand and type.
DO NOT mix battery chemistries. Dispose of or recycle batteries per local code.
DO NOT dispose of batteries in fire.
Keep batteries out of reach of children.
Remove batteries if the device will not be used for several months.
-4-
Personal safety
Stay alert, watch what you are doing and use common sense when operating a tool. Do not use a tool while you are tired or under the influence of drugs, alcohol or medication. A moment of inattention while operating a tool may result in serious personal injury or incorrect measurement results.
Use safety equipment. Always wear eye protection. Safety equipment such as dust mask, non-skid safety shoes, hard hat, or hearing protection used for appropriate conditions will reduce personal injuries.
Use and care
Use the correct tool for your application. The correct tool will do the job better and safer.
Do not use the tool if the switch does not turn it on and off. Any tool that cannot be controlled with the switch is dangerous and must be repaired.
Store idle tool out of the reach of children and do not allow persons unfamiliar with the tool or these instructions to operate the tool. Tools are dangerous in the hands of untrained users.
Maintain tools. Check for misalignment or binding of moving parts, breakage of parts and any other condition that may affect the operation. If damaged, tool repaired before use. Many accidents are caused by poorly maintained tools.
Use the tool, accessories, etc., in accordance with these instructions and in the manner intended for the particular type of tool, taking into account the working conditions and the work to be performed. Use of the tool for operations different from those intended could result in a hazardous situation.
Service
Have your tool serviced by a qualified repair person using only identical replacement parts. This will ensure that the safety of the tool is maintained.
Develop a periodic maintenance schedule for tool. When cleaning a tool be careful not to disassemble any portion of the tool since internal wires may be misplaced or pinched or may be improperly mounted.
Certain cleaning agents such as gasoline, carbon tetrachloride, ammonia, etc. may damage plastic parts.
SAVE THESE INSTRUCTIONS.
-5-

Intended Use
This tool projects rotating and stationary laser points and is intended for accurate transfer and alignment of plumb, level, graded and 90-degree points and lines.
•Plumbing (Making vertical) — Use the tool in the vertical orientation for indoor and outdoor plumb applications, such as plumbing up framing, aligning cabinetry, etc.
•Leveling — Use the tool in the horizontal orientation for indoor and outdoor level applications, such as leveling cabinetry, setting concrete forms, leveling electrical outlets, etc.
•Squaring— The laser beam emitting from the top of the tool is perpendicular to the rotating beam, which provides the ability to use the tool for 90 degree layout functions.
Preparation
Inserting/Replacing the Battery
ALWAYS turn off the laser and the main power switch before removing and replacing
the batteries.
Alkaline batteries are recommended for the tool.
The battery compartment is located on the top of the unit. Open the compartment and replace the batteries.
When inserting, pay attention to the correct polarity according to the representation on the inside of the battery compartment. To unlock the battery lid, turn the
locking screw 2 in a counter-clockwise direction.To lock the battery lid, turn the locking screw 2 in clockwise direction.
Always replace all batteries at the same time. Only use batteries from one brand and with the identical capacity.
•Remove the batteries from the tool when not using it for extended periods. When storing for extended periods, the batteries can corrode and discharge themselves.
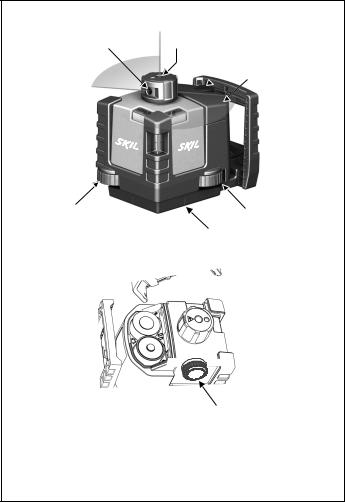
Features
The numbering of the product |
1 Plumb Beam Aperture |
||
features shown refers to the |
2 |
Battery cover locking screw |
|
illustration of the tool on page 3. |
|||
3 |
Laser Aperture |
||
|
|||
-6-
4 ON/OFF, speed adjustment |
Other Features (not shown) |
knob |
9 Protective Case |
5 Bubble Vials |
10 Laser Target |
6 Leveling Screw |
11 Tripod |
7 Battery Compartment |
12 Laser Viewing Glasses |
8 5/8-11 Tripod Mount |
|
|
|
Technical Data |
|
Accuracy |
|
Level & Plumb: |
|
Typical Accuracy |
up to ±3/8” @100ft |
|
(±9mm at 30m) |
Range: |
up to 100-ft (30M) |
Rotation Speed |
0 rpm to 600 rpm +/- 10% |
Leveling Type |
Manual |
Laser Class |
Class IIIa |
Laser Beam Power |
630-670nm, <5mW max. |
Power |
2 ‘D’ alkaline batteries |
Weight |
2.2lb (1.0kg)(including batteries) |
Operating |
41°F to 104°F (5°C to +40°C) |
temperature range |
|
Storage |
-4° F to 158°F (-20°C to +70°C) |
temperature range |
|
Tripod |
5/8-11 |
Dimensions |
6.5” x 5” x 5.5” |
|
|
(165mm x 126mm x 140mm)
-7-

Operation
Initial Operation
•Protect the tool against moisture and direct sun irradiation.
•Do not subject the tool to extreme temperatures or variations in temperature.
As an example, do not leave it in vehicles for longer periods. In case of large variations in temperature, allow the tool to adjust to the ambient temperature before putting it into operation. In case of extreme temperatures or variations in temperature, the accuracy of the tool can be impaired.
•Avoid heavy impact or and prevent the tool from falling.
After heavy exterior impact on the tool, an accuracy check should always be carried out before continuing to work (see “Leveling Accuracy”)
•Switch the tool off during transport. Switch off the leveling unit, which can be damaged in the case of intense movement.
Turning on the Tool
1.Place the tool either horizontally or vertically on a flat surface, or set it on a standard surveyor’s tripod, using the built-in 5/8- 11 tripod mount (located on the bottom of the unit).
2.Turn on the tool with its ON/OFF, speed adjustment knob 4.
Customize the rotation speed of the laser by turning the speed adjustment knob 4 clockwise to increase the speed or counterclockwise to decrease the speed.
•ALWAYS turn off the laser before transporting or storing the unit.
Rotation Mode
The laser beam is dispersed throughout the level or plumb plane. Rotation mode is used under conditions where laser beam visibility is poor or nonexistent (for example, outdoors in daylight). It is not always possible to easily see a rotating laser beam. A laser receiver-detector makes it possible to detect and correctly position the rotation laser indoors or outdoors.
Working Advice
•Always use the center of the laser point for marking. The size of the laser point changes with the distance.
-8-

Leveling Accuracy
Influences on Accuracy
The ambient temperature has the greatest influence. Especially temperature differences occurring from the ground upward can divert the laser beam.
As thermal fluctuation is largest close to the ground, the tool, if possible, should be mounted on a commercially available tripod and placed in the center of the working area. Apart from exterior influences, device specific influences (such as heavy impact or drop) can lead to deviations. Therefore, check the accuracy of the tool each time before starting your work.
Should the tool exceed the maximum deviation during one of the tests, see recalibration procedure or have it recalibrated by a Skil after-sales service center.
Leveling
Level the laser tool using leveling wheels and bubble vials.
Calibration
Although the laser tools are calibrated to specification before leaving the factory, they contain many precision-machined parts that may be affected if subject to abuse. Therefore, if a unit is dropped or sustains significant impact, check its calibration. It is also recommended that the tool be periodically calibrated, as a normal maintenance procedure.
To Calibrate the Laser:
1.Select a site for calibration that allows the unit to be placed about 50 ft. (15m) away from a smooth vertical surface, such as a wall.
2.Set the unit on a level surface at one end of the range.
3. Position the unit so that the front of the instrument is perpendicular to the target.
4.Using the leveling wheels, center both horizontal vials, paying particular attention to the vial perpendicular with your target.
Note: Allow 5-10 seconds for the bubble to settle before reading the bubble vial and adjust as needed.
5.Without disturbing the laser unit, point the beam to the target until the beam hits your target (vertical surface).
-9-
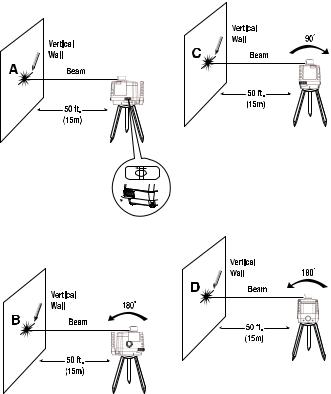
6.Walk to the target and mark the height of the beam, record as "A".
7.Return to the unit and rotate it 180 degrees without disturbing its platform.
8. Repeat Step #4.
9.Repeat Step #5.
10.Walk to the target and mark the height of the beam. Record as "B".
11.Return to the unit and rotate it 90 degrees on its platform.
12. Repeat Step #4.
13. Repeat Step #5.
14.Walk to the target and mark the height of the beam. Record as "C".
15.Return to the unit and rotate it 180 degrees on its platform.
16.Repeat Step #4.
17.Repeat Step #5.
18. Walk to the target and mark the height of the beam. Record as "D".
Calibration error calculation =
Vial #1 = (Distance between "A" and "B")/2
-10-

Vial #2 = (Distance between "C" and "D")/2
Note: Calibration error should not exceed 1/4" (6.4mm) @ 100'
(30m). If the unit does exceed 1/4" (6.4mm) @ 100' (30m) please call Skil Customer Service
at 1-877-754-5999.
|
Applications |
Level (Carpentry) |
Square (Concrete) |
|
|
|
|
|
|
|
|
|
|
|
|
|
|
|
|
|
|
|
|
|
|
|
|
|
|
|
|
|
|
|
|
|
|
|
|
|
|
|
|
|
|
|
|
|
|
|
|
|
|
|
|
|
|
|
|
|
|
|
|
|
|
|
|
|
|
|
|
|
|
|
|
|
|
|
|
|
|
|
|
|
|
|
|
|
|
|
|
|
|
|
|
|
|
|
|
|
|
|
|
|
|
|
|
|
|
|
|
|
|
|
|
|
|
|
|
|
|
|
|
|
|
|
|
|
|
|
|
|
|
|
|
|
|
|
|
|
|
|
|
|
|
|
|
|
|
|
|
|
|
|
|
|
|
Level (Drop Ceiling) |
|
Level (Framing) |
|
||||||||||||
|
|
|
|
|
|
|
|
|
|
|
|
|
|
|
|
|
|
|
|
|
|
|
|
|
|
|
|
|
|
|
|
|
|
|
|
|
|
|
|
|
|
|
|
|
|
|
|
|
|
|
|
|
|
|
|
|
|
|
|
|
|
|
|
|
|
|
|
|
|
|
|
|
|
|
|
|
|
|
|
|
|
|
|
|
|
|
|
|
|
|
|
|
|
|
|
|
|
|
|
|
|
Plumb (Carpentry) |
Plumb (Framing) |
-11-

Use with Accessories
Working with Tripod
A tripod 11 offers a stable, heightadjustable measuring support. Place the tool via the tripod mount 8 onto the 5/8-11 male thread of the tripod and screw the locking screw of thetripod tight.
Working with the Laser Target
With the laser target 10, it is possible to project the laser mark onto the floor or the laser height onto a wall.
The red acrylic used in the laser target enhances the laser beam, making the laser dot more visible.
With the zero field and the scale, the offset or drop to the required height can be measured and projected at another location. This eliminates the necessity of precisely adjusting the tool to the height to be projected.
The laser target 10 has a reflective coating that enhances the visibility of the laser beam at greater distances or in intense sunlight. The brightness intensification can be seen only when viewing, parallel to the laser beam, onto the laser target.
Laser Viewing Glasses
The laser viewing glasses filter out the ambient light. This makes the red light of the laser appear brighter for the eyes.
The red plastic used in the glasses enhances the laser beam, making the laser dot more visible. These glasses are particularly useful when using the laser tool outdoors or in brightly lit environments.
•Do not use the laser viewing glasses as safety goggles. The laser viewing glasses are used for improved visualization of the laser beam, but they do not protect against laser radiation.
•Do not use the laser viewing glasses as sun glasses or in traffic. The laser viewing glasses do not afford complete UV protection and reduce color perception.
Working with Wall Mount
The durable metal wall mount provides a flexible, yet sturdy means of positioning the tool in the desired location.
1.Determine the approximate height at which the laser beam will need to be project.
2.Choose the surface on which the mount will be attached, wall, T-bar framing or beam.
3. Secure the mount to the mounting surface
When mounting to a wall, drive two or three study screws into the wall with at least one driven into a stud. Make sure the screw heads are wide than the upper end of the screw openings.
-12-
 Loading...