


9210

9210

CAUTION!
POLARIZED PLUG FOR NORTH AMERICAN TERRITORIES
To reduce the risk of electric shock, this appliance has a polarized plug
(one blade is wider than the other). This plug will fit in a polarized outlet
only one way. If the plug does not fit fully in the outlet, reverse the plug.
If it still does not fit, contact a qualified electrician to install the proper
outlet. Do not change the plug in any way.

IMPORTANT SAFETY INSTRUCTIONS
When using this machine, basic safety precautions should always be followed including
the following:
Read all instructions before using this machine.
DANGER.
To reduce the risk of electric shock:
■The machine should never be left unattended when plugged in. Always unplug the
machine from the electric outlet immediately after using and before cleaning.
■ Always unplug before changing light bulb. Replace bulb with the same type rated 12
volts, 5 watts. Be sure to replace the face plate which covers the light bulb before
operating the machine.
WARNING.
To reduce the risk of burns, fire, electric shock or injury to persons:
■ Be sure that the electrical voltage of the socket outlet (wall receptacle) Is the same
as the rated voltage of the motor.
■ Use this machine only for its intended use as described in this Operator’s Guide. Use
only attachments recommended by the manufacturer as contained in the Operator’s
Guide.
■To disconnect, turn all controls to the off ("O") position, then remove plug from outlet.
■ Disconnect the power-line plug from the socket outlet or switch the machine off when
making any adjustments in the needle area, such as threading needle, changing nee
dle, changing needle plate or changing presser foot, etc.
■ Always unplug the machine from the electrical outlet when removing covers, lubricat
ing, or when making any other user servicing adjustments mentioned in the
Operator’s Guide.
■ Do not attempt to adjust the motor belt. Contact your nearest Service Center should
any adjustment be required.
■ Do not unplug by pulling on cord. To unplug, grasp the plug, not the cord.
■ Handle the foot controller with care and avoid dropping it on the floor. Be sure not to
place anything on top of It.
■ Always use the proper needle plate. The wrong plate can cause the needle to break.
■ Do not use bent needles.
■ When sewing, keep fingers away from all moving parts. Special care is required
around the sewing machine needle.
■ Do not pull or push fabric while stitching. This may deflect the needle causing it to
break.
■ Before removing the bobbin case, remove plug from the socket outlet.
■For double insulated machines, when servicing, use only identical Singer replacement
parts. See instructions for Servicing of Double-insulated Appliances.
■ Never operate the machine if it has a damaged cord or plug, if it Is not working
properly. If it has been dropped or damaged, or dropped Into water. Return the ma
chine to the nearest authorized dealer or Service Center for examination, repair, elec
trical, or mechanical adjustment.
I Never operate the machine with any air openings blocked. Keep ventilation openings
of the machine and foot controller free from the accumulation of lint, dust, and losse
cloth.
I Never drop or Insert any object into any opening.
I Do not use outdoors.
I Do not operate where aeroslo (spray) products are being used or where oxygen Is be
ing administered.
I Do not allow to be used as a toy. Close attention is necessary when the machine is
used by or near children.
¡SERVICING OF DOUBLE-INSULATED PRODUCTS. In a double-insulated product, two
systems of insulation are provided instead of grounding. No grounding means is pro
vided on a double-insulated product, nor should a means for grounding be added to
the product. Servicing of a double-insulated product requires extreme care and
knowledge of the system, and should be done only by qualified service personnel. Re
placement parts for a double-insulated product must be identical to those parts in the
product. A double-insulated product' is marked with the words "DOUBLE
INSULATION" or "DOUBLE-INSULATED".
SAVE THESE INSTRUCTIONS
Servicing should be performed by an authorized service representative.
This product is intended for household use.
FOR EUROPEAN AND SIMILAR TERRITORIES:
This puoduct Is suppressed for radio and television interference with the international
Electrotechnical Commission requirements of the CISPR.
Machine for Great Britain and some other countries having similar wiring standards
are shipped from the factory with a plug for connection to the mains. The wires in
this mains lead are coloured in accordance with the following code:
Blue.neutral (N) Brown:live (L)
As the colours of the wires In the mains lead of this appliance may not correspond
with the coloured markings identifying the terminals in your plug, proceed as follows:
The wire which is coloured blue must be connected to the terminal which is marked
with the letter N or coloured black. The wire which Is coloured brown must be con
nected to the terminal which is marked with the letter L or coloured red. If a 13 Amp.
(BS 1363) plug is used, a 3 Amp. fuse must be fitted, or If any other type of plug is
used, a 5 Amp. fuse must be fitted either in the plug or adaptor or at the distribution
board. Neither cord is to b^ connected to the earth terminal of a three-pin plug.

TABLE OF CONTENT
PERFORMANCE CHECKLIST
.............................................................................
i
IMPORTANT SAFETY INSTRUCTIONS.............................................................. 1
PRINCIPAL PARTS................................................................................................2
STANDARD ACCESSORIES INCLUDED WITH MACHINE
CONNECTING AND RUNNING MACHINE
..........................................................
.................................
3
4
WINDING BOBBIN.................................................................................................5
THREADING MACHINE......................................................................................... 6
INSERTING WOUND BOBBIN..............................................................................7
RAISING BOBBIN THREAD..................................................................................7
SELECTING A PATTERN..................................................................................... 8
STRAIGHT STITCH................................................................................................8
STITCHING IN REVERSE..................................................................................... 8
KEEPING SEAMS STRAIGHT............................................................................... 8
ADJUSTING NEEDLE POSITION
........................................................................
9
TURNING SQUARE CORNERS........................................................................... 9
USING SEAM GUIDE............................................................................................. 9
RECOMMENDED SETTINGS AND APPLICATIONS..........................................10
ADJUSTING THREAD TENSION.........................................................................12
ADJUSTING STITCH WIDTH.............................................................................. 12
ADJUSTING STITCH LENGTH............................................................................12
BALANCING A PATTERN.................................................................................... 12
FREE ARM SEWING............................................................................................12
CHANGING PRESSER FEET...............................................................................13
ATTACHING FEED COVER.................................................................................13
BLINDSTITCHING................................................................................................14
OVEREDGING AND SEAMING............................................................................ 14
SEWING BUTTONHOLES....................................................................................15
ADJUSTING BUTTONHOLE BALANCE
.............................................................
16
SEWING ON A BUTTON......................................................................................16
DARNING..............................................................................................................17
FREE MOTION EMBROIDERY............................................................................17
CHANGING NEEDLE...........................................................................................18
FABRIC, THEREAD AND NEEDLE TABLE........................................................18
INSERTING A ZIPPER.........................................................................................19
OPTIONAL ACCESSORIES NOT INCLUDED
REMOVING AND REPLACING BOBBIN CASE
REMOVING AND REPLACING LIGHT BULB
....................................................
.................................................
....................................................
19
20
21
CLEANING MACHINE..........................................................................................21
Dear Customer:
We recommend that for future reference you record the Serial
Number of your Sewing Machine in the space provided.
Refer to illustration
at right for location
of Serial Number on
your machine.
Model No.
To ensure that you are always provided with the most modern
sewing capabilities, the manufacturer reserves the right to change
the appearance, design or accessories of this sewing coachine
when considered necessary.
__________
A trademark of The Singer Company
Serial No.
Serial No.
SINGER CUSTOMER ASSISTANCE IN THE U.S.A. TOLL-FREE
NUMBER:1-800-877-7762
-1
twfmmm,
j I
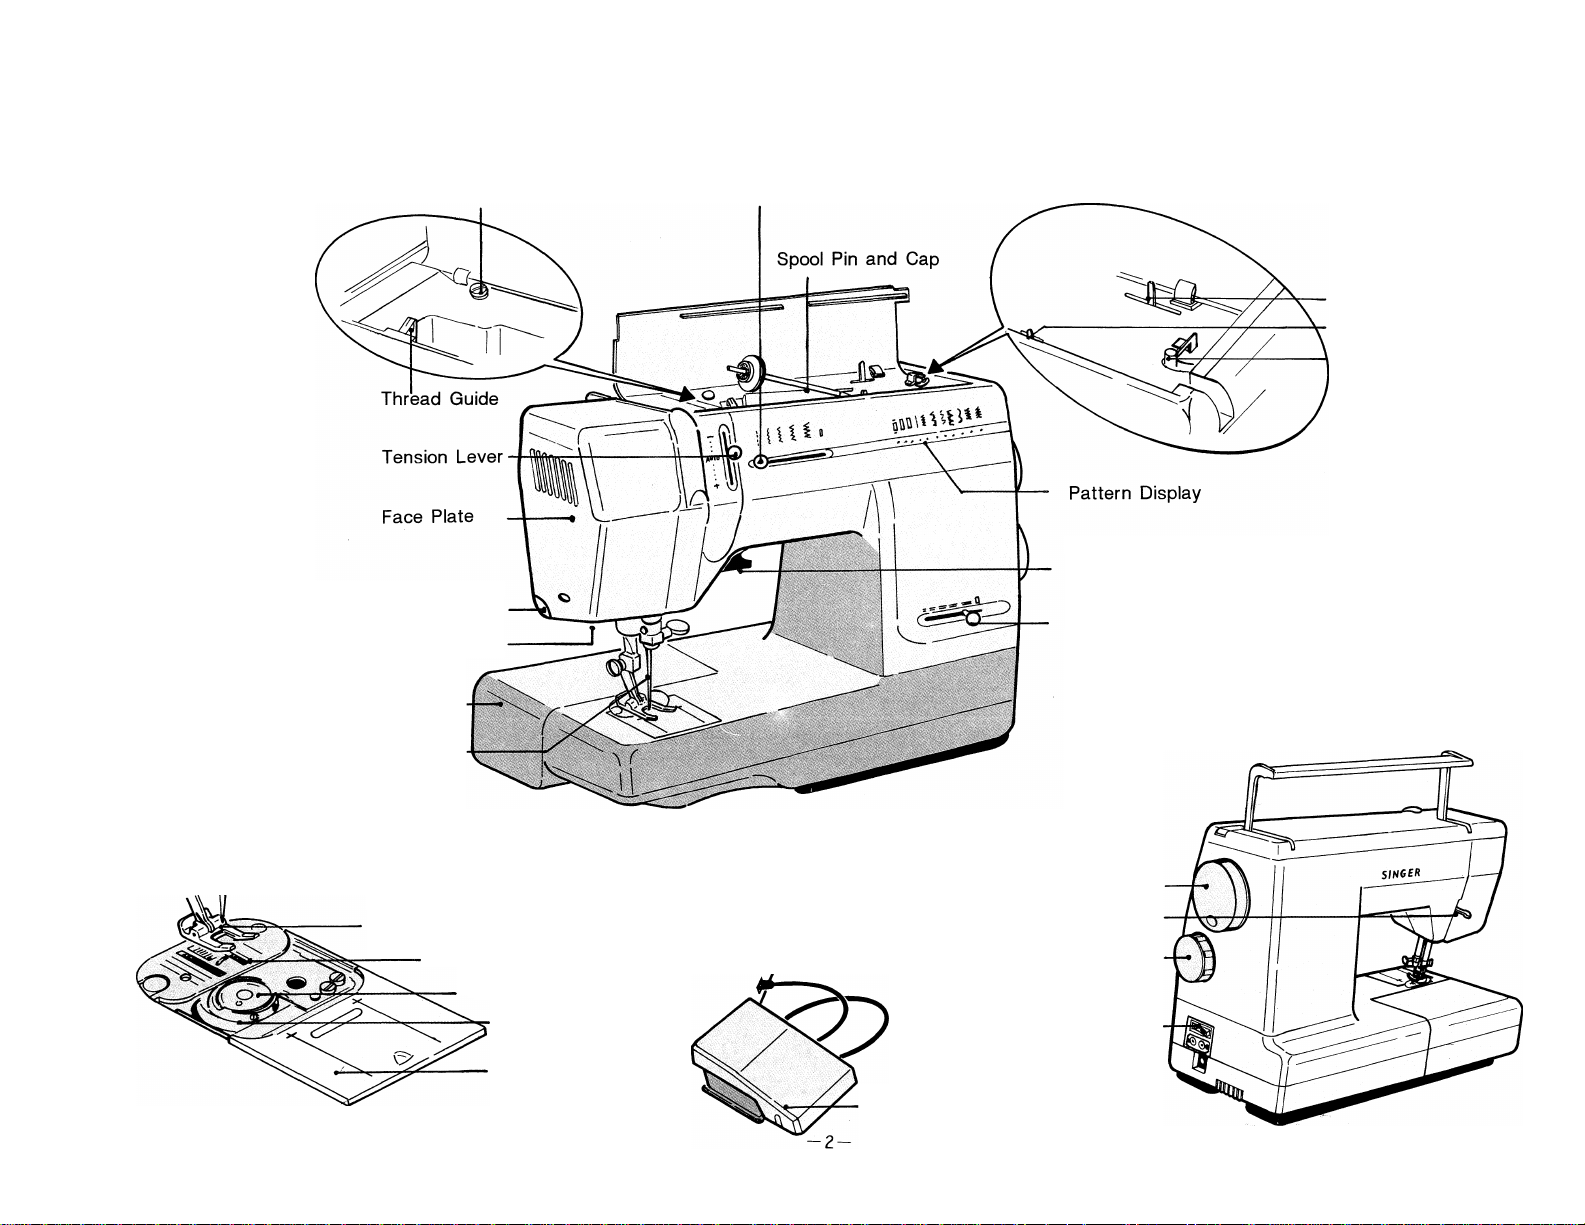
Bobbin Winder Thread Guide Stitch Width Lever
Needle Position Selector
Balance Lever
Bobbin Winder
Reverse Lever
Thread Cutter
Sewing Light
Accessory Box
Needle
Presser Foot
Needle Plate
Bobbin
Bobbin Case
Slide Plate
Stitch Length lever
Hand Wheel
Presser foot lifter
Pattern Selector Dial
Power and Light Switch
. Speed Controller
Model no.: 979583-003

STANDARD ACCESSORIES INCLUDED WITH MACHINE
J
D
(A)
General purpose needle plate
(on machine)
#312777
(B)
General purpose presser foot
(on machine)
#313150
(E)
Zipper foot
#171480
(K)
Blindstitch presser foot
#381491
(J)
special purpose presser foot
#171463
(L)
Buttonhole presser foot
#313992
Spool cap
(on machine)
#179967
Lint brush
#546358
Needle pack
J
cr-
■ I, !l
!y
1 ' '
L) L.
(F)
Feed cover
#313117
©
(Q)
Small spool cap
#507664
-3-
Bobbins
(1 in machine)
#172336
Class 66 Drop-in
¡il''”''
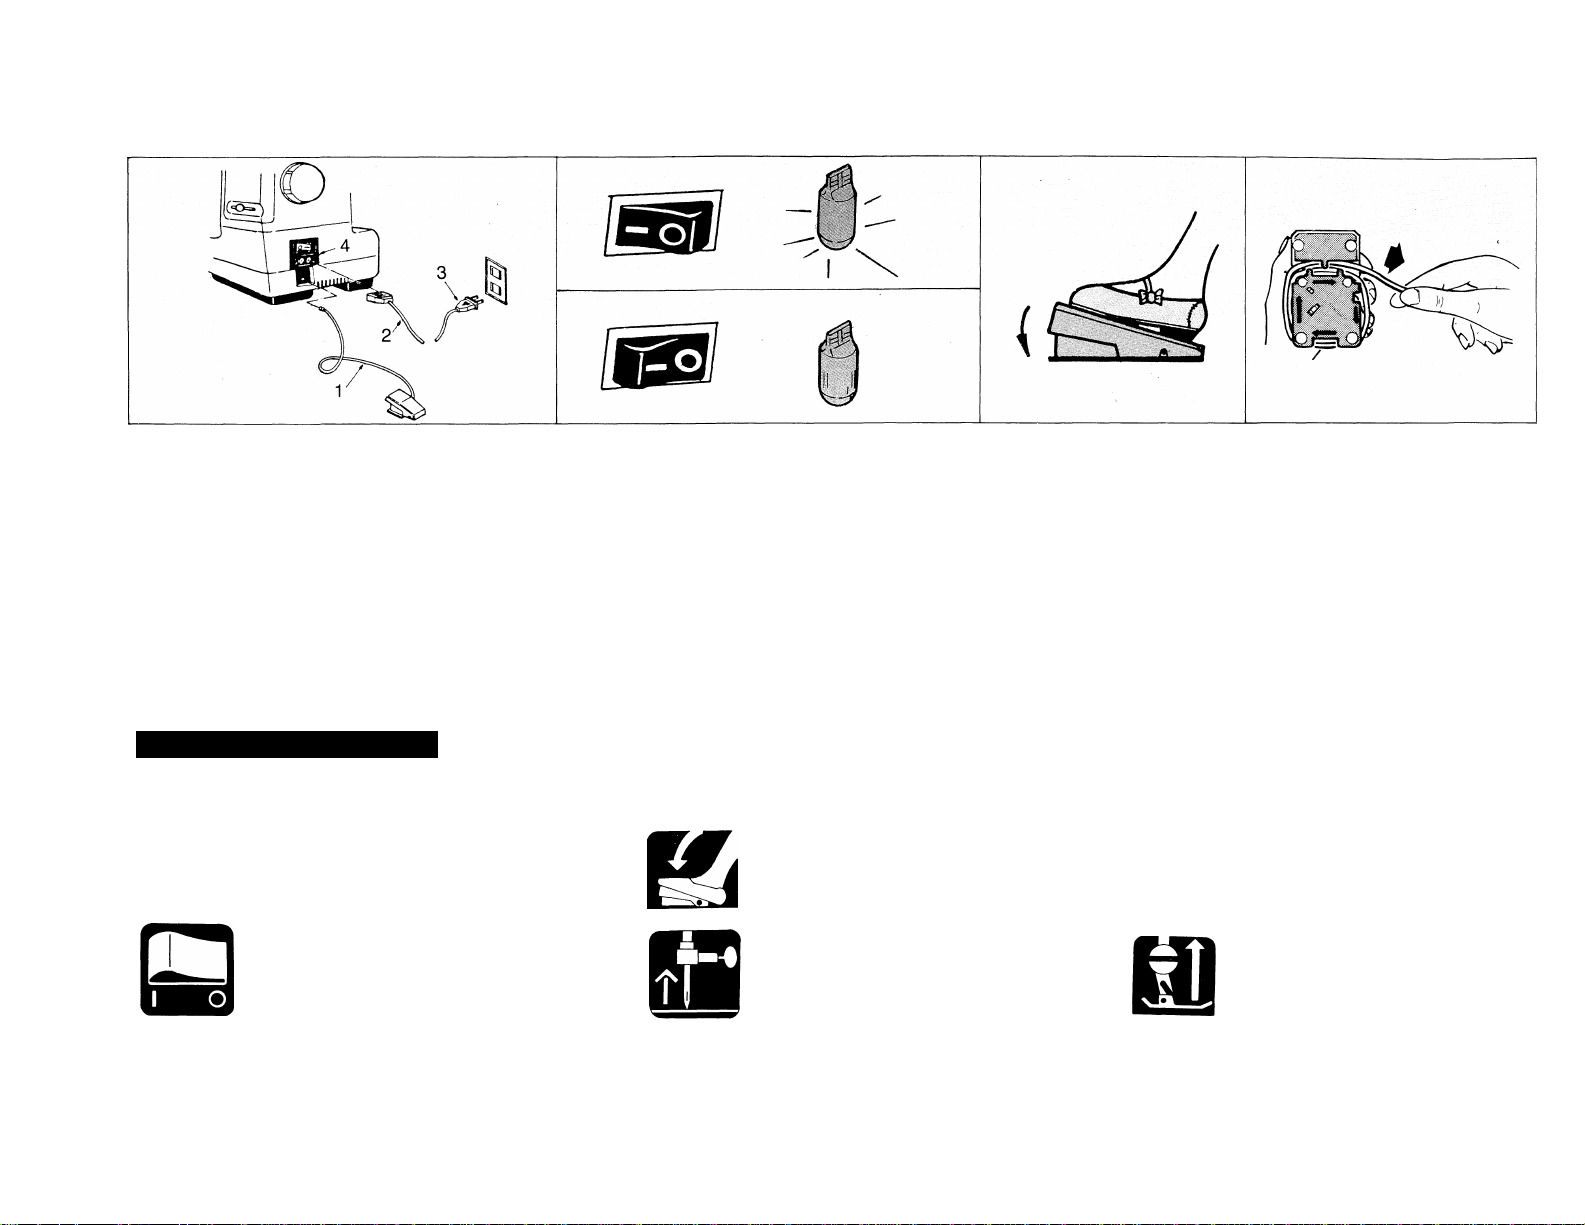
CONNECTING- RUNNING-
Push speed controller tube (1) and
electrical power cord (2) into receptacle
(4).
Plug power cord (3) into electric outlet.
INSTRUCTION SYMBOLS
To simplify understanding, the following
symbols are used throughout the operator’s
manual.
Turn power off.
Power on - press "I" side of switch
Power off - press "O" side.
Press speed controller
Use hand wheel to
raise needle.
Press sepped controller When not using machine, rewind
to run machine. air hose around speed controller
for storage, as shown.
Note:
Lower presser foot.
gl
Raise presser foot.
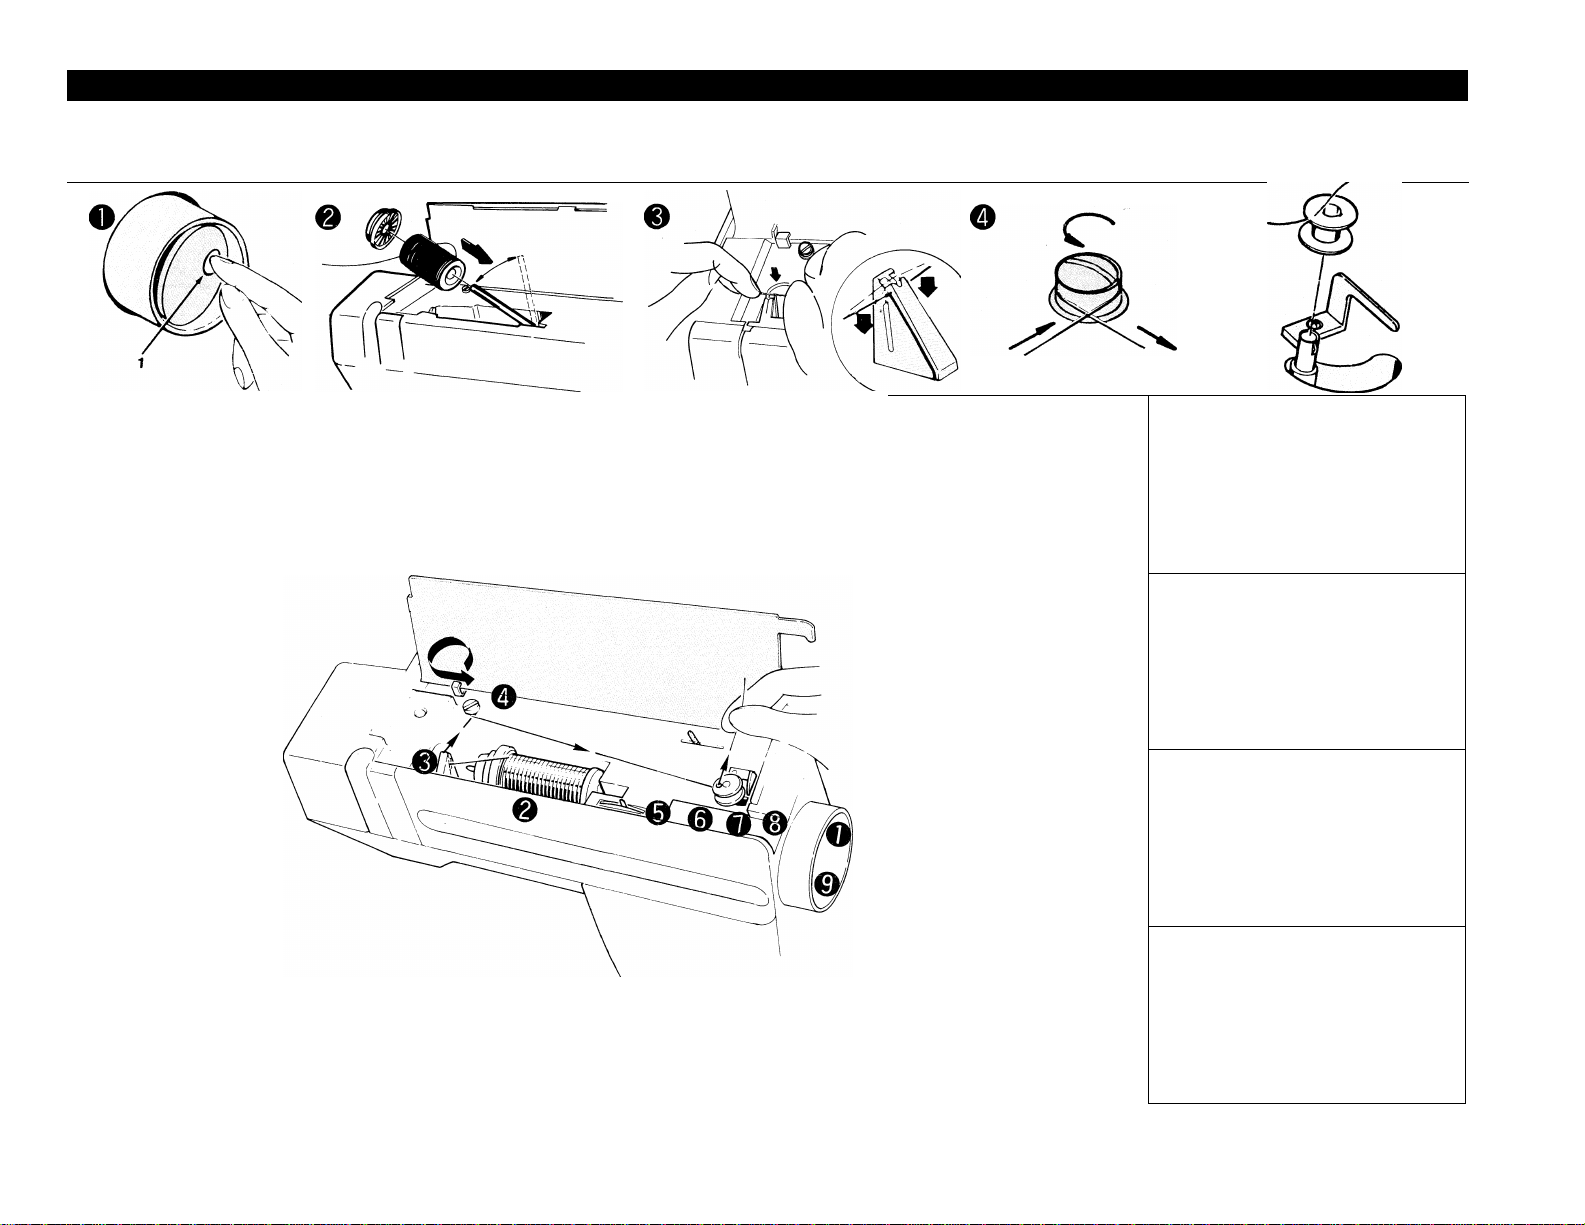
1 yfflNDlNG BOBBIN
Push indent on hand
wheel.
For best sewing
performance use
proper spool cap.
Place thread and cap onto spool
pin.
Snap thread into thread guide.
Wind thread around bobbin
winder thread guide.
Push bobbin to the right.
Hold thread end.
Step on speed controller.
Thread bobbin and
place on spindle.
0
Slide spool cap firmly over the rim of the spool to prevent thread tangling.
Push bobbin to the left.
Cut thread.
Press side opposite indent.
’(hr-
-5-
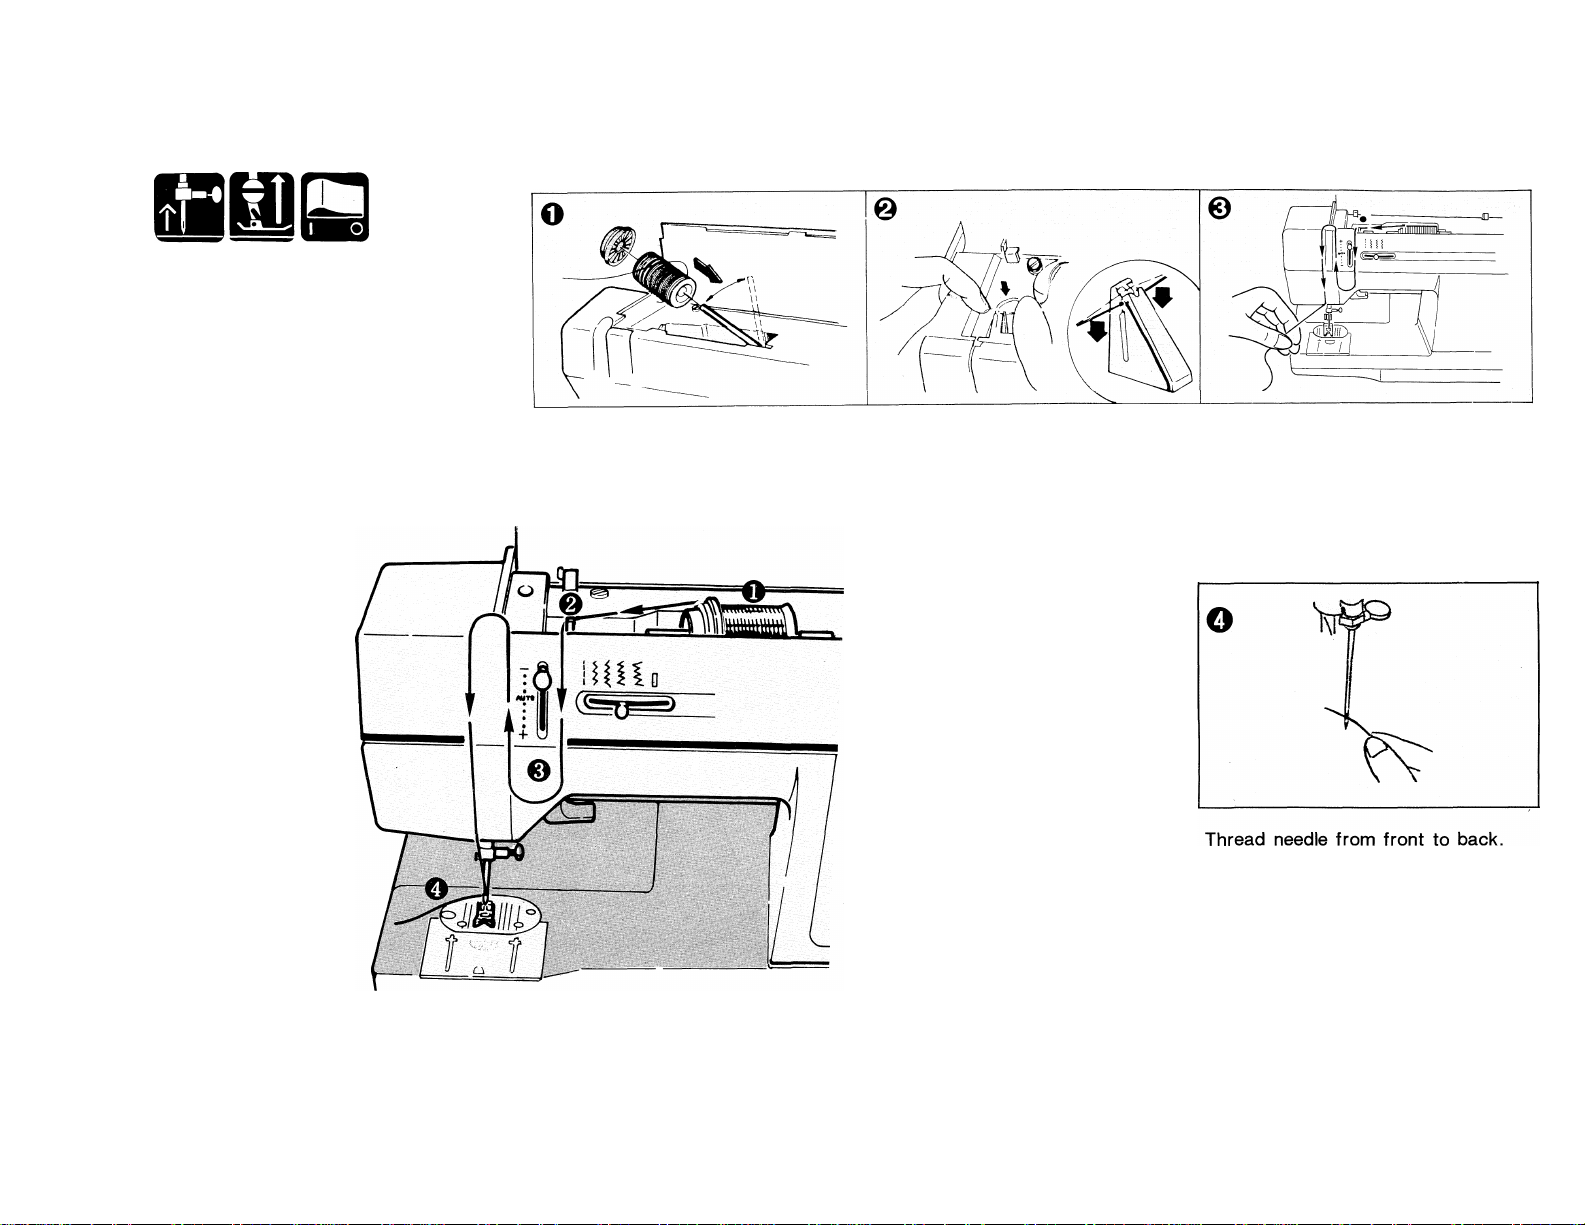
Place thread and cap onto spool Snap thread into Thread guide. following arrows, guide thread
pin.
down to needle.
 Loading...