


771
Table of contents
 Loading...
<iT
Deluxe Zig-Zag Sewirig Machine by SINGER
Congratulaiions...
You are about to discover the wonderfui pleasure of sewing with your new
Touch & Sew* sewing machine. The Modei 771 Flip & Sew* sewing machine
features a hinged bed lor free arm sewing. And you will also enjoy;
• the simplicity of dial controls. Now, you can simply dial a stitch length, a
stitch width, and a stitch pattern; pressure and tension settings; even
buttonhole stitching
• the versatility Oi sewing capacity that produces stitches that stretch, and
stitches that don't stretch ... permanent stitches that are firmly locked in,
and temporary stitches that pul! out easily... stitches that decorate,
embroider, mend, baste
• and, of course, the ease of the push-button bobbin, and much more!
Among the many Singer engineering and design features that ensure these
sewing pleasures are —
• buHt-in stitch patterns, which let you produce a straight stitch and a variety
of zig-zag patterns by simply turning a dial, plus Flexi-Stitch* patterns for
stitching knit and stretch fabrics and producing intricate stitch designs
• Soft-touch Fabric Feed that protects even the most delicate fabrics
• one-way needle clamp that makes it impossible to insert the needle back
wards
• stitch control dial that lets you switch from regular to s-t-r-e-t-c-h
stitching
• easy needle plate changing — needle plate secured by magnets is easy to
lift out for cleaning
• three-position presser foot lifter that lets you place bulky fabric or many
fabric layers under the presser foot
As you go through this book, you will discover how these and many other
leatures give you the ultimate in simplicity of operation and beautiful results.
sewing!
SINGEB* Service is always close at hand, if your machine should need servic
ing, call your local SINGER Sewing Center to be sure of v.'arranted SINGER
Parts and Service. You will find the address in the telephone directory under
SINGER COMPANY.
Copyright ‘ 1977 THE SiNGER COMPAN'Y
AU Rights Reserved Throughoyt the Wodd

CONTENTS
1. Getting to Know Your Machine......................................................................
Principal Parts and What They Do..................................................................................................... 3
Accessories.......................................................................................................................................... 4
2. Getting Ready to Sew
Preliminary Steps ................................................................................................................................... 6
Choosing Needle and Thread ............................................................................................................. 7
Threading the Machine..................................................................................................................... 12
3. Straight Stitching...................................................................................................................................... 18
Preparation ..................................................................................................................................... 18
Starting to Sew.................................................................................................................................... 18
Adjusting for Your Fabric.................................................................................................................. 19
Sewing a Seam..................................................................................................................................... 21
4. Zig-Zag Stitching.................................................................................................................................... 25
Zig-Zag Stitch Patterns......................................................................................................................... 25
Adjusting Dials.................................................................................................................................... 26
Satin Stitching .................................................................................................................................... 28
5. Twin-Needle Stitching.............................................................................................................................. 29
Inserting the Needle............................................................................................................................ 29
Threading the Needle.......................................................................................................................... 30
Dial Settings ........................................................................................................................................ 31
Turning a Square Corner ..................................................................................................................... 32
.....
.......................................................................................................................... 6
.......................................
2
6. Temporary Stitching
Speed Basting ................................................................................................................................... 33
Chainstitching....................................................................................................................................... 35
7. Buttons and Buttonholes........................................................................................................................ 39
Buttons............................................................................................................................................... 39
Buttonholes....................................................................................................................................... 40
8. Free-Motion Stitching ............................................................................................................................ 46
Flower Embroidery ............................................................................................................................ 46
9. Sewing the Professional Way ............................................................................................................. 47
Construction Details......................................................................................................................... 47
Sewing Knit and Stretch Fabric .......................................................................................................
Hints on Sewing Special Fabric......................................................................................................... 58
Decorative Touches ............................................................................................................................. 60
Keeping Up Appearances................................................................................................................. 65
10. Free-Arm Sewing
11. Caring for Your Machine ................................................................................................................... 72
Cleaning the Machine ........................................................................................................................ 72
Removing Covers. Bobbin Case, and Bulb........................................................................................ 73
Performance Checklist ....................................................................................................................... 76
12. Sewing Aids
...................................................................................................................................... 78
..............
................................................................................................................................ 68
................................................................................................................ 33
52
Index................................................................................................................................................................. 80
1. GETTING TO KNOW YOUR MACHINE
12, Spool Hol<ler
13. Handwheel
Switch
Dial
16. Stitch Width Dial
Dial
Lever
19* Suttonhoie Dial
20. Sewing Light

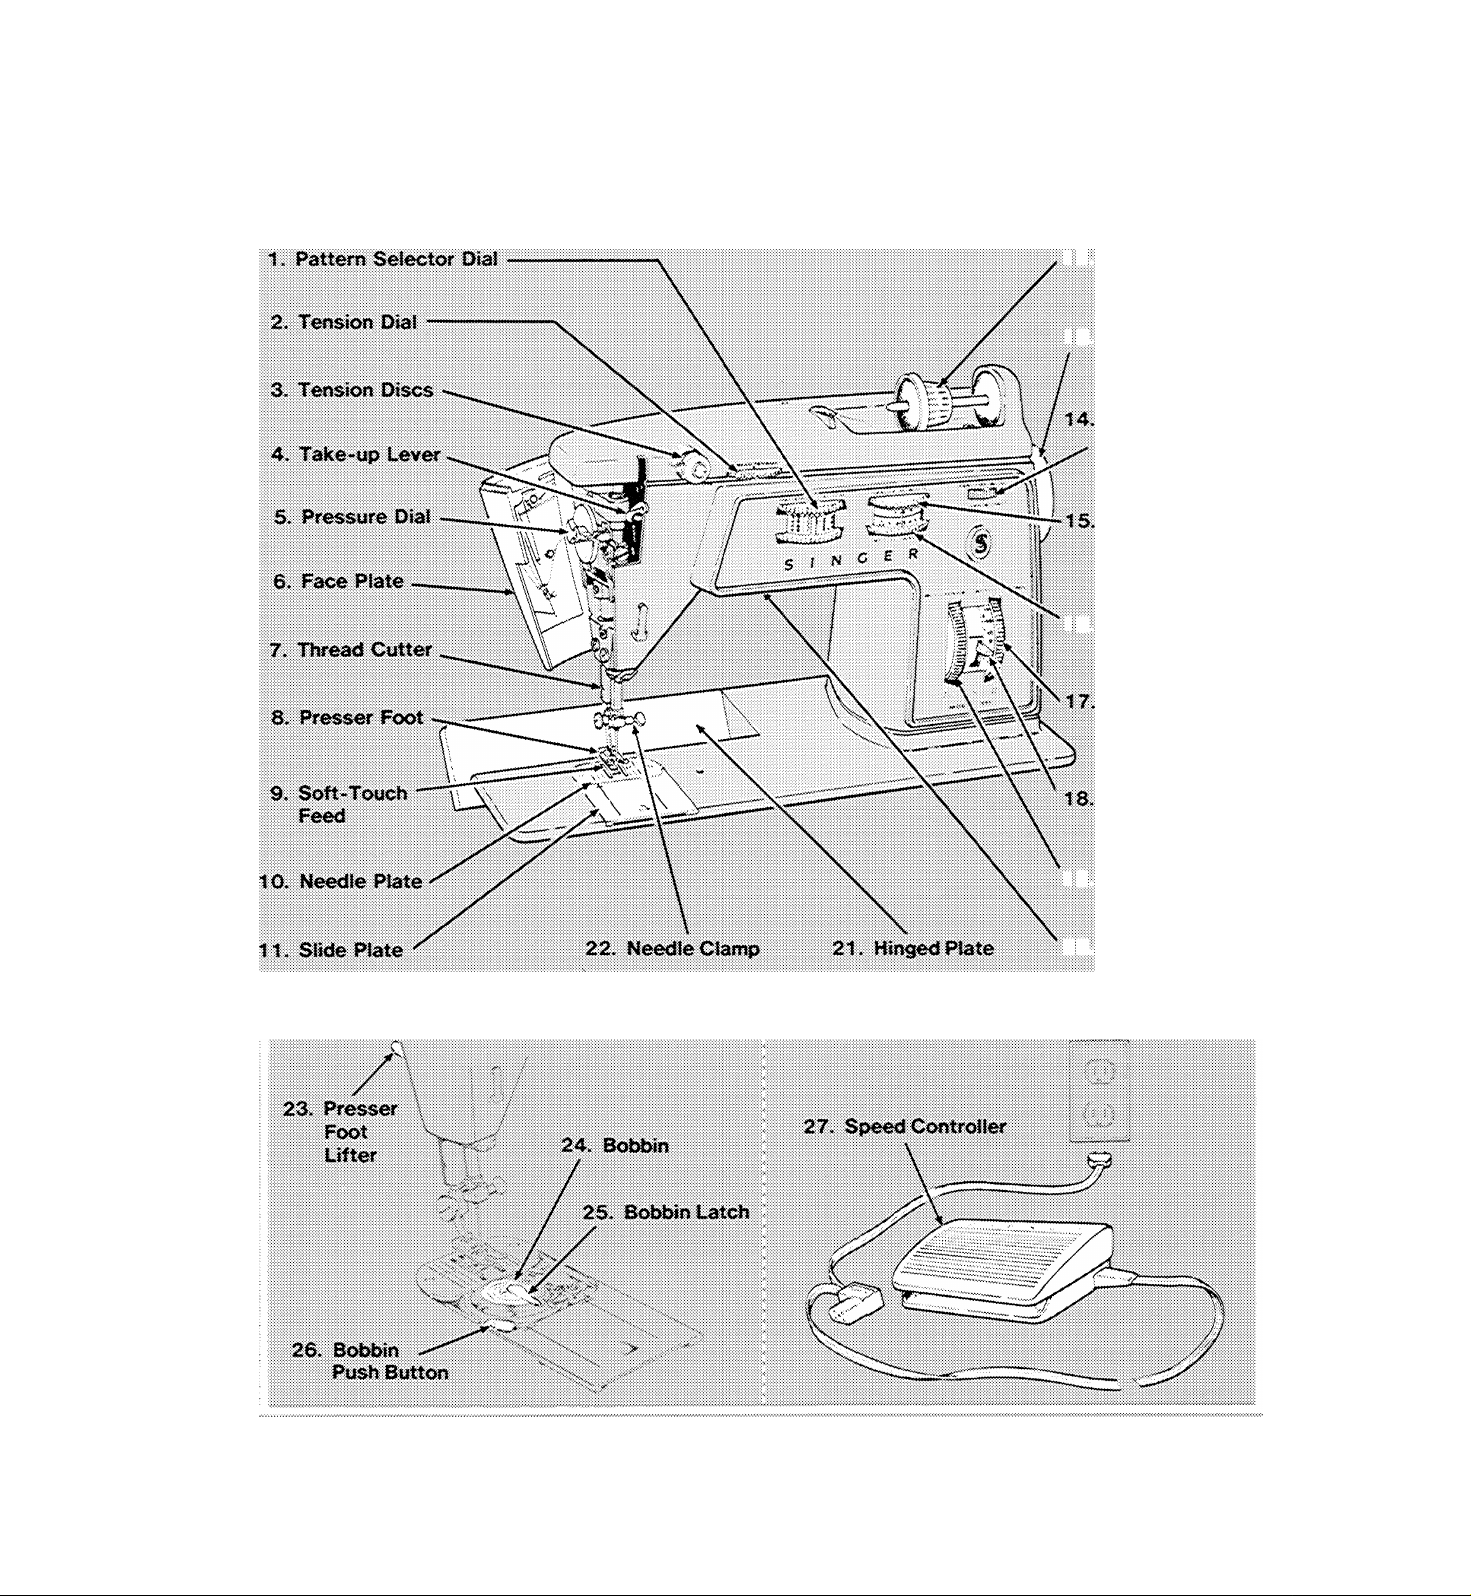
principal parts and what they do
1. Pattern Selector Dial can be set to pro
duce a straight stitch, a decorative or
practical zig-zag stitch: or speed basting.
2. Tension Dial lets you select just the right
tension for your stitch, thread, and fabric.
The numbers eliminate guesswork in
duplicating settings,
3. Tension Discs, controlled by the tension
dial, regulate the amount of tension on
your needle thread.
4. Self-Threading Take-up Lever controls
flow of needle thread.
5. Pressure Dial regulates presser-foot
pressure on fabric. It has an all-purpose
sewing setting plus settings for extra
light and extra-heavy pressure and for
darning.
6. Face Plate swings open for access to
threading chart and pressure dial.
7. Thread Cutter is built into presser bar for
safety and convenience,
8. Presser Foot holds fabric against feed.
9. Soft-Touch Feed moves fabric under
presser foot. Soft surface does not injure
fabric, even the most delicate.
10. Needle Plate, secured by magnets, lifts
out for removal. Guidelines on right and
left sides of plate help you keep seams
straight.
11. Slide Plate opens easily, lets you see
bobbin. Releases bobbin push button
from winding to sewing position when
closed. Seam guidelines (extended from
needle plate) have cross lines to help you
turn square corners.
12. Friction-Free Spool Holder with horizon
tal pin holds spools of various sizes:
holder lets thread unwind without tug or
drag. The spool does not turn.
13. Hand Wheel controls movement of takeup lever and needle. Always turn it toward
you.
14. Power and Light Switch turns on
machine and sewing light simul
taneously. FAST and SLOW speed range
settings let you choose the best sewing
speed for your work.
15. Needle Position Dial places needle in
either L (left), A (center) or R (right)
stitching position.
16. Stitch Width Dial controls the width of
zig-zag stitching and positions the nee
dle for bobbin winding and straight
stitching.
17. Stitch Control Dial allows for a variety of
stitch lengths, including FINE for zig-zag
satin stitching. Has special settings for
buttonholing and Flexi-Stitch patterns.
18. Reverse-Stitch Lever instantly reverses
stitching direction at the touch of your
finger.
19. Buttonhole Diai controls steps in sewing
round-end buttonholes. Dial must be in
OFF position when not in use,
20. Built-in Sewing Light illuminates sewing
area. Pull-down bracket makes it easy to
replace bulb.
21. Hinged Plate converts machine for free
arm sewing.
22. Needle Clamp is designed to make nee
dles self-setting and eliminate the
possibility of inserting needle back
wards.
23. Presser Foot Lifter, at back of machine,
allows you to raise and lower presser
foot. Extra-high lift position permits easy
placement of bulky fabrics.
24. Transparent Bobbin shows thread sup
ply. Two halves can be unscrewed to
гетюуе unwanted thread.
25. Bobbin Latch holds bobbin in place. Flips
up at the touch of your finger for easy
bobbin removal.
26. Bobbin Push Button allows you to switch
from sewing to bobbin winding without
rem*oving bobbin.
27. Electrical Connections and Speed Con
troller designed for convenience and
safety.
accessories
The accessories that come with your Touch &
Sew sewing machine are designed to help you
do many Kinds of sewing easily and perfectly.
To increase the versatility of your machine,
additional accessories can be purchased at
your Singer store. See page 78.
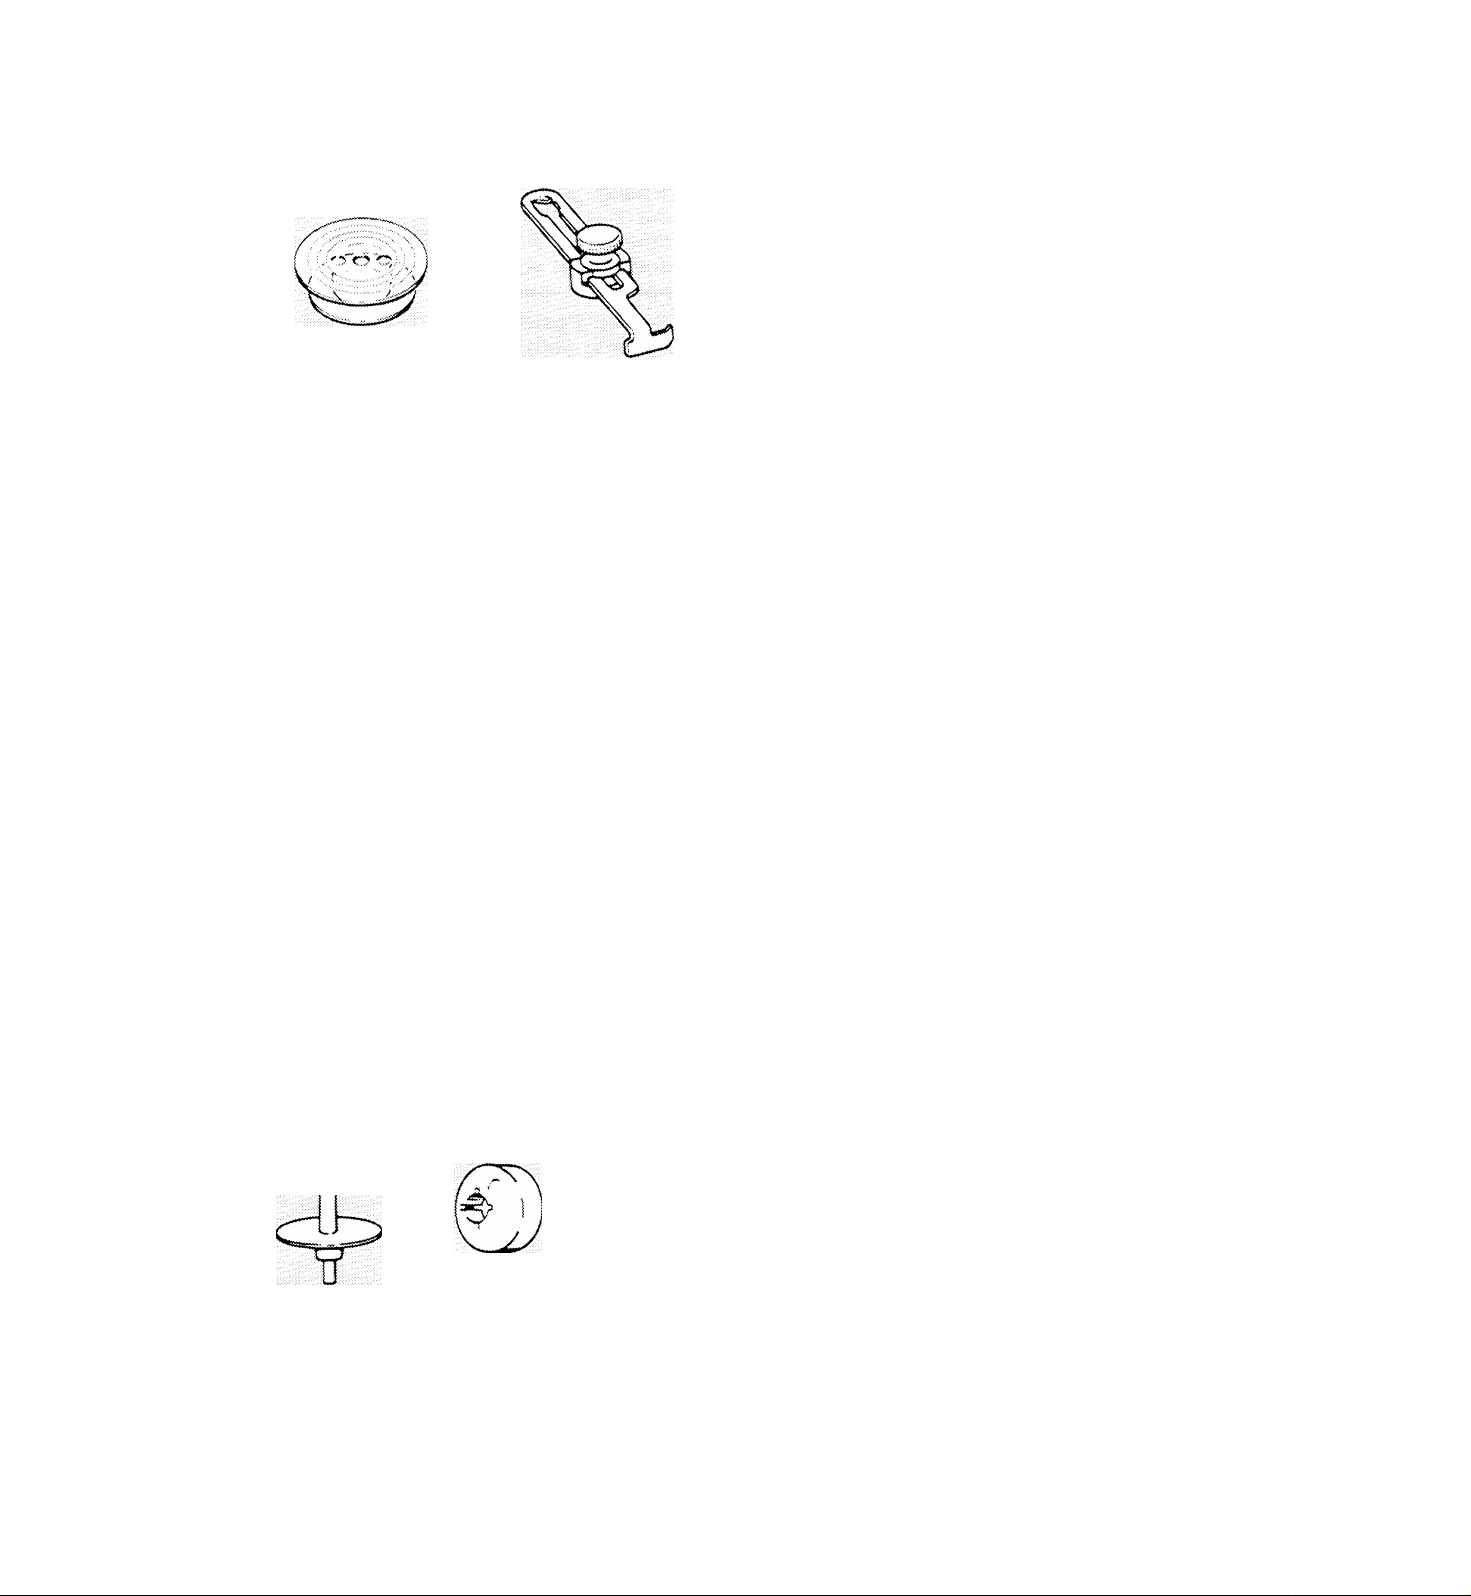
1. BOBBINS
Transparent Bobbin Seam and Biindstitch
Hem Guide
A
A
Ü
Regular Needle
Bat! Point
(Yellow Band) Needle
r
Twin Needle
• Transparent drop-in bobbin in your
machine.
• Extra transparent drop-in bobbins.
2. SEAM AND BLINDSTITCH HEM GUIDE
• Helps you stitch seams and blindstitch
hems of uniform width.
3. NEEDLES
IMPORTANT: Your SINGER sewing
machine has been designed to obtain best
results with SINGER* needles. You should
follow the recommendations in this in
struction book and on the needle package
for correct style and size of needle for
different types and weights of fabric.
• Style 2020 (15x1) needles, for all-pur
pose sewing.
• Style 2045 ball-point Yellow Band" nee
dles, for sewing synthetic knits and
stretch fabrics.
Vertical
Spool Pin
Small
Spool Holder
Lint Brush
Style 2028 needle,
decorative stitching.
4. VERTICAL SPOOL PIN
• Vertical spool pin for decorative twin-
needle stitching.
5. SMALL SPOOL HOLDER
• For use with small diameter tubes of
thread.
6. LINT BRUSH
• Lint brush for cleaning your sewing
machine.
for twin-needie
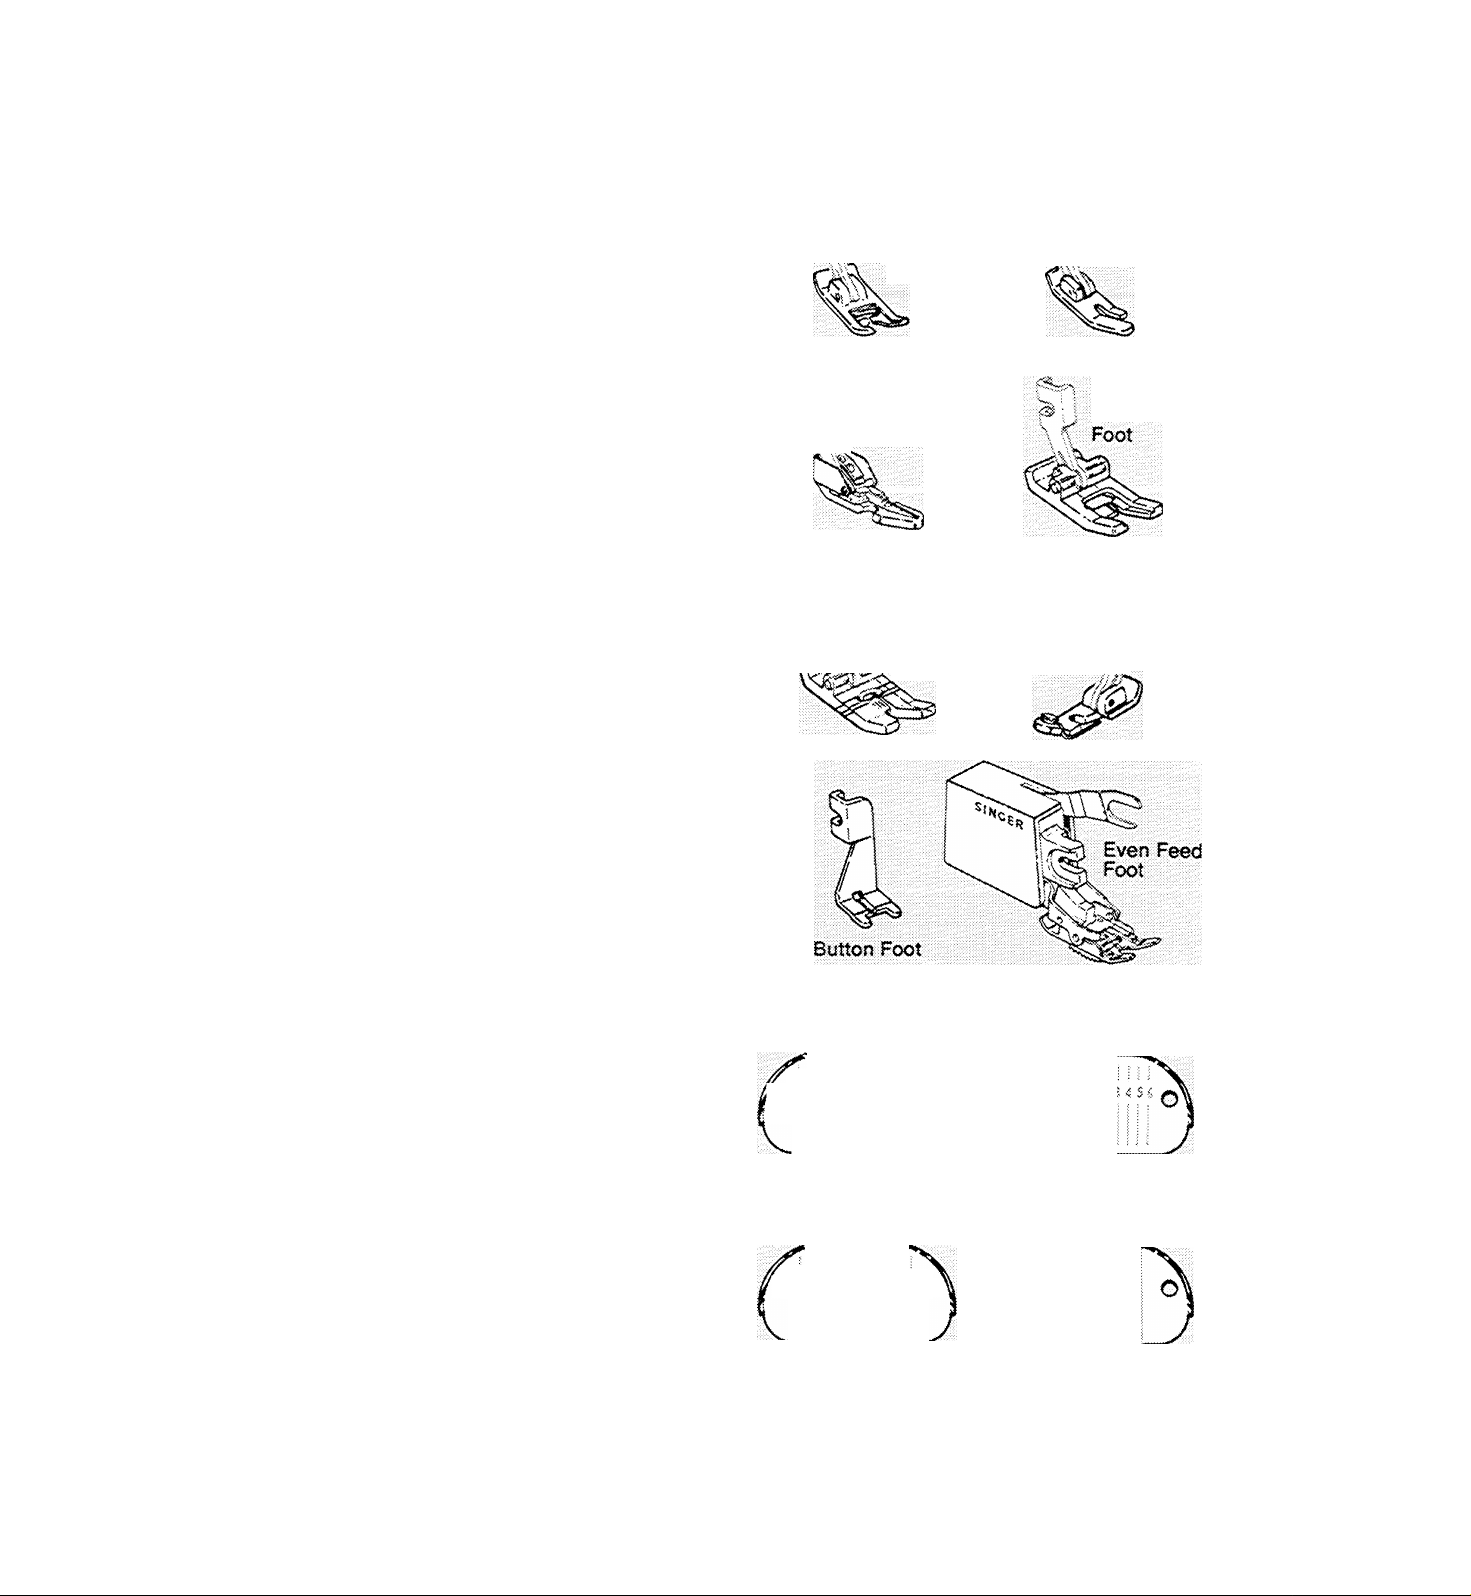
7. PRESSER FEET
• The genera! purpose foot on your
machine.
• Additionai interchangeabie snap-on
presser feet:
Straight stitch foot for close fabric
control
Zipper foot for inserting zippers and
stitching corded seams
Special purpose foot for all kinds of
decorative zig-zag stitching
Buttonhole foot to make round-end
buttonholes
Overedge foot for overedged seams in
stretch fabric
• A one-piece button foot to hold buttons
securely for stitching.
• Even Feed Foot for sewing hard-to-feed
pile, stretch, and bonded fabrics. Also
excellent for matching plaids and stripes
and for topstitching. (Cannot be used for
speed basting.)
Fresser Feet
% •: I;
. \\ General Purpose
Foot
>
P p Zipper Foot
; Buttonhole Foot
>, Straight
Stitch
Special
Purpose
ii
Overedge Foot // /
8. MEEDLE PLATES
• The general purpose needle plate in
place on your machine.
• The straight stitch needle plate for use
with the st.--aight stitch foot.
• The chainstitch needle plate for single
thread chainstitching.
• The feed-cover plate for button sewing
and free-motion work.
9. CHAINSTITCH FITTINGS
• One set of three fittings.
Thread Guide
6
Bobbin Case Cover
Needle Plate
Heedle Plates
General Purpose
Needle Plate
Straight Stitch
Needle Plate
O
ChamstiicN Fittings
Chainstitch
Needle Piate
Feed Cover
Plate
2. GETTliyC READY TO SEW
preliminary steps
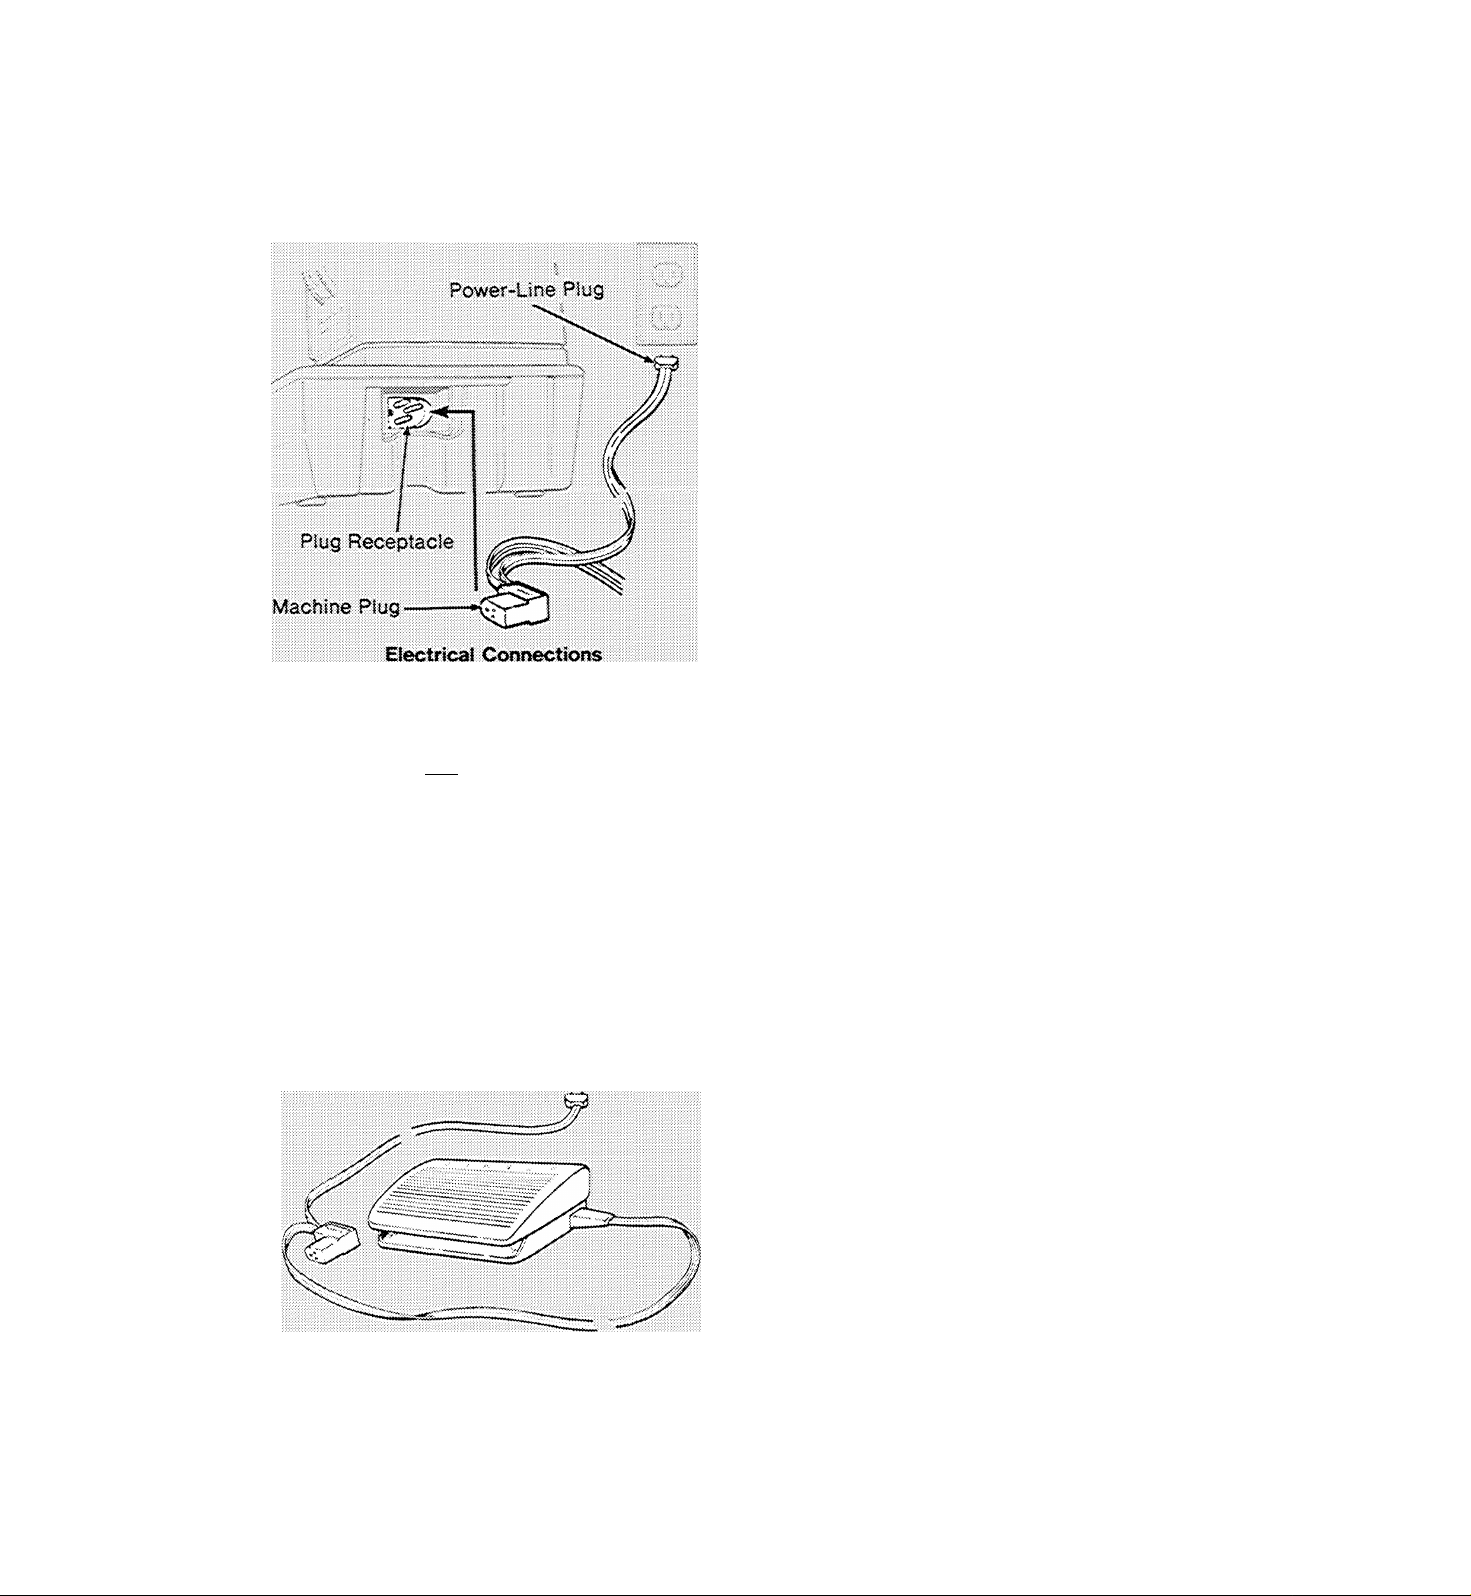
1. CONNECTING MACHINE
Before plugging in your machine, be sure that
the voltage and number of cycles indicated at
the right end of the machine or inside face
plate conform to your electrical power supply.
Push the machine plug into the machine recep
tacle. Then connect the power-line plug to
your electrical outlet
2. OPERATING MACHINE AND
CONTROLLER
To turn on both the machine and sewing light
and set speed range, slide the power and light
switch to the selected range.
F>Sv3T OFF' 3L.OW
^ i': ' T'^"rT?TTT
T¥^’T
F>OW3P^ e< L^IOMT
• The FAST setting allows for full speed ca
pacity of the machine. It is best for long,
straight seams, easy-to-handle fabrics, and
general sewing where a variety of speeds
are needed.
Power and Light Switch
Speed Controller
• The SLOW setting allows for maximum con
trol at lower sewing speeds. Use this setting
for special jobs such as button sewing, but
tonhole making, and where intricate con
struction details require close control.
CAUTION: We recommend that you turn off
the power and light switch before changing
needles, presser feet or needle plates and when
leaving the machine unattended. This elimi
nates the possibility of starting the machine by
accidentally pressing the speed controller.
To run the machine, press the speed con
troller. The harder you press, the faster the
machine will sew within the selected speed
range.
Very light pressure on the controller will oper
ate the machine very slowly, enabling you to
stop the machine with the needle In any
desired position, up or down.

choosing needle and thread
The needle and thread you choose will depend
upon the fabric being stitched. The table below is a practical guide to needle and thread
FABRIC, THREAD AND NEEDLE TABLE t
selection. Refer to it before starting a sewing
project Be sure to use the same size and type
of thread in both needle and bobbin.
FABRIC WEIGHT AND TYPE
DELICATE — tulle, chiffon, fine lace, or
ganza, chiffon velvet
LIGHTWEIGHT - batiste, organdy, voile,
taffeta, crepe, chiffon velvet, plastic film,
satin, surah, peau de soie, shantung,
brocade
MEDIU.Vt WEIGHT - gingham, seersucker,
madras, percale, piqué, linen, chintz, faille.
fine corduroy, velveteen, suitings, vinyl,
terry doth, chains, twill
MEDIUIVI HEAVY — gabardine, tv/eed, sail
cloth. duck, denim, coatings, drapery
fabrics, vinyl, deep“pile fabrics, corduroy,
bonded fabric
HEAVY — overcoatings, upholstery fabrics,
canvas
KNITS, WOVEN STRETCH AND ELASTIC--
double knits, bonded knits, spandex, ny
lon tricot ciré tricot, jersey, panné velvet,
stretch terry
LEATHER — suede, kidskin. calf, capeskin.
buckskin, cabreita. patent, cobra, lined
leathers, simulated leathers
VINYLS (KNIT BACK)-suede, imitation
reptile, crinkle patent, patent, embossed
and printed vinyls
WOVEN FABRICS (ALL WEIGHTS) - dec
orative straight-stitch topstitchlng
LIGHT AND MEDIUM WEIGHTS (WOVEN) -
decorative twin-needle stitching
tDoes not apply to chalnstitching.
ttSize 9 needle recommended for sewing only. For
tttUse with mercerized cotton, “A” silk, or polyester
THREAD
Fine polyester, nylon,
or cotton thread
Cotton-wrapped
polyester (FINE)
100% polyester
SO mercerized cotton
’^A" nylon
‘‘A’’silk
Cotton-wrapped polyester
100% polyester
50 mercerized cotton
60 cotton
“A” silk
Cotton-wrapped polyester
100% polyester
Heavy-duty
mercerized cotton
40 to 60 cotton
Cotton-wrapped polyester
Heavy-duty
mercerized cotton
40 cotton
Cotton-wrapped polyester
100% polyester
'‘A'" nylon
50 mercerized cotton
‘‘A’' silk
Cotton-wrapped polyester
100% polyester
50 mercerized cotton
nylon
“A" silk
Cotton-wrapped polyester
100% polyester
50 mercerized cotton
nylon
Yellow Band
Yellow Band
^'A^’silk
-D'’silkttt
(Buttonhole twist)
Cotton-wrapped polyester
100% polyester
50 mercerized cotton
bobbin winding use larger size needle,
thread in bobbin.
NEEDLES
TYPE SIZE
Style 2020
(15x1)
Style 2020
,15x1)
Style 2020
(15x1)
Style 2020
(15x1)
Style 2020
(15x1)
Style 2045
Ball Polrit
Style 2032
(15x2)
Style 2045
Sail Point
Style 2020
(15x1)
Style 202$
(twin)
9tt
11
18
14
11
14
16
14
16
16
14
Changing the Needle
NEEDLES
The needle you use should be straight to en
sure perfect stitch formation and needle
penetration through the fabric. The needle
should also be fine enough to prevent the
fabric from being marred with large
punctures, yet heavy enough to pierce the
fabric without being bent or deflected.
Remember, too, that the eye of the needle
must be large enough for the thread to pass
through freely; too fine a needle will cause the
thread to fray.
For best results use a SINGER* needle.
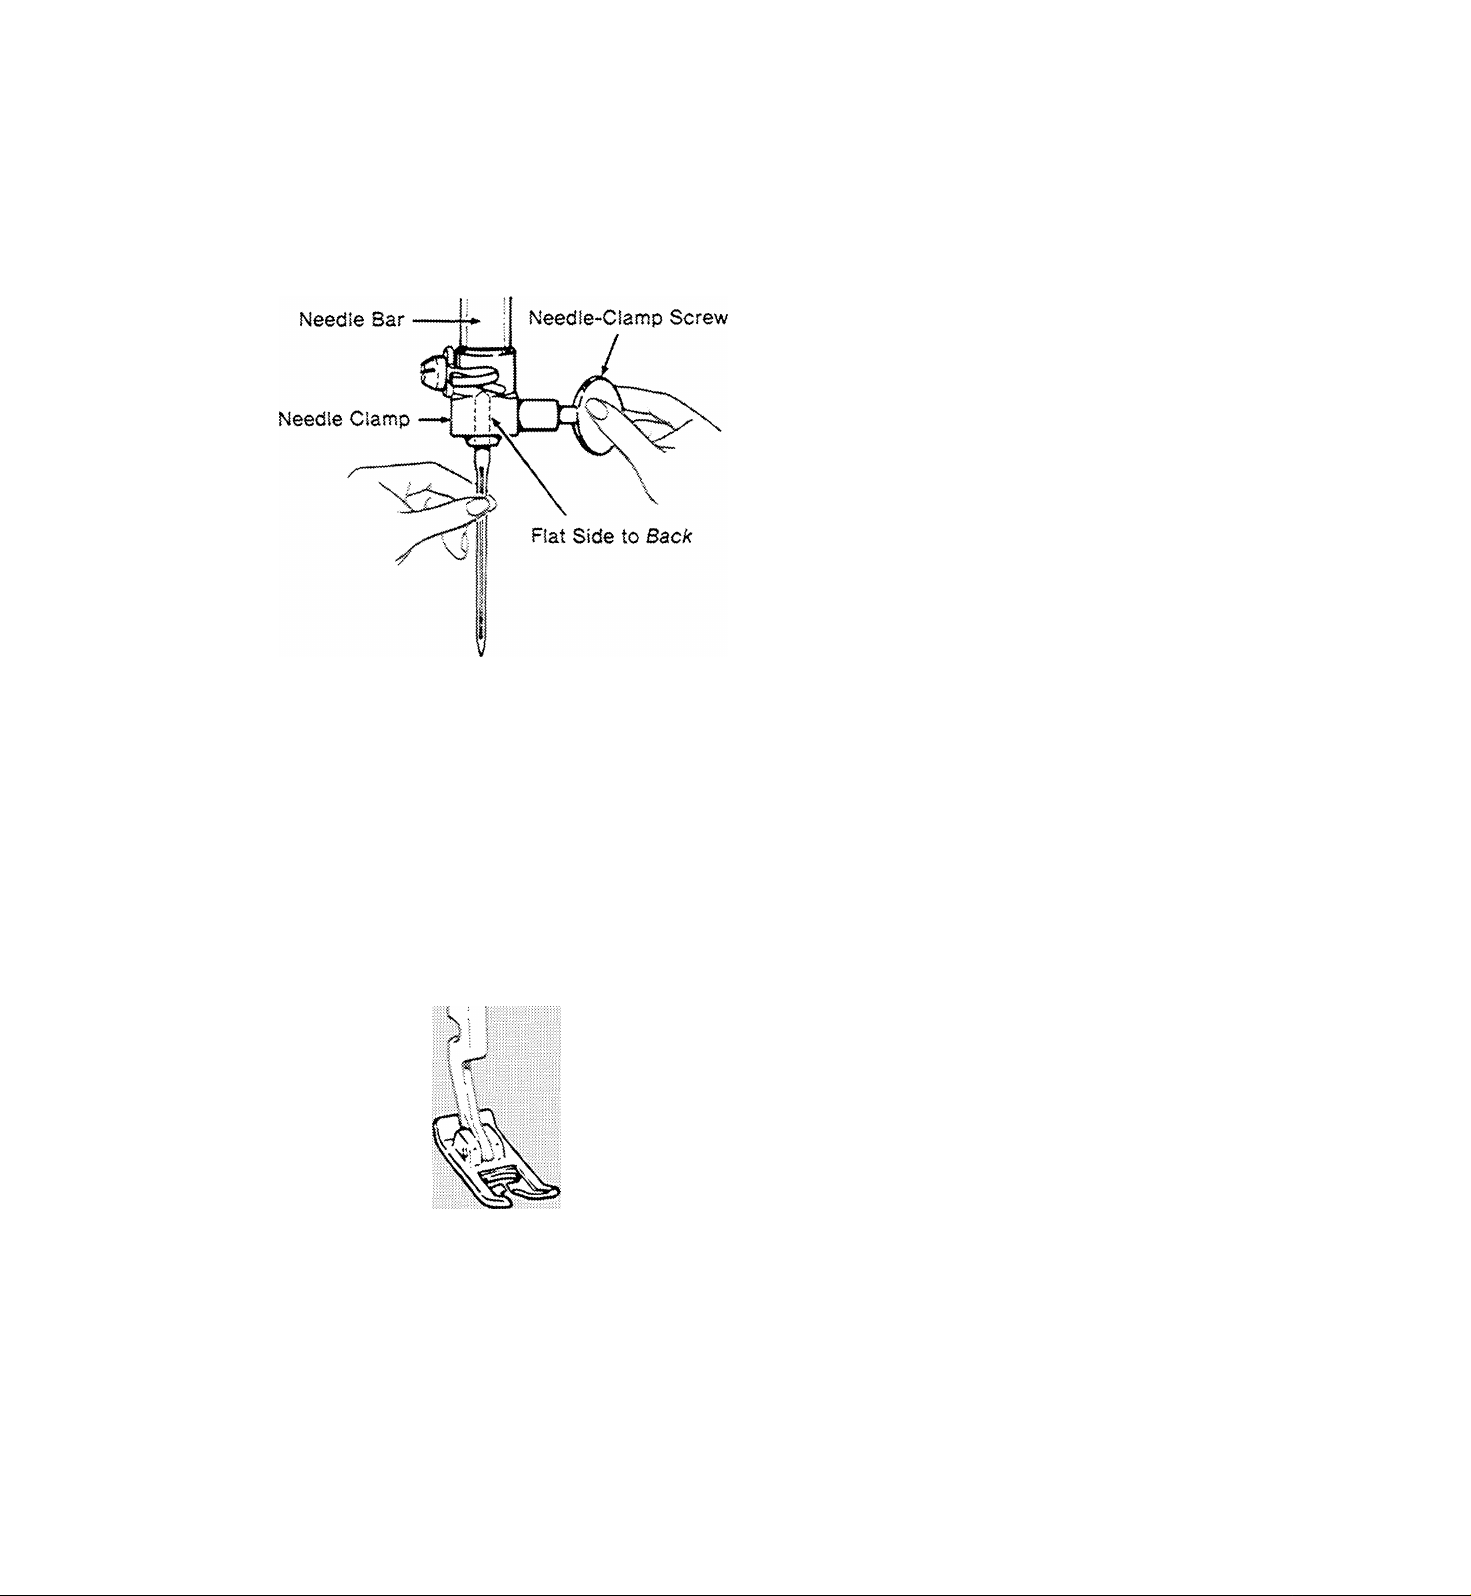
Changing the Needle
1. Raise needle bar to its highest point,
loosen needle-clamp screw, and remove
needle.
2. insert new needle in clamp, with the flat
side of the needle to the back; push it up as
far as it will go.
General Purpose Foot
3. Tighten needle-clamp screw.
choosing accessories
The type of sewing you plan to do will deter
mine which presser foot and needle plate you
should use.
PRESSER FEET
Three Most Used Presser Feet
General purpose foot is used with the general
purpose needle plate for all utility sewing and
some decorative zig-zag stitching. These
general purpose accessories ntust be used
together when alternating between straight
and zig-zag stitching.
8
straight stitch foot Is used with the straight
stitch needle plate when your fabric or sewing
procedure requires close control Use for:
• Precision straight stitching of curved and
scalloped edges, top stitching, edge stitch
ing. etc.
• Straight stitching delicate or spongy fabrics.
Special purpose foot is used with the general
purpose needle plate for all kinds of decora
tive zig-zag stitching. The raised center sec
tion of the foot allows closely spaced zig-zag
stitching to feed freely while the toe holds
fabric firmly for straight line feeding. Use for:
• Ornamental stitching, bar-tack buttonholes.
Flexi-Stitch pattern stitching, applique, satin
stitching,
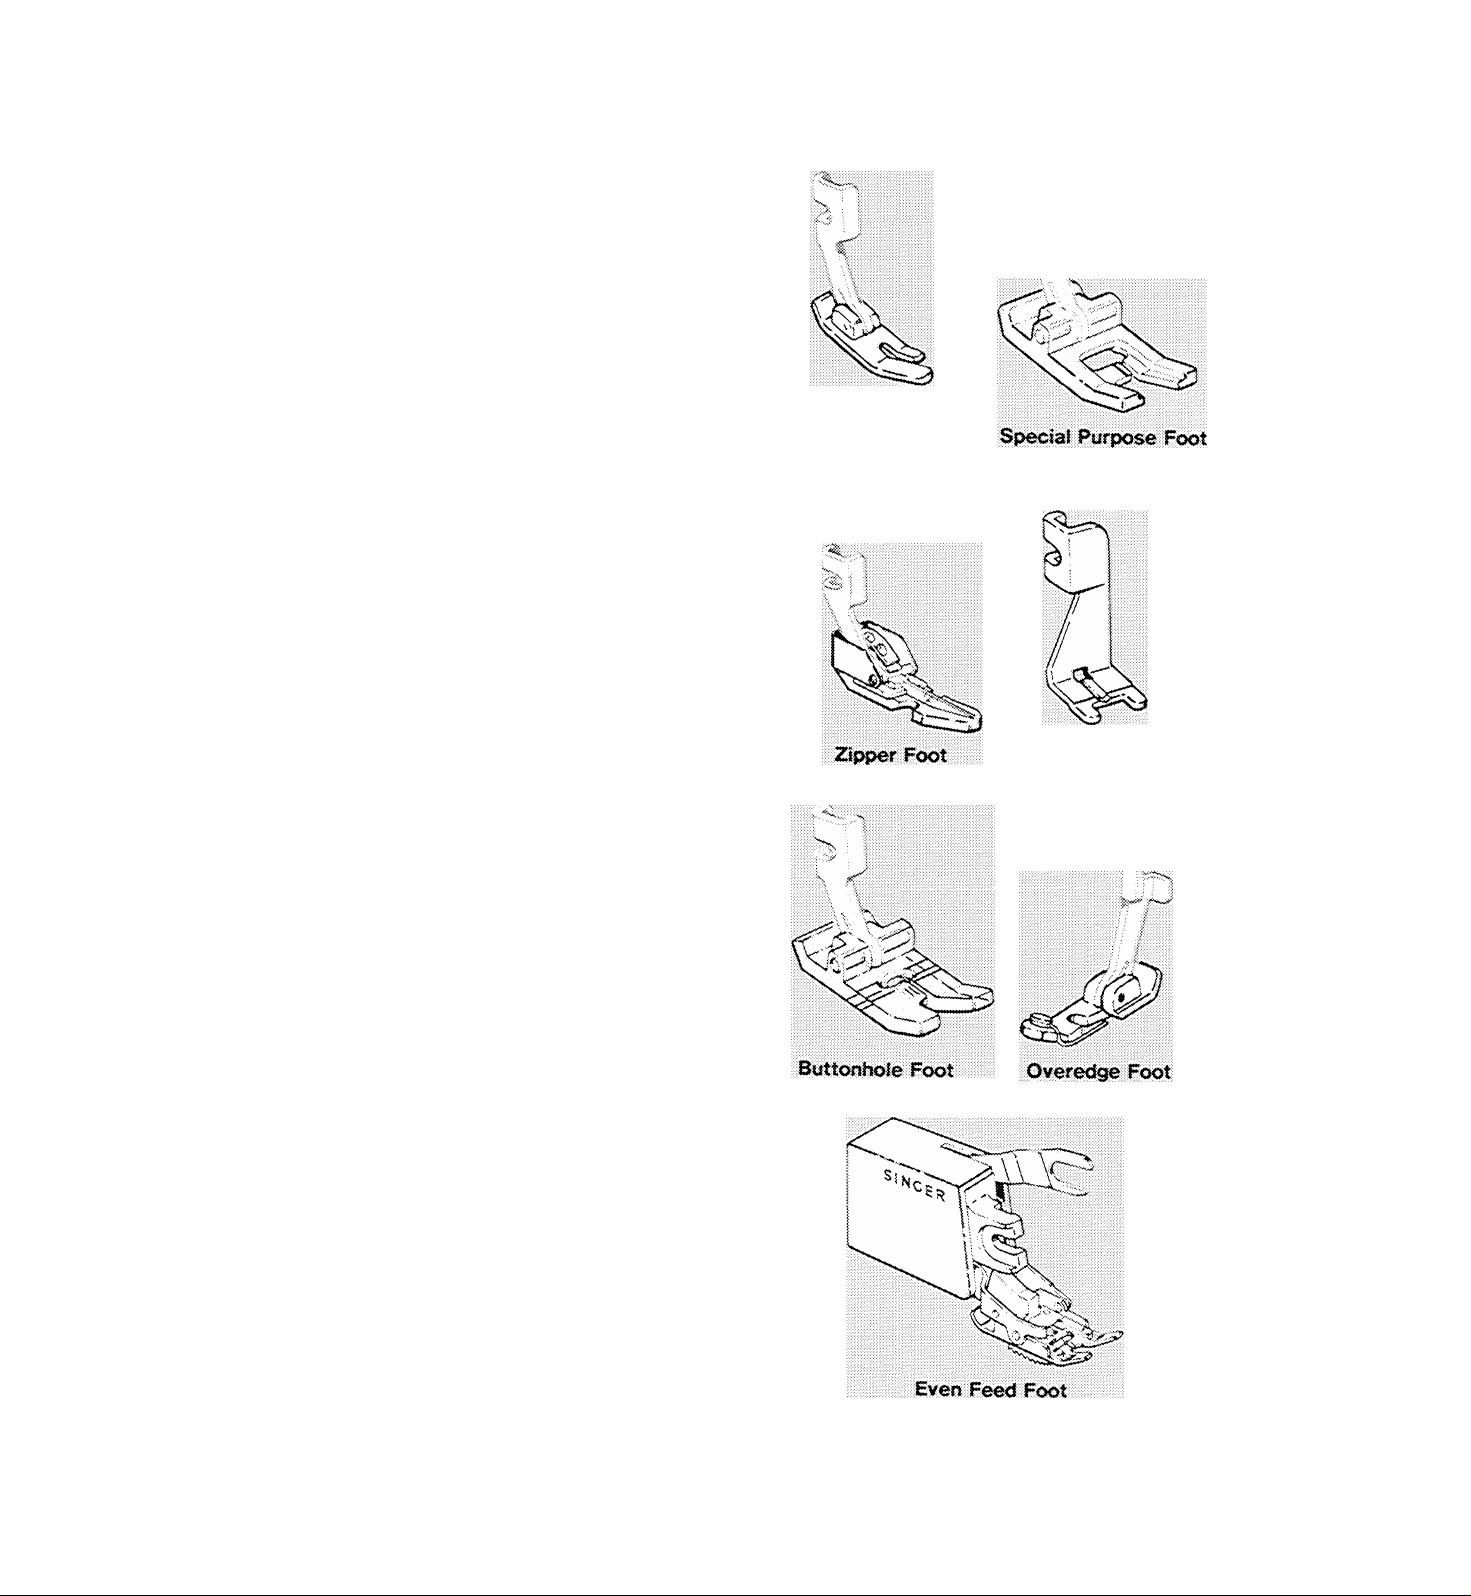
Presser Feet for Special Sewing Needs
Zipper foot is used to place stitching close to
a raised edge. Thus, it is useful for corded
seams (page 48) as well as zipper insertion
(page 47). It can be fitted to the presser foot
shank for use on either the right or left side of
the needle.
Straight Stitch Foot
Button Foot
Sutton foot holds any two-hole or four-hole
button securely for stitching. The groove in
the foot can be used to hold a needle, over
which a thread shank can be formed.
Buttonhole foot. This snap-on transparent
foot is used to make two-step, round-end but
tonholes in fabrics of light to medium weight.
The guidelines on the sole plate simplify but
tonhole placement and make it easy to gauge
buttonhole length.
Overedge foot, used with the overedge
stretch pattern (see page 54) enables you to
produce flexible overedge seams and edge
finishes. It is particularly useful in construc
tion of garments made of knit, stretch, and
elastic fabric.
Even Feed foot improves the feeding of
fabrics that tend to stick, stretch, or slip while
being sewn. The foot feeds top and bottom
fabric layers together so that seams start
even, feed evenly, and end even.
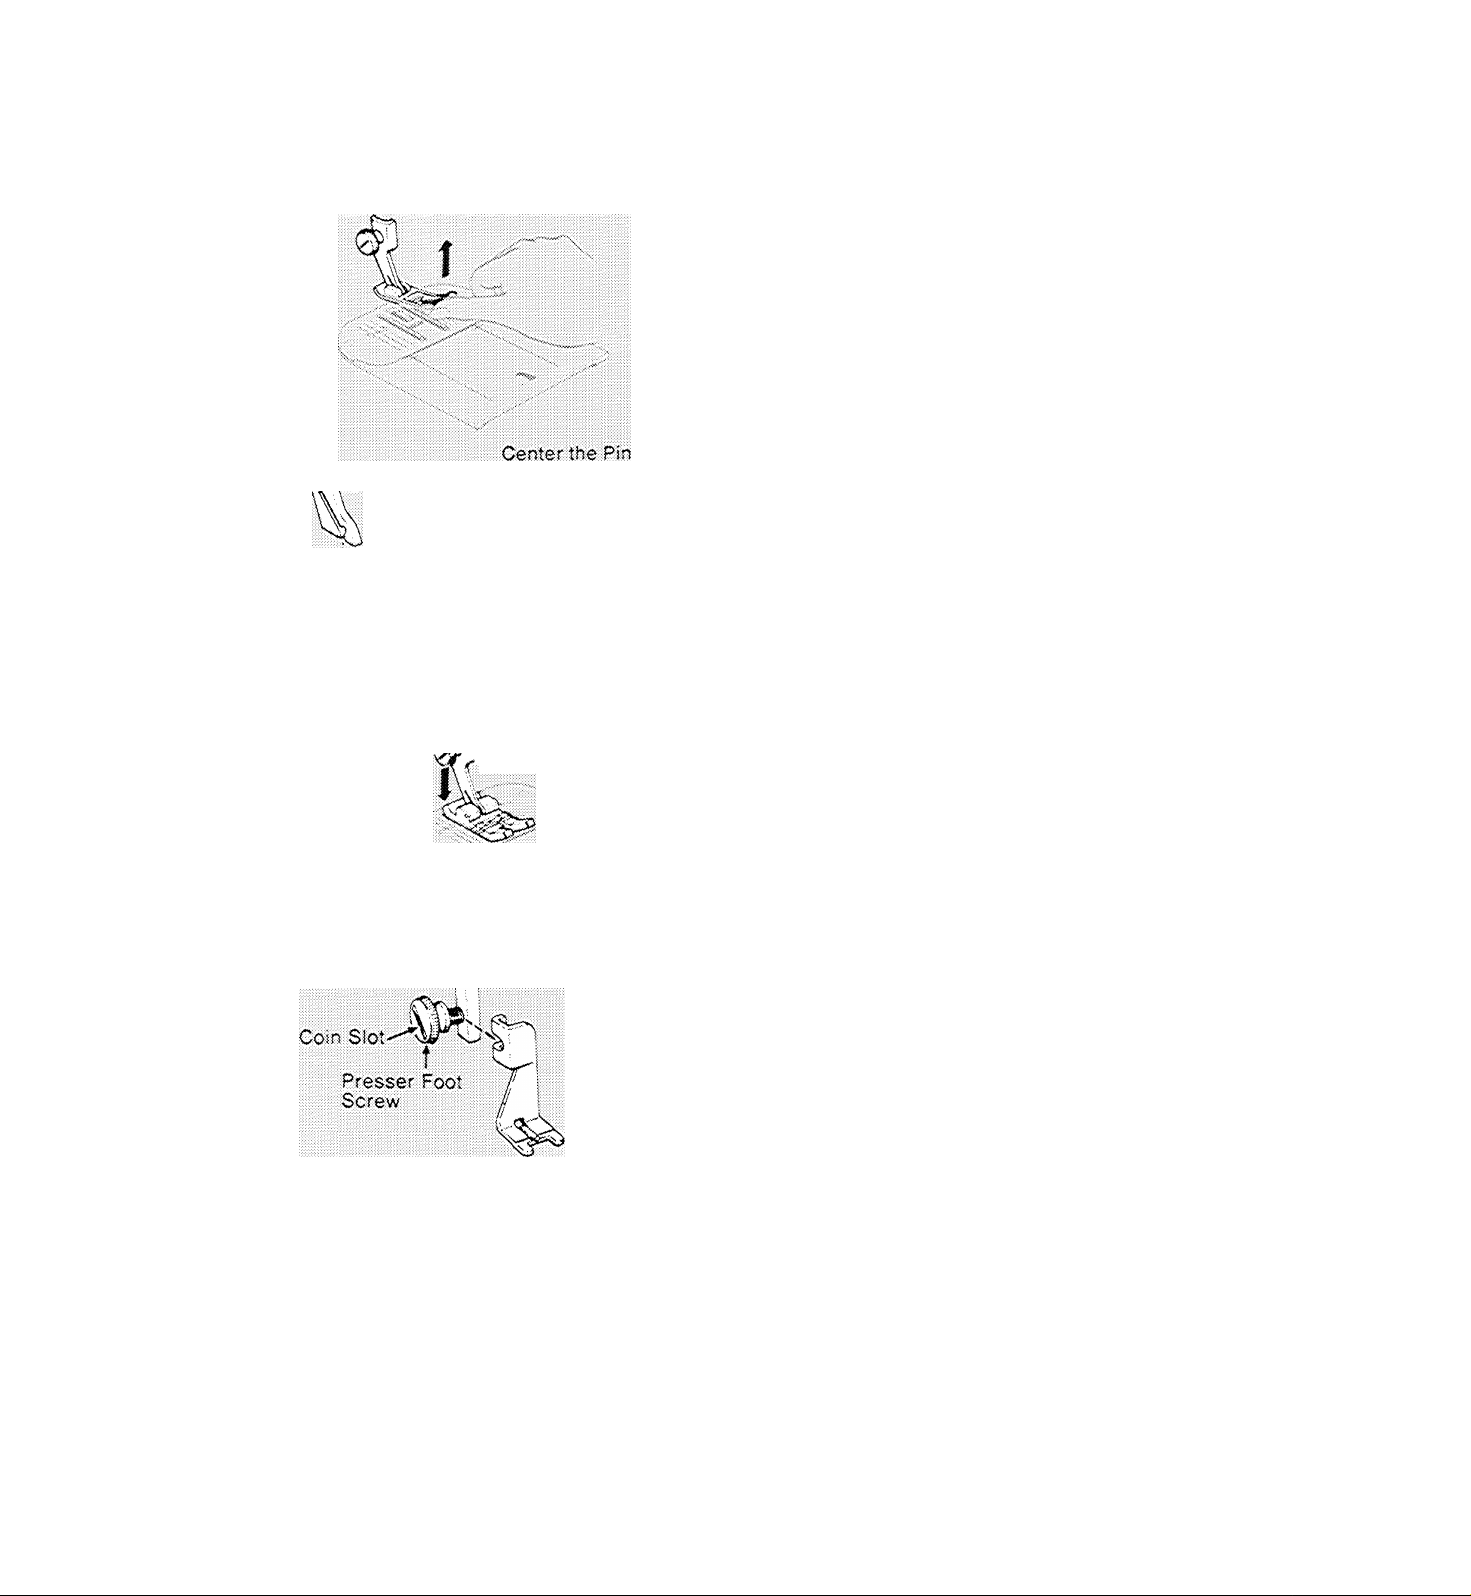
Changing Snap^on Presser Feet
press Toe Upward
for Rerr.ovai
of New Presser Foot
under Shank
■ \, Lower Presser Bar and
Press Down on Screw
; to Secure New Foot
CHANGING PRESSER FEET
Snap-on Presser Feet
These presser feet snap on and off a common
shank.
1. Raise needle to its highest position and
raise the presser foot.
2. Press toe of presser foot upward (as far as
it will go) and then snap down to remove.
3. Center the new presser foot under the
shank and lower the presser bar so that the
shank fits over the presser foot pin.
4. Press down on presser foot screw until foot
snaps into place.
To remove and replace shank of snap-on
presser feet, follow instructions below for
one-piece presser feet.
Changing One-Piece Presser Foot
Movable Arm.
One-Piece Presser Feet
1. Raise needle to its highest position and
raise the presser foot.
2. Loosen presser foot screw and remove the
foot.
3. Hook new foot around the presser bar and
tighten presser foot screw.
NOTE: When changing one-piece presser
feet, you may insert the edge of a coin in the
slot to tighten presser foot securely.
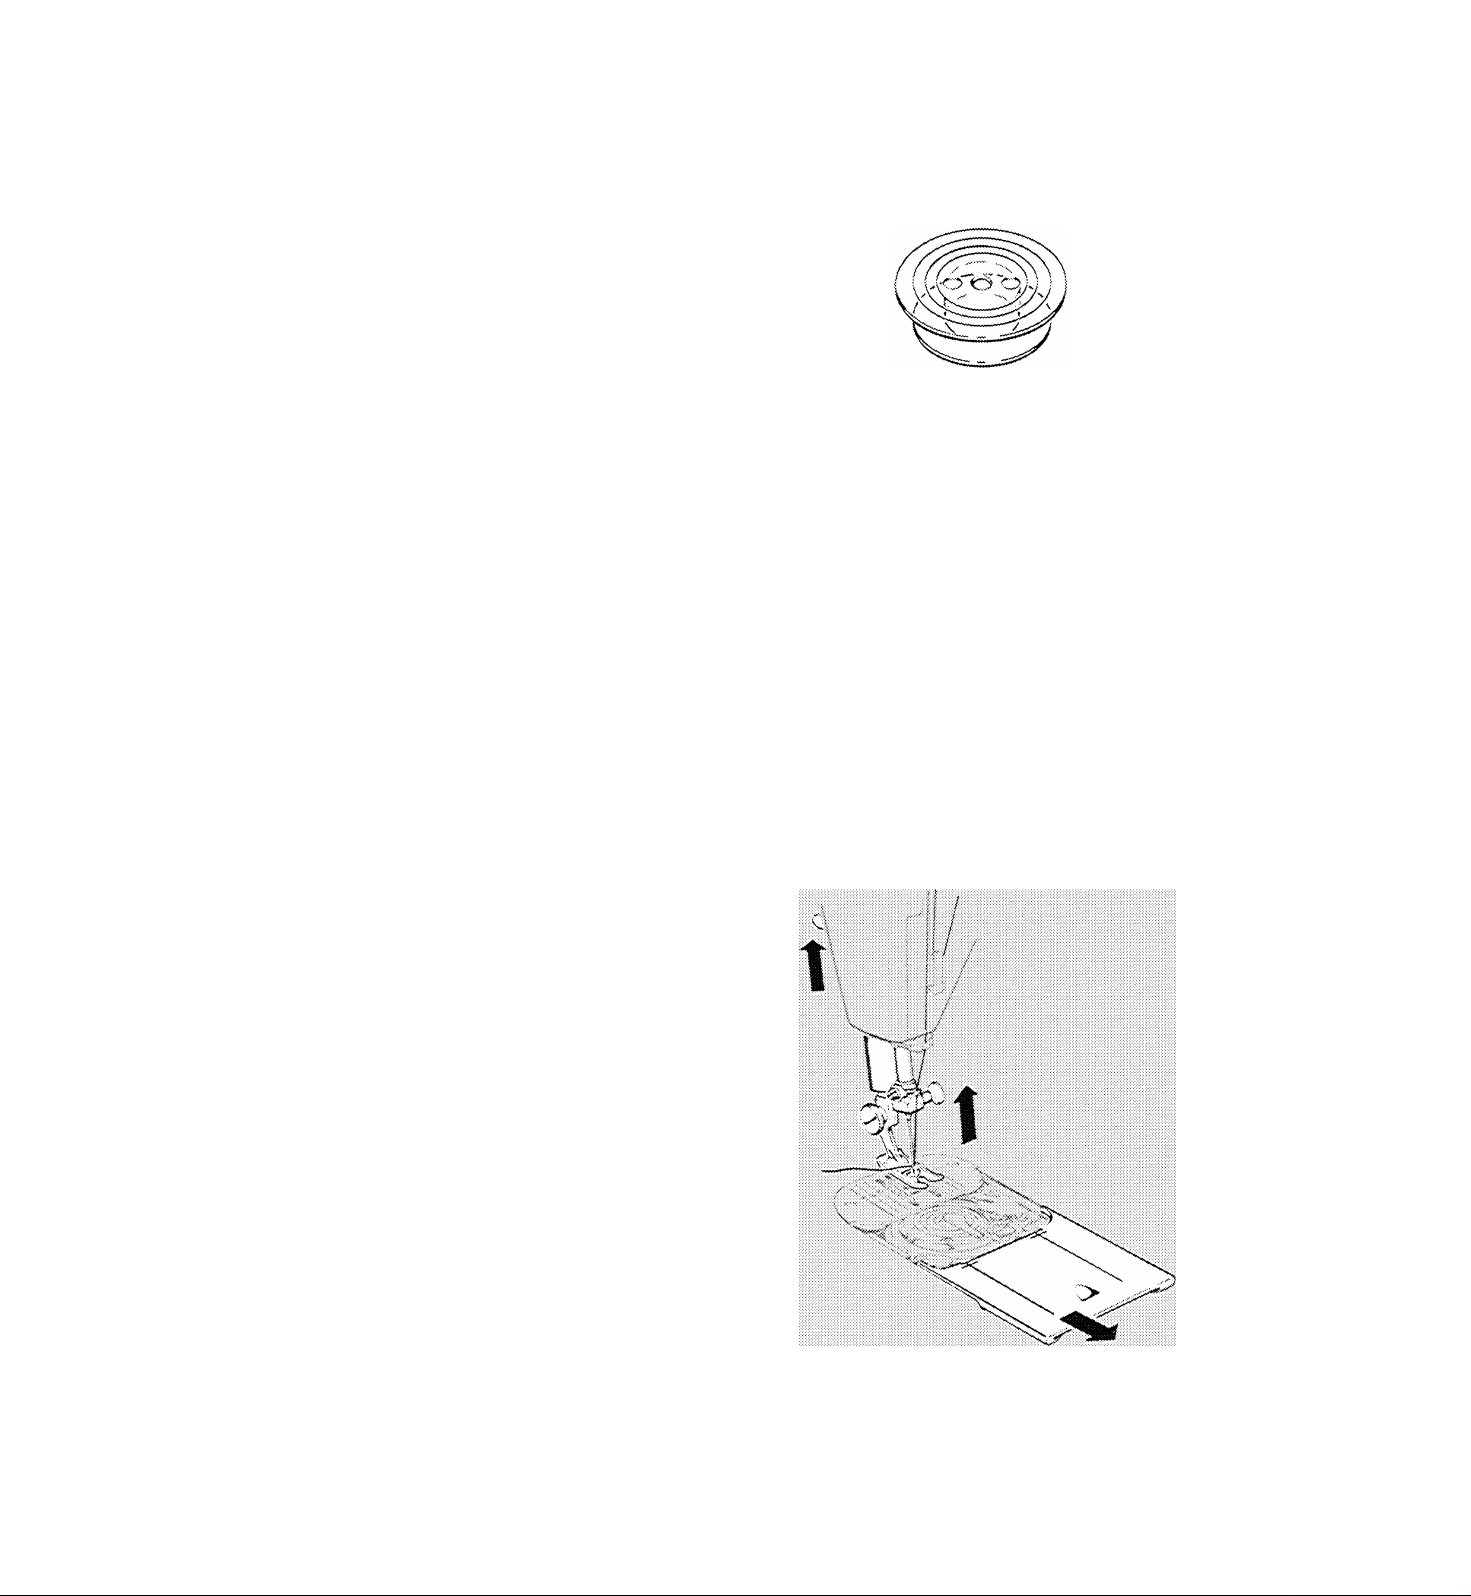
The Even Feed Foot
• Guide Even Feed foot into position from
back of machine, making sure the movable
arm straddles the needle clamp. Tighten
presser-foot screw securely with a coin.
Needle
Clamp
10
Changing Even Feed Foot
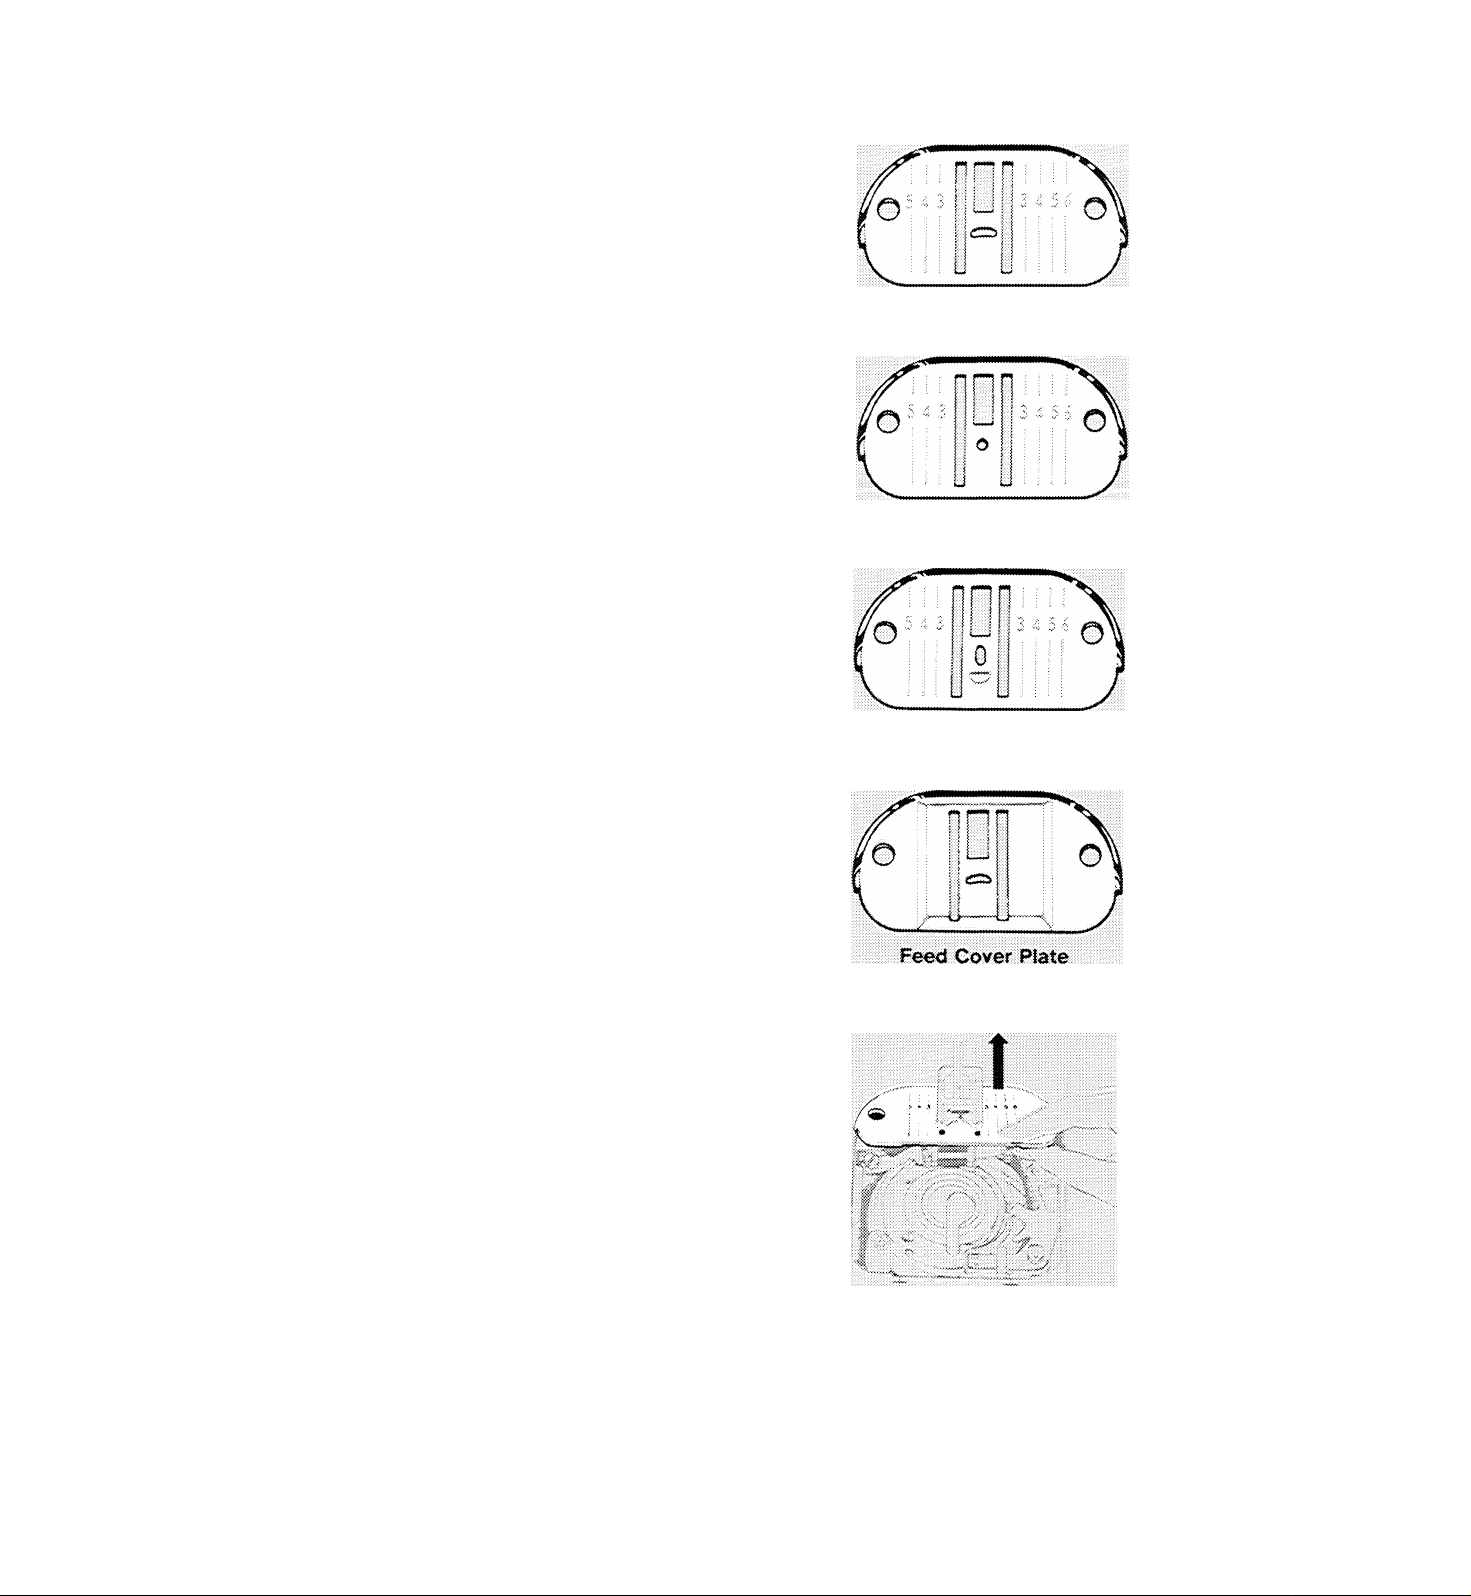
NEEDLE PLATES
General purpose needle plate, in place in
your machine, can be used with all presser
feet.
Straight stitch needle plate for use with the
straight stitch presser foot.
Chainstitch needle plate is one of three ac
cessories that must be used together for
ohainstitching. For instructions, refer to
“Chainstitching” beginning on page 35.
General Purpose Needle Plate
Feed cover plate for use when fabric feeding
is not desired.
CHANGING NEEDLE PLATE
NOTE: Remove bobbin if it contains thread in
order to prevent thread being caught when
needle plate is replaced.
1. Raise needle to its highest point and raise
presser foot.
2. Open slide plate. Remove needle plate by
placing thumb under plate and lifting it up
and out.
Straight Stitch Needle Plate
Chainstitch Needle Plate
3. Position new needle plate over the two pins
and release. (Needle plate is drawn into
position by magnets.)
4. Close slide plate.
Changing Needle Plate
11
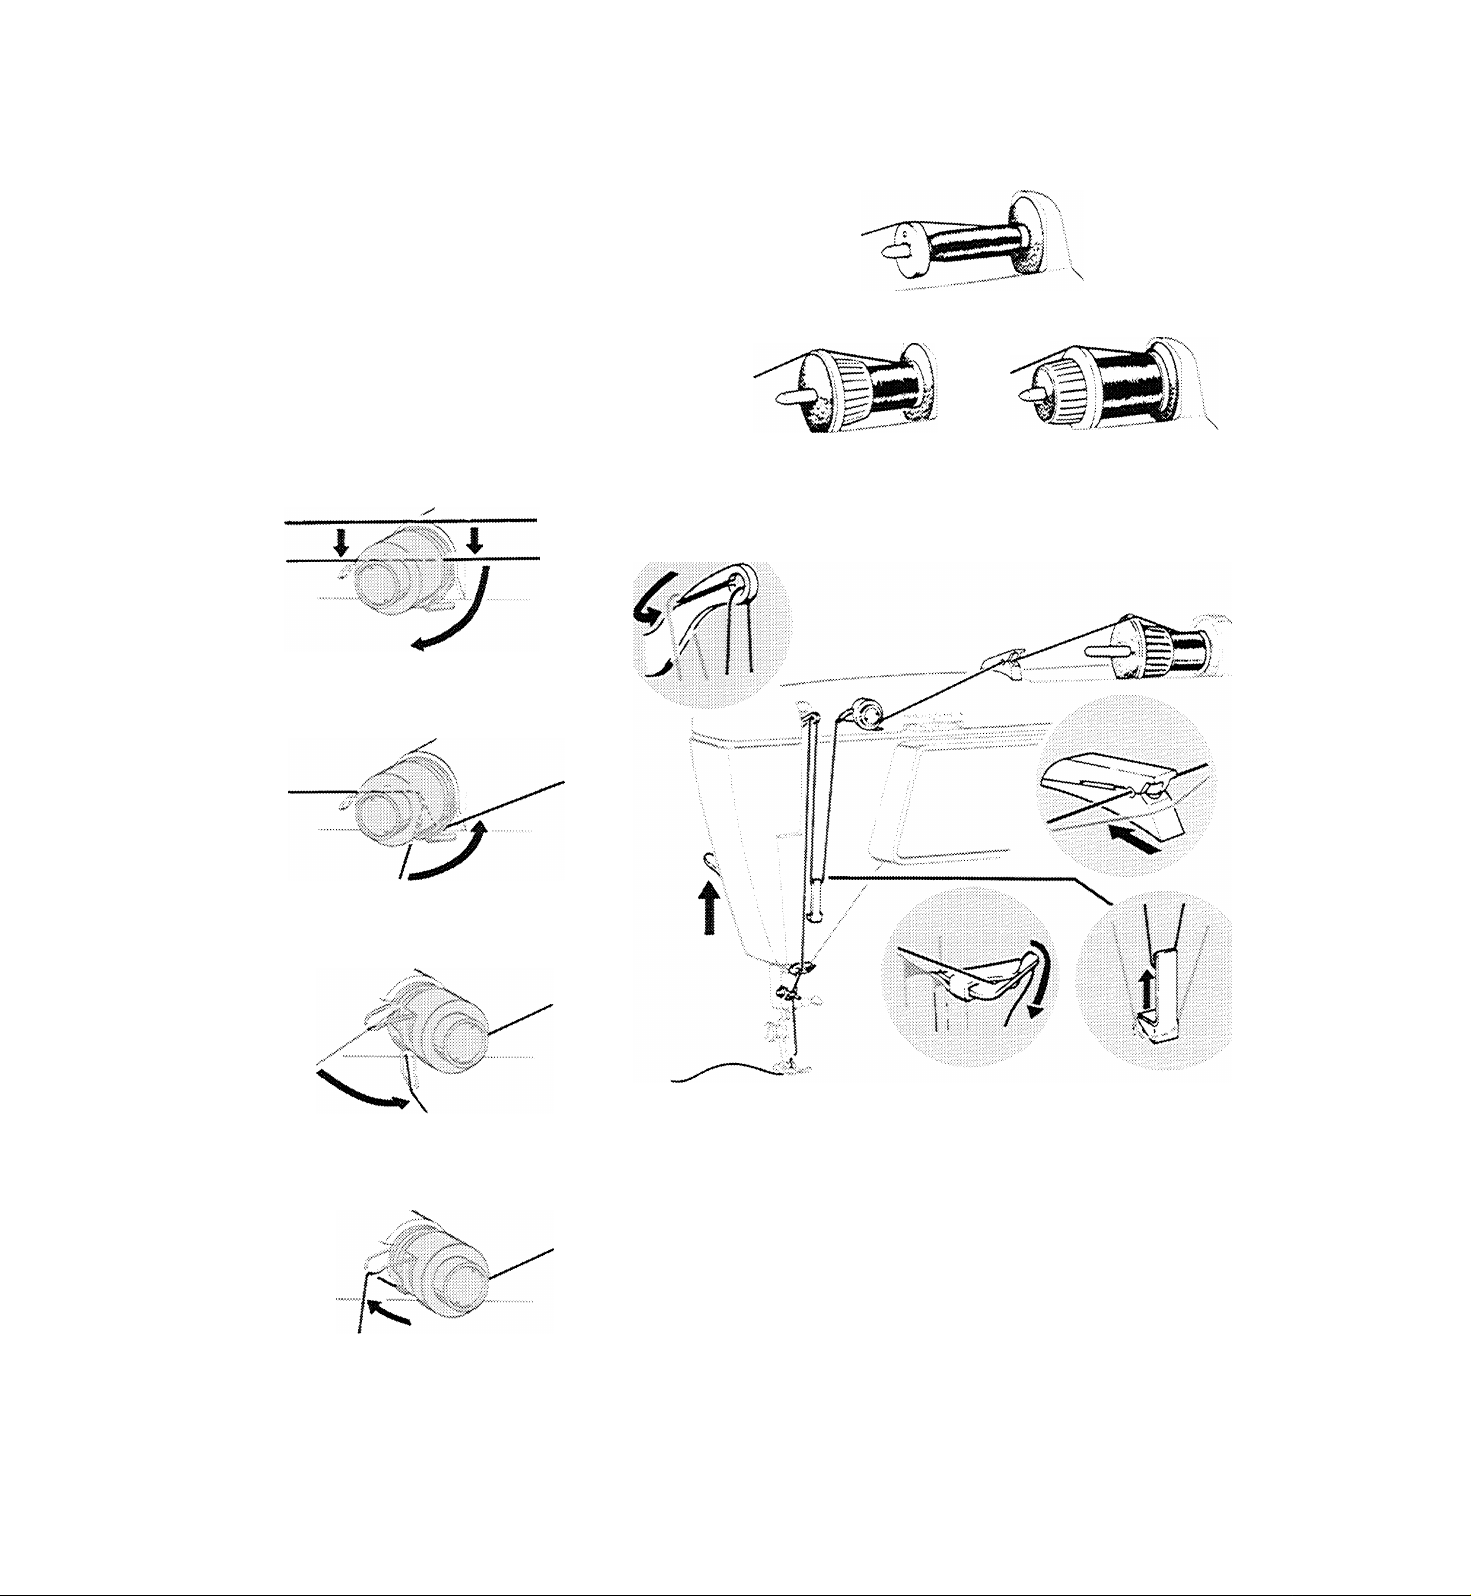
threading the machine
Place spool or tube of thread on horizontal
spool pin. If spool has a retaining slit, the slit
should be placed against the spool cushion to
the right Select correct spool holder according
to the type and diameter of spool being used.
The diameter of the end of the spool holder
should always be larger than that of the spool
itself. Press holder firmly against spool to pre
vent it from turning.
With two hands, slip thread
horizontally between ten
sion discs from the top.
ÍO Hold Small Tubes
To Hold Small Spools To Hold Large Spools
THREADIMG THE NEEDLE
With right hand, lead thread
under thread guide on right
side . . .
1
Turn hand wheel to raise take-up lever to its highest posi
... and, with left hand, lead
thread over spring and un
der guide on left side.
tion, and raise presser foot to release the tension discs.
2, Lead thread through all points as shown, making sure to:
Use both hands and snap thread horizontally into thread
guide-post, making sure it enters eyelet fine thread
should be doubled for added strength.
Thread tension discs as illustrated at left.
Thread take-up lever from back to front, guiding thread
Allow spring to return to its
normal up position and con
tinue threading the machine.
down over top of lever and then up into eyelet.
Thread needle from front to back, drawing about four in
ches (10cm) of thread through eye of needle.
Note: Dotted lines in illustrations represent thread path hidden by machine.
12
WINDING THE BOBBIN
Push-button bobbin winding wiO make your
sewing go faster than ever before — whether
you are using a lot of one kind of thread or
small quantities of blfierent threads.
You will find a bobbin in place under the slide
plate of your machine. To open slide plate,
simply slide it gently toward you. If the bobbin
runs out of thread while you are sewing, you
can rewind it without removing it from the
machine-
Bobbin
preparation for Winding
l4 R I
r 1 Ti-i
Preparation Steps
Make sure buttonhole dial is in OFF position.
1. Use genera! purpose, special purpose, or
straight stitch presser foot.
2. Raise presser foot to release tension on
thread, and raise the needie to its highest
position. (Make sure your needle is a size
11 or larger).
3. Set needle position and stitch width dials
at straight stitch setting indicated by
A symbols.
4. Open slide piate and make sure bobbin is
empty. For removal of bobbin and thread,
see page 16.
13
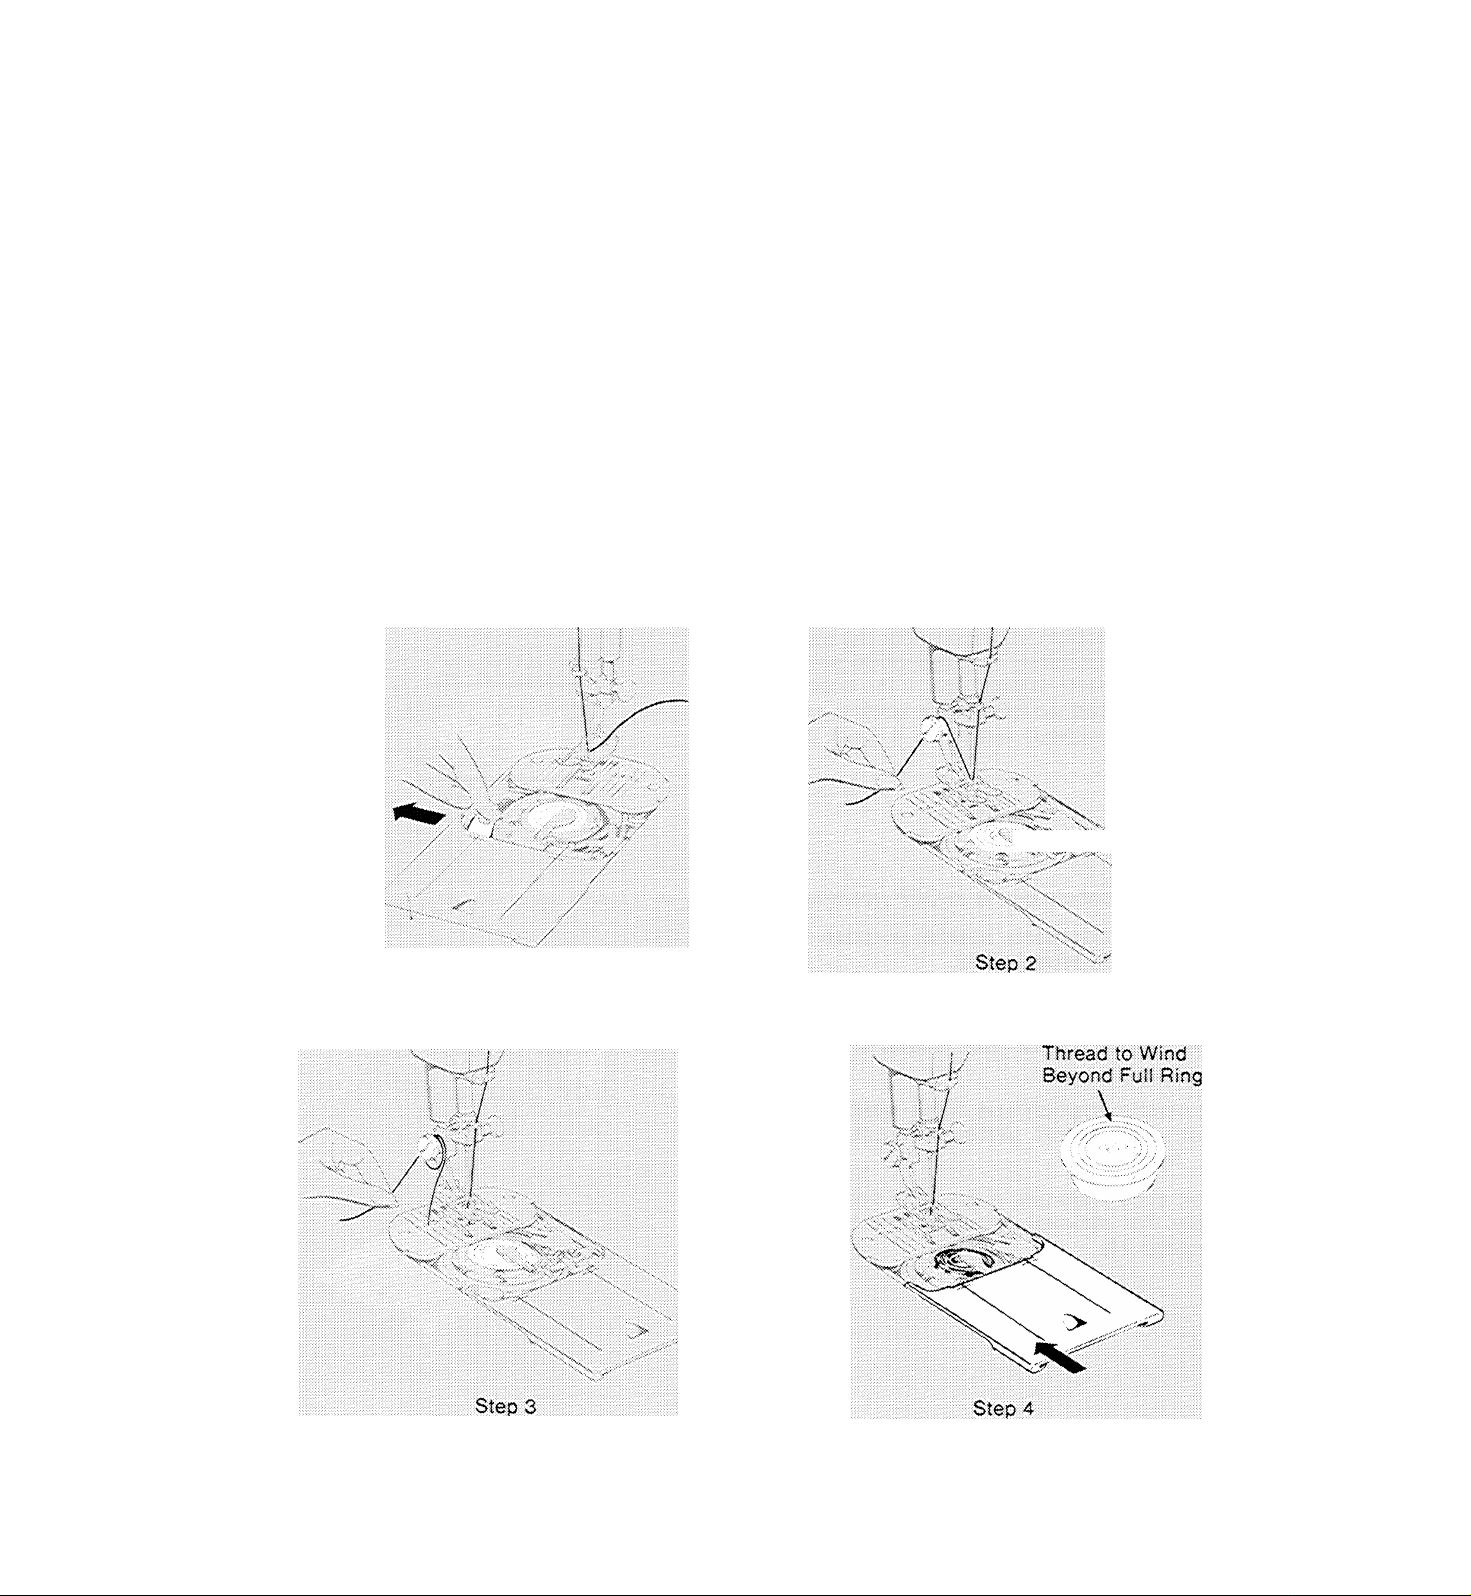
Wmdirsg Steps
1. Press bobbin push button to the left to
engage it in winding position.
2. Wrap thread around pressar foot screw,
and hold end of thread firmly.
3. Start the machine.
* Run the machine at a moderate speed.
♦ Pull thread end away after a few coils
have been wound.
• Keep your eye on the bobbin as it fills. Do
not allow thread to wind beyond the out
side FULL ring.
4. Close slide plate to release push button to
sewing position.
Turn to the next page for instructions on start
ing to sew.
Winding Steps
14
Step 1
Do Not Allow
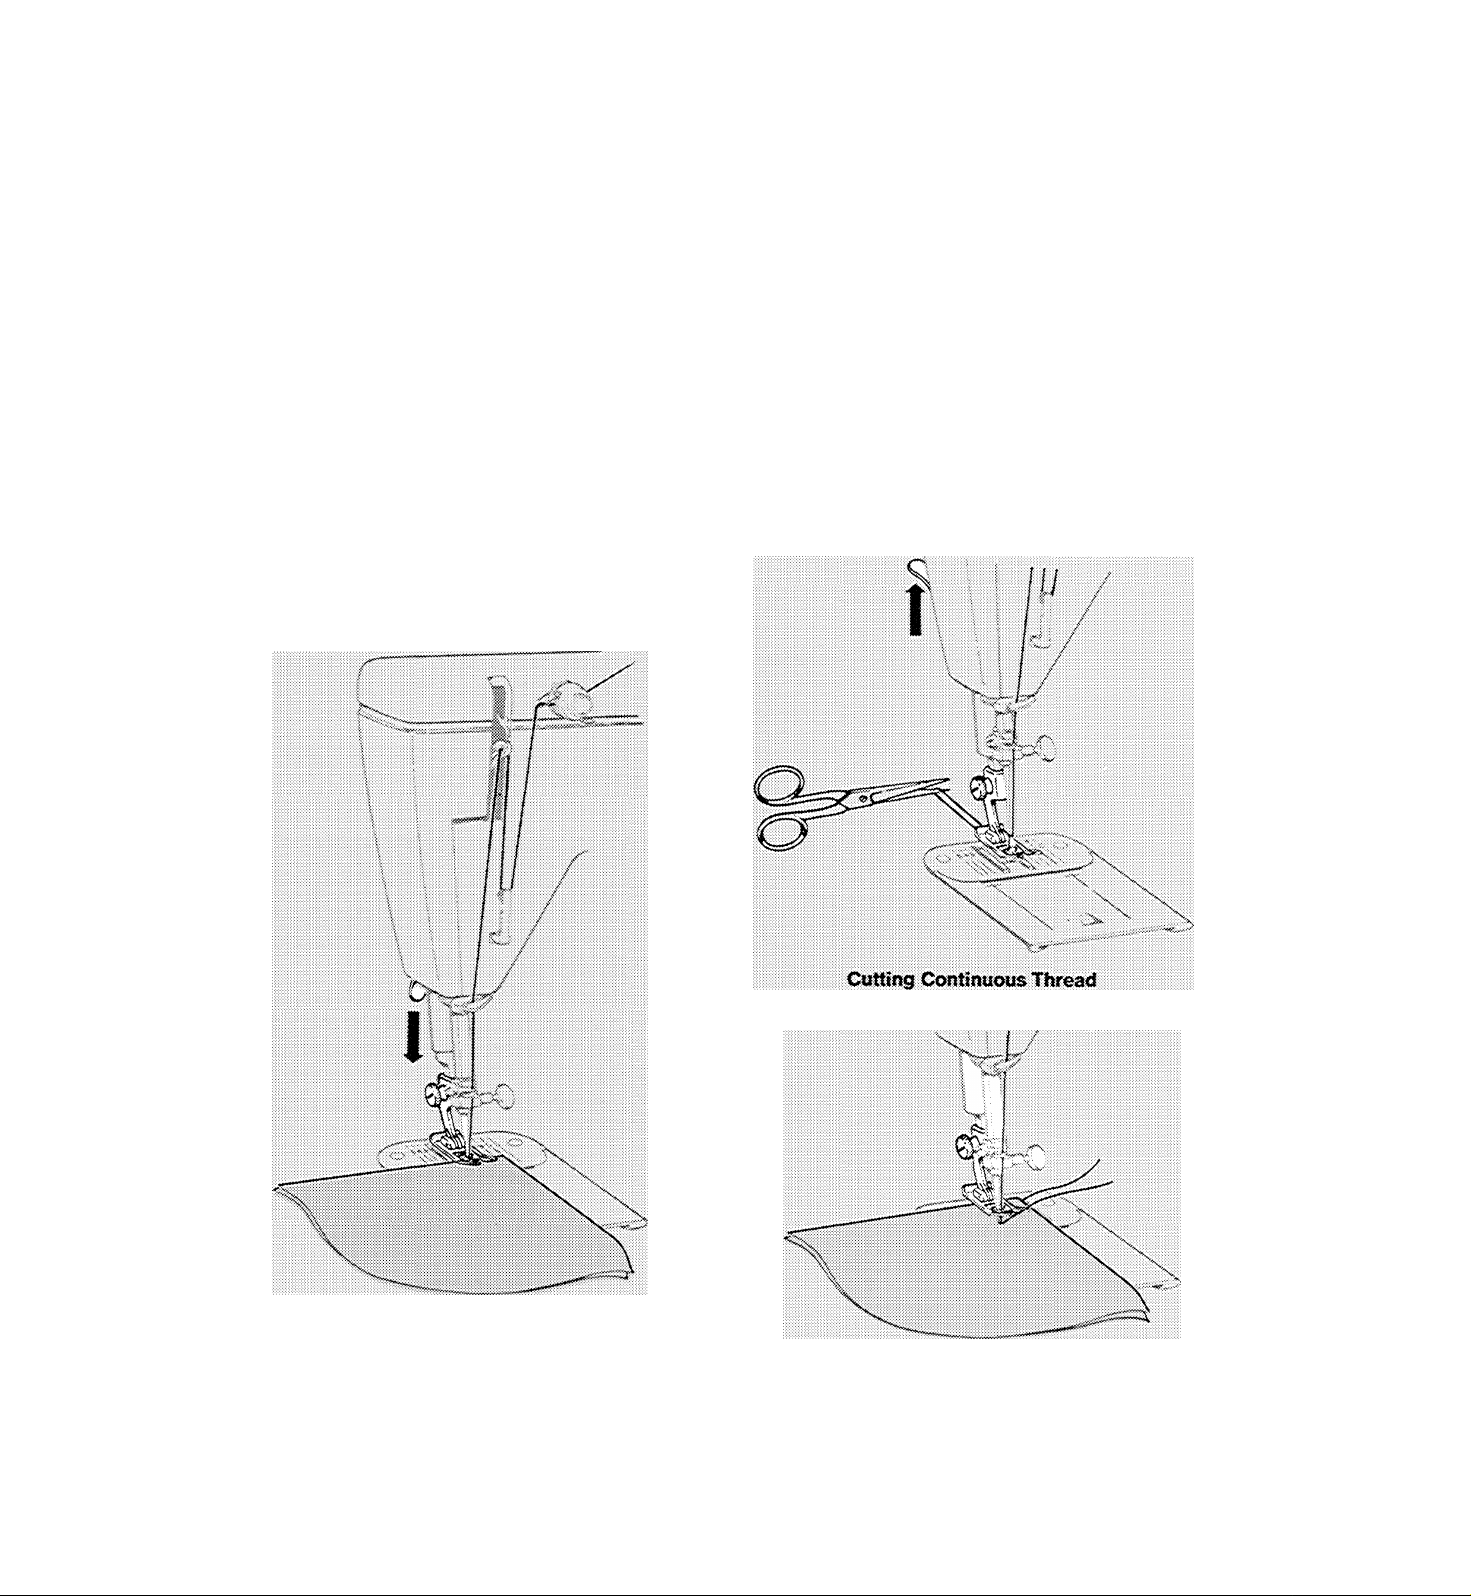
how to start sewing
How you begin to sew after winding a bobbin
depends on whether your stitching is to start
at or away from the edge of the fabric.
TO START AT FABRIC EDGE
♦ Position needle in very edge of fabric by
pressing speed controller lightly or turning
the hand wheel
• Lower the presser foot and stitch. The con
tinuous thread, leading from the needle to
the bobbin, will 'lock” over the fabric edge.
TO START AWAY FROM FABRIC EDGE
• Puli thread back under presser foot and cut.
• Position needle in fabric where desired and
stitch.
NOTE: Should the bobbin run out of thread
after you have begun a line of stitching, re
move the fabric, rewind the bobbin, and follow
the two immediately preceding steps.
Starting at Fabric Edge
with a Continuous Thread
Starting Away from Fabric Edge
15
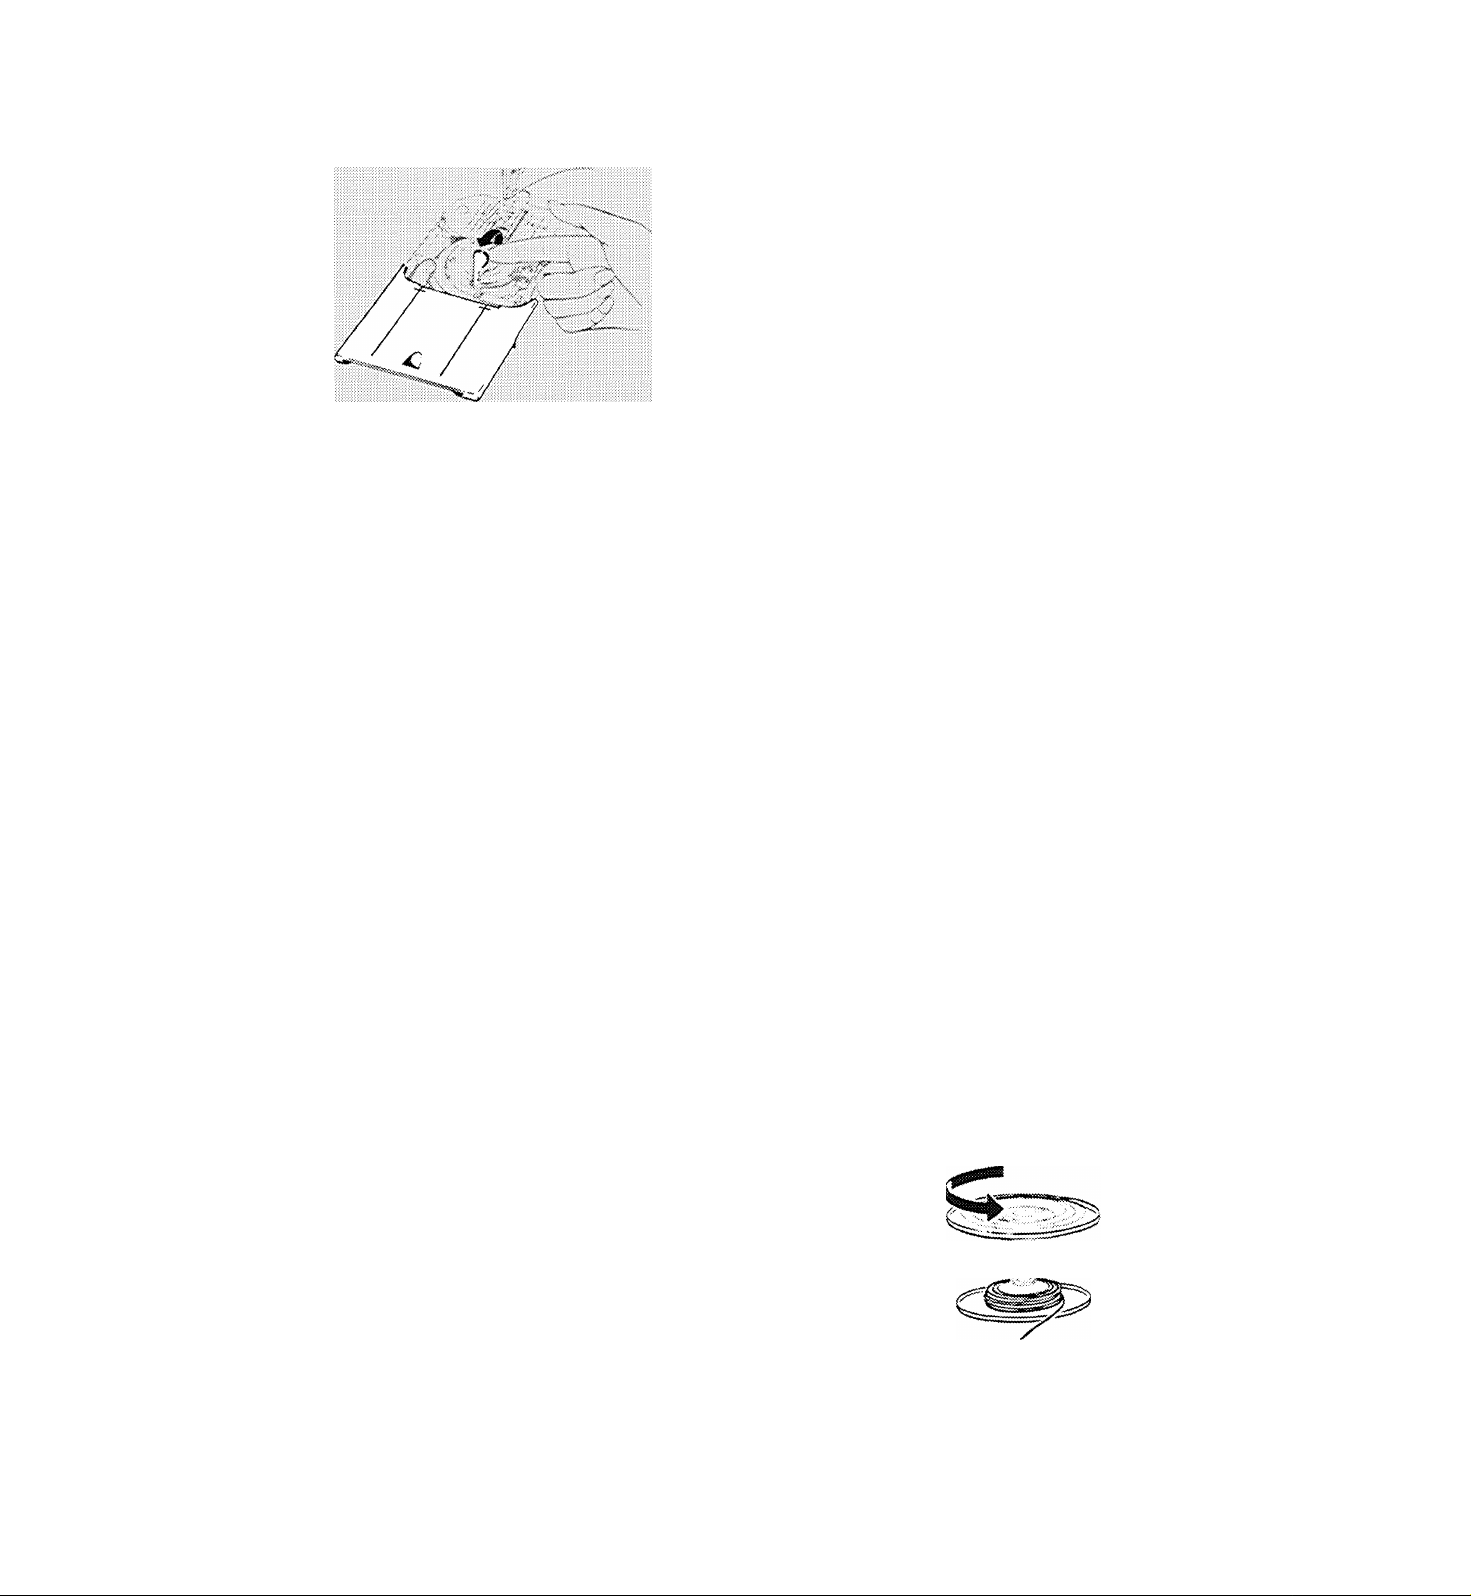
Removing Bobbin
changing the bobbin
REMOVING THE BOBBIN
Raise needle to its highest position.
1. Open slide plate; leave bobbin push button
in sewing position,
2. Raise bobbin latch by inserting fingernail
under end of latch at center of bobbin.
Open Slide Plate and Raise Latch
/■^ f. V ' V -X
/ / /■ ;■' ’Vf^--:-. Ч Ч
/ / / ,/
Lift Out Bobbin
Replacing Empty Bobbin
.........
.
Л
X .
V ■ ■
> У
7 ^
/
/
■:. < /
/ /
Slip Bobbin into Case
V —
.-г'-Л,
.
'' '
3. Insert fingernail under rim of bobbin im
mediately to right of latch and remove the
bobbin.
REPLACING AN EMPTY BOBBIN
1. Make sure bobbin halves are securely tight
ened.
2. With latch raised, slip bobbin (wide side
up) into bobbin case. Then snap latch down
to secure bobbin.
3. Leave the slide plate open until you have
finished winding,
REMOVING THREAD FROM BOBBIN
■\
If there is not much thread left on the bobbin,
you do not need to remove bobbin from ma
chine— simply pull the thread end through
the needle plate.
If there is a lot of thread left and you do not
wish to reserve it by setting aside the bobbin
for future use, remove the bobbin, unscrew the
two halves, and remove all the thread at once.
Then screw the two halves together, tighten
ing securely.
16
/ /'
/
■ <, /
f/ 'x..^;-^:r v-.
\
/
Snap Latch Down
/ \...
Removing Thread from Bobbin
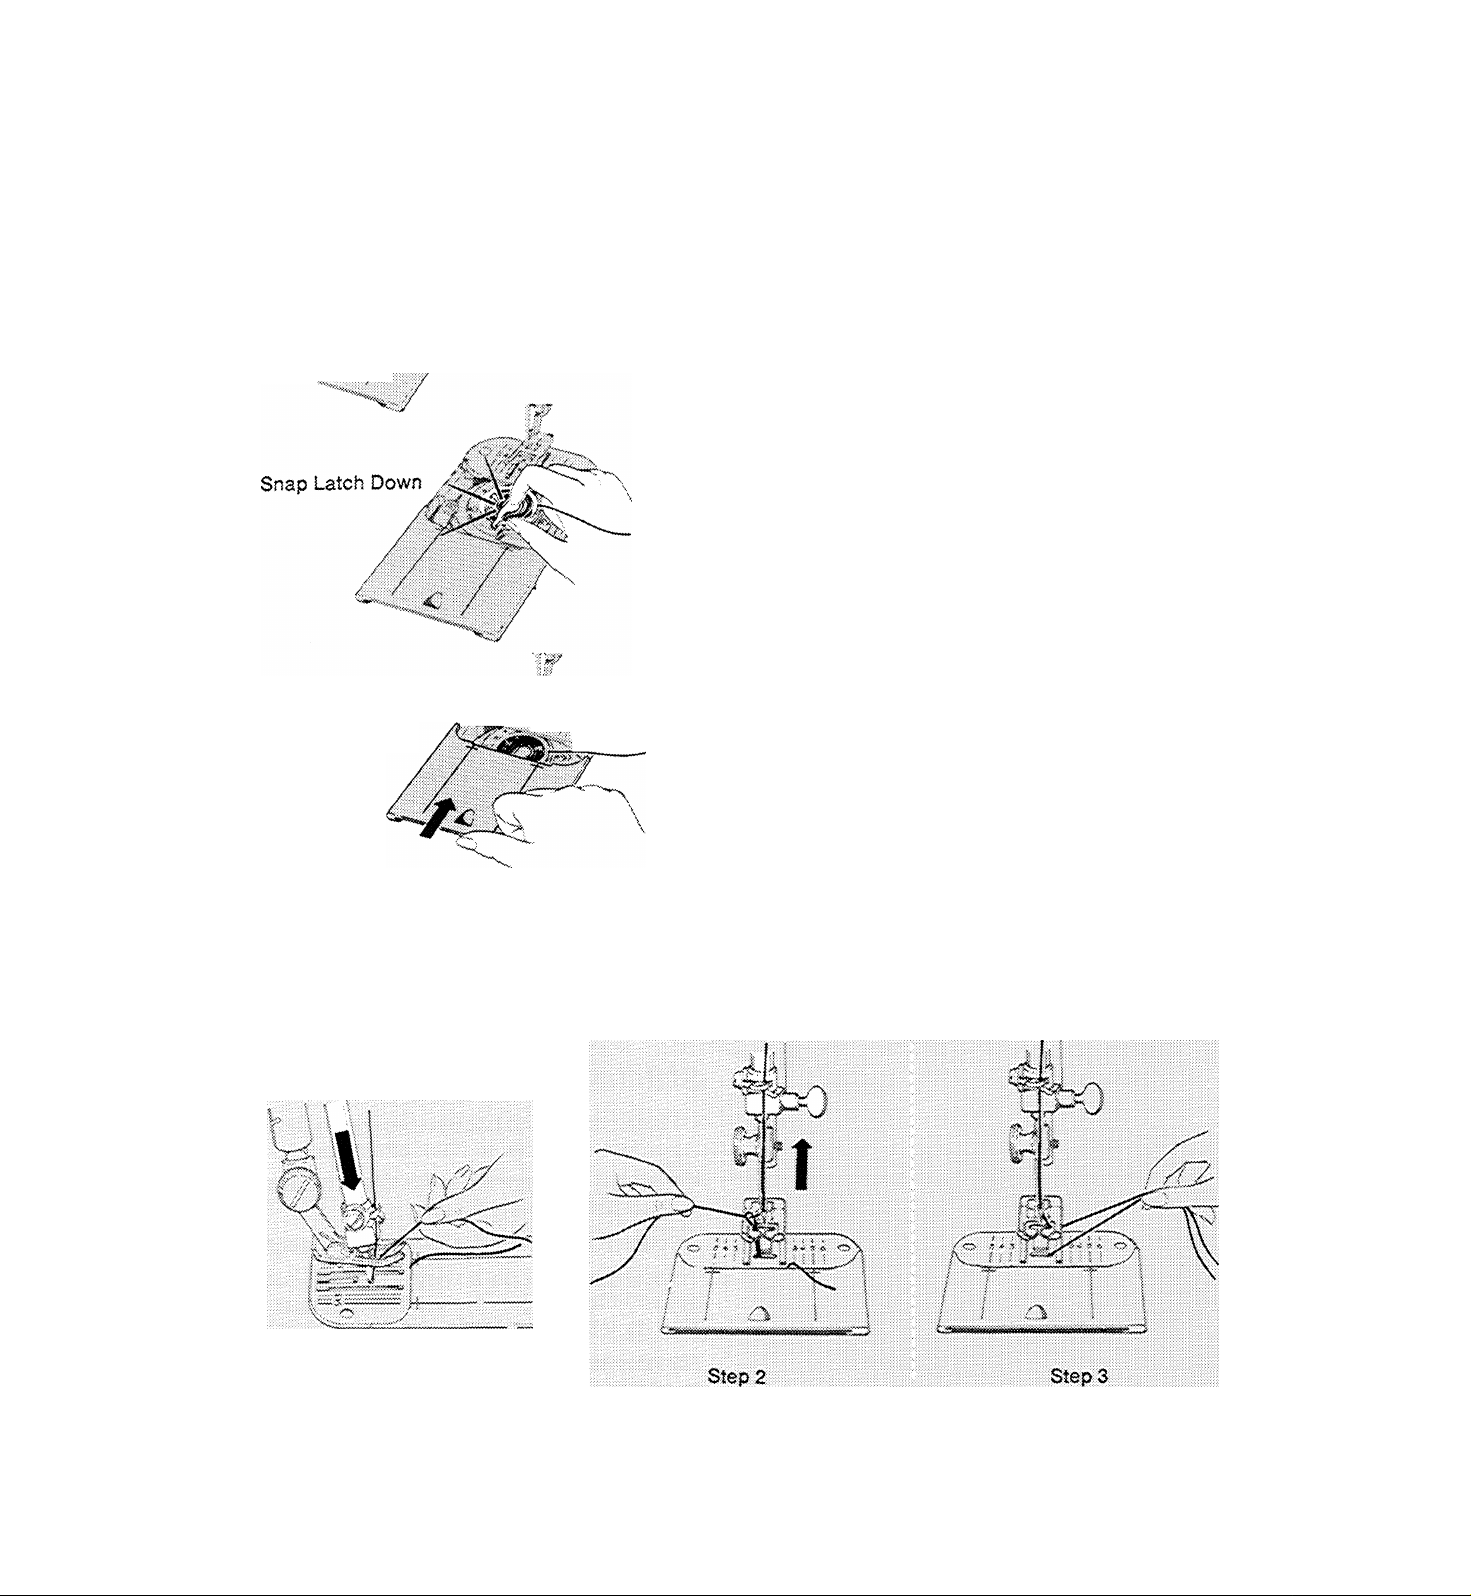
REPLACING A WOUND BOBBIN
0':4K7r>
/f
VVi
/
^ / / Insert Bobbin
Close Slide Plate
Raise needle to Its highest position.
1 Open slide plate; leave bobbin push button
in sewing position.
/
2. Draw about four inches {10cm) of thread
from bobbin and place bobbin in case with
thread leading off to right side of latch.
Snap latch down to secure bobbin.
3. Close slide plate, allowing the thread to
enter the slot in the slide plate. Then raise
the bobbin thread as instructed below.
RAISING THE BOBBIN THREAD
1. Hold needle thread lightly with left hand
/■"o
and turn hand wheel slowly toward you so
that needle enters needle plate,
2. Continue turning hand wheel until needle
rises and brings up bobbin thread in a loop.
Replacing a Wound Bobbin
Stepi
3. Undo the loop and place both threads under
the presser foot, laying them diagonally to
the right Position needle in fabric where
desired, lower the presser foot and stitch.
Raising the Bobbin Thread
17
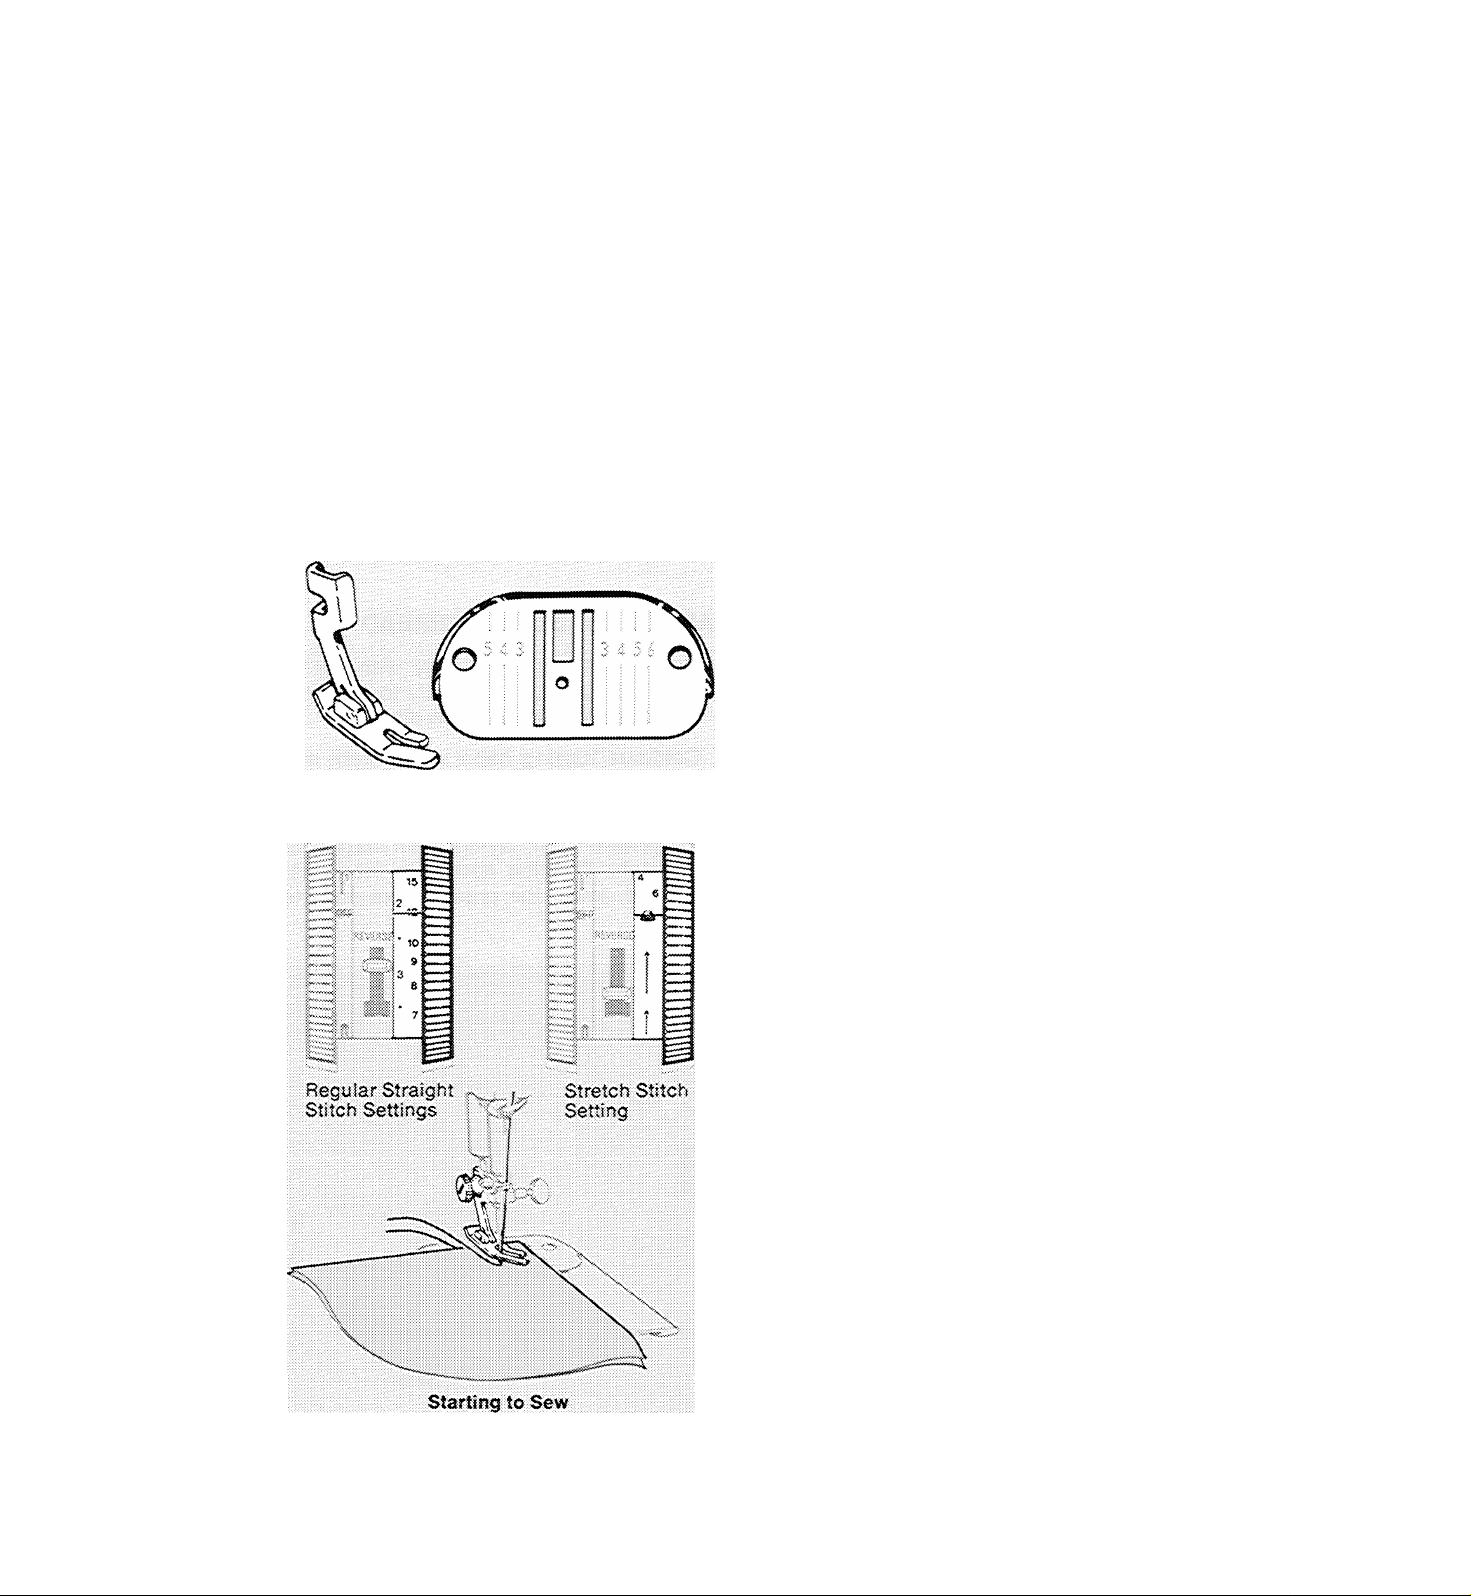
3. STRAIGHT STITCHING
Pattern: Straight Stitch
Needie Position: A
Stitch Width: A
Stitch Controi; To suit fabric
1 :... 4. ; A
Dials Set for Straight Stitching
Straight Stitch Needle Plate or
General Purpose Needle Plate
Straight Stitch Foot or
General Purpose Foot
preparation
Before you set the dials for straight stitching,
turn the handwheel toward you untiltheneedle
is above the needle plate.
Straight Stitch Foot and Needle Plate
SETTING THE IVIACHINE
1. Set pattern dial selector at .
2. Move needle position dial to A .
3. Set stitch width dial on A .
4. Set stitch control for desired stitch length.
For regular straight stitching, turn dial to
a numbered setting; for straight stretch
stitching, turn dial to
^ setting.
!
CHOOSING ACCESSORIES
Best results will be obtained if you use the
straight stitch foot and needle plate. However,
the general purpose foot and needle plate
may also be used.
starting to sew
* Place needle and bobbin threads under pres-
ser foot and draw to back of machine.
• Position the needle in the fabric where de
sired for stitching start.
18
♦ Lower the presser foot and start the machine.
To sew perfectly on a wide variety of fabrics
adjust stitch length, pressure and thread ten
sion as instructed on the following pages.
For information on straight stretch stitching, turn
to page 52.
adjusting for your fabric
SETTING STITCH LENGTH
The stitch-controi dial regulates the length of
both straight and zig-zag stitches. The num
bers 6 to 20 represent the number of straight
stitches per inch and the numbers 1 to 4
represent stitch length in milhnneters.
Generally, shorter stitches are best for light
weight fabric; longer ones for heavy fabric.
Curved seams, bias-cut seams and scallops
require short straight stitches for elasticity
and smooth contours. Bound buttonholes
should be sewn with a short stitch for
durability and strength.
The FINE area is used for the adjustment of
zig-zag satin stitching (page 28} and speed
basting {page 33}.
The ^ setting is used for straight-stretch
stitching and Flexi-Stitch patterns. For infor
mation on Flexi-Stitch patterns and straightstretch stitching, see pages 25 and 52.
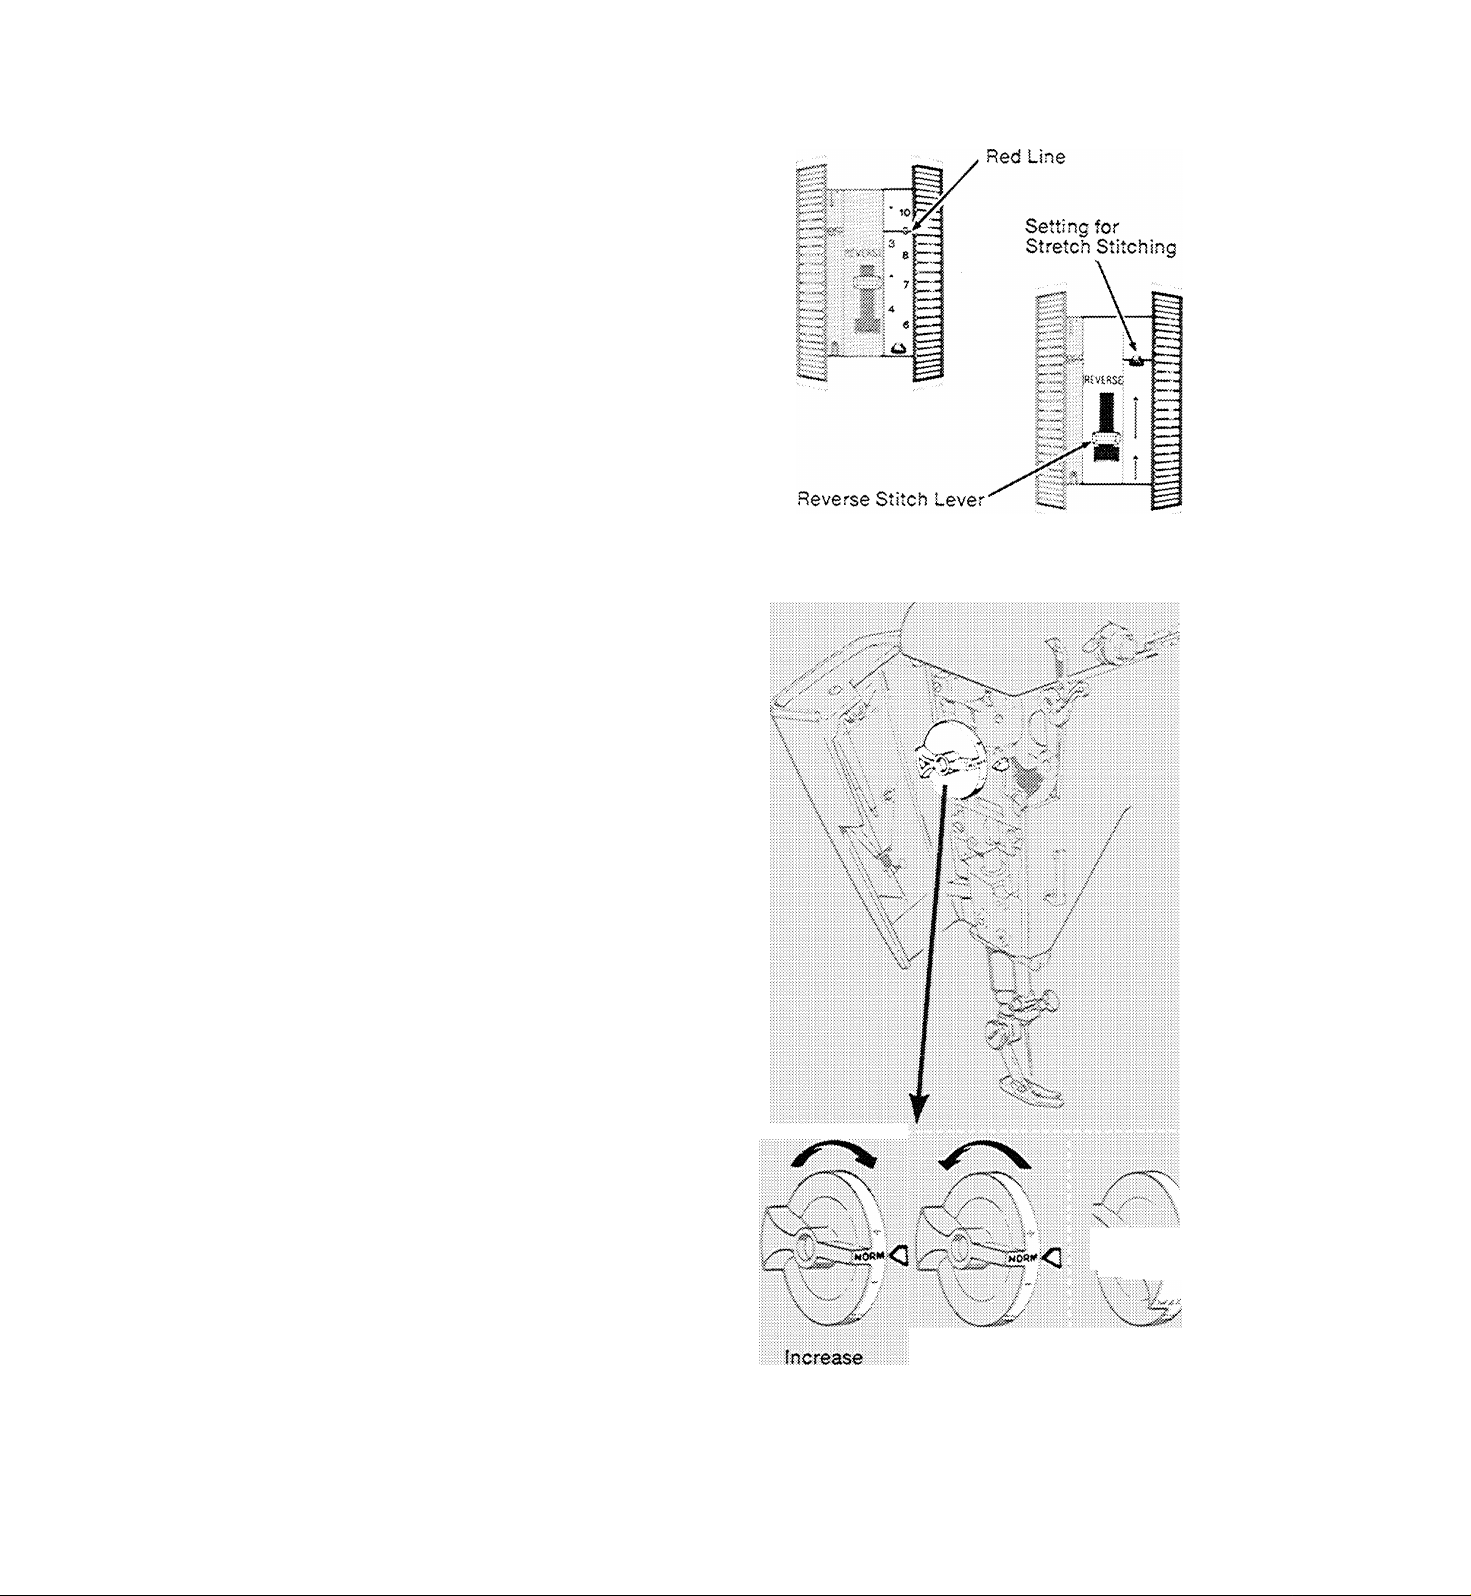
Stitch Control Dial
• To set stitch control, turn dial until setting
desired is under the red line.
For reverse stitching, simply press reversestitch lever all the way down and hold in place.
Release lever for forward stitching.
REGULATING PRESSURE
The pressure dial regulates the pressure that
the presser foot exerts on the fabric. Correct
pressure is important because it means fabric
feeds smoothly and evenly. The NORM (nor
mal} setting Is an all-purpose setting that can
be used for sewing a wide variety of fabrics
of different weights and textures. Intermediate
notched settings, above and below NORM,
are also provided. When you need extra con
trol to sew very heavy fabric, use the MAX
{maximum) setting.
Lower the presser foot before setting pressure.
♦ To increase pressure, turn dial from NORM
toward MAX.
• To decrease pressure, turn dial from NORM
toward DARN.
♦ For darniing, set dial on DARN.
Decrease
Pressure Dial
Darning
19
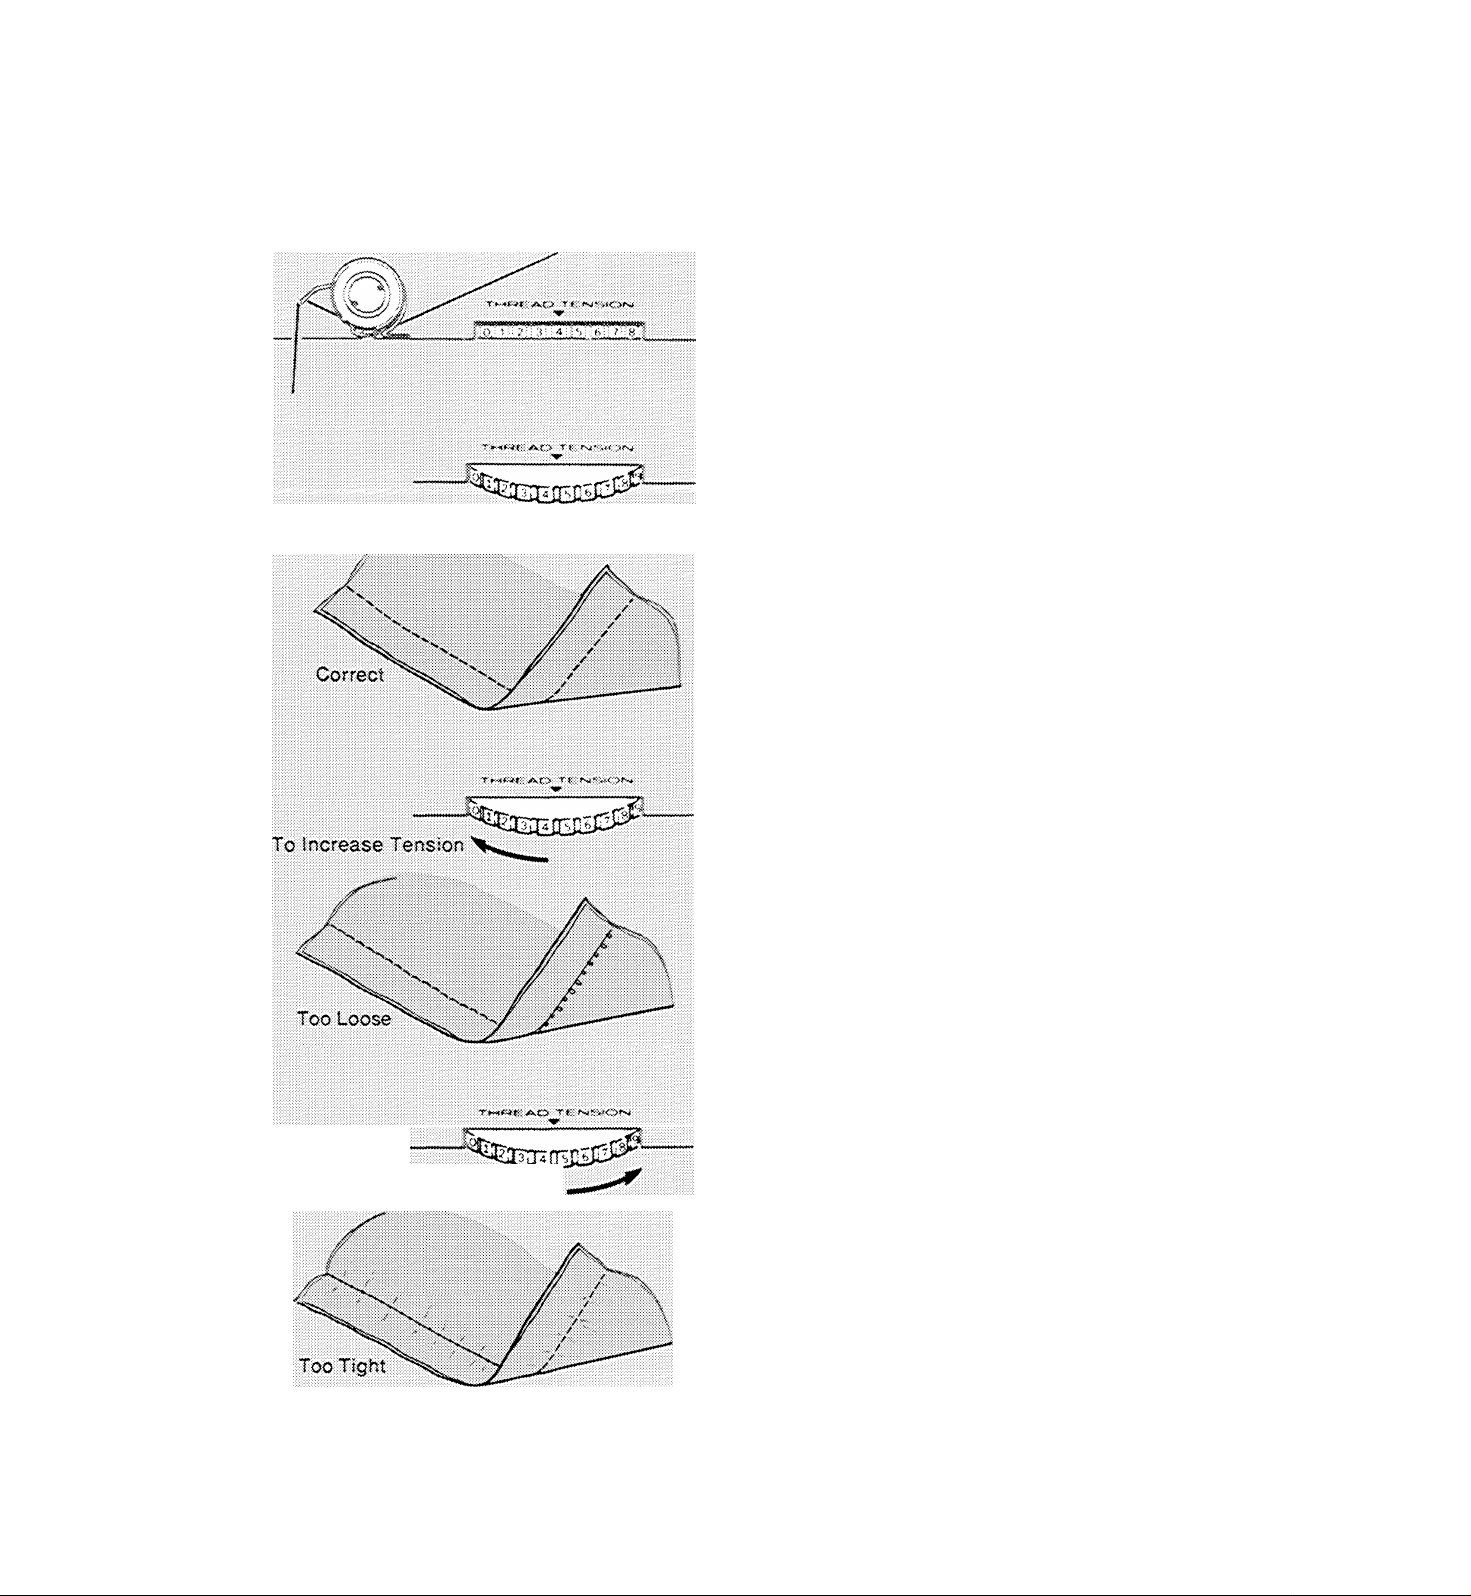
Needle-Thread Tension
REGULATING NEEDLE-THREAD TEN
SION
The tension dial regulates the degree of ten
sion on your needle thread. Set it according to
the type of thread and fabric you use. The
numbers on the dial are for reference and
eliminate guesswork in duplicating settings.
Correct tension is important because too
much or too little will weaken your seams or
cause your fabric to pucker. Be sure your
machine is threaded correctly and make a
test sample with the fabric and thread you
plan to use, and examine it.
A perfect stitch will have the needle and bob
bin threads locked between the two layers of
fabric with no loops on top or bottom and no
puckers.
To Decrease Tension
♦ If the top stitches in your test sample look
loose, increase needle-thread tension by
turning the dial to a higher number.
♦ If the fabric puckers, decrease needle-
thread tension by turning the dial to a lower
number.
20
sewing a seam
PIN BASTING
Pin basting is a time saver and can be used In
place of hand basting when you are straight
stitching seams in easy-to-handle fabric.
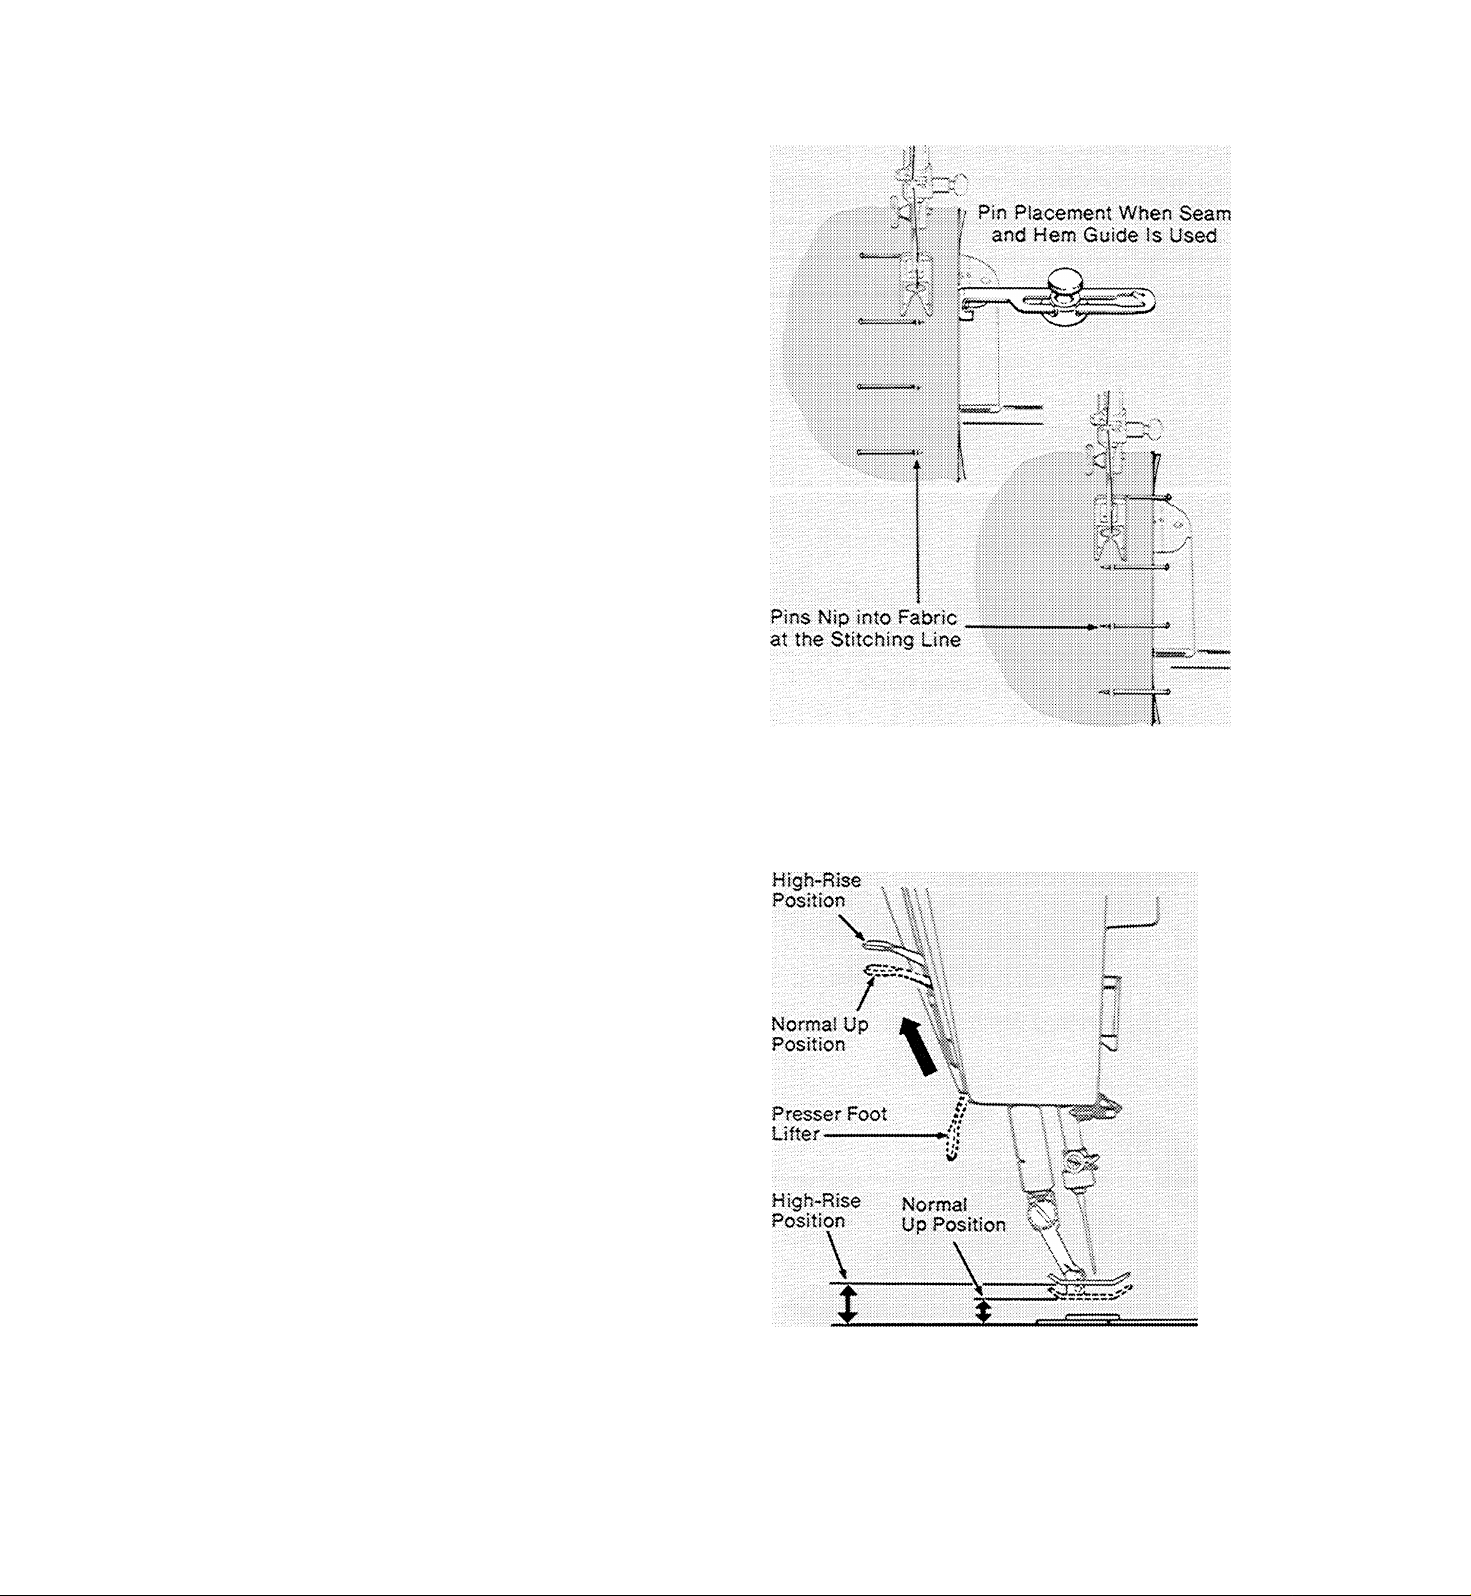
Use fine pins and place them so that:
• They are at right angles to the presser foot
and just nip into the fabric at the stitching
line.
• They do not extend under both sides of the
presser foot. Never place pins on the under
side of the fabric in contact with the feed.
Pin Placement When Seam
and Hem Guide Is Not Used
Pin Placement
PLACING FABRIC
Most fabric can be placed under the presser
foot by raising the presser-foot lifter to its
normal up position. When placing bulky fab
rics, such as coating, knit or terry cloth, or
multiple fabric layers, you will find it conven
ient to raise the presser-foot lifter to the highrise position. Hold lifter in position (since it
does not lock) while placing fabric under the
presser foot Make sure the lifter is all the way
down before starting to sew.
Presser Foot Lifter Settings
21
starting a Seam
Stitching a Seam
Guiding and Supporting Fabric
Applying Gentle Tension
STARTING A SEAM
1. With presser foot raised, turn hand wheel
toward you to position needle in fabric about
1/2 inch (1.3cm) from starting edge.Lower
the presser foot.
2. Press reverse-stitch lever all the way down
and hold in place. Backstitch to edge of
fabric for reinforcement.
3. Release reverse-stitch lever and stitch in
forward direction.
GUIDING AND SUPPORTING FABRIC
Most fabrics need only to be guided in front of
the presser foot Some fabrics, however, re
quire support while being stitched, as shown.
These fabrics require using the straight stitch
presser foot.
CAUTION: Do not puli the fabric while you are
stitching as this may deflect the needle, caus-
ing it to break,
• For filmy sheers, knits, tricot, etc., apply
gentle tension by holding seam in front and
back of the presser foot.
22
Applying Firm Tension
♦ For stretch fabrics, apply firm tension front
and back when stitching in the same direc
tion as the stretch. For seams not on the
stretch direction, stitch in the conventional
manner, guiding fabric in front of the presser
foot.
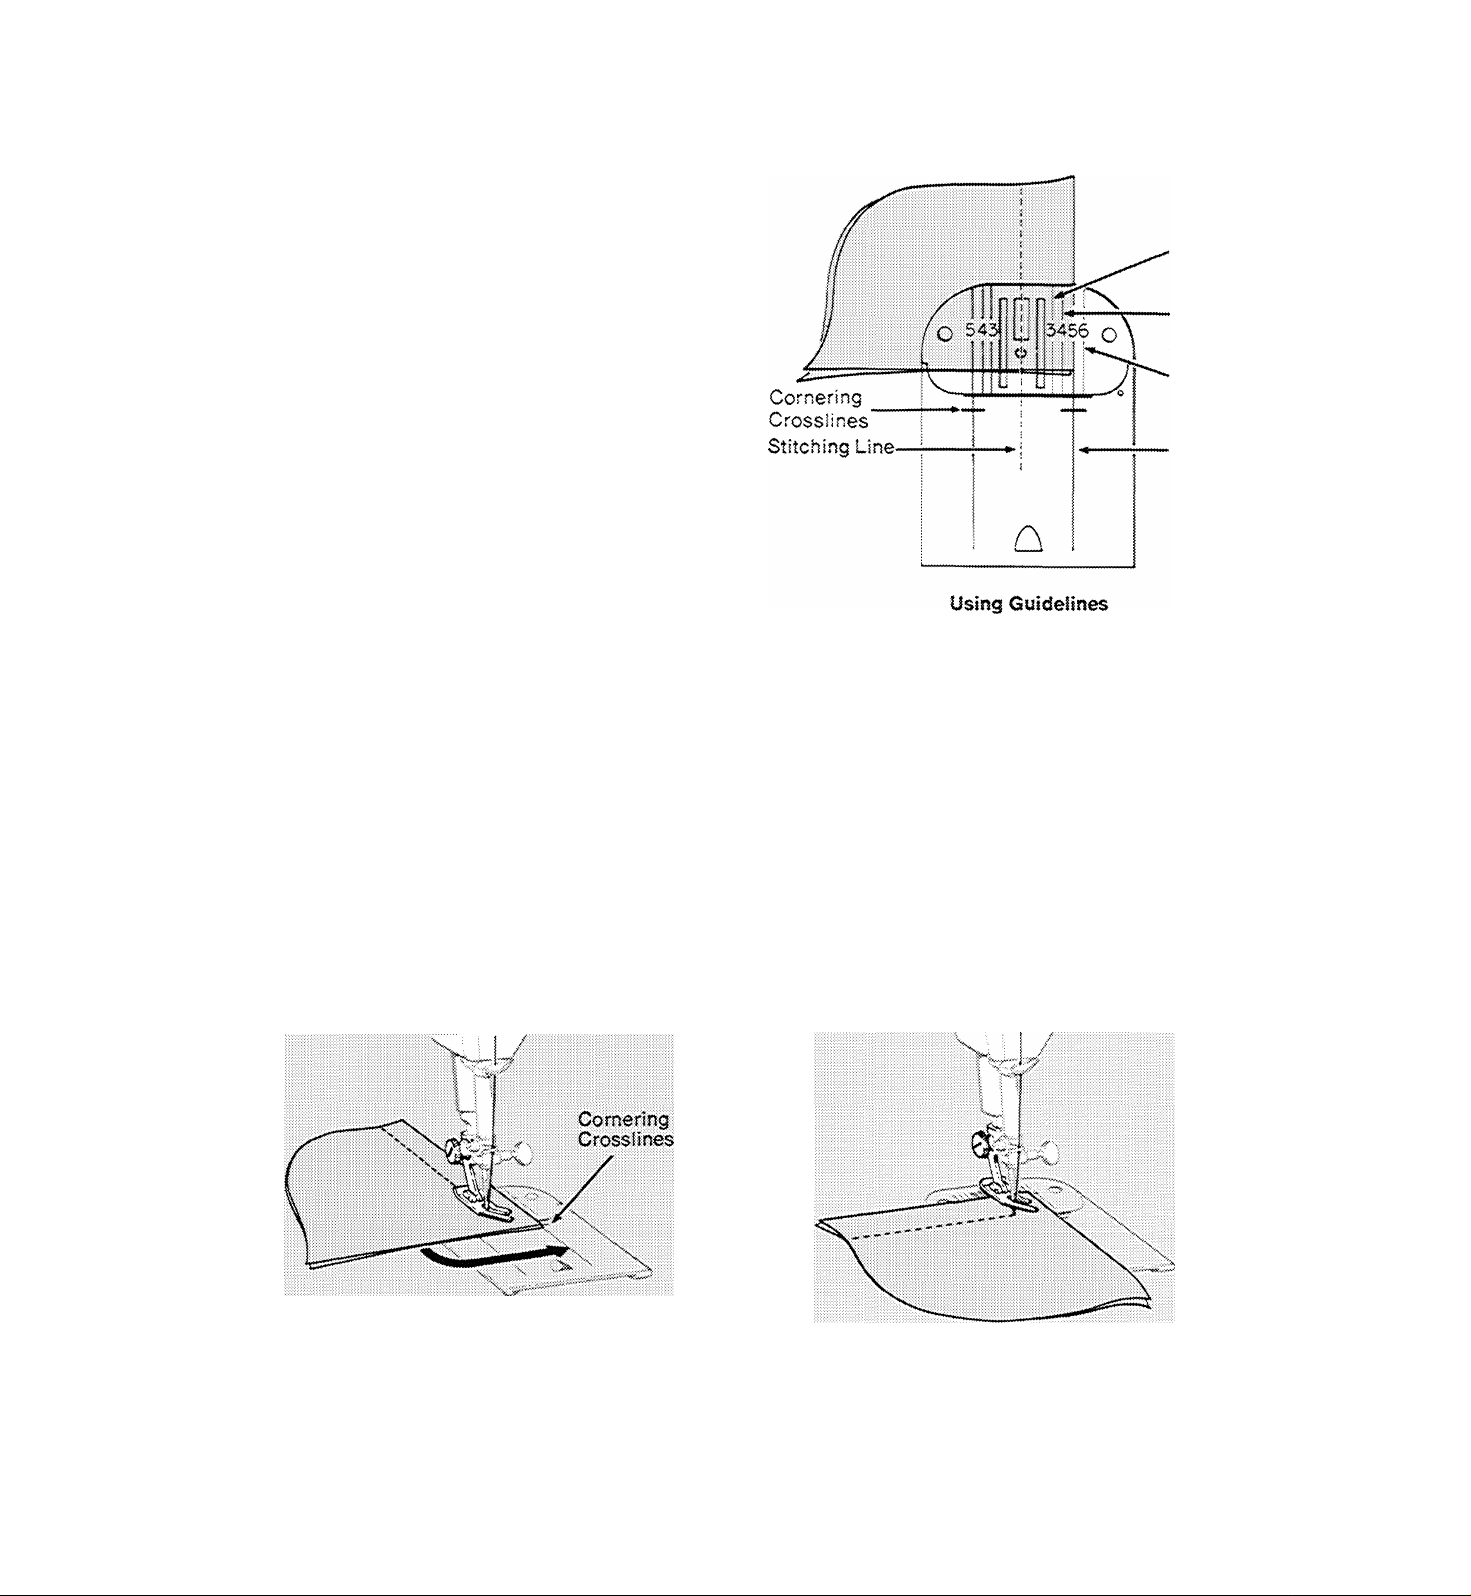
KEEPING SEAMS STRAIGHT
To keep the seam straight, use one of the
numbered guidelines on the needle plate. The
numbers indicate distance, in eighths of an
inch, from the needle. If you want a 5/8 inch
f 1.6cm) seam, for example, line up your fabric
with the number 5 guideline. Note that both
number 5 guidelines (the most commonly
used) are extended on the slide plate for your
convenience: the crosslines serve as corner
ing guides when stitching a square corner.
(9mm)
Vz"
(1.3cm)
%"
(1.9cm)
%"
(1.6cm)
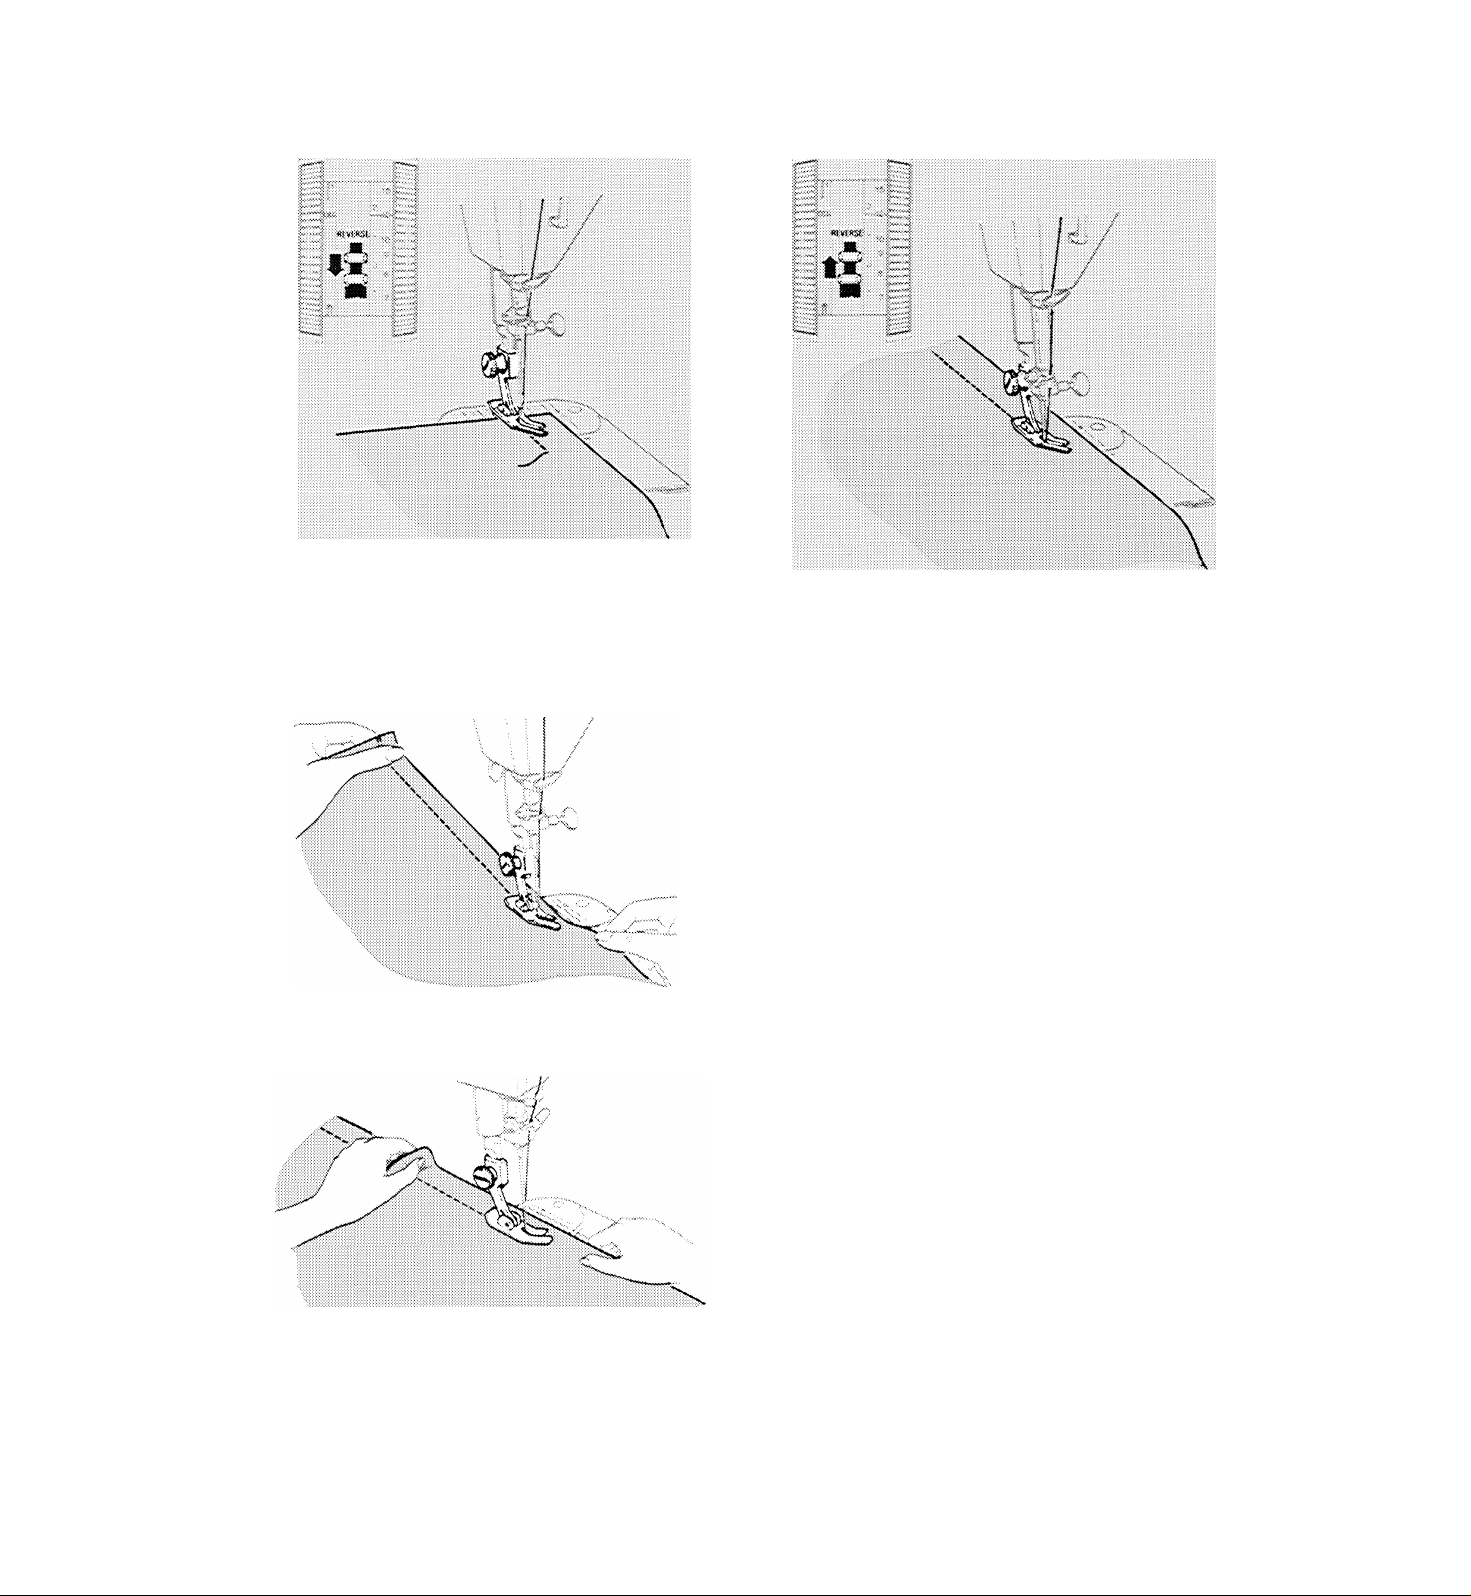
TURNING SQUARE CORNERS
To turn a square corner 6/8 inch (1.6cm)
from the fabric edge, you need not
measure or mark the seam. Simply use
the crosslines on the slide plate.
• tine up your fabric with right or left
guideline 5 on the needle plate. Stitch
seam, slowing speed as you approach
corner.
Pivoting at Corner
• Stop stitching, with the needle down,
when the bottom edge of the fabric
reaches the cornering crosslines on the
slide plate.
• Raise presser foot and turn fabric on
needle, bringing bottom edge of fabric
in line with guideline 5.
• Lower the presser foot and stitch in new
direction.
Fabric at Crosslines Fabric after Turning
23
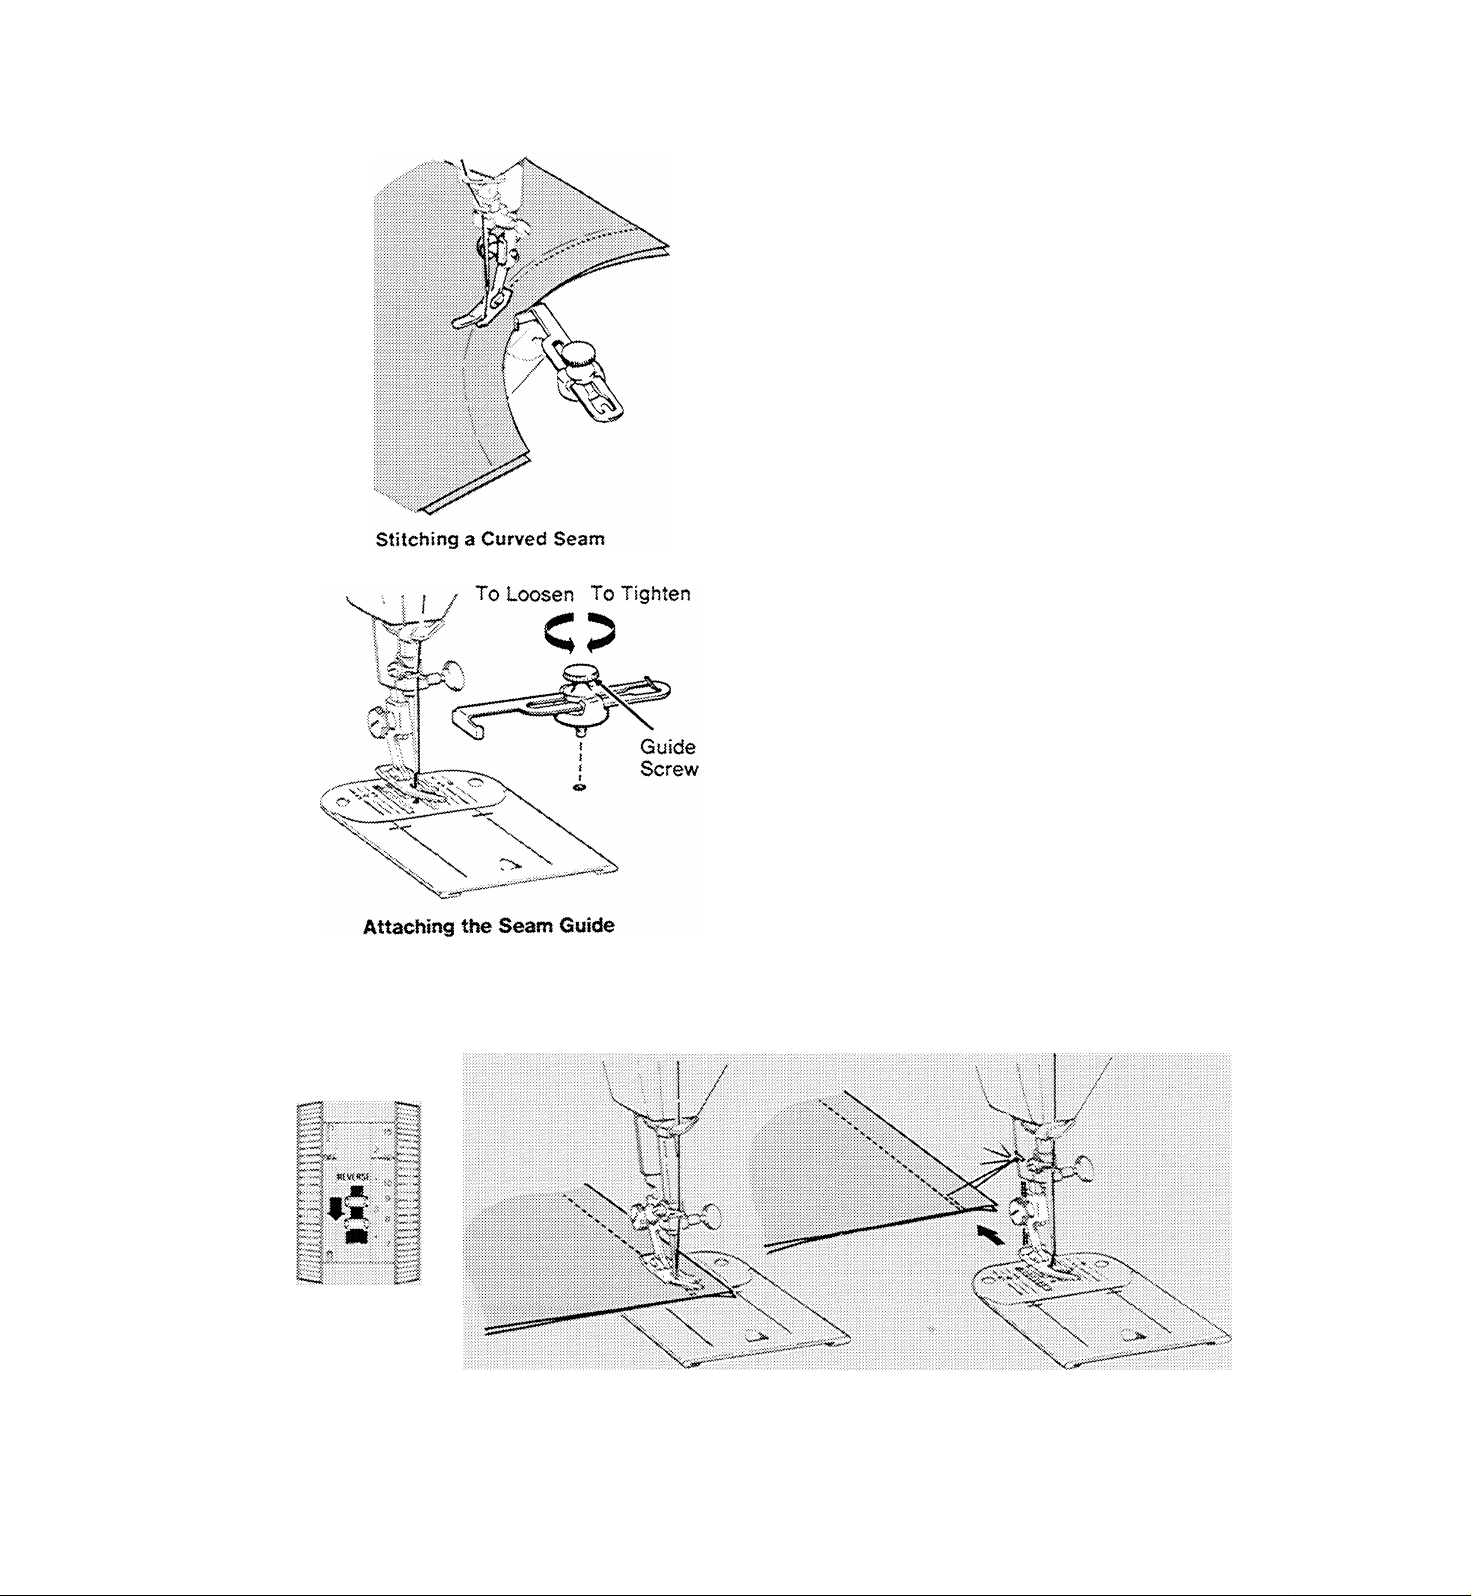
CURVED SEAMS
1. Use a fairly short stitch for elasticity and
strength. For example, if you use a medium
stitch length for straight seams, select a
slightly shorter stitch length to stitch
curved seams in the same fabric.
2, If you use the seam guide to guide stitch
ing, attach it at an angle so that the edge
that is closer to the needle acts as a guide.
TO ATTACH SEAM GUIDE
Fasten seam guide by securing guide screw
into hole provided for it in machine bed.
To adjust the seam guide, loosen the guide
screw and slide the guide to the required
seam width. Then tighten the guide screw.
REINFORCING END OF SEAM
1. Stitch to the edge of the fabric,
2. Press reverse-stitch lever all the way down
and hold in place. Backstitch approx
imately 1/2 inch (1.3 cm) to reinforce end
of seam. Release lever.
Reverse-Stitch
Lever
3. Raise needle to its highest position, raise
the presser foot, and remove the fabric by
drawing it to the back and left.
4. Cut threads on thread cutter at rear of
presser bar.
24
Ending a Seam
Cutting Threads
Loading...