


6104

Copyright © 1979 THE SINGER COMPANY
All rights reserved throughout the world

CONTENTS
Chapter 1* Getting to Know Your Machine...................................................................................................... 2
Principal París.............................................................................
Accessories..................................................
....
...........................
....
.........................................
....
.....................................
....
....
. . 3
. 2
Chapter 2. Getting Ready to Sew................................................................................
Choosing arid Changing Accessories
Fabric Weight Table
..........................................
...........................................
*......................................................
....
.
.................................
....
................................
....
....
* . 4
. , , 6
4
Fabric Thread and Needle Table........................................................................., 8
Needle-Fabric Combinations
.............................
....
. . . «...................................................
....
10
Operating the Machine.................................................................................................................. 10
The Bobbin Thread................................................................................................................... 11
Winding the Bobbin ♦ Threading the Bobbin Case
Threading the Machine................................................................................................................... 13
Raising the Bobbin Thread
Chapter 3. Straight Stitching.............................................................................................................................15
Adjusting Machine Stitch to Suit Your Fabric
...................................................
....
15
Setting Selectors ♦ Regulating Presser Foot Pressure ♦
Adjusting Stitch Length ♦ Stitch Length Guidance Table ♦ Needle-Tread Tension
Reverse Stitching............................................................................................................................ 17
Sewing a Seam............................................................................................................................... 18
Keeping the Seam Straight
Applications.......................................................................................................................................19
Darning ♦ Zipper Insertion ♦ Corded Seams
Chapter 4. Basic Zig-Zag Stitching................................................................................................................ 21
Adjusting Machine to Suit Your Fabric.......................................................................................... 21
Needie Position Selector ♦ Stitch Width Selector ♦ Adjusting Needle Tension ♦
Adjusting Stitch Length ♦ Adjusting Presser Foot Pressure
Satin Stitching................................................................................................................................. 23
Applications.......................................................................................................................................24
Appliqué • Zig-Zag Seam Finishes ♦ Lingerie Seams
Chapter S. Stretch Stitch Patterns ....................................................................................................................27
Setting Selectors........................................................................................................................... 27
Setting Needle Position ♦ Setting Stitch Width ♦
Adjusting Stitch Length ♦ Adjusting Stitch Balance
Adjusting Stitches to Suit Stretch Fabrics ....................................................................................
29
Guiding and Supporting Fabric ♦ Adjusting Pressure
Applications..................................................................................................................................... 30
Straight Stretch Stitch ................................................................................................................... 30
Ric-Rac Stitch.............................................................................................................................. 31
Chapter 6. Buttonholes and Buttons ............................................................................................................. 32
Four-Step Buttonholing...................................................................................................................32
Changing Stitch Density
Buttons
....
........................................................................................................................................ 34
Chapter 7. Free-Arm Sewing ........................................................................................................................... 35
Chapter 8. Caring for Your Machine............................................................................................................. 36
Chapter 9. Performance Checklist.................................................................................................................... 38
Your Personal Measurements........................................................................................................................... 39
Index ..................................................................................................................................................................... 40
0;.'' "' '> ^'' ^'^^^ i o'^ 't
W' '-"f:''-''\i^ - sH^'^^^‘m^m -V'-^pi'»
-;; -'■' ^-^--M^ftif^Qiaii^''-'!.;*"-'''.'''Vjs.i-'tC^.F^'i \V'i --" >'v''S-5 -'„:':'!^''-'C .'x-'p;-^
' '^-mmd^cimt; -2. r: t-'”\rMiBmmi<^^&m<' ^::^\ ~":^mj
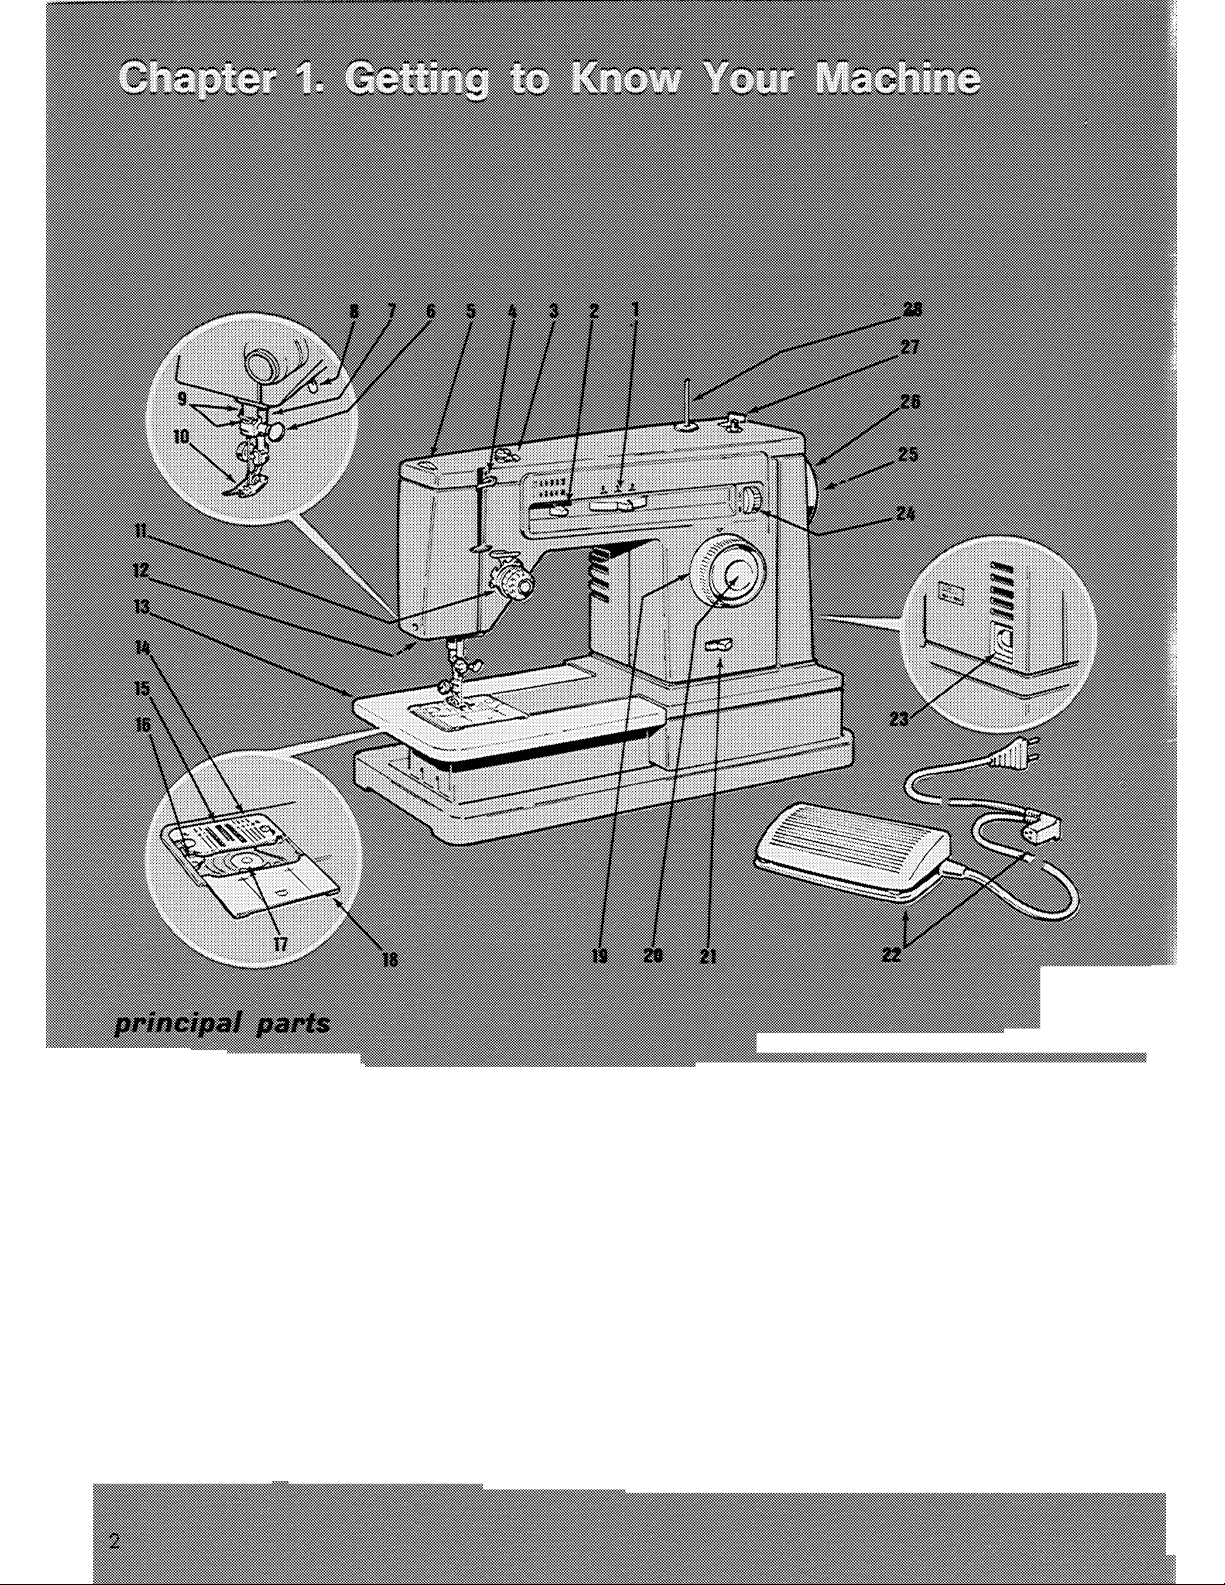
a Presser Foot Ufter 17. Transparem Bobbin
a Thread G«i<ie$ ig. Plate Wand Whe^ Knob
m General Purpose Ptesaer ^tJtph t^gth Seiecu»' ^ Wheel
^d Buttonhole Dial 27. Bobbin Winder Spindle
"u ™'' '' 0 '\i.''';^'^ ^'"'' ' '"'■'5-^ ' ■!■ ^ ' * ^' V' ''^ '■■'^ ^'''' ■^' ^' ''i.' ' ^;,'
Ci^trta!
...............

accessaries
The accessories that come with your sewing
machine are designed to help you do many
kiiids of sewing easily.
1. Transparent Bobbins {No. 172336).
2. Needles
♦ Style 2020 in your machine when deliver
ed is for general sewing.
♦ Style 2045 is used for sewing knits,
stretch fabrics and elastic.
3* Buttonhole Foot is used to make bar tack
buttonholes of any length in four steps.
4. Special Purpose Foot Used for all kinds
of decorative zig-zag stitching.
5< Zipper Foot for inserting zippers and stitch
ing corded seams.
6. General Purpose Foot on your machine
when delivered, is used for all utility sew
ing. with either straight or zig-zag stitching.
7. General Purpose Needle Plate on your
machine when delivered is used with all
presser feet.
8. Snap-in Feed Cover for button sewing and
free-motion work.
9. Spool Pin Extension used for tubes of
thread.
choosing and changing accessories
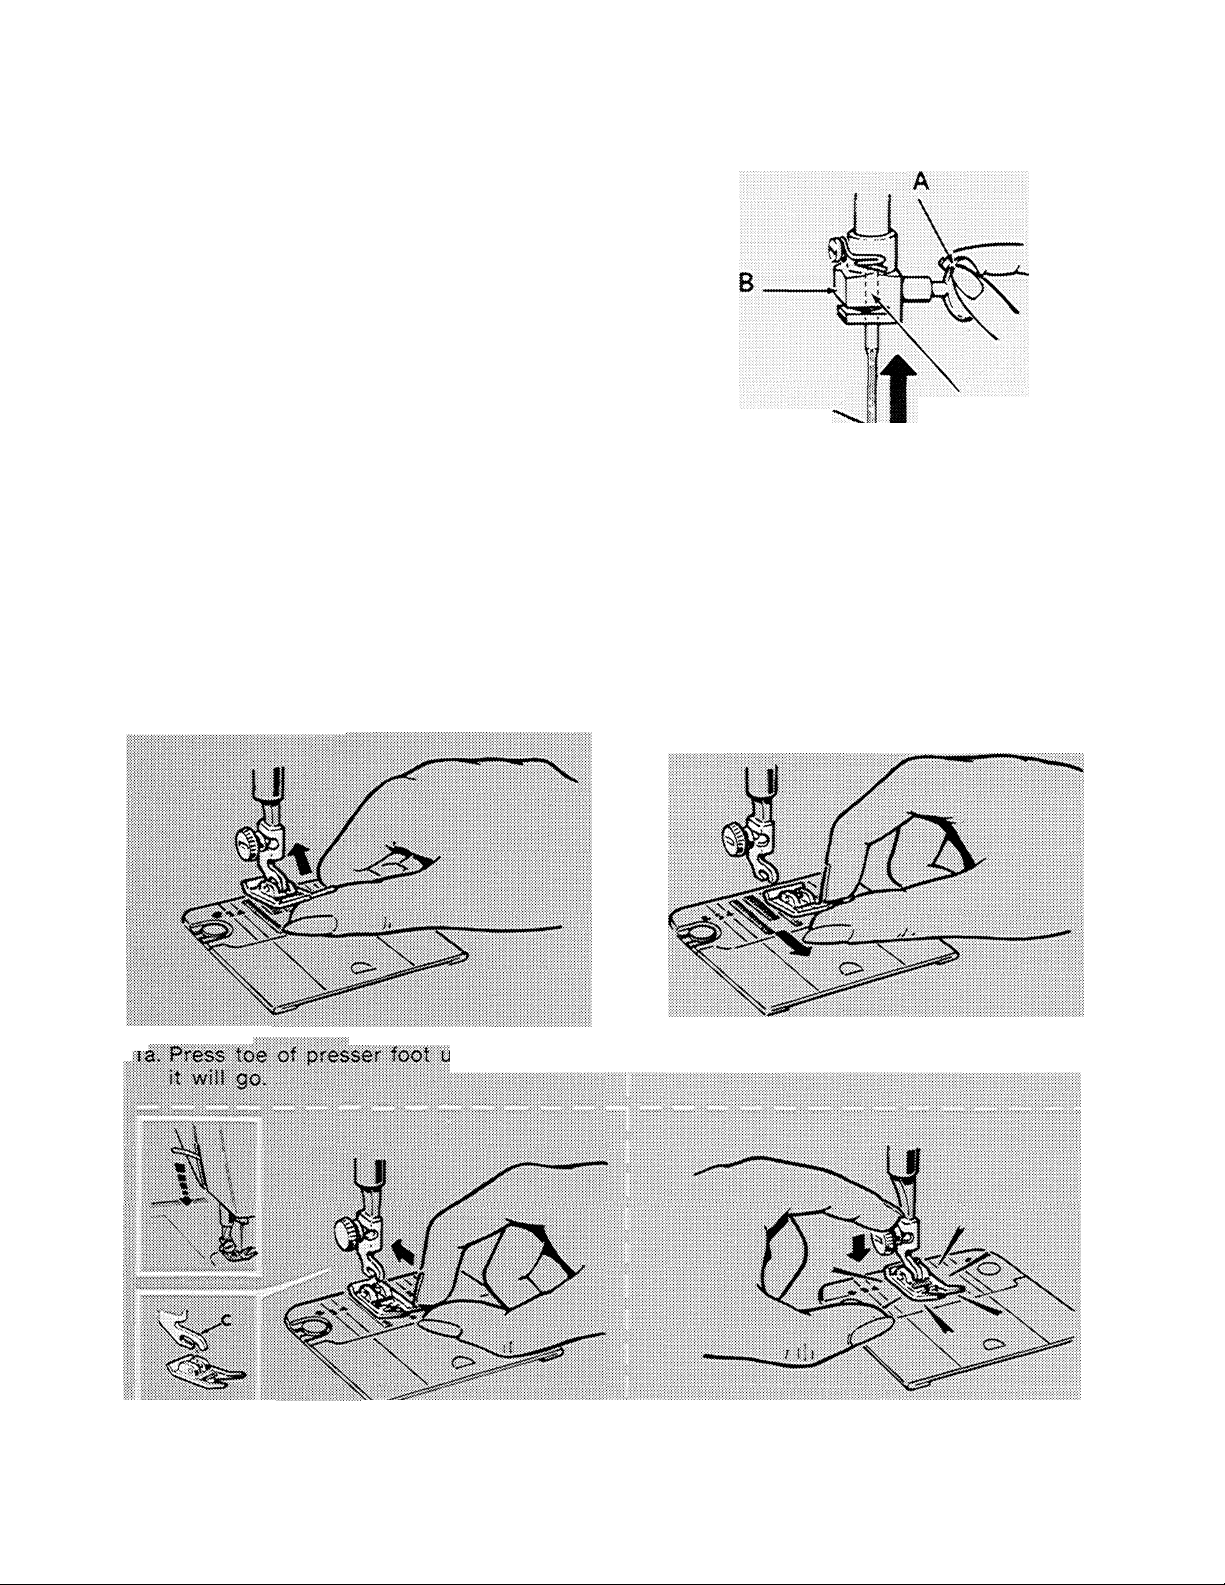
CHANGING THE NEEDLE
♦ Raise needle to its highest point by turning
the hand wheel toward you. Loosen needle
clamp screw A and remove the needle.
♦ Insert new needle up into clamp B as far
as it will go, with the flat side of the needle
to the back,
♦ Tighten needle clamp screw.
CHANGING PRESSER FEET |
Snap-on Presser Feet
The presser feet furnished with your machine Raise needie to highest position by turning the
snap on and off a common shank. hand wheei toward you. Raise presser foot.
To Remove and Replace Foot
Flat Side to Back
ipward as far as 1 b. Then snap down to remove.
mk .3> Press presser foot screw down firmiy until
that foot snaps into place.
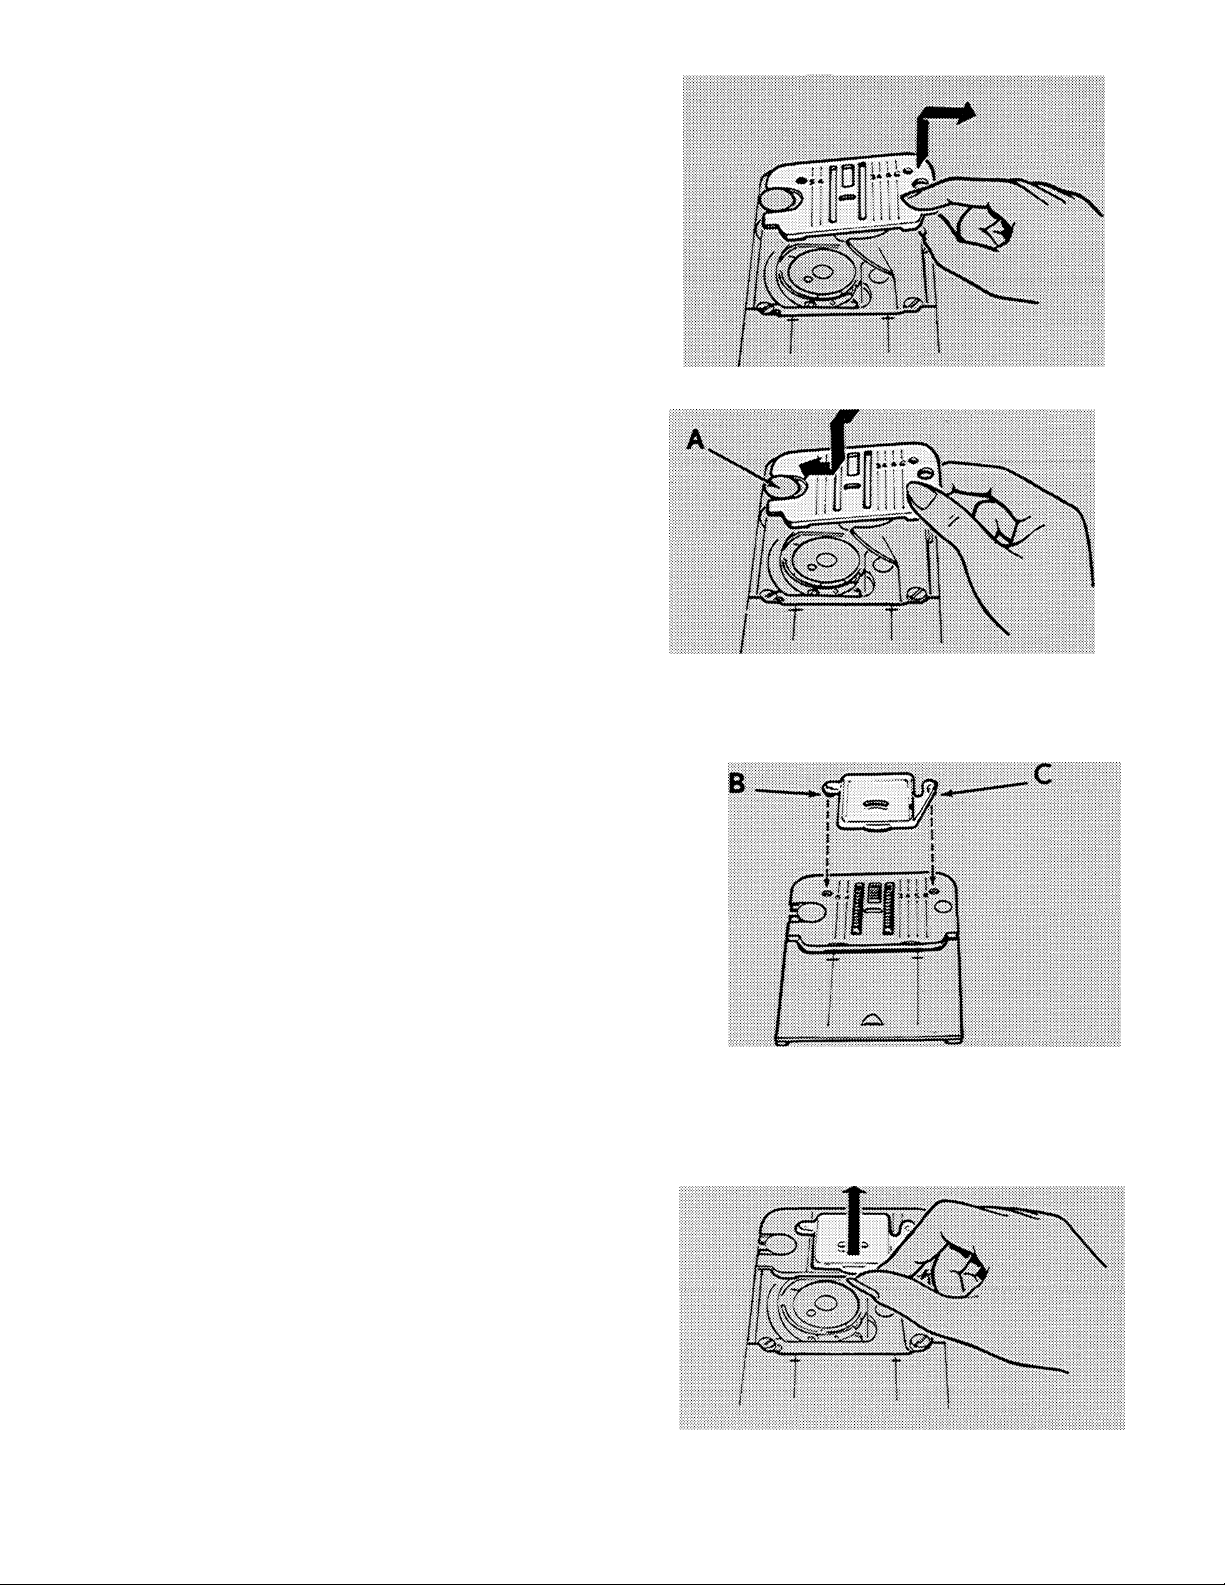
REMOVING AND REPLACING NEEDLE
PLATE
• Raise presser foot.
• Raise needle to highest position.
• Open slide piate. Place thumb under right
side of f^eedie plate, lift it up and withdraw
it to right.
•, Replace needle plate under clamping pin A.
push it gently to the left and press down
until it snaps into place.
ATTACHrNG SNAP-IN FEED COVER
♦ Raise presser foot
♦ Raise needle to highest position by turning
hand wheel tov/ard you. Open slide plate,
♦ Slide snap-in feed cover, away from you
over needle plate until points B and C are
positioned directly over holes in needle plate
as illustrated. Snap in point 8. Then push
point C in toward point B until it snaps into
place. Close slide plate. To remove, open
slide plate then simply lift up front edge of
feed coven

FABRIC WEIGHT TABLE
There are many types of fabrics around the worid, each manufactured with a specific fibre and
weight. The fabric below have been classified according to weight to give a small sample of
what is available for purchase.
SILK
(Woven)
(Knit)
mroH
(Woven)
(Knit)
COTTON
(Woven)
(KnU)
WOOL
(Woven)
(Knit)
SYNTHETIC
(Woven)
Chiffon,
Organza,
Tune
Tulle
Voile,
Tulle
Chiffon,
Organza,
Tulle
Net Lace. Ninon
Net Laee
Net, Lace
Net Lace, Ninon,
Crepe de Chine
Velvet, Crepe de Chine, Shantung, Faille
Jersey
Velvet Taffeta, Satin
llllliliiiil
Challis, Organdy, Muslin, Batiste, Dimity,
Lawn, Percale, Eyelet, Oingham, Piqué,
Poplin
Jersey
Cashmere» Flannel, Mohair, Felt, Crepe
Jersey
Crepe; Velvet Taffeta, Satin
(Knit)
SYNTHETIC
BLENDS
(Woven)
(Knit)
LEATHER
BLASTIC
VINYUS
Voile
Plastic Film
Rasohel, Single Knit* Sweater Knit
Bonded Knit Tricot, Oiré
Broadcloth, Batiste, Eyelet Cingham*
Poplin
Single Knit
Kidsl<1n, Patent, Chamois, ImitationLeathers Suedes, Leather, Suede
Plastic Film

Refer to this table to determine the weight and type of fabric you will be using in order to
select the correct needle and ihrea<i combination.
For correct needle and thread combination for your fabric, refer to the Fabric, Thread and
Needle Table on the following page.
Velvet. Crepe de Chine, Shantung,
Suiting, Brocade
Velvet Taffeta, Satin, Crepe
Velveteen, Corduroy* Velvet, Fleece,
Veloun Terry, Chintz
Brocade. Taffeta* Satin, Crepe
Corduroy, Denim. Ticking, Canvas,
Linen, Drapery Fabric. Burlap
Stretch Velours Stretch Terry
¿X usuaMy somse synthetic fibrcc also.
Suiting, Flannel, Gabardine. Felt,
Suiting* Tweed* Duffle
Serge, Mohair
Jersey
Velvet, Crepe, Taffeta. Satin.
Gabardine
Jacquard, Double Knit, Sweater Knit,
Double Knit, Helenca, Fake Furs
Bonded Knit, Tricot, Spandex* Stretch
Terry. Stretch Velour, Deep Pile. Fake
Furs
Denim, Duck,
Canvas, Sailcloth,
Upholstery Fabric
Coating. Blanketing
Linen Type. Poplin. Corduroy,
Denim, Gabardine, Drapery Fabric
Gabardine
Terry Knit
Patent Imltation^Leathers Bk Suedes*
Double Knit
Buckskin, Calfskin, Suede* Reptile Upholstery Leather
Leather, Suede, Reptile
Bonded vinyl (Knit Back),. Patent,
Upholstery Vinyl
Embossed, Printed
Upholstery Vinyl

FABRIC, THREAD AND NEEDLE TABLE
Choosing the correct needle and thread for your fabric is of utmost importance. Correct choice
Will make the difference in the wear and appearance of your new garment. The Fabric Weight
Table on the previous page, and the Fabric, Thread and Needle Table below are practical guides
to needle and thread selection. Refer to them before starting a sewing project. Be sure
to use the same size and type of thread in both needle and bobbin.
To select the correct needle and thread for your fabric, first refer to the Fabric Weight Table
to determine the weight and type of the material you are mlng.
Next, refer to the Fabric Thread and Needle Table.
b-TSiwiB; % •; 7 > Ms’'’ ^
..........................................................................
i
.• i3'rFAiiiBIRi-v=.i ^^'1ipE*0Sf:x- *> mifiiitniH liFITOliili. HBESGBSh-iMl
SItK
RAYON Fine Silk
COTTON
WOOL
SYNTHETIC
SYNTHETIC
BLENDS
Fine Silk
Fme Mercerized
Fine Mercerized
Fine Coticn
Fine Mercerized
Fine Synthetic
Fine Synthetic
2020-9
2020-9
2020-9
2020-9
2020-9
Fine Silk
Fine Mercerized
Fine Silk
Fine Mercerized 2020-9
Fine Cotton
Fine Mercerized
Fine Silk
Fine Mercerized
Fine Synthetic
Fine Synthetic
2020-9
2020-9
2020-11
2020-9
2020-9
Fine Silk
Fine Mercerized
Fine SHk
Fine Mercerized
Medium Cotton
Med. Mercerized 2020-11
Fine Silk
Fine Mercerized
Fine Synthetic
Fine Synthetic 2045-11
2020-11
2020-11
2020-11
2045-11
LEATHER
Med. Mercerized
Med- Synthetic
PLASTIC Fine Mercerized
Fine Synthetic
VINYLS
Fine Mercerized
Fine Synthetic
2032-11
2020-11
2020-11

Find the fabric you are using in Type of Fabric column at left (silk, rayon, etc.)« Then locate
the fabric weight column (filmy, sheer, etc.) for your fabric at top of table. Read across from
Type of Fabric column to correct weight of fabric column. There, the correct thread and needle
choice for your fabric will be found.
Example: If you are sewing a medium weight wool, find wool in Type of Fabric column. Read
across to Medium (weight) column and you will see that a medium silk or mercerized thread
and a size 2020-14 needle are to be used.
You should follow the recommendations In this Instruction book and on the needle package
for correct style and size of needle for different types and weights of fabric.
Medium
Medium
Medium
Medium
Medium
Medium
Medium
Medium
Medium
Medium
Medium
Medium
Medium
Medium
Silk
Mercerized
Synthetic
Mercerized
Cotton
Mercerized
Silk
Mercerized
Synthetic
Synthetic
Mercerized
Synthetic
Mercerized
Synthetic
2020-11
2020-11
2020-14
2020-14
204S-14
2046-14
2032-14
2020-11
Heavy Silk
Heavy Mercerized
Heavy Synthetic
Heavy Mercerized
Heavy Cotton
Heavy Mercerized
Heavy Mercerized
Heavy Synthetic
Heavy Synthetic
Heavy Mercerized
Heavy Synthetic 2032-16
Medium Mercerized
Medium Synthetic
2020-14
2020-14
2020-ie
2020-16
2045-16
2045-16
2020-14
Heavy Silk
Heavy Synthetic
Heavy Mercerized
Heavy Cotton
Heavy Mercerized
Heavy Mercerized
Heavy Synthetic
Heavy Synthetic
Heavy Mercerized
Heavy Synthetic
Heavy Mercerized
Heavy Synthetic
2020-14
2020-14
2020-18
2020-16
2020-16 or 16
2020-16 or 18
2032-16
2020-16
Medium
Medium
Mercerized
Synthetic
2020-11
Medium Mercerized
Medium Synthetic
2020-14
Heavy Mercerized
Heavy Synthetic
2020-16
needie-fabric combinations
Correct needle selection is closely related to
stitch quality and appearance. Damaged fabric
is almost always caused by a needle that is
berit, burred or that is an inappropriate style
for the fabric and thread you are using.
The three types of needles most commonly used
are the regular, ball point, and wedge. To
obtain good results, the correct size and type
of needle for the fabric and thread you are
using must be chosen. Refer to the Fabric,
Thread and Needle Table, page 8.
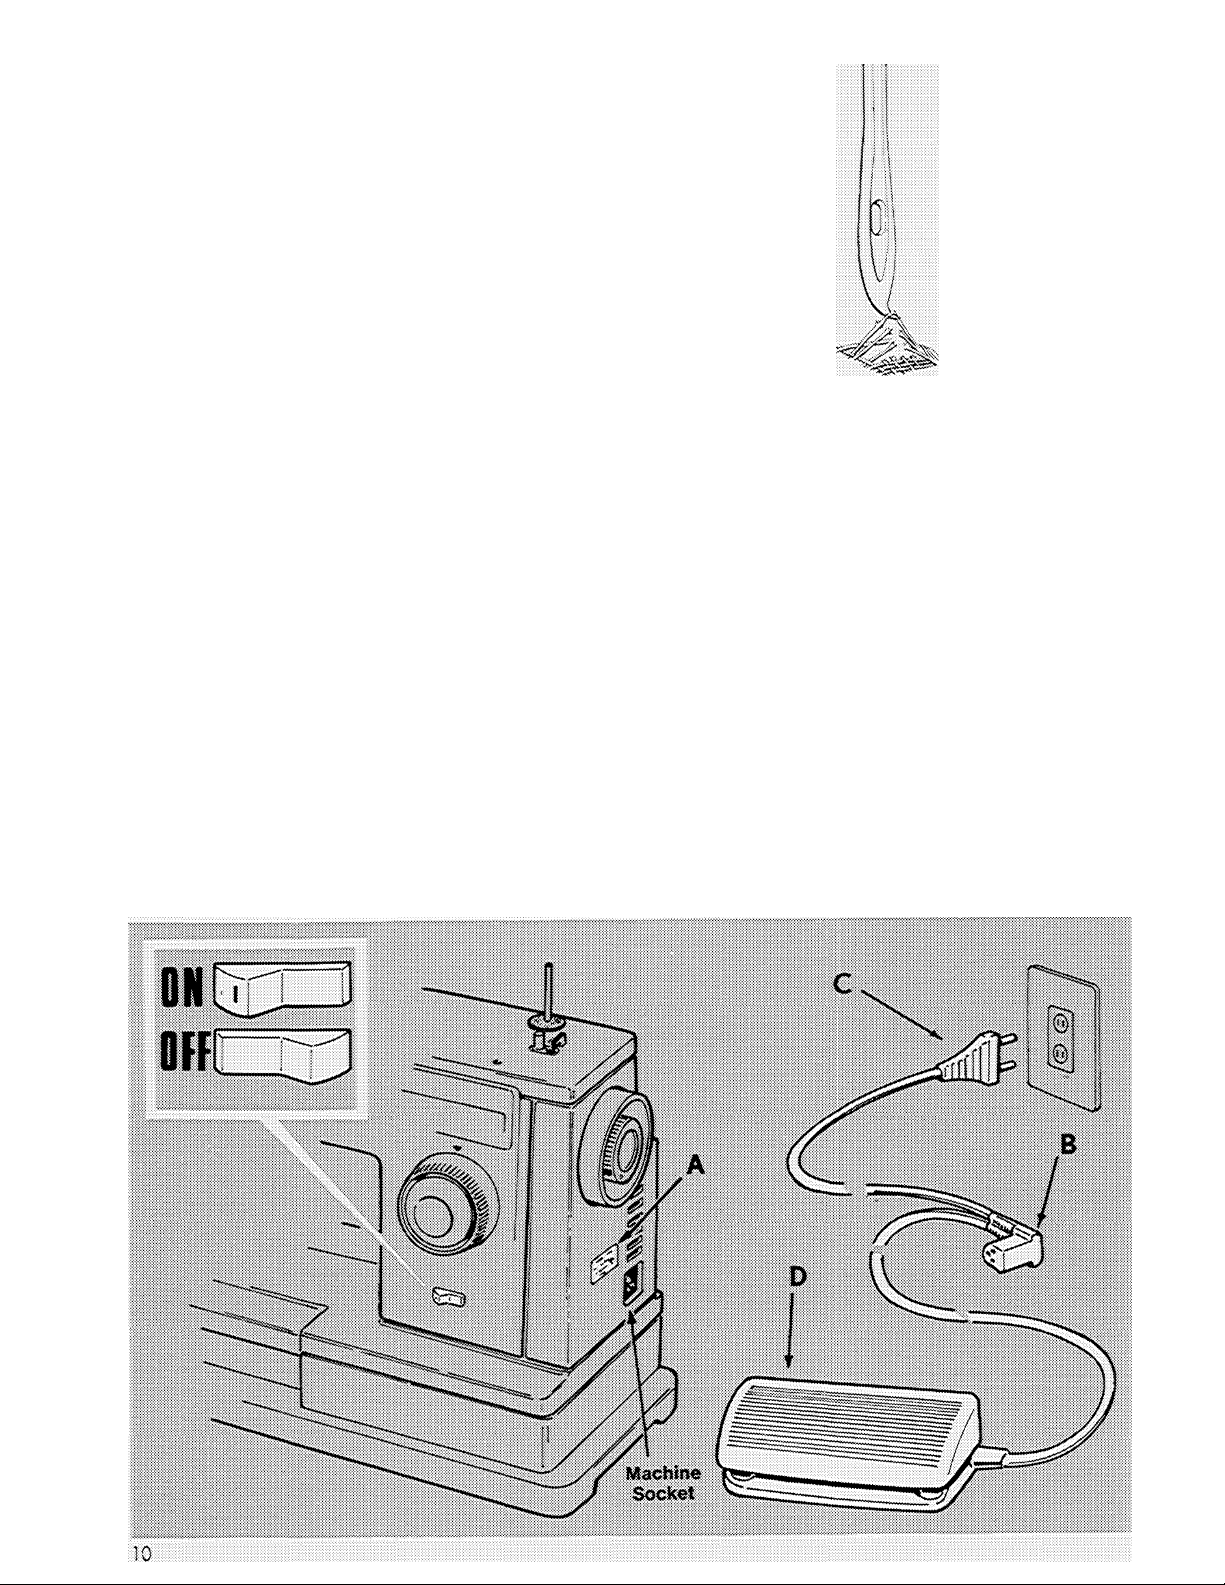
operating the machine
CONNECTING MACHINE
Result of Using a Bent Needle
♦ Before plugging In your machine, be sure
the eiectncai information on the side of the
machine A, below the hand wheel agrees
with the range marked on your electrical
meter.
♦ Connect plug B to machine and plug C to
your socket outlet.
♦ To turn the machine and light on or off,
press switch as shown.
♦ To run the machine and control speed,
press the speed controller 0 with your foot
The harder you press, the faster the ma
chine will sew.
CAUTiON:•Disconnect the power line plug from
the socket outlet when changing needles, feet
or needle plates or when leaving the machine
unattended. This eliminates the possibility of
starting the machine by accidentally pressing
the speed controller.
ihe bobbin thread!
Your sewitig machine uses two threads to form a stitch. The upper thread comes from the
spool and is thipaded through the eye of the needle. The lower thread comes from the hobbin. Wind fee bobbin before threading fee machine.
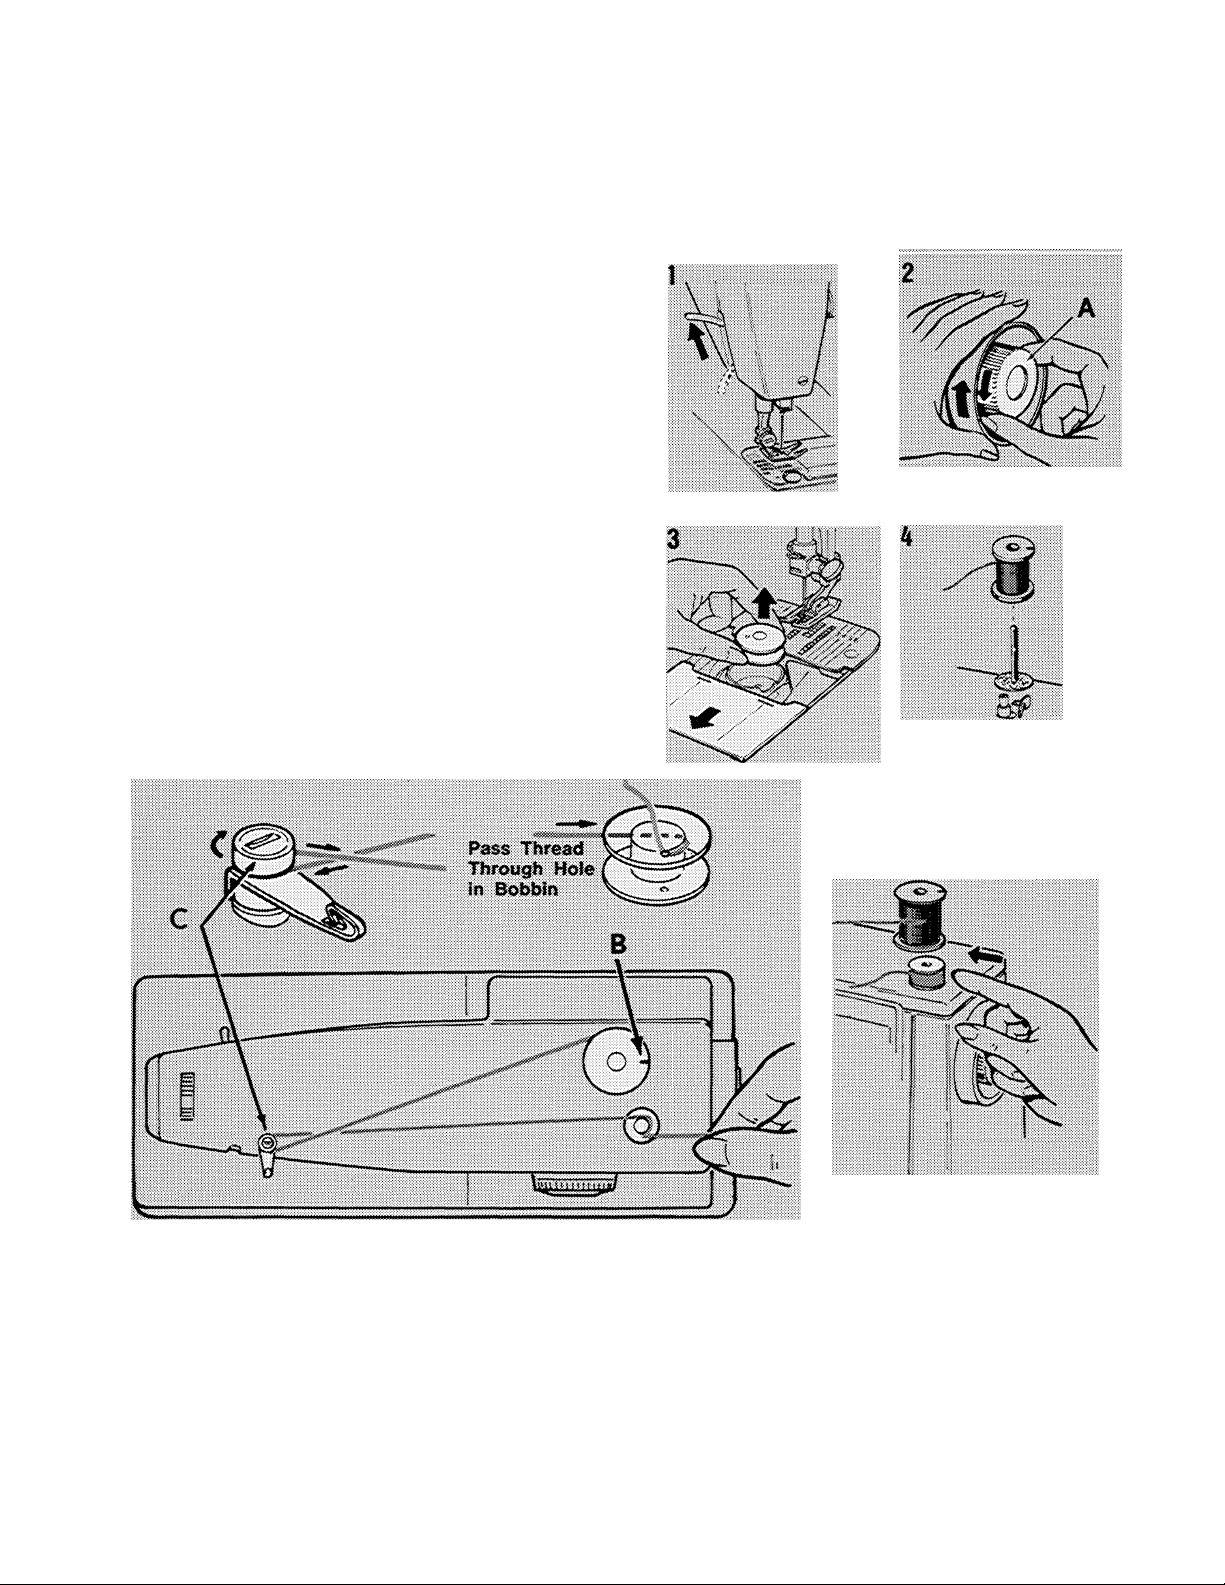
WINDING THE BOS&IN
Pr<^amlk>i) Steps
1. Raise the presser foot and turn hand wheel
toward you until needie is in highest po
sition,
2. Loosen hand wheel knob A by turning it fo-
ward you With the right hand while holding
hand wheel with fee left hand.
3. Open slide plate and lift out bobbin.
4. Place spool pin felt on pin.
Winding Steps
• Place thread spool on spool pin with thread
retaining slit B on top. (Break paper at the
end of spool if necessary}. If you are using
a tube of thread affix spool pin extension
to spooi pin to ensure even flow of thread.
• Lead thread around bobbin winder tension
disc C and through smaii hole in bobbin
from inside out.
• Place bobbin on spindle and push bobbin
to right to engage bobbin winder.
•
/
Hold thread end as shown and start the ma
chine. Cut off thread end after a few coils
have been wound.
When required amount of thread has been
wound (winding will stop when bobbin is
fuil}> stop fee machine and cut connecting
thread.
Push bobbin to left and remove bobbin from
splndie.
Hold hand wheel and tighten hand wheel
knob.
II
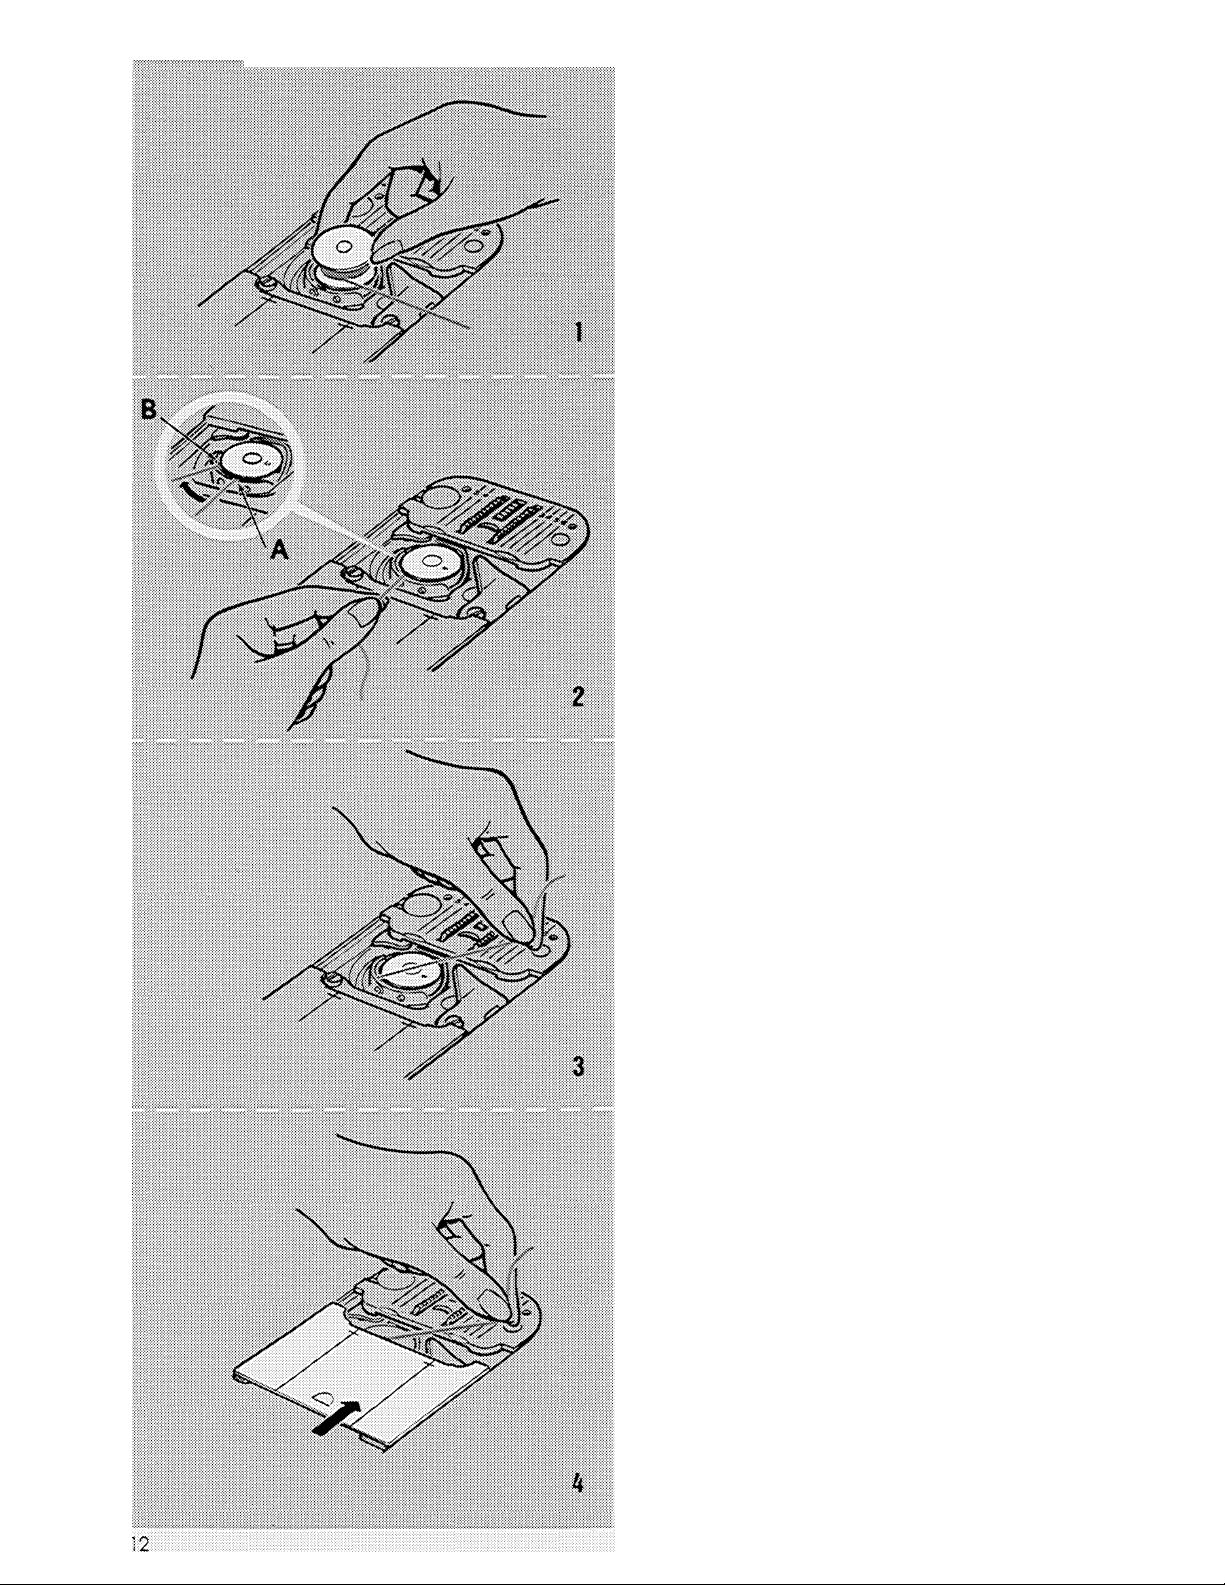
THREADING THE BOBBIN CASE
1, Hold bobbin $0 that thread unwinds in the
direction shown, and put bobbin into bobbin
case.
2. Puli thread into notch A. draw it back under
the tension spring and back into slot B.
3. Draw approximately 10 cm (4 inches) of
thread across the bobbin.
4. Close slide plate allowing thread to enter slot
between the needle plate and slide plate.
 Loading...