

Page 1

Important
additional information to the owner manual of the
digital satellite receiver SilverCrest SL 80/2 100CI
This additional information is an important component of your owner manual.
Please keep this additional information carefully within your owner manual.
Point 1
After finishing the basic installation, the integrated hard disk drive (HDD) has to be
formatted, in order to adjust it to the receiver. This procedure needs to be done only one
time at the initial operation. Please proceed as follows:
Press button MENU (8) on the remote control. The main menu appears.
Move the blue bar with the arrow buttons up (12) res. down (13) to the main
menu point “HDD / USB applications”.
Press the button OK (14).
Move the blue bar with the arrow buttons up (12) res. down (13) to the menu point
„HDD Manager“.
Press the button OK (14).
Move the blue bar in the menu “HDD Manager” with the arrow buttons up (12) res.
down (13) to the menu point „Format HDD“.
Press the button OK (14).
Insert with the numeric buttons the current password (factory default 0000).
Confirm the appearing message with the button OK (14). The format procedure
starts.
The format procedure ist successfully finished, as soon as the sub-menu „HDD
Manager“ appears.
Press the button EXIT (9) on the remote control to leave the menu.
Point 2
External USB-Storage devices of the Mass Storage Device-class have to be in format
FAT 32.
Page 2
100% Black+Silver
for light surfaces
Serviceadresse:
COMAG Handels AG
Zillenhardtstr. 41
D-73037 Göppingen
Service-Hotline:
0049 (0)7161 / 5 03 06 33
E-Mail:
hotline@comag-ag.de
#
Faulty-Description:
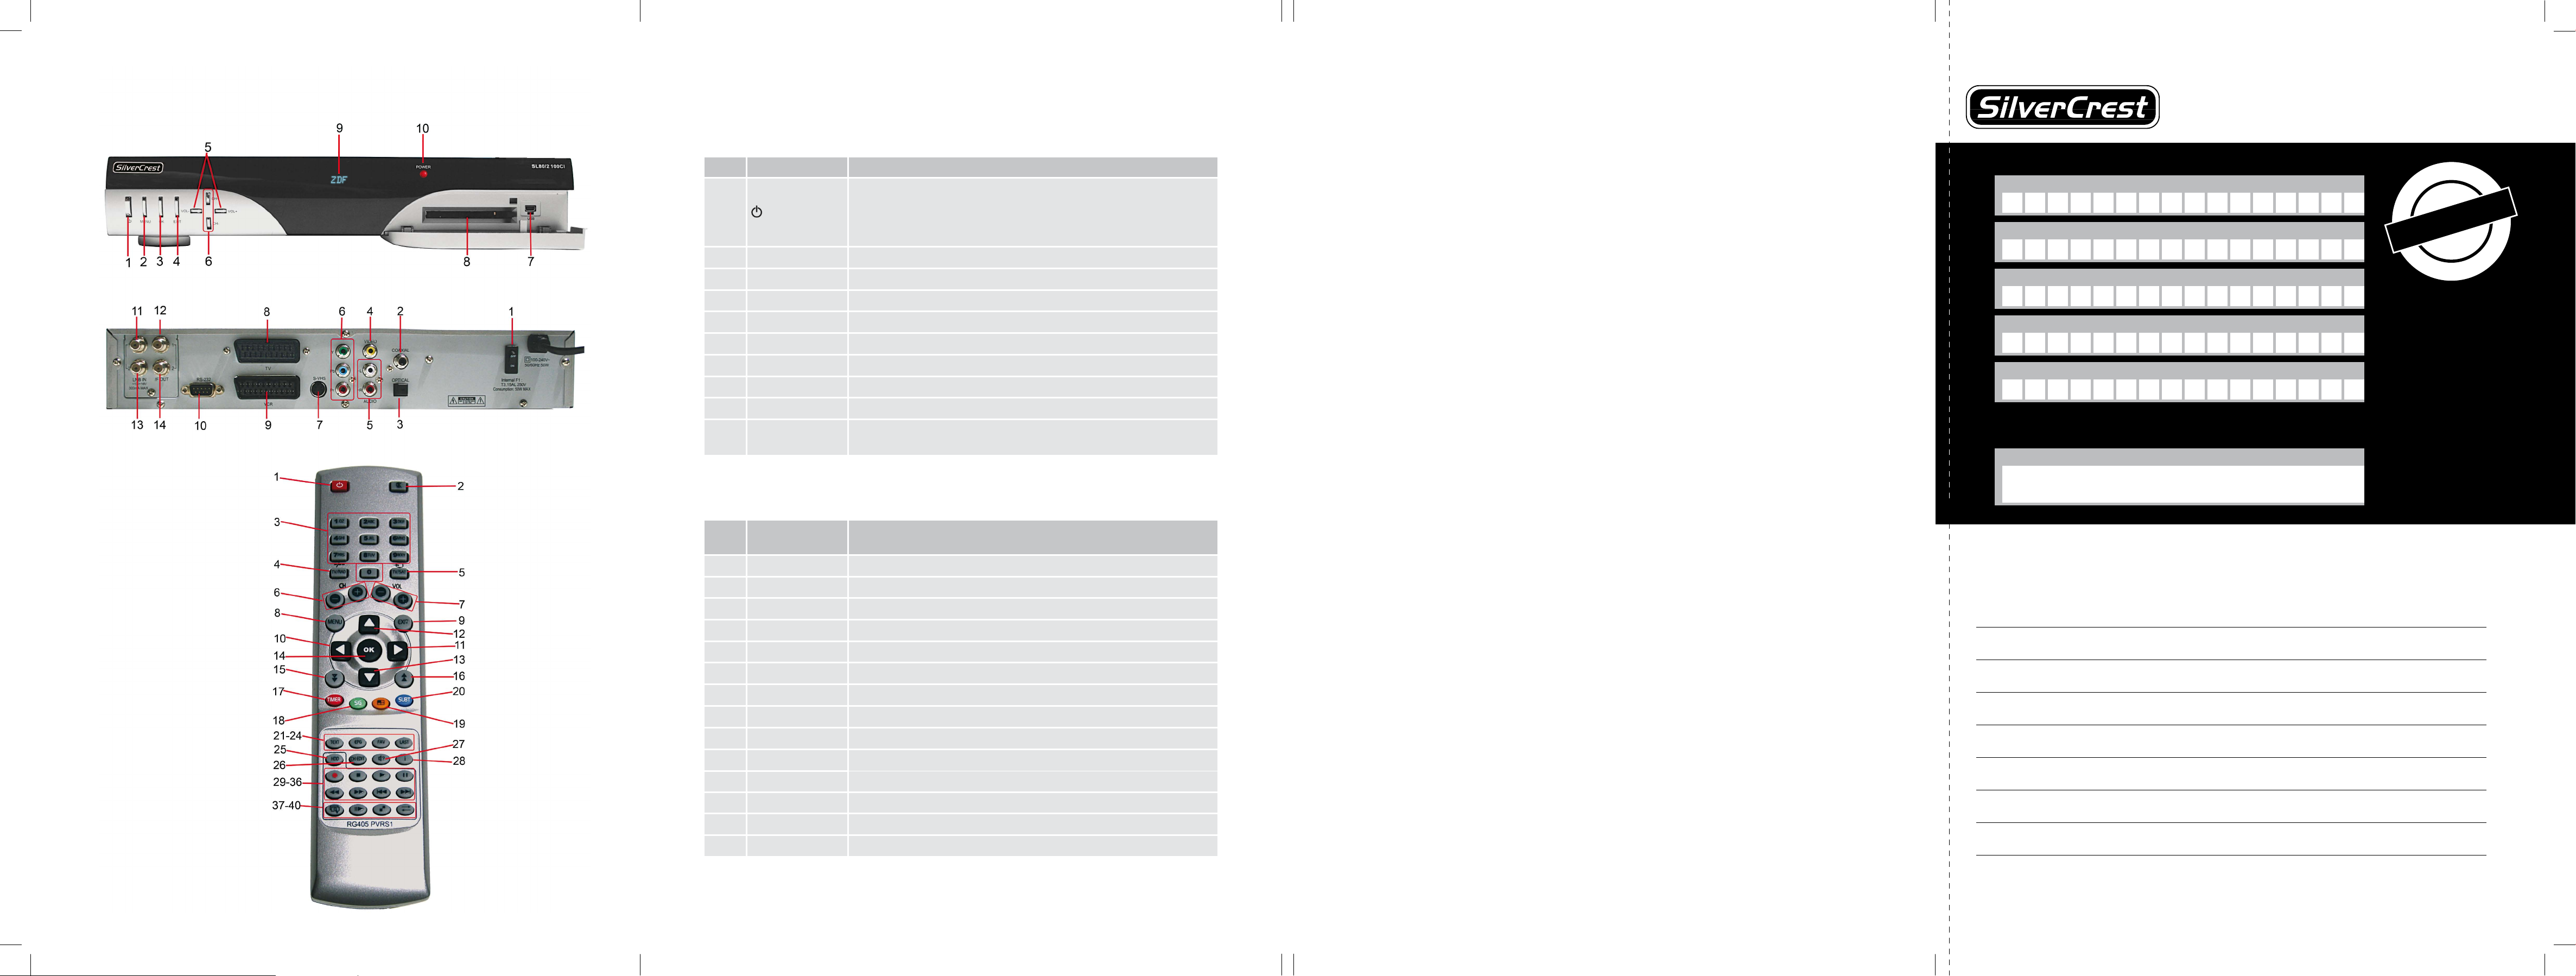
Nr. Key/Display Explanation
1
Switches on and switches to the standby mode.
The default settings will be reseted if you keep this button
pressed for more than 10 seconds.
Caution! By doing this, your personal settings will be deleted.
2 Menu Invokes main menu/one step back in the menu
3 OK Conrm
4 Exit To leave the menu
5 Vol-/+ Volume-control
6 CH-/+ Channel switch
7 USB USB-Connection (Mini-USB)
8 CI-slot CI-slot
9 Display 8-digit alphanumeric display
10 POWER
Green LED is illuminated, if the recveiver is operation mode or
in standby mode.
Nr.
Connection/
Switch
Explanation
1 On/Off Mains switch
2 Coaxial Digital coaxial audio output
3 Optical Optical digital audio output
4 Video Video connection (CVBS)
5 Audio RCA stereo connection L, R
6 YPbPr YPbPr-connection
7 S-VHS S-Video connection
8 TV TV scart connection
9 VCR VCR scart connection
10 RS-232
Serial interface RS-232 (Service)
11 LNB in 1
Antenna input 1 LNB in
12
IF out 1
Antenna output 1 IF out
13
LNB in 2
Antenna input 2 LNB in
14
IF out 2
Antenna output 2 IF out
Overview of equipment
Overview of equipment
1. Front side of the receiver
1. Front side of the receiver
2. Rear side of the receiver
2. Rear side of the receiver
3. Remote control
GUARANTEE
Sender please use block-writing in boxes with CAPITAL LETTERS
Surname
Firstname
Street
Postcode and city
Telefon no. with areacode
Model / Type: SL80/2 100CI
Signature of buyer
PLEASE CUT THIS CARD AND ENCLOSE IT TO THE RETURNING GOOD
•
•
f
r
o
m
p
u
r
c
h
a
s
e
-
d
a
t
e
•
•
•
•
3
6
m
o
n
t
h
s
•
•
Guarantee
Service Centre
Tony Denyer
Unit 1 Longs
Industrial Estate
Englands Lane
Gorleston Great Yarmouth
Norfolk NR31 6BE
Service-Hotline:
00 44 (0) 8708 900137
E-mail:
info@comag-ag.co.uk
Page 3

Please open!
Please open!
DIGITAL SATELLITE RECEIVER
WITH HARD DRIVE
SL80/2 100CI
Before reading, unfold the page containing the illustrations and familiarise yourself with all functions of the
device.
GB / IE / CY Operation and Safety Notes Page 5
DIGITAL SATELLITE RECEIVER
WITH HARD DRIVE
Operation and Safety Notes
Art. Nr.: 16425
COMAG Handels AG
Zillenhardtstr. 41
73037 Göppingen
(Germany)
Last Information Update:
07 / 2008 · Ident.-No.: SL80/2100CI072008-6
Page 4
List, selection window
Remote control
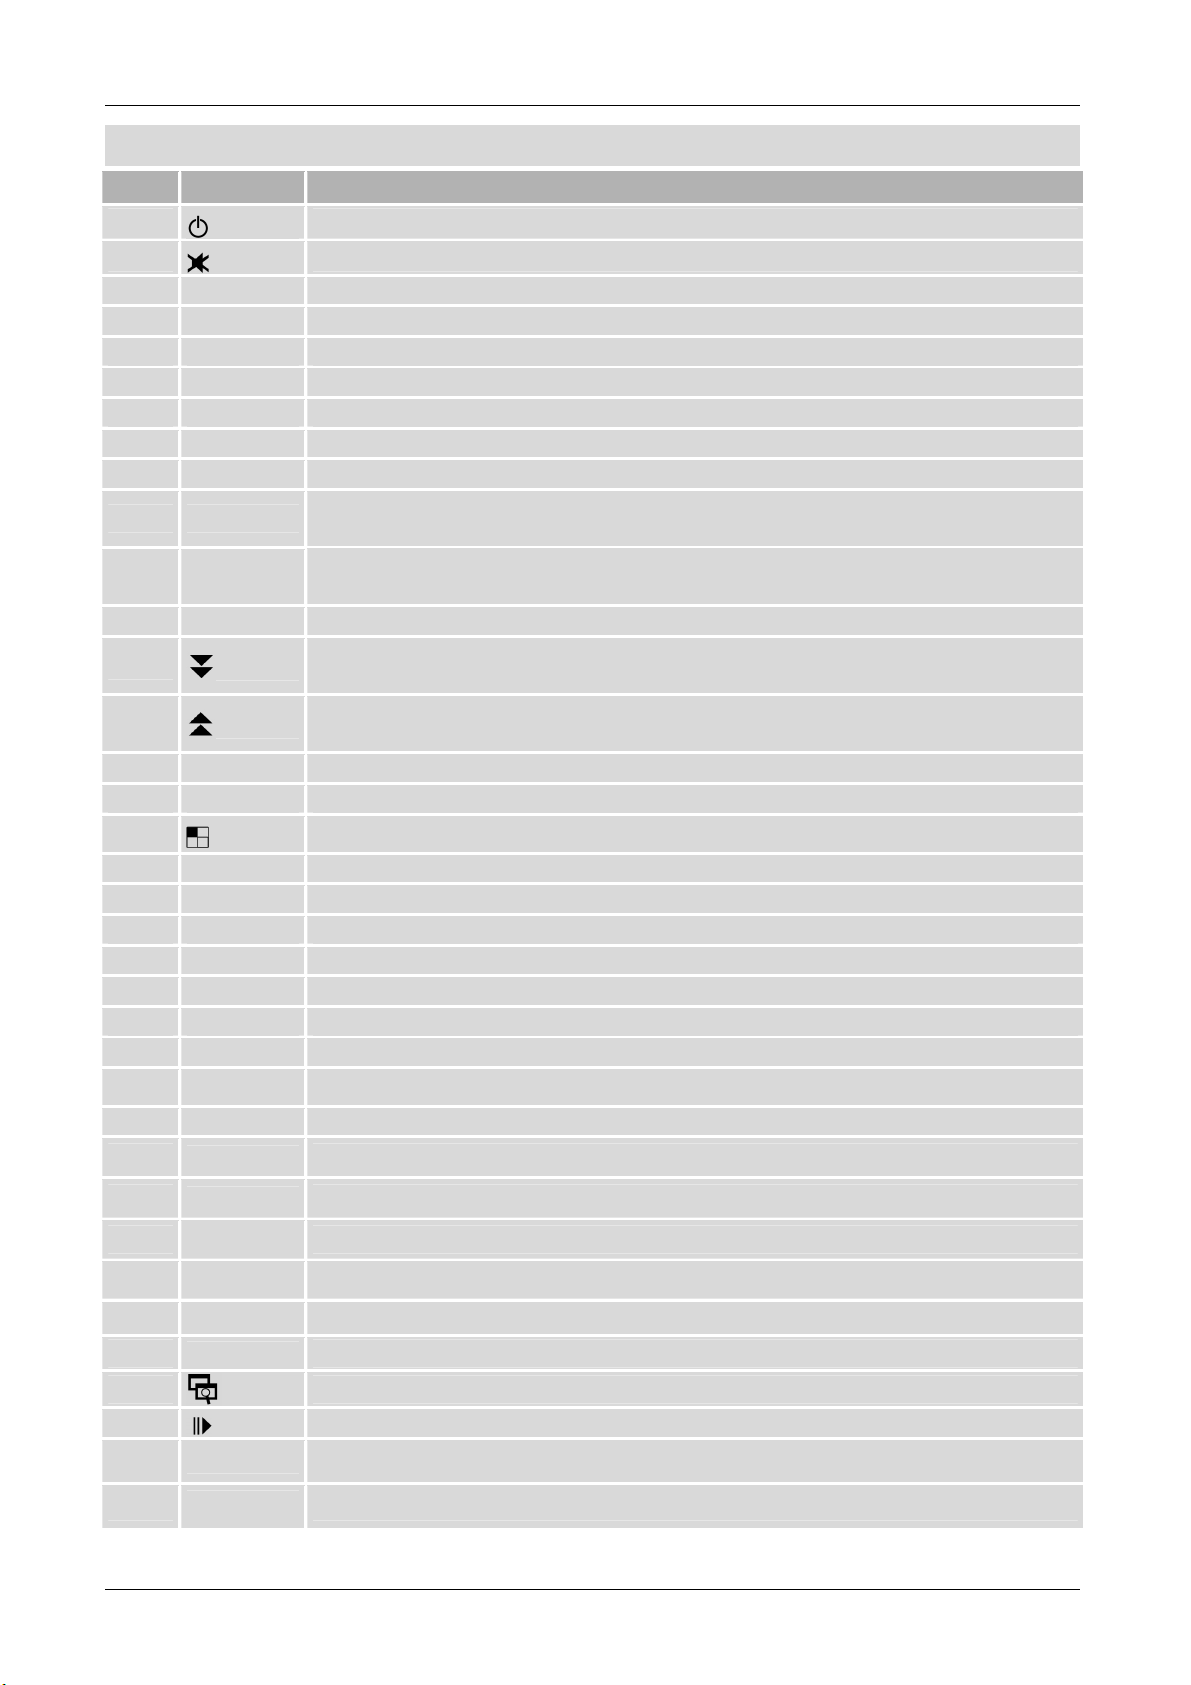
No. Key Description
1
2
3 0-9 Enter numerals/ characters (A-Z)
4 TV/ RAD Toggle between TV and radio modes
5 TV/SAT Toggle between TV and Sat mode
6 CH-/+ Channel down/ up
7 Vol-/+ Volume softer/ louder
8 Menu Call up menu / back to previous menu
9 Exit Exit menu / Hide inserts
10/11 ◄►
12/13 ▲▼
14 OK
15
16
17 Timer Invoke Timer menu/ Special function "Red key"
18 SIG Display signal information/ Special function "Green key"
Switch on/ Stand-by / Activate Sleep timer
Volume control on / mute
Arrow keys: Use the arrow keys to navigate in the menu. You can
adjust the volume in the normal mode (TV/Radio).
Arrow keys: Use the arrow keys to navigate in the menu. You can
change the programs in the normal mode (TV/Radio).
Confirm your inputs (menu etc.), invoke the programme list.
Browse further through the displayed page (Prog.-
etc.)
Browse back through the displayed page (Prog.-List, selection window
etc.)
19
20 SUBT Select / change sub-titles/ Special function "Blue key"
21 TEXT Display video text (switch to transparent)
22 EPG Electronic programme guide
23 FAV Display / browse through Favourites list
24 Last Invoke last watched programme
25 HDD Invoke hard disk menu
26 CH EDIT Invoke / edit Programme list
27 ? Select / change audio track
28 i Display additional information
29
30
31
32
33/34
35/36
37
38
39
Preview of 9 channels / Special function "Yellow key"
Start recording (invoke Recording window)
Stop button to stop playing or recording
Play button to start playback
Pause button / Time shift function
Rewind/ Fast forward of the playback
Back/ skip a title (Playback)
Invoke data storage directory
Slow motion
Picture-in-picture function
40
- 1 -
Switch between Picture-in-picture displays
Page 5

Preface
This operating manual will help you with the proper, safe and comfortable
operation of the digital Twin Satellite receiver, referred to as Receiver in this
manual.
Please read this manual before using the receiver, even if you are familiar
with electronic devices and their handling.
Any person assembling, connecting, operating, cleaning and disposing of this
receiver must first study the entire contents of this operating manual. Always
keep this operating manual in the proximity of the receiver. Please pass on
the operating manual too, if you sell or hand over the receiver to someone
else.
Style features
Specific style features have been given in different sections of the operating
manual. Thus, you can easily differentiate whether it concerns
normal text,
• enumerations
or
actions.
Status: July 2008, Version 1.3_GB_CY
Modifications and errors reserved. We do not assume any liability for printing
errors.
- 2 -
Page 6

Contents
Remote control..............................................................................................1
Preface..........................................................................................................2
Style features ................................................................................................2
Contents........................................................................................................3
Safety instructions.........................................................................................5
Basic safety instructions................................................................................5
Correct battery handling ................................................................................7
Explanation of safety instructions ..................................................................8
Appropriate use.............................................................................................8
Description of the device ...............................................................................9
Unpacking the device ..................................................................................10
Scope of supply...........................................................................................11
Inserting the batteries..................................................................................12
Features......................................................................................................13
Preparation for initial start-up ......................................................................15
Connecting the receiver...............................................................................15
Description of the connection ......................................................................16
Connection with the SCART cable ..............................................................16
Connection with a YUV cable (YPbPr).........................................................18
Connection with the S-Video Cable (S-VHS)...............................................20
Connecting with the Video Cinch cable (CVBS) ..........................................22
Connection of an audio-digital receiver........................................................24
Initial start-up...............................................................................................27
Operation ....................................................................................................29
Installation ...................................................................................................30
Antenna setup .............................................................................................30
Channel search ...........................................................................................42
Transponder list editor.................................................................................46
Program List Editor......................................................................................50
User Setup ..................................................................................................54
Video output ................................................................................................55
OSD Setup ..................................................................................................56
Time setup ..................................................................................................57
Timer Setup.................................................................................................59
Edit Timer....................................................................................................60
Activate/ Deactivate Timer...........................................................................63
Remove Timer.............................................................................................63
System Settings ..........................................................................................64
PIN / parental settings .................................................................................64
Factory default ............................................................................................65
System information......................................................................................66
- 3 -
Page 7

Software update ..........................................................................................67
Channel List Management...........................................................................70
Channel Restore From HDD/USB ...............................................................70
Channel Backup To HDD/USB....................................................................71
Common Interface.......................................................................................73
HDD / USB Applications..............................................................................74
Recordings ..................................................................................................74
Playback......................................................................................................75
Edit recording ..............................................................................................75
Remove selected / marked recordings ........................................................77
Select all......................................................................................................77
Music & Picture ...........................................................................................78
HDD Manager .............................................................................................81
Special functions .........................................................................................83
EPG ............................................................................................................83
Recording multiple channels .......................................................................84
Example of a Cable Bridge (Loop):..............................................................85
Direct recording...........................................................................................85
Time shift (staggered TV watching).............................................................87
Picture-in-picture .........................................................................................87
Displaying the Stream Information...............................................................88
Sleep timer ..................................................................................................89
Multi-picture.................................................................................................89
Text .............................................................................................................90
Switch between TV and SAT.......................................................................90
Switching between TV and radio .................................................................90
Connecting external storage media.............................................................90
Connecting to PC/Notebook ........................................................................91
Decommissioning........................................................................................92
Cleaning......................................................................................................92
Specifications ..............................................................................................93
Tips & tricks/ Trouble shooting ....................................................................94
Manufacturer ...............................................................................................97
Guarantee ...................................................................................................98
Declaration of conformity.............................................................................98
Glossary......................................................................................................99
Notes.........................................................................................................101
- 4 -
Page 8
Safety instructions
Please read the safety instructions carefully before operating the receiver.
Please follow all warnings and instructions on the equipment and in the
operating manual.
Basic safety instructions
Electrical connection
• Disconnect the receiver from the power source in case of operational
disruptions. Please note: The receiver will remain live, even if it is turned off
from the mains switch on the rear side.
• Do not expose the receiver to rain or any kind of humidity to avoid risk of
fire and electric shock.
• Never open the casing. Otherwise, there is a risk of electric shock. There
are no serviceable parts inside.
• Connect the receiver only to a professionally installed mains socket of 100–
240 V ~, 50–60 Hz.
• The total power consumption by the antenna connection of the receiver
“LNB IN” must not exceed 300 mA.
• Pull out the mains plug from the socket if the equipment is not in use for a
relatively long period of time. Only pull at the mains plug, not at the cable.
• Do not touch the power cable with moist or wet hands.
• In the event of storms, pull out the mains plug of the receiver from the
socket.
• The Standby key (device front) of this device will not separate the device
completely from the power source. To isolate the device completely from
the power circuit, operate the On/Off switch on the back of the unit.
• Thread off the connecting cable (satellite supply line) from the receiver, in
the event of a storm.
• If foreign bodies or fluids enter the receiver, immediately pull out the mains
plug from the socket. Ask a qualified person to check the equipment before
operating it again. Otherwise, there is a risk of electric shock.
• Do not place any objects or other things on the power cord.
- 5 -
Page 9

• Ensure that the power source (socket) is easily accessible.
Do not bend or crimp the power cord.
• If the power cord is damaged, have an expert repair the
receiver before you reuse it. Otherwise, there is a risk of electric shock.
• Never allow children to operate the receiver or to play with the antenna unit
unless supervised. Children cannot always correctly perceive possible
dangers.
• Always leave service jobs to qualified technicians, otherwise you will put
yourself and others in danger.
• Disconnect the receiver from the power source in case of operational
disruptions.
• Spare parts must be ordered directly from the manufacturer
• Modifications to the device will nullify the manufacturer’s liability.
• Remove all protective coverings before putting the device in operation.
• Keep all packing materials (foils etc) away from children. They involve
danger of suffocation.
Suitable location
• Place the receiver on a stable and even base.
• Never place receptacles filled with liquid (e. g. vases) on or next to the
receiver.
• Avoid direct sunlight and places with an extremely high amount of dust.
• Never cover ventilation slits. Ensure adequate ventilation of the receiver.
• Do not place any heavy objects on the receiver.
• Humidity may settle in the receiver if it is brought into hot surroundings from
the cold. In such an event, wait for about an hour before operating the
equipment.
• Lay the mains and antenna cables in such a manner that no-one steps or
trips over them.
Avoid proximity to:
• heat sources, such as heaters,
• naked flames, such as candles,
• devices with strong magnetic fields, such as loudspeakers.
- 6 -
Page 10
Correct battery handling
Batteries may contain toxic agents. Ensure that batteries are not within the
reach of children. Children could put the batteries in their mouth and swallow
them. If a battery is swallowed, call for medical help immediately.
Batteries that are getting discharged may damage the remote control. If the
receiver is not in use for a longer period of time, remove the batteries from the
remote control.
Batteries may contain toxic agents. Please, therefore, dispose of the batteries
immediately in an ecologically accepted manner according to the prevailing
statutory regulations. Never throw batteries in the household garbage, but
dispose of them at the collection points intended for the purpose.
Never expose the batteries to open fire or strong heat, as otherwise there is a
danger of explosion.
Never charge the batteries, as they may explode.
Always replace the batteries by batteries of the same type.
Disposal of old devices
If this symbol of a crossed-out garbage can is displayed on a product, this
product is covered under the European Guidelines 2002/96/EC.
All old electrical and electronic devices must be disposed of separately from
household garbage, at specially provided public locations.
By properly disposing of the old device, you avoid damage to the environment
and endangerment of the personal health.
You can obtain further information about disposal of old devices from the city
administration, at the time of disposal or from the shop where you purchased
the product.
- 7 -
Page 11
Explanation of safety instructions
The following categories of safety instructions are included in this
operating manual:
Danger!
Instructions with the word DANGER give a warning against possible
personal injuries.
Caution!
Instructions with the word CAUTION give a warning against possible
material or environmental damages.
These instructions contain special information regarding an -
economic use of the receiver.
Appropriate use
The receiver is designed for receiving unencryted and encrypted digital
satellite channels for private use. It is exclusively meant for this purpose and
must only be used for the same. This also includes paying attention to all
information contained in this operating manual, especially in the safety
instructions.
Any other usage is considered to be improper and may lead to material damages and even personal injuries. Moreover, it will result in the immediate
loss of guarantee.
The manufacturer does not bear any liability for damages caused due to improper use.
- 8 -
Page 12

Description of the device
With this receiver, you are able to receive unencrypted and encrypted digital
satellite channels via a satellite antenna. In addition, you have the option of
using a second satellite supply line to record another channel through the
second built-in tuner and to play it back at a later time. The device has a builtin hard disc and offers the additional option of playing back data through the
USB interface. It is also possible to record on a USB medium.
It is not necessary to programme the receiver beforehand.
The most important broadcasting stations and satellites have already been
pre-programmed.
The satellite antenna has to be directed towards the desired satellite.
The receiver will scan for further new channels as soon as you initiate the
automatic scanning of broadcasting stations for this satellite. Satellites that
are not preset may be added.
All receiver settings can be done easily using the user interface (menu) on the
TV monitor.
The multilingual user interface supports following languages:
• German
• Swedish
• Czech
• English
• French
• Turkish
• Spanish
• Italian
- 9 -
Page 13

Unpacking the device
Before you can put the device in operation, please observe the following tips
and carry out the steps as listed.
On opening, remove the packaging material and the protective sheet
around the device.
Take out the accessories. These are packed in a separate plastic bag.
On opening, check the completeness of the scope of supply (see the next
page).
- 10 -
Page 14
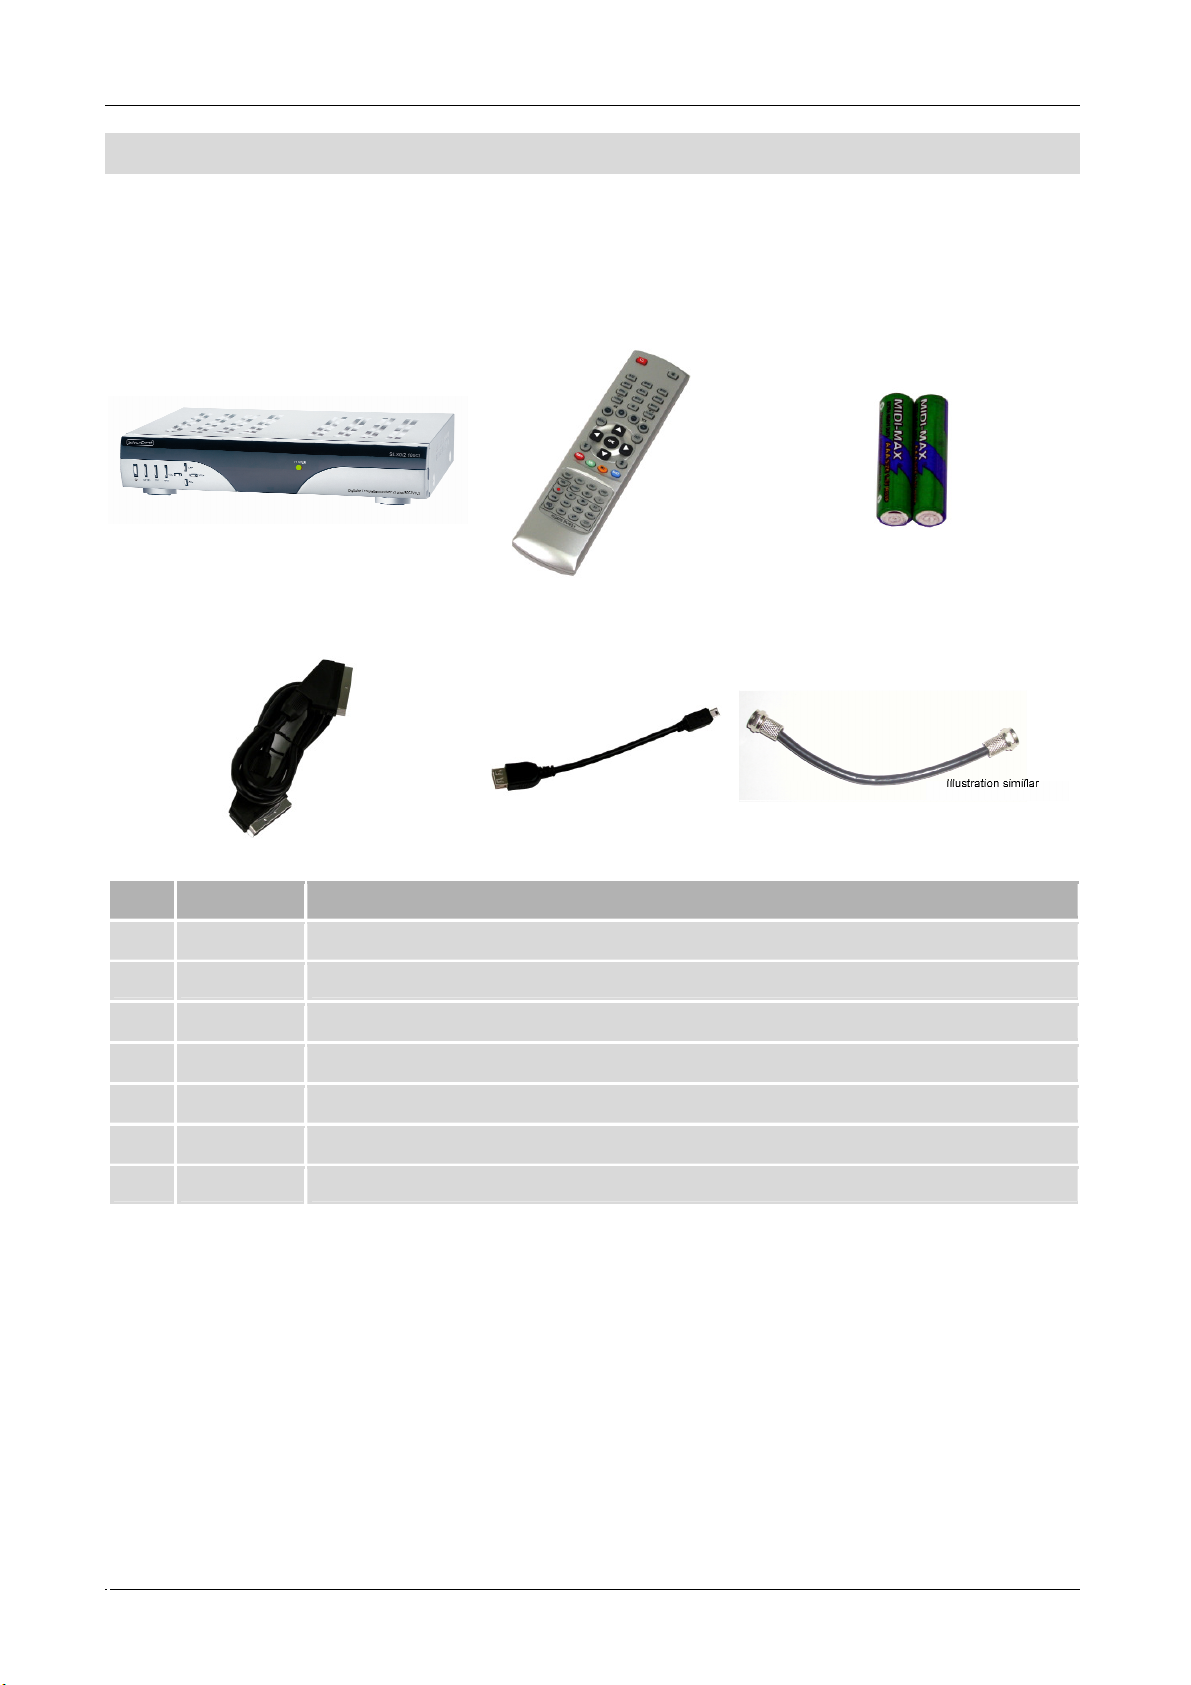
Scope of supply
Check the scope of supply after purchase. The package must contain the
components listed below.
1 2 3
4 5 6
No. Pieces Description
1 1 Receiver
2 1 Remote control
3 2 Batteries of type AAA/1,5 V
4 1 Scart cable
5 1 USB Adapter cable (Mini A-plug on normal A-socket)
6 1 Loop cable
- 1 Operating manual
- 11 -
Page 15
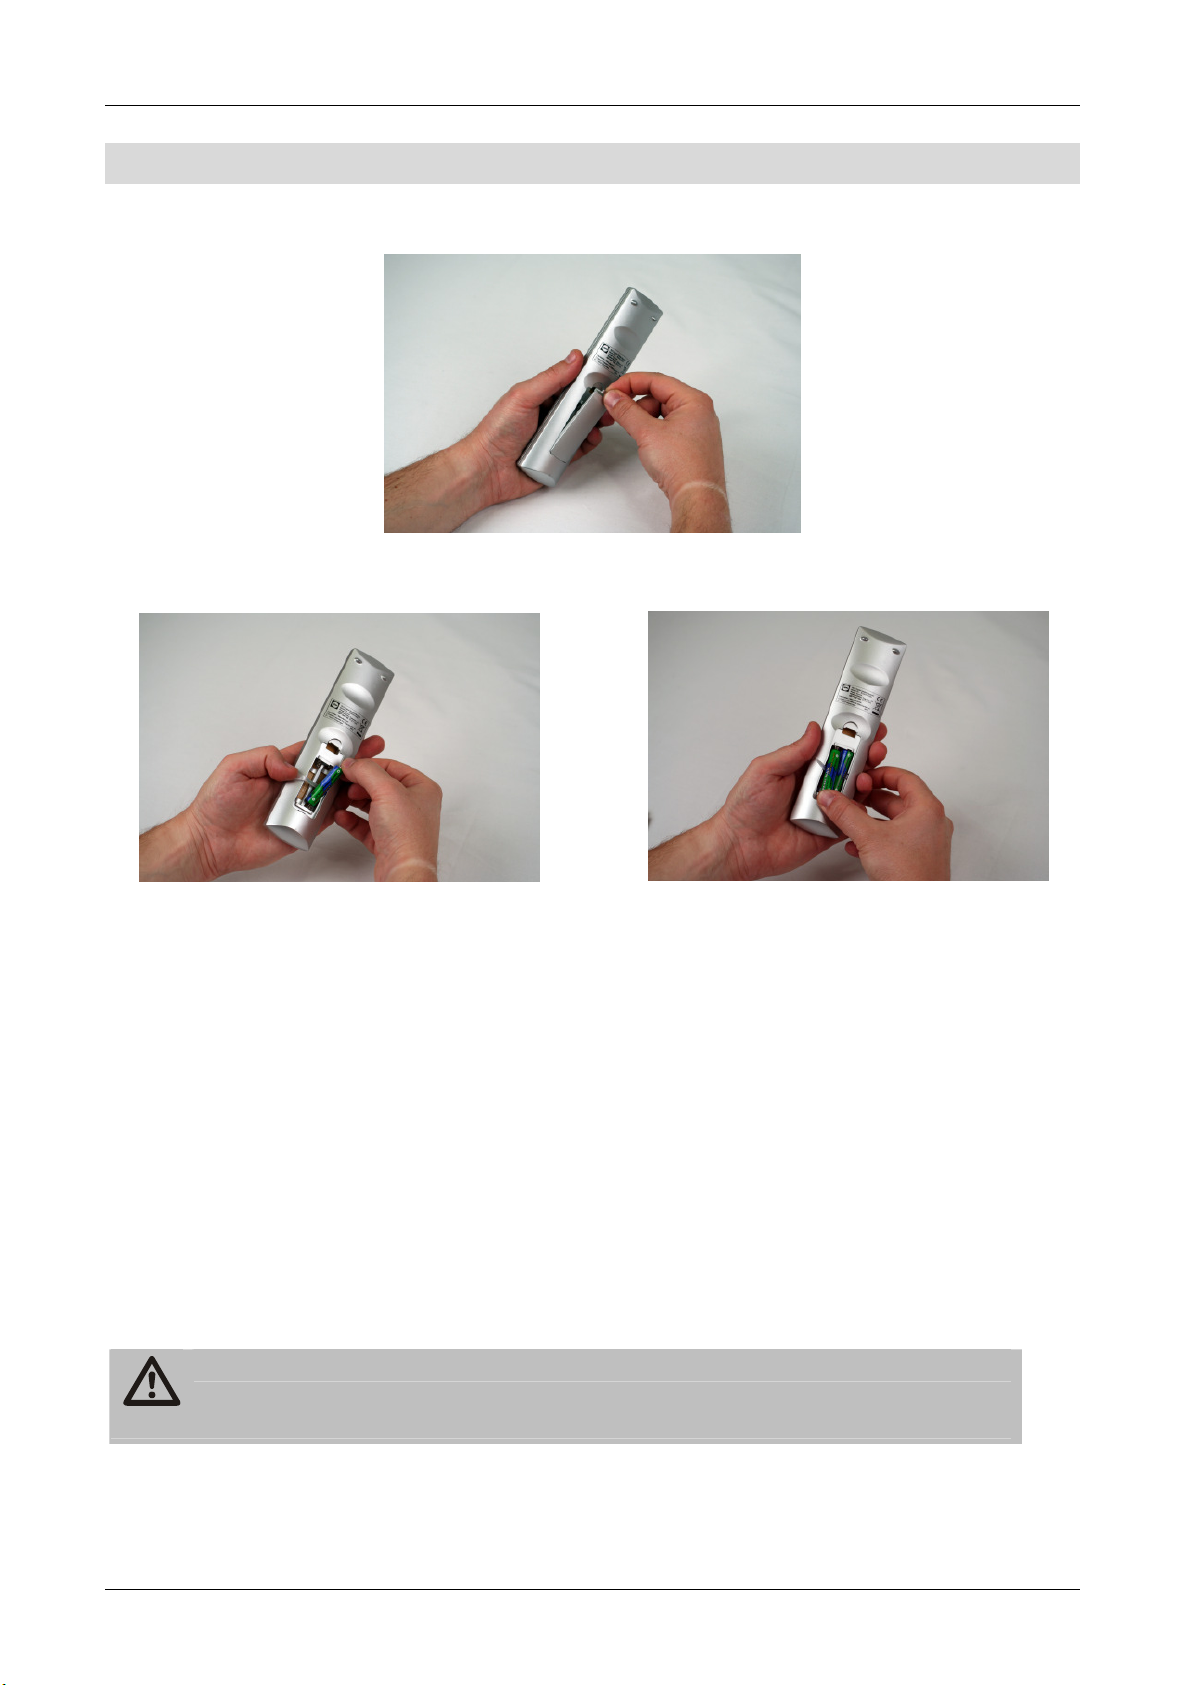
Inserting the batteries
Open the battery compartment.
Insert two batteries in the battery compartment; observe proper polarity as
mentioned.
Push the cover of the battery compartment carefully until the cover is
locked.
The strap is for removing the batteries easily out of the battery
Observe the disposal tips on page 7.
compartment. If you put the strap below the batteries when
inserting them, you can remove them by simply pulling the strap
carefully.
Replace discharging batteries on time. Otherwise, the sending
capacity of the remote control will be too low.
Always replace both batteries simultaneously and use batteries of
the same type.
Check the batteries of your remote control at least once a year.
If a battery has leaked, wear protective gloves and clean the
battery compartment with a dry cloth.
Caution!
- 12 -
Page 16

Features
• 8-digit alphanumeric display on the front side of the device
• Facility to connect external USB storage medium to the USB port for
recording and playback of the contents. Also for playing back
readable image and music files.
• TWIN tuner for simultaneous recording and watching different channels.
• Simultaneous recording of two channels and watching a third channel
(depending on the recorded transponder).
• Software update via satellite ASTRA1 19.2° E or via the USB connection on
the front side of the device.
• 8 keys at the frontage
• Saves the channel last watched (Last Channel Memory)
• LNB control logic (sound 0/22 kHz), max. current delivery for LNB 300 mA
• Symbol rate 2-35 MS/s and 950-2150 MHz input frequency
• Common Interface slot on the front of the device
• Plug & play
• The power draw in standby mode is about 2W.
• 100–240 V ~, 50/60 Hz mains connection
• 5,000 channel-storage locations
• Child lock (preset password: 0000)
• Built-in hard disc for recording and storing transmissions and movies.
• 10 favourites lists
• Automatic channel scan
• Channel-list editor
• Analogue sound output through Cinch connector (stereo), volume
adjustment possible via remote control
• Coaxial output (digital audio) for AC3/Dolby Digital
• Optical output (digital audio) for AC3/Dolby Digital
• 2 Euro-SCART connections for TV and video set (VCR)
• TV SCART output with CVBS, RGB and YUV (YPbPr) assignment
• Loop-through function for connecting another satellite receiver
• Super fast video text with a memory of 800 pages
- 13 -
Page 17

• Digital radio reception, screen saver for radio
• Additional channel information is displayed when the channel is changed.
• DiSEqC 1.0, 1.2, is supported if an appropriate antenna unit is connected
• SWAP function (via LAST key)
• Screen aspect ratios can be set to 4:3 letterbox, 4:3 PanScan, 16:9
• 60x multi-functional timer linked with EPG
• Sleep timer
• Electronic Programme Guide EPG (up to 7 days in advance, channel-
dependent)
• SCPC/MCPC reception standard C/Ku-band satellites
• Automatic selection of the TV standard with video converter (SDTV)
• Digital satellite finder for optical and acoustic adjustment of the
paraboloidal-type reflector
A suitable channel editor is additionally available through our
hotline. Then you will be able to edit the channel lists of the
receiver using your computer. Please read the information on our
website www.mysilvercrest.de for this purpose.
- 14 -
Page 18
Preparation for initial start-up
Connecting the receiver
The receiver is connected with your satellite antenna by means of one or two
coaxial cable(s). If necessary, you have to prepare one or two coaxial
cable(s), as the case may be, before connecting the receiver.
The coaxial cable is not included in the scope of supply.
Caution!
Connect the receiver to the mains supply only after you have connected
it to all equipment and the antenna properly. Otherwise the receiver can
suffer damages.
The wire netting and the inner core of the coaxial cable carry current
during operation.
- 15 -
Page 19

Description of the connection
Connection with the SCART cable
Insert the SCART cable in the SCART socket “TV” on the receiver.
Connect the SCART cable to the TV set. Follow the operating manual of the
TV set (Fig. 1).
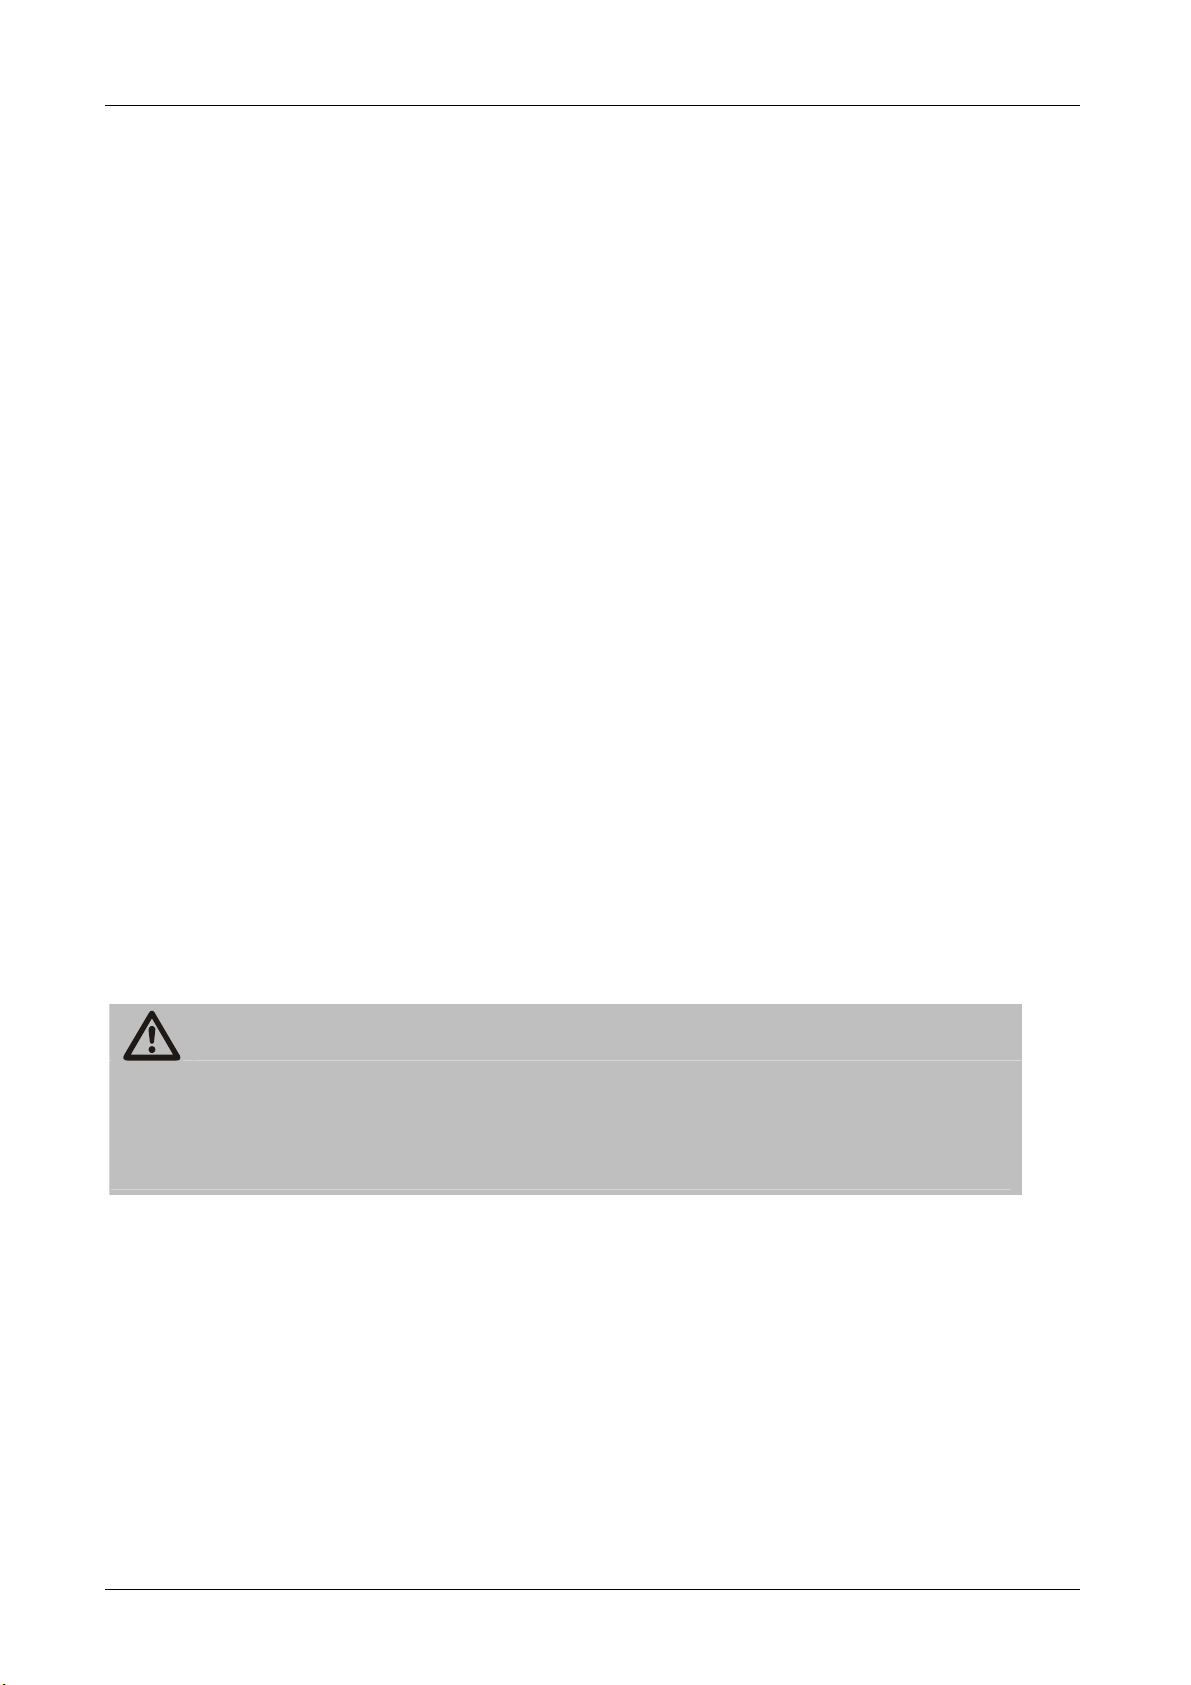
Insert the SCART cable in the SCART socket “VCR” of the receiver if you
want to connect a video set (Fig. 2).
Connect the SCART cable to the video set. Follow the operating manual of
the video set.
Insert the Cinch connector of the Cinch cable in the “AUDIO-R” and
“AUDIO-L” sockets of the receiver if you want to connect a stereo system.
Keep in mind that only one SCART cable is included in the scope
of supply.
- 16 -
Page 20
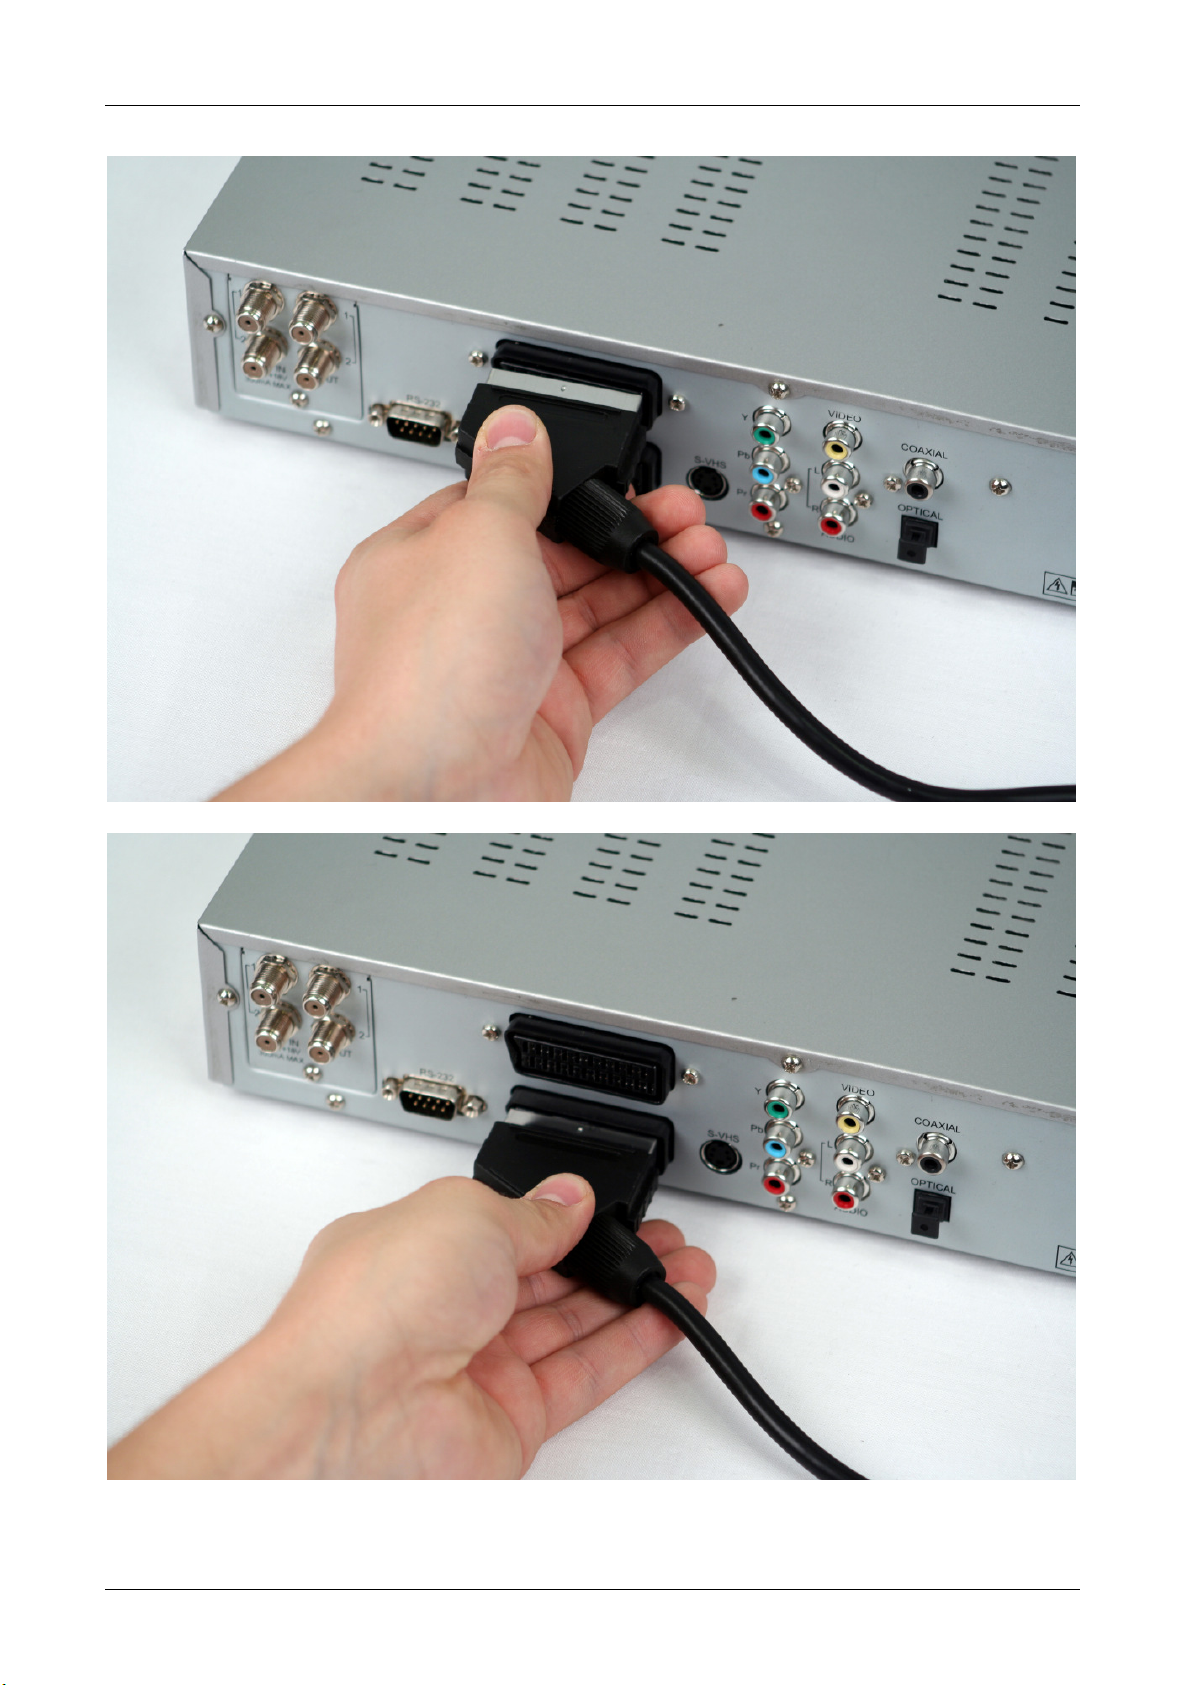
Connection to the SCART sockets
Fig. 1
Fig. 2
- 17 -
Page 21
L“ sockets of the receiver.
Connection with a YUV cable (YPbPr)
If you own a TV set with YUV connections, you can connect it via the SCART
socket “TV“ to the receiver. For this purpose, you need a YUV cable with YUV
connectors at one and a SCART connector with YUV element at the other
extreme.
Connect the SCART connector of the YUV cable to the SCART socket “TV“
on the receiver.
Connect the YUV cable (not included in the scope of supply) to the YUV
connectors of the TV set (Fig. 1).
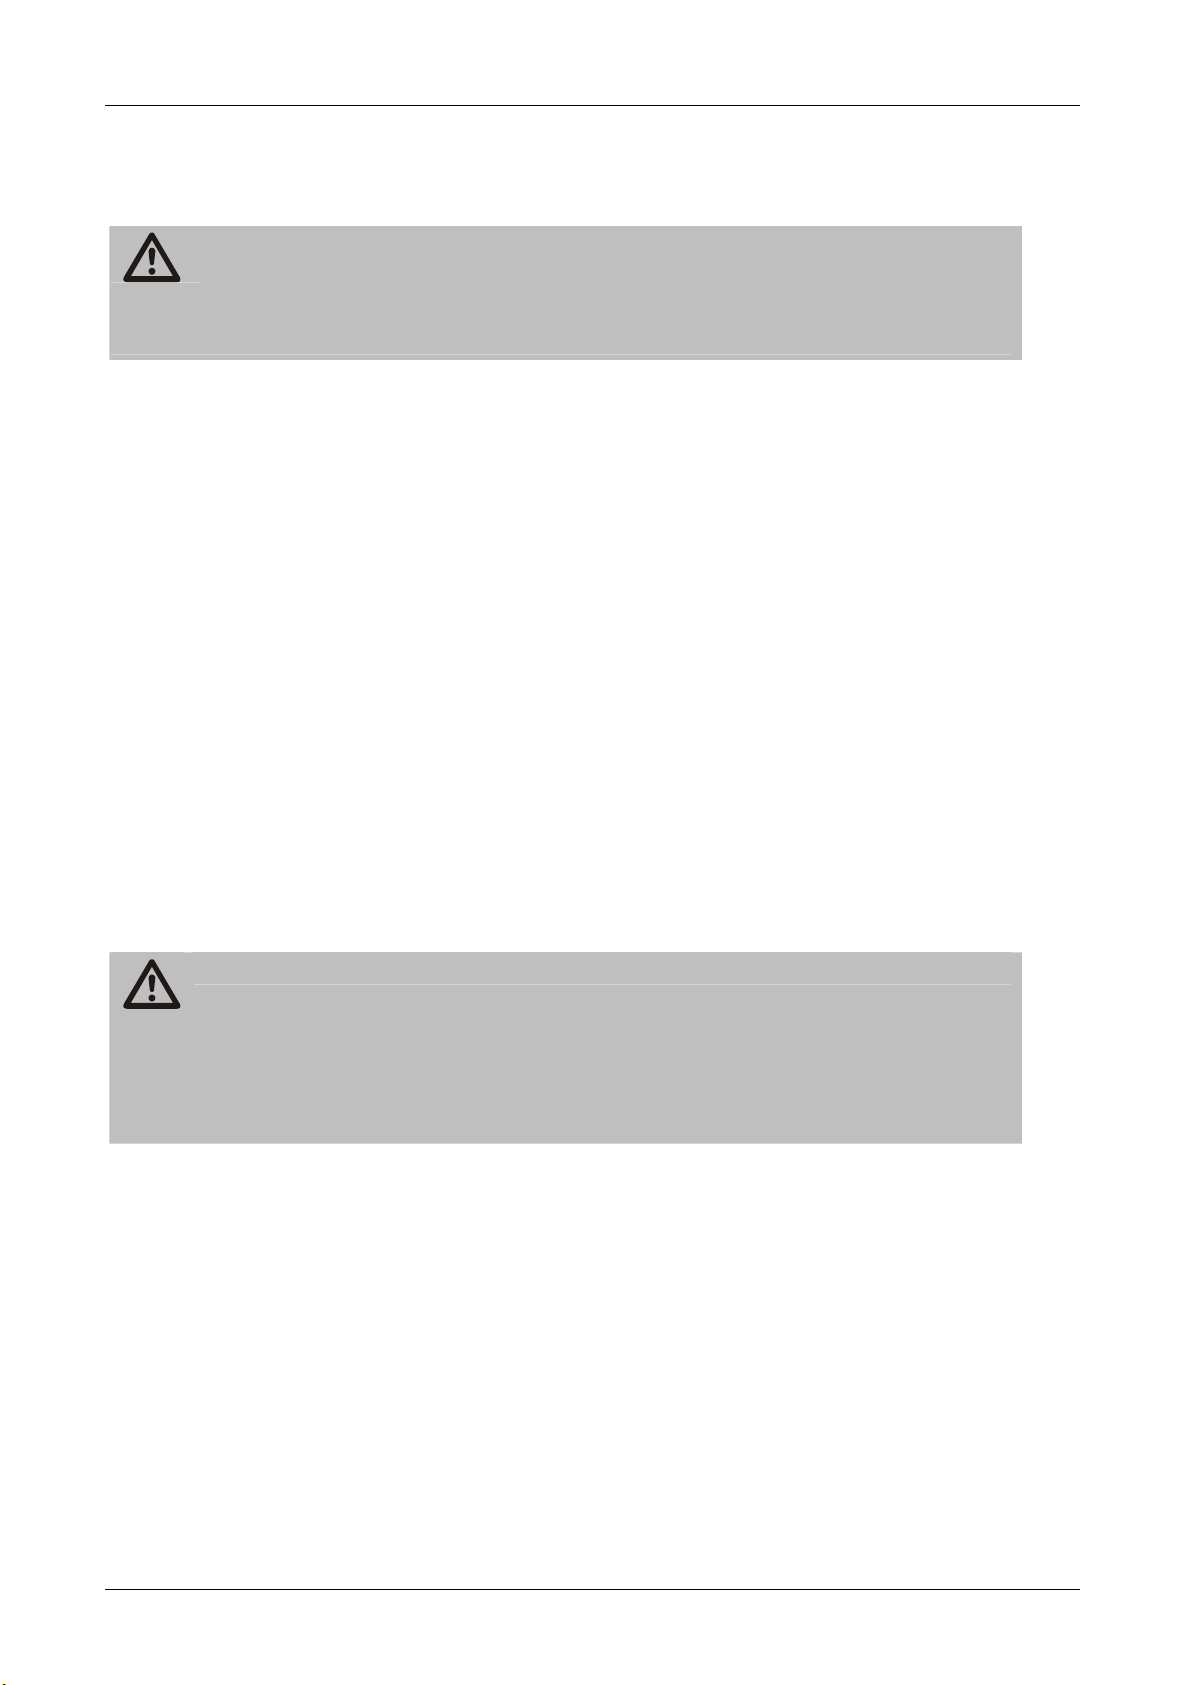
You can even connect a YUV cable directly to the YUV sockets of the receiver
with the TV set.
Connect the YUV cable to the YUV connectors of the TV set.
Connect the YUV cable to the YUV connectors of the TV set (Fig. 2).
Follow the indications in the operating manual of the TV set.
As the YUV cable does not send an audio signal to the TV set, you must
connect your receiver with a stereo system to hear the sound.
For this purpose, use a Cinch cable and insert the Cinch connector in the
“AUDIO-R“ and “AUDIOAlternatively, you can also connect an audio digital receiver to your receiver
to get a 5-channel audio transmission. Use the digital audio outputs
"COAXIAL" or "OPTICAL" for this purpose. The corresponding connection
diagram can be found on the following pages.
Caution!
Never connect the Phono input of your stereo system to the receiver; it
may damage your stereo system.
Strictly follow instructions for connecting the Cinch cable
given in the operating manual of your stereo system.
This YUV output is a high-quality output especially made for flat
screens, plasma TV sets or beamers. Follow the indications in the
operating manual of the connected devices.
- 18 -
Page 22
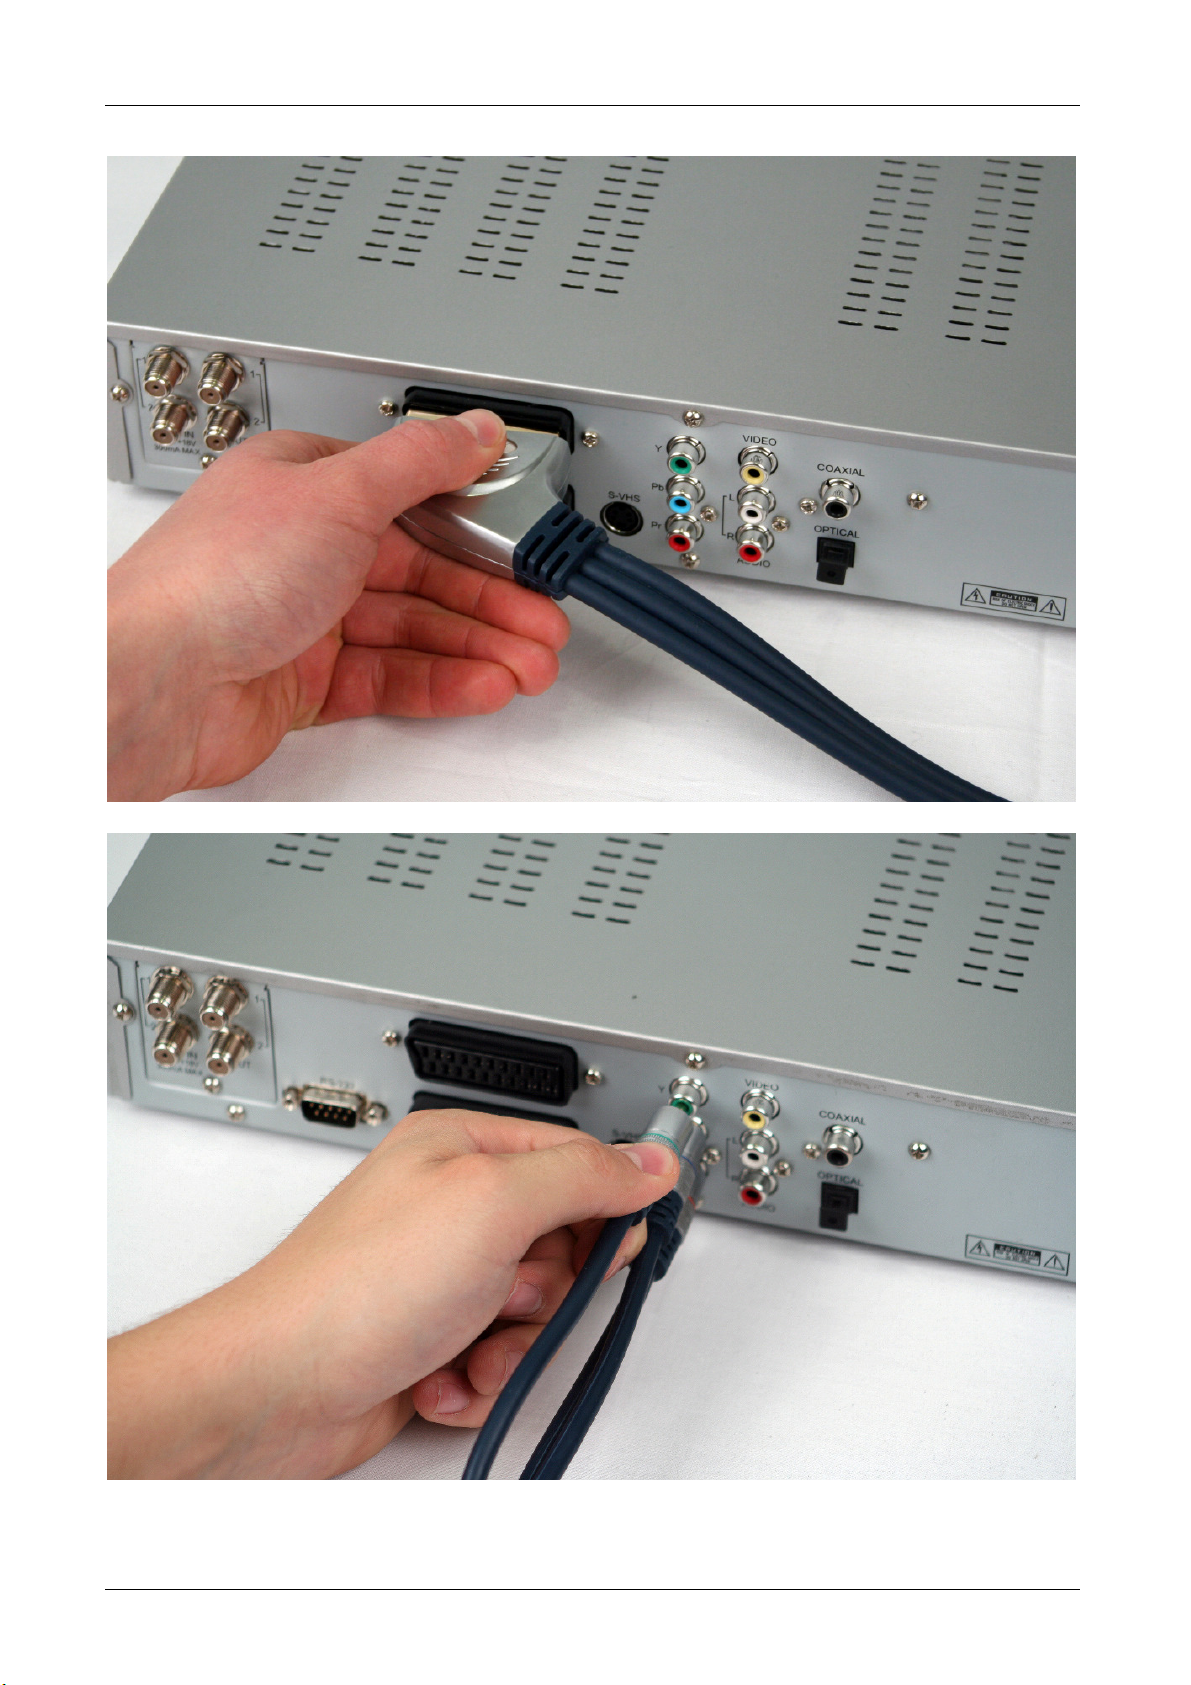
Connection to the YUV output
Fig. 1
Fig. 2
- 19 -
Page 23
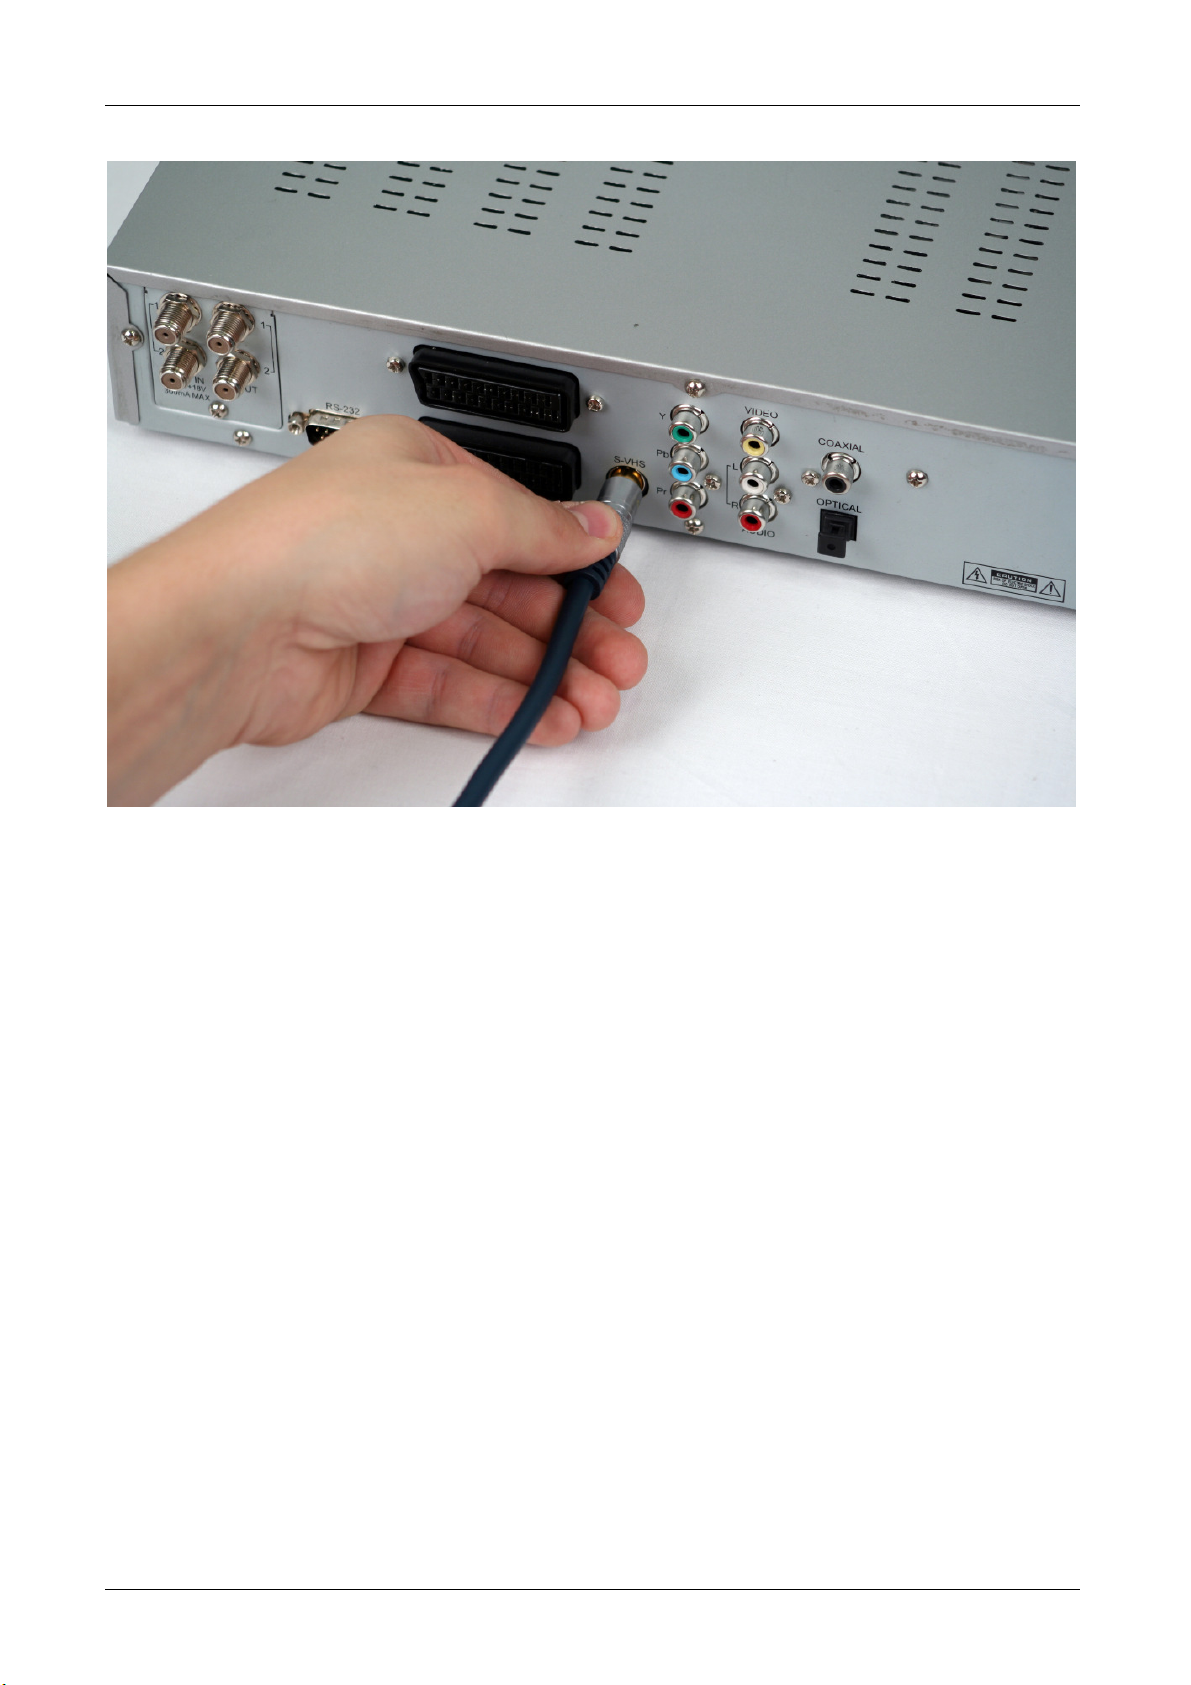
Connection with the S-Video Cable (S-VHS)
Caution!
Strictly follow the instructions for connecting the S-video cable (S-VHS)
provided in the operating manual of your TV set.
The S-Video cable is not included in the scope of supply.
Insert the S-Video cable in the “S-VHS“ socket of the receiver.
Connect the S-Video cable to the TV set.
Insert the Cinch connector of the Cinch cable in the “AUDIO-R“ and
“AUDIO-L“ sockets of the receiver.
Connect the Cinch cable to the TV set or a stereo set.
Insert the SCART cable in the SCART socket “VCR” of the receiver if you
want to connect a video set.
Connect the SCART cable to the video set.
Follow the operating manual of the video set.
If the receiver is connected to a stereo set, the TV set does not
need to be switched on to listen to the radio.
Caution!
Never connect the Phono input of your stereo system to the receiver; it
may damage your stereo system.
Strictly follow instructions for connecting the Cinch cable
given in the operating manual of your stereo system.
- 20 -
Page 24
Connection to the S-VHS output
- 21 -
Page 25
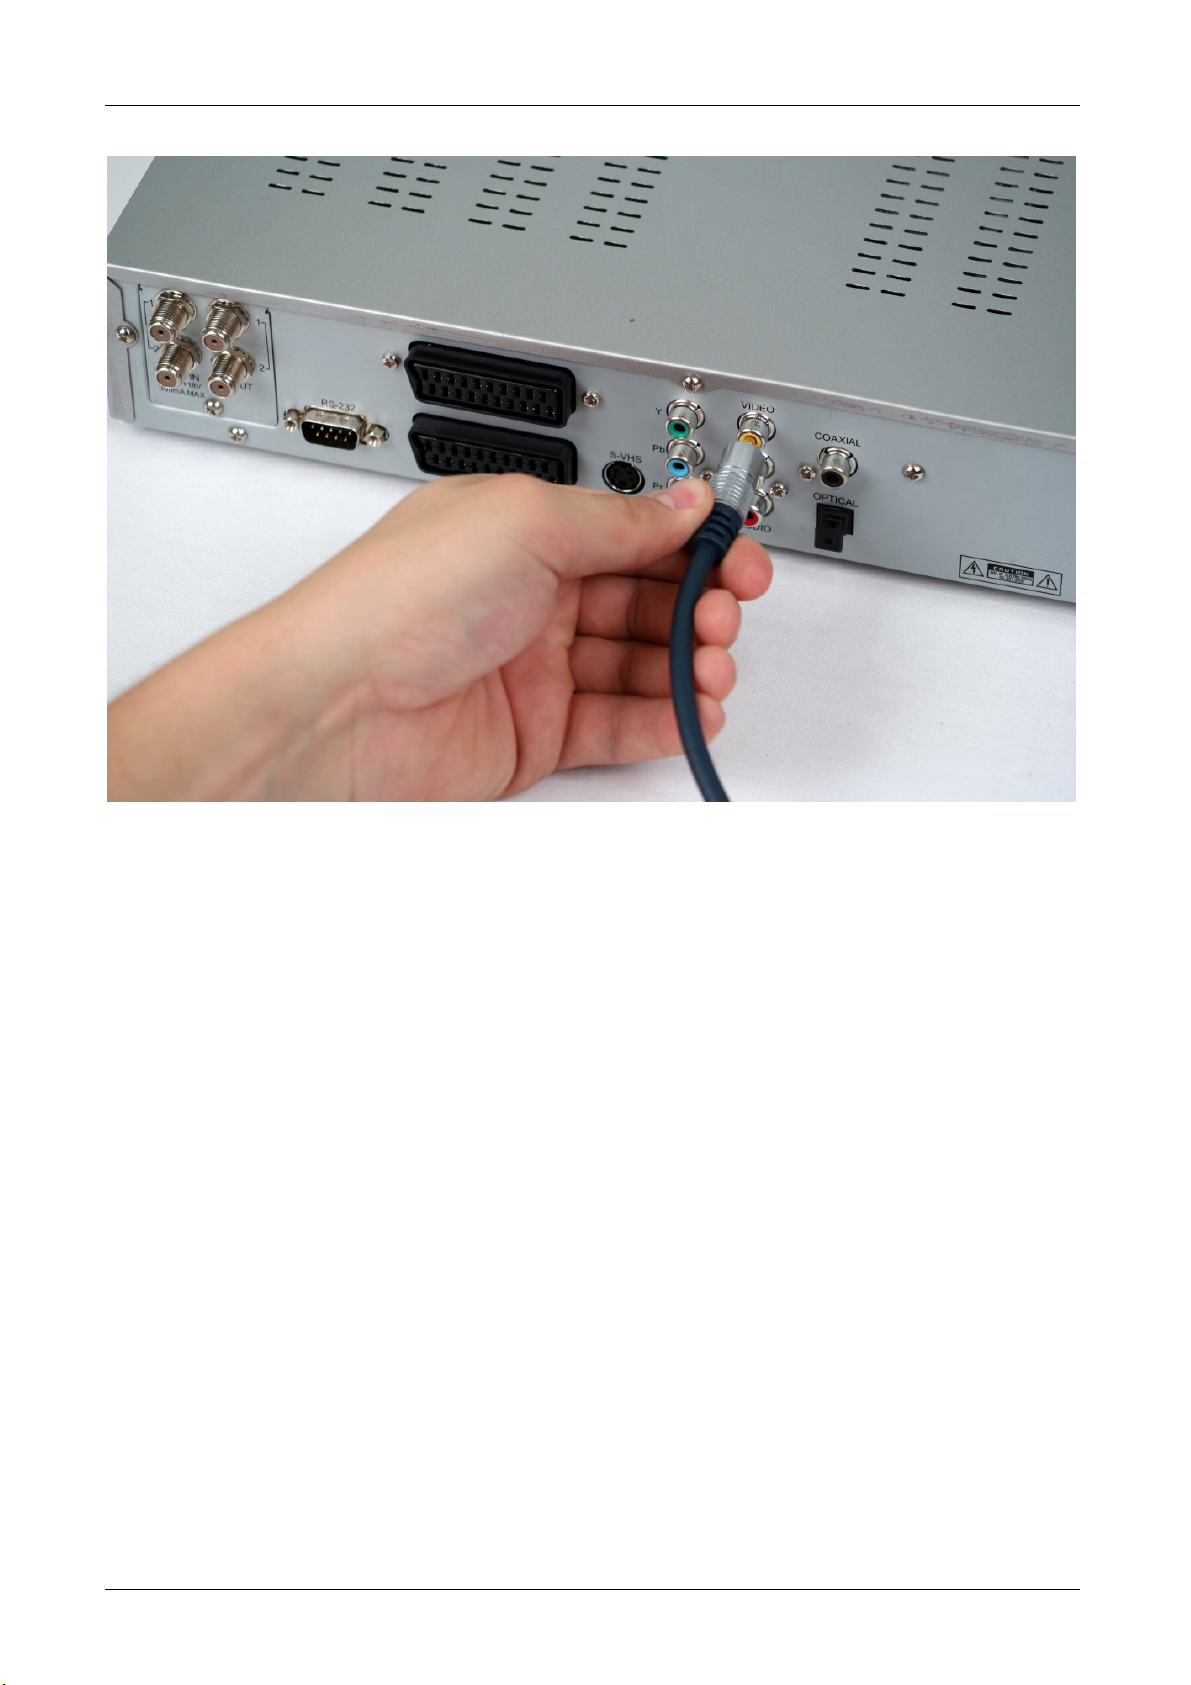
Connecting with the Video Cinch cable (CVBS)
If you own a TV set not provided with a SCART socket, you can connect the
receiver via a Cinch cable.
Connect the “VIDEO“ socket of the receiver to the video input of the TV set.
Connect the “AUDIO-R" and “AUDIO-L" sockets of the receiver to the audio
inputs of the TV set or a stereo set.
The Cinch cable is not included in the scope of supply.
If the receiver is connected to a stereo set, the TV set does not
need to be switched on to listen to the radio.
Caution!
Never connect the Phono input of your stereo system to the receiver; it
may damage your stereo system.
Strictly follow instructions for connecting the Cinch cable
given in the operating manual of your stereo system.
- 22 -
Page 26
Connection to the video output
- 23 -
Page 27
Connection of an audio-digital receiver
If you want to use 5-channel audio transmission (Dolby digital sound/AC3),
you must connect your audio-digital receiver to the optical or coaxial output of
the receiver.
For the optical output, you need a light wave conductor cable, also called as
"optical cable".
For the coaxial audio output of the receiver, you need a
Cinch cable.
Caution!
Never connect the Phono input of your stereo system to the receiver; it
may damage your stereo system.
Strictly follow instructions for connecting the Cinch cable
given in the operating manual of your stereo system.
Caution!
Please follow strictly the information regarding connection in the
operating manual of your audio-digital receiver.
The optical and coaxial cables are not included in the scope of -
supply.
Your TV set does not need to be switched on for radio reception.
- 24 -
Page 28
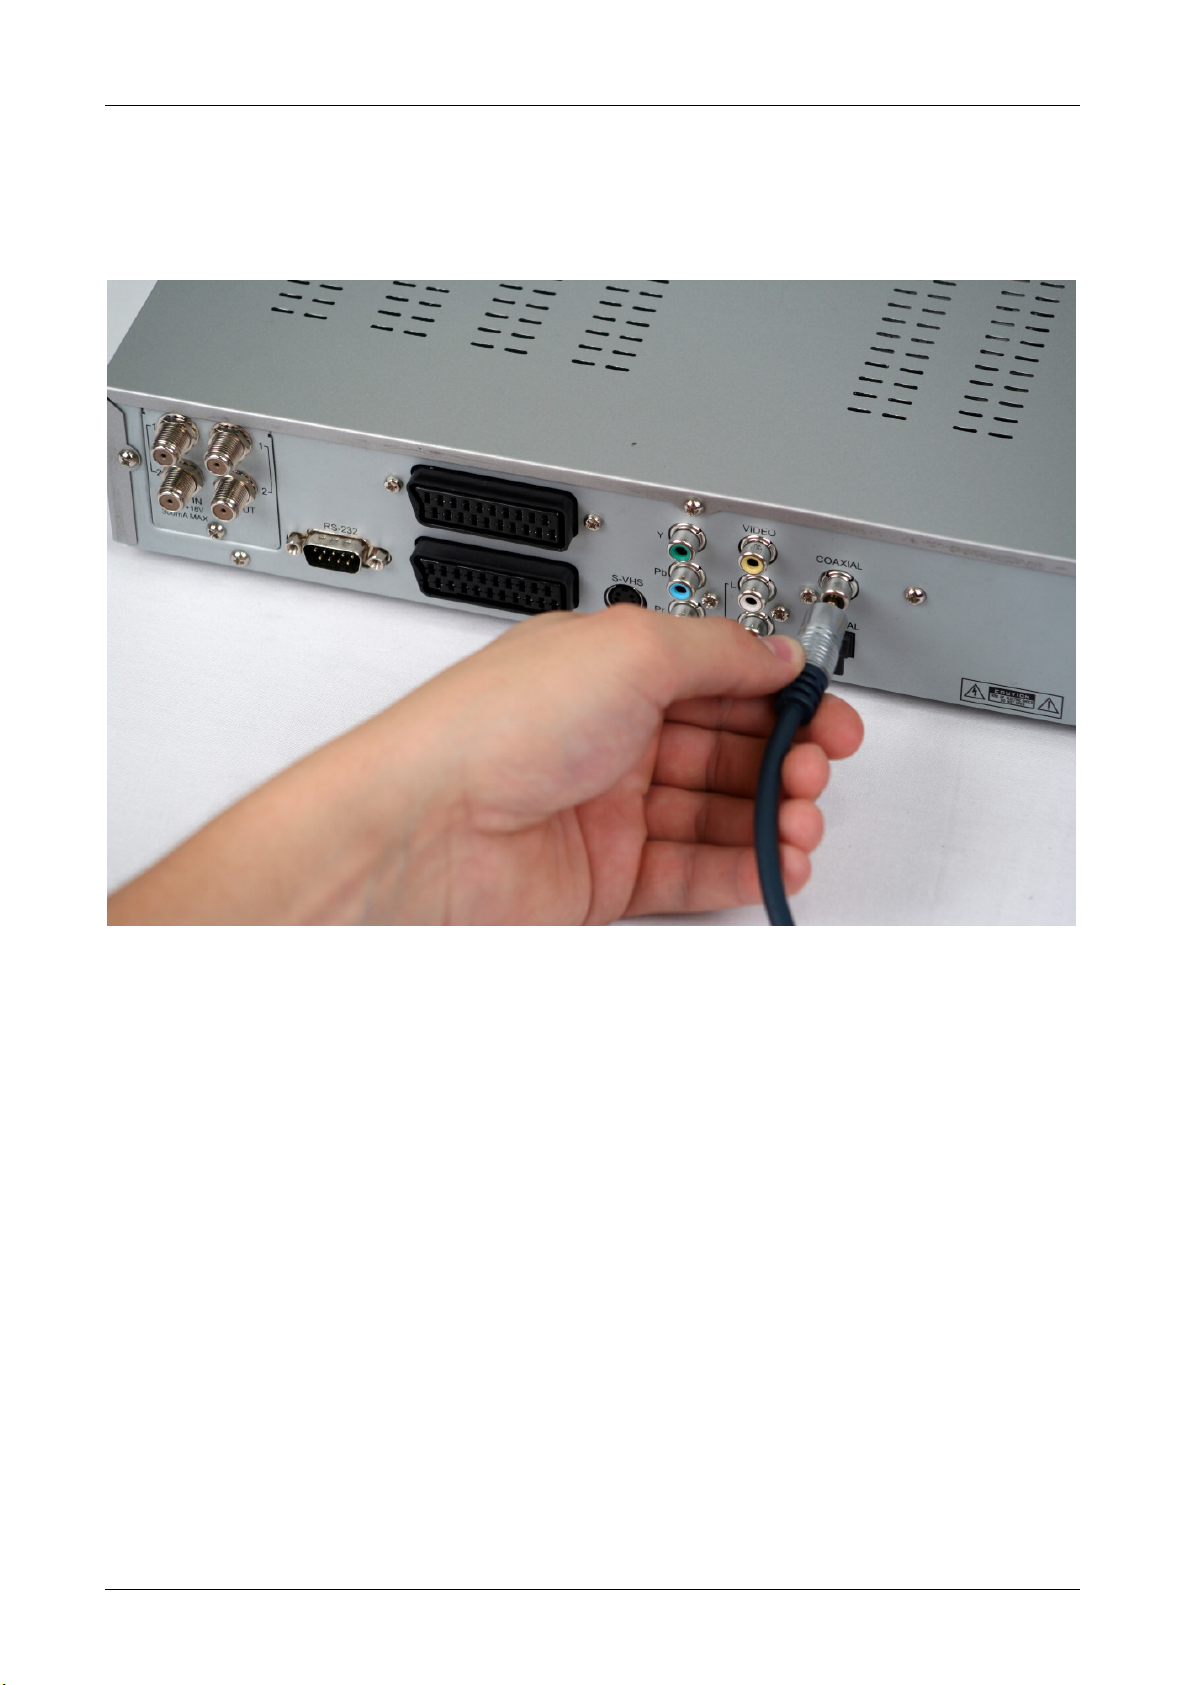
Connection of the coaxial digital output
Insert a Cinch cable in the “COAXIAL” socket of the receiver.
Connect the other end of the Cinch cable to the audio-digital receiver.
- 25 -
Page 29
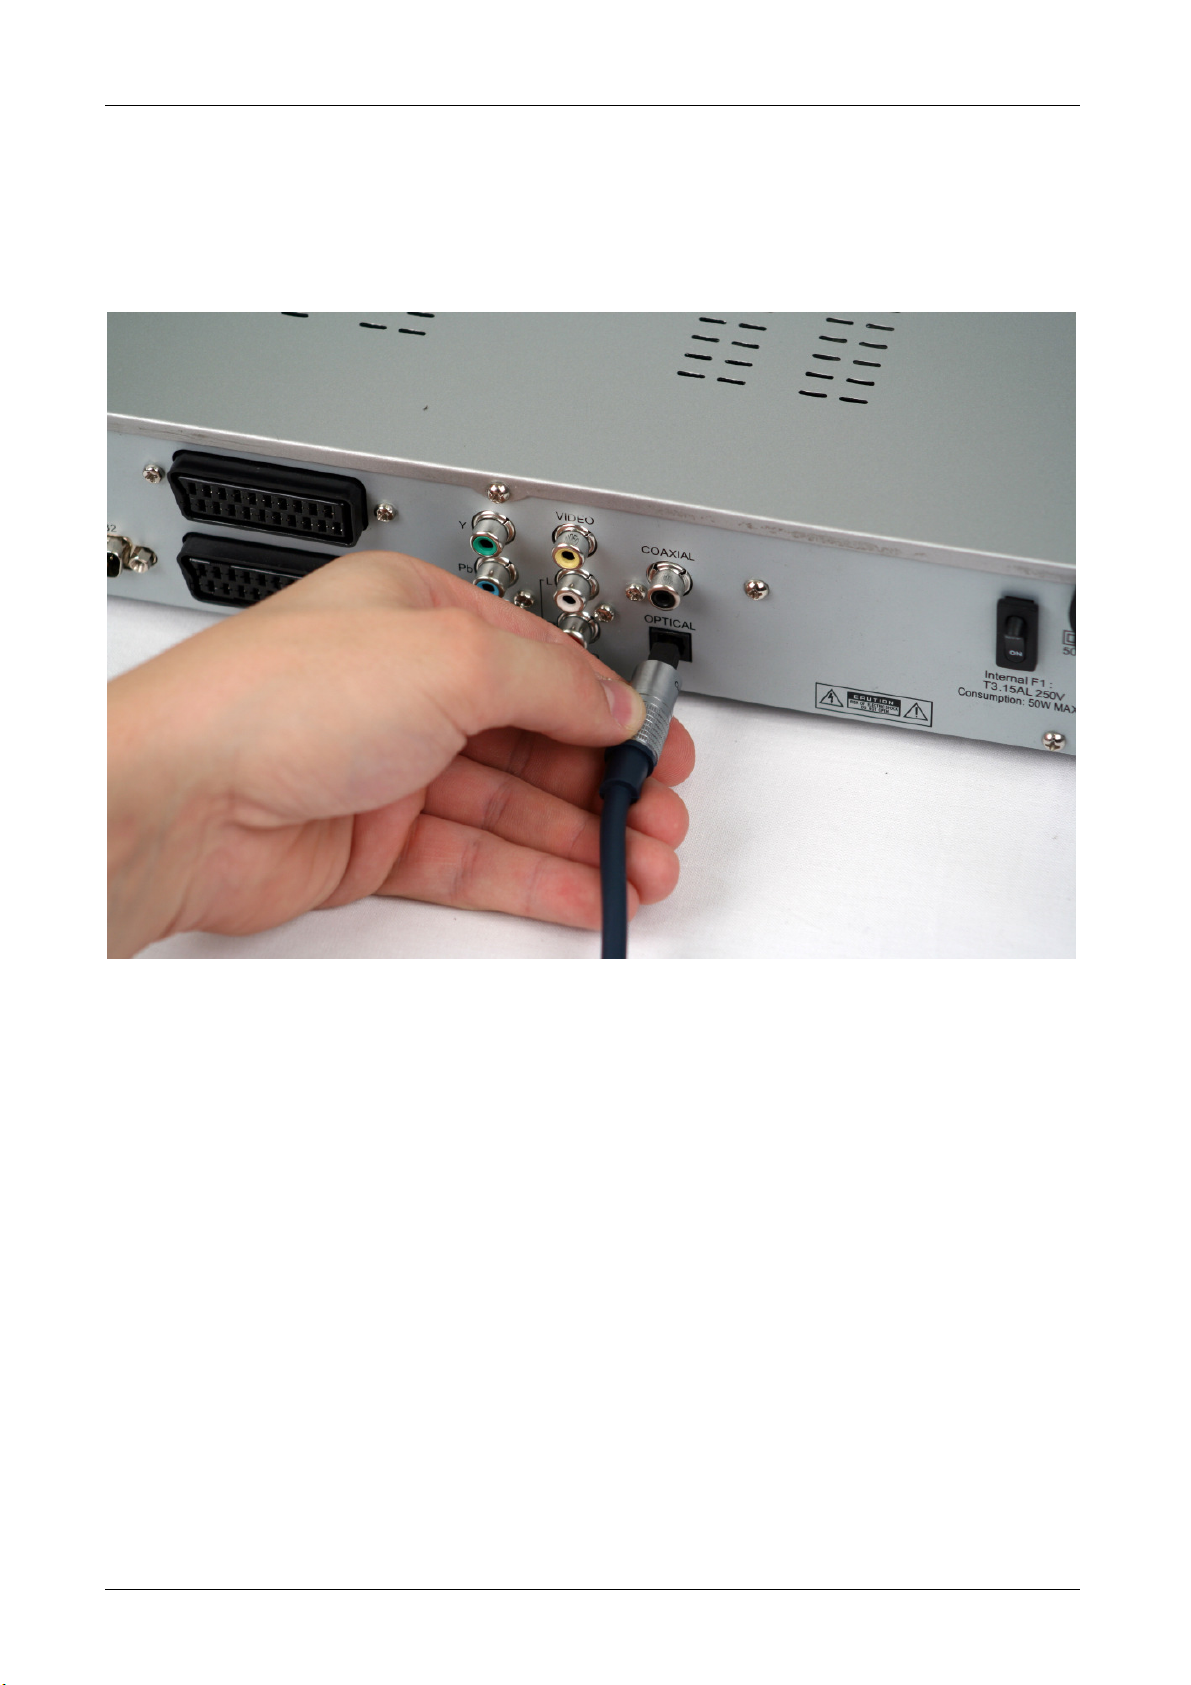
Connection of the optical digital output
Pull the protective cap out of the "OPTICAL“ socket of the receiver.
Insert the optical cable in the “OPTICAL” socket of the receiver.
Connect the optical cable to the audio-digital receiver.
- 26 -
Page 30

Initial start-up
Once you have connected the receiver, you can put it into operation. Switch
on by putting the ON/OF switch on the back in the ON position.
Use the (1) button on the remote control to switch the receiver on. The
basic installation will appear after a brief starting process.
Use the arrow keys up (12) and down (13) to move the blue bar to the menu
item which you would like to change.
You can terminate the basic installation at any time. You can do so
by using the Exit button (9) on the remote control.
OSD language:
You can use this menu item to change the language settings for the menu
displays.
Switch between the languages by pressing the arrow key right (10) or left
(11) on the remote control.
or
Press the OK (14) button on the remote control. A selection window opens
up. Use the arrow keys up (12) and down (13) to move the blue bar to
select the desired language.
Press the "OK" key (14) to confirm your selection.
- 27 -
Page 31

Time setup
In this sub-menu, you can enter the region and thus the time (time zone) of
your location. The receiver finds out the clock time automatically as soon it
finds a satellite signal.
To reach the sub-menu, press the OK key (14).
Region
Select the country in which you operate the receiver.
Switch over to the country by pressing the arrow key right (10) or left (11) on
the remote control.
or
Press the OK (14) button on the remote control. A selection window opens
up.
Use the arrow keys up (12) and down (13) to move the blue bar to select
the desired language of the country.
Press the "OK" key (14) to confirm your selection.
GMT offset
The time is changed informally according to the selected country. A manual
change is not possible.
Summertime
You can set here the time between "Summer time On" and "Summer time Off
(Winter time)".
Adjust the summer time by pressing the arrow key right (10) or left (11) on
the remote control.
To go to the previous menu, press the menu key (8) on the remote control.
or
Press the Exit key (9) to terminate the basic installation.
- 28 -
Page 32

Operation
The individual menu items and functions of the set are explained below. A few
steps will repeat, in order to make the operation easier and more intuitive for
you.
You will find the following items in the menu of the set. To reach the main
menu, press the OK key (8). To exit the main menu or an insert, press the
Menu key (8) again or the Exit key (9).
You will similarly find the "Installation" item in the basic installation
(when you put the set into operation for the first time or on
restoring the factory settings).
- 29 -
Page 33

Installation
In the Installation item, you can carry out antenna settings, search for
channels and edit transponder and channel lists.
To reach the sub-menu, press the OK key (14).
Select the desired menu item by using the arrow keys up (12) or down (13).
To reach one of the sub-menus, press the OK key (14).
Antenna setup
In this menu, you can set the configuration of your satellite set.
- 30 -
Page 34

Use the SIG key (18) to switch the electronic beep tone on or off,
for acoustic indication of the reception strength. A tone will be
emitted only if a corresponding transponder is selected.
You can always go back one step in the menu by using the menu
key (8).
You can terminate the basic installation at any time. You can do so
by using the Exit button (9) on the remote control.
Select satellite
You can select one of the preset satellites here.
Press the arrow keys left (10) or right (11) to select one of the preset
satellites.
The following satellites have been preset by the manufacturer:
• ASTRA (19.2° East)
• Hotbird (13.0° East)
• Sirius (5.0° East)
• Hispasat 1C/1D (30.0°West)
• ASTRA 2 (28.2° East)
• Türksat 1C (42.0° East)
• Amos 1 (4.0° West)
- 31 -
Page 35

If you would like to add a new satellite or to delete one, please follow the
steps given below:
Add:
Mark the item "Select satellite" and press the OK key (14). A satellites list
editor opens up.
Press the green key (18).
Press the OK key (14) to rename the new satellite.
A virtual keyboard appears on which you can enter the desired characters by
using the arrow keys (10-13).
Use the red key (17) to delete the default name "new Sat 11".
Move the blue cursor by using the arrow keys left (10), right (11),
up (12) and down (13) to enter the desired letters or the desired
number and confirm your input by using the OK key (14).
Confirm the selected characters by using the OK key (14).
With the menu key (8) confirm the input and close the virtual keyboard.
Press the arrow key down (13) to reach the item "Orbit Position in °".
To enter the orbital position, press the OK key (14) and enter the number of
degrees by using the numerical pad (3).
Press the "OK" key (14) to confirm the input.
Press the arrow key down (13) to reach the item "West / East".
Adjust the orientation by pressing the arrow key left (10) or right (11).
Press the menu key (8) to feed the new satellite and to return to the
antenna settings.
- 32 -
Page 36

Delete:
Mark the item "Select satellite" and press the OK key (14). A satellites list
editor opens up.
Select the desired satellite to be deleted by using the arrow keys left (10) or
right (11).
Press the red key (17).
Press the "OK" key (14) to confirm the input. Press the red key (17), if you
would like to interrupt the process and not delete the satellite.
Press the menu key (8) to save the settings and to return to the antenna
settings.
If you wish to enter the name, just as in a mobile phone, you can do so by
using the numeral/character input (3).
Use the input mode (ABC/Abc/abc/123) shown below.
Press the green key (18) to modify the input mode of the
character / numerical pad (3) (switching between ABC (only capitals), Abc
(1st letter in capital), abc (only small letters) or 123 (numerical input).
In the numerical mode, the capital and small letters spelling of the word
changes (see the example on the next page).
Now enter the desired letters or the desired figure by using the
corresponding key on the remote control.
- 33 -
Page 37

Examples:
Input mode ABC
Tap the numerical key 8 once, to get the letter T.
Tap the numerical key 3 twice, to get the letter E.
Tap the numerical key 7 thrice, to get the letter S.
Tap the numerical key 8 once, to get the letter T.
Now you should be able to see the word TEST.
Input mode Abc
Tap the numerical key 8 once, to get the letter T.
Tap the numerical key 3 twice, to get the letter e.
Tap the numerical key 7 thrice, to get the letter s.
Tap the numerical key 8 once, to get the letter t.
Now you should be able to see the word "Test".
Input mode abc
Tap the numerical key 8 once, to get the letter t.
Tap the numerical key 3 twice, to get the letter e.
Tap the numerical key 7 thrice, to get the letter s.
Tap the numerical key 8 once, to get the letter t.
Now you should be able to see the word "test".
Input mode 123
Tap the numerical key 8 once, to get the numeral 8.
Tap the numerical key 3 once, to get the numeral 3.
Tap the numerical key 7 once, to get the numeral 7.
Tap the numerical key 8 once, to get the numeral 8.
Now you should be able to see the number 8378.
- 34 -
Page 38

Select tuner
You can select the number and connection version of the tuner in this menu
item. If you have two separate satellite feeders, you have the option to
connect one tuner to each of them (recommended connection method, where
possible).
This connection method lets you use the full functionality of the set.
Select the setting "1 and 2" by using the arrow keys left (10) or right (11).
• If you have only one satellite feeder, you can use only one tuner.
Select the setting "1" or "2" by using the arrow keys left (10) or right (11).
• If you connect both tuners through one cable bridge (included in the scope
of supply):
Select the "LOOP" setting by using the arrow keys left (10) or right (11).
Link the connections IF OUT 1 and LNB IN 2 with the cable bridge, in
addition to the LNB IN 1 with a satellite feeder.
A cable bridge is a coaxial cable about 10 cm in length, with an Fsocket at each end. If the cable bridge is connected correctly, you
can do the following with only one connected satellite feeder:
- During a recording, change to the channels on the polarisation
plane on which the recorded program is present;
- Make a second recording within the polarisation plane of the first
recorded channel;
- If there are two recordings, change the channel on the
trasponders of the recorded channels.
All the channels of one polarisation plane are also available to you
through the picture-in-picture.
High signal quality for each is essential.
or
Press the “OK” key (14). A selection window appears.
Select the desired setting by using the arrow keys up (12) or down (13).
Confirm your selection by pressing the “OK” key (14).
- 35 -
Page 39

LNB type
Select the connected LNB type (standard setting is "Universal 1").
Press the arrow keys left (10) or right (11) to change the setting and to
select from "Universal 1", "Universal 2" or "Standard".
or
Press the “OK” key (14). A selection window appears.
Select the desired setting by using the arrow keys up (12) or down (13).
Confirm your selection by pressing the “OK” key (14).
Caution!
The "Standard" setting is recommended only for expert users, as the
LNB oscillator can be entered manually here (see the next point).
LNB local-freq
This setting cannot be changed in case of the settings "Universal 1" and
"Universal 2" of the LNB type.
If the "Standard" (LNB type) setting is selected, the oscillator frequency can
be entered manually.
Press the arrow keys left (10) or right (11) to change the displayed oscillator
frequency.
or
Press the “OK” key (14). The displayed oscillator frequency is deleted.
Enter the desired oscillator frequency by using the numerical pad (3).
Confirm your selection by pressing the “OK” key (14).
LNB power
Select whether LNB power supply should be switched on or off.
Press the arrow keys left (10) or right (11) to change the setting.
or
Press the “OK” key (14). A selection window appears.
Select the desired setting by using the arrow keys up (12) or down (13).
Confirm your selection by pressing the “OK” key (14).
- 36 -
Page 40

Caution!
For a single cable solution for the antenna system, this function must
be switched off, otherwise it may cause damage.
22 kHz
Select whether the 22 kHz setting should be switched on or off.
This function can be changed manually, only if the LNB type
"Standard" is selected.
Press the arrow keys left (10) or right (11) to change the setting.
or
Press the “OK” key (14). A selection window appears.
Select the desired setting by using the arrow keys up (12) or down (13).
Confirm your selection by pressing the “OK” key (14).
- 37 -
Page 41

DiSEqC
Select whether the DiSEqC function should be switched on or off.
Press the arrow keys left (10) or right (11) to change the setting. You have
the option of selecting from
A, B, C, D, DiSEqC 1.2, Tone A, Tone B and Off.
or
Press the “OK” key (14). A selection window appears.
Select the desired setting by using the arrow keys up (12) or down (13).
Confirm your selection by pressing the “OK” key (14).
Motor settings
You can use this item to change or define the motor control setting, if your
satellite set has a motor.
This function can be changed only if "DiSEqC 1.2" is selected.
Press the “OK” key (14). The "Motor control setting" menu appears.
Select position
You can store up to 64 motor positions.
Press the arrow keys left (10) or right (11) to change the setting.
or
Press the “OK” key (14). A selection window appears.
Select the desired setting by using the arrow keys up (12) or down (13).
- 38 -
Page 42

Confirm your selection by pressing the “OK” key (14).
Press the EPG key (22) to display advanced settings for the motor
control.
- 39 -
Page 43

Drive motor
You can set the position of the motor, by rotating the motor in one of the
possible directions.
Press the arrow keys left (10) or right (11) to change the direction (East /
West) (setting on calling the motor control setting is "Stop").
Store position
When you make changes, you can save them under the indicated position
number (Select Position).
Press the “OK” key (14) to save.
Recalculate
On changing the settings in the "Motor control setting" menu, the motor must
recalculate them.
Press the “OK” key (14) to recalculate.
Set limit
You can define the current position as limit. The motor will then not rotate any
further than the defined position and thus detects the outer limit.
Press the arrow keys left (10) or right (11) to change the direction
(East/West).
Press the “OK” key (14) to save.
Clear limits
If the set limits are not correct, you can delete them again.
Press the “OK” key (14) to delete.
The East and West limits are deleted. It is not possible to delete
only one limit.
- 40 -
Page 44

Go to reference
The motor gets its orientation through a reference point. This point is the
position 0.
Press the “OK” key (14). The motor rotates back to the position 0.
Select TP
You can make a manual selection of the transponder. Various numbers of
transponders are preset according to the selected satellites.
Press the arrow keys left (10) or right (11) to select one of the preset
transponders.
or
Press the OK key (14) to reach the Transponders List editor.
Please read the item Transponder-List editor on the pages below.
Signal intensity
The signal intensity (strength) based on the reception strength is displayed
here graphically and numerically.
Signal quality
The signal quality based on the reception quality is displayed here graphically
and numerically.
Press the menu key (8) to save the settings. You go back one page in the
menu.
or
Press the Exit key (9) to reject the settings. You will exit the menu
completely.
- 41 -
Page 45

Channel search
This menu item allows you to search all available channels or individual
transponders in case there are new changes.
Select satellite
Select the desired satellite here.
Press the arrow keys left (10) or right (11) to change the setting.
or
Press the “OK” key (14). A selection window appears.
Select the desired setting by using the arrow keys up (12) or down (13).
Confirm your selection by pressing the “OK” key (14).
Scan method
Select the scanning method here. If you select the "Auto" selection, all
available transponders are scanned. If the setting is "Channel", only the
transponder set under
"Edit/ select TP" is scanned.
Press the arrow keys left (10) or right (11) to change the setting.
or
Press the “OK” key (14). A selection window appears.
Select the desired setting by using the arrow keys up (12) or down (13).
Confirm your selection by pressing the “OK” key (14).
- 42 -
Page 46

Kind of service
You can make a search between "Only free services" or "All services". In case
of "Only free services", no encrypted services are scanned.
Press the arrow keys left (10) or right (11) to change the setting.
or
Press the “OK” key (14). A selection window appears.
Select the desired setting by using the arrow keys up (12) or down (13).
Confirm your selection by pressing the “OK” key (14).
TV / Radio
You can choose from a search by TV and radio channels. The selection
allows you to select out of the following options:
• TV + Radio
• Only TV
• Only radio
Press the arrow keys left (10) or right (11) to change the setting.
or
Press the “OK” key (14). A selection window appears.
Select the desired setting by using the arrow keys up (12) or down (13).
Confirm your selection by pressing the “OK” key (14).
Signal intensity
The signal intensity (strength) based on the reception strength is displayed
here graphically and numerically.
Signal quality
The signal quality based on the reception quality is displayed here graphically
and numerically.
- 43 -
Page 47

Edit / Select TP
You can make a manual selection of the transponder. Various numbers of
transponders are preset according to the selected satellites.
Press the arrow keys left (10) or right (11) to select one of the preset
transponders.
or
Press the OK key (14) to reach the Transponders List editor.
Please read the item Transponder-List editor on the pages below.
Start scanning
This item is to start scanning with the set parameters.
Press the “OK” key (14).
or
Press the red key (17) even if you have not marked the point "Start
scanning".
A "Scanning" window opens up. This shows you the progress of the scan and
the channels found.
Press the red key (17) to abort the scan.
- 44 -
Page 48

Press the blue key (20) to change between the displayed lists (TV Radio).
Press the menu key (8) to exit the search window.
A confirmation window appears in which you can save or reject the
modifications.
Press the OK key (14) to save the changes.
Press the Exit key (9) if you choose not to save the changes.
- 45 -
Page 49
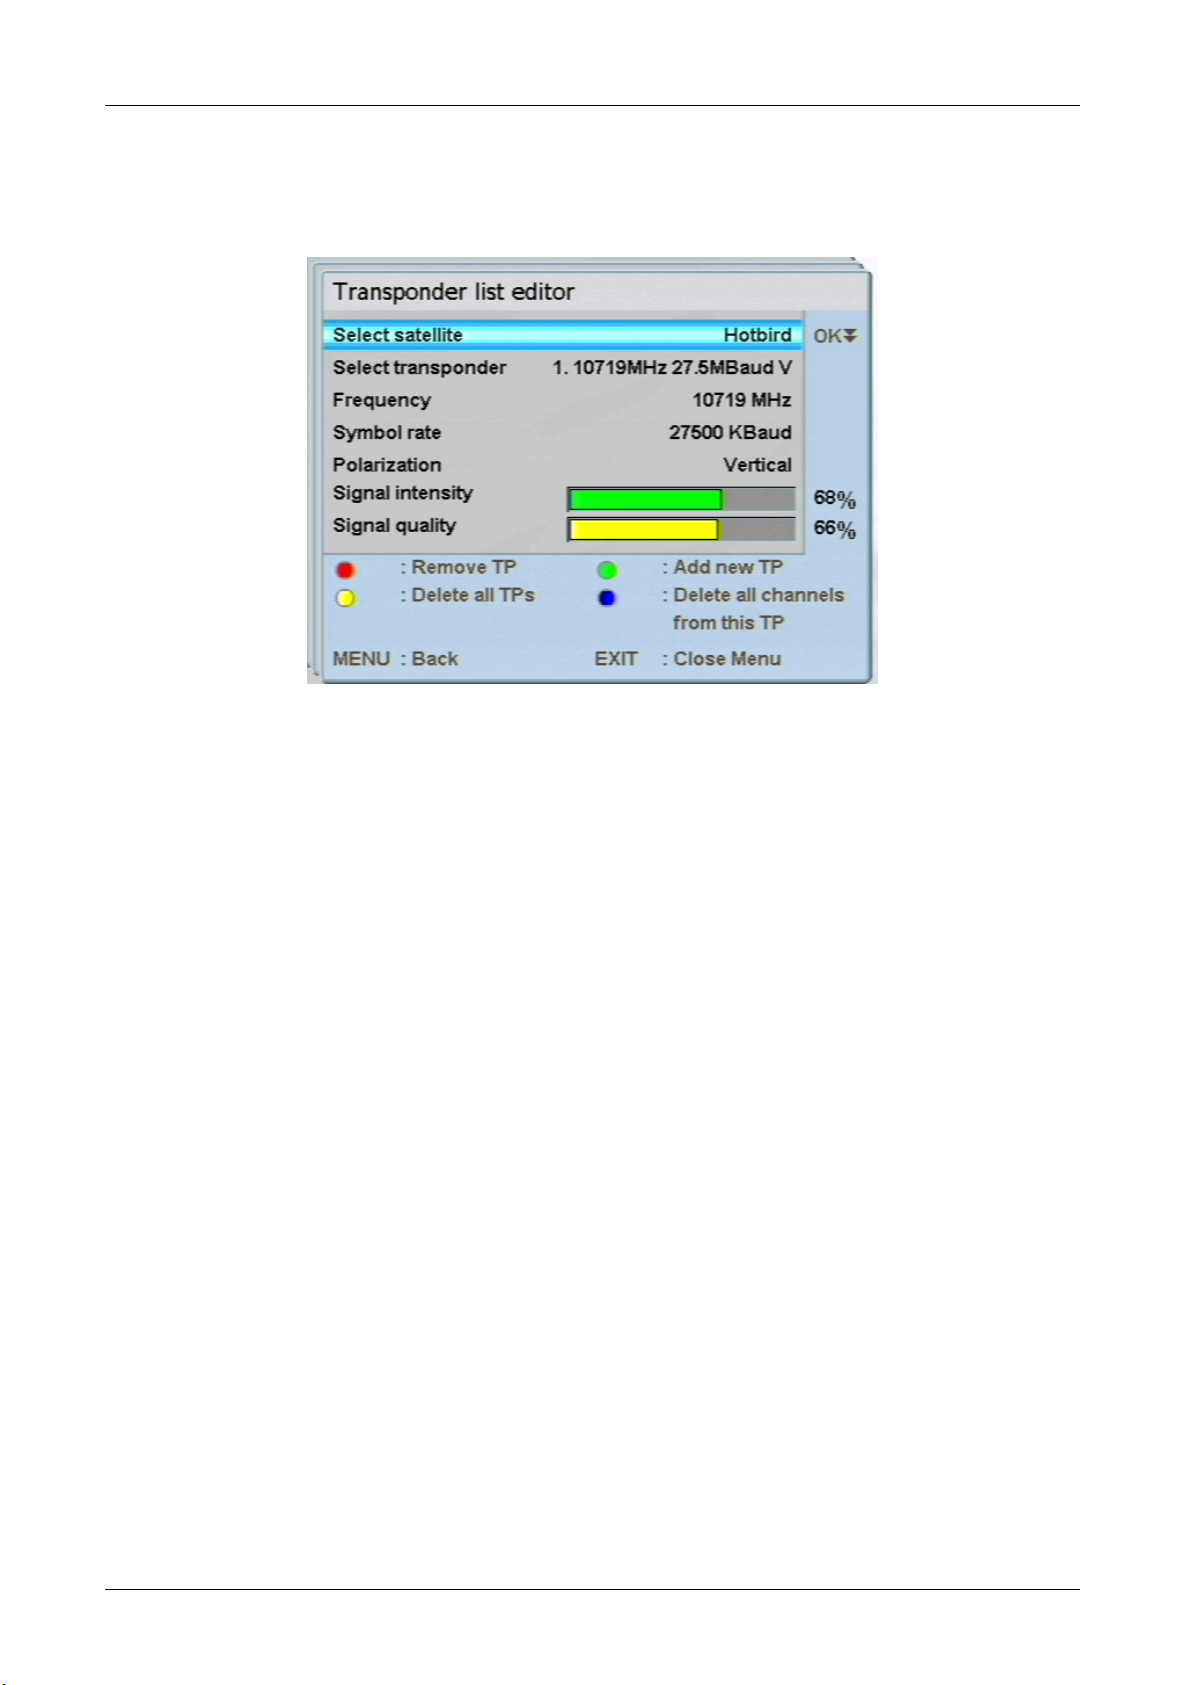
Transponder list editor
This sub-menu lets you edit or delete the preset transponders, or to add new
transponders.
Select satellite
Select the desired satellite here.
Press the arrow keys left (10) or right (11) to change the setting.
or
Press the “OK” key (14). A selection window appears.
Select the desired setting by using the arrow keys up (12) or down (13).
Confirm your selection by pressing the “OK” key (14).
Select transponder
You can make a manual selection of the transponder. Various numbers of
transponders are preset according to the selected satellites.
Press the arrow keys left (10) or right (11) to select one of the preset
transponders.
or
Press the “OK” key (14). A selection window appears.
Select the desired setting by using the arrow keys up (12) or down (13).
Confirm your selection by pressing the “OK” key (14).
- 46 -
Page 50

Frequency
You can enter the desired frequency directly or change it in single steps.
Enter the frequency directly by using the numerical pad (3).
Confirm your input by pressing the “OK” key (14).
or
Press the arrow keys left (10) or right (11) to change the frequency by one
step (1 MHz) downwards (arrow key left (10)) or upwards (arrow key right
(11)).
Symbol rate
Enter the symbol rate directly through the numerical pad or use the arrow
keys to change the symbol rate by 100 steps.
Enter the symbol rate directly by using the numerical pad (3).
Confirm your input by pressing the “OK” key (14).
or
Press the arrow keys left (10) or right (11) to change the symbol rate by one
step (100 K Baud) downwards (arrow key left (10)) or upwards (arrow key
right (11)).
Polarization
Change the polarisation and select between horizontal or vertical.
Press the arrow keys left (10) or right (11) to change the polarisation.
Signal intensity
The signal intensity (strength) based on the reception strength is displayed
here graphically and numerically.
- 47 -
Page 51

Signal quality
The signal quality based on the reception quality is displayed here graphically
and numerically.
To delete a transponder, press the red key (17).
To add a new transponder, press the green button (18).
Remove TP
You can delete preset or newly added transponders from the list.
Caution!
Please remember that preset transponders will be permanently deleted.
To get the full scope of the set and the channel selection, it is advisable
not to delete any of the preset transponders.
Select the desired transponder in the item "Select TP".
Press the red key (17).
Press the “OK” key (14) to confirm the input.
or
Press the red key (17) to abort the input and not to delete the transponder.
- 48 -
Page 52

Add new TP
If the desired transponder is not entered in the list, you can add new
transponders.
Press the green key (18).
Enter the desired value in the item "Frequency". Please read further
information in the item "Frequency" given on the preceding pages.
Enter the desired value in the item "Symbol rate". Please read further
information in the item "Symbol rate" given on the preceding pages.
Enter the desired value in the item "Polarization". Please read further
information in the item "Polarization" given on the preceding pages.
Press the menu key (8) to save the settings. You go back one page in the
menu.
or
Press the Exit key (9) to reject the settings. You will exit the menu
completely.
- 49 -
Page 53

Program List Editor
This menu lets you save TV or radio channels in the Favourites lists, sort or
delete channels.
You can see the entire channel list in the left half. The right half shows you the
Favourites list in which the desired channel is added. You can select from 10
different Favourites lists (6 of which are pre-named). You can change the
name of any Favourites list as you wish.
To display Help, press the ? key (27). This will provide further
information for editing the channel and Favourites lists.
- 50 -
Page 54

Explanation of the Help function (appears as pop up over the ? key
(27)):
L/R: You can switch between the lists by using the arrow keys left
(10) and right (11).
Play: You can use the Play key (31) to have the selected channels
displayed in the background. (If you change to a new channel,
you must press the Play key (31) again to update the
channel).
TV/ RAD Press the TV/RAD key (4) to select from TV or radio
channels.
FAV Press the FAV key (23) several times to select the desired
Favourites list.
REW/FF Press the Rewind or Fast Forward keys (33 or 34) to shift the
marked station up or down in the list.
OK Press the OK key (14) to add the marked channel (channel
list) to the Favourites list.
MENU Press the Menu key (8) to save or reject the changes. A
confirmation window appears.
TEXT Pressing the TEXT key (21) opens an input window (virtual
keyboard). You can enter the name of the sought channel to
find it quickly again. If you enter the first letter, channels
starting with that letter will appear. Exit the input window by
pressing the Exit key (9). Please remember that you have to
delete the first letter again to have all channels displayed.
(SUBT) Press the blue key (20) to rename the selected Favourites list.
An input window appears.
(TIMER) Press the red key (17) to delete the selected station.
Please note that no confirmation window will appear if you
delete a channel. You can even delete channels from the
entire channels list.
(SIG) The green key (18) opens a selection window for sorting the
channels. You can select from among the options channel
number, A-Z, Z-A, free channels, scrambled, Sat/TP.
- 51 -
Page 55

( ) Use the yellow key (19) to lock or unlock channels. The
locked channels can then be unlocked only on entering the
four digit password. Please also refer to the item "Menu lock"
on page 64.
HDD Press the HDD key (25) to delete the complete contents of
the selected list.
Please remember that no confirmation window will appear if
you delete a list. You can also delete the list of all channels.
? Use the ?-key (27) to show or hide Help.
EXIT Pressing the Exit key (9) brings up a confirmation window.
You can select whether you would like to save the changes
(OK key (14) to "Save changes", menu key (8) to "Abort", Exit
key (9) to "Exit without saving").
Tip about functions "Remove channel" and "Clear current list":
If you have unintentionally deleted a channel or a whole list, you can
make a channel search to recover the channels.
- 52 -
Page 56

Edit favourites list
Press the FAV key (23) to switch to the desired Favourites list. See top right
for the current name of the Favourites list.
Select the selected channel and press the OK key (14) to shift the selected
channel into the Favourites list. The marking jumps automatically to the
next channel.
Repeat this sequence until all the desired channels are listed in the
corresponding Favourites list.
Alternatively, you can mix TV and radio channels in one Favourites list.
When a TV channel is displayed and you select a radio channel in the
channels list, the set switches over automatically.
To reach the main menu, press the menu key (8). You go back one page in
the menu.
or
To leave the menu completely, press the Exit key (9).
- 53 -
Page 57

User Setup
In this menu, you set the user-relevant points, such as the OSD language,
screen aspect ratio, TV standard, video output signal, OSD and clock time
settings.
OSD language:
You can use this menu item to change the language settings for the menu
displays.
Switch between the languages by pressing the arrow key right (10) or left
(11).
or
Press the OK key (14). A selection window opens up.
Use the arrow keys up (12) and down (13) to move the blue bar to select
the desired language.
Press the "OK" key (14) to confirm your selection.
Display format
Select the screen aspect ratio corresponding to that of your TV set. You can
choose from "4:3 LetterBox", "4:3 PanScan" or "16:9".
Press the arrow keys left (10) or right (11) to change the setting.
or
Press the “OK” key (14). A selection window appears.
Select the desired setting by using the arrow keys up (12) or down (13).
Confirm your selection by pressing the “OK” key (14).
- 54 -
Page 58

TV standard
The TV standard should be set according to the country where the set will be
used. You can select from PAL, NTSC, Secam or Auto.
Press the arrow keys left (10) or right (11) to change the setting.
or
Press the “OK” key (14). A selection window appears.
Select the desired setting by using the arrow keys up (12) or down (13).
Confirm your selection by pressing the “OK” key (14).
Video output
The video output signal depends on the type of cabling by means of which
you have connected the receiver to your TV set (refer to Connection
description).
Press the arrow keys left (10) or right (11) to change the setting.
or
Press the “OK” key (14). A selection window appears.
Select the desired setting by using the arrow keys up (12) or down (13).
Confirm your selection by pressing the “OK” key (14).
Explanations for the individual connection options are given below:
Connection with the SCART cable
You can select the RGB or CVBS setting according to the TV set. The RGB
setting is the most used signal and delivers the best reproduction through the
SCART connection.
Connection with a YUV cable:
Set the output signal to YPbPr, if you have connected the receiver and the TV
set with a YUV cable.
- 55 -
Page 59

Connection with an S-Video Cable:
If you have connected the receiver and the TV set with an S-video cable, keep
the setting on YC.
Connection with a video cable:
If you have connected the receiver and the TV set with a video cable, keep
the setting on CVBS.
OSD Setup
In the "OSD Setup" sub-menu, you can change the timeout and the
transparency of the OSD.
With the OSD time-out, you set the time until the inserts (e.g. on changing the
channel) are hidden automatically.
The transparency setting makes the inserts more transparent or opaque
depending on the setting.
OSD timeout
Change the duration of the inserts (1 – 30 seconds).
Press the arrow keys left (10) or right (11) to change the setting.
or
Press the “OK” key (14).
Enter a number between 1 and 30 through the numerical pad (3).
Confirm your input by pressing the “OK” key (14).
OSD transparency
Change the transparency of the inserts (0 % - 50 %).
Press the arrow keys left (10) or right (11) to change the setting.
- 56 -
Page 60

The changes are saved automatically.
To return to the user settings, press the menu key (8).
or
To leave the menu completely, press the Exit key (9).
Time setup
In this sub-menu, you can enter the region and thus the time (time zone) of
your location. The receiver finds out the time automatically as soon it finds a
satellite signal.
To reach the sub-menu, press the OK key (14).
- 57 -
Page 61

Region
Select the country in which you operate the receiver.
Switch over to the country by pressing the arrow key right (10) or left (11) on
the remote control.
or
Press the OK (14) button on the remote control. A selection window opens
up.
Use the arrow keys up (12) and down (13) to move the blue bar to select
the desired language of the country.
Press the "OK" key (14) to confirm your selection.
GMT offset
The time is changed informally according to the selected country. A manual
change is not possible.
Summertime
You can set here the time between "Summertime On" and "Summertime Off
(Winter time)".
Adjust the summer time by pressing the arrow key right (10) or left (11) on
the remote control.
To go to the previous menu, press the menu key (8) on the remote control.
or
Press the Exit key (9) to exit the menu.
- 58 -
Page 62

Timer Setup
To program recordings or to change/delete set programming, call the submenu Timer Setup.
To reach the sub-menu, press the OK key (14).
If there is no programming, you can add a new one.
Press the green key (18) to enter a new programme. The Timer editing
window opens.
If the Timer programmes are saved, you can edit them and change the stored
data.
Select the desired menu item in the overview list by using the arrow keys up
(12) or down (13).
- 59 -
Page 63

Press the OK key (14) to edit the selected Timer. The "Edit Timer" window
opens.
Edit Timer
Title
Enter the desired name of the recording through the virtual keyboard.
Press the OK key (14) to open the virtual keyboard.
Enter the name of the title.
Press the menu key (8) to confirm the input and to return to the Timer
menu.
Start Date
You can set the date of recording here.
Select the desired date by pressing the arrow key left (10) or right (11).
Please note that the date of the next day must be entered, if a
transmission begins at, say, 00:05 hrs.
Start Time
Enter the start time of the transmission. Use either the arrow keys or the
numerical pad for direct input.
Enter the start time directly by using the numerical pad (3).
or
Press the arrow keys left (10) or right (11) to change the start time by one
minute earlier (arrow key left (10)) or later (arrow key right (11)).
End Time
Enter the end time of the transmission. Use either the arrow keys or the
numerical pad for direct input.
Enter the end time rate directly by using the numerical pad (3).
or
- 60 -
Page 64

Press the arrow keys left (10) or right (11) to change the end time by one
minute earlier (arrow key left (10)) or later (arrow key right (11)).
Always enter the start and end time with some buffer in order to include
Channel
Set the desired channel on which the transmission to be recorded is going to
be broad/telecast.
Timer mode
Select the repeat rate in the Timer mode. You can select from the modes
"single", "Daily", "Weekends", "Weekdays" or “Weekly”.
possible shifts or extra lengths. You can later on edit out superfluous
recording time by using the editing function for recordings.
Press the arrow keys left (10) or right (11) to change the channel by one
channel step (1 MHz) downwards (arrow key left (10)) or upwards (arrow
key right (11)).
The "Weekend" mode includes the days Saturday and Sunday.
If the setting is "Weekly", the recording is repeated "every week at the
set time (and day)".
In the "Weekdays" mode, the recordings are repeated Mondays till
Fridays.
Press the arrow keys left (10) or right (11) to change the setting.
or
Press the “OK” key (14). A selection window appears.
Select the desired setting by using the arrow keys up (12) or down (13).
Confirm your selection by pressing the “OK” key (14).
Power mode after rec.
Modify the status of the receiver after the recording is over. If the set is to be
switched in the Stand-by mode, select "Stand-by". Select "Switch on", if the
set is supposed to go into the operating mode after the recording.
- 61 -
Page 65

Press the arrow keys left (10) or right (11) to change the setting.
or
Press the “OK” key (14). A selection window appears.
Select the desired setting by using the arrow keys up (12) or down (13).
Confirm your selection by pressing the “OK” key (14).
Record to
You have the option to save recordings on the internal hard disc or on a USB
stick (not included in the scope of supply). You can even output the recording
on the SCART socket, to record it on another recording device.
Press the arrow keys left (10) or right (11) to change the setting.
or
Press the “OK” key (14). A selection window appears.
Select the desired setting by using the arrow keys up (12) or down (13).
Confirm your selection by pressing the “OK” key (14).
Press the Exit key (9) to exit the menu without saving.
or
To return to the overview list of the Timer programming, press the menu
key (8). A confirmation window opens up.
Press the OK key (14) to save the changes.
or
Press the red key (17) if you choose not to save the changes and to abort
the input.
or
Press the REC key (29) to save the changes, to exit the "Edit Timer"
window and to set the timer on "Activate".
Set the timer to "activate" after inputting the recording data, otherwise
- 62 -
no recording will take place.
Page 66

Activate/ Deactivate Timer
You must activate a timer programming so that the receiver can record the
entered channel. If you set "Deactivate", the selected Timer Programme is not
recorded.
Select the desired timer programming by using the arrow keys up (12) or
down (13).
Press the blue key (20) to activate or deactivate the selected timer
programming. An appears in the column "On" in the overview list.
Remove Timer
You can delete the stored timer from the overview list. The data are then
irrecoverably deleted.
Press the red key (17) to edit the selected Timer. A confirmation window
opens up.
Press the “OK” key (14) to confirm the input.
or
Press the red key (17) not to delete the timer and to return to the overview
list.
To reach the main menu, press the OK key (8).
or
Press the Exit key (9) to exit the menu completely.
The changes are saved automatically.
- 63 -
Page 67

System Settings
In this sub-menu, you can make system-relevant settings, such as setting
child-protection, restore factory settings, update software etc.
Please note that the personal channel lists will be deleted if you restore
factory settings.
PIN / parental settings
To reach this sub-menu, you must enter a four-digit password. The factory set
password is 0000. You can change the password as you wish.
Select the item "PIN / parental settings" by using the arrow keys up (12) or
down (13) and press the OK key (14).
Enter the current password by using the numerical pad (3). The sub-menu
"PIN / parental settings" opens.
Menu lock
Use the menu lock function to define whether a password dialog box should
appear for invoking some of the menu items. You can thus protect the set
channel lists and satellite settings from improper use.
Press the arrow keys left (10) or right (11) to change the setting.
- 64 -
Page 68

This function must be "On" to lock or unlock channels.
Change password (PIN)
You can change the factory-set password here and define a customised one.
Press the “OK” key (14). An input window appears.
Enter the current password (standard value 0000).
Enter the new customised password twice.
If entered correctly, the insert in the centre of the lower screen half will say
"PIN successfully changed".
If you forget the defined custom password, please contact our Service
Hotline.
Viewing age
You can set the minimum age between 6 and 18 years in this menu. If a
channel telecasts an age limit, you can restrict the watching of this channel.
Please remember that, even with the set minimum age, this function is
or
dependent on the transmitting station. If the transmitting station does
not telecast any minimum age, the protective function will not work.
Press the arrow keys left (10) or right (11) to change the setting.
Press the “OK” key (14). The displayed number is deleted and you can
define an age between 6 and 18 by using the numerical pad (3). You can
even switch off the minimum age if you do not use this function.
Factory default
To reach this sub-menu, you must enter a four-digit password. The default
password is 0000.
Select the item "Factory default" by using the arrow keys up (12) or down
(13) and press the OK key (14).
Enter the current password by using the numerical pad (3). A confirmation
window appears.
Press the OK key (14) to confirm the restoration of the factory default.
- 65 -
Page 69

or
Press the red key (17) to abort the process.
System information
In this menu, you can have the system display the current hardware and
software statuses. You cannot make any adjustments here.
Press the menu key (8) to return to the previous menu.
or
Press the Exit key (9) to exit the menu completely.
- 66 -
Page 70

Software update
You can update the receiver with a new software. Select between the options
to execute an Update via satellite or via USB/HDD. To reach this sub-menu,
you must enter a four-digit password. The default password is 0000.
Select the item "Software update" by using the arrow keys up (12) or down
(13) and press the OK key (14).
Enter the current password by using the numerical pad (3). The "Software
update" window appears.
Using the arrow keys up (12) or down (13), select from the items "Software
update via USB/HDD" or Software update via satellite".
Press the “OK” key (14).
Software Update by USB/HDD
A directory window opens (similar to the one on a PC). Select the desired file.
When the update is successful, the receiver restarts.
Select the desired file by using the arrow keys up (12) or down (13).
- 67 -
Page 71

Press the "OK" key (14) to confirm your selection.
A confirmation window appears, showing the current and the new version of
the software. You have here the option of aborting the process or to start the
update.
Press the OK key (14) to confirm. The software update begins.
or
Press the Exit key (9) to abort the process. You return to the "Softwareupdate" menu.
If you wish to update the software via a USB stick, press the blue key
Software update by OTA (via satellite)
If software update via the satellite is available, you can update the receiver
through your satellite connection.
When you select the item "Software update by OTA", the Software Update via
satellite menu appears.
(20) to switch to the USB stick directory. Use the supplied USB adapter
cable to connect the USB stick.
As there are a lot of different USB-devices on the market, it is possible
that the receiver does not recognize the USB-devices by pressing the
blue key. In order to activate the USB-device, switch the receiver into
the Standby-mode. After a few seconds, switch back to the operationmode. The connected USB-device is running now. This is no
malfunction.
You have the option of selecting the pertinent satellites, the corresponding
transponder and the pertinent PID.
The data for a software update via satellite are factory-set.
- 68 -
Page 72

Select satellite
Press the arrow keys left (10) or right (11) to change the setting.
or
Press the “OK” key (14). A selection window appears.
Select the desired setting by using the arrow keys up (12) or down (13).
Confirm your selection by pressing the “OK” key (14).
Edit / Select TP
You can make a manual selection of the transponder. Various numbers of
transponders are preset according to the selected satellites.
Press the arrow keys left (10) or right (11) to select one of the preset
transponders.
or
Press the OK key (14) to reach the Transponders List editor.
Please read further under the item Transponder-List editor on page 44.
PID
You can select the PID of the transponder manually. You can select between
0 and 8191.
Enter the PID for it directly by using the numerical pad (3).
or
Press the arrow keys left (10) or right (11) to increase or decrease the PID
by one step.
Once all the settings have been made, the scanning can be started.
Press the red key (17) to start scanning.
or
Select the item "Start OTA" by using the arrow keys up (12) or down (13)
and press the OK key (14). The scanning begins.
To return to the "System Settings" sub-menu, press the menu key (8).
- 69 -
Page 73

or
Press the Exit key (9) to exit the menu completely.
Channel List Management
This menu lets you restore the stored stations list from the hard disc or from a
USB stick or to save a customised stations list. To reach this sub-menu, you
must enter a four-digit password. The default password is 0000.
Select the item "Channel List Management" by using the arrow keys up (12)
or down (13) and press the OK key (14).
Enter the current password by using the numerical pad (3). The "Channel
List Management" window appears.
Using the arrow keys up (12) or down (13), select from the items "Channel
Restore from HDD/USB" or "Channel Backup To HDD/USB".
Press the “OK” key (14).
Channel Restore From HDD/USB
The Directory window opens up.
Select the desired folder which contains the saved stations, by using the
arrow keys up (12) or down (13). You can see the file extension .BIN, so
you can easily recognise the stations list file.
Press the key (40) to load the stations list file.
- 70 -
Page 74
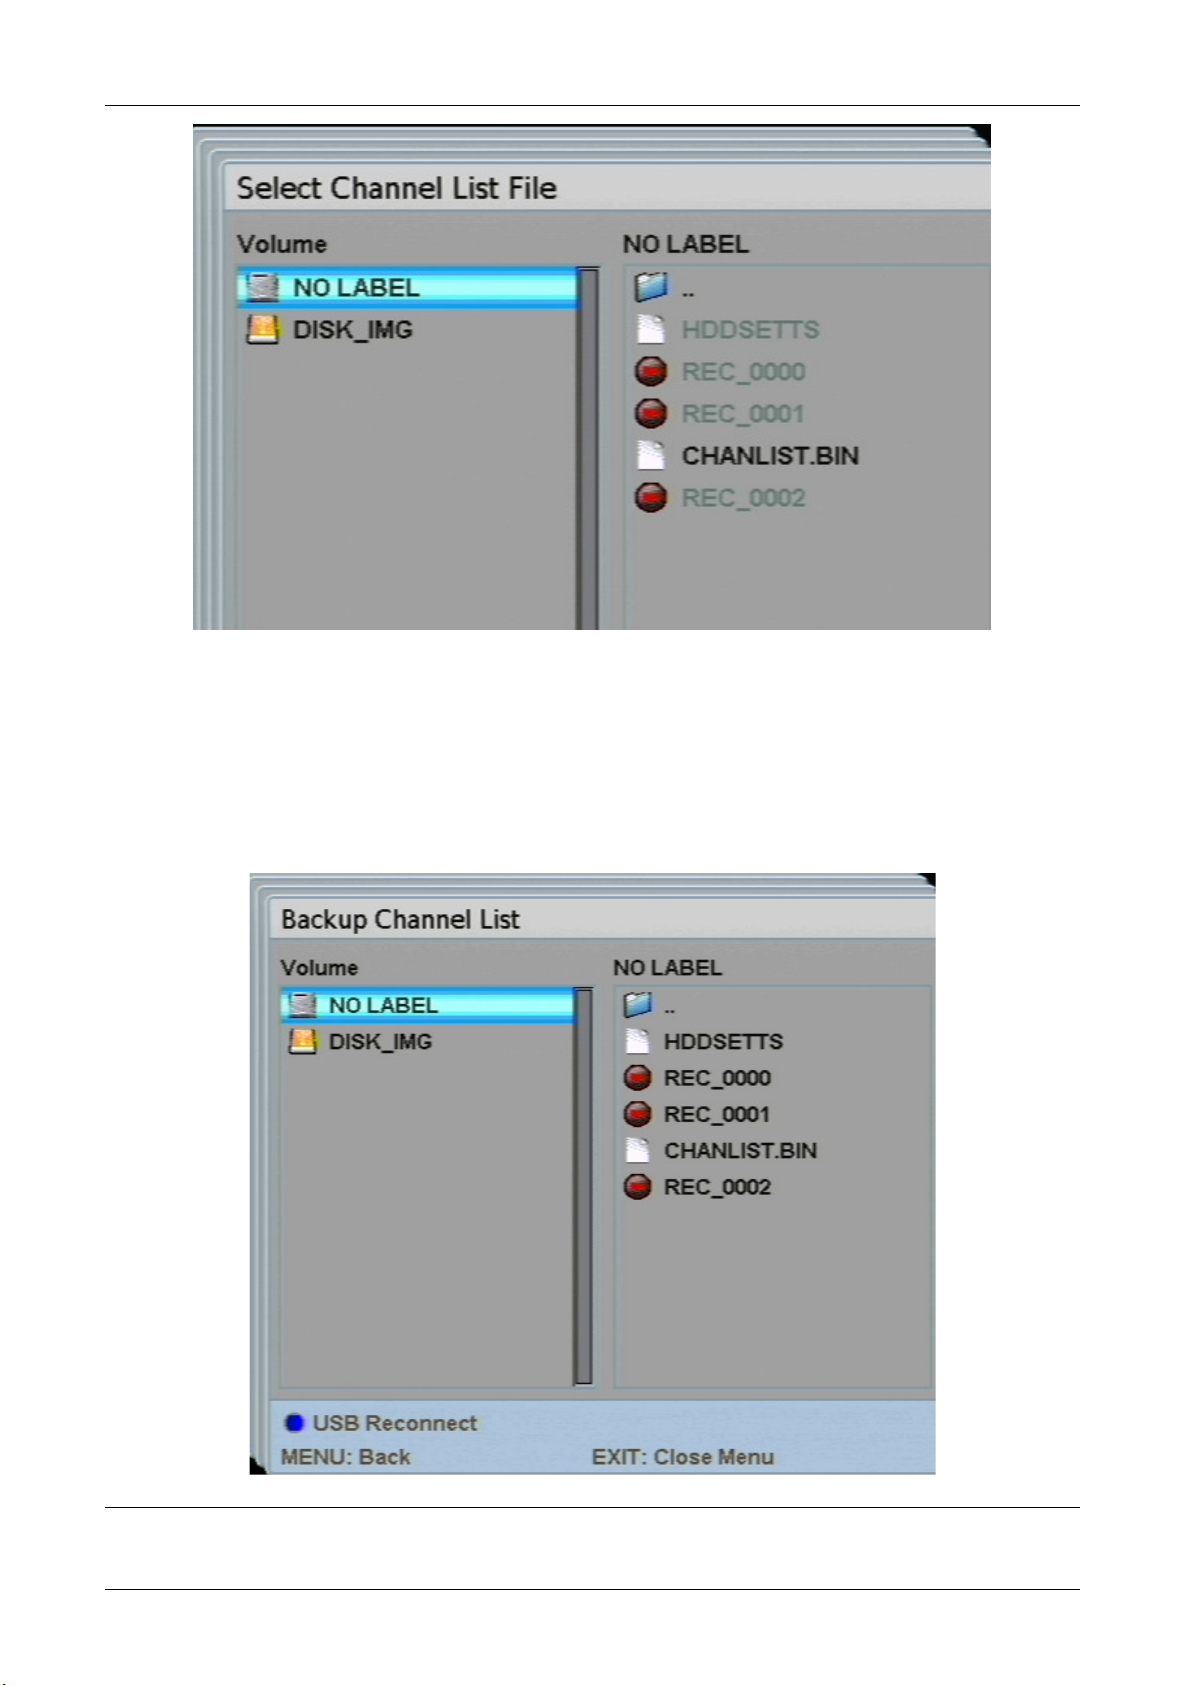
Channel Backup To HDD/USB
The Directory window opens up.
Select the desired folder in which the stations list is to be saved, by using
the arrow keys up (12) or down (13).
Press the key (40) to save the stations list file.
- 71 -
Page 75

To return to the "System Setup" sub-menu, press the menu key (8).
or
Press the Exit key (9) to exit the menu completely.
- 72 -
Page 76

Common Interface
You can use optionally available CI modules for Pay-TV through the CI slot.
You need a Smartcard from the provider, which is inserted into the receiver by
using a CI module. When you have scanned and installed the desired
channels, you can watch them depending on the provider service.
The sub-menu Common Interface shows you the currently used CI module.
Please remember that a software interface of the module is loaded
according to the CI module. Please follow the operating manual of the
CI module.
If a software interface is loaded, you can access the CI module in an
Extra menu.
- 73 -
Page 77

HDD / USB Applications
This sub-menu lets to manage the recordings, music and images on the hard
disc and connected USB sticks. Furthermore, you can play back music or
images through the receiver from the hard disc or a USB stick.
Select the desired item by using the arrow keys up (12) or down (13).
To reach the corresponding sub-menu, press the OK key (14).
Recordings
Manage the recordings on the hard disc or on a USB stick. An overview
window appears. You can find the saved recordings here. You can start
playback, edit the recording or delete it.
Select the desired recording by using the arrow keys up (12) or down (13).
- 74 -
Page 78

Playback
Press the OK key (14) to play back the selected recording.
A selection window appears. Select whether you would like to play back the
recording from the point where you stopped last or from the beginning. You
can also abort the process.
Press the OK key (14) to play back the recording from the point where it
was last stopped.
or
Press the Play key (31), if you want the recording to be played from the
beginning.
or
Press the Exit key (9) to abort the process.
Edit recording
You can use the Edit function to remove undesired sequences such as
commercials or front or end titles from the recording.
If you wish to edit the selected recording, press the yellow key (19). The
editing window called "Directors Assistant" appears.
Press the i-key (28) to get Help as insert.
- 75 -
Page 79

The playback is stopped by default. You can now start the playback. To fastforward or rewind, use the fast-forward and rewind keys (33-36). Mark the
unwanted parts of the recording. The recording is sub-divided into segments.
You can then delete the individual segments.
Press the Play key (31) to start playback.
When you reach the desired point in the recording, press the Pause key
(32). The playback is paused.
You can also press the slow motion key (38) or the Play key (31) once
more to activate the slow motion function. You can thus set the markers
precisely.
You can move between the individual markers by using the / - keys
(15/16).
If you press the green key (18) again on a set marking, the set marking
is removed.
Press the green key (18) to set a marking. You see a vertical line in the
progress beam.
Repeat the step until you have marked the unwanted part of the recording
at the beginning and at the end of the unwanted part.
Press the yellow key (19) several times to select the segment which you
wish to delete. The current segment is framed in red in the progress beam.
Press the red key (17) to delete the selected segment. A confirmation
window appears.
Press the OK key (14) to cut the selected segment.
or
Press the red key (17) to abort the process.
Caution!
Cut segments are deleted permanently.
- 76 -
Page 80

Remove selected / marked recordings
To delete a selected recording, press the red key (17). The selected
recording is marked with a .
Press the HDD key (25) to delete the marked recording.
You can even mark several recordings and then delete them all by
Select all
You can again remove the marking on all recordings by using the arrow key
right (11).
Please note that the recording will be deleted permanently.
using the HDD key (25).
To delete all recordings, press the arrow key left (10). All recordings will be
marked with a .
Press the HDD key (25) to delete all recordings.
Caution!
To return to the "Recordings" overview window, press the menu key (8).
or
Press the Exit key (9) to exit the menu completely.
- 77 -
Page 81

Music & Picture
The music and picture function lets you play back all readable music and
picture files from the hard disc or an external USB storage medium.
A directory window opens (similar to the one on a PC).
Select the desired file by using the arrow keys up (12) or down (13).
Press the OK key (14) to play back the selected file.
- 78 -
Page 82

Music playback
The "Musicbox" window opens up. The selected file is played back.
You can control the reproduction by using the playback keys (30-32) as on a
usual playback device.
You can see the name of the next track below the current playback.
To delete the next track, press the red key (17). You can press the red key
(17) several times until the desired track appears.
You can change the playback mode (Repeat function). You have the option of
choosing repeat modes "Continuous" ( ), random ( ) or current track ( ).
Press the blue key (20) several times, to change the repeat mode.
To return the folder directory, press the Menu key (8).
or
Press the Exit key (9) to exit the menu completely.
- 79 -
Page 83

Picture reproduction
A Playback window opens up. The selected file is played back.
Operating the image reproduction:
Slideshow
You can use the Play key (31) to start a slide show of the images on the
hard disc or the USB stick. A selection window opens up.
Select the corresponding display option by using the arrow keys up (12) or
down (13) and press the OK key (14) to confirm.
The Shuffle function allows you to start random playback.
Previous/Next
Press the arrow keys left (10) or right (11) to go to the previous or the next
image.
Hide/show
Use the i-key (28) to show or hide Operating Strip.
Zoom
You can use the red (17) or green (18) key to zoom in or out in the picture.
There is a position pointer in the bottom right corner of the operating strip,
where you can determine the current position. You can zoom in to a
maximum of 800 %. Use the arrow keys (10-13) to move the image section
viewed from the total picture.
- 80 -
Page 84

Rotate
Press the blue key (20) if you want to rotate the picture. Pressing several
times will rotate the picture in the clockwise direction (0°, 90°, 270°).
Press the menu key (8) to return to the folder structure "Directory".
To return to the "HDD / USB Applications" sub-menu, press the menu key
(8).
or
Press the Exit key (9) to exit the menu completely.
HDD Manager
This menu lets you make hard disc related changes. You can format the
entire hard disc, set the time until when the hard disc should switch off or
have hard disc information displayed.
Format HDD
If you wish to format the hard disc, observe the following points.
Caution!
All data and partitions of the hard disc will be permanently lost.
Press the “OK” key (14). An input window appears.
Enter the current password (standard value 0000).
Press the OK key (14) to confirm the formatting process.
or
Press the red key (17) to abort the process.
- 81 -
Page 85

SHDD power down
You can set the time when the hard disc should switch to the Sleep mode.
Press the arrow keys left (10) or right (11) to change the setting.
or
Press the “OK” key (14). A selection window appears.
Select the desired setting by using the arrow keys up (12) or down (13).
Confirm your selection by pressing the “OK” key (14).
Note that it will need a few seconds to switch over from the Sleep mode
HDD information
Let the hard disc information be displayed. You will find here the capacity of
the hard disc and the remaining data volume.
back to active mode. This can be relevant in case of a direct recording.
Press the OK key (14) to display the hard disc information.
To return to the main menu, press the Menu key (8).
or
Press the Exit key (9) to exit the menu completely.
- 82 -
Page 86

Special functions
EPG
Electronic Programme Guide. To enable this function, please press the “EPG“
key (22). The channel list appears.
You can select a channel by using the arrow keys up (12) or down (13).
You can jump 10 channels up or down by using the / keys (15/16).
You can browse through the days by using the arrow keys left (10) and
right(11).
Press the OK key (14) for displaying the detail information of the current
events.
- 83 -
Page 87

Press the OK key (14) for displaying the complete list of events.
You can use the / -keys (15/16) to push the displayed channel text down
or up for easier reading.
Use the arrow keys left (10) or right (11) to preview the next channel.
If you invoke the EPG window and show the detail information, you can
A selected event of a channel will be taken over directly in the timer by
pressing the red key (17). The "Edit Timer" window opens.
have the previously cast transmissions or the next ones displayed by
using the arrow keys left (10) or right (11).
When you use the arrow keys up (12) or down (13) for changing to
another station, the immediately next channel is shown.
Recording multiple channels
This receiver offers you the possibility of recording two different programs and
to watch another one, if two separate satellite feeders are connected to the
receiver. The TV channel is subdivided in transponder (channel packages). A
transponder contains several channels.
- 84 -
Page 88

Example of two separate satellite feeders:
• You record a channel from transponder A on (REC 1).
• You record a channel from transponder B on (REC 2).
The channel which you wish to watch can be selected only from the currently
running transponders (depending on the recording). You can make a channel
selection from the transponders A and B. The remaining transponders are not
available.
Example of a satellite feeder:
• You record a channel from transponder A on (REC 1).
• You record a channel from transponder A on (REC 2).
The channel which you wish to watch can be selected only from the currently
running transponder (depending on the recording). You can make a channel
selection from the transponder A. The remaining transponders are not
available.
Example of a Cable Bridge (Loop):
• You record a channel from transponder A on (REC 1).
• You record a channel from transponder B on (REC 2).
The channel which you wish to watch can be selected only from the currently
running transponders (depending on the recording). You can make a channel
selection from the transponders A and B. The remaining transponders are not
available. The cable bridge, however, offers you more options than with only
one satellite feeder. They are described on page 35.
Direct recording
You can record the currently running shows directly, without programming a
timer.
Press the key (29) to start recording. The "Edit Timer" window opens.
- 85 -
Page 89

Press the key (29) again to start direct recording.
If you press the i-key (28) when the show is running, you will see the running
time of the recording(s) as an insert. They are in the bottom left corner of the
information window.
To stop the recording, press the key (30). A selection window appears,
depending upon whether one or two recordings have been started.
Press the key (30) again to stop the selected recording.
If you have started two recordings, repeat the process to stop the
- 86 -
second recording.
Page 90

Time shift (staggered TV watching)
You can use the Time shift function to interrupt a running show and watch it at
a later time. The receiver records the show on the hard disc. The displayed
image is frozen so you can resume watching from this point onwards.
The recording through the Time shift function is not stored permanently
on the hard disc. Switching over or stopping the recording will erase the
Time shift recording. If you wish to store a recording permanently,
press the key (29).
The Time shift function has a capacity of maximum 90 minutes.
Press the key (32) while the show is running.
Picture-in-picture
If you have connected both tuners, you can use the Picture-in-Picture
function. After selecting the channels to be displayed, a small window is
inserted in which you can see the selected channel in parallel with the main
channel.
Press the key (39) to enable the Picture-in-Picture function. The channel
list appears.
Select the desired channel that you would like to be shown in addition to the
main picture, by using the arrow keys up (12) or down (13) and press the
OK key (14). A small secondary screen appears.
If no channel inserts can be seen you can change the size of the
If you have connected only one tuner, this function is available to you only
within one transponder.
If you have connected both the tuners through a cable bridge, you can make
only a limited use of this function.
secondary screen by using the arrow keys up (12) or down (13).
If no channel inserts can be seen you can change the position of the
secondary screen by using the arrow keys left (10) or right (11).
You can use the key (40) to toggle between the main and secondary
screens. The displays are interchanged.
Press the key (39) to deactivate the Picture-in-Picture function.
Caution!
- 87 -
Page 91

Displaying the Stream Information
You can display the stream information of the displayed channel. Various
information, such as the signal intensity (strength) and signal quality, the
current transponder, the tuner configuration and various information about the
video and audio signal is given here.
Press the SIG key (18). An "Information Window" opens up.
Press the OK key (14) to display more stream information.
To exit the stream information, press the
Menu key (8) or the Exit key (9).
- 88 -
Page 92

Sleep timer
You can activate the sleep timer during the operation by using the Standby
key (1). The receiver will shut off after the set time.
Press the Standby key (1). A selection window appears.
Select the desired time after which the receiver should switch off, by using
the arrow keys up (12) or down (13).
Press the “OK” key (14). The receiver will shut off after the set time.
or
Press the Standby key (1). A selection window appears.
Press the Standby key (1) again to switch off the receiver immediately.
Multi-picture
Press the key (19) to go to the multi-picture mode. Now, 9 channels will
appear simultaneously on your screen, starting with the current channel.
You can navigate the blue marking by using the arrow keys (10-13). The
yellow marked channel is displayed in real time; the unmarked channels are
freeze images.
To activate the desired channel, mark it and then press the OK key (14) or
the EXIT key (9).
- 89 -
Page 93

By pressing the Exit key, you will leave the multi-picture mode. The channel
you marked last will appear as complete image on your screen.
Text
Teletext is an information system displaying Teletext on your TV set. For
Teletext reception, the selected channel must support this function. The TXT
symbol appears when channels are changed.
Press the Text key (21) to start Teletext.
For switching off Teletext
, press the Exit (9) or press the Text key (21) thrice.
You can use the Text key (21) to make the displayed video text
Using Fasttext functions
The coloured keys on the remote control are meant for Fasttext and are
activated after invoking another Teletext page. You can get there directly by
pressing the coloured keys on the remote control.
transparent. Press the Text key (21) several times to do this.
Press the desired key (17-20).
Switch between TV and SAT
With the “TV/SAT” key (5) you can switch between TV and satellite functions.
(This function has to be provided by your TV set).
Keep pressing the “TV/Radio“ key until you have set the desired function.
Switching between TV and radio
With the TV/RAD key (4) you can switch between TV and the radio function.
Now, the receiver transmits a radio channel and shows a background image.
To return to the TV channel, press the “TV/RAD key (4) on the remote
control.
Connecting external storage media
You can create a connection to an external device of Mass Storage Device
class (USB stick or external hard disc (FAT 32)) by using the supplied USB
adapter cable Mini-A-plug on Normal-A- sockets. Other device classes are not
supported. Use only the devices which support the High Speed mode. Typical
devices of this Mass Storage Device Class are external hard discs (via USB),
USB Memory Sticks and Card Readers. If there are several partitions on the
hard disc, the first partition is used. The functionality of the receiver demands
the activation of the USB interface. That can take place after connecting the
external device through one of the following three actions:
• Switching the receiver off and on from the mains switch
- 90 -
Page 94

• Switch the receiver in the Standby mode and then change over to the
operating mode
• About the menu of the receiver
There is no guarantee that all devices of the Mass Storage Device class are
supported. External hard discs receive their operating voltage through the
USB connector. The receiver delivers the specified power as demanded by
the USB specification.
However, when these external hard discs start-up, their power requirement
can be so high that they may not be recognised. An external power pack is
then required for these hard discs.
Connecting to PC/Notebook
Moreover, it is possible to connect to a PC through a USB adapter cable MiniB-connector on
Normal-A-connector (not included in the scope of supply).
Always follow the operating manual of the external device.
The receiver is recognised as a data exchange storage. The receiver
- 91 -
starts anew after removing the USB connector.
Please also follow the operating manual of your PC or Notebook.
Recording of the receiver on a PC or Notebook can be played back
for example by using the VLC Media Player (Freeware).
Page 95

Decommissioning
Disconnect the receiver and connected equipment from the power supply.
Loosen the LNB cable from the receiver.
Take the batteries out of the remote control, if you are not going to use the
receiver for a relatively long time.
Pack up the receiver, the cables and the remote control in a cardboard box.
Store the receiver and all accessories in a dry and dust-free room.
Protect the receiver from frost.
Cleaning
Caution!
The receiver must not become wet. Never clean it with a wet cloth.
Do not use any cleaning agent containing solvents like petrol or thinners for
cleaning. These agents may damage the surface of the casing.
Clean the casing of the receiver with a dry cloth.
Clean the display of the receiver with a slightly wet cloth.
- 92 -
Page 96

Specifications
Receiver
Dimensions in mm (W × D × H) 350 × 265 × 70
Weight in grams Receiver 3040 g
Remote control 80 g (without batteries)
Range of input frequency 950 MHz ~ 2150 MHz
IF band width 55 MHz / 8 MHz (below 5 MS/s)
LNB power supply 13/18 GS, 0.30 A max.
Overload protection
LNB control 22 KHz ± 2 KHz, 0.6 V pp ± 0.2 V
DiSEqC control Version 1.0, Version 1.2, tone burst A/B
Symbol rate 2 ~ 35 MS/s
Input speed Max. 15 Mbit/s
Error correction (FEC) 1/2, 2/3, 3/4, 5/6, 7/8, auto
Aspect ratio 4:3 letterbox, 4:3 PanScan, 16:9
Video resolution 720 x 576 (Pal), 720 x 480 (NTSC)
Audio mode Left, right, stereo, AC3 digital sound
Connection options
2 x LNB IF-input Type F, IEC 169-24
2 x IF OUT-output Type F, IEC 169-24
TV SCART (output only)
Video, Audio L,R, CVBS, RGB, YUV (YPbPr)
VCR SCART (output and input) Video CVBS, Audio L, R
YPbPr component YPbPr
RCA (CINCH) Audio L,R, Video (CVBS)
COAXIAL, OPTICAL Digital audio output
RS 232 Serial port
S-VHS S-Video (Hosiden)
CI Common Interface
USB Mini-USB A/B Interface
Power supply
Input voltage power pack 100-240 V ~, 50/60 Hz
Power consumption approx. 20W (operation with Single
LNB)
approx. 2W (standby)
Operating temperature 0 ºC ~ +40 ºC
Storage temperature – 40 ºC ~ + 65 ºC
Humidity 5 % - 95 % (RH, non-condensing)
- 93 -
Page 97

Tips & tricks/ Trouble shooting
Symptom Possible cause and remedy
Satellite cannot be
found, or
no signal
Example: Astra1 19,2° East
1 key (default setting: “ARD“)
“SIG“ key (“ARD“, FR11837)
Signal AND quality are both 0%
Direct vertical reflector to the south. Turn a few
millimetres to the left, wait approx. 3 seconds and
repeat, until signal AND quality are displayed. With
a signal of approx. 60%, the black background
disappears and the TV image will be displayed.
For changing the satellite please select a current
channel out of the preset channel list and then press
the SIG key.
Frontal display dark The mains cable is not connected.
Connect the mains cable to the power source and
the receiver.
No sound or image, but
receiver menus are
displayed
The antenna is not directed towards the satellite.
Direct the antenna properly.
No signal.
Check the cable connection from the LNB to the
receiver and from the receiver to the connected
equipment.
Align the antenna.
Frontal display shows
channel location.
The TV set does not
display any image.
- 94 -
The system is not connected properly.
Check connection of the SCART cable
The TV set is not in AV mode.
Switch the TV set to the respective AV input.
Page 98

Poor image, blocking
error, formation of
small blocks, sound
stops
No image, no sound,
signal strength and
signal quality OK
System crash (receiver
can no longer be
operated.)
The antenna is not directed exactly towards the
satellite.
Align the antenna more precisely. For this purpose,
use the SIG key on the remote control. The signal
strength will be displayed for directing the antenna
properly.
The LNB is defective. Replace the LNB.
The satellite antenna has been directed to a wrong
satellite.
Should it come to the improbable case of a system
crash, separate the receiver from the mains supply.
Connect it again after 10 seconds. This can usually
solve the problem.
Please note: A software crash is not a malfunction
and no guarantee will apply. For technical
equipment (e.g. also PC, radio network, etc.) a
system crash can be solved simply and quickly by
following this procedure.
The remote control
does not work
The batteries are exhausted.
Replace the batteries.
The remote control is not directed properly.
Aim the remote control towards the front side of the
receiver and ensure that there is no obstacle
between the remote control and the receiver.
Channel has received
new frequency and is
Delete the corresponding channel and initiate an
automatic scan.
no longer transmitted
with the current data.
Exit favourites list. Press TV/RAD key.
- 95 -
Page 99

Password The default password is 0000.
Cannot remember
personal password.
Please contact the Service Hotline, if you have
forgotten your personal password.
Channel-list editor On the website www.comag-ag.de, a channel list
editor is available for download.
Factory default The default settings are restored if you keep the
standby key at the front side of your receiver
pressed for more than 10 seconds. Caution! By
doing this, your personal settings will get lost.
If a problem cannot be rectified in spite of this, please contact your specialised
dealer or the manufacturer.
- 96 -
Page 100

Manufacturer
COMAG Handels AG
Zillenhardtstraße 41
D-73037 Göppingen
Germany
Telephone: 0049 (0)7161 / 5 03 06 – 0
Telefax: 0049 (0)7161 / 5 03 06 – 11
Website: www.comag-ag.de
Dear customer,
Past experience has shown that many complaints can be settled through a
simple telephone call.
In case problems should arise with your device we kindly ask you to contact
our service hotline first. Proceeding like this will save you time and possible
irritation.
Our hotline personnel will be glad to help you and explain the exact procedure
of guarantee handling, should it become necessary to send in your device.
Service hotline: 0044 (0)8708 900137
E-mail: info@comag-ag.co.uk
- 97 -
 Loading...