


ELECTRIC OVEN & GRILL SGBR 1500 C4
ELECTRIC OVEN & GRILL
Operating instructions
IAN 303861
GRILL- UND BACKAUTOMAT
Bedienungsanleitung

Before reading, unfold the page containing the illustrations and familiarise yourself with all functions of
the device.
Klappen Sie vor dem Lesen die Seite mit den Abbildungen aus und machen Sie sich anschließend mit allen
Funktionen des Gerätes vertraut.
GB / IE / NI Operating instructions Page 1
DE / AT / CH Bedienungsanleitung Seite 21
A
8
7
6
9
1
2
3
4
5
B
z
0
q
w
e
t r

Contents
Introduction ............................................................2
Proper use .............................................................2
Package contents .......................................................2
Appliance description ....................................................2
Technical data ..........................................................2
Safety instructions ......................................................3
Setting up .............................................................6
Using the appliance .....................................................6
Glass door .........................................................................6
Inserting the crumb tray ...............................................................6
Using the rotisserie ...................................................................7
Using the baking tray/rack ............................................................8
Before first use .........................................................8
Operating the appliance .................................................9
Function switch ......................................................................9
Temperature control ..................................................................9
Timer .............................................................................9
Grilling and baking .....................................................9
Grilling with the rotisserie ...............................................10
Cleaning and care ......................................................12
Storage ..............................................................12
Troubleshooting .......................................................13
Disposal ..............................................................14
Kompernass Handels GmbH warranty ....................................14
Service ...........................................................................15
Importer ..........................................................................15
Recipes ...............................................................16
SGBR 1500 C4
GB│IE│NI
│
1 ■

Introduction
Congratulations on the purchase of your new
appliance.
You have selected a high-quality product.
The operating instructions are part of this product.
They contain important information on safety, usage
and disposal. Before using the product, familiarise
yourself with all handling and safety guidelines.
Use the product only as described and for the
range of applications specified. Please also pass
these operating instructions on to any future
owner(s).
Proper use
The automatic oven and grill is intended for the
heating, cooking and grilling of food.
This appliance is intended solely for use in private
homes. Do not use it for commercial applications.
All other uses are deemed to be improper and may
result in property damage or even in personal injury.
Package contents
♦ Electric Oven & Grill
♦ 1 baking tray
♦ 1 rack
♦ 2 tongs
♦ Rotisserie with 2 clamps
♦ 1 crumb tray
♦ Operating instructions
NOTE
Check contents for completeness and damage
immediately after unpacking. Contact Customer
Services if necessary.
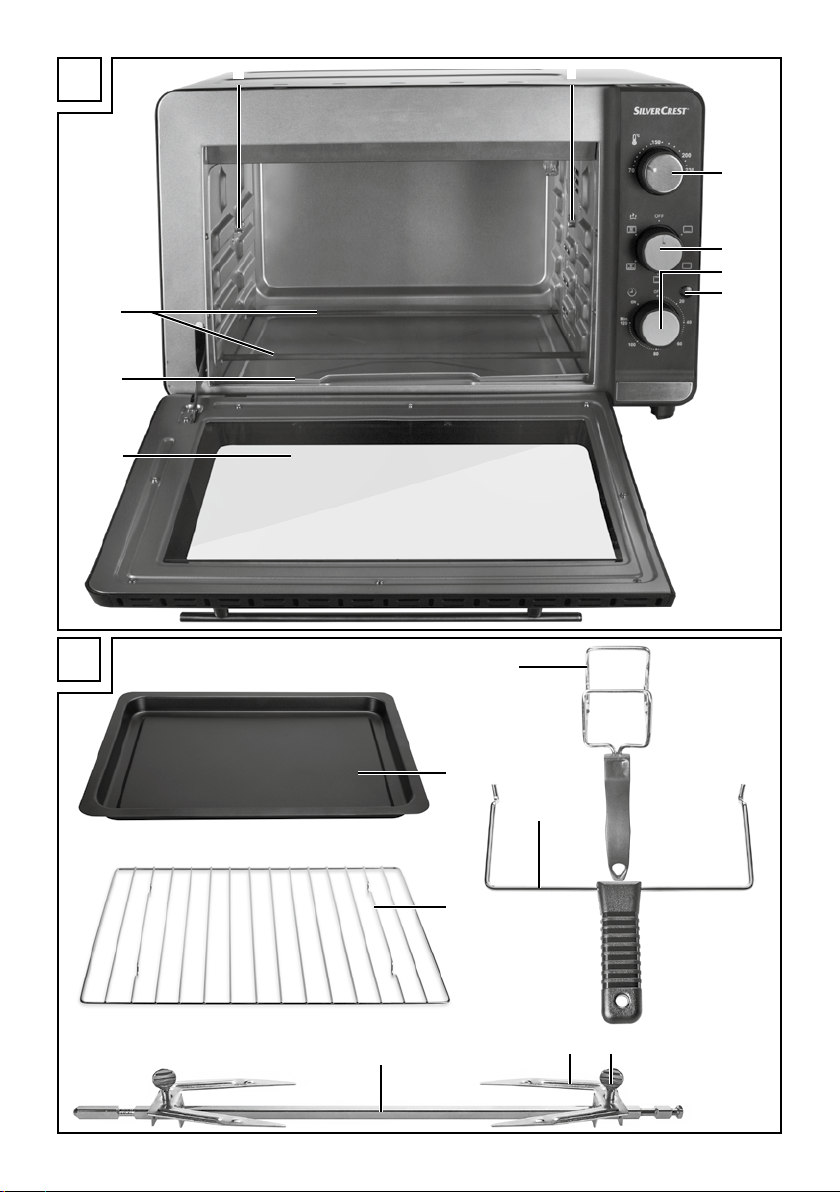
Appliance description
Figure A:
1 Drive
2 Temperature control
3 Function switch
4 Timer
5 Control lamp
6 Glass door
7 Crumb tray
8 Lower heating element
9 Spit fitting
Figure B:
0 Tongs (baking tray or rack)
q Baking tray
w Tongs (for spit)
e rack
r Restrainer
t Skewer clamps
z Rotisserie
Technical data
Rated voltage: 220 - 240 V ∼
(alternating current),
50/60 Hz
Power consumption: 1500 W
All of the parts of this appliance
that come into contact with food
are food-safe.
■ 2 │ GB
│IE│
NI
SGBR 1500 C4

Safety instructions
DANGER – RISK OF ELECTRIC SHOCK!
► Do not open the housing of the appliance or attempt to
repair it. Doing so can lead to risks and also invalidates the
warranty. Defective appliances should be repaired by the
retailer or authorized personnel only.
► Arrange for defective power plugs and/or cables to be
replaced as soon as possible by a qualified technician or by
our Customer Service Department to avoid the risk of injury.
► Do not allow any liquids to penetrate the housing. Do not
expose the appliance to moisture and do not use it outdoors.
Additionally, do not place fluid-filled receptacles such as
flower vases on the appliance. This increases the risk of fire
and of receiving an electric shock! If liquids permeate into
the housing, unplug the appliance immediately and arrange
for it to be repaired by a qualified technician.
► Never touch the appliance, power cable or power plug with
wet hands. There is a risk of electric shock!
NEVER immerse the appliance in water or other liquids!
Risk of electrocution if residual liquids come into contact
with live components during operation.
SGBR 1500 C4
GB│IE│NI
│
3 ■

WARNING – RISK OF INJURY!
► This appliance may be used by children of the age of 8 years
or more and by persons with reduced physical, sensory or
mental capabilities or lack of experience and/or knowledge if
they are being supervised or have been instructed with regard
to the safe use of the appliance and have understood the
potential risks.
► Children must not use the appliance as a plaything.
► Cleaning and user maintenance must not be performed by
children unless they are older than 8 years of age and are
supervised.
► Children younger than 8 years of age must be kept away
from the appliance and the power cable.
► Route the power cable in such a way that no one can tread
on it or trip over it.
► Never touch the glass door or the housing during use, these
can get very hot. Use oven gloves or something similar to
open the glass door to avoid being burnt!
► Never touch the heating elements or the viewing window
when the appliance is in use, or before it has cooled down
completely. Do not reach into the cooking chamber when
the appliance is in use. Wait until the appliance has cooled
down. Otherwise, you could be burnt.
► Allow the appliance to cool down after use before trans-
porting it.
► Always use oven gloves or a pot holder if you need to take
hold of the appliance.
Caution! Hot surface!
■ 4 │ GB
│IE│
NI
SGBR 1500 C4

CAUTION – PROPERTY DAMAGE!
► Do not use an external timer switch or a separate remote
control system to operate the appliance.
► Never leave the appliance unattended during operation.
► Ensure that the appliance, the power cable and the plug do
not come into contact with heat sources such as hotplates or
naked flames.
► Only operate the appliance with the original accessories
supplied.
► Do not kink or crush the mains cable.
► To disconnect, always remove the plug itself from the mains
power socket, do not pull on the power cable.
► When the appliance is in use, ensure that there are no easily
inflammable materials in the immediate vicinity (e.g. dishcloths,
oven cloths, etc.).
► Never dry textiles or other objects on or above the appliance.
This increases the risk of fire!
SGBR 1500 C4
GB│IE│NI
│
5 ■

Setting up
Using the appliance
WARNING! RISK OF FIRE!
► Never place the appliance beneath wall cup-
boards or next to curtains, cupboard walls or
other flammable objects.
► Always ensure a minimum distance between
the appliance and hanging cupboards, ceilings,
side walls or similar of at least 10 cm above
the appliance and 5 cm at the sides. For this
reason the appliance may not be used, for
example, in cupboards or similar. Otherwise
there is likely to be insufficient ventilation for the
appliance, which could cause a fire or damage.
► Always place the appliance on a heat-resistant
surface. Failure to do so increases the risk of
fire or of it being damaged. The area under
the bottom can discolour and be damaged.
Additionally, if placed on a soft upper surface,
the appliance could cause permanent damage
to it due to pressure indentations.
DANGER – ELECTRIC SHOCK!
► Do not place the appliance immediately ad-
jacent to sources of water, e.g. sinks or basins,
or in damp cellar areas. Otherwise, there is
a risk of receiving an electric shock.
■ Place the appliance on a solid, level and heat-
resistant surface (e.g. stainless steel worktops
or natural stone worktops such as granite).
Ensure there is sufficient ventilation around the
appliance.
■ Push the appliance up against the wall, with its
rear side facing the wall. The spacers on the
back must touch the wall. Ensure that the wall is
made of heat-resistant material, e.g. tiles, natural
stone or granite.
■ Clean all components as described in the
section “Cleaning and care”.
Glass door
ATTENTION! DAMAGE TO PROPERTY!
► Do not lean on the glass door 6. Do not
place any objects on the glass door 6.
This can cause damage to the hinges.
■ If you are cooking especially fatty foodstuffs, this
can result in increased smoke production. In this
case, do not close the glass door 6 completely;
instead, leave it slightly open:
The glass door 6 has a latching position so that
it remains open a little: if you carefully push the
glass door 6 closed, it clicks into this position
shortly before closing completely.
■ When drying fruit (to make dried fruit), the glass
door 6 should remain in the latching position
to ensure that moisture can escape and that the
fruit dries better.
Inserting the crumb tray
■ Push the crumb tray 7 under the lower heating
element 8 so that it rests flat on the bottom of
the appliance. You can use the higher bent-up
side as a handle. The other, less bent side must
be inserted into the appliance first.
■ 6 │ GB
│IE│
NI
SGBR 1500 C4
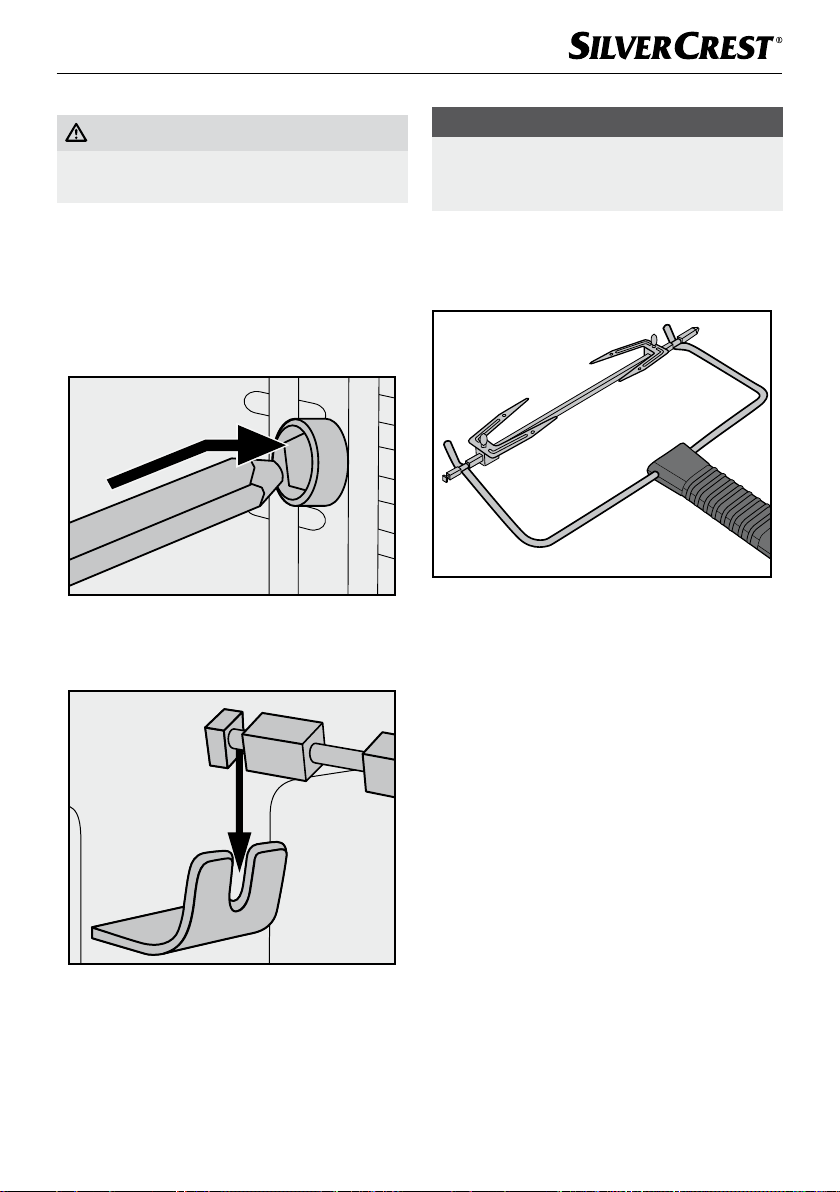
Using the rotisserie
WARNING! RISK OF INJURY!
► Always use the tongs w to insert the hot rotis-
serie z into the appliance or to remove it.
■ You can use the two skewer clamps t to fix the
food onto the rotisserie z. Loosen the restrainer r
on the skewer clamps t, push them so that the
food is fixed firmly in between the clamps and
then screw the restrainer r tight again.
■ First push the end of the rotisserie z without the
notch into the drive 1 (Figure 1):
NOTE
► Always slide the baking tray q into the lower
rail when you use the rotisserie z.
This will collect any drips.
■ To remove the hot rotisserie z, grip with
the hooks at the end of the tongs w into the
recesses on the rotisserie z (Figure 3):
Fig. 1: Push the rotisserie z into the drive 1.
■ Then insert the other end of the rotisserie z with
the deep groove in the spit fitting 9 (Figure 2):
Fig. 2: Insert the rotisserie z in the spit fitting 9.
SGBR 1500 C4
Fig. 3: Hooking the tongs w onto the rotisserie z
■ First lift the left-hand side of the rotisserie z out
of the spit fitting 9 and then pull the rotisserie z
from the drive 1.
GB│IE│NI
│
7 ■
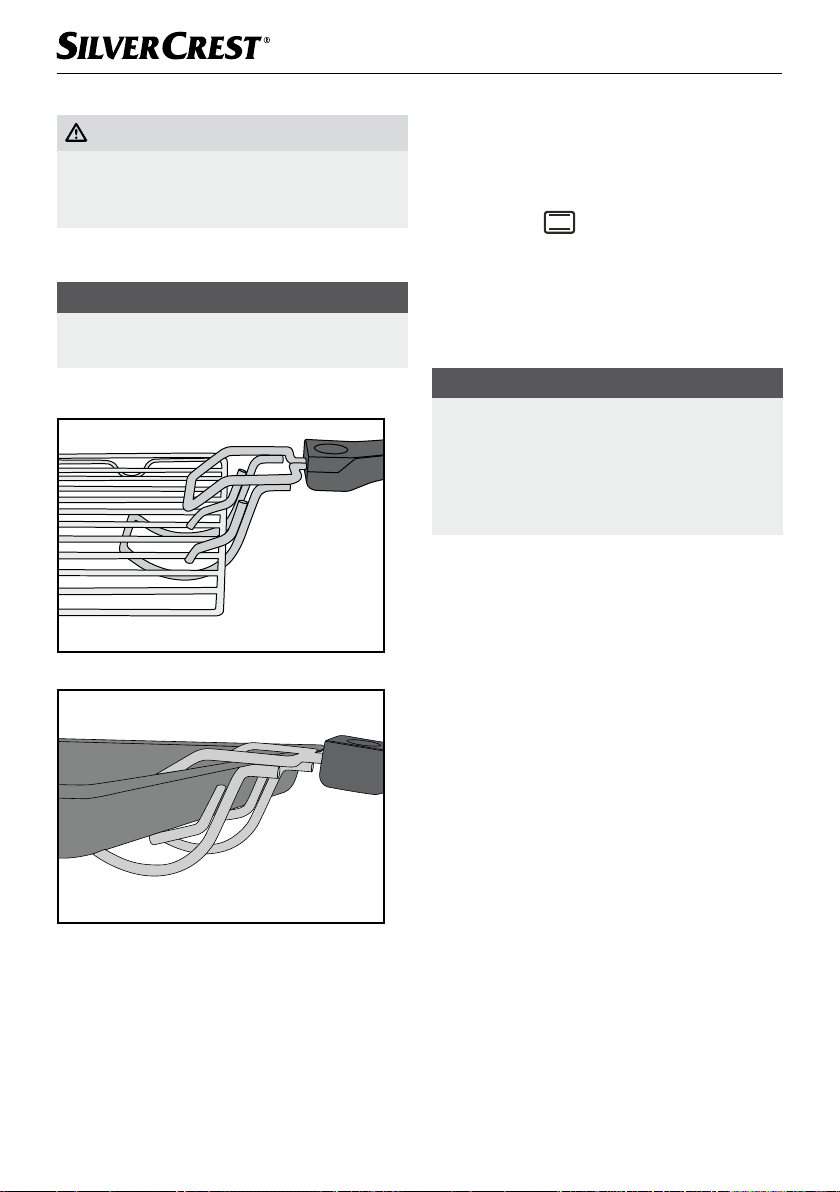
Using the baking tray/rack
WARNING! RISK OF INJURY!
► Always use the tongs 0 to insert the hot
baking tray q/the hot rack e into the appliance or to remove it.
■ Push the baking tray q/the rack e into one of
the 3 rails in the cooking chamber of the appliance.
ATTENTION! DAMAGE TO PROPERTY!
► Never place the baking tray q/the rack e
directly onto the heating elements 8.
■ To remove the hot baking tray q or the rack e,
hook the tongs 0 onto them as follows:
Fig. 4: Hooking the tongs 0 onto the rack e
Before first use
1) Insert the plug into a mains power socket.
2) Turn the temperature control 2 clockwise to
the maximum temperature (to the stop).
3) Turn the function switch 3 to “upper and
lower heat”
4) Open the glass door 6 leave this open for this
operation.
5) Remove any installed accessories from the
cooking chamber.
6) Turn the timer 4 to 20 minutes.
NOTE
► The first time the appliance heats up, a
small amount of smoke and odour may be
generated due to production-related residue.
This is normal and is completely harmless.
Provide sufficient ventilation by opening a
window, for example.
The appliance switches off automatically
after 20 minutes.
If you want to interrupt the heating process
prematurely, turn the temperature control 2
counter-clockwise to the stop and set the
timer 4 to “OFF”.
7) Allow the appliance to cool down, then clean
the appliance as described in the chapter
“Cleaning and care”.
The appliance is now ready for use.
.
Fig. 5: Hooking the tongs 0 onto the baking
tray q
■ 8 │ GB
│IE│
NI
SGBR 1500 C4

Operating the appliance
Function switch
You can switch on the appliance with the function
switch 3, and also set 5 different functions:
Symbol Meaning
“Upper heat”
e.g. to gratinate
“Lower heat”
e.g. for baking
Timer
Use the timer 4 to switch the device on / set the
cooking time.
■ Set the timer 4 to the desired cooking time.
After expiry of the set time a signal tone sounds
and the appliance stops heating.
If the function “Upper heat/hot air/rotisserie”
is selected, the rotisserie z will also stop
turning.
■ If you wish to use the device without a time limit,
turn the dial on the timer 4 counter-clockwise to
the position “ON”.
"Upper & lower heat"
e.g. for baking a pizza
"Upper heat/hot air/
rotisserie"
e.g. to roast poultry
"Upper & lower heat/hot air"
e.g. to reheat rolls
"OFF" the appliance is
switched off.
Temperature control
Use the temperature control 2 to set the desired
temperature.
Grilling and baking
1) Put the crumb tray 7 into the appliance.
2) Remove the rack e and baking tray q from
the appliance. If required, cover these with
baking paper or lightly grease the baking tray q
with suitable baking fat.
NOTE
► Depending on the meal, the oven must be
preheated. Refer to the guidelines in the
respective recipe. Preheating is useful for:
– very short baking times,
– crisp crusts,
– sensitive meals that require a constant
temperature, such as soufflés.
► If no preheating is required, skip step 3).
3) Allow the appliance to heat up for approx.
10 minutes (depending on the temperature
setting) to the required temperature:
– Select the required temperature using the
temperature control 2.
– Select the required function with the function
switch 3.
SGBR 1500 C4
GB│IE│NI
│
9 ■

NOTE
► As a general rule, if you are baking or grilling
with hot air you can dispense with a preheating
of the grilling/cooking space.
– Use the timer 4 to set the preheat time
(approx. 10 minutes).
– Close the glass door 6.
4) Once the warm-up period is finished, place
the foodstuffs on the rack e or the baking
tray q and slide it in on one of the rails.
Ensure that there is sufficient space between
the foodstuffs and the inner walls/heating
elements of the appliance.
NOTE
► If you wish to prepare food on the rack e
that drips excessively, then slide the baking
tray q onto the bottom rail. By doing this,
dripping fat for example will be caught and
the appliance is then easier to clean.
5) Close the glass door 6 before starting the
grilling or baking process.
6) If required, use the timer 4 to set the required
grilling or baking time. You can set a maximal
grilling/baking time of 120 minutes using the
timer 4. Alternatively, you can set the timer 4
to the “ON” position to run the appliance for
an unlimited period.
NOTE
► If the cooking time for the food is less than
20 minutes, first set the timer 4 to 40 minutes
and then turn it back to the required grilling
or baking time.
The appliance switches off automatically after the
set period (if any); there is a beep and the control
lamp 5 goes out.
NOTE
If you want to interrupt the heating process
prematurely, turn the temperature control 2
counter-clockwise to the stop and set the timer 4
to "OFF ".
7) f you do not pre-set a baking time, you can
manually stop the heating process by moving
the timer 4 to “OFF”.
8) After cooking, remove the rack e or the baking
tray q using the tongs 0.
9) Set the function switch 3 to “OFF”.
Grilling with the rotisserie
1) Put the crumb tray 7 into the appliance.
2) If inserted, remove the rotisserie z from the
appliance.
3) Push the baking tray q onto the lower rail.
4) Fix the food to be grilled with the skewer
clamps t. Ensure that the food in the cooking
chamber can turn freely without touching the
sides. The rotisserie z may change its direction
of rotation if the food strikes against a resistance.
The two depressions on the rotisserie z must remain freely accessible, otherwise you will not be
able to grasp the rotisserie z with the tongs w.
5) Fit the rotisserie z in the cooking chamber
(see chapter “Using the rotisserie”)
6) Close the glass door 6.
The control lamp 5 indicates that the appliance is
now switched on. If you pre-set a baking time, the
dial of the timer 4 will move towards the “OFF”
position.
■ 10 │ GB
│IE│
NI
SGBR 1500 C4

NOTE
If you want to interrupt the heating process prematurely, turn the temperature control 2 counterclockwise to the stop and set the timer 4 to
"OFF ".
7) Adjust the temperature control 2 to the desired
temperature.
8) Set the function switch 3 to “Upper heat/hot
air/rotisserie”
9) If required, set the desired grilling time at the
timer 4. Alternatively, you can set the timer 4
to the “ON” position to run the appliance for
an unlimited period.
The appliance starts the grilling process and
the rotisserie z starts turning.
The control lamp 5 indicates that the appliance is
now switched on. If you pre-set a baking time, the
dial of the timer 4 will move towards the “OFF”
position.
The appliance switches off automatically after the
set period (if any); there is a beep and the control
lamp 5 goes out.
NOTE
If you want to interrupt the heating process
prematurely, turn the temperature control 2
counter-clockwise to the stop and set the timer 4
to "OFF ".
10) If you do not pre-set a baking time, you can
manually stop the heating process by moving
the timer 4 to “OFF”.
11) After the grilling process is completed remove
the rotisserie z with the help of the tongs w.
12) Set the function switch 3 to “OFF”.
.
EXAMPLE: GRILLED CHICKEN
Ingredients
♦ Grilling chicken (approx. 1.3 kg,
guts removed)
♦ Spices (salt, paprika)
♦ Cooking oil
1) Season the chicken on the inside and outside
with salt and paprika powder. Brush it from
the outside with heat resistant cooking oil.
2) Push the chicken onto the rotisserie z and
fix it in place with the skewer clamps t.
Ensure that the notches on the rotisserie z
remain free so that you can remove the
rotisserie z with the help of the tongs w.
Depending on the shape of the chicken, it
may be necessary to fasten the wings and
legs with a fireproof string to stop them
impacting the sides when turning.
3) Push the baking tray q onto the lower rail.
4) Preheat the appliance for about 10 minutes
using the function "Upper & lower heat/hot
air"
to 230°C.
5) Put the chicken on the rotisserie into the
appliance using the tongs w.
6) Set the function switch to "Upper heat/hot
air/rotisserie"
7) Set the timer 4 approx. 80 minutes. The
cooking time can vary depending on the
size and nature of the chicken.
8) Brush the chicken every now and again with
some cooking oil. This will make it crispy.
9) Once the set time is up, carefully remove the
rotisserie with the chicken using the tongs w.
Loosen the skewer clamps t and pull the
chicken off the rotisserie z.
and close the door.
SGBR 1500 C4
GB│IE│NI
│
11 ■
 Loading...