

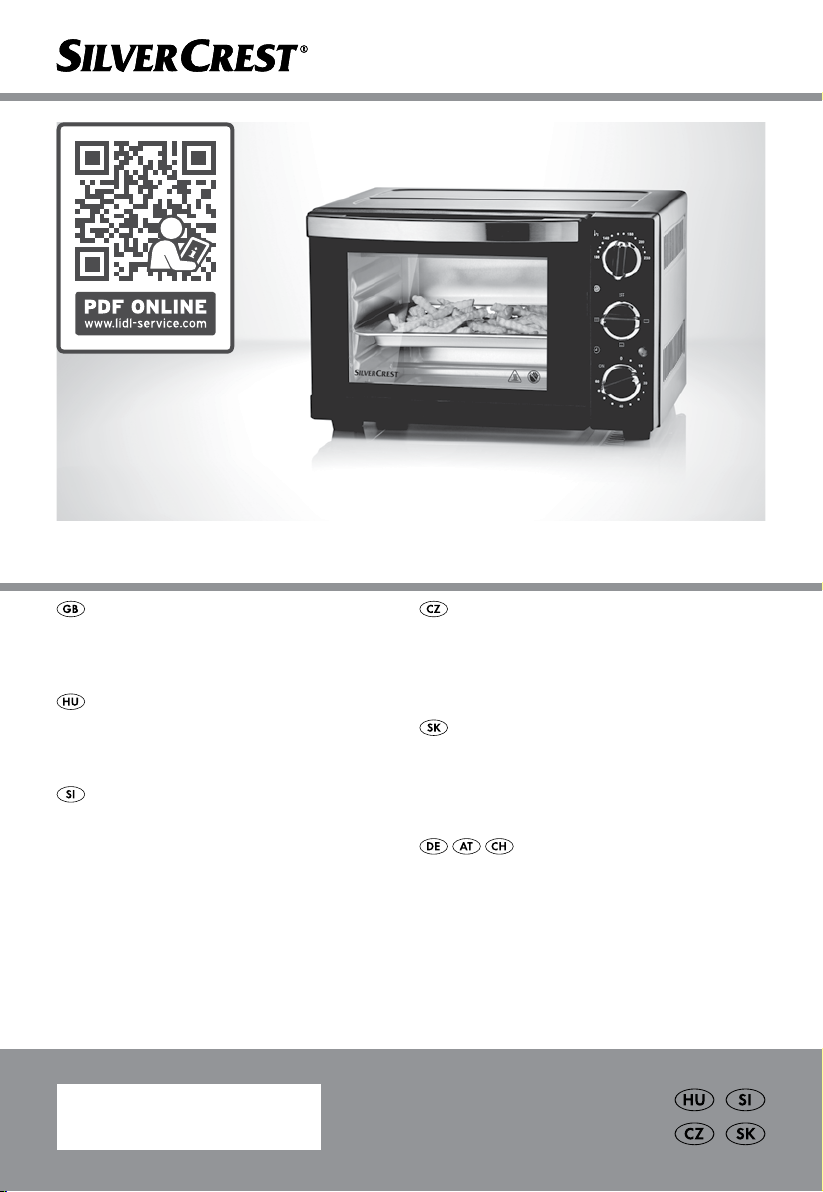
MINI OVEN SGB 1200 E1
MINI OVEN
Operation and safety notes
MINI SÜTŐ
Kezelési és biztonsági utalások
MINI PEČICA
Navodila za upravljanje in varnostna opozorila
IAN 315110
TROUBA NA GRILOVÁNÍ A
PEČENÍ
Pokyny pro obsluhu a bezpečnostní pokyny
AUTOMAT NA PEČENIE A
GRILOVANIE
Pokyny pre obsluhu a bezpečnostné pokyny
MINI-BACKOFEN
Bedienungs- und Sicherheitshinweise

GB Operation and safety notes Page 5
HU Kezelési és biztonsági utalások Oldal 18
SI Navodila za upravljanje in varnostna opozorila Stran 31
CZ Pokyny pro obsluhu a bezpečnostní pokyny Strana 44
SK Pokyny pre obsluhu a bezpečnostné pokyny Strana 57
DE/AT/CH Bedienungs- und Sicherheitshinweise Seite 70
A
1
2
3
13
12
4
5
6
7
8
9
11
10
B
10
11
10 12
C
100
140
180
200
230
3
OF F
4
0
ON
60
10
20
40
5
6

Warnings and symbols used .............................................Page 6
Introduction ................................................................Page 6
Intended use..................................................................Page 6
Scope of delivery..............................................................Page 7
Description of parts ............................................................Page 7
Technical data ................................................................Page 7
Safety instructions.........................................................Page 7
Before first use .............................................................Page 10
Operation...................................................................Page 11
Accessories ..................................................................Page 11
Cooking and grilling ...........................................................Page 11
Switching off..................................................................Page 12
Recipes ......................................................................Page 12
Salmon fillet ..................................................................Page 12
Roasted beef steak.............................................................Page 13
Roast chicken breast............................................................Page 13
Roasted wings with black pepper .................................................Page 13
Baked prawns ................................................................Page 14
Rosemary potatoes ............................................................Page 14
Tex-Mex chicken quesadillas .....................................................Page 15
Mini apple pie ................................................................Page 15
Roasted asparagus ............................................................Page 15
Quick pan pizza ..............................................................Page 16
Cleaning and care .........................................................Page 16
Disposal.....................................................................Page 17
Warranty ...................................................................Page 17
5 GB
Warnings and symbols used
The following warnings are used in this user manual and on the packaging:
Voltage (alternating current)
DANGER! This symbol in combination with
the signal word “Danger” marks a high-risk
hazard that if not prevented could result in
death or serious injury.
WARNING! This symbol in combination
with the signal word “Warning” marks a
medium-risk hazard that if not prevented
could result in death or serious injury.
Hertz (supply frequency)
Watts
This product is classified as protection class I
and must be connected to a protective
ground.
Use the product in dry indoor spaces only.
CAUTION! This symbol in combination
with the signal word “Caution” marks a
low-risk hazard that if not prevented could
result in minor or moderate injury.
ATTENTION! This symbol with the signal
word “Attention” indicates a possible
property damage.
NOTE: This symbol in combination
with “Note” provides additional useful
information.
MINI OVEN
Introduction
We congratulate you on the purchase of your new
product. You have chosen a high quality product.
The instructions for use are part of the product. They
contain important information concerning safety,
use and disposal. Before using the product, please
familiarise yourself with all of the safety information
and instructions for use. Only use the product as
described and for the specified applications. If you
pass the product on to anyone else, please ensure that
you also pass on all the documentation with it.
Danger – risk of electric shock!
Warning – hot surface!
Food safe. This product has no adverse
effect on taste or smell.
Intended use
This product is intended for heating and baking food.
Do not use it for any other purpose.
The product is designed only for use in private
household and must not be used in medicinal or
commercial areas.
The manufacturer is not liable to damage caused by
improper use.
6 GB

Scope of delivery
After unpacking the product, check if the delivery
is complete and if all parts are in good condition.
Remove all packing materials before use.
1 x Mini oven
1 x Crumb tray
1 x Tongs
1 x Baking tray
1 x Grill rack
1 x Instruction manual
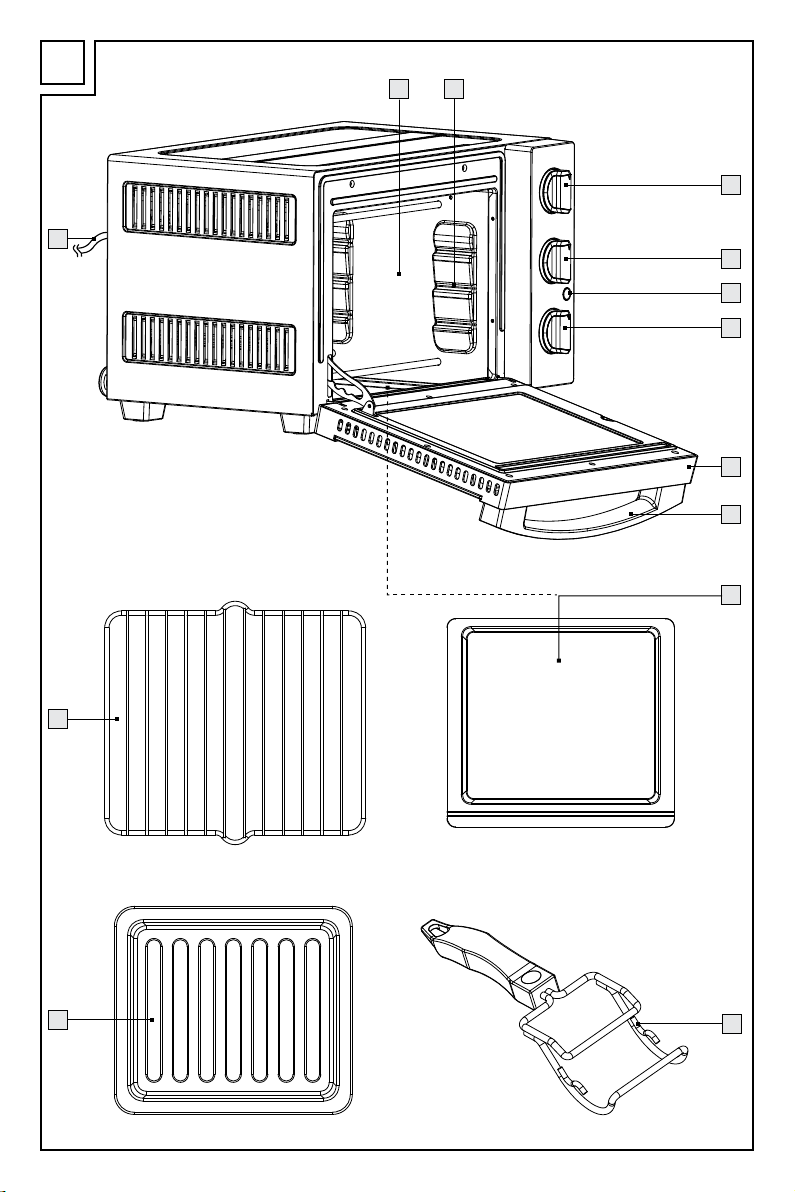
Description of parts
Cooking chamber
1
Rack levels
2
Thermostat
3
Mode selector switch
4
Indicator light
5
Timer
6
Door
7
Handle
8
Crumb tray and insertion rack
9
Tongs
10
Baking tray
11
Grill rack
12
Power cord with power plug
13
Technical data
Nominal voltage: 220 – 240 V~, 50 Hz
Power consumption: 1200 W
Protection class: I
Temperature range: 100 to 230 °C
Cooking chamber volume: approx. 15 litres
TÜV-Rheinland / GS certified
Safety instructions
BEFORE USING THE PRODUCT,
PLEASE FAMILIARISE
YOURSELF WITH ALL OF THE
SAFETY INFORMATION AND
INSTRUCTIONS FOR USE! WHEN
PASSING THIS PRODUCT ON TO
OTHERS, PLEASE ALSO INCLUDE
ALL THE DOCUMENTS!
In the case of damage resulting
from non-compliance with these
operating instructions the warranty
claim becomes invalid! No liability is
accepted for consequential damage!
In the case of material damage or
personal injury caused by incorrect
handling or non-compliance with
the safety instructions, no liability is
accepted!
Children and persons with
disabilities
m WARNING! RISK OF LOSS
OF LIFE OR ACCIDENT TO
INFANTS AND CHILDREN!
Never leave children unsupervised
with the packaging material. The
packaging material represents a
danger of suffocation.
7 GB

Children frequently underestimate
the dangers. Always keep
children away from the packaging
material.
¾ This product can be used by
children aged from 8 years and
above and persons with reduced
physical, sensory or mental
capabilities or lack of experience
and knowledge if they have been
given supervision or instruction
concerning use of the product in
a safe way and understand the
hazards involved.
¾ Children shall not play with the
product.
¾ Cleaning and user maintenance
shall not be made by children
unless they are older than 8 and
supervised.
¾ Keep the product and its cord
out of reach of children less than
8 years.
Intended use
m WARNING! Misuse may
lead to injury. Use this product
solely in accordance with these
instructions. Do not attempt to
modify the product in any way.
¾ The product is intended to be
used in household and similar
applications such as:
–staff kitchen areas in shops,
offices and other working
environments;
–farm houses;
–by clients in hotels, motels and
other residential environments;
–bed and breakfast type
environments.
Electrical safety
m DANGER! Risk of electric
shock! Never attempt to repair
the product yourself.
In case of malfunction, repairs
are to be conducted by qualified
personnel only.
8 GB

m DANGER! Risk of electric
shock! Do not immerse the
product in water or other liquids.
Never hold the product under
running water.
m DANGER! Risk of electric
shock! Never use a damaged
product. Disconnect the product
from the power supply and
contact your retailer if it is
damaged.
¾ The product is not to be used if
it has been dropped, if there are
visible signs of damage.
¾ Before connecting the product
to the power supply, check that
the voltage and current rating
corresponds with the power
supply details shown on the
product’s rating label.
¾ Regularly check the power plug
and the power cord for damages.
If the supply cord is damaged,
it must be replaced by the
manufacturer, its service agent or
similarly qualified persons in order
to avoid a hazard.
¾ Protect the power cord against
damages. Do not let it hang over
sharp edges, do not squeeze or
bend it. Keep the power cord
away from hot surfaces and open
flames.
Operation
m DANGER! Risk of burns!
During use the product gets hot.
Do not touch the product while in
use nor immediately after use.
¾ Do not place the product on hot
plates (gas, electric, coal cooking
range etc.).
Operate the product on a level,
stable, clean, heat-resistant and
dry surface.
¾ Do not cover the product while it
is in use or shortly after use, when
it is still warm.
¾ The use of extension cords is not
recommended. If the use of an
extension cord is necessary, it
must be designed for a current
flow of at least 10 A.
9 GB

¾ Lay cords and extension cords
in such a way that they may not
be tripped over or otherwise
damaged.
¾ The product is not intended to be
operated by means of an external
timer or separate remote control
system.
¾ Always use oven mitts and the
included tongs when handling hot
accessories.
¾ Never operate the product without
inserted crumb tray. This prevents
direct contamination of the
cooking chamber and facilitates
the care and maintenance of the
product.
Cleaning and care
m WARNING! Risk of injury!
Disconnect the product from the
power supply before cleaning and
when not in use.
¾ Do not pull the power plug out of
the electrical outlet by the power
cord.
¾ Protect the product, its power
cord and power plug against
dust, direct sunlight, dripping and
splashing water.
¾ Protect the product against heat.
Do not place the product close to
open flames or heat sources such
as stoves or heating appliances.
¾ Do not use abrasive cleaning
agents to clean the oven door
glass, as they may scratch the
surface, which can lead to glass
breakage.
¾ The product shall not be cleaned
with a steam cleaner.
Before first use
¾ Remove the packaging material. Check if all parts
are complete.
¾ Before using the product for the first time:
Operate the product empty in order to let any
production residues evaporate.
– Place the product on a flat surface that leaves
at least 15 cm distance to walls to ensure
ventilation.
– Remove any accessories from the cooking
chamber
packaging residue. Wipe the cooking chamber
with a clean and dry cloth.
– Close the door
– Connect the power plug
outlet.
. Remove coarse dirt and remaining
1
.
7
with a suitable wall
13
10 GB
¾ For the following steps, refer to the “Operation”
chapter.
– Set the mode selector switch
position (upper and lower heat).
– Set the thermostat
– Set the timer
light
switches on. Residues, if any, are
5
evaporating. This is normal and harmless.
– After the set time has elapsed: Allow the
product to cool for 10 minutes.
¾ Disconnect the power plug
outlet.
¾ Clean the product and its accessories
(see “Cleaning and care”).
to 230 °C.
3
to 20 minutes. The indicator
6
to the
4
from the wall
13
Operation
Accessories
Crumb tray
m ATTENTION! The crumb tray
bottom of the cooking chamber
dirt and facilitates cleaning.
Use the product only with inserted crumb tray.
¾ Hold the crumb tray
edge. Fully push in the crumb tray at the product's
bottom (underneath the lower heating elements).
on the extended grip
9
protects the
9
from coarse
1
NOTE: For very greasy or juicy food: Insert the
baking tray
drip tray.
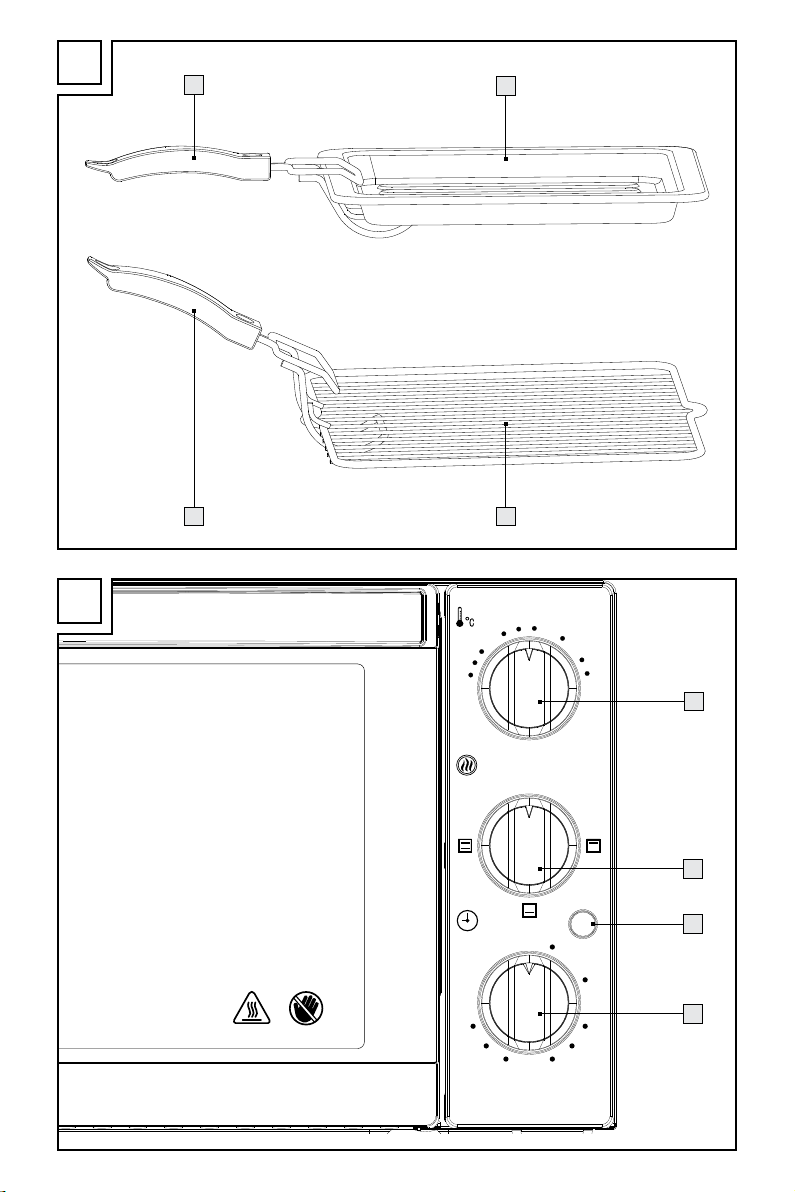
Tongs
The tongs
baking tray
still hot (see fig. B).
10
¾ Hold the tongs
¾ Hook the tongs
tray
11
m ATTENTION! When using the grill rack
small hooks of the tongs
above into the grille.
¾ Tilt the tongs
horizontal.
¾ Check if the tongs
baking tray
underneath the grill rack 12 as a
11
are used for the safe handling of the
and the grill rack 12 when they are
11
slightly downwards.
10
into the edge of the baking
10
or the grill rack 12.
must also grip from
10
carefully in the direction of the
10
have a tight grip. Move the
10
or the grill rack 12.
11
12
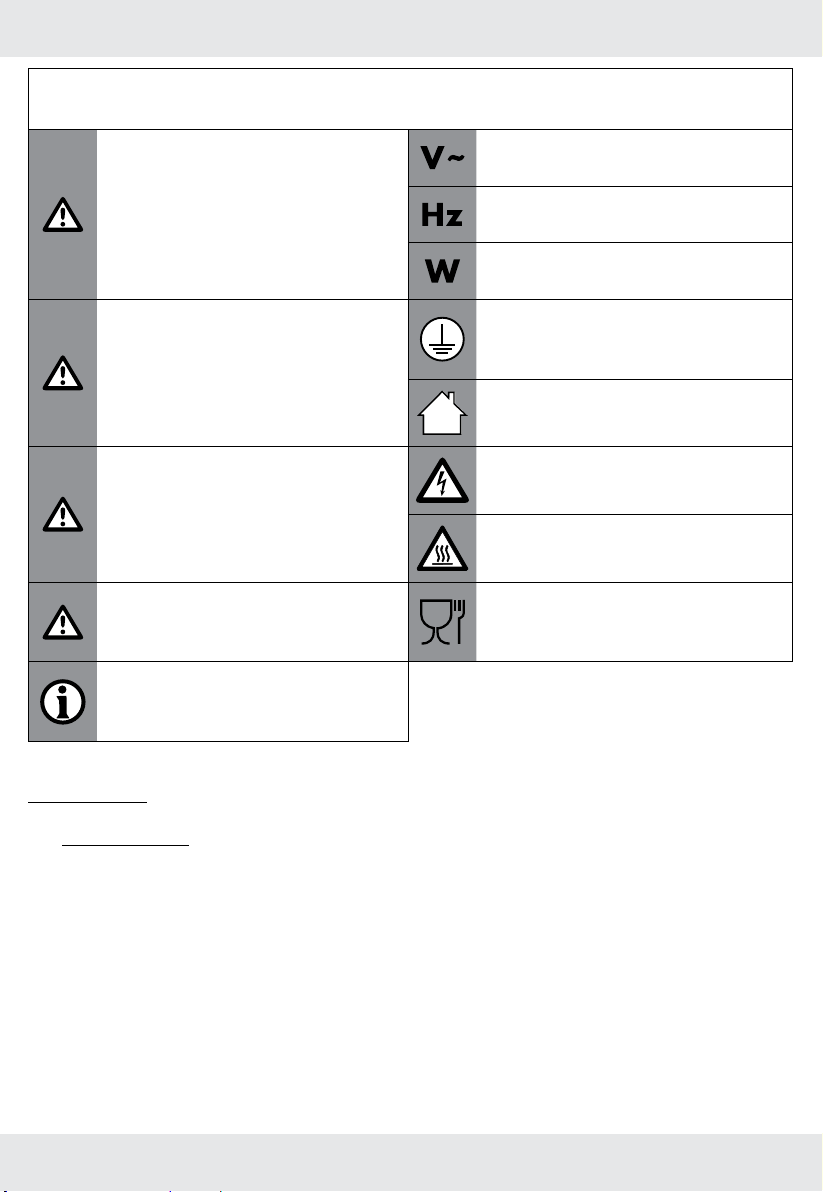
Cooking and grilling
(see fig. C)
¾ Set the desired cooking temperature by rotating
the thermostat
¾ Choose the desired cooking mode with the mode
selector switch
3
:
4
, the
Baking tray
¾ The baking tray
without separate container.
¾ Use baking paper to prevent food from burning
and cleaning.
Grill rack
¾ Use the grill rack
– when you want to grill larger meals.
– when you cook the food in a separate
container.
is used for cooking food
11
:
12
Setting Mode
OFF
Off
Heating elements off.
Upper heat
Only upper heating elements are
switched on.
Lower heat
Only lower heating elements are
switched on.
Upper and lower heat
Upper and lower heating
elements are switched on.
11 GB
¾ Set the timer 6 to the desired cooking time
(max. 60 minutes). Starting from the 0 position,
the timer can be turned in both directions.
Rotation
direction
Clockwise
Anti-clockwise
to ON position
¾ Once the timer
on automatically.
NOTES:
¾ The indicator light
product is switched on.
¾ The product requires 7 to 10 minutes to heat
the cooking chamber
temperature.
¾ The cooking temperature setting be changed
anytime by rotating the timer
Cooking time
Limited cooking time
The product switched off when
the set time has elapsed.
Unlimited cooking time
The product does not switch off
automatically.
has been set, the product turns
6
remains lit as long as the
5
to the set cooking
1
.
6
Switching off
¾ Rotate the timer 6 to the 0 position.
¾ When the product is switched off:
– a signal tone sounds.
– the indicator light
goes off.
5
Recipes
NOTE: The amount of ingredients is for reference
only. It can be adjusted according to personal
preferences.
Salmon fillet
Ingredients
¾ 70 g red or white miso
¾ 80 ml sake
¾ 5 ml soy sauce
¾ 30 ml vegetable oil
¾ 50 g sugar
¾ 4 skinless salmon fillets, at least 2.5 cm thick,
140 g to 170 g each
Preparation
¾ Whisk together miso, sake, soy sauce, oil, and
sugar. Rub mixture over every surface of salmon
fillets. Transfer to a plastic zipper lock bag or
sealable container. Proceed immediately to
next step, or for best results, marinate for about
30 minutes.
¾ Preheat the product to 230 °C for 10 minutes
upper and lower heat. Cover the baking tray with
aluminium foil. Rub excess marinade off of salmon
and place on baking tray at middle rack level.
Broil until top surface is well charred and salmon
is barely warm in the centre for about 22 minutes,
using the foil to protect any areas that threaten to
burn. Serve immediately.
12 GB

Roasted beef steak
Ingredients
¾ 300 g tender beef
¾ 1 onion, sliced
¾ 1 lemon
¾ 50 g oyster sauce
¾ 50 g butter
¾ 2 g salt
¾ 10 g black pepper
Preparation
¾ Preheat the product to 230 °C for 10 minutes
upper and lower heat.
¾ Cut the beef into slices about 2 cm thick and beat
it with a hammer to break the tendon. It can be
beaten up to about 1 cm thick.
¾ Season beef with oyster sauce, butter, salt, and
black pepper.
¾ Spread onion slices on the baking tray. Place
beef slices on the baking tray. Place the baking
tray at middle rack level. Bake for 10 minutes and
remove.
¾ Sprinkle a little lemon juice on the beef and heat
it in the product for 19 minutes until the beef
becomes medium rare.
Roast chicken breast
Ingredients
¾ 300 g chicken breast
¾ 1 egg
¾ 30 g grated Parmesan cheese
¾ 2 g salt
Preparation
¾ Preheat the product to 230 °C for 10 minutes
upper and lower heat.
¾ Chicken breast slices are beaten loose with a
hammer, then salted for 10 minutes.
¾ Hang the chicken slices with a mixture of eggs
and grated Parmesan cheese.
¾ Brush oil on the baking tray. Place the chicken
slices in the baking tray. Place the baking tray
at middle rack level for 9 minutes until the skin is
golden.
Roasted wings with black
pepper
Ingredients
¾ 8 chicken wings
¾ 8 g black pepper
¾ 5 g cumin powder
¾ 5 g honey
¾ 2 g salt
¾ 30 g olive oil
¾ 50 g rice wine
Preparation
¾ Preheat the product to 230 °C for 10 minutes
upper and lower heat.
¾ Cut a few knives on the surface of chicken wings
and add salt, rice wine and black pepper to
marinate for 30 minutes.
¾ Brush the chicken wings with olive oil and put
them on the grill rack. Place the grill rack on the
middle rack level. Bake for 20 minutes. Turn over
once in the middle.
¾ Brush the chicken wings with honey. Sprinkle with
cumin powder. Place the chicken wings into the
product. Heat for 6 minutes.
13 GB

Baked prawns
Ingredients
¾ 6 big prawns (fresh or unfrozen)
¾ 100 g mashed potatoes
¾ 30 g minced garlic
¾ 30 g milk
¾ 25 g butter
¾ 3 g salt
¾ 25 g white wine
¾ 10 g black pepper
Preparation
¾ Cut shrimp meat 2/3 from the back of the shrimp
with a knife. Do not cut 1/3 of the shrimp meat.
Use a toothpick to pick out the sand line on the
back and the sand from the head. Open the back
of the shrimp and cut it with a knife blade against
the grain of the shrimp meat.
¾ Place the shrimp in a tin-paper baking pan,
sprinkle with white wine and salt. Spread evenly.
Finally, sprinkle with black pepper. Marinate for
10 minutes.
¾ Add butter, milk and garlic into the mashed
potatoes and stir evenly. Fill the mashed potatoes
on the back of the shrimp.
¾ Preheat the product to 180 °C for 10 minutes
with upper and lower heat.
¾ Place the baking tray at the middle rack level and
bake for 15 minutes.
Rosemary potatoes
Ingredients
¾ 450 g baby potatoes (yellow) – washed and
dried
¾ 15 ml olive oil, plus more for oiling the pan
¾ 3 g granulated garlic
¾ 3 g chopped fresh rosemary
¾ Fine sea salt
¾ Black pepper
Preparation
¾ Preheat the product to 230 °C for 10 minutes
with upper and lower heat.
¾ Lightly oil the baking tray.
¾ Cut the potatoes in half or quarters about 1.5 to
2 cm thick.
¾ In a medium bowl, combine potatoes, olive oil,
garlic, rosemary, salt, and black pepper. Toss
well to coat.
¾ Transfer potatoes to the prepared baking tray.
Arrange it with the cut sides facing the tray at
middle rack level.
¾ Roast potatoes, flipping occasionally, until
golden, crispy, and fork-tender about 30 to
45 minutes, depending on the size of your
potatoes.
14 GB

Tex-Mex chicken quesadillas
Ingredients
¾ 2 green onions
¾ 250 g shredded skinless rotisserie chicken meat
¾ 135 g shredded Gouda cheese
¾ 1 pickled Jalapeño chili
¾ 40 g fresh cilantro leaves
¾ 3 burrito-size flour tortillas
Preparation
¾ Preheat the product to 230 °C for 10 minutes
with upper and lower heat.
¾ Thinly slice the green onions. Set aside some dark
green tops for decoration later.
¾ Evenly divide chicken, cheese, jalapeño, cilantro,
and remaining green onion on one side of each
tortilla.
¾ Put the quesadillas on foil-lined baking tray at
middle rack level and bake for 8 to 10 minutes,
or until tortillas are golden brown and cheese is
melted.
¾ Sprinkle with reserved green onions to make them
look pretty.
Mini apple pie
Ingredients
¾ 1 flour tortilla wrap
¾ ½ apple
¾ 7 g honey
¾ 0.5 g cinnamon
Preparation
¾ Take half an apple and cut it into thin slices.
¾ Get the tortilla and place it on a flat surface. Add
the sliced apple and put it all in the centre. Mix
the apple with honey and sprinkle the cinnamon
evenly on top of it.
¾ Gently fold up the corners of the tortilla to the
centre, create a little apple pie pouch. Use some
toothpicks to keep the sides of the tortilla in place,
so it does not open.
¾ Preheat the product to 230 °C for 10 minutes
upper and lower heat.
¾ Spray baking pan with non-stick cooking spray.
¾ Place the mini pie inside at middle rack level for
about 7 minutes.
Roasted asparagus
Ingredients
¾ 1 bunch asparagus
¾ 60 ml olive oil
¾ Salt
¾ Freshly ground black pepper
Preparation
¾ Preheat the product to 230 °C for 10 minutes
upper and lower heat.
¾ Wash the asparagus thoroughly. Stack a bunch
together and lop off the tough/thick bottom an
2.5 cm or so.
¾ Spread out the asparagus in a single layer on the
baking tray. Pat it dry.
¾ Begin by generously drizzling olive oil all over
the asparagus. Then, sprinkle the asparagus
generously with salt and freshly ground black
pepper.
¾ Place the baking pan at the middle rack level for
10 minutes.
15 GB

Quick pan pizza
Ingredients
¾ 1 piece refrigerator pizza crust
(max. 26 cm diameter)
¾ 30 ml oil
¾ 165 ml spaghetti sauce
¾ 200 g shredded Gouda cheese
¾ 18 slices pepperoni
¾ 1 small green pepper, sliced into rings
¾ 2 large mushrooms, sliced
Preparation
¾ Preheat your product to 230 °C for 10 minutes
upper and lower heat.
¾ Spray baking pan with non-stick cooking spray.
¾ Press half of dough into the baking tray at middle
rack level. Brush with 30 ml oil.
¾ Bake 8 to 9 minutes or until light brown.
¾ Top baked crust with sauce, shredded Gouda
cheese, pepperoni, green pepper, and
mushrooms.
¾ Bake an additional 11 to 13 minutes or until
cheese is melted and crust is brown.
Cleaning and care
m DANGER! Risk of electric shock! Before
cleaning: Always disconnect the product from the
wall outlet.
DANGER! Risk of burns! Do not clean the
product right after operation. Let the product cool
first.
m WARNING! Do not immerse the product’s
electrical components in water or other liquids.
Never hold the product under running water.
NOTE: Clean the product right after it has
cooled. Once the food residues have dried, they
are not easy to remove.
Cooking chamber and housing
¾ Remove the accessories from the cooking
chamber
¾ Regularly wipe
– the housing,
– the door
– the viewing window (both sides)
with a damp cloth.
¾ If required, use a mild washing-up liquid on the
cloth. Afterwards, wipe with a cloth moistened
only with clear water to remove any detergent
residue.
¾ Do not use cleaning sprays and other aggressive
cleaning agents, as they can cause stains, smears
or clouding on the surfaces.
¾ Do not use abrasive cleaning agents.
.
1
(both sides)
7
16 GB
Accessories
¾ Clean the accessories in a kitchen sink.
¾ Heavily soiled accessories: Before cleaning, soak
the accessories in a water bath for a while.
m ATTENTION! The accessories are not suitable
for cleaning in the dishwasher.
Disposal
The packaging is made entirely of recyclable
materials, which you may dispose of at local recycling
facilities.
Observe the marking of the packaging
materials for waste separation, which are
marked with abbreviations (a) and numbers
(b) with following meaning: 1 – 7: plastics /
20 – 22: paper and fibreboard / 80 – 98:
composite materials.
The product and packaging materials are
recyclable, dispose of it separately for
better waste treatment.
The Triman logo is valid in France only.
Contact your local refuse disposal authority
for more details of how to dispose of your
worn-out product.
To help protect the environment, please
dispose of the product properly when it
has reached the end of its useful life and
not in the household waste. Information on
collection points and their opening hours
can be obtained from your local authority.
Warranty
The product has been manufactured to strict quality
guidelines and meticulously examined before delivery.
In the event of product defects you have legal rights
against the retailer of this product. Your legal rights are
not limited in any way by our warranty detailed below.
The warranty for this product is 3 years from the
date of purchase. Should this product show any fault
in materials or manufacture within 3 years from the
date of purchase, we will repair or replace it – at our
choice – free of charge to you.
The warranty period begins on the date of purchase.
Please keep the original sales receipt in a safe
location. This document is required as your proof of
purchase. This warranty becomes void if the product
has been damaged, or used or maintained improperly.
The warranty applies to defects in material or
manufacture. This warranty does not cover product
parts subject to normal wear, thus possibly considered
consumables (e. g. batteries) or for damage to fragile
parts, e. g. switches, rechargeable batteries or glass
parts.
17 GB

Felhasznált figyelmeztető jelzések és szimbólumok.................Oldal 19
Bevezető ...................................................................Oldal 19
Rendeltetésszerű használat .....................................................Oldal 19
A csomagolás tartalma ........................................................Oldal 20
A részegységek leírása ........................................................Oldal 20
Műszaki adatok ..............................................................Oldal 20
Biztonsági utasítások ....................................................Oldal 20
Mielőtt először használná ...............................................Oldal 23
Kezelés.....................................................................Oldal 24
Tartozékok ..................................................................Oldal 24
Sütés és grillezés .............................................................Oldal 24
Kikapcsolás .................................................................Oldal 25
Receptek ...................................................................Oldal 25
Lazacfilé....................................................................Oldal 25
Sült marhaszelet..............................................................Oldal 26
Sült csirkemell................................................................Oldal 26
Sült csirkeszárnyak feketeborssal .................................................Oldal 26
Sült garnélarákok.............................................................Oldal 27
Rozmaringos burgonya ........................................................Oldal 27
Tex-mex csirkés quesadilla ......................................................Oldal 28
Mini almás pite ..............................................................Oldal 28
Sült spárga..................................................................Oldal 28
Gyors tepsis pizza . . . . . . . . . . . . . . . . . . . . . . . . . . . . . . . . . . . . . . . . . . . . . . . . . . . . . . . . . . . . Oldal 29
Tisztítás és ápolás ........................................................Oldal 29
Mentesítés .................................................................Oldal 30
Garancia ...................................................................Oldal 30
18 HU
Felhasznált figyelmeztető jelzések és szimbólumok
Ebben a használati útmutatóban és a csomagoláson az alábbi figyelmeztető jelzésekkel találkozhat:
VESZÉLY! Ez a szimbólum a „Veszély”
szó mellett nagy kockázati tényezőre hívja
fel a figyelmet, melyet ha nem kerülnek el,
az súlyos sérülésekhez vagy halálesethez
vezet.
FIGYELMEZTETÉS! Ez a szimbólum
a „Figyelmeztetés” szó mellett közepes
kockázati tényezőre hívja fel a figyelmet,
melyet ha nem kerülnek el, az súlyos
sérülésekhez vagy akár halálesethez is
vezethet.
VIGYÁZAT! Ez a szimbólum a „Vigyázat”
szó mellett alacsony kockázati tényezőre
hívja fel a figyelmet, melyet ha nem
kerülnek el, az kisebb vagy mérsékelt
sérülésekhez vezethet.
FIGYELEM! Ez a szimbólum a „Figyelem”
szó mellett anyagi károk veszélyére utal.
MEGJEGYZÉS: Ez a szimbólum a
„Megjegyzés” szó mellett hasznos
információkra hívja fel a figyelmet.
Feszültség (váltóáram)
Hertz (hálózati frekvencia)
Watt
A termék az I. védelmi osztályba tartozik, és
földelni kell.
A terméket csak száraz helyiségekben,
beltéren használja.
Veszély – Áramütésveszély!
Vigyázat, forró felületek!
Élelmiszerbiztos. A termék nincs negatív
hatással az ételek ízére vagy szagára.
MINI SÜTŐ
Bevezető
Gratulálunk új termékének vásárlása alkalmából.
Ezzel a döntésével vállalatunk értékes terméke mellett
döntött. A használati utasítás ezen termék része. A
biztonságra, a használatára és a megsemmisítésre
vonatkozó fontos tudnivalókat tartalmazza. A termék
használata előtt ismerje meg az összes használati és
biztonsági tudnivalót. A terméket csak a leírtak szerint
és a megadott felhasználási területeken alkalmazza. A
termék harmadik személy számára való továbbadása
esetén kézbesítse vele annak a teljes dokumentációját
is.
Rendeltetésszerű használat
A termék élelmiszerek grillezésére és sütésére
alkalmas. Más célra ne használja.
A termék kizárólag háztartási használatra alkalmas,
üzleti célra nem használható.
A gyártó nem vállal felelősséget a szakszerűtlen
használatból adódó károkért.
19 HU

A csomagolás tartalma
A termék kicsomagolása után ellenőrizze a
csomagolás teljességét és az alkatrészek megfelelő
állapotát. A használat előtt távolítson el minden
csomagolóanyagot.
1 x Mini sütő
1 x Morzsagyűjtő tálca
1 x Fogó
1 x Sütőtepsi
1 x Grillrács
1 x Használati útmutató
Biztonsági utasítások
A TERMÉK HASZNÁLATBA
VÉTELE ELŐTT ISMERKEDJEN
MEG A TERMÉK BIZTONSÁGI
UTASÍTÁSAIVAL! HA A TERMÉKET
TOVÁBBADJA, ADJA MELLÉ
EZEKET A DOKUMENTUMOKAT
IS!
A részegységek leírása
Sütőtér
1
Többszintű polctartók
2
Hőmérséklet-szabályozó
3
Üzemmódkapcsoló
4
Jelzőfény
5
Időzítő
6
Ajtó
7
Fogó
8
Morzsagyűjtő tálca polctartóval
9
Fogó
10
Sütőtepsi
11
Grillrács
12
Elektromos vezeték csatlakozóval
13
Műszaki adatok
Bemeneti feszültség: 220 – 240 V∼, 50 Hz
Bemenő teljesítmény: 1200 W
Védelmi osztály: I
Hőmérsékleti tartomány: 100és 230 °C között
A sütőtér űrtartalma: kb.15 liter
A TÜV-Rheinland és a GS tanúsítványával
A jelen használati útmutatóban
leírtak figyelmen kívül hagyásából
adódó károk esetén a garancia
érvényét veszti! A közvetett károkért
nem vállalunk felelősséget! A
szakszerűtlen használat vagy a
biztonsági utasítások figyelmen
kívül hagyása következtében
történő anyagi károkért és
személyi sérülésekért nem vállalunk
felelősséget!
Gyermekek és fogyatékkal
élők
m FIGYELEM! ÉLETVESZÉLY
GYERMEKEK,
KISGYERMEKEK SZÁMÁRA!
Ne hagyja a gyermekeket a
csomagolóanyagokkal felügyelet
nélkül. A csomagolóanyagok
fulladást okozhatnak.
20 HU

A gyermekek gyakran alábecsülik
az ezzel kapcsolatos veszélyeket.
A csomagolóanyag nem játékszer.
¾ A terméket akkor használhatják
8éves és afeletti gyermekek,
csökkent testi, érzékszervi vagy
szellemi képességű, valamint
megfelelő tapasztalattal és
tudással nem rendelkező
személyek, ha számukra
felügyeletet biztosítanak vagy
ha utasításokat kapnak a termék
biztonságos használatával
kapcsolatban és megértik az
azzal járó veszélyeket.
¾ A gyermekek nem játszhatnak a
készülékkel.
¾ A tisztítást és a felhasználói
karbantartást gyermekek nem
végezhetik, kivéve ha elmúltak
8évesek és számukra felügyeletet
biztosítanak.
¾ Tartsa a 8év alatti gyermekeket
a termék elektromos vezetékétől
távol.
Rendeltetésszerű használat
m FIGYELMEZTETÉS! A
szakszerűtlen kezelés sérülésekhez
vezethet. A terméket kizárólag
ezen használati útmutatónak
megfelelően használja. Ne
próbálja meg a terméket
bármilyen módon módosítani.
¾ A termék háztartáson belüli és
annak megfelelő használati
módokra alkalmas, például:
–üzletek, irodák vagy hasonló
munkahelyek alkalmazotti
konyháiban;
–tanyaházakban;
–szállodák, motelek és egyéb
szálláshelyek vendégei számára
–reggelivel szolgáló
szálláshelyeken.
Elektromos biztonság
m VESZÉLY! Áramütésveszély!
Ne próbálja meg saját kezűleg
megjavítani a készüléket.
Hibás működés esetén a termék
javítási munkáit bízza képzett
szakemberre.
21 HU

m VESZÉLY! Áramütésveszély!
A terméket ne merítse vízbe vagy
egyéb folyadékokba. Soha ne
tartsa a terméket folyó víz alá.
m VESZÉLY! Áramütésveszély!
Ne használja a terméket, ha
sérült. Ha a termék megsérült,
válassza le a hálózati áramról és
forduljon az eladójához.
¾ Ne használja a terméket, ha az
leesett, vagy ha azon látható
sérülések vannak.
¾ Mielőtt a terméket az elektromos
hálózatra csatlakoztatná
ellenőrizze, hogy a hálózat
névleges feszültsége megfelel-e
a termék adattábláján
feltüntetettnek.
¾ Rendszeresen ellenőrizze
az elektromos vezeték és a
csatlakozó épségét. Ha a termék
elektromos vezetéke megsérül, a
kockázatok elkerülése érdekében
azt a gyártónak, annak az
ügyfélszolgálatának, vagy egy
annak megfelelő képzettségű
szakembernek kell kicserélnie.
¾ Óvja az elektromos vezetéket a
sérülésektől. Ne hagyja, hogy azt
éles sarkokon átlógni, becsípődni,
és ne hajlítsa meg. Az elektromos
vezetéket tartsa forró felületektől
és nyílt lángoktól távol.
Kezelés
m VESZÉLY! Égési sérülés
veszélye! A termék működés
közben nagyon forró.
A termékhez ne érjen hozzá
működés közben és közvetlenül
azután.
¾ Ne tegye a terméket forró
felületekre (pl. gáztűzhely,
elektromos tűzhely, sütő stb.).
A terméket mindig egyenes, stabil,
tiszta, hőálló és száraz felületen
üzemeltesse.
¾ Ne takarja le a terméket míg
az használatban van, röviddel
használat után és amíg meleg.
¾ Hosszabbítókábel használata
nem ajánlott. Amennyiben mégis
szükség van hosszabbítókábelre,
annak legalább alkalmasnak
kell lennie legalább 10 A áram
vezetésére.
22 HU

¾ A csatlakozó- és
hosszabbítókábeleket úgy
vezesse, hogy azokban senki ne
tudjon elbotlani és hogy azok ne
tudjanak semmiben kárt tenni.
¾ Ezt a terméket ne működtesse
külső időzítővel vagy különálló
távszabályzórendszerrel.
¾ A forró elemek kezelése során
viseljen sütőkesztyűt és használja
a mellékelt fogót.
¾ Soha ne használja a terméket
behelyezett morzsagyűjtő tálca
nélkül. Ez megakadályozza a
sütőtér közvetlen szennyeződését,
és megkönnyíti a termék ápolását
és karbantartását.
Tisztítás és ápolás
m FIGYELMEZTETÉS!
Sérülésveszély! A termék
tisztítása előtt, illetve ha nincs
használatban, húzza ki a készülék
csatlakozóját a konnektorból.
¾ Az elektromos csatlakozót ne
a vezetéknél fogva húzza ki a
konnektorból.
¾ A terméket, az elektromos
vezetéket és a csatlakozót óvja
a portól, a közvetlen napfénytől,
a rácseppenő vagy ráfröccsenő
víztől.
¾ Óvja a terméket a hőtől. Ne
tegye a terméket nyílt lángok
vagy hőforrások (tűzhelyek,
fűtőberendezések) közelébe.
¾ A sütő ajtóüvegének tisztításához
ne használjon éles súroló
eszközöket, mert azok
összekarcolhatják a felületet, ami
az üveg töréséhez vezethet.
¾ A tisztításhoz soha ne használjon
gőztisztítót.
Mielőtt először használná
¾ Távolítsa el a csomagolóanyagokat. Ellenőrizze,
hogy az alkatrészek hiánytalanok-e.
¾ Mielőtt először használná: Indítsa be a
terméket üresen, hogy az esetleges gyártási
maradékanyagok el tudjanak párologni.
– A terméket helyezze egy egyenes felületre úgy,
hagyjon a termék és a falak között legalább
15cm távolságot a szellőzés biztosításához.
– Vegyen ki minden tartozékot a sütőtér
belsejéből. Távolítsa el a makacsabb
1
szennyeződéseket és maradék
csomagolóanyagokat. Törölje át a sütőteret egy
tiszta, száraz ruhával.
– Zárja be az ajtót
– Dugja be a hálózati csatlakozót
megfelelő konnektorba.
.
7
egy
13
23 HU
¾ Az ezt követő lépésekhez olvassa el a „Kezelés”
című fejezetet.
– Az üzemmódkapcsolót
(felső és alsó sütés).
– A hőmérséklet-szabályozót
ra.
– Állítsa be az időzítőt
kigyullad. Az esetleges maradékanyagok
5
ekkor elpárolognak. Ez normális és
jelentéktelen.
– A beállított idő lejárta után: Hagyja a terméket
10percig hűlni.
¾ Húzza ki az elektromos csatlakozót
konnektorból.
¾ Tisztítsa meg a terméket és az alkatrészeit (ehhez
lásd a „Tisztítás és ápolás” című részt).
fordítsa állásba
4
állítsa 230 °C-
3
20percre. A jelzőfény
6
a
13
Kezelés
Tartozékok
Morzsagyűjtő tálca
m VIGYÁZAT! A morzsagyűjtő tálca
a sütőtér
megkönnyíti a tisztítást.
A terméket csak behelyezett morzsagyűjtő
tálcával használja.
¾ A morzsagyűjtő tálcát
meghosszabbított fogóperemnél. Tolja be a
morzsagyűjtő tálcát a termék aljába (alulra, az
alsó fűtőelem alá) ütközésig.
Sütőtepsi
¾ A sütőtepsi
edények használata nélkül.
¾ Az ételek letapadásának megakadályoza és a
tisztítás megkönnyítése érdekében használjon
sütőpapírt.
Grillrács
¾ A grillrácsot az alábbi esetekben használja
– Nagyobb méretű élelmiszerek grillezése esetén.
– Ha az ételt egy külön edényben süti.
alját a makacs szennyeződésektől és
1
tartsa a
9
ételek sütésére használható külön
11
megvédi
9
MEGJEGYZÉS: Különösen nagy zsírtartalmú,
szaftos húsok grillezésekor: Helyezze a sütőtepsit
11
Fogó
A fogó
sütőtepsit
forróak (lásd a B ábrát).
¾ Tartsa a fogót
¾ Akassza be a fogót
grillrács
m VIGYÁZAT! A grillrács
kisebb kampójának is be kell akadnia felülről a
rácsba.
¾ Döntse meg kissé a fogót
vízszintes felé.
¾ Ellenőrizze a fogó
sütőtepsit
Sütés és grillezés
(lásd a C ábrát)
¾ Fordítsa a hőmérséklet-szabályozót
sütési hőmérséklethez.
¾ Az üzemmódkapcsolóval
üzemmódot:
:
12
a grillrács 12 alá a zsiradék felfogásához
segítségével biztonságosabban tudja a
10
és a grillrácsot 12 kezelni, amikor azok
11
kissé lefelé.
10
a sütőtepsi 11 vagy a
10
peremébe.
12
esetében a fogó 10
12
óvatosan a
10
erős tartását. Mozgassa a
10
vagy a grillrácsot 12.
11
a kívánt
3
válassza ki a kívánt
4
Állás Üzemmód
Ki
OFF
A fűtőelemek kikapcsolt
állapotban vannak.
Felső sütés
Csak a felső fűtőelemek
kapcsolnak be.
Alsó sütés
Csak az alsó fűtőelemek
kapcsolnak be.
Alsó és felső sütés
Az alsó és a felső fűtőelemek
együttes bekapcsolása.
24 HU
¾ Állítsa be az időzítőt 6 a kívánt sütési időre
(max. 60perc). A 0 állástól indulva az időzítő
mindkét irányban állítható.
Irány Sütési idő
Az óramutató
járásának
megfelelő
Az óramutató
járásával ellentétes
irány, az ON felé
¾ Amint az időzítőt
megkezdi a működést.
MEGJEGYZÉSEK:
¾ Amíg a termék működésben van, a jelzőfény
világít.
¾ A terméknek a sütőtérben
hőmérséklet eléréséhez 7és 10perc közötti időre
van szüksége.
¾ A beállított sütési időt az időzítő
elforgatásával bármikor módosíthatja.
Korlátozott sütési idő
A termék a beállított idő
lejárta után magától
kikapcsol.
Korlátlan sütési idő
A termék nem kapcsol ki
magától.
beállítja, a készülék
6
a beállított sütési
1
6
Kikapcsolás
¾ Fordítsa az időzítőt 6 0 állásba.
¾ A termék kikapcsolásakor:
– Egy jelzőhang hallható.
– A jelzőfény
kialszik.
5
5
Receptek
MEGJEGYZÉS: A hozzávalók mennyisége
csak tájékoztató érték. Ezeket kívánság szerint
megváltoztathatja.
Lazacfilé
Hozzávalók
¾ 70 g piros vagy fehér miso
¾ 80 ml szaké
¾ 5 ml szójaszósz
¾ 30 ml növényi olaj
¾ 50 g cukor
¾ 4 darab bőr nélküli lazacfilé legalább 2,5 cm
vastagságban, egyenként 140 és 170 g súly
között
Elkészítés
¾ A misot, a szakét, a szójaszószt, az olajat és a
cukrot keverje össze. A keverékkel dörzsölje be
a lazacfilék felületét. Azokat helyezze be egy
zárható műanyag zacskóba, vagy egy szorosan
zárható edénybe. Folytathatja a következő
lépéssel, de a legjobb eredményekhez ajánlatos
30perc pácolási időt hagyni.
¾ Melegítse elő a terméket alsó és felső sütésen
10percig 230 °C-on. Helyezzen a sütőtepsibe
alufóliát. A lazacról törölje le a felesleges páclét,
majd helyezze a sütőtepsire. Tolja be a termék
középső sínére. Grillezze körülbelül 22percen
keresztül addig, amíg szépen meg nem barnul
és a lazac közepe kissé felmelegszik. Azokat a
részeket, melyek könnyen megégnek, takarja le
fóliával. Azonnal tálalja.
25 HU
 Loading...