

Luz de despertar5
Luz de despertar
Manual de instruções
KH 2600
KOMPERNASS GMBH
BURGSTRASSE 21 · D-44867 BOCHUM
www.kompernass.com
ID-Nr.: KH2600-09/10-V4
Wake-Up Light
Operating instructions
KH 2600
10
2
3
4
5
78
9
6
20
19
17
1315
11
12141618
21
5
26
2425
23
22

Índice
Introdução. . . . . . . . . . . . . . . .2
Informações acerca deste manual
de instruções . . . . . . . . . . . . . . . . . . . 2
Direitos de autor . . . . . . . . . . . . . . . . 2
Utilização correcta . . . . . . . . . . . . . . 2
Indicações de aviso . . . . . . . . . . . . . 3
Segurança . . . . . . . . . . . . . . . .4
Indicações básicas de segurança . . 4
Perigo por choque eléctrico . . . . . . . 5
Perigo de lesões auditivas . . . . . . . . 5
Manuseamento de pilhas . . . . . . . . . 6
Descrição geral . . . . . . . . . . . .7
Vista geral do aparelho . . . . . . . . . . 7
Telecomando . . . . . . . . . . . . . . . . . . 8
Visor . . . . . . . . . . . . . . . . . . . . . . . . . 9
Instalação e ligação . . . . . . .10
Indicações de segurança . . . . . . . .10
Material fornecido e inspecção
de transporte . . . . . . . . . . . . . . . . . 10
Retirar da embalagem . . . . . . . . . .10
Eliminação da embalagem. . . . . . .11
Requisitos do local de instalação . .11
Ligação eléctrica . . . . . . . . . . . . . . 12
Colocar as pilhas de backup . . . . .12
Activar a pilha do telecomando . . .13
Substituição da pilha do
telecomando . . . . . . . . . . . . . . . . . .13
Estabelecer a alimentação de
corrente . . . . . . . . . . . . . . . . . . . . .13
Antena de fi o FM . . . . . . . . . . . . .13
Ligar auscultadores. . . . . . . . . . . . .13
PT
Operação e funcionamento .14
Ligar e desligar . . . . . . . . . . . . . . . . 14
Ajustar a hora . . . . . . . . . . . . . . . . .14
Ajustar o volume . . . . . . . . . . . . . . . 15
Modo de rádio . . . . . . . . . . . . . . . . 15
Reproduzir música do iPod/iPhone 17
Reprodução de aparelhos áudio
externos . . . . . . . . . . . . . . . . . . . . . 19
Reprodução de sons da natureza .19
Luz ambiente . . . . . . . . . . . . . . . . .19
Luz de leitura . . . . . . . . . . . . . . . . . 20
Função de alarme . . . . . . . . . . . . .21
Limpeza . . . . . . . . . . . . . . . .25
Indicações de segurança . . . . . . . .25
Limpeza da estrutura do secador . . 25
Armazenamento/Eliminação 25
Armazenamento . . . . . . . . . . . . . . .25
Eliminar o aparelho . . . . . . . . . . . .25
Eliminação das pilhas . . . . . . . . . . .25
Resolução de problemas . . .26
Indicações de segurança . . . . . . . .26
Causas e resolução de avarias . . .26
Anexo . . . . . . . . . . . . . . . . . .27
Indicações acerca da Declaração
de Conformidade CE . . . . . . . . . . .27
Dados técnicos . . . . . . . . . . . . . . . .28
Garantia . . . . . . . . . . . . . . . . . . . . .29
Assistência técnica . . . . . . . . . . . . .29
Importador . . . . . . . . . . . . . . . . . . .29
KH 2600
1
PT
Introdução
Introdução
Informações acerca deste manual de instruções
Este manual de instruções é parte integrante do despertador KH 2600 (daqui
em diante designado como aparelho) e fornece-lhe indicações importantes para
a utilização correcta, a segurança, a ligação e o comando do aparelho.
O manual de instruções deve estar sempre próximo do aparelho. Este deve
ser lido e utilizado por todas as pessoas encarregues do funcionamento do
aparelho.
Conserve o manual de instruções e entregue-o a terceiros juntamente com o
aparelho.
Direitos de autor
Esta documentação está protegida por direitos de autor.
A cópia ou reimpressão, mesmo que parcial, assim como a reprodução de
imagens, mesmo que alteradas, é permitida apenas com autorização por escrito
do fabricante.
iPhone, iPod, iPod classic, iPod nano, iPod shuffl e, e iPod touch são nomes de
marcas da Apple Inc., registados nos EUA e noutros países.
Utilização correcta
Este aparelho destina-se apenas à recepção de emissoras de rádio FM, à ligação
de aparelhos áudio externos (por ex. leitores de MP3) e iPod/iPhone, bem como
para a função de alarme através de um som de alarme, sons da natureza, rádio
ou música do iPod/iPhone em espaços fechados. Qualquer utilização para além
da descrita é considerada incorrecta.
AVISO
Perigo devido a uma utilização incorrecta!
Podem surgir riscos resultantes de uma utilização incorrecta e/ou inadequada
do aparelho.
O aparelho deve ser utilizado apenas para a fi nalidade descrita. ►
Cumprir os procedimentos descritos neste manual de instruções. ►
Está excluído qualquer tipo de reclamação devido a danos resultantes de utilização incorr
de peças de reposição não homologadas.
O proprietário do aparelho deverá assumir a responsabilidade pelo aparelho.
2
eparações indevidas, alterações não autorizadas ou utilização
ecta, r
KH 2600
Introdução
Indicações de aviso
No presente manual de instruções são utilizadas as seguintes indicações de
aviso:
PERIGO
Uma indicação de aviso deste nível de perigo indica uma
situa-ção perigosa iminent
Se esta situação não for evitada, existe perigo de morte ou de ferimentos
graves.
Siga as indicações neste aviso para evitar o perigo de morte ou ferimentos ►
graves.
AVISO
Uma indicação de aviso deste nível de perigo indica uma
situa-ção potencialmente perigosa.
Se esta situação não for evitada, existe perigo de ferimentos.
Siga as indicações neste aviso para evitar ferimentos. ►
ATENÇÃO
Uma indicação de aviso deste nível de perigo indica a
possibilidade de danos materiais.
Se esta situação não for e
Siga as indicações neste aviso para evitar danos materiais. ►
PT
e.
vitada, existe perigo de danos materiais.
KH 2600
NOTA
A nota fornece informações adicionais para facilitar o manuseamento do ►
aparelho.
3

PT
Segurança
Este capítulo contém indicações de segurança importantes para o manuseamento
do aparelho.
Este aparelho está em conformidade com as normas de segurança em vigor.
Uma utilização indevida pode resultar em ferimentos e danos materiais.
Indicações básicas de segurança
Para um manuseamento seguro do aparelho, tenha em consideração as seguintes
indicações de segurança:
Antes da utilização, verifi que o aparelho quanto a danos exteriores visíveis. ■
Não tente colocar em funcionamento um aparelho avariado ou sujeito a
uma queda.
Nunca utilize o apar
quebrado ou não estiver colocado.
Se o cabo ou as ligações estiver
um técnico autorizado ou ao serviço de assistência técnica.
As pessoas impossibilitadas de utilizar o aparelho de forma segur
às suas capacidades físicas, mentais ou motoras, apenas o devem fazer sob
vigilância ou com instruções de uma pessoa responsáv
As crianças apenas podem utilizar o aparelho se forem supervisionadas por ■
um adulto.
Solicite a repar
serviço de assistência técnica. Reparações indevidas podem acarretar perigo
par
a o utilizador. Adicionalmente, a garantia é anulada.
A reparação do aparelho dentro do período de garantia deve ser efectuada ■
apenas pelo serviço de assistência técnica do fabricante.
Os componentes avariados de
posição originais. Apenas a utilização destas peças garante o cumprimento
dos requisitos de segur
Proteja o aparelho da humidade e da infi ltração de líquidos. Nunca mergulhe ■
o aparelho em água, não instale o aparelho nas proximidades de água
e não coloque nenhum objecto cheio de líquido (por ex. jarr
aparelho.
elho se o alojamento da lâmpada estiver danifi cado, ■
em danifi cados, solicite a sua substituição a ■
ação do aparelho apenas a empresas autorizadas ou ao ■
ve ser substituídos apenas por peças de re- ■
ança.
Segurança
a, devido ■
el.
as) sobre o
4
KH 2600
Segurança
Não utilize o aparelho nas proximidades de chamas (por ex. velas). ■
Evite a exposição solar directa. ■
Não utilize o aparelho com temperaturas ambiente inferiores a 10° C ou ■
superiores a 35° C.
Caso tenha sofrido de uma depr
momento, consulte o seu médico antes de utilizar o aparelho.
e
tirar a alimentação sempre pela fi cha de alimentação da tomada e não ■
R
pelo cabo de alimentação.
Em caso de ocorrência de av
de alimentação da tomada.
Perigo por choque eléctrico
PERIGO
Perigo de morte por choque eléctrico!
Em caso de contact
existe perigo de morte!
Respeite as seguintes indicações de segurança para evitar risco por choque
eléctrico:
Não utilize o aparelho, caso a fi cha de alimentação ou o cabo de alimenta- ►
ção estejam danifi cados.
Nunca abra a caix
sejam tocadas e a estrutura eléctrica e mecânica sejam alteradas, existe
perigo de choque eléctrico.
ave ou esteja a sofrer uma no ■
essão gr
arias e em caso de intempéries, retire a fi cha ■
o com cabos ou componentes sob tensão,
a do aparelho. Caso as ligações condutoras de tensão ►
PT
Perigo de lesões auditivas
AVISO
Perigo devido a um volume extremo!
A audição de música com um volume elevado através de auscultadores pode provocar lesões auditivas.
Evite volumes extremos, especialmente durante longos períodos, ►
caso utilize auscultadores.
KH 2600
5

PT
Manuseamento de pilhas
AVISO
Perigo devido a uma utilização incorrecta!
Tenha em consideração as seguintes indicações de segurança para um
manuseamento seguro das pilhas:
Não atire as pilhas para o fogo. ►
Nunca coloque as pilhas em curto-circuito. ►
Não tente recarregar as pilhas. ►
Verifi que regularmente as pilhas. O ácido derramado das pilhas pode ►
causar danos permanentes no aparelho. O manuseamento de pilhas
danifi
cadas e que tenham derramado ácido requer um cuidado especial.
Perigo de ferimentos! Utilizar luvas de protecção.
Manter as pilhas fora do alcance das crianças. Em caso de ingestão, ►
procurar imediatamente assistência médica.
Se não utilizar o aparelho dur
pilhas do aparelho e do telecomando.
Segurança
ante um longo período de tempo, retire as ►
6
KH 2600
Descrição geral
Descrição geral
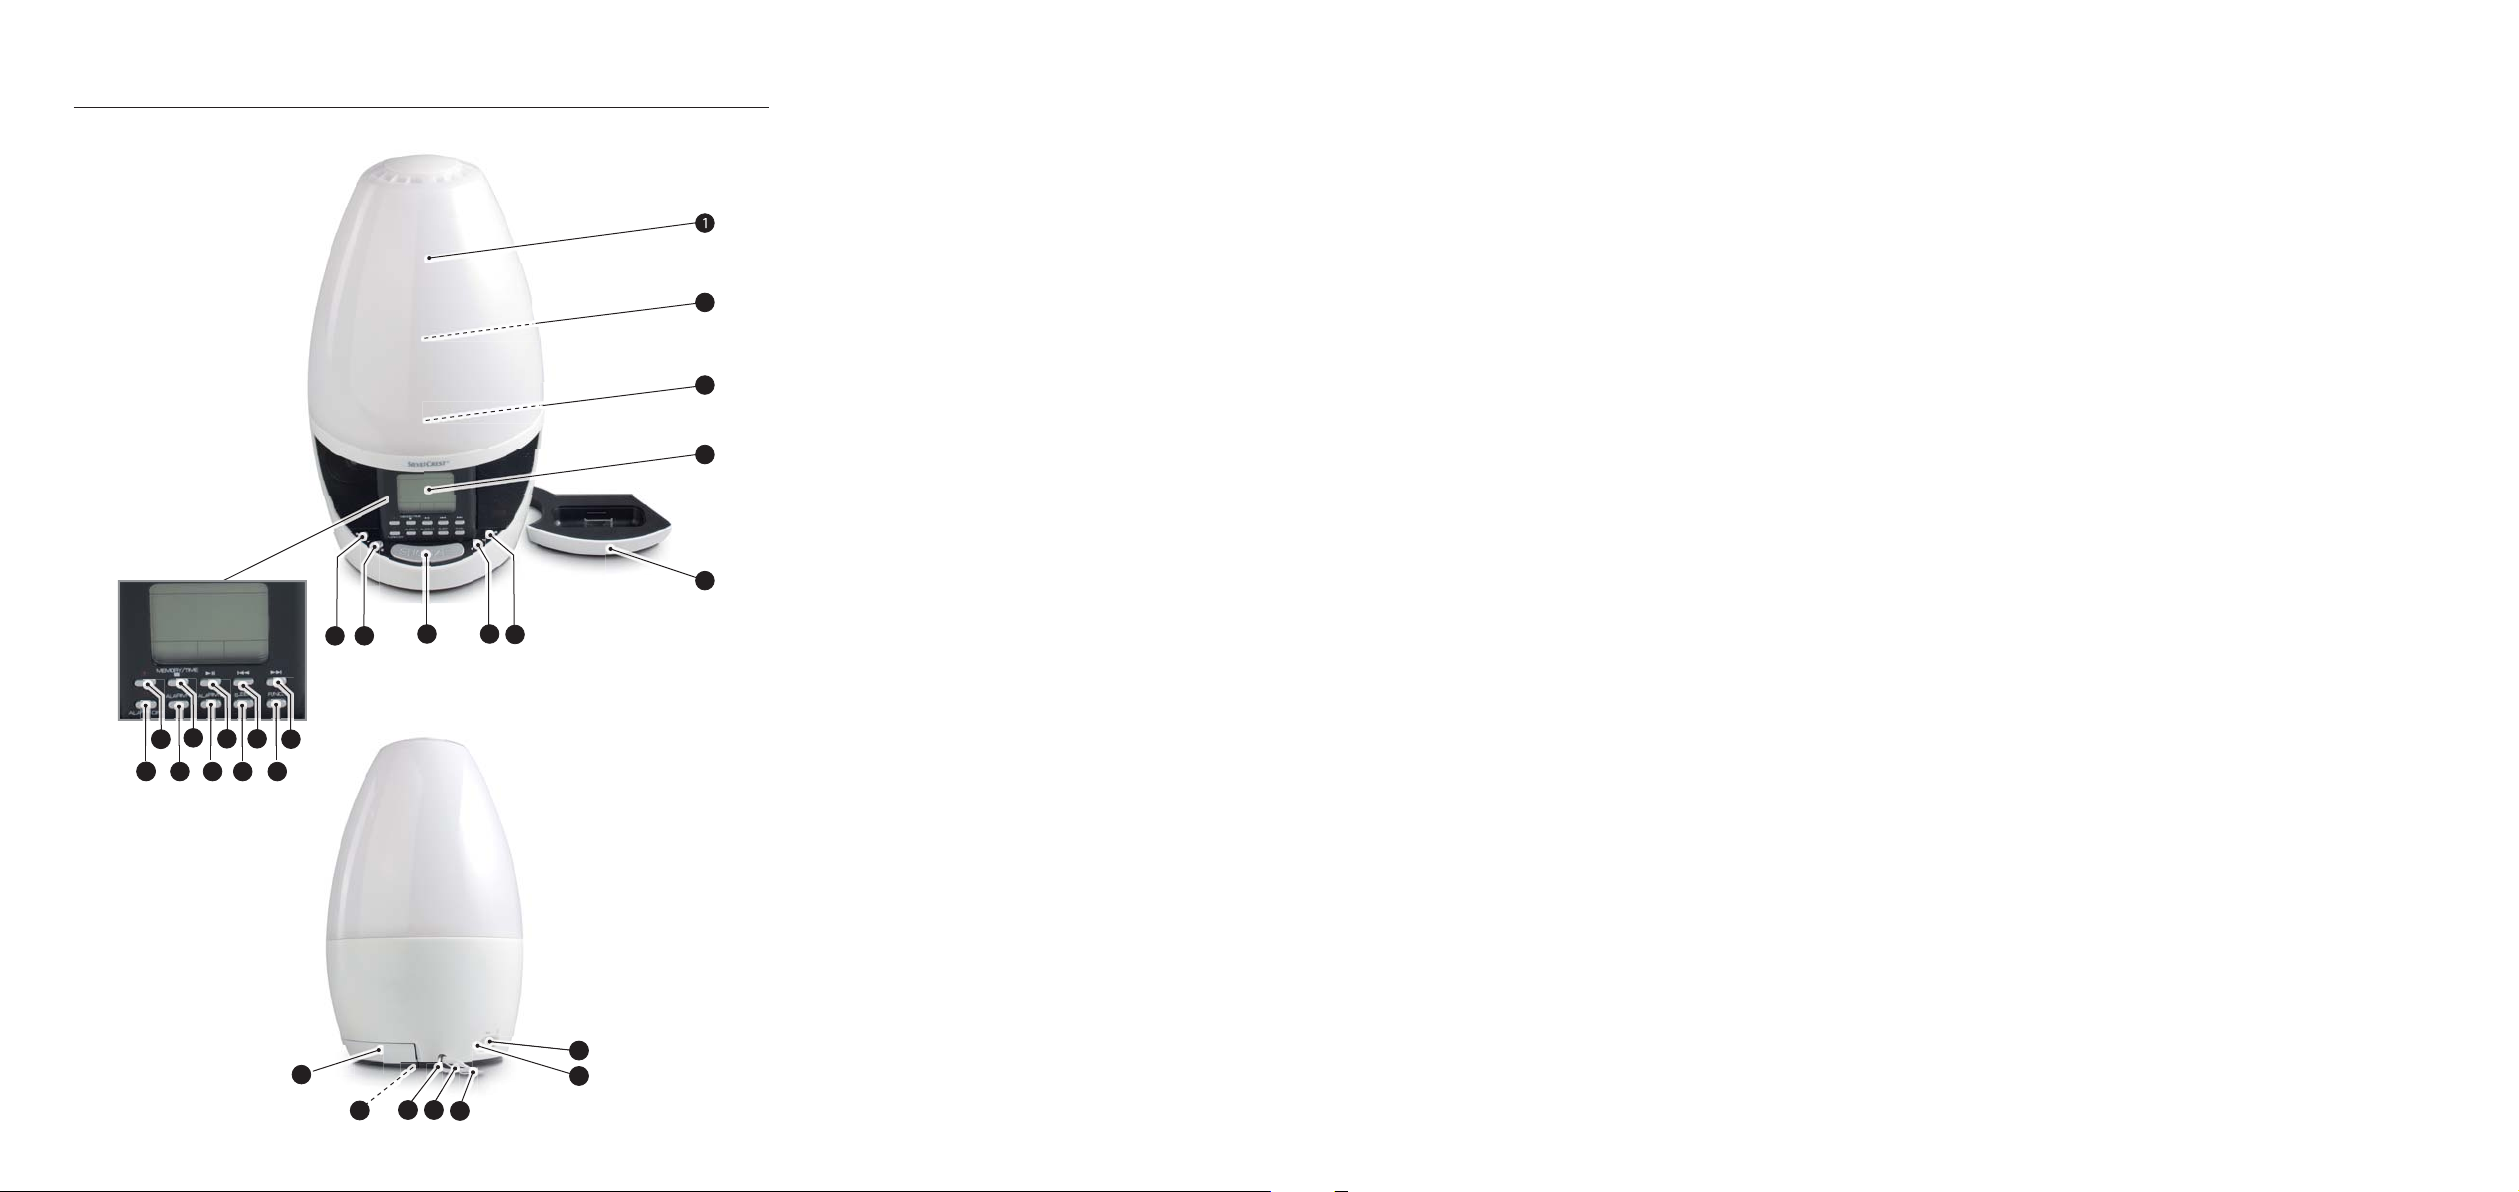
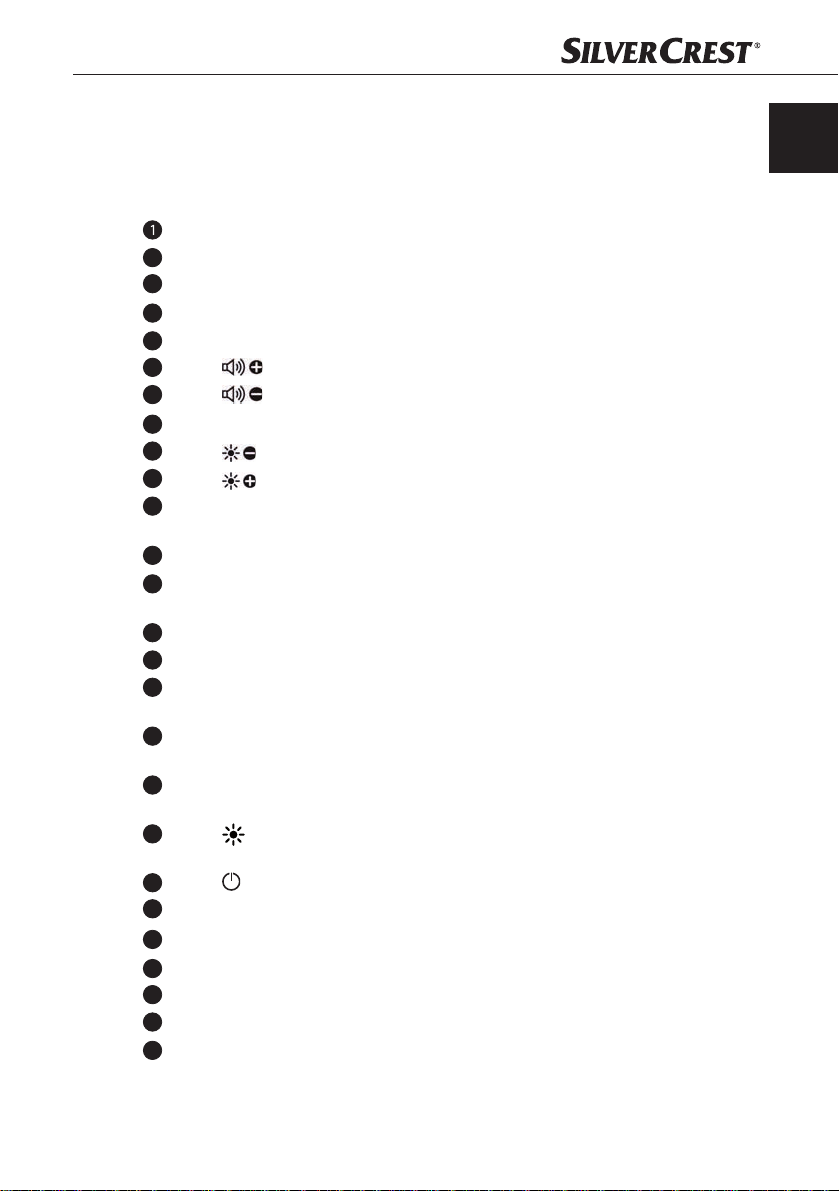
Vista geral do aparelho
Para tal, consulte as fi guras na parte desdobrável.
Alojamento da lâmpada
2
Lâmpada de halogéneo (42 W, E27)
3
Luz ambiente (3 LED: verde, azul e vermelho)
4
Visor
5
Base para iPod/iPhone
6
Botão : aumentar o volume
7
Botão : reduzir o volume
8
Botão SNOOZE: activar a função de snooze/ajustar a cor da luz ambiente
9
Botão : menor intensidade da luz
10
Botão : maior intensidade da luz
11
Botão ►►I: avançar faixa/avanço rápido (iPod/iPhone)/procura de emissoras
(rádio)/selecção de sons da natureza 1-4
12
FUNC.: seleccionar função
Botão I◄◄: retroceder faixa/retrocesso rápido (iPod/iPhone)/procura de
13
emissoras (rádio)/selecção de sons da natureza 1-4
Botão SLEEP: desactivação automática/alternar entre indicação de 12h/24h
14
Botão ►II: iniciar/parar reprodução
15
Botão ALARM2/UP: programar o alarme 2/subir na selecção de posições de
16
memória
Botão MEMORY/TIME: memorizar emissora (rádio)/ajuste da hora no modo de
17
standby/parar a reprodução de iPod/iPhone
Botão ALARM1/DOWN: programar o alarme 1/descer na selecção de posições
18
de memória
Botão : ligar/desligar lâmpada/activar a função de Wake-Up Light durante a
19
programação da hora de despertar
Botão /ALARM OFF: ligar/desligar o aparelho/desligar o alarme (alarme)
20
21
Entrada de ligação para auscultadores
22
AUX IN: entrada áudio para a ligação de um aparelho externo
Cabo de alimentação
23
24
Antena de fi o para recepção FM
25
Sensor da temperatura
26
Compartimento para as pilhas
PT
KH 2600
7
PT
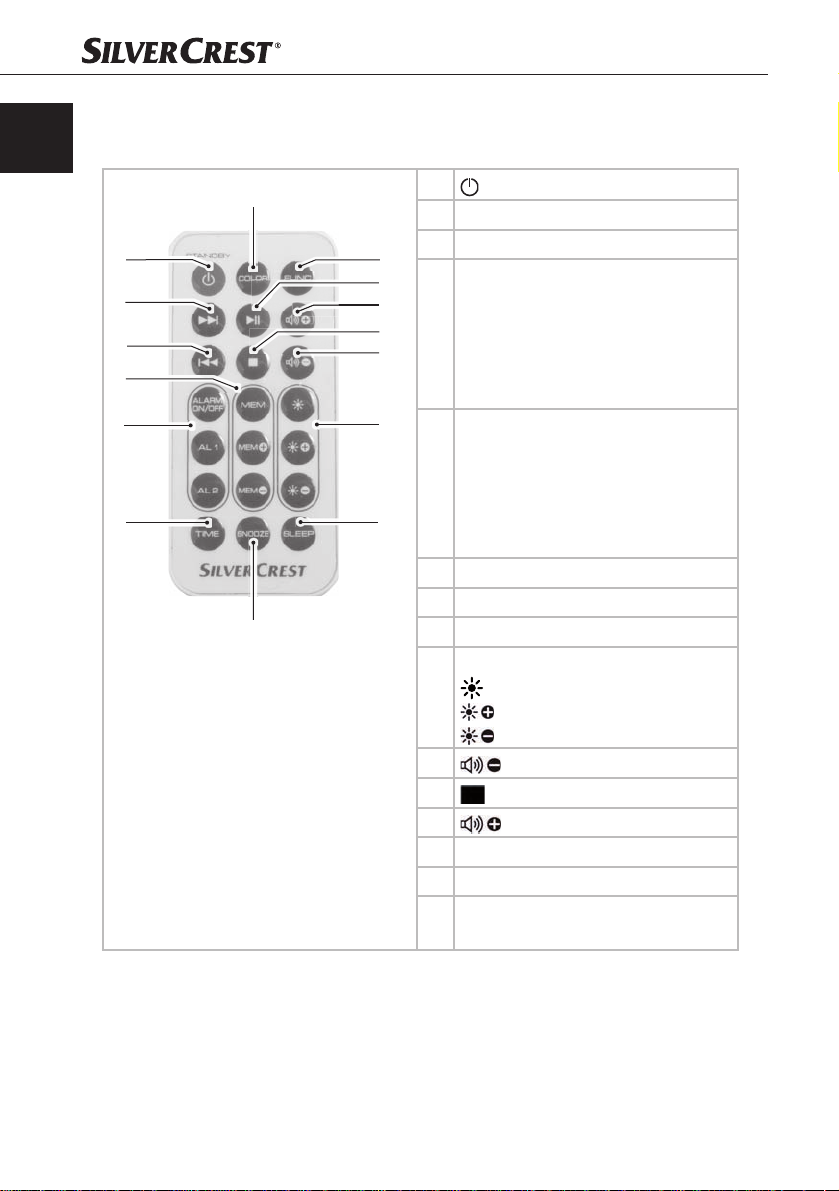
Telecomando
Todas as funções do aparelho podem ser executadas com o telecomando.
1
2
3
4
5
6
15
Descrição geral
1
: standby
2 ►►I : avanço rápido
3 I◄◄ : retrocesso rápido
14
13
12
11
10
9
8
7
Controlo da memória:
MEM: memorizar emissora
MEM +: seleccionar posição de
4
memória
MEM -: seleccionar posição de
memória
Controlo do alarme:
Alarm ON/OFF
AL1: programar o alarme 1/descer na
5
6 TIME: ajustar a hora
7 SNOOZE: activar a função de snooze
8 SLEEP: desactivação automática
9
10
11
12
13 ►II : reproduzir/pausa
14 FUNC: seleccionar função
15
selecção de posições de memória
AL2: programar o alarme 2/subir na
selecção de posições de memória
Controlo da lâmpada:
: ligar/desligar a lâmpada
: mais claro
: mais escuro
: reduzir o volume
: parar
: aumentar o volume
COLOR: seleccionar a cor da luz
ambiente
8
KH 2600
Descrição geral
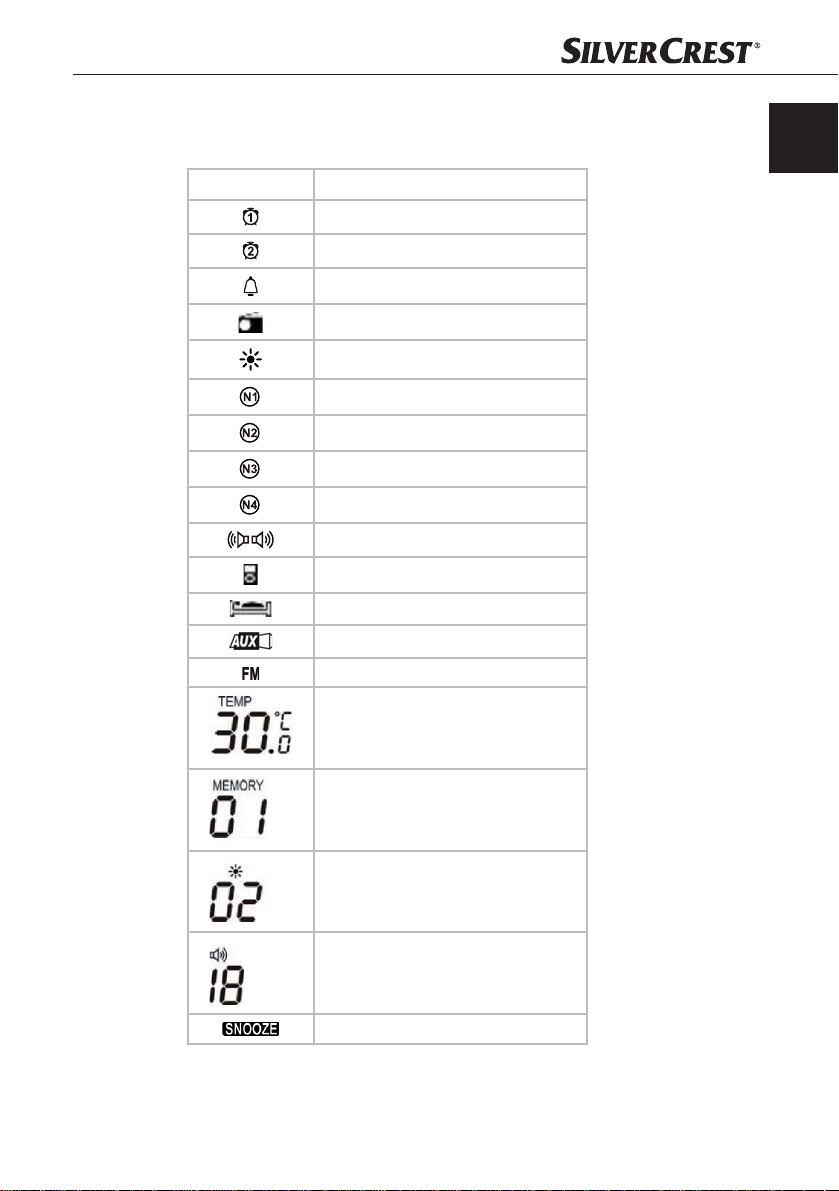
Visor
Os símbolos no visor têm o seguinte signifi cado:
Símbolo Signifi cado
PT
Alarme 1 activado
Alarme 2 activado
Som de alarme
Função de rádio
Lâmpada/função Wake-up Light
Som da natureza 1
Som da natureza 2
Som da natureza 3
Som da natureza 4
Recepção estéreo
Função iPod/iPhone
Desactivação automática activada
Aparelho áudio externo
Recepção FM
KH 2600
Indicação da temperatura
Indicação da posição de memória
Indicação da intensidade da luz
Indicação do nível do volume
Função de snooze activada
9

PT
Instalação e ligação
Instalação e ligação
Indicações de segurança
AVISO
Durante a colocação em funcionamento do aparelho podem
ocorrer ferimentos e danos materiais!
Respeite as seguintes indicações de segurança para evitar os perigos:
Os materiais da embalagem não devem ser utilizados como brinquedos. ►
Existe perigo de asfi xia.
Respeite as indicações acer
ligação eléctrica do aparelho para evitar ferimentos e danos materiais.
Material fornecido e inspecção de transporte
Por norma, o aparelho é fornecido com os seguintes componentes:
Rádio-despertador ▯
Telecomando com pilha (CR 2032, 3V) ▯
2 pilhas do tipo AA, 1,5 V ▯
5 bases adaptadoras para iPod/iPhone ▯
Manual de instruções ▯
ca dos requisitos do local de instalação e da ►
NOTA
Verifi que o material fornecido quanto à sua integridade e danos visíveis. ►
Em caso de fornecimento incompleto ou danos resultantes de embalagem ►
insufi ciente ou transporte, entre em contacto com a linha directa de assistência técnica (ver capítulo
Retirar da embalagem
Poderá consultar todas as peças do aparelho e o manual de instruções na ¡
embalagem.
Re
tire todo o material de embalagem. ¡
10
Assistência Técnica).
KH 2600
Instalação e ligação
Eliminação da embalagem
A embalagem protege o aparelho de danos durante o transporte. Os materiais
da embalagem devem ser seleccionados numa perspectiva ecológica e de
poupança energética e, como tal, reciclados.
A reciclagem da embalagem permite a poupança de matérias-primas e reduz a
formação de lixo. Elimine os materiais de embalagem que já não são necessários
em conformidade com as normas locais em vigor.
NOTA
Se possível, conserve a embalagem original durante o período de garantia, ►
para que possa embalar o aparelho correctamente em caso de devolução
ou semelhante.
Requisitos do local de instalação
Para um funcionamento seguro e correcto do aparelho, o local de instalação
deve cumprir as seguintes recomendações:
Coloque o aparelho numa superfície fi xa, plana e horizontal. ■
Mantenha um espaço livre de, pelo menos, 15 cm em torno do aparelho e de, ■
pelo menos, 40 cm por cima do aparelho, a fi m de evitar um sobreaquecimento.
Não instale o aparelho num ambiente com pó, quente, molhado ou muito
■
húmido ou na proximidade de materiais infl amáveis.
Proteja o apar
As superfícies dos móveis podem, eventualmente, conter substâncias que ■
possam corroer as bases de borracha e amolecê-las. Se necessário, coloque
uma base por baix
A tomada deve encontrar-se num local bem acessível, de modo que a fi cha ■
de alimentação possa ser possa ser facilmente desligada.
elho de vibrações. ■
o da base do apar
PT
elho.
KH 2600
11

PT
Ligação eléctrica
Antes da ligação do aparelho, compare os dados de ligação (tensão e ■
frequência) na placa de identifi cação com os da sua rede eléctrica. Estes
dados devem coincidir de modo a que não ocorram danos no aparelho.
Certifi que-se de que o cabo de alimentação do aparelho está intacto e não ■
é disposto sobre superfícies quentes e/ou arestas afi adas.
Certifi
que-se de que o cabo de alimentação não é esticado ou dobrado. ■
Não deixe o cabo de ligação suspenso sobre esquinas (perigo de tropeça- ■
mento).
Colocar as pilhas de backup
A colocação destas pilhas evita a perda da hora actual e da hora de despertar
programada em caso de falha de corrente eléctrica. As pilhas permitem que o
relógio interno continue a funcionar mesmo em caso de falha de corrente eléctrica.
Em caso de reactivação da corrente eléctrica é automaticamente exibida no
4
visor
a hora correcta.
NOTA
As pilhas de backup memorizam apenas a hora actual e a hora de des- ►
pertar programada. Todas as outras funções apenas podem ser executadas com o aparelho ligado à corr
O aparelho também pode funcionar sem pilhas. ►
Retire a tampa do compartimento para as pilhas ¡
aparelho, deslocando-a na direcção da seta.
Coloque 2 pilhas do tipo AA (incluídas no volume de fornecimento) no ¡
compartimento para as pilhas. Tenha atenção à polaridade ilustrada no
compartimento par
Feche o compartimento para as pilhas, colocando a tampa e encaixando-a. ¡
a as pilhas.
Instalação e ligação
ente eléctrica.
26
na parte inferior do
12
KH 2600
Instalação e ligação
Activar a pilha do telecomando
A pilha do telecomando já se encontra colocada no momento da entrega.
Active a pilha, removendo as fi tas de isolamento. ¡
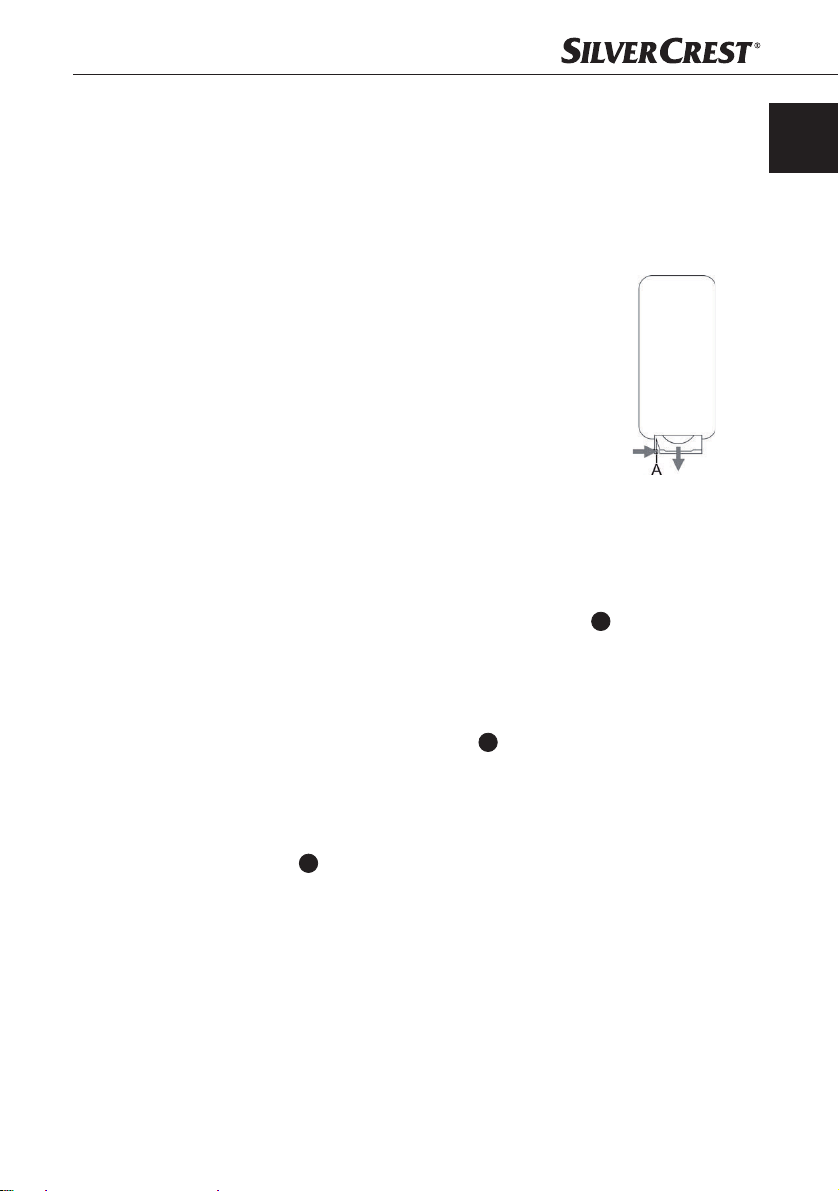
Substituição da pilha do telecomando
Com a unha, prima o entalhe (A) para a direita ¡
e extraia o compartimento para as pilhas.
Coloque uma pilha de 3 V do tipo CR 2032 no ¡
compartimento para as pilhas. O lado com a
marcação "+" fi
Volte a inserir o compartimento para as pilhas no ¡
telecomando.
Estabelecer a alimentação de corrente
Instale o aparelho com uma distância de aprox. 40 a 50 cm da sua cabeça ¡
(por ex. sobre a mesa-de-cabeceira).
Insira a fi cha de alimentação numa tomada. No visor ¡
a hora (0:00) e a temperatura.
ca voltado para cima.
4
são apresentadas
PT
Antena de fi o FM
Desenrole totalmente a antena de fi o ¡
Ligar auscultadores
Se necessário, ligue auscultadores (com fi cha jaque de 3,5 mm) à tomada ¡
de ligação
automaticamente.
KH 2600
24
para a recepção FM.
21
na parte traseira do aparelho. As colunas desligam-se
13

PT
Operação e funcionamento
Operação e funcionamento
Este capítulo contém informações importantes acerca da operação e do funcionamento do aparelho.
Ligar e desligar
Prima o botão ¡ /ALARM OFF 20 ou o botão no telecomando para
ligar o aparelho. O visor
Prima o botão ¡
desligar o aparelho No visor 4 é apresentada a hora, a temperatura e o
alarme programado (modo de standby).
NOTA
/ALARM OFF 20 ou o botão no telecomando para
4
é activado.
O botão ►
eléctrica. Para desligar o aparelho totalmente da corrente, a fi cha do
cabo de alimentação
Ajustar a hora
Condição: O aparelho encontra-se no modo de standby.
Prima o botão MEMORY/TIME ¡
A indicação das horas no visor
Prima o botão SLEEP ¡
indicação de 12h/24h.
Com o botão ►►I ¡
vez que prime o botão, a indicação avança ou retrocede uma hora. Se
mantiver o respectivo botão premido durante mais de 2 segundos, é iniciado
o ajuste rápido.
Prima o botão MEMORY/TIME ¡
A indicação dos minutos no visor
Com o botão ►►I ¡
De cada vez que prime o botão, a indicação avança ou retrocede um minuto.
Se mantiver o respectivo botão premido durante mais de 2 segundos, é
iniciado o ajuste rápido.
Prima o botão MEMORY/TIME ¡
confi rmar a introdução da hora, ou aguarde aprox. 7 segundos e a introdução da hora será confi rmada automaticamente.
NOTA
A hora é reposta a 0:00 se o aparelho for desligado da corrente eléctrica e ►
não estiverem inseridas pilhas de backup, ou se estas estiverem demasiado
fracas.
/ALARM OFF 20 não desliga totalmente o aparelho da corrente
23
tem de ser retirada da tomada.
17
ou o botão TIME no telecomando.
4
fi ca intermitente.
14
durante aprox. 2 segundos para alternar entre a
11
ou o botão I◄◄ 13 , ajuste a hora actual. De cada
17
ou o botão TIME no telecomando.
4
fi ca intermitente.
11
ou o botão I◄◄ 13, ajuste os minutos da hora actual.
17
ou o botão TIME no telecomando para
14
KH 2600
Operação e funcionamento
Ajustar o volume
Condição: O aparelho está ligado.
Prima o botão ¡
mando para ajustar o volume. O nível de volume ajustado é indicado no
canto inferior direito do visor
NOTA
O volume ajustado aplica-se a todas as funções. ►
O volume por si seleccionado é memorizado automaticamente como ►
volume da função de despertar.
Modo de rádio
NOTA
Para uma boa recepção de rádio, a antena de fi o ►
mente desenrolada. Ajuste a antena no modo de rádio para a melhor
recepção.
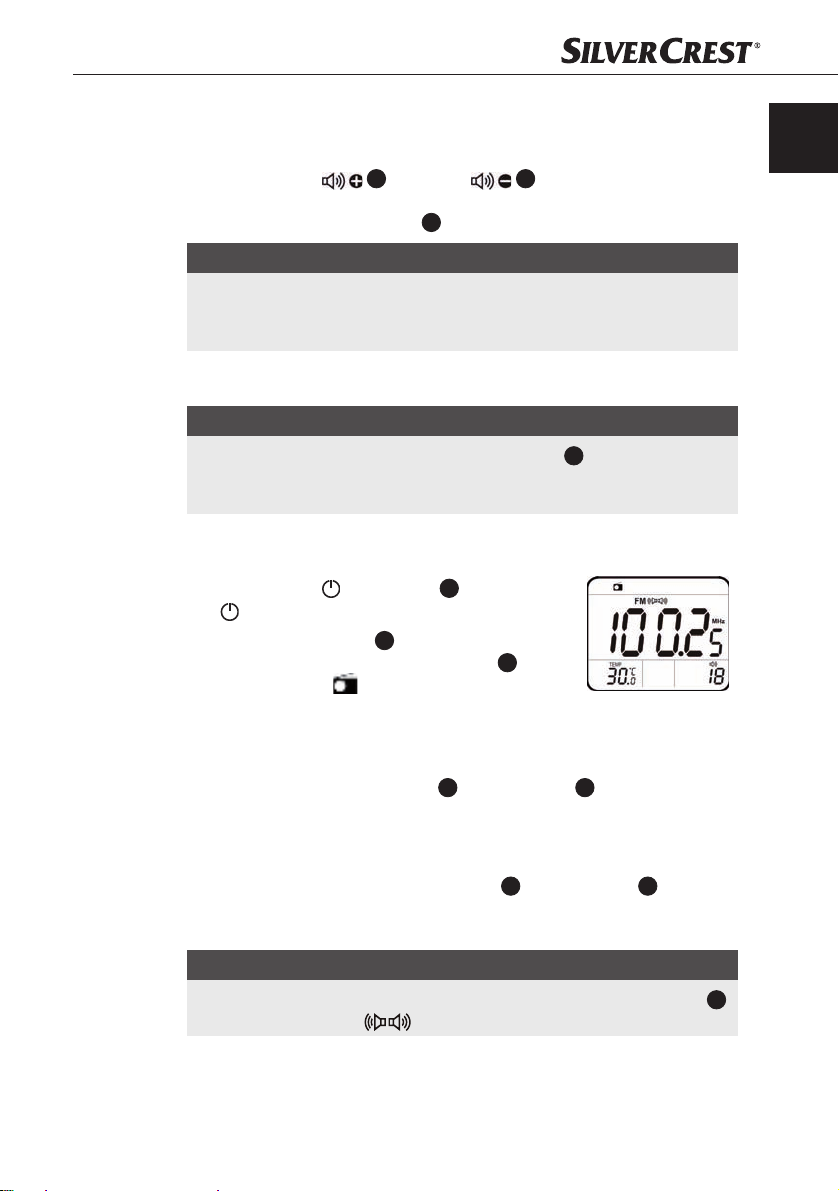
Ligar o rádio
Prima o botão ¡ /ALARM OFF 20 ou o botão
no telecomando para ligar o aparelho.
Prima o botão FUNC. ¡
seleccionar a função de rádio. No visor
surge o símbolo
ção actual da emissora ajustada.
6 ou o botão 7 no aparelho ou no teleco-
4
.
12
repetidamente para
e a frequência de recep-
PT
24
deve estar total-
4
Confi gurar a emissora manualmente
Prima brevemente o botão ►►I ¡
sora pretendida de forma gradual, premindo o botão.
Procurar emissora automaticamente
Prima e mantenha premido o botão ►►I ¡
pelo menos, dois segundos. O aparelho procura automaticamente a emissora mais próxima com uma qualidade de recepção suficiente.
NOTA
Se a qualidade de recepção for especialmente elevada, surge no visor ►
o símbolo de estéreo .
KH 2600
11
ou o botão I◄◄ 13 para ajustar a emis-
11
ou o botão I◄◄ 13 durante,
4
15
PT
Operação e funcionamento
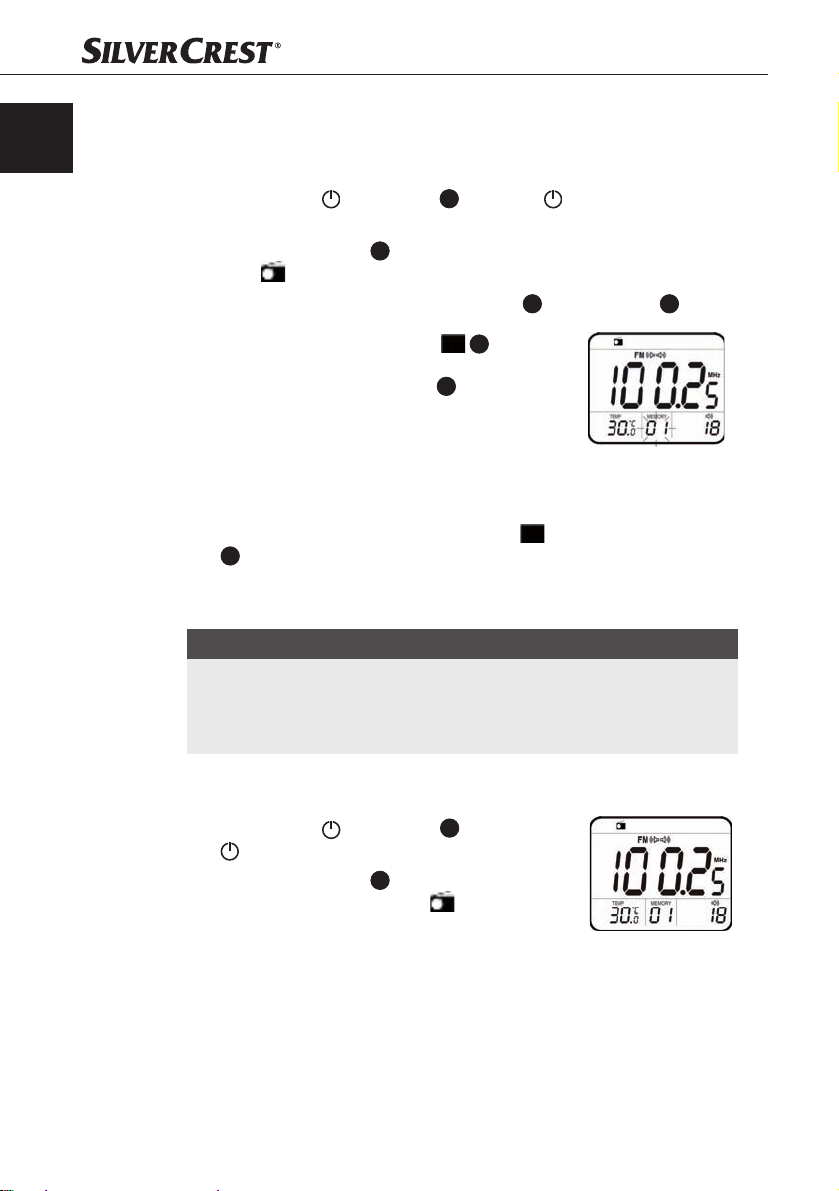
Memorizar emissoras manualmente
O aparelho dispõe de 20 posições de memória para frequências de emissoras.
Para memorizar uma frequência de emissora, proceda da seguinte forma:
Prima o botão ¡
ligar o aparelho.
Prima o botão FUNC ¡
rádio
Seleccione uma emissora com o botão ►►I ¡
/ALARM OFF 20 ou o botão no telecomando para
12
repetidamente para seleccionar a função de
.
11
ou o botão I◄◄ 13.
4
e "01"
17 ou
Prima o botão MEMORY/TIME ¡
o botão MEM no telecomando. Surge a
indicação "MEMORY" no visor
fica intermitente.
Prima o botão A ¡ LARM1/ALARM2 ou o botão
MEM-/MEM+ no telecomando para seleccionar
a posição de memória pretendida entre 01 e
20.
Prima novamente o botão MEMORY/TIME ¡
17
ou o botão MEM no telecomando para memorizar a frequência de recepção da emissora
ajustada na posição de memória pretendida.
NOTA
Se não efectuar qualquer introdução durante aprox. 5 segundos depois ►
de premir o botão MEMORY/TIME ou o botão MEM no telecomando, a
indicação "MEMORY 01" no visor desapar
memorizada.
Consultar as emissoras memorizadas
Prima o botão ¡ /ALARM OFF 20 ou o botão
no telecomando para ligar o aparelho.
12
Prima o botão FUNC ¡
seleccionar a função de rádio .
Com os botões A ¡ LARM1/ALARM2 ou os
botões MEM-/MEM+ no telecomando,
seleccione a posição de memória pretendida
par
a a emissora memorizada entre 01 e 20.
repetidamente para
ece e a emissora actual não é
16
KH 2600
Operação e funcionamento
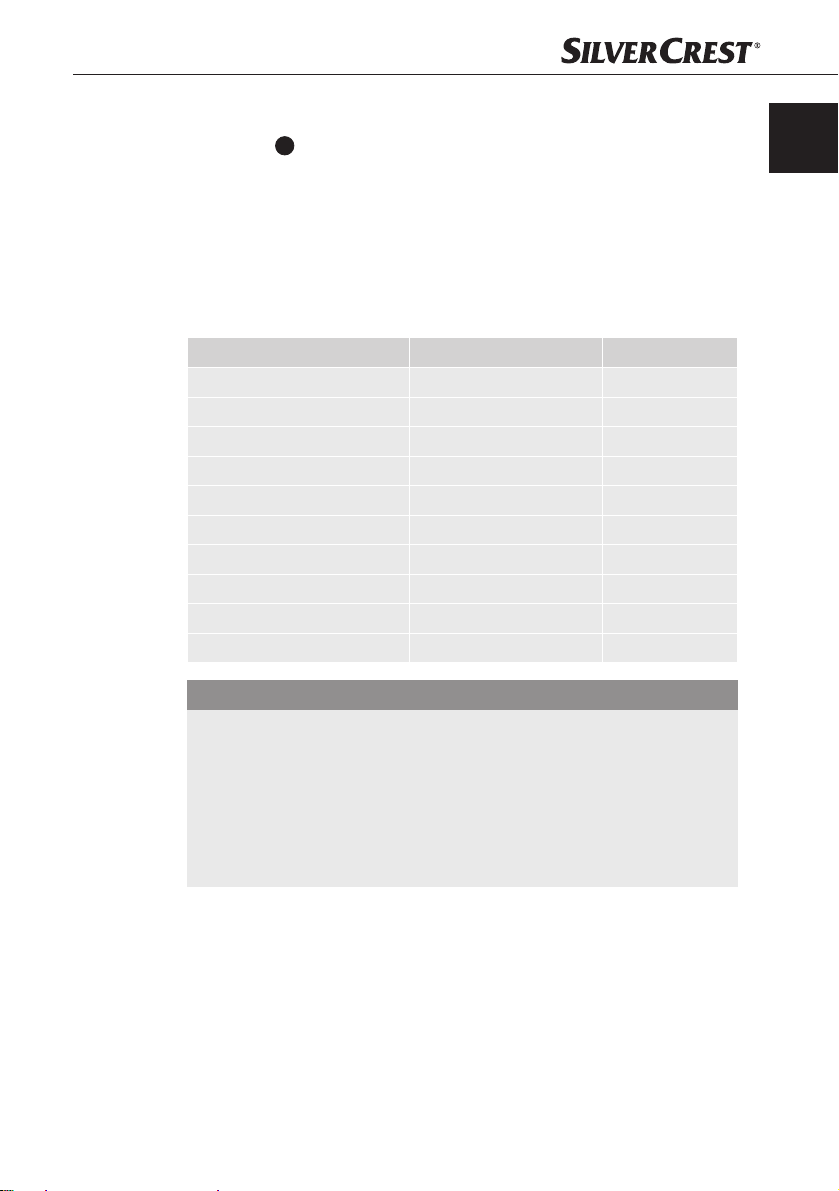
Reproduzir música do iPod/iPhone
Com a base 5 pode utilizar o aparelho como uma coluna para o seu iPod/
iPhone. Sempre que colocar o iPod/iPhone na base, será ainda carregado
automaticamente.
O aparelho está equipado com 5 adaptadores para a base, para que os modelos de iPod/iPhone mais comuns se adaptem sempre à base. Os adaptadores
possuem números na parte traseira. Na tabela pode encontrar uma lista dos
adaptadores adequados ao seu modelo.
Pode utilizar a base para os seguintes modelos de iPod e iPhone:
Modelo Tipo Adaptador
iPod 5G (com vídeo) 30GB 9
iPod U2 com vídeo 30GB 9
iPod classic 80GB, 120GB 9
iPod touch 8GB & 16GB 14
iPod touch 2G 8GB, 16GB, & 32GB 14
iPod touch (Outono de 2009) 16GB, 32GB, & 64GB 14
iPhone 3G 8GB & 16GB 15
iPhone 3GS 16GB & 32GB 15
iPod nano (4.ª geração) 8GB & 16GB 17
iPod nano (5.ª geração) 8GB & 16GB 18
PT
KH 2600
ATENÇÃO
Danos no aparelho ou no iPod/iPhone!
A colocação do iPod/iPhone sem adaptador pode pr
lho e no iPod/iPhone.
Coloque o iPod/iPhone na base apenas com o adaptador adequado. ►
Se o adaptador adequado não se encontrar no volume de fornecimento, ►
contacte a linha directa de assistência técnica (consulte o capítulo
Assistência T
écnica).
ovocar danos no apare-
17

PT
Operação e funcionamento
Colocar/retirar o adaptador na/da base
Seleccione o adaptador necessário com a ajuda da seguinte tabela e coloque-o
na cavidade da base da seguinte forma:
Coloque a aresta dianteira do ¡
adaptador na aresta dianteira
da cavidade.
Pressione a ar
para baixo até encaixar de
forma audível.
Para retirar o adaptador, proceda da seguinte forma:
Coloque a unha do polegar na ranhura e extraia o adaptador da cavidade, ¡
levantando-o.
Reproduzir música
Coloque o seu iPod ou iPhone na base ¡
Prima o botão FUNC. ¡
iPod/iPhone. No visor
pode ser iniciada.
Avançar faixa e avanço/retrocesso rápido
Prima o botão ►►I ¡
o início da próxima faixa.
Prima o botão I◄◄ ¡
para o início da faixa actual. Prima novamente o botão I◄◄
ceder para o início da faixa anterior.
Mantenha premido o botão ►►I ¡
retrocesso rápido.
Prima o botão MEMORY/TIME ¡
para parar a reprodução.
esta traseira ¡
12
repetidamente para seleccionar a função de
4
surge o símbolo e a reprodução de música
11
no aparelho ou no telecomando para avançar para
13
no aparelho ou no telecomando para retroceder
Base
5
11
ou o botão I◄◄ 13 para um avanço/
17 ou o botão no telecomando
Ranhura
Adaptador
.
13
para retro-
Carregar iPod/iPhone
Se o seu iPod/iPhone estiver colocado na base, será automaticamente carregado
até a bateria estar novamente cheia.
NOTA
O iPod/iPhone não é carregado através da pilha de backup. ►
18
KH 2600

Operação e funcionamento
Reprodução de aparelhos áudio externos
Ligue um aparelho áudio externo como, por ex., um leitor de MP3, à tomada ¡
para jaque de 3,5 mm AUX IN
Prima o botão FUNC. ¡
AUX.
Inicie a reprodução no aparelho áudio externo e ajuste o volume. ¡
NOTA
Tenha em atenção o manual de instruções do aparelho áudio externo. ►
12
Reprodução de sons da natureza
Prima o botão ¡ /ALARM OFF 20 ou o botão no telecomando para
ligar o aparelho.
Prima o botão FUNC. ¡
da natureza .
Com o botão ►►I ¡
sons da natureza:
Chuva
Água a correr
Gaivotas
Vida no campo
12
11
ou o botão I◄◄ 13, seleccione um entre os 4 seguintes
22
na parte traseira do aparelho.
repetidamente para seleccionar a função
repetidamente para seleccionar a função de sons
PT
Luz ambiente
KH 2600
Prima o botão SNOOZE ¡
Os LED acendem na seguinte sequência:
azul → vermelho → vermelho + azul → verde → verde + azul → vermelho + verde
→ todos os LED → etc.
Prima novamente o botão SNOOZE ¡
ajustar a mesma de forma permanente.
Volte a premir o botão SNOOZE ¡
NOTA
Em vez do botão SNOOZE ►
telecomando.
O ajuste da cor através do botão SNOOZE ►
de snooze estiver activada.
8
no aparelho para ligar a luz ambiente.
8
se a cor pretendida acender, para
8
para desligar a luz ambiente.
8
, também pode utilizar o botão COLOR no
8
não funciona se a função
19

PT
Operação e funcionamento
Luz de leitura
Pode utilizar o aparelho como luz de leitura.
Prima o botão ¡
o aparelho.
Prima o botão ¡
intensidade da luz (00 a 20) são indicados no visor 4.
NOTA
Caso tenha ajustado a intensidade da luz para 00, pode ajustar um valor ►
superior, mas a luz permanece desligada e deve ser ligada novamente
és do botão
atrav
A intensidade da luz por si ajustada é memorizada automaticamente ►
como intensidade de luz para a função de despertar.
Substituir a lâmpada de halogéneo
A lâmpada de halogéneo 2 deve ser substituída se estiver danifi cada ou se a
intensidade da luz enfraquecer.
PERIGO
Perigo de morte por choque eléctrico!
Desligue a fi
substituição da lâmpada de halogéneo 2.
19 no aparelho ou no telecomando para ligar/desligar
/ para ajustar a luminosidade. O símbolo e a
19 no aparelho ou no telecomando.
cha de alimentação da tomada antes de iniciar o processo de ►
20
NOTA
A lâmpada de halogéneo ►
do mesmo tipo: E27 42 W.
Rode o alojamento da lâmpada ¡
sentido da seta e levante-o.
Desaperte a lâmpada danifi cada do ¡
casquilho.
Coloque uma nov
halogéneo de 42 W no casquilho.
Coloque o alojamento da lâmpada ¡
cuidadosamente a partir de cima e
fi xe-o, rodando-o no sentido da seta.
2
a lâmpada de ¡
apenas pode ser substituída por uma lâmpada
no
KH 2600

Operação e funcionamento
Função de alarme
Ao ajustar a hora de despertar, defi na a intensidade da luz, o som para despertar
e o volume. Nos 30 minutos antecedentes à hora de despertar ajustada, a
intensidade da luz aumenta lentamente até ao nível ajustado. Quando a hora
de despertar for atingida, o nível do som aumenta lentamente, dentro de 90
segundos, até ao volume seleccionado.
Programar horas de alarme
O aparelho dispõe de dois despertadores. Todos os ajustes podem ser efectuados individualmente para cada despertador. Pode optar entre um som de
alarme ou vários sons da natureza para a hora programada, se o rádio deve
ligar ou se pretende ouvir a reprodução de música de um iPod/iPhone ou de um
aparelho áudio externo.
Condição: O aparelho encontra-se no modo de standby.
PT
Prima o botão ALARM1/DOWN ¡
16
UP
no aparelho ou o botão AL1/AL2 no
telecomando. A indicação das horas no visor
fi ca intermitente.
Ajuste as horas com o botão ►►I ¡
13
I◄◄
. De cada vez que prime o botão, a indicação avança ou retrocede uma hora. Se mantiver o respectivo botão premido durante mais de
dois segundos, é iniciado o ajuste rápido.
Prima o botão ALARM1/DOWN ¡
16
no aparelho ou o botão AL1/AL2 no
UP
telecomando. A indicação dos minutos no visor
4
fi ca intermitente.
Ajuste os minutos com o botão ►►I ¡
13
. De cada vez que prime o botão, a indicação
avança ou retrocede um minuto. Se mantiver o
respectivo botão premido durante mais de dois
segundos, é iniciado o ajuste rápido.
Prima novamente o botão ALARM1/DOWN ¡
aparelho ou o botão AL1/AL2 no telecomando para confi rmar o ajuste.
18
/ALARM2/
11
ou o botão
18
/ALARM2/
11
ou o I◄◄
4
18
/ALARM2/UP 16 no
KH 2600
21

PT
Ajustar o som de alarme
Prima o botão ►►I ¡
repetidamente para seleccionar um som de
alarme:
→ → → → → → →
apagar. (Para a explicação dos símbolos,
consulte o capítulo Visor.)
Prima o botão ¡
a função Wake-up Light.
NOTA
Ajuste o volume com o qual pretende ser despertado, tal como descrito no ►
capítulo Ajust
Ajuste a intensidade da luz com a qual pretende ser despertado, tal como ►
descrito no capítulo Luz de leitura.
A função W
som de alarme. A intensidade da luz aumenta nos 30 minutos antecedentes
à hora de despertar ajustada e o símbolo
Para despertar apenas com a função Wake-up Light, deve ajustar o volume ►
para 00.
Prima novamente o botão ALARM1/DOWN ¡
aparelho ou o botão AL1/AL2 no telecomando para confi rmar o ajuste, ou
aguarde aprox. 7 segundos e o alarme será confi rmado automaticamente.
O símbolo do som de alarme seleccionado fi ca intermitente no visor e o alarme
é emitido através da coluna assim que a hora de despertar for alcançada.
ar o volume.
ake-up Light apenas pode ser activada juntamente com um ►
Operação e funcionamento
11
ou o botão I◄◄ 13
para activar adicionalmente
fi ca intermitente no visor 4.
18
/ALARM2/UP 16 no
22
NOTA
Caso pretenda utilizar a música do seu iPod/iPhone como som de alarme, ►
seleccione uma faixa (ou um álbum ou uma lista de reprodução) do iPod/
iPhone como som de alarme. A sua selecção será r
a hora de despertar for alcançada.
eproduzida assim que
KH 2600

Operação e funcionamento
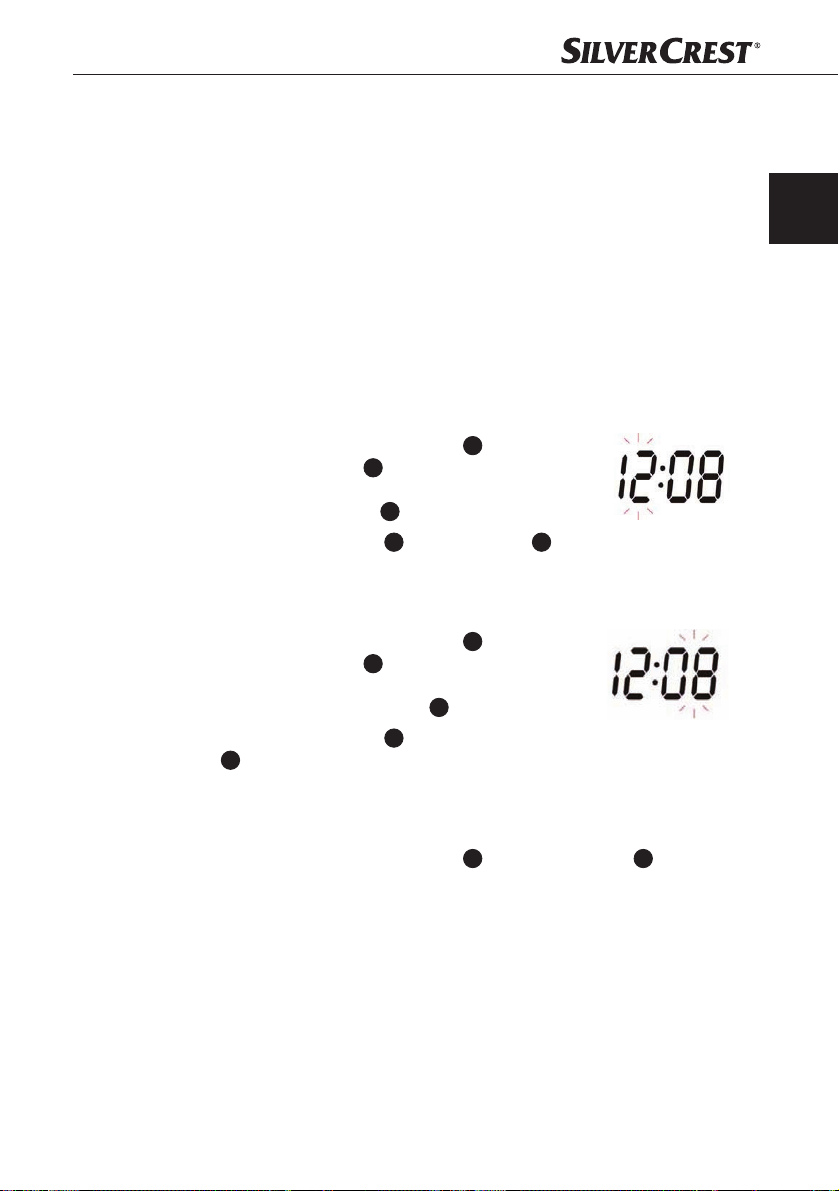
Desligar o despertador
Função "SNOOZE"
Enquanto o alarme soa, prima o botão ¡
SNOOZE
mente o alarme. No visor
9 minutos.
(Na fi gura à direita os alarmes 1 e 2 estão programados.
O alarme 2 é emitido e o símbolo fi ca intermitente.)
Desactivar alarme
Assim que a hora programada for alcançada, é emitido o alarme até ser desactivado.
Prima o botão ¡
desactivar o alarme.
Prima o botão ¡
NOTA
O alarme é emitido novamente dentro de 24 horas. ►
para desligar temporaria-
8
. O alarme é emitido novamente após
/ALARM OFF 20 ou o botão no telecomando para
4
surge a indicação
se tiver activado a função Wake-up Light.
PT
KH 2600
Activação/desactivação rápida do alarme
Condição: O aparelho encontr
Prima o botão ALARM1/DOWN ¡
botão AL1/AL 2 no telecomando até o símbolo do alarme / no visor
surgir/desaparecer.
NOTA
Os últimos ajustes de alarme seleccionados permanecem memorizados. ►
a-se no modo de standby.
18
/ALARM2/UP 16 no aparelho ou o
23

PT
Operação e funcionamento
Apagar horas de despertar
Prima três vezes o botão ALARM1/DOWN ¡
lho ou o botão AL1/AL 2 no telecomando, até que o símbolo de alarme
fi que intermitente no visor
Prima o botão ►►I ¡
alarme no visor 4.
Prima novamente o botão ALARM1/DOWN ¡
lho ou o botão AL1/AL2 no telecomando ou aguarde aprox.
10 segundos. Já não está programada qualquer hora de despertar.
Desactivação automática (função SLEEP)
Com a função Sleep pode ouvir a sua música ou emissora favorita para adormecer. O aparelho desliga-se automaticamente após um período entre 10 e
90 minutos.
Condição: O aparelho encontra-se na função de rádio, AUX IN ou iPod/iPhone.
Prima o botão SLEEP ¡
ção
.
Prima novamente o botão SLEEP ¡
de 10 minutos.
Opções de ajuste: 90, 80, 70, 60, 50, 40, 30, 20 ou 10 minutos.
Cinco segundos depois, o ajuste seleccionado é memorizado.
Prima novamente o botão SLEEP ¡
Para desactivar a função Sleep antes de a mesma se desactivar automatica- ¡
mente, prima o botão
4
.
11
ou o botão I◄◄ 13 até não surgir nenhum som de
14
. No visor 4 surge o símbolo e a indica-
14
para reduzir o tempo em intervalos
14
para desligar a função Sleep.
/ALARM OFF 20 ou o botão no telecomando.
18
/ALARM2/UP 16 no apare-
18
/ALARM2/UP 16 no apare-
24
KH 2600

Limpeza/Armazenamento/Eliminação
Limpeza
Indicações de segurança
PERIGO
Perigo de morte por choque eléctrico!
Re
tire a fi cha de alimentação da tomada, antes de iniciar a limpeza. ►
ATENÇÃO
Danos no aparelho!
Certifi
que-se de que não entra humidade no aparelho durante a limpeza, ►
a fi m de evitar danos irreparáveis no aparelho.
Limpeza da estrutura do secador
Limpe as superfícies do aparelho com um pano macio e seco. ■
Armazenamento/Eliminação
Armazenamento
Caso não pretenda utilizar o aparelho durante um período prolongado,
desligue-o da corrente eléctrica, retires as pilha e armazene-o num local
limpo e seco, sem exposição solar directa.
PT
Eliminar o aparelho
Nunca deposite o aparelho no lixo doméstico comum. Este
produto é abrangido pela Directiva Europeia 2002/96/EC-WEEE
(Waste Electrical and Electronic Equipment).
Elimine o aparelho através de uma instituição de recolha de resíduos autorizada ou através da instituição de recolha do seu município. Tenha atenção aos
regulamentos actualmente em vigor. Em caso de dúvida, entre em contacto com
a entidade de eliminação de resíduos.
Eliminação das pilhas
As pilhas não devem ser eliminadas juntamente com o lixo doméstico. Todos
os consumidores devem entregar as pilhas/pilhas recarregáveis num ponto de
recolha da sua freguesia/região ou num estabelecimento comercial. Este dever
permite garantir que as pilhas são eliminadas de modo ecológico. Devolva as
pilhas/pilhas recarregáveis apenas quando estas estiverem vazias.
KH 2600
25

PT
Resolução de problemas
Resolução de problemas
Este capítulo contém indicações importantes acerca da determinação de anomalias
e a respectiva resolução. Tenha em consideração as indicações, a fi m de evitar
perigos e danos.
Indicações de segurança
AVISO
Tenha em consideração as seguintes indicações de segurança, a fi m de evitar
perigos e danos materiais:
As reparações em aparelhos eléctricos devem ser efectuadas apenas por ►
técnicos especializados, instruídos pelo fabricante. Podem surgir perigos
para o utilizador e danos no apar
Causas e resolução de avarias
A seguinte tabela permite determinar e eliminar com mais facilidade anomalias
de menor dimensão:
Erro Causa possível Resolução
elho resultantes de reparações incorrectas.
O visor não
apresenta qualquer
indicação.
Não é emitido som.
Ruídos de interferências na recepção de rádio.
26
A fi cha de alimentação
não está inserida.
A tomada não fornece
tensão.
O volume está no mínimo.
Estão ligados auscultadores.
A reprodução do aparelho
áudio não é iniciada.
A emissora não está
correctamente ajustada.
A recepção é demasiado
fraca.
Insira a fi cha de alimentação na
tomada.
Verifi que os fusíveis domésticos.
Aumente o volume com o botão
6 no aparelho ou no tele-
comando.
Desligue a fi cha dos auscultadores
da tomada de ligação
Inicie a reprodução no aparelho
áudio.
Ajuste correctamente a emissora com
o botão ►►I
Procure melhorar a recepção
movendo a
11
28
21
.
ou o botão I◄◄ 13.
antena de fi o.
KH 2600

Resolução de problemas/Anexo
Erro Causa possível Resolução
O alarme não é
emitido.
O iPod/iPhone não
é carregado.
NOTA
Caso não seja possível resolver o problema com os passos acima mencio- ►
nados, contacte o serviço de assistência técnica.
A hora de alarme está programada incorrectamente.
O alarme não está programado.
O aparelho não está no
modo de standby.
A fi cha de alimentação
não está inserida.
Verifi que a hora de despertar
programada.
Programe correctamente o alarme.
Active o modo de standby do
aparelho antes de adormecer.
Insira a fi cha de alimentação
na tomada.
Anexo
Indicações acerca da Declaração de Conformidade CE
Este aparelho está em conformidade com os requisitos fundamentais e as outras normas relevantes da Directiva europeia
relativa a Compatibilidade Electromagnética 2004/108/EC,
a Directiva de Baixa Tensão 2006/95/EC e a Directiva
de Concepção Ecológica 2009/125/EC (Regulamento
1275/2008, anexo II, n.º 1)
Pode obter a versão completa e original da declaração de
conformidade junto do importador.
PT
KH 2600
27

PT
Dados técnicos
Tensão de serviço 220-240 V / 50 Hz
Pilhas de backup
Pilha do telecomando 3 V, CR 2032
Consumo de energia
Funcionamento com luz 50 W
Funcionamento sem luz 10 W
Standby aprox. 1,7 W
Potência de saída das colunas 2 x 1 W (no caso de 10% de distorção)
Tensão da saída dos auscultadores no máx. 120 mV
Gama de frequências do rádio
(FM)
Lâmpada E27 máx. 42 W
Temperatura de funcionamento +10 - +35 °C
Humidade (sem condensação) 5 - 90 %
Anexo
2 x 1,5 V tipo AA
(incluídas no material fornecido)
87,5 - 108 MHz
28
Dimensões (A x L x P) 29 x 17,5 x 19,5 cm
Peso aprox. 1650 g
Classe de protecção
II
KH 2600

Anexo
Garantia
Este aparelho tem 3 anos de garantia a partir da data de compra. Este aparelho foi fabricado com o máximo cuidado e escrupulosamente testado antes da
sua distribuição.
Guarde o talão como comprovativo da compra. Em caso de reclamação de
garantia, entre em contacto com o seu ponto de assistência técnica por telefone.
Apenas deste modo pode ser garantido um envio gratuito do seu produto.
NOTA
A garantia abrange apenas defeitos de material e de fabrico, mas não peças ►
de desgaste ou danos em peças frágeis, p.ex. interruptores ou baterias.
PT
O produto foi concebido apenas par
A garantia extingue-se no caso de utilização incorrecta e de intervenções que
não foram efectuadas pelo nossa fi lial de assistência técnica autorizada.
Os seus direitos legais não são limitados por esta garantia. O período de garantia
não é prolongado pela prestação da garantia. Isto aplica-se igualmente a peças
substituídas e reparadas.
Danos ou falhas já presentes no momento da compra devem ser comunicados
imediatamente após a desembalagem, o mais tardar dois dias após a data de
compra.
Após a expiração do período de garantia, a reparação de eventuais danos está
sujeita a pagamento.
Assistência técnica
Kompernass Service Portugal
Tel.: 707 780 707
e-mail: support.pt@kompernass.com
Importador
KOMPERNASS GMBH
BURGSTRASSE 21
44867 BOCHUM, GERMANY
www.kompernass.com
a uso privado e não para uso comercial.
(0,12 EUR por minuto)
KH 2600
29


Index
Introduction . . . . . . . . . . . . .32
Information for these operating
instructions . . . . . . . . . . . . . . . . . . .32
Copyright . . . . . . . . . . . . . . . . . . . .32
Proper use. . . . . . . . . . . . . . . . . . . .32
Warnings . . . . . . . . . . . . . . . . . . . .33
Safety . . . . . . . . . . . . . . . . . .34
Basic Safety Instructions . . . . . . . . .34
Danger from electric shock . . . . . . . 35
Danger of hearing damage . . . . . .35
Interaction with batteries . . . . . . . .36
General description . . . . . . .37
Device summary . . . . . . . . . . . . . . . 37
Remote control . . . . . . . . . . . . . . . .38
Display . . . . . . . . . . . . . . . . . . . . . .39
Setting up and connecting .40
Safety instructions . . . . . . . . . . . . . .40
Package contents and
transportation inspection . . . . . . . .40
Unpacking . . . . . . . . . . . . . . . . . . .40
Disposal of the packaging . . . . . . .41
Requirements for the set-up location .41
Electrical connections . . . . . . . . . . .42
Inserting back-up batteries . . . . . . .42
Activating the remote control battery 43
Changing the remote control battery 43
Providing mains power . . . . . . . . . .43
VHF wire antenna . . . . . . . . . . . . .43
Connecting the headphones . . . . .43
Handling and operation . . .44
Switching On and Off . . . . . . . . . . 44
Setting the time . . . . . . . . . . . . . . . . 44
Adjusting the volume . . . . . . . . . . .45
Radio operation . . . . . . . . . . . . . . .45
Playback music from an iPod/iPhone 47
Playback of external audio devices 49
Playback of nature sounds . . . . . .49
Mood lighting . . . . . . . . . . . . . . . . . 49
Reading lamp . . . . . . . . . . . . . . . . . 50
Alarm Function . . . . . . . . . . . . . . . .51
Cleaning . . . . . . . . . . . . . . . .55
Safety instructions . . . . . . . . . . . . . .55
Cleaning the housing . . . . . . . . . . .55
Storage/Disposal . . . . . . . . .55
Storage . . . . . . . . . . . . . . . . . . . . . . 55
Disposal of the device . . . . . . . . . . 55
Disposing of the batteries . . . . . . . . 55
Troubleshooting . . . . . . . . . .56
Safety instructions . . . . . . . . . . . . . .56
Malfunction causes and remedies . 56
Appendix . . . . . . . . . . . . . . .57
Information regarding the EG
conformity declaration . . . . . . . . . .57
Technical data . . . . . . . . . . . . . . . .58
Warranty . . . . . . . . . . . . . . . . . . . .59
Service . . . . . . . . . . . . . . . . . . . . . . 59
Importer . . . . . . . . . . . . . . . . . . . . .59
GB
MT
KH 2600
31

GB
MT
Introduction
Introduction
Information for these operating instructions
These operating instructions are a component of the KH 2600 Wake-Up Light
(henceforth designated as the device) and they supply you with important
information about the intended use, safety and connection as well as operation
of the device .
The operating instructions must be constantly kept available close to the device.
They are to be read and applied by everyone assigned to operate and troubleshoot the device.
Keep these operating instructions and hand them over with the device to any
future owners.
Copyright
This documentation is copyright protected.
Any copying or reproduction, including extracts, as well as the reproduction of
images, also in an altered state, is not permitted without express written permission
from the manufacturer.
iPhone, iPod, iPod classic, iPod nano, iPod shuffl e, and iPod touch are brand
names of Apple Inc., registered in the USA and other countries.
Proper use
32
This device is intended only for reception of VHF radio programmes, for the connection of external devices (i.e. MP3 players) and iPod/iPhone and for alarms
by means of audible signals, nature sounds, radio or music from an iPod/iPhone,
in enclosed spaces. This device is not intended for any other use or for uses
beyond those mentioned.
WARNING
Danger from unintended use!
Danger can come from the device if used for unintended purposes and/or
other types of use.
Use the device exclusively for intended purposes. ►
Observe the procedures described in these operating instructions. ►
Claims of any kind resulting from damage caused by improper use, incompetent
r
s, unauthorized modifi cations or the use of non-approved spare parts will
epair
not be acknowledged.
The operator alone bears liability.
KH 2600

Introduction
Warnings
In the current operating instructions the following warnings are used:
DANGER
A warning at this danger level indicates a threatening dangerous
situation.
If the dangerous situation is not av
injury.
Follow the instructions given in this warning notice to avoid the risks of ►
death or serious injury to people.
WARNING
A warning of this danger level signifi es a possible dangerous
situation.
If the dangerous situation is not avoided it can lead to injuries.
The directives in this warning are there to avoid personal injuries. ►
IMPORTANT
A warning of this danger level signifi es possible pr
damage.
If the situation is not avoided it can lead to property damage.
The directives in this warning are there to avoid property damage. ►
NOTICE
A notice signifi es additional information that assists in the handling of the ►
device.
oided, it could result in death or serious
operty
GB
MT
KH 2600
33

GB
MT
Safety
In this chapter you receive important safety information regarding handling of the
device.
This device complies with the statutory safety regulations. Incorrect usage can,
however, lead to personal injury and property damage.
Basic Safety Instructions
For safe handling of the device observe the following safety information:
Before use check the device for visible external damage. Do not put into ■
operation a device that is damaged or has been dropped.
er use the device if the lamp housing is damaged, broken or missing. ■
Nev
Damaged cables or connections should be replaced by authorized qualifi ed ■
persons or by the customer service department.
P
sons who, due to their physical, intellectual or motor abilities, are incapable ■
er
of operating the device safely may only use the device under supervision or
direction fr
Only permit children to use the device under supervision. ■
Repairs should only be carried out by authorized specialist companies or by ■
the customer service department. Incompetent repairs can result in signifi cant
risk
A repair to the device during the warranty period may only be carried out ■
by a customer service department authorized by the manufacturer otherwise
no additional warr
Defective components may only be replaced with original replacement parts. ■
Only by using original replacement parts can you guarantee that the safety
requir
Protect the device from moisture and liquid penetration. Never submerge the ■
device in water, never locate the device in the close vicinity of water and
nev
om a responsible person.
s for the user
ements are complied with.
er place any objects fi lled with liquids (such as vases) on the device.
. In addition warranty claims become void.
anty claims can be considered for subsequent damages.
Safety
34
KH 2600

Safety
Do not operate the device close to open fl ames (e.g. candles). ■
Avoid direct sunlight. ■
Do not use the device when the room temperature is below 10° C or above ■
35° C.
If y
such at present, consult your doctor before you use the device.
Alw
never pull on the connection cable.
If malfunctions occur or thunder storms threaten pull the po
wall socket.
Danger from electric shock
DANGER
Risk of fatal electrocution!
A life-t
wires or components!
Observe the following safety instructions to avoid electric shock hazards:
Do not use the device if the mains power plug or the connection cable are ►
damaged.
Do not, under any cir
electric shock is present if the power carrying connections are touched or
the electrical and mechanical construction is changed.
e previously suff ered from severe depression or are suff ering from ■
ou hav
ay
s pull on the power plug when disconnecting from the wall socket, ■
hreatening situation can arise from contact with live
GB
MT
wer plug from the ■
cumstances, open the device housing. The risk of an ►
Danger of hearing damage
WARNING
Danger from extreme volumes!
Listening to loud music via connected headphones can result in
hearing damage.
Avoid extreme volumes, especially over long periods of time, ►
when you are using headphones.
KH 2600
35

GB
MT
Interaction with batteries
WARNING
Danger from improper use!
For safe handling of batteries observe the following safety instructions:
Do not throw batteries into a fi re. ►
Do not short circuit batteries. ►
Do not attempt to recharge batteries. ►
Regularly check the condition of the batteries. Leaking battery acid can
►
cause permanent damage to the device. Special caution should be shown
when handling damaged or leaking batteries. Danger from acid burns!
Wear protective gloves.
Store batteries in a place inaccessible to children. When swallowed seek ►
immediate medical attention.
ve the batteries from the device and the remote control if you do not ►
Remo
intend to use the device for an extended period of time.
Safety
36
KH 2600

General description
General description
Device summary
For the following see the diagrams on the fold out sides.
Lamp housing
2
Halogen lamp (42 W, E27)
3
Mood light (3 LEDs: green, blue and red)
4
Display
5
Station for iPod/iPhone
6
button: Volume increase
7
button: Volume decrease
8
SNOOZE Button: Activate snooze function / set the mood light colour
9
button: Reduce light intensity
10
button: Increase light intensity
11
►►I button: Title skip forwards / fast forward play (iPod/iPhone) / station search
(Radio) / selection of nature sounds 1-4
12
FUNC.: Select function
I◄◄ button: Title skip backwards / fast backward play (iPod/iPhone) / station
13
search (Radio) / selection of nature sounds 1-4
SLEEP button: Set automatic switch off / change between 12h/24h time of day
14
display
►II button: Playback start / stop
15
Alarm2/UP button: Programme alarm 2 / memory slot selection upwards
16
MEMORY/TIME button: Save station (Radio) / setting the time in standby mode /
17
stop playback of iPod/iPhone
Alarm1/DOWN button: Programme alarm 1 / memory slot selection downwards
18
button: Switch lamp on/off / activate wake-up light function during wake time
19
programming
/ALARM OFF button: Switch device on/off / switch alarm off (Alarm)
20
21
Headphones connection socket
22
AUX IN: Audio input for the connection of an external device
Mains connection cable
23
24
Wire antenna for VHF reception
25
Temperature sensor
26
Battery compartment
GB
MT
KH 2600
37

GB
MT
Remote control
All device functions can be carried out with the remote control.
15
1
2
3
4
5
6
7
General description
1
: Standby
2 ►►I : Fast play forward
3 I◄◄ : Fast play backwards
14
13
12
11
10
9
8
Memory control:
MEM: Programming stations
4
MEM +: Selecting memory slot
MEM -: Selecting memory slot
Alarm control:
Alarm ON/OFF
AL1: Programme alarm1 / memory slot
5
6 TIME: Set time of day
7 SNOOZE: Activate snooze function
8 SLEEP: Automatic switch off
9
10
11
12
13 ►II : Play/Pause
14 FUNC: Select function
15 COLOR: Select mood light colour
selection downwards
AL2: Programme alarm2 / memory slot
selection upwards
Lamp control:
: Lamp ON/OFF
: brighter
: darker
: Volume decrease
: Stop
: Volume increase
38
KH 2600

General description
Display
The symbols in the display have the following meanings:
Symbol Meaning
Alarm 1 activated
Alarm 2 activated
Alarm tone
Radio function
Lamp / wake-up light function
Nature sound 1
Nature sound 2
Nature sound 3
Nature sound 4
Stereo reception
iPod/iPhone function
Automatic switch off activated
External audio device
VHF reception
Temperature Display
GB
MT
KH 2600
Memory slot indicator
Light intensity indicator
Volume level indicator
Snooze function activated
39

GB
MT
Setting up and connecting
Setting up and connecting
Safety instructions
WARNING
Damage may occur to people and property when operating
the device!
Observe the following safety information to avoid any risks:
Packaging material should not be used as a play thing. There is a risk of ►
suff ocation!
To av
oid risks to persons and property, pay attention to the requirements ►
for the set-up location and the electrical connections.
Package contents and transportation inspection
The device is delivered with the following components as standard:
Wake-Up Light ▯
Remote control with battery (CR 2032, 3V) ▯
2 x Batteries type AA, 1.5 V ▯
5 x Adapter docks for iPod/iPhone ▯
Operating instructions ▯
Unpacking
40
NOTICE
Check the contents to make sure everything is there and for visible damage. ►
If the items supplied are incomplete, or damaged due to defective ►
packaging or transportation, contact the Service Hotline (see chapter
Service
).
Remove all parts of the device and the operating instructions from the box. ¡
Remove all packing material. ¡
KH 2600

Setting up and connecting
Disposal of the packaging
The packaging protects the device from transport damage. The packaging
materials are chosen from an environmentally friendly and disposal technological
point of view and are therefore recyclable.
The recirculation of packaging into the material circuit saves on raw material
and reduces generated waste. Dispose of packaging material that is no longer
needed according to the regionally established regulations.
NOTICE
If possible preserve the device's original packaging during the warranty ►
period so that in the case of a warranty claim you can package the device
properly for r
Requirements for the set-up location
For safe and fault free operation of the device, the set-up location must fulfi ll the
following conditions:
Place the device on a fi rm, fl at and level surface. ■
To avoid overheating maintain a free space of at least 15 cm around and ■
40 cm above the device.
Do not position the device in a dust
in the vicinity of fl ammable materials.
Protect the de
The surfaces of furniture may contain components that could aff ect and ■
soften the rubber feet on the device. If necessary, place an anti-slip mat or
similar under the rubber feet of the de
The w
can be quickly withdrawn from the socket.
eturn.
vice from vibration. ■
all socket must be easily accessible so that, in an emergency, the plug ■
GB
MT
y, hot, wet or very humid environment or ■
vice.
KH 2600
41

GB
MT
Setting up and connecting
Electrical connections
Before connecting the device, compare the connection data (voltage and ■
frequency) on the rating plate of the device with that of your power supply
network. This data must tally in order to avoid damage to the device.
Make sure that the device's connection cable is not damaged and is not ■
laying over hot surfaces and/or sharp edges.
Make sur
Do not allow the connection cord to hang over edges (Trip wire eff ect). ■
Inserting back-up batteries
By inserting the batteries you can avoid the loss of programmed time of day and
alarm wake time in the event of a possible power outage. The batteries make
sure that the internal clock continues to run even during a power outage. When
power is restored the correct time appears automatically in the display
NOTICE
The back-up batteries only save the time of day and the programmed wake ►
time. All other functions are only possible with mains power operation.
The device can also be oper
e that the connection cable is not tightly stretched or bent. ■
Slide the access cover of the battery compartment ¡
the device in the direction of the arrow and remove the access cover.
Insert 2 batteries type AA (supplied) into the battery compartment. Make ¡
sure that you observe the polarity as depicted in the battery compartment.
Close the battery compar
and allow it to lock into place.
4
.
ated without batteries. ►
26
on the underside of
tment by replacing the access cover, slide back in ¡
42
KH 2600

Setting up and connecting
Activating the remote control battery
The remote control battery is already inserted when delivered.
Activate the battery by removing the isolation strip. ¡
Changing the remote control battery
Press, with the fi ngernail, the recess (A) to the right ¡
and, at the same time, pull the battery compartment
out.
Insert a 3 V battery type CR 2032 in the battery ¡
compartment. The side with the marking "+" points
upwar
ds.
Slide the battery compartment completely back into ¡
the remote control.
Providing mains power
Place the device approx. 40 to 50 cm away from your head (i.e. on the ¡
bedside table).
Plug the mains power plug into a wall socket. In the display ¡
day (0:00 o'clock) and the temperature will be shown.
4
the time of
GB
MT
VHF wire antenna
For VHF reception completely unfold the wire antenna ¡
Connecting the headphones
If required you can connect headphones (with a 3.5 mm jackplug) to the ¡
connection socket
switch off automatically.
KH 2600
24
.
21
on the rear panel of the device. The speakers then
43

GB
MT
Handling and operation
In this chapter you receive important information for the handling and operation
of the device.
Switching On and Off
Press the ¡ /ALARM OFF button 20 or the button on the remote control
to switch the device on. The display
Press the ¡
to switch the device off . In the display 4 is shown the time of day, the
temperature and a programmed alarm time (Standby mode).
NOTICE
The ►
from the mains power. To completely disconnect the device from the mains
power the mains power cable plug
Setting the time
Prerequisite: The device is in standby mode.
Press the MEMORY/TIME button ¡
control. The hour indicator in the display
Press the SLEEP button ¡
12h/24h time of day display.
Set, with the ►►I button ¡
hour. With each button press the time changes by one hour. Holding down
the respective button for more than 2 seconds starts the speed setting.
Press the MEMORY/TIME button ¡
control. The minute indicator in the display 4 blinks.
Set, with the ►►I button ¡
minutes. With each button press the time changes by one minute. Holding
down the respective button for more than 2 seconds starts the speed setting.
Press the MEMORY/TIME button ¡
control to confi rm the time input or wait for approx. 7 seconds after which
the time input will be automatically confi rmed.
/ALARM OFF button 20 or the button on the remote control
/ALARM OFFbutton 20 does not completely disconnect the device
14
for approx. 2 seconds to switch between the
11
11
Handling and operation
4
is activated.
23
must be pulled from the mains socket.
17
or the TIME button on the remote
4
blinks.
or the I◄◄ button 13 , the current time of day
17
or the TIME button on the remote
or the I◄◄ button 13, the current time of day
17
or the TIME button on the remote
44
NOTICE
The time of day will revert back to 0:00 o'clock if the device is disconnected ►
from the mains power supply with no back-up batteries inserted or if the
back-up batteries ar
e too weak.
KH 2600

Handling and operation
Adjusting the volume
Prerequisite: The device is switched on.
Press the ¡
control to adjust the volume. The set volume level is shown below and to the
right in the display
NOTICE
The set volume applies for all functions. ►
The volume you have selected will also be saved automatically as the ►
volume for the wake function.
Radio operation
NOTICE
For a good radio reception the wire antenna ►
coiled. Adjust the antenna, whilst in radio operation, to the best reception.
Switching on the radio
Press the ¡ /ALARM OFF button 20 or the
button on the remote control to switch the
device on.
Press the FUNC. button ¡
select the radio function. In the display
appears the symbol
tion frequency of the set station.
button 6 or button 7 on the device or on the remote
4
.
12
several times to
and the current recep-
24
must be completely un-
4
GB
MT
Manual station selection
Press the ►►I button ¡
desired station gradually with each button press.
Automatic station search
Press and hold down the ►►I button ¡
seconds. The device automatically searches for the nearest station with
sufficient reception quality.
NOTICE
If the reception quality is especially high, in the display ►
stereo symbol .
KH 2600
11
or I◄◄ button 13 briefly to set the frequency of the
11
or I◄◄ button 13 for at least two
4
appears the
45

GB
MT
Saving stations manually
The device has 20 memory slots available for station frequencies. To save a
station frequency proceed as follows:
Press the ¡
to switch the device on.
Press the FUNC. button ¡
Select a station with the ►►I button ¡
/ALARM OFF button 20 or the button on the remote control
Handling and operation
12
several times to select the radio function.
11
or the I◄◄ button 13.
Press the MEMORY/TIME ¡
MEM button on the remote control. "MEMORY"
appears in the display
Press the A ¡ LARM1/ALARM2 button or the
MEM-/MEM+ button on the remote contr
to select the desired memory slot between 01
and 20.
Press the MEMORY/TIME ¡
MEM button on the remote control again to
save the reception frequency of the set station
to the selected memory slot.
NOTICE
If no input is made within approx. 5 seconds after the MEMORY/TIME ►
button or the MEM button on the remote control is pressed the "MEMORY
01" indicator in the display goes out and the current station is not sav
4
and "01" blinks.
Selecting a saved radio station
Press the ¡ /ALARM OFF button 20 or the
button on the remote control to switch the
device on.
12
Press the FUNC. button ¡
select the radio function.
Select with the A ¡ LARM1/ALARM2 buttons or
the MEM-/MEM+ buttons on the remote control
the desired memory slot for the saved station
between 01 and 20.
several times to
button 17 or the
ol
button 17 or the
ed.
46
KH 2600

Handling and operation
Playback music from an iPod/iPhone
With the station 5 you can use the device as a speaker for your iPod/iPhone.
If you insert the iPod/iPhone in the station it will, in addition, be automatically
charged.
The device is equipped with 5 adapters for the station thus even the most current
iPod/iPhone models will, in any case, fi t into the station. The adapters, provided
with numbers, are on the rear panel. In the table you will fi nd, itemized, the
adapter that is to be used for your model.
You can use the station for the following iPod and iPhone models:
Model Type Adapter
5G iPod (with video) 30GB 9
U2 iPod with video 30GB 9
iPod classic 80GB, 120GB 9
iPod touch 8GB & 16GB 14
iPod touch 2G 8GB, 16GB, & 32GB 14
iPod touch (Fall 2009) 16GB, 32GB, & 64GB 14
iPhone 3G 8GB & 16GB 15
iPhone 3GS 16GB & 32GB 15
iPod nano (4th generation) 8GB & 16GB 17
iPod nano (5th generation) 8GB & 16GB 18
GB
MT
KH 2600
IMPORTANT
Damaging of the device or the iPods/iPhones!
Inserting the iP
device and/or the iPods/iPhones.
Place the iPod/iPhone in the station only with the proper adapter. ►
In the event that the proper adapter has not been provided get in touch ►
with the Service-Hotline (see chapter Service
ods/iPhones without an adapter can result in damage to the
).
47

GB
MT
Handling and operation
Inserting / removing the adapter in / from the station
Select from the table the required adapter and place it in the station dock as
follows:
Lay the front edge of the ¡
adapter on the front edge of
the dock.
Press the r
wards until you hear a light
"click".
To remove the adapter from the dock proceed as follows:
Grip with the thumbnail in the groove and lift the adapter out of the dock. ¡
Playback of music
Insert your iPod and/or iPhone into the station ¡
Press the FUNC. button ¡
In the display
Title skip and fast forward / backward
Press the ►►Ibutton ¡
beginning of the next title.
Press the I◄◄ button ¡
beginning of the current title. Press the I◄◄ button
to the beginning of the previous title.
Hold down the ►►I button ¡
ward.
Press the MEMORY/TIME ¡
control to stop playback.
ear edge down- ¡
12
several times to select the iPod/iPhone function.
4
appears the symbol and the music playback can begin.
11
on the device or on the remote control to skip to the
13
on the device or on the remote control to skip to the
11
Station
5
.
13
a second time to skip
or I◄◄ button 13 for fast forward / back-
button 17 or the button on the remote
Groove
Adapter
Charging the iPod/iPhone
If your iPod/iPhone is inserted into the station it will charge automatically until the
battery is full.
NOTICE
The iPod/iPhone will not charge via the back-up battery. ►
48
KH 2600

Handling and operation
Playback of external audio devices
Connect an external audio device, for example, an MP3 player to the ¡
3.5 mm jackplug socket AUX IN
12
Press the FUNC. button ¡
Start playback of the external audio device and set the volume. ¡
NOTICE
Follow the operating instructions for the external audio device. ►
Playback of nature sounds
Press the ¡ /ALARM OFF button 20 or the button on the remote control
to switch the device on.
Press the FUNC. button °
tion
.
Select with the ►►I button ¡
4 nature sounds:
Rain
Babbling brook
Seagulls
Rural life
several times to select the AUX function.
12
several times to select the nature sounds func-
11
or the I◄◄ button 13 between the following
22
on the rear panel of the device.
GB
MT
Mood lighting
The LEDs light up in the following sequence:
blue → red → red + blue → green → green + blue → red + green → all LEDs → etc.
KH 2600
Press the SNOOZE button ¡
Press the SNOOZE button ¡
this colour permanently.
Press the SNOOZE button ¡
NOTICE
Instead of the SNOOZE button ►
control can also be used.
The colour setting via the SNOOZE button ►
function has been activated.
8
on the device to switch on the mood lighting.
8
again when the desired colour lights up to set
8
once more to switch off the mood lighting.
8
the COLOUR button on the remote
8
will not work if the SNOOZE
49

GB
MT
Reading lamp
You can use the device as a reading lamp.
Press the ¡
lamp on and off .
Press the ¡
light intensity (00 to 20) are shown in the display 4.
NOTICE
If you have set the light intensity to 00 you can, by all means, set a higher ►
value, the lamp remains, however, switched off and must be switched back
on via the
The light intensity that you have selected will also be saved automatically ►
as the light intensity for the wake function.
Replacing the halogen lamp
The halogen lamp 2 must be replaced if it is defective or the light intensity
decreases.
DANGER
Risk of fatal electrocution!
Pull the plug from the mains sock
button 19 on the device or on the remote control to switch the
/ button to set the brightness. The symbol and the
button 19 on the device or on the remote control.
Handling and operation
et before you change the halogen lamp ►
2
.
50
NOTICE
The halogen lamp ►
type: E27 42 W.
Turn the lamp housing ¡
tion of the arrow and lift it upwards.
Unscrew the defective halogen lamp ¡
from the lamp socket.
Scre
w a new 42 W halogen lamp into ¡
the lamp socket.
Place the lamp housing ¡
from above and turn it in the opposite
direction to the arrow to attach.
2
must only be replaced with one of the same lamp
in the direc-
carefully
KH 2600
Handling and operation
Alarm Function
When setting the wake time you confi gure the light intensity, the wake sound
and the volume. In the 30 minutes before the set wake time the light intensity
increases slowly to the selected level. When the set wake time is reached the
sound level increases, within 90 seconds, slowly to the selected volume.
Programming alarm wake times
The device has two alarms available. All settings for both alarms can be carried
out independently from each other. You can choose whether, at the programmed
time, an alarm tone or a variety of nature sounds should be played, whether
the radio should sound out or music from an iPod/iPhone or an external audio
device should be played.
Prerequisite: The device is in standby mode.
GB
MT
Press the ALARM1/DOWN button ¡
ALARM2/UP button
AL1/AL2 button on the remote control. The hour
indicator in the display
Set with the ►►I button ¡
the hour. With each button press the time changes
by one hour. Holding down the respective button
for more than two seconds starts the speed setting.
Press the ALARM1/DOWN button ¡
ALARM2/UP button
AL1/AL2 button on the remote control. The
minute indicator in the display
Set with the ►►I button ¡
13
the minutes. With each button press the time
changes by one minute. Holding down the respective button for more than two seconds starts
the speed setting.
Press the ALARM1/DOWN button ¡
device or the AL1/AL2 button on the remote control again to confi rm the
setting.
16
on the device or the
4
blinks.
11
or the I◄◄ button 13
16
on the device or the
11
or the I◄◄ button
18
/
18
/
4
blinks.
18
/ALARM2/UP button 16 on the
KH 2600
51

Setting the wake tone
Handling and operation
GB
MT
Press the ►►I button ¡
repeatedly to select a wake tone:
→ → → → → → →
delete. (For an explanation of the symbols see
chapter Display.)
Press the ¡
wake-up light function.
NOTICE
Set the volume that you want to be woken with as described in the chapter ►
Setting the volume.
Set the light intensity that y
chapter Reading lamp.
The w
tone. The light intensity increases in the 30 minutes before the set wake
time and the
To be woken with the wake-up light only the volume must be set to 00. ►
Press the ALARM1/DOWN button ¡
device or the AL1/AL2 button on the remote control again to confi rm the
setting or wait approx. 7 seconds and the alarm will be confi rmed automatically.
The symbol for the selected wake tone blinks in the display and the alarm goes
off via the speaker with the arrival of the wake time.
button to activate, in addition, the
ake-up light function can only be activated together with a wake ►
11
or the I◄◄ button 13
ou want to be woken with as described in the ►
symbol blinks in the display 4.
18
/ALARM2/UP button 16 on the
52
NOTICE
If you want to use music from your iPod/iPhone as the wake tone select a ►
title on the iPod/iPhone (or an album and/or playback list) that is to be
used as a wak
time arrives.
e tone. Your choice will be played back when the set wake
KH 2600

Handling and operation
Switching the alarm off
Snooze function ("SNOOZE" function)
Whilst the alarm is sounding press the SNOOZE ¡
button
In the display
After 9 minutes the alarm sounds again.
(In the diagram on the right both alarm 1 and alarm 2
are programmed. The alarm 2 goes off and the symbol
blinks.)
Switching the alarm off
When the programmed time is reached the alarm continues to sound until it is
switched off .
Press the ¡
to switch the alarm off .
Press the ¡
Fast switch on/off of t
Prerequisite: The device is in standby mode.
Press the ALARM1/DOWN button ¡
device or the AL1/AL 2 button on the remote control continually until the
alarm symbol / in the display appears/disappears.
to temporarily switch off the alarm.
8
4
appears the notice .
/ALARM OFF button 20 or the button on the remote control
button if you have activated the wake-up light function.
NOTICE
The alarm goes off again within 24 hours. ►
he alarm
18
/ALARM2/UP button 16 on the
GB
MT
KH 2600
NOTICE
The last selected alarm settings remain saved. ►
53

GB
MT
Handling and operation
Deleting wake times
4
blinks.
18
18
Press the ALARM1/DOWN button ¡
device or the AL1/AL 2 button on the remote control three times until the
alarm symbol in the display
11
Press the ►►I button ¡
appear in the display 4.
Press the ALARM1/DOWN button ¡
device or the AL1/AL2 button on the remote control again or wait approx.
10 seconds. There are no more wake times programmed.
or the I◄◄ button 13 until no more wake tones
Automatic Switch-off ("SLEEP" function)
With the sleep function you can listen to your favourite music or your favourite
station whilst falling asleep. The device switches itself off after a time between
10 and 90 minutes.
Prerequisite: The device is set to either the radio, AUX IN or iPod/iPhone
function.
Press the SLEEP button ¡
and the notice
Press the SLEEP button ¡
10 minutes with each button press.
Setting options: 90, 80, 70, 60, 50, 40, 30, 20 or 10 minutes. After fi ve
seconds the selected setting is saved.
Press the SLEEP button ¡
To end the sleep function before it is automatically ended press the ¡
ALARM OFF button
14
. In the display 4 appears the symbol
.
14
again to reduce the time in increments of
14
again to switch off the "Sleep" function.
20
or the button on the remote control.
/ALARM2/UP button 16 on the
/ALARM2/UP button 16 on the
/
54
KH 2600

Cleaning/Storage/Disposal
Cleaning
Safety instructions
DANGER
Risk of fatal electrocution!
Remo
ve the plug from the mains power socket before cleaning. ►
IMPORTANT
Damage to the device!
Make sur
in order to avoid irreparable damage to it.
Cleaning the housing
Clean the surfaces of the device with a soft, dry cloth. ■
Storage/Disposal
Storage
If you do not intend to use the device for an extended period of time disconnect
it from the power supply, remove the batteries and store it in a clean, dry location
that is not subjected to direct sunlight.
e when you are cleaning the device that no moisture gets inside ►
GB
MT
Disposal of the device
Do not dispose of the device in your normal domestic waste.
This product is subject to the European directive 2002/96/ECWEEE (Waste Electrical and Electronic Equipment).
Dispose of the device through an approved disposal centre or at your community
waste facility. Observe the currently applicable regulations. In case of doubt,
please contact your waste disposal centre.
Disposing of the batteries
Do not dispose of the batteries with household waste. Every consumer is legally
obligated to hand in batteries at a collection centre in his/her community/district
or a dealer. This obligation is intended to ensure that batteries are disposed of in
an environmentally friendly manner. Hand batteries in only when they are fully
discharged.
KH 2600
55

GB
MT
Troubleshooting
In this chapter you will receive important information for malfunction localization
and remedies. Observe the instructions in order to avoid danger and damage.
Safety instructions
WARNING
Observe the following safety information to avoid danger and property
damage:
Repairs to electronic devices may only be carried out by specialists who ►
have been trained by the manufacturer. Considerable danger to the consumer and damage to the device can occur as a r
Malfunction causes and remedies
The following table will help with localizing and remedying minor malfunctions:
Defect Possible cause Solution
Troubleshooting
esult of incorrect repairs.
The display is
showing nothing.
No sound.
Noisy radio reception
The plug is not inserted.
Mains power socket is not
supplying power.
The volume is set to
minimum.
Headphones are connected.
Playback of the audio device has not been started.
The radio station is not
properly tuned in.
Reception is too weak.
Insert the plug into the
mains power socket.
Check the circuit fuse.
Increase the volume with the
6
button
remote control.
Remove the headphones plug from
the connection socket
Start playback of the audio device.
Tune the station correctly with the ►►I
button
Try to improve reception by moving
the wire antenna
on the device or on the
21
.
11
or the I◄◄ button 13.
28
.
56
KH 2600

Troubleshooting/Appendix
Defect Possible cause Solution
The alarm does not
go off .
iPod/iPhone does
not charge.
NOTICE
If you cannot solve the problem with the aforementioned methods, please ►
contact Customer Service.
The alarm time is incorrectly
programmed.
The alarm is not programmed.
The device is not in standby
mode.
The mains power plug is
not plugged in.
Check the programmed wake time.
Programme the alarm correctly.
Switch the device to the standby
mode before you go to sleep.
Insert the plug into the mains power
socket.
Appendix
Information regarding the EG conformity declaration
This device complies regarding conformance to the basic
requirements and other relevent regulations of the European
directive for electromagnetic compatibility 2004/108/EC,
the low voltage directive 2006/95/EC as well as the Ecodesign directive 2009/125/EC (Supplement 1275/2008
Appendix II, Nr.1)
The complete original declaration of conformity can be
obtained from the importer.
GB
MT
KH 2600
57

GB
MT
Technical data
Operational voltage 220-240 V / 50 Hz
Backup batteries
Remote control Battery: 3 V, CR 2032
Power consumption
Operation with light 50 W
Operation without light 10 W
Standby approx. 1.7 W
Speaker power output: 2 x 1 W (with 10 % harmonic distortion)
Headphone Output Voltage max. 120 mV
Radio frequency range (VHF) 87.5 - 108 MHz
Lamp E27 max. 42 W
Operating temperature +10 - +35 °C
Humidity (no condensation) 5 - 90 %
Appendix
2 x 1.5 V Typ “AA”
(supplied)
58
Dimensions (H x W x D) 29 x 17.5 x 19.5 cm
Weight approx. 1650 g
Protection class
II
KH 2600

Appendix
Warranty
You receive a 3-year warranty for this device as of the purchase date. This device
has been manufactured with care and meticulously examined before delivery.
Please retain your receipt as proof of purchase. In the case of a warranty claim,
please get in touch by telephone with our service department. Only in this way
can a post-free dispatch for your goods be assured.
NOTICE
This product is for private use only and is not intended for commercial applications. In the event of misuse and improper handling, use of force and interference
not carried out by our authorized service branch, the warranty will become void..
Your statutory rights are not restricted in any way by this warranty. The warranty
period is not extended by repairs eff ected under warranty. This applies also to
replaced and repaired parts.
Damages or defects discovered after purchase are to be reported directly after
unpacking, at the latest two days after the purchase date.
Repairs carried out after the lapse of the warranty period are subject to charge.
The warranty adjustment is valid only for material or manufacturing defects ►
not, however, for transport damage, wear and tear or for damage to breakable parts, i.e. switches or r
echargeable batteries.
GB
MT
Service
Importer
KH 2600
DES UK LTD
Tel.: 0871 5000 700
e-mail: support.uk@kompernass.com
Kompernass Service Ireland
Tel: 1850 930 412
Standard call rates apply. Mobile operators may vary.
e-mail: support.ie@kompernass.com
KOMPERNASS GMBH
BURGSTRASSE 21
44867 BOCHUM, GERMANY
www.kompernass.com
(£ 0.10 / minute)
(0,082 EUR/Min.)
59

 Loading...