

Page 1
Gigaset 8800
Quick Start Guide
This guide will help you get started using your Gigaset handset. For
additional information related to your Gigaset 8825 system, please
refer to the User Manual.
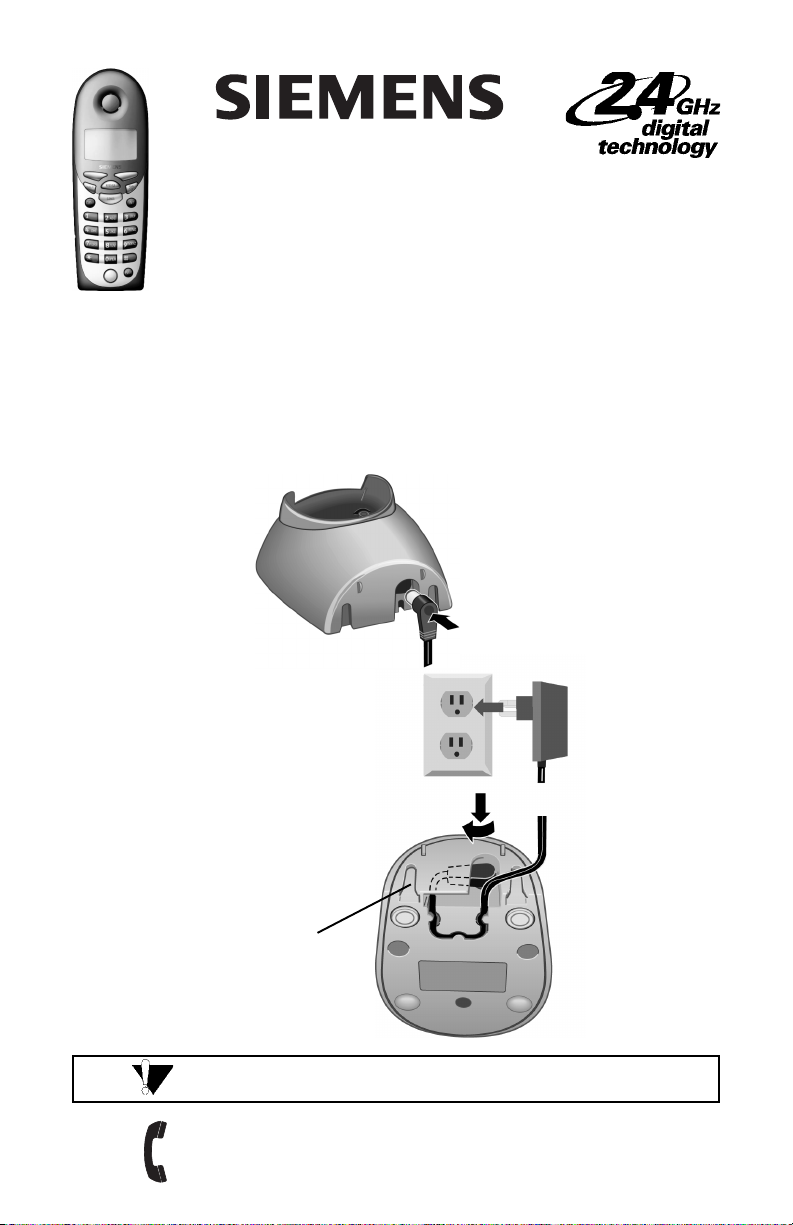
Connecting the Charger
A charger is included with handsets. This charger does not require connection to a
telephone line for operation. Use only the power supply (110 VAC/60 Hz with cord) included
with the charger. (Do not use other power supplies.)
Before using your charger, follow these steps:
1 Insert small plug
on cord into
back of charger.
Back of
Charger
2 Turn small plug to the left and
place cord in cable channel on
bottom of charger.
May be wall mounted
using two small
screws (not provided)
IMPORTANT: Do not use a wall outlet controlled by a wall switch.
Customer Care: 1-888-777-0211
Or visit our Website: www.icm.siemens.com
Visite nuestro sitio Web para obtener instrucciones en español.
3 Insert power
supply into
wall outlet.
Bottom of
Charger
Page 2
Gigaset 8800 Handset
The Gigaset 8800 handset is used exclusively on the Gigaset 8825 system. Up to a total
of eight handsets may be added.
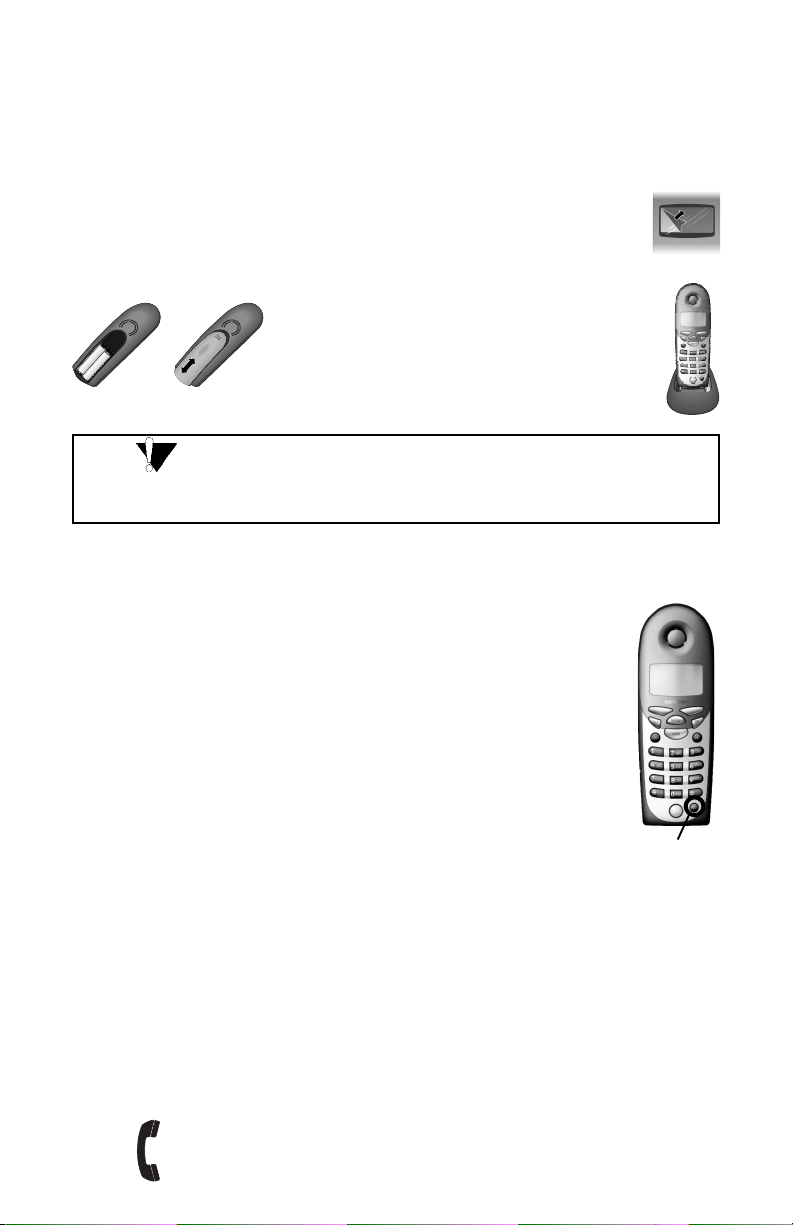
Handset Setup
Before using your handset, follow these steps:
2 Insert batteries
as shown.
–
+
+
–
IMPORTANT: Charge batteries 12 to 14 hours before using the
handset for the first time. WARNING: Use only NiCd or NiMh
AA rechargeable batteries. DO NOT USE ALKALINE, LITHIUM,
OR NON-RECHARGEABLE BATTERIES.
Cordless Handset Registration
The cordless handset that comes with the system is preregistered to the base station.
Additional cordless handsets need to be registered to the base station.
3 Place cover on back
of handset and push
gently upward until it
clicks into place.
1 Remove protective
plastic film from
display.
4 Place handset in
charger with
display facing out.
1 If the handset is not already on, press PWR key in the
lower right corner of handset.
2 When Please Register is displayed, press OK.
3 Enter System PIN and press OK (default is 0000).
4 At base station, press MENU.
5 Scroll to System Settings by pressing >FWD key and
then press SELECT.
Power key
6 Enter System PIN and press SELECT (default is 0000).
7 Scroll to Mobile Registration by pressing >FWD key and then press
SELECT.
8 When Select Intercom Number is displayed on handset, scroll to
number you want to assign, and press OK.
9 When completed, you will hear a confirmation beep.
See User Manual for additional options.
Customer Care: 1-888-777-0211
Or visit our Website: www.icm.siemens.com
Visite nuestro sitio Web para obtener instrucciones en español.
Page 3

Your handset is now registered
0(18
and ready for use.
Ta lk ke y
-accept call
-dial number
Menu key
DIRCTRY REDIAL
Û
Charge status
Ý battery empty
Ü battery 1/3 full
Û battery 2/3 full
Ú battery fully charged
battery flashing when low
Soft keys
use for access to the
functions shown in display
Speakerphone key
Switch from handset to
handsfree talking
Conference key
connect to another call
Headset Jack
End key
-end call
-cancel function
-return to idle status
(hold down)
Intercom key
internal calls
Power key
Keypad
Handset Soft Key Operation
Press the soft keys above the
screen in this example is one of many screens you will see on your handset. Always
press the corresponding side of the left or right soft key to activate the function shown
in the display.
At the Handset:
Press the LEFT side
of the LEFT soft key
to scroll up.
Left
Soft Key
Press the RIGHT side of the
LEFT soft key to scroll down.
key to navigate through the handset options. The
Î
↕
↕
↕
↕
Right
Soft Key
Press the LEFT side of the
RIGHT soft key to return.
Press the RIGHT
side of the RIGHT
soft key to select
(OK).
Customer Care: 1-888-777-0211
Or visit our Website: www.icm.siemens.com
Visite nuestro sitio Web para obtener instrucciones en español.
Page 4

BASIC HANDSET OPERATION
Making a Call 1 Dial desired number.
2 Press
3 Press
Answering Call 1 Lift handset from charger.
c
a
hang up.
2 Or, press
Intercom Call 1 Press INT and select handsets intercom number or
0 for (desk) base station.
63.5
or
or place handset in base or charger to
c
speakerphone key.
63.5
or
speakerphone key.
2 Or, select DSK for (desk) base station in display.
3 Or, select ALL to call base and all handsets.
Setting Volume 1 Press MENU.
(Handset Earpiece) 2 Scroll to MOBILE SETTINGS and press OK.
3 Select HANDSET VOLUME and press OK.
4 Select volume level by pressing >or<on left
soft key and press OK.
Setting Volume 1 Press MENU.
(Handset Speakerphone) 2 Scroll to MOBILE SETTINGS and press OK.
3 Select HANDSFREE VOL and press OK.
4 Select volume level by pressing >or<on left
soft key and press OK.
Setting Language1 Press MENU.
2 Scroll to MOBILE SETTINGS and press OK.
3 Scroll to LOCAL SETTINGS and press OK.
4 Scroll to LANGUAGE and press OK.
5 Select the desired language and press OK. A check
mark appears next to the selected language.
Page 5

FCC Information
This telephone system equipment has been tested and found to comply with the limits for Class B
digital device, pursuant to Part 15 of the FCC Rules. Operation is subject to the following two conditions:
(1) This device may not cause harmful interference, and
(2) This device must accept any interference received, including interference that may cause undesired
operation.
These limits are designed to provide reasonable protection against harmful interference in a residential
installation. Some cordless telephones operate at frequencies that may cause interference to nearby
TVs and VCRs. To minimize or prevent such interference, the system base should NOT be placed near
or on top of a TV or VCR; and, if interference is experienced, moving the base farther away from the TV
or VCR will often reduce or eliminate the interference.
However, there is no guarantee that interference will not occur in a particular installation. If this
telephone system does cause harmful interference to radio or television reception, which can be
determined by turning the system off and on, the user is encouraged to try to correct the interference
by one or more of the following measures:
(1) Increase the separation between the base station and receiver;
(2) Connect the base station to an outlet on a circuit different from that to which the receiver is
connected;
(3) Consult the dealer or an experienced radio TV technician for help.
Notice to Hearing Aid Wearers: This phone system is compatible with inductively coupled hearing
aids.
Power Outage: In the event of a power outage, your cordless telephone will not operate. The cordless
telephone requires electricity for operation. You should have a telephone that does not require electricity
available for use during power outages.
Safety Precautions: Before using your telephone equipment, basic safety instructions should always
be followed to reduce the risk of fire, electric shock, and injury to persons. Contains Nickel-Metal
Hydride Batteries. Battery must be recycled or disposed of properly. Do not dispose in municipal waste.
Only use type AA Nickel-Cadmium (NiCd) or type AA Nickel-Metal Hydride (NiMH) rechargeable batteries
in the cordless handset. Do not use Alkaline or lithium batteries in the cordless handset or charger. Do
not mix old and new batteries. Use the same rechargeable battery type. Do not combine rechargeable
battery types. Exercise care in handling batteries in order not to short the batteries with conducting
materials such as rings, bracelets, and keys. The batteries or conduction materials may overheat and
cause burns or fire. Do not dispose batteries in fire. For additional instructions, see the users manual
included with your Gigaset 8825 system.
The installation of the base unit should allow at least 8-inches between the base and persons to be in
compliance with FCC RF exposure guidelines.
Warranty: The product warranty is contained in the users manual. Please refer to the manual for
complete product warranty details.
Information subject to change as Siemens reserves the right, without notice, to make changes in equipment design or
components. Siemens is a registered trademark and Gigaset is a trademark of Siemens AG.
Made in Germany. © Siemens Information and Communication Mobile, LLC 2001 Copyright. All rights reserved.
A31008-G4035-U102-1-7619
Customer Care: 1-888-777-0211
Or visit our Website: www.icm.siemens.com
Visite nuestro sitio Web para obtener instrucciones en español.
Page 6

DO NOT RETURN
THIS PRODUCT TO THE STORE!
Please read the following important information.
For Siemens Customer Care, product operation information, or
for technical information, call our experts toll-free
1-888-777-0211
7 a.m. to 10 p.m. Central Standard Time EVERY DAY
www.icm.siemens.com
Visite nuestro sitio Web para obtener instrucciones en español.
 Loading...